
PANDORA IX/F/90 - Basket ELICA - Free user manual and instructions
Find the device manual for free PANDORA IX/F/90 ELICA in PDF.
| Product type | Downdraft built-in extractor hood |
| Brand | ELICA |
| Model | PANDORA IX/F/90 |
| Built-in dimensions (W x D) | 822 mm x 100 mm |
| Exhaust duct diameter | 150 mm |
| Number of speeds | 3 + intensive (Booster 5 min) |
| Power supply | 220-240 V ~ 50 Hz |
| Power consumption | 250 W (estimated) |
| Noise level | Variable by speed, max ~60 dB(A) (estimated) |
| Installation type | External extraction or recirculation with charcoal filter |
| Filters | Washable metal grease filters + active charcoal filter (optional) |
| Grease filter maintenance | Monthly cleaning (manual or dishwasher) |
| Charcoal filter replacement | Every 4 months (recirculation version) |
| Filter saturation indicator | Yes, by indicator lights (40h grease, 160h charcoal) |
| Timer function | Delayed automatic shut-off (20 min at speed 1, 15 min at speed 2) |
| Weight | Approximately 18 kg (estimated) |
| Material | Lacquered metal and protective glass |
| Safety | Disconnect before maintenance; do not use without filter; no flambé cooking |
| Available spare parts | Grease filters, charcoal filters, motor, electronic board |
| Repairability | Easy access to electronic components via removable casing |
| Warranty | 2 years (standard, check conditions) |
| Manual available in | FR, EN, DE, ES, IT, NL, PT, RU, AR, BG, CS, DA, EL, ET, FI, HU, KK, LT, LV, NO, PL, RO, SK, SL, SR, SV, TR, UK |
Frequently Asked Questions - PANDORA IX/F/90 ELICA
User questions about PANDORA IX/F/90 ELICA
0 question about this device. Answer the ones you know or ask your own.
Ask a new question about this device
Download the instructions for your Basket in PDF format for free! Find your manual PANDORA IX/F/90 - ELICA and take your electronic device back in hand. On this page are published all the documents necessary for the use of your device. PANDORA IX/F/90 by ELICA.
USER MANUAL PANDORA IX/F/90 ELICA
Strictly follow all the instructions given in this manual. The manufacturer declines all responsibility for any inconvenience, damages or fire caused by the appliance due to failure to comply with the instructions mentioned in this manual. The hood was designed to suction cooking fumes and vapours, therefore it is intended for household use only. The aesthetic features of the hood might be different from the ones shown in the drawings of this manual; in any case, the use, installation and maintenance instructions are the same.
! Please keep this manual for future reference. Should the appliance be sold or passed on to others, make sure that these instructions are passed on with it.
! Carefully read these instructions, where important information on the appliance installation, use and safety is provided.
! Do not perform any electrical or mechanical modifications on the appliance or on the exhaust ducts.
! Before carrying out installation, make sure that all components are not damaged. Please contact your retailer in case they are damaged, and do not proceed with the installation
WARNING
Before carrying out any maintenance or cleaning operations, disconnect the hood from the power supply, by unplugging it from the mains supply or by switching off the main switch.
Wear protective gloves during any installation and maintenance operation.
The appliance is not intended for use by children under 8, and by persons with reduced physical, sensory or mental capabilities, or lack of experience and knowledge, unless they have been given supervision or instructions concerning the safe use of the appliance and the risk connected to it, by a person responsible for their safety.
Children should be supervised to ensure that they do not play with the appliance.
Cleaning and maintenance operations shall not be performed by children without supervision.
Adequately ventilate the room when the cooker hood and other appliances, powered by energy other than electricity, such as gas combustion or other fuels, are used simultaneously.
The hood shall be cleaned regularly, both internally and externally (AT LEAST ONCE A MONTH); please follow the instructions given in the maintenance section of this manual.
Failure to comply with the instructions provided for the hood cleaning operations, as well as filter cleaning and replacement operations, may result in fire risk.
Open flames can damage the grease filters and can cause fire risk, therefore cooking over open flames should be strictly avoided.
Deep frying should be done under constant supervision, in order to keep overheated oil from igniting.
CAUTION: When the hob is in use, the accessible parts of the hood may become hot.
Caution! Do not connect the appliance to the power source until installation is completed.
As far as the technical and safety measures, to be implemented to discharge fumes, are concerned, strictly comply with provisions set forth in relevant regulations by the local competent authorities.
Air extracted shall not be conveyed into a duct used to discharge fumes coming from appliances fed by gas combustion or other fuels.
Never use the hood without having the grid properly installed!
NEVER use the hood as a support surface unless it is expressly mentioned in the instructions.
Only use the fixing screws supplied with the appliance during installation.
In case they are not supplied, please buy a suitable screw type. Use proper length screws, specific details are given in the Installation Guide. In case of doubts, please contact our authorized technical assistance center or similarly qualified personnel.
CAUTION! Fixing screws and fixing devices shall be installed according to the instructions given in this manual; failure to comply with them might result in electric risk.
The manufacturer declines all responsibility for any inconvenience, damage or fire caused by the appliance, due to failure to comply with these instructions.
Constantly seeking to improve our products, we reserve the right to modify their technical, functional, or aesthetic characteristics as a result of their upgrading.
In the case of external motor version, for the hood normal operation, it is necessary to use a suctioning unit (external motor) made by the same manufacturer.
- Range hoods and other cooking fume extractors may adversely affect the safe operation of appliances burning gas or other fuels (including those in other rooms) due to back flow of combustion gases. These gases can potentially result in carbon monoxide poisoning. After installation of a range hood or other cooking fume extractor, the operation of flued gas appliances should be tested by a competent person to ensure that back flow of combustion gases does not occur.
This appliance is marked according to the European directive 2012/19/EC-UK SI 2013 No.3113 on Waste Electrical and Electronic Equipment (WEEE). By ensuring this product is disposed of correctly, you will help prevent potential negative consequences for the environment and human health.
The symbol on the product or on the documentation included with it, means that this product shall not be disposed of as household waste. Instead, it shall be handed over to the suitable collection point for the recycling of electrical and electronic equipment. The product shall be disposed of according to applicable local standards and regulations on waste disposal. For more detailed information on the disposal and recycling of this product, please contact your local city office, your household waste disposal service or the shop where you purchased the product.
This appliance has been designed, tested and produced in compliance with all relevant standards on :
- Safety: CEI/EN 60335-1; CEI/EN 60335-2-31, CEI/EN 62233.
Performance: CEI/EN 61591; ISO 5167-1; ISO 5167-3; ISO 5168; CEI/ EN 60704-1; CEI/EN 60704-2-13; ISO 3741; EN 50564; CEI 62301.
EMC: EN 55014-1; CISPR 14-1; EN 55014-2; CISPR 14-2; CEI/EN 61000-3-2; CEI/EN 61000-3-3.
Tips for the proper use of the appliance, aimed at reducing environmental impact.
Switch the hood on at minimum speed when you start cooking and leave it in operation for some minutes after you finish cooking. Increase the speed only
in case of high quantities of fumes and vapours, using the boost feature only when absolutely necessary.
In order to keep the odour reducing system efficient over time, replace the charcoal filter/s whenever necessary.
In order to keep the grease filter efficient over time, clean it whenever necessary. Use a piping system with the maximum diameter specified in this manual, in order to reach very high performances and maintain low noise levels.
Use
The hood can be used both in aspiration mode with external discharge of suctioned air, and in filtering mode, where the air is recycled back into the room.
Aspiration Mode

Vapours are discharged to the outside, through the specific exhaust pipe fixed to the flange.
The exhaust pipe diameter shall be the same as the connection ring diameter.
Caution! The exhaust pipe is not supplied with the appliance and shall be purchased. The pipe shall have a light upwards inclination (about 10^ ) in its horizontal part, in order to convey the air to the outside more easily. If the hood is equipped with charcoal filters, they shall be removed.
Filtering mode

The air that is sucked in will be 'degreased' before being re-conveyed into the room. If you wish to use the hood in this mode, you will need to buy an additional filtering system with activated charcoal filers.
Note: The air recycled through the charcoal filters is conveyed back into the kitchen through a duct that conveys the air along a side of the cabinet.
Installation
Note: installation shall be performed in such a way as to allow that the hood and its electric components can be easily accessible in case of technical assistance.
WARNING Place the metal box containing the electronic components at a minimum distance of 65~cm from the gas hob or anyway at 65~cm from the hood aspiration area. (not less than 65cm only for Australia and New Zealand)
RECOMMENDATION: we advise that you install the metal box, containing the electronic components, at 10 cm from the floor, at least, and at a safe distance from any heat source (e.g.: an oven side, or a hob).
In the case that the installation instructions of your gas cooker mention a higher distance, please comply with this requirement.
Electrical Connection
The connection of the hood to the power supply shall be performed by qualified and specialised technical personnel.
The mains voltage shall correspond to the voltage value specified on the rating label found inside the hood. If the appliance is equipped with a plug, the hood shall be connected to a socket which is compliant with the relevant standards in force, and which is located in an easily reachable area, also after installation. If the appliance is not equipped with a plug (direct connection to power supply), or if the plug is not found in an easily reachable place after installation, use an approved double-pole main switch, ensuring complete disconnection from the power supply at the overvoltage category III conditions, in accordance with the installation procedure.
Caution! Before reconnecting the hood electric circuit to the power supply, and to check for proper operation, please always make sure the mains lead has been installed properly.
Installation
Before carrying out the appliance installation, please check that all components are not damaged, in such a case contact your retailer and do not proceed with any further installation step. In addition, carefully read all the instructions specified below.
Use an air exhaust pipe whose maximum length does not exceed 5 meters.
- Limit the number of elbows in the piping, since each elbow reduces the air capacity of 1 linear meter. (Ex.: if you use no. 2 × 90^ elbows, the length of piping should not exceed 3 meters)
- Avoid abrupt direction changes.
- Use a 150 mm constant diameter pipe for the whole length.
- Use piping approved by relevant standards in force.
- The manufacturer shall not be deemed responsible for air capacity or noise problems caused by failure to comply with the above instructions and no warranty on the product shall be provided.
Before making the hole, check that there are no structural, or other parts inside the cabinet, where the appliance is to be placed, which could hinder proper installation.
Check that the dimensions of the hood and the ones of the hob are compatible with the cabinet, so that the installation can be carried out properly.
- Make a rectangular hole in the rear side of the cook top, of the following sizes: (Fig. 1) 822mm × 100mm .
If your appliance is supplied with the motor already mounted, remove the screws and the suctioning unit in order to fit the downdraft into the hole made.
- Fit the hood into the hole made, by inserting it from above, as shown in (Fig. 2).
Secure the hood inside the cabinet, by using the specific fixing brackets provided (Fig.3). Fix the brackets into the lower side of the hood, Before inserting the screws into the cabinet, make sure that the appliance is perfectly perpendicular with the worktop.
In the case of internal motor version, it is necessary to fit the power pack by directing the air outlet towards the desired position, either downwards or upwards (Fig. 5). The motor can be fit on both the front and rear side of the downdraft. Once fitting the motor, the air-outlet piping can be fit.
In the case of external motor version, the power pack (external motor) shall be positioned in a suitable place and the air exhaust piping shall be fit. Install the air outlet piping between the external motor and the downdraft. Select the air-out let among the 5 possible options (Fig.6) and fit the pipe fitting supplied.
After completing installation and connecting the appliance to the power supply, lift up the downdraft by pushing on the front piece seat, as shown in fig. 7.
Then fit the charcoal filters, if the product is in the filtering version, (charcoal filters are not supplied with the appliance and are purchased in a specific kit), the grease filters (see fig. 8), and finally the front glass as shown in fig. 9; make sure to fit the glass properly, as shown in fig. 10.
- Place the metal box containing the electronic components in an easily reachable area for possible technical assistance operations, by connecting the electric connectors of the box to the hood (fig. 11).
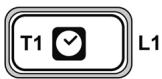
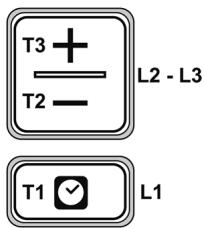
How the hood works
It is necessary to open the extractable unit in order to ensure the appliance normal operation, by following these steps. Push the glass downwards, as shown in fig. 12; the glass will be released and will open.
Following the extractable unit opening, it will be possible to operate the suction motor by using the push-button panel, as follows.
To close the extractable unit, push on the front glass until the extractable unit is completely closed.
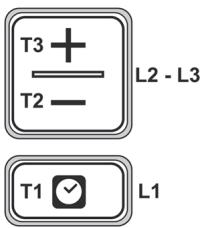
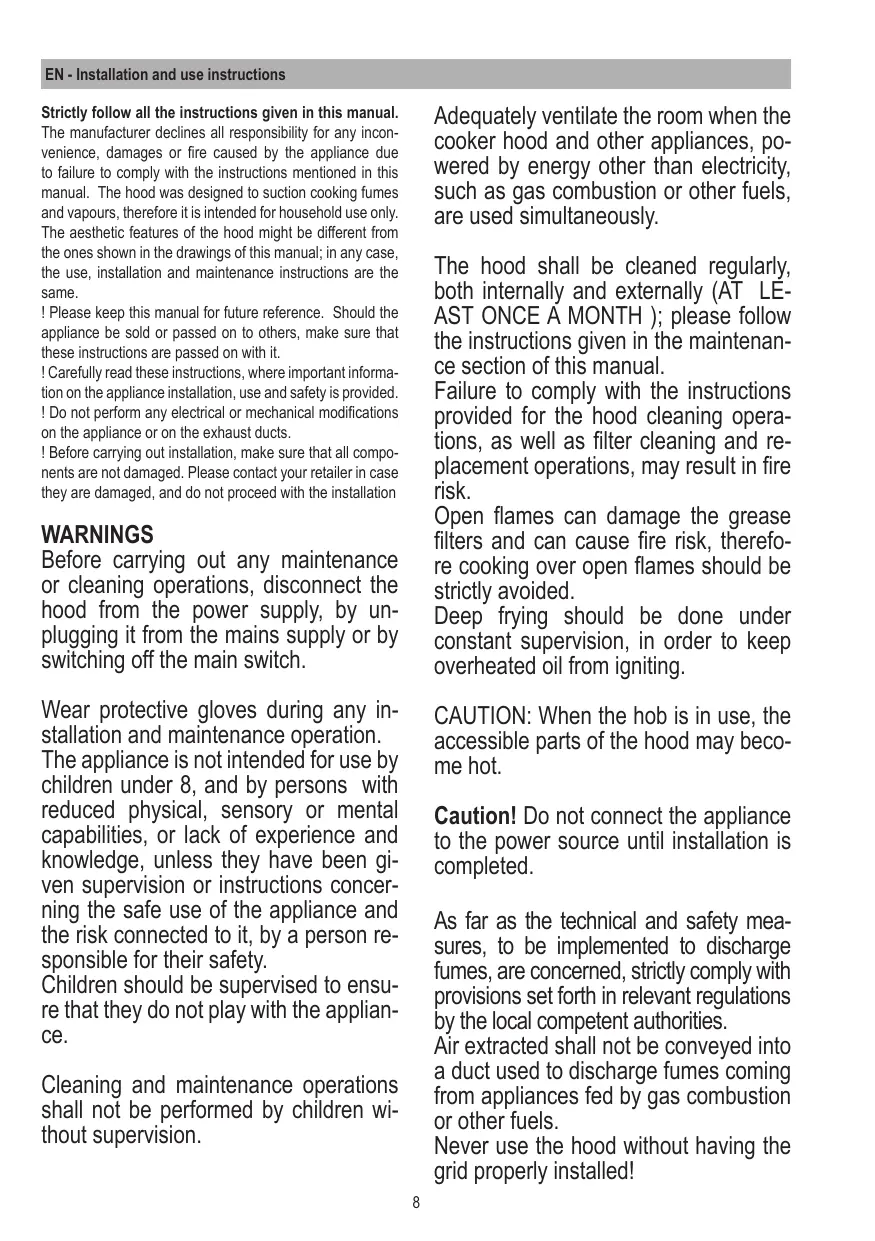
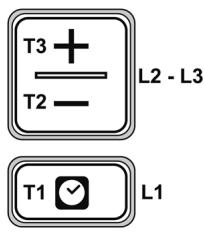
T1. Timer ON/OFF key: press it to set the automatic switching off:
Speed 1:20 minutes
Speed 2:15 minutes
Speed 3:10 minutes
High Speed : 5 minutes
T2. Key to decrease the aspiration speed (power).
OFF 1: press it multiple times, in order in order to reduce the aspiration speed until the hood is turned off.
OFF 2: hold it down for a prolonged period of time, at any speed.
T3. ON /aspiration speed (power) increase (1-2-3-High speed) key.
The High speed lasts about 5 minutes: after that speed 2 is automatically set.
Filter saturation indicator
The hood displays when it is necessary to carry out maintenance on the filters:
Grease filter (about every 40 hours of use): all the LEDs with blue light will flash
Activated charcoal filter (about every 160 hours of use): all the LEDs with blue light, leds L2 and L3 will flash.
Filter saturation resetting
After performing the filter maintenance, press keys T1 and T3, for a prolonged period of time, Leds L1, L2 and L3 will flash shortly with a blue light, and then will turn off.
Enabling the activated charcoal filter saturation indicator.
This indicator is usually disabled. Follow this procedure to enable it:
With the hood turned off, press and keep T1 and T2 keys pressed simultaneously for a prolonged period of time: at first L1 will light up, followed by L2 and L3; then, when the keys are released, leds L2 and L3 will flash shortly to confirm that activation has been completed.
Disabling the activated charcoal filter saturation LED: repeat the above mentioned procedure; at first leds L1, L2 and L3 light up simultaneously; then, when the keys are released, leds L2 and L3 will turn off to confirm that deactivation has been completed.
MAINTENANCE
Grease filter
It captures grease particles deriving from cooking.
It shall be cleaned once a month (or when the filter saturation indicator - in case your model is equipped with this feature- displays that it is necessary), with mild detergent, by washing it by hand or in the dishwasher at low temperature and with a short cycle.
The metal grease filter may fade if washed in the dishwasher, but its filtering characteristics will remain unchanged.
Activated charcoal filter (Filtering Version only)
It captures unpleasant odours deriving from cooking.
The charcoal filter saturation depends on the usage, on the cooking style and on how often the grease filter is cleaned. In any case, the filter shall be replaced at least every four months.
After removing the grease filters, it is possible to fit the charcoal filters (Fig. 8).
Vitesse 3:10 minutes
Vitesse intensive : 5 minutes
Indikator for fulla filter
Indikator for mettet filter
Hetten indikerer nár du ma vedlikeholde filtrene:
Ioi3BaIte eHa Tpb6a 3a n3nyckaHe Ha Bb3dUx, KOrTO Da NMa MaKcImaJIHa IdbJxHnHa He NoBce O T MeTpa.
-Да ce hamajn 6poT ha KpNBteHa KaHaN3IpaHe, 3aUTO BCraKaKpNbHa HamanBa eΦeKTNbHOCCTTa Ha3acMycKBaHe npnpabHeHa 3a 1 NInHeEHMeTp.(Hanp: ako ce noJ3Bat 26poarKpNBn Ha 90^ ,DbJnxHaTa HaKaHaJIIN3aunrTa He 6nBa Da HADBnIaBA3 MeTpA).
-Да ceи36яВаТ ДраCTиЧИ ПсОмЕН HA NOcOKaT.
Ja ce nol3Ba Tpb6a c dnaMaTeBpO t 150mm, noctoHEn 3a zIaTaIbJIxHa.
-Да ce noJ3Ba Tpb6a OT HopMaTHBHOOdo6peH MaTePnaI.
3a JINNCBaIoo Heun3nBJIHeHne Ha TropHInTe HNCTpyKcU, QnpMaTa IOCTaBvUHK He OTROBAp 3a npo6IeMn, CBbP3aHN C NOTOKa IIN UyMa N HNKaKBa rapaHcua Hma Da 6bJe yBaXeHa.
IpeNi Da ce HnnpaBn OTbopa, da Ce npOBepn DaJIIN BbB BbTpEShHaTc TpaHa Ha shkaΦa, B CbOTBETCTBne C MxCTOTO Ha 3akayane Ha acnPpataOpa, He e B HaNUnHocT MoBnHata CTpykTpya NII nDpyr NaCTN, KOnTO bXa MoIIN Da Cb3daat Pno6JIeMn 3a InpaBnHOTOMOHtnpaHe.
Ja ce npOBepn DaJIu N3MpeHnraHa acnpaTopa Hn Ha nIOTa 3a rotBeHe Ca B CbOTBETCTBne C uKaΦaH CNeIOBaTeJHO e Bb3MOxHo INCTaJInpaHETo.
Ja ce HapnbB 3aHaTa YacT Ha IJOTA 3a rotBeHe eINH PpaBObIbJeH OTBOp CbC CneHnTe pa3Mepn: (Φnr.1)
822mm X 100mm.
B cIyauHa BercnC Buee MOHTnpaH DBrTaTeI, Da Ce I3BaJaT BnHTOBete N Da ce npemaxHe 3acMykBaUaTa rpyna, 3a Da MoKe Da ce Bkapa downdraft B HappaBeHnO TBOp.
-Да ce Инсталра acnupaTobв HanpaBENH OTBOP, BkapBaN KTo OTrope, KaKTo e noka3aHO. (Фиг.2).
Ja ceФИКСИРа acNIPAtoPbT BvB BvTpEshOCTTa Ha ShkaΦa CbC CbOTBeTHnTe DoCTaBeHn CkOBn (ΦIr. 3).Ja ce npemHne KbM MOHTnpaHeTo Ha CkOBnTe B DoJHaT a Yact Ha acNIPAtoPa (ΦIr.4).IpeNi Da ce Bkapate BnHTOBete B ShkaΦa, yBepTe Ce, Ye pOdyKtBt e HAnbJHo nepHeHdNKyJIpaR e Ha pa6oTHaT a NOBbpxHOCT.
B cIyuaH a Bepcna C MOTOp Ha 60pda, da Ce npncTbnn KbM Crrno6raBeHa 6JIOka HAMOTopa, opneHTnpaIKn I3XoJa Hb3dUxa B ppeBapnteJIHO I36paHata Nocoka HADONY IIN Harope (Fir.5).MOTOpBT MOKe Da 6bDe IHCTaJIpaH KaKTo OT ppeHata, Taka n OT 3aHata CTpaHa Ha downdraft. Ppi I3BbPseHo INCTaJIpaH e Ha MOTopa, da Ce pOndJxN C MOHTnpaHeTo Ha KaHaJa 3a I3XoJa Ha Bb3dUxa.
B clyuha Ha Bercn C bhnweh MOTOP, Da ce pa3noJoxn B eHa nOxOJa 30Ha 3acMyKbAaTaTgpyna (BbHweH MOTOP) n Da ce pa3noJoxn Tpb6ata 3a N3nyaHe Ha Bb3Dyxa. Da ce npoJbJnx C MOHTnpaHETo Ha KaHaja 3a N3XoJ Ha Bb3Dyxa MExdy BbHsHnma MOTOP n downdraft. Da ce n3Bepe N3XoJa 3a Bb3Dyxa CpeiNETTE Bb3MOxHOCTn (ΦIr.6) n da ce HNCTaJInpa DoCTaBeHATA Bp3ka.
CneI KaTo e n3BbPseHa HnHCTaJaTAta N CneI Cbbp3BaHETo Ha npOdyKTa KbM eJIeKTPnuYeCKaTa MpeKa, Da ce NOBdInrHe downdraft HATNcKaIKn fpoNTaJIHo, KaKTo e POKa3aHO Ha qnr.7.
Да ce Инсталрат след TOBA Bыгелерднite Филтп,В случай Ha Филърна Верся (Выгелерднite Филтпса Доставенnotделно CBС Cпeцален KOMПК), Филтпerte 3a Ma3HnHn (BIXKФИ.8),След Инсталране на п徴но CTbKЛо, КakTO e pOKa3aHo Ha ФИ.9;Да ce BHIMABA npri 3akayaheto Ha CTbKЛOTO, КakTO e nOKa3aHo Ha ФИr.10.
Ja ce nocTabn MetaJHaTa KyTna, CbIbPkaa eJIeKTPoHHNTE KOMNoHEHTB JIeCHO DoCTbJNa 3OHa 3a eBEHTyaJIHn cepBn3HN HaMeCN, CBbp3BaIKNe EJIeKTPnueCKNTe CbeDInHNTeJI Na camna acnnpatop, (fnr.11).
ДeИCTBnE
3a eHNO HOpMaJIHO DeIcTBHe HaIpOyKTa TpI6Ba Da Ce OTBOpn I3BaXdaUaTa ce UaCT, DeIcTBAuKN, KaKTO CJIeDba.
Ja ce HATNCHE CTbKJIOTO HAIOJy, KaKTo e poka3aHO Ha qnr. 12, ue e pOlyuN OCBO6OXdAbaHe n CbOTBETHO OTBaprHe.
B CJIeIcTBHe Ha OTBapJHTo Ha NOdBnXHaT aact, MoKe Da Ce 3aJeIcTb MaTOpa 3a 3acMyKBaHe, DeIcTBaIK N Bbpx KlaBnaTpyata, KaT0 e NOKa3aHO IIO-DOy. 3aTbapJHTo Ha NaHeJa CTaba IIO anaJIoRmUeH NaHy, Tp6Ba Da ce HATNCHE Bbpx npEHaTO CTbKJIO Do nbJHOTO 3aTbapJHHe Ha NODBnXHaTa qact.
T1. ByToH ON/OFF TaMep: HATnCHeTe, 3a Da HactponTe abTomatnHO:
Ckopoct 1:20 MNHytn
Ckopoct 2:15 MNHyTN
Ckopoct 3:10 MmHytn
CKoPoCT INHTeH3nBHa:5MnHyTn
T2. ByToH 3a HamaIyBaHe Ha CKOpocTtA (MOUHOCT) Ha 3acMyKBAHe
OFF 1: HATNCHE TE NOBeye NTbT 3a HamaJIaBaHe Ha CKOPOCTTA Do N3KIOUcBaHe Ha acNIPAToPA.
OFF 2: Na KaKaBaTo n da e cKOpocT, 3aDpBjXTe HATINCHATO 3a DJIPIO.
T3. ByToH ON/YbeMInuBaHa He cKOpocTa (MoUHoCT) Ha 3aCMyKBaHe (1-2-3-HTeH3nBHO)
HHTeH3NBHATA CKOPoCT mHa npOdbJXnTeJIHOCT OT OKOJO 5 MInHyTN, CNeI KOeTo ABTOMaTHo CE HAcTpoBa CKOPoCTTa 2.
TokaTeI 3a HacnUaHe Na qHntPte
AcnipatopbT nok3Ba Kora e Heo6xodmo Da ce N3Bbpns noDpBkaHaΦnITPnte:
ΦnntbP Ma3HNN (np6n3HTeHNo 3a BcK40 Yaca non3BaHe): BCuKN CBTeOIOND CbC CNHa CBETINHa ΦnTbP MIn3Ma CAKTNBEH BbIeH (np6n3HTeHNo Ha BcK4160 caca non3BaHe): BCuKN CBTeOIOND CbC CNHa CBETINHa, CBTeOIOND L2 nL3 npemirBat
Hynipane hacsuane fnntpn
CneodocbuectBraBaHeHaNpOdpBXKkataHaΦnITPnte, HATNCHETe 3aDbIro6byTOH T1uT3,CBEToDnOmTe L1,L2 nL3npemrBtHa KpaTKo B CInhBo N Cneied TOBa ce 3aracrt OKOHnatEnHO.
3aTeiCTBaHe Ha NokaTeJIa 3a HacNtIeHa HnITbpa 3a MInpIm3Ma C aKTHBEn BbTJIeH.
To3n nok3aTeI e o6mKHOBeHo He e 3aJeCTBaH. 3a da ce 3aDeiCTBa, npOeDnpaIte, KaKTO cJeDa:
Pn n3KnHoyen acnnpatop HATNCHEt e 3aDpBjKTe HATNCHATn 3a DJIIO r EJNOHBpeMeHHo T1 n T2: PbBOCe BKNIOyBa L1 nocne CbIoo L2 n L3, cNeI KOeTo npn OCBOOxKDaBAHETo Ha 6yTOHITe CBETODIOHTe L2 n L3 IpemMIRbat 3a KpATKO, 3a Da NOKaKAT ycNEuHOTo 3aDeiCTBaHe.
CnnpaHE LED hacnuahe Ha bTgeopndna FmTTbP: nobTOpe ropeONcaHata onepaun, Hau-HanpeD ce BKNIOuBaT eNHOBPEMeHNO CBEtOINoIDTe L1,L2nL3,CneJ KOeTO COCBO6OxJaDaHETO HA 6yTOHInTE, CBeTOINoIDTe L2 n L3 3aracT, 3a da NOKaxat ye e DoCTnHaTo DeakTNbPaHe.
IIOIIPbJbKAA
ΦnTbP 3a Ma3HHH
3aIbPka qactnnte Ma3HnHa,06pa3yBaun Ce npnrtoTBeHe.
Tp6Ba da ce noHCTBa BeDhK MeceHNo (NIM KOrato INnMkATOPHATA CNTema 3a HacnUaHe Ha qHITPnTe - aKO e npEdbuDeHO 3a npTEkabAHn MOeJ - nOKa3Ba Ta3n Heo6xOJMOcT), C hearpeCINBn NOuchCTBaunnpenapatn, pBuHO Nm B MmJIHa MaUNHa npn HNCa TEMnepaTpya n 3a KpaTBK ZIKbI.
PnI N3MnBaHe B MmJHa MaShHa, MetaJIHnT ΦnITbP 3a Ma3HnH MoKe Da Ce Obe3UBeTn, Ho HerOBnTe ΦnITpnpaZx XapakTepeNtKn BbO6Je He Ce npomeHr.
ФИЛТБСАКТИBEHиВьгЛЕнI
(Cam0 3aФиNTpRpaUa 贝CpH) 3aIbPka HENPnTHTMe MmN3Mn, IVBaunIO BpeMa Ha rotBeHe.
HacuHaTo Ha BtIepoDnna QnlIbpe CytahOBa Cneedno Nobeue Nn NO-MaIKo PNOBknTeHNO No3BaHe nCnope Bnda RotBeHe n peoBHOCTTa H noOHTBaHe HaΦnITPnte 3a Ma3HNHn. BbB BCEKn CnyaH e Heo6XoMnO daCe 3aMeHrT MAcNMaJHo HA BCEKn YeTnpi Meceua.
CneI OTcTpaHraBaHeTo HaФINTPnTE 3a Ma3HNHe e Bb3MOXHO Da Ce BbBEdaT BbIpeOpDnTeФINTPn.(FInr.8).
Heo6xOJHMO NOCTOARHH OUHuaTb BbITXKBy BHyTpN n CHaPyKn (KAK MHNIMYM, PA3 B MEcA), CO6JIHOJa IHCTpyKuIN, yKa3aHHbIe B DaHHOM pyKOBODCTBe.
HecobJIOeHne npaBnI 6e3OpacHOCTn npO uNcTKe n 3aMeHe fNJIbTpOB MOKET pINBeCTn K Ioxapy.
IcnoIb3OBAHnE OTKpbITOro IJIaMeHN OnaCHO DnA ΦnIbTPOB N MoXeT npNBecrN K IOxapy - Heo6xoJMoN 36eRaTb B JIObOM Cnyae.
Ha MINHIMaIbHOJ CKOPOCTN, N OCTaBtTe ee BkJIoueHHoH Ha HeKOTOpoe BpeM IocJIe OKOHuaHn IpiroTOBJIeHn.
YBeINHBAIe CkOPOCTb TOJbKO npi 60JIbOM KOJInueCTBe npa NDbIMa N noJIb3yIteCb QyHKUeN 6CyTeP (bo- oster) B NCKJIIOHTeJIbHbIX CnyuaX.
3aemenyte yroIbHbIe fIbTpbl nO Heo6xOdIMOCn dIpy nOpIepXaHnE 30fpeKTHBHOpa6tblCNUCTMBOuNTKNOT 3anaxOB. Iyra 30fpeKTHBHO pa6tbl
Фильърра КИРОВ,ПромьВаитЕ ergо NO HeO6xOДМСОCTN. ДЯ ONТIMN3aцIN 3ФФЕKTNUBHOCTN И CHINЖЕнЯ урOBня Shyma, ИСПОЛБ3УпTe МAKСМАЛьнBIД nAmEtP CNTeMbl BO3ДУXOBODOB, OпИССАНHов B DAHHOM pyKOBODCTBE.
IcnoJIb3OBAHne
BbTjKka npedHa3NayeHa IJnIcNoJIb3OBAHnBpeKIMe BHeUHeRo BO3dYxooTBoJa Nn peCpKyJLzCuNBO3DyxaB NOMeHn.
Pexim OTbOJa BO3dYxa

NapbI BbIBOJCTa HApUky Upe3 Bo3DyXOOBTo, npKpeJIeHHbIK COeINHITeJIbHOMyФJaHcy.
ДиamEtр BO3dYxOoTBoJa DoJIXeH 6bIbT TaKIM JKe, KaK y COeINHITeNbHOrO KOJIbCu.
BHHMaHHe! Bo3dyXooTBoD He NOCTabIaTeC B KOMPJIeKTe, Iero Heo6xOJIMO NOKyPaTb. BROPn3OHTaIbHOu qACTn, Tpy6a DOJnxHa CJIeRka HAKIOHrTaBcR BBePx (pnpMepHo 100) TaKIM o6pa3OM, UTO6bI BO3dYx IeRKO BbIXoIN HApUKy. EcIn B BbITraKKe pa3MeUeHbl yroJbHbIe FInbTpbl, IN Heo6xOJIMO ydaNtB.
Pexmmpeunpkyua

BcabsbAembl Bo3dyx OHUaETcO T XnPOB npei TEM, KAK OH BepHETcB I NOMUeHne. ITOI TORO, YTObI NCIOJIb3OBaTb BbITKky B 3OTOM PEXIMME, HE06XODIMO yCTAHOBITb DOONHINTEJbHyO CNTcEMy QpINbTpOB Ha OCHOBE AKTINBOPOBaHHOR YoJIA.
Примechанe: OчицehньугЛьньIMNФпьтамьо3dYx OTправляETСЯДВ ПОMEшение УецkaHaJI, KOTOPыВБИВODИТ BO3dYxВCTOPOHушkaфa.
YCTaHOBka
Примочанe: установkadoлжнабытвБыллеснаТakIMобразимчToВыгЖии ee 3ЛКТронькOMПОHENTb BCEДАДOCOTПьДЯ BO3MOXньIX BMEWAteJIbCTBXHNUeCKORO OБслуЖиBaHЯ.
PNEUYNPEXKDEHNE: IOMeCTIte MeaJIiueckyo Kopo6ky, CoepxauyO 3JIeKTOHHbIe KOMIOHeTbI, Ha paCCToHnH He MeHcE 65 CM OT rAOBOI PINTbI NIN, PO MeHbSeMpe, 65 CM. OT BCaCbIBaIOUeI NOBepxHOCTN BvITJIKN.
PEKOMEHDAIyA:Mb pekomehdyem UCTaHOBtB MeTALINueckyU KOPO6ky, COdePkaLuy 3JIeKTPoHHbIe KOMNOHeHTbl, IIO MEHbSeMpe,Ha pacCTOHN10 cm. OT 3EMnN Ha DOCTaTOHOM pacCTOHNOT BCEx NCTOCHNKOB TeIIa (HaIPIMEp: CTeHOK BApOHyON IOBepxHOCTn INI Peu).EcnN IHCTpyKUIM NO yCTaHOBKe PnIBopa dIpy IpiRTOBJIeHNA Ra3y IpeDyCMATpNBaIOT 6OJIbUeE PACCTOAHne, Heo6XODIMO yYeCTb 3TN INHCTpyKUIM.
3NeKtpnueckoe coeHene
ПОДКЛЮЧЕН EBITJAKK K 3JIeKTPOCETN DOJIXHO IPOIN3BOIDITbC RAJIINФИЦРОВАHbIM NEPCOHAIOM INI TEXHNIKOM. HanpЯЖЕнE CETN DOJIXHO COOTBETCTBOBaTb HANPЯЖЕHI, YKa3aHHOMy Ha TaBJIuYKe C TExHNIYeCKIMXapaKTEPcHNTKAMi, pACNOJIOXeHNO BHyTpN BByTJAKK.N.EcIn B KOMJIeKT BXODINT BVJKA, NO 3aBepUSeHmY cTaHOBKn POKJIIOUHTe BbITJAKK Ky K PO3eTKe, HAXOJaIeICR B DOCTYNHom MeCTe (DAxe IocNe 3aBepUSeHnY cTaHOBKn) IN B COOTBETCTBmC DeIcTbYUOUMnpabINAMn 6e3OnaChOCTN.EcIn BVJKN Het (IprMOE POKJIIOUChEne K CETn) INI PO3eTKa He HAXOJTCR B DOCTYNHom MeCTe IocNe 3aBepUSeHnY cTaHOBKn, Heo6xOДmO yCTaHOBNTb DBvXIIOLCHbI BbIKJIQUaTeJIb, COOTBETCTBYUOUsM HOPMaM 6e3OnaCHOCTN, KOtOpbI OBeCpeHnBaET PONHOE OTKJIIOUChEne 3JIeKTPo3HeprNi B CJIyuae NepeHaNPJeHENIA.
BhImaHne! Ipeed TeM, KaK IOdkIIOUHTb BbITJgKc Ky K 3JIeKTPocETn IN npOBepNTb IpaBnIbHyu pa6Otu, BCErDa Heo6xOdIMo yOcTOBepNTbcR B TOM, YTO CETeBOH Ka6eJIb IpaBnIbHO UCTaHOBJIeH.
YctaHObKa
Ipeed yCTaHOBKO np6bopa yIOCTOBeBPTECb B 9eJIOCTHOCTN BCEKOMnOHeTOB, B IpOTNBHOM Cnyae He NaHHaHTe yCTaHOBky N o6paTNTecb K pOdaBcy. TaKxe BHNMaTeJIbHo npOHTaTe PpNBEdEHbIe HNXe IHCTpyKcHn.
IcnoJIb3yIte Tpy6y BO3dYXooTBOda IaHIOH He 6oJee 5 MeTpOB.
OrpaHnUyTe KOJIynchecTBo N3rN6OB B BO3dYxOoTBODe, NOTOMy UTo KaXdbIb I3rN6 UMeHbShaet 3ΦΦeKTHBHOCTb BCacbBaHnB B 3KBVBaJeHTe Ha 1 JINHeHbMy MeTp.(PpIMep: ecnn MCNoJb3OBAhbl 2 yrPa B 90^ , DInHa BO3dYxOoTBODa He DoJxHa PpeBbIaTaB 3 MeTpa).
I36eraTe pe3Knx I3MeHeHn HappaBHeHn DBNKeHn.
IcnoB3yIte Tpy6y DnAmetpom 150 MM. NO Bcei DJIHe.
-
IcnoJb3yIte COOTBETCTBYUOuHOPMaMaTePnAaN DnRA Bo3DyXooTBoDa.
-
Pnp HeBbIIOJIHeHn BblIePBeBnIeHHbIX NHCTpyKcIy KOMNaHnI-IPoN3BOIDTeJIb He Hecet OTBETCTBEHHOCTn 3a CHNXKeHHyIO IPON3BOIDTeJIbHOCTb NJIIN N3JIuHnI MwM, uYcNoBna rapaHTnN He paacpOcTpaHЯOTc Ha daHHbIe cIyua.
Ipeed Tem KAK npocBepnItb OTBepCTne, ybeintecb B TOM,yTO Ha BHyTpeHHe CTOpOHe Me6eNi, TaM rDe DOJXHa paCNoIaratbcra BblrXKa, Het HNKaNX DeTaIeN, KOtOpbIe MOryT CO3DaTb PpenTCTBnA DJIa IpaBnIbHOY CTAHOK N BblrXX. IpoBepbTe pa3MepbI N φOpMy BblrXXN UyBeintecb, YTO DaHHa BblrXXKa MOxET bblpa3MeUeHa PpAmo C KxOHHO Me6eIbHO B BblpaHHOM MecTe.
Ha 3aHne CTeHKe BapOuHoN IOBepxHOCTn IpocBepIHTe IprMoYroJIbHoe OTBepCTne CpeDyUoJero pa3Mepa: (Pnc.1).
822mm X 100mm.
B clyuae, ecn MOTOp yXe BMOHTnpoBaH, CHrTb BNHTbI N ydaJIntb OTBOJraIIN BO3dYx 6JOK, YTObI pa3MeCTnTB HNCXODaIzI N eJeMENT B IPOCBePJIeHHoe OTBepCTne.
Pa3MeCTIe BbITJkKByBnpOCBepJIeHOM OTBepCTn, BCTaBnB ee Cbepxy, KaK yKa3aHo Ha (Pnc.2).
- YCTaHOBnTe BbITJkKBy BHyTpN uKaΦa, NcNoJIb3yI NOCTaBnIeMbIe B KOMnJIeKTe KpOHnTeHbI (Pnc. 3).
T2. Khonka yMeHbIeHnA CKOpOCTn (MOUHOCTN) BCaCbIBaHnA
OFF1:HaKaTbHeCKoJIbKOpa3,yTO6bIyMeHbJWHTbCKOPOCTbDoBbIKIOUChENBByITRAKKN
OuHHe HnTexHicHe OScnyroByBaHH He NOBHHI BIKOHyBaTnCn DITbMn 6e3 HaJy.
Приишения NOВИНО MATN DOCTAΤΗ BERTINЯЦИ Y pa3i, RAΚΙΟ KXYOHHA BINTJXKA BИКОПΝΥБУЕТСР CTЛьНО 3 iHΠIMM ПИСТРОМД ПЛСАЛЮВАнг RA3Y a60 iHΠX WДIB пИVBa.
BntjKky Heo6xIDHO peyIpaHOn Ounuatn k BCEpeDnHi, TaK i 3OBHi (HE PIJlJE OJHOPO PA3y HA MICaLb), y BiINOBiDnOCTi 3 IHcTpyKciEo 3 TexNCHoro 06CnyROvBaHNHa HabeJeHO B cblomy KepiBnHTBI.
HeDToPImaHnI npabJU OuIeHHBnTJxKn i 3amIn Ta OuIeHHN oJIbTpIBMOxTyB pN3BecTn DO NoxEki.
Cybopo 3a6bOpOHeNo roTyBaTn iJy Ha BiDkPitOMy BOrHi.
BVKOPINCTAHN BIDKPNTOI NOYM' HAnOcNTb ⅢKOyΦIpbTpam i MoKe npn3BeCTn Do NpKexi, TOMy Cboro Heo6XiHOn yHnKaTu y 6yDb-akomy BInpaNDy.
Буд-як e cmaжehн Heo6xidno npobodntu 3 obepexhictu, 06 3ano6irtn 3aropnHpo3irpitoro macna.
YBA:Пдчасpo60TuBapouhoi nobepxhi 6n3bko po3taoBaHi qactHn BNTJKKMOKytb HarpIBaTcIe.
Ipeed TmM, k npctyntn Do BCTaHOBJIeHn npcTPOU, Heo6xIDHO nepeBipNT BCI KOMNHOENT Ha BiCyTHICTb ySKODKeHb, B iHOMy BnPaIKy 3BepHITbcr DO npOabzra i np3yNIHITb MOtack. TaKoX yBaJHo npOHTaTe BCI HxKHeHaBeDeHi IHCTpykii.
MaKcMmaJIbHa DoBxHnBa BVITJXHOI Tpy6n He NOBHHa NepeBnUyBaTn 5 MeTpib.
Heobxidno obMeKntu KJIbkiCTb KOJIH B KaHani, OCKIbKn KOXHe KOJIHO 3HNKye epeKTnBHiCTb BCMOKTyBaHHa, ekBiaJeHThe 1 MeTpY. (Hanpknad: AKN Bu NKOpNCtOByTe 2 KOJIHa Ha 90^ DOBXHa NOBITponPoBdy He NOBHHa nepeBnuBAtn 3-x MeTpiv DOBXHy).
- YHnKaIte pi3Kx 3MIn HapPmKy pyxy.
BukopncToByTe nobitponpoBoOn 3 He3miHHm diaMetpom y150 MM no Bci IOBXHHi.
BnKOpncToBvTe nobitponpoBoOn 3 Do3BOJeHOro MaTepiAly.
- Пи Невноаннь Вицевka3ahnx peKOMeHdaцi piДпriЕмCTBO-nOCTaaybHK He Hece BiNobiДаьHocTi 3a npo6JIemn 3 npOdyKTnBHiCTIO abO Wym Ta He NaJaE HiaKOI rapaHTII.
Ipeed TMM, k3pO6bHTN OTBip IpeekohaiTeCJ, 0o BCEpeHnHi Me6JIy BIDNOBIHDocI Do MICa P03aUbyBaHH BNTJXKN He BCTAHOBJIeHl Hecuyi Detaji waHn a6o IHwi Detani, kki MOKyTb 3abaxkATn npabNJbHOMy BCTAHOBJIeHHo Bnp6y. IpeebipTe, 0o6n po3mipn BNTJxKn i Bapouhoi naHeni COnolyuAInCb 3 Me6JIaMn i 3abe3neUyBaHn MoXJIbVicThb MONTaKy.
B 3aHnH yactnHi BapOuHoi IOBepxHi 3po6ntn npAOMOKyTHn OTBip 3 NaCTynHMn PO3mipamn: (MaI.1).
822mm X 100mm.
y BnnaKv Bepcii 3 NOBHCtIO BCTaHOJIeHIM DBNrHyOM, BNdaJIITb TBnHTn i 3HiMTb 6JOK BCMOKrYBaHHA JIg TOrO, 06b BCTaBnTn 6JOK Hn3XiIDHOrO NOTOKy B OTBip.
BCTaHOBiB BNTJxKBy B OTBip, BCTaBbBn II 3Bepxy, JIK NOKa3aHo Ha MaJIOnHcy (MaI.2).
- 3aKpiNTn BHTJkky BCEpaHni 3a DOnOMoTO KPOHSTeHIB, 10 HaadaOTbcR B KOMPJIeKTI (MaJ.3). BnKOHaTn MOHTaK KPOHSTeHIB y HnXHi YacTHNI BHTJkKN (MaJ.4). IpePe 3aKpyUBaHHaM rBnHTiB y 10 aphi, HeobxIDHO nepeKoHaTncy Tomy, 10 npicTpI 3hAxOHTbcr ToUHO nepneHdkyIrpHo Do pOboOoi NOBepxHi.
- y pa3i Bepci 3 HeBCTaHOBJIeHIM DBNrHyOM, BCTaHOBtN 6Jok DBNrHyHa, OpiEHTyOuN BnXiD NOBITpr B o6paHe NIOJOxEHn: Bn3 a6o BROPy (MaI.5). DBNrHy MoKe BCTaHOBJIbOBAtncsK cpepey, TaK i 33aNy 6LOKy Hn3XiDHorO NOTOk. Picn 3aBepSeHHra BCTaHOBJIeHH Y DBNrHyA, BIKOHATN MOHTax NOBITpOpPObID INI BIDBOy NOBITpr.
Y pa3i BapiaHt a 3 3OBhiUHM DBNyHOM, BCTaHOBHTI Noro Y BiIDNOiDHi 30HI npIcTpoIO dIg BCMOKTyBaHHA (3OBhiHn IBDnHy) Ta BCTaHOBHTI NOBITponpOBI DIBODY 3a6pydHeHORO NOBITp. BIKOHATN MOHTAX BIVIDHNX NOBITponpOBOID MIX K 3OBHIHIM DBNHyHOM i 6JOKOM Hn3XiDHorO NOTOKy. Bn6epitb OOnH 3 n'ATN BApiaHTIB BIDBOy NOBITPRA (MaJI. 6) i BCTaHOBITb 3'EDHyBaIbHi eJeMeENTu, IO BXOJaTB B KOMPiKeT NoCTaBKn.
IicJ3aBepWeHH BCTaHOBJeHH iPiKlOueHH npNcTPOIO Do eNeKTpOMepeXi, BnBeITb Haropy 6nok Hn3xIDHOro NOTOKy, HaNTCHyBmHa nepeHIO NaHeIb, kN oKa3aHo Ha MaI. 7.
Iicra yboro Heo6xio HOBNTu ByiNbHi 0jnbTpN -y BnnaKy Bepci3 0jnbTpaueo (ByrJIbHi 0jnbTpN NOCTABJNAOTbcg OKpEmo, YK CneiaJIbHNI KOMJIeKT), 0jnbTpN -XnPOBIOBIOBaHi (DINB.MaI.8), NOTIM BCTaHOt b NpeDHe CKNo, JIK NOKa3aHO Ha MaI.9; BCTaHOBIOHTe CKNO ObepeXHo, JIK NOKa3aHO Ha MaI.10.
BCTaHObHTMetaeByKopo6ky,IO MICTNtbeEneKTPOHHi KOMnOHeHTN B JERKOIOCTyPHOMyMICUДЯMOxJIINBOr OPOBeDeHNpObit3ObClyROvBaHHa, TaPi'd'EdNaHTe II eNeKTpNCHi PO3'EMN Do BNTJxKn (MaI.11).
Ekcnnyatauaia
ДяHopmaJIbHOIpo6OTn Bnpo6y Heo6xIDHO BnTЯrTN BnCyBHy nAneJIb, DiIOCh NaCTyINHM YInHOM.
Ha cnchyn Ha cknO 3ropn-BHn3, k noka3aHo ha man.12, cknO Bnnde i3 3aueenneHHra Ta aactKOBO BiDkPncTbcra.
IicBnXoDy BNCyBHOi nHeJI BKJIOHTN eKeKtpoDBuRHy
BCMOKTyBaHHa 6Iooi ynpabJIHH, JIK NOKa3aHO HIXy.
3aKpTT TaHEni Bi6yBaTbcra aHaJoriyHM YHOM, HaTnCKaHHa
Ha pOHTaIbHy CKJIaHy NaHeIb Do NOBHOrO NepeMIuJehn NaHeJI BHN3.
T1. Khonka TaImepy BKJI./BKNJI.: HaTnchyt nI BCTaHOBHeHHA ABtOMaTHUHOr BoDKnKHeHH:
WBnDkiCTb:20xBnIH;
Ubukicb2:15 xBnH;
WBnDkictb3:10xBnINH;
Bucoka швдкICTb.5xbnINH.
T2. Khonka 3mehuennn H uBnKoCTi (notyKhocti) BiDBeHnH NoBITpr.
BKN.1:HaTnCHyTN DeKeJIbKa pa3iB dIg 3MeHWeHnH WbNdkOciAIX DO BiKJIOUeHHBITXKK;
BKNL. 2: npn 6ydb-kaik uiwbnkocti ytpmbyatny HATNCHYOMI NOLOXeHHI Tpmbam Yac.
T3. KhoNa BKJl./36iNbSeHnB WbUdkOci (notyXhOci) BiDeeHn Nobitpr (IHTecNBHH peXm1-2-3).
IHTEHCNBHa WbNdkictb BnKOpNCObyEcBcra npOTROM 5XbINH, NiCnA YOrO aBTOMaTHNO BCTaHOBNIoctbCra WbNdkictb 2.
IInkaizia hAcuHnHa jltbtpiB.
Bntjka nobidomJIe, KOJI NHe6xIDHO BIKOHaTn TexHJHe 0cIcyroByBaHHa IbtpiB:
ΦiNbTp-χnPoBnOBnOBauch (KoXHi 40 roDn pO6To): yci CbITNoIOJNO ropTa cnHm CBITLOM
ФиьтВLOBЛОВАнг3anaxiB3akTNBOBAHm ByrInlM (KoXHi 160 roDnBnKOpuctaHn):yci CbitNoIOJIOI ropTb CNHIM CbitIOM, CbitNoIOJIOI L2 i L3 6nmaIOtB.
CknadnnoNOKa3iHnacuHennHnΦnlbtpiB.
Iicra BnKoHaHHaTexHcHOrO 06cnyroBaHnHa pInbTpiB, HATNCiHTb i yTpMMyTe KhoNk T1 i T3 npu cBOMy CBrITIOIOJ L1,L2 i L3 KopOTkn Yac 6bnMaOTb CnHIM KOJIbOpOM,a NOT IM OCTaTOUHO 3racaOtB.
BkIouenHH iHnkauii HacuHnn HpiIbtpy BIOBIOBaHH 3anaxiB 3 aKTHBOBaHM ByrInm.
3a3bnuayu iHnkaui BIKNUOyeHa. IJI BKNIOUeHHN HINKaui, BIKOHATEHACTyHNI II:
Pn BiKIOHHei BITXJI HaTCHITb i yTPMMyTe OJHOaCHO npOTROM TpBAnoro Yacy KHOKN T1 i T2: CNOATky 3aORApEbC bITNIOID L1,NOTIM,nicIy BiDnyCKAHHH KHOKN, cBITNIOID L2 Ta L3 KOPOTKO 6mHaIOb, BkA3yOuH Na ycniHHy AKTBAUJIO.
BIDKNIOHNN CBIITNOIOy IHINKAaII HACNENHByrInbHorO pInbTpY: NOBTOPiB Ti Jx Cami D, onNCahi BnIe: CnepSy ONDUacHO BKNUOaYte L1, L2 i L3, npuCbOMy nicIy BiDnyckAHK HONOK CBITIOIOJN L2 i L3 BIDKNIOHTBCA, 00 BkayE Ha npabINbHO 3dIcHeB BIDKNIOUeHN.
TEXHUIHE OBCJYROBYAHHH
ΦInbTp-χnpoBNOBnIOBaay
3aTpMMye cactkn jnpy,Ioo yTBOPHOb8c npicnpiroToyBaHHia
Heo6xio hO ouuatn OOnn pa3 Ha MicaIb (a60 KoIIN CNTema iHmkauii HacuueHHaPfIbTIPB - kUO y MoJeI nepe6aueHo BCTAHOBIIeHHra TKOI CNTEm - BKAByE Ha Uo Heo6xioHcIb), 3 BkOpncTahHm HaeRpeCUNBHX MIOUHX 3ac06B, BpyHy a60 y nocyDomHm MaMH B pexMIM H3bkOITempepaTy i KOPOTKOr cKKnY.
Ipi MNTTI B NocydomnHi MaunHi, fIbtpKINPOBNOBIOBAU MOKe PEBHOIO MipoIO 3e6apBNTsc, npote Ioro fIbtpuyoi BnaCTNBOCTi 3aIIuiaOtbcr He3MIHNMI.
ΦiNbTp 3 aKTHOBaHIM ByrIJIaM (MoJei 3 peuNpkyIaIeIO NOBITP) nOrrnHaec HENPIeMHi 3anaxn, IIO BUNKaIoTB niD Yac nprirotyBaHHia Xi.
HacuHHeNHaIbTa3aKTHIBoBaHmByrIJIaMByIDObyBaTeBcA nicla6iIbI-MeHt TpNbAIONO BIKOPNCtAnH,By3aJexHoCTi
BID TNY nprirotybannj iki i perynpaHocti OunuHnn HJNPOBOrO pfIbTpa. Y 6by-akomy BnnaKky Heo6xidno 3aMInrN KApTprnck npnHaMHKOKHi YoTnpMiCui.
BctahOBHTn pifIbTpri 3akTINBOBaHIM ByrIINm MOxJIINBO nicra BnuadaneHHa pifIbTpry-kyinpoBIOBIOBauy (Ma1.8).
- atrums: 20 minutes
- atrums: 15 minutes
- atrums: 10 minutes
Intensivais atrums: 5 minutes
T2. lesuksanas atruma (jaudas) pazeminanas tausts
OFF 1: piespiest vairakas reizes, lai pazeminatu atrumu lidz gaisa nosuccej izslegsanai.
Ieuy Tpe6a HaanpaTn da ce He nprajc acnpaTopom.
Ushene n OdpkaBahe He Cmejy BpwnTn Deca 6e3 Ha30pa.
Y npoctopn mopa 6ntn DOBObHO BeHTnlaucjne KaD Ce KxNbCKn acnpatop KopnCTn NCTOBpeMeHO C OCTaIM anapatima Ha pINH nIi Ha dpyra rOpBa.
AcnipaTop tpe6a peoOBHO uHCTHTN KaKo ca cnoJbawhe TaKO n Ca yHyTpaWbe cTpanE (HAJMAHJEJHOM MECEUHO),y CBAKOM cIyauj Tpe6a da ce npdRpXabTe N3pUnTHx yNyTcTaBa Koja cy caDpxaHa y OBOM PnpuyHnky.
HenowtoBaHe npabuHa 3a uhihebe acnpaTopa n 3a 3amEny uhihebe pfntepa MoKe DoBecn Do pN3nKa oJ nojapa.
Ctporo je 3a6paHbeHo peHn xpaHy ha nnamEny.
YnOtnpe6aOTBopeHOr nIaMeHa je WTeTHa 3aФnItepe NMOKe N3a3BaTn NOxap, CTOrCe CBaKo MOpa N36eRaBatn.
Ppxe Xpahe Mopa Ce Bpntn Pd KOHTPOJOM KAKO Ce BpeNo yBe He 6n 3aapanio.
IAXHB: KaJ je nloa 3a KyBaHe yKJbUyeHa Mory ce 3arpejATn DeIOBn acnnpaTopa KOjMa ce MoKe npICTyNTN.
Paxha! HeMoJTe NOBE3nBaTu acnpaTop Ha eNeKtpnHy MpeKy yKOJIIno Ra HNCTe KOMJIeTHO INCTaIIpaI.
Kada cy y nItaBy TexHnUe cnrypnoche Mepe Koje Tpe6a npIMeHTn 3a ODBoD dIma, Ctporo ce npndpxaabTe npOnica caPzxahnx y npabNInHnCmA Koje cy n3daJIHn HadIeXHn IOKaHN OprAHn.
YcncanBa3dyx He CMe Da Ce ODbOny uekoja ce KOpNCTn 3a ODbOndmMOBA Koje CTBope anapatn Ha nnH nnHa npyro ropNo. HkaJaHemojTe KopNCTnTn acnnpatOp yKoJIKNPepeTka Hnje npabInHo hAmOHTnpaHa!
Ha acnpaTop HNKADA He cMeTe da Ondaxete npedMeTe OCIM yKoJIko TO n3pUHTO Hnje HabeDeHo.
Kopncntte camo 7pafoBe 3a
fKnCnpaHe KoJc cy nCnOpyuEn C
acnnpatopom, nIn, y cnUyaj Da HnCy
ncnOpuyen, KynTe ODroBapayjhe
7pafoBe. KopncTe 7pafoBe
OndroBapayjhe DyKnHe Koja je
HabeDeHa y Bodny 3a HnCTaInpaBe.
Y cnUyaj HeDoymuCe, o6patnte ce
OBlaunHeoJ cnXk63 Za ACnCTeHcnjy
nIn KBaIIΦNKOBaHOM OC6bly.
IAXHB! Ako He Kopncntte 7pafoBe n elemente 3a 6nKcnpahe KoJn cy HabeDeH y OBOM PnpuyHky,MOKe doHn Do np3nka eJeKtpnue npnpoJe. Hehmo ChocNTn HnKaBv ODROBOPHOCT y Cnyajy npoblema, WTeTe nn He3roDa Koje n3aOBe anapat yKoJINKo ce He npdPjBaTe yNyTCTaba HabeDeHx y OBOM PnpuyHky.
Y Hamepi Da CtaIHo N6oJbIaMo HaIe Ipon3BOJe, 3aIpxaBaMo IpaBO Da I3MeHIMO HIXOBe TEXHcKe, paIHe IJIe cTeTcKe KapaKTepnCTKe Koje Cy NocLeIaHa pa3BOJa camx Ipon3BODa. YKoJInKO Ce paINo MoJeLy ca CNOJbAaHbM MOTOpM, 3a HopMaJIHn PaI acnIparopa Notpe6Ho je KOpNCTtN yCnCHn CKnI (CnoJbAaHbM MOTop) IcTOr Ipon3BOJaua.
Obaj acnpaTop je obelenkny cknaudy c ebproncknM dnpeKtmbama 2012/19/ EC-UK SI 2013 No.3113, EneKTpUHn n eKeTPOHcN oTnA. Ako ce KopncnK nOpTuDn da npabInHO 36pnHe Obaj acnpaTop, nCTn DOnpHocn CnpeHaBv Moryhnx HeratNBHX NocJIeDiuca PO OKOJIHHy n 3dpaBJIbe.
Cm6oHa acnnpatopy nHa npatehoj dokymeHTauniJn 03NaUaba da OBaj npOn3BOD He CME Da Ce TpeTnpa KaO KyHn OTnad Behra Tpe6a npedATn OndOBapajyem ZeHTpy 3a cKynbaHe OTnada N peuKnlaJx y eJeKTpUHnx anapata. 36pnHnte acnnpatop y cKaJy c IOKaJIHm pONNCMa 3a 36pnBaBaHe OTnada. 3a BnSe INΦOpMaunja O TpeTnpaHy, NOHOBJ yNtpe6n N peuKnJaXn OBor anPapota, KOHTaKTnpajTe IOKaJIHy cIyXb 3a cKynBaHe KyHOR OTnada nPi npABy y Kojoj CTe acnPapatop Kynnn.
Obaj acnnpatop je npjoektobah, nCnntan H peaIIN3OBAH y cknaDy ca npoNcIma o:
Cunypnoctn: LEN/EH 60335-1; LEN/ EH 60335-2-31, LEN/EH 62233.
Yemek pişirmeye为进一步,进一步,进一步,进一步,进一步,进一步,进一步,进一步,进一步,进一步,进一步,进一步,进一步,进一步,进一步,进一步,进一步,进一步,进一步,进一步,进一步,进一步,进一步,进一步,进一步,进一步,进一步,进一步,进一步,进一步,进一步,进一步,进一步,进一步,进一步,进一步,进一步,进一步,进一步,进一步,进一步,进一步,进一步,进一步,进一步,进一步,进一步,进一步,进一步,进一步,进一步,进步,进步,进步,进步,进步,进步,进步,进步,进步,进步,进步,进步,进步,进步,进步,进步,进步,进步,进步,进步,进步,进步,进步,进步,进步,进步,进步,进步,进步,进步,进步,进步,进步,进步,进步,进步,进步,进步,进步,进步,进步,进步,进步,进步,进步,进步,进步,进步,进步,进步,的进步。
Kullanim
BaIanapra KpyblfblMeH OiHayra 6oImaIbI. BaIanapra 6aKblaycbl3 KpyblfblHbl Ta3aIayra XHe OFaH KbI3MeT Kepcetyre 6oImaIbI.
Ta3bI Hemece baca OTbIH TyplepH XaFaTbIH TypMbICTbIK acnaptdbIH biplecin Ymbic XacaybIH KAMTaMaCbI3 eTy yuH, KOJaHbICtaFbI HopMaIap MeH epexeJepre caiKec yJXaJInapdbIH bepik JeIeTeiYi KaMTaMaCbI3 etiYi Tnic.
CopfblTbH iwi MeH cbIpTBH jNt Ta3an Tpy KaKet (Kem DerenDe aBHa 6ip pet) cohImeH KaTap, Ocb HcaybKaTa KepCetIJreH caTay 7apaJapdbI 6yNxItnaJ OpbIHdAhl3.
Copfbltbl Ta3aay XHe cy3rinepdi Ta3aay/ aybICTbipy HcckaynapbiOpbHdaanMaca, ept LbIfybl MymKiH.
Copfblw actbIHda kanaH OTneH TaFAM nicipyre kaTaN TbIbIM caNbHaDbI;
Ke3 KeIrrn JkaFdaJna JkaIaN OTbI NaIaIaNbay KepeK, EiTkeHi ON cy3rInepdi 3akBIMdaybl XHe eptke c6eBn bonybl MymkiH.
Kb3faH MaJ XaHbIn, 0ptTih
IbIFybiHa 0KeN COFybl MymKiH,
COHdbIKTaH actb Kybipy Ke3iHde
YHeMi KaDaRaJAn OTbpy Kepek.
ECKEPTY: TaFam nicipy ПИNTacbl JyMbIc ICTeN TypFaH Ke3de acnantbIH OTKa JxAkblH БeJIkTepi bICTbIK 6OJybl MymKIn.
EckepTy! ByJ Ka6DbIK TOJbIfbIMeH OPhaTbIJMaHaHbIHSha TOKKa KaJIraYf6OJIMaIdbI.
TyTin,6yJxHe ra3dap 1bIfybiHa KaTbICTbl TexHnKaIbIK XHe Kayinci3diKwaapalapbIHOpbIHday yushi JepriNikTi XayanTbI opraHapdbIH epexeJIepiH KOJaHyKepek. CopfblTah 1bIFaTBiH aya,ra3 Hemece backa Typni OTbIHAp Tytihn TaCtBnKybipnapfa XaJIfayfa 60ImMaIDbl. MaCy3rici XHe ac yI nnITacbIH,6eti DypbICTan OPhATNaFaHsA Copfbltbl KOJaHyfa 60ImMaIDbl!
Anbik Typde HycKay bepiImmece, copfbltbl Tipek peTInDe EUKAUAHDA KOJdaHyuBb 60lMaHbI3. Ptnta copfblsBImeH bire 6oIT TbIfbIHApbl, bypaHdaIap MeH dIO6eJIbdep 6epiJeErep 6ypaHdaIap MeH dIO6eJIbdep KypaImen bipre JETKl3iImece, copfblw OPhaTbIaNbIH Ka6bIpFa MaTePnAlbHa caikec KeNeTIHH OCbl HcCKayda KOpCetIINRe ONWeMDEpDe NaJaIaNbIHbI3. Kymeh TydbipFaH JkaFdaIda, TEXNkaJIbIK KOJlay KOpCetTy opTaIaNbHa HeMece apNaBl MAmaHdapFa JyriHyiH3re 60laDbI.
ECKEPTY! Copfblsh 6bpaHdaIapbl HcayIbIK 60bIHwa 6ekitImereH XaJaIdaOpHaTy 3JekTp KayinIH TybIPybl MymKIn. Kofapbla KaepctiIreH HcayIbIK epexeJIepiH OpbIHdAmay caIapblHaH TybIHdaFaH 3aIaInap ysiH eHdipywi eWkaHdaJ kayaantbl 60blT Ta6blMaIdbI.
ΘHimdερdi JxakapTy, XetinDipy MaKcaTbIHda ΘHπDipUyWi TayapDbIH Kbl3MeTTiK, TexHnKaJIbIK JxHe 3CTeTnKaIbIK e3repicTepeHri3yRe KyKblbl. MoJeIb cbIpTTa KOHdbIpblaTbIH/OpHaTbIaTbIH MOTOPMeH JxabdkTaIaNfAH JxafDaIJa, CopfbltBtIH KaNbITbI JxMbIC icteyi ywiH, copfbIi KOHdbIpfbICbIHbIH 6oJIwEKeTIepi COI MOdeJre apHaIaNfAH JxHe COI ΘHπDipUyWiH TayapbIH NaIdaIahy KaXeT.
Бул Крьлфы «ДалКТржэн ЗлЕКТРОнды» КабдыКтардын КалдыБы》 EC-UK SI 2013 No.3113 EC/2012/19 ДиpeкТиВасын ТаланТарыHa сэйес (WEEE). КрьлфыНы ТиICTi Турde Кэдere Харазу Коршафан opta MeH aДam ДeHCayЛьфыИна TURi3yI ыКТимал 3алаладын aДын aNfyfa KemeKTeceidi.
Ohimderi Hemece OHbIH
KykaTamaCbHdaB TaHbAcbl
eHIMdi TyPmbICTbIK KOkbc
TactaJImaybl, OHbH OPhbHa
3JIeKtp XHe 3JIeKTPoHDbIK
KOKbICTbCypbINTay OptaNbIFbHa
Ta6bICTaNybl Tnic eKeHH
6iIipedi. XepriikTi KOkbc
Tactay 3aHdapbHa CaiKec
apeket etIH3. Ohimdi KOnDaHy,
KaIIbHa KeNTipy XHe KaTa
eHDeY Typalbl KocbIMsa
MJIIMET any ywiH XepriikTi
Ky3bIPbI OprHdapfa, KOkbc
XnHay KbI3MeTIHe Hemece
eHIMdi CaTbIN aJfAH OpbIHfa
xa6apnaCbHbI3.
TyTikke XaJFaHaTbH HycKa

CopfblwTblya Ta3apTbIn,
blfapy fnaHeiHe KocblfAH
blfapy TyTiri apKblbl OHbl
cbiptka xiepeedi.
IbIapy TyTirHin DnAmETpi IbIapy PnaHeuHIN DnAmETpimEn 6ipdE BolybI Tnic.
A6aB 60bHb3! 1bIfapy TyTiri
6ipre 6epiImMeiDi, OHbI 6eJIek
caTbIn any KaKTe.
KeJdeneH, 6aftbTTaTfAH Ke3de, aya cbiptka OHaI 7bIfybl ywiH TYtIKTI cAn XOFapbl (wamameH 10^ ) kapaTy KepeK. Copfbl W KEMip cy3rInepMeH JxabblKTanfaH bONca, Onapbl anDbIMeH wewin any KepeK.
Cy3y Hyckacbl

Copfblw ayahbl Ta3apTbIn, OHbl 6eImere KaITapaIbI. Copfbltbn 6yJ HcKacbHa KocbIMwa 6eIceHdi KEMip cy3ri KaKeT.
BvI Hycka aya DeΦJIeKTopbl, a3aIy aanTepi JxHe KEmip cy3ri (-Iep) KaJcTe.
EcepeTy:Kemip cy36ecimeH Ta3apTbIINFaH aya KNXa3DbIH 6ip KaNTaBInDa opHaJaNcKaH TeMeHre TapTy downdraft 6noriH apTKbl aya WbIfbICbl apKbIbIb6eMere KaITapbIaNabi.
ECKEPTY: əJIeKTPoHdIbIK KypayblTapbl 6ap MeTaJI XaWikUweciH, ra3dbH Nicipy NaHeJIHeH 65cm-DeH KeM eMeC apa KaWbIKTBkTA, HEmeCE Ke3 KeIReH JkaFdaJa, CopfblWtB1H copy HYKTeciHc 65cm apa KaWbIKTBkTA opHaTbHbI3.
KEHEC: 3JNEKTPoHDbIK KypaybIuTapbl 6ap MeTaJI XeWikUecIH, eDeHHen 10 cm- DeH KEM EMEc apa KaWbIKbIKTa, XHe KE3 KeJIrEH KbIy Ke3iHeH XeTKiNlIKTi apa KaWbIKbIKTa OPhATyDbI YCbIHAmbl3.
Erep de ac nicipy pnnntacbIHbOpHaTy HcyckaynbIFbIHda 10cm-DeH KOFapbl DnCTaHcNJKopCetiJnce, OcbI KeHectieceptiH3.
3JIeKTp KocblbIMap
CopfbluTbI 3neKtp XeNire Kocybl 6iJIikTi MaMaH opblndaybl Tnic.
JKeiDi er KepHey Copfbl iHdi er HOMHaIbI cInaTTap TaKTacblnda 6epiIreh KepHeyre Caikec KeNyikKaTe. CopfblTbIH Kyat aibpbl 60nca, OHbl OHaonKoJ XeTKi3yRe 60laTbIH peTteImei po3eTKaFa KOcbIb13. Aibpbl 60Imaca (XeIire TikeNei Kocy) HeMece po3eTKaFa OHaon Koj XeTKi3y MymkiH 60Imaca, opHATy epeXeJIepHe cAek III caHAT KepHeY KywiH apTybl JxafdaBbIHDa TOlbIFbIMeh 3neKTP XeJIdeH axkbipaty MymkiHdiiri 60nybl YsiH eKi NOIOCTi peTteImei aibpbIN KOCbIbKa Kocblb3.
A6aJ 60JIbIbI3! CopfblUHTbl
3neKtp JKeIre KaIta Kocnac
6ypbIH TOK Ka6eni Dypbc
XaJIFaHfaHbIH XHe OJ Dypbc
XyMbIC ICTeITiH IN TeKcepin
OTbIPbIHbI3.
OpaTy
AcnantbOpHaTy anDbIHda, 6apnbIK KOMNHOHeHTTepi 3aKbIMdAifahbHa Ke3 XeTki3iH3. OlaB 6oJMaFaH XafDaIJa
XepriikTi DInlepiH3re
xaBapnaCbIHbI3 XaHE De acnan opHaTbIH XaJIfactbIpMaHbI3. Cohblmeh KaTAP, TMeHde KeNTipJlre HapbIK
HyCKaynapDbIMKnAT OKbIHbI3.
Aya 乌bifapbyiHa apHaJIraH MaKcImMaIDbI Y3bIHDbIFbl 5 MeTpdeH acnaiTbIH TYtIKTi NaIdaIaNbIHbI3.
- Tytik Mymkih 60nfahwa a3 niyikepek, oHtkehi apbip niyacnaptbIH 1 kyma metpdein copy KuyiH TEmeHdTei. (Mbicalbl: erep 90^ TeH eki (2) niy6oIca, aya 7bIfapaTbIH TYtIKTH y3bIHdbfbl 3 MetpdeH acnaybl Kepek.
- Aya Übıfapy Tytirihin Şaft bil Kehet e3repMey Kepek.
Tytik 6apIbIK y3bIHDbIfbl 60bIbHsa TypaKtbl 150MM dHaMeTp 6ony Kepek. - Tytik HopMaJapFa CənKeC KeIeTIH MaTePnaIaH XacanFaH 6Olybl Tnic.
BvN HcKknap DypbcOpbIHdaImaca, copfbIuTbH ayaTapTy KyaTbI TeMeHdieni XHeOhBiH XyMbIC icTeReH Ke3deriWybbl apTaDbI. OHdpuyMiHydai apeKeTTiH caIapbHaXayaANTb6oImaIdbI.
IkaftbIH iWKi 6JIirHne TecIK
XacapdaH 6ypbIH, COPfbltBtIH
TpyaTbIH aMafbIHDA, IkaQFTbIH
KypblmbH HeMece Dypbc
OPHaTybHa Keep XacaHTbIH
XaFdaJnap BoImay Kepek.
CopfbltbiH, ac nicipetih
PnntaHbIH X3He XnXa3dbIH
OJIWeMdepi yIneCIMdi eKeHH
TEKceprenHeN KeiH opHaTydbI
BactaHbI3 ac nicipetih PnntaHbIH
apTKbl XafblHa, cypETte
KOpCETIInReH OJIWeMdepDi
PnaidanahBi TIKbpyblTBeCik
Kacay Kepek: (cypet.1)
MToOpMeH 6ipre opHaTbIJFaH MoDenb 6oNca, uKaΦ iuHnde JxacanFah Tecikke Oha Kipri3y yuHbYpaHdbIJaPdJI XHe copy 6NoBtH aMbI TaCTaHbI3.
-
CopfbIiHTbI JINXa3DbIH TeciriHe OpHaTbIHbI3 (cypeT 2).
-
CopfbIuTbIXnxa3DbIH iuiHderi KypaIaIapDbI naIdaIaNbIbN 6ekitin3 (cpeT 3).
Copfbltbln TEmehri 6eJIirHderi KOCTbIKbIHTapdbI kAnfactblpbl3.(CypeT4).
Bypalma igelepein kipri3y aIbIHda copfbltbiH Jnxa3fa Teric opHaJaackaHbIH TeKcepHi3.
-MOTOpbICbIPtBHaOPHaTbIJFaH MoIeNb 6oJCa, MOTop 6IOnrBHaaya 6bIFaTbIH 6aFbika CaiKec KeITipin OPhaTbIHbI3 (TomeHRe Hemece XofapBa) (cypeT 5).
Temehe tapTy downdraft 6norihCOPfbltbiH aIdbiHa Hemece apTbHa OPhaTbHb3 MoTpoDbI OPhaJatbIN 6oIfaHHaH KeH, aya 7bIfaTbIH KaHaJIbH OPhaTbHbI3.
CbIPTkbl MOTOpbl 6ap MOeIb 6oIFaH XaFdaIa copy rpynnacbln (cbIPTkbl MOTOP) KOJaJIbI Jxepre KOHdbIpbl aya UbIFapy TytirIH OPHAJnactbIpblHbI3.
Aya Šǔbɪrapy Tɪyɪrɪn Təmehre
TapTy (downdraft) 6ŋɔrɪne
Xaɪfæctbɪpɒbɪhɒl3.
CbIPTka WbIFapblaTbIH XeUk aWbIJaDbI.
TemeHde KepcetijIreH TyMeIepdi 6aCKaHda copfbltbiH MOTOpbl KOcbIaDbI. PaHeNbIH Xa6blNybl dOcblDaI TpyDe OpbHaJaAdbI. ΘiHeKti IbIFapblaTbIH XaUk Xa6blFaHsa bacy KepeK.
T1. On/Off TaHMePiH:ABTomaTTbI Tpye Owipy yuH bAcbHb3:
KbIJaMdbk1:20 MNHyT
KbIJaMdbk 2:15 MNHyT
KbIJaMdbk 3:10 MNHyT
KyuWeiTilreH XbIJaDamDbIK:5MnHyT
T2. Tyime 6aCbIJaHda copy XbIJaMdbIfbl (Kyuli) a3aNtblnada
OFF 1: 6ipHeWe pet 6acBIn KblIaMdbIKtbl a3aiTa kenin copfblw eiwipinei.
OFF 2: Ke3 KeIrrn XbIaMdbkneH y3ak6acyKepeK.
T3. ON/TyIme 6aBfHaDacopyKbIJaDAmdbIfbl (Kyuli) K6eBtiniDi (1-2-3-KyuweiinreH).
KyueneiJreH KblJaMdbI (Kei 6ip MoJeJIbIepDe 3 KblJaMdbI) 5 MNHyT y3aKaTaHaNbI, OaH KeH ABTomaTTbI Type2 KblJaMdbIbIHa KaTaNOCbIJaNbI.
Wamdapdbin KaHbIKKaHbIN 6iDipetih wa
Copfblc y3rilepihe TeXnKaNbIK Kbl3MeT Kepcty eceptynepi:
MaCy3rIJIepi (eP 40 caraT 6oBbI naJdanaHFaH KeiH): bapIbIK KerIndip wamnap
Kemip 6eNceHdiPirreH niC cy3rici (ep 160 carat 6oBnI naDanaHraH KeiH) 6apblk Keriindp 7aMdap, L2 XHe L3 7aMdapbl XbIbJIbIKTaJDb
Cy3ri caHaRbIbH KaJIbHa KeTtipy
Cy3rinepre TexHnKaIbIK KbI3MeT KepcTeKHeHH KeiH, T1 XeHe T3, L1, L2 XeHe L3 TyMecIn 6acbl TpyraH Ke3De KeirJip Wamap a3 yaKbIT XbIbJIbIKtan anFaWkbI npaMetpIepiHe Keenei.
Kemip cy3rici KaHbIKKaHbIH 6iJdpertih amdbI Kocy.
BvI INHdkatop eDette cehyni TypaIbI. Ohbl Kocy yuIH, TEmHeJe KepCerinreHdej XacaHbI3:
Copfbls cHIn TpyFaHda, T1XaHe T2 TYmmeepiH y3ak yaBt 6oBb 6acbl, YCTan TpybHb3: bipHliL1, codan Kein L2 XaHe L3 KocblJaDbI. L2 XaHe L3 XiBeprHHeN Kein a3 yaBt XblnDbIKTan KocblFaHbIH KopceTei.
Kemip cy3rici KaHBiKaHbIN biDipetIH waMdbI cEHdipy: KefapbIda KepcetinreH onepaunlaIapdbI kaTalaHbI, bipiHwL1, L2 kHe L3 waMdaPbI KocbladaI, L2 kHe L3 kiibepreH eH cHeJI.
MaCy3ricHe KbI3MeT Kepcty
MaJ cy3rici TaFAM nicipren Ke3e 7bIfaTbIH MaI 6eIWeKTepiH yCTaIdbI.
OhbI KEM DeReHde aBbHa 6ip pet (HeMece ФиЛьТрДИн KaHbIfy INdUkAtOp JxuNeci OcbI KakTeTTirIn KepeTeTIN 60nca - Keibip MoDEnbDepe 60nabI) aJIci3 JxYbIu 3aTtNeH KoIMeH HeMece TEmeH TemnepaTypaIb Ibicka bIDIC JxYbIu ZIKlbIMeH Ta3aJAY KepeK.
blIbc JyfbIbTa JybyIbCa, MeTaN Cy3rHiH Tyci e3repYi MymKIn, Bipa OHbIH JyMbICbHa HkykCaH KeMmEiDi.
Kemip cy3ire Kb13MeT Kepctery
Kemip cy3rici KaftbImcb3 TaFam nicipy nictepin YctaIdbi (Tek KaHa cy3etih HycKaada 60nAdbi). Cy3ri nicipineti TaFam TyPihe XaHe MaJ cy3ricn Ta3anay XnJIirine BaiJaNbIcTbI eP TpyNI KxNlIKNeH KaHbIbn OTbIPadbl. Kaptndx KEM dereHne Topt aIna 6ip pet aybIcTbIpblNybl Tnic. MaJ cy3rinepH aInbTactaFaHHah KeIN, Kemip cy3rinepi canyra 60nAdbi. (cyp8).
jlll
L3 L2 L1 T3 T1
Sso
ailln ynnrlll jil
yIe Ie alalil oJr jolll lla
L3 L2 1 L1 J T2 T1 jao jao kai biai jao jao jao jao jao jao jao jao jao
L 3 L2
j 1 L3 J L2 J L1 eall aegy jao jao jao jao jao jao jao jao jao jao jao jao jao jao jao jao jao jao
L3,L2
aill
j
a a a a a a a a a a a a
y 1 y
a a a a a a a a a a a a a a a a a a a a a a a a a a a
a 1
a a a a a a a a a a a a a a a a a a a a a a a a a a
y
j5 jgl 1glll gai jai
j1:Jia).gob jio 1 Juy Luy baiy Ayya Juy Juy gao Jy y slil ay Cuiyiald y no dall de Jaci
j 3 090 a j j j
aaiy
150
1gil 2aia 1go jao ginaol
yj y j j j j j j j j j j j j j j j j j j j j j j j j j j j j j j j j j j j j j j j j j j j j j j j j j j j j j j j j j
.la
i 1 1 1 1 1 1 1 1 1 1 1 1 1 1 1 1 1 1 1 1 1 1
i 1
(1)
100x822
yss sll yalll g aagg 1000000000000000000000000000000000000000000000000000
A
a aalll jalal all aai al lal alal alal alal alal alal
jusly jiee ie juaiai jibil 1c oij
y
j 1
2
Culj 1 j 1 1 1 1 1 1 1 1 1 1 1 1 1 1 1 1 1 1 1
aaii
y 1
1111 1a aebbl yab ly lae gina
Jy
Jilai Jia jia and yi jin jinyi jia jia jia jia jia jia jia jia jia jia jia jia jia jia jia jia jia jia jia jia jia jia jia jia jia jia jia jia jia jia jia jia jia jia jia jia jia jia
a a a a a a a a a a a a a a a a a a a a a a a a a a
j 1
gulal uai liy jilil yj guiuui iuii laii iuii iuii iuii iuii iuii iuii iuii
alalal
J 1
a a a a a a a a a a a a a a a a a a a a a
aI aI i I oJyI pI aI lo laiW jbs lIb bblal plaiw po
a aal 1
j 1 1 1 1 1 1 1 1 1 1 1 1 1 1 1 1 1 1 1 1 1
J 1
A 1
1 1
ylll jlll llll iilil 1iilil
a a a a a a a a a a a a a a a a a a a a a a a a
aall 25 100 (gj
(WEEE)UK SI 2013 No.3113 UCE/96/2002
jiee 1
aaiy aay aay aay aay aay aay aay aay aay aay aay aay aay aay aay aay aay aay aay aay aay aay aay aay aay aay aay aay aay aay aay aay aay aay aay aay aay aay aay aay aay aay aay aay aay aay aay aay aay aay a
| TYPE | PANDORA GME + GME22 | PANDORA GME + GME88 |
| Radice type: | ZB02XXI | ZB02XXI |
| Type Lab: | ZB02 I GME22 T B | ZB02 I GME88 T B |
| Voltage [V]: | 220-240 | 220-240 |
| Frequency [Hz]: | 50 | 50 |
| Power Lamp [W]: | N/A | N/A |
| Power Mot [W]: | 190 | 250 |
| Power TOT [W]: | 190 | 250 |
| ENERGY EFFICIENCY | ||
| Supplier name: ELICA | ELICA | ELICA |
| Model ID: | ZB02XXI-015-004 | ZB02XXI-016-002 |
| EEI Index: | 74.1 | 70.7 |
| EEI Class: | C | C |
| AEC [kWh/a]: | 80.4 | 96.1 |
| FDE Index [%]: | 20.6 | 21.1 |
| FDE Class: | C | C |
| LE Index: - [lux/W] | - | - |
| LE Class: - | - | - |
| GFE Index [%]: | 56 | 46.0 |
| GFE Class: | E | F |
| Qmin declared: [m³/h] | 304 | 240 |
| Qmax declared: [m³/h] | 515 | 581 |
| Qboost declared: [m³/h] | 603 | 713 |
| dBA min declared: [dBA] | 59 | 58 |
| dBA max declared: [dBA] | 66 | 71 |
| dBA boost declared: [dBA] | 70 | 72 |
| P0 [W]: | N/A | N/A |
| PS [W]: | 0,49 | 0,49 |
| Time increase factor f: | 1.3 | 1.2 |
| SAEC: [kWh/a] | 108.5 | 136.0 |
| QBEP: [m³/h] | 304.0 | 384.0 |
| PBEP: [Pa] | 414.0 | 434.0 |
| WBEP:[W] | 169.5 | 219.5 |
| WL: [W] | 0.0 | 0.0 |
| Emiddle: - [lux] | - | - |
elica®
LIB0122607A Ed.04/24 90002014000
