
UNIVERSALRAKE 900 - Electric rake BOSCH - Free user manual and instructions
Find the device manual for free UNIVERSALRAKE 900 BOSCH in PDF.
| Product type | Electric rake / lawn aerator-scarifier |
| Brand | Bosch |
| Model | UNIVERSALRAKE 900 |
| Rated power | 900 W |
| Working width | 32 cm |
| Collection bag volume | 50 L |
| Weight (according to EPTA 01:2014) | 10.0 kg |
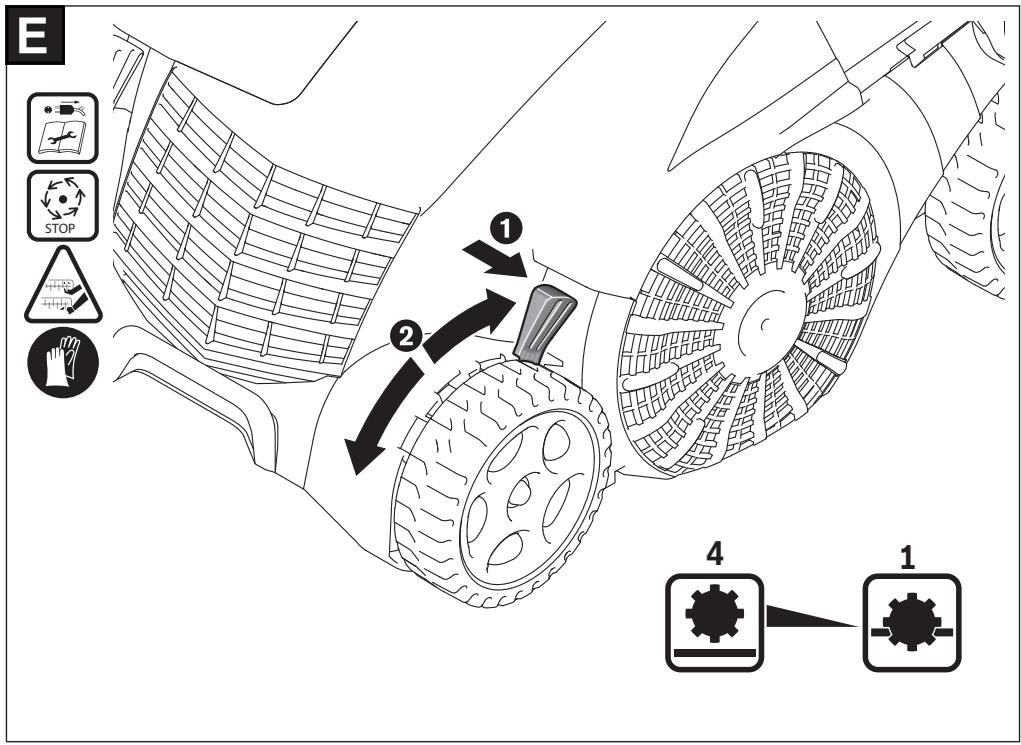
| Adjustable working height | +10 / +5 / 0 / -5 mm |
| Protection class | II (double insulation) |
| Supply voltage | 230 V~, 50 Hz |
| Main functions | Lawn aeration and scarification |
| Working mechanism | Elastic tines (aerator) |
| Collection system | Jet Collect |
| Sound pressure level | 81 dB(A) |
| Sound power level | 93 dB(A) |
| Vibration emission value (ah) | 4.0 m/s² |
| Safety | Safety stop, double insulation, residual current device recommended (30 mA) |
| Maintenance | Cleaning with a soft brush, checking fixings, gloves must be worn |
| Spare parts and repairability | Genuine Bosch parts, authorized after-sales service, exploded view at www.boschpt.com |
Frequently Asked Questions - UNIVERSALRAKE 900 BOSCH
User questions about UNIVERSALRAKE 900 BOSCH
0 question about this device. Answer the ones you know or ask your own.
Ask a new question about this device
Download the instructions for your Electric rake in PDF format for free! Find your manual UNIVERSALRAKE 900 - BOSCH and take your electronic device back in hand. On this page are published all the documents necessary for the use of your device. UNIVERSALRAKE 900 by BOSCH.
USER MANUAL UNIVERSALRAKE 900 BOSCH
UniversalRake 900 | UniversalVerticut 1100
Robert Bosch Power Tools GmbH
70538 Stuttgart
GERMANY
www.bosch-pt.com
F 016 L94 116 (2020.10) O / 299

F 016 L94 116
natural_image
Illustration of two lawn lawn mangle holders with visible blades and wheels (no text or symbols)www.bosch-pt.com/serviceaddresses
Entsorgung
Warning! Read all safety warnings and all instructions. Make yourself familiar with the controls and the proper use of the product. Please keep the instructions safe for later use!
Explanation of symbols on the machine
General hazard safety alert.
Read instruction manual.

Make sure that bystanders are not injured by foreign objects being thrown away.

Warning: Keep a safe distance to the product when operating.

Caution: Do not touch rotating blades. Sharp blade(s). Beware of severing toes or
fingers.

Switch off and remove plug from mains before adjusting, cleaning or if the cable is entangled and before leaving the garden tool unattended for any period. Keep the power cord away from the raking tines/blades.

Wait until all machine com- ponents have completely stopped before touching
them. The tines/blades continue to rotate after the machine is switched off, a rotating blade can cause injury.

Do not use the product in the rain or leave it outdoors when it is raining.

Beware electric shock hazard.

Keep supply flexible cord away from cutting means.
Do not use a high-pressure washer or a garden hose to the machine.

Carefully check the area where the tool is to be used for wildlife and pets. Wildlife and pets may be injured while the machine is in operation. Thoroughly check the working area and remove any stones, sticks, wires, bones and foreign objects. When using the ma-
chine, ensure that no wildlife, pets or small tree stumps are hidden in the dense grass.
Operation
▶ Never allow children or people unfamiliar with these instructions to use the product. Local regulations may restrict the age of the operator. When not in use store the product out of reach of children.
▶ Never allow children, persons with physical, sensory or mental limitations or a lack of experience and/or knowledge and/or people unfamiliar with these instructions to use the product. Local regulations may restrict the age of the operator.
▶ Never operate the product when you are tired, ill or under the influence of alcohol, drugs or medicine.
▶ Never work while people, especially children, or pets are nearby.
▶ Children should be supervised to ensure that they do not play with the product.
▶ The user is responsible for accidents or hazards occurring to other people or their property.
▶ Always wear hearing protection and safety glasses when working with the product.
▶ Do not wear open rubber shoes or sandals when using the product. Always wear sturdy shoes and long trousers. Do not use barefoot.
▶ Thoroughly inspect the area where the product is to be used and remove all stones, sticks, wires, bones and other foreign objects.
▶ Before using, always visually inspect to see that the tines and tine assembly are not worn, damaged or loose.
▶ Replace worn or damaged tine and assemblies in sets to preserve balance. On multi-tined machines, take care as rotating one tine can cause other tines to rotate.
▶ Walk, never run.
▶ Rake/Verticut only in daylight or in good artificial light.
▶ If possible, avoid using the product on wet grass or take additional precautions to avoid slipping.
▶ Do not rake/verticut excessively steep slopes.
▶ Working on banks can be dangerous. Always be sure of your footing on slopes or wet grass.
Rake/Verticut across the face of slopes never up and down.
- Exercise extreme caution when changing direction on slopes.
▶ Use extreme caution when stepping back or pulling the machine towards you.
▶ Always push the product forward when raking/verticutting the lawn and never pull it towards the body.
▶ Wait until the tines/blades stop if the machine has to be tilted for transportation when crossing surfaces
other than grass and when transporting the product to and from the area to be raked/verticut.
▶ Never operate the machine with defective guards or shields, or without safety devices, for example deflectors and/or grass box in place.
▶ Switch on the motor according to the instructions with feet well away from rotating parts.
▶ Do not tilt the product when starting or switching on the motor, except if the machine has to be tilted for starting in long grass. In this case, do not tilt it more than absolutely necessary and tilt only the part which is away from the operator. Always ensure that both hands are in the operating position before returning the machine to the ground.
▶ Do not put hands or feet near or under rotating parts.
▶ Always stand clear of the discharge zone when operating the machine.
▶ Never pick up or carry the machine while the motor is running.
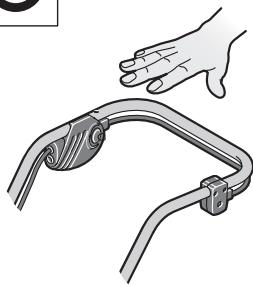
▶ When storing, make sure that all 4 wheels of the garden tool stand on the ground/floor.
▶ Only lift the garden tool with the carrying handle. Use the carrying handle with care.
▶ Do not modify the machine. Unauthorized modifications can impair the safety of your machine, lead to increased noise and vibrations, and poor performance.
▶ Be careful during adjustment of the product to prevent entrapment of the feet and hands between moving tines/blades and fixed parts of the machine.
- Avoid operating the product in bad weather conditions especially when there is a risk of lightning.
▶ Regularly inspect the supply cable and any extension cables. Do not connect damaged cables to the supply or touch a damaged cable before it is disconnected from the supply. A damaged cable can lead to contact with live parts. Beware electric shock hazard.
▶ Do not touch the tines before the machine is disconnected from the supply and the tines have come to a complete stop.
▶ Keep supply cables and extension cables away from the tines. The tines can cause damage to the cables and lead to contact with live parts. Beware electric shock hazard.
Remove the plug from the socket:
- Whenever you leave the machine.
- Before clearing a blockage.
- Before checking, cleaning or working on the machine.
- After striking a foreign object. Inspect the machine for damage and change the blade as necessary.
- If the machine starts to vibrate abnormally (check immediately).
Connecting to the mains
▶ The voltage of the power source must correspond with the data on the type plate of the product.
▶ We recommend that this product is only connected into a socket which is protected by a circuit-breaker that would be actuated by a 30 mA residual current.
▶ Only use or replace power supply cables for this unit which correspond to the types indicated by the manufacturer. See the operating instructions for the order no. and types.
▶ Never touch the mains plug with wet hands.
▶ Do not run over, crush or pull the power supply cord or extension cord, otherwise it may be damaged. Protect the cable from heat, oil and sharp edges.
▶ The extension lead must have a cross section in accordance with the operating instructions and be protected against splashed water. The connection must not be in water.
▶ Always wear gardening gloves when handling or working near the sharp blade/tines.
Electrical Safety

Warning! Switch the product off and pull the mains plug before any maintenance or cleaning. The same applies when the mains cable is damaged, cut or entangled.
▶ The blade/tines continues to rotate for a few seconds after the machine is switched off.
▶ Caution do not touch the rotating blade/tines.
Your product is double insulated for safety and requires no earth connection. The operating voltage is 230 V AC, 50 Hz (for non-EU countries 220 V, 240 V as applicable). Contact your Bosch Service Centre for details. If in doubt contact a qualified electrician or the nearest Bosch Service Centre.
For increased electrical safety use a Residual Current Device (RCD) with a tripping current of not more than 30 mA. Always check your RCD every time you use it.
Keep the supply cables away from moving hazardous parts and avoid damage to the cables; this can lead to contact with live parts.
The connections (plugs and sockets) should be kept dry and off the ground. The supply cables must be inspected for signs of damage at regular intervals and may only be used if in perfect condition.
If the supply cable on the product is damaged, it must only be replaced by a Bosch Service Centre. Only use approved extension cables.
Use only extension cords, cables, leads and cable reels that comply with EN 61242/IEC 61242 or IEC
60884-2-7 and are of type H05VV-F or H05RN-F.
If you want to use an extension cable when operating your product, only the following cable dimensions should be used:
- Nominal conductor area of 1.25 ~mm^2 or 1.5 ~mm^2
- Maximum length 30 m for a Cord Extension Set or maximum length of 60 m for a Cable Reel with Residual Current Device (RCD).
Note: If an extension cable is used it must be earthed and connected through the plug to the earth cable of your supply network in accordance with prescribed safety regulations. If in doubt contact a qualified electrician or the nearest Bosch Service Centre.

WARNING! Inadequate extension cables can be dangerous. Extension cable,
plug and socket must be of water-tight construction and intended for outdoor use.
For products not sold in GB:
WARNING: For your safety, it is required that the plug attached to the product is connected with the extension cord. The coupling of the extension cord must be protected against splash water, be made of rubber or coated with rubber. The extension cord must be used with a cable strain relief.
Products sold in GB only:
Your product is fitted with an BS 1363/A approved electric plug with internal fuse (ASTA approved to BS 1362).
If the plug is not suitable for your socket outlets, it should be cut off and an appropriate plug fitted in its place by an authorised customer service agent. The replacement plug should have the same fuse rating as the original plug.
The severed plug must be disposed of to avoid a possible shock hazard and should never be inserted into a mains socket elsewhere.
Products that are only sold in AUS
and NZ: Use a residual current device (RCD) with a nominal residual current of 30 mA or less.
Maintenance
▶ Always wear gardening gloves when handling or working near the sharp tines/blades.
- Keep all nuts, bolts and screws tight to ensure safe working with the product.
▶ Check the grass box frequently for wear or deterioration.
▶ Inspect the product and replace worn or damaged parts for safety.
▶ Ensure replacement parts fitted are Bosch-approved.
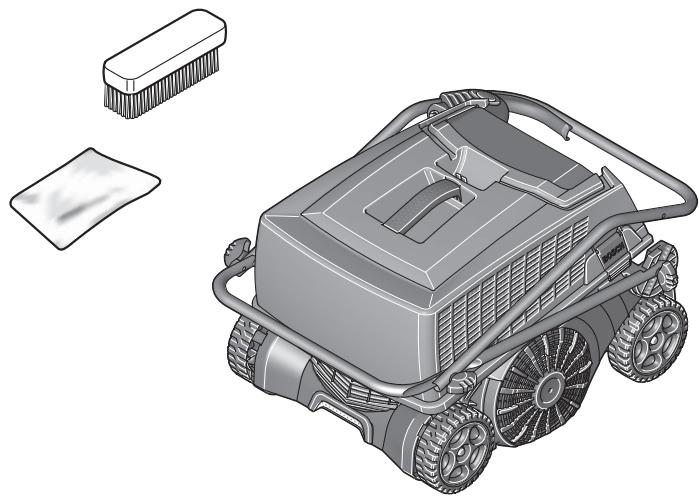
▶ Before storing, make sure that the product is clean and free of residue. If necessary, clean with a soft dry brush.
Symbols
The following symbols are important for reading and understanding the original instructions. Please take note of the symbols and their meaning. The correct interpretation of the symbols will help you to use the product in a better and safer manner.
| Symbol | Meaning |
 | Movement direction |
| [DZTT] | Reaction direction |
 | Wear protective gloves |
| CDH10 | Weight |
| CDH15 | Switching on |
| Symbol | Meaning |
 | Switching off |
| [K∅YT] | Permitted action |
 | Prohibited action |
| CLICK! | Audible noise |
 | Accessories/Spare Parts |
Intended Use
The garden tool is intended for domestic lawn raking, verticutting or aerating.
The garden tool is not intended for hedge cutting, trimming, shredding, etc.
The garden tool is intended for use at ground level.
Technical Data
| Raker/Verticutter | UniversalRake 900 | UniversalVerticut 1100 | |
| Article number | 3 600 H8A 0.. | 3 600 H8A 1.. | |
| Rated power input | W | 900 | 1100 |
| Cutting width | cm | 32 | 32 |
| Grassbox, capacity | l | 50 | 50 |
| Cutting system | |||
| - Double wound tines | ● | - | |
| - Pivoting blades | - | ● | |
| Collection system | Jet Collect | Jet Collect | |
| Height of cut | mm | +10/+5/0/-5 | +5/0/-5/-10 |
| Weight according to EPTA-Procedure 01:2014 | kg | 10.0 | 10.5 |
| Protection class | ☐/II | ☐/II | |
| Serial number | see type plate on garden tool | ||
The specifications apply to a rated voltage [U] of 230 V. These specifications may vary at different voltages and in country-specific models.
All values in this manual are measured for usage below or equal to 2000 meters above nominal sea level.
Noise/Vibration Information
| 3 600 H8A 0.. | 3 600 H8A 1.. | ||
| Noise emission values determined according to EN 50636-2-92. | |||
| Typically the A-weighted noise levels of the product are: | |||
| – Sound pressure level | dB(A) | 81 | 80 |
| – Uncertainty K | dB | = 2.5 | = 2.5 |
| – Sound power level | dB(A) | 93 | 93 |
| – Uncertainty K | dB | = 1.0 | = 1.2 |
| Vibration total values ah (triax vector sum) and uncertainty K determined according to EN 50636-2-92 | |||
| – Vibration emission value a_h | m/s^2 | 4.0 | 2.9 |
| 3 600 H8A 0.. | 3 600 H8A 1.. | ||
| - Uncertainty K | m/s^2 | = 1.6 | = 1.5 |
Mounting and Operation
▶ Do not connect the product to the mains socket before it is completely assembled.
| Action | Figure | Page |
| Delivery scope | A | 289 |
| Assembly | B | 289 |
| Connecting the extension cable | ||
| Assembling the grassbox | C | 290 |
| Grassbox assembly | D | 290 |
| Adjusting the working height | E | 291 |
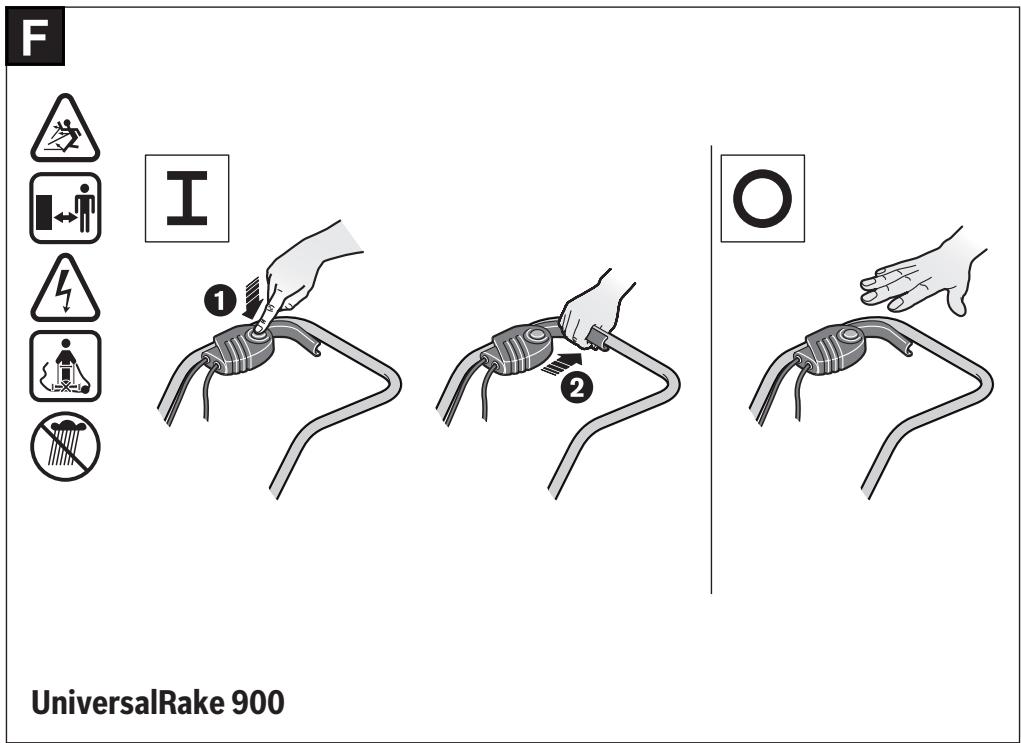
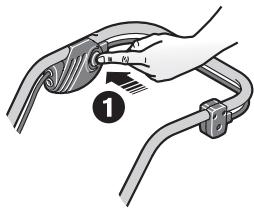
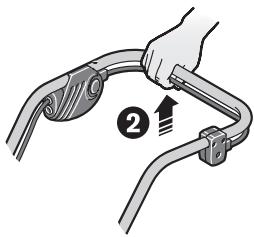
| Switching On and Off UniversalRake 900 | F | 291 |
| Switching On and Off UniversalVerti-cut 1100 | G | 292 |
| Maintenance, Cleaning and Storage | H | 292 |
Working Advice
Raking/Verticutting

flowchart
graph TD
    A["Vehicle"] --> B["Route 1"]
    A --> C["Route 2"]
    A --> D["Route 3"]
    A --> E["Route 4"]
    A --> F["Route 5"]
    A --> G["Route 6"]
    A --> H["Route 7"]
    A --> I["Route 8"]
    A --> J["Route 9"]
    A --> K["Route 10"]
    style A fill:#f9f,stroke:#333
    style B fill:#ccf,stroke:#333
    style C fill:#ccf,stroke:#333
    style D fill:#ccf,stroke:#333
    style E fill:#ccf,stroke:#333
    style F fill:#ccf,stroke:#333
    style G fill:#ccf,stroke:#333
    style H fill:#ccf,stroke:#333
    style I fill:#ccf,stroke:#333
    style J fill:#ccf,stroke:#333
    style K fill:#ccf,stroke:#333
    style L fill:#cfc,stroke:#333
Place the product on the edge of the lawn, as close to the mains socket as possible. Work away from the mains socket.
Position the cable to opposite side (already raked/verticut lawn) at the end of each turn.
When raking/verticutting do not overload the motor.
UniversalRake 900:
In case of overload, the speed of the motor drops and the motor sound changes. In this case, stop, release the start/stop lever and adjust to a higher working height. Failure to do so could damage the machine.
UniversalVerticut 1100:

The motor is protected by a safety cut out, which is activated when the blades become jammed, clogged or if the motor is overloaded. When this occurs, switch the product off.
The safety cut out is only reset when the start/stop lever is released.
Pull the mains plug, remove any blockages and wait one minute before restarting the product so that the safety cut out can reset itself.
▶ Always wear gardening gloves when handling or working near the sharp tines/blades.
Note: When waiting for a reset of the safety cut out and actuating the start/stop lever too early with the product plugged into the socket outlet, the reset time of the safety cut out will increase.
If the product cuts out again, increase the working height or postpone use until conditions improve. Please refer to the Trouble Shooting Chart" and "Raking/Verticutting Tips".
Raking/Verticutting Tips
Optimum conditions for raking/verticutting are when the grass is short and slightly moist. Raking or verticutting the lawn when the soil is very soft or hard can damage it and cause the product to collect poorly.
- Kill moss with a commercially-available moss killer before raking/verticutting.
- Start the product at the highest working height and lower it as required.
- Rake/Verticut the lawn in the one direction, then proceed at right angles a week later until the whole lawn has been completed.
- Depending on the condition of the lawn, raking/verticutting moss and dead plant parts can lead to ragged and bare patches.
Note: In conditions with excessive tree debris (e.g. leaves, twigs, etc.), first clear the surface by using the product with the working height set to 3 or 4.
For best results mow the lawn before reseeding. Promote the spread of grass into bare and weak areas with good quality lawn seed after raking/verticutting. Allow fresh grass seed to root and establish before fertilising, where necessary water to prevent fresh seeds drying out.
Ideal times for raking/verticutting are spring and late autumn.
Lawns can also be maintained by raking/verticutting on a higher setting after every six cuts.
Troubleshooting
The following chart lists problem symptoms, possible causes and corrective action, if your product does not operate properly. If these do not identify and correct the problem, contact your service agent.
▶ Warning: Switch off and remove plug from mains before investigating fault.
| Problem | Possible Cause | Corrective Measure |
| Garden tool does not operate | Power turned off | Turn power on |
| Mains socket faulty | Use other socket | |
| Extension cable damaged | Inspect cable, replace if damaged | |
| Fuse faulty / blown | If fuse blows continuously, please check your electricity supply system or contact Bosch customer service agent | |
| Possible clog | Check underneath the garden product and clear out as necessary (always wear protective gloves) | |
| Safety cut out is active (only UniversalVerti-cut 1100) | See below A) | |
| Setting for raking/verticutting too low for the conditions | Increase working height | |
| Obstructed rotor | Clear obstruction (always wear protective gloves) | |
| Blocked side grilles | Clear debris from the outside of the side grilles | |
| Grassbox full | Empty the grassbox regularly | |
| Garden tool runs intermittently | Extension cable damaged | Inspect cable, replace if damaged |
| Internal wiring of garden tool defective | Contact Bosch customer service agent | |
| Worn/Missing tines/blades | Contact Bosch customer service agent | |
| Conditions too wet | Increase working height (see "Tips for Raking/Verticutting Lawns") | |
| Too much debris on the ground | See below A) | |
| Possible clog | Check underneath the garden tool and clear out as necessary (always wear protective gloves) | |
| Setting for raking/verticutting too low for the conditions | Increase working height | |
| Grass too long | Cut grass | |
| Very uneven surface | Increase working height | |
| Grassbox full | Empty the grassbox regularly | |
| Garden tool runs stiffly or belt squeaks | Working height too low | Increase working height (see "Adjusting the Working Height") |
| Cutting tines/blades not rotating | Cutting tines/blades obstructed by grass | Clear obstruction (always wear protective gloves) |
| Belt slipping or damaged | Contact Bosch customer service agent | |
| Excessive vibrations/noise | Cutting tines/blades damaged | Contact Bosch customer service agent |
| Poor work performance | Ground too moist for raking/verticutting | Increase working height (see "Tips for Raking/Verticutting Lawns") |
| Setting for raking/verticutting too low for the conditions | Increase working height | |
| Possible clog | Check underneath the garden tool and clear out as necessary (always wear protective gloves) | |
| Blocked side grilles | Clear debris from the outside of the side grilles | |
| Missing tines (only UniversalRake 900) | Contact Bosch customer service agent |
A) In conditions with excessive tree debris (e.g. leaves, twigs, etc.), first clear the surface by using the product with the working height set to 3 or 4.
After-Sales Service and Application Service
Our after-sales service responds to your questions concerning maintenance and repair of your product as well as spare parts. You can find explosion drawings and information on spare parts at: www.bosch-pt.com
The Bosch product use advice team will be happy to help you with any questions about our products and their accessories.
In all correspondence and spare parts orders, please always include the 10-digit article number given on the nameplate of the product.
Great Britain
Robert Bosch Ltd. (B.S.C.)
P.O. Box 98
Broadwater Park
North Orbital Road
Denham Uxbridge
UB 9 5HJ
At www.bosch-pt.co.uk you can order spare parts or arrange the collection of a product in need of servicing or repair.
Tel. Service: (0344) 7360109
E-Mail: boschservicecentre@bosch.com
You can find further service addresses at:
www.bosch-pt.com/serviceaddresses
Disposal
The product, accessories and packaging should be sorted for environmental-friendly recycling.

Do not dispose of products into household waste!
Only for EU countries:
According to the European Directive 2012/19/EU on Waste Electrical and Electronic Equipment and its implementation into national law, products that are no longer usable must be collected separately and disposed of in an environmentally friendly manner.
Français
Robert Bosch (France) S.A.S.
www.bosch-pt.com/serviceaddresses
www.bosch-pt.com/serviceaddresses
Eliminación
www.bosch-pt.com/serviceaddresses
Eliminação
56 | Italiano
www.bosch-pt.com/serviceaddresses
Smaltimento
www.bosch-pt.com/serviceaddresses
Afvalverwijdering
Bosch Service Center
Telegrafvej 3
2750 Ballerup
På www.bosch-pt.dk kan der online bestilles reservedele eller oprettes en reparations ordre.
Tlf. Service Center: 44898855
Fax: 44898755
E-Mail: vaerktoej@dk.bosch.com
www.bosch-pt.com/serviceaddresses
Bortskaffelse
Bosch Service Center
Telegrafvej 3
2750 Ballerup
Danmark
Tel.: (08) 7501820 (inom Sverige)
Fax: (011) 187691
www.bosch-pt.com/serviceaddresses
Avfallshantering
Motoren er utstyrt med en sikkerhetsutkopling som aktiveres när knivene klemmer fast, er tettet eller motoren er overbelastet. Slå av produktet hvis dette skjer.
Sikkerhetsutkoplingen stilles bare tilbake hvis du slipper koplingsspaken.
www.bosch-pt.com/serviceaddresses
Deponering
www.bosch-pt.com/serviceaddresses
Hävitys
www.bosch-pt.com/serviceaddresses
Απόσυροη
www.bosch-pt.com/serviceaddresses
Tasfiye
Robert Bosch Sp. z o.o.
www.bosch-pt.com/serviceaddresses
Utylizacja odpadów
Bosch Service Center PT
K Vápence 1621/16
692 01 Mikulov
www.bosch-pt.com/serviceaddresses
Likvidace
www.bosch-pt.com/serviceaddresses
Likvidácia
www.bosch-pt.com/serviceaddresses
Eltávolítás
www.bosch-pt.com/serviceaddresses
Утилизация
www.bosch-pt.com/serviceaddresses
Утилізація
www.bosch-pt.com/serviceaddresses
Кәдеге жарату
Service scule electrice
Strada Horia Măcelariu Nr. 30–34, sector 1
013937 Bucureşti
www.bosch-pt.com/serviceaddresses
Eliminare
Service scule electrice
Strada Horia Măcelariu Nr. 30–34, sector 1
013937 Bucureşti, România
www.bosch-pt.com/bg/bg/
www.bosch-pt.com/serviceaddresses
Бракуване
www.bosch-pt.com/serviceaddresses
Отстранување
www.bosch-pt.com/serviceaddresses
Uklanjanje dubreta
Proizvode, pribor i pakovanja treba podvrgnuti ekološkoj daljnjoj obradi.

Ne bacajte proizvode u kućni otpad!
Samo za EU-zemlje:
Prema Evropskoj direktivi 2012/19/EU o starim električnim i elektronskim uređajima i njenoj implementaciji u nacionalnom zakonodavstvu, proizvodi koji nisu više upotrebljivi moraju da se odvojeno sakupe i podvrgnu ekološkoj daljnjoj obradi.
Slovenščina
Varnostna navodila
www.bosch-pt.com/serviceaddresses
Odlaganje
Odpadne izdelke, pribor in embalažo morate reciklirati v skladu z varstvom okolja.

Motor je opremljen sigurnosnim isključivanjem koje se aktivira ako su noževi zaglavljeni, začepljeni ili je motor preopterećen. Isključite proizvod ako se to dogodi.
www.bosch-pt.com/serviceaddresses
Zbrinjavanje
Proizvode, pribor i pakiranja potrebno je odnijeti na ekološko recikliranje.

Ne bacajte proizvode u kućni otpad!
Samo za zemlje EU:
U skladu s Europskom direktivom 2012/19/EU o otpadnoj električnoj i elektroničkoj opremi i njezinoj provedbi u nacionalno zakonodavstvo, proizvode koji nisu više uporabljivi potrebno je odvojeno prikupiti i odnijeti na ekološko recikliranje.
Eesti
Ohutusnõuded
www.bosch-pt.com/serviceaddresses
www.bosch-pt.com/serviceaddresses
www.bosch-pt.com/serviceaddresses
Šalinimas
الbebث عن الأخطاء
www.bosch-pt.com/serviceaddresses
www.bosch-pt.com/serviceaddresses
G


I
natural_image
Illustration of a hand gripping a curved mechanical component, with a numbered callout (no text or symbols present)O
natural_image
Illustration of a hand touching a curved mechanical component (no text or symbols)UniversalVerticut 1100
H

natural_image
Illustration of a lawn mower with visible blades and wheels, accompanied by a flat surface and a rectangular brush (no text or symbols)CE
|
| de | EU-Konformitätserklärung | Wir erklären in alleiniger Verantwortung, dass die genannten Produkte allen einschlägigen Bestimmungen der nachfolgend aufgeführten Richtlinien und Verordnungen entsprechen und mit folgenden Normen übereinstimmen. | |
| Rasenlüfter | Sachnummer | ||
| Vertikutierer | |||
| en | EU Declaration of Conformity | We declare under our sole responsibility that the stated products comply with all applicable provisions of the directives and regulations listed below and are in conformity with the following standards. | |
| Lawnraker | Article number | ||
| Verticutter | |||
| fr | Déclaration de conformité UE | Nous déclarons sous notre propre responsabilité que les produits décrits sont en conformité avec les directives, règlements normatifs et normes énumérés ci-dessous. | |
| Rasenlüfter | N° d'article | ||
| Vertikutierer | |||
| es | Declaración de conformidad UE | Declaramos bajo nuestra exclusiva responsabilidad, que los productos nombrados cumplen con todas las disposiciones correspondientes de las Directivas y los Reglamentos mencionados a continuación y están en conformidad con las siguientes normas. | |
| Rasenlüfter | N° de artículo | ||
| Vertikutierer | |||
| pt | Declaração de Conformidade UE | Declaramos sob nossa exclusiva responsabilidade que os produtos mencionados cumprem todas as disposições e os regulamentos indicados e estão em conformidade com as seguintes normas. | |
| Rasenlüfter | N.° do produto | ||
| Vertikutierer | |||
| it | Dichiarazione di conformità UE | Dichiariamo sotto la nostra piena responsabilità che i prodotti indicati sono conformi a tutte le disposizioni pertinenti delle Direttive e dei Regolamenti elencati di seguito, nonché alle seguenti Normative. | |
| Rasenlüfter | Codice prodotto | ||
| Vertikutierer | |||
| nl | EU-conformiteitsverklaring | Wij verklaren op eigen verantwoordelijkheid dat de genoemde producten voldoen aan alle desbetreffende bepalingen van de hierna genoemde richtlijnen en verordeningen en overeenstemmen met de volgende normen. | |
| Rasenlüfter | Productnummer | ||
| Vertikutierer | |||
| da | EU-overensstemmelseserklæring | Vi erklærer som eneansvarlige, at det beskrevne produkt er i overensstemmelse med alle gældende bestemmelser i følgende direktiver og forordninger og opfylder følgende standarder. | |
| Rasenlüfter | Typenummer | ||
| Vertikutierer | |||
| sv | EU-konformitetsförklaring | Vi förklarar under eget ansvar att de nämnda produkterna uppfyller kraven i alla gällande bestämmelser i de nedan angivna direktiven och förordningarnas och att de stämmer överens med följande normer. | |
| Rasenlüfter | Produktnummer | ||
| Vertikutierer | |||
| no | EU-samsvarserklæring | Vi erklærer under eneansvar at de nevnte produktene er i overensstemmelse med alle relevante bestemmelser i direktivene og forordningene nedenfor og med følgende standarder. | |
| Rasenlüfter | Produktnummer | ||
| Vertikutierer | |||
| fi | EU-vaatimustenmukaisuusvakuutus | Vakuutamme täten, että mainitut tuotteet vastaavat kaikkia seuraavien direktiivien ja asetusten asiaankuuluvia vaatimuksia ja ovat seuraavien standardien vaatimusten mukaisia. | |
| Rasenlüfter | Tuotenumero | ||
| Vertikutierer | |||
| el | Δήλωση πιστότητας EE | Δηλώνουμε με αποκλειστική μας ευθύνη, ότι τα αναφερόμενα προϊόντα αντιστοιχούν σε όλες τις σχετικές διατάξεις των πιο κάτω αναφερόμενων οδηγιών και κανονισμών και ταυτίζονται με τα ακόλουθα πρότυπα. | |
| Rasenlüfter | Αριθμός ευρετηρίου | ||
| Vertikutierer | |||
| tr | AB Uygunluk beyani | Tek sorumlu olarak, tanımlanan ürünün aşağıdaki yönetmelik ve direktiflerin geçerli bütün hükümetlerine ve aşağıdaki standartlara uygun olduğunu beyan ederiz. | |
| Rasenlüfter | Ürün kodu | ||
| Vertikutierer | |||
| pl | Deklaracja zgodności UE | Oświadczamy z pełną odpowiedzialnością, że niniejsze produkty odpowiadają wszystkim wymaganiom poniżej wyszczegól- | |
| Rasenlüfter | Numer katalogowy | ||
||
CE
| Vertikutierer | nionych dyrektyw i rozporządzeń, oraz że są zgodne z następują-cymi normami. | ||
| cs | EU prohlášení oshodě | Prohlašujeme na výhradní zodpovědnost, že uvedený výrobek splňuje všechna příslušná ustanovení níže uvedených směrnic anařízení aje vsouladu snásledujícími normami:* | |
| Rasenlüfter | Objednací číslo | ||
| Vertikutierer | |||
| sk | EÚ vyhlásenie ozhode | Vyhlasujeme na výhradní zodpovednosť, že uvedený výrobok splňa všetky príslušné ustanovenia nižšie uvedených smerníc anariadení aje vsúlade snasledujúcími normami: | |
| Rasenlüfter | Vecné číslo | ||
| Vertikutierer | |||
| hu | EU konformitási nyilatkozat | Egyedüli felelőséggel kijelentjük, hogy a megnevezett termékek megfelelnek az alábbiakban felsorolásra kerülő irányelvek és ren-letek valamennyi idevágó előírásainak és megfelelnek a követ-kező szabványoknak. | |
| Rasenlüfter | Cikkszám | ||
| Vertikutierer | |||
| ru | Заявление о соответствии EC | Мы заявляем под нашу единоличную ответственность, что названные продукты соответствуют всем действующим предписаниям нижеуказанных директив и распоряжений, а также нижеуказанных норм. | |
| Rasenlüfter | Товарный No | ||
| Vertikutierer | |||
| uk | Заява про відповідність ЄС | Мизаявляємо під нашу одноособову відповідальність, що названі вироби відповідають усім чинним положенням нищеозначених директив і розпоряджень, а також нижчеозначеним нормам. | |
| Rasenlüfter | Товарний номер | ||
| Vertikutierer | |||
| kk | EO сәйкестік мағлүмдамасы | Өз жауапкершілікпен біз аталған өнімдер төменде жзылған директикалар мен жарлықтардың тиісті қағидаларына сәйкестігін және төменdegі нормаларға сай екенін білдіреміз. | |
| Rasenlüfter | Өнім нөмірі | ||
| Vertikutierer | |||
| ro | Declarație de conformitate UE | Declarăm pe proprie răspundere că produsele mentionate core-spund tuturor dispozițiilor relevante ale directivelor și regle-mentărilor enumerate în cele ce urmează și sunt în conformitate cu următoarele standarde. | |
| Rasenlüfter | Număr de identificare | ||
| Vertikutierer | |||
| bg | ЕС декларация за съответствие | С пълна отговорностние декларираме, че посочените продукти отговарят на всички валидни изисквания на директивите и разпоредбите по-долу и съответства на следните стандарти. | |
| Rasenlüfter | Каталожен номер | ||
| Vertikutierer | |||
| mk | EU-Изjava за сообразност | Со целосна одговорност изјавуваме, дека опишаните производи се во согласност со сите релевантни одредби на следните регулативи и прописи и се во согласност со следните норми. | |
| Rasenlüfter | Број на дел/артик | ||
| Vertikutierer | |||
| sr | EU-izjava o usaglašenosti | Na sopstvenu odgovornost izjavljujemo, da navedeni proizvodi odgovaraju svim dotičnim odredbama naknadno navedenih smernica u uredaba i da su u skladu sa sledećim standardima. | |
| Rasenlüfter | Broj predmeta | ||
| Vertikutierer | |||
| sl | Izjava o skladnosti EU | Izjavljamo pod izključno odgovornostjo, da je omenjen izdelek v skladu z vsemi relevantnimi določili direktiv in uredb ter ustreza naslednjim standardom. | |
| Rasenlüfter | Številka artikla | ||
| Vertikutierer | |||
| hr | EU izjava o sukladnosti | Pod punom odgovornošću izjavljujemo da navedeni proizvodi odgovaraju svim relevantnim odredbama direktiva i propisima navedenima u nastavku i da su sukladni sa sljedećim normama. | |
| Rasenlüfter | Kataloški br. | ||
| Vertikutierer | |||
| et | EL-vastavusdeklaratsioon | Kinnitame ainuvastutajatena, et nimetatud tooted vastavad järgnevalt loetletud direktiivide ja määruste kõikidele asjaomastele nõuetele ja on kooskõlas järgmiste normidega. | |
| Rasenlüfter | Tootenumber | ||
| Vertikutierer | |||
CE
III
Chairman of Executive
Management
Helmut Heinzelmann
Head of Product Certification
i. V. h = w c
Robert Bosch Power Tools GmbH, 70538 Stuttgart, GERMANY
Stuttgart, 20.10.2020