G-301 - Stapler Abac - Free user manual and instructions
Find the device manual for free G-301 Abac in PDF.

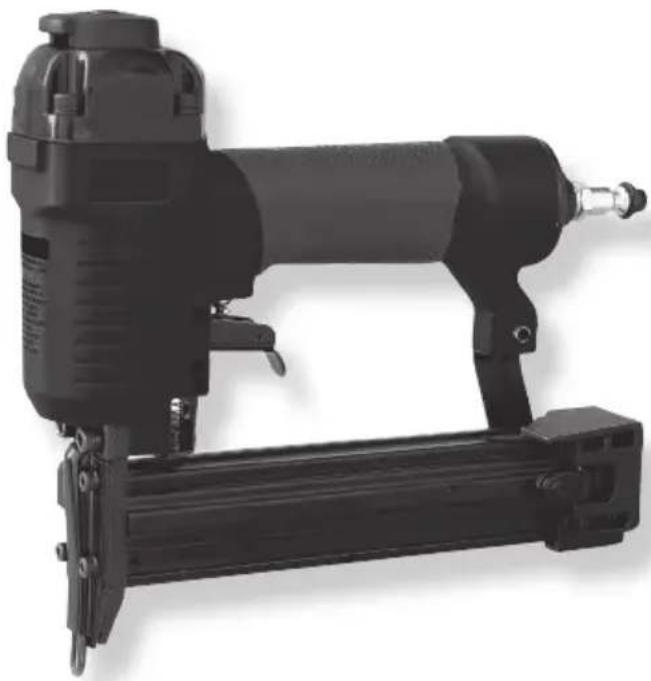
| Product type | Pneumatic stapler / Combined nailer |
| Brand | Abac |
| Model | G-301 |
| Air consumption | 0.8 l/min |
| Maximum working pressure | 8 bar (0.8 MPa) |
| Magazine capacity | 100 staples (estimated) |
| Dimensions (L x W x H) | 250 x 150 x 200 mm (estimated) |
| Weight | 1.5 kg (estimated) |
| Power supply | Pneumatic (compressed air) |
| Trigger mode | Contact (safety + trigger) |
| Lubrication | Via air inlet, standard oil |
| Cleaning | Non-flammable detergent, do not immerse |
| Safety | Contact safety device |
| Repairability | Repair kit available (O-rings, etc.) |
| Additional functions | Depth adjustment by wheel (depending on model) |
Frequently Asked Questions - G-301 Abac
User questions about G-301 Abac
0 question about this device. Answer the ones you know or ask your own.
Ask a new question about this device
Download the instructions for your Stapler in PDF format for free! Find your manual G-301 - Abac and take your electronic device back in hand. On this page are published all the documents necessary for the use of your device. G-301 by Abac.
USER MANUAL G-301 Abac
natural_image
Black industrial dazda kit with attached base and mounting bracket (no visible text or symbols)
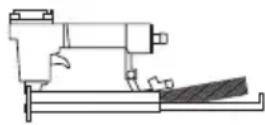
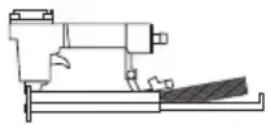
COMBI NAILER
USER GUIDE
EN Combi nailer - Instructions
natural_image
Black NDA918 airaptor kit with attached mounting bracket (no visible text or symbols)3. DISPOSITIF DE SÉCURITÉ ANTI-DÉCLENCHEMENT
3.1 CONTRÔLE DU FONCTIONNEMENT DE L'OUTIL
natural_image
Line drawing of a hand operating a mechanical device with no visible text or symbols
4

5

natural_image
Line drawing of a hand operating a precision tool (no text or symbols)FR
4. CHARGEMENT DE L'OUTIL
natural_image
Illustration of a hand operating a sewing machine with a circular gauge and base mount (no text or symbols)6. LUBRIFICATION
natural_image
Pure technical line drawing of mechanical components without any text, numbers, or symbols8. NETTOYAGE
Carefully read the information in the manual to preserve YOUR SAFETY and to PREVENT PROBLEMS WITH THE EQUIPMENT.
DANGER: Indicates a situation of immediate danger which, if not avoided, will result in serious injury or death.
WARNINGS: Indicates a potentially hazardous situation which, if not avoided, could result in death or serious injury.
WARNINGS: Indicates important information for the operator.
natural_image
Black NDA feeder with attached metal bracket (no visible text or symbols)3. SNAP-ACTION RELEASE SAFETY DEVICE
3.1 CHECKING THAT THE TOOL IS WORKING PROPERLY
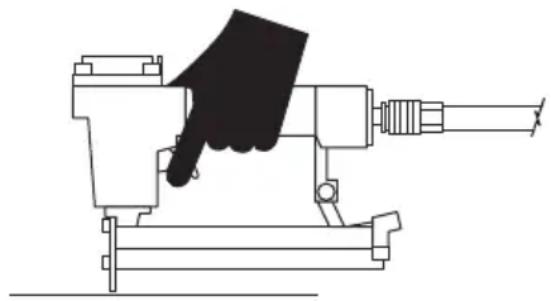
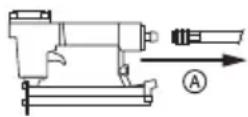
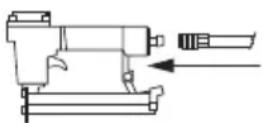
The operator's finger must not be on the trigger and the tip of the tool must be positioned on the work surface.
Push the tool towards the work surface to raise the safety device, and squeeze the trigger.
Release the trigger after every shot. Move the tool to the next position and repeat the above procedure again.
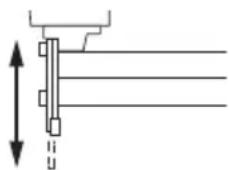
3.2 CHECKING THE TOOL
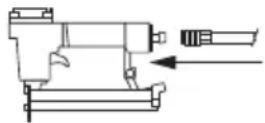
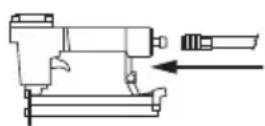
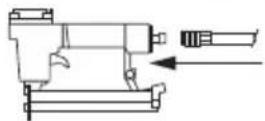
3.2.1 Disconnect the air supply from the tool (1).
3.2.2 Empty the magazine (2).
3.2.3 Ensure that the trigger and safety device move up and down without jamming (3).
natural_image
Line drawing of a hand operating a mechanical device with no visible text or symbols1

2

3

WARNINGS: CHECK AND REPLACE DAMAGED OR WORN PARTS OF THE TOOL. THE SAFETY WARNING LABELS MUST BE REPLACED IF UNREADABLE.
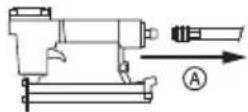
3.2.4 Connect the air supply to the tool (4).
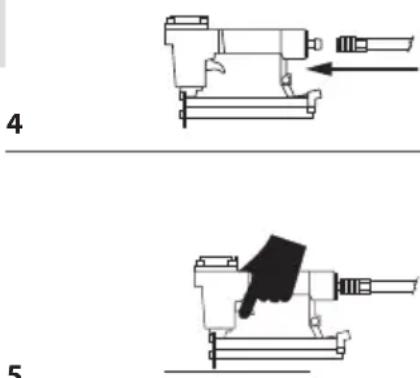
3.2.5 Lower the tip against the work area without squeezing the trigger. The tool must not trigger continuously. Do not use the tool if this happens.
Move the tool out of the work area. The safety device must return to its original lowered position. Squeeze the trigger. The tool should not operate. Do not use the tool if this occurs (5).
4

5

natural_image
Line drawing of a hand operating a precision tool (no text or symbols)EN
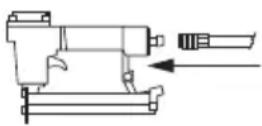
4. LOADING THE TOOL
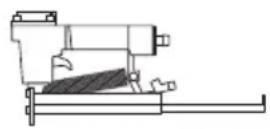
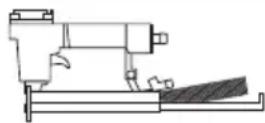
4.1 Connect the air tube (1).
4.2 Lower the magazineⒶ catch. Pull the magazine cover back (2).
4.3 Insert a bar of fasteners into the magazine. Make sure that the points of the fasteners are loaded downwards. Also make sure that the fasteners are not dirty or damaged (3).
4.4 Push the magazine cover forward until it locks into place (4).
1
2
3

4
5. TOOL OPERATION
5.1 You are advised to lubricate the tool before each use (see section 6) (1).
5.2 Empty the magazine.
Connecting the air using the quick coupling (2).
5.3 Adjust the operating pressure so that it remains within the operating pressure range specified for the tool (3).
Load the fastening elements inside the magazine according to the instructions in paragraph 4.
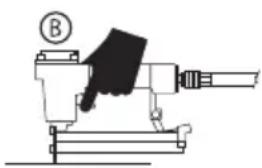
5.4 Check that the fasteners penetrate correctly by shooting nails into a wooden sample. If the fasteners do not reach the desired depth, adjust the air pressure to a higher value so as to achieve the desired result. If the model is equipped with a depth adjustment device, turn the thumb wheel Ⓑ to obtain the desired depth (4).
1

2

8 bar max
3
natural_image
Illustration of a hand operating a sewing machine with a circular gauge and pointer (no text or symbols)WARNINGS: do not exceed a value of 8 bar (0.8 Mpa)
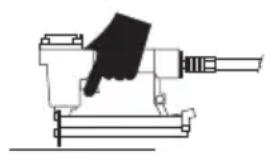
6. LUBRICATION
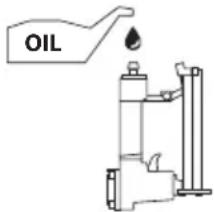
6.1 Disconnect the air supply from the tool before lubricating it (1).
6.2 Add a few drops of tool oil to the air inlet. Position the tool with the air inlet connector facing upwards and place a drop of tool oil inside the air inlet. Do not use cleaning oil or additives. Put the tool into operation briefly after adding the oil (2).
Wipe off any excess oil in the outlet. Excess oil may damage the O-ring seals of the tool. If a lubrication system is used, manual lubrication through the air inlet will not be necessary on a daily basis.


7. RELEASING THE JAMMED TOOL
7.1 Fasteners jammed in the expulsion area:
Disconnect the tool from the air tube. Manually lift the safety device, grip the jammed fasteners with pliers and remove them (1).
Fasteners jammed inside the magazine:
Disconnect the tool from the air tube.
Pull the magazine cover back.
If necessary, manually lift the safety device and remove any jammed fasteners.
Push the magazine cover forward until it locks into place.
natural_image
Pure technical line drawing of mechanical components without any text, numbers, or symbolsEN
8. CLEANING
WARNINGS: Disconnect the tool from the air tube before cleaning and inspecting it. Solve all problems before putting the tool back into operation.
DANGER: Never use petrol or other flammable liquids to clean the tool. An fumes on the tool could ignite due to a spark and cause the tool to explode, resulting in serious personal injury or death.
8.1 Disconnect the tool from the air tube. Remove any spilled deposits with detergent #2. Dry thoroughly before use (1).
NOTE: DO NOT IMMERSE the tool in cleaning solvents as it could get damaged.
1
9. REPAIRING THE TOOL AND TROUBLESHOOTING
9.1 MAINTENANCE AND REPAIRS
All quality tools may require maintenance over time or replacement of parts due to normal operating wear.
These operations must be carried out ONLY by an authorized technician.
NEVER TRY TO REPAIR THE TOOL YOURSELF.
9.2 TROUBLESHOOTING
WARNINGS: Disconnect the air supply from the tool before carrying out any maintenance procedures.
| PROBLEM CAUSES SOLUTIONS | |||
| 1 | Air leak in the tool cover or trigger area. | Loose screws.Worn or damaged o-rings or seals. | Tighten the screws. Install a repair kit. |
| 2 | The tool does not operate or operates slowly. | Inadequate air supply.Insufficient lubrication.Worn or damaged o-rings or seals. | Check the screws. Install a repair kit. |
| 3 | Air leakage in the bottom part of the tool. | Loose screws.Worn or damaged o-rings or seals. | Tighten the screws. Install a repair kit. |
| 4 | The tool jams frequently. Unsuitable fasteners. | Damaged fasteners.Loose magazine screws or front screws.Dirty magazine. | Check that the fasteners are the correct size. Replace worn or damaged fasteners. Tighten the screws. Clean the magazine. |
| 5 | Other problems Contact your local distributor for service. | ||
1. CHIODATRICE COMBINATA
1.1 SPECIFICHE TECNICHE
CONSUMO D'ARIA: 0,8 lt/min
2. LINEE GUIDA
natural_image
Black NDA feeder with attached metal bracket (no visible text or symbols)3. DISPOSITIVO DI SICUREZZA CON RILASCIO A SCATTO
natural_image
Line drawing of a hand operating a mechanical device with no visible text or symbols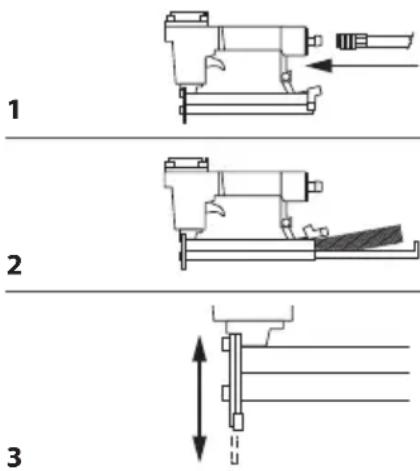

natural_image
Illustration of a hand operating a sewing machine with a circular gauge and pointer (no text or symbols)natural_image
Pure technical line drawing of mechanical components without any text, numbers, or symbolsnatural_image
Black industrial dialsuit with attached mounting bracket (no visible text or symbols)natural_image
Line drawing of a hand operating a mechanical device with no visible text or symbols1

2

3

4

5

natural_image
Illustration of a hand operating a precision tool (no text or symbols visible)DE
4. LADEN DES WERKZEUGS
natural_image
Illustration of a hand operating a sewing machine with a circular gauge and pointer (no text or symbols)6. SCHMIEREN
natural_image
Pure technical line drawing of mechanical components without any text, numbers, or symbols8. REINIGUNG
natural_image
Black NDA918 airaptor kit with attached mounting bracket (no visible text or symbols)natural_image
Line drawing of a hand operating a mechanical device with no visible text or symbols

natural_image
Diagram of a hand operating a machine with a labeled component (B), no text or symbols present6. LUBRICACIÓN
natural_image
Pure technical line drawing of mechanical components without any text, numbers, or symbols8. LIMPIEZA
natural_image
Black N/A GNDN kit with attached mounting bracket (no visible text or symbols)3. DISPOSITIVO DE SEGURANÇA COM MOLA
natural_image
Line drawing of a hand operating a mechanical device with no visible text or symbols1

2
3
4

5

natural_image
Line drawing of a hand operating a precision tool (no text or symbols)PT
natural_image
Illustration of a hand operating a sewing machine with a circular gauge labeled B (no text or symbols on the machine itself)6. LUBRIFICAÇÃO
natural_image
Pure technical line drawing of mechanical components without any text, numbers, or symbolsPT
8. LIMPEZA
natural_image
Black NDA feeder with attached stand and mounting bracket (no visible text or symbols)natural_image
Line drawing of a hand operating a mechanical device with no visible text or symbols1
2

3

4

5
natural_image
Illustration of a hand operating a precision machine tool (no text or symbols visible)natural_image
Illustration of a hand operating a sewing machine with a circular gauge labeled B (no text or symbols on the machine itself)natural_image
Pure technical line drawing of mechanical components without any text, numbers, or symbols8. ΚΑΘΑΡΙΣΜΟΣ
natural_image
Black N/A GNDN kit with attached mounting bracket (no visible text or symbols)3. GEÇMELİ EMNİYET TERTİBATI
natural_image
Line drawing of a hand operating a mechanical device with no visible text or symbols1

2

3

4

5

natural_image
Line drawing of a hand operating a precision tool (no text or symbols)TR
4. ALETİN DOLDURULMASI
natural_image
Illustration of a hand operating a sewing machine with a circular gauge and pointer (no text or symbols)natural_image
Pure technical line drawing of mechanical components without any text, numbers, or symbolsTR
8. TEMIZLIK
natural_image
Black NDA918 airaptor kit with attached mounting bracket (no visible text or symbols)3. VEILIGHEIDSINRICHTING MET CONTACTSCHAKELAAR
3.1 CONTROLE VAN DE WERKING VAN HET GEREEDSCHAP
natural_image
Line drawing of a hand operating a mechanical device with no visible text or symbols
NL
4. HET GEREEDSCHAP LADEN
natural_image
Illustration of a hand operating a sewing machine with a circular gauge and pointer (no text or symbols)6. SMERING
natural_image
Pure technical line drawing of mechanical components without any text, numbers, or symbols8. REINIGING
9.2 PROBLEEMOPLOSSING
natural_image
Black NDA918 airaptor kit with attached mounting bracket (no visible text or symbols)3. SIKKERHEDSANORDNING MED UDL∅SNING VIA TRYK
natural_image
Line drawing of a hand operating a mechanical device with no visible text or symbols1

2

3

4

5

natural_image
Illustration of a hand operating a precision machine tool (no text or symbols visible)DK
4. OPFYLDNING AF REDSKABET
natural_image
Illustration of a hand operating a sewing machine with a circular gauge labeled B (no text or symbols on the machine itself)6. SM∅RING
natural_image
Pure technical line drawing of mechanical components without any text, numbers, or symbolsnatural_image
Black N/A GNDN kit with attached mounting bracket (no visible text or symbols)3. SIKKERHETSINNRETNING MED UTL∅SER
3.1 KONTROLL AV VERKT∅YETS FUNKSJON
natural_image
Line drawing of a hand operating a mechanical device with no visible text or symbols3.2 KONTROLL AV VERKT∅YET
natural_image
Technical line drawing of a mechanical device with an arrow indicating direction (no text or symbols)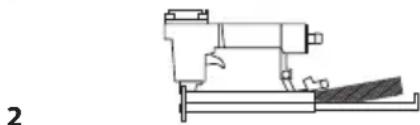
natural_image
Technical line drawing of a mechanical assembly or tool (no text or symbols visible)
natural_image
Pure mechanical assembly diagram showing a vertical dimension with no text or symbolsADVARSLER: KONTROLLERE OG ERSTATTE VERKT∅YETS DELER SOM ER SKADET ELLER SLITTE. ETIKETTENE MED SIKKERHETSVARSLER MÅ BYTTES UT DERSOM DE ER ULESBARE.
natural_image
Technical line drawing of a mechanical device with an arrow indicating direction (no text or symbols)
natural_image
Illustration of a hand operating a sewing machine (no text or symbols visible)NO
4. PÅFYLLING AV VERKT∅YET
4.1 Koble til luftslangen (1).
4.2 Senk magasinets® stopper.
Trekk tilbake magasinets deksel (2).
4.3 Sett en ladning med festeelementer i magasinet. Kontroller at spissene til festeelementene peker nedover. Forsikre deg også om at festeelementene ikke er skitne eller skadet (3).
4.4 Skyv dekselet på magasinet frem til det festes (4).
5. BRUK AV VERKTÖYET
natural_image
Illustration of a hand operating a precision machine with a labeled pointer (no text or symbols present)natural_image
Pure technical line drawing of mechanical components without any text, numbers, or symbolsFesteelementer som sitter fast i magasinet:
9.1 VEDLIKEHOLD OG REPARASJONER
natural_image
Black NDA918 airaptor kit with attached mounting bracket (no visible text or symbols)3. SÄKERHETSANORDNING MED UTLÖSNING
3.1 KONTROLL AV VERKTYGETS FUNKTION
natural_image
Line drawing of a hand operating a mechanical device with no visible text or symbols1

2

3

4

5

natural_image
Line drawing of a hand operating a precision machine tool (no text or symbols)SE
4. PÅFYLLNING AV VERKTYGET
natural_image
Illustration of a hand operating a sewing machine with a circular gauge and pointer (no text or symbols)natural_image
Pure technical line drawing of mechanical components without any text, numbers, or symbolsKlamrar/spikar som fastnat i magasinet:
natural_image
Black industrial airknup device with attached mounting bracket (no visible text or symbols)3. TURVALAITE NAPSAHTAVALLA VAPAUTUKSELLA
3.1 TYÖKALUN TOIMINNAN TARKASTUS
natural_image
Line drawing of a hand operating a mechanical device with no visible text or symbols3.2 TYÖKALUN TARKASTUS
natural_image
Illustration of a hand operating a sewing machine with a circular gauge and pointer (no text or symbols)6. VOITELU
natural_image
Pure technical line drawing of mechanical components without any text, numbers, or symbolsnatural_image
Black N/A GNDN kit with attached mounting bracket (no visible text or symbols)3. BEZPEČNOSTNÍ ZAŘÍZENÍ SE SKLÁPĚCÍM UVOLŇOVÁNÍM
3.1 KONTROLA ČINNOSTI NÁSTROJE
natural_image
Line drawing of a hand operating a mechanical device with no visible text or symbols3.2 KONTROLA NÁSTROJE
natural_image
Line drawing of a hand operating a precision machine tool (no text or symbols)CZ
4. PLNĚNÍ NÁSTROJE
natural_image
Illustration of a hand operating a sewing machine with a circular gauge and base mount (no text or symbols)6. MAZÁNÍ
natural_image
Pure technical line drawing of mechanical components without any text, numbers, or symbols8. ČIŠTĚNÍ
natural_image
Black N/A GNDN kit with attached mounting bracket (no visible text or symbols)natural_image
Line drawing of a hand operating a mechanical device with no visible text or symbols1
2
3

OSTRZEŻENIE: SPRAWDZIĆ I WYMIENIĆ USZKODZONE LUB ZUŻYTE KOMPONENTY PRZYRZĄDU. NALEŻY WYMIENIĆ NIECZYTELNE ETYKIETY OSTRZEGAWCZE.
natural_image
Illustration of a hand operating a precision machine tool (no text or symbols visible)PL
4. ŁADOWANIE PRZYRZĄDU
natural_image
Pure technical line drawing of mechanical components without any text, numbers, or symbolsPL
8. CZYSZCZENIE
9.1 KONSERWACJA I NAPRAWA
natural_image
Black N/A GNDN kit with attached mounting bracket (no visible text or symbols)3. VARNOSTNA OPREMA S SPROŽANJEM
3.1 PREVERJANJE DELOVANJA ORODJA
natural_image
Line drawing of a hand operating a mechanical device with no visible text or symbols1

2

3

4
5

natural_image
Illustration of a hand operating a precision machine tool (no text or symbols visible)SI
4. POLNJENJE ORODJA
4.1 Priključite cev zraka (1).
4.2 Spustite zaklopko Ⓐ šaržerja.
Povlecite pokrov šaržerja (2).
4.3 Vstavite en set sponk, preverite, da so konice sponk naložene navzdol. Preverite tudi, da sponke niso umazane ali poškodovane (3).
4.4 Potisnite pokrov šaržerja naprej do zaklepa (4).

5. DELOVANJE ORODJA
natural_image
Illustration of a hand operating a precision machine with a circular indicator (no text or symbols)OPOZORILA: ne prekoračite vrednosti 8 barov (0,8 Mpa)
6. PODMAZOVANJE
natural_image
Pure technical line drawing of mechanical components without any text, numbers, or symbols8. ČIŠČENJE
natural_image
Black NDA feeder with attached stand and mounting bracket (no visible text or symbols)3. BEZPEČNOSTNÉ ZARIADENIE SO SKLÁPACÍM UVOĽŇOVANÍM
3.1 KONTROLA ČINNOSTI NÁSTROJA
natural_image
Line drawing of a hand operating a mechanical device with no visible text or symbols3.2 KONTROLA NÁSTROJA
natural_image
Technical line drawing of a mechanical device with an arrow indicating direction (no text or symbols)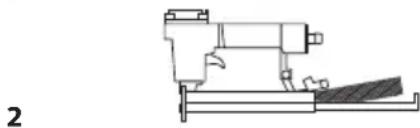
natural_image
Technical line drawing of a mechanical assembly or tool (no text or symbols visible)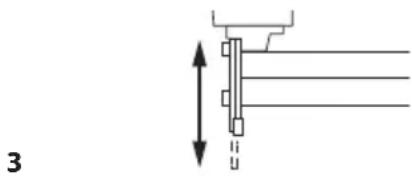
natural_image
Pure mechanical assembly diagram showing a lever and shaft without any text, labels, or symbolsVAROVANIA: SKONTROLUJTE NÁSTROJ A VYMEŇTE POŠKODENÉ ALEBO OPOTREBOVANÉ ČASTI. NEČITATEĽNÉ VÝSTRAŽNÉ ŠTÍTKY MUSIA BYŤ NAHRADENÉ.
natural_image
Technical line drawing of a mechanical device with an arrow indicating direction (no text or symbols)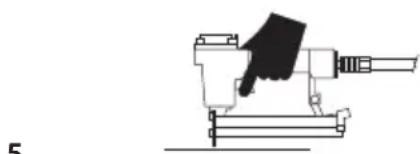
natural_image
Illustration of a hand operating a sewing machine (no text or symbols visible)SK
4. PLNENIE NÁSTROJA
natural_image
Illustration of a hand operating a sewing machine with a circular indicator (no text or symbols)VAROVANIA: neprekračujte hodnotu 8 barov (0,8 MPa)
6. MAZANIE
natural_image
Pure technical line drawing of mechanical components without any text, numbers, or symbolsSK
8. ČISTENIE
natural_image
Black N/A GNDN kit with attached mounting bracket (no visible text or symbols)3. APSAUGINIS PRIETAISAS SU FIKSUOJAMU ATLEIDIMU
3.1 IRANIO VEIKIMO PATIKRA
natural_image
Line drawing of a hand operating a mechanical device with no visible text or symbols3.2 IRANKIO PATIKRA
natural_image
Mechanical assembly diagram showing a piston and shaft assembly (no text or labels)
natural_image
Technical line drawing of a mechanical assembly or tool (no text or symbols visible)
natural_image
Pure mechanical assembly diagram showing a vertical shaft with a horizontal guide and a downward arrow, no text or symbols present.JSPĖJIMAI: PATIKRINKITE IR PAKEISKITE JRANKIO PAŽEISTUS ARBA SUSIDĖVĖJUSIUS KOMPONENTUS. JEI APSAUGINIŲ JSPĖJIMŲ ETIKETĖS TAPO NEĮSKAITOMOS, JOS TURI BŪTI PAKEISTOS.
natural_image
Technical line drawing of a mechanical device with an arrow indicating direction (no text or symbols)
natural_image
Illustration of a hand operating a sewing machine (no text or symbols visible)LT
4. IRANKIO PRIPILDYMAS
natural_image
Illustration of a hand operating a sewing machine with a circular gauge and pointer (no text or symbols)6. TEPIMAS
natural_image
Pure technical line drawing of mechanical components without any text, numbers, or symbols8. VALYMAS
natural_image
Black N/A GNDN kit with attached mounting bracket (no visible text or symbols)natural_image
Line drawing of a hand operating a mechanical device with no visible text or symbols1

2

3

4

5

natural_image
Illustration of a hand operating a precision machine tool (no text or symbols visible)natural_image
Illustration of a hand operating a sewing machine with a circular gauge and pointer (no text or symbols)natural_image
Pure technical line drawing of mechanical components without any text, numbers, or symbols8. АЧЫСТКА
natural_image
Black NDA feeder with attached stand and mounting bracket (no visible text or symbols)3. ПРЕДОХРАНИТЕЛЬНОЕ УСТРОЙСТВО
natural_image
Line drawing of a hand operating a mechanical device with no visible text or symbols

4. ЗАРЯДКА ИНСТРУМЕНТА
natural_image
Illustration of a hand operating a sewing machine with a circular gauge and pointer (no text or symbols)4
natural_image
Pure technical line drawing of mechanical components without any text, numbers, or symbols8. ЧИСТКА
natural_image
Black NDA918 airaptor kit with attached mounting bracket (no visible text or symbols)3. BIZTONSÁGI BERENDEZÉS GYORSOLDÓVAL
3.1. A SZERSZÁM MÜKÖDÉSÉNEK ELLENŐRZÉSE
natural_image
Line drawing of a hand operating a mechanical device with no visible text or symbols1

2

3

4

5

natural_image
Line drawing of a hand operating a precision machine tool (no text or symbols)HU
natural_image
Illustration of a hand operating a sewing machine with a circular gauge and pointer (no text or symbols)natural_image
Pure technical line drawing of mechanical components without any text, numbers, or symbolsHU
8. TISZTÍTÁS
natural_image
Black NDA918 airaptor kit with attached mounting bracket (no visible text or symbols)3. DISPOZITIV DE SIGURANTĂ CU DECLANŞARE BRUSCĂ
3.1 VERIFICAREA FUNCTIONĂRII APARATULUI
natural_image
Line drawing of a hand operating a mechanical device with no visible text or symbols

4. ÎNCĂRCAREA APARATULUI
natural_image
Illustration of a hand operating a sewing machine with a circular gauge and pointer (no text or symbols)natural_image
Pure technical line drawing of mechanical components without any text, numbers, or symbols8. CURĂȚAREA
natural_image
Black NDA feeder with attached metal bracket (no visible text or symbols)3. SIGURNOSNI MEHANIZAM SA SEKVENCIJALNIM OTPUŠTANJEM
3.1 PROVJERA ISPRAVNOSTI RADA ALATA
natural_image
Line drawing of a hand operating a mechanical device with no visible text or symbols1

2
3

4

5

natural_image
Illustration of a hand operating a precision machine tool (no text or symbols visible)HR
4. PUNJENJE ALATA
4.1 Spojite crijevo za zrak (1).
4.2 Spustite blokaduⒶ spremnika.
Povucite unazad poklopac spremnika (2).
4.3 Umetnite redenik pričvrsnih elemenata u spremnik. Uvjerite se da su vrhovi pričvrsnih elemenata umetnuti tako da su okrenuti prema dolje. Uvjerite se također da pričvrsni elementi nisu onečišćeni ili oštećeni (3).
4.4 Gurnite poklopac spremnika prema naprijed do zapora (4).
5. NAČIN RADA ALATA
5.1 Preporuča se podmazati alat prije svake uporabe (vidi odlomak 6) (1).
5.2 Ispraznite spremnik.
Spojite alat s dovodom zraka putem priključka za brzo spajanje (2).
5.3 Regulirajte radni tlak na način da ostane unutar raspona radnog tlaka, utvrđenog za alat. (3).
Napunite spremnik pričvrsnim elementima slijedeći upute iz odlomka 4.
natural_image
Illustration of a hand operating a sewing machine with a circular gauge and base mount (no text or symbols)natural_image
Pure technical line drawing of mechanical components without any text, numbers, or symbolsPričvrsni elementi zaglavljeni unutar spremnika:
natural_image
Black industrial airknup device with attached mounting bracket (no visible text or symbols)3. DROŠĪBAS MEHĀNISMS AR ATLAIŠANU AR KLIKŠKI
3.1 IERICES DARBIBAS PĀRBAUDE
natural_image
Line drawing of a hand operating a mechanical device with no visible text or symbols1

2

3

4

5

natural_image
Illustration of a hand operating a precision machine tool (no text or symbols visible)LV
4. IERICES IELÄDE
natural_image
Diagram of a hand operating a sewing machine with a circular indicator labeled B (no text or symbols on the machine itself)natural_image
Pure technical line drawing of mechanical components without any text, numbers, or symbols1
8. TİRİŞANA
natural_image
Black NDA feeder with attached metal bracket (no visible text or symbols)3. VEDRUVABASTUSEGA OHUTUSSEADE
3.1 KONTROLLIB TÖÖRIISTA TÖÖD
natural_image
Line drawing of a hand operating a mechanical device with no visible text or symbols3.2 TÖÖRIISTA KONTROLL
natural_image
Line drawing of a hand operating a precision machine tool (no text or symbols)4. TÖÖRIISTA LAADIMINE
natural_image
Illustration of a hand operating a sewing machine with a circular gauge and pointer (no text or symbols)6. ÖLITAMINE
natural_image
Pure technical line drawing of mechanical components without any text, numbers, or symbols8. PUHASTUS
natural_image
Black N/A GNDN kit with attached mounting bracket (no visible text or symbols)natural_image
Line drawing of a hand operating a mechanical device with no visible text or symbols1

2

3

4

5

natural_image
Illustration of a hand operating a precision tool (no text or symbols visible)4. ЗАРЕЖДАНЕ НА ИНСТРУМЕНТА
natural_image
Illustration of a hand operating a sewing machine with a labeled section B (no text or symbols on the machine itself)4
natural_image
Pure technical line drawing of mechanical components without any text, numbers, or symbols8. ПОЧИСТВАНЕ
natural_image
Black industrial airknup device with attached mounting bracket (no visible text or symbols)3. BEZBEDNOSNI UREĐAJ ZA OTPUŠTANJE U SLUČAJU NAGLOG STEZANJA
3.1 PROVERA DA LI ALAT PRAVILNO RADI
Prst operatera ne sme biti na okidaču i vrh alata mora biti postavljen na radnu površinu.
natural_image
Line drawing of a hand operating a mechanical device with no visible text or symbols3.2 PROVERA ALATA
natural_image
Mechanical assembly diagram showing a piston and shaft assembly (no text or labels)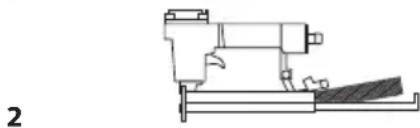
natural_image
Technical line drawing of a mechanical assembly or tool (no text or symbols visible)
natural_image
Pure mechanical assembly diagram showing a lever and shaft with no text or symbolsUPOZORENJA: PROVERITE I ZAMENITE OŠTEĆENE ILI POHABANE DELOVE ALATA. NALEPNICE SA BEZBEDNOSNIM UPOZORENJIMA SE MORAJU ZAMENITI AKO SU NEČITKE.
natural_image
Technical line drawing of a mechanical device with an arrow indicating direction (no text or symbols)
natural_image
Illustration of a hand operating a precision machine tool (no text or symbols visible)SR
4. PUNJENJE ALATA
natural_image
Illustration of a hand operating a sewing machine with a circular gauge and pointer (no text or symbols)UPOZORENJA: ne prekoračujte vrednost od 8 bara (0,8 Mpa)
6. PODMAZIVANJE
6.1 Odvojite dovod vazduha sa alata pre podmazivanja (1).
6.2 Sipajte nekoliko kapi ulja za alat u otvor za ulaz vazduha.
Postavite alat tako da konektor za ulaz vazduha bude okrenut nagore i sipajte kap ulja za alat u otvor za ulaz vazduha. Ne koristite ulje za čišćenje niti aditive. Nakon sipanja ulja, alat na kratko pustite u rad (2).
Obrišite višak ulja na izlazu. Višak ulja može da ošteti zaptivne O-prstenove alata. Ako se koristi sistem za podmazivanje, nije potrebno dnevno ručno podmazivanje putem otvora za ulaz vazduha.

7. OTPUŠTANJE ZAGLAVLJENOG ALATA
7.1 ekseri zaglavljeni u oblasti izbacivanja: Odvojite alat od cevi za vazduh.
natural_image
Pure technical line drawing of mechanical components without any text, numbers, or symbolsSR
8. ČIŠĆENJE
UPOZORENJA: Odvojite alat od cevi za vazduh pre čišćenja i provere.
Otklonite sve probleme pre vraćanja alata u rad.
OPASNOST: Nikada ne koristite benzin niti druge zapaljive tečnosti za čišćenje alata. Isparenja na alatu mogu da se zapale usled stvaranja varnica i da uzrokuju eksplodiranje alata, što rezultira telesnom povredom ili smrću.