XLED home 2 XL S - Lamp STEINEL - Free user manual and instructions
Find the device manual for free XLED home 2 XL S STEINEL in PDF.
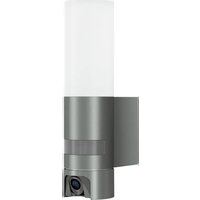
| Product Type | Outdoor LED projector with motion detector |
| Brand | Steinel |
| Model | XLED home 2 XL S |
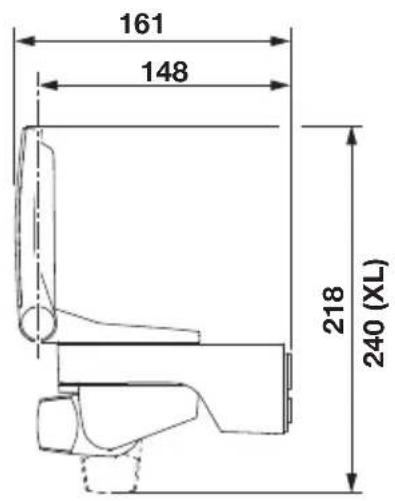
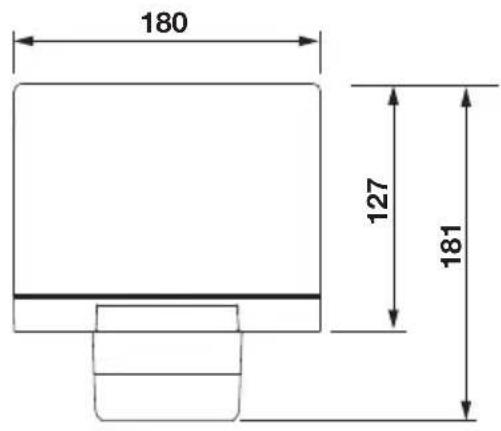
| Dimensions (H x W x D) | 240 x 180 x 161 mm |
| Weight | 0,620 kg |
| Supply voltage | 220-240 V ~ 50/60 Hz |
| Power consumption | 19,3 W |
| Luminous flux | 2124 lumens (360°) |
| Luminous efficacy | 110 lm/W |
| Color temperature | 3000 K (warm white) |
| Color rendering index (CRI) | 82 |
| Average lifespan | >60 000 h (L70B50 at 25°C) |
| Detection technology | Passive infrared (PIR) |
| Detection range | Max. 10 m |
| Detection angle | 180° |
| Adjustable time delay | From 8 s to 35 min |
| Trigger threshold | From 2 to 2000 lux |
| Protection rating (IP) | IP44 |
| Protection class | II (double insulation) |
| Operating temperature | -20°C to +40°C |
| Energy efficiency class | E |
| Detector orientation | 180° horizontal, 90° vertical |
| Manufacturer warranty | 5 years |
| Maintenance | Clean the lens with a damp cloth (without detergent) |
| Replacement of light source | Not replaceable (projector must be fully replaced) |
Frequently Asked Questions - XLED home 2 XL S STEINEL
User questions about XLED home 2 XL S STEINEL
0 question about this device. Answer the ones you know or ask your own.
Ask a new question about this device
Download the instructions for your Lamp in PDF format for free! Find your manual XLED home 2 XL S - STEINEL and take your electronic device back in hand. On this page are published all the documents necessary for the use of your device. XLED home 2 XL S by STEINEL.
USER MANUAL XLED home 2 XL S STEINEL
text_image
steinel XLED ho XLED home XLED XLED hoXLED home 2 S XLED home 2 XL S XLED home 2 XLED home 2 SC

GB ..... 19 Follow written instructions!
3.1 XLED home 2 S / XL S / SC
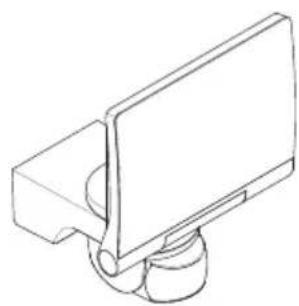
natural_image
Line drawing of a mechanical component with a flat plate and cylindrical base (no text or symbols)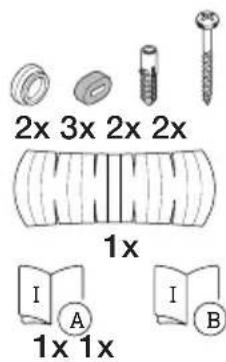
natural_image
Technical line drawing of a mechanical component with a rectangular housing and mounting bracket (no text or symbols)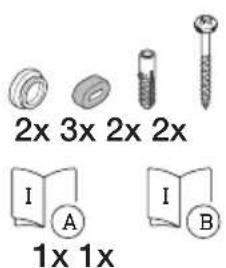
text_image
2x 3x 2x 2x I A 1x 1x I B3.3 XLED home 2 S / XL S / SC
text_image
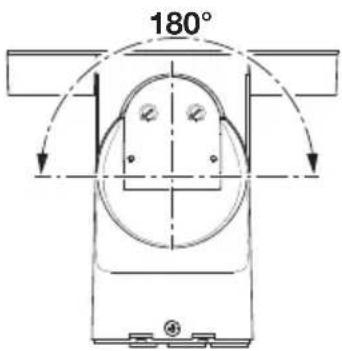
180°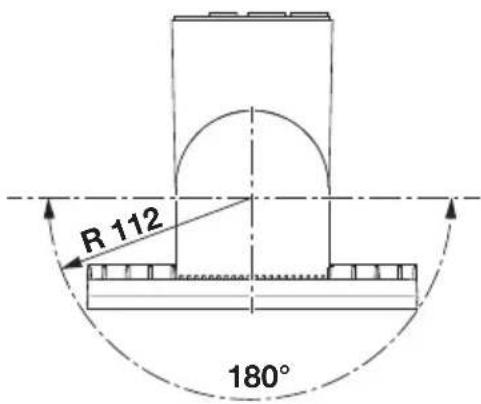
text_image
R 112 180°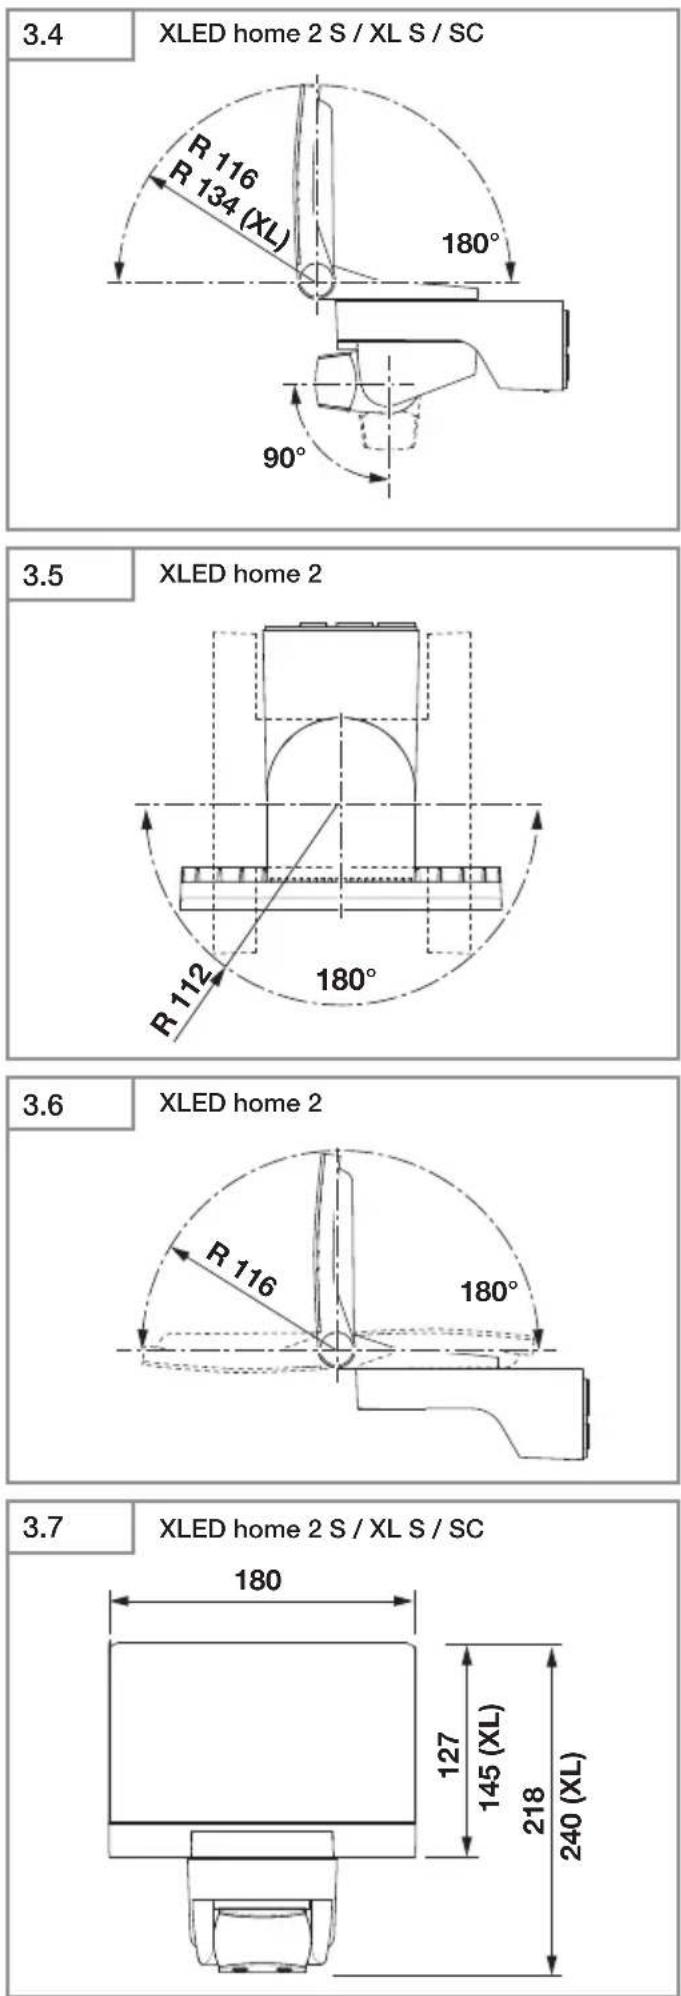
3.8
XLED home 2 S / XL S / SC
text_image
161 148 218 240 (XL)XLED home 2
3.9
text_image
180 127 1813.10
XLED home 2
text_image
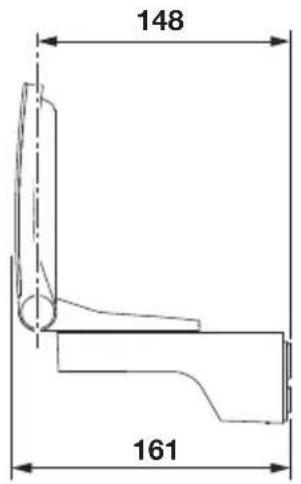
148 1613.11
XLED home 2 S / XL S / SC
text_image
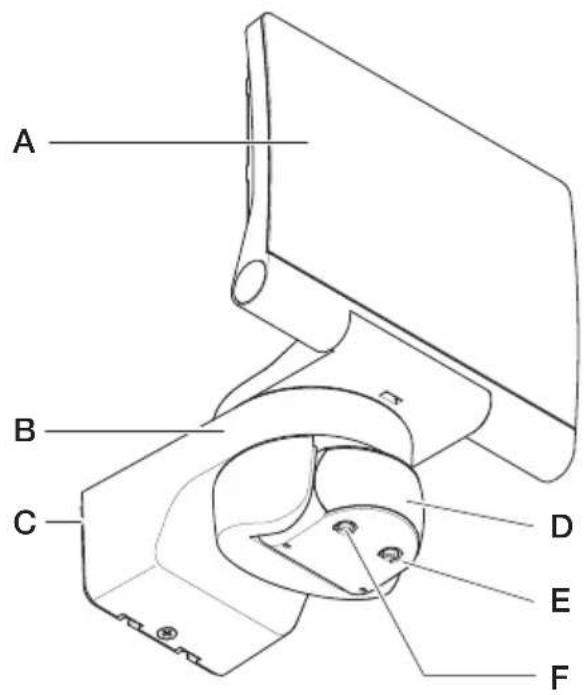
A B C D E F4.1

4.2
text_image
L N L N3.12
XLED home 2
A
natural_image
Line drawing of a computer monitor with a curved screen and base mount (no text or symbols)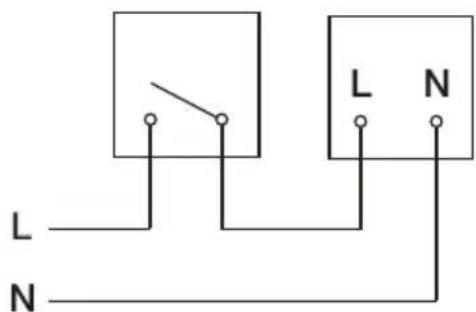
text_image
L N3.13
XLED home 2 S / XL S / SC
radar
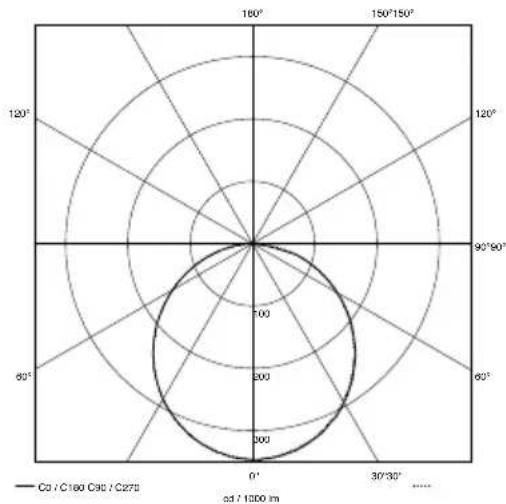
| Angle | Value | |-------|-------| | 0° | 200 | | 30° | 150 | | 60° | 100 | | 90° | 50 | | 120° | 25 | | 150° | 10 | | 180° | 5 |4.3
XLED home 2 SC
text_image
L N L N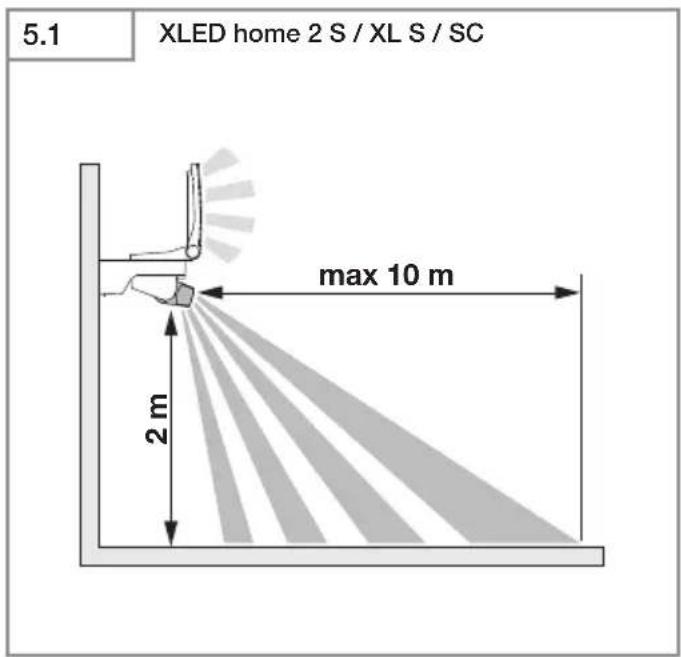
text_image
5.1 XLED home 2 S / XL S / SC max 10 m 2 m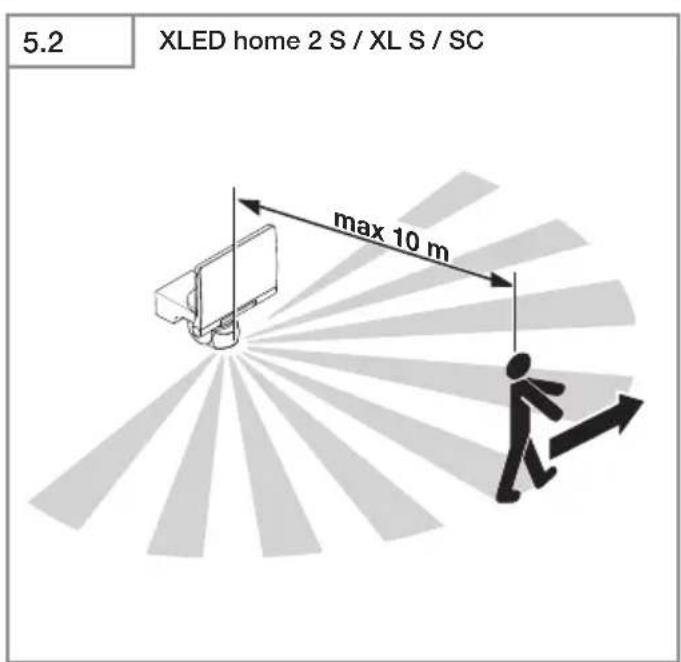
text_image
5.2 XLED home 2 S / XL S / SC max 10 m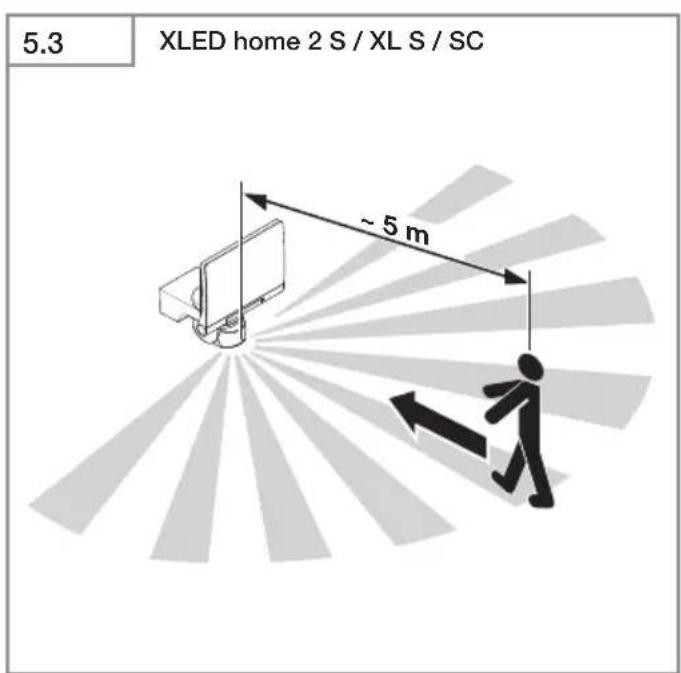
text_image
5.3 XLED home 2 S / XL S / SC ~ 5 m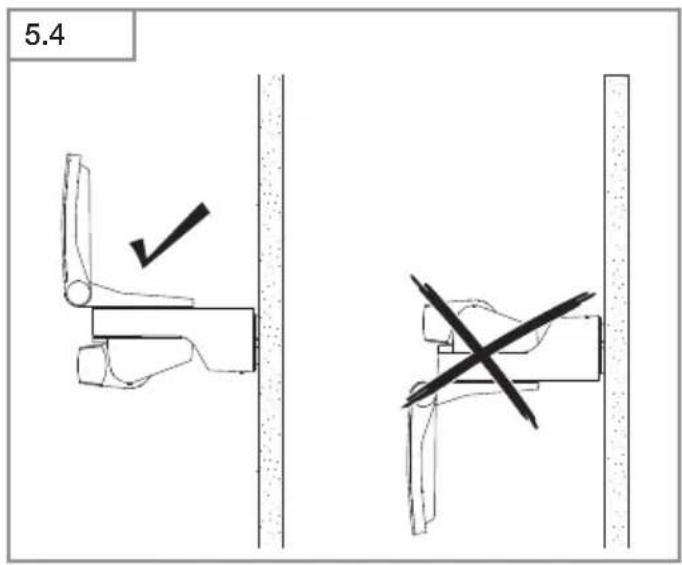
text_image
5.4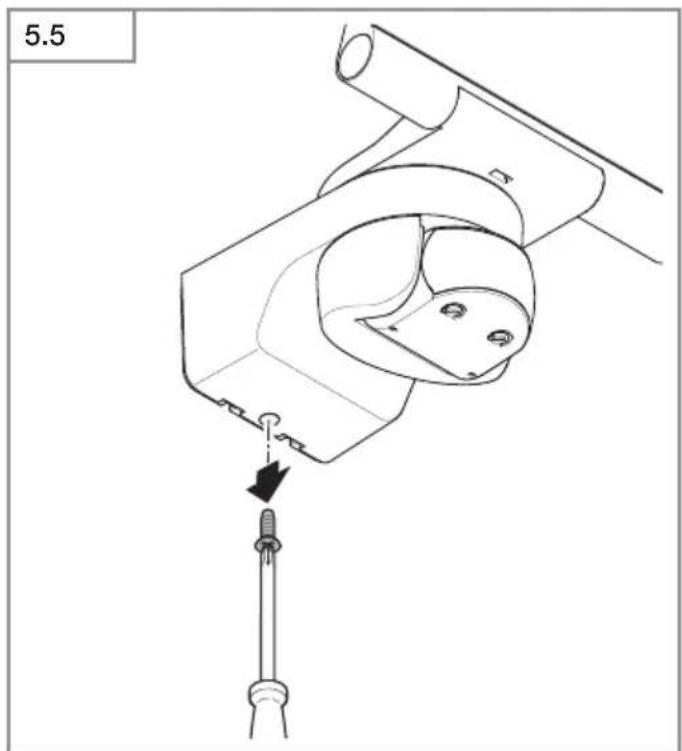
text_image
5.5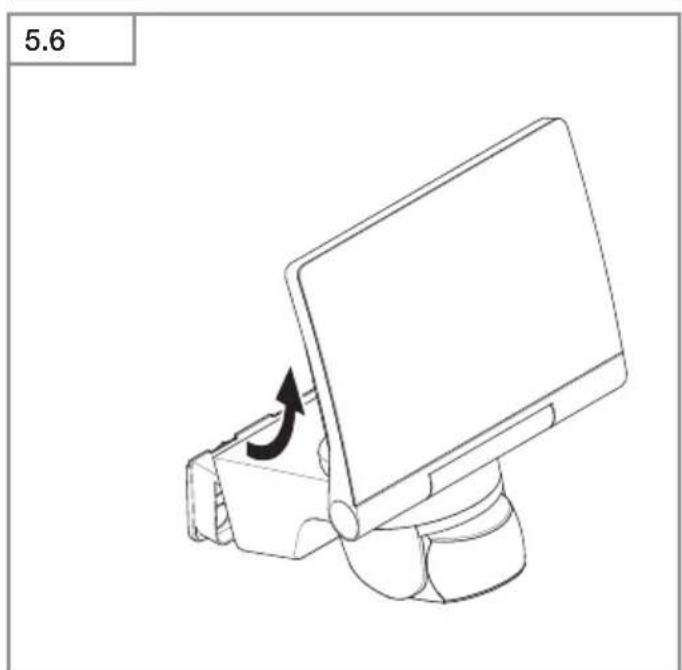
natural_image
Line drawing of a computer monitor with an arrow indicating rotation (no text or symbols)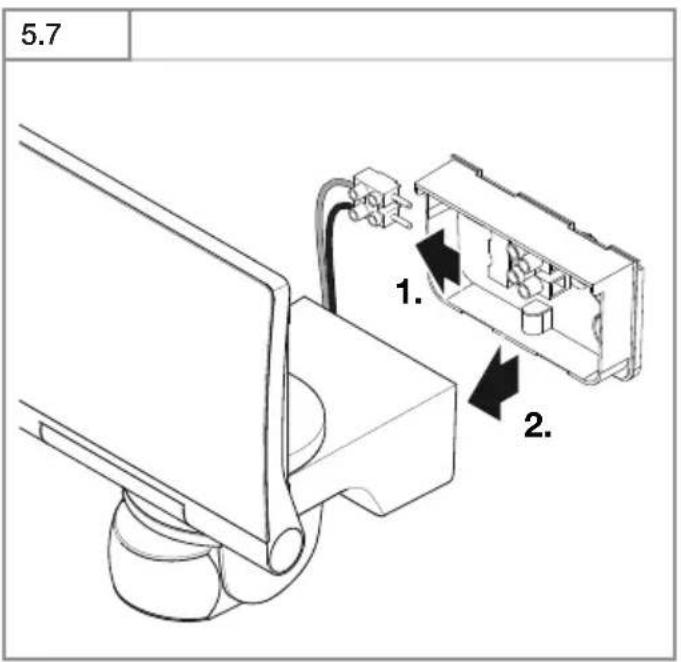
text_image
5.7 1. 2.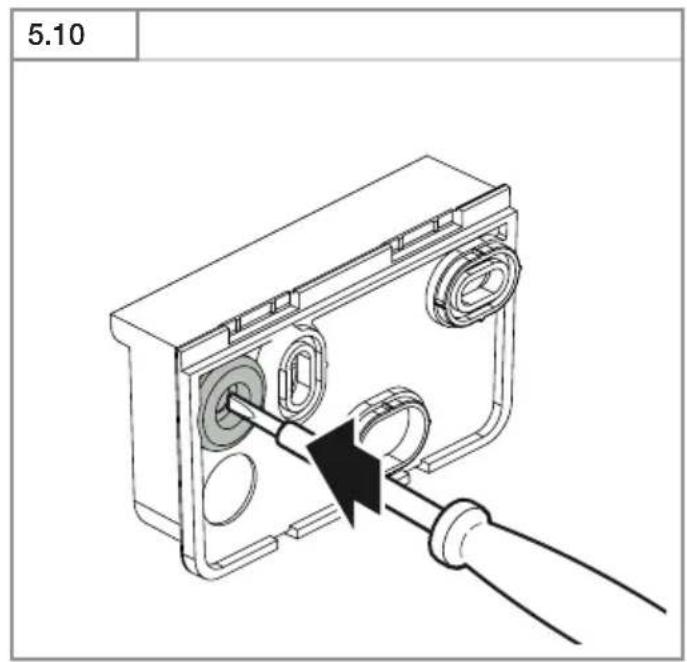
text_image
5.10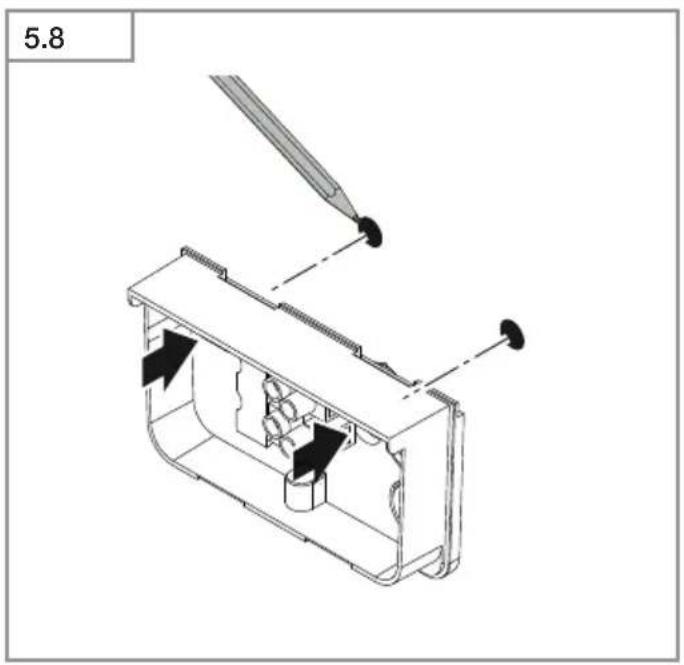
text_image
5.8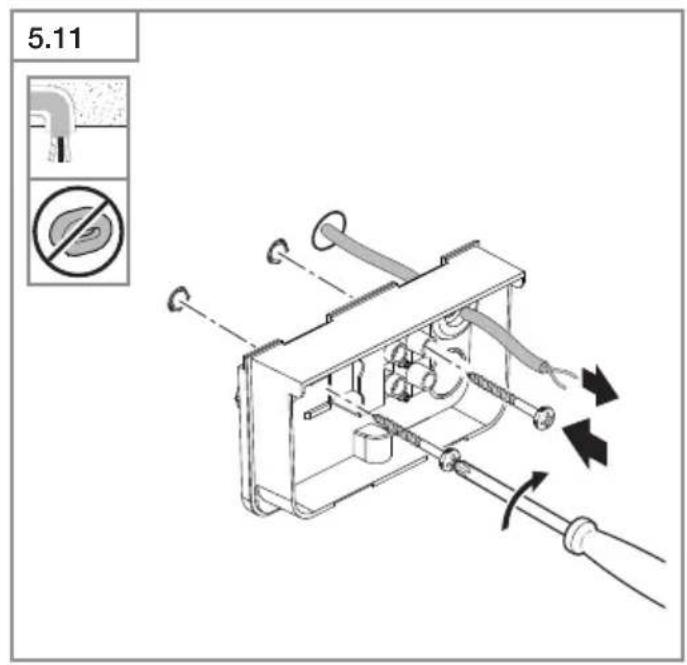
text_image
5.11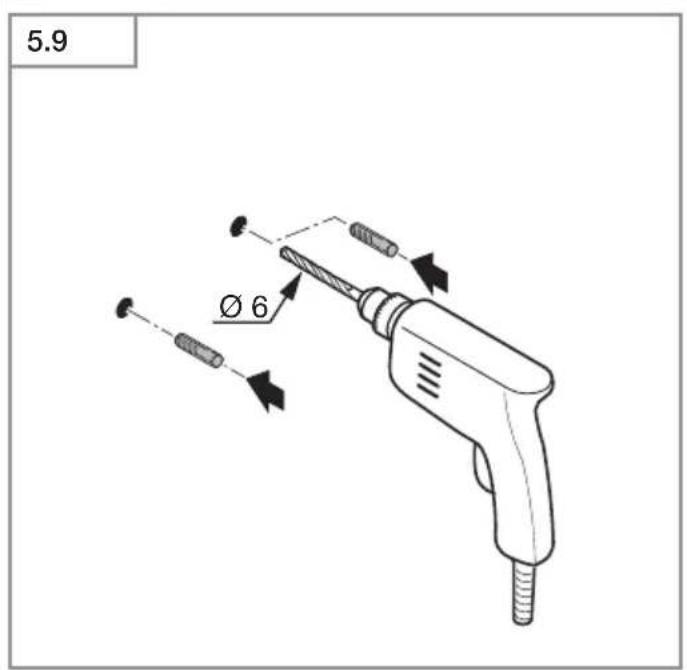
text_image
5.9 Ø 6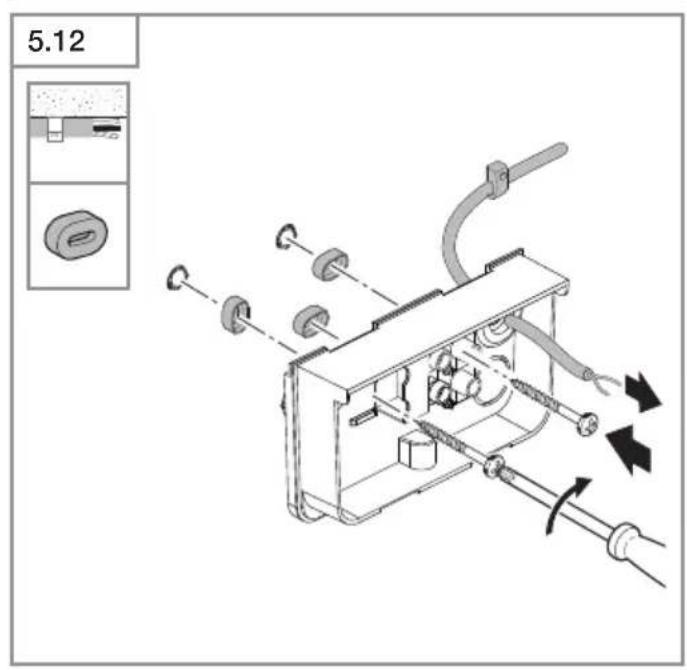
text_image
5.12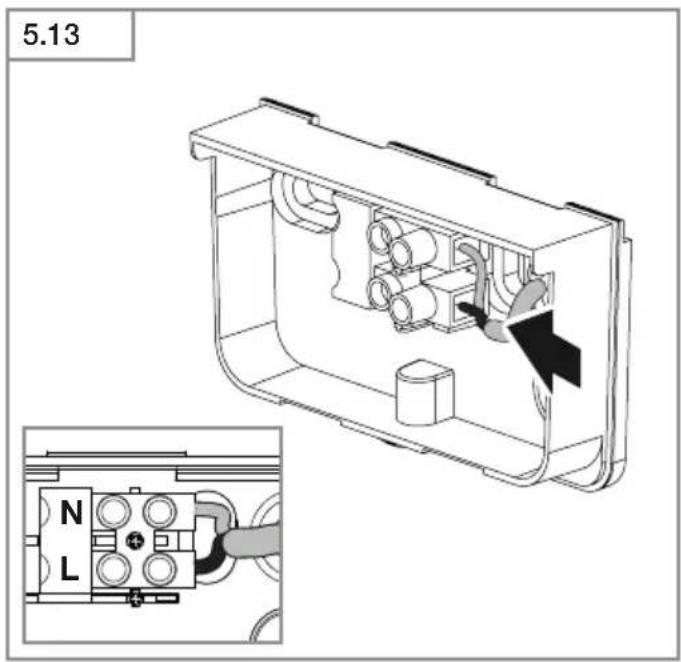
text_image
5.13 N L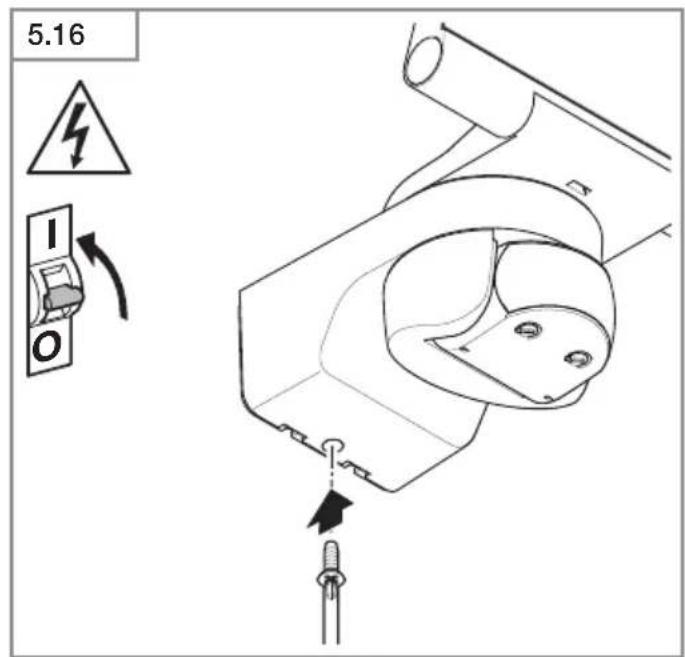
text_image
5.16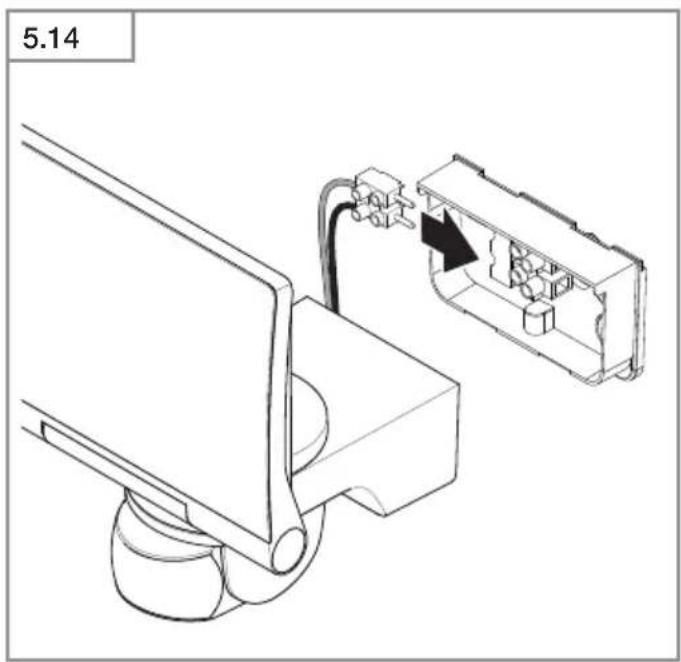
text_image
5.14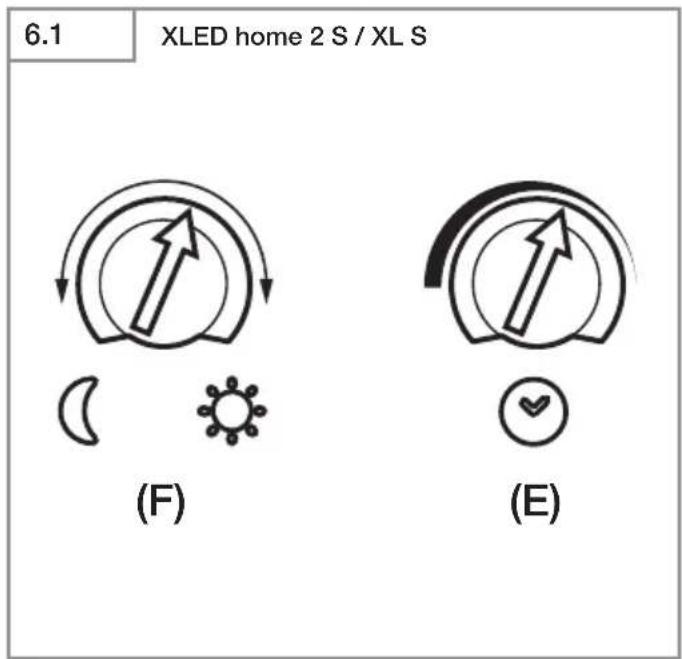
text_image
6.1 XLED home 2 S / XL S (F) (E)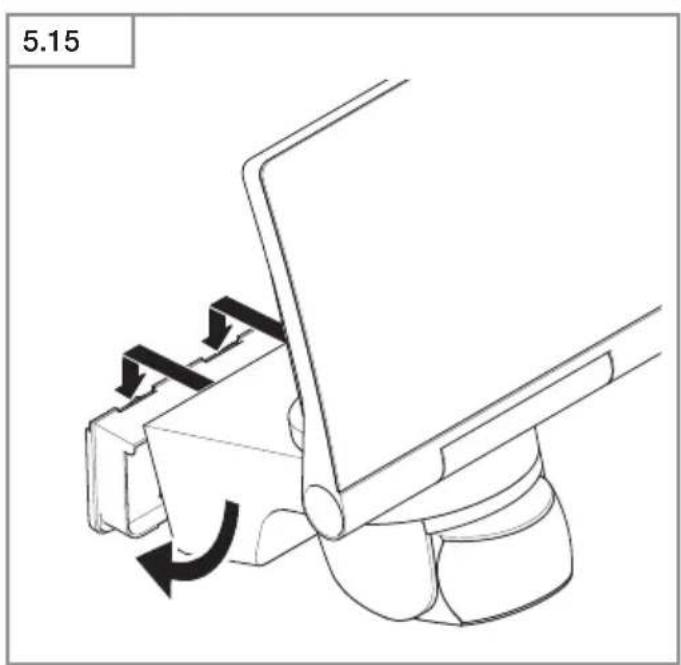
natural_image
Mechanical assembly diagram showing a lever mechanism with rotational arrows (no text or symbols)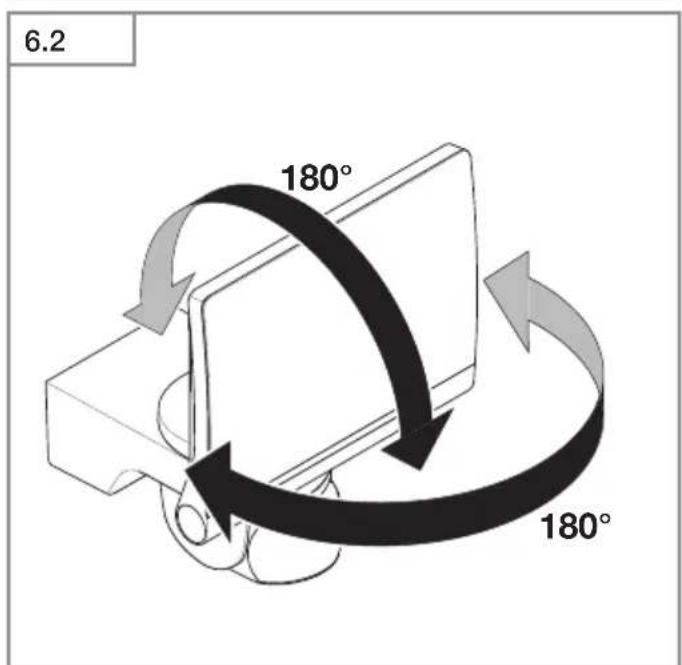
text_image
6.2 180° 180°6.3
XLED home 2 S / XL S / SC
text_image
180° 90° 90°6.4
XLED home 2 S / XL S / SC

natural_image
Line drawing of a pair of scissors cutting through a pair (no text or symbols)6.5
XLED home 2 S / XL S / SC

natural_image
Three-step diagram showing a mechanical device with rotating components and fan blades, illustrating motion or assembly (no text or symbols)6.6
XLED home 2 S / XL S / SC

natural_image
Technical line drawing of a mechanical component with a 90-degree rotation indicator (no text or symbols)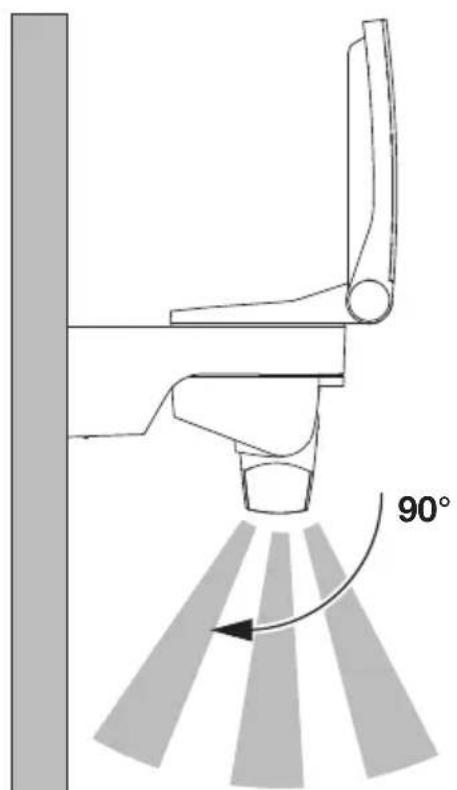
text_image
90°DE
3. XLED home 2 / XLED home XL S / XLED home SC / XLED home
XLED home 2 S / XL S
- Bedienung per Einstellregler.
XLED home 2 SC
XLED home 2 S / XL S / S SC
- XLED home 2 S / XL S
- XLED home 2 SC
- XLED home 2
Lieferumfang XLED home 2 S / XL S / SC
(Abb. 3.1)
Lieferumfang XLED home 2 (Abb. 3.2)
(XLED home 2 S / XL S / SC) (Abb. 3.11)
A LED-Panel
B Gehäuse
C Wandhalter
D Sensoreinheit
E Zeiteinstellung (XLED home 2 S / XLED home 2 XL S)
F Dämmerungseinstellung (XLED home 2 S / XLED home 2 XL S)
XLED home 2 S / XLED home 2 XL S
STEINEL Connect App (XLED home 2 SC)
text_image
QR code image containing encoded data, no visible human-readable textiOS

text_image
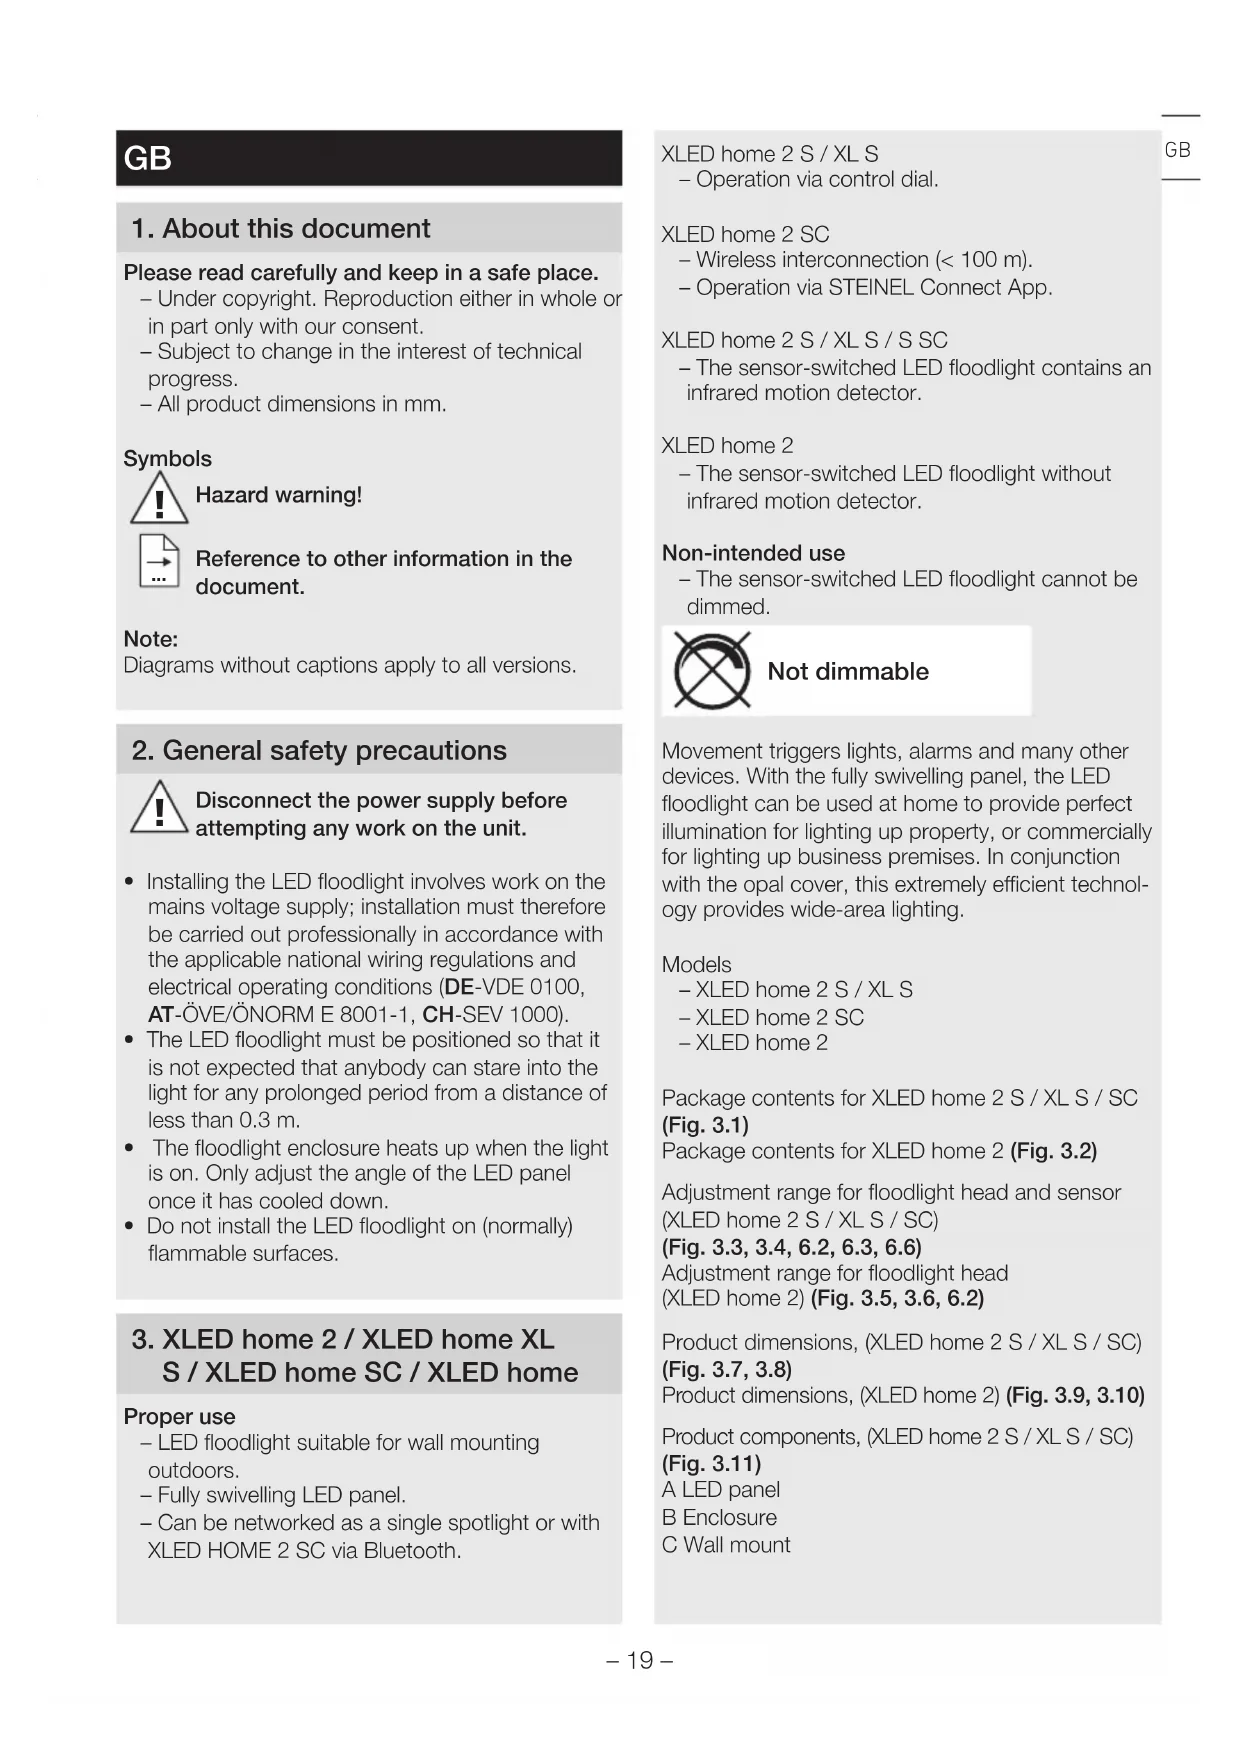
QR code image containing encoded data, no visible human-readable textPlease read carefully and keep in a safe place.
– Under copyright. Reproduction either in whole or in part only with our consent.
– Subject to change in the interest of technical progress.
- All product dimensions in mm.
Symbols

Hazard warning!

Reference to other information in the document.
Note:
Diagrams without captions apply to all versions.
2. General safety precautions

Disconnect the power supply before attempting any work on the unit.
- Installing the LED floodlight involves work on the mains voltage supply; installation must therefore be carried out professionally in accordance with the applicable national wiring regulations and electrical operating conditions (DE-VDE 0100, AT-ÖVE/ÖNORM E 8001-1, CH-SEV 1000).
- The LED floodlight must be positioned so that it is not expected that anybody can stare into the light for any prolonged period from a distance of less than 0.3 m.
- The floodlight enclosure heats up when the light is on. Only adjust the angle of the LED panel once it has cooled down.
- Do not install the LED floodlight on (normally) flammable surfaces.
3. XLED home 2 / XLED home XL S / XLED home SC / XLED home
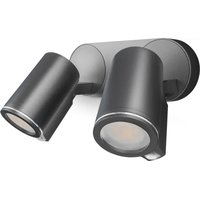
Proper use
- LED floodlight suitable for wall mounting outdoors.
– Fully swivelling LED panel. - Can be networked as a single spotlight or with XLED HOME 2 SC via Bluetooth.
XLED home 2 S / XL S
– Operation via control dial.
XLED home 2 SC
– Wireless interconnection (< 100 m).
– Operation via STEINEL Connect App.
XLED home 2 S / XL S / S SC
- The sensor-switched LED floodlight contains an infrared motion detector.
XLED home 2
- The sensor-switched LED floodlight without infrared motion detector.
Non-intended use
- The sensor-switched LED floodlight cannot be dimmed.

Not dimmable
Movement triggers lights, alarms and many other devices. With the fully swivelling panel, the LED floodlight can be used at home to provide perfect illumination for lighting up property, or commercially for lighting up business premises. In conjunction with the opal cover, this extremely efficient technology provides wide-area lighting.
Models
- XLED home 2 S / XL S
- XLED home 2 SC
- XLED home 2
Package contents for XLED home 2 S / XL S / SC
(Fig. 3.1)
Package contents for XLED home 2 (Fig. 3.2)
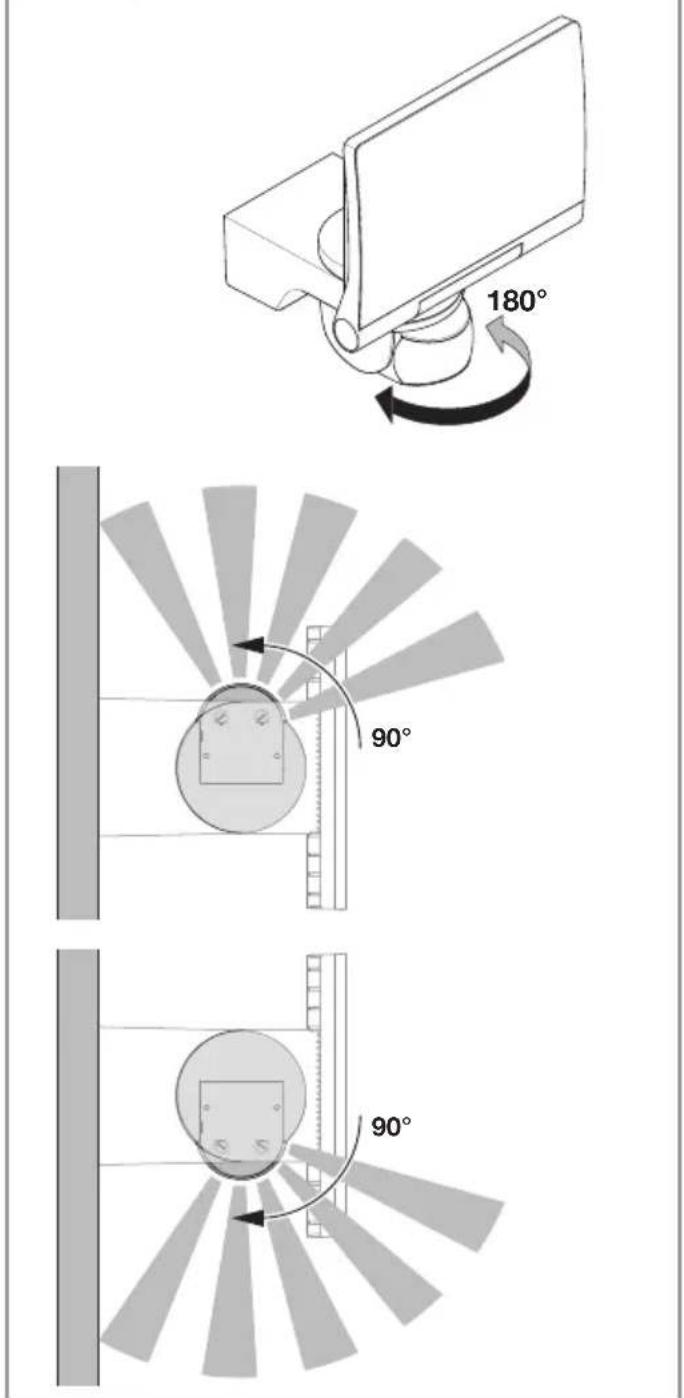
Adjustment range for floodlight head and sensor (XLED home 2 S / XL S / SC)
(Fig. 3.3, 3.4, 6.2, 6.3, 6.6)
Adjustment range for floodlight head
(XLED home 2) (Fig. 3.5, 3.6, 6.2)
Product dimensions, (XLED home 2 S / XL S / SC)
(Fig. 3.7, 3.8)
Product dimensions, (XLED home 2) (Fig. 3.9, 3.10)
Product components, (XLED home 2 S / XL S / SC)
(Fig. 3.11)
A LED panel
B Enclosure
C Wall mount
D Sensor unit
ETimesetting(XLED home 2 S / XLED home 2 XL S)
F Twilight setting (XLED home 2 S / XLED home 2 XL S)
Product components, (XLED home 2) (Fig. 3.12)
A LED panel
B Enclosure
C Wall mount
Luminous intensity distribution (Fig. 3.13)
4. Electrical installation
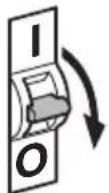
- Switch OFF power supply. (Fig. 4.1)
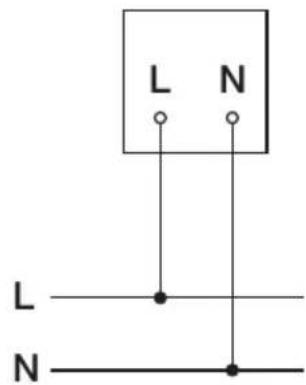
Connecting the mains power supply lead
The supply lead is a 2 or 3-core cable:
L = phase conductor (usually black, brown or grey)
N = neutral conductor (usually blue)
Note:
The protective-earth conductor need not be connected for this product.
Wiring diagrams XLED home 2 S / XLED home 2 X L S / XLED home 2 (Fig. 4.2)
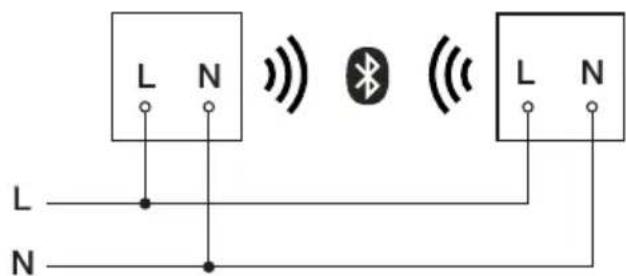
Wiring diagram XLED home 2 SC (Fig. 4.3)
Important:
Incorrectly wired connections will produce a short circuit later on in the LED floodlight or your fuse box. In this case, you must identify the individual conductors once again and reconnect them.
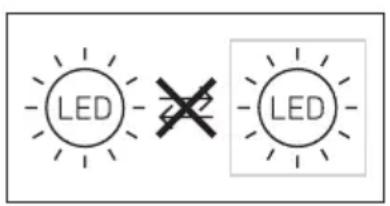
The light source of this LED floodlight cannot be replaced. If the light source needs to be replaced (e.g. at the end of its service life), the complete LED floodlight must be replaced.
text_image
LED LED5. Installation
- Check all components for damage.
- Do not use the product if the LED floodlight is damaged.
- Select an appropriate mounting location, taking the reach and motion detection into consideration. (Fig. 5.1, 5.2, 5.3)
- Align the LED floodlight. (Fig. 5.4)
The most reliable way to detect movement is given by mounting the LED floodlight to point across the direction in which people walk and by making sure no obstacles (e.g. trees, walls etc.) interrupt the line of sensor vision. (Fig. 5.2, 5.3)
Mounting procedure
- Switch OFF power supply. (Fig. 4.1)
- Undo retaining screw. (Fig. 5.5)
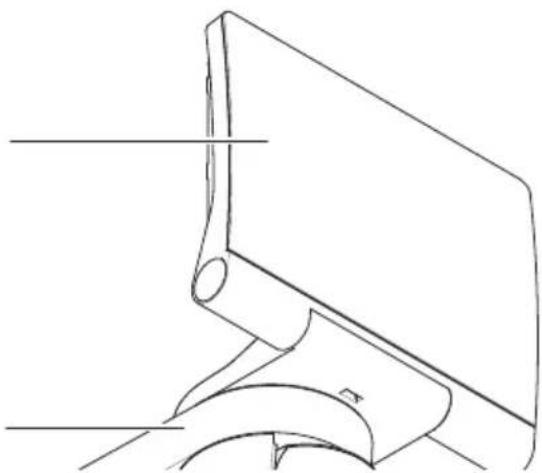
- Detach enclosure (B) from wall mount (C). (Fig. 5.6)
- Detach plug-in terminal from wall mount. (Fig. 5.7)
• Mark drill holes. (Fig. 5.8) - Drill holes and fit ground plugs. (Fig. 5.9)
• Fit sealing plug. (Fig. 5.10)
– Power supply lead, concealed (Fig. 5.11)
– Power supply lead, surface-mounted, with spacers (Fig. 5.12) - Connect conductors. (Fig. 5.13)
- Connect plug-in terminal. (Fig. 5.14)
• Fit enclosure onto wall mount. (Fig. 5.15) - Screw in locking screw. (Fig. 5.16)
- Switch ON power supply. (Fig. 5.16)
- Make settings "6. Function"
6. Function
XLED home 2 S / XLED home 2 XL S
Setting functions
- Setting via control dial (XLED home 2 S / XL S)
- Setting via STEINEL Connect App (XLED home 2 SC)
Factory settings
Time setting (E): 8 seconds
Twilight setting (F): 2,000 lux, (daytime mode)
Time setting (Fig. 6.1 / E)
The time you want the LED floodlight to stay on for (main light) is infinitely adjustable from approx. 8 seconds to a maximum of 35 minutes. Any movement detected before this time elapses will restart the timer.
- Control dial set to + = longest time,
approx. 35 minutes - Control dial set to - = approx. 8 seconds
Twilight setting (Fig. 6.1 / F)
The LED floodlight's chosen response threshold can be infinitely varied from approx. 2 to 1,000 lux.
- Control dial set to ⚙ = daylight operation (independent of ambient brightness)
- Control dial set to = night-time operation (approx. 2 lux)
The control dial must be turned to ⚙ when adjusting the detection zone and performing the functional test in daylight.
Note:
When setting the detection zone, we recommend selecting the shortest time.
Note:
After the LED floodlight switches OFF, it takes approx. 1 second before it is able to start detecting movement again. The LED floodlight will only switch ON in response to movement once this period has elapsed.
Reach setting / adjustment
The detection zone can be optimised to suit requirements.
- Sensor unit swivels through 180^ . (Fig. 6.3)
– Sensor unit tilts through 90°. (Fig. 6.6)
Adhesive shroud (Fig. 6.4)
The film shroud can be used for masking out any number of lens segments to limit reach as required. Inadvertent triggering is ruled out or the sensor can be targeted to watch over danger spots (Fig. 6.5).
Other information:
Floodlight adjustment range (Fig. 6.2)
Note:
The settings last selected on the control will be used.
STEINEL Connect App (XLED home 2 SC)
To configure the device via smartphone or tablet, you must download the STEINEL Connect App from your app store. You will need a Bluetooth-capable smartphone or tablet.
XLED home 2 SC
Factory settings
Twilight setting: 2,000 lux, daytime mode, lux teach Time setting: 5 seconds
Android

text_image
QR code image containing encoded data, no visible human-readable textiOS

text_image
QR code image containing encoded data, no visible human-readable textFunctions:
Following functions can be set via the STEINEL Connect App:
- Time setting 5 s - 60 min.
– Twilight setting 2 – 2,000 lux - Teaching lux
- Basic light level
- Main light level
- Soft light start function
- Teaching time of day
- Reach adjustment
- Bluetooth interconnection
Time setting
The stay-ON time can be set to any period from approx. 5 seconds to a maximum of 60 minutes. Every movement detected re-activates the light. The shortest time setting is recommended when adjusting the detection zone and performing the functional test.
Twilight setting
The brightness response threshold (twilight) can be infinitely varied from approx. 2 - 2,000 lux.
Daylight mode must be selected when adjusting the detection zone and performing the functional test in daylight..
Basic light level
The brightness of the basic light level setting can be varied between 0% and 100%.
Basic light can be set in relation to time or ambient light level. The light switches to maximum output (100%) for the time selected in response to movement in the detection zone. The light then returns to the basic light level.
Main light level
The brightness of the main light level setting can be varied between 0 % and 100 %.
Soft light start function
On switching ON, light level constantly builds up to 100 % (fade in).
On switching OFF, light level is constantly reduced to 0 % (fade out).
Fade-in and fade-out times are selectable.
Manual override
The manual override parameters can be set via the STEINEL Connect App. In the new app, manual override can be set to any specific time of day (teaching time of day).
Bluetooth interconnection (Bluetooth Connect mesh)
The sensor switch complies with the Bluetooth Mesh standard. It can be interconnected with all products complying with the Bluetooth mesh standard.
The sensor switch is configured via the STEINEL Connect App. Appropriate network keys are saved on a smartphone or tablet the first time a connection is made between the sensor switch and STEINEL Connect App. The key rules out any unauthorised access to the sensor. The network key must be shared for access via another smartphone or tablet.
Note:
After the LED floodlight switches OFF, it takes approx. 1 second before it is able to start detecting movement again. The LED floodlight will only switch ON in response to movement once this period has elapsed.
The XLED home 2 SC has an internal clock for time-based activation and deactivation. This automatically synchronises with the clock of the connected smartphone via the STEINEL Connect App each time a Bluetooth connection is established. To ensure correct function following an interruption in the LED floodlight's power supply, it must be re-connected via the STEINEL Connect App. The internal clock is re-synchronised with the smartphone clock.
7. Operation / maintenance
The LED floodlight is not suitable for burglar alarm systems as it is not tamperproof in the manner prescribed for such systems. Weather conditions may affect the way the LED floodlight works. Strong gusts of wind, snow, rain and hail may cause the light to come ON when it is not wanted because the sensor is unable to distinguish between sudden changes in temperature and sources of heat.
The detector lens may be cleaned with a damp cloth if it gets dirty (do not use cleaning agents).
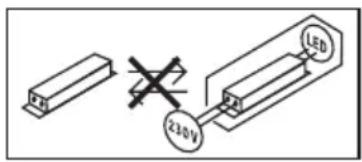
Important note: the control gear cannot be replaced.
text_image
210V LED8. Disposal
Electrical and electronic equipment, accessories and packaging must be recycled in an environmentally compatible manner.
Do not dispose of electrical and electronic equipment as domestic waste.
EU countries only:
Under the current European Directive on Waste Electrical and Electronic Equipment and its implementation in national law, electrical and electronic equipment no longer suitable for use must be collected separately and recycled in an environmentally compatible manner.
9. Declaration of Conformity
STEINEL GmbH hereby declares that the XLED home 2 SC radio equipment type conforms to Directive 2014/53/EU. The full wording of the EU Declaration of Conformity is available for downloading from the following Internet address: www.steinel.de
10. Manufacturer's Warranty
Manufacturer's warranty of STEINEL GmbH, Diesel strasse 80-84, DE-33442 Herzebrock-Clarholz, Germany
All STEINEL products meet the highest quality standards. For this reason, we, the manufacturer, are pleased to provide you, the customer, with a warranty under the following terms and conditions: The warranty covers the absence of deficiencies which are proven to be the result of a material defect or fault in manufacturing and which are reported to us immediately after detection and within the warranty period. The warranty shall cover all STEINEL Professional products sold and used in Germany.
Our warranty cover for consumers
The provisions below apply to consumers. A consumer is any natural person who, on entering into the purchase transaction, neither acts in exercising their commercial nor their self-employed activity.
You can opt for warranty cover in the form of repair or replacement which will be provided free of charge (if applicable, in the form of a successor model of the same or higher quality) or in the form of a credit note.
In the case of sensors, floodlights, outdoor and indoor lights, the warranty period for the STEINEL Professional product you have purchased is:
5 years
for hot-air and hot-melt gluing products: 1 year in each case from the date on which the product was purchased.
We shall bear the shipping costs but not the transport risks involved in return shipment.
Our warranty cover for entrepreneurs
The provisions below apply to entrepreneurs. Entrepreneur is a natural or legal person or partnership with legal personality who or which, on entering into the purchase transaction, acts in exercising their or its commercial or self-employed activity. We have the option of providing warranty cover by
rectifying deficiencies free of charge, replacing a product free of charge (if applicable, in the form of a successor model of the same or higher quality) or by issuing a credit note.
In the case of sensors, floodlights, outdoor and indoor lights, the warranty period for the STEINEL Professional product you have purchased is:
5 years
for hot-air and hot-melt gluing products: 1 year in each case from the date on which the product was purchased.
Within the scope of warranty cover, we shall not bear your expenses accruing from subsequent fulfillment nor shall we bear your expenses for removing the defective product and installing a replacement product.
Statutory rights accruing from defects, gratuitousness
The warranty cover described here shall be applicable in addition to the statutory rights of warranty – including special consumer protection provisions – and shall not restrict or replace them. Exercising your statutory rights in the event of defects is gratuitous.
Exemptions from the warranty
All replaceable lamps are expressly excluded from this warranty.
In addition to this, the warranty shall not cover:
– any wear resulting from use or any other natural wear of product parts or any deficiencies in the STEINEL Professional product that are attributable to wear caused by use or other natural wear,
– any improper or non-intended use of the product or any failure to observe the operating instructions,
– any unauthorised additions, alterations or other modifications to the product or any deficiencies attributable to the use of accessory, supplementary or replacement parts which are not genuine STEINEL parts,
– any maintenance or care of products that is not carried out in accordance with the operating instructions,
– any attachment or installation that is not in accordance with STEINEL’s installation instructions,
– any damage or loss occurring in transit.
Application of German law
The warranty shall be governed by German law excluding the United Nations Convention concerning the International Sale of Goods (CISG).
Making claims
If you wish to make a warranty claim, please send your product complete and carriage paid with the original receipt of purchase, which must show the date of purchase and product designation, either to your retailer or directly to us at STEINEL (UK) Ltd. – 25 Manasty Road, Axis Park, Orton Southgate, GB- Peterborough Cambs PE2 6UP United Kingdom. For this reason, we recommend that you keep your receipt of purchase in a safe place until the warranty period expires.
- Technical specifications
GB
| XLED home 2 S XLED | home 2 XL S XLED | home 2 SC XLED home 2 | ||
| Dimensions(H × W × D) | 218 × 180 ×161 mm | 240 × 180 ×161 mm | 218 × 180 ×161 mm | 181 × 180 ×161 mm |
| Supply voltage 220-240 V / 50/60 Hz | ||||
| Power consumption (Pon) | 13.7 W 19.3 W 13.8 W | 13.7 W | ||
| Luminous flux / brightness | 1550 lm (360°) /113 lm / W | 2124 lm (360°) /110 lm / W | 1550 lm (360°) /113 lm / W | 1550 lm (360°) /113 lm / W |
| Standby Sensor (Pab) / network (Pnet) | 0.50 W /– | 0.50 W /– | 0.35 W /0.35 W | – /– |
| Weight 0.575 kg 0.620 kg 0.575 kg 0.480 kg | ||||
| Area illuminated Front view283.1 cm2Side view113 cm2 | Front view316.2 cm2Side view115 cm2 | Front view283.1 cm2Side view113 cm2 | Front view274.1 cm2Side view86.3 cm2 | |
| Mains current 80 mA 113 mA 80 mA 80 mA | ||||
| Power factor 0.74 0.74 0.78 0.74 | ||||
| Colour temperature | 3,000 K (warm white) | |||
| Colour rendering index | Ra=82 | |||
| Average rated life expectancy | L70B50 at 25 °C: >60,000 hours | |||
| Colour consistency SDCM | Starting value: 3 | |||
| Luminous intensity distribution | 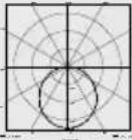 | |||
| Sensor systems | Passive infrared | – | ||
| Reach | max. 10 m | – | ||
| Angle of coverage | 180° | – | ||
| Time setting | 8 s–35 min | 5 s–60 min | – | |
| Twilight setting | 2–2,000 lux | – | ||
| IP / protection class | IP44 / II | |||
| XLED home 2 S XLED | home 2 XL S XLED | home 2 SC XLED home 2 | |
| Ambient temperature | -20 °C - +40 °C | ||
| Bluetooth frequency | - | 2.4 - 2.48 GHz | - |
| Bluetooth transmitter power (Pnet) | - | 5 dBm / 3 mW | - |
| Energy efficiency class | This product contains an energy efficiency class “E” light source | ||
 | Technical documentation at www.steinel.de | ||
12. Troubleshooting
GB
Malfunction Cause Remedy
| LED floodlight without power | ■ Fuse has blown, not switched ON, break in wiring■ Short circuit | ■ New fuse, turn on power switch, check wiring with voltage tester■ Check connections |
| Sensor-switched LED floodlight will not switch ON | ■ Twilight setting in night-time mode during daytime operation■ Mains switch OFF■ Fuse blown■ Detection zone not correctly adjusted | ■ Reset■ Switch ON■ Replace fuse, check connection if necessary■ Readjust |
| Sensor-switched LED floodlight will not switch OFF | ■ Continued movement within the detection zone | ■ Check zone and readjust if necessary or apply shroud |
| Sensor-switched LED floodlight keeps switching ON and OFF | ■ Animals moving in detection zone | ■ Tilt sensor higher or fit shrouds to target sensor; adjust detection zone or fit shrouds |
| Sensor-switched LED floodlight switches ON when it should not | ■ Wind is moving trees and bushes in the detection zone■ Cars in the street are detected■ Sudden temperature changes due to weather (wind, rain, snow) or air expelled from fans, open windows■ Sensor-switched LED floodlight swaying (moving), resulting, for example, from gusts of wind or heavy precipitation | ■ Change detection zone■ Change detection zone■ Adjust detection zone or install in a different place■ Fit sensor-switched LED floodlight to a firm surface |
| LED floodlight is now shown in the Bluetooth listing | ■ Incorrect region selected | ■ Settings→ Region EU / Region US |
| Forgotten password? ■ After entering wrong password: | "Reset password" button; switch power supply OFF and back ON again within 10 minutes; then re-enter password | |
| App won't start | ■ Location is not activated | ■ Activate location in smartphone settings |
| Settings for LED floodlight are greyed out | ■ LED floodlight is not declared as group master (slave mode) | ■ Set master floodlight■ Declare LED floodlight as master |
| No Bluetooth LED floodlight found | ■ LED floodlight is not in reach■ Bluetooth is deactivated on smartphone | ■ Check whether Bluetooth is activated on smartphone or reduce distance to the product■ Re-startsearch |
| No connection being set up from smartphone to LED floodlight | ■ Smartphone too close to device■ Smartphone not compatible with app■ App version not up to date | ■ Distance to LED floodlight at least 1.5 m■ Use different smartphone■ Update STEINEL Connect App in app store |
FR
3. XLED home 2 / XLED home XL S / XLED home SC / XLED home
Utilisation conforme aux prescriptions
XLED home 2 S / XL S
XLED home 2 S / XL S / S SC
- XLED home 2 S / XL S
- XLED home 2 SC
- XLED home 2
(XLED home 2 S / XL S / SC) (Fig. 3.11)
A Panneau LED
B Boîtier
C Support mural
D Détecteur
ETemporisation(XLED home 2 S / XLED home 2 XL S)
(XLED home 2 S / XLED home 2 XL S)
XLED home 2 S / XLED home 2 XL S
L'application STEINEL connect (XLED home 2 SC)
text_image
QR code image containing encoded data, no visible human-readable textiOS

text_image
QR code image containing encoded data, no visible human-readable textFonctions :
3. XLED home 2 / XLED home XL S / XLED home SC / XLED home
XLED home 2 S / XL S
- Bediening via instelknopje.
XLED home 2 SC
– Draadloze koppeling (< 100 m).
- Bediening m.b.v. STEINEL Connect App.
XLED home 2 S / XL S / S SC
- XLED home 2 S / XL S
- XLED home 2 SC
- XLED home 2
(XLED home 2 S / XLED home 2 XL S)
S / XLED home 2 XL S / XLED home 2 (afb. 4.2)
XLED home 2 S / XLED home 2 XL S
Functies instellen
STEINEL Connect App (XLED home 2 SC)
text_image
QR code image containing encoded data, no visible human-readable textiOS

text_image
QR code image containing encoded data, no visible human-readable textFunctions:
3. XLED home 2 / XLED home XL S / XLED home SC / XLED home
XLED home 2 S / XL S
XLED home 2 S / XL S / S SC
- XLED home 2 S / XL S
- XLED home 2 SC
- XLED home 2
(XLED home 2 S / XL S / SC) (Fig. 3.11)
A Pannello LED
B Involucro
(XLED home 2 S / XLED home 2 XL S)
S / XLED home 2 XL S / XLED home 2 (Fig. 4.2)
XLED home 2 S / XLED home 2 XL S
STEINEL Connect App (XLED home 2 SC)
text_image
QR code image containing encoded data, no visible human-readable textiOS

text_image
QR code image containing encoded data, no visible human-readable textFunzioni:
3. XLED home 2 / XLED home XL S / XLED home SC / XLED home
Uso previsto
- Panel LED girable.
XLED home 2 S / XL S
XLED home 2 S / XL S / S SC
-XLED home 2 S / XL S
- XLED home 2 SC
- XLED home 2
Volumen de suministro XLED home 2 S / XL S / SC (fig. 3.1)
Volumen de suministro XLED home 2 (fig. 3.2)
(XLED home 2 S / XL S / SC) (fig. 3.11)
A Panel LED
B Carcasa
C Soporte de pared
D Unidad del sensor
XLED home 2 S / XLED home 2 XL S
Ajustar funciones
STEINEL Connect App (XLED home 2 SC)
text_image
QR code image containing encoded data, no visible human-readable textiOS

text_image
QR code image containing encoded data, no visible human-readable textFunciones:
3. XLED home 2 / XLED home XL S / XLED home SC / XLED home
Utilização prevista
XLED home 2 S / XL S
XLED home 2 S / XL S / S SC
-XLED home 2 S / XL S
- XLED home 2 SC
- XLED home 2
Vista geral (XLED home 2 S / XL S / SC) (Fig. 3.11)
XLED home 2 S / XLED home 2 XL S
Ajustar funções
- Ajuste através do potenciómetro (XLED home 2 S / XL S)
- Ajuste através da STEINEL Connect App (XLED home 2 SC)
STEINEL Connect App (XLED home 2 SC)
text_image
QR code image containing encoded data, no visible human-readable textiOS

text_image
QR code image containing encoded data, no visible human-readable text3. XLED home 2 / XLED home XL S / XLED home SC / XLED home
XLED home 2 S / XL S
XLED home 2 S / XL S / S SC
- XLED home 2 S / XL S
- XLED home 2 SC
- XLED home 2
(XLED home 2 S / XL S / SC)
(bild 3.3, 3.4, 6.2, 6.3, 6.6)
XLED home 2 S / XLED home 2 XL S
STEINEL Connect App (XLED home 2 SC)
text_image
QR code image containing encoded data, no visible human-readable textiOS

text_image
QR code image containing encoded data, no visible human-readable textFunktioner:
3. XLED home 2 / XLED home XL S / XLED home SC / XLED home
Korrekt anvendelse
XLED home 2 S / XL S
XLED home 2 S / XL S / S SC
- XLED home 2 S / XL S
- XLED home 2 SC
- XLED home 2
Leveringsomfang XLED home 2 S / XL S / SC (fig. 3.1)
Leveringsomfang XLED home 2 (fig. 3.2)
XLED home 2 S / XLED home 2 XL S
(XLED home 2 S / XL S)
- Indstilling med STEINEL Connect App
(XLED home 2 SC)
Standardindstillinger
Tidsindstilling (E): 8 sekunder
Skumringsindstilling (F): 2.000 lux, (dagsdrift)
Tidsindstilling (fig. 6.1 / E)
STEINEL Connect App (XLED home 2 SC)
For at konfigurere af enheden med smart-phone eller tablet skal du downloade STEINEL Connect App fra din AppStore. Du skal bruge en smartphone eller tablet med Bluetooth.
XLED home 2 SC
Standardindstillinger
Skumringsindstilling: 2.000 lux, Dagsdrift, lux-teach
Tidsindstilling: 5 sekunder
Android

text_image
QR code image containing encoded data, no visible human-readable textiOS

text_image
QR code image containing encoded data, no visible human-readable textFunktioner:
3. XLED home 2 / XLED home XL S / XLED home SC / XLED home
XLED home 2 S / XL S
XLED home 2 S / XL S / S SC
- XLED home 2 S / XL S
- XLED home 2 SC
- XLED home 2
XLED home 2 S / XLED home 2 XL S
STEINEL Connect App (XLED home 2 SC)
text_image
QR code image containing encoded data, no visible human-readable textiOS

text_image
QR code image containing encoded data, no visible human-readable textToiminnot:
3. XLED home 2 / XLED home XL S / XLED home SC / XLED home
XLED home 2 S / XL S
XLED home 2 S / XL S / S SC
- Sensor LED-lyskasteren inneholder en infrarød bevegelsessensor.
XLED home 2
- Sensor LED-lyskaster uten infrarød bevegelses-sensor.
- XLED home 2 S / XL S
- XLED home 2 SC
- XLED home 2
Leveringsomfang XLED home 2 S / XL S / SC (ill. 3.1)
Leveringsomfang XLED home 2 (ill. 3.2)
(XLED home 2 S / XL S / SC)
(ill. 3.3, 3.4, 6.2, 6.3, 6.6)
Svingvidde lyskasterhode (XLED home 2)
(ill. 3.5, 3.6, 6.2)
Produktmål (XLED home 2 S / XL S / SC) (ill. 3.7, 3.8)
Produktmål (XLED home 2) (ill. 3.9., 3.10.)
Apparatoversikt (XLED home 2 S / XL S / SC) (ill. 3.11)
A LED-panel
B Hus
C Veggholder
D Sensorenhet
ETidsinnstilling(XLED home 2 S / XLED home 2 XL S)
FSkumringsinnstilling(XLED home 2
S / XLED home 2 XL S)
Apparatoversikt (XLED home 2) (ill. 3.12)
A LED-panel
B Hus
C Veggholder
Koblingsskjemaer for XLED home 2 S / XLED home 2 XL S / XLED home 2 (ill. 4.2)
XLED home 2 S / XLED home 2 XL S
Tidsinnstilling (ill. 6.1 / E)
∅nsket belysningstid for LED-lyskasteren kan stilles trinnløst inn fra ca. 8 sekunder til maks. 35 minutter.
- Skruknapp + = ca. 35 minutter
- Skruknapp - = ca. 8 sekunder
Skumringsinnstilling (ill. 6.1 / F)
STEINEL Connect-app (XLED home 2 SC)
For å konfigurere av enheten med smart- telefon eller nettbrett må du laste ned STEINEL
text_image
QR code image containing encoded data, no visible human-readable textiOS

text_image
QR code image containing encoded data, no visible human-readable textFunksjoner:
3. XLED home 2 / XLED home XL S / XLED home SC / XLED home
XLED home 2 S / XL S
XLED home 2 S / XL S / S SC
- XLED home 2 S / XL S
- XLED home 2 SC
- XLED home 2
XLED home 2 S / XLED home 2 XL S
Ρύθμιση λειτουργιών
STEINEL Connect App (XLED home 2 SC)
text_image
QR code image containing encoded data, no visible human-readable textiOS

text_image
QR code image containing encoded data, no visible human-readable textΛειτουργίες:
text_image
23.0V LED8. Διάθεση
3. XLED home 2 / XLED home XL S / XLED home SC / XLED home
XLED home 2 S / XL S
XLED home 2 S / XL S / S SC
- XLED home 2 S / XL S
- XLED home 2 SC
- XLED home 2
(XLED home 2 S / XL S / SC)
(Şek. 3.3, 3.4, 6.2, 6.3, 6.6)
EZamanayari(XLED home 2 S / XLED home 2 XL S)
(XLED home 2 S / XLED home 2 XL S)
XLED home 2 S / XLED home 2 XL S / XLED
XLED home 2 S / XLED home 2 XL S
STEINEI Connect App (XLED home 2 SC)
text_image
QR code image containing encoded data, no visible human-readable textiOS

text_image
QR code image containing encoded data, no visible human-readable textFonksiyonlar:
text_image
230 V LED8. Tasfiye
3. XLED home 2 / XLED home XL S / XLED home SC / XLED home
XLED home 2 S / XL S
XLED home 2 S / XL S / S SC
- XLED home 2 S / XL S
- XLED home 2 SC
- XLED home 2
XLED home 2 S / XLED home 2 XL S
Funkciók beállítása
STEINEL Connect App (XLED home 2 SC)
text_image
QR code image containing encoded data, no visible human-readable textiOS

text_image
QR code image containing encoded data, no visible human-readable textMűveletek:
3. XLED home 2 / XLED home XL S / XLED home SC / XLED home
XLED home 2 S / XL S
XLED home 2 S / XL S / S SC
- XLED home 2 S / XL S
- XLED home 2 SC
- XLED home 2
Rozsah dodávky XLED home 2 S / XL S / SC (obr. 3.1)
Rozsah dodávky XLED home 2 (obr. 3.2)
(XLED home 2 S / XLED home 2 XL S)
(XLED home 2 S / XLED home 2 XL S)
XLED home 2 S / XLED home 2 XL S
Nastavení funkcí
(XLED home 2 S / XL S)
text_image
QR code image containing encoded data, no visible human-readable textiOS

text_image
QR code image containing encoded data, no visible human-readable textFunkce:
3. XLED home 2 / XLED home XL S / XLED home SC / XLED home
Správne používanie
XLED home 2 S / XL S
XLED home 2 S / XL S / S SC
- XLED home 2 S / XL S
- XLED home 2 SC
- XLED home 2
Rozsah dodávky verzií XLED home 2 S / XL S / SC (obr. 3.1)
Rozsah dodávky verzie XLED home 2 (obr. 3.2)
Rozsah otáčania hlavy reflektora a senzora
(XLED home 2 S / XL S / SC)
(obr. 3.3, 3.4, 6.2, 6.3, 6.6)
Rozsah otáčania hlavy reflektora (XLED home 2) (obr. 3.5, 3.6, 6.2)
(XLED home 2 S / XLED home 2 XL S)
FNastaveniestmievania
(XLED home 2 S / XLED home 2 XL S)
XL S / XLED home 2 (obr. 4.2)
Schéma zapojenia XLED home 2 SC (obr. 4.3)
Dôležité:
XLED home 2 S / XLED home 2 XL S
Nastavenie funkcií
– Nastavenie cez nastavovací regulátor
(XLED home 2 S / XL S)
– Nastavenie cez aplikáciu STEINEL Connect
(XLED home 2 SC)
Nastavenia z výroby
text_image
QR code image containing encoded data, no visible human-readable textiOS

text_image
QR code image containing encoded data, no visible human-readable textFunkcie:
3. XLED home 2 / XLED home XL S / XLED home SC / XLED home
XLED home 2 S / XL S
XLED home 2 S / XL S / S SC
- XLED home 2 S / XL S
- XLED home 2 SC
- XLED home 2
(XLED home 2 S / XLED home 2 XL S)
(XLED home 2 S / XLED home 2 XL S)
XLED home 2 S / XLED home 2 XL S
Ustawianie funkcji
text_image
QR code image containing encoded data, no visible human-readable textiOS

text_image
QR code image containing encoded data, no visible human-readable textFunkcje:
3. XLED home 2 / XLED home XL S / XLED home SC / XLED home
XLED home 2 S / XL S
- Utilizare prin buton de reglare.
XLED home 2 SC
XLED home 2 S / XL S / S SC
- XLED home 2 S / XL S
- XLED home 2 SC
- XLED home 2
XLED home 2 S / XLED home 2 XL S
Reglarea funcțiilor
- Reglare prin intermediul butonului de reglare (XLED home 2 S / XL S)
- Reglare prin STEINEL Connect App (XLED home 2 SC)
Reglaje din fabrică
STEINEL Connect App (XLED home 2 SC)
text_image
QR code image containing encoded data, no visible human-readable textiOS

text_image
QR code image containing encoded data, no visible human-readable textFuncții:
3. XLED home 2 / XLED home XL S / XLED home SC / XLED home
Namenska uporaba
XLED home 2 S / XL S
– Upravljanje z nastavitvenim gumbom.
XLED home 2 SC
XLED home 2 S / XL S / S SC
- XLED home 2 S / XL S
- XLED home 2 SC
- XLED home 2
Dobavi obseg različice XLED home 2 S / XL S / SC (sl. 3.1)
Obseg dobave različice XLED home 2 (sl. 3.2)
Območje nihanja glave žarometa in senzorja (XLED home 2 S / XL S / SC) (sl. 3.3, 3.4, 6.2, 6.3, 6.6)
Območje nihanja glave žarometa (XLED home 2) (sl. 3.5, 3.6, 6.2)
Mere izdelka (XLED home 2 S / XL S / SC) (sl. 3.7, 3.8)
Mere izdelka (XLED home 2) (sl. 3.9, 3.10)
Pregled sestavnih delov XLED home 2 S / XL S / SC) (sl. 3.11)
A LED-panel
B Ohišje
C Stensko držalo
D Senzorska enota
ENastavitevčasa(XLED home 2 S / XLED home 2 XL S)
F Nastavitev zatemnitve (XLED home 2 S / XLED home 2 XL S)
Pregled sestavnih delov (XLED home 2) (sl. 3.12)
A LED-panel
B Ohišje
C Stensko držalo
Priključne sheme XLED home 2 S / XLED home 2 X L S / XLED home 2 (sl. 4.2)
Priključna shema XLED home 2 SC (sl. 4.3)
Pomembno:
XLED home 2 S / XLED home 2 XL S
Nastavitev funkcij
– Nastavitev z nastavnim gumbom
(XLED home 2 S / XL S)
– Nastavitev z aplikacijo STEINEL Connect App (XLED home 2 SC)
text_image
QR code image containing encoded data, no visible human-readable textiOS

text_image
QR code image containing encoded data, no visible human-readable textFunkcije:
Funkcije, nastavljive v aplikaciji Steinel Connect:
3. XLED home 2 / XLED home XL S / XLED home SC / XLED home
Namjenska uporaba
– LED reflektor prikladan je za zidnu montažu u vanjskom području.
– Slobodno okretni LED panel.
- Može se umrežiti kao jedan reflektor ili s XLED HOME 2 SC putem Bluetootha.
XLED home 2 S / XL S
XLED home 2 S / XL S / S SC
– Senzorski LED reflektor sadrži infracrveni dojavnik pokreta.
XLED home 2
– Senzorski LED reflektor bez infracrvenog dojavnika pokreta.
Nenamjenska uporaba
- XLED home 2 S / XL S
- XLED home 2 SC
- XLED home 2
Sadržaj isporuke XLED home 2 S / XL S / SC
(sl. 3.1)
Sadržaj isporuke XLED home 2 (sl. 3.2)
(XLED home 2 S / XL S / SC)
(sl. 3.3, 3.4, 6.2, 6.3, 6.6)
(XLED home 2 S / XLED home 2 XL S)
F podešavanje svjetlosnog praga (XLED home 2 S / XLED home 2 XL S)
Pregled proizvoda (XLED home 2) (sl. 3.12)
A LED panel
B kućište
C zidni držač
Raspodjela jačine svjetlosti (sl. 3.13)
4. Električna instalacija
• Isključite strujno napajanje. (sl. 4.1)
XLED home 2 S / XLED home 2 XL S
Podešavanje funkcija
– Podešavanje pomoću regulatora
(XLED home 2 S / XL S)
- Podešavanje pomoću aplikacije STEINEL
Connect (XLED home 2 SC)
Tvorničke postavke
Podešenost vremena (E): 8 sekundi
text_image
QR code image containing encoded data, no visible human-readable textiOS

text_image
QR code image containing encoded data, no visible human-readable textFunkcije:
Funkcije koje se mogu podesiti pomoću aplikacije Steinel Connect:
– Podešavanje vremena: 5 s – 60 min
- Podešavanje svjetlosnog praga: 2 - 2.000 luksa
– Učenje luksa
– Osnovno svjetlo
- Glavno svjetlo
– Funkcija soft uključivanja svjetla
– Učenje vremena
- Podešavanje dometa
- Bluetooth umreženje
Podešavanje vremena
Kašnjenje isključivanja može se podešavati kontinuirano od oko 5 sekundi do maks. 60 minuta.
Svaki detektirani pokret ponovno uključuje svjetlo. Kod podešavanja područja detekcije i testiranja funkcije preporučuje se podesiti najkraće vrijeme.
3. XLED home 2 / XLED home XL S / XLED home SC / XLED home
XLED home 2 S / XL S
XLED home 2 S / XL S / S SC
- Sensoriga LED-prožektor sisaldab infrapunaliikumissensorit.
XLED home 2
- XLED home 2 S / XL S
- XLED home 2 SC
- XLED home 2
Komplekti sisu XLED home 2 S / XL S / SC (joon. 3.1)
Komplekti sisu XLED home 2 (joon. 3.2)
(XLED home 2 S / XL S / SC)
(joon. 3.3, 3.4, 6.2, 6.3, 6.6)
Prožektoripea pööramisala (XLED home 2)
(joon. 3.5, 3.6, 6.2)
Toote möõdud (XLED home 2 S / XL S / SC)
(joon. 3.7, 3.8)
Toote möõdud (XLED home 2) (joon. 3.9, 3.10)
XLED home 2 S / XLED home 2 XL S
Aja seadmine (joon. 6.1 / E)
text_image
QR code image containing encoded data, no visible human-readable textiOS

text_image
QR code image containing encoded data, no visible human-readable textFunktsioonid:
3. XLED home 2 / XLED home XL S / XLED home SC / XLED home
XLED home 2 S / XL S
– Valdomas nustatymo reguliatoriumi
XLED home 2 SC
XLED home 2 S / XL S / S SC
- XLED home 2 S / XL S
- XLED home 2 SC
- XLED home 2
Pristatymo sritis XLED home 2 S / XL S / SC (3.1 pav.)
Pristatymo sritis XLED home 2 (3.2 pav.)
(XLED home 2 S / XL S / SC) (3.11 pav.)
text_image
LED 22 LED5. Montavimas
XLED home 2 S / XLED home 2 XL S
Funkciju nustatymas
text_image
QR code image containing encoded data, no visible human-readable textiOS

text_image
QR code image containing encoded data, no visible human-readable texttext_image
230 V LED8. Šalinimas
3. XLED home 2 / XLED home XL S / XLED home SC / XLED home
Pareiza lietošana
XLED home 2 S / XL S
- Apkalpe ar iestatijumu regulatoru.
XLED home 2 SC
XLED home 2 S / XL S / S SC
- XLED home 2 S / XL S
- XLED home 2 SC
- XLED home 2
Piegādes apjoms XLED home 2 S / XL S / SC (3.1 att.)
Piegādes apjoms XLED home 2 (3.2 att.)
Starmeša galvas pagrieziena zona un sensors (XLED home 2 S / XL S / SC)
(3.3, 3.4, 6.2, 6.3, 6.6 att.)
Starmeša galvas pagrieziena zona (XLED home 2) (3.5, 3.6, 6.2 att.)
Produkta izmēri (XLED home 2 S / XL S / SC) (3.7, 3.8 att.)
Produkta izmēri (XLED home 2) (3.9, 3.10 att.)
(XLED home 2 S / XLED home 2 XL S)
(XLED home 2 S / XLED home 2 XL S)
XLED home 2 S / XLED home 2 XL S
lestatiet funkcijas
– lestatiet ar iestatišanas regulatoru (XLED home 2 S / XL S)
– lestatiet STEINEL Connect App (XLED home 2 SC)
STEINEL Connect App (XLED home 2 SC)
text_image
QR code image containing encoded data, no visible human-readable textiOS

text_image
QR code image containing encoded data, no visible human-readable textFunkcijas:
3. XLED home 2 / XLED home XL S / XLED home SC / XLED home
Употреба по предназначение
XLED home 2 S / XL S
XLED home 2 S / XL S / S SC
- XLED home 2 S / XL S
- XLED home 2 SC
- XLED home 2
XLED home 2 S / XLED home 2 XL S
Настройка функции
text_image
QR code image containing encoded data, no visible human-readable textiOS

text_image
QR code image containing encoded data, no visible human-readable textФункции:
3. XLED home 2 / XLED home XL S / XLED home SC / XLED home
按规定使用
XLED home 2 S / XL S
- 通过调节器操作。
XLED home 2 SC
XLED home 2 S / XL S / S SC
- XLED home 2 S / XL S
- XLED home 2 SC
- XLED home 2
供货范围 XLED home 2 S / XL S / SC (图 3.1)
供货范围 XLED home 2 (图 3.2)
主机泛光灯头和传感器的转动范围
(XLED home 2 S / XL S / SC)
F 亮度设置 (XLED home 2 S / XLED home 2 XL S)
XLED home 2 S / XLED home 2 XL S
其他:
泛光灯灯头转动范围(图 6.2)
- 通过调节器设置 (XLED home 2 S / XL S)
- 通过 STEINEL Connect App 设置
(XLED home 2 SC)
出厂设置
时间设置(E): 8 秒
亮度设置 (F): 2,000 Lux (日间运行模式)
时间设置(图 6.1 / E)
STEINEL Connect App (XLED home 2 SC)
text_image
QR code image containing encoded data, no visible human-readable textiOS

text_image
QR code image containing encoded data, no visible human-readable text3. XLED home 2 / XLED home XL S / XLED home SC / XLED home
XLED home 2 S / XL S
XLED home 2 S / XL S / S SC
- XLED home 2 S / XL S
- XLED home 2 SC
- XLED home 2
XLED home 2 S / XLED home 2 XL S
text_image
QR code image containing encoded data, no visible human-readable textiOS

text_image
QR code image containing encoded data, no visible human-readable textЭксплуатация:
natural_image
World map silhouette in grayscale, showing continents and oceans without any text or labelsContact
www.steinel.de/contact