L 10 S - Lighting STEINEL - Free user manual and instructions
Find the device manual for free L 10 S STEINEL in PDF.
| Product type | Outdoor light with infrared motion detector |
| Model | Steinel L 10 S |
| Light source | E27 socket, bulb not included, max. 15 W LED or 1000 W incandescent/halogen |
| Power supply | 220–240 V, 50/60 Hz |
| Dimensions (L x H) | 255 mm x 175 mm |
| Optimal mounting height | 2 m |
| Detection angle | 180° |
| Detection range | Max. 7.5 m (at 2 m height) |
| Adjustable time delay | From 5 seconds to 60 minutes |
| Trigger threshold (brightness) | From 2 to 2000 lux (day/night mode) |
| Protection rating | IP44 |
| Protection class | II (double insulation) |
| Impact resistance | IK03 |
| Ambient temperature | -20 °C to +40 °C |
| Package contents | Light, 2 screws, 2 wall plugs, 6 lens covers, technical data sheet, quick start guide |
| Main functions | Infrared motion detection, time delay and trigger threshold adjustment, covers to limit detection zone |
| Maintenance and cleaning | Clean with a slightly damp cloth without detergent |
| Safety | Installation by a professional, cut power before intervention, do not use with a dimmer |
| Spare parts and repairability | Use only original Steinel parts; repairs reserved for professionals |
| Manufacturer's warranty | 3 years (excluding bulbs and wear parts) |
| General information | For outdoor wall mounting, not suitable for explosive atmospheres, observe minimum distances (50 cm from other LED lights) |
Frequently Asked Questions - L 10 S STEINEL
User questions about L 10 S STEINEL
0 question about this device. Answer the ones you know or ask your own.
Ask a new question about this device
Download the instructions for your Lighting in PDF format for free! Find your manual L 10 S - STEINEL and take your electronic device back in hand. On this page are published all the documents necessary for the use of your device. L 10 S by STEINEL.
USER MANUAL L 10 S STEINEL
natural_image
Black wall-mounted street lamp with glass frame and spherical light bulb (no text or symbols visible)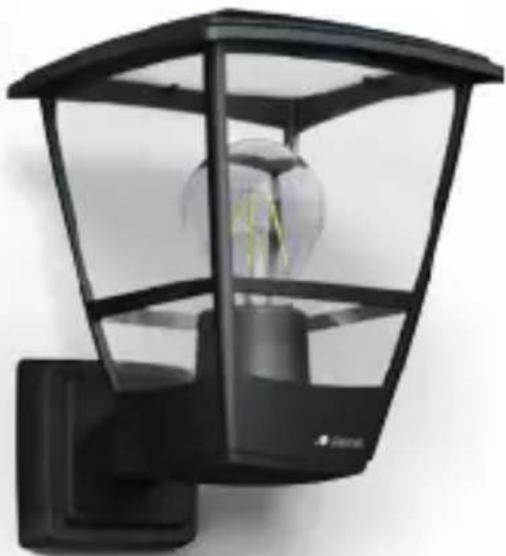
natural_image
Black wall-mounted street lamp with glass frame and spherical light bulb (no text or symbols visible)L 10 S
L 10
DE
Inhalt
natural_image
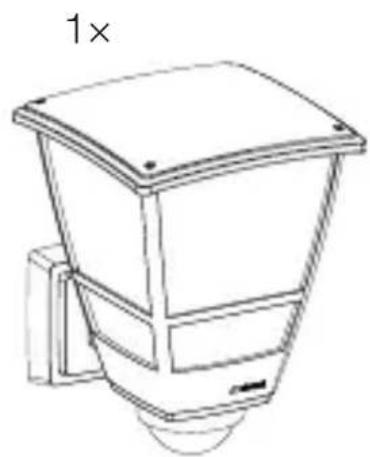
Line drawing of a mechanical device with a 1× multiplier label (no text or symbols on the device itself)2×

2×

6×

1×

1×

natural_image
Line drawing of a trash bin with a 1× multiplier label (no text or symbols on the object itself)


natural_image
Technical line drawing of a conical device with a 224 mm dimension label (no other text or symbols)Produktmaße L 10
3.4

text_image
175 mm 242 mm
natural_image
Technical line drawing of a bucket with a 224 mm dimension label (no other text or symbols)text_image
L ⊕ N ↓ L N PE⊕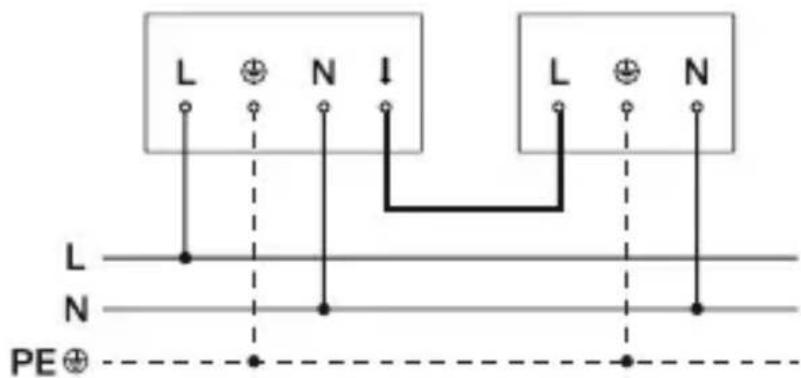
text_image
L ⊕ N ↓ L ⊕ N L N PE ⊕
text_image
L ⊕ N I L ⊕ N I L N PE⊕text_image
Weather icon decomposition diagram showing sunlight and a checkmark symbol5. Montage

text_image
Diagram illustrating electrical hazard warning and component disassembly steps, showing switch, battery, and device with numbered arrows.natural_image
Technical line drawing of an electrical connector with cable and socket (no text or symbols)natural_image
Line drawing of a mechanical device with arrows indicating motion or force, no text or symbols presentnatural_image
Line drawing of a light bulb mounted on a 3D box, with a downward arrow indicating compression or disassembly (no text or symbols)natural_image
Technical line drawing of a mechanical device with directional arrows indicating motion or force (no text or symbols)natural_image
Technical line drawing of a mechanical component with arrows indicating assembly or movement (no text or symbols)natural_image
Technical line drawing of a device internal structure with cable and components, no text or symbols presentnatural_image
Line drawing of a mechanical device with a control panel and housing (no text or symbols)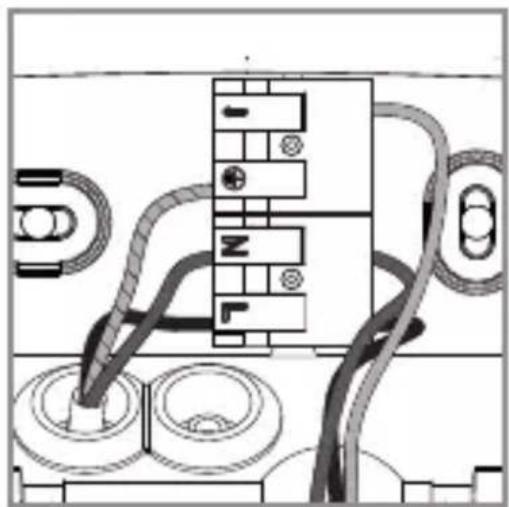
natural_image
Pure electrical circuit lines without any symbolsnatural_image
Technical line drawing of a mechanical assembly with a tool and component, no visible text or symbolsnatural_image
Line drawing of a mechanical device with a circular base and directional arrow, no text or symbols presentnatural_image
Technical line drawing of a mechanical assembly with a downward arrow indicating motion (no text or symbols)natural_image
Line drawing of a mechanical device with a base and top component, no text or symbols presentnatural_image
Technical line drawing of a mechanical device with a conical top and base, showing no text or symbols.
natural_image
Technical line drawing of a mechanical device with radial blades and a central top component (no text or symbols)
natural_image
Line drawing of a mechanical device with no visible text or symbolsLED Lampen < 2 W: 16 W
2 W < LED Lampen < 8 W: 64 W
LED Lampen > 8 W: 64 W
- About this document 33
- General safety precautions 33
- System description 34
- Electrical connection 40
- Installation 42
- Function 52
- Cleaning and maintenance 56
- Disposal 56
- Manufacturer's warranty 57
- Technical specifications 59
- Troubleshooting 60
1. About this document
– Under copyright. Reproduction either in whole or in part only with our consent.
- Subject to change in the interest of technical progress.
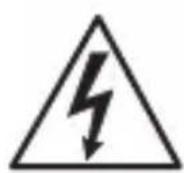
Hazard warning!
Warning of hazards from electricity!
Warning of hazards from water!
2. General safety precautions
Failure to observe these operating instructions presents hazards!
These instructions contain important information on the safe use of this product. Particular attention is drawn to potential hazards. Failure to observe this information may lead to death or serious injuries.
- Read instructions carefully.
- Follow safety advice.
-
Keep instructions within easy reach.
-
Working with electrical current may produce hazardous situations. Touching live parts can result in electrical shock, burns or death.
- Work on mains voltage must only be performed by qualified, skilled personnel.
- National wiring regulations and electrical operating conditions must be observed (e.g. D: VDE 0100, A: ÖVE-ÖNORM E8001-1, CH: SEV 1000).
- Only use genuine replacement parts.
- Repairs must only be carried out by companies qualified to do so.
3. System description
Proper use for L 10 S
– E 27 light source with infrared motion sensor.
- For mounting on outdoor walls.
- Not suitable for connecting to a dimmer.
Operating principle
- The integrated infrared sensor detects the heat radiated from moving objects (e.g. people, animals). The heat detected in this way is converted electronically into a signal that switches the light source ON automatically.
- The most reliable way of detecting motion is to install the unit with the sensor aimed across the direction in which a person would walk.
- Motion detection reach is restricted when the unit is approached head on.
- Obstacles (such as trees, walls or panes of glass) may restrict or prevent the detection of movement.
- Sudden fluctuations in temperature as a result of changes in weather are not distinguished from sources of heat.
Proper use for L 10
- E 27 light source.
- For mounting on outdoor walls.
- Not suitable for connecting to a dimmer.
3.1
natural_image
Line drawing of a mechanical device with a base and top component, labeled '1×' (no text or symbols on the device itself)2×

2×

6×

1×
1×

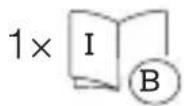
– E 27 light with infrared motion sensor
- 2 screws
- 2 wall plugs
- 6 lens covers
- 1 safety data sheet
- 1 quick-start guide
Bulbs are not included.
L 10 package contents
3.2
natural_image
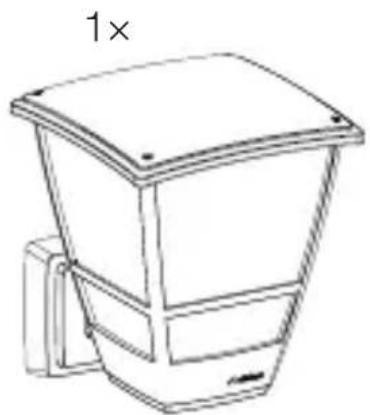
Line drawing of a trash bin with a 1× multiplier label (no text or symbols on the object itself)2×
2×
- E 27 light
- 2 screws
- 2 wall plugs
- 1 safety data sheet
- 1 quick-start guide
Bulbs are not included.
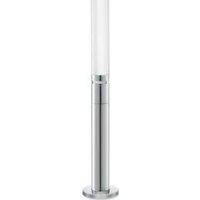
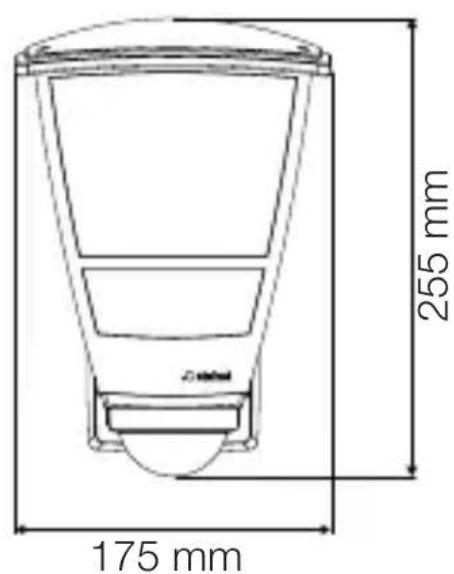
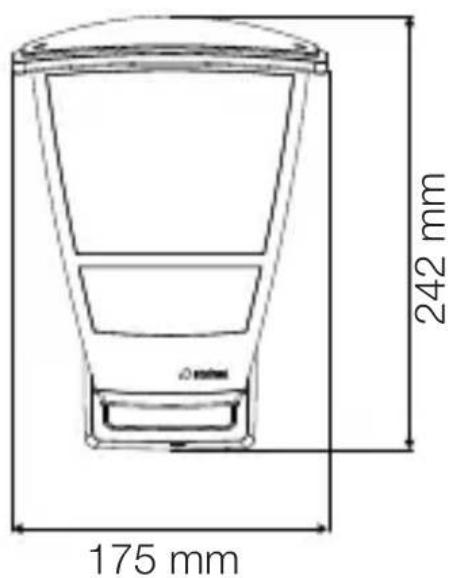
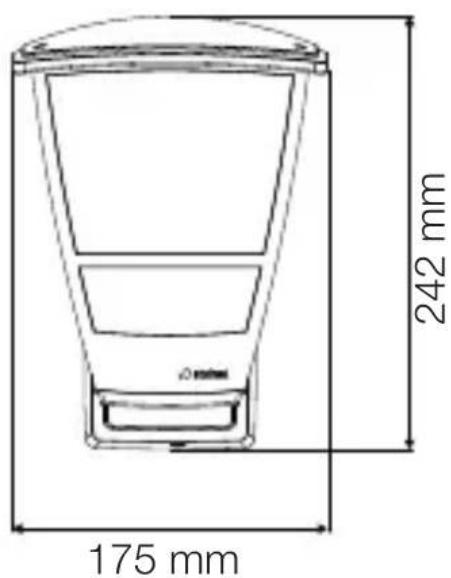
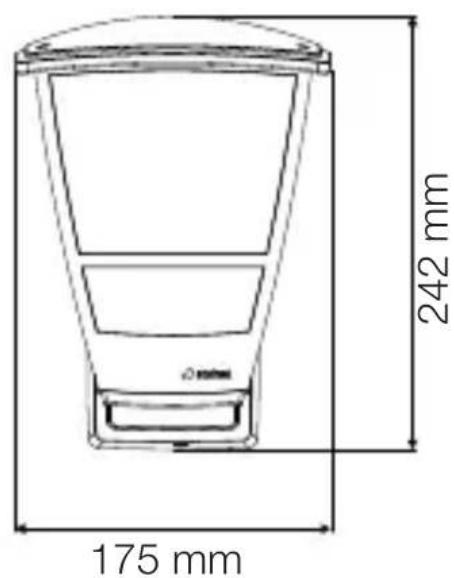
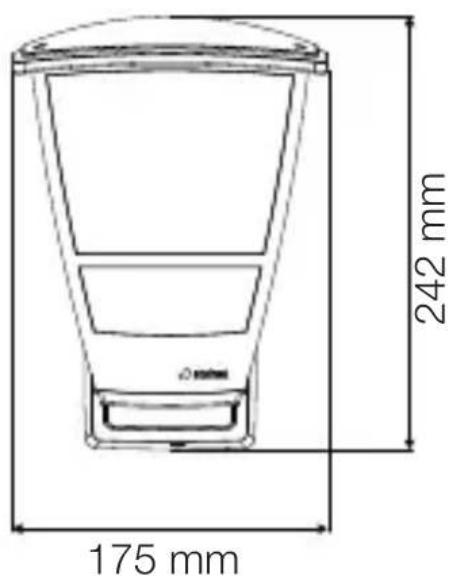
L 10 S product dimensions
GB
3.3
text_image
255 mm 175 mm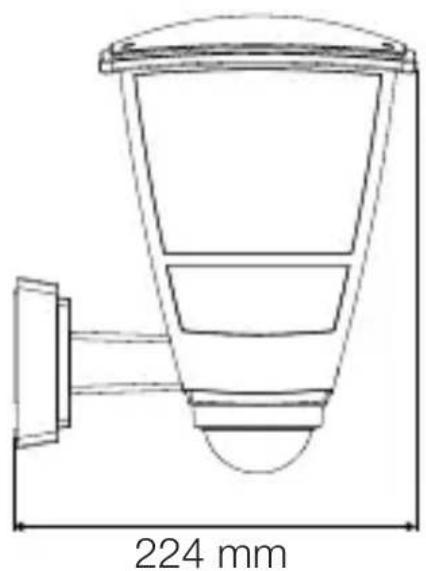
natural_image
Technical line drawing of a conical device with a 224 mm dimension label (no other text or symbols)L 10 product dimensions
3.4
text_image
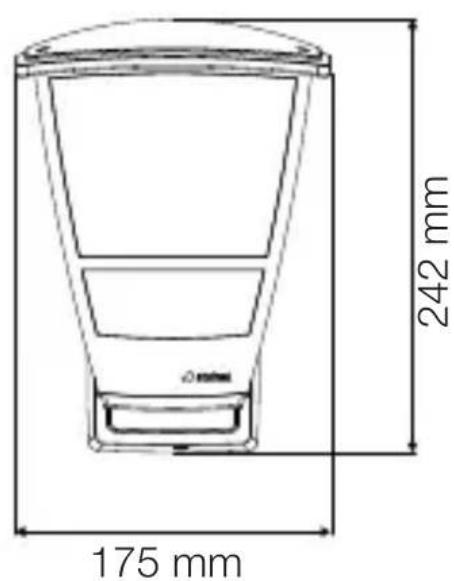
175 mm 242 mm
natural_image
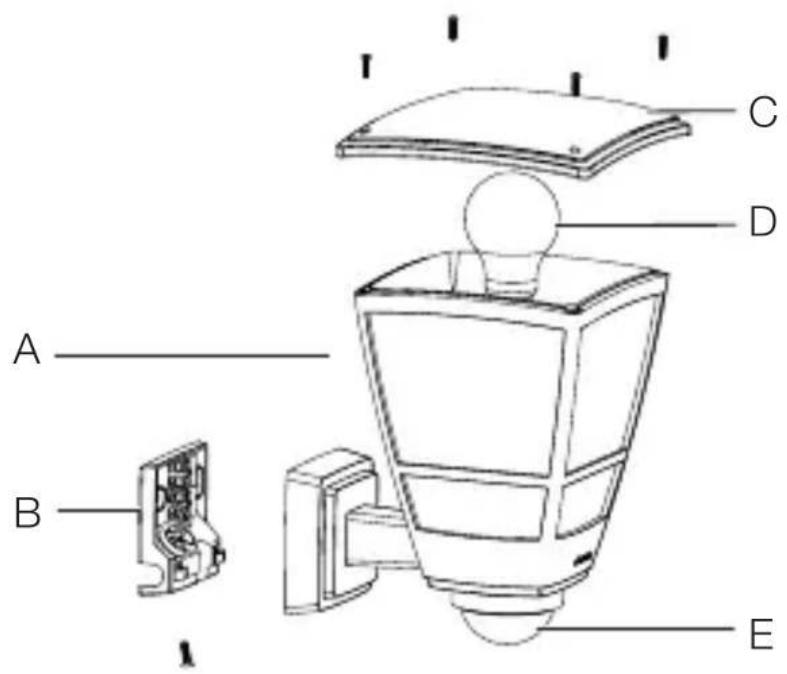
Technical line drawing of a bucket with a 224 mm dimension label (no other text or symbols)L 10 S product components
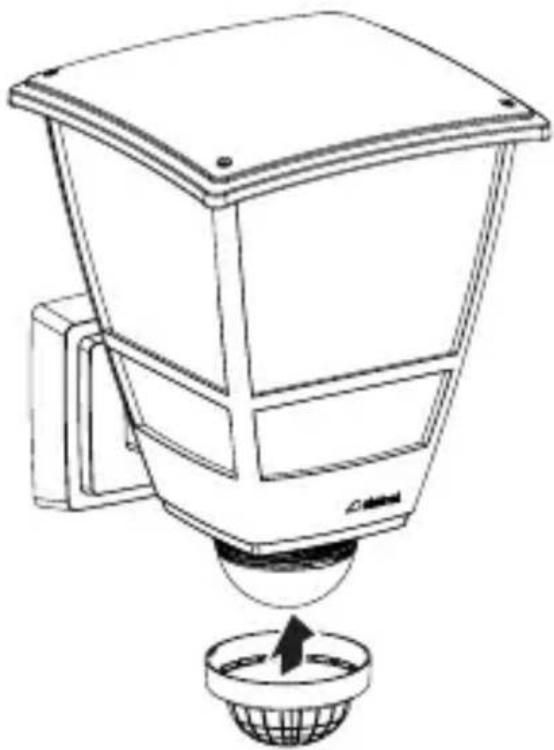
3.5
text_image
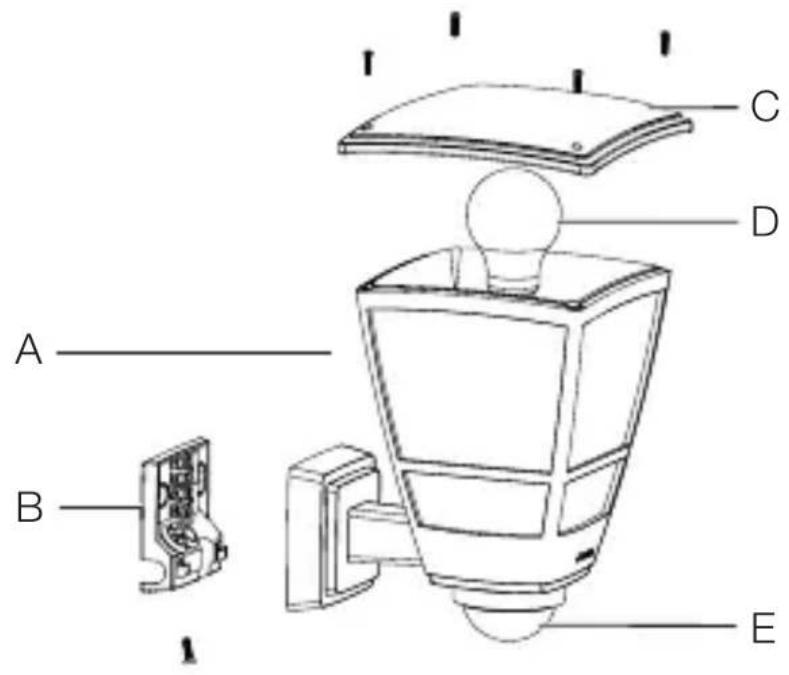
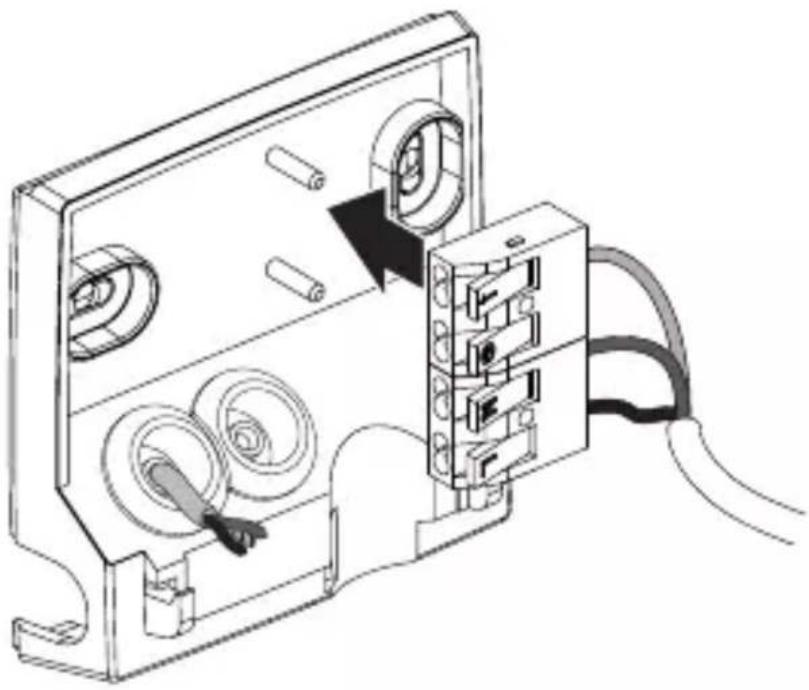
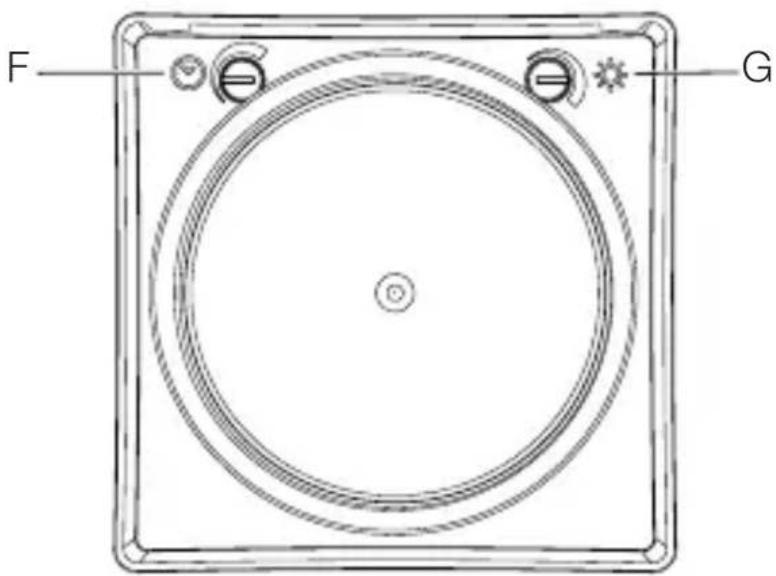
A B C D EA Luminaire
B Connecting terminal
C Top cover
D E27 light sourc
E Sensor unit
3.6

text_image
F GF Time setting
G Twilight setting
L 10 product components
GB
3.7

text_image
A B C DA Luminaire
B Connecting terminal
C Top cover
D E27 light source
4. Electrical connection
Circuit diagram
4.1
text_image
Safety warning symbol and electrical circuit diagram showing lightning bolt and switch mechanism
text_image
L ⊕ N ↓ L N PE⊕
text_image
L ⊕ N ↓ L ⊕ N L N PE ⊕
text_image
L ⊕ N I L ⊕ N I L N PE⊕The mains power supply lead is a 2-core cable:
L = Phase conductor (usually black, brown or grey)
N = Neutral conductor (usually blue)
↓ = Switched phase conductor (usually black, brown or grey)
PE = Protective-earth conductor (usually green / yellow)
The luminaire can also be connected to the power supply downstream of a mains switch if it is ensured that the mains switch is left ON all the time.
Note:
The light source in this light is interchangeable.
text_image
Weather icon decomposition diagram showing sunlight and a checkmark symbol5. Installation

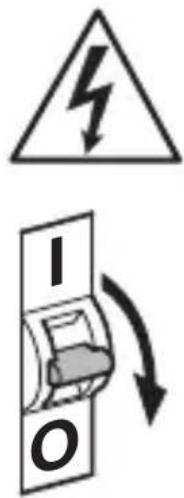
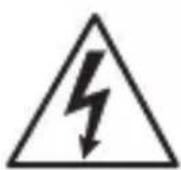
Hazard from electrical power!
Touching live parts can result in electrical shock, burns or death.
- Switch OFF power and interrupt power supply.
- Using a voltage tester, check to make sure that the power supply is disconnected.
- Make sure power supply remains interrupted.
Risk of damage to property!
Mixing up connection leads may produce a short circuit.
- Identify connection leads.
- Connect the leads correctly.
Preparing for installation
- Check all components for damage. Do not use the floodlight if it is damaged.
- Select an appropriate site to install the product.
- Take reach into consideration.
- Take reach and motion detection into consideration.
- Vibration-free.
- No obstacles in detection zone.
- Not in explosive atmospheres.
- Not on normally flammable surfaces.
- Do not look into the light source from a short distance (< 30 cm).
- Spaced at a distance of at least 50 cm from other LED lights.
5.1
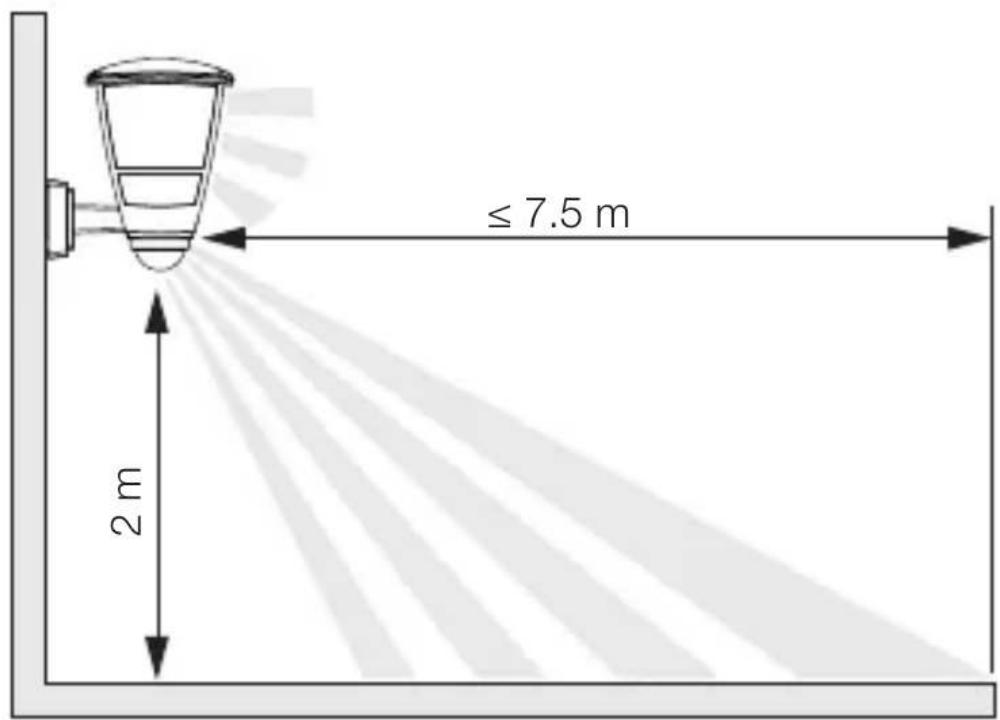
text_image
≤ 7.5 m 2 mDetecting movement of persons walking past the L 10 S
5.2

text_image
≤ 7.5 mDetecting movement of persons walking towards the L 10 S
5.3
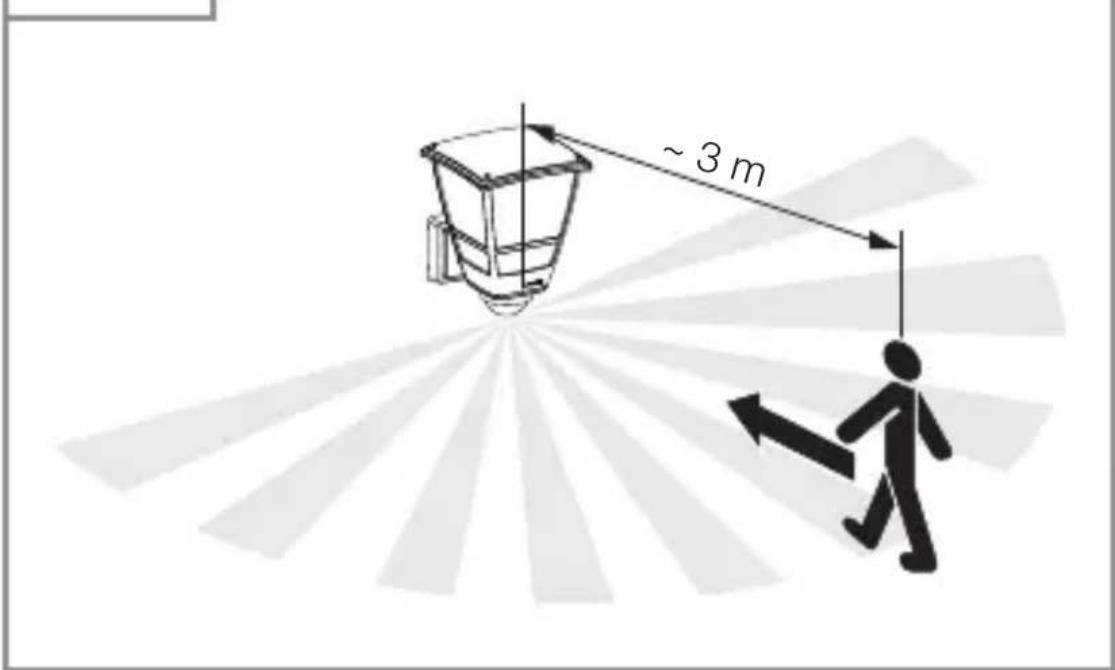
text_image
~ 3 mMounting procedure
5.4
text_image
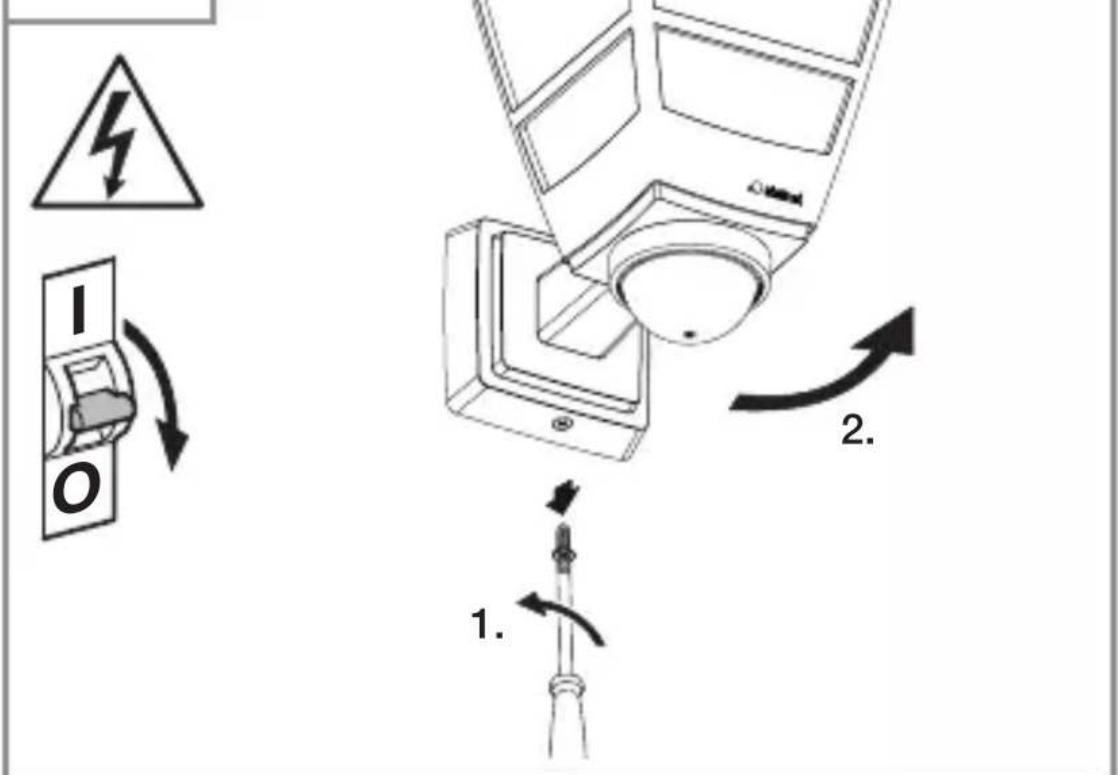
Diagram illustrating electrical hazard warning and safety instructions for a device, with labeled steps 1 and 2.- Check to make sure the power supply is switched OFF.
- Unscrew retaining screws and dismount luminaire from the wall mount.
5.5

natural_image
Technical line drawing of an electrical connector with cable and motor components (no text or symbols)GB
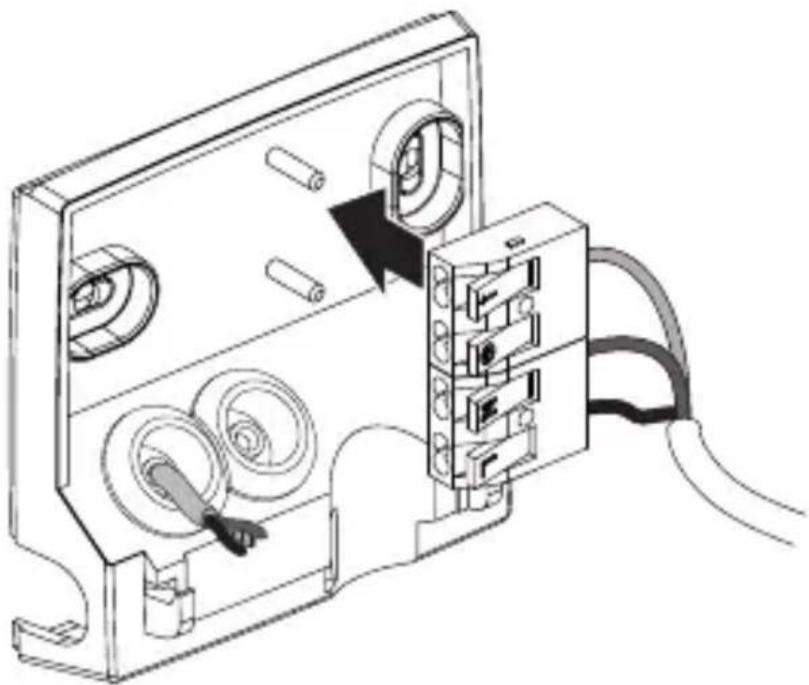
- Remove connecting terminal from wall mount.
5.6

natural_image
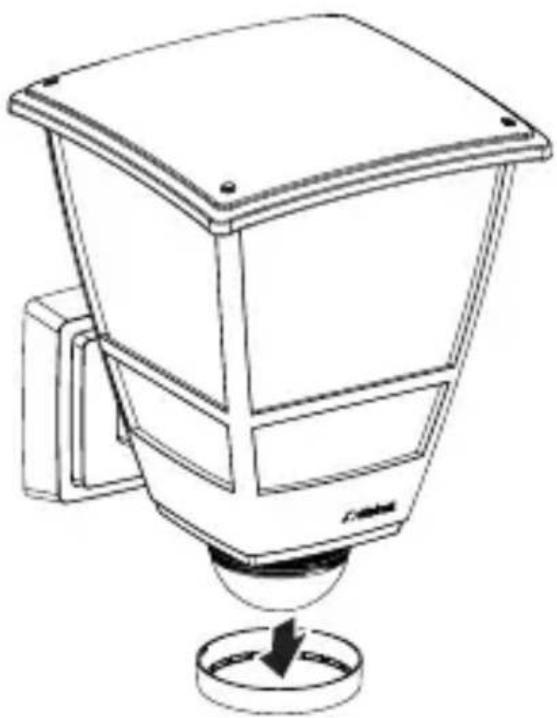
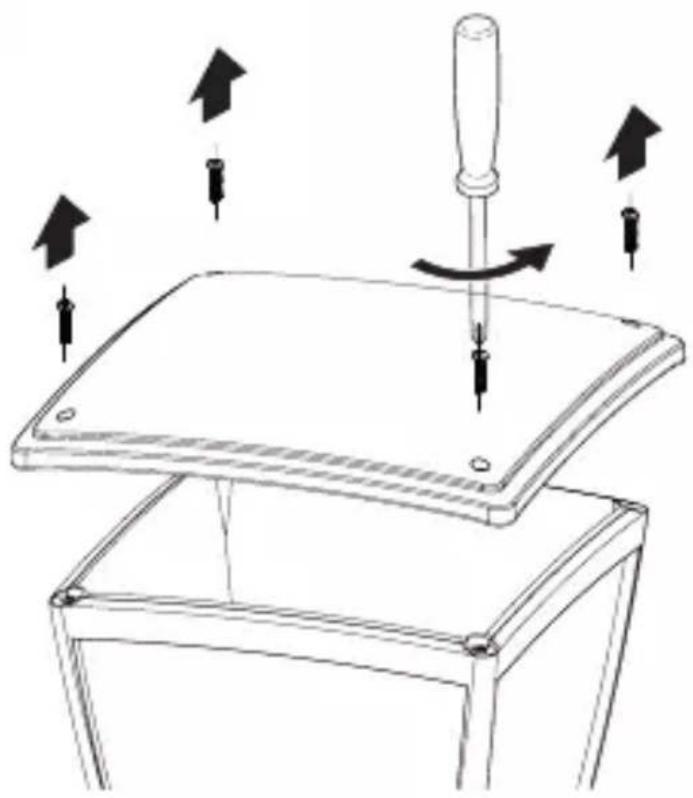
Line drawing of a mechanical device with arrows indicating motion or force, no text or symbols present- Unscrew top cover from the luminaire.
5.7

natural_image
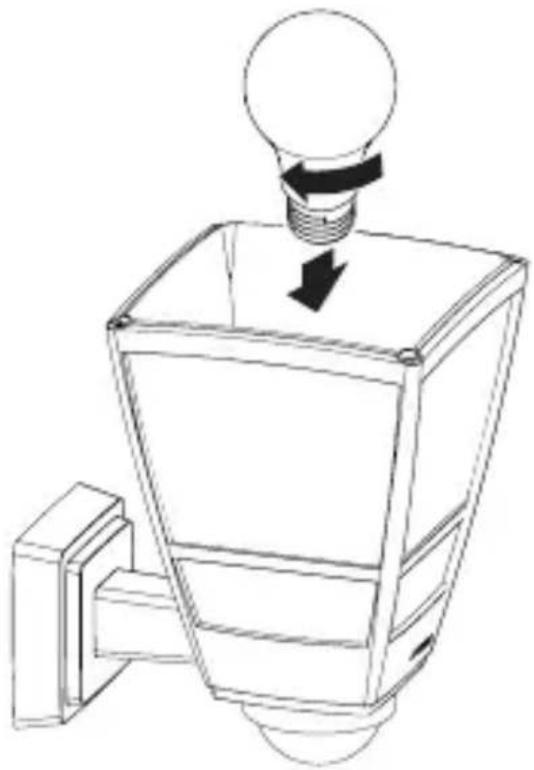
Line drawing of a light bulb mounted on a square base with a downward arrow indicating compression or disassembly (no text or symbols)- Fit E27 light source.
5.8

natural_image
Technical line drawing of a mechanical device with directional arrows indicating motion or force (no text or symbols)- Install top cover.
5.9

natural_image
Technical line drawing of a mechanical component with arrows indicating assembly or movement (no text or symbols)GB
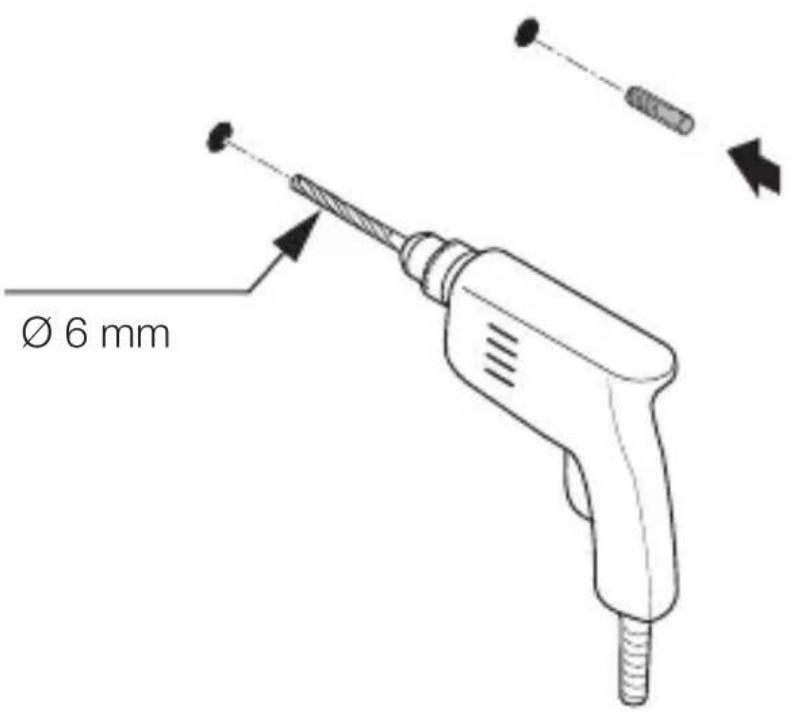
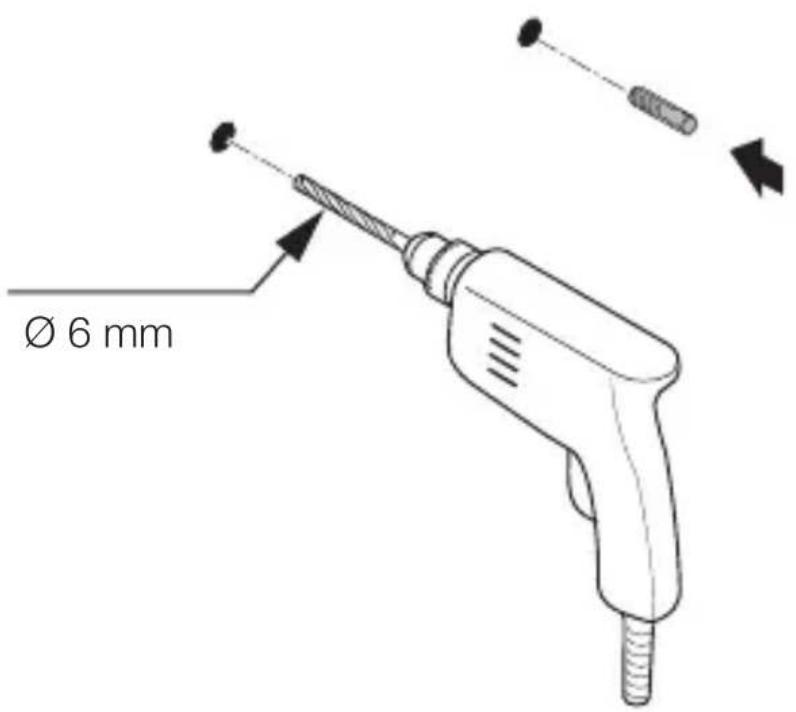
- Mark drill holes.
5.10

text_image
6 mm Ø- Drill the holes.
text_image
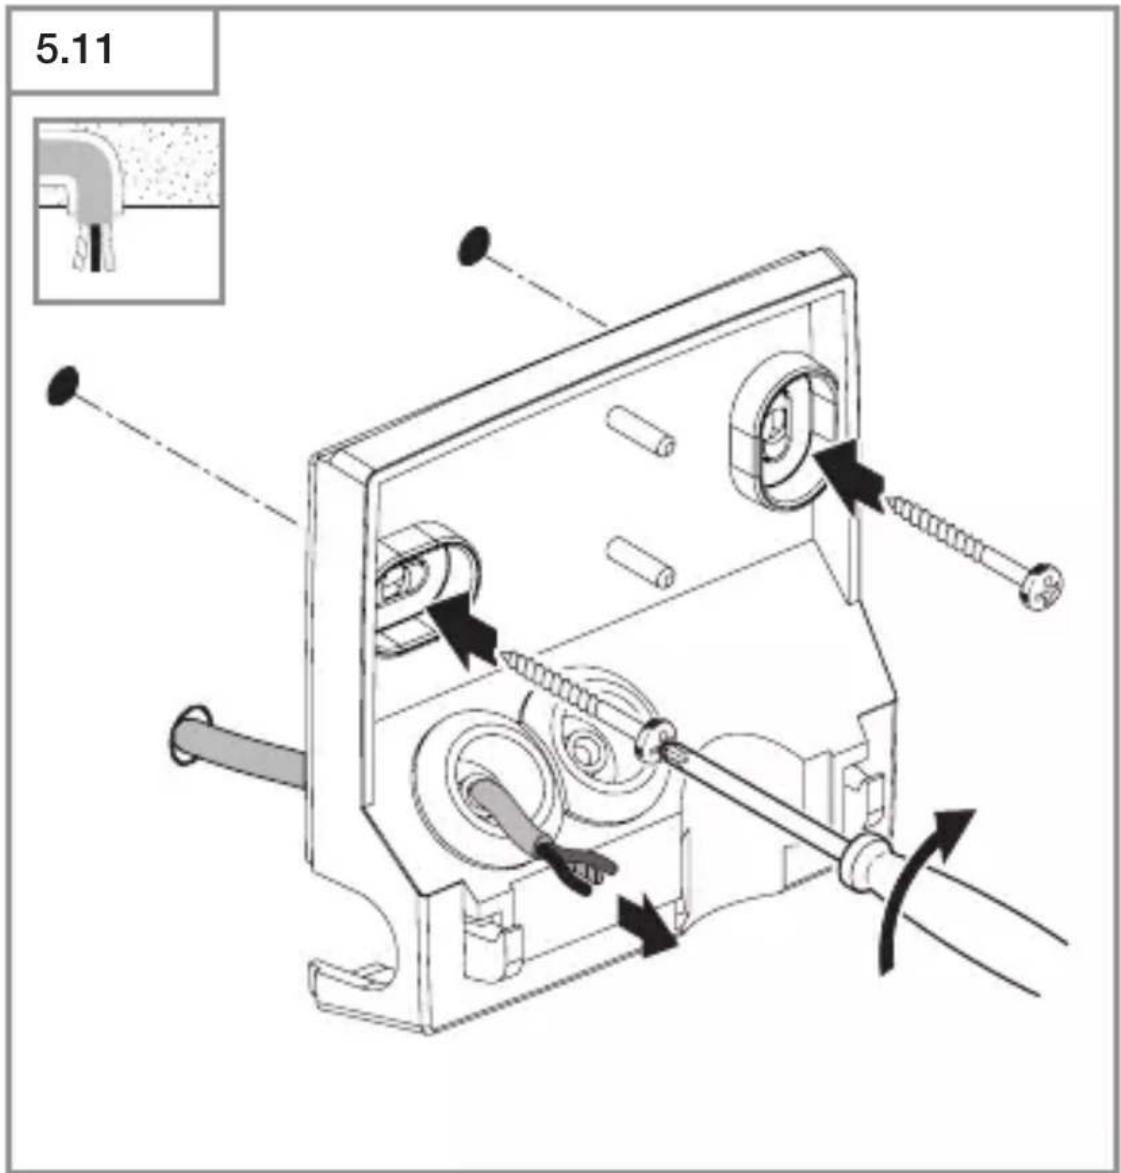
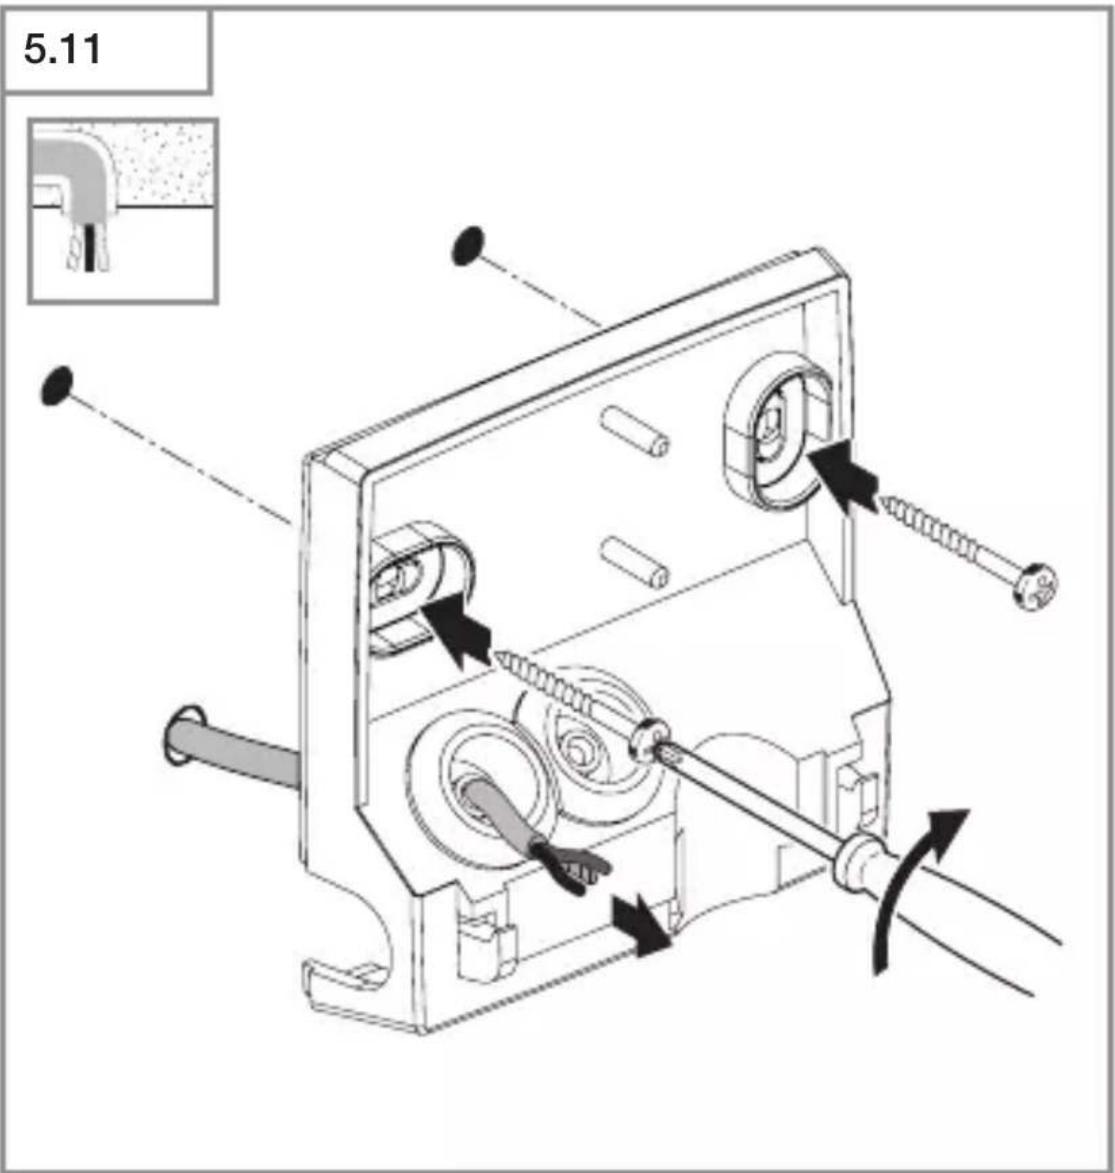
5.11- Pierce sealing plug for power supply lead.
- Firmly screw wall mount into place.

text_image
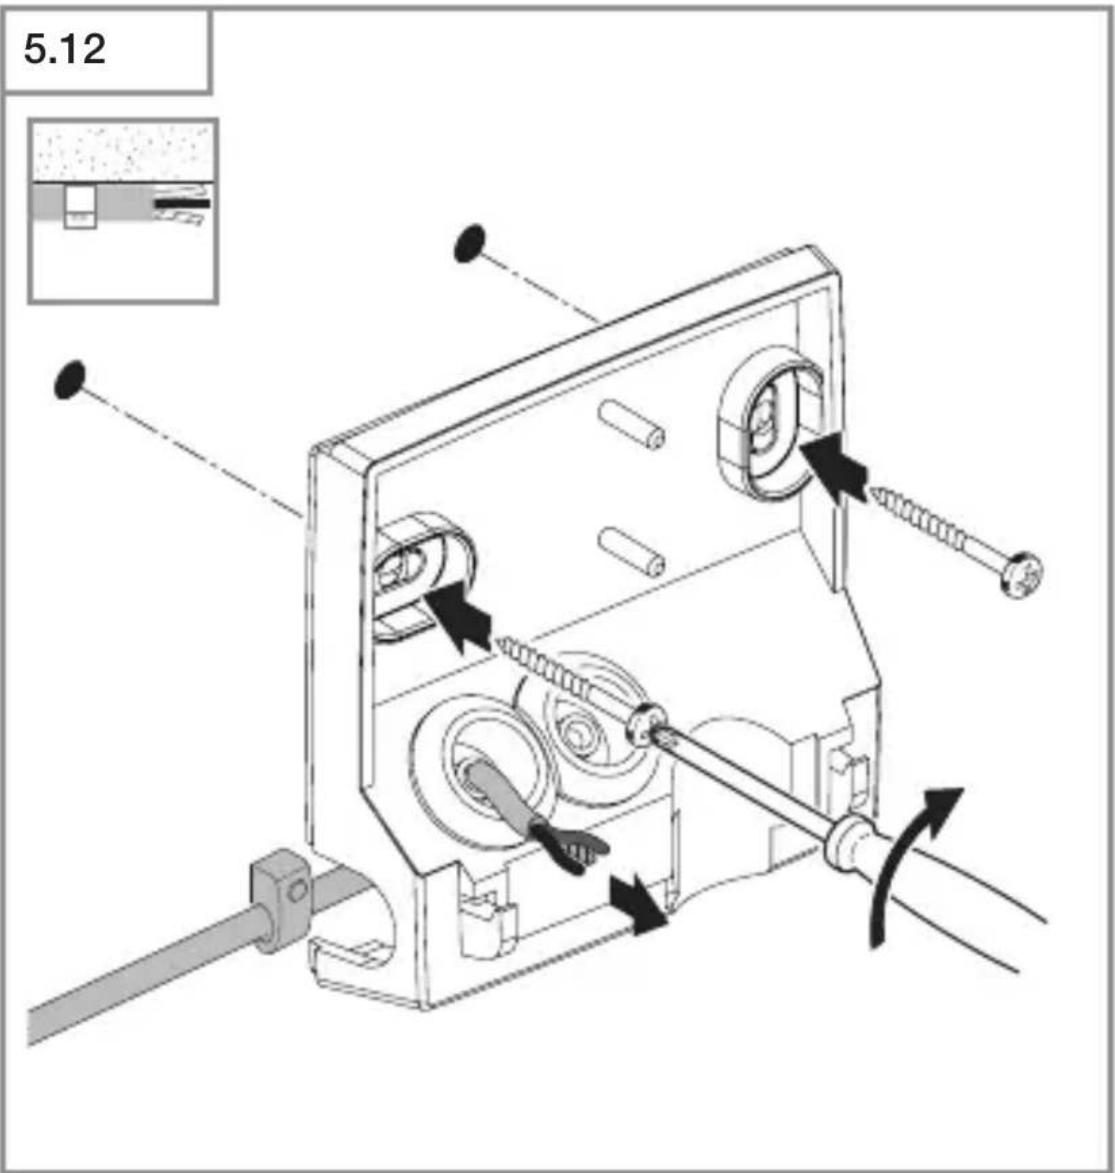
5.12GB
- Pierce sealing plug for power supply lead.
- Firmly screw wall mount into place.
- Lead wires trough the opening for surface mounted wiring.
- Pierce sealing plug for power supply lead.
- Firmly screw wall mount into place.
- Lead wires trough the opening for surface mounted wiring.
5.13
natural_image
Technical line drawing of a device internal structure with cable and components, no text or symbols present- Put connecting terminal back in wall mount.
5.14

natural_image
Technical line drawing of a mechanical device with a control panel and base mount (no text or symbols)
natural_image
Pure electrical circuit lines without any symbols- Connect mains power supply lead as shown in the wiring diagram.
→“4. Electrical connection”.
5.15
natural_image
Technical diagram of a mechanical assembly with a tool and directional arrow, no visible text or symbolsGB
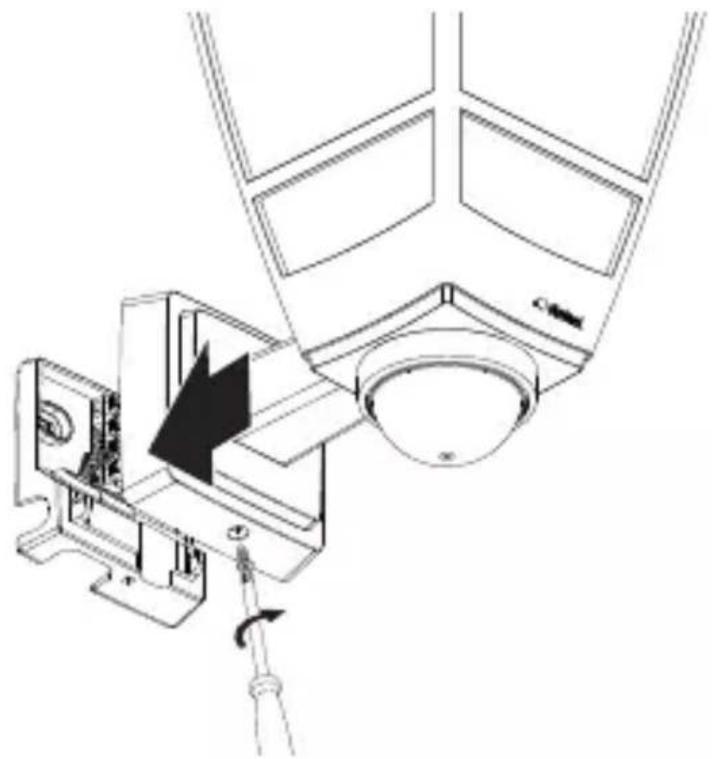
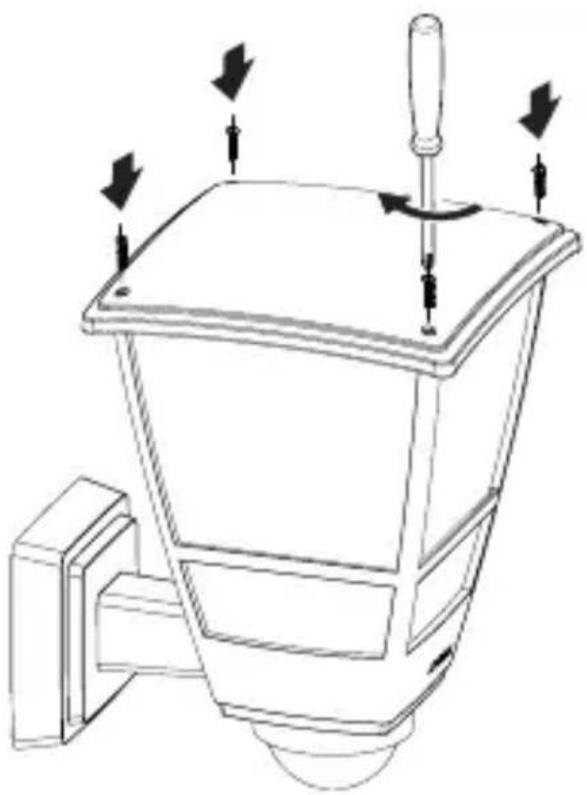
- Mount luminaire on wall mount.
- Screw in retaining screw.
5.16
text_image
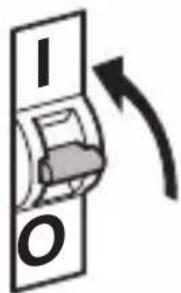
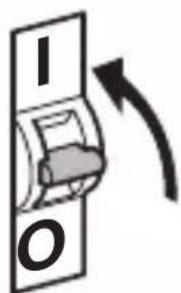
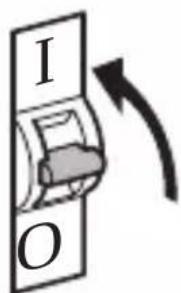
I O- Switch ON power supply.
- Setting functions.
→“6. Function”
6. Function
L 10 S
6.1

text_image
F G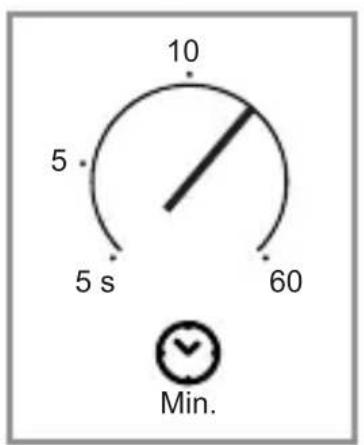
text_image
10 5 5 s 60 Min.
text_image
500 2 2000 Lux- Make settings.
Time setting (F)
The time (stay-ON time) can be set to any period from approx. 5 seconds to a maximum of 60 minutes. Every movement detected re-activates the light.
Note: after the luminaire switches OFF, it takes approx. 1 second before movement can be detected again. The E27 light source can then switch ON again in response to movement.
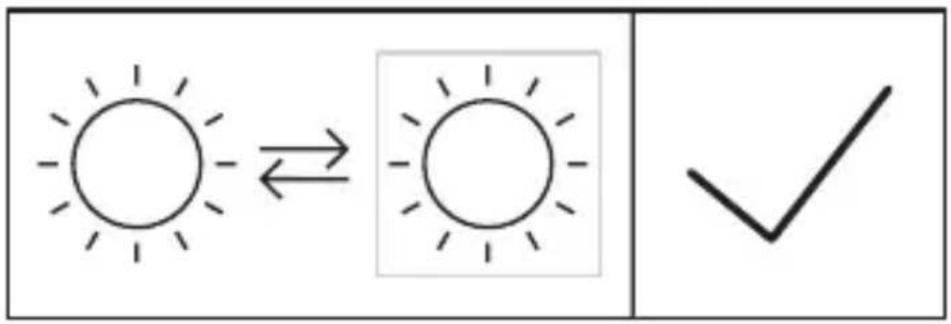
Twilight setting (G)
The response threshold (twilight) can be infinitely varied from approx. 2 to 2,000 lux.

daylight mode (depending on ambient light level)

night-time operation (approx. 2 lux)
The control dial must be turned to ⚙ when adjusting the detection zone and performing the functional test in daylight.
Factory settings
– Twilight setting: daylight mode 2,000 lux
– Time setting: 5 seconds
Adjusting the L 10 S detection zone
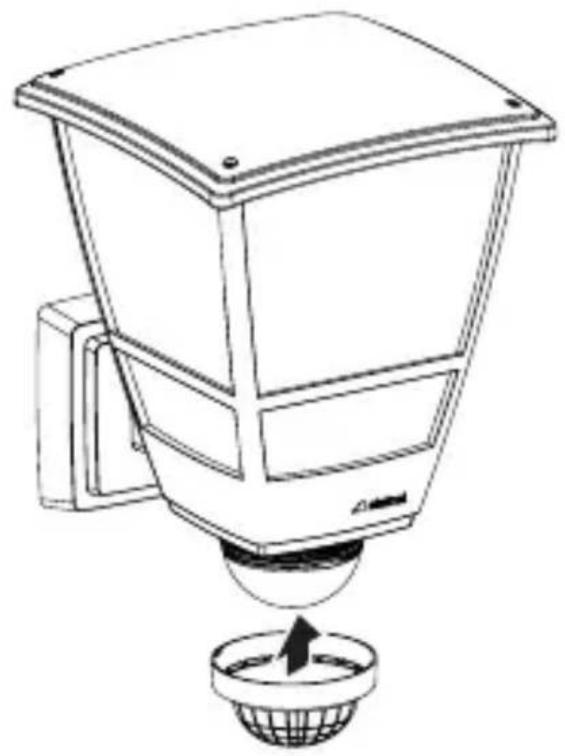
To rule out inadvertent triggering or target specific danger spots, the detection zone can be limited with lens plastic covers. The lens plastic cover is installed in the design ring.
6.2
natural_image
Line drawing of a mechanical device with a base and central component, no text or symbols present- Dismount design ring from the sensor unit.
6.3
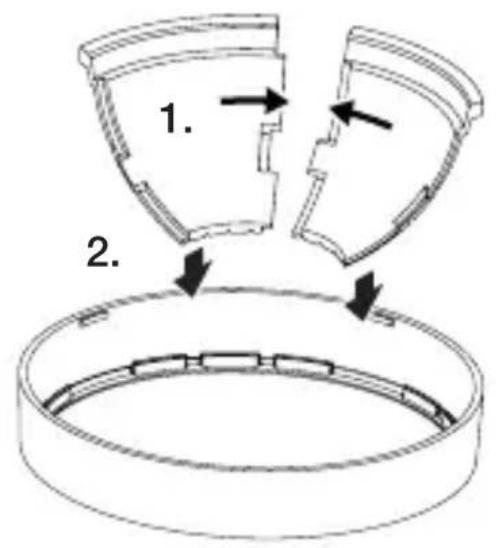
text_image
1. 2.
natural_image
Technical line drawing of a mechanical assembly with an arrow indicating direction (no text or symbols)- Install desired amount of the plastic covers to the design ring and connect them.
6.4
natural_image
Line drawing of a mechanical device with a spherical base and upward arrow, no text or symbols present- Fit design ring with covers back on the sensor unit.
6.5
natural_image
Line drawing of a mechanical device with a conical top and base, showing no text or symbols.GB

natural_image
Technical line drawing of a mechanical device with radial blades and a central hub (no text or symbols)
natural_image
Line drawing of a mechanical device with a central hub and radial motion lines (no text or symbols)- By rotating the design ring with the installed covers, the detection range is limited.
- Detection range can also be adjusted by cutting the plastic covers.
The shortest time and daylight mode setting is recommended when adjusting the detection zone and performing the functional test.
7. Cleaning and maintenance
The tool requires no maintenance.
Hazard from electrical power!
Contact between water and live parts can result in electric shock, burns or death.
- Only clean tool in a dry state.
Risk of damage to property!
Using the wrong cleaning product can damage the light.
- Clean tool with a moist cloth without detergent.
8. Disposal
Electrical and electronic equipment, batteries, accessories and packaging must be recycled in an environmentally compatible manner.
Do not dispose of batteries or electrical and electronic equipment as domestic waste!
EU countries only:
Under the current European Directive on Waste Electrical and Electronic Equipment and its implementation in national law, batteries and electrical and electronic equipment no longer suitable for use must be collected separately and recycled in an environmentally compatible manner.
9. Manufacturer's warranty
Manufacturer's warranty of STEINEL GmbH, Dieselstrasse 80-84, DE-33442 Herzebrock-Clarholz, Germany
All STEINEL products meet the highest quality standards.
For this reason, we, the manufacturer, are pleased to provide you, the consumer, with a warranty under the following terms and conditions:
The warranty covers the absence of deficiencies which are proven to be the result of a material defect or fault in manufacturing and which are reported to us immediately after detection and within the warranty period. The warranty shall apply to all STEINEL products sold and used in Germany – excluding STEINEL Professional products.
You can opt for warranty cover in the form of repair or replacement which will be provided free of charge (if applicable, in the form of a successor model of the same or higher quality) or in the form of a credit note.
The warranty period for the STEINEL product you have purchased is 3 years in each case from the date on which the product was purchased.
We shall bear the shipping costs but not the transport risks involved in return shipment.
Statutory rights accruing from defects, gratuitousness
The warranty cover described here shall be applicable in addition to the statutory rights of warranty – including special consumer protection provisions – and shall not restrict or replace them. Exercising your statutory rights in the event of defects is gratuitous.
Exemptions from the warranty
All replaceable lamps are expressly excluded from this warranty. In addition to this, the warranty shall not cover:
– any wear resulting from use or any other natural wear of product parts or any deficiencies in the STEINEL product that are attributable to wear caused by use or other natural wear,
– any improper or non-intended use of the product or any failure to observe the operating instructions,
– any unauthorised additions, alterations or other modifications to the product or any deficiencies attributable to the use of accessory,
– supplementary or replacement parts which are not genuine STEINEL parts,
– any maintenance or care of products that is not carried out in accordance with the operating instructions,
– any attachment or installation that is not in accordance with STEINEL’s installation instructions,
– any damage or loss occurring in transit.
Application of German law
The warranty shall be governed by German law excluding the United Nations Convention concerning the International Sale of Goods (CISG).
Making claims
If you wish to make a warranty claim, please send your product complete and carriage paid with the original receipt of purchase, which must show the date of purchase and product designation, either to your retailer or directly to us at STEINEL (UK) Ltd. – 25 Manasty Road, Axis Park, Orton Southgate, GB- Peterborough Cambs PE2 6UP United Kingdom. For this reason, we recommend that you keep your receipt of purchase in a safe place until the warranty period expires.
10. Technical specifications
- Dimensions (H × W × D):
L 10 S: 255 × 175 × 224 mm
L 10: 242 × 175 × 224 mm - Power supply: 220–240 V, 50/60 Hz
- Output: max. 15 W / E27
- Switching capacity L 10 S:
Incandescent / halogen lamp load: 1,000 W
Low-voltage halogen lamps: 1,000 VA
Fluorescent lamps, uncorrected: 500 VA
Fluorescent lamps, series-corrected: 500 VA
Fluorescent lamps, parallel-corrected: 500 VA
Fluorescent lamps, EVG: 1,000 W
LED lamps < 2 W: 16 W
2 W < LED lamps < 8 W: 64 W
LED lamps > 8 W: 64 W
Capacitive load: 132 μF - Mounting height: optimum mounting height: 2m
– Angle of coverage: L 10 S: 180° - Sensor reach in installation height 2 m:
L 10 S: max. 7.5 m
– Twilight setting: L 10 S: 2–2,000 lux
– Time setting: L 10 S: 5 s – 60 min - IP rating: IP44
- Ambient temperature: -20 °C to +40 °C
- Protection class: //
- Impact resistance: IK03
11. Troubleshooting
Unit without power.
- Fuse not switched ON or faulty.
- Switch ON fuse.
- Change faulty fuse.
- Break in wiring.
- Check wiring with voltage tester.
– Short circuit in mains power supply lead.
- Check connections.
- Any mains switch OFF
- Switch ON mains switch.
Unit does not switch ON.
– Wrong twilight setting selected.
- Reset twilight setting.
- Mains switch OFF.
- Turn on mains switch.
- Fuse not switched ON or faulty.
- Switch ON fuse.
- Change faulty fuse.
– Rapid movements being suppressed to minimise malfunctioning, or detection zone too small or incorrectly defined.
- Check and adjust detection zone.
Unit does not switch OFF.
- Continued movement within the detection zone.
- Check detection zone.
- If necessary, limit or change detection zone.
Unit switches ON when it should not.
– Floodlight not mounted for detecting movement reliably.
- Securely mount floodlight.
- Movement occurred but not identified by the observer (small object moving in immediate proximity of lamp etc.).
- Check detection zone.
- If necessary, limit or change detection zone.
Sommaire
natural_image
Line drawing of a mechanical device with a 1× multiplier label (no text or symbols on the device itself)2×

2×

6×

1×

1×

natural_image
Technical line drawing of a conical device with a 224 mm dimension label (no other text or symbols)natural_image
Technical line drawing of a bucket with a 224 mm dimension label (no other text or symbols)text_image
Safety warning symbol and electrical circuit diagram showing lightning bolt and switch mechanism
text_image
L ⊕ N ↓ L N PE⊕
text_image
L ⊕ N ↓ L ⊕ N N PE ⊕
text_image
L ⊕ N I L ⊕ N I L N PE⊕text_image
Weather forecast icons showing sunlight and a checkmark, indicating rightward shift and confirmation5. Montage

natural_image
Diagram of a kitchen appliance with a circular sink and a curved arrow indicating rotation (no text or symbols)
natural_image
Diagram of a mechanical device with an arrow indicating direction, no text or symbols presentnatural_image
Technical line drawing of an electrical connector with cable and motor (no text or symbols)- Retirer le domino de la fixation murale.
5.6

natural_image
Diagram of a mechanical device with arrows indicating motion or force direction (no text or symbols)natural_image
Line drawing of a light bulb mounted on a square base with a downward arrow indicating compression or disassembly (no text or symbols)• Monter la source E 27.
5.8

natural_image
Technical line drawing of a mechanical device with directional arrows indicating motion or force (no text or symbols)natural_image
Technical line drawing of a mechanical component with arrows indicating assembly or movement (no text or symbols)natural_image
Technical diagram of a mechanical device with labeled parts and directional arrows indicating assembly (no text or symbols present)FR
natural_image
Technical line drawing of an electrical connector with cable and internal components (no text or symbols)natural_image
Technical line drawing of a mechanical device with a control panel and housing (no text or symbols)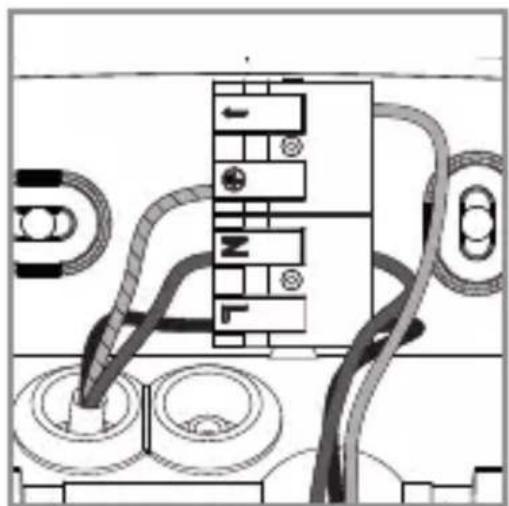
natural_image
Pure electrical circuit lines without any symbolsnatural_image
Technical line drawing of a mechanical assembly with a tool and directional arrow (no text or symbols)natural_image
Line drawing of a mechanical device with a base and top component, no text or symbols presentnatural_image
Technical line drawing of a mechanical assembly with an arrow indicating direction (no text or symbols)natural_image
Line drawing of a mechanical device with a base and top component, no text or symbols presentnatural_image
Technical line drawing of a mechanical device with a conical top and base, showing no text or symbols.
natural_image
Technical line drawing of a mechanical device with radial blades and mounting bracket (no text or symbols)
natural_image
Line drawing of a mechanical device with no visible text or symbols- Dimensions (H x I x P) :
L 10 S : 255 × 175 × 224 mm
L 10 : 242 × 175 × 224 mm
Lampes LED < 2 W : 16 W
2 W < Lampes LED < 8 W : 64 W
Lampes LED > 8 W : 64 W
Charge capacitive : 132 μF
natural_image
Line drawing of a mechanical device with a 1× multiplier label (no text or symbols on the device itself)2×

2×

6×

1×

1×

natural_image
Line drawing of a trash bin with a 1× multiplier label (no text or symbols on the object itself)

natural_image
Technical line drawing of a conical device with a 224 mm dimension label (no other text or symbols)Productafmetingen L 10
3.4
text_image
175 mm 242 mm
natural_image
Technical line drawing of a bucket with a 224 mm dimension label (no other text or symbols)text_image
L ⊕ N ↓ L N PE⊕
text_image
L ⊕ N ↓ L ⊕ N L N PE ⊕
text_image
L ⊕ N I L ⊕ N I L N PE⊕text_image
Weather forecast icons showing sunlight and a checkmark for confirmation5. Montage

text_image
Diagram illustrating electrical hazard warning and switch mechanism with labeled components and directional arrowsnatural_image
Technical line drawing of an electrical connector with cable and motor (no text or symbols)natural_image
Diagram of a mechanical device with arrows indicating motion or force, showing a lever and base structure (no text or symbols)natural_image
Line drawing of a light bulb mounted on a square base with a downward arrow indicating compression or disassembly (no text or symbols)• E27 lichtbron inzetten.
5.8

natural_image
Technical line drawing of a mechanical device with directional arrows indicating motion or force (no text or symbols)natural_image
Technical line drawing of a mechanical component with arrows indicating assembly or movement (no text or symbols)- Boorgaten aftekenen.
5.10

text_image
Ø 6 mm- Gaten boren.
text_image
5.11natural_image
Technical line drawing of an electrical connector with cable and internal components (no text or symbols)natural_image
Technical line drawing of a mechanical device with a base and internal components (no text or symbols)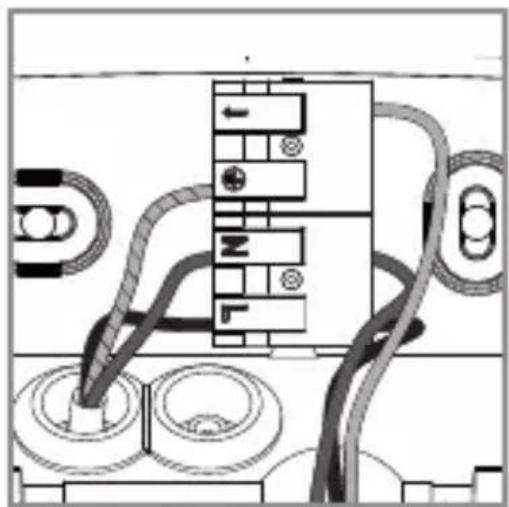
natural_image
Pure electrical circuit lines without any symbolsnatural_image
Technical line drawing of a mechanical assembly with a valve and adjustment knob (no text or symbols)natural_image
Line drawing of a mechanical device with a base and circular base, no text or symbols present- Haal de designring van de sensorunit.
6.3

text_image
1. 2.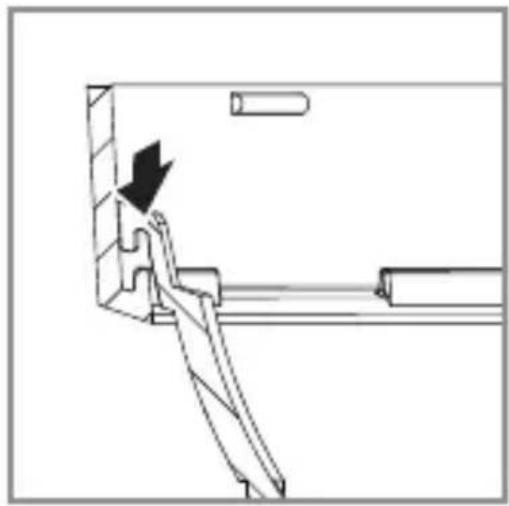
natural_image
Technical line drawing of a mechanical assembly with a directional arrow indicating motion (no text or symbols)natural_image
Line drawing of a mechanical device with a central component and a base, no text or symbols presentnatural_image
Line drawing of a mechanical device with a conical top and base, showing no text or symbols.NL

natural_image
Line drawing of a spray gun with incident and scattered blades (no text or symbols)
natural_image
Line drawing of a mechanical device with no visible text or symbolsnatural_image
Line drawing of a mechanical device with a 1× multiplier label (no text or symbols on the device itself)2×

2×

6×

1×

1×

natural_image
Technical line drawing of a mechanical component with dimension label (224 mm), no readable text or symbols beyond the measurement.natural_image
Technical line drawing of a bucket with a 224 mm dimension label (no other text or symbols)text_image
L ⊕ N ↓ L N PE⊕
text_image
L ⊕ N ↓ L ⊕ N L N PE ⊕
text_image
L ⊕ N I L ⊕ N I L N PE⊕text_image
Weather forecast symbols and checkmark for sunlight, showing left turn and right turn with blank boxes5. Montaggio
text_image
Diagram illustrating electrical hazard warning and safety instructions for a device, with labeled components and directional arrows.natural_image
Technical line drawing of an electrical connector with cable and motor components (no text or symbols)natural_image
Line drawing of a mechanical device with arrows indicating motion or force direction (no text or symbols)natural_image
Line drawing of a light bulb mounted on a square base with a downward arrow indicating compression or disassembly (no text or symbols)- Inserire la lampadina E 27.
5.8
natural_image
Technical line drawing of a mechanical device with directional arrows indicating motion or force (no text or symbols)natural_image
Technical line drawing of a mechanical component with arrows indicating assembly or movement (no text or symbols)- Segnare i fori.
5.10
text_image
Ø 6 mmnatural_image
Technical diagram of a mechanical device with labeled parts and directional arrows indicating assembly (no text or symbols present)natural_image
Technical line drawing of an electrical connector with cable and internal components (no text or symbols)natural_image
Line drawing of a mechanical device with a side panel and control panel (no text or symbols)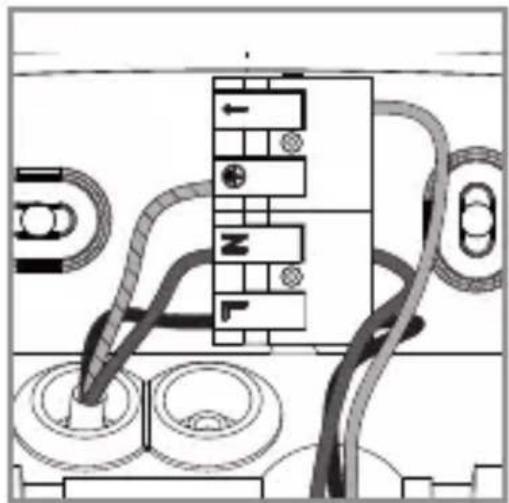
natural_image
Pure electrical circuit lines without any symbolsnatural_image
Technical line drawing of a mechanical assembly with a lever and component (no text or symbols)natural_image
Line drawing of a mechanical device with a base and circular base, no text or symbols presentnatural_image
Technical line drawing of a mechanical assembly with an arrow indicating direction (no text or symbols)natural_image
Line drawing of a mechanical device with a central component and a circular base (no text or symbols)natural_image
Technical line drawing of a mechanical device with a conical top and base, showing no text or symbols.
natural_image
Technical line drawing of a spray gun with incident and reflected blades (no text or symbols)
natural_image
Line drawing of a mechanical device with no visible text or symbols2 W < lampade LED < 8 W: 64 W
Lampade LED > 8 W: 64 W
natural_image
Line drawing of a mechanical device with a 1× multiplier label (no text or symbols on the device itself)2×

2×

6×

1×

1×

natural_image
Line drawing of a trash bin with a 1× multiplier label (no text or symbols on the object itself)


natural_image
Technical line drawing of a conical device with a 224 mm dimension label (no other text or symbols)natural_image
Technical line drawing of a bucket with a 224 mm dimension label (no other text or symbols)text_image
A D C D EES
text_image
L ⊕ N ↓ L N PE⊕
text_image
L ⊕ N ↓ L ⊕ N L N PE ⊕
text_image
L ⊕ N I L ⊕ N I L N PE⊕text_image
Weather forecast symbols and checkmark for sunlight, showing left turn and right turn with blank boxes5. Montaje

text_image
Diagram illustrating electrical hazard warning and safety instructions for a device, with labeled components and directional arrows.natural_image
Technical line drawing of a device with internal components and cable, showing no text or symbolsnatural_image
Diagram of a mechanical device with arrows indicating motion or force, showing a lever and base structure (no text or symbols)natural_image
Line drawing of a light bulb mounted on a square base with a downward arrow indicating compression or disassembly (no text or symbols)- Insertar la bombilla E 27.
5.8

natural_image
Technical line drawing of a mechanical device with directional arrows indicating motion or force (no text or symbols)natural_image
Technical line drawing of a mechanical component with arrows indicating assembly or movement (no text or symbols)natural_image
Technical diagram of a mechanical device with labeled parts and directional arrows indicating assembly (no text or symbols present)ES
natural_image
Technical line drawing of a cable connector with internal components and cable routing (no text or symbols)natural_image
Line drawing of a mechanical device with a side panel and internal components (no text or symbols)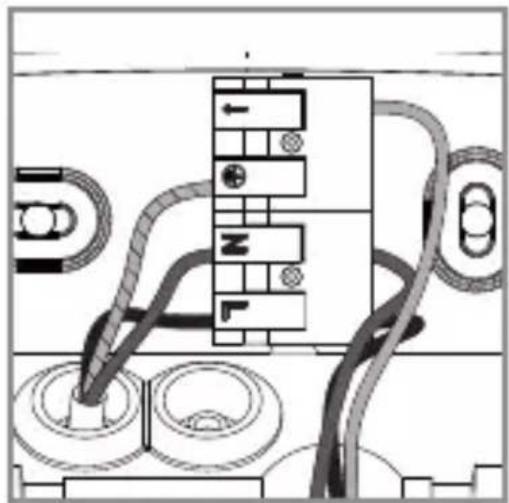
natural_image
Pure electrical circuit lines without any symbolsnatural_image
Technical line drawing of a mechanical assembly with a lever and component (no text or symbols)natural_image
Line drawing of a mechanical device with a base and top component, no text or symbols presentnatural_image
Technical line drawing of a mechanical assembly with a directional arrow indicating motion (no text or symbols)natural_image
Line drawing of a mechanical device with a base and top component, no text or symbols presentnatural_image
Technical line drawing of a mechanical device with a conical top and base, showing no text or symbols.
natural_image
Technical line drawing of a spray gun with incident and reflected blades (no text or symbols)
natural_image
Line drawing of a mechanical device with no visible text or symbolsnatural_image
Line drawing of a mechanical device with a 1× multiplier label (no text or symbols on the device itself)2×

2×

6×

1×
1×

natural_image
Technical line drawing of a conical device with a 224 mm dimension label (no other text or symbols)natural_image
Technical line drawing of a bucket with a 224 mm dimension label (no other text or symbols)text_image
Safety warning symbol and electrical circuit diagram showing lightning bolt and switch mechanism
text_image
L ⊕ N ↓ L N PE⊕
text_image
L ⊕ N ↓ L ⊕ N L N PE ⊕
text_image
L ⊕ N I L ⊕ N I L N PE⊕text_image
Weather forecast symbols and checkmark for sunlight, showing left turn and right turn with blank boxes5. Montagem

natural_image
Diagram of a mechanical assembly with a circular component and an arrow indicating direction (no text or symbols)
natural_image
Technical line drawing of a mechanical device with internal components and cable, showing no text or symbolsnatural_image
Diagram of a mechanical device with arrows indicating motion or force, showing a tool pressing down on a flat plate (no text or symbols present)- Desaparafuse a cobertura superior da armadura.
5.7

natural_image
Line drawing of a light bulb mounted on a square base with a downward arrow indicating motion (no text or symbols)• Coloque a lâmpada E 27.
5.8

natural_image
Technical line drawing of a mechanical device with directional arrows indicating motion or force (no text or symbols)• Coloque a cobertura superior.
5.9

natural_image
Technical line drawing of a mechanical component with arrows indicating assembly or movement (no text or symbols)- Marque os furos.
5.10

text_image
Ø 6 mm- Faça os furos.
5.11

natural_image
Technical diagram of a mechanical device with labeled parts and directional arrows indicating assembly (no text or symbols present)natural_image
Technical line drawing of a device internal structure with cable and connector (no text or symbols)natural_image
Technical line drawing of a mechanical device with a base and internal components (no text or symbols)
natural_image
Pure electrical circuit lines without any symbolsnatural_image
Technical line drawing of a mechanical assembly with a valve and adjustment knob (no text or symbols)natural_image
Line drawing of a mechanical device with a base and circular base, no text or symbols presenttext_image
Technical diagram showing a mechanical assembly with labeled components and directional arrows indicating motion or assembly.natural_image
Line drawing of a mechanical device with a base and top component, no text or symbols presentnatural_image
Technical line drawing of a mechanical device with a conical top and base, showing no text or symbols.
natural_image
Technical line drawing of a mechanical device with radial blades and a central hub (no text or symbols)
natural_image
Line drawing of a mechanical device with no visible text or symbols2 W < LEDs < 8 W: 64 W
LEDs > 8 W: 64 W
Carga capacitiva: 132 μF
natural_image
Line drawing of a mechanical device with a 1× multiplier label (no text or symbols on the device itself)2×

2×

6×

1×

1×

natural_image
Technical line drawing of a conical device with a 224 mm dimension label (no other text or symbols)Produktmått L 10
3.4
text_image
175 mm 242 mm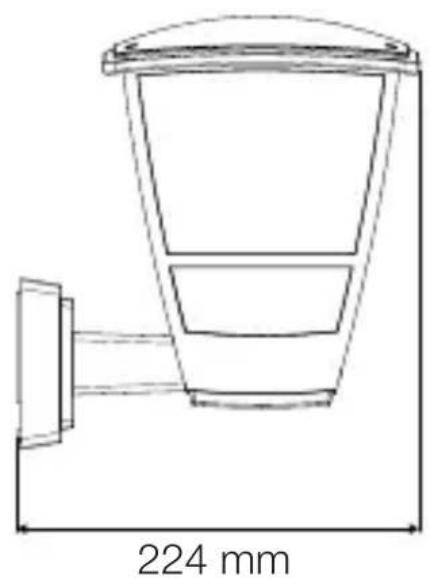
natural_image
Technical line drawing of a bucket with a 224 mm dimension label (no other text or symbols)Översikt L 10 S
3.5

text_image
A B C D ESE
text_image
Safety warning symbol and electrical circuit diagram showing lightning bolt and switch mechanism
text_image
L ⊕ N ↓ L N PE⊕
text_image
L ⊕ N ↓ L ⊕ N N PE ⊕
text_image
L ⊕ N I L ⊕ N I L N PE⊕text_image
Weather forecast symbols showing sun and moon icons with directional arrows and a checkmark5. Montage

Fara p.g.a. elektrisk ström!
text_image
Diagram illustrating electrical hazard warning and switch mechanism with labeled components and directional arrowsnatural_image
Technical line drawing of a device with internal components and cable, showing no text or symbolsnatural_image
Diagram of a mechanical device with arrows indicating motion or force, showing a lever and base structure (no text or symbols)natural_image
Line drawing of a light bulb mounted on a square base with a downward arrow indicating motion (no text or symbols)natural_image
Technical line drawing of a mechanical device with directional arrows indicating motion or force (no text or symbols)natural_image
Technical line drawing of a mechanical component with arrows indicating assembly or movement (no text or symbols)- Markera borrhålen.
5.10

text_image
Ø 6 mm- Borra hål.
5.11
text_image
Technical diagram of a mechanical device with labeled parts and directional arrows indicating assembly or movement.SE
natural_image
Technical line drawing of an electrical switchgear assembly with no visible text or symbolsnatural_image
Technical line drawing of a mechanical device with a control panel and housing (no text or symbols)
natural_image
Pure electrical circuit lines without any symbolsnatural_image
Technical line drawing of a mechanical assembly with a lever and component (no text or symbols)natural_image
Line drawing of a mechanical device with a base and circular base, no text or symbols presentnatural_image
Technical line drawing of a mechanical assembly with a directional arrow indicating motion (no text or symbols)natural_image
Line drawing of a mechanical device with a base and top component, no text or symbols presentnatural_image
Line drawing of a mechanical device with a conical top and base, showing no text or symbols.
natural_image
Technical line drawing of a mechanical device with radial blades and a central hub (no text or symbols)
natural_image
Line drawing of a mechanical device with no visible text or symbolsLED lampor < 2 W: 16 W
2 W < LED lampor < 8 W: 64 W
LED lampor > 8 W: 64 W
Kapacitiv last: 132 μF
natural_image
Line drawing of a mechanical device with a 1× multiplier label (no text or symbols on the device itself)2×

2×

6×

1×

1×

natural_image
Line drawing of a trash bin with a 1× multiplier label (no text or symbols on the diagram itself)


- E 27-lampe
- 2 skruer
- 2 rawlplugs
- 1 sikkerhedsdatablad
- 1 Quick-Start
natural_image
Technical line drawing of a conical device with a 224 mm dimension label (no other text or symbols)Produktmål for L 10
3.4
text_image
175 mm 242 mm
natural_image
Technical line drawing of a bucket with a 224 mm dimension label (no other text or symbols)text_image
Safety warning symbol and electrical circuit diagram showing lightning bolt and switch mechanism
text_image
L ⊕ N ↓ L N PE⊕
text_image
L ⊕ N ↓ L ⊕ N N PE⊕
text_image
L ⊕ N I L ⊕ N I L N PE⊕text_image
Weather forecast symbols showing sun and moon icons with directional arrows and a checkmarkDK
5. Montering

text_image
Diagram illustrating electrical hazard warning and switch mechanism, showing components like fuse, switch, and battery with numbered arrows.natural_image
Technical line drawing of an electrical connector with cable and socket (no text or symbols)natural_image
Line drawing of a mechanical device with arrows indicating motion or assembly (no text or symbols)natural_image
Line drawing of a light bulb mounted on a square base with a downward arrow indicating compression or disassembly (no text or symbols)• Sæt E 27-lyskilden i.
5.8
natural_image
Technical line drawing of a mechanical device with directional arrows indicating motion or force (no text or symbols)- Anbring den øverste kappe.
5.9

natural_image
Technical line drawing of a mechanical component with arrows indicating assembly or movement (no text or symbols)natural_image
Technical line drawing of an electrical connector with cable and internal components (no text or symbols)natural_image
Technical line drawing of a mechanical device with internal components (no text or symbols)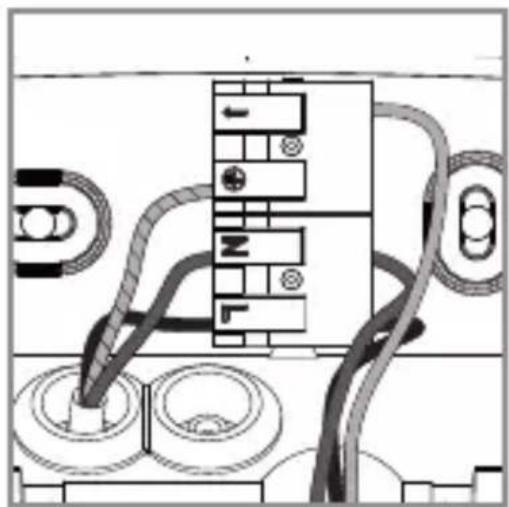
natural_image
Pure electrical circuit lines without any symbolsnatural_image
Technical line drawing of a ceiling-mounted electrical fixture with a mounted component and a circular base (no text or symbols)natural_image
Line drawing of a mechanical device with a base and central component, no text or symbols presenttext_image
Technical diagram showing mechanical assembly steps with labeled components and directional arrowsnatural_image
Line drawing of a mechanical device with a spherical component inserted into a circular base (no text or symbols)natural_image
Technical line drawing of a mechanical device with a conical top and base, showing no text or symbols.
natural_image
Technical line drawing of a mechanical device with radial blades and a central hub (no text or symbols)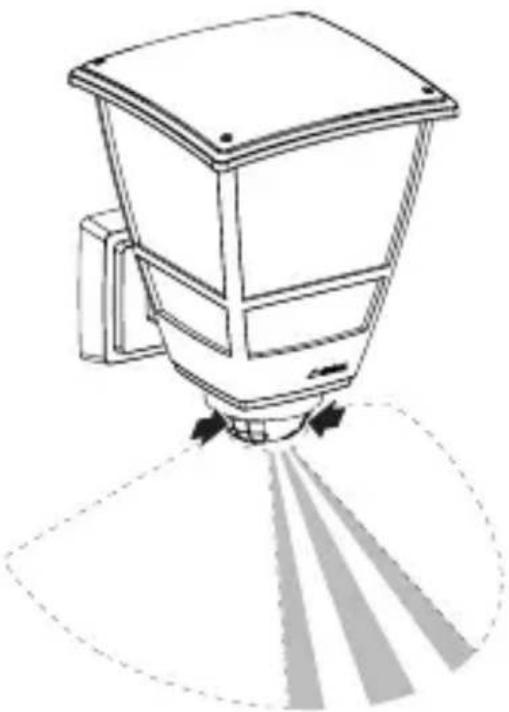
natural_image
Line drawing of a mechanical device with no visible text or symbolsnatural_image
Line drawing of a mechanical device with a 1× multiplier label (no text or symbols on the device itself)2×

2×

6×

1×

1×

natural_image
Technical line drawing of a conical device with a 224 mm dimension label (no other text or symbols)Tuotteen mitat L 10
3.4

text_image
175 mm 242 mm
natural_image
Technical line drawing of a bucket with a 224 mm dimension label (no other text or symbols)text_image
L ⊕ N ↓ L N PE⊕
text_image
L ⊕ N ↓ L ⊕ N L N PE ⊕
text_image
L ⊕ N I L ⊕ N I L N PE⊕text_image
Weather forecast symbols and checkmark for sunlight, showing left turn and right turn with a checkmark5. Asennus

text_image
Diagram illustrating electrical hazard warning and switch mechanism, showing components like a fuse, switch, and battery with numbered arrows.natural_image
Technical line drawing of an electrical connector with cable and motor components (no text or symbols)natural_image
Diagram of a mechanical device with arrows indicating motion or force, showing a lever and base structure (no text or symbols)natural_image
Line drawing of a light bulb mounted on a 3D box, with a downward arrow indicating compression or disassembly (no text or symbols)natural_image
Technical line drawing of a mechanical device with directional arrows indicating motion or force (no text or symbols)- Kiinnitä yläkupu.
5.9

natural_image
Technical line drawing of a mechanical component with arrows indicating assembly or movement (no text or symbols)- Merkitse reiät.
5.10

text_image
Ø 6 mm- Poraa reiät.

text_image
5.11natural_image
Technical line drawing of an electrical switchgear assembly with no visible text or symbolsnatural_image
Technical line drawing of a mechanical device with a control panel and housing (no text or symbols)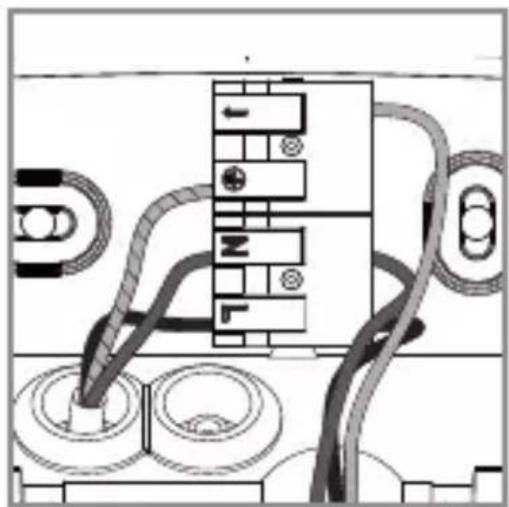
natural_image
Pure electrical circuit lines without any symbolsnatural_image
Technical line drawing of a ceiling-mounted electrical fixture with a mounted component and a circular base (no text or symbols)natural_image
Line drawing of a mechanical device with a base and circular base, no text or symbols presentnatural_image
Technical line drawing of a mechanical assembly with an arrow indicating direction (no text or symbols)natural_image
Line drawing of a mechanical device with a base and top component, no text or symbols presentnatural_image
Technical line drawing of a mechanical device with a conical top and base, showing no text or symbols.
natural_image
Technical line drawing of a mechanical device with radial blades and a central hub (no text or symbols)
natural_image
Line drawing of a mechanical device with no visible text or symbolsLED-lamput < 2 W: 16 W
2 W < LED-lamput < 8 W: 64 W
LED-lamput > 8 W: 64 W
natural_image
Line drawing of a mechanical device with a 1× multiplier label (no text or symbols on the device itself)2×

2×

6×

1×

1×

- E 27 lampe med infrarød bevegelsessensor.
- 2 skruer
- 2 murplugger
- 6 linsedeksler
- 1 sikkerhetsdatablad
- 1 hurtigstart
natural_image
Line drawing of a trash bin with a 1× multiplier label (no text or symbols on the diagram itself)


- E 27 lampe
- 2 skruer
- 2 murplugger
- 1 sikkerhetsdatablad
- 1 hurtigstart
natural_image
Technical line drawing of a conical device with a 224 mm dimension label (no other text or symbols)Produktmål L 10
3.4
text_image
175 mm 242 mm
natural_image
Technical line drawing of a bucket with a 224 mm dimension label (no other text or symbols)text_image
Safety warning symbol and electrical circuit diagram showing lightning bolt and switch mechanism
text_image
L ⊕ N ↓ L N PE⊕
text_image
L ⊕ N ↓ L ⊕ N L N PE ⊕
text_image
L ⊕ N I L ⊕ N I L N PE⊕text_image
Weather forecast symbols and checkmark for sunlight, showing left turn and right turn with a checkmark5. Montering

text_image
Diagram illustrating electrical hazard warning and switch mechanism with labeled components and directional arrowsnatural_image
Technical line drawing of an electrical connector with cable and motor components (no text or symbols)natural_image
Diagram of a mechanical device with arrows indicating motion or force, showing a lever and base structure (no text or symbols)natural_image
Line drawing of a light bulb mounted on a 3D box, with a downward arrow indicating compression or disassembly (no text or symbols present)- Sett inn E 27 lyselementet.
5.8

natural_image
Technical line drawing of a mechanical device with directional arrows indicating motion or force (no text or symbols)natural_image
Technical line drawing of a mechanical component with arrows indicating assembly or movement (no text or symbols)- Tegn borehull.
5.10

text_image
Ø 6 mm- Bor hull.

text_image
5.11NO
- Trykk inn tetningspluggen for nettledningen.
- Skru fast veggbraketten.

text_image
5.12natural_image
Technical line drawing of an electrical switchgear assembly with no visible text or symbolsnatural_image
Technical line drawing of a mechanical device with a control panel and housing (no text or symbols)
natural_image
Pure electrical circuit lines without any symbolsnatural_image
Technical line drawing of a ceiling-mounted electrical fixture with a mounted component and a circular base (no text or symbols)natural_image
Line drawing of a mechanical device with a base and circular base, no text or symbols presentnatural_image
Technical line drawing of a mechanical assembly with an arrow indicating direction (no text or symbols)- Sett ønsket antall plastdeksler på designringen og koble dem sammen.
6.4
natural_image
Line drawing of a mechanical device with a central component and a base, no text or symbols present.natural_image
Technical line drawing of a mechanical device with a conical top and base, showing no text or symbols.
natural_image
Technical line drawing of a mechanical device with radial blades and mounting bracket (no text or symbols)
natural_image
Line drawing of a mechanical device with no visible text or symbolsnatural_image
Line drawing of a mechanical device with a base and top component, labeled '1×' (no text or symbols on the device itself)2×

2×

6×

1×

1×
natural_image
Line drawing of a trash bin with a 1× multiplier label (no text or symbols on the diagram itself)

natural_image
Technical line drawing of a conical device with a 224 mm dimension label (no other text or symbols)natural_image
Technical line drawing of a bucket with 224 mm dimension label (no other text or symbols)text_image
L ⊕ N ↓ L N PE⊕
text_image
L ⊕ N ↓ L ⊕ N L N PE ⊕
text_image
L ⊕ N I L ⊕ N I L N PE⊕text_image
Weather forecast diagram showing sunlight transforming into a blank box with a checkmark indicating completion.5. Συναρμολόγηση

natural_image
Diagram of a mechanical assembly with a circular component and an arrow indicating direction (no text or symbols)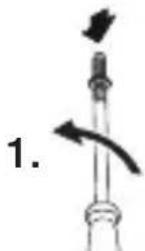
natural_image
Technical line drawing of an electrical connector with cable and motor (no text or symbols)natural_image
Line drawing of a mechanical device with arrows indicating motion or force direction (no text or symbols)natural_image
Line drawing of a light bulb mounted on a square base with a downward arrow indicating compression or disassembly (no text or symbols)natural_image
Technical line drawing of a mechanical device with directional arrows indicating motion or force (no text or symbols)natural_image
Technical line drawing of a mechanical component with arrows indicating assembly or movement (no text or symbols)natural_image
Technical line drawing of an electrical connector with internal components and cable (no text or symbols)natural_image
Line drawing of a mechanical device with a control panel and housing (no text or symbols)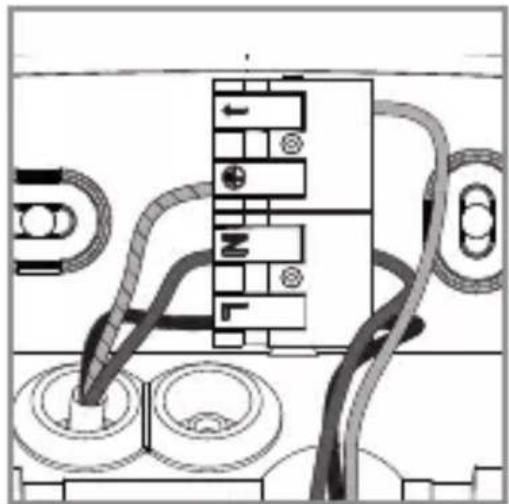
natural_image
Pure electrical circuit lines without any symbolsnatural_image
Technical line drawing of a mechanical assembly with no visible text or symbolsnatural_image
Line drawing of a mechanical device with a base and circular base, no text or symbols presenttext_image
Technical diagram showing a mechanical assembly with labeled components and directional arrows indicating motion or assembly.natural_image
Line drawing of a mechanical device with a base and top component, no text or symbols presentnatural_image
Line drawing of a mechanical device with a conical top and base, showing a downward arrow indicating motion (no text or symbols)
natural_image
Technical line drawing of a mechanical device with radial blades and a central top component (no text or symbols)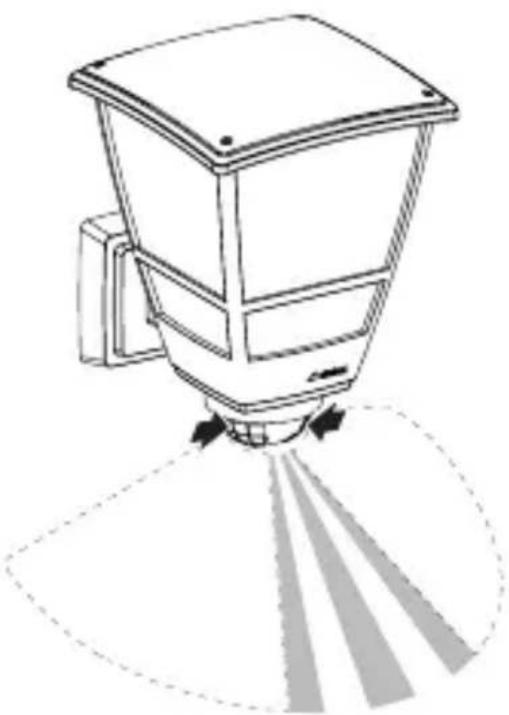
natural_image
Line drawing of a mechanical device with no visible text or symbolsnatural_image
Line drawing of a mechanical device with a 1× multiplier label (no text or symbols on the device itself)2×

2×

6×

1×

1×

natural_image
Line drawing of a trash bin with a 1× multiplier label (no text or symbols on the object itself)2×
2×


natural_image
Technical line drawing of a conical device with a 224 mm dimension label (no other text or symbols)natural_image
Technical line drawing of a bucket with a 224 mm dimension label (no other text or symbols)text_image
Safety warning symbol and electrical circuit diagram showing lightning bolt and switch mechanism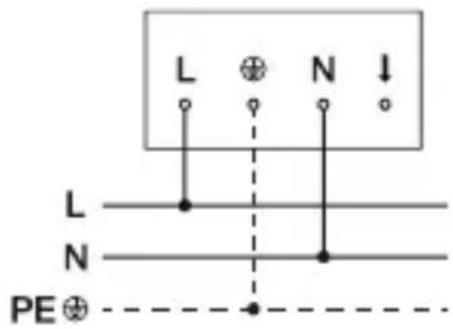
text_image
L ⊕ N ↓ L N PE ⊕ -
text_image
L ⊕ N ↓ L ⊕ N N PE⊕
text_image
L ⊕ N I L ⊕ N I L N PE⊕text_image
Weather forecast symbols and checkmark for sunlight, showing left turn and right turn with a checkmark5. Montaj

text_image
Diagram illustrating electrical hazard warning and switch mechanism, showing components like fuse, switch, and battery with numbered arrows.natural_image
Technical line drawing of an electrical connector with cable and motor (no text or symbols)natural_image
Diagram of a mechanical device with arrows indicating motion or force, showing a tool pressing down on a flat plate (no text or symbols present)natural_image
Line drawing of a light bulb mounted on a square base with a downward arrow indicating compression or disassembly (no text or symbols)natural_image
Technical line drawing of a mechanical device with directional arrows indicating motion or force (no text or symbols)natural_image
Technical line drawing of a mechanical component with arrows indicating assembly or movement (no text or symbols)natural_image
Technical line drawing of an electrical connector with cable and internal components (no text or symbols)natural_image
Technical line drawing of a mechanical device with a base and internal components (no text or symbols)
natural_image
Pure electrical circuit lines without any symbolsnatural_image
Technical line drawing of a ceiling-mounted electrical fixture with a mounted component and a circular base (no text or symbols)natural_image
Line drawing of a mechanical device with a base and circular base, no text or symbols presenttext_image
Technical diagram showing two mechanical assembly steps with labeled components and directional arrowsnatural_image
Line drawing of a mechanical device with a spherical base and a circular component, no text or symbols present.natural_image
Technical line drawing of a mechanical device with a conical top and base, showing no text or symbols.
natural_image
Technical line drawing of a mechanical device with radial blades and a central hub (no text or symbols)
natural_image
Line drawing of a mechanical device with no visible text or symbols2 W < LED lambalar < 8 W: 64 W
LED lambalar > 8 W: 64 W
natural_image
Line drawing of a mechanical device with a 1× multiplier label (no text or symbols on the device itself)2×

2×

6×

1×

1×

natural_image
Line drawing of a trash bin with a 1× multiplier label (no text or symbols on the object itself)


natural_image
Technical line drawing of a conical device with a 224 mm dimension label (no other text or symbols)Termékméretek, L 10
3.4
text_image
175 mm 242 mm
natural_image
Technical line drawing of a bucket with 224 mm dimension label (no other text or symbols)HU
text_image
Safety warning symbol and electrical circuit diagram showing lightning bolt and switch mechanism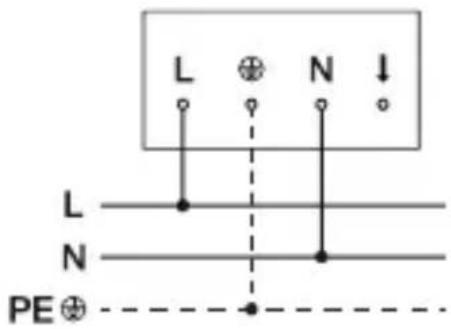
text_image
L ⊕ N ↓ L N PE⊕
text_image
L ⊕ N ↓ L ⊕ N L N PE ⊕
text_image
L ⊕ N I L ⊕ N I L N PE⊕text_image
Weather forecast symbols and checkmark for sunlight, showing left turn and right turn with a checkmark5. Szerelés

Áramütés veszélye!
natural_image
Diagram of a mechanical assembly with a rotating component and an arrow indicating rotation (no text or symbols)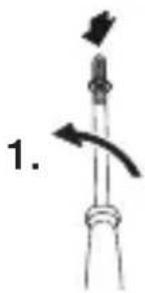
natural_image
Simple line drawing of a mechanical component with an arrow indicating direction (no text or symbols)natural_image
Technical line drawing of a device with internal components and cable, showing no text or symbolsnatural_image
Line drawing of a mechanical device with arrows indicating motion or force, no text or symbols presentnatural_image
Line drawing of a light bulb mounted on a square base with a downward arrow indicating compression or disassembly (no text or symbols)natural_image
Technical line drawing of a mechanical device with directional arrows indicating motion or force (no text or symbols)natural_image
Technical line drawing of a mechanical component with arrows indicating assembly or movement (no text or symbols)natural_image
Technical diagram of a mechanical device with labeled parts and directional arrows indicating motion (no text or symbols present)natural_image
Technical line drawing of a cable connector with internal components and cable routing (no text or symbols)natural_image
Technical line drawing of a mechanical enclosure or enclosure with internal components (no text or symbols)
natural_image
Pure electrical circuit lines without any symbolsnatural_image
Technical line drawing of a mechanical assembly with no visible text or symbolsnatural_image
Line drawing of a mechanical device with a circular base and directional arrow, no text or symbols presentnatural_image
Technical line drawing of a mechanical assembly with an arrow indicating direction (no text or symbols)natural_image
Line drawing of a mechanical device with a base and top component, no text or symbols presentnatural_image
Technical line drawing of a mechanical device with a conical top and base, showing no text or symbols.
natural_image
Technical line drawing of a spray gun with incident and reflected rays (no text or symbols)
natural_image
Line drawing of a mechanical device with no visible text or symbolsnatural_image
Line drawing of a mechanical device with a 1× multiplier label (no text or symbols on the device itself)2×

2×

6×

1×

1×

natural_image
Line drawing of a trash bin with a 1× multiplier label (no text or symbols on the object itself)


natural_image
Technical line drawing of a conical device with a 224 mm dimension label (no other text or symbols)natural_image
Technical line drawing of a bucket with a 224 mm dimension label (no other text or symbols)text_image
Safety warning symbol and electrical circuit diagram showing lightning bolt and switch mechanism
text_image
L ⊕ N ↓ L N PE⊕
text_image
L ⊕ N ↓ L ⊕ N L N PE ⊕
text_image
L ⊕ N I L ⊕ N I L N PE⊕text_image
Weather forecast symbols and checkmark for sunlight, showing left turn and right turn with a checkmark5. Montáž

natural_image
Technical line drawing of a device with internal components and cable, showing no text or symbolsnatural_image
Diagram of a mechanical device with arrows indicating motion or force, showing a lever and base structure (no text or symbols)natural_image
Line drawing of a light bulb mounted on a square base with a downward arrow indicating compression or disassembly (no text or symbols)natural_image
Technical line drawing of a mechanical device with directional arrows indicating motion or force (no text or symbols)natural_image
Technical line drawing of a mechanical component with arrows indicating assembly or movement (no text or symbols)natural_image
Technical line drawing of an electrical switch or power connector with internal components and cable (no text or symbols)natural_image
Technical line drawing of a mechanical device with a control panel and housing (no text or symbols)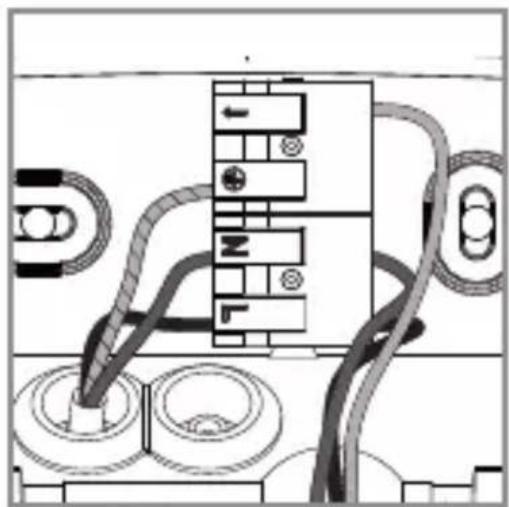
natural_image
Pure electrical circuit lines without any symbolsnatural_image
Technical line drawing of a mechanical assembly with a lever and component (no text or symbols)natural_image
Line drawing of a mechanical device with a circular base and directional arrow, no text or symbols presentnatural_image
Technical line drawing of a mechanical assembly with an arrow indicating direction (no text or symbols)natural_image
Line drawing of a mechanical device with a base and top component, no text or symbols presentnatural_image
Technical line drawing of a mechanical device with a conical top and base, showing no text or symbols.
natural_image
Technical line drawing of a spray gun with incident and reflected blades (no text or symbols)
natural_image
Line drawing of a mechanical device with no visible text or symbolsnatural_image
Line drawing of a mechanical device with a 1× multiplier label (no text or symbols on the device itself)2×

2×

6×

1×

1×

natural_image
Technical line drawing of a conical device with a 224 mm dimension label (no other text or symbols)natural_image
Technical line drawing of a bucket with a 224 mm dimension label (no other text or symbols)text_image
L ⊕ N ↓ L N PE⊕
text_image
L ⊕ N ↓ L ⊕ N L N PE ⊕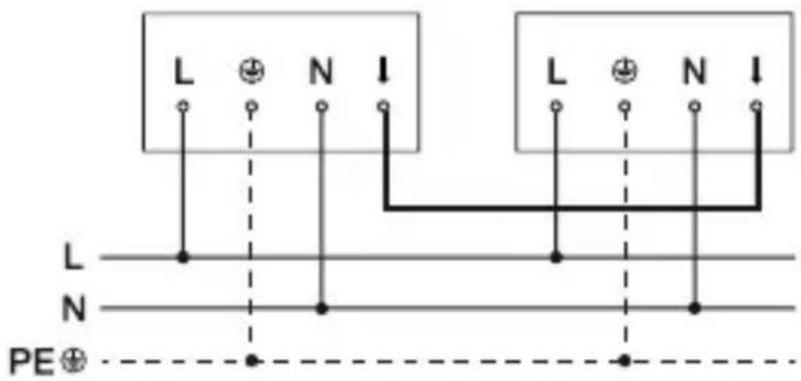
text_image
L ⊕ N I L ⊕ N I L N PE⊕text_image
Weather forecast symbols and checkmark for sunlight, showing left turn and right turn with a checkmark5. Montáž

natural_image
Technical line drawing of an electrical connector with cable and motor (no text or symbols)natural_image
Diagram of a mechanical device with arrows indicating motion or force, showing a lever and base structure (no text or symbols)- Odskrutkujte horný kryt zo svietidla.
5.7

natural_image
Line drawing of a light bulb mounted on a square base with a downward arrow indicating motion (no text or symbols)natural_image
Technical line drawing of a mechanical device with directional arrows indicating motion or force (no text or symbols)natural_image
Technical line drawing of a mechanical component with arrows indicating assembly or movement (no text or symbols)- Naznačte diery na vrtanie.
5.10

text_image
Ø 6 mm- Vyvrtajte otvory.

text_image
5.11natural_image
Technical line drawing of a cable connector with internal components and cable routing (no text or symbols)natural_image
Technical line drawing of a mechanical device with no visible text or symbols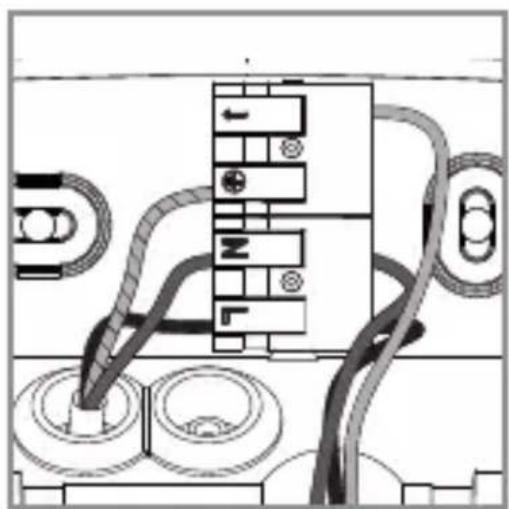
natural_image
Pure electrical circuit lines without any symbolsnatural_image
Technical line drawing of a mechanical assembly with a lever and component (no text or symbols)natural_image
Line drawing of a mechanical device with a base and circular base, no text or symbols presentnatural_image
Technical line drawing of a mechanical assembly with an arrow indicating direction (no text or symbols)natural_image
Line drawing of a mechanical device with a base and top component, no text or symbols presentnatural_image
Technical line drawing of a mechanical device with a conical top and base, showing no text or symbols.
natural_image
Technical line drawing of a spray gun with incident and reflected blades (no text or symbols)
natural_image
Line drawing of a mechanical device with no visible text or symbolsnatural_image
Line drawing of a mechanical device with a 1× multiplier label (no text or symbols on the device itself)2×

2×

6×

1×

1×

natural_image
Line drawing of a trash bin with a 1× multiplier label (no text or symbols on the object itself)


natural_image
Technical line drawing of a conical device with a 224 mm dimension label (no other text or symbols)natural_image
Technical line drawing of a bucket with a 224 mm dimension label (no other text or symbols)PL
text_image
Safety warning symbol and electrical circuit diagram showing lightning bolt and switch mechanism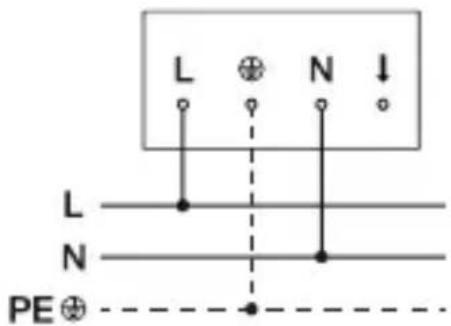
text_image
L ⊕ N ↓ L N PE⊕
text_image
L ⊕ N ↓ L ⊕ N L N PE ⊕
text_image
L ⊕ N I L ⊕ N I L N PE⊕text_image
Weather forecast symbols and checkmark for sunlight, showing left turn and right turn with blank boxesPL
5. Montaż
text_image
Diagram illustrating electrical hazard warning and switch mechanism, showing components like fuse, switch, and battery with numbered arrows.natural_image
Technical line drawing of an electrical connector with cable and motor (no text or symbols)natural_image
Diagram of a mechanical device with arrows indicating motion or force, showing a lever and base structure (no text or symbols)natural_image
Line drawing of a light bulb mounted on a square base with a downward arrow indicating motion (no text or symbols)natural_image
Technical line drawing of a mechanical device with directional arrows indicating motion or force (no text or symbols)natural_image
Technical line drawing of a mechanical component with arrows indicating assembly or movement (no text or symbols)natural_image
Technical diagram of a mechanical device with labeled parts and directional arrows indicating motion (no text or symbols present)natural_image
Technical line drawing of a cable connector with internal components and cable routing (no text or symbols)natural_image
Technical line drawing of a mechanical device with no visible text or symbols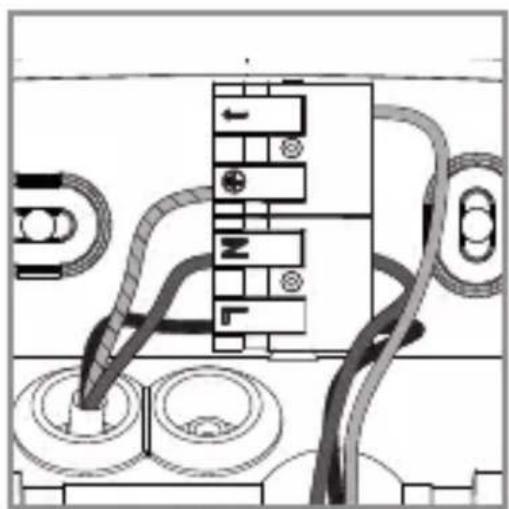
natural_image
Pure electrical circuit lines without any symbolsnatural_image
Technical line drawing of a mechanical assembly with a lever and component (no text or symbols)natural_image
Line drawing of a mechanical device with a base and circular base, no text or symbols presenttext_image
Technical diagram showing a mechanical assembly with labeled components and directional arrows indicating motion or assembly.natural_image
Line drawing of a mechanical device with a spherical base and a conical top, no text or symbols present.natural_image
Technical line drawing of a mechanical device with a conical top and base, showing no text or symbols.
natural_image
Technical line drawing of a mechanical device with radial blades and a central hub (no text or symbols)
natural_image
Line drawing of a mechanical device with no visible text or symbols2 W < Lampy LED < 8 W: 64 W
Lampy LED > 8 W: 64 W
natural_image
Line drawing of a mechanical device with a 1× multiplier label (no text or symbols on the device itself)2×

2×

6×

1×

1×

natural_image
Line drawing of a trash bin with a 1× multiplier label (no text or symbols on the object itself)2×
2×

natural_image
Technical line drawing of a conical device with a 224 mm dimension label (no other text or symbols)natural_image
Technical line drawing of a bucket with a 224 mm dimension label (no other text or symbols)RO
text_image
Safety warning symbol and electrical circuit diagram showing lightning bolt and switch mechanism
text_image
L ⊕ N ↓ L N PE⊕
text_image
L ⊕ N ↓ L ⊕ N L N PE ⊕
text_image
L ⊕ N I L ⊕ N I L N PE⊕text_image
Weather forecast symbols and checkmark for sunlight, showing left turn and right turn with a checkmark5. Montaj

text_image
Diagram illustrating electrical hazard warning and switch mechanism, showing components like fuse, switch, and battery with numbered annotations.natural_image
Technical line drawing of a device with internal components and cable, showing no text or symbolsnatural_image
Diagram of a mechanical device with arrows indicating motion or force, showing a lever and base structure (no text or symbols)natural_image
Line drawing of a light bulb mounted on a square base with a downward arrow indicating compression or disassembly (no text or symbols)- Introduceti becul E 27.
5.8

natural_image
Technical line drawing of a mechanical device with directional arrows indicating motion or force (no text or symbols)natural_image
Technical line drawing of a mechanical component with arrows indicating assembly or movement (no text or symbols)natural_image
Technical diagram of a mechanical device with labeled parts and directional arrows indicating motion (no text or symbols present)natural_image
Technical line drawing of a mechanical assembly with internal components and a directional arrow (no text or symbols)natural_image
Line drawing of a mechanical device with a side panel and cylindrical housing (no text or symbols)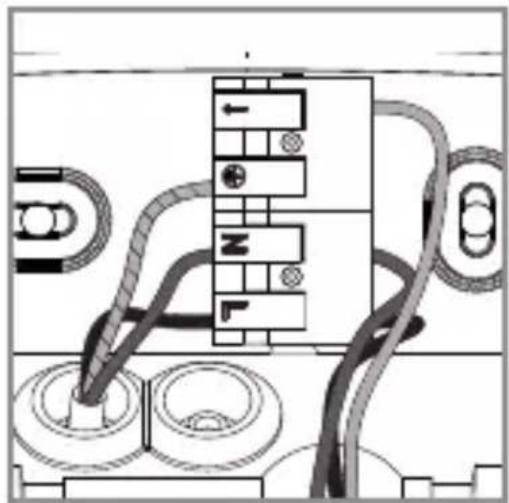
natural_image
Pure electrical circuit lines without any symbolsnatural_image
Technical line drawing of a ceiling-mounted electrical fixture with a mounted component and a circular base (no text or symbols)natural_image
Line drawing of a mechanical device with a circular base and directional arrow, no text or symbols presentnatural_image
Technical line drawing of a mechanical assembly with an arrow indicating direction (no text or symbols)natural_image
Line drawing of a mechanical device with a base and top component, no text or symbols presentnatural_image
Technical line drawing of a mechanical device with a conical top and base, showing no text or symbols.
natural_image
Technical line drawing of a spray gun with incident and reflected blades (no text or symbols)
natural_image
Line drawing of a mechanical device with no visible text or symbolsnatural_image
Line drawing of a mechanical device with a 1× multiplier label (no text or symbols on the device itself)2×

2×

6×

1×

1×

natural_image
Line drawing of a trash bin with a 1× multiplier label (no text or symbols on the object itself)


- E 27 svetilka
- 2 vijaka
- 2 vložka
- 1 varnostni list
- 1 hiter zagon
natural_image
Technical line drawing of a conical device with a 224 mm dimension label (no other text or symbols)Mere izdelka L 10
3.4

text_image
175 mm 242 mm
natural_image
Technical line drawing of a bucket with a 224 mm dimension label (no other text or symbols)Pregled naprav L 10 S
3.5
text_image
A B C D Etext_image
Safety warning symbol and electrical circuit diagram showing lightning bolt and switch mechanism
text_image
L ⊕ N ↓ L N PE⊕
text_image
L ⊕ N ↓ L ⊕ N L N PE ⊕
text_image
L ⊕ N I L ⊕ N I L N PE⊕text_image
Weather forecast symbols and checkmark for sunlight, showing left turn and right turn with a checkmark5. Montaža

text_image
Diagram illustrating electrical hazard warning and safety instructions for a device, with labeled components and directional arrows.natural_image
Technical line drawing of an electrical connector with cable and motor components (no text or symbols)- Odstranite priključno sponko s stenskega nosilca.
5.6
natural_image
Diagram of a mechanical device with arrows indicating motion or force, showing a lever and base structure (no text or symbols)- Odvijte zgornji pokrov s svetilke.
5.7
natural_image
Line drawing of a light bulb mounted on a square base with a downward arrow indicating compression or disassembly (no text or symbols)natural_image
Technical line drawing of a mechanical device with directional arrows indicating motion or force (no text or symbols)natural_image
Technical line drawing of a mechanical component with arrows indicating assembly or movement (no text or symbols)natural_image
Technical diagram of a mechanical device with labeled parts and directional arrows indicating motion (no text or symbols present)- Skozi izvrtine potisnite tesnilne zamaške za omrežno napeljavo.
- Stensko držalo trdno privijačite.
text_image
5.12natural_image
Technical line drawing of a cable connector with internal components and cable routing (no text or symbols)• Vstavite priključno sponko nazaj v stenski nosilec.
5.14
natural_image
Technical line drawing of a mechanical device with internal components (no text or symbols)
natural_image
Pure electrical circuit lines without any symbolsnatural_image
Technical line drawing of a mechanical assembly with a lever and component (no text or symbols)- Svetilko montirajte na stenski nosilec.
- Pritrdite varnostni vijak.
5.16
text_image
I Onatural_image
Line drawing of a mechanical device with a base and circular base, no text or symbols presentnatural_image
Technical line drawing of a mechanical assembly with a downward arrow indicating motion (no text or symbols)natural_image
Line drawing of a mechanical device with a base and top component, no text or symbols present- Dizajn-obroč s pokrovom spet namestite nazaj na senzorsko enoto.
6.5

natural_image
Line drawing of a mechanical device with a conical top and base, showing no text or symbols.
natural_image
Technical line drawing of a mechanical device with radial blades and a central hub (no text or symbols)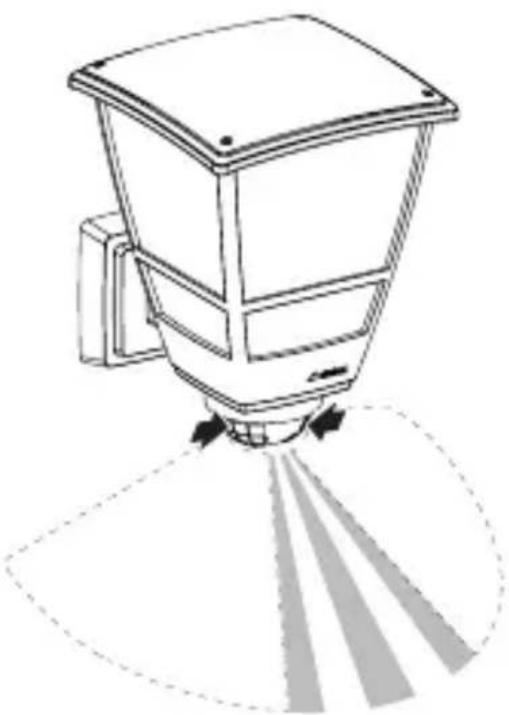
natural_image
Line drawing of a mechanical device with no visible text or symbolsnatural_image
Line drawing of a mechanical device with a 1× multiplier label (no text or symbols on the device itself)2×

2×

6×

1×

1×

– Svjetiljka E 27 s infracrvenim senzorom pokreta
- 2 vijka
- 2 učvrsnice
- 6 poklopaca leća
- 1 sigurnosno tehnički list
- 1 uputa za brzo pokretanje
natural_image
Line drawing of a trash bin with a 1× multiplier label (no text or symbols on the object itself)2×
2×
1× I A
1× I B
- Svjetiljka E 27
- 2 vijka
- 2 učvrsnice
- 1 sigurnosno tehnički list
- 1 uputa za brzo pokretanje
natural_image
Technical line drawing of a conical device with a 224 mm dimension label (no other text or symbols)Dimenzije proizvoda L 10
3.4

text_image
175 mm 242 mm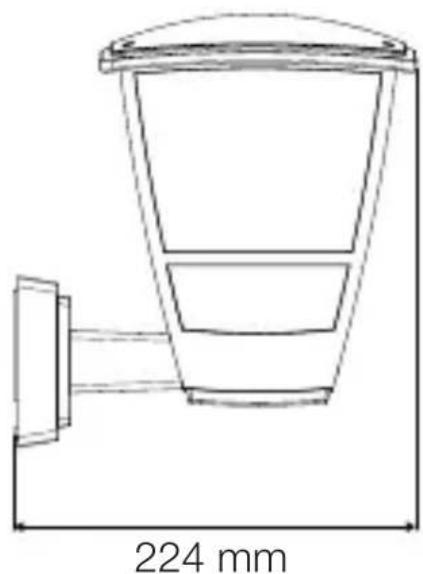
natural_image
Technical line drawing of a bucket with a 224 mm dimension label (no other text or symbols)Pregled uređaja L 10 S
3.5

text_image
A B C D Etext_image
Safety warning symbol and electrical circuit diagram showing lightning bolt and switch mechanism
text_image
L ⊕ N ↓ L N PE⊕
text_image
L ⊕ N ↓ L ⊕ N N PE⊕
text_image
L ⊕ N I L ⊕ N I L N PE⊕Mrežni vod sastoji se od dvožilnog kabela:
L = faza (većinom crna, smeda ili siva)
N = neutralni vodič (većinom plavi)
↓=uključenafaza
(većinom crna, smeda ili siva)
text_image
Weather forecast symbols and checkmark for sunlight, showing left turn and right turn with a checkmark5. Montaža
text_image
Diagram illustrating electrical hazard warning and safety instructions for a device, with labeled components and directional arrows.natural_image
Technical line drawing of an electrical connector with cable and motor components (no text or symbols)natural_image
Diagram of a mechanical device with arrows indicating motion or force, showing a lever and base structure (no text or symbols)natural_image
Line drawing of a light bulb mounted on a square base with a downward arrow indicating motion (no text or symbols)natural_image
Technical line drawing of a mechanical device with directional arrows indicating motion or force (no text or symbols)• Stavite gornji poklopac.
HR
5.9

natural_image
Technical line drawing of a mechanical component with arrows indicating assembly or movement (no text or symbols)- Označite rupe.
5.10
text_image
Ø 6 mm- Izbušite rupe.

text_image
5.11- Probijte brtveni čep za mrežni priključak.
- Pričvrstite zidni držač.
HR

text_image
5.12- Probijte brtveni čep za mrežni priključak.
- Pričvrstite zidni držač.
• Provucite žice kroz otvor za nadžbukni kabel. - Probijte brtveni čep za mrežni priključak.
- Pričvrstite zidni držač.
- Provucite žice kroz otvor za nadžbukni kabel.
5.13
natural_image
Technical line drawing of a cable connector with internal components and wiring (no text or symbols)- Umetnite natrag priključnu stezaljku u zidni držač.
5.14

natural_image
Technical line drawing of a mechanical device with internal components (no text or symbols)
natural_image
Pure electrical circuit lines without any symbolsnatural_image
Technical line drawing of a mechanical assembly with a lever and component (no text or symbols)- Montirajte svjetiljku na zidni držač.
• Uvrnite sigurnosni vijak.
5.16

text_image
I O• Uključite strujno napajanje.
- Podesite funkcije.
→,,6. Funkcija“
6. Funkcija
L 10 S
6.1
text_image
F G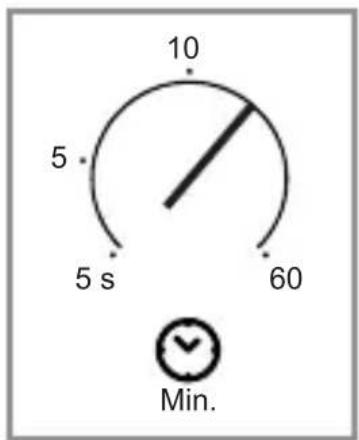
text_image
10 5 5 s 60 Min.
text_image
500 2 2000 Lux- Izvršite podešavanja.
Podešavanje vremena (F)
natural_image
Line drawing of a mechanical device with a circular base and directional arrow, no text or symbols present- Dizajnirani prsten skinite sa senzorske jedinice.
6.3
text_image
1. 2.
natural_image
Technical line drawing of a mechanical assembly with a downward arrow indicating motion (no text or symbols)natural_image
Line drawing of a mechanical device with a base and top component, no text or symbols present- Stavite dizajnirani prsten s poklopcima na senzorsku jedinicu i učvrstite.
HR
6.5

natural_image
Line drawing of a mechanical device with a conical top and base, showing no text or symbols.
natural_image
Technical line drawing of a mechanical device with radial blades and a central hub (no text or symbols)
natural_image
Line drawing of a mechanical device with no visible text or symbolsnatural_image
Line drawing of a mechanical device with a 1× multiplier label (no text or symbols on the device itself)2×

2×

6×

1×

1×

natural_image
Line drawing of a trash bin with a 1× multiplier label (no text or symbols on the object itself)


natural_image
Technical line drawing of a conical device with a 224 mm dimension label (no other text or symbols)Toote mõõdud L 10
3.4
text_image
175 mm 242 mm
natural_image
Technical line drawing of a bucket with a 224 mm dimension label (no other text or symbols)text_image
L ⊕ N ↓ L N PE⊕
text_image
L ⊕ N ↓ L ⊕ N L N PE ⊕
text_image
L ⊕ N I L ⊕ N I L N PE⊕text_image
Weather forecast symbols showing sun and moon icons with directional arrows and a checkmark5. Montaaž

Elektrilöögi oht!
text_image
Diagram illustrating electrical hazard warning and safety instructions for a device, with labeled steps 1 and 2.natural_image
Technical line drawing of an electrical connector with cable and motor components (no text or symbols)natural_image
Diagram of a mechanical device with arrows indicating motion or force, showing a lever and base structure (no text or symbols)natural_image
Line drawing of a light bulb mounted on a 3D box, with a downward arrow indicating compression or disassembly (no text or symbols)- Pange sisse E27 lambipirn.
5.8

natural_image
Technical line drawing of a mechanical device with directional arrows indicating motion or force (no text or symbols)natural_image
Technical line drawing of a mechanical component with arrows indicating assembly or movement (no text or symbols)natural_image
Technical line drawing of an electrical switchgear assembly with no visible text or symbolsnatural_image
Technical line drawing of a mechanical device with a control panel and housing (no text or symbols)
natural_image
Pure electrical circuit lines without any symbolsnatural_image
Technical line drawing of a ceiling-mounted electrical fixture with a mounted component and a circular base (no text or symbols)• Paigaldage valgusti seinakinnitusele.
• Kinnitage lukustuskruvi.
5.16
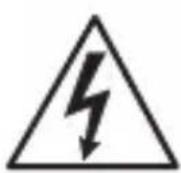
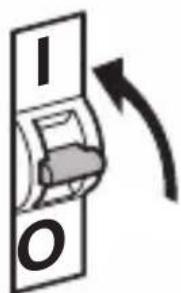
text_image
I Onatural_image
Line drawing of a mechanical device with a base and circular base, no text or symbols presenttext_image
Technical diagram showing mechanical assembly steps with labeled components and directional arrowsnatural_image
Line drawing of a mechanical device with a spherical component inserted into a circular base (no text or symbols)- Kinnitage katetega disainrõngas uuesti sensoriseadmele.
6.5

natural_image
Line drawing of a mechanical device with a conical top and base, showing a downward arrow indicating motion (no text or symbols)
natural_image
Technical line drawing of a mechanical device with radial blades and a central top component (no text or symbols)
natural_image
Line drawing of a mechanical device with no visible text or symbolsnatural_image
Line drawing of a mechanical device with a 1× multiplier label (no text or symbols on the device itself)2×

2×

6×

1×

1×

natural_image
Line drawing of a trash bin with a 1× multiplier label (no text or symbols on the diagram itself)2×
2×


natural_image
Technical line drawing of a conical device with a 224 mm dimension label (no other text or symbols)Gaminio matmenys L 10
3.4

text_image
175 mm 242 mm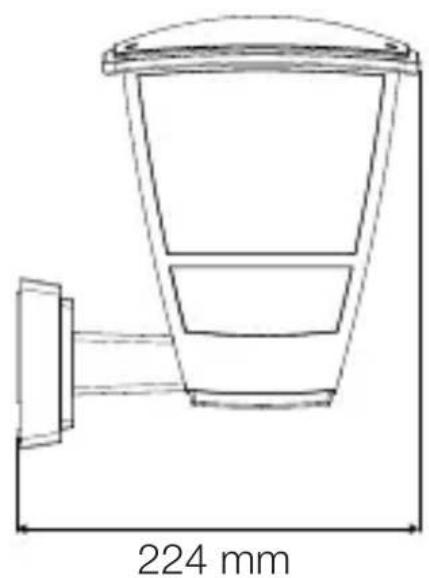
natural_image
Technical line drawing of a bucket with a 224 mm dimension label (no other text or symbols)Prietaiso apžvalga L 10 S
3.5

text_image
A B C D EA Šviestuvas
B Gnybtai
C Dangtelis
D E 27 lemputé
E Sensorius
3.6
text_image
F Gtext_image
L ⊕ N ↓ L N PE⊕
text_image
L ⊕ N ↓ L ⊕ N L N PE ⊕
text_image
L ⊕ N I L ⊕ N I L N PE⊕text_image
Weather forecast symbols showing sun and moon icons with directional arrows and a checkmark5. Montavimas

text_image
Diagram illustrating electrical hazard warning and safety instructions for a device, with labeled steps 1 and 2.natural_image
Technical line drawing of an electrical connector with cable and motor components (no text or symbols)natural_image
Diagram of a mechanical device with arrows indicating motion or force, showing a lever and base structure (no text or symbols)natural_image
Line drawing of a light bulb mounted on a square base with a downward arrow indicating compression or disassembly (no text or symbols)natural_image
Technical line drawing of a mechanical device with directional arrows indicating motion or force (no text or symbols)natural_image
Technical line drawing of a mechanical component with arrows indicating assembly or movement (no text or symbols)natural_image
Technical line drawing of an electrical switchgear assembly with no visible text or symbolsnatural_image
Technical line drawing of a mechanical or electrical enclosure with internal components (no text or symbols)
natural_image
Pure electrical circuit lines without any symbols- Prijunkite maitinimo linija pagal elektros schema.
→ „4. Elektros jungtis“.
5.15

natural_image
Technical line drawing of a mechanical assembly with a lever and component (no text or symbols)natural_image
Line drawing of a mechanical device with a base and circular base, no text or symbols presentnatural_image
Technical line drawing of a mechanical assembly with an arrow indicating direction (no text or symbols)natural_image
Line drawing of a mechanical device with a base and top component, no text or symbols presentnatural_image
Technical line drawing of a mechanical device with a conical top and base, showing no text or symbols.
natural_image
Technical line drawing of a spray gun with incident and reflected blades (no text or symbols)
natural_image
Line drawing of a mechanical device with no visible text or symbolsLED lempos < 2 W: 16 W
2 W < LED lempos < 8 W: 64 W
LED lempos > 8 W: 64 W
natural_image
Line drawing of a mechanical device with a 1× multiplier label (no text or symbols on the device itself)2×

2×

6×

1×

1×
natural_image
Line drawing of a trash bin with a 1× multiplier label (no text or symbols on the object itself)


natural_image
Technical line drawing of a conical device with a 224 mm dimension label (no other text or symbols)natural_image
Technical line drawing of a bucket with a 224 mm dimension label (no other text or symbols)text_image
L ⊕ N ↓ L N PE⊕
text_image
L ⊕ N ↓ L ⊕ N L N PE ⊕
text_image
L ⊕ N I L ⊕ N I L N PE⊕text_image
Weather forecast symbols showing sun and moon icons with directional arrows and a checkmark5. Montāža

text_image
Diagram illustrating electrical hazard warning and safety instructions for a device, with labeled steps 1 and 2.natural_image
Technical line drawing of an electrical connector with cable and motor components (no text or symbols)natural_image
Diagram of a mechanical device with arrows indicating motion or force, showing a lever and base structure (no text or symbols)natural_image
Line drawing of a light bulb mounted on a square base with a downward arrow indicating motion (no text or symbols)- levietojiet E 27 spuldzi.
5.8

natural_image
Technical line drawing of a mechanical device with directional arrows indicating motion or force (no text or symbols)natural_image
Technical line drawing of a mechanical component with arrows indicating assembly or movement (no text or symbols)natural_image
Technical line drawing of an electrical switch or power connector with internal components and cable (no text or symbols)natural_image
Technical line drawing of a mechanical device with internal components (no text or symbols)
natural_image
Pure electrical circuit lines without any symbolsnatural_image
Technical line drawing of a mechanical assembly with a lever and component (no text or symbols)natural_image
Line drawing of a mechanical device with a circular base and directional arrow, no text or symbols presentnatural_image
Technical line drawing of a mechanical assembly with an arrow indicating direction (no text or symbols)natural_image
Line drawing of a mechanical device with a central component and a base, no text or symbols present.natural_image
Technical line drawing of a mechanical device with a conical top and base, showing no text or symbols.
natural_image
Technical line drawing of a spray gun with incident and reflected blades (no text or symbols)
natural_image
Line drawing of a mechanical device with no visible text or symbols2 W < LED lampas < 8 W: 64 W
LED > 8 W: 64 W
natural_image
Line drawing of a mechanical device with a 1× multiplier label (no text or symbols on the device itself)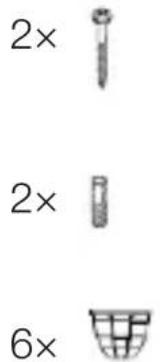
text_image
2× 2× 6×1×

1×

– E 27 лампа с инфрачервен сензор
-2винта
- 2 дюбела
natural_image
Line drawing of a trash bin with a 1× multiplier label (no text or symbols on the object itself)


natural_image
Technical line drawing of a conical device with a 224 mm dimension label (no other text or symbols)Размери L 10
3.4

text_image
175 MM 242 MM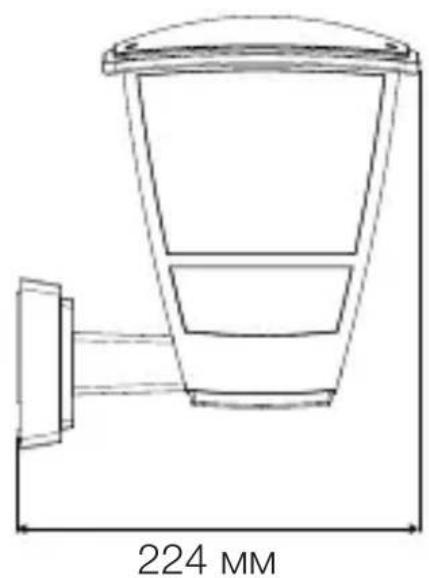
natural_image
Technical line drawing of a bucket with a 224 mm dimension label (no other text or symbols)text_image
Safety warning symbol and electrical circuit diagram showing lightning bolt and switch mechanism
text_image
L ⊕ N ↓ L N PE⊕
text_image
L ⊕ N ↓ L ⊕ N N PE ⊕
text_image
L ⊕ N I L ⊕ N I L N PE⊕text_image
Weather forecast symbols and checkmark for sunlight, showing left turn and right turn with blank boxes5. Монтаж

text_image
≤ 7,5 M 2 Mtext_image
Diagram illustrating electrical hazard warning and safety instructions for a device, with labeled steps 1 and 2.natural_image
Technical line drawing of an electrical connector with cable and motor (no text or symbols)natural_image
Diagram of a mechanical device with arrows indicating motion or force, showing a lever and base structure (no text or symbols)natural_image
Line drawing of a light bulb mounted on a square base with a downward arrow indicating compression or disassembly (no text or symbols)natural_image
Technical line drawing of a mechanical device with directional arrows indicating motion or force (no text or symbols)natural_image
Technical line drawing of a mechanical component with arrows indicating assembly or movement (no text or symbols)natural_image
Technical diagram of a mechanical device with labeled parts and directional arrows indicating motion (no text or symbols present)natural_image
Technical line drawing of a cable connector with internal components and cable routing (no text or symbols)natural_image
Line drawing of a mechanical device with a control panel and housing (no text or symbols)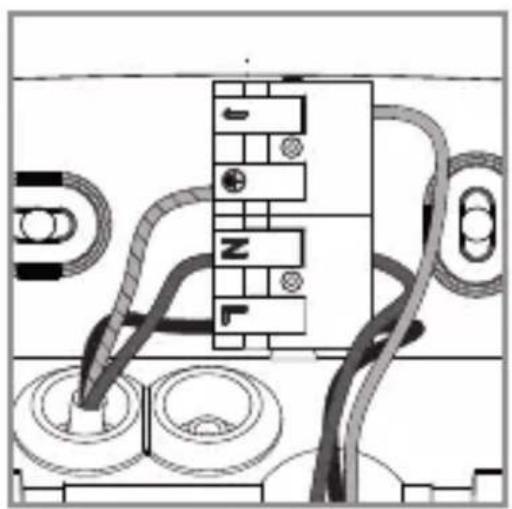
natural_image
Pure electrical circuit lines without any symbolsnatural_image
Technical line drawing of a mechanical assembly with no visible text or symbolsnatural_image
Line drawing of a mechanical device with a base and circular base, no text or symbols presentnatural_image
Technical line drawing of a mechanical assembly with an arrow indicating direction (no text or symbols)natural_image
Line drawing of a mechanical device with a base and top component, no text or symbols presentnatural_image
Technical line drawing of a mechanical device with a conical top and base, showing no text or symbols.
natural_image
Technical line drawing of a spray gun with incident and reflected blades (no text or symbols)
natural_image
Line drawing of a mechanical device with no visible text or symbolsnatural_image
Line drawing of a mechanical device with a 1x multiplier label (no text or symbols on the device itself)
text_image
2× 2× 6×
natural_image
Line drawing of a trash bin with a 1x multiplier label (no text or symbols on the object itself)

natural_image
Technical line drawing of a square mechanical component with labeled points F and G (no text or symbols beyond labels)F 时间设置
G 亮度设置
L 10 设备概况
3.7
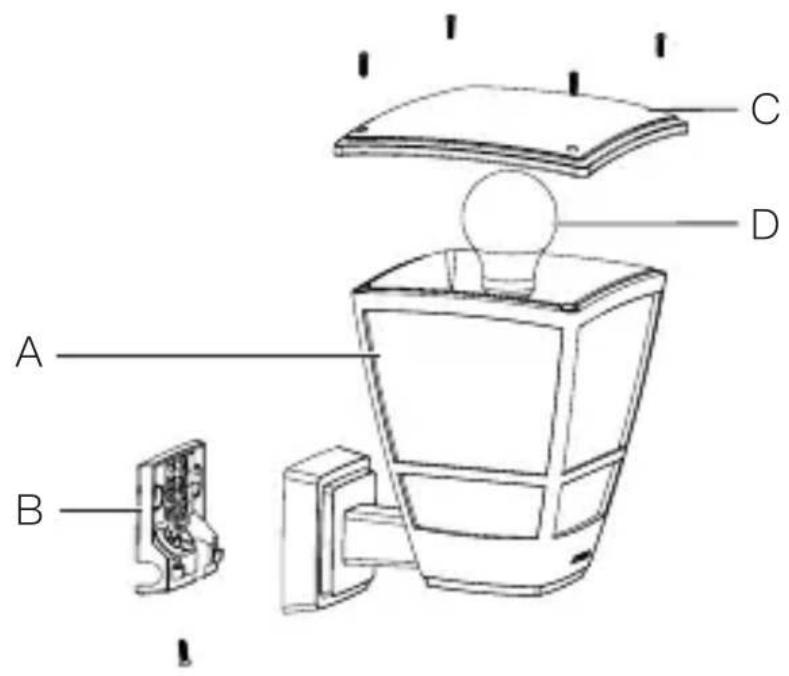
text_image
A B C DA 灯
B 连接端子
C 盖板
D E 27 灯具
4. 电气连接
电路图
4.1

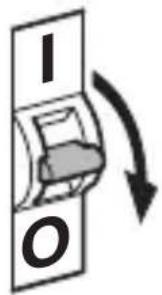
text_image
I O
text_image
L ⊕ N ↓ L N PE ⊕
text_image
L ⊕ N ↓ L ⊕ N N PE⊕
text_image
L ⊕ N ↓ L ⊕ N ↓ N PE⊕电源线由一根 2 芯的电缆组成:
L = 相位(通常是黑色、棕色或灰色)
N = 零线(通常为蓝色)
↓ = 开关火线
(通常为黑色、棕色或者灰色)
text_image
Weather forecast diagram showing sunlight and a checkmark with a right arrow, indicating the correct direction.5. 安装

触电危险!
接触导电部件可能造成电击、灼伤或死亡。
text_image
≤ 7.5 m 2 mL 10 S 平行于行走方向的动作检测
5.2
text_image
≤ 7.5 mCN
L 10 S 正对行走方向的动作检测
5.3
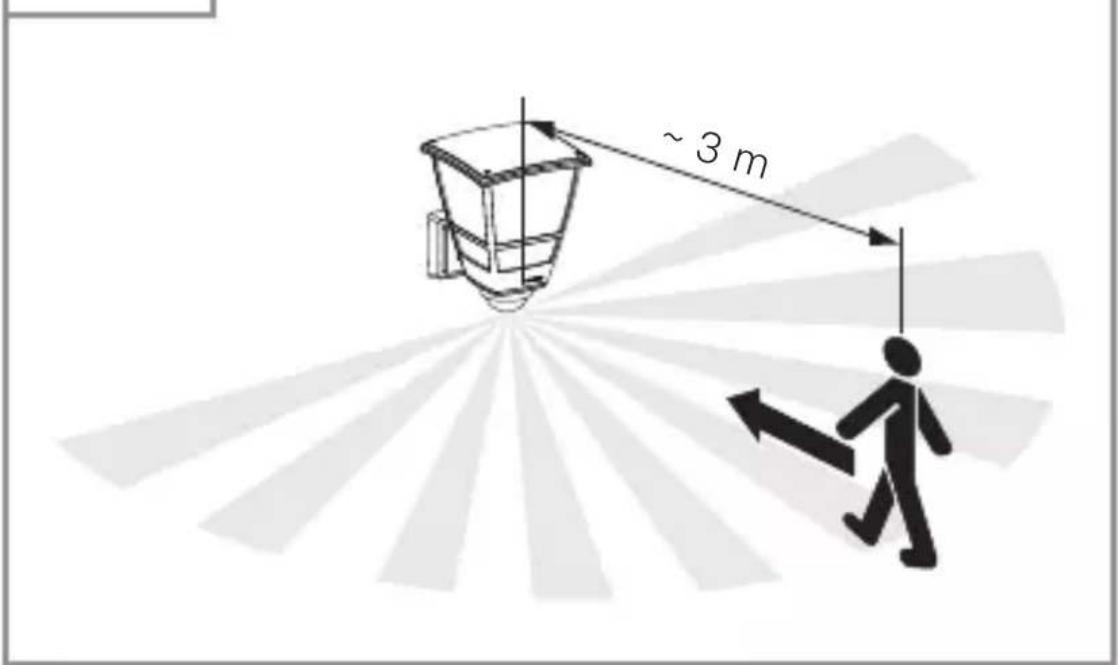
text_image
~ 3 m安装步骤

text_image
5.4 1. 2. 1.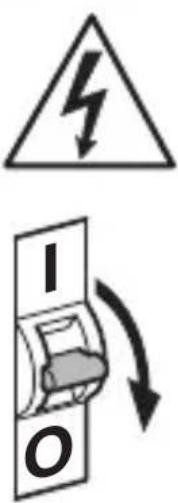
text_image
Safety warning symbol and electrical circuit diagram showing lightning bolt and switch mechanism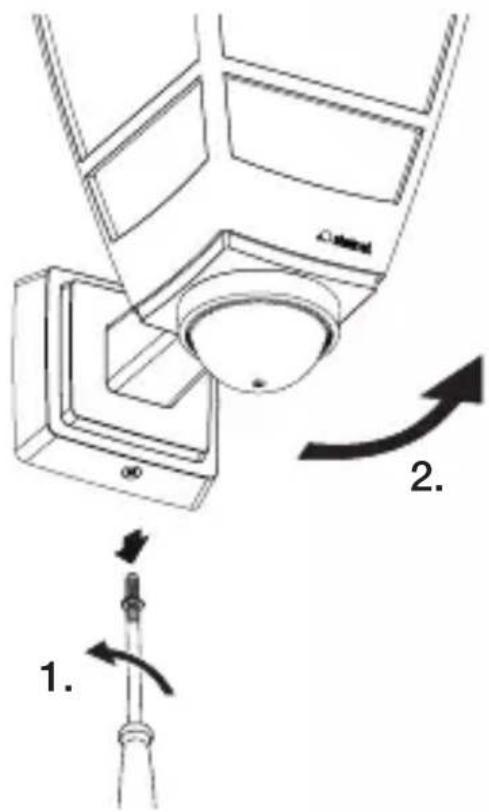
text_image
Technical diagram showing a mechanical assembly with labeled components and directional arrows indicating motion or force.natural_image
Technical line drawing of an electrical connector with cable and motor (no text or symbols)- 将接线端从墙壁支架中取下。
5.6

natural_image
Line drawing of a mechanical device with arrows indicating motion or force, no text or symbols present- 拧下灯具上部盖罩的螺栓。
5.7

natural_image
Line drawing of a light bulb mounted on a square base with a downward arrow indicating compression or disassembly (no text or symbols)- 装入 E27 灯具。
5.8
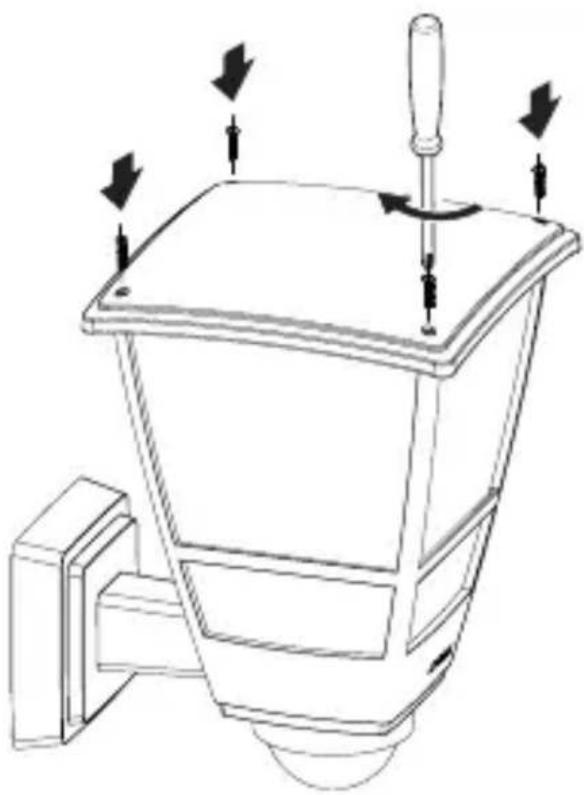
natural_image
Technical line drawing of a mechanical device with directional arrows indicating motion or force (no text or symbols)- 装上上部盖罩。
5.9
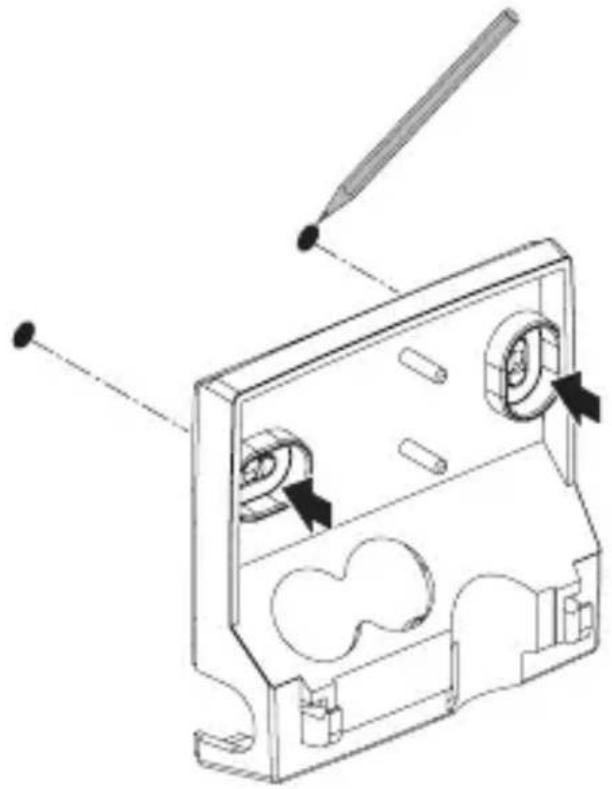
natural_image
Technical line drawing of a mechanical component with arrows indicating assembly or movement (no text or symbols)- 标记钻孔。
5.10

text_image
Ø 6 mm- 钻出钻孔。
CN

text_image
5.11natural_image
Mechanical assembly diagram showing a motor with rotating gears and a shaft, no text or symbols presentnatural_image
Technical line drawing of an electrical switch or power connector with internal components and cable (no text or symbols)- 将接线端装回到墙壁支架中。
5.14
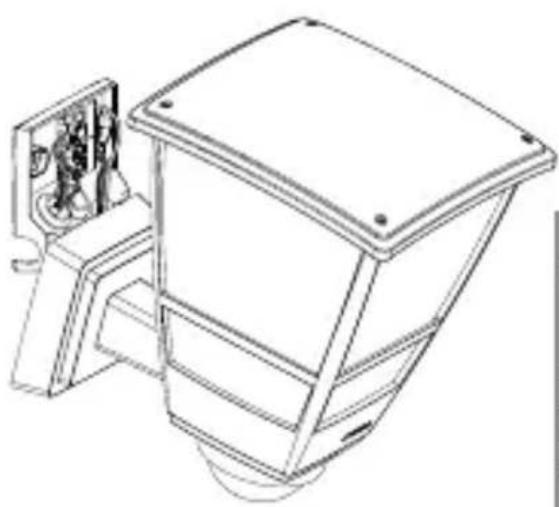
natural_image
Technical line drawing of a mechanical or electrical enclosure with internal components (no text or symbols)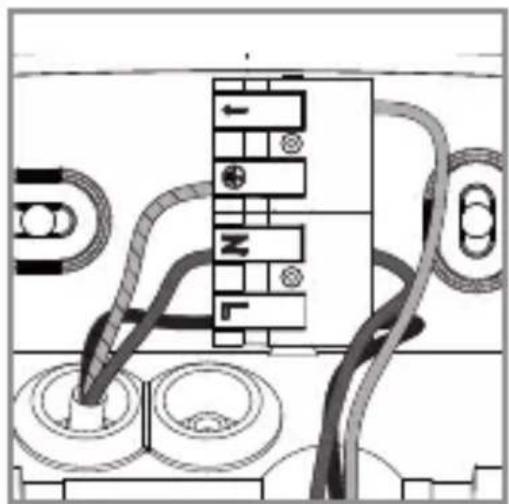
natural_image
Pure electrical circuit lines without any symbols- 按照电路图连接电源引线。
→ “4. 电气连接”.
5.15
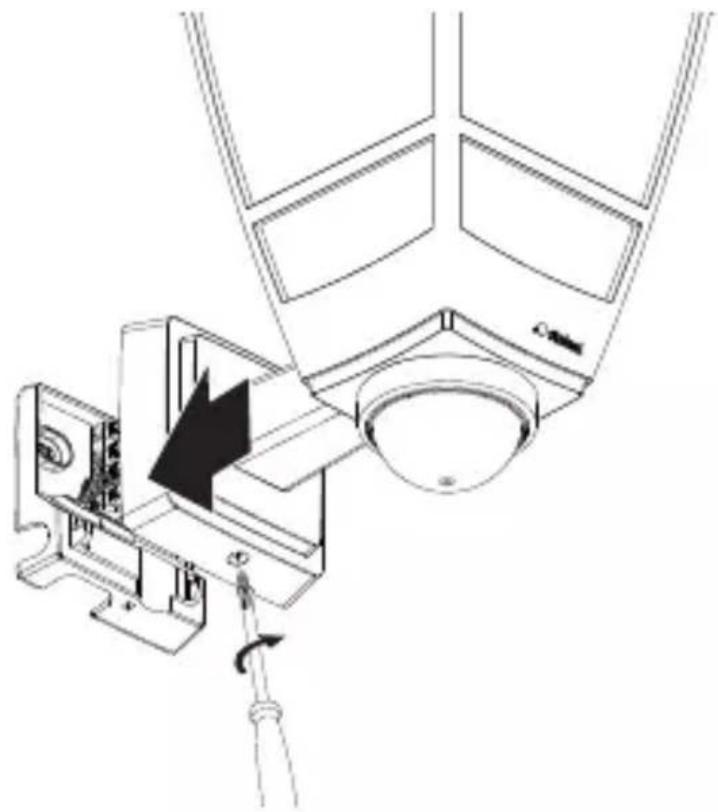
natural_image
Technical line drawing of a mechanical assembly with a lever and component (no text or symbols)- 将灯具装到墙壁支架上。
- 旋入止动螺栓。
5.16


text_image
I O- 接通电源。
- 设置功能。
→ “6. 功能”
6.□功能
L□10□S
6.1
F
G
10
500
5
5 s
60
2
2000
Min.
Lux
- 进行设置。
时间设置(F)
natural_image
Line drawing of a mechanical device with a circular base and arrow indicating force or motion (no text or symbols)- 将设计环从传感器单元中取下。
6.3
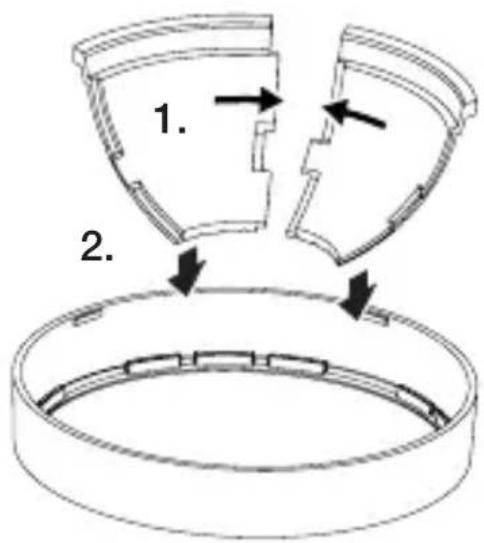
text_image
1. 2.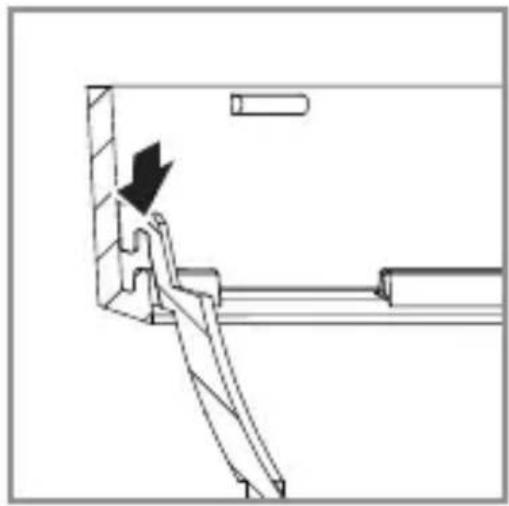
natural_image
Technical line drawing of a mechanical assembly with a downward arrow indicating motion (no text or symbols)natural_image
Line drawing of a mechanical device with a base and top component, no text or symbols presentnatural_image
Technical line drawing of a mechanical device with a conical top and base, showing no text or symbols.
natural_image
Technical line drawing of a mechanical device with radial blades and a central hub (no text or symbols)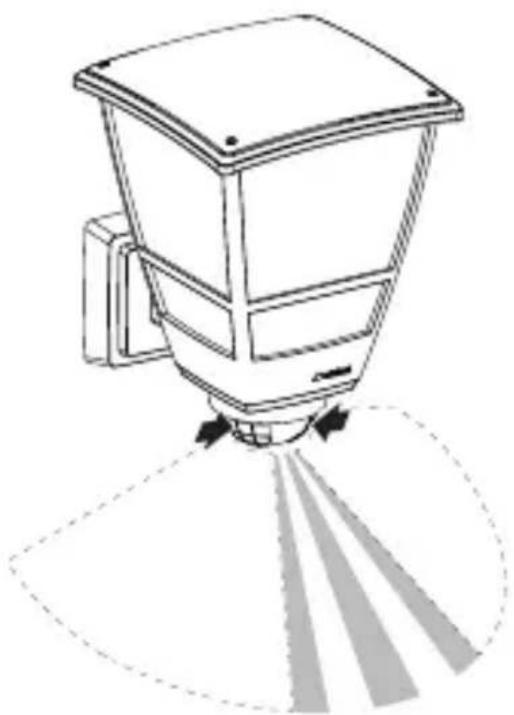
natural_image
Technical line drawing of a mechanical device with directional arrows indicating motion or flow (no text or symbols)2 W < LED 灯泡 < 8 W: 64 W
LED 灯泡 > 8 W: 64 W
电容负载:132 F
- 安装高度: 最佳安装高度:2 m
- 探测角度: L 10 S: 180^
natural_image
Line drawing of a mechanical device with a 1× multiplier label (no text or symbols on the device itself)2×

2×

6×

1×

1×

natural_image
Line drawing of a trash bin with a 1× multiplier label (no text or symbols on the object itself)


natural_image
Technical line drawing of a bucket with a 224 mm dimension label (no other text or symbols)text_image
L ⊕ N ↓ L N PE⊕
text_image
L ⊕ N ↓ L ⊕ N L N PE ⊕
text_image
L ⊕ N I L ⊕ N I L N PE⊕text_image
Weather forecast symbols and checkmark for sunlight, showing left turn and right turn with blank boxes5. Монтаж
text_image
≤ 7,5 M 2 Mnatural_image
Diagram of a mechanical assembly with a circular component and an arrow indicating direction (no text or symbols)
natural_image
Technical line drawing of an electrical connector with cable and motor components (no text or symbols)natural_image
Diagram of a mechanical device with arrows indicating motion or force, showing a lever and base structure (no text or symbols)natural_image
Line drawing of a light bulb mounted on a square base with a downward arrow indicating compression or disassembly (no text or symbols)natural_image
Technical line drawing of a mechanical device with directional arrows indicating motion or force (no text or symbols)natural_image
Technical line drawing of a mechanical component with arrows indicating assembly or movement (no text or symbols)natural_image
Technical diagram of a mechanical device with labeled parts and directional arrows indicating assembly (no text or symbols present)natural_image
Technical line drawing of an electrical connector with cable and internal components (no text or symbols)natural_image
Technical line drawing of a mechanical device with a control panel and base mount (no text or symbols)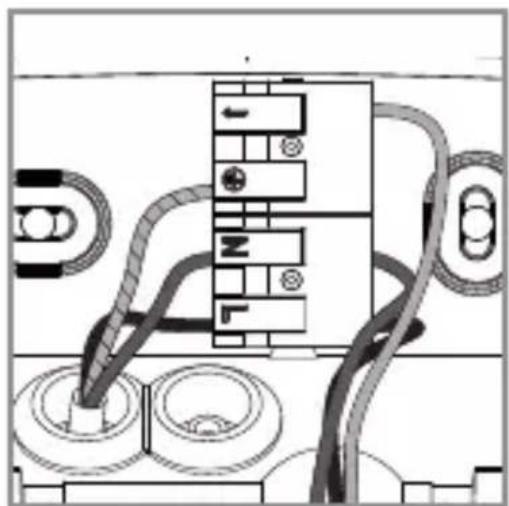
natural_image
Pure electrical circuit lines without any symbolsnatural_image
Technical line drawing of a mechanical assembly with a lever and component (no text or symbols)natural_image
Line drawing of a mechanical device with a base and central component, no text or symbols presenttext_image
Technical diagram showing a mechanical assembly with labeled parts and directional arrows indicating motion or assembly.natural_image
Line drawing of a mechanical device with a spherical base and a conical top, no text or symbols present.natural_image
Technical line drawing of a mechanical device with a conical top and base, showing no text or symbols.
natural_image
Technical line drawing of a mechanical device with radial blades and a central hub (no text or symbols)