Cubus 110 S - Laser pointer Laserliner - Free user manual and instructions
Find the device manual for free Cubus 110 S Laserliner in PDF.

User questions about Cubus 110 S Laserliner
0 question about this device. Answer the ones you know or ask your own.
Ask a new question about this device
Download the instructions for your Laser pointer in PDF format for free! Find your manual Cubus 110 S - Laserliner and take your electronic device back in hand. On this page are published all the documents necessary for the use of your device. Cubus 110 S by Laserliner.
USER MANUAL Cubus 110 S Laserliner
Cubus Green: https://packd.li/ll/APV/in
Completely read through the operating instructions, the "Warranty and Additional Information" booklet as well as the latest information under the internet link at the end of these instructions. Follow the instructions they contain. This documents must be kept in a safe place and if the laser device is passed on, this documents must be passed on with it.
Intended use
This rotary laser is designed for aligning the horizontal plane. Thanks to the 5/8" thread integrated on the side of the housing for mounting on a tripod, it is also suitable for vertical alignment. The rotary laser has a manual tilt function. The Cubus model is compatible with the SensoLite 110, SensoLite 210, SensoLite 410 and SensoMaster M350 receivers and the Cubus Green with the SensoLite G 110, SensoLite G 210, SensoLite 410 and SensoMaster M350 receivers.
General safety instructions
- The device must only be used in accordance with its intended purpose and within the scope of the specifications.
- The measuring tools and accessories are not toys. Keep out of reach of children.
- Modifications or changes to the device are not permitted, this will otherwise invalidate the approval and safety specifications.
- Do not expose the device to mechanical stress, extreme temperatures, moisture or significant vibration.
- The device must no longer be used if one or more of its functions fail, the battery charge is weak, or the housing has been damaged.
- When using the device outdoors, make sure that the weather conditions are appropriate and/or that suitable protection measures are taken.
- Please ensure compliance with the safety regulations set out by local and national authorities with regard to the correct and proper use of the device.
Safety instructions
Using class 2 lasers
Laser radiation!
Do not stare into the beam!
Class 2 [laser] < 1 mW · 635 / 515 nm
EN 60825-1:2014/A11:2021 / EN 50689:2021
- Attention: Do not look into the direct or reflected beam.
- Do not point the laser beam towards persons.
- If a person's eyes are exposed to class 2 laser radiation, they should shut their eyes and immediately move away from the beam.
- Under no circumstances should optical instruments (magnifying glass, microscope, binoculars) be used to look at the laser beam or reflections.
- Do not use the laser at eye level (1.40 ... 1.90 m)
- Reflective, specular or shiny surfaces must be covered whilst laser devices are in operation.
- In public areas shield off the laser beam with barriers and partitions wherever possible and identify the laser area with warning signs.
Safety instructions
Dealing with electromagnetic radiation
- The measuring device complies with electromagnetic compatibility regulations and limit values in accordance with EMC-Directive 2014/30/EU.
- Local operating restrictions – for example, in hospitals, aircraft, petrol stations or in the vicinity of people with pacemakers – may apply. Electronic devices can potentially cause hazards or interference or be subject to hazards or interference.
- The measuring accuracy may be affected when working close to high voltages or high electromagnetic alternating fields.
Special product features and functions
SENSOR AUTOMATIC
The rotary laser aligns itself automatically. It is set to the required ion (to within an operating angle of ± 4^ ) and the automatic
system then performs the necessary fine adjustment, with three electronic measurement sensors detecting the X, Y and Z axes.
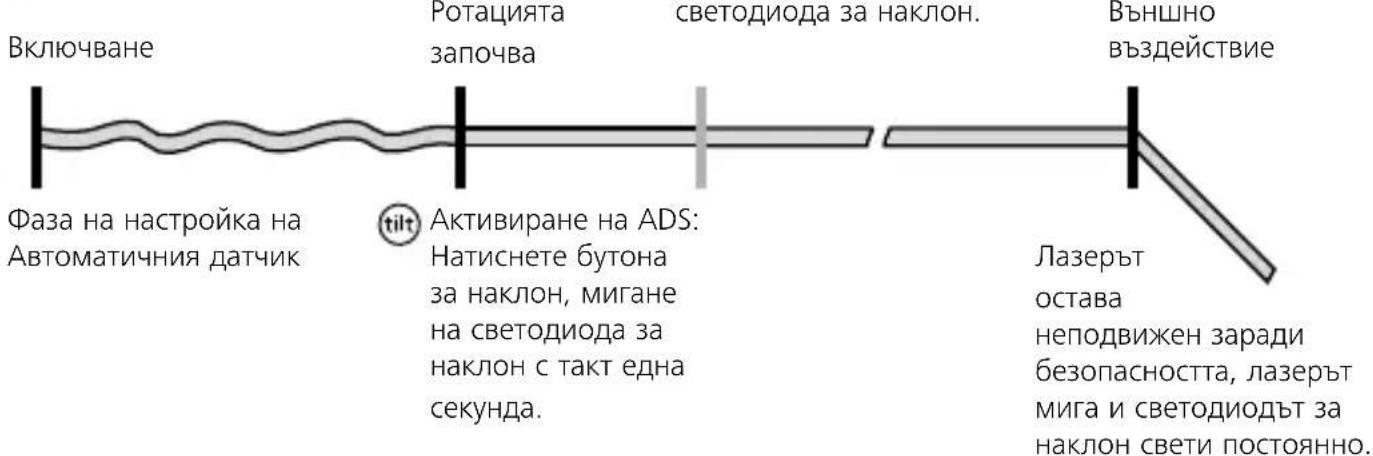
ADS
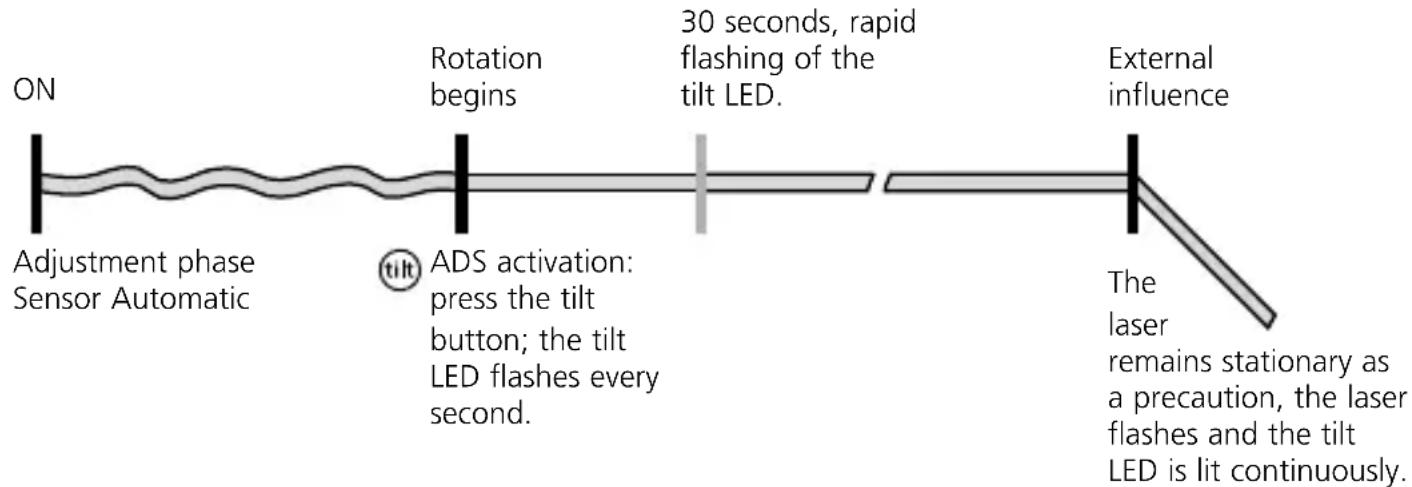
The anti-drift system (ADS) prevents erroneous or inaccurate
measurements. How it works: continuous monitoring of the alignment of the laser is activated 30 seconds after the ADS is switched on. If the device moves due to the influence of external factors or the laser loses its height reference, the laser will come to a standstill. Additionally, the laser flashes and the tilt LED is lit continuously. To continue working, press the tilt button again or switch the device off then on again.

The ADS is not active following switch-on. Once the device has
been set up, press the tilt button to activate the ADS. The tilt LED flashes to indicate that the ADS function is active; see the diagram below.

The ADS does not activate the monitoring function until 30 seconds after the laser levelling procedure has been completed (set-up phase).
The tilt LED flashes every second during the set-up phase, rapid flashing, when ADS is active.
ADS function
Laserliner

Transport LOCK: The device is protected by a special motor brake
during transport.

The device characterised by specific protection against
dustand rain.
Using the power supply / lithium-ion rechargeable battery
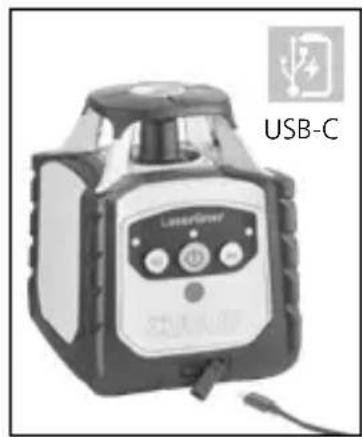
- The rechargeable battery can be charged using the 9V power supply provided or externally using the battery's integral USB-C socket and a standard USB-C power supply.
- Use the power supply/charger unit only in closed rooms; do not expose to moisture or rain otherwise risk of electric shock.
- Charge the device's battery completely prior to use.
- Connect the power pack/charger to the mains power supply and the socket in the battery pack. Please only use the power pack/charger supplied. Using any other power pack/charger will invalidate the warranty.
- While the battery is being charged when installed, the LED operating display lights up red. The LED changes to green when charging is complete.
- While the device is being charged, the LEDs flash from right to left in ascending order. Charging is complete when all three LEDs are continuously lit.
- When the battery charge level is very low, the middle LED operating display flashes first of all, and then all three LED displays together before the device switches off.
- Operation without battery: The device can be used without a battery if it is connected to the mains supply via the charging socket and the enclosed mains adapter. In this case, the middle LED operating display flashes.
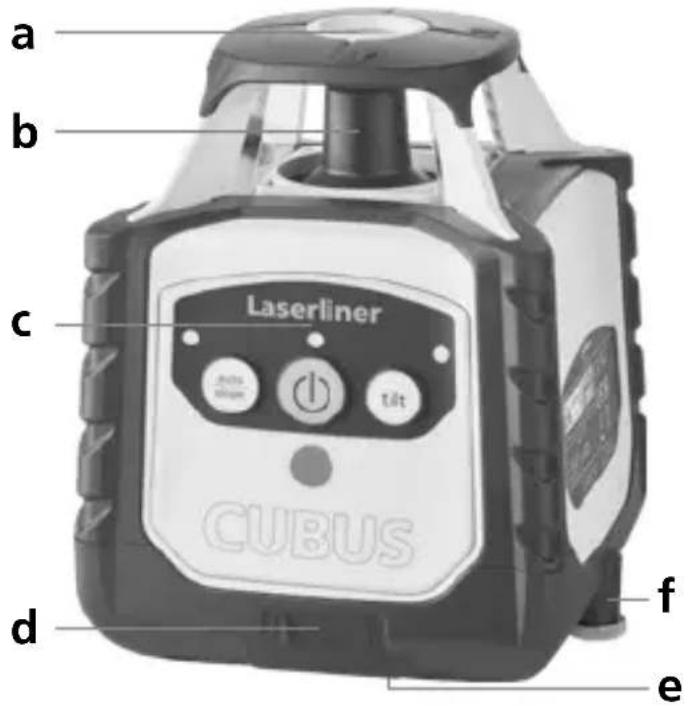
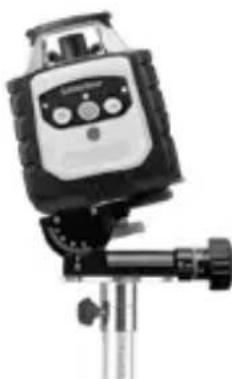
a Reference laser outlet
b Prism head / laser beam outlet
c Control panel
d Connection socket for power pack/charger
e 5/8" thread
f Battery compartment
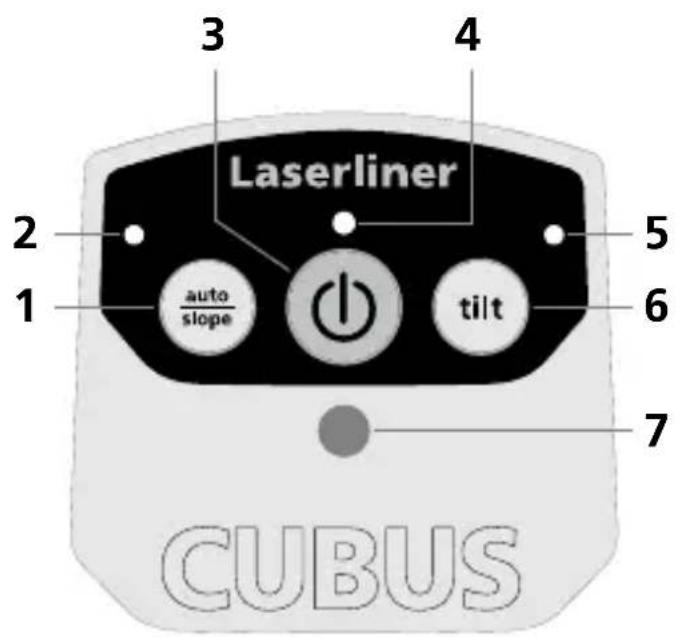
1 auto/slope function
2 auto/slope function LED: LED off: automatic alignment LED on: manual alignment
3 ON/OFF button
4 Operation indicator (LowBat: LED flashes)
5 Tilt function LED
6 Tilt function
7 Infrared signal receptor
Laserliner
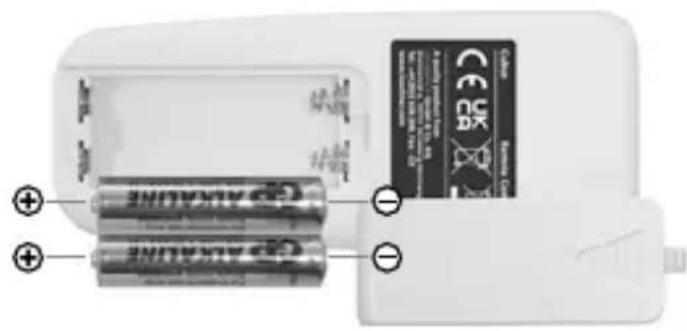
Insert batteries into the remote control
Open the battery compartment and insert batteries (2 x 1,5V LR03 (AAA)) according to the symbols. Observing the correct polarity.
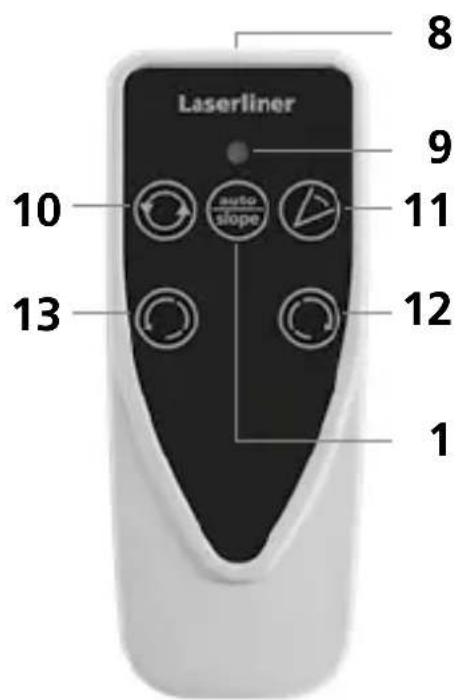
8 Infrared signal emitter
9 Operation indicator
10 Rotary speed for selection 600/330/30/0 rpm
11 Scan mode 10^ / 45^ / 90^ / 180^
12 Positioning button (rotate to the right)
13 Positioning button (rotate to the left)
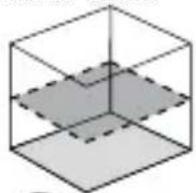
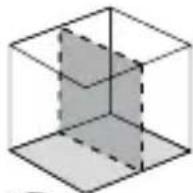
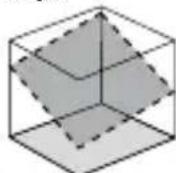
Space grids: These show the laser planes and functions.
auto: Automatic alignment / man: Manual alignment
auto auto man
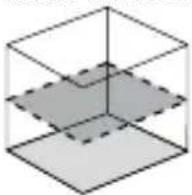
Horizontal levelling
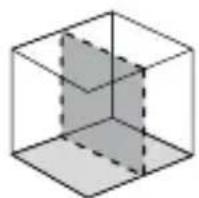
Vertical levelling
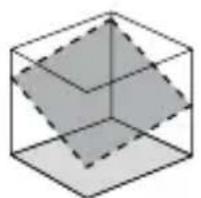
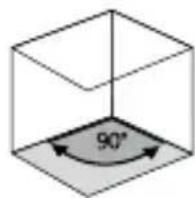
Inclined plane 90^ angle 90^ reference function
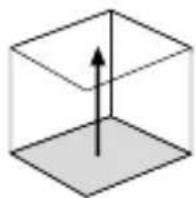
Horizontal levelling and vertical levelling
- Horizontal: Position the device on a level surface or on a tripod.
Vertical: Place the device on its side with the stand and wall bracket fitted. The operator panel should be at the top. The device with the stand and wall bracket can be mounted on a tripod for vertical use. - Press the "ON/OFF" switch
auto auto
①
(1)
! auto/slope function LED OFF: Automatic alignment
- The device levels itself automatically to within a range of ± 4^ . During the set-up phase, the laser flashes and the prism head remains stationary. When levelling is complete, the laser lights up continuously and rotates at maximum speed. Refer also to the sections about „Sensor Automatic" and „ADS Tilt".

If the device has been placed on a surface with a slope of more than 4^ , the prism head will remain stationary and the laser as well as the auto/slop LED will start to flash. The device must then be placed on a more even surface.
Slope function
Steeper slopes can be set using the angle plate, which is available as an optional extra.
TIP: Allow the device to align itself automatically and set the angle plate to the zero position.
Then press the auto/slope button to switch the automatic sensor off. Finally, incline the device to the angle you require.
man
(1)

! Auto/slope function LED ON: Manual alignment
Laser modes
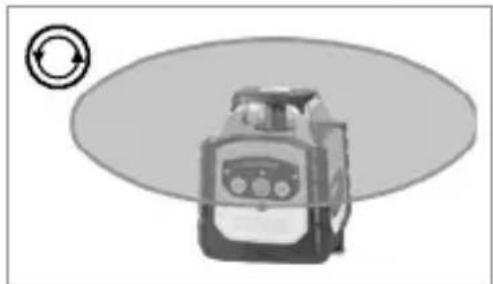
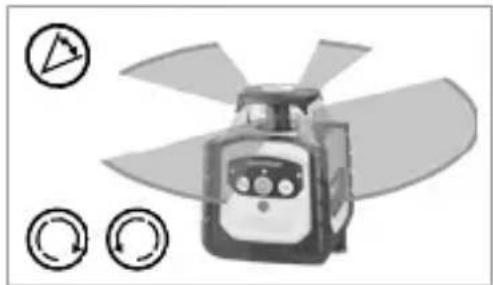
Rotary mode
The following speeds can be set using the rotary button: 0, 30, 330, 600 rpm
Spot mode
You access spot mode by pressing the rotary button repeatedly until the laser stops rotating. The laser can then be rotated to the required position using the positioning buttons.
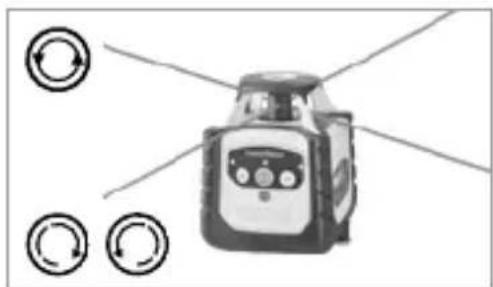
Scan mode
The scan button can be used to activate and set a lightintensive segment in 4 different widths. You position the segment via the direction buttons.
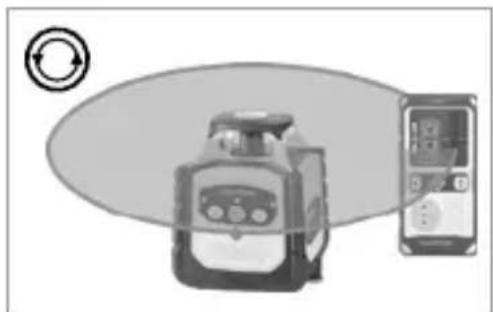
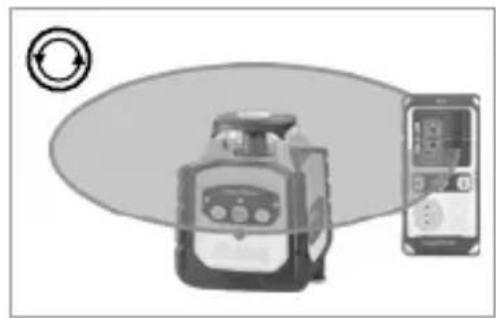
Hand receiver mode
Working with the laser receiver (available as an optional extra): Set the rotary laser to maximum speed and switch on the laser receiver. Refer to the operating instructions for the respective laser receiver about this.
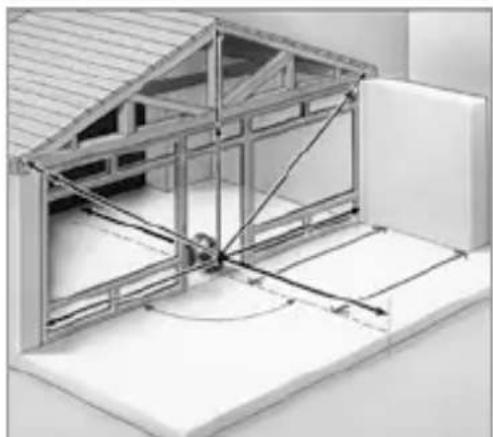
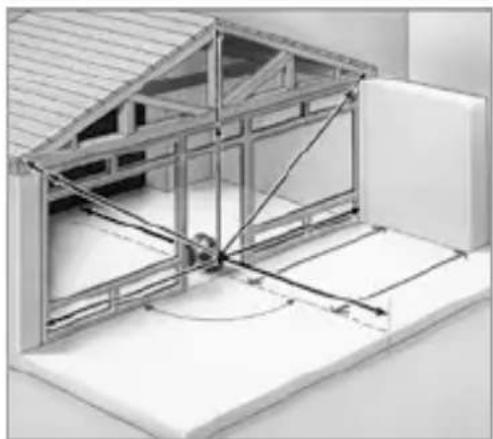
Working with the reference laser
The device has one reference laser. In vertical mode the reference laser is used to align the device. Align the reference laser parallel to the wall for this purpose. This aligns the vertical laser plane at a right angle to the wall, see illustration.
Information on maintenance and care
Clean all components with a damp cloth and do not use cleaning agents, scouring agents and solvents. Remove the battery before storing for longer periods. Store the device in a clean and dry place.
Calibration
The measuring device should be calibrated and tested on a regular basis to ensure it is accurate and working properly. We recommend the measuring device is calibrated every year. If necessary, contact your distributor or the UMAREX-LASERLINER service department.
EU and UK directives and disposal
This device complies with all necessary standards for the free movement of goods within the EU and the UK.
This product, including accessories and packaging, is an electrical appliance that must be recycled in an environmentally appropriate manner in accordance with European and UK directives on waste electrical and electronic equipment, batteries and packaging, in order to recover valuable raw materials. Electrical devices, batteries and packaging do not belong in household waste. Users are obliged by law to surrender used batteries or battery packs to a public collection point, to sales outlets, or to technical customer services, free of charge. Remove the battery from the device without damaging it using standard commercial tools: arrange separate collection before returning the device for disposal. Please do not hesitate to contact the UMAREX-LASERLINER service department if you have any queries regarding removing the battery. Look for information on local disposal facilities and note the relevant disposal and safety information at the collection points.
Further safety and supplementary notices at:
Cubus: https://packd.li/II/ANM/in
Cubus Green: https://packd.li/ll/APV/in
| Technical data (Subject to technical alterations. 24W43) | |
| Self-levelling range ± 4° | |
| Accuracy ± 0.15 mm / m | |
| Levelling | automatic horizontal / vertical levelling with electronic levels and motors |
| Self-levelling alignment time | approx. 30 seconds over the entire operating angle |
| Rotation speed 0, 30, 330, 600 | rpm |
| Laser wavelengths Reference beam red / green | 635 nm / 515 nm |
| Laser class | 2 / < 1 mW (EN 60825-1:2014/A11:2021 / EN 50689:2021) |
| Power supply Li-ion battery pack | 7.4V / 2.6Ah / 19.24Wh |
| Operating time red / green approx. 25 h | |
| Charging time approx. 4 h | |
| Operating conditions | -10°C ... 50°C, max. humidity 80% rH, no condensation, max. working altitude 4000 m above sea level |
| Storage conditions | -10°C ... 70°C, max. humidity 80% rH |
| Protection class IP 66 | |
| Dimensions (W x H x D) | 130 x 160 x 145 mm (with stand and wall bracket) |
| Weight 1300 g (with stand and wall bracket) | |
| Remote control | |
| Power supply 2 x 1.5V LR03 (AAA) | |
| Remote control range max. 30 m (IR-control) | |
| Weight 70 g (incl. batteries) | |
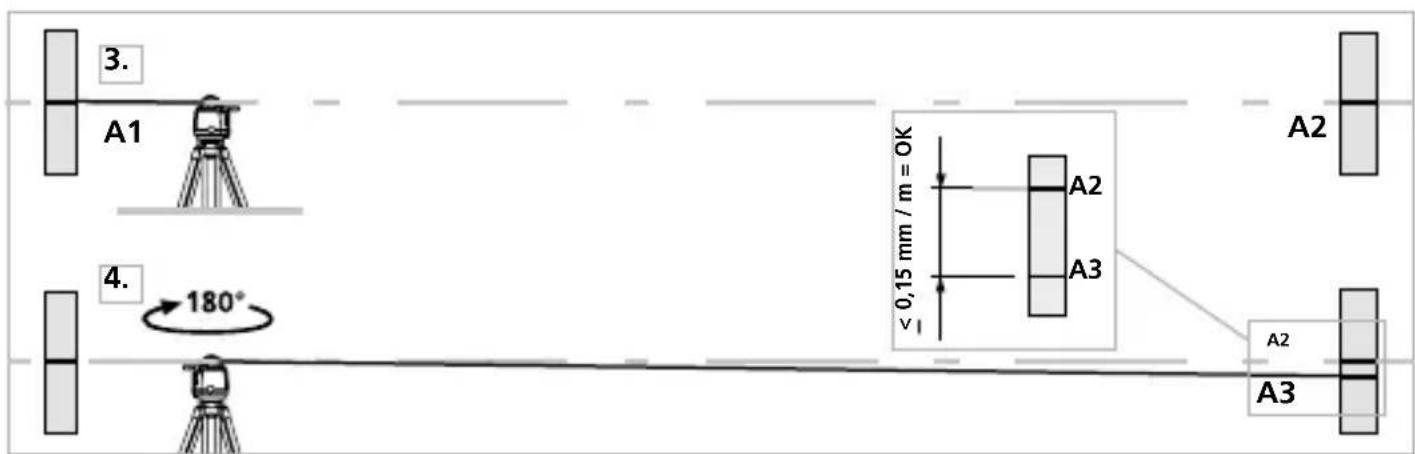
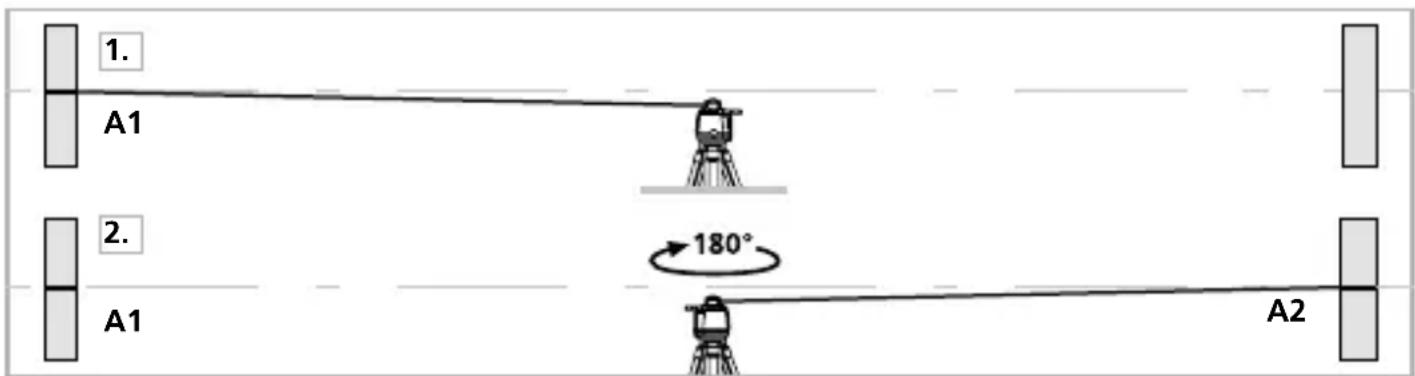
Preparing the calibration check
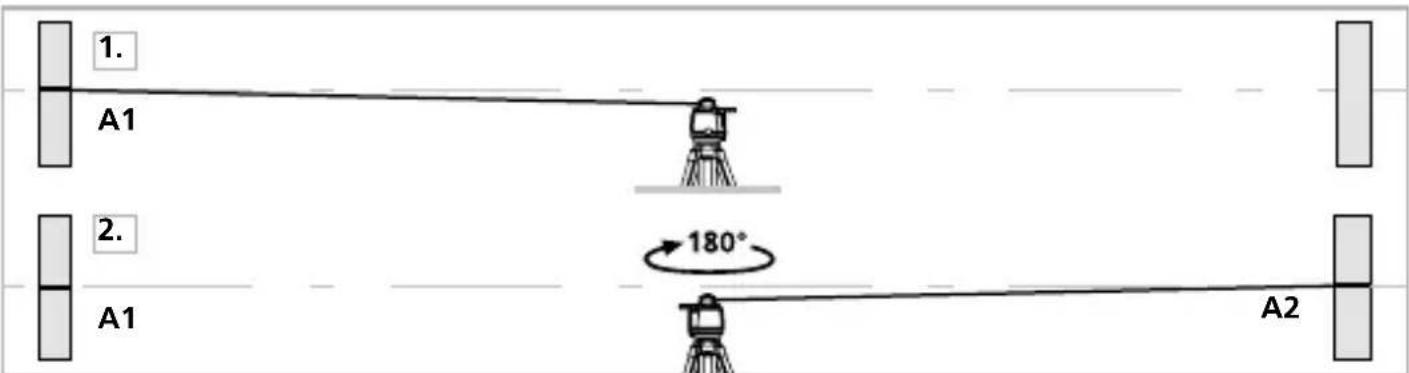
It is possible for you to check the calibration of the laser. To do this, position the device midway between 2 walls, which must be at least 5 metres apart. Switch the device on. The best calibration results are achieved if the device is mounted on a tripod. IMPORTANT: The automatic sensor must be active (auto/slope LED is off).
- Mark point A1 on the wall.
- Turn the device through 180^ and mark point A2. You now have a horizontal reference between points A1 and A2.
Performing the calibration check
- Position the device as near as possible to the wall at the height of point A1. Now adjust the device in the X axis.
- Turn the device through 180^ and mark point A3. The difference between points A2 and A3 is the tolerance for the X axis.
- To check the Y and Z axis, repeat steps 3 and 4.
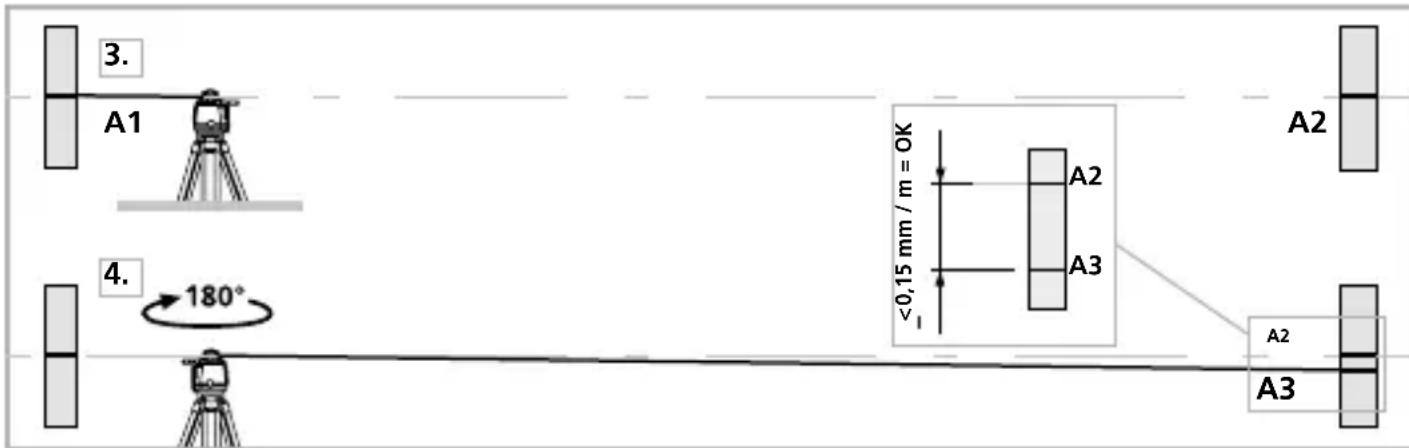

If points A2 and A3 are more than 0.15mm / m apart on either the X or Y axis, the device is in need of adjustment. Contact your authorised dealer or else the UMAREX-LASERLINER Service Department.
Laserliner
#
Cubus Green: https://packd.li/ll/APV/in
Cubus Green: https://packd.li/ll/APV/in
Cubus Green: https://packd.li/ll/APV/in
Cubus: https://packd.li/ll/ANM/in
Cubus Green: https://packd.li/ll/APV/in
Cubus Green: https://packd.li/ll/APV/in
Cubus Green: https://packd.li/ll/APV/in
Cubus Green: https://packd.li/ll/APV/in
Cubus: https://packd.li/ll/ANM/in
Cubus Green: https://packd.li/ll/APV/in
Cubus Green: https://packd.li/ll/APV/in
Cubus: https://packd.li/ll/ANM/in
Cubus Green: https://packd.li/ll/APV/in
Cubus Green: https://packd.li/ll/APV/in
CTeneHb 3aunTbI np6opOB OT nbInn BlaRn.
Cubus Green: https://packd.li/ll/APV/in
IoproTOBka K npOBepke KaJIb6pOBKn
KaJIb6poBky Ja3epa MoXHO KOHTpOJInpOBaTb. YCTaHOBtB npI6Op nOcepeHHe MeKdy 2 cTeHaMn, pacCToRHe MEXy KOTOpbIMN COCTaBJIeT He MeHee 5 M. BkJIIOuHTb npI6Op. IJa ONTImaJIbHOJ npOBepKN ICNOJIb3OBaTb IStaTINB.
BHHMAHNE: CeHcOpHa aBTOMaTnKa dOJIxHa 6bITb aKTINBHa (CBeToIIOJ auto/slope pexIma He ropnt).
Ja3epHe BnnpomHOBaHHa! He cnpMOByBaTn nOrlaHa npOMiNb! Ja3ep KIacy 2 <1 MBT 635/515 Hm
EN 60825-1:2014/A11:2021 / EN 50689:2021
- Ybara: He ДиВNTиСя на пямий чи ВдБИТи npOMiHb.
-He HABODITN Ia3epHn Ipomihb Ha JIOdei.
-Якшо Лазерн Вириримиювань Класу 2notpanntbВOKO,шьно 3akpintu Oчт ha HeaHNO BiDBeCTn rOlOBy BiД npOMeH. - 3a6bopohraetbcra nBNTnca Ha na3epHn npomihb a6o noro dzepkaJIbHe BIDobpaXeHHaYepe3 6ydb-aki ONTnHi npnilaN (ny, MikpocKoI, 6iHOKJb TToIO).
-Пд час ВИКОРистань пиладу Лазерни Роминь He NOВИнен 3HAxODNTSCЯ на ровни очey (1,40 - 1,90 m). - NOBepxhi, kki IIO6pe BiID6nBaIbTB CBIITIO, I3epKaJIbHI a6O 6IuCKyHi IOBepxHl IOBHHI 3aTyJATNcR PiD yac EKcnLyataui Ja3epHNx npNCtpoIB.
-Пд час поведеня робит полneyу abTomobьнх дориг зально Користуваимп нашлaxy похожени лаzerhoю помень baxано Востановпг оropoжі та поресни спт,在а зону дллллллрого помень ПОЗнчпг поpeджуваимп Знakам.
Bka3iBkn 3 Texhikn 6e3nekn
Cubus Green: https://packd.li/ll/APV/in
Cubus Green: https://packd.li/ll/APV/in
Uldised ohutusjuhised
Cubus Green: https://packd.li/ll/APV/in
Cubus Green: https://packd.li/ll/APV/in
Pa6ota c Ia3epn ot Klaac 2

Ja3epHo JbYeHne! He rIeDaIte cpeuJla3epnJbU! Ja3ep KlaC 2 <1 mW | 635 / 515 nm
EN 60825-1:2014/A11:2021 / EN 50689:2021
-BHIMaHHe:HeIeJaTeBINpeKTHnIINOTpa3eHnJIbU.
- He hacouBaIte Ia3epHnI JbU KbM Xopa.
- Ako Ia3epHo IbueHne ot Klaac 2 nonaIHe B OKOTO, OunTe Tp6Ba Cb3HaTeJIHO da ce 3aTbOpT n IlaBata BeHara da Ce npemeCTn HactpaHn OT Ibua.
- Hnkora He rIeJaTe Ja3epHnA JbU nII HeROBOTO OTPaXeHne C ONTNUHn np6opn (Jyna, MnkpockoN, daJIeKOrJeD, ...).
- He n3noJI3BaIte Ia3epa Ha HnBOTO Ha OunTe (1,40 ... 1,90 m).
- IopBpeMe Ha pa6oTa c Ja3epHn yCTpoiCtBa cnIHO OTPa3raBauNTe, orJeJaHnTe nIIN rJaHcObTe NOBbpxHOCTn Tp6Ba Da ce NOKpNBaT.
- Ha MeCTa C O6UeCTBeH TpaΦnK NO Bb3MOxHOCr ORpaHnUaBaIe NbTЯ Ha JbUa Upe3 KaIau nIi IpeHocmN CTeHn I O6O3NaUeTe 3OnaTa Ha Ja3epa C npEduynPeDnteJIHn Ta6eJI.
Инструкции за 6еzoноct
Pa6ota c eIeKtpomarHHTHO JbueHne
- Измерва对接урд саЗва пеДпсаняТа и ГраниHTe CTоиHOCTn 3a eLEKtpOMaHHTHaTа CBMecTUMOCT cBflacHo ДиpeKTnBa 2014/30/EC 3a eLEKtpOMaHHTHaTа CBMecTUMOCT (EMC).
- Tp6Ba Da Ce Cn3BAt IOKaHnTe OraHnueHn B pa6oTaT, KaTo Hnnp. B 6OJIHNu, B CaMOJeTn, Ha 6eH3NHOCTaHcIIN NIn B 6JI3OCT Do JInca C neiCMeiKbprn. CbIeCTByBa Bb3MOxHocT 3a OnaCHO BJIIN HnE INIcmUeHne OT eJIeKTPoHHn UpeDn.
-Прии n3noJ3BaHe B 6JIu3OCTdo BnCOKn HAnpeXeHnI IIN IOI cNJIHn eJeKtpomarHHTn IpOMeHJIbN IOneTa MoKe da 6bIe IOBJIraHa TOUHOCTT a Ha n3MePbaHe.
CpeunHxapaKtepncnHa npOyKta nФyHKcN
sens
PotaunHnT na3ep ce noDpaBnBa camOCToTeJHo. Toi ce
yctaHOBA B Heo6xOIMOTO Haayalno NOLOXeHne - B paMKte Ha pa6oTeH bbl ± 4°. ABtOMaTHuHaTa CnCTema n3BbPbBa φnHa HacTpoiKa: Tpn eJIeKTPoHnI n3MePHTeJHn IaTHnka pernCTpnpaT oCnTe X, Y n Z.
ADS
CnCTema 3a KOMpeHcaun Ha dpeu (ADS) npedotBpaTBA
HeToUHInTe n3MepBaHn. PpHnCnH Na pa6Ota: 30 cekyni Cnei akTbIpaHeTo Ha ADS 3aNoUBa Da Ce N3BbPbWA HeNpeKbChat KOHTPOJ Ha NOdpabHBaHcTo Ha Ja3epa. Ako yCTpoiCTBOTo 6bJe N3MeCTeHO OT BbHsHn fakTopn nn Ja3epbT 3aY6n CBoA EtALoH 3a BnCOuHa, Ja3epbT Cnnpa. Ocben TOBa, Ja3epbT Mra n CBETOnIODbT 3a HAKLOH CBETN NOCTOARHHo. 3a Da MoKe Da npOdbJxN pa6OtaTa, HATINCHete OTHOBo 6yTOHa 3a HAKLOH IIN N3KJIQUte N BKJIQUte UpeDa.
tilt
CneBkIIOUbaHeTo ADS He e aKTHBHa. 3a da ce npedOTbpaTn
nnpomHaTa Ha nO3nTnA Ha npnbopa B cIeCTBne Ha BbHnBb3JeCTBn, CLei KaTO cbuT e HAcTpoEh, Tp6Ba Da ce AKTNBnpa ADS Upe3 HaTnCKaHe Ha 6yToHa 3a HaKIOH. FyHKUraTA ADS Ce INDnUpa Upe3 CBeToOnoJa 3a HaKIOH, BVXTe NIIocTpaunrTa PO-DOJy.
!
BhimaHne: ADS ce BkIIOUBa yHKcIIra Ta Ha cIeJeHe 30 cek. cIeI PbJIHOTo HnBeJIInpaHe Ha Ia3epa (fa3a Ha yCTaHOBbAHe). MuraHe Ha CBeTOAnOJa 3a HaKIOH C TaKT eJHa CeKyHda NO BpeMe Ha fa3aTa Ha yCTaHOBBAHe, 6bp3o MURAHe, KOrato ADS e aKtINbHa.
Прицпн Ha DeиCTBne Ha ADS
ADS ce aKTHBnpa CJIeI 30 cek.,6bP3O MmraHe Ha CBETOIOnda 3a HaKJIOH.

TpaHcnpTHa BLOKINPOBKA: UpeIbT ce 3aunTaBa npn TpaHCnopt
Upe3 cneuaHa MoToPHa cnIPAuKa.

3aunta ot npax n Boda - YpeT ce xapaKtepn3npa CbC cneuaHa
3aunTa OT npax N bXk.
PexkIM pbyeH npneMHNK
Pa60tnc Ja3epeH npneMHNK no n36op: Pa60tnc Ja3epeH npneMHNK no n36op: 3aadTeMaKcImaJIHN O6OpOTn Ha potaunOHnra Ja3epN BkIIOUte Ja3ePHnRA npneMHNK. BIXTe TOBa BVbKOBOdCTBOTO 3a pa60Ta Ha cboTBETHnRA Ja3epeH npneMHNK.
Pa6ota c eTaJOnHHn Ja3ep
UpebT pa3noIara c Dba eTaJOhn Ja3epa. PpN BepTKaJIHa pa6Ota eTaJOhHnT Ja3ep CnyKn 3a NOpaBnBaHe Ha np6opa. 3a ceJtA NaCTpoIe TaJIOHHn Ja3ep napaleJHo KbM CTeHa. Toraba BepTKaJIHaTa Ja3epHa paBnHa e yCTaHOBeHa NOI ppAB bTbI CNpAMo CTeHaT, BVXTe qnYpata.
Yka3aHna 3a TexHnuecko O6cIyKbaHe I NOdRpBxKka
Почистваши Слички Компоенти Слесу Навлajх Heha Крпа ИЗбягваши ИЗползваши на поисваши и abpa3иВиnpenapatи и pa3TBOPител. ИЗваши akumylatopнata бateрnia, korato уpeьт Нама да sbde ИЗпOL3Ван прдьжпелно Врeme. Сыхсанвiate уpeда на чосто и сухо място.
Kanibpnpahe
I3mepBaTeHnT ypei Tp8Ba peoBHO da ce KaJIb6pnpa n 3nITBa, 3a da ce rapaHTnpa ToUHocTTa i OyHKcnoHnpaHeTo. IpeOpbUBAme nHTepBaJ Ha KaJIb6pnpaHe ot eHa roDHa. Ppi Heo6xOIMoCT ce CBbpxKeTe c Baunr dInbp nn Ce o6bPHeTe KbM cepBn3Hn rTdeJ Ha UMAREX-LASERLINER.
Pa3npope6n Ha EC n O6eHHeHTo KpaJIcTBo n I3XbPJIaHe
UpeIbT OTROBapr Ha BCnKHeo6xOIMM CTaHApTn 3a CBO6OHO dBIXeHne Ha cTOKN B paMKITE Ha EC n OBeiHHeHTo KpaJIcTBo.
To3n npOdyKT, BkIIOUHTeJIHO npINHaIJIeJXHocHTte I ONAKOBAtA, e eJeKTPnuYeCKn ypei, KOITo Tp86Ba Da ce peuKIInpa No 6e3OpaceH 3a npipOdaTa HauH, B CbOTBcTCTBHe C EBPOeNCKITE N 6pnTahCKTe DnpeKTHBn 3a OTNaDbCITE OT eJeKTPnuCecko N eJeKTPoHNO OBOpYDaHe, BaTePNI I ONAKOKN 3a IN3BlnuHa He cEHNN CypOBHN. He n3XBpJIyTE eJeKTPnuCeckn ypei, BaTePNI I ONAKOKN npn DOMAKINCKITE OTNaDbzI. Notpe6NTeJIte ca 3aKOHOB0 3aNbJxHeN da npedabat n3NoJ3BaHInTE BaTePNI I Akymylatopn 6e3PiATHO B o6uEcTBHe nyHKT 3a Cb6nPaHe Ha OTNaDbzI, NyHKT 3a npOdaX6a IJIu TexHnuecka CnyX6a 3a KJIneHTN. BaTePNI Ta Tp86Ba Da ce n3BaAn OT UcTPOINCTBOTo, KaTO Ce n3NoJ3Ba HAIUnE H TBpROBCKATA MpeKa IHCTpyMeH, 6e3 Da ce pa3pyuBa, I Da CE n3npatn 3a pa3dEJIHO Cb6nPaHe, PpeNi Da ce BbpHE UcTPOINCTBOTo 3a IN3XBpJIyHe KATO OTNaDbK. AKO IMATE BbIPOCN OTHOCHO IN3BaXJaHeTO Ha BaTePnTA, MoJIa, CBpXeTe Ce CbC cepBn3Hna OTdeJHa UMAREX-LASERLINER. MoJIa, CBpXeTe Ce c BaWata obuHa, 3a Da ce INHΦOpMnPaTe 3a NOxODJaIte CbOpBXeHnA 3a IN3XBpJIyHe Ha OTNaDbzI andeBaNTE CbOTBeTHNte INHCTpyKZnn 3a IN3XBpJIyHe n 6e3OnacHocT B NYKTOBete 3a CB6nPaHe Ha OTNaDbzI.
Ouhe nHctpyKuH 3a 6e3oNaChOCT N dOnbHnTeHn yKa3aHn Iue Hamepnte Ha aDpec:
Cubus: https://packd.li/II/ANM/in
Cubus Green: https://packd.li/ll/APV/in
| Текнистухахарактористук (Забалая се паBOTо 3а ТЕЧИССКИ ИЗМЕн�я. 24W43) | |
| Диапазон Ha само-нibелIPAнe ± 4° | |
| Toчноct ± 0,15 mm / m | |
| НивелIPAнe | хориозонтадно/Вертукално авTomатICALno с[eльков�и Ниевлірі и СервдыгATEПи |
| Вrame 3a поразваяне ok. 30 сек. поцеляпабotingьгл | п о ceеля рабotingьгл |
| Рotaцюни обороти 0, 30, 330, 600 | об/Minn |
| Дьлжина Ha вьлнaitа Ha Лаэр разферентен Льч червен / зелен | 635 nm / 515 nm |
| Клас Ha Лаэрpa | 2 / < 1 mW (EN 60825-1:2014/ A11:2021 / EN 50689:2021) |
| Елькоatroзхарвае | Литnevob-ийонna akumулаторна батерия 7,4V / 2,6Ah / 19,24Wh |
| С所需要的就是可以的 червен / зелен | okolno 25 ча |
| Вrame Ha заразождане okolno 4 час | |
| Условners Ha па? YSLOBNIA Ha pa? YSLOBNIA Ha pa? YSLOBNIA Ha pa? YSLOBNIA Ha pa? YSLOBNIA Ha pa? YSLOBNIA Ha pa? YSLOBNIA Ha pa? YSLOBNIA Ha pa? YSLOBNIA Ha pa? YSLOBNIA Ha pa? YSLOBNIA Ha pa? YSLOBNIA Ha pa? YSLOBNIA Ha pa? YSL OB NHA Ha pa? YSLOBNIA Ha pa? YSLOBNIA Ha pa? YSLOBNIA Ha pa? YSLOBNIA Ha pa? YSLOBNIA Ha pa? YSLOBNIA Ha pa? YSLOBNIA Ha pa? YSLOBNIA Ha pa? YSLOBNIA Ha pa? YSLOBNIA Ha pa? YSLOBNIA Ha pa? YSLOBNIA Ha pa? YNLSTAHIOHNO урал? YSLOBNIA Ha pa? YSLOBNIA Ha pa? YSLOBNIA Ha pa? YSLOBNIA Ha pa? YSLOBNIA Ha pa? YSLOBNIA Ha pa? YSLOBNIA Ha pa? YSLOBNIA Ha pa? YSLOBNIA Ha pa? YSLOBNIA Ha pa? YSLOBNIA Ha pa? YSLOBNIA Ha pa? YSLLBNA Ha pa? YSLOBNIA Ha pa? YSLOBNIA Ha pa? YSLOBNIA Ha pa? YSLOBNIA Ha pa? YSLOBNIA Ha pa? YSLOBNIA Ha pa? YSLOBNIA Ha pa? YSLOBNIA Ha pa? YSLOBNIA Ha pa? YSLOBNIA Ha pa? YSLOBNIA Ha pa? YSLOBNIA Ha pa? ynpaВлeпeпeпeпeпeпeпeпeпeпeпeпeпeпeпeпeпeпeпeпeпeпeпeпeпeпeпeпeпeпeпeпeпeпeпeпeпeпeпeпeпeпeпeпeпeпeпeпeпeпe? YSLOBNIA Ha pa? YSLOBNIA Ha pa? YSLOBNIA Ha pa? YSLOBNIA Ha pa? YSLOBNIA Ha pa? YSLOBNIA Ha pa? YSLOBNIA Ha pa? YSLOBNIA Ha pa? YSLOBNIA Ha pa? YSLOBNIA Ha pa? YSLOBNIA Ha pa? YSLOBNIA Ha pa? YSLOBB NA Ha pa? YSLOBNIA Ha pa? YSLOBNIA Ha pa? YSLOBNIA Ha pa? YSLOBNIA Ha pa? YSLOBNIA Ha pa? YSLOBNIA Ha pa? YSLOBNIA Ha pa? YSLOBNIA Ha pa? YSLOBNIA Ha pa? YSLOBNIA Ha pa? YSLOBNIA Ha pa? YSLOBNIA Ha pa? Tengl 70 g (ВКЛ. Баери) | |
Cubus Green: https://packd.li/ll/APV/in
| Текстухугостахукьдддддддддддддддддддддддддддддддддддддддддддддддддддддддддддддддддддддддддддддддддддддддддддддддддддд徳хукьддддддддддддддддддддддддддддддддддддддддддддддддддддддддддддддддддддддддддддддддддддддддддддддд徳хурьдддддддддддддддддддддддддддддддддддддддддддддддддддддддддддддддддддддддддддддддддддддддддддддддддд徹хурьддддддддддддддддддддддддддд徳хурьддддддддд徳хурьддддддд徳хурьддддд徳хурьддд徳хурьдд徳хурьдд徳хурьд徳хурьд徳хурьд徳хурь徳хурь徳хурь徳хурь徳хурь徳хурь徳хурь徳хурь徳хурь徳хурь徳хурь徳хурь徳хурь徳хурь徳хурь徳хурь徳хурь徳хYPYQ | 635 / 515 nm |
| Мыковая кужатоς λέιερακτίνησαναφοράκόκκινοχρώμα / πράσιν χρώμα | 2 / < 1 mW (EN 60825-1:2014/A11:2021 / EN 50689:2021) |
| Кат�нограда λέιερ | Επαναφορτίζόμενη μπαταρία Μόντων -λιθίου 7,4V / 2,6Ah / 19,24Wh |
| Διάρκεία λέιτουργίας κόκκινοχρώμα / πράσιν χρώμα | περ. 25 χρες |
| Хroduç φόρτιοης περ. 4 χρες | |
| Συνθήκες εργασίας | -10°C ... 50°C, uγρασία αέρα μέγ.80% rH, χωρίς συμπύκυωση, ὄψος εργασία μέγ. 4000 m πάνω από το μέδος επίπεδο της θάλασος |
| Συνθήκες αποθήκευοης | -10°C ... 70°C, uγρασία αέρα μέγ.80% rH |
| Katayogia npoσtaσίας IP 66 | |
| Διαστάσεις (Π x Y x B) | 130 x 160 x 145 mm(με βάση τρίποδα και τοίχου) |
| Báρος 1300 g (με βάση τρίποδα και τοίχου) | |
| Τηλεχεριριστήρο | |
| Τροφοδοσία ρεύματος 2 x 1,5V LR03 (AAA) | |
| Εμβέλεία τηλεχεριριστηρίου | μέγ. 30 m (τηλεχεριριστήριοιπερύθρων IR-Control) |
| Báρος 70 g (με μπαταρίες) | |
PpOeToIaOia EλEyxou βaθμovóμnonc
Mnpoeite va eleyxte tn 3aOmuovonn tou Ieep. Bale tn ouokun oTo moov
ueta2 toixw, nou exouv anootaon toul. 5 m uetaou touc. Evpyoioiote tn
oukeun. Tia tov teiaio eleyxo, xpooiopoioote eva tpino8a.
Cubus Green: https://packd.li/ll/APV/in
Cubus Green: https://packd.li/ll/APV/in
Cubus Green: https://packd.li/ll/APV/in
Cubus Green: https://packd.li/ll/APV/in
| Tehnički podaci (Zadržavamo pravo na tehnicike izmjene bez prethodne najave. 24W43) | |
| Raspon samoniveliranja ± 4° | |
| Točnost ± 0,15 mm / m | |
| Niveliranje | vodoravno / okomito automatiski pomoću elektroničkih libela i servomotora |
| Brzina podešavanja.oko 30 sekundì preko cijelog radnog kuta | |
| Broj okretaja pri rotaciji 0, 30, 330, 600 o/min | |
| Valna duljina lasera crveno / zeleno | 635 nm / 515 nm |
| Valna duljina lasera Referentna zraka crveno / zeleno | 635 nm / 515 nm |
| Klasa lasera | 2 / < 1 mW (EN 60825-1:2014/A11:2021 / EN 50689:2021) |
| Napajanje | Paket litij-ionskih punjivih baterija, 7,4V / 2,6Ah / 19,24Wh |
| Trajanje rada crveno / zeleno oko | 25 sati |
| Vrijeme učitavanja.oko 4 sati | |
| Radni uvjeti | -10°C ... 50°C, maks. vlaga 80% rH, bez kondenzacije, Radna visina maks. 4000 m nadmorske visine (normalna nula) |
| Uvjeti skladištenja | -10°C ... 70°C, maks. vlaga 80% rH |
| Klasa zašite IP 66 | |
| Dimenzije (Š x V x D) | 130 x 160 x 145 mm (sa stativni držač / zidni držač) |
| Masa 1300 g (sa stativni držač / zidni držač) | |
| Daljinski upravljɑč | |
| Napajanje 2 x 1,5V LR03 (AAA) | |
| Domet daljinskog upravljɑа max | 30 m (IR kontrola) |
| Masa 70 g (uklj. baterije) | |
Priprema provjere kalibracione
Možete kontrolirati kalibraciju lasera. Urešaj postavite u sredinu izmedu 2 zida koji su razmaknuti majmanje 5 m. Nivelirajte urešaj i uključite ga. Molimo koristite tronožac za optimalnu provjeru. VAŽNо: Mora biti aktivna senzorska automatika (isključen je LED funkcjije auto/slope).
- Oznacite točku A1 na zidu. (Koristite Mod točke).
- Okrenite uredaj za 180^ i označite točku A2. Izmedu točke A1 i A2 imate sada horizontalnu referencu.
Provjera kalibracione
- Urešaj postavite što blije zidu na visini označene točke A1, poravnajte urešaj s X-osi.
- Razlika izmedu A2 i A3 predstavlja toleranciju za os X.
- Ponovite korake 3. i 4. kakobiste provjerili os Y, odn. os Z.