
WRT32XB - Router LINKSYS - Free user manual and instructions
Find the device manual for free WRT32XB LINKSYS in PDF.
| Product Type | Dual-band Wi-Fi router for gaming |
| Dimensions (without antennas) | 246 x 194 x 52 mm |
| Weight | 883 g |
| Power Supply | 12 V, 3 A |
| Port Speed | Gigabit Ethernet (10/100/1000 Mbit/s) |
| Radio Frequency | 2.4 GHz and 5 GHz |
| Number of Antennas | 4 adjustable external antennas |
| Ports | USB 3.0, USB 2.0/eSATA, Internet (yellow), Ethernet (1-4), power |
| Buttons | Reset, Wi-Fi Protected Setup, Power |
| LED Indicators | Power, Internet, 2.4 GHz, 5 GHz, eSATA, USB1, USB2, Ethernet (1-4), WPS |
| Wireless Security | WPA2, up to 128-bit encryption |
| Supported File Systems | FAT, NTFS, HFS+ |
| UPnP | Compatible |
| Certifications | FCC, IC, CE, Wi-Fi (a/b/g/n/ac) |
| Operating Temperature | 0 °C to 40 °C |
| Operating Humidity | 10 % to 80 % (non-condensing) |
| Main Features | Device prioritization (Killer), external storage, guest network, speed test |
| Care and Cleaning | Unplug before cleaning; use a soft dry cloth |
| Spare Parts and Repairability | Reset via Reset button; contact Linksys support for repairs |
| General Information | Brand: Linksys ; Model: WRT32XB ; Category: Router |
Frequently Asked Questions - WRT32XB LINKSYS
User questions about WRT32XB LINKSYS
0 question about this device. Answer the ones you know or ask your own.
Ask a new question about this device
Download the instructions for your Router in PDF format for free! Find your manual WRT32XB - LINKSYS and take your electronic device back in hand. On this page are published all the documents necessary for the use of your device. WRT32XB by LINKSYS.
USER MANUAL WRT32XB LINKSYS
Setting Up: Basics 7
WRT32X Settings.... 11
Dashboard....11
Wi-Fi Settings 12
Devices....12
Device Prioritization....13
Speed Test....13
Router Administration....14
External Storage 14
Local Network Settings....15
Troubleshooting 16
Setup was unsuccessful 16
"Your Internet cable is not plugged in" message....17
"Cannot access your router" message....18
After setup....19
The internet appears to be unavailable 19
Specifications 21
Linksys WRT32X 21
Environmental....21
Product Overview
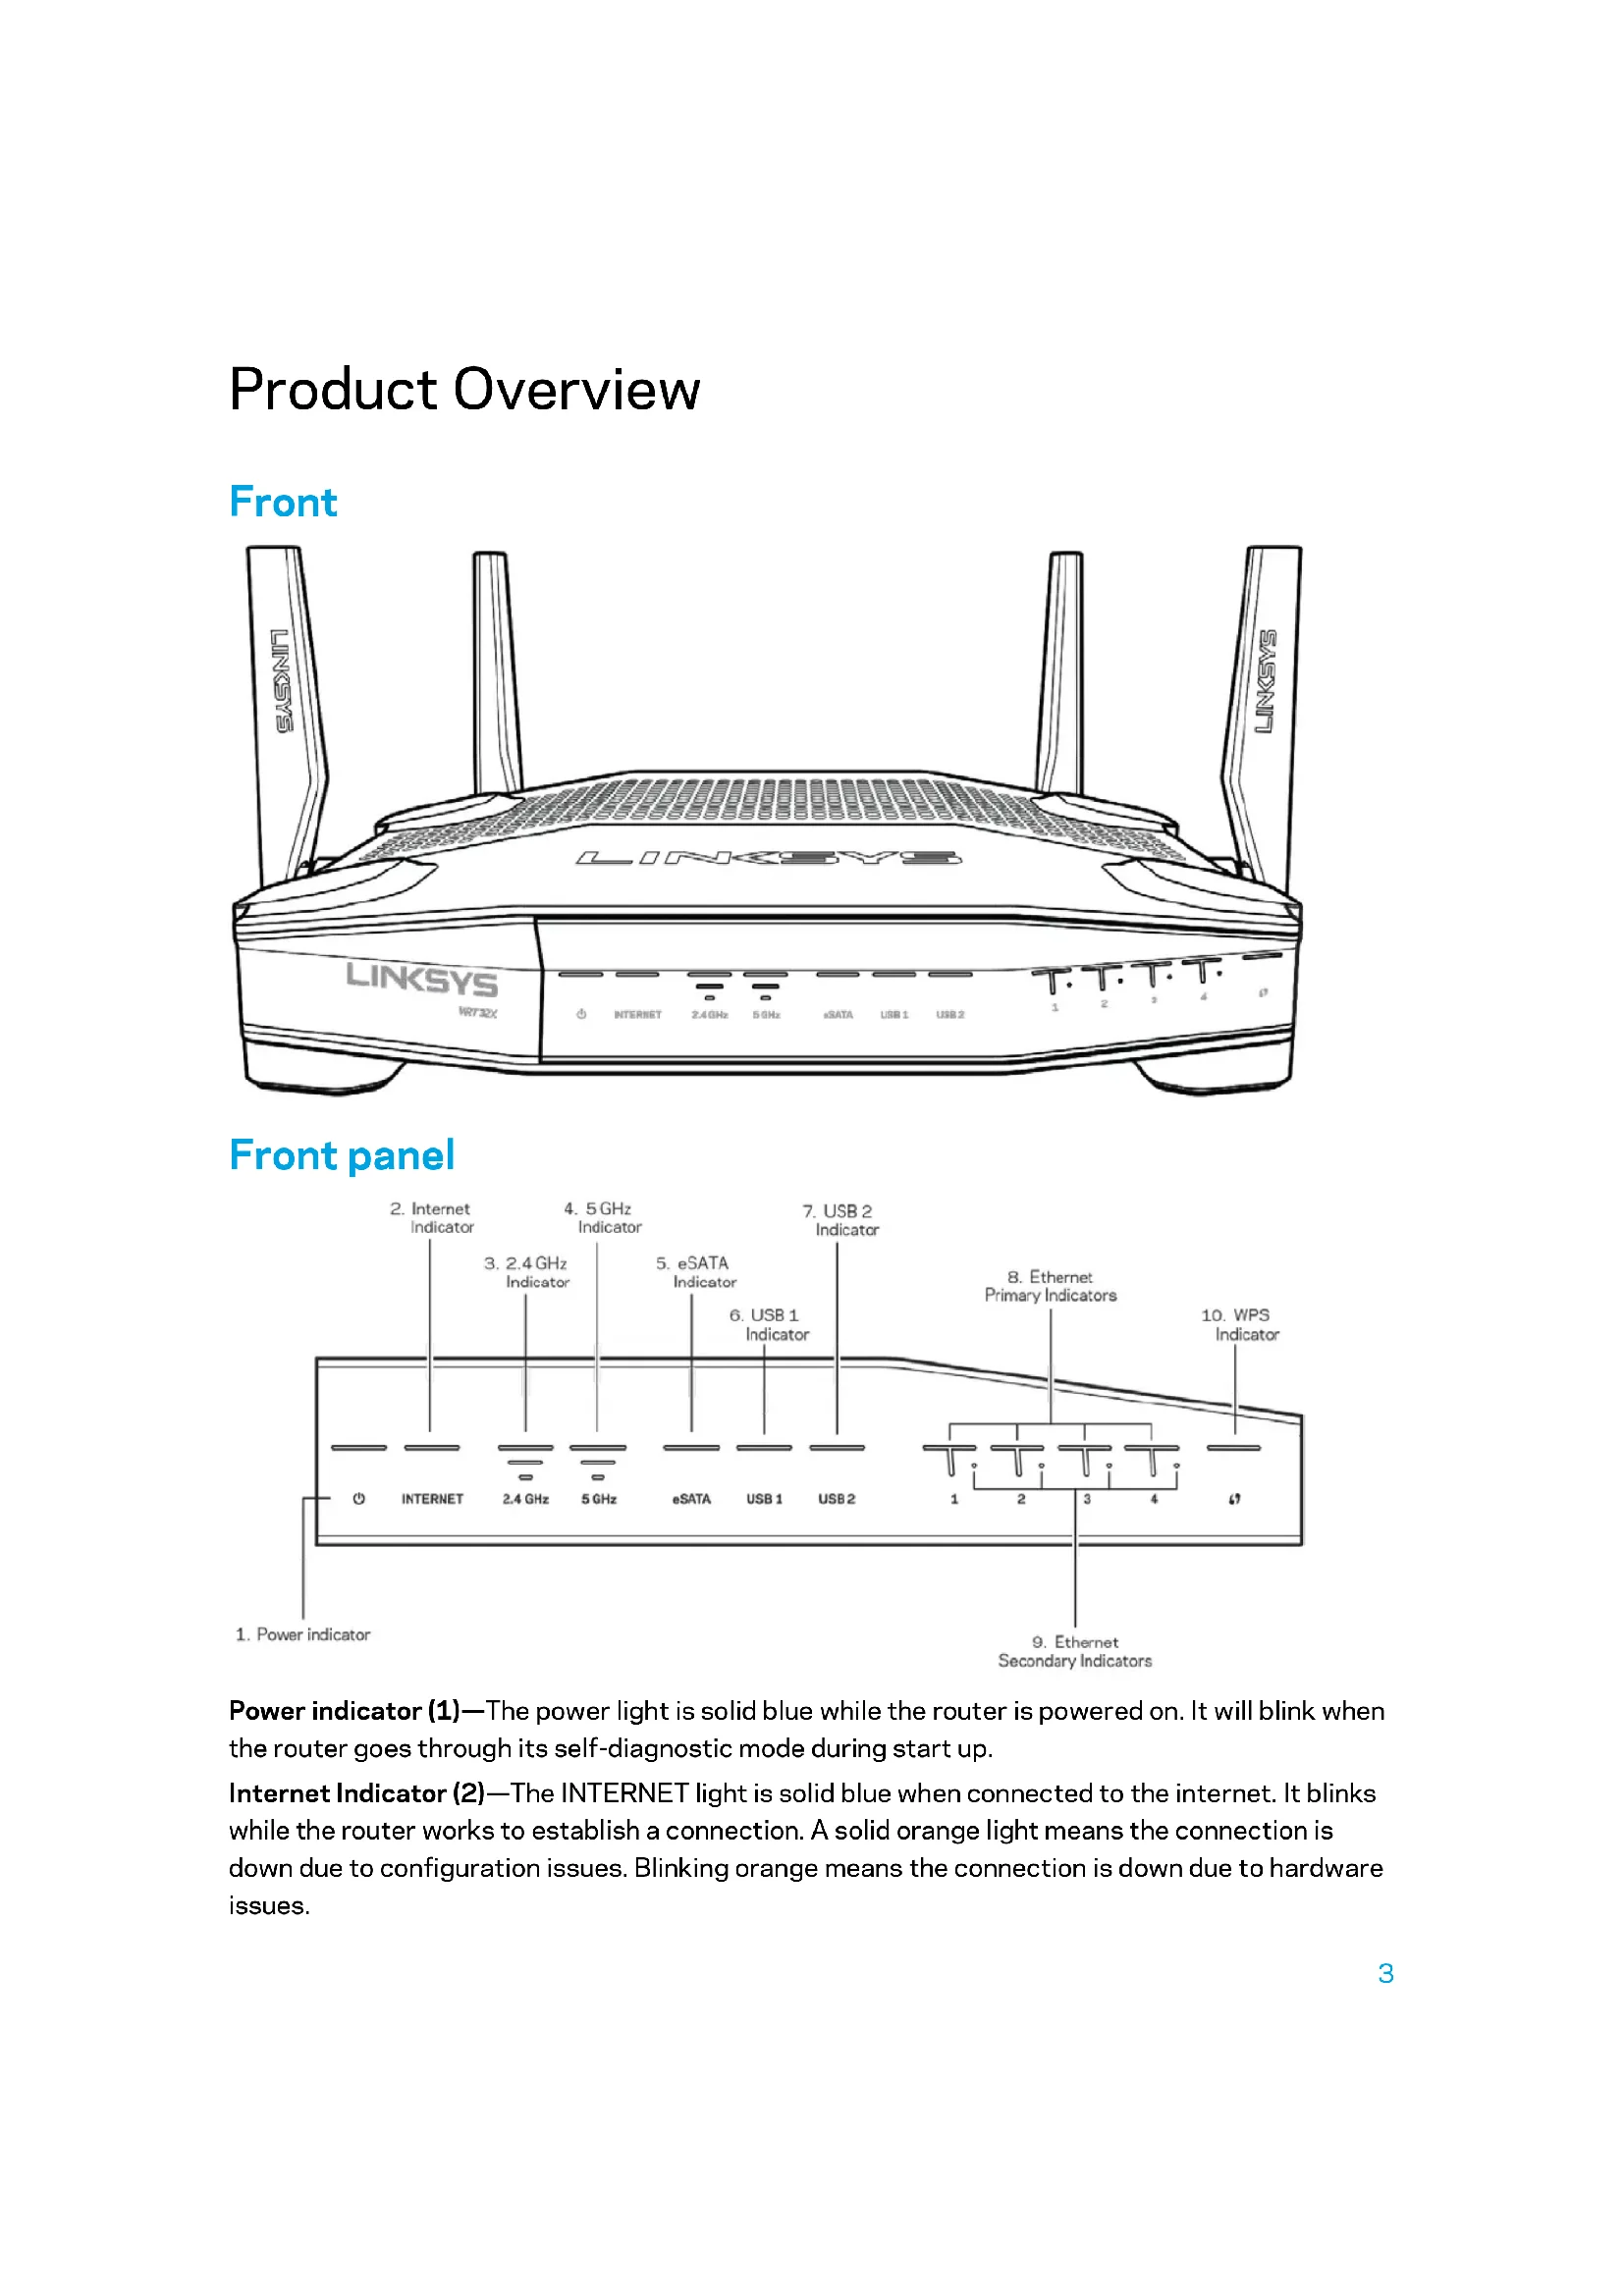
Front
text_image
LINKSYS WIFI32X INTERNET 2.4 GHz 5 GHz xDATA USB 1 USB 2 T T T T T 1 2 3 4 0Front panel
text_image
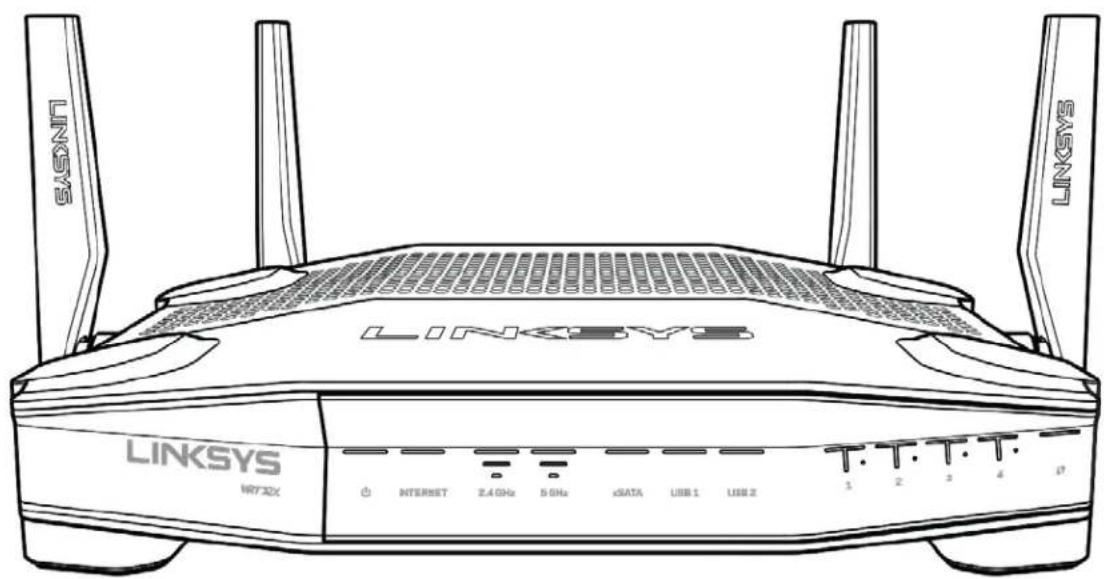
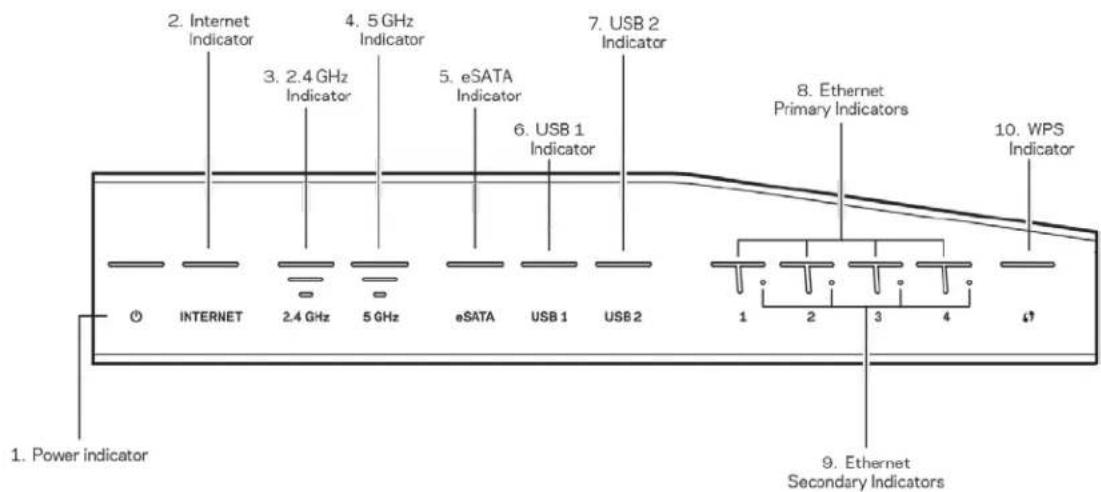
2. Internet Indicator 3. 2.4 GHz Indicator 4. 5 GHz Indicator 5. eSATA Indicator 6. USB 1 Indicator 7. USB 2 Indicator 8. Ethernet Primary Indicators 9. WPS Indicator 10. WPS Indicator 1. Power indicator 2. INTERNET 2.4 GHz 5 GHz eSATA USB 1 USB 2 3 4 4 5 6 7 8 9 10 Secondary IndicatorsPower indicator (1)—The power light is solid blue while the router is powered on. It will blink when the router goes through its self-diagnostic mode during start up.
Internet Indicator (2)—The INTERNET light is solid blue when connected to the internet. It blinks while the router works to establish a connection. A solid orange light means the connection is down due to configuration issues. Blinking orange means the connection is down due to hardware issues.
2.4 GHz Indicator (3)—The light is solid blue when one or more clients are connected to the 2.4 GHz network. The light blinks when the router is sending or receiving data over the 2.4 GHz network.
5 GHz Indicator (4)—The light is solid blue when one or more clients are connected to the 5GHz network. The light blinks when the router is sending or receiving data over the 5 GHz network.
eSATA Indicator (5)—If the light is off, the USB/eSATA port is off or a USB device is connected. The light is solid blue when an eSATA device is connected. The light blinks to indicate activity through the eSATA port.
USB1 Indicator (6)—If the light is off, the USB /eSATA port is off or an eSATA device is connected. The light is solid blue when a USB device is connected. The light blinks to indicate activity on the port.
USB2 Indicator (7)—The light is solid blue when a USB device is connected. The light blinks to indicate activity on the port.
ETHERNET 1 through 4 (Primary) (8)—These numbered lights correspond with the numbered ports on the router's back panel. If the light is solid blue, the router is connected to a device through that port. The light blinks to indicate network activity over that port.
ETHERNET 1 through 4 (Secondary) (9)—If the light is off, the router is connected to a device through that port at 10/100 Mbps. A solid blue light means the router is connected to a device at 1000 Mbps.
WPS Indicator (10)—The light blinks slowly for up to two minutes during Wi-Fi Protected Setup. It will be solid blue for five seconds to indicate a successful connection. The light blinks orange if the WPS process fails. If that happens, make sure the client device supports WPS. Wait until the light is off, and try again. The router supports one WPS session at a time.
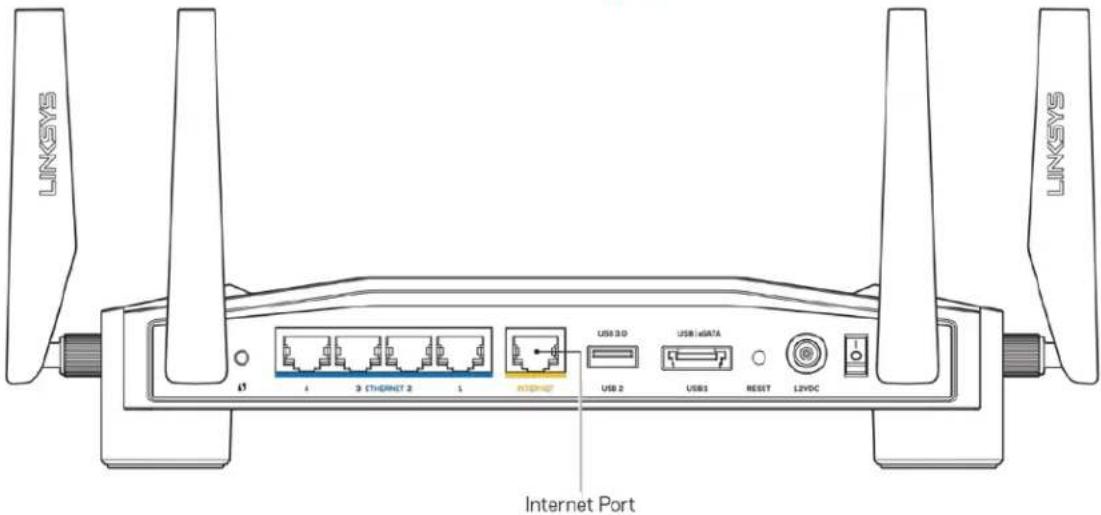
Back
text_image
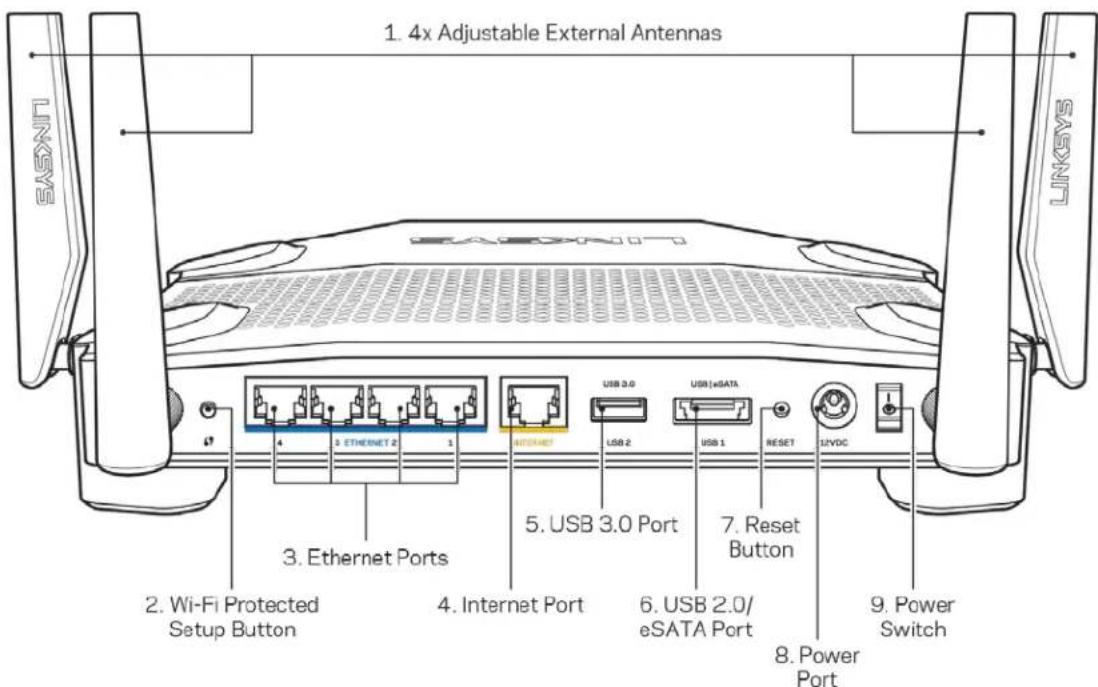
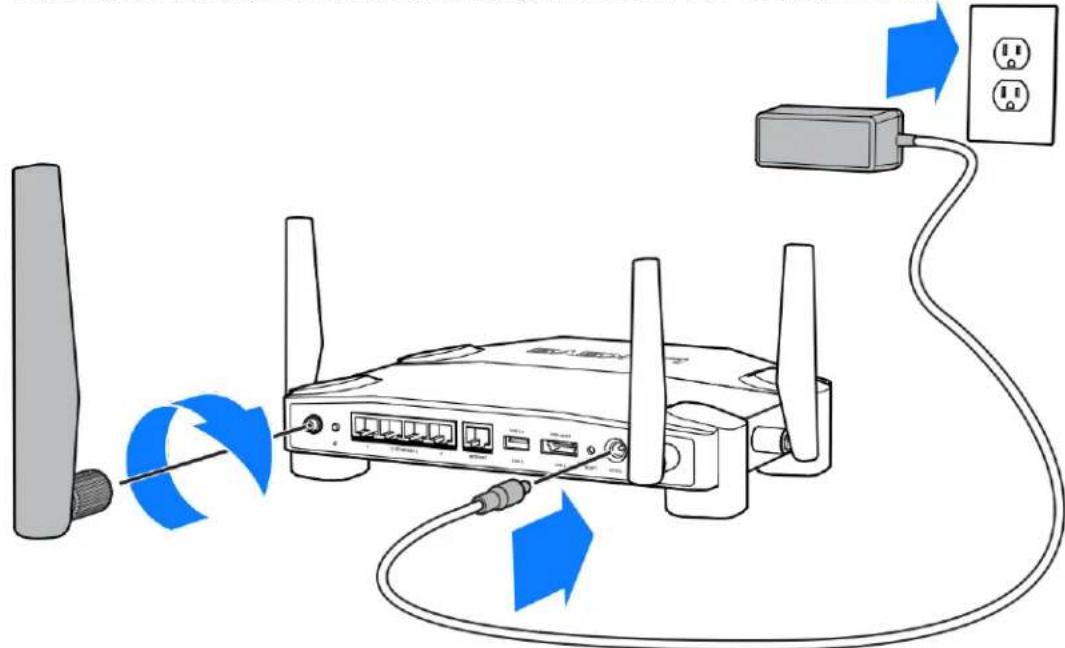
1. 4x Adjustable External Antennas 2. Wi-Fi Protected Setup Button 3. Ethernet Ports 4. Internet Port 5. USB 3.0 Port 6. USB 2.0/ eSATA Port 7. Reset Button 8. Power Port 9. Power Switch LINKSYSAdjustable antennas (1)—The four adjustable external antennas should be connected to the router before powering it on. Twist the antenna connector clockwise onto the antenna port on the router.
Note—For best performance, position the side antennas vertically as shown in the picture on the left.
Wi-Fi Protected Setup™ button (2)—Press to configure wireless security on Wi-Fi Protected Setup-enabled network devices.
Ethernet ports (3)—Connect ethernet cables to these blue gigabit (10/100/1000) ports, and to wired devices on your network.
Note—For best performance, use CAT5e or higher rated cables on the ethernet ports.
Internet port (4)—Connect an ethernet cable to this yellow gigabit (10/100/1000) port, and to a broadband internet cable/DSL or fiber modem.
Note—For best performance, use CAT5e or higher rated cables on the Internet port.
USB 3.0 port (5)—Connect and share a USB drive on your network or on the internet.
USB 2.0/eSATA combo port (6)—Connect and share a USB or eSATA drive on your network or on the internet.
Reset button (7)—Press and hold for 10 seconds (until the power light starts blinking) to reset the router to factory settings.
Power port (8)—Connect the included AC power adapter.
Power switch (9)—Press to the | position to turn on the router.
Setting Up: Basics
To complete setup, you will need a computer or mobile device.
- Identify your equipment and prepare for setup.
Modem | OR | Modem Router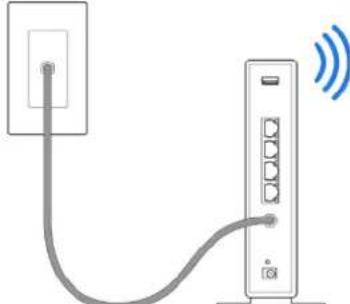 |
| If you have a separate modem and standalone router, disconnect and remove your old router. | If you have a modem router, leave it connected. |
- Twist on the antennas as pictured, and plug your router into a power source.
text_image
Diagram showing wireless router connected to a power outlet via cable, with blue arrows indicating signal flow.- Plug one end of the included internet cable into the yellow INTERNET port on your new router.
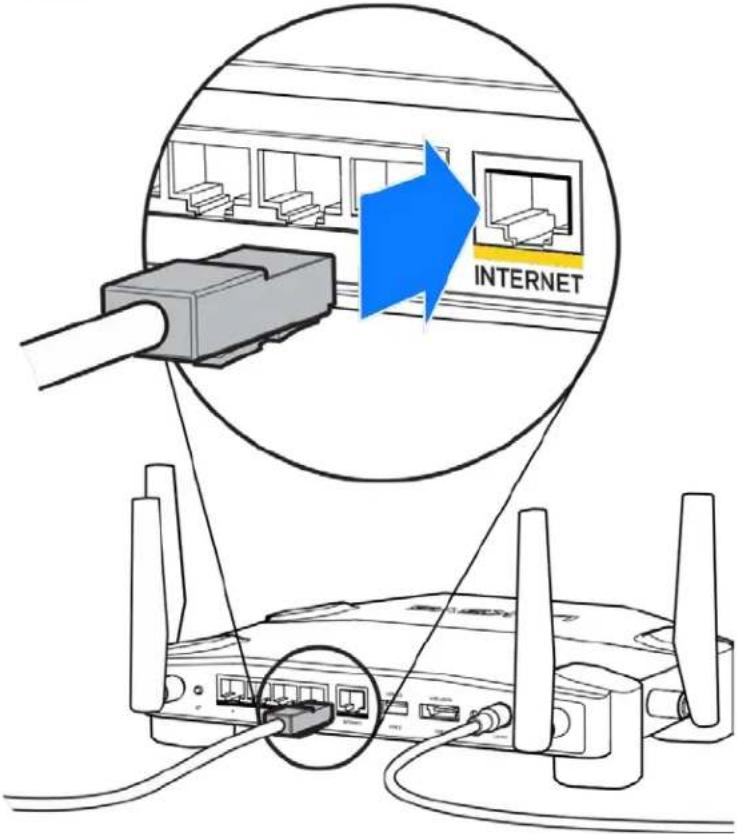
text_image
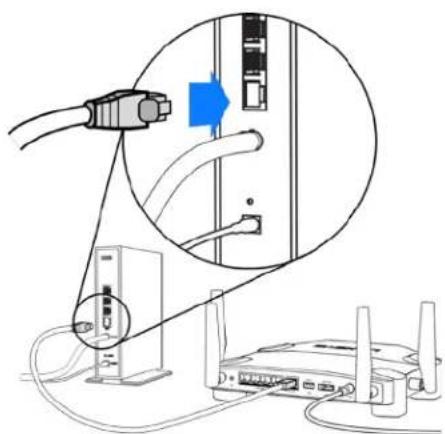
INTERNET- Connect your router to your modem or modem router.
Modem Modem Router
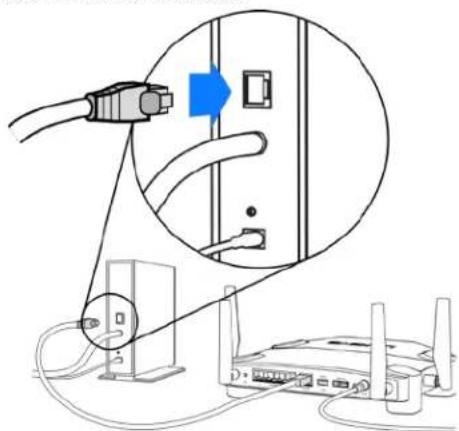
text_image
Diagram showing connection between a router and a device via cable, with a magnified view highlighting the cable's connector.If you have a modem, plug the other end into the Ethernet (LAN) port on the modem.
natural_image
Diagram showing connections between a router, switch, and server with cables (no text or symbols present)If you have a modem router, plug into any available port.
You will need a computer or mobile device for steps 5 and 6.
- Connect to the temporary setup Wi-Fi name on the sticker in the Quick Start Guide that came with your router, and enter the password. (You can personalize these details later.)
- Enter http://myrouter.local in a web browser. Follow the onscreen instructions to complete your router setup.

text_image
New Tab ← → C ↗ http://myrouter.localYou also can type 192.168.1.1 in a browser to start setup.
Manual Setup
- Connect your computer to your router with an ethernet cable.
- Visit 192.168.1.1 in a browser.
- Choose "skip the setup" at the bottom of the Welcome page.
- Click the Agree button at the bottom of the Terms and Conditions screen.
Print this page, then record your router and account settings in the table below as a reference. Store your notes in a safe place.
| 2.4 GHz Wi-Fi Name | |
| 2.4 GHz Wi-Fi Password | |
| 5 GHz Wi-Fi Name | |
| 5 GHz Wi-Fi Password | |
| Admin Password | |
| Guest Wi-Fi Name | |
| Guest Wi-Fi Password |
WRT32X Settings
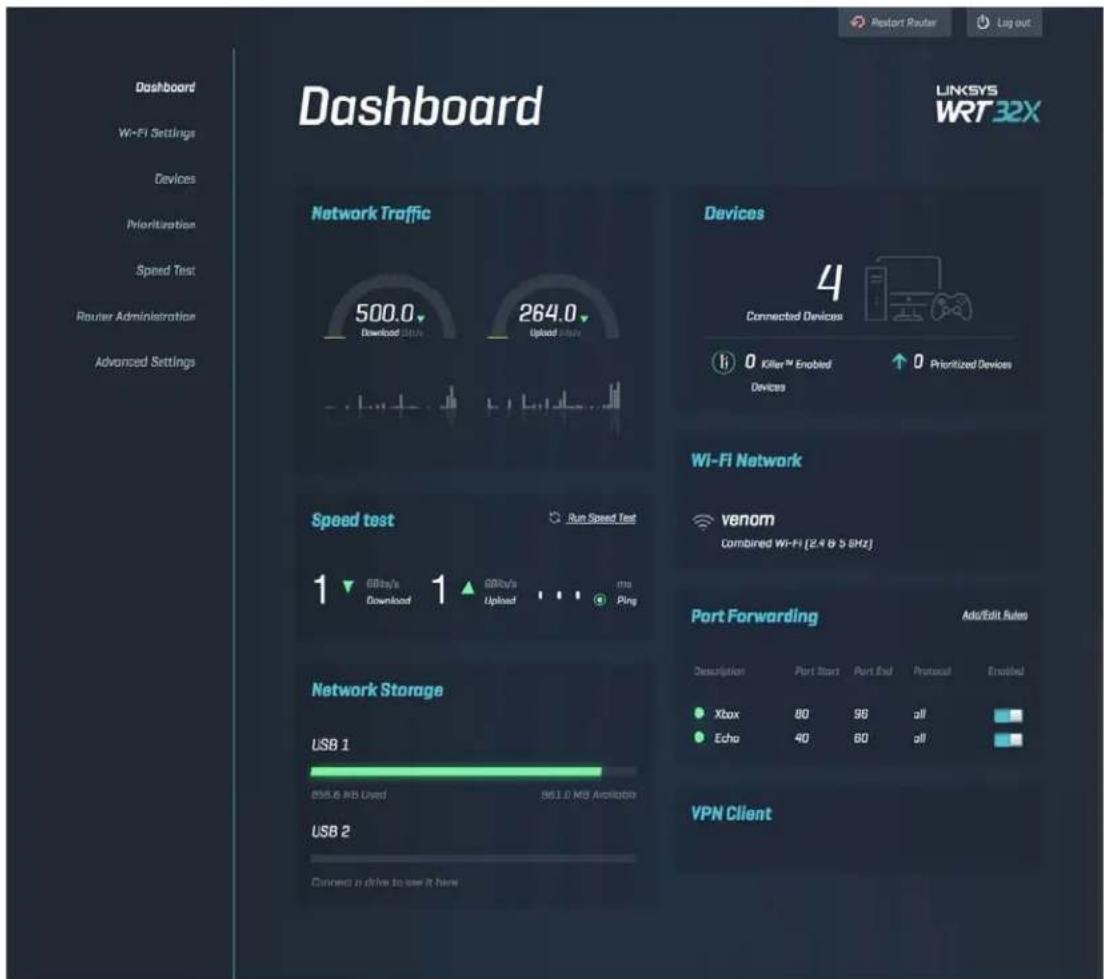
Dashboard
Dashboard is your router's homepage. The main window of the dashboard displays performance details about your router and Wi-Fi.
text_image
Dashboard WRF 32X LinkSYS WRT 32X Dashboard Wi-Fi Settings Devices Prioritization Speed Test Router Administration Advanced Settings Network Traffic 500.0 Download Data 264.0 Upload Data Devices 4 Connected Devices 0 Killer™ Enabled Devices 0 Prioritized Devices Speed test 1 Download 1 Upload ms Ping Wi-Fi Network venom Combined Wi-Fi [2.4 & 5 MHz] Port Forwarding Add/Edit Autox Network Storage USB 1 856.6 MB Used 863.0 MB Archipids USB 2 Connect a drive to see it here Description Port Start Port End Protocol Enabled ● Xbox 80 96 all ■ ● Echo 40 60 all ■ VPN ClientWi-Fi Settings
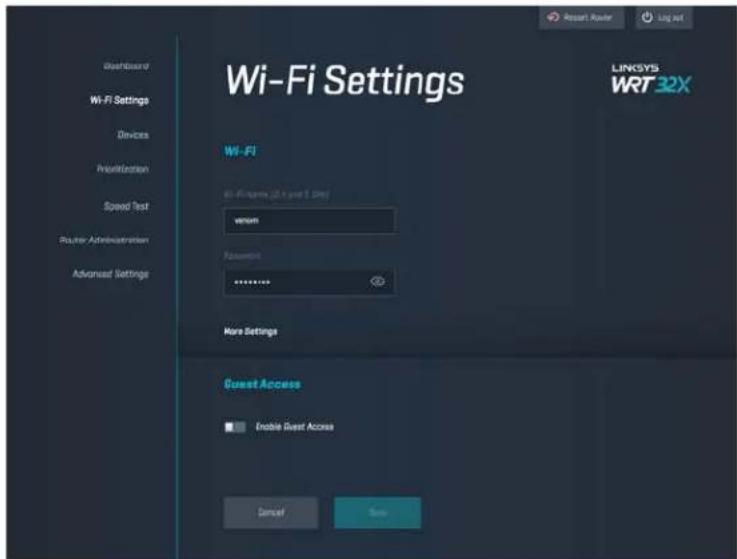
View and manage Wi-Fi settings: name and password, security type, Wi-Fi mode, channel and channel width. You can also set up guest access by creating a separate Wi-Fi name and password to share with guests. Toggle to the off position when not needed to protect your network from unauthorized users.
text_image
Wi-Fi Settings LinkSYS WRT32X Wi-Fi Wi-Fi Programs (2.1 Card 1.0) v容om Password: ****** More Settings Guest Access ■ Enable Guest Access Cancel SaveDevices
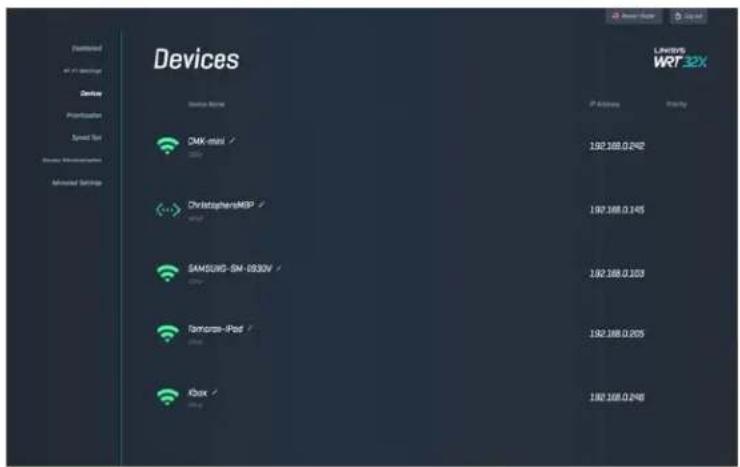
View wired and wireless devices connected to your router, and get their IP address.

text_image
Devices Device Name DMX-mail ChristophensM6P SAMSUNG-SIN-1030V Tennessee-iPod Koax Lindeys WRT 32X IP Address Ricky 192 168.0.242 192 168.0.245 192 168.0.203 192 168.0.205 192 168.0.246Device Prioritization
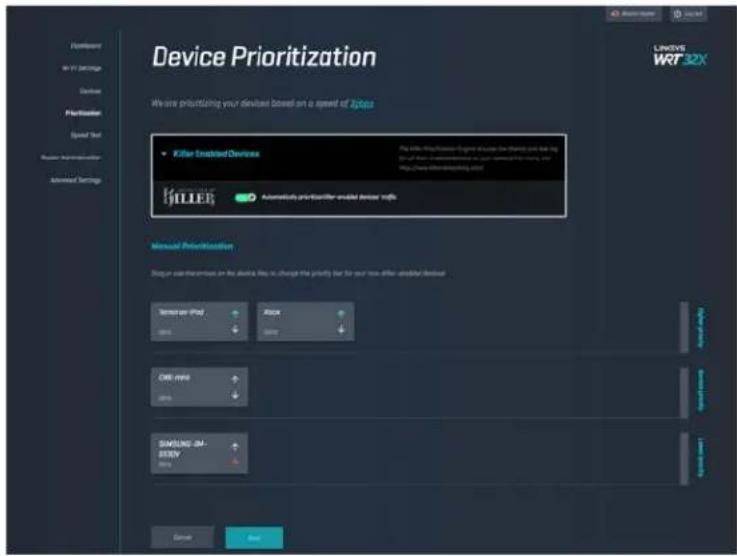
Move devices among priority levels to get the best performance for streaming and online gaming. Automatically prioritize Killer-enabled devices to reduce latency and lag. The higher the priority, the better the access to your internet connection. Low-priority devices share the leftover capacity. For more about Killer, visit http://www.killernetworking.com.
text_image
Device Prioritization We are prioritizing your devices based on a speed of 2000s Killer Advanced Devices Automatic prioritization enabled devices with Manual Prioritization Logic user preferences on the device,请在选择此功能时,可将此功能放在一个硬件上的设备。 Microsoft - 4.0M 80% Albox 80% OK here 80% SAMSUNG 3M-80MV 80% System Next LINKYS WRT 32XSpeed Test
Measure the download (from the internet) and upload (to the internet) speeds of your router. Speeds vary depending on many factors, including how many devices are connected to your router, and what those devices are doing. Speed test is a good way to find out whether you are getting the level of service promised by your internet service provider.
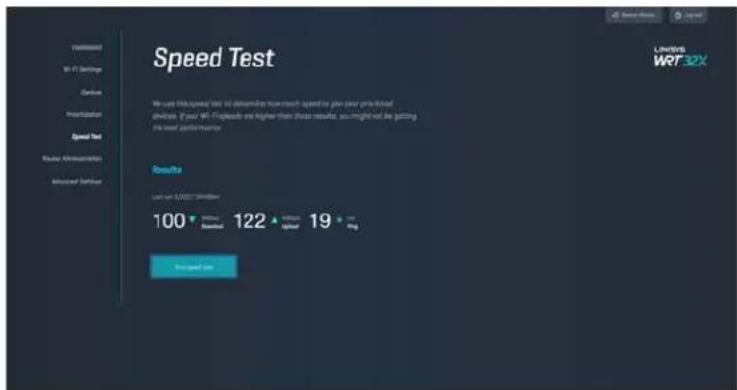
text_image
Speed Test We used Hi-speed test to determine how each speed is given your preferred devices. If your Wi-Fi spreads are higher than those results, you might not be getting the best performance. Results Last run: 100000000000 100 Maximal 122 Optimal 19 Avg Speed Test LANTUS WRT32XRouter Administration
View or change basic router settings, including your admin password and hint, firmware update method, time zone and router name.
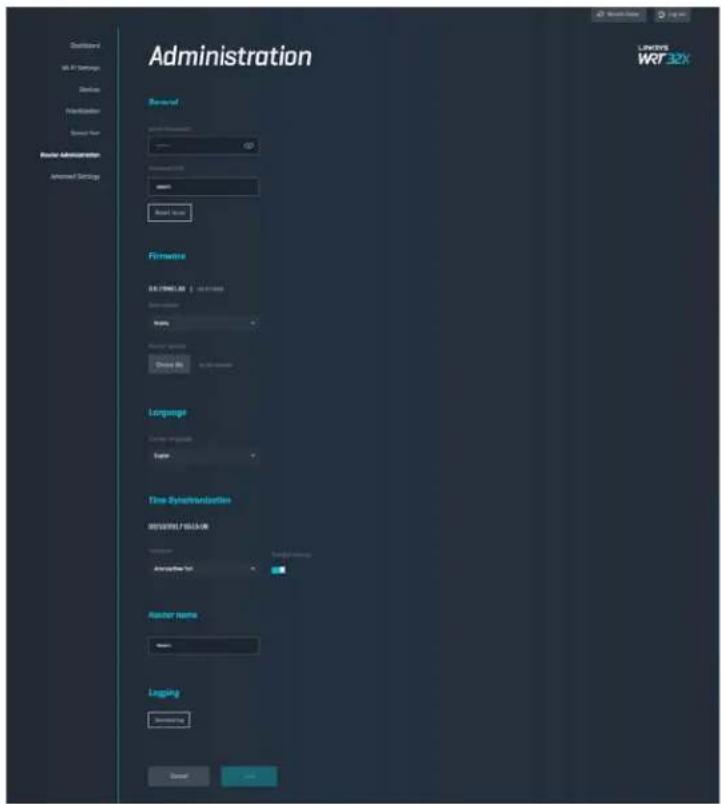
text_image
Administration Server System Administration Server User Router Administration Advanced Settings LINKERS WRF32X Language WRF32X Firmware WRF32X Language WRF32X Language WRF32X Language WRF32X Time Synthesis WRF32X WRF32X WRF32X WRF32X WRF32X WRF32X WRF32X WRF32X WRF32X WRF32X WRF32X WRF32X WRF32X WRF32X WRF32X WRF32X WRF32X WRF10000000000000000000000000000000000000000000000000000000000000000000000000000000000000000000000000000 WRF15111111111111111111111111111111111111111111111111111111111111111111111111111111111111111111111External Storage
Connect a USB drive (not included) and set up file sharing and FTP access.
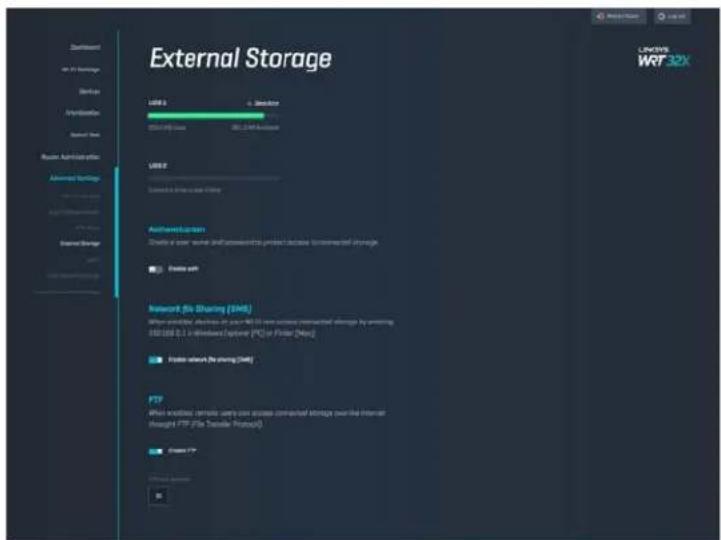
text_image
External Storage USB 3 USB 2 Configuration USB 3 (USB Type) USB 2 Configuration to include an WiFi Authentication Create a user's network shall access the product because external storage Create web Internet: Web Sharing (WRF) When provided, wireless on your WRF 5.0 will access internal storage by entering USB10.0.1 or distributed Ethernet (PC) or Provider [Mbps] Create website by sharing (WRF) FTP When providing remote users can access internal storage via the Internet through FTP (File Transfer Protocol) Create FTP WINW WRF32XLocal Network Settings
View and change basic and advanced network settings.

text_image
Local Network Settings Provider IP Setup POWER 100 (100.0) Power Settings Power 100 (100.0) PWM DHCP Server POWER 100 (100.0) UN Security LPSF Response to 368V slots ON2 LINKINS WR732XTroubleshooting
Find more help from our award-winning customer support at linksys.com/support/WRT32X.
Setup was unsuccessful
If you were not successful with the browser-based setup wizard:
- Press and hold the Reset button on your router with a paperclip or pin for 10 seconds. Restart the setup wizard.

text_image
LINKSNT 4 3 ETHERNET 2 1 USB 3.0 USB iGATA USB 2 USB 1 RESET 12VDC Reset Button LINKSNT- Temporarily disable your computer's firewall (see the security software's instructions for help). Install the router again.
• If you have another computer, use that computer to install the router again.
"Your Internet cable is not plugged in" message
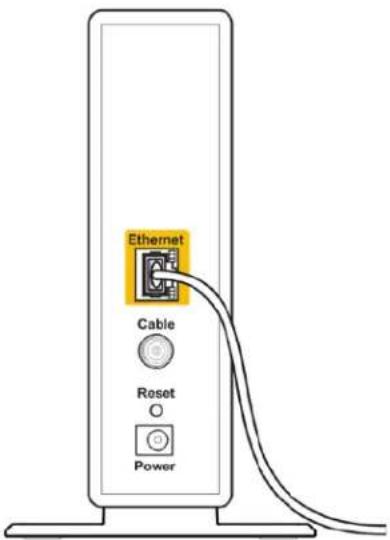
- Make sure that an ethernet cable (like the one included with your router) is securely connected to the yellow INTERNET port on the back of the router and to the appropriate port on your modem or modem router. See Step 4 (p. 8) in setup instructions.
text_image
LINKSYS 3 ETHORNET 2 1 Internet Port USB 3.0 USB DATA USB 2 USB1 RESET L2VDC LINKSNT- Make sure that your modem is connected to power and is turned on. If it has a power switch, make sure that it is set to the ON or I (as opposed to O) position.
- If your Internet service is cable, verify that the cable modem's CABLE port is connected to the coaxial cable provided by your ISP.
text_image
Ethernet Cable Reset PowerBack view of cable modem
- If your Internet service is DSL, make sure the DSL line is connected to the modem's DSL port.

text_image
DSL USB Ethernet Reset PowerBack view of DSL modem
- If your computer was previously connected to your modem with a USB cable, disconnect the USB cable.
• Install the router again.
"Cannot access your router" message
To access your router's administrative tool, you must be connected to your router's network. If you currently have wireless internet access, the problem may be that you have accidentally connected to a different wireless network.
To fix the problem on Windows computers*:
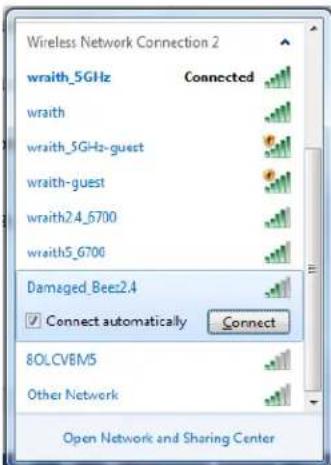
- Click on the wireless icon in the system tray to see a list of available Wi-Fi networks.
- Click your own network name. Click Connect. In the example below, the computer was connected to another wireless network named wraith_5GHz. The wireless network name of the Linksys WRT32X router, Damaged_Beez2.4 in this example, is shown selected.
text_image
Wireless Network Connection 2 wraith_5GHz Connected wraith wraith_5GHz-guest wraith-guest wraith2.4_6700 wraith5_6700 Damaged_Beez2.4 Connect automatically Connect 8OLCVBM5 Other Network Open Network and Sharing Center-
If you are prompted to enter a network key, type your password (Security Key) into the Network key and Confirm network key fields. Click Connect.
-
When your computer connects to the network you should be able to access the router's administrative tool. Enter http://myrouter.local in a browser.
*Depending on your version of Windows, there could be some differences in wording or icons in these steps.
To fix the problem on Mac computers:
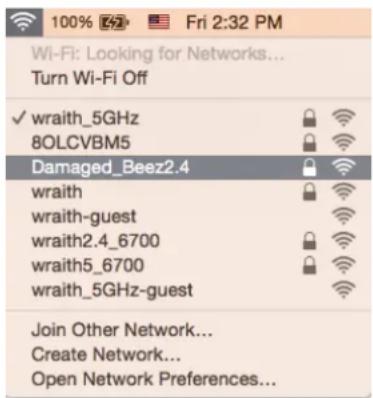
- In the menu bar across the top of the screen, click the Wi-Fi icon. A list of wireless networks will appear. Linksys Smart Wi-Fi has automatically assigned your network a name.
- In the example below, the computer was connected to another wireless network named wraith_5GHz. The wireless network name of the Linksys WRT32X router, Damaged_Beez2.4 in this example, is shown selected.
text_image
100% 2:32 Fri 2:32 PM Wi-Fi: Looking for Networks... Turn Wi-Fi Off ✓ wraith_5GHz 8OLCVBM5 Damaged_Beez2.4 wraith wraith-guest wraith2.4_6700 wraith5_6700 wraith_5GHz-guest Join Other Network... Create Network... Open Network Preferences...- Click the wireless network name of your Linksys WRT32X router (Damaged_Beez2.4 in the example).
- Type your wireless network password (Security Key) into the Password field. Click OK.
After setup
The internet appears to be unavailable
If your router is not communicating with the internet, the problem may appear as a "Cannot find [Internet address]" message in your web browser. If you know that the internet address is correct, and if you've tried several valid internet addresses with the same result, there could be a problem with your ISP or your modem or modem router.
Some potential fixes:
• Make sure that the ethernet and power cables are securely connected.
• Make sure the power outlet that your router is connected to has power.
- Contact your ISP and ask about outages in your area.
The most common method of troubleshooting your router is to restart it by turning it off, then back on again. Your router can then reload its custom settings, and other devices (such as the modem) will be able to rediscover the router and communicate with it.
To restart your router using the power cord:
- Disconnect the power cord from the router and the modem or modem router.
-
Wait 10 seconds, and reconnect the power cord to the modem or modem router. Make sure it has power.
-
Wait until the online light on your modem or modem router has stopped blinking (about two minutes). Reconnect the power cord to the router.
-
Wait until the power light stops blinking. Wait two minutes before trying to connect to the internet from a computer.
To restart your router using the router's browser-based administrative tool:
-
Log in to your WRT32X. (See Step 6 on p. 9 in setup instructions.)
-
Click Router Administration in the navigation bar on the left side of the screen.
-
Click Restart router.

text_image
Administration Auto Administrator Hardware LADSYS WRT 32X- The router will restart. All connected devices will temporarily lose their internet connection. They will automatically reconnect when the router is ready again.
Specifications
Linksys WRT32X
| Model Name | WRT32X Wi-Fi Gaming Router |
| Description | Dual-Band Gigabit Router with 2×USB |
| Model Number | WRT32X |
| Switch Port Speed 10/100/1000 Mbps (Gigabit Ethernet) | |
| Radio Frequency | 2.4 GHz and 5 GHz |
| # of Antennas | 4 external adjustable antennas |
| Ports | USB 3.0, USB 2.0/eSATA, Power, Internet, Ethernet (1-4), R-SMA antenna (4) |
| Buttons | Reset, Wi-Fi Protected Setup, Power |
| Lights | Power, Internet, 2.4 GHz, 5 GHz, eSATA, USB1, USB2, Ethernet (1-4), Wi-Fi Protected Setup |
| UPnP | Supported |
| Security Features | WPA2 |
| Security Key Bits | Up to 128-bit encryption |
| Storage File System Support | FAT, NTFS, and HFS+ |
Environmental
| Dimensions | 9.68" x 7.64" x 2.05" without antennas(246 x 194 x 52 mm) |
| Unit Weight | 31 oz. (883 g) |
| Power | 12V, 3A |
| Certifications | FCC, IC, CE, Wi-Fi a/b/g/n/ac |
| Operating Temperature | 32 to 104°F (0 to 40°C) |
| Storage Temperature | -4 to 140°F (-20 to 60°C) |
| Operating Humidity | 10% to 80% relative humidity, non-condensing |
| Storage Humidity | 5% to 90% non-condensing |
Notes:
For regulatory, warranty, and safety information, see the insert (US) or CD (all other countries) that came with your router or go to Linksys.com/support/WRT32X.
Specifications are subject to change without notice.
Maximum performance derived from IEEE Standard 802.11 specifications. Actual performance can vary, including lower wireless network capacity, data throughput rate, range and coverage. Performance depends on many factors, conditions and variables, including distance from the access point, volume of network traffic, building materials and construction, operating system used, mix of wireless products used, interference and other adverse conditions.
BELKIN, LINKSYS and many product names and logos are trademarks of the Belkin group of companies. Third-party trademarks mentioned are the property of their respective owners. Licenses and notices for third party software used in this product may be viewed here: http://support.linksys.com/en-us/license. Please contact http://support.linksys.com/en-us/gplcodecenter for questions or GPL source code requests.
© 2017 Belkin International, Inc. and/or its affiliates. All rights reserved.
LNKPG-00494
LINKSYS
PERFORMANCE PERFECTED™
دليل المستخدم
WRT32X
GAMING ROUTER
- Power indicator
- Ethernet Secondary Indicators
.Wi-Fi Protected Setup
Wi-Fi Protected Setup™ (2) زر
(1000/100/10) gigabit
ethernet
natural_image
Diagram showing connections between a router, server rack, and connected devices (no text or symbols present)natural_image
Diagram showing a cable being inserted into a device via a network switch, with no visible text or symbols.text_image
New Tab ← → C ↗ http://myrouter.localtext_image
Dashboard LinkSYS WRT32X Network Traffic 500.0 Download Units 264.0 Upload Groups Speed test 1 Minute/s Download 1 Minute/s Upload ms Ping Network Storage USB 1 258.5 Mb Used 961.0 Mb Available USB 2 Connect a drive to see it here Devices 4 Connected Devices 0 Killer™ Enabled Devices 0 Prioritized Devices Wi-Fi Network venvom Combined Wi-Fi [2.4 B 5 GHz] Port Forwarding Add/Edit Rules Description Port Start Port End Protocol Enabled Xbox 80 96 all Echo 40 60 all VPN ClientWi-Fi إعدادات
text_image
Wi-Fi Settings LinkSYS WRT32X Wi-Fi Wi-Fi Name (1:1 and 2:0):\ wenom Username: ****** Horse Settings Guest Access ■ Double Guest Access Cancel Auto
text_image
Device Prioritization We are prioritizing your device designed to use a option / Load Killer Enabled Devices Author Devices Automatically optimized the enabled device with Manual Prioritization Device uses the privacy on the device file to change the priority for your own Killer adapter device Tenorise-Phd 30% Fbox 30% CHF-MH 30% EMSERIC 3M-DEEV 30% Server Save LINKYS WRT32Xاختبار السرعة
text_image
Speed Test The user still tested over as determining how much speed is given power purchased. Services. If your 96% speed is higher than those measured, you might not be getting the best performances Results 100 ▼ Basic 122 ▲ High 19 ▲ Avg Exercising LINKINS WRT 32Xإدارة الموجه
text_image
Administration Formal WIN IN Settings Schedule Configuration Access Path Rawer Administration Admitted Settings WIN IN WIN IN Settings Schedule Configuration Rawer Administration Admitted Settings WIN IN WIN IN Settings Schedule Rawer Administration Admitted Settings WIN IN WIN IN Settings Schedule Rawer Administration Admitted Settings WIN IN WIN IN Settings Schedule Rawer Administration Admitted Settings WIN IN WIN IN Settings Schedule Rawer Administration Admitted Settings WIN IN WIN IN Settings Schedule Rawer Administration Admitted Settings WIN IN WIN IN Settings Schedule Rawer Administration Admitted Settings WIN IN WIN IN Setting Rawer Administration Admitted Settings WIN IN WIN IN Setting Schedule Rawer Administration Admitted Settings WIN IN WIN IN Setting Rawer Administration Admitted Settings WIN IN WIN IN Setting Schedule Rawer Administration Admitted Settings WIN IN WIN IN Setting Rawer Administration Admitted Settings WIN IN WIN IN Setting Schedule Rawer Administration Admitted Settings WIN IN WIN IN Setting Rawer Administration Admitted Settings WIN IN WIN IN Setting Schedule Newer Administration Admitted Settings WIN IN WIN IN Setting Rawer Administration Admitted Settings WIN IN WIN IN Setting Schedule Newer Administration Admitted Settings WIN IN WIN IN Setting Rawer Administration Admitted Settings WIN IN WIN IN Setting Schedule Newer Administration Admitted Settings WIN IN WIN IN Setting Rawer Administration Admitted Settings WIN IN WIN IN Setting Schedule Newer Administration Abbrack Location Firmware Name Time Synchreibung IN SUBJECT BLOCK Description Editor's Name Editor's Name Linguing Editor's Name Editor's Name Editor's Name Editor's Name Editor's Name Editor's Name Editor's Name Editor's Name Editor's Name Editor's Name Editor's Name Editor's Name Editor's Name Editor's Name Editor's Name Editor's Name Editor's Name Editor's Name Editor's Name Editor's Name Editor's Name Editor's Name Editor's Name Editor's Name Editor's Name Editor's NAME Editor's Name Editor's Name Editor's Name Editor's Name Editor's Name Editor's Name Editor's Name Editor's Name Editor's Name Editor's Name Editor's Name Editor's Name Editor's Name Editor's Name Editor's Name Editor's Name Editor's Name Editor's Name Editor's Name Editor's Name Editor's Name Editor's Name Editor's Name Editor's Name Editor's N/A Editor's N/A Editor's N/A Editor's N/A Editor's N/A Editor's N/A Editor's N/A Editor's N/A Editor's N/A Editor's N/A Editor's N/A Editor's N/AالتخزينHWI
.FTP
text_image
External Storage USB 3 USB 2 Authentication Enable each access to the network to protect a security for external storage Enable each Network (No Sharing) [046] When uncontrolled, wireless users can access external storage to accessing USB 3.1 or Windows Explorer (PC) or Private (MPC) Enable network (No Sharing) [046] FTP When uncontrolled, wireless users can access external storage to the internal through FTP (No Sharing Protocol) Enable FTP Unknown WRT 32X"Your Internet cable is not plugged in" رسالة
اموصل
Back view of cable modem
Back view of DSL modem
text_image
Diagram showing wireless router connected to a power outlet via cable, with blue arrows indicating signal flow.natural_image
Diagram showing connections between a router, cable, and a device (no text or symbols present)Ако имате модем, включете другия край в Ethernet (LAN) порта на модема.

natural_image
Diagram showing connections between a router, a switch, and a device with cables (no text or symbols present)text_image
New Tab ← → C ↗ http://myrouter.localtext_image
Dashboard WRF 32X LinkSYS WRT 32X Dashboard Wi-Fi Settings Devices Prioritization Speed Test Router Administration Advanced Settings Network Traffic 500.0 Download Data 264.0 Upload Data Devices 4 Connected Devices 0 Killer™ Enabled Devices 0 Prioritized Devices Speed test 1 Download 1 Upload ms Ping Wi-Fi Network venom Combined Wi-Fi [2.4 & 5 MHz] Port Forwarding Add/Edit Autox Network Storage USB 1 856.6 MB Used 863.0 MB Archipids USB 2 Connect a drive to see it here Description Port Start Port End Protocol Enabled Xbox 80 96 all Echo 40 60 all VPN ClientНастройки на Wi-Fi
text_image
Wi-Fi Settings Wi-Fi Wi-Fi Settings (2.4 bits $ 5.0m) wenom Password: ****** Here Settings Guest Access Enable Guest Access Cancel Save LINKSYS WRT32XУстройства
text_image
Device Prioritization We are amortizing your device border on a custom or website Kitter Advanced Devices Automotive WRT 32X Manual Prioritization Display your devices on the device file to change this priority list for your own software-enabled device Tomato-Intel 80% Block OK - mini 80% SAMSUNG SH- 80% System Other LANSYS WRT 32XТест за скорост
text_image
Speed Test We save this speed test to determine how much speed is given your practical adverses. If your WT-PS speeds are higher than closed results, you might need to get the best performance. Results Last run: 100 • Minimum 122 • Final 19 • Max • Final runtext_image
Administration Name Password: Password Password Password Password Password Password Password Password Password Password Password Password Password Password Password Password Password Password Password Password Password Password Password Password Password Password Password Password Password Password Password Password Password Password Password Password Password Password Password Password Password Password Password Password Password Password Password Password Password Password PasswordСъобщение "Your Internet cable is not plugged in"
Back view of cable modem
Back view of DSL modem
text_image
Diagram showing wireless router connected to a power outlet via cable, with blue arrows indicating signal flow.natural_image
Diagram showing connection between a router and a device via cable, with no visible text or symbols.natural_image
Diagram showing connections between a router, a switch, and a device with cables (no text or symbols present)text_image
New Tab ← → C ↑ Q http://myrouter.localtext_image
Dashboard LINKSYS WRT32X Network Traffic 500.0 Download Data 264.0 Upload Data Devices 4 Connected Devices 0 Killer™ Enabled Devices Prioritized Devices Wi-Fi Network venom Combined Wi-Fi (2.4 & 5 MHz) Speed test 1 Download 1 Upload ms Ping Port Forwarding Add/Edit Auto Network Storage USB 1 856.6 MB Used 863.0 MB Archipids USB 2 Connect a drive to see it here Description Port Start Port End Protocol Enabled Xbox 80 96 all Echo 40 60 all VPN ClientNastavení Wi-Fi
text_image
Wi-Fi Settings Wi-Fi Wi-Fi Settings (2.4 port 1.0bit) Venom Password: ****** Here Settings Guest Access Enable Guest Access Cancel Save LINKSYS WRT32XZařízení
text_image
Device Prioritization We are prioritizing your devices based on a scope of Java Killer Inclined Devices Microsoft Windows Automotive prioritize tool Manual Prioritization Logic or write instructions on the device type to change the priority for your own other inclined devices Terror-Prot 20% Alex 20% DME-MSI 20% SAMSUNG IN- ESRV 20% Server Save LicenseVR WR732XTest rychlosti
text_image
Speed Test We use 300-speed test to determine how much speed is just your practical deviation. If your 300-speeds are higher than those results, you might not be getting the best performance Results Use on 2007 Quickup 100 ▼ Basic 122 ▲ High 19 ▲ Avg No need canSpráva routeru
Back view of cable modem
Back view of DSL modem
text_image
Diagram showing wireless router connected to a power outlet via cable, with blue arrows indicating signal flow.natural_image
Diagram showing connection between a router and a device via cable, with no visible text or symbols.natural_image
Diagram showing connections between a router, switch, and network device (no text or symbols present)text_image
New Tab ← → C ↗ http://myrouter.localtext_image
Dashboard WRF 32X LinkSYS WRT 32X Dashboard Wi-Fi Settings Devices Prioritization Speed Test Router Administration Advanced Settings Network Traffic 500.0 Download Data 264.0 Upload Data Devices 4 Connected Devices 0 Killer™ Enabled Devices 0 Prioritized Devices Speed test 1 Download 1 Upload ms Ping Wi-Fi Network venom Combined Wi-Fi [2.4 & 5 MHz] Port Forwarding Add/Edit Autox Network Storage USB 1 856.6 MB Used 863.0 MB Archipids USB 2 Connect a drive to see it here Description Port Start Port End Protocol Enabled ● Xbox 80 96 all ■ ● Echo 40 60 all ■ VPN ClientWi-Fi-indstillinger
text_image
Device Prioritization We are prioritizing your devices based on a scope of Java Killer Inclined Devices Microsoft Windows Automotive prioritize tool Manual Prioritization Logic or write instructions on the device type to change the priority for your own other inclined devices Terror-Prot 20% Alex 20% DME-MSI 20% SAMSUNG IN- ESRV 20% Server Save LicenseVR WR732XTest af hastighed
text_image
Speed Test We use 300-speed test to determine how much speed is just your practical deviation. If your 300-speeds are higher than those results, you might not be getting the best performance Results Use on 2007 Quickup 100 ▼ Basic 122 ▲ High 19 ▲ Avg No need canRouteradministration
text_image
Administration Server System Administration Server User Router Administration Advanced Settings LINKERS WRF32X Language WRF32X Language RIVER Language Time Synthesis MISCELLATION Description Address Name Reader Name Reader Name Lengthing Description Reset ViewEkstern lagring
Back view of cable modem
Back view of DSL modem
text_image
Administration General Active Connection System Router Administrator Advanced Settings LANEVR WRT32X Hardware 0.570000.00 Up to Start Auto system Paths Remote Security Close On To Use Windowtext_image
Diagram showing wireless router connected to a power outlet via cable, with blue arrows indicating signal flow.natural_image
Diagram showing connection between a router and a device via cable, with no visible text or symbols.natural_image
Diagram showing connections between a router, switch, and server rack (no text or symbols present)text_image
New Tab ← → C ↗ http://myrouter.localtext_image
Dashboard WRF 32X LinkSYS WRT 32X Dashboard Wi-Fi Settings Devices Prioritization Speed Test Router Administration Advanced Settings Network Traffic 500.0 Download Data 264.0 Upload Data Devices 4 Connected Devices 0 Killer™ Enabled Devices 0 Prioritized Devices Speed test 1 Download 1 Upload ms Ping Wi-Fi Network venom Combined Wi-Fi [2.4 & 5 MHz] Port Forwarding Add/Edit Autox Network Storage USB 1 856.6 MB Used 863.0 MB Archipids USB 2 Connect a drive to see it here Description Port Start Port End Protocol Enabled ● Xbox 80 96 all ■ ● Echo 40 60 all ■ VPN ClientWLAN-Einstellungen
text_image
Wi-Fi Settings Wi-Fi Wi-Fi Name (2.4 µm 2.0 µm) versum Passwd-1 ****** More Settings Guest Access Enable Guest Access Cancel Tune LINKSYS WRT32XGeräte
text_image
Devices Device Name DMK-mail ✓ ChristophersMBP ✓ SAMSUNG-SN-1830V ✓ Tomorrow-iPod ✓ Kbox ✓ Limited WRT 32X IP Address Priority 192.368.0.2492 192.368.0.145 192.368.0.103 192.368.0.205 192.368.0.2496Gerätepriorisierung
text_image
Device Prioritization We are prioritizing your devices based on a speed of 200ms Killer Enloaded Devices KoTEN Automotive Enloaded Devices Help Manual Prioritization Stop or run directly on the device list to change the priority list for your own Killer Enloaded devices Tomato-Prot Max OK max SIMONE 50.000V OK Save Linkover WFT32Xtext_image
Speed Test We can find speed test to determine how each speed in plan user prioritized devices. If your Wi-Fi speeds are higher than those results, you might not be getting the best performance. Results Limit us $202.750/8bit 100 • Minimum 122 • Minimum 19 • No No confirmation LINUX WRT32XRouterverwaltung
text_image
External Storage WRT 3 Access WRT32X LANEYS WRT32X External Storage Access Settings External Storage External Storage LANE5 Connect to WRT-32X Server Path Authentication Create a user name and password the project source is connected storage ■ Enable usk Network (Air Sharing) [S40] When enabled, checkup an your Wi-Fi server enables internalized storage by connecting LBT1008.0.1.0 (Windows Explorer PC) or Finder (Alt+) ■ Enable usersk for sharing [S40] FTP When enabled,然后 users can access connected rights using the Internet through FTP (the Transfer Provider). ■ Enable FTP System servicestext_image
Local Network Settings Number of Settings Networks 100 (100.0) System Type PSS-2005-2010 New Settings New Security 100 (100.0) IP6 DHCP Server 100 (100.0) LWP Security UPP Regulated by LWP IP6 DACFehlerbehebung
Back view of cable modem
Back view of DSL modem
text_image
Diagram showing wireless router connected to a power outlet via cable, with blue arrows indicating signal flow.natural_image
Diagram showing a router connected to a device via cables, with an inset magnified view of the switch (no text or symbols present)natural_image
Diagram showing connections between a router, a switch, and a server with cables (no text or symbols present)text_image
New Tab ← → C ↗ http://myrouter.localtext_image
Dashboard LinkSYS WRT32X Network Traffic 500.0 Download Upload 264.0 Devices 4 Connected Devices 0 Killer™ Enabled Devices Prioritized Devices Wi-Fi Network venom Combined Wi-Fi (2.4 B 5 GHz) Speed test 1 Download 1 Upload ms Ping Port Forwarding Add/Edit Rules Network Storage USB 1 890.6 MB Used 963.6 MB Available USB 2 Connect to drive to see it here Description Port Start Port End Protocol Enabled ● Xbox 80 96 ail ● Echo 40 60 ail VPN ClientΡυθμίσεις Wi-Fi
text_image
Wi-Fi Settings Wi-Fi all-fi Open(2 or 3 only) wom Parameters ****** More Settings Guest Access Enable Guest Access Cancel New LINKSYS WRT32XΣυσκευές
text_image
Device Prioritization We are prioritizing your devices based on a scope of July Killer Advanced Devices A customly prioritizing the installed device tools Manual Prioritization Using your device to change the priority list for your new software's device Tenorav iPad Box DME-iMOS SAMSUNG-ON- 800W System ARMOS ARMOS ARMOS ARMOS ARMOS ARMOS ARMOS ARMOS ARMOS ARMOS ARMOS ARMOS ARMOS ARMOS ARMOS ARMOS ARMOS ARMOS ARMOS ARMOS ARMOS ARMOS ARMOS ARMOS ARMOS ARMOS ARMOS ARMOS ARMOS ARMOS ARMOS ARMOS ARMOS ARMOS'Ελεγχος ταχύτητας
text_image
Speed Test We use Wi-Fi speed test to determine how next speed is to join your practitioner/ devices. If your Wi-Fi speeds are higher than that second results, you might need to getting the best performance Results put us 20027.3948mm 100 Download 122 Speed 19 Plug Access Test LIONTS WRT 32XΔιαχείριση router
text_image
External Storage USB3 USB2 USB2 Authentication ■ Folder off Desktop (File Sharing) (F408) When installed devices on your WiFi can access commercial storage by ordering 1957/2016.1.1 - Microsoft Explorer (FC) or Folder (F408) ■ Folder open the sharing (F408) FTP When installed devices on your WiFi can access commercial storage over the internet thoughts FTP (File Temporary Version) ■ Folder FP WINR32X WINR32XBack view of cable modem
Back view of DSL modem
text_image
Administration User Administer Advanced Settings New User New User Formset Formset User Formset User Formset User Formset User Formset User Formset User Formset User Formset User Formset User Formset User Formset User Formset User Formset User Formset User Formset User Formset User Formset User Formset User Formset User Formset User Formset User Formset User Formset User Formset User Formset User Formset Users Formset Users Formset Users Formset Users Formset Users Formset Users Formset Users Formset Users Formset Users Formset Users Formset Users Formset Users Formset Users Formset Users Formset Users Formset Users Formset Users Formset Users Formset Users Formset Users Formset Users Formset Users Formset Users Formset Users Formset Users FormsetUserstext_image
Diagram showing wireless router connected to a power outlet via cable, with blue arrows indicating signal flow.natural_image
Diagram showing connection between a router and a device via cable, with no visible text or symbols.natural_image
Diagram showing connections between a router, switch, and network device (no text or symbols present)text_image
New Tab ← → C ↗ http://myrouter.localtext_image
Dashboard LINKSYS WRT32X Network Traffic 500.0 Download Data 264.0 Upload Data Devices 4 Connected Devices 0 Killer™ Enabled Devices Prioritized Devices Wi-Fi Network venom Combined Wi-Fi [2.4 & 5 MHz] Speed test 1 Download 1 Upload ms Ping Port Forwarding Add/Edit Auto Network Storage USB 1 856.6 MB Used 863.0 MB Archipids USB 2 Connect a drive to see it here Description Port Start Port End Protocol Enabled Xbox 80 96 all Echo 40 60 all VPN Clienttext_image
Device Prioritization We are amortizing your device border on a custom or website Kitter Advanced Devices Automotive WRT 32X Manual Prioritization Display your devices on the device file to change this priority list for your own -file-enabled device Tomato-Intel 80% Block OK - mini 80% SAMSUNG SH- 80% System SystemPrueba de velocidad
text_image
Speed Test We save this speed test to determine how much speed is given your practical adverses. If your WT-PS speeds are higher than closed results, you might need to get the best performance. Results Last run: 2000*1000mm 100 • Maximal 122 • Minimum 19 • Max • Current use LINDYS WRT32Xtext_image
Administration Server of System Documents System Address Language Language Language Language Language Language Language Language Language Language Language Language Language Language Language Language Language Language Language Language Language Language Language Language Language Language Language Language Language Language Language Language Language Language Language Language Language Language Language Language Language Language Language Language Language Language Language Language Language Language Currency Currency Currency Currency Currency Currency Currency Currency Currency Currency Currency Currency Currency Currency Currency Currency Currency Currency Currency Currency Currency Currency Currency Currency Currency Currency Currency Currency Currency Currency Currency Currency Currency Currency Currency Currency Currency Currency Currency Currency Currency Currency Currency Currency Currency Currency Currency Currency Currency Currency Currencytext_image
External Storage USB3 USB2 USB1 USB0 Authentication Database: www Uruguay-UNICOM/2008-UNICOM-UNICOM-SPG Enable Web Network (By Advertising) [2008] When installed devices on your WiFi server access commercialized storage by entering ESD 100.0.1 in Internet System (PCI) or Provider (TSX) Enable network by placing (TCP) FTP When installed, server users can access commercialized storage over the internal thought FTP (File Transfer Protocol). Enable FTPtext_image
Local Network Settings Router IP Setup IP Setup: WRF 32X New Settings WRF 32X IP DPGP IP Setup: WRF 32X LRT Devices by DPGP Proposed to Bank Page LANOS WRF32XBack view of cable modem
Back view of DSL modem
text_image
Diagram showing wireless router connected to a power outlet via cable, with blue arrows indicating signal flow.natural_image
Diagram showing connection between a router and a device, with no visible text or symbolsnatural_image
Diagram showing connections between a router, a switch, and a server with cables (no text or symbols present)text_image
New Tab ← → C ↗ http://myrouter.localtext_image
Dashboard LINKSYS WRT32X Network Traffic 500.0 Download Data 264.0 Upload Data Devices 4 Connected Devices 0 Killer™ Enabled Devices Prioritized Devices Wi-Fi Network venom Combined Wi-Fi [2.4 & 5 MHz] Speed test 1 Download 1 Upload ms Ping Port Forwarding Add/Edit Auto Network Storage USB 1 856.6 MB Used 863.0 MB Archipids USB 2 Connect a drive to see it here Description Port Start Port End Protocol Enabled Xbox 80 96 all Echo 40 60 all VPN Clienttext_image
Wi-Fi Settings Wi-Fi Wi-Fi Settings (2.4 bits $1.0m) wenom Password: ****** Here Settings Guest Access Enable Guest Access Cancel Save LINKSYS WRT32XDispositivos
text_image
Device Prioritization We are prioritizing your devices based on a speed of 200ms Killer Enloaded Devices KILTER Manual Prioritization On or you define the device type to change the priority for your own Killer Enloaded devices Tenorier-Prot 30% Box 30% OK init 30% SIMBER 5M-320V 30% Device Show LINKVER WRT32XPrueba de velocidad
text_image
Speed Test We use this speed test to determine how much speed is given your predefined deviation. If your WFT speeds are higher than those results, you might not be getting the best performance Results Use on 6/07/2018 100 ▼ 122 ▲ 19 ▲ No Recommended 10000 No need to run LINK/S WRT 32Xtext_image
Administration Server of System Documents System Address Language Language Language Language Language Language Language Language Language Language Language Language Language Language Language Language Language Language Language Language Language Language Language Language Language Language Language Language Language Language Language Language Language Language Language Language Language Language Language Language Language Language Language Language Language Language Language Language Language Language Currency Currency Currency Currency Currency Currency Currency Currency Currency Currency Currency Currency Currency Currency Currency Currency Currency Currency Currency Currency Currency Currency Currency Currency Currency Currency Currency Currency Currency Currency Currency Currency Currency Currency Currency Currency Currency Currency Currency Currency Currency Currency Currencytext_image
External Storage USB3 USB2 USB1 USB0 Authentication Database: www Uruguay-UNICOM/2008-UNICOM-UNICOM-SPG Enable Web Network (By Advertising) [2008] When installed devices on your WiFi server access commercialized storage by entering ESD 100.0.1 in Internet System (PCI) or Provider (TSX) Enable network by placing (TCP) FTP When installed, server users can access commercialized storage over the internal thought FTP (File Transfer Protocol). Enable FTPAjustes de la Red Local
Back view of cable modem
Back view of DSL modem
text_image
Administration General Active Timestamp 0:15:00 Password Email Router Administrator Advanced Dispatch Hardware 0.8 LXXX 48 | 16:00:00 Access Information Mnys Remote Settings Choose File No. No. 100%text_image
Diagram showing wireless router connected to a power outlet via cable, with blue arrows indicating signal flow.natural_image
Diagram showing connection between a router and a device via cable, with no visible text or symbols.Kui teil on modem, ühendage teine ots modemi Etherneti (LAN) porti.

natural_image
Diagram showing connections between a router, switch, and network device (no text or symbols present)text_image
New Tab ← → C ↑ Q http://myrouter.localtext_image
Dashboard W-Fi Settings Devices Prioritization Speed Test Router Administration Advanced Settings Dashboard Wi-Fi Settings Devices Prioritization Speed Test Router Administration Advanced Settings Network Traffic 500.0 Download 264.0 Upload 264.0 264.0 Network Storage USB 1 USB 6 MB Used USB 2 Connect a drive to see it here Devices 4 Connected Devices 0 Killer™ Enabled Devices ↑ 0 Prioritized Devices Wi-Fi Network venom Combined Wi-Fi [2.4 B 5.8Hz] Port Forwarding Add/Edit Rules Description Port Start Port End Protocol Enabled ● Xbox 80 96 aif ■ ● Echo 40 60 aif ■ VPN ClientWi-Fi seaded
text_image
Wi-Fi Settings Wi-Fi Wi-Fi Name: 12.7 bits/2.5bit Version Password: ******** LinkSYS WRT32X More Settings Guest Access Enable Guest Access Cancel SaveSeadmed
text_image
Device Prioritization We are prioritizing your devices based on a speed of 200ms Killer Enloaded Devices KILTER Manual Prioritization On or you define the device type to change the priority for your own Killer Enloaded devices Tenorier-Prot 30% Box 30% OK init 30% SIMBER 5M-320V 30% Device Show LINKVER WRT32XKiirustest
text_image
Speed Test We use this speed test to determine how much speed is given your predefined deviation. If your WFT speeds are higher than those results, you might not be getting the best performance Results Use on 6/07/2018 100 ▼ 122 ▲ 19 ▲ No Recommended 10000 No need to run LINK/S WRT 32XRuuteri haldamine
text_image
Administration Server System Administration Server User Router Administration Advanced Settings LINKERS WRF32X Language WRF32X Firmware WRF32X Language WRF32X Language WRF32X Language WRF32X Time Synthesis WRF32X WRF32X WRF32X WRF32X WRF32X WRF32X WRF32X WRF32X WRF32X WRF32X WRF32X WRF32X WRF32X WRF32X WRF32X WRF32X WRF32X WRF10000000000000000000000000000000000000000000000000000000000000000000000000000000000000000000000000000 WRF15111111111111111111111111111111111111111111111111111111111111111111111111111111111111111111Välismälu
text_image
External Storage USB 3 USB 2 Configuration USB 3 (USB Type) USB 2 Configuration to include an WiFi Authentication Create a user's network shall access the product because external storage Create web Internet: Web Sharing (WRF) When provided, wireless on your WRF 5.0 will access internal storage by entering USB10.0.1 or distributed Ethernet (PC) or Provider [Mbps] Create website by sharing (WRF) FTP When providing remote users can access internal storage via the Internet through FTP (File Transfer Protocol) Create FTP WINW WRF 32XBack view of cable modem
Back view of DSL modem
text_image
Administration General Route Administrator Advanced Settings Copyright Address Microsoft Office Microsoft Office Firmware 0.6.27001338 | Top to Drive Auto Support Myers Microsoft Security Close Web LinkSYS WRT32Xtext_image
Diagram showing wireless router connected to a power outlet via cable, with blue arrows indicating signal flow.natural_image
Diagram showing connection between a router and a device via cable, with no visible text or symbols.natural_image
Diagram showing connections between a router, switch, and server rack (no text or symbols present)text_image
New Tab ← → C ↗ http://myrouter.localtext_image
Dashboard LINKSYS WRT32X Network Traffic 500.0 Download Data 264.0 Upload Data Devices 4 Connected Devices 0 Killer™ Enabled Devices Prioritized Devices Wi-Fi Network venom Combined Wi-Fi (2.4 & 5 MHz) Speed test 1 Download 1 Upload ms Ping Port Forwarding Add/Edit Auto Network Storage USB 1 856.6 MB Used 863.0 MB Archipids USB 2 Connect a drive to see it here Description Port Start Port End Protocol Enabled Xbox 80 96 all Echo 40 60 all VPN ClientWi-Fi-asetukset
text_image
Wi-Fi Settings Wi-Fi Wi-Fi Settings (2.4 and 1.0ms) vence Password ****** More Settings Guest Access ■ Enable Guest Access Cancel Save LINKSYS WRT32XLaitteet
text_image
Device Prioritization We are prioritizing your devices based on a scope of Java Killer Inclined Devices Microsoft Windows Automotive prioritize tool Manual Prioritization Logic or write instructions on the device type to change the priority for your own other inclined devices Terror-Prot 20% Alex 20% DME-MSI 20% SAMSUNG IN- ESRV 20% Server Save LicenseVR WR732XNopeustesti
text_image
Speed Test We use 300-speed test to determine how much speed is just your practical deviation. If your 300-speeds are higher than those results, you might not be getting the best performance Results Use on 2007 Quickup 100 ▼ Basic 122 ▲ High 19 ▲ Avg No need canReitittimen hallinta
text_image
Administration Server System Administration Server User Router Administration Advanced Settings LINKERS WRF32X Server System Administration Server User Router Administration Advanced Settings Language Current Interface Form Time Synthesis MISCELLATION Description Additional Data Syncer name Server Lengthing Downloaded Data Cancel OKBack view of cable modem
Back view of DSL modem
text_image
Diagram showing wireless router connected to a power outlet via cable, with blue arrows indicating signal flow.natural_image
Diagram showing connection between a router and a device via cable, with no visible text or symbols.natural_image
Diagram showing connections between a router, switch, and network device (no text or symbols present)text_image
New Tab ← → C ↗ http://myrouter.localtext_image
Dashboard LINKSYS WRT32X Network Traffic 500.0 Download Data 264.0 Upload Data Devices 4 Connected Devices 0 Killer™ Enabled Devices Prioritized Devices Wi-Fi Network venom Combined Wi-Fi (2.4 & 5 MHz) Speed test 1 Download 1 Upload ms Ping Port Forwarding Add/Edit Auto Network Storage USB 1 856.6 MB Used 863.0 MB Archipids USB 2 Connect a drive to see it here Description Port Start Port End Protocol Enabled Xbox 80 96 all Echo 40 60 all VPN ClientWi-Fi Settings (Paramètres Wi-Fi)
text_image
Wi-Fi Settings Wi-Fi Wi-Fi Name (2.4 µm 2.0 µm) versum Passwd-1 ****** More Settings Guest Access Enable Guest Access Cancel Tune LINKSYS WRT32Xtext_image
Devices Device Name DMK-mail ChristophersMBP SAMSUNG-SN-1830V Tomorrow-iPod Kbox Limited WRT 32X IP Address Priority 192.368.0.2492 192.368.0.145 192.368.0.103 192.368.0.205 192.368.0.2496Device Prioritization (Priorisation des appareils)
text_image
Device Prioritization We are prioritizing your devices based on a symbol of Adobe Killer Enabled Devices Adobe Microsoft Word Microsoft Word Microsoft Word Home Prioritization Design on file drives on for device data to change the justify key for your new Adobe-enabled devices Tomorrow-Phd 200% Box 200% DMV-rems 200% Switchbox-3M-800W 200% Cancel New LINUXS WRT 32Xtext_image
Speed Test We use this speed test to determine how much speed is higher than your preferred devices. If your Wi-Fi packages are higher than those results, you might not be getting the best performances. Results Limit us 100% of total 100 % Normal 122 % Normal 19 % Avg An end test LUNES WRT 32Xtext_image
Administration General Service Provider System Show it Hardware OR:12045.68 Language Language Language Time Synucleation DESIGNS PRECISION Interset to set Language name Language Logging Login WRT32XExternal Storage (Stockage externe)
text_image
External Storage LRR3 R2014-08-07 LRR0 Access: 0.0000 (0.0000) Authentication Delete user name and password to protect access to connected storage Delete work Network (No Sharing) [OKR] When enabled, users can your website can access connected storage by sending TCP288.0.1 or Windows Explorer [WPC] or Provider [Max.] Delete switch for sharing [OKR] FTP When enabled, users can access connected storage by the Internet Through FTP (File Transfer Protocol) Delete FIP Network WRT32Xtext_image
Local Network Settings Router OF Setup Networks LHDYS WR7 32X Networks LHDYS WR7 32X Networks LHDYS WR7 32X Networks LHDYS WR7 32X Networks LHDYS WR7 32X Networks LHDYS WR7 32X Networks LHDYS WR7 32X Networks LHDYS WR7 32X LHDYS WR7 32X Networks LHDYS WR7 32X Networks LHDYS WR7 32X Networks LHDYS WR7 32X Networks LHDYS WR7 32X Networks LHDYS WR7 32X Networks LHDYS WR7 32X Networks NHDYS WR7 32X Networks NHDYS WR7 32X Networks NHDYS WR7 32X Networks NHDYS WR7 32X Networks NHDYS WR7 32X Networks NHDYS WR7 32X Networks NHDYS WR7 32X Networks NHDY WR7 32X Networks NHDY WR7 32X Networks NHDY WR7 32X Networks NHDY WR7 32X Networks NHDY WR7 32XDépannage
text_image
LINKSYS 3 INTERNET 2 1 USB 3.0 USB iDATA USB 2 USB1 RESET 12VDC INTERNET Port LINKSYSBack view of cable modem
Back view of DSL modem
text_image
Administration General Server Administration Microsoft SQL Server Microsoft SQL Server Firmware R & C:\WINDOWS\WIN\WIN\WIN\WIN\WIN\WIN\WIN\WIN\WIN\WIN\WIN\WIN\WIN\WIN\WIN\WIN\WIN\WIN\WIN\WIN\WIN\WIN\WIN\WIN\WIN\WIN\WIN\WIN\WIN\WIN\WIN\WIN\WIN\WIN\WIN\WIN\WIN\WIN\WIN\WIN\WIN\WIN\WIN\WIN\WIN\WIN\WIN\WIN\WIN\WIN\WRT32X Command: 100% Access: 96 Log: 100%text_image
Diagram showing wireless router connected to a power outlet via cable, with blue arrows indicating signal flow.natural_image
Diagram showing connection between a router and a device via cable, with no visible text or symbols.natural_image
Diagram showing connections between a router, switch, and network device (no text or symbols present)text_image
New Tab ← → C ↗ http://myrouter.localtext_image
Dashboard WRF 32X LinkSYS WRT 32X Dashboard Wi-Fi Settings Devices Prioritization Speed Test Router Administration Advanced Settings Network Traffic 500.0 Download Data 264.0 Upload Data Devices 4 Connected Devices 0 Killer™ Enabled Devices 0 Prioritized Devices Speed test 1 Download 1 Upload ms Ping Wi-Fi Network venom Combined Wi-Fi [2.4 & 5 MHz] Port Forwarding Add/Edit Autox Network Storage USB 1 856.6 MB Used 863.0 MB Archipids USB 2 Connect a drive to see it here Description Port Start Port End Protocol Enabled Xbox 80 96 all Echo 40 60 all VPN Clienttext_image
Wi-Fi Settings Wi-Fi Wi-Fi Settings (2.4 bits $ 5.0m) wenom Password: ****** Here Settings Guest Access Enable Guest Access Cancel Save LINKSYS WRT32XAppareils
text_image
Device Prioritization We are amortizing your devices based on a speed of 500ms Killer Enrolled Devices Automotive Enrolled Devices Manual Prioritization Display user addresses on the device file to change the proxy for the your own Killer Enrolled Devices Tomson Pfd Box OK - mini SINONE SH. BOXV Cancel Add LINKYS WRT 32XTest de vitesse
text_image
Speed Test We used this speed test to determine how much speed is plan power practical systems. If your WF-1 speed is higher than those results, you might not be getting the best performance. Results Last run: 2000/2001/2002 100 122 19 Top No resulttext_image
Administration General System Administration Access to: 100% Server Password Password Password Password Password Password Password Password Password Password Password Password Password Password Password Password Password Password Password Password Password Password Password Password Password Password Password Password Password Password Password Password Password Password Password Password Password Password Password Password Password Password Password Password Password Password Password Password Password Password Authentication Authentication Authentication Authentication Authentication Authentication Authentication Authentication Authentication Authentication Authentication Authentication Authentication Authentication Authentication Authentication Authentication Authentication Authentication Authentication Authentication Authentication Authentication Authentication Authentication Authentication Authentication Authentication Authentication Authentication Authentication Authentication Authentication Authentication Authentication Authentication Authentication Authentication Authentication Authentication Authentication Authentication Authentication Authentication Authentication Authentication Authentication Authentication Authentication Authentication CommunicationStockage externe
text_image
External Storage USB2 USB2 Authentication Network (No Sharing) [0496] FTP FTP (File Transfer Protocol) Enable TCP WINWINS WRF 32XBack view of cable modem
Back view of DSL modem
text_image
Administration General Router Administrator Advanced Networks Network Hardware 4.6.1000.00 Up to Drive Add to Service Help Choose File On Use LINKSYS WRT 32Xtext_image
Diagram showing wireless router connected to a power outlet via cable, with blue arrows indicating signal flow.text_image
Diagram showing connection between a router and a device via cable, with a magnified view highlighting the cable's connector.natural_image
Diagram showing connections between a router, switch, and server rack (no text or symbols present)text_image
New Tab ← → C ↗ http://myrouter.localtext_image
Dashboard LINKSYS WRT32X Network Traffic 500.0 Download Data 264.0 Upload Data Devices 4 Connected Devices 0 Killer™ Enabled Devices Prioritized Devices Wi-Fi Network venom Combined Wi-Fi (2.4 & 5 MHz) Speed test 1 Download 1 Upload ms Ping Port Forwarding Add/Edit Auto Network Storage USB 1 856.6 MB Used 863.0 MB Archipids USB 2 Connect a drive to see it here Description Port Start Port End Protocol Enabled Xbox 80 96 all Echo 40 60 all VPN Clienttext_image
Wi-Fi Settings Wi-Fi Wi-Fi Settings (2.4 bits $ 5.0m) wenom Password: ****** Here Settings Guest Access Enable Guest Access Cancel Save LINKSYS WRT32XDevices (Eszközök)
text_image
Speed Test We used this speed test to determine how much speed is given your practical performance. If your WT-1 speed is higher than those results, you might not be getting the best performance Results Last run: 2000/1948/19 100 ▼ Minimum 122 ▼ Maximum 19 ▼ Avg For next run LIMITEW WRT32Xtext_image
Administration Server System Administration Server User Router Administration Advanced Settings LINKERS WRF32X Server System Administration Server User Router Administration Advanced Settings Language Current Interface Form Time Synthesis MISCELLATION Description Address Name Reader name Length Description Save AddBack view of cable modem
Back view of DSL modem
text_image
Administration General Router Administration Advanced Settings Firmware 4.0.15/983.00 | 100% (2000) Aerial Administration Notes Choose No. 100% (2000) LINKSYS WR732Xtext_image
Diagram showing wireless router connected to a power outlet via cable, with blue arrows indicating signal flow.natural_image
Diagram showing connection between a router and a device via cable, with no visible text or symbols.natural_image
Diagram showing connections between a router, switch, and network device (no text or symbols present)text_image
New Tab ← → C ↗ http://myrouter.localtext_image
Dashboard LINKSYS WRT32X Network Traffic 500.0 Download Data 264.0 Upload Data Devices 4 Connected Devices 0 Killer™ Enabled Devices Prioritized Devices Wi-Fi Network venom Combined Wi-Fi [2.4 & 5 MHz] Speed test 1 Download 1 Upload ms Ping Port Forwarding Add/Edit Auto Network Storage USB 1 856.6 MB Used 863.0 MB Archipids USB 2 Connect a drive to see it here Description Port Start Port End Protocol Enabled Xbox 80 96 all Echo 40 60 all VPN ClientPengaturan Wi-Fi
text_image
Wi-Fi Settings Wi-Fi all-Program (2.1 or 3.0ms) wenom Password: ****** Hira Settings Guest Access Enable Guest Access Cancel Save LINKSYS WRT32XPerangkat
text_image
Device Prioritization We have prioritizing your device based on a speed of 2.000 Killer Insulated Devices Microsoft WR732X Automatic prioritization enabled devices with Manual Prioritization On or you define the device has to change the priority for your own other installed devices Tomato-Phil Alex DAR-000 SAMSUNG SM- ESWY Cancer SaveUji Kecepatan
text_image
Speed Test We can find speed test to determine how much speed in plan ever practical minutes. If your WF-Proposals are higher than those results, you might not be getting the best performance Results Limit us 200-300/800m 100 ▼ Minimum 122 ▲ Maximum 19 ▲ Avg No resultAdministrasi Router
text_image
Administration Server System Administration Server User Router Administration Advanced Settings LINKERS WRF32X Language WRF32X Firmware WRF32X Language WRF32X Language WRF32X Language WRF32X Time Synthesis MISCELLATION WRF32X WRF32X WRF32X Reader name WRF32X Linking WRF32X Save AddPenyimpanan Eksternal
text_image
External Storage LWB3 LWB2 Authentication Internet: 56 Sharing (SPB) When installed, virtual users can access connected storage by incoming SPB10.0.1 or Windows Connection (PC) or Provider [49x] Provider when No sharing (SNR) FTP When installed, virtual users can access connected storage over the Internet Thought FTP (File Transfer Protocol) Provider: SPBBack view of cable modem
Back view of DSL modem
text_image
Wireless Network Connection 2 wraith_5GHz Connected wraith wraith_5GHz-guest wraith-guest wraith2.4_6700 wraith5_6700 Damaged_Bee2.4 Connect automatically Connect 8OLCVBM5 Other Network Open Network and Sharing Centertext_image
Administration General Active Response Server Server Manager Firmware 0.6.27001.00 | Up to Close Active Response Starts Maintenance Settings Close 5% No. No. 32x LINKERS WRF32Xtext_image
Diagram showing wireless router connected to a power outlet via cable, with blue arrows indicating signal flow.natural_image
Diagram showing connection between a router and a device, with no visible text or symbolsnatural_image
Diagram showing connection between a router and a server with cables, highlighting a cable outlet (no text or symbols present)text_image
New Tab ← → C ↗ http://myrouter.localtext_image
Dashboard LINKSYS WRT32X Network Traffic 500.0 Download Data 264.0 Upload Data Devices 4 Connected Devices 0 Killer™ Enabled Devices Prioritized Devices Wi-Fi Network venom Combined Wi-Fi (2.4 & 5 MHz) Speed test 1 Download 1 Upload ms Ping Port Forwarding Add/Edit Auto Network Storage USB 1 856.6 MB Used 863.0 MB Archipids USB 2 Connect a drive to see it here Description Port Start Port End Protocol Enabled Xbox 80 96 all Echo 40 60 all VPN ClientImpostazioni Wi-Fi
text_image
Wi-Fi Settings Wi-Fi Wi-Fi Settings (2.4 bits $ 5.0m) wenom Password: ****** Here Settings Guest Access Enable Guest Access Cancel Save LINKSYS WRT32XDispositivi
text_image
Device Prioritization We are prioritizing your devices based on a scope of Java Killer Enabled Devices KILTER Manual Prioritization On or you define the device type to change the priority for your own Killer-enabled devices Terrorer-Prot 30% Box 30% OK init 30% SIMBER 5M-200V 30% Device Show LINKVER WRT32XTest della velocità
text_image
Speed Test We use this speed test to determine how much speed is given your predefined deviation. If your WFT speeds are higher than those results, you might not be getting the best performance Results Limit us 6102.7 Mbps 100 Mbps Max/Min 122 Mbps Max/Min 19 Mbps No need toGestione router
text_image
External Storage USB3 USB2 USB1 USB0 Authentication Database: www Uruguay-UNICOM/2008-UNICOM-UNICOM-SPG Enable Web Network (By Advertising) [2008] When installed devices on your WiFi server access commercialized storage by entering ESD 100.0.1 in Internet System (PCI) or Provider (TSX) Enable network by placing (TCP) FTP When installed, server users can access commercialized storage over the internal thought FTP (File Transfer Protocol). Enable FTPtext_image
Local Network Settings Router IP Setup IP Setup: WRF 32X New Settings WRF 32X 2015 IP DPGP WRF 32X WRF 32X 2015 WRF 32X 2015 WRF 32X 2015 WRF 32X 2015 WRF 32X 2015 WRF 32X 2015 WRF 32X 2015 WRF 32X 2015 WRF 32X 2015 WRF WRF 32X WRF 32X 2015 WRF 32X 2015 WRF 32X 2015 WRF 32X 2015 WRF 32X 2015 WRF 32X 2015 WRF 32X 2015 WRF 32X 1999 WRF 32X 1999 WRF 32X 1999 WRF 32X 1999 WRF 32X 1999 WRF 32X 1999 WRF 32X 1999 WRF 32X 1999 WRF 32X 1999 WRF WRF 32X WRF 32X 1999 WRF 32X 1999 WRF 32X 1999 WRF 32X 1999 WRF 32X 1999 WRF 32X 1999 WRF 32X 1999 WRF 32X 1999 WRFBack view of cable modem
Back view of DSL modem
text_image
Administration Route Administrator Advanced Settings General Active Dimension ... Microsoft SQL Microsoft SQL Firmware 0.6.27001338 | 0.6.27001338 Auto Support Myers Microsoft Security Close Web LinkSYS WRT32Xtext_image
Diagram showing wireless router connected to a power outlet via cable, with blue arrows indicating signal flow.natural_image
Diagram showing connection between a router and a device via cable, with no visible text or symbols.natural_image
Diagram showing connections between a router, switch, and network equipment (no text or symbols present)text_image
New Tab ← → C ↗ http://myrouter.localtext_image
Dashboard WRF 32X LinkSYS WRT 32X Dashboard Wi-Fi Settings Devices Prioritization Speed Test Router Administration Advanced Settings Network Traffic 500.0 Download Data 264.0 Upload Data Devices 4 Connected Devices 0 Killer™ Enabled Devices 0 Prioritized Devices Speed test 1 Download 1 Upload ms Ping Wi-Fi Network venom Combined Wi-Fi [2.4 & 5 MHz] Port Forwarding Add/Edit Autox Network Storage USB 1 856.6 MB Used 863.0 MB Archipids USB 2 Connect a drive to see it here Description Port Start Port End Protocol Enabled ● Xbox 80 96 all ■ ● Echo 40 60 all ■ VPN Client„Wi-Fi“ nuostatos
text_image
Wi-Fi Settings Wi-Fi all-Program (2.1 or 3.0ms) wenom Password: ****** Hira Settings Guest Access Enable Guest Access Cancel Save LINKSYS WRT32XIrenginiai
text_image
Device Prioritization We are prioritizing your devices based on a scope of Java Killer Inclined Devices Microsoft Windows Automotive prioritize tool Manual Prioritization Logic or write instructions on the device type to change the priority for your own other inclined devices Terrorix-Prot 20% Alex 20% DME-MSR 20% SAMSUNG IN- ESRV 20% Server Save LicenseVR WR732XGreičio bandymas
text_image
Speed Test We use 300-speed test to determine how much speed is just your practical deviation. If your 300-speeds are higher than those results, you might not be getting the best performance Results Use on 2007 Quickup 100 ▼ Basic 122 ▲ High 19 ▲ Avg No need cantext_image
External Storage USB2 USB2 External Storage USB2 Authentication Network (No Sharing 2049) When installed, network users can access commercial storage by entering 130/180.0.1 or Wireless Explorer [P] or Fader [Max] Fader used for sharing (MIR) FTP When installed, network users can access commercial storage by entering Routing (FTP) (File Summary Protocol) Fader FTP WINERS WRIF 32XBack view of cable modem
Back view of DSL modem
text_image
Administration Route Administration Advanced Settings General Route Administrator Route Manager Firmware R & C:\WINDOWS\WRT32X Copyright Choose No Copyright LINKINS WRT32Xnatural_image
Diagram showing connection between a router and a device via cable, with no visible text or symbols.natural_image
Diagram showing connections between a router, switch, and network device (no text or symbols present)text_image
New Tab ← → C ↗ http://myrouter.localtext_image
Dashboard WRF 32X LinkSYS WRT 32X Dashboard Wi-Fi Settings Devices Prioritization Speed Test Router Administration Advanced Settings Network Traffic 500.0 Download Data 264.0 Upload Data Devices 4 Connected Devices 0 Killer™ Enabled Devices 0 Prioritized Devices Speed test 1 Download 1 Upload ms Ping Wi-Fi Network venom Combined Wi-Fi [2.4 & 5 MHz] Port Forwarding Add/Edit Autox Network Storage USB 1 856.6 MB Used 863.0 MB Archipids USB 2 Connect a drive to see it here Description Port Start Port End Protocol Enabled ● Xbox 80 96 all ● Echo 40 60 all VPN ClientWi-Fi-instellingen
text_image
Device Prioritization We are prioritizing your devices based on a scope of Java Killer Enloaded Devices KILTER Manual Prioritization On or you define the device type to change the priority for your own Killer Enloaded devices Tenorier-Prof 30% Box 30% OK mode 40% SIMBER 5M-200V 40% Device Show LINKVER WRT32XSnelheidstest
text_image
Speed Test We use this speed test to determine how much speed is given your predefined deviation. If your WFT speeds are higher than those results, you might not be getting the best performance Results Limit us 6102.7 Mb/min 100 mb/1000 mb/1000 mb/1000 mb/1000 mb/1000 mb/1000 mb/1000 mb/1000 mb/1000 mb/1000 mb/1000 mb/1000 mb/1000 mb/1000 mb/1000 mb/1000 mb/1000 mb/ No need toRouterbeheer
text_image
Administration Server System Administration Server User Router Administration Advanced Settings LINKERS WRF32X Server System Administration Server User Router Administration Advanced Settings Language Current Interface Form Time Synthesis MISCELLATION Description Additional Data Syncer name Server Lengthing Downloaded Data Cancel OKExterne opslag
text_image
External Storage USB 3 USB 2 Configuration USB 3 (USB Type) USB 2 Configuration to include an WiFi Authentication Create a user's network shall access the product because external storage Create web Internet: Web Sharing (WRF) When provided, wireless on your WRF 5.0 will access internal storage by entering USB10.0.1 or distributed Ethernet (PC) or Provider [Mbps] Create website by sharing (WRF) FTP When providing remote users can access internal storage via the Internet through FTP (File Transfer Protocol) Create FTP WINW WRF32XBack view of cable modem
Back view of DSL modem
text_image
Administration General Active Response 400% Response to 400% System name Firmware 0.6.27001.00 | Up to 50% Active Response Starts Maintenance Options Choose 5% No. No. 5%text_image
Diagram showing wireless router connected to a power outlet via cable, with blue arrows indicating signal flow.- Koble den ene enden av den medfølgende Internett-kabelen til den gule Internett-porten på den nye ruteren.

text_image
INTERNET- Koble ruteren til modemet eller modemruteren.
Modem Modemruter

natural_image
Diagram showing connection between a router and a device via cable, with no visible text or symbols.natural_image
Diagram showing connections between a router, switch, and network equipment (no text or symbols present)text_image
New Tab ← → C ↗ http://myrouter.localWRT32X-innstillinger
Dashbord
text_image
Dashboard WRF 32X LinkSYS WRT 32X Dashboard Wi-Fi Settings Devices Prioritization Speed Test Router Administration Advanced Settings Network Traffic 500.0 Download Data 264.0 Upload Data Devices 4 Connected Devices 0 Killer™ Enabled Devices 0 Prioritized Devices Speed test 1 Download 1 Upload ms Ping Wi-Fi Network venom Combined Wi-Fi [2.4 & 5 MHz] Port Forwarding Add/Edit Autox Network Storage USB 1 856.6 MB Used 863.0 MB Archipids USB 2 Connect a drive to see it here Description Port Start Port End Protocol Enabled ● Xbox 80 96 all ■ ● Echo 40 60 all ■ VPN ClientWi-Fi-innstillinger
text_image
Wi-Fi Settings Wi-Fi Wi-Fi Settings (2.4 and 1.0ms) vence Password ****** More Settings Guest Access ■ Enable Guest Access Cancel Save LINKSYS WRT32XEnheter
Se kablede og trådløse enheter som er koblet til ruteren din, og få deres IP-adresse.
text_image
Devices DMK-mail ChristophensMBP SAMSUNG-SN-0930V Tamora-iPod Kbox LHESYS WRT 32X Access Apply 192.168.0.2492 192.168.0.145 192.168.0.103 192.168.0.205 192.168.0.2496Enhetsprioritering
text_image
Device Prioritization We are prioritizing your devices based on a speed of 2000s Killer Advanced Devices Automatic prioritization enabled devices with Manual Prioritization Logic user preferences on the device,请在选择此功能时,可将此功能放在一个硬件上的设备。 Microsoft - IPOV Apple OK port SAMSUNG 3M-856V Java WINRS WR7 32XHastighetstest
text_image
Speed Test We used Hi-speed test to determine how each speed is given your preferred devices. If your Wi-Fi spreads are higher than those results, you might not be getting the best performance. Results Last run: 100000000000 100 Maximal 122 Optimal 19 Avg Speed Test LANTUS WRT32XRuteradministrasjon
text_image
Administration Server System Administration Server User Router Administration Advanced Settings LINKERS WRF32X Server System Administration Server User Router Administration Advanced Settings Language Current Interface Form Time Synthesis MISCELLATION Description Additional Data Syncer name Server Lengthing Downloaded Data Cancel OKEkstern lagringsplass
text_image
External Storage USB 3 USB 2 Configuration USB 3 (USB Type) USB 2 Configuration to include an WiFi Authentication Create a user's network shall access the product because external storage Create web Internet: Web Sharing (WRF) When provided, wireless on your WRF 5.0 will access internal storage by entering USB10.0.1 or distributed Ethernet (PC) or Provider [Mbps] Create website by sharing (WRF) FTP When providing remote users can access internal storage via the Internet through FTP (File Transfer Protocol) Create FTP WINW WRF 32XLokale nettverksinnstillinger
Back view of cable modem
Back view of DSL modem
text_image
Diagram showing wireless router connected to a power outlet via cable, with blue arrows indicating signal flow.natural_image
Diagram showing connection between a router and a device via cable, with no visible text or symbols.natural_image
Diagram showing connections between a router, switch, and network equipment (no text or symbols present)text_image
New Tab ← → C ↗ http://myrouter.localtext_image
Dashboard WRF 32X LinkSYS WRT 32X Dashboard Wi-Fi Settings Devices Prioritization Speed Test Router Administration Advanced Settings Network Traffic 500.0 Download Data 264.0 Upload Data Devices 4 Connected Devices 0 Killer™ Enabled Devices 0 Prioritized Devices Speed test 1 Download 1 Upload ms Ping Wi-Fi Network venom Combined Wi-Fi [2.4 & 5 MHz] Port Forwarding Add/Edit Autox Network Storage USB 1 856.6 MB Used 863.0 MB Archipids USB 2 Connect a drive to see it here Description Port Start Port End Protocol Enabled Xbox 80 96 all Echo 40 60 all VPN Clienttext_image
Wi-Fi Settings Wi-Fi all-Program (2.1 or 3.0ms) wenom Password: ****** Hira Settings Guest Access Enable Guest Access Cancel Save LINKSYS WRT32XUrządzenia
text_image
Device Prioritization We are amortizing your devices based on a speed of 500ms Killer Enrolled Devices Automotive Enrolled Devices Manual Prioritization Display user addresses on the device file to change the proxy for the your own Killer Enrolled Devices Tomson Pfd Box OK - mini SINONE SH. BOXV Cancel Add LINKYS WRT 32XTest szybkości
text_image
Speed Test We use this speed test to determine how much speed is put out practical devices. If your Wi-Fi packages are higher than those results, you might not be getting the best performance. Results 100 122 19 No resulttext_image
Administration Server of System Documents System Address Language Language Language Language Language Language Language Language Language Language Language Language Language Language Language Language Language Language Language Language Language Language Language Language Language Language Language Language Language Language Language Language Language Language Language Language Language Language Language Language Language Language Language Language Language Language Language Language Language Language Currency Currency Currency Currency Currency Currency Currency Currency Currency Currency Currency Currency Currency Currency Currency Currency Currency Currency Currency Currency Currency Currency Currency Currency Currency Currency Currency Currency Currency Currency Currency Currency Currency Currency Currency Currency Currency Currency Currency Currency Currency Currency Currency Currency Currency Currency Currency Currency Currency Currency Currencytext_image
External Storage USB 1 USB 2 USB 3 USB 4 USB 5 Authentication ■ Initialize the server to download a product. Download: fundamental package. ■ Initialize the server to download a product. Network (File Sharing) [2008] When prompting devices or your file from access commercialized storage by ordering: $22108.2.1 - Windows System (PCI) or Provider (TDC). ■ Initialize the sharing (TCP) FTP When launching server users can access centralized package over the internal integrated FTP (File Transfer Protocol). ■ Initialize FTPtext_image
Local Network Settings Server NT Storage NT Storage 541.000.0 255.255.2550 Power Settings 388.000.0 PWR DHCP Banner 541.000.0 257.100.0.256 Link Security LWP Request to 80% pipe SNY LWRS WRF32XBack view of cable modem
Back view of DSL modem
text_image
Administration General Active Function Program 2013 System Router Administrator Advanced Settings Firmware 0 & 37000.00 Up to Next Apply system Paths Remove Security Choose OK To Use Window LINESYS WRT 32Xtext_image
Diagram showing wireless router connected to a power outlet via cable, with blue arrows indicating signal flow.natural_image
Diagram showing connection between a router and a device via cable, with no visible text or symbols.natural_image
Diagram showing connections between a router, switch, and server with a magnified view of the switch (no text or symbols present)text_image
New Tab ← → C ↗ http://myrouter.localtext_image
Dashboard LINKSYS WRT32X Network Traffic 500.0 Download Data 264.0 Upload Data Devices 4 Connected Devices 0 Killer™ Enabled Devices Prioritized Devices Wi-Fi Network venom Combined Wi-Fi [2.4 & 5 MHz] Speed test 1 Download 1 Upload ms Ping Port Forwarding Add/Edit Auto Network Storage USB 1 856.6 MB Used 863.0 MB Archipids USB 2 Connect a drive to see it here Description Port Start Port End Protocol Enabled Xbox 80 96 all Echo 40 60 all VPN ClientDefinições de Wi-Fi
text_image
Wi-Fi Settings Wi-Fi Wi-Fi Settings (2.4 bits $ 5.0m) wenom Password: ****** Here Settings Guest Access Enable Guest Access Cancel Save LINKSYS WRT32XDispositivos
text_image
Device Prioritization We are prioritizing your devices based on a scope of Java Killer Inclined Devices Microsoft Windows Automotive prioritize tool Manual Prioritization Logic or write instructions on the device type to change the priority for your own other inclined devices Terrorix-Prot 20% Alex 20% DME-MSR 20% SAMSUNG IN- ESRV 20% Server Save LicenseVR WR732XTeste de velocidade
text_image
Speed Test We use B10-speed test to determine how much speed is just your practical deviation. If your B10 speeds are higher than those results, you might not be getting the best performance Results Use on 6/02/2018 100 ▼ Normal 122 ▲ Normal 19 ▲ Avg No need totext_image
Administration Server of System Documents System Address Language Language Language Language Language Language Language Language Language Language Language Language Language Language Language Language Language Language Language Language Language Language Language Language Language Language Language Language Language Language Language Language Language Language Language Language Language Language Language Language Language Language Language Language Language Language Language Language Language Language Currency Currency Currency Currency Currency Currency Currency Currency Currency Currency Currency Currency Currency Currency Currency Currency Currency Currency Currency Currency Currency Currency Currency Currency Currency Currency Currency Currency Currency Currency Currency Currency Currency Currency Currency Currency Currency Currency Currency Currency Currency Currency Currency Currency Currency Currency Currency Currency Currency Currency CurrencyArmazenamento externo
text_image
Local Network Settings Router IP Setup IP Setup: WRF 32X New Settings WRF 32X 2015 IP DPGP WRF 32X WRF 32X 2015 WRF 32X 2015 WRF 32X 2015 WRF 32X 2015 WRF 32X 2015 WRF 32X 2015 WRF 32X 2015 WRF 32X 2015 WRF 32X 2015 WRF WRF 32X WRF 32X 2015 WRF 32X 2015 WRF 32X 2015 WRF 32X 2015 WRF 32X 2015 WRF 32X 2015 WRF 32X 2015 WRF 32X 1999 WRF 32X 1999 WRF 32X 1999 WRF 32X 1999 WRF 32X 1999 WRF 32X 1999 WRF 32X 1999 WRF 32X 1999 WRF 32X 1999 WRF WRF 32X WRF 32X 1999 WRF 32X 1999 WRF 32X 1999 WRF 32X 1999 WRF 32X 1999 WRF 32X 1999 WRF 32X 1999 WRF 32X 1999 WRFBack view of cable modem
Back view of DSL modem
text_image
Administration General Route Administrator Advanced Settings Copyright Address Microsoft Office Microsoft Office Firmware 0.6.27001338 | Top to Drive Auto Support Myers Microsoft Security Close Web LinkSYS WRT32Xtext_image
Diagram showing wireless router connected to a power outlet via cable, with blue arrows indicating signal flow.natural_image
Diagram showing connection between a router and a device via cable, with no visible text or symbols.natural_image
Diagram showing connections between a router, switch, and network equipment (no text or symbols present)text_image
New Tab ← → C ↗ http://myrouter.localtext_image
Dashboard WRF 32X LinkSYS WRT 32X Dashboard Wi-Fi Settings Devices Prioritization Speed Test Router Administration Advanced Settings Network Traffic 500.0 Download Data 264.0 Upload Data Devices 4 Connected Devices 0 Killer™ Enabled Devices 0 Prioritized Devices Speed test 1 Download 1 Upload ms Ping Wi-Fi Network venom Combined Wi-Fi [2.4 & 5 MHz] Port Forwarding Add/Edit Autox Network Storage USB 1 856.6 MB Used 863.0 MB Archipids USB 2 Connect a drive to see it here Description Port Start Port End Protocol Enabled Xbox 80 96 all Echo 40 60 all VPN Clienttext_image
Wi-Fi Settings Wi-Fi Wi-Fi Settings (2.4 and 1.0ms) vence Password ****** More Settings Guest Access Enable Guest Access Cancel Save LINKSYS WRT32XDispositivos
text_image
Device Prioritization We have prioritizing your device based on a speed of 2.000 Killer Insulated Devices Microsoft WR732X Automatic prioritization enabled devices with Manual Prioritization On or you define the device has to change the priority for your own other installed devices Tomato-Phil Alex DAR-000 SAMSUNG ON-EWY SAMSUNG Cancer Show LicenseVR WR732XTeste de velocidade
text_image
Speed Test We can this speed test to determine how much speed in your peer prioritized devices. If your Wi-Fi speeds are higher than those results, you might not be getting the peer performance. Results Last time: 2000-2000 Max 100 122 19 No resulttext_image
Administration Server of System Documents System Address Language Language Language Language Language Language Language Language Language Language Language Language Language Language Language Language Language Language Language Language Language Language Language Language Language Language Language Language Language Language Language Language Language Language Language Language Language Language Language Language Language Language Language Language Language Language Language Language Language Language Currency Currency Currency Currency Currency Currency Currency Currency Currency Currency Currency Currency Currency Currency Currency Currency Currency Currency Currency Currency Currency Currency Currency Currency Currency Currency Currency Currency Currency Currency Currency Currency Currency Currency Currency Currency Currency Currency Currency Currency Currency Currency Currency Currency Currency Currency Currency Currency Currency Currency CurrencyArmazenamento externo
text_image
External Storage USB3 USB2 USB1 USB0 Authentication Database: www.ewb.com Authorization Database: www.ewb.com Network (By Advertising) [2008] When installed devices on your WiFi server access commercialized storage by entering ESD 1000.0.1 in Wireless System (FCS) or Provider (TSX) Enable network by placing (MS) FTP When installed, server users can access commercialized storage over the internal thought FTP (File Transfer Protocol). Enable FTPtext_image
Local Network Settings Router IP Setup IP Setup: WRF 32X New Settings WRF 32X IP DPGP IP Setup: WRF 32X LRT Devices by DPGP Proposed to Bank Page LANOS WRF32XBack view of cable modem
Back view of DSL modem
text_image
Administration Server Administration Advanced Settings Network Network Address Network Address Network Address Network Address Network Address Network Address Network Address Network Address Network Address Network Address Network Address Network Address Network Address Network Address Network Address Network Address Network Address Network Address Network Address Network Address Network Address Network Address Network Address Network Address Network Address Network Address Network Address Network Address Network Address Network Address Network Address Network Address Network Address Network Addresstext_image
Diagram showing wireless router connected to a power outlet via cable, with blue arrows indicating signal flow.natural_image
Diagram showing connection between a router and a device via cable, with no visible text or symbolsnatural_image
Diagram showing connections between a router, cable ports, and a server unit (no text or symbols present)text_image
New Tab ← → C ↗ http://myrouter.localtext_image
Dashboard LinkSYS WRT32X Network Traffic 500.0 Download Only 264.0 Upload Only Devices 4 Connected Devices 0 Killer™ Enabled Devices Prioritized Devices Wi-Fi Network venom Combined Wi-Fi [2:8 5 GHz] Speed test 1 Download 1 Upload Ping Port Forwarding Add/Edit Rules Network Storage USB 1 USB & Web User USB 2 Connect a driver to see it here Description Port Start Port End Protocol Enabled ● Xbox 80 96 a# # ● Echo 40 60 a# # VPN ClientSetări Wi-Fi
text_image
Wi-Fi Settings Wi-Fi Wi-Fi Name (2 Features 1 Slot) whom Password ****** More Settings Guest Access Enable Guest Access Cancel Save LinkSYS WRT32XDispositive
text_image
Device Prioritization Where are annotating your devices based on a spread of Jubos Killer Inactivated Devices Automated prioritize for an enabled device with Automated prioritize for an enabled device with Automated prioritize for an enabled device with Automated prioritize for an enabled device with Automated prioritize for an enabled device with Automated prioritize for an enabled device with Automated prioritize for an enabled device with Automated prioritize for an enabled device with Automated prioritize for an enabled device with Automated prioritize for an enabled device with Automated prioritize for an enabled device with Automated prioritize for an enabled device withTest de viteză
text_image
Speed Test We can still update less as determine from reach speed to your user professional devices. If your WR-4 packages are higher than those results, you might not be getting the best performances. Results 100 x 100x100x100x Speed Test 122 x 19 x 19x Speed Test Advanced Service LIFEYS WRT-32XBack view of cable modem
Back view of DSL modem
text_image
Diagram showing wireless router connected to a power outlet via cable, with blue arrows indicating signal flow.natural_image
Diagram showing connection between a router and a device via cable, with no visible text or symbols.natural_image
Diagram showing connections between a router, switch, and server rack (no text or symbols present)text_image
New Tab ← → C ↗ http://myrouter.localtext_image
Dashboard LINKSYS WRT32X Network Traffic 500.0 Download Data 264.0 Upload Data Devices 4 Connected Devices 0 Killer™ Enabled Devices Prioritized Devices Wi-Fi Network venom Combined Wi-Fi (2.4 & 5 MHz) Speed test 1 Download 1 Upload ms Ping Port Forwarding Add/Edit Auto Network Storage USB 1 856.6 MB Used 863.0 MB Archipids USB 2 Connect a drive to see it here Description Port Start Port End Protocol Enabled Xbox 80 96 all Echo 40 60 all VPN ClientНастройки Wi-Fi
text_image
Wi-Fi Settings Wi-Fi Wi-Fi Settings (2.4 bits $ 5.0m) wenom Password: ****** Here Settings Guest Access Enable Guest Access Cancel Save LINKSYS WRT32XУстройства
text_image
Device Prioritization We are amortizing your device border on a custom or website Kitter Advanced Devices Automotive WRT 32X Manual Prioritization Display your devices on the device file to change this priority list for your own -file-enabled device Tomato-Intel 80% Block OK - mini 80% SAMSUNG SH- 80% System System System System SystemИзмерение скорости
text_image
Speed Test We save this speed test to determine how much speed is given your practical adverses. If your WT-PI speeds are higher than closed results, you might need to get the best performance. Results Last run: 100 • Minimum 122 • Final 19 • Max • Final runtext_image
External Storage USB3 USB2 USB1 USB0 Authentication Database: www Uruguay-UNICOM/2019 - Windows 2020-05-04 Enable Web Network (By Advertising) [2018] When installed devices on your WiFi server access commercialized storage by entering ESD 100.0.1 in Internet System (PCI) or Provider (TSX) Enable network by placing (TCP) FTP When installed, server users can access commercialized storage over the internal thought FTP (File Transfer Protocol). Enable FTPtext_image
Local Network Settings Router IP Setup IP Setup: WRF 32X New Settings WRF 32X IP DPGP IP Setup: WRF 32X LRT Devices by DPGP Proposed to Bank Page LANOS WRF32XBack view of cable modem
Back view of DSL modem
text_image
Administration General Active/Transmission Presets to 2013 Microsoft Firmware 0.0.37985.48 | 100% 2014 Admin: admin Myers Remove Quantity Choose OK LinkSYS WRT 32Xtext_image
Diagram showing wireless router connected to a power outlet via cable, with blue arrows indicating signal flow.natural_image
Diagram showing a router connected to a device via cables, with a magnified inset highlighting the switch (no text or symbols present)natural_image
Diagram showing connections between a router, switch, and server rack (no text or symbols present)text_image
New Tab ← → C ↗ http://myrouter.localtext_image
Dashboard LinkSYS WRT32X Dashboard Wi-Fi Settings Devices Prioritization Speed Test Router Administration Advanced Settings Network Traffic 500.0 Download URLs 264.0 Upload URLs Devices 4 Connected Devices 0 Killer™ Enabled Devices 0 Prioritized Devices Wi-Fi Network venom Combined Wi-Fi (2.4 6.5 GHz) Speed test 1 Download 1 Upload ms Ping Port Forwarding Add/Edit Rules Network Storage USB 1 USB 8 MB User 961.0 MB Available USB 2 Connect o drive to see it here Description Port Start Port End Protocol Enabled Xbox 80 96 all Echo 40 80 all VPN ClientWi-Fi设置
text_image
Device Prioritization We are prioritizing your devices based on a spread of links Filepath/Inclined Devices Aerially selected the installed devices with Manual Prioritization Design and use the devices on the device due to change the projects that do you own. Also installed devices Tamarav-Phil Box DML-mail SAMSUNG 3M-0500V SAMSUNG 3M-0500V SAMSUNG 3M-0500V SAMSUNG 3M-0500V SAMSUNG 3M-0500V SAMSUNG 3M-0500V SAMSUNG 3M-0500V SAMSUNG 3M-0500V SAMSUNG 3M-1200V SAMSUNG 3M-1200V SAMSUNG 3M-1200V SAMSUNG 3M-1200V SAMSUNG 3M-1200V SAMSUNG 3M-1200V SAMSUNG 3M-1200V SAMSUNG 3M-1200V SAMSUNG 1200V SAMSUNG 1200V SAMSUNG 1200V SAMSUNG 1200V SAMSUNG 1200V SAMSUNG 1200V SAMSUNG 1200V SAMSUNG 1200V SAMSUNG 1200V SAMSUNG 1200V SAMSUNG WRT 32X速度测试
text_image
Speed Test We used Wi-Fi testing test as a demonstrable form based upon the best speed professional devices. If your Wi-Fi speeds are higher than that least results, you might not be getting the best performance. Results 100 Mbps Battery 122 Mbps Power 19 Mbps Advanced路由器管理
text_image
Administration Formal Form Name: Form Name: Form Name: Form Name: Form Name: Form Name: Form Name: Form Name: Form Name: Form Name: Form Name: Form Name: Form Name: Form Name: Form Name: Form Name: Form Name: Form Name: Form Name: Form Name: Form Name: Form Name: Form Name: Form Name: Form Name: Form Name: Form Name: Form Name: Form Name: Form Name: Form Name: Form Name: Form Name: Form Name: Format Format Format Format Format Format Format Format Format Format Format Format Format Format Format Format Format Format Format Format Format Format Format Format Format Format Format Format Format Format Format Format Format Format Format Format Format Format Format Format Format Format Format Format Format Format Format Format Format Format Format外部存储器
text_image
External Storage USB.1 USB.2 USB drive USB.3 USB drive USB.4 USB.5 USB drive USB.6 USB drive USB.7 USB drive USB.8 USB drive USB.9 USB drive USB.10 USB drive USB.11 USB drive USB.12 USB drive USB.13 USB drive USB.14 USB drive USB.15 USB drive USB.16 USB drive USB.17 USB drive USB.18 USB drive USB.19 USB drive USB.20 USB drive USB.21 USB drive USB.22 USB drive USB.23 USB drive USB.24 USB drive USB.25 USB drive USB.26 USB drive USB.27 USB drive USB.28 USB drive USB.29 USB drive USB.30 USB drive USB.31 USB drive USB.32 USB drive USB.33 USB drive USB.34 USB drive USB.35 USB drive USB.36 USB drive USB.37 USB drive USB.38 USB drive USB.39 USB drive USB.40 USB drive USB.41 USB drive USB.42 USB drive USB.43 USB drive USB.44 USB drive USB.45 USB drive USB.46 USB drive USB.47 USB drive USB.48 USB drive USB.49 USB drive USB.50 USB drive USB.51 USB drive USB.52 USB drive USB.53 USB drive USB.54 USB drive USB.55 USB drive USB.56 USB drive USB.57 USB drive USB.58 USB drive USB.59 USB drive USB.60 USB drive USB.61 USB drive USB.62 USB drive USB.63 USB drive USB.64 USB drive USB.65 USB drive USB.66 USB drive USB.67 USB drive USB.68 USB drive USB.69 USB drive USB.70 USB drive USB.71 USB drive USB.72 USB drive USB.73 USB drive USB.74 USB drive USB.75 USB drive USB.76 USB drive USB.77 USB drive USB.78 USB drive USB.79 USB drive USB.80 USB drive本地网络设置
查看并更改基本和高级网络设置。

text_image
Local Network Settings Router IP Setup LHNSYS WRT32X Network IP-10 Settings Device Configuration Speed Set Power Administration Advanced Control LHPF Server Local Network Settings Router IP Setup LHPF Server LHPF Server LHPF Server LHPF Server LHPF Server LHPF Server LHPF Server LHPF Server LHPF Server LHPF Server LHPF Server LHPF Server LHPF Server LHPF Server LHPF Server LHPF Server LHPF Server LHPF Server LHPF Server LHPF Server LHPF Total LHPF Total LHPF Total LHPF Total LHPF Total LHPF Total LHPF Total LHPF Total LHPF Total LHPF Total LHPF Total LHPF Total LHPF Total LHPF Total LHPF Total LHPF Total LHPF Total LHPF Total LHPF Total LHPF Total LHPFTotal LHPF Total LHPF Total LHPF Total LHPF Total LHPF Total LHPF Total LHPF Total LHPF Total LHPF Total LHPF Total LHPF Total LHPF Total LHPF Total LHPF Total LHPF Total LHPF Total LHPF Total LHPF Total LHPF Total LHPF T4.0.0.0.0.0.0.0.0.0.0.0.0.0.0.0.0.0.0.0.0.0.0.0.0.0.0.0.0.0.0.0.0.0.0.0.0.0.0.0.0.0.0.0.0.0.0.0.0.0.0.故障排除
Back view of cable modem
Back view of DSL modem
text_image
Diagram showing wireless router connected to a power outlet via cable, with blue arrows indicating signal flow.natural_image
Diagram showing connection between a router and a device via cable, with no visible text or symbols.natural_image
Diagram showing connections between a router, a switch, and a server tower (no text or symbols present)text_image
New Tab ← → C ↑ Q http://myrouter.localtext_image
Dashboard LINKSYS WRT32X Network Traffic 500.0 Download Data 264.0 Upload Data Devices 4 Connected Devices 0 Killer™ Enabled Devices Prioritized Devices Wi-Fi Network venom Combined Wi-Fi [2.4 & 5 MHz] Speed test 1 Download 1 Upload ms Ping Port Forwarding Add/Edit Auto Network Storage USB 1 856.6 MB Used 863.0 MB Archipids USB 2 Connect a drive to see it here Description Port Start Port End Protocol Enabled Xbox 80 96 all Echo 40 60 all VPN ClientNastavenia siete Wi-Fi (Wi-Fi Settings)
text_image
Wi-Fi Settings Wi-Fi Wi-Fi Settings (2.4 and 1.0ms) vence Password ****** More Settings Guest Access ■ Enable Guest Access Cancel Save LINKSYS WRT32XZariadenia (Devices)
text_image
Device Prioritization We are prioritizing your devices based on a scope of Java Killer Enloaded Devices KILTER Manual Prioritization On or you define the device type to change the priority for your own Killer Enloaded devices Tenorier-Prof 30% Box 30% OK mode 40% SIMBER 5M- 200V 40% Device Show LINKVER WRT32XTest rýchlosti (Speed Test)
text_image
Speed Test We use this speed test to determine how much speed is given your predefined deviation. If your WFT speeds are higher than those results, you might not be getting the best performance Results Limit us 6102.7 Mbps 100 Mbps Max/Min 122 Mbps Max/Min 19 Mbps No need toSpráva smerovača (Router Administration)
text_image
External Storage USB3 USB2 USB1 USB0 Authentication Database: www.ewb.com Authorization Database: www.ewb.com Network (By Advertising) [2008] When installed devices on your WiFi server access commercialized storage by entering ESD 1000.0.1 in Wireless System (FCS) or Provider (TSX) Enable network by placing (MS) FTP When installed, server users can access completed storage over the internal thought FTP (File Transfer Protocol). Enable FTPtext_image
Local Network Settings Router IP Setup IP Setup: WRF 32X New Settings WRF 32X IP DPGP IP Setup: WRF 32X LRT Devices by DPGP Proposed to Bank Page LANOS WRF32XRiešenie problémov
Back view of cable modem
- Ak na pripojenie k internetu používate DSL, skontrolujte, či je telefónna linka DSL pripojená k rozhraniu modemu DSL.
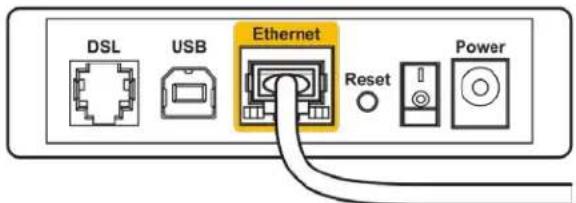
text_image
DSL USB Ethernet Reset PowerBack view of DSL modem
text_image
Administration General Route Administrator Advanced Settings Firmware 0.6.27000000 Up to Drive Auto Support Myers Microsoft Office Close Web LinkSYS WRT32Xtext_image
Diagram showing wireless router connected to a power outlet via cable, with blue arrows indicating signal flow.natural_image
Diagram showing connection between a router and a device via cable, with no visible text or symbols.natural_image
Diagram showing connections between a router, a switch, and a device with cables (no text or symbols present)text_image
New Tab ← → C ↗ http://myrouter.localtext_image
Dashboard WRF 32X LinkSYS WRT 32X Dashboard Wi-Fi Settings Devices Prioritization Speed Test Router Administration Advanced Settings Network Traffic 500.0 Download Data 264.0 Upload Data Devices 4 Connected Devices 0 Killer™ Enabled Devices 0 Prioritized Devices Speed test 1 Download 1 Upload ms Ping Wi-Fi Network venom Combined Wi-Fi [2.4 & 5 MHz] Port Forwarding Add/Edit Autox Network Storage USB 1 856.6 MB Used 863.0 MB Archipids USB 2 Connect a drive to see it here Description Port Start Port End Protocol Enabled ● Xbox 80 96 all ■ ● Echo 40 60 all ■ VPN Clienttext_image
Wi-Fi Settings Wi-Fi all-Program (2.1 or 3.0ms) wenom Password: ****** Hira Settings Guest Access Enable Guest Access Cancel Save LINKSYS WRT32XNaprave
text_image
Device Prioritization We are prioritizing your devices based on a scope of Java Killer Inclined Devices Microsoft Windows Automotive prioritize tool Manual Prioritization Logic or write instructions on the device type to change the priority for your own other inclined devices Terror-Prot 20% Alex 20% DME-MSI 20% SAMSUNG IN- ESRV 20% Server Save LicenseVR WR732XPreskus hitrosti
text_image
Speed Test We use B10-speed test to determine how much speed is just your practical deviation. If your B10 speeds are higher than those results, you might not be getting the best performance Results Use on 6/02/2018 100 ▼ Normal 122 ▲ Normal 19 ▲ Avg No need totext_image
External Storage USB2 USB2 External Storage USB2 Authentication Network (No Sharing 2049) When installed, network users can access commercial storage by entering 130/180.0.1 or wireless Explorer [P] or printer (Max.) Provider must be sharing (MIR) FTP When installed, network users can access commercial storage by entering Routing (FTP) (File Summary Protocol) Provider TCP WINPORT WRF32XBack view of cable modem
- Če imate DSL, preverite, ali je linija DSL povezana z vrati DSL na modemu.
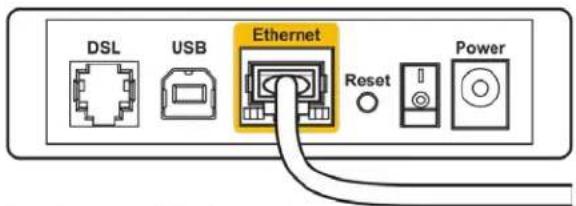
text_image
DSL USB Ethernet Reset PowerBack view of DSL modem
text_image
Administration General Route Administration Advanced Settings WRT32X Firmware R: 0.0785.00 Type: Windows Name: Close On: LineSYS WRT32Xtext_image
Diagram showing wireless router connected to a power outlet via cable, with blue arrows indicating signal flow.natural_image
Diagram showing connection between a router and a device via cable, with no visible text or symbols.natural_image
Diagram showing connections between a router, switch, and network device (no text or symbols present)text_image
New Tab ← → C ↗ Q http://myrouter.localManuell installation
text_image
Dashboard WRF 32X LinkSYS WRT 32X Dashboard Wi-Fi Settings Devices Prioritization Speed Test Router Administration Advanced Settings Network Traffic 500.0 Download Data 264.0 Upload Data Devices 4 Connected Devices 0 Killer™ Enabled Devices 0 Prioritized Devices Speed test 1 Download 1 Upload ms Ping Wi-Fi Network venom Combined Wi-Fi [2.4 & 5 MHz] Port Forwarding Add/Edit Autox Network Storage USB 1 856.6 MB Used 863.0 MB Archipids USB 2 Connect a drive to see it here Description Port Start Port End Protocol Enabled ● Xbox 80 96 all ■ ● Echo 40 60 all ■ VPN ClientWi-Fi-inställningar
text_image
Wi-Fi Settings Wi-Fi Wi-Fi Settings (2.4 and 1.0ms) vence Password ****** More Settings Guest Access ■ Enable Guest Access Cancel Save LINKSYS WRT32XEnheter
text_image
Device Prioritization We are prioritizing your devices based on a scope of Java Killer Inclined Devices Microsoft Windows Automotive prioritize tool Manual Prioritization Logic or write instructions on the device type to change the priority for your own other inclined devices Terror-Prot 20% Alex 20% DME-MSI 20% SAMSUNG IN- ESRV 20% Server Save LicenseVR WR732XHastighetstest
text_image
Speed Test We use 300-speed test to determine how much speed is just your practical deviation. If your 300-speeds are higher than those results, you might not be getting the best performance Results Use on 2007 Quickup 100 ▼ Basic 122 ▲ High 19 ▲ Avg No need canRouteradministration
text_image
Administration Server System Administration Server User Router Administration Advanced Settings LINKERS WRF32X Language WRF32X Firmware WRF32X Language WRF32X Language WRF32X Language WRF32X Time Synthesis MISCELLATION WRF32X WRF32X WRF32X Reader name WRF32X Linking WRF32X Save AddExtern lagring
Back view of cable modem
Back view of DSL modem
text_image
Diagram showing wireless router connected to a power outlet via cable, with blue arrows indicating signal flow.natural_image
Diagram showing a USB cable inserted into a network device via a cable outlet, with no visible text or symbols.natural_image
Diagram showing connections between a router, switch, and network device (no text or symbols present)text_image
New Tab ← → C ↗ http://myrouter.localtext_image
Dashboard Wi-Fi Settings Devices Prioritization Speed Test Router Administration Advanced Settings Dashboard Wi-Fi Settings Devices Prioritization Speed Test Router Administration Advanced Settings Network Traffic 500.0 Download Inputs 264.0 Upload Inputs Devices 4 Connected Devices 0 Killer™ Enabled Devices 0 Prioritized Devices Wi-Fi Network venom combined Wi-Fi (2.4 B 5 GHz) Speed test 1 GBits/s Download 1 GBits/s Upload ms Ping Port Forwarding Add/Edit Rules Network Storage USB 1 USB 6 MS Used USB 2 Connect a drive to see it here Adsorption Port Start Port End Protocol Enabled ● Xbox 80 96 all ● Echo 40 60 all VPN ClientWi-Fi 設定
text_image
Device Prioritization We are prioritizing your devices based on a speed of 200ms Kitter Involved Devices Pay the following: - I guess power in the setting not being Do it help to understand how to get network for my or you can access the network to this device. Manual Prioritization Begin and end process on the device due to change the priority for the user now. Kitter-enabled devices Tenserve-Plat Box OK more SAMSUNG 3M-DOCK SAMSUNG 3M-DOCK SAMSUNG 3M-DOCK SAMSUNG 3M-DOCK SAMSUNG 3M-DOCK SAMSUNG 3M-DOCK SAMSUNG 3M-DOCK SAMSUNG 3M-DOCK SAMSUNG 3M-DOCK SAMSUNG 3M-DOCK SAMSUNG 3M-DOCE SAMSUNG 3M-DOCE SAMSUNG 3M-DOCE SAMSUNG 3M-DOCE SAMSUNG 3M-DOCE SAMSUNG 3M-DOCE SAMSUNG 3M-DOCE SAMSUNG 3M-DOCE SAMSUNG 3M-DOCE SAMSUNG 3M-DOCE SAMSUNG 3M-DOCC SAMSUNG 3M-DOCC SAMSUNG 3M-DOCC SAMSUNG 3M-DOCC SAMSUNG 3M-DOCC SAMSUNG 3M-DOCC SAMSUNG 3M-DOCC SAMSUNG 3M-DOCC SAMSUNG 3M-DOCC SAMSUNG 3M-DOCC SAMSUNG 3M-DOCO SAMSUNG 3M-DOCO SAMSUNG 3M-DOCO SAMSUNG 3M-DOCO SAMSUNG 3M-DOCO SAMSUNG 3M-DOCO SAMSUNG 3M-DOCO SAMSUNG 3M-DOCO SAMSUNG 3M-DOCO SAMSUNG 3M-DOCO SAMSUNG 3M-DOO SAMSUNG 3M-DOO SAMSUNG 3M-DOO SAMSUNG 3M-DOO SAMSUNG 3M-DOO SAMSUNG 3M-DOO SAMSUNG 3M-DOO SAMSUNG 3M-DOO SAMSUNG 3M-DOO速度測試
text_image
Speed Test How much to complete the next three tests have been applied to your best performance. Results: If your WT-7 speeds are higher than these results, you might not be getting the best performance Results 100 seconds 122 seconds 19 seconds Success rate LINKINS WRT32X路由器管理
text_image
Administration Server1 Form1 Form2 Form3 Language Time Synthesis Duration Time Raster name Raster Name Leverage System1 WINVER WRF32X外部儲存
text_image
External Storage URL: 1.0 BRL: 1.0 Directory WRT32X ASP.NET Address & path to Web Server Authentication Directory select server and access to protect files in connected storage Provider: w Network (No Sharing) [SP49] When available directories in your WiFi areas access commercial attacks by entering [SP49] or Windows Options (% of Provider [New]) Provider doesn't share [SP49] FTP When provided, remote users can access connected attacks over the Internet Through FTP (File Transfer Protocol) Provider: FIP ASP.NET區域網路設定
檢視並變更基本和進階網路設定。
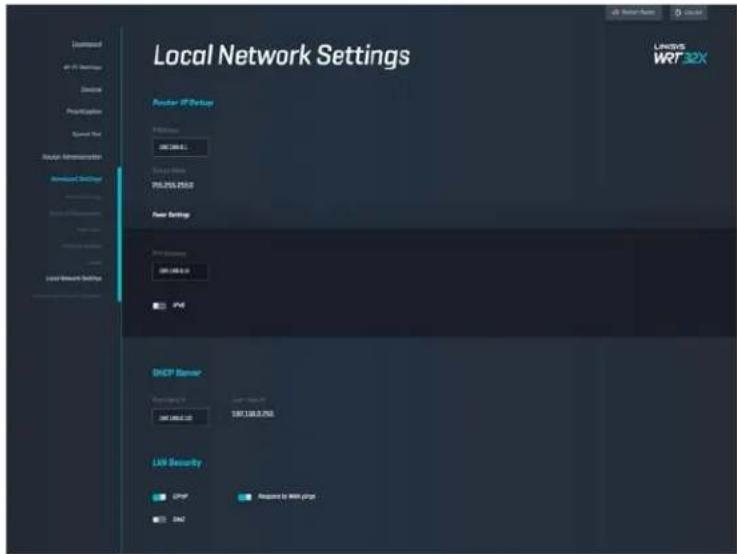
text_image
Local Network Settings Network ID Settings LANOS WR732X LANOS WR732X LANOS WR732X LANOS WR732X LANOS WR732X LANOS WR732X LANOS WR732X LANOS WR732X LANOS WR732X LANOS WR732X LANOS WR732X LANOS WR732X故障排除
Back view of cable modem
Back view of DSL modem
text_image
Administration Security Security Support LPHSYS WR732Xtext_image
Diagram showing wireless router connected to a power outlet via cable, with blue arrows indicating signal flow.natural_image
Diagram showing connection between a router and a device via cable, with no visible text or symbols.natural_image
Diagram showing connections between a router, cable ports, and a server unit (no text or symbols present)text_image
New Tab ← → C ↗ http://myrouter.localtext_image
Dashboard LinkSYS WRT32X Network Traffic 500.0 Download Only 264.0 Upload Only Devices 4 Connected Devices 0 Killer™ Enabled Devices Prioritized Devices Wi-Fi Network venom Combined Wi-Fi [2:8 5 GHz] Speed test 1 Download 1 Upload Ping Port Forwarding Add/Edit Rules Network Storage USB 1 USB & Web User USB 2 Connect a driver to see it here Description Port Start Port End Protocol Enabled ● Xbox 80 96 a/l ● Echo 40 60 a/l VPN Clientการตั้งค่า Wi-Fi
text_image
Wi-Fi Settings Wi-Fi Wi-Fi Name (2 Features 1 Slot) whom Password ****** More Settings Guest Access Enable Guest Access Cancel Save LinkSYS WRT32Xอุปกรณ์
text_image
Device Prioritization Where are annotating your devices based on a spread of Jubos Killer Inactivated Devices Automated, automated, or enabled device tools Automated Prioritization Setup or post-processing as the device this is to change the priority for how the Killer inactivated devices Tension-Plat Xbox OK - main STARTED ON SDDV Control Save LINKYS WRT 32Xการทดสอบความเร็ว
text_image
Speed Test We can still update less as determine from reach speed to your new professional devices. If your WR-A packages are higher than those results, you might not be getting the best performances. Results 100 x 100x100x100x Standard 122 x 19 x 19x Speed Test Advanced Servicetext_image
Local Network Settings Driver IP Setup WRT 32X LINES WRT 32X Driver IP Setup WRT 32X 250.0 Power Settings WRT 32X WRT 32X 0.0 PWR DPSP Connection WRT 32X 0.0 WRT 32X 250.0 Link Community DPSP Request to MRT group EATการแก่ไขปัญหา
Back view of cable modem
Back view of DSL modem
text_image
Administration Auto Administration Firmware AS:2008.02 Style: C:\Users\WRT 32Xtext_image
Diagram showing wireless router connected to a power outlet via cable, with blue arrows indicating signal flow.natural_image
Diagram showing connection between a router and a device via cable, with no visible text or symbols.natural_image
Diagram showing connections between a server, network ports, and a router (no text or symbols present)text_image
New Tab ← → C ↗ http://myrouter.localtext_image
Dashboard WRF 32X LinkSYS WRT 32X Dashboard Wi-Fi Settings Devices Prioritization Speed Test Router Administration Advanced Settings Network Traffic 500.0 Download Data 264.0 Upload Data Devices 4 Connected Devices 0 Killer™ Enabled Devices 0 Prioritized Devices Speed test 1 Download 1 Upload ms Ping Wi-Fi Network venom Combined Wi-Fi [2.4 & 5 MHz] Port Forwarding Add/Edit Autox Network Storage USB 1 856.6 MB Used 863.0 MB Archipids USB 2 Connect a drive to see it here Description Port Start Port End Protocol Enabled ● Xbox 80 96 all ■ ● Echo 40 60 all ■ VPN ClientWi-Fi Ayarları
text_image
Device Prioritization We are prioritizing your devices based on a scope of Java Killer Enloaded Devices KILTER Manual Prioritization On or you define the device type to change the priority for your own Killer Enloaded devices Tenorier-Prof 30% Box 30% OK mode 40% SIMBER 5M- 200V 40% Device Show LINKVER WRT32XSpeed Test
text_image
Speed Test We use this speed test to determine how much speed is given your predefined deviation. If your WFT speeds are higher than those results, you might not be getting the best performance Results Limit us 6102.7 Mbps 100 Mbps Max/Min 122 Mbps Max/Min 19 Mbps No need toRouter Yönetimi
text_image
Administration Server of System Documents System Address Language Language Language Language Language Language Language Language Language Language Language Language Language Language Language Language Language Language Language Language Language Language Language Language Language Language Language Language Language Language Language Language Language Language Language Language Language Language Language Language Language Language Language Language Language Language Language Language Language Language Currency Currency Currency Currency Currency Currency Currency Currency Currency Currency Currency Currency Currency Currency Currency Currency Currency Currency Currency Currency Currency Currency Currency Currency Currency Currency Currency Currency Currency Currency Currency Currency Currency Currency Currency Currency Currency Currency Currency Currency Currency Currency Currency Currency Currency Currency Currency Currency Currency Currency CurrencyHarici Depolama
text_image
External Storage USB3 USB2 USB1 USB0 Authentication Database: www.ewb.com Network: 6x-6666 (2004) When installed devices on your WiFi server access commercialized storage by entering ESD 1008.0.1 in Wireless System (FCS) or Provider (TSX). Enable network by placing (MSI) FTP When installed, server users can access completed storage over the internal thought FTP (File Transfer Protocol). Enable FTPYerel Ağ Ayarları
Back view of cable modem
Back view of DSL modem
text_image
Diagram showing wireless router connected to a power outlet via cable, with blue arrows indicating signal flow.natural_image
Diagram showing connections between a router, cable, and network devices (no text or symbols present)natural_image
Diagram showing connections between a router, a switch, and a device with cables (no text or symbols present)text_image
New Tab ← → C ↗ http://myrouter.localtext_image
Dashboard WRF 32X LinkSYS WRT 32X Dashboard Wi-Fi Settings Devices Prioritization Speed Test Router Administration Advanced Settings Network Traffic 500.0 Download Data 264.0 Upload Data Devices 4 Connected Devices 0 Killer™ Enabled Devices 0 Prioritized Devices Speed test 1 Download 1 Upload ms Ping Wi-Fi Network venom Combined Wi-Fi [2.4 & 5 MHz] Port Forwarding Add/Edit Autox Network Storage USB 1 856.6 MB Used 863.0 MB Archipids USB 2 Connect a drive to see it here Description Port Start Port End Protocol Enabled Xbox 80 96 all Echo 40 60 all VPN ClientНастройки Wi-Fi
text_image
Wi-Fi Settings Wi-Fi Wi-Fi Settings (2.4 µs or 3.0µs) wenom Password: ****** Hira Settings Guest Access Enable Guest Access Cancel Save LINKSYS WRT32XПристрої
text_image
Device Prioritization We are prioritizing your devices based on a scope of Java Killer Inclined Devices Microsoft Windows Automotive prioritize tool Manual Prioritization Logic or write instructions on the device type to change the priority for your own other inclined devices Terror-Prot 20% Alex 20% DME-MSI 20% SAMSUNG IN- ESRV 20% Server Save LicenseVR WR732XТест швидкості
text_image
Speed Test We use B10-speed test to determine how much speed is just your practical deviation. If your B10 speeds are higher than those results, you might not be getting the best performance Results Use on 6/02/2018 100 ▼ Normal 122 ▲ Normal 19 ▲ Avg No need cantext_image
Administration Server of System Documents System Address Language Language Language Language Language Language Language Language Language Language Language Language Language Language Language Language Language Language Language Language Language Language Language Language Language Language Language Language Language Language Language Language Language Language Language Language Language Language Language Language Language Language Language Language Language Language Language Language Language Language Currency Currency Currency Currency Currency Currency Currency Currency Currency Currency Currency Currency Currency Currency Currency Currency Currency Currency Currency Currency Currency Currency Currency Currency Currency Currency Currency Currency Currency Currency Currency Currency Currency Currency Currency Currency Currency Currency Currency Currency Currency Currency Currency Currency Currency Currency Currency Currency Currency Currency Currencytext_image
External Storage USB3 USB2 USB1 USB0 Authentication Database: www.ewb.com Database: www.ewb.com Authentication Database: www.ewb.com Authentication Database: www.ewb.com Authentication Database: www.ewb.com Authentication Database: www.ewb.com Authentication Database: www.ewb.com Authentication Database: www.ewb.com Authentication Database: www.ewb.com Authentication Database: www.ewb.com Authentication Database: www.ewb.com Authentication Database: www.ewb.com Information (File Attaining [2006]) When installed, Deviation on your WiFi server enables commercial storage by entering ESD 1008.0.1 in Wireless System (FCS) or Provider (TSX). ■ Release network (by placing [MS]) FTP When installed, Deviation users can access completed storage over the internal thought FTP (File Transfer Protocol). ■ Release FTPtext_image
Local Network Settings Router IP Setup IP Setup: WRF 32X New Settings WRF 32X 2015 New Settings WRF 32X 2015 IP DP DP/DP Server IP Setup: WRF 32X 2015 Last Server Set DP DP Proposed to Bank Page SNCУсунення неполадок
Back view of cable modem
Back view of DSL modem
text_image
Diagram showing wireless router connected to a power outlet via cable, with blue arrows indicating signal flow.text_image
Diagram showing connection between a router and a device via cable, with a magnified view highlighting the cable's connector.natural_image
Diagram showing connections between a server rack, network switch, and router (no text or symbols present)text_image
New Tab ← → C ↗ http://myrouter.localtext_image
Dashboard Wi-Fi Settings Devices Prioritization Speed Test Router Administration Advanced Settings Dashboard Wi-Fi Settings Devices Prioritization Speed Test Router Administration Advanced Settings Network Traffic 500.0 Download Bits 264.0 Upload Bits Devices 4 Connected Devices 0 Killer™ Enabled Devices 0 Prioritized Devices Wi-Fi Network venom Combined Wi-Fi [2.4 & 5 GHz] Speed test 1 Download 1 Upload Ping Network Storage USB 1 USB 8 kW User QRT 2 MHz Available USB 2 Connect a drive to see it here Port Forwarding AdultEdit Auto Description Port Start Port End Protocol Enabled ● Xbox 80 96 all ● Echo 40 60 all VPN Client Restart Router Lay out LINKSYS WRT32XCài đặt Wi-Fi
text_image
Wi-Fi Settings Wi-Fi and Wi-Fi setting (2.4 years 2.5 years) WINSPI Password: ****** More Settings Guest Access ■ Enable Guest Access Cancel Save LinkSYS WRT32XThiết bị
text_image
Device Prioritization We are prioritizing your devices posted on a speed of 6.125 Killer Involved Devices Automatic prioritization for the device with a speed of 6.125 Manual Prioritization Using your previous OS on the device Day to change the priority for your own other optional devices Temporary-Play OK OK OK OK OK OK OK Switching On- OK OK Cancel SaveKiểm tra tốc độ
text_image
Speed Test We use Info support, how to determine how test support is good and preferred. Devices. If your 96% speed is higher than these results, you might need to getting the best performance Results 100 ▼ Minimum 122 ▲ Minimum 19 ▲ Avg This result is LINKERS WRT 32Xtext_image
Administration Application Firmware Language Time Synthesis Registrar Logger Routing WINVER WRT 32XLưu trữ ngoài
text_image
External Storage USB3 Solution USB2 Access to the Web Services Authentication Check up your own key password to access website connected via https://www.wrf32x/ Enable Web Remote Web Sharing (EWR) When portable network in your Web User access connected via https://www.wrf32x/1-Wordset Explorer (WOR) or Pusher (Push). Enable switch Web Sharing (WIN) FTP When including remote user can access connected via the internal through FTP (File Transfer Protocol). Enable FTPCài đặt mạng cục bộ
text_image
LINKSYS LINKSYS Internet PortBack view of cable modem
Back view of DSL modem