USER MANUAL RoboCut XL600 SCHEPPACH

Download on the App Store

Android APP ON Google play
Günzburger Straße 69
D-89335 Ichenhausen
Verehrter Kunde
Explanation of the symbols on the product
Symbols are used in this manual to draw your attention to potential hazards. The safety symbols and the accompanying explanations must be fully understood. The warnings themselves will not rectify a hazard and cannot replace proper accident prevention measures.
| Before commissioning, read and observe the operating manual and safety instructions! |
| Warning! Switch the product off before handling it or working on it. |
| Danger due to parts flying off during operation. Keep a safe distance from the product when it is in operation. |
| Keep your hands and feet away from the rotating blades. Do not sit or stand on the product. |
| Protect batteries from heat and fire. |
| Protect batteries from water and moisture. |
| Product fuse |
| Protection class II |
| Do not throw primary batteries or rechargeable batteries away with household waste. |
| "POWER ON/OFF" button (on/off button) |
| Start button / Select button (up) |
| Home button (back to charging station) / - Select button (down) |
| OK button |
| PIN code setting |
| Date/Time setting |
| WiFi (WLAN) |
| Bluetooth |
| The product complies with the applicable European directives. |
| The product complies with the applicable Serbian directives. |
Table of contents: Page:
- Introduction 29
- Description of the product 29
- Scope of delivery 29
- Proper use 29
- Safety instructions 30
- Technical data 32
- Unpacking 33
- Assembly/Before commissioning 33
- Starting up / adjustments 36
- Cleaning 39
- Transport 39
- Storage/Hibernation 39
- Maintenance/Update 39
- Disposal and recycling 40
- Troubleshooting / fault codes 42
- Declaration of conformity 436
1. Introduction
Manufacturer:
Scheppach GmbH
GünzburgerstraBe 69
D-89335 Ichenhausen
Dear Customer
We hope your new product brings you much enjoyment and success.
Note:
In accordance with the applicable product liability laws, the manufacturer of this product assumes no liability for damage to the product or caused by the product arising from:
- Improper handling
- Failure to comply with the operating instructions.
- Repairs carried out by third parties, unauthorised specialists
- Installing and replacing non-original spare parts
- Improper use
- Failure of the electrical system in the event of the electrical regulations and VDE provisions 0100, DIN 57113 / VDE 0113 not being observed
Note:
Read the whole text of the operating instructions before assembly and commissioning.
This operating manual should help you to familiarise yourself with your product and to use it for its intended purpose.
The operating manual includes important instructions for the safe, proper and economic operation of the product, for avoiding danger, for minimising repair costs and downtimes and for increasing the reliability and extending the service life of the product.
In addition to the safety instructions in this operating manual, you must also observe the regulations applicable to the operation of the product in your country. Keep the operating manual with the product at all times and store it in a plastic cover to protect it from dirt and moisture. They must be read and carefully observed by all operating personnel before starting the work.
The product may only be used by personnel who have been trained to use it and who have been instructed with respect to the associated hazards. The required minimum age must be observed.
In addition to the safety instructions in this operating manual and the separate regulations of your country, the generally recognised technical rules relating to the operation of such machines must also be observed.
We accept no liability for accidents or damage that occur due to a failure to observe this manual and the safety instructions.
2. Description of the product
- Robotic lawnmower
- Cutting height adjustment knob
- Display with control panel
- Stop button
- Front axle
- Blade plate
- Blade
- Blade fixing screw
- Rear wheel
- Charging station
- Boundary wire
- Wire peg
- Charging station anchor pegs
- Power supply with cable and connector
3. Scope of delivery
- 1x Robotic lawnmower
- 1x Charging station
- 9x Blades (3x installed; 6x replacement)
- 6x Screw for blade
- 1x Boundary wire (130 metres)
180x Wire pegs
- 6x Fastening peg
- 1x power supply
- 1x operating manual
4. Properuse
The machine is designed for automatic mowing of lawns. The machine may only be used in the intended manner. Any use beyond this is improper. The user/operator, not the manufacturer, is responsible for damages or injuries of any type resulting from this.
An element of the intended use is also the observance of the safety instructions, as well as the assembly instructions and operating information in the operating manual.
Persons who operate and maintain the machine must be familiar with it and must be informed about potential dangers.
The liability of the manufacturer and resulting damages are excluded in the event of modifications of the machine.
The machine may only be operated with original parts and original accessories from the manufacturer.
The safety, operating and maintenance specifications of the manufacturer, as well as the dimensions specified in the technical data, must be observed.
Please note that our products were not designed with the intention of use for commercial or industrial purposes. We assume no guarantee if the product is used in commercial or industrial applications, or for equivalent work.
5. Safety instructions
General safety instructions
- The user is responsible for accidents and hazards that cause damage to other people or their property.
- Children, persons with reduced physical, sensory or mental capabilities or lack of experience and knowledge, or persons unfamiliar with the instructions for operating the machine are not allowed to use the machine. Local regulations may restrict the age of the user.
- Never connect the power supply unit to a socket if the plug or cable is damaged.
- Worn or damaged cables increase the risk of an electric shock.
- Only charge the batteries in the charging station supplied. Incorrect use may result in electric shocks, overheating or leakage of corrosive liquid from the battery. Rinse with water/neutralising agent in the event of electrolyte leakage. In the event of contact with the eyes, please seek immediate medical attention.
- Only use manufacturer's recommended original battery. Product safety can only be guaranteed when original batteries are used. Do not use batteries that are not rechargeable.
- The product must be disconnected from the mains when removing the battery.
Safety instructions - operation
- The product must only be used with the equipment recommended by the manufacturer. Other types of use are not permitted. The manufacturer's instructions regarding operation/maintenance must be strictly adhered to.
- When using the product in public areas, warning signs must be placed around the work area. These signs must bear the following text:
"Warning! Robotic lawnmower! Keep your distance from the product! Children must be supervised!"
- Switch the product off if there is anyone (in particular children) or any animals within the working range. It is recommended to program the product to operate during times when there is no activity in the area, e.g. at night. Note that certain animals, e.g. hedgehogs, are nocturnal. They could potentially be injured by the product.
Children are not allowed in the working area during operation.
Children are forbidden to play with the product, both out of and in use.
-
Always ensure that the product is switched off when carrying it. Not with arms outstretched but always against the body. Ensure you have a secure footing.
-
Do not run while transporting the unit. Walk carefully and always make sure you have a secure footing.
Always wear sturdy footwear and long trousers when using the product.
- Do not operate the device in bad weather conditions, especially during thunderstorms. There is a danger of lightning strike.
- Use a residual current circuit breaker with a trigger current of 30mA or less. Use of an RCD reduces the risk of electric shock.
- ATTENTION: The extension cable as well as the mains cable must be outside the working area to ensure that it is not damaged.
- The product may only be operated, maintained and repaired by persons who are fully familiar with its characteristics and the safety regulations to be observed during use. Read the operating manual carefully and familiarise yourself with the contents before using the product.
- It is not permitted to change the original design of the product. All changes in this regard are made at the user's own risk.
- Make sure that there are no foreign objects such as stones, branches, tools or toys on the lawn. The blades can be damaged if they collide with foreign objects. Always switch off the product with the POWER ON/OFF button before removing a blockage. Check the product for damage before operating it again.
- If the product starts to vibrate abnormally, always switch it off with the main switch or POWER ON/OFF button and check for damage before operating it again.
- Start the product in accordance with the instructions. When the product is switched on, make sure that your hands and feet are not near the rotating blades. Keep your hands and feet away from the underside of the product.
- Never touch moving dangerous components, such as the blade disc, before they have come to a complete stop.
- Do not lift the product or carry it around when it is switched on.
- Do not let anyone operate the product who does not know how it works and behaves.
- The product must not collide with persons or other living creatures. If a person or other living creature enters the travel path of the product, it must be stopped immediately.
- Do not place any objects on the housing or the charging station of the product.
-
Never allow people to sit on the robot. Never lift the robot to inspect the cutting edge or carry it during operation. Do not place hands or feet under the robot during operation.
-
The product must not be operated with damaged guards, blade plate or housing. Furthermore, it must not be operated with damaged blades, screws, nuts or cables. Do not connect or touch damaged cables until they have been disconnected from the power supply.
- Do not use the product if the POWER ON/OFF button and the STOP button are not working properly.
- Always switch the product off via the ON/OFF button if it is not in use. The product will only start if the POWER ON/OFF button is switched on and the correct PIN code is entered.
- If the power cord is damaged during use, press the "STOP" button to stop the robot and unplug the mains cable from the socket.
- Scheppach does not guarantee full compatibility between the product and other wireless systems such as remote controls, transmitters, in-ground electric fencing of livestock pastures or similar.
- Metal objects in the ground (e.g. reinforced concrete or anti-mole nets) can cause the mower to stop. The metallic objects may cause interference with the loop signal, which may cause the mower to stop.
- The operating and storage temperature is 5 - 50^ . The temperature range for charging is 5 - 45^ . Excessively high temperatures can cause damage to the product.
- Never use or charge the robot in explosive and/or flammable environments.
- Do not use the robotic lawnmower if a sprinkler is running. In this case, program the robot and the sprinkler so that they do not operate simultaneously.
- Do not wash the robot with high pressure water jets or immerse it partially or completely in water as it is not waterproof.
- Use only the battery charger and power supply provided by the manufacturer. Improper use may result in electric shocks, overheating or leakage of corrosive liquids from the battery.
- Do not position the power supply unit at a height where it could be submerged. Do not set the power supply down on the ground.
- Do not cover the power supply unit. Condensation can damage the power supply unit and increase the risk of electric shock.
- If liquid leaks, wash the battery with water / neutraliser.
In the event of eye contact, consult a doctor.
When the mower is turned upside down, the mains switch must always be off. The mains switch should be turned off during all work on the mower's bottom frame, e.g. when cleaning or replacing the blades.
Safety instructions - Battery and battery charger
Battery and battery charger
Read the instructions before charging. Make sure your battery charger matches your local AC supply. Make sure that the connection between the battery charger and the battery pack corresponds to the correct models. Longer service life and better performance can be achieved if the battery is charged when the air temperature is between 18^ and 25^ . Do not charge the battery at air temperatures below 5^ or above 40^ . These instructions are important as they can prevent serious damage to the battery.
WARNING:
Lithium-ion batteries may explode or cause fire if disassembled, short-circuited or exposed to water, fire or high temperatures. Proceed with caution, do not open the battery and do not expose it to electrical/ mechanical stress. Avoid storing the batteries in direct sunlight.
ATTENTION
This power tool generates an electromagnetic field during operation. This field can impair active or passive medical implants under certain circumstances. In order to prevent the risk of serious or deadly injuries, we recommend that persons with medical implants consult with their physician and the manufacturer of the medical implant prior to operating the machine.
Residual risks
The machine has been built according to the state-of-the-art and the recognised technical safety requirements. However, individual residual risks can arise during operation.
- Health hazard due to electrical power, with the use of improper electrical connection cables.
- Before performing setting or maintenance work, release the start button and pull out the mains plug.
- Furthermore, despite all precautions having been met, some non-obvious residual risks may still remain.
- Residual risks can be minimised if the "Safety Instructions" and the "Intended Use" together with the operating manual as a whole are observed.
- Avoid accidental starting of the machine: the operating button may not be pressed when inserting the plug in an outlet. Use the tool that is recommended in this operating manual. This is how to ensure that your machine provides optimum performance.
- Keep your hands away from the working area when the machine is in operation.
6. Technical data
Robotic lawnmower
| Voltage 20 V | --- |
| Idle speed n0 | 2800 rpm |
| Cutting width 18 cm | |
| Cut height 20-60 mm | |
| Cutting height positions 9 | |
| Area 600 m² | |
| Max. incline 35 % | |
| Tightest possible passage 0.8 m | |
(App) control
| Bluetooth® |
| Operating frequency band 2.4-2.48 GHz |
| Maximum transmitted power 8.61 dBm |
| WiFi |
| Frequency range of the WLAN module | 2.4-2.48 GHz |
| Max. radio frequency power of the WLAN module | 18.39 dBm |
AK2.0-RC-20Li battery
| Type Li-ion |
| Voltage | 18V max 20 V) --- |
| Capacity | 2000 mAh |
| Power | 36 Wh |
| Charge time | approx. 120 min |
NT1.1-RC-20Li power supply unit
| Voltage (input) | 100-240 V~ |
| Frequency | 50-60 Hz |
| Power consumption | 28 W |
| Voltage (output) | 20 V --- |
| Charge current | 1.1 A |
IP protection classes
| Robotic lawnmower | IPX5 |
| Charging station | IPX4 |
| Power supply | IP67 |
| Total weight (net) | approx. 8 kg |
Subject to technical changes!
IMPORTANT:
This battery charger is suitable exclusively for charging the product type RoboCut XL600.
Noise & vibration
Warning: Noise can have serious effects on your health. If the machine noise exceeds 85 dB, please wear suitable hearing protection.
Device emissions values
| Sound power level \( {\mathrm{L}}_{\mathrm{{WA}}} \) | 50 dB |
| Uncertainty \( {\mathrm{K}}_{\mathrm{{WA}}} \) | 4.09 dB |
| Guaranteed sound power level \( {\mathrm{L}}_{\mathrm{{WA}}} \) | 55 dB |
| Sound pressure level \( {\mathrm{L}}_{\mathrm{{pA}}} \) | 44 dB |
| Uncertainty \( {\mathrm{K}}_{\mathrm{{PA}}} \) | 3 dB |
The noise emission declaration complies with standard EN ISO 3744.
7. Unpacking
- Open the packaging and carefully remove the product.
- Remove the packaging material, as well as the packaging and transport safety devices (if present).
- Check whether the scope of delivery is complete.
- Check the product and accessory parts for transport damage. In the event of complaints the carrier must be informed immediately. Later claims will not be recognised.
- If possible, keep the packaging until the expiry of the warranty period.
- Familiarise yourself with the product by means of the operating instructions before using for the first time.
- With accessories as well as wearing parts and replacement parts use only original parts. Spare parts can be obtained from your specialist dealer.
- When ordering please provide our article number as well as type and year of manufacture for the product.
ATTENTION!
The device and the packaging material are not children's toys! Do not let children play with plastic bags, films or small parts! There is a danger of choking or suffocating!
8. Assembly / Before commissioning
ATTENTION!
Always make sure the product is fully assembled before commissioning!
ATTENTION!
If you intend to use a scarifier within the working area of the robotic mower, the boundary wire (11) must be buried.
ATTENTION!
Do not use a strimmer near the boundary wire (11). Take care when trimming edges near which the boundary wire (11) is located.
8.1 Setting up / correct position of the charging station (10)
ATTENTION
Fix the charging station (10) in place with the help of a hammer (not in scope of delivery) and the anchor pegs (13) only after you have staked out the complete working area. (Fig. 16).
NOTE:
Do not make new holes in the charging station.
NOTE:
Do not stand with your feet on the charging station plate.
ATTENTION
The extension cable as well as the mains cable must be outside the working area to ensure that it is not damaged.
The charging station (10) can be placed near a shed, a garden shed or the house.
- The charging station (10) must be placed on level ground.
NOTE:
Do not place the charging station (10) on a sloping or uneven surface, otherwise it will bend and the function will be impaired or a defect may occur.
- The charging station (10) must be set up/positioned such that there is at least one metre of space in front of and behind the charging station (10), without obstacles or similar. (Fig. 3)
8.2 Connect the boundary wire (11) to the charging station (10)
NOTE:
The boundary wire (11) must be laid at least one metre long, straight, without corners and obstacles in front of the charging station (10). This ensures the mower is able to drive into the charging station properly (10) (Fig. 3).
- The boundary wire (11) must be laid at least 30~cm away from boundaries, such as the house wall, ahead of and after the charging station (10). (Fig. 3)
- Strip approx. 10mm of insulation from one end of the boundary wire (11) (Fig. 4).
-
Insert the stripped boundary wire (11) into the red "OUT" cable clamp on the back of the charging station (10). Then pass the boundary wire (11) through the slot under the charging station (10) (Fig. 5).
-
Then lay the boundary wire (11) as described in point 8.3 "Laying the boundary wire (11)".
NOTE:
The boundary wire (11) must be laid at least 100 cm straight in front of the charging station (10).
After laying the boundary wire (11), trim off the excess wire.
- To connect the second end of the boundary wire (11), strip approx. 10mm of insulation from the end and insert it into the black "IN" cable clamp.
8.3 Laying the boundary wire (11) (Fig. 1/2)
The boundary wire (11) must be laid as a loop around the working area. When the robotic lawnmower (1) approaches, sensors inside the product detect the boundary wire (11). The mower changes direction at a random angle when it reaches the boundary wire (11).
If the mower needs to return to the charging station (10), it searches for / drives to the boundary wire (11) and then turns to the left.
It then travels along the boundary wire (11) back to the charging station (10).
ATTENTION:
To avoid damage to the product there must be an obstacle of min. 15cm height between the boundary wire (11) and water bodies/slopes/embankments and/or public roads.
ATTENTION:
Do not operate the mower on gravel/stones.
NOTE:
Define and make a sketch of the working area before starting to lay the boundary wire (11).
NOTE:
The max. permissible length for the boundary wire (11) is 300m .
- The distance from the boundary wire (11) to the outer edge must be 30~cm (Fig. 6).
-
A distance of 8cm between the boundary wire (11) is sufficient if all of the following apply (Fig. 7):
-
the boundary surface can be driven over (e.g. footpath, driveway or similar).
- the boundary surface is at the same level as the mowing surface.
- there are no protruding or pointed parts on the boundary surface that can come into contact with the mower or blades and damage them.
-
there are no plants on the boundary area that should not be mown.
-
The boundary wire (11) can be buried, or fastened in place using the wire pegs (12) provided.
- When laying the boundary wire (11), the angle in corners must always be >90^ (see Fig. 8+9).
- The robotic lawnmower (1) finds areas/passages that taper or that have a width of ≥ 0.8m (Fig. 10).
The minimum width of the mowing area is 0.8m (Fig. 10).
The maximum possible gradient is 35% (20^)
ATTENTION
To prevent accidents and/or damage to persons or the product, it is prohibited to operate the product on steeper terrain.
You can see how to determine the slope in Fig. 11.
NOTE:
For the demarcation of slopes/embankments, see point 8.3.3.
ATTENTION!
If you intend to use a scarifier within the working area of the robotic mower, the boundary wire (11) must be buried.
8.3.1.1 Burying the boundary wire (11)
- When burying the boundary wire (11), make a narrow groove in the grass turf using a spade or similar. Then place the wire in the groove and cover it with soil.
IMPORTANT:
To ensure trouble-free operation, the boundary wire (11) may be covered with max. 3cm of earth.
- After covering the boundary wire (11) with soil, it is sufficient to compact the loose soil with your body weight.
8.3.1.2 Fasten the boundary wire (11) with the wire pegs (12)
NOTE:
The distance between the wire pegs (12) must not exceed 80~cm (Fig. 12).
- Place the boundary wire (11) on the grass at a distance of 30cm or 8cm from the outer edge (Fig. 6/7).
Fix the boundary wire (11) at least every 80~cm using a wire peg (12) (Fig. 12).
- Knock the wire pegs (12) into the ground (Fig. 13) with the help of a hammer (not included in the scope of delivery).
- In case of uneven or curved conditions, the distance between the wire pegs (12) must be reduced accordingly.
8.3.2 Laying the boundary wire around obstacles (islands) (Fig. 14)
NOTE:
For large and heavy objects listed below as examples, an "island installation" is not necessarily required:
-Tree
- Raised bed
Large/heavy plant buckets
- Greenhouse
- Garden shed
To protect delicate/small objects from damage, lay the boundary wire (11) as follows:
- Run the boundary wire (11) along the outer edge until you have reached the point with the shortest distance (but at least 0.8m ) between the outer edge and the obstacle.
- Lay the boundary wire (11) like a "supply line" along the shortest path to the obstacle.
- Lay the boundary wire (11) at a distance of 30~cm or 8cm see point 8.3.1) around the obstacle.
- Lay the cable along the "feed line" back to the outer edge.
ATTENTION!
DO NOT ALLOW The boundary wire (11) to cross. The maximum distance between the boundary wires is 5mm .
- Continue to lay the cable along the outer edge.
8.3.3 Demarcation of slopes >35% (Fig. 15)
- The boundary to slopes >35% must be at least 40 cm, as shown in Fig. 15.
- If you do not maintain this distance, there is a risk that the robotic lawnmower (1) will drive out of the demarcated area. Thus, no function is possible any more, as the robot no longer has any orientation.
NOTE
When you have completely staked out the working area, connect the boundary wire (11) to the charging station (10) as described in point 8.2.
ATTENTION
Fix the charging station (10) in place with the help of a hammer (not in scope of delivery) and the anchor pegs (13) only after you have staked out the complete working area.
8.4 Connecting the charging station (10) (Fig. 16)
- Connect the 2-pin connector to the charging station (10) as shown in figure 16 and screw it in place.
- Then plug the mains plug into the socket.
ATTENTION
Make sure that the boundary wire (11) is correctly routed and the power supply unit (14) is correctly connected to the charging station (10) before connecting the plug to the mains.
If the charging station (10) is connected to the mains, an LED lights up on the rear part of the charging station (10). (see Fig. 17).
8.4.1 Description of the LED statuses (Fig. 17)
| LED status | Meaning Measure |
| Does not illuminate | No power supply | Make sure that the mains cable is properly connected to the battery charger and that the battery charger is connect- ed to a suitable power supply. |
| Illumi- nates green | The boundary wire is connected correctly. The robot is fully charged. | - |
| Flashes green | The robot is charging. | - |
| Flashes red | The boundary wire is damaged or not connected properly. | Check: Whether both ends of the boundary wire are connected and that the cable clamp is dependa- ble. Check: That the boundary wire has not been broken. |
8.5 Before commissioning
- Set the cutting height to the maximum cutting height (60 mm) using the cutting height adjustment knob (2) as shown in figure 18.
- Place the mower in the working area and start it (as described in point 9).
- Observe the mower for some time.
- If it returns to the charging station (10) without any problems, the installation is complete.
TIP:
Before first use:
Position the mower, directly behind the charging station (10), at a 90^ angle to the boundary wire (11) and give it the command to return to the charging station (10) via the "HOME" button (see point 9).
The mower will now drive back to the charging station (10) along the complete boundary wire (11) (Fig. 2).
This allows you to identify problem areas immediately before first use and correct them if necessary.
The same procedure is recommended for critical places, such as embankments/ditches/beds, etc.
Proceed as described above and start the mower (see point 9) with the "START" button.
In the event of a problem, you can stop the mower by pressing the stop button (4) on the product.
9. Starting up / adjustments
ATTENTION!
To ensure optimum function, a software update must be carried out before first use. (see 13.3 Software update)
NOTE
For a long service life, the robotic lawnmower (1) should only be operated at an outdoor temperature of 5 - 40^ .
ATTENTION!
Always make sure the product is fully assembled before commissioning!
Electrical connection
The electrical motor installed is connected and ready for operation. The connection complies with the applicable VDE and DIN provisions.
The customer's mains connection as well as the extension cable used must also comply with these regulations.
Damaged electrical connection cable
The insulation on electrical connection cables is often damaged.
This may have the following causes:
- Pressure points, where connection cables are passed through windows or doors.
- Kinks where the connection cable has been improperly fixed or routed.
- Places where the connection cables have been cut due to being driven over.
Insulation damage due to being ripped out of the wall outlet.
- Cracks due to the insulation ageing.
Such damaged electrical connection cables must not be used and are life-threatening due to the insulation damage.
Check the electrical connection cables for damage regularly. Ensure that the connection cables are disconnected from electrical power when checking for damage.
Electrical connection cables must comply with the applicable VDE and DIN provisions.
Only use connection cables of the same designation. The printing of the type designation on the connection cable is mandatory.
9.1 Quick start (Fig. 19/20)
After installing the boundary wire (11), you can use the robotic lawnmower (1).
Adjusting the cutting height
- Turn the cutting height adjustment knob (2) clockwise to increase the cutting height seamlessly between 20 - 60mm .
- Turn the cutting height adjustment knob (2) anti-clockwise to decrease the cutting height seamlessly between 20 - 60 mm.
NOTE
The arrow on the cutting height adjustment knob (2) points to numbers outside the knob. Here you can read off the cutting height currently set in 5 mm steps.
Halting/stopping the robotic lawnmower:
- To stop the robotic lawnmower, press the stop button (4).
- The robotic lawnmower stops immediately and the blade disc (6) stops.
ATTENTION
The robotic lawnmower is not switched off, it has only been stopped. Always use the "POWER ON/OFF" button to switch the robotic lawnmower off.
Switching the robotic lawnmower on:
- The robotic lawn mower can then be restarted as described below.
NOTE
Before the robotic lawnmower (1) starts mowing, an acoustic signal (four beeps) is heard, then the blade disc (6) starts rotating.
- Press the button ("POWER ON/OFF" button) until the robotic lawnmower (1) switches on.
- For the first use, enter the default PIN code "0000" by pressing "OK" four times when the number "0" flashes. (The PIN code can be changed as described in point 9.2.1).
After confirming the fourth digit with the "OK button", the robotic lawnmower is ready for use. The word "IdLE" appears on the display.
NOTE
The robotic lawnmower (1) switches off automatically after 30 seconds if no input is made.
ATTENTION
If the PIN code is entered incorrectly 10 times, "LOCK" appears on the display. The device is now locked for 10 minutes before you can enter the PIN code again.
- Press the "START" button and then the "OK" button to start mowing.
- If you press the "HOME" button and then the "OK" button, the robotic lawn mower (1) returns to the charging station (10) with the mowing function switched off.
The robotic lawnmower (1) operates continuously until the battery charge is too low. The robotic lawnmower automatically returns to the charging station (10). The cutter disc is deactivated in this state.
NOTE
After the battery is fully charged, the robotic lawnmower starts again. Alternatively, the robotic lawnmower remains in the charging station (10) in accordance with the set mowing schedule.
(By default, the robot mows from Monday to Friday from 09:00 - 15:00 hrs)
9.2 Settings
NOTE
To make adjustments to the product, the robotic lawnmower (1) must be switched on. Switch on the robotic lawnmower (1) by pressing and holding the button ("POWER ON/OFF" button) until "PIN" appears on the display.
9.2.1 Changing the PIN code (Fig. 21)
- Press and hold the "START" and "HOME" buttons simultaneously for at least 3 seconds.
The symbol and "PInI" flash.
- Now enter the old PIN code as follows (factory setting "0000").
The first digit illuminates ("0---").
- Use the "START" and "HOME" buttons to select the desired digit.
- Confirm the digit with the "OK" button.
The next digit illuminates (e.g. "10--).
- Proceed as described in paragraph 2-4 above.
After you have entered the "old" PIN code and confirmed the fourth digit with the "OK" button, "Pin2" appears, now you can enter the new PIN code.
The first digit flashes (0 - - )
- Use the "START" and "HOME" buttons to select the desired digit.
- Confirm the digit with the "OK" button.
- The next digit flashes (e.g. "10--").
- Proceed as described in paragraph 2-4 above.
After confirming the fourth digit with the "OK" button, the new PIN code is stored. The word "IdLE" appears on the display.
9.2.2 Setting/changing the date/time (Fig. 22)
NOTE
Date and time are necessary settings so that the robotic lawnmower (1) can mow in accordance with the set mowing schedule.
- The date/time setting is done in the order year - date - time.
- Press and hold the "START" button for at least 5 seconds.
- The symbol and a number (e.g. 2020) flashes on the display.
- Use the "START", "HOME" and "OK" buttons to set the year, similarly to the PIN setting.
- Then the next number illuminates (month.day e.g. 08.25 for 25 August).
- Use the "START", "HOME" and "OK" buttons to set the correct month and day.
The time is displayed last (e.g. 13:25).
- Set the current time as described above.
After confirming the fourth digit with the "OK" button, the date and time are stored. The word "IdLE" appears on the display.
9.2.3 Changing the start time (Fig. 23)
The factory-set start time of 09:00 can be changed at any time.
- Press and hold the "START" and "OK" buttons simultaneously for at least 3 seconds.
- The display shows the set start time, e.g. 13:25, with the first digit flashing.
- Use the "START" and "HOME" buttons to select the desired digit and confirm with the "OK" button.
- Proceed as described in paragraph 2-4 above.
After confirming the fourth digit with the "OK" button, the new start time is stored. The word "ldLE" appears on the display.
9.2.4 Changing the mowing time/day (Fig. 24)
The factory-set mowing time per day of 6 hours can be changed at any time.
- Press and hold the "OK" button for at least 3 seconds.
- The display shows the set mowing time, e.g. 06 H, with the first digit flashing.
- Use the "START" and "HOME" buttons to select the desired digit and confirm with the "OK" button.
After confirming the second digit with the "OK" button, the new mowing time or the new day is stored. The word "IdLE" appears on the display.
9.3 Edge mowing
The default setting is for the robotic lawnmower (1) to mow the edges every Tuesday and Friday.
This means that the robotic lawnmower (1) travels once along the boundary wire (11) the first time it mows for the day.
ATTENTION
In this mode, the blade disc (6) is active.
The times for edge mowing can only be set via the app.
9.4 App control
The RoboCut XL600 robotic lawn mower can be operated via app. The app is available in the respective app stores for Android and iOS.


ATTENTION
The use of the app falls under the term "using" as defined in this operating manual. Therefore, also observe the safety regulations that apply to this.
The robotic lawnmower has two different working methods. In the original condition as delivered, the robot works offline. The default range of robot mowing functions are available.
If you wish to use additional services (mowing times, software update, sensor settings, etc.), an additional app is available but this is not provided by the Scheppach Group. You must enter your contact information before you can connect this app to our robotic lawnmower. An e-mail address is sufficient in this instance. The APP manufacturer has provided a data privacy statement and a user agreement for this, which regulates use of the app or your personal data.
We would like to advise you that the Scheppach Group will not save any personal data when you use the app and will also not process any further information. This is only done by the app manufacturer.
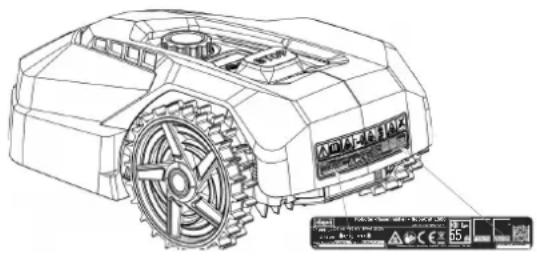
9.4.1 Registration
In order to use the app, registration via email is necessary. Alternatively, you can also register and log in via Facebook, with your Apple ID or with Google. Have the serial number of your robotic lawnmower ready for registration. You will find this on the type plate of the unit.

9.4.2 Communication / data transfer
The app communicates with the robotic lawnmower either via Bluetooth or WiFi.
NOTE
Depending on your contract with your mobile phone provider or internet provider, the data transfer from the app to the internet may incur costs that you will have to bear yourself.
9.4.3 App functions
Viewing and editing the mowing plan
- Adjusting the mowing zones
Starting mowing
- Send the device to the charging station
- Settings
- Updates / read out (log data)
9.4.3.1 Viewing and editing the mowing plan
With this function you can set when the robotic lawnmower should start mowing and how long it should mow for each individual day.
There is one start time per day (later max. two start times) available.
In this function you can also set the days on which the lawn edges are to be mown.
ATTENTION
Changing the mowing schedule, starting a mowing operation, switching the automatic on and off, sending the robotic lawnmower home and changing the date and time may result in activities that are not expected by other people. Affected persons must therefore always be informed in advance about possible activities of the robotic lawnmower.
9.4.3.2 Adjusting the mowing zones
In this function you can manually set up four different mowing zones in % .By default, the function is set to "AutoMultizone".
Here, the mower starts after each charging process at an arbitrary place along the boundary wire.
This means:
After the first charging process, the robotic lawnmower moves along the boundary wire in accordance with the set % number for zone 1 and starts mowing.
After the second charging process, it does the same in accordance with the set % number for zone 2, etc.
Do not use chain saw for purposes not intended.
You have installed 200m of boundary wire and set a value of 25% for zone 1.
After charging, the robotic lawnmower drives 50m along the boundary wire and starts mowing from there.
NOTE
This function allows you to start the robotic lawnmower in difficult-to-reach passages, for example, to ensure a perfect mowing pattern.
9.5 Changing the default rain sensor setting
Press and hold the "HOME" button for 3 seconds, then "Rain" will appear on the display. Press "OK" to access the settings interface. Then "ON" or "OFF" is displayed. You can change the settings by pressing the "START" and "HOME" buttons and confirm with the "OK" button.
10. Cleaning
ATTENTION
Switch off the product before cleaning with the button.
ATTENTION
Put on protective gloves before cleaning the rotating blade carrier.
We recommend that you clean the product directly after every use.
Clean the product at regular intervals using a damp cloth and a little soft soap. Do not use any cleaning products or solvents; they could attack the plastic parts of the product. Make sure that no water can penetrate the product interior.
11. Transport
- Press the button ("POWER ON/OFF" button) to switch off the robotic lawnmower (1).
- Wear protective gloves when transporting the robotic lawn mower (1).
- Carry the robotic lawn mower (1) securely with both hands.
To prevent damage, avoid the robotic lawnmower (1) falling to the ground from greater heights.
If this does happen, it must be immediately taken to a specialist workshop for inspection.
Do not continue to use the robotic lawnmower (1) before this has been done.
12. Storage / Hibernation
Your mower will give you pleasure for longer if it is allowed to hibernate.
Although this is not a problem, we recommend that you store your mower in a closed room, e.g. in the garage, during the winter.
Before storing the mower:
- Clean it thoroughly (see point 10).
- Charge the battery fully.
- Switch the product off.
- Remove the battery (see point 13.2).
Store the product and its accessories in a dark, dry and frost-free place that is inaccessible to children.
The optimum storage temperature lies between 5 and 40^ .
Store the robotic lawnmower (1) in its original packaging.
Cover the robotic lawnmower (1) to protect it from dust and moisture.
Store the operating manual with the robotic lawnmower (1).
13. Maintenance / Update
ATTENTION
Disconnect the mains plug before carrying out any maintenance work.
Connections and repairs
Connections and repair work on the electrical equipment may only be carried out by electricians.
- Type of current for the motor
- Machine data - type plate
13.1 Replacing the blade (7) (Fig. 25)
ATTENTION
Switch the mower off before starting with the work.
NOTE
The blades (7) must be replaced after approx. 8 weeks. (2 sets of 3 blades each are included in the delivery)
Use only original blades from the manufacturer. (Art. no. 7913001601)
ATTENTION
Put on protective gloves before replacing the blade (7).
ATTENTION
All blades (7) must always be changed at the same time. The changing of individual blades (7) is not permitted.
If the Phillips screws (8) are damaged or can no longer be tightened, these must also be replaced.
New screws are included with the replacement blades.
- To replace the blades (7), place the robotic lawnmower (1) on a workbench with the underside facing upwards. (We recommend a soft base to avoid damage to the housing).
- Loosen the Phillips screw (8) with the help of a Phillips screwdriver (not included in the scope of delivery).
- Remove the old blade (7).
- Fit the new blade (7) and fasten it with a new screw (8).
- Check that the blade (7) can move. If this is not the case, loosen the screw (8) a little.
- Carry out this operation on all three blades (7).
13.2 Inserting/removing the rechargeable battery (Fig. 26/27)
ATTENTION
Switch the mower off before starting with the work.
- To install/remove the battery, place the robotic lawnmower (1) on a workbench with the underside facing upwards. (We recommend a soft base to avoid damage to the housing).
- Remove the battery cover screws and remove the battery cover (Fig. 26/27).
- Remove the battery retaining device.
Pull the battery out carefully. NOTE Do not pull on the cables.
- Loosen the locking and pull the connector off.
- Insert the battery (if necessary a new original battery).
- Re-install the battery in reverse order (Fig. 26/27).
13.3 Software update (Fig. 28)
Connect your robot to your WiFi.
The software can be updated as soon as a new version is available. (The latest software version can be found on our homepage.
The software can be installed via USB or the app. The software for USB transmission can be downloaded from our homepage www.scheppach.com.
13.3.1 Software update via USB
NOTE
The operating manual supplied with your robotic lawnmower (1) is based on the software version at the time of production of the mower.
Some new or changed features and functions may not be included in the operating manual.
You can find the latest version of the software in the app or at www.scheppach.com.
With this product, it is necessary to note that the following parts are subject to natural or usage-related wear, or that the following parts are required as consumables.
Wearing parts*: Blade (7), screws (8), boundary wire (11), wire pegs (12).
- may not be included in the scope of delivery!
Article number(s) for wear parts:
Pos.
7
Blade
79130016C
Pos.
8
Screws
39130011
Pos. 11 Boundary wire 7913001702
Pos. 12 Wire pegs 7913001701
Spare parts and accessories can be obtained from our Service Centre. To do this, scan the QR code on the front page.
14.Disposal and recycling
Notes for packaging


The packaging materials are recyclable. Please dispose of packaging in an environmentally friendly manner.
Notes on the electrical and electronic equipment act (ElektroG)
Waste electrical and electronic equipment does not belong in household waste, but must be collected and disposed of separately!
-
Used batteries or rechargeable batteries that are not installed permanently in the old device must be removed non-destructively before disposal! Their disposal is regulated by the battery act.
-
Owners or users of electrical and electronic devices are legally obliged to return them after use.
- The end user is responsible for deleting their personal data from the old device being disposed of!
- The symbol of the crossed-out dustbin means that waste electrical and electronic equipment must not be disposed of with household waste.
-
Waste electrical and electronic equipment can be handed in free of charge at the following places:
-
Public disposal or collection points (e.g. municipal works yards).
- Points of sale of electrical devices (stationary and online), provided that dealers are obliged to take them back or offer to do so voluntarily.
-
Up to three waste electrical devices per type of device, with an edge length of no more than 25 centimetres, can be returned free of charge to the manufacturer without prior purchase of a new device from the manufacturer or taken to another authorised collection point in your vicinity.
Further supplementary take-back conditions of the manufacturers and distributors can be obtained from the respective customer service.
-
If the manufacturer delivers a new electrical device to a private household, the manufacturer can arrange for the free collection of the old electrical device upon request from the end user. Please contact the manufacturer's customer service for this.
- These statements only apply to devices installed and sold in the countries of the European Union and which are subject to the European Directive 2012/19/EU. In countries outside the European Union, different regulations may apply to the disposal of waste electrical and electronic equipment.
Notes on lithium-ion batteries

Remove the battery before disposing of the device!
- Do not dispose of the battery in household waste, in a fire (risk of explosion) or in water. Damaged batteries can harm the environment and your health if toxic vapours or liquids escape.
Defective or used batteries must be recycled in accordance with Directive 2006/66/EC.
- Hand in the device and the battery charger at a recycling centre. The plastic and metal parts used can be separated by type and thus recycled.
- Dispose of batteries when discharged. We recommend covering the poles with an adhesive strip to protect against a short circuit. Do not open the battery.
- Dispose of batteries according to local regulations. Return batteries to a used battery collection point where they can be recycled in an environmentally friendly manner. Ask your local waste disposal company about this.
15. Troubleshooting / fault codes
The following table shows fault symptoms and describes remedial measures in the event of your machine failing to work properly. If you cannot localise and rectify the problem with this, please contact your service workshop.
15.1 Fault table
| Fault Possible cause Remedy |
| Mower does not start | Mower or charging station not connected to the mains | • Connect the power supply unit to a suitable power source
• Call a specialist if necessary |
| LED light on charging station does not light up |
| LED light on charging station flashes red | Boundary wire is not connected or is cut/broken | • Connect/repair boundary wire |
| Mower does not mow properly | Blades are worn • Replace the blade | |
| Mower starts at unusual/ wrong times | Date/time is incorrectly set • Set the correct date and time |
| Mower gets stuck Unsuitable terrain | terrain/obstacle | • Adapt the terrain/obstacle to the requirements of the robotic lawnmower
• Adjust the laying of the boundary wire accordingly |
15.2 Error codes
| Error code | Meaning | Remedy |
| ---- | Rain sensor delay | - |
| E1 | Mower outside the working area | 1. Check that the mower is in the working area.
2. Ensure that the charging station is properly connected to the battery charger and charger is connected to a suitable power supply.
3. Make sure that the boundary wires have been clamped correctly and replace them if necessary. |
| E2 | Wheel motor blocked | 1. Switch the mower off. Move the mower to an area that is free of obstacles. Press the “START” button and then the “OK” button.
2. If the error message is still displayed, switch off the product. Turn the mower upside down and check what is preventing the wheels from turning.
3. Remove the objects blocking the wheel(s), turn the mower over.
4. Press the “START” button and then the “OK” button. |
| E3 | Cutter disc blocked | 1. Switch the mower off.
2. Turn the mower upside down and check what is preventing the blades from turning.
3. Remove the objects and turn the mower over.
4. Place the mower in an area with short grass.
5. Press the “START” button and then the “OK” button. |
| E4 | Obstacle sensor trigger not reset | 1. If the error still occurs, contact your specialist dealer. |
| E5 | The mower was lifted | 1. Switch the mower off.
2. Move the mower to an area that is free of obstacles. Press the “START” button and then the “OK” button.
3. If the error message is still displayed, switch off the product. Turn the mower upside down and check if there is anything preventing the front axle from moving.
4. Remove all obstacles, turn the mower over and switch it on. Press the “START” button and then the “OK” button. |
| E6 | Roll-over sensor was triggered | 1. Position the mower.
2. Press the “START” button and then the “OK” button. |
| E7 | Inclination sensors were triggered | 1. Switch the mower off.
2. Move the mower to an area in your lawn with level ground.
3. Switch the mower on. Press the “START” button and then the “OK” button. |
| E8 Docklng/recharging failed | 1. Check that there is 1 metre of space before and after the charging station, without obstacles or corners.
2. The charging station must be placed on level ground.
3. Manually place the mower in the charging station for charging. After the mower is fully charged, press the “START” and then the “OK” button. |
| E9 | The robotic lawnmower is stuck | 1. Place the robotic lawnmower in an area that is free of obstacles.
2. If the error still occurs, contact your specialist dealer. |
| E10 Protection of the battery | 1. If the temperature is too high, wait until the temperature has dropped. If the temperature is too low, wait until the temperature is above 5 degrees Celsius.
2. If the error message is still displayed, replace the battery. Re-start the mower. Press START and then OK.
3. If the error still occurs, contact your specialist dealer. |
| E11 No boundary signal | 1. When the mower is in the working area, check the charging station LED indicator. If it lights up red, make sure that the boundary wires are well connected to the terminals on the charging station. If the problem persists, check whether the boundary wires have been cut. |
| E13 | Charging current too high or too low | 1. Check docking area.
2. If the error still occurs, contact your specialist dealer. |
| EE Error unknown | 1. Re-start the mower.
2. If the error still occurs, contact your specialist dealer. |
| BP Battery thermal protection | 1. Switch the mower off.
2. Move the mower to an area in your lawn with level ground.
3. Check the temperature of the battery.
4. If the temperature is too high, let the battery cool down.
5. If the temperature is too low, wait until the temperature is higher than 5°C.
6. Re-start the mower.
7. If the error still occurs, replace the battery.
8. If the error still occurs, contact your specialist dealer. |
| LOCK | Robotic lawnmower locked (PIN entered incorrectly too many times) | 1. Wait 10 minutes and then enter the PIN again.
2. Do not switch the robotic lawnmower off.
3. If the error still occurs, contact your specialist dealer. |

Download on the
App Store

ANDROID APP ON
Google play
ATTENTION
Download on the App Store


Android APP on Google play
ATTENZIONE

Download on the App Store


Android APP ON Google play
LET OP

Download on the App Store


Android APP ON Google play
ATENCLON
9.3 Cortar as bordas do relvado
Download on the App Store


Android APP on Google play
ATENÇAO
Akumulator nabijecka
Pred nabijenim si prectete instrukce.
Ujistete se, ze nabijecka opovida mistrimu zdroji stridaveho proudu. Zkontrolujte, zda spojeni mezi nabijeckou a Jednotkou bateriovych zdroju opovida spravnym modelum. Delsi zivotnosti a lepsiho vykonu lze dosahnout,Pokud se akumulator nabiji pri teplote vzduchu mezi 18^ a 25^. .Nenabijejte akumulator pri teplote vzduchu nizsi nez 5^ nebo vyssi nez 40^. Tyto pokyny jsou dulezite, protoze tim muzete zaranit vaznemu poskozeni akumulatoru.
VAROVÁNÍ:
Akumulator AK2.0-RC-20Li
| Typ Li-Ion |
| Napěti | 18V max 20 V) --- |
| Kapacita | 2000 mAh |
| Vykon | 36 Wh |
| Doba nabijeni | cca 120 min |
Sityovy adaptor NT1.1-RC-20Li
Pokyny k lithio-ionovym akumulatorum

Akumulátor préd likvidaci pristroje demontujte!
Akumulator AK2.0-RC-20Li
| Typ Lǐtium-iónovy |
| Napätie | 18V max. 20 V) = = |
| Kapacita 2000 mAh |
| Vykon | 36 Wh |
| Doba nabijania | cca 120 min. |
Napájaci zdroj NT1.1-RC-20Li
| Napătie (vstup) | 100 – 240 V~ |
| Frekvencia | 50 – 60 Hz |
| Přikon | 28 W |
| Napătie (vystup) | 20 V --- |
| Nabijaci prud | 1,1 A |
Triedy ochrany IP

Download on the App Store


Android APP ON Google play
FIGYELEM
Akumulator AK2.0-RC-20Li
| Tip Litij-ionski | |
| Napon 18 V (maks. 20 V --- | |
| --- |
| Kapacitet 2000 mAh | |
| Snaga 36 Wh | |
| Vrijeme punjenja okay 120 min | |
Download on the App Store


Android APP on Google play
POZOR
Uporaba aplikacije potpada pod pojam „uporaba" u skladu s ovim prisuCnikom za uporabu. U vezi s tim pogledajte i vazece sigurnosne propisi unjemu.
Akumulator AK2.0-RC-20Li
| Tip Li-ion |
| Napetost 18 V (maks. 20 V == ==>) |
| Kapaciteta 2000 mAh |
| Moč 36 Wh |
| Čas poljenja prbl. 120 minut |
Napajalnik NT1.1-RC-20Li
| Napetost (vhod) 100-240 V~ |
| Frekvenca 50-60 Hz |
| Vhodna moč 28 W |
| Napetost (izhod) | 20 V --- |
| Polnilni tok | 1,1 A |
Razredi zašcite IP
| Robotka kosilnica | IPX5 |
| Polnilna postaja | IPX4 |
| Napajalnik | IP67 |
Skupna teza (neto) prbl. 8 kg
Pridržujemo si pravico do tehnicih sprememb!
POMEMBNO:
Polnilnik jeprimeren samo za poljenje tipa izdelka RoboCut XL600.
Hrup & vibracije
Download on the App Store


Android APP on Google play
POZOR
Uldised ohutusjuhised
JUHISArge tommake kaablitest.

Download on the App Store


Android APP on Google play
DÉMESIO
Akumulators AK2.0-RC-20Li
| Tips litija jonu | |
| Spriegums 18V (maks. 20 V --- | |
| --- |
| Kapacitate 2000 mAh | |
| Jauda 36 Wh | |
| Uzlădes laiks apm. 120 min | |
Tikla barošanasbloks NT1.1-RC-20Li
| Spiegums (ieejas) 100-240 V~ |
| Frekvence 50-60 Hz |
| Jaudas pateriš 28 W |
| Spiegums (izejas) | 20 V --- |
| Lädēšanas strāva | 1,1 A |

Download on the App Store


Android APP on Google play
IEVERIBAI

Download on the App Store


Android APP on Google play
OBS
Download on the App Store


Android APP on Google play
HUOMIO

Download on the
App Store

ANDROID APP ON
Google play
PASPA

Download on the App Store


Android APP ON Google play
OBS
Yka3aHnna 3a6e3oNaCHOCT3aakymyIaTOp n 3a-pnHO ycTPOIcTBO
AkyMylatop 3aprAnHO yctpoiCTBO
IpeHn 3apeXdaHeTo npOeTe HNcTpyKuHn-
Te. YBepete ce, ye BaWeto 3aprAnHO yctpoiCTBO
CbotBeTCTBa Ha MeCTHOT eNEkTPO3axpaHBA-
He CnpomEnHb TOK. YBepete ce, ye Bp3KaTa
MeJy 3aprHOTO yCTpoiCTBO n AkyMylatop-
HnaKet CbotBeTCTBa Ha npaBnHHTe MoDe-
II. No-dblbr EKcnNoatauHOHen XHBOT n No-do-
6pa npOn3BoDntENHocT Morat Da 6bDat NocTnR-
HaTH, aKO akyMylatopBT ce 3apeXda npn Temne-
paTypa Ha Bb3dyxa MeXdy 18°C n 25°C.
He 3apekdaIte akymyIaTopo npn Temnepatypn Ha Bb3dyxa nOd 5 ^ C nnn HAd 40 ^ C Te3nHnCTpyKcnn Ca BaXHN, TbN KaTO TOBa MoKe da npedOTBpaTH cepno3HN NOBpeDN no akymyIaTopa.
△PNEpyPExDEHNE:
JIITHeBO-IOHHNTE aKymyIaTOPn MoRat da eKcnNo-Dnpat IIN Da npuHnRr NOxap, AOK Te Ce demOH-Tnpa, Cbbp3BaT HaKbCo IIN Ce n3NaRaT Ha BOda, OfBn IIN BUCOKI TemnepaTyPi. NdoXoxJaTe npedna3nBO, He OTbapRyTe aKymyIaTopa H He To I3NaRaTe Ha eNEkTpnueCKm/MexaHnHyn HaTOBaPBAHn. IV36raBaTe cbxpaHene Ha batepInTe npn PpKa CJIbHcEBA CBETIIHa.
- He pa3rno6BaIte, oTbapraTe uIn pa3dpo6BaIte aKymyIaTopa.
- He cBbP3BaIte akymyIaTOp hakbcO. He cbxpaHraBaIte akymyIaTOpn npOn3BOJHO B KyTIN YekMeDke, KbDeTo Te MORat B3aIMHO da Ce CbPkaT hakbcO INI Da 6bTaT Cbbp3AHn HAKbcO OT npOBoDAIu MATEpnaJI.
AkoakymnatopbHeceN3noJ3Ba,dpjKTe ro daJeuOTdpymMeTaNHPeDMETN KATO KnaMeepnMOHETN,KNIOOBE,PiPOHN,BHTOBeNNDpyrMaJIKNMeTAJHIN PpeDMETN,KONTO MORaT DaOCbIeCTBRT Bp3kaOT eDNHNA3BODdoDPyrrCbp3BaHeTo HAcBcOHa KNEMITe Ha bATEpNtAMoKe Da DOBeDe Do N3rapAHN INN NOkap.
He n3naraaTe akymyIaTopa HnTo Ha ropeuHa, HnTo Ha orbH. N36BaBaeTc bXpaHeHne npraKa CJIbHHeBa CBETJInHa.
- He n3naraite akymyntopaa ha MexaHnHy yapn.
-ПииИЗТИЧАЕНЯбATEРЯТА HeДОпУСКаITE KOHТAKTHaTeUHOCCTTA CKOЖATAИЛN OUHTe.Ako e6nI OcBIIeCTBeH KOHTaKT,I3MnIte 3aCerHaTaTAtObIaCT O6nIHOC BODA INOTbPcTe Jekapcka NOMOUI.
- He3a6abHNo notbpcTe JekapcKa nomou, ako KneTka uNn ayMyIaTop e 6uNa noBlnHaTa.
-Дрьжteakymnatopa nctn cyx.
- AkymylatopbT OCNIpyra Hai-DobpaTa cn npoN3BOIDTeHOCCT, KORATO ToC ce N3NOJ3Ba npn HopMaHa cTaima Tempepata (20°C ± 5°C).
-Пи n3xBpIeHTo Ha akMyIaTOpn npbXTe aKymIaTOpIte c pa3IuHn eIeKtpoxmUHn CnCTeMn OTdJIeHn eINH OT dpyr.
3apekdaTe npdyKaTa camo C npedoctabeHoTo c KocackaTa 3apdno yctpoiCTBO.He n3non3BaTe 3apdno yctpoiCTBO,pa3nHOrOT cneunanHO npedBnDEHOTo 3a n3non3BaHe C npdyKa.3apdHO yctpoiCTBO,KoETe eoXOJaIO 3a DaJeH TIN akymynatOpN,MOKe Da npdeN3BnKa Ioxap npn n3- non3BaHe C dpyr akymynatOp.
He n3no3BaIte akymlyaTo, KOTo He ca npedBnDeH 3a H3no3BaHe c npOdyKta.
CbxpaHraBaIte akymyNaTopa n3BbN 06cera Ha deua.
3ana3eOpnHnHnHOOnncHHe Ha npOyKTa 3a6bdeu cnpaBKn.
- N3xBbPne npodykTa cblnacHO n3NcBAHnraTa.
- PóndbpxaIte 3apáHOTO yCTpOINCTBO YnCTO.
Pópaɪn 3ambpcraBaHe cIeCTByBa ONaCHOCT OT TOKOB yIap.
-Ппеби BCяка ynoTppe6a npOBepBaIte 3apДHOTO yCTpoiCTBO, KaBena n ukepea. He n3nON3BAITE 3apJHOTO yCTPOIcTBO, aKO yCTaHOBInTe NOBpeNi. He OTbApIte 3apJHOTO yCTpoIcTBOcamn N Bb3JaarTe peMOHTupaHTo My cAmo Ha KBaINuNCHpAHn CneuaJIncTn n Camo C oprHaHN Pe3ePBn qactn. ПОврдENn 3apJHn yCTPOIcTBA, KaBeni n ukepeRy yBeJIuYabat pUCKaOT TOKOB yIap.
BnHaH npOBepaBaiTe daJI MpeXkoBOTo HAnpeXeHne OTRObAp Ha NocOueHOTo HAnpeXeHne BbpxTyINOBaTa TaBeIka Ha 3apdHOTO yCTpoiCTBO.
Hikora He n3noJ3BaIte 3apJdHTo yCTpoiCTBO, aKo Ka6eJIbT, UenCeJIb T uNn CaMnT npOdyKT ca NobpeDeH N O T BbHUn H b3JeCTBn. 3aHeceTe 3apJdHTo yCTpoiCTBO B Ha-6JIu3Kn Cneua-nIIN3npaH cepBn3.
B HnKaKbCnyaH He OTBapRyTe 3aprHTo ycTPOiCTBO. 3aHecTe 3aprHOTO yCTPOiCTBO B Hn-6Jn3Kn CneuaJIn3npaH cepBn3.
BHIMAHHE!
No Bpeme Ha ekcnnoataunr To3n eJektpuyeckn HNCTpyMeHc3daBa eJekTpomarHHTHO nOe. Pnp ONpeJeHn ycNoBna TOBa nOne MOxKe da Hapywn FyHKUHOHPaHeTo Ha aKTUBHn Nn NaCNBn MeDnC HCK NmIpaHTN.
3a da ce HamaHOnaCHOCTTa OT cepNo3HNiN CmbpTOHOCHn HapaHbAHn, npenopbYBaMe Ha JIu- taC MeuHcHKn IMnHaHT Da Ce KOHCyTnpa T cbC CB0JeKap N C npo3BOIDTeNa Ha MeuHCKnIMnHaHT, npedn Da n3NO3BaMaHHaTa.
OcTaTbUHn pNCKOBe
MaunHatae KOHCTpynpaHa CbIpaCHO HIBOTo Ha pa3BNTHe HaTexHnKaTa Npni3HaTne npaBnJa Ha TexHnKa Ha 6e3onacHOCT. BbIpeKn ToBa, npi pa6Ota MoratDa Bb3HNKHaT OTeENH OCTaTbUH PNCKOBE.
3aTaPaaBaHe Ha 3dpabeTo npaTn Tok npn n3- n03BaHe Ha HnPaBnHn eNeKtpueckn Cbbp3Baun npoBoNDn.
- PpEiJa n3BbPwBaTe paBoTn No HAcTpOiKa nn Nn NOdpbXka,OCBO6oTe NyCKOBn 6yToH n 13-DbpnaIte uenceja.
OcbeH ToBa, BbIpeKn BCNUKn B3eTN IpeJNa3Hm MepKn, MoRaT Da CbUeCTByBaT HeaBn OCTaTbHu PNCKOB.
OctaTbUHHTe pNCKOBe MORAT da 6bDat HamaJIeHN, aKO 6bDat cna3BaHn rIaNbYyKa3AHNA 3a6e3onachocT" n, yNoTppeBa no npedHa3hauehne KaKTo n PbKOBOCTBOTO 3a yNoTppeBa KaTO cyaJIO.
- PpeoTbpaTaBaNte CnyaHn BKnOuBaHnHa MaMaHnHata: npu NoctabHe Ha uencena B KOHTa Ta NyckOBnT 6byoH He 6bNa Da e HATncHt. N3noJ3BaIte HNCTpyMeHtA, npenOpBuH B TOBA pBoKoBOdCTBO 3a ekCnNoatau. Taka noctirate ONImaHa npou3BODntelnoCT Ha BaWata MaunHa.
-Дрьктpe рьцete cn ДалачOT pa6oTHaTа 30Ha, KOrato MaunHata pa6oTN.
6. Texhnuecken daHHN
Kocayka-po60T
| Hansegen 20 V | --- |
| Obopotn ha npazeh xod n0 | 2800 min-1 |
| Sinoquna ha prazane | 18 cm |
| Bvocunha ha prazane | 20-60 mm |
| Pozniem 3a Bvocunha ha prazane | 9 |
| Πούц | 600 m² |
| Makc. NaKIoN | 35 % |
| Вьзможно най-тесен п Voxod | 0,8 m |
YnpabHeHne (c npnIOKeHne)
| Bluetooth® |
| РавOTна чектона лentesа | 2,4 - 2,48 GHz |
| Мakсимална пedingавана
мошист | 8,61 dBm |
| WiFi | |
| Чектон обхват на WLAN
моуILA | 2,4 - 2,48 GHz |
| Марс. радиочектона
мошист на WLAN моуILA | 18,39 dBm |
Akymyntop AK2.0-RC-20Li
| Тип | Литnevobo-ийонен |
| Наржени | 18 V --- (мakc. 20 V ---) |
| Кац捜тET | 2000 mAh |
| Моцноct | 36 Wh |
| Вреme за заразождае | ok. 120 min |
3axpaHbaa 6nok NT1.1-RC-20Li
| Hansejeene (Bxod) | 100-240 V~ |
| Yectota | 50 - 60 Hz |
| KoHcympaHa MoiHocT | 28 W |
| Hansejeene (n3xoJ) | 20 V--- |
| Зарден тOK | 1,1 A |
IP KJACOBe Ha 3aunTa
| Kocauka-robot | IPX5 |
| Зардна стацnia | IPX4 |
| ЗхранвашиRobok | IP67 |
| Овно Терло (нето) | OK. 8 kg |
3ana3Ba ce npabTo Ha texHnueckn npomeH!
BAXHO:
3apnHOTo yCPOINCTBO e NOxOJaIO eINHCTBeHo 3a 3apeKdahe Ha Tnna npOyKT RoboCut XL600.
UyM N Bn6paun
Ipeynpexdne:UymbTMOKeJaOKaKecepnO3Hb3DcNCTBnBbpxBaWTo3dpabe.AKO WymbTHaMaunHInTe npEbnwaba85dB,mon,HoceteNOxD0Aua3auNTa3aCnyxa.
UymoBn emncn
He cTbNbaIe Bbpy nIoYuTa Ha 3apdHaTa cTaHcIy.
BHIMAHHE
YdIbJIKNTeHNNrT, KaKTo mMpexKOBnT Ka6eI TpI6Ba Da ce HAMnpa N3BbH pa6OThata 3oHa, 3a Da He 6bDat NOBpeHn.
3apHaTa CtaHua (10) MoKe da 6bDe NoCTaBeHa B 6n3OcT Do HAcB, rpaHnCKa 6apaKa nnDo KbShaTa.
- 3apnata cTanu (10) Tp86Ba da 6bde noctaBeHa Bbpxy paBHa ochoba.
YKA3AHNE:
He nocTabaIte 3apdHaTc tAnu (10) Bbpxy HAKIOHEHa INI HepaBHa NOBbpxHOCT, TbI KATO B IPOTNBEH CnyaI Ta Ce ObBA, C KOEtO fYHKUaTa Ce HApUaBA INI MoKe Da Bb3HNKHe DepeKT.
3apndhata ctaunra (10) Tpr6ba da 6bde TaKa nocctaBeHa/No3nUHOHpaHa, ye nped n 3ad 3aPraHaTa ctaunra (10) da mHa hA-MaNKo eIN MeTbp plou6e3 npenrTcBna IIn NIOO6Hn. (Furpa 3)
8.2 Cbbp3BaHe Ha orpaHnUteHnI npoBOdHk (11) KbM 3apAHaTa cTahnI (10)
△YKA3AHNE:
OrpaHnHTeHHT npoBODnK (11) Tp86Ba da e noLoXKeH nped 3apAHaTa CTaHcNra (10) Ha nOHe eHN MeTbp npab, 6e3 bIIN n PpePrtCTbNra. TaKa ce OcnIpyRa BnpaBnHO Bn3aHe B 3apAHaTa CTaHcNra (10) (ΦIr. 3).
-OrpaHnUHTeHHrT npoBODnK (11) nped n cneJ 3apAHaTa CTaHcNra (10) TpA6Ba da e noLoXeH Na pa3ctOarHHe OT NOHe 30 cm OT orpaHnUeHn, KaTo HAnp. cTeHaTa Ha KbIaTa. (Furpya 3)
Cbaaneok.10mmotn3oanaetaHa orpaHnHTeHHna npoBODnK (11) ot eHaTa cTpHa (Phrypa4).
BkapaTe oroIeHn orpaHnHTeJIeH npoBOdHnK (11) B cepBeHata Ka6eHna KInema "OUT"OT 3aHnHaTcTpHa Ha 3apAnHata cTahn (10).CneT OBA npokapaiTe orpaHnHTeJIHn npoBOdHnK (11) npe3 npope3a noD 3apAnHata cTahn (10) (fnpura 5).
CneToba noJoxTe orpaHnHTenHn npoBODnK (11),KaKTo e onncAo B ToUka 8.3,NoIarHe Ha orpaHnHTeJeH npoBODnK (11)
YKA3AHNE:
OrpaHnHTeHNrT npoBOdNk (11) Tp8Ba da 6b-De noJoxhen HapBo MmH. 100 cm nped 3apJnHata cTaHcna (10).
CneI noIarHeTo Ha orpaHnUHTenHH npoBOHnK (11)CKbCeTe n3JIuHHn npoBOHnK.
- 3a Да CBьржete Btopя Край Ha orpaHnHTeJIHЯ npOBODHk (11), orone Te ok. 10 mm ot Края My n Iro BKapaIte B uepHaTa Ka6enHa KInema ,IN".
8.3 Ponalarahe Ha orpaHnHTeIeH npoBODHK (11) (Φnr. 1/2)
OrpaHnHTeHHnT npoBODnK (11) Tp6Ba da 6b- de noLoXeH kato KOHTyp OKoNo pa6OTHata 30Ha. Ako Kocaykata-po6ot (1) ce np6nKn, ceh3Opnte B npOyKt pa3No3HaBt orpaHnHTeHHn npoBODnK (11).Pnp DoCTnraHe Ha orpaHnHTeHHn npoBODnK (11) Kocaykata npomeH nocokata noD cnlyaeh bIbn.
Ako Kocaykata Tp6Ba Da ce Bbpe ObaTHo KbM 3apnHata CtaHcna (10), Ta TbpCn/npuDnKba Ce Do OrpaHmHTeJIHH npOBoHNK (11) n CneI ToBa 3aBnBa No 3daHHe HnBA.
CneTobaTcSeDnKnIokpAorpaHHTeHnI npoBODNk (11) 6paTHo KbM 3apJHaTcTaHn (10).
8.3.1 06u yka3aHnHaNuHn Ha noJaraHe
BHIMAHNE:
3a da ce n36erHaT NOBpeHn No npOdyKta, Tp8Ba Da HMa npenrTCTBHe C MHN. 15 cm BncoUHaMeKdy orpaHnHTeHHN npoBOdHnK (11) n BOdHn 6aceHn/CKNoHOBe/OTKocn n/nnn o6ueCTBeHn yInu.
BHIMAHNE:
KocaykaTa He 6nBa da ce nyca B ekcnloataunBbpxy yaKn/kambln.
YKA3AHNE:
OnpeJeTe n cbCTaBeTe cKuca Ha pa6oTHaTa 30Ha, npEi Da 3anOHTe nonarHTo Ha orpaHnHiTeHHn npOBODnK (11).
YKA3AHNE:
MaKc. DOnyucTmMaTa IbIaXHa Ha orpaHnUTeHnna npoBODnK (11) e 300 m.
Pa3cToaHHeToOTOrpaHnHTeHHnI npoBODnK (11) Do BbHsHnK pKaTp8Ba Da e 30 cm (FHyrpa6).
Pa3ctoHne oT 8 cm MeKdy orpaHnHTeJIHHra npoBODnK (11) eIOCTaTbUHO, aKO BCNUOcTaHaNIOT CNeDHnTe TOkN Ca N3IbJIHeH (Φnrypa 7):
- Ppe3 orpaHnueHaTa nnoi moKe da ce npemn Haba (Hanp. nbTeKa, ane nn noo6HN).
-OrpauHueHaTa IIIOUe Ha eDHaKBO HnBO KaTO IIIOuTa 3a KOCHe.
-Bbpxo orpaHueHaTnIOo HMa CTbpuaunnnOCTPNuACTN,KOHToMOraT da OcbIeCTBtKOHtAKTC KocaykaTa nIN HOXOBete n da r/tnOBpeDn.
- Bbpxy orpaHueHata nnou Hma pacteHna, KOnto He Tp6Ba da ce Kocrt.
OrpaHnHTeJIHHrT npoBOnHK (11) MoKe da 6bJe 3apOBeHnIa 6bJe qKcIpaH c NOMOuTa Ha DOCTABeHNTe KONHeTa 3a npoBOnHK (12).
- Pn noJaraHeTo Ha orpaHunTeHNHa npoBODnK (11) bTbNt B bTnTe BuHarn Tpr6Ba da e >90° (BnKte Phnrypa 8+9).
Kocayata-po60T (1) OTKPnBa 30Hn/npoxOu nCb cTeChENr / uropounHa oT ≥ 0,8m (FHypTa 10).
- MinhimaHaTa WnpOuHa Ha nIoUa 3a KocHe e 0,8 m (Furpa 10).
- MaKcIMaJIHO Bb3MOxHnIrT HaKJIOH e 35% (20°). △BHIMAHNE
3a da ce npedotbpaT 3nONyKn C xopa n/nnnoBpeNi no npOkyKa, 3a6paHHe e n3noJ3BaHTo Ha npOdykTa Ha NO-CTpbMHN TepeHi.
HaФИгура 11 moKTe Да BИДиTe KaK Дa onpeIeJInte HAKLOHa.
YKA3AHNE:
3a orpaHnHaBaHeTo Ha HauKIOH/OTKOCn BuxTe ToKa 8.3.3.
BHUMAHNE!
AkoBb3HaMepeBaTe Da H3NoJ3BaTe aepaTop B pa6oTHaTa 3OHa, 3aDJIIXeTIHo Heo6XoIMo e da 3apOBtE orpaHHuTEnHn npoBOHNK (11).
8.3.1.1 3apaBHe Ha orpaHnHTeHHn npoBoHnK (11)
Korato 3apaBTe OprHnHTeHHnI npoBOnHK (11), HaprabTe TeceH KaHb B TpeBHaT a NOKpVB Ka C nOMOuTa Ha npaba IOnaTa IIN NIObHO. CneT TOBa NOnoxTe npoBOnHka B KaHana I ro NOKpnTE C npbCT.
BAKHO:
3a da ocnpynte 6e3npo5nemHa pa60ta, orpaHnHTeHHnT npOBOHNK (11) Tp6Ba da 6bDe noKpNT c MaKc. 3 cm npbct.
Cnei KaTo CTe NOKpnn OrpaHnHTeHHn npoBODnK (11) c npbCT, DoCTaTbYHO e Da yNtBTHI Te poXkabata npbCT cbc CO6CTBEHOTo CN TeNEcHo TerNo.
8.3.1.2 ΦиксupaHe Ha orpaHnHTeHnHa npoBoDnHK (11) c konueTa 3a npoBoDnHK (12)
YKA3AHNE:
Pa3ToHHeTo MeKdy KOny Ta 3a npoBoHNk (12) Tpa6Ba da e MaKc. 80 cm (ΦnR. 12).
- PonoJoxTe OpraHnUHTeHHnI npOBoDnIK (11) Ha pa3ctOraHHe oT 30 cm, cBoTB. 8 cm Do BbHUnHnK pKaHa TpeBHaTa NOKpNBka (FInrpa 6/7).
-ФИКСИРаTe OрpaHnUHTeHnIЯ npOBoDnK (11) noHe Ha BCEkn 80 cm c KoJIue 3a npOBoDnK (12) (ФИr.12).
- H6nTe konyeta 3a npoBOnHK (12) c nomOuTa Ha yK (He e BkIIOyeH B o6ema Ha doCTaKa-Ta) B 3emrta (Φnrypa 13).
-ПинЕрави ИИ N3BNTu yCNoBnpa3cTOrHneTo MExJy KOnYeTa 3a npOBoDnK (12) Tpr6Ba cb-OTBeTHo Da ce HAmJI.
8.3.2 HauHH Ha noJarahe npn npenrTcTBn (octpoBn) (Φnr. 14)
△YKA3AHNE:
3a n36poeHnTe npimepHo no-dony roJeMn n TeKKn npedMeTn He e 3aNbJnxIteJIHO Heo6xoJIMO ,n3-rpaXdaHeTo Ha ocTpOBo":
-ДьрBO
-Повдигната лexа
-ΓoJIeMn/TeKKn CaKcN C pAcTeHn
- Opanhkeperia
-Граинска барaka
3a da npedna3nte yubCTBnteHn npedmetn OT noBpeHn, noJoxTe orpaHnHTenHn npoBODnK (11) NO cneHNHaHn:
-Премн elect c orpaHnHTeHnI npoBODnK (11) nOKpaBbHnHnK paN,doKaTOnCTnHete Do Toykata C Hai-MaNKOTO pa3CTOraHne (obae nohe 0.8 m) MeJxDy BbHnHnK paN npenrTcBnETo.
-ПложкTe orpaHnHTeHnI npOBoDnK (11) KaTo "3axpaHbAa npOBoDnK" nO Hai-KbcNra nbTdo npenrTCTBneTo.
-ПложжerteогранчтелняпpoBoDNHk(11)Ha pa3ctOraHnEOT30cm,cBoTB.8cm(BuXTeTOUka 8.3.1)OKoJIo npenTCTBneTo.
-Положete Кабета порай ,зхраиьшия поворнк"образно Do Вьншни край.
BHIMAHHE!
OrpaHnHTeHHrT npOBdHk (11) HE 6uBa da ce KpbCTOCBA. MakcImaHOTo pa3ToHne MEXdy OrpaHnHTeHHte npOBdHn e 5 mm.
- PpOdbIjKTe OTHOBOC nonaraHTo Ha Ka6ena nOKpaBbHnHnKpa.
8.3.3 OrpaHmuaBaHe Ha OTKocn/CKnoHOBe >35% (Фиг.15)
-OrpaHnUaBaHToOTOTKocn/HaKnIOH>35%Tp86Ba daeMnH.40cm,KaKTo e nokaaHo HaΦuIpya 15.
Ako He cna3nte TOBa pa3CTOARHe, CbIeCTByBa OnaCHOCT KOCaYkata-po50T (1) Da N3Je3e OTOrpaHnueHaTa 30Ha. Taka Beye He e Bb3MOxHOfYHKUHOHPaHe, Tb KaTO po60TBeye HMaOpneHTnp.
YKA3AHNE
Ako cTe orpaunn c konyeta qnaTapa paOtha 30Ha, CBpXeTe orpaHnHTENHn npoBOnHK (11) KbM 3apraHnata cTAnu (10), KaKTo e onncaHO B TOka 8.2.
BHIMAHNE
3akpenete 3apndhata cTahnna (10) c nomouta Ha yk (He e BkIIOueH bOeMa Ha doCTaBkaTa) n 3akpenBaunte KOJIyeta (13), eDba cneK kato cTe orpaanin C konyeta qraIATA pa6oTHa 30Ha.
8.4 Cbbp3BaHe Ha 3apHaHaTa cTaHcN (10) (Фиr.16)
CbpxKeTe 2-nIOHcHnIeKep KbM 3apraHaTa cTAnzur (10), KaKTo e nOKa3aHo Ha FInrpya 16, n ITO 3aBnHTeTe.
CneTobawBknHouTeUeNCeJIbKoHTaKaTa.
BHIMAHNE
YBepTe ce, ye orpaHnHTeHNrT npoBOHnK (11) e noLoKeH npaBnHOb, a 3axpaHbauHrT 6nok (14) e cBbP3aH npaBnHOb KbM 3apAHaTa CTaHcNra (10), npdN da CbBpXeTe uencena KbMeJeKtpnueckata MpeKa.
Ako 3apraHaTcTaHnra (10) e Cbbp3aHa c eNeKtpnueckata MPexka, B 3aHaTata qact Ha 3apraHaTcTaHnra (10) CBETBa EINH CBETOIdNo. (BNXTe Phr. 17).
8.4.1 Onncahne Ha chtoHnra Ha cBeTo- dnoDa (Φnr. 17)
Yka3aHn 3a JNTHeBO-NOHHTe aKymyNaTOPn

DemontpaTe akymnatopa npedn n3XbpbnaHTo Ha ypea!
He n3xBpIyTe akyMylatopa B 6ntOBITE OTnAdbu, BObH (OnaCHOCT OT EKCNIO3N) Nn BBB Oda. NobpeDeHnte akyMylatopn Morat da HABpeJr Ha OKONHATA cpea N BaWeto 3dpabe, Ako n3nyckat TokCNUHn N3napeHn Nn TeHQCTN.
-ДeФeKTHNte nnn n3noJ3BaHnTe akyMynatOpn Tp86Ba Da ce peuNKnupaT cbrnaCHO DupeKTHNa 2006/66/EO.
IpeaTe ypeHa n 3apAnHTo yCTpoNCTBO B nyKt 3a peuNKnnpaHe. N3non3BaHnTe pnaCoBn H MeTaNH Yactn Moar Da 6bDat cOptnpaHN H peuKNpauHN.
- IV3XbPnIe akymyIaTOPnIe B n3ToUeHO cbcTOHHe. IpenOpBvBaMe Da nokpneTe nOIOcNte Cbc 3aJIenBaHa JeHTa, 3a Da n ppeJa3Ne O T Kbco cbEInHeHHe. He OTbApJrTe akymyIaTopa.
- IV3xBbpynnte akymynaTopHne 6aTeepn cbrIacHo MeCTHnTe pa3npoe4b. PpeaTe akymynaTOpHNte 6aTeepn B nyKt 3a cbbpaHe Ha OTNaDbuN OT 6aTeepn, KbDeTo ue 6bDaT peuKnnpaHn NO ekONorueH hauH. NOnTaJIte 3a TOBa MeCTHaTAKOMnHn 3a IV3xBbpynHe HA OTNaDbU.
15. OtctpaHbAhe Ha Hen3npabHoctn / KoObe 3a rpeuKn
CneBbauata Taabua nok3Ba Cmntomte 3a nobpeu nn onncba kak morat Ba Nn nomorhat, ako Maunhata Bn he paobTu npabunho. Ako He MoKeTe Da Hamepu T OTCpaHNTe npo6nMa, CBpbXeTe ce cbc cepBn3.
15.1 Ta6nua c Hn3npaBHOCTnTe
| Helen III ppabnocct Bb3moxha npuynna OTctpaunbahe |
| Kocaykata He cTaptnpa | Kocaykata Или Зарднота сTahцу
He e cBbP3aHa KbM eNeKtpueckata
mpexa | •Свьржete зхраиьшяблok Кьм
побхаяиЗToчнк на ТОК
•При Нжда ИЗвкайтспczuaJIst |
| СbvetoiodbT ha 3apydnata
STAHZHA He CBETN | Огразичтелниот повODнк He e
cBbP3aH Или e ppeKbChAТ/СКБСАH | •Свьржete/ремontирaite орравиитelни
повODнк |
| Kocaykata He kOci npaBnlnho | HoxkoBeTe ca ИЗносени • СмЯн Ha HOZA | HactpoiTe павилнота Data и павилни
чac |
| Kocaykata cTaptnpaВ
Heobuayho/rpeuho Bpeme | Гршно HabtroeHi Data/Quac | •Дадтuraite Tepena/npeЯTCTBneto
спразу ИЗСКВаняТа Ha Kocaykata-poBOT
•Коригирaite sbOTBETHO ПОлаганeto Na
огравиитelни повODнк |
| Kocaykata OCTaba Ha Място | Helenoxodny TepeH/npeYrTCTBVE |
15.2KoIobe 3a rpeuKm
Katyopie TpooTaoia IP
PouTOTIKO XoOkOTIKO IPX5

Download on the App Store


Android APP on Google play
PO OXH
H xpno n ts eapauoyns eminnte oTov opo "Xpno" kata tnv evvoia tou napovtoc EYxieipoiou obnyiw xpno. Entoevws laabeTE uToyn kai Touc ixuovtec oxetikou kavoviooucs aopaaeias.
To pOITOTIKo XOOKOTTIKO exei duo diaopopeTIOUC
IPOTTOUc LEITOUpyiac. TnV apxikn kataaon nAPdoOns To pOITOT EPyAcetai EKTOC uovdeOns. TnV
TEPIITWWOn autn eivai diaeoiu n TUTIKN EKTaON
AEITOUpyiw KOTINCS TO pOITOT.
Av Tepa aTO autc eEETe va xpnoioutoioeTE KAI
TPOoTeEc untneoeic (xpovoi KOITNS, evnuepwon
Loyiaikou,puhuiacei aohtnpwv kTT.).uTAPXei dI
aTheoi n EITIIeov mApapoyn n otioa dey vive
ta Dthieun atTo V Omuo Scheppach. PIV MIOpeoTe VA TPayatotoinote TN ouzEugn Tg epapoyns autnc TE to pouttIKO xlookotTIKO, TpETe
VA KATAxwpioeTE TIG TLNPopopiec ETIKOVWVAC oac.
Tnv TEPITIWOn autn apkei ia dieuohvon naektpovikou taxuOpoeiou. OKATAOKEAuaTNC TNS epapoyns exyia TOV SKOTTO auto ETOIAe iia Anaw
ON TPOoTAaIac dboEvwv KAI iua Suupwvia xph
ONS,oi OTAOEC puOizouv TN xPON TNS epapoyns
KaiTw PVPOoTNIKWdooEvwv OAc.
XETIKOAS EVNUEWVOUOEOTIO OMILOs Scheppach, kata Tn xpnoT nS epapoyns dev aTOoNKEUEI PPOoWTiKa DEoEva KAI DEV ETEEpyocetai OTIOEOnHnTote PEPaITepw NAnpopoPpie.AutayivovTAltOKAEOTiKaAtoTovKATAKEUAOTnTNS epapoyns.
9.4.1 Eyypaq
Tia va mtopeite va xnpoiopoioinoe Tnv epapouyn eivai avaykaia ia eyypaepn eoew nAektpovikou taXuobpoueiou.
Mtnopeite Etnions va yyypaqitee meo Facebook, eaw Apple ID n meoog Google ia va ouvdoeie tnv epapouyn.
TnV Eyyapn ExeTe EToIO TOv apIio oepac Tou pOHTIKOU XoOkOTIKOU OaC. Autov mTOpeite va Tov BPeite OTNV tivakida TUtou nG oukeun.
9.4.2 Etikoivwia/Metαβiβaσn δδδμεvω

Download on the App Store


ANDROID APP ON Google play
ATENTIE

Download on the App Store


D APP ON Google play
PAZNJA
8.5 Isletime almadan once
Ilk isletime almadan once:

Download on the App Store


Android APP on Google play
DIKKAT
Apparent defects must be notified within 8 days from the receipt of the goods. Otherwise, the buyer's rights of claim due to such defects are invalidated. We guarantee for our machines in case of proper treatment for the time of the statutory warranty period from delivery in such a way that we replace any machine part free of charge which provably becomes unusable due to faulty material
or defects of fabrication within such period of time. With respect to parts not manufactured by us we only warrant insofar as we are entitled to warranty claims against the upstream suppliers. The costs for the installation of the new parts shall be borne by the buyer. The cancellation of sale or the reduction of purchase price as well as any other claims for damages shall be excluded.
Garantie FR