USER MANUAL RLM500W SCHEPPACH
RASENMÄHROBOTER RLM500W
DE
RASENMÄHROBOTER RLM500W
Operating and Safety Instructions
Translation of Original Operating Manual
FR
ROBOT TONDEUSE RLM500W
Before reading, unfold the page containing the illustrations and familiarise yourself with all functions of the device.

GB Operating and Safety Instructions Page 21
3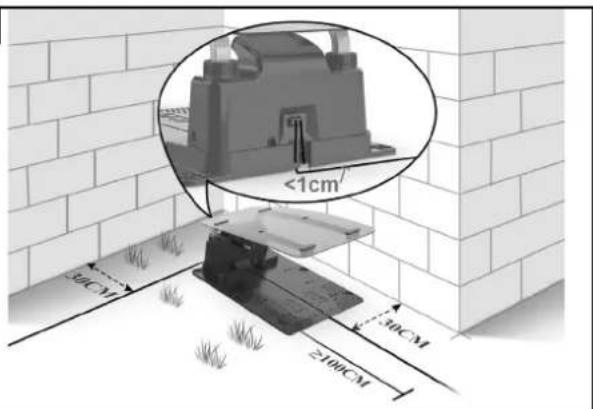
5
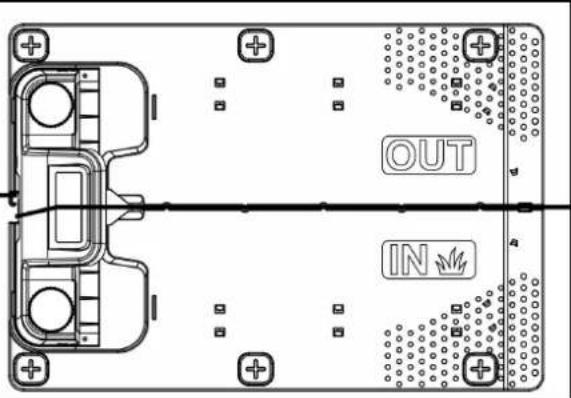
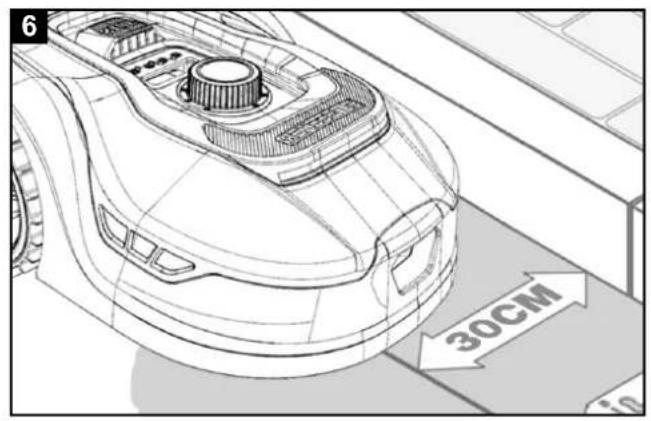
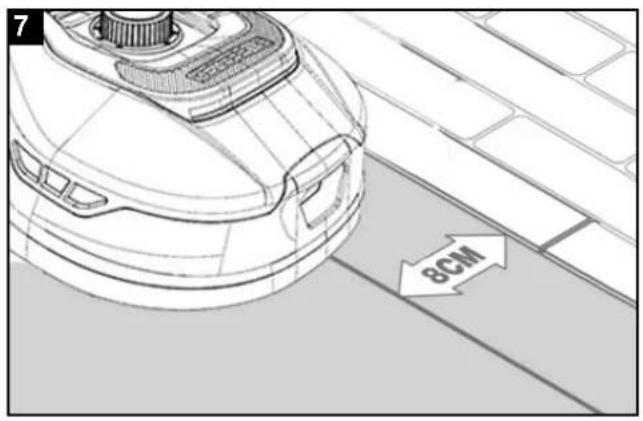
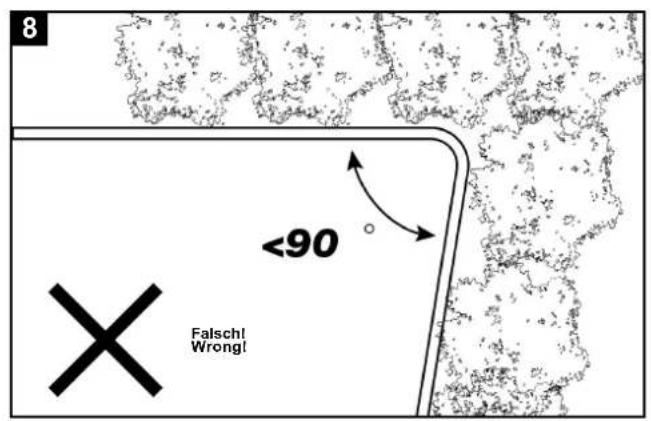
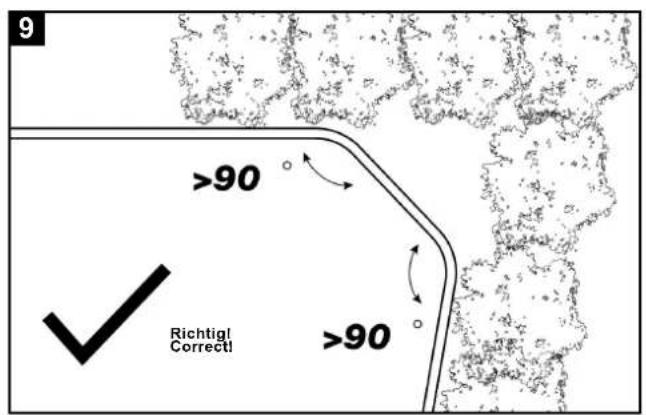
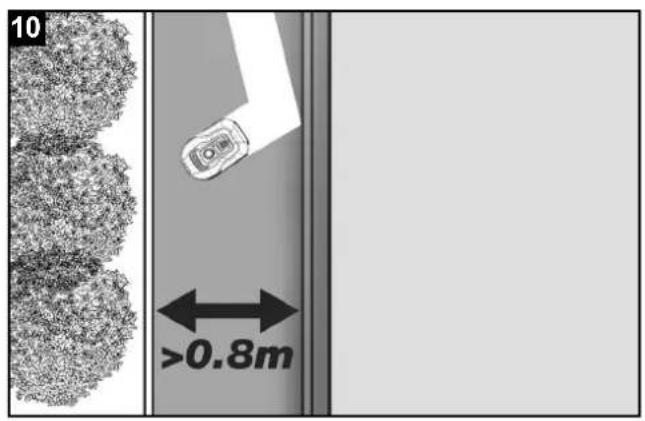
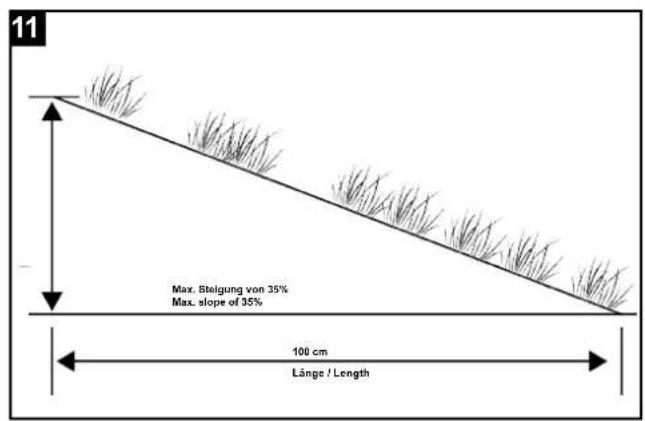
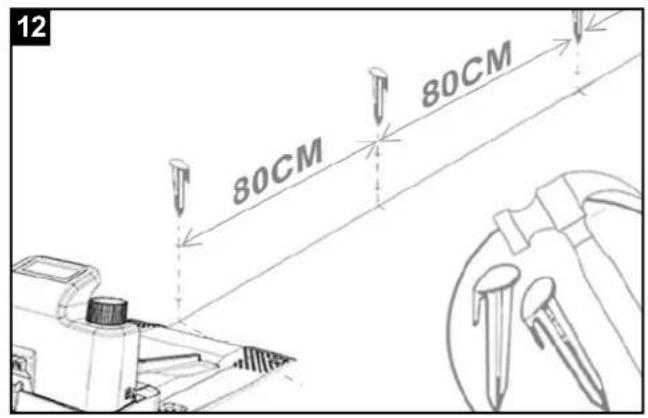
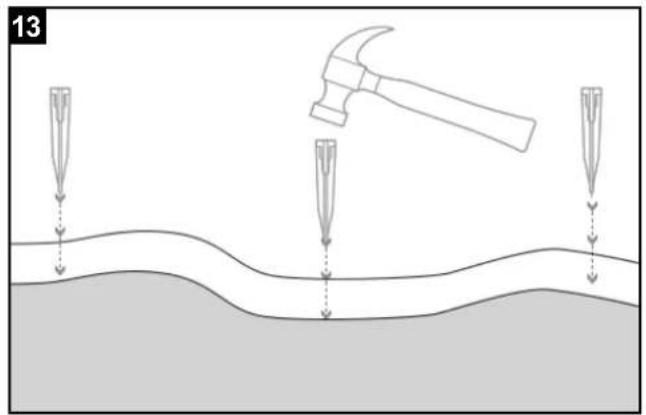
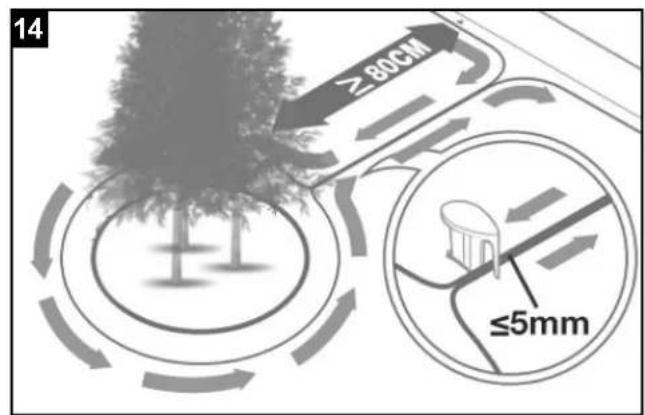
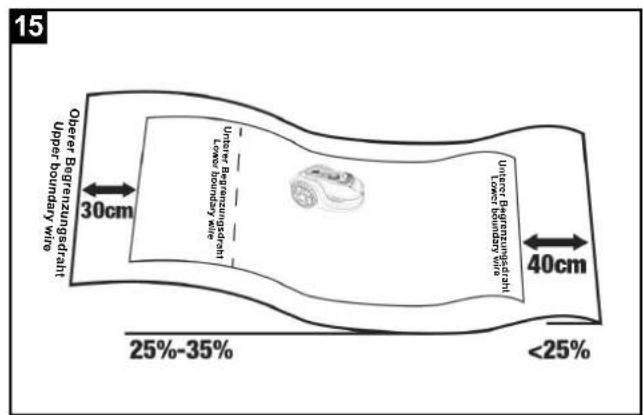
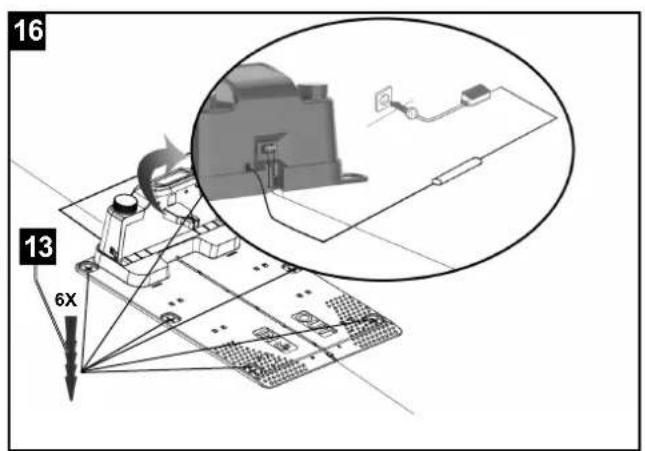
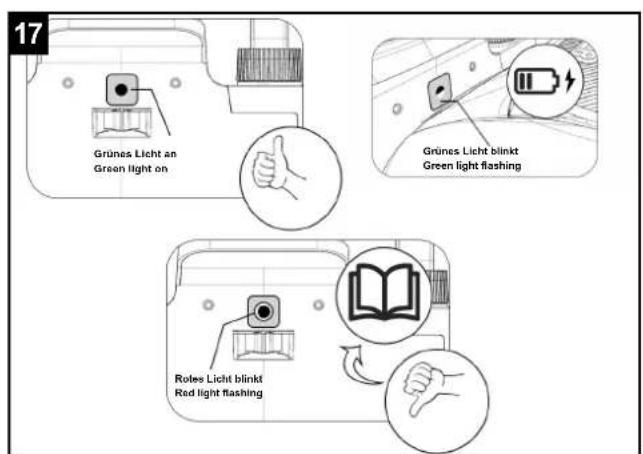
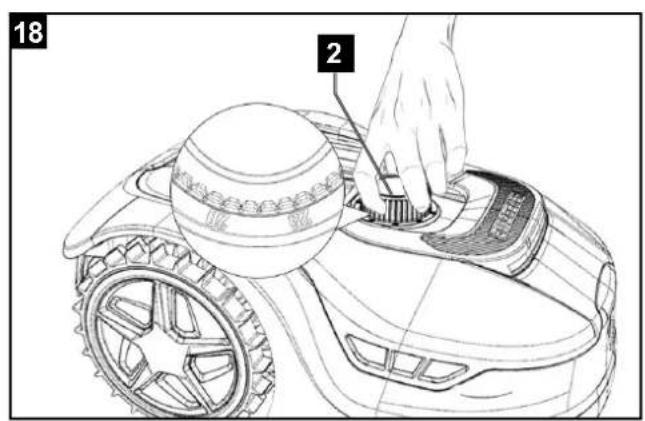
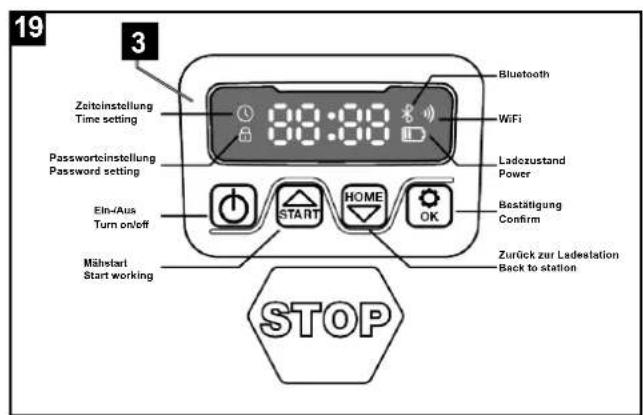
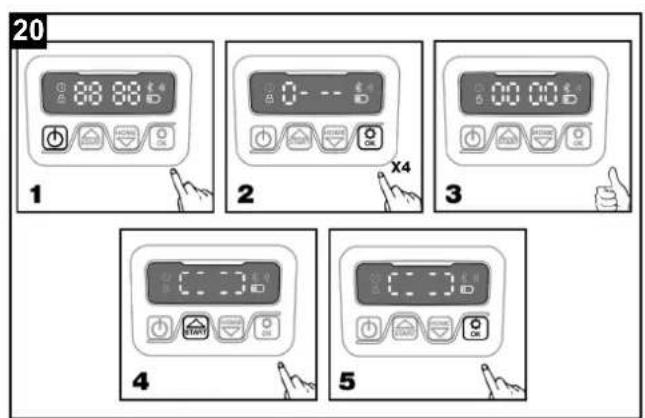
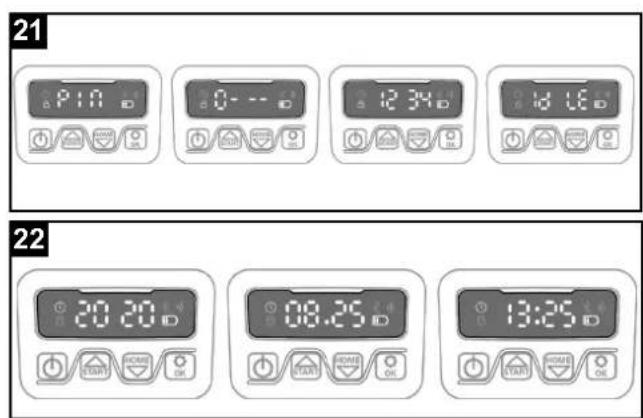
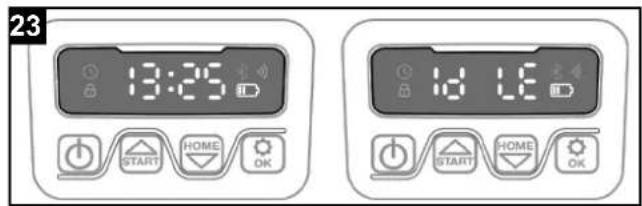
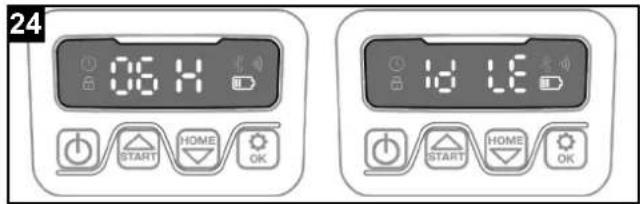
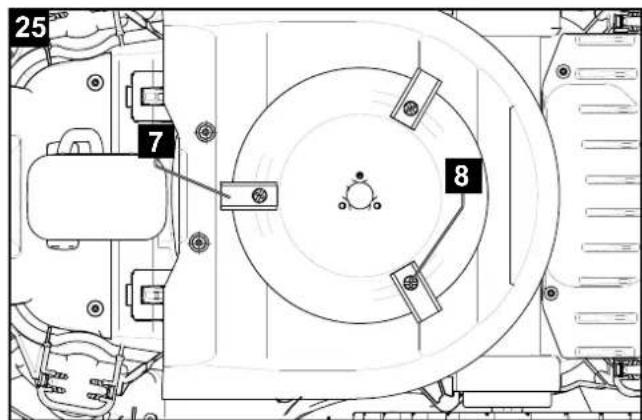
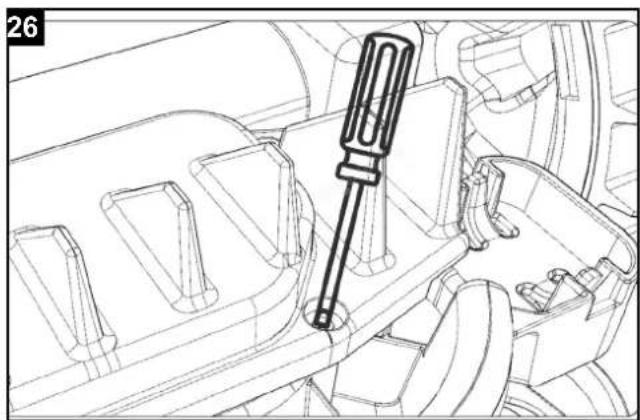
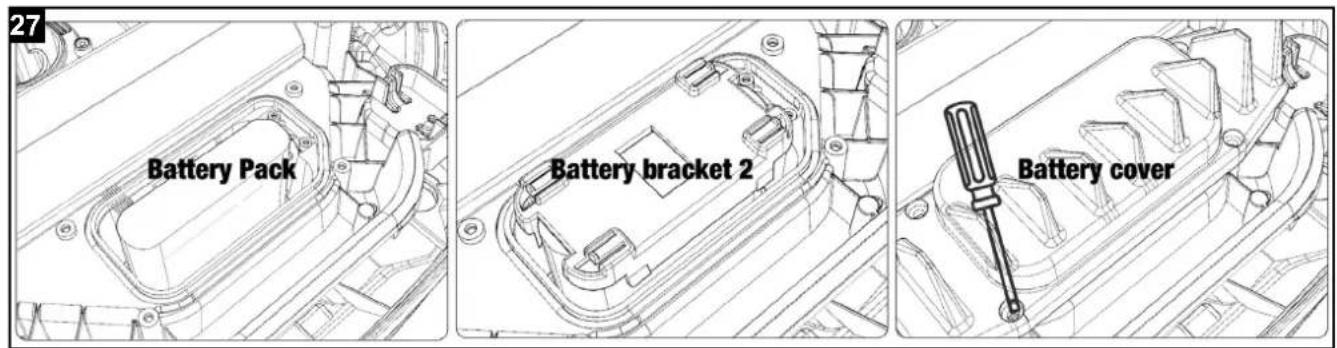
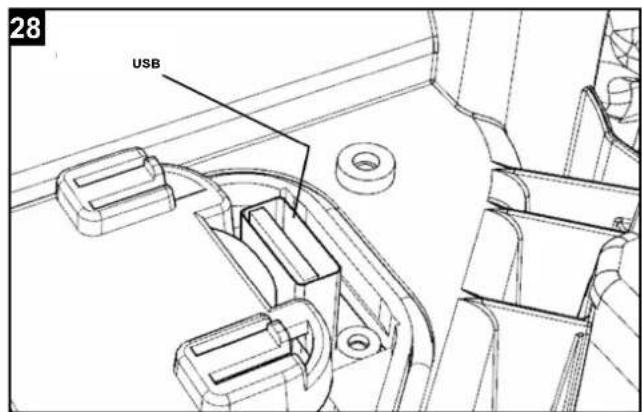
Table of Contents:
Günzburger Straße 69
D-89335 Ichenhausen
Dear Customer
Download on the App Store


ANDROID APP ON
Google play
Table of contents: Page:
- Introduction......23
- Description of the product 23
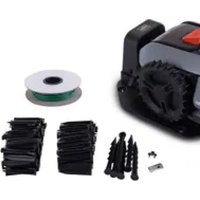
- Scope of delivery....23
- Proper use....23
- Safety instructions....24
- Technical data 26
- Unpacking 27
- Assembly / Before commissioning 27
- Starting up / adjustments 30
- Cleaning 33
- Transport 33
- Storage/Hibernation 33
- Maintenance / Update 33
- Disposal and recycling 35
- Troubleshooting / fault codes 36
- Declaration of conformity 60
Explanation of the symbols on the product
Symbols are used in this manual to draw your attention to potential hazards. The safety symbols and the accompanying explanations must be fully understood. The warnings themselves will not rectify a hazard and cannot replace proper accident prevention measures.
 | Before commissioning, read and observe the operating manual and safety instructions! |
| 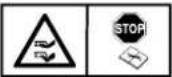 | Warning! Switch the product off before handling it or working on it. |
| 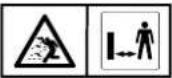 | Danger due to parts flying off during operation. Keep a safe distance from the product when it is in operation. |
|  | Keep your hands and feet away from the rotating blades. Do not sit or stand on the product. |
|  | Protect rechargeable batteries from heat and fire. |
|  | Protect rechargeable batteries from water and moisture. |
| — — — 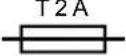 | Product fuse |
|  | Protection class II |
|  | The product complies with the applicable European directives. |
|  | Do not throw primary batteries or rechargeable batteries away with household waste. |
|  | "POWER ON/OFF" button (on/off button) |
|  | Start button / Select button (up) |
|  | Home button (back to charging station) / - Select button (down) |
|  | OK button |
|  | PIN code setting |
|  | Date/Time setting |
|  | WiFi (WLAN) |
| [BZZC] | Bluetooth |
| ⚠ Attention! | We have marked points in this operating manual that impact your safety with this symbol. |
1. Introduction
Manufacturer:
Scheppach GmbH
Günzburger Straße 69
D-89335 Ichenhausen
Dear Customer
We hope your new product brings you much enjoyment and success.
Note:
In accordance with the applicable product liability laws, the manufacturer of this product assumes no liability for damage to the product or caused by the product arising from:
- Improper handling
- Failure to comply with the operating instructions. • Repairs carried out by third parties, unauthorized specialists
- Installing and replacing non-original spare parts,
- Improper use
- Failures of the electrical system in the event of the electrical regulations and VDE provisions 0100, DIN 57113 / VDE 0113 not being observed
Note:
Read the whole text of the operating manual before assembly and commissioning.
This operating manual should help you to familiarize yourself with your product and to use it for its intended purpose.
The operating manual includes important instructions for the safe, proper and economic operation of the product, for avoiding danger, for minimizing repair costs and downtimes and for increasing the reliability and extending the service life of the product.
In addition to the safety instructions in this operating manual, you must also observe the regulations applicable to the operation of the product in your country. Keep the operating manual package with the power tool at all times and store it in a plastic cover to protect it from dirt and moisture. They must be read and carefully observed by all operating personnel before starting the work.
The product may only be used by personnel who have been trained to use it and who have been instructed with respect to the associated hazards. The required minimum age must be observed.
In addition to the safety instructions in this operating manual and the separate regulations of your country, the generally recognized technical rules relating to the operation of such machines must also be observed.
We accept no liability for accidents or damage that occur due to a failure to observe this manual and the safety instructions.
2. Description of the product
- Robot mower
- Cutting height adjustment knob
- Display with control panel
- Stop button
- Front axle
- Blade plate
- Blade
- Blade fixing screw
- Rear wheel
- Charge station
- Boundary wire
- Wire peg
- Charge station anchor pegs
- Mains adapter with cable and connector
3. Scope of delivery
- 1x Robot mower
- 1x Charge station
- 9x Blades (3x installed; 6x replacement)
- 6x Screw for blade • 1x Boundary wire (100 metres)
- 130x Wire pegs
- 6x Fastening peg
- 1x Mains power unit
- 1x Operating manual
4. Proper use
The machine is designed for automatic mowing of lawns.
The machine may only be used in the intended manner. Any use beyond this is improper. The user/operator, not the manufacturer, is responsible for damages or injuries of any type resulting from this.
An element of the intended use is also the observance of the safety instructions, as well as the assembly instructions and operating information in the operating manual.
Persons who operate and maintain the machine must be familiar with it and must be informed about potential dangers.
In addition, the applicable accident prevention regulations must be strictly observed.
Other general occupational health and safety-related rules and regulations must be observed.
The liability of the manufacturer and resulting damages are excluded in the event of modifications of the machine.
The machine may only be operated with original parts and original accessories from the manufacturer.
The safety, operating and maintenance specifications of the manufacturer, as well as the dimensions specified in the technical data, must be observed.
Please note that our products were not designed with the intention of use for commercial or industrial purposes. We assume no guarantee if the product is used in commercial or industrial applications, or for equivalent work.
5. Safety instructions
General safety instructions
- The user is responsible for accidents and hazards that cause damage to other people or their property.
- Children, persons with reduced physical, sensory or mental capabilities or lack of experience and knowledge, or persons unfamiliar with the instructions for operating the machine are not allowed to use the machine. Local regulations may restrict the age of the user.
- Never connect the power supply unit to a socket if the plug or cable is damaged.
- Worn or damaged cables increase the risk of an electric shock.
- Only charge the rechargeable batteries in the charging station supplied. Incorrect use may result in electric shocks, overheating or leakage of corrosive liquid from the rechargeable battery. Rinse with water/neutralising agent in the event of electrolyte leakage. In the event of contact with the eyes, please seek immediate medical attention.
- Only use manufacturer's recommended original rechargeable battery. Product safety can only be guaranteed when original rechargeable batteries are used. Do not use batteries that are not rechargeable.
- The product must be disconnected from the mains when removing the rechargeable battery.
Safety instructions - operation
- The product must only be used with the equipment recommended by the manufacturer. Other types of use are not permitted. The manufacturer's instructions regarding operation/maintenance must be strictly adhered to.
- When using the product in public areas, warning signs must be placed around the work area. These signs must bear the following text:
"Warning! Robot mower! Keep your distance! Children must be supervised!"
Switch the product off if there is anyone (in particular children) or any animals within the working range. It is recommended to program the product to operate during times when there is no activity in the area, e.g. at night. Note that certain animals, e.g. hedgehogs, are nocturnal. They could potentially be injured by the product.
- Children are not allowed in the working area during operation.
- Children are forbidden to play with the product, both out of and in use.
- Always ensure that the product is switched off when carrying it. Not with arms outstretched but always against the body. Ensure you have a secure footing.
- Do not run while transporting the unit. Walk carefully and always make sure you have a secure footing. Always wear sturdy footwear and long trousers when using the product.
- Do not operate the device in bad weather conditions, especially during thunderstorms. There is a danger of lightning strike.
- Use a residual current circuit breaker with a trigger current of 30 mA or less. Using a fault-current circuit breaker reduces the risk of an electric shock.
- ATTENTION: The extension cable as well as the mains cable must be outside the working area to ensure that it is not damaged.
- The product may only be operated, maintained and repaired by persons who are fully familiar with its characteristics and the safety regulations to be observed during use. Read the operating manual carefully and familiarise yourself with the contents before using the product.
- It is not permitted to change the original design of the product. All changes in this regard are made at the user's own risk.
- Make sure that there are no foreign objects such as stones, branches, tools or toys on the lawn. The blades can be damaged if they collide with foreign objects. Always switch off the product with the POWER ON/OFF button before removing a blockage. Check the product for damage before operating it again.
- If the product starts to vibrate abnormally, always switch it off with the main switch or POWER ON/OFF button and check for damage before operating it again.
- Start the product in accordance with the instructions. When the product is switched on, make sure that your hands and feet are not near the rotating blades. Keep your hands and feet away from the underside of the product.
- Never touch moving dangerous components, such as the blade disc, before they have come to a complete stop.
- Do not lift the product or carry it around when it is switched on.
- Do not let anyone operate the product who does not know how it works and behaves.
- The product must not collide with persons or other living creatures. If a person or other living creature enters the travel path of the product, it must be stopped immediately.
- Do not place any objects on the housing or the charge station of the product.
- Never allow people to sit on the robot. Never lift the robot to inspect the cutting edge or carry it during operation. Do not place hands or feet under the robot during operation.
- The product must not be operated with damaged guards, blade plate or housing. Furthermore, it must not be operated with damaged blades, screws, nuts or cables. Do not connect or touch damaged cables until they have been disconnected from the power supply.
- Do not use the product if the POWER ON/OFF button and the STOP button are not working properly.
- Always switch the product off via the ON/OFF button if it is not in use. The product will only start if the POWER ON/OFF button is switched on and the correct PIN code is entered.
- If the power cord is damaged during use, press the "STOP" button to stop the robot and unplug the mains cable from the socket.
- Riwall Pro does not guarantee full compatibility between the product and other wireless systems such as remote controls, transmitters, in-ground electric fencing of livestock pastures or similar.
- Metal objects in the ground (e.g. reinforced concrete or anti-mole nets) can cause the mower to stop. The metallic objects may cause interference with the loop signal, which may cause the mower to stop.
- The operating and storage temperature is 5–50 °C. The temperature range for charging is 5–45 °C. If the temperature is too high, the product may be damaged.
- Never use or charge the robot in explosive and/or flammable environments.
- Do not use the robot mower if a sprinkler is running. In this case, program the robot and the sprinkler so that they do not operate simultaneously. Do not wash the robot with high pressure water jets or immerse it partially or completely in water as it is not waterproof.
- Use only the charging unit and mains power unit provided by the manufacturer. Improper use may result in electric shocks, overheating or leakage of corrosive liquids from the battery.
- Do not position the power supply unit at a height where it could be submerged. Do not set the mains power unit down on the ground.
- Do not cover the power supply unit. Condensation can damage the power supply unit and increase the risk of electric shock.
- If liquid leaks, wash the battery with water / neutraliser. ⚠ In the event of eye contact, consult a doctor.
△ When the mower is turned upside down, the mains switch must always be off. The mains switch should be turned off during all work on the mower's bottom frame, e.g. when cleaning or replacing the blades.
Safety instructions - Rechargeable battery and charging unit
△ Rechargeable battery and charging unit
Read the instructions before charging. Make sure your charging unit matches your local AC supply. Make sure that the connection between the charging unit and the rechargeable battery pack corresponds to the correct models. Longer service life and better performance can be achieved if the rechargeable battery is charged when the air temperature is between 18 °C and 25 °C. Do not charge the rechargeable battery in air temperatures below 5 °C or above 40 °C. These instructions are important as this can prevent serious damage to the rechargeable battery.
⚠ WARNING:
Lithium-ion batteries may explode or cause fire if disassembled, short-circuited or exposed to water, fire or high temperatures. Proceed with caution, do not open the rechargeable battery and do not expose it to electrical/mechanical stress. Avoid storing the batteries in direct sunlight.
- Do not disassemble, open or crush the rechargeable battery.
- Do not short-circuit the rechargeable battery. Do not store rechargeable batteries haphazardly in a box or drawer where they can short-circuit each other or be short-circuited by conductive materials.
- When the rechargeable battery is not in use, keep it away from other metal objects such as paper clips, coins, keys, nails, screws or other small metal objects that could connect from one terminal to the other. Short-circuiting the battery terminals can cause burns or a fire.
- Do not expose the rechargeable battery to heat or fire. Avoid storage in direct sunlight.
- Do not subject the rechargeable battery to mechanical shocks.
- Do not allow the liquid to come into contact with the skin or eyes in the event of a battery leak. If contact has been made, wash the affected area with plenty of water and seek medical attention.
- Seek medical attention immediately if a cell of the rechargeable battery has been swallowed.
- Keep the rechargeable battery clean and dry.
- The rechargeable battery performs best when operated at normal room temperature (20 °C ± 5 °C).
- When disposing of rechargeable batteries, keep batteries of different electrochemical systems separate from each other.
- Only charge the product with the charging unit specified by the mower. Do not use a charging unit other than the one specifically intended for use with the product. A charging unit suitable for one type of rechargeable battery may cause a fire hazard when used with another battery.
- Do not use rechargeable batteries that are not intended for use with the product.
- Keep the rechargeable battery out of the reach of children.
- Keep the original product description safety for future reference.
- Dispose of the product properly.
- Keep the charging unit clean. Dirt results in a risk of electric shock.
- Check the charging unit, cable and plug before every use. Do not use the charging unit if you detect any damage. Never open the charging unit yourself and only have it repaired by qualified specialists and only with original spare parts. A damaged charging unit, cable and plug increases the risk of an electric shock.
- Always check that the mains voltage concurs with the voltage specified on the type plate of the charging unit.
- Never use the charging unit if the cable, plug or the product itself are damaged due to external influences. Take the charging unit to the nearest specialist workshop.
- Never open the charging unit. Take the charging unit to the nearest specialist workshop.
Attention!
This power tool generates an electromagnetic field during operation. This field can impair active or passive medical implants under certain conditions.
In order to prevent the risk of serious or deadly injuries, we recommend that persons with medical implants consult with their physician and the manufacturer of the medical implant prior to operating the machine.
Residual risks
The machine has been built according to the state-of-the-art and the recognised technical safety requirements. However, individual residual risks can arise during operation.
- Health hazard due to electrical power, with the use of improper electrical connection cables.
- Before performing setting or maintenance work, release the start button and pull out the power plug.
- Furthermore, despite all precautions having been met, some non-obvious residual risks may still remain.
- Residual risks can be minimised if the "Safety Instructions" and the "Intended Use" together with the operating manual as a whole are observed.
- Avoid accidental starting of the machine: the operating button may not be pressed when inserting the plug in an outlet. Use the tool that is recommended in this operating manual. This is how to ensure that your machine provides optimum performance.
- Keep your hands away from the working area when the machine is in operation.
6. Technical data
Robot mower
| Voltage 20 V | --- |
| Idle speed n0 | 2800 min -1 |
| Cutting width 18 cm | |
| Cut height 20-60 mm | |
| Area 400 m 2 | |
| Max. incline 35% | |
| Tightest possible passage 0,8 m | |
(App) control
| Bluetooth® |
| Operating frequency band 2.4-2.48 GHz |
| Maximum transmitted power 8.61 dBm |
| WiFi |
| Frequency range of the WLAN module | 2.4-2.48 GHz |
| Max. radio frequency power of the WLAN module | 18.39 dBm |
AK2.0-RC-20Li rechargeable battery
| Type | Li-Ionen |
| Voltage | 18V (max 20 V) === |
| Capacity | 2000 mAh |
| Power | 36 Wh |
| Charge time | approx. 120 min |
NT1.1-RC-20Li mains power unit
| Voltage (input) | 100-240 V~ |
| Frequency | 50-60 Hz |
| Power consumption | 28 W |
| Voltage (output) | 20 V --- |
| Charge current | 1,1 A |
IP protection classes
| Robot mower IPX5 |
| Charge station IPX4 |
| Mains power unit IP67 |
| Total weight (net) 8,0 kg |
Technical changes reserved!
IMPORTANT:
This charging unit is suitable exclusively for charging the product type RLM500W.
Noise & vibration
⚠ Warning: Noise can have serious effects on your health. If the machine noise exceeds 85 dB, please wear suitable hearing protection.
Device emissions values
| Measured sound power level LWA | 50.36 dB |
| Uncertainty KWA | 4.09 dB |
| Guaranteed sound power level LWA | 55 dB |
| Sound pressure level LpA | 44 dB |
| Uncertainty KpA | 3 dB |
The noise emission declaration complies with standard EN ISO 3744
7. Unpacking
- Open the packaging and carefully remove the product.
- Remove the packaging material, as well as the packaging and transport safety devices (if present).
- Check whether the scope of delivery is complete.
- Check the product and accessory parts for transport damage. In the event of complaints, the carrier must be informed immediately. Later claims will not be recognized.
- If possible, keep the packaging until the expiry of the warranty period.
- Familiarize yourself with the product by means of the operating manual before using it for the first time.
- With accessories, as well as wearing parts and replacement parts, use only original parts. Replacement parts can be obtained from your dealer.
- When ordering, please provide our article number as well as type and year of manufacture for the product.
ATTENTION!
The device and the packaging material are not children's toys! Do not let children play with plastic bags, films, or small parts! There is a danger of choking or suffocating!
8. Assembly / Before commissioning
ATTENTION!
Always make sure the product is fully assembled before commissioning!
ATTENTION!
If you intend to use a scarifier within the working area of the robotic mower, the boundary wire (11) must be buried.
ATTENTION!
Do not use a strimmer near the boundary wire (11). Take care when trimming edges near which the boundary wire (11) is located.
8.1 Setting up / correct position of the charging station (10)
ATTENTION
Fix the charging station (10) in place with the help of a hammer (not included in delivery) and the anchor pegs (13) only after you have staked out the complete working area. (Fig. 16).
NOTE:
Do not make new holes in the charging station.
NOTE:
Do not stand with your feet on the charging station plate.
ATTENTION
The extension cable as well as the mains cable must be outside the working area to ensure that it is not damaged.
- The charging station (10) can be placed near a shed, a garden shed or the house.
- The charging station (10) must be placed on level ground.
NOTE:
Do not place the charging station (10) on a sloping or uneven surface, otherwise it will bend and the function will be impaired or a defect may occur.
- The charging station (10) must be set up/positioned such that there is at least one metre of space in front of the charging station (10), without obstacles or similar. (Fig. 3)
8.2 Connect the boundary wire (11) to the charging station (10)
NOTE:
The boundary wire (11) must be laid at least one metre long, straight, without corners and obstacles in front of the charging station (10). This ensures the mower is able to drive into the charging station properly (10) (Fig. 3).
- The boundary wire (11) must be laid at least 30 cm away from boundaries, such as the house wall, ahead of and after the charging station (10). (Fig. 3)
- Strip approx. 10 mm of insulation from one end of the boundary wire (11) (Fig. 4).
- Insert the stripped boundary wire (11) into the red "OUT" cable clamp on the back of the charging station (10). Then pass the boundary wire (11) through the slot under the charging station (10) (Fig. 5).
- Then lay the boundary wire (11) as described in point 8.3 "Laying the boundary wire (11)".
NOTE:
The boundary wire (11) must be laid at least 100 cm straight in front of the charging station (10).
- After laying the boundary wire (11), trim off the excess wire.
- To connect the second end of the boundary wire (11), strip approx. 10 mm of insulation from the end and insert it into the black "IN" cable clamp.
8.3 Laying the boundary wire (11) (Fig. 1/2)
The boundary wire (11) must be laid as a loop around the working area. When the robot mower (1) approaches, sensors inside the product detect the boundary wire (11). The mower changes direction at a random angle when it reaches the boundary wire (11).
If the mower needs to return to the charging station (10), it searches for / drives to the boundary wire (11) and then turns to the left.
It then travels along the boundary wire (11) back to the charging station (10).
8.3.1 General notes / boundary cable installation
ATTENTION:
To avoid damage to the product there must be an obstacle of min. 15 cm height between the boundary wire (11) and water bodies/slopes/embankments and/or public roads.
ATTENTION:
Do not operate the mower on gravel/stones.
NOTE:
Define and make a sketch of the working area before starting to lay the boundary wire (11).
NOTE:
The max. permissible length for the boundary wire (11) is 300 m.
- The distance from the boundary wire (11) to the outer edge must be 30 cm (Fig. 6).
- A distance of 8 cm between the boundary wire (11) is sufficient if all of the following apply (Fig. 7):
- the boundary surface can be driven over (e.g. footpath, driveway or similar).
- the boundary surface is at the same level as the mowing surface.
- there are no protruding or pointed parts on the boundary surface that can come into contact with the mower or blades and damage them.
- There are no plants on the boundary area that should not be mown.
The boundary wire (11) can be buried, or fastened in place using the wire pegs (12) provided.
When laying the boundary wire (11), the angle in corners must always be greater than 90 degrees (see Fig. 8+9).
The robot mower (1) finds areas/passages that taper or that have a width of at least 0.8 m (Fig. 10).
The minimum width of the mowing area is 0.8 m (Fig. 10).
The maximum possible gradient is 35% (20°).
Attention
To prevent accidents and/or damage to persons or the product, it is prohibited to operate the product on steeper terrain.
You can see how to determine the slope in Fig. 11.
NOTE:
For the demarcation of slopes/embankments, see point 8.3.3.
ATTENTION!
If you intend to use a scarifier within the working area of the robotic mower, the boundary wire (11) must be buried.
8.3.1.1 Burying the boundary wire (11)
When burying the boundary wire (11), make a narrow groove in the grass turf using a spade or similar. Then place the wire in the groove and cover it with soil.
IMPORTANT:
To ensure trouble-free operation, the boundary wire (11) may be covered with max. 3 cm of earth.
- After covering the boundary wire (11) with soil, it is sufficient to compact the loose soil with your body weight.
8.3.1.2 Fasten the boundary wire (11) with the wire pegs (12)
NOTE:
The distance between the wire pegs (12) must not exceed 80 cm (Fig. 12).
- Place the boundary wire (11) on the grass at a distance of 30 cm or 8 cm from the outer edge (Fig. 6/7).
- Fix the boundary wire (11) at least every 80 cm using a wire peg (12) (Fig. 12).
- Knock the wire pegs (12) into the ground (Fig. 13) with the help of a hammer (not included in the scope of delivery).
- In case of uneven or curved conditions, the distance between the wire pegs (12) must be reduced accordingly.
8.3.2 Laying the boundary wire around obstacles (islands) (Fig. 14)
NOTE:
For large and heavy objects listed below as examples, an “island installation” is not necessarily required:
- Tree
- Raised bed
- Large/heavy plant buckets
- Greenhouse
- Garden shed
To protect delicate/small objects from damage, lay the boundary wire (11) as follows:
- Run the boundary wire (11) along the outer edge until you have reached the point with the shortest distance (but at least 0.8 m) between the outer edge and the obstacle.
- Lay the boundary wire (11) like a "supply line" along the shortest path to the obstacle.
- Lay the boundary wire (11) at a distance of 30 cm or 8 cm (see point 8.3.1) around the obstacle.
- Lay the cable along the "feed line" back to the outer edge.
ATTENTION!
DO NOT ALLOW THE BOUNDARY WIRE (11) TO CROSS. The maximum distance between the boundary wires is 5 mm.
- Continue to lay the cable along the outer edge.
8.3.3 Demarcation of slopes >35% (Fig. 15)
- The boundary to slopes >35% must be at least 40 cm, as shown in Fig. 15.
- If you do not maintain this distance, there is a risk that the robot mower (1) will drive out of the demarcated area.
Thus, no function is possible any more, as the robot no longer has any orientation.
NOTE
When you have completely staked out the working area, connect the boundary wire (11) to the charging station (10) as described in point 8.2.
ATTENTION
Fix the charging station (10) in place with the help of a hammer (not included in delivery) and the anchor pegs (13) only after you have staked out the complete working area.
8.4 Connecting the charge station (10) (Fig. 16)
- Connect the 2-pin connector to the charging station (10) as shown in figure 16 and screw it in place.
- Then plug the mains plug into the socket.
ATTENTION
Make sure that the boundary wire (11) is correctly routed and the power supply unit (14) is correctly connected to the charging station (10) before connecting the plug to the mains.
If the charging station (10) is connected to the mains, an LED lights up on the rear part of the charging station (10). (see Fig. 17).
8.4.1 Description of the status LED (Fig. 17)
| LED status | Meaning Measure |
| Does not illu-minate | No power supply | Make sure that the mains cable is properly connected to the charging unit and that the charging unit is connected to a suitable power supply |
| Illumi-nates green | The boundary wire is connected correctly. The robot is fully charged. | - |
| Flashes green | The robot is charging. | - |
| Flashes red | The boundary wire is damaged or not connected properly. | Check that both ends of the boundary wire are connected and that the cable clamp is reliable. Check that the boundary wire has not been broken. |
8.5. Before commissioning
- Set the cutting height to the maximum cutting height (60 mm) using the cutting height adjustment knob (2) as shown in figure 18.
- Place the mower in the working area and start it (as described in point 9).
- Observe the mower for some time.
- If it returns to the charging station (10) without any problems, the installation is complete.
TIP:
Before first use:
Position the mower directly behind the charging station (10), at a 90° angle to the boundary wire (11), and give it the command to return to the charging station (10) via the "HOME" button (see point 9).
The mower will now drive back to the charging station (10) along the complete boundary wire (11) (Fig. 2)
This allows you to identify problem areas immediately before first use and correct them if necessary.
The same procedure is recommended for critical places, such as embankments/ditches/beds, etc.
Proceed as described above and start the mower (see point 9) with the "START" button.
In the event of a problem, you can stop the mower by pressing the stop button (4) on the product.
9. Starting up / adjustments
ATTENTION!
To ensure optimum function, a software update must be carried out before first use. (see 13.3 Software update)
NOTE
For a long service life, the robot mower (1) should only be operated at an outdoor temperature of 5 - 40 °C.
ATTENTION!
Always make sure the product is fully assembled before commissioning!
Electrical connection
The installed electric motor is connected and ready for operation. The connection complies with the applicable VDE and DIN regulations.
The customer's mains connection as well as any extension cable used must also comply with these regulations.
Damaged electrical connection cable
The insulation on electrical connection cables is often damaged.
This may have the following causes:
- Pressure points, where connection cables are passed through windows or doors.
- Kinks where the connection cable has been improperly fastened or routed.
- Places where the connection cables have been cut due to being driven over.
- Insulation damage due to being ripped out of the wall outlet.
- Cracks due to the insulation ageing.
Such damaged electrical connection cables must not be used and are life-threatening due to the insulation damage.
Check the electrical connection cables for damage regularly. Ensure that the connection cables are disconnected from electrical power when checking for damage.
Electrical connection cables must comply with the applicable VDE and DIN regulations.
Only use connection cables of the same designation. The printing of the type designation on the connection cable is mandatory.
9.1. Quick start (Fig. 19/20)
After installing the boundary wire (11), you can use the robot mower (1).
Adjusting the cutting height
- Turn the cutting height adjustment knob (2) clockwise to increase the cutting height seamlessly between 20 - 60 mm.
- Turn the cutting height adjustment knob (2) anti-clockwise to decrease the cutting height seamlessly between 20 - 60 mm.
NOTE
The arrow on the cutting height adjustment knob (2) points to numbers outside the knob. Here you can read off the cutting height currently set in 5 mm steps.
Halting/stopping the robot mower:
- To stop the robot mower, press the stop button (4).
- The robot mower stops immediately and the blade disc (6) stops.
ATTENTION
The robot mower is not switched off, it has only been stopped. Always use the "POWER ON/OFF" button to switch the robot mower off.
Switching the robot mower on:
- The robot mower can then be restarted as described below.
NOTE
Before the robot mower (1) starts mowing, an acoustic signal (four beeps) is heard, then the blade disc (6) starts rotating.
- Press the button ("POWER ON/OFF" button) until the robot mower (1) switches on.
- For the first use, enter the default PIN code "0000" by pressing "OK" four times when the number "0" flashes. (The PIN code can be changed as described in point 9.2.1).
- After confirming the fourth digit with the "OK button", the robot mower is ready for use. The word "IdLE" appears on the display.
NOTE
The robot mower (1) switches off automatically after 30 seconds if no input is made.
ATTENTION
If the PIN code is entered incorrectly 10 times, "LOCK" appears on the display. The device is now locked for 10 minutes before you can enter the PIN code again.
- Press the "START" button and then the "OK" button to start mowing.
- If you press the "HOME" button and then the "OK" button, the robot mower (1) returns to the charging station (10) with the mowing function switched off.
The robot mower (1) operates continuously until the battery charge is too low. The robot mower automatically returns to the charging station (10). The cutter disc is deactivated in this state.
NOTE
After the rechargeable battery is fully charged, the robot mower starts again. Alternatively, the robot mower remains in the charging station (10) in accordance with the set mowing schedule.
(By default, the robot mows from Monday to Friday from 09:00 - 15:00 hrs)
9.2. Settings
NOTE
To make adjustments to the product, the robot mower (1) must be switched on. Switch the robot mower (1) on by pressing and holding the Ⓞ button ("POWER ON/OFF" button) until "PIN" appears on the display.
9.2.1 Changing the PIN code (Fig. 21)
- Press and hold the "START" and "HOME" buttons simultaneously for at least 3 seconds.
- The symbol 🔒 and "PInl" flash.
- Now enter the old PIN code as follows (factory setting "0000").
- The first digit illuminates ("0---").
- Use the "START" and "HOME" buttons to select the desired digit.
- Confirm the digit with the "OK" button.
- The next digit illuminates (e.g. "10--).
- Proceed as described in paragraph 2-4 above.
- After you have entered the "old" PIN code and confirmed the fourth digit with the "OK" button, "PIn2" appears, now you can enter the new PIN code.
- The first digit flashes ("0---").
- Use the "START" and "HOME" buttons to select the desired digit.
- Confirm the digit with the "OK" button.
- The next digit flashes (e.g. "10--"). Proceed as described in paragraph 2-4 above.
- After confirming the fourth digit with the "OK" button, the new PIN code is stored. The word "IdLE" appears on the display.
9.2.2 Setting/changing the date/time (Fig. 22)
NOTE
Date and time are necessary settings so that the robot mower (1) can mow in accordance with the set mowing schedule.
- The date/time setting is done in the order year - date - time.
- Press and hold the "START" button for at least 5 seconds.
- The symbol and "PInl" flash. The Ⓤ symbol and a number (e.g. 2020) flash on the display.
- Use the "START", "HOME" and "OK" buttons to set the year, similarly to the PIN setting.
- Then the next number illuminates (month.day e.g. 08.25 for 25 August).
- Use the "START", "HOME" and "OK" buttons to set the correct month and day. The time is displayed last (e.g. 13:25).
- Set the current time as described above.
- After confirming the fourth digit with the "OK" button, the date and time are stored. The word "IdLE" appears on the display.
9.2.3 Changing the start time (Fig. 23)
The factory-set start time of 09:00 can be changed at any time.
- Press and hold the "START" and "OK" buttons simultaneously for at least 3 seconds.
- The display shows the set start time, e.g. 13:25, with the first digit flashing.
- Use the "START" and "HOME" buttons to select the desired digit and confirm with the "OK" button. Proceed as described in steps 2-4 above.
- After confirming the fourth digit with the "OK" button, the new start time is stored. The word "IdLE" appears on the display.
9.2.4 Changing the mowing time/day (Fig. 24)
The factory-set mowing time per day of 6 hours can be changed at any time.
- Press and hold the "OK" button for at least 3 seconds.
- The display shows the set mowing time, e.g. 06 H, with the first digit flashing.
- Use the "START" and "HOME" buttons to select the desired digit and confirm with the "OK" button.
- After confirming the second digit with the "OK" button, the new mowing time or the new day is stored. The word "IdLE" appears on the display.
9.3 Mowing edges
The default setting is for the robot mower (1) to mow the edges every Tuesday and Friday.
This means that the robot mower (1) travels once along the boundary wire (11) the first time it mows for the day.
ATTENTION
In this mode, the blade disc (6) is active.
The times for edge mowing can only be set via the app.
9.4 App control
The RLM500W robot mower can be operated via app. The app is available in the respective app stores for Android and iOS.




ATTENTION
The use of the app falls under the term "using" as defined in this operating manual. Therefore, also observe the safety regulations that apply to this.
The robotic lawnmower has two different working methods. In the original condition as delivered, the robot works offline. The default range of robot mowing functions are available.
If you wish to use additional services (mowing times, software update, sensor settings, etc.), an additional app is available but this is not provided by the Scheppach Group. You must enter your contact information before you can connect this app to our robotic lawnmower. An e-mail address is sufficient here.
The APP manufacturer has provided a data privacy statement and a user agreement for this, which regulates use of the app or your personal data.
We would like to advise you that the Scheppach Group will not save any personal data when you use the app and will also not process any further information. This is only done by the app manufacturer.
9.4.1 Registration
In order to use the app, registration via email is necessary. Alternatively, you can also register and log in via Facebook, with your Apple ID or with google.
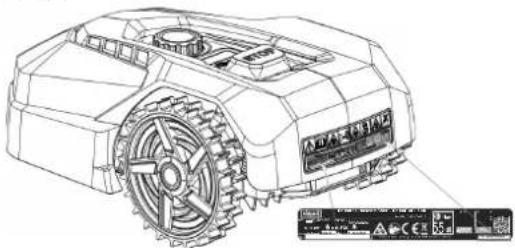
Have the serial number of your robot mower ready for registration. You will find this on the type plate of the unit.
9.4.2 Communication / data transmission
The app communicates with the robot mower either via Bluetooth or WiFi.
NOTE
Depending on your contract with your mobile phone provider or internet provider, the data transfer from the app to the internet may incur costs that you will have to bear yourself.
9.4.3 Functions of the app
• Viewing and editing the mowing plan - Adjusting the mowing zones - Starting mowing - Send the device to the charging station - Settings - Updates / read out (log data)
9.4.3.1 Viewing and editing the mowing plan
With this function you can set when the robot mower should start mowing and how long it should mow for each individual day.
There is one start time per day (later max. two start times) available.
In this function you can also set the days on which the lawn edges are to be mown.
ATTENTION
Changing the mowing schedule, starting a mowing operation, switching the automatic on and off, sending the robot mower home and changing the date and time may result in activities that are not expected by other people. Affected persons must therefore always be informed in advance about possible activities of the robot mower.
9.4.3.2 Adjusting the mowing zones
In this function you can manually set up two different mowing zones in %. By default, the function is set to "AutoMultizone". Here, the mower starts after each charging process at an arbitrary place along the boundary wire.
This means:
After the first charging process, the robot mower moves along the boundary wire in accordance with the set % number for zone 1 and starts mowing. After the second charging process, it does the same in accordance with the set % number for zone 2, etc.
Example:
You have installed 200 m of boundary wire and set a value of 25% for zone 1.
After charging, the robot mower drives 50 m along the boundary wire and starts mowing from there.
NOTE
This function allows you to start the robot mower in difficult-to-reach passages, for example, to ensure a perfect mowing pattern.
10. Cleaning
ATTENTION
Switch off the product with the button ⏻ before cleaning.
ATTENTION
Put on protective gloves before cleaning the rotating blade carrier.
We recommend that you clean the product directly after every use.
Clean the product at regular intervals using a damp cloth and a little soft soap. Do not use any cleaning products or solvents; they could attack the plastic parts of the product. Make sure that no water can penetrate the product interior.
11. Transport
- Press the button ("POWER ON/OFF" button) until the robot mower (1) switches on. @button ("POWER ON/OFF" button) to switch the robot mower (1) off.
- Wear protective gloves when transporting the robot mower (1).
- Carry the robot mower (1) securely with both hands.
To prevent damage, avoid the robot mower (1) falling to the ground from greater heights.
If this does happen, it must be immediately taken to a specialist workshop for inspection.
Do not continue to use the robot mower (1) before this has been done.
12. Storage/Hibernation
Your mower will give you pleasure for longer if it is allowed to hibernate.
Although this is not a problem, we recommend that you store your mower in a closed room, e.g. in the garage, during the winter.
Before storing the mower:
- Clean it thoroughly (see point 10)
- Charge the rechargeable battery fully.
- Switch the product off.
- Remove the rechargeable battery (see point 13.2). Store the product and its accessories in a dark, dry and frost-free place that is inaccessible to children. The optimum storage temperature lies between 5 and 40 °C.
Store the robot mower (1) in its original packaging.
Cover the robot mower (1) to protect it from dust and moisture.
Store the operating manual with the robot mower (1).
13. Maintenance / Update
ATTENTION
Disconnect the mains plug before carrying out any maintenance work.
Connections and repairs
Connections and repair work on the electrical equipment may only be carried out by electricians.
• Type of current for the motor - Machine data - type plate
13.1 Replacing the blade (7) (Fig. 25)
ATTENTION
Switch the mower off before starting with the work.
NOTE
The blades (7) must be replaced after approx. 8 weeks. (2 sets of 3 blades each are included in the delivery)
Use only original blades from the manufacturer. (Art. no. 7913001601)
ATTENTION
Put on protective gloves before replacing the blade (7).
ATTENTION
All blades (7) must always be changed at the same time. The changing of individual blades (7) is not permitted.
If the Phillips screws (8) are damaged or can no longer be tightened, these must also be replaced.
New screws are included with the replacement blades.
- To replace the blades (7), place the robot mower (1) on a workbench with the underside facing upwards. (We recommend a soft base to avoid damage to the housing).
- Loosen the Phillips screw (8) with the help of a Phillips screwdriver (not included in the scope of delivery).
- Remove the old blade (7).
- Fit the new blade (7) and fasten it with a new screw (8).
- Check that the blade (7) can move. If this is not the case, loosen the screw (8) a little.
- Carry out this operation on all three blades (7).
13.2 Inserting/removing the rechargeable battery (Fig. 26/27)
ATTENTION
Switch the mower off before starting with the work.
- To install/remove the rechargeable battery, place the robot mower (1) on a workbench with the underside facing upwards. (We recommend a soft base to avoid damage to the housing).
- Remove the battery cover screws and remove the battery cover (Fig. 26/27).
- Remove the rechargeable battery retaining device.
- Pull the rechargeable battery out carefully.
⚠️ NOTE Do not pull on the cables.
- Loosen the locking and pull the connector off.
- Insert the rechargeable battery (if necessary a new original rechargeable battery).
- Re-install the rechargeable battery in reverse order (Fig. 26/27).
13.3 Software update (Fig. 28)
Connect your robot to your WiFi.
The software can be updated as soon as a new version is available. (The latest software version can be found on our homepage.
The software can be installed via USB or the app.
The software for USB transmission can be downloaded from our homepage www.scheppach.com.
13.3.1 Software update via USB
- Look for the latest software version on our homepage.
- Download this to an empty FAT32 formatted disk.
- Remove the rechargeable battery covering as described in 13.2.
- Insert the data carrier into the USB drive (Fig. 28).
- Switch on the mower by pressing the Ⓞ button ("POWER ON/OFF" button). • The update starts automatically.
- Wait until "OK" appears on the display and then remove the data carrier.
- Re-attach the rechargeable battery covering as described in 13.2.
NOTE
The operating manual supplied with your robot mower (1) is based on the software version at the time of production of the mower.
Some new or changed features and functions may not be included in the operating manual.
You can find the latest version of the software in the app or at www.scheppach.com.
With this product, it is necessary to note that the following parts are subject to natural or usage-related wear, or that the following parts are required as consumables.
Wearing parts*: Blade (7), screws (8), boundary wire (11), wire pegs (12).
* may not be included in the scope of supply!
Article number(s) for wear parts:
| Item 7 Blade | 7913001601 |
| Item 8 Screws | 3913001001 |
| Item 11 Boundary wire | 7913001702 |
| Item 12 Wire pegs | 7913001701 |
Spare parts and accessories can be obtained from our service centre. To do this, scan the QR code on the cover page.
14. Disposal and recycling
Notes for packaging


The packaging materials are recyclable. Please dispose of packaging in an environmentally friendly manner.
Notes on the Electrical and Electronic Equipment Act [ElektroG]
![SCHEPPACH RLM500W - Notes on the Electrical and Electronic Equipment Act [ElektroG] - 1](/content/2026/04/738708/images/9cb29b8b47451ce496f08bd0dbc0331a23e5af16a3ac3fd1f27185baa34e85e3.jpg)
Waste electrical and electronic equipment does not belong in household waste, but must be collected and disposed of separately!
- Used batteries or rechargeable batteries that are not installed permanently in the old appliance must be removed non-destructively before disposal. Their disposal is regulated by the battery law.
- Owners or users of electrical and electronic devices are legally obliged to return them after use.
- The end user is responsible for deleting their personal data from the old device being disposed of!
- The symbol of the crossed-out dustbin means that waste electrical and electronic equipment must not be disposed of with household waste.
- Waste electrical and electronic equipment can be handed in free of charge at the following places:
- Public disposal or collection points (e.g., municipal works yards)
- Points of sale of electrical appliances (stationary and online), provided that dealers are obliged to take them back or offer to do so voluntarily.
- Up to three waste electrical devices per type of device, with an edge length of no more than 25 centimeters, can be returned free of charge to the manufacturer without prior purchase of a new device from the manufacturer or taken to another authorized collection point in your vicinity.
- Further supplementary take-back conditions of the manufacturers and distributors can be obtained from the respective customer service.
- If the manufacturer delivers a new electrical appliance to a private household, the manufacturer can arrange for the free collection of the old electrical appliance upon request from the end user. Please contact the manufacturer's customer service for this.
- These statements only apply to devices installed and sold in the countries of the European Union and which are subject to the European Directive 2012/19/EU. In countries outside the European Union, different regulations may apply to the disposal of waste electrical and electronic equipment.
Notes on lithium-ion batteries

Remove the battery before disposing of the device!
- Do not dispose of the battery in household waste, in a fire (risk of explosion) or in water. Damaged batteries can harm the environment and your health if toxic vapours or liquids escape.
- Defective or used batteries must be recycled in accordance with Directive 2006/66/EC.
- Hand in the device and the battery charger at a recycling centre. The plastic and metal parts used can be separated by type and thus recycled.
- Dispose of batteries when discharged. We recommend covering the poles with an adhesive strip to protect against a short circuit. Do not open the battery.
- Dispose of batteries according to local regulations. Return batteries to a used battery collection point where they can be recycled in an environmentally friendly manner. Ask your local waste disposal company about this.
15. Troubleshooting / fault codes
The following table shows fault symptoms and describes remedial measures in the event of your machine failing to work properly. If you cannot localise and rectify the problem with this, please contact your service workshop.
15.1 Fault table
| Fault Possible cause Remedy |
| Mower does not start | Mower or charging station not connected to the mains | Connect the power supply unit to a suitable power sourceCall a specialist if necessary |
| LED light on charging station does not light up |
| LED light on charging station flashes red | Boundary wire is not connected or cut/broken. | Connect/repair boundary wire |
| Mower does not mow properly | Blades are worn • Replace blades | |
| Mower starts at unusual/wrong times | Date/time is incorrectly set • Set the correct date and time | |
| Mower gets stuck Unsuitable terrain/obstacle | Adapt the terrain/obstacle to the requirements of the robot mowerAdjust the laying of the boundary wire accordingly |
15.2 Fault codes
| Error code Meaning Remedy |
| ---- Rain | sensor delay • - | |
| E1 | Mower outside the working area | 1. Check that the mower is in the working area.2. Ensure that the charging station is properly connected to the battery charger and charger is connected to a suitable power supply.3. Make sure that the boundary wires have been clamped correctly and replace them if necessary. |
| E2 | Wheel motor blocked | 1. Switch the mower off. Move the mower to an area that is free of obstacles. Press the “START” button and then the “OK” button.2. If the error message is still displayed, switch off the product. Turn the mower up-side down and check what is preventing the wheels from turning.3. Remove the objects blocking the wheel(s), turn the mower over.4. Press the “START” button and then the “OK” button. |
| E3 | Cutter disc blocked | 1. Switch the mower off.2. Turn the mower upside down and check what is preventing the blades from turning.3. Remove the objects and turn the mower over.4. Place the mower in an area with short grass.5. Press the “START” button and then the “OK” button. |
| E4 | Obstacle sensor trigger not reset | 1. If the error still occurs, contact your specialist dealer. |
| E5 | The mower was lifted | 1. Switch the mower off.2. Move the mower to an area that is free of obstacles. Press the “START” button and then the “OK” button.3. If the error message is still displayed, switch off the product. Turn the mower up-side down and check if there is anything preventing the front axle from moving.4. Remove all obstacles, turn the mower over and switch it on. Press the “START” button and then the “OK” button. |
| E6 | Roll-over sensor was triggered | 1. Position the mower.2. Press the “START” button and then the “OK” button. |
| E7 | Inclination sensors were triggered | 1. Switch the mower off.2. Move the mower to an area in your lawn with level ground.3. Switch the mower on. Press the “START” button and then the “OK” button. |
| E8 | Docking/recharging failed | 1. Check that there is 1 metre of space before and after the charging station, without obstacles or corners.2. The charging station must be placed on level ground.3. Manually place the mower in the charging station for charging. After the mower is fully charged, press the “START” and then the “OK” button. |
| E9 | The robotic lawn-mower is stuck | 1. Place the robotic lawnmower in an area that is free of obstacles.2. If the error still occurs, contact your specialist dealer. |
| E10 | Protection of the battery | 1. If the temperature is too high, wait until the temperature has dropped. If the temperature is too low, wait until the temperature is above 5 degrees Celsius.2. If the error message is still displayed, replace the battery. Re-start the mower. Press START and then OK.3. If the error still occurs, contact your specialist dealer. |
| E11 No boundary signal | 1. When the mower is in the working area, check the charging station LED indicator. If it lights up red, make sure that the boundary wires are well connected to the terminals on the charging station. If the problem persists, check whether the boundary wires have been cut. |
| E13 | Charging current too high or too low | 1. Check docking area.2. If the error still occurs, contact your specialist dealer. |
| EE Error | unknown | 1. Re-start the mower.2. If the error still occurs, contact your specialist dealer. |
| BP | Battery thermal protection | 1. Switch the mower off.2. Move the mower to an area in your lawn with level ground.3. Check the temperature of the battery.4. If the temperature is too high, let the battery cool down.5. If the temperature is too low, wait until the temperature is higher than 5°C.6. Re-start the mower.7. If the error still occurs, replace the battery.8. If the error still occurs, contact your specialist dealer. |
| LOCK | Robotic lawnmower locked (PIN entered incorrectly too many times) | 1. Wait 10 minutes and then enter the PIN again.2. Do not switch the robotic lawnmower off.3. If the error still occurs, contact your specialist dealer. |
D-89335 Ichenhausen
Dear customer,
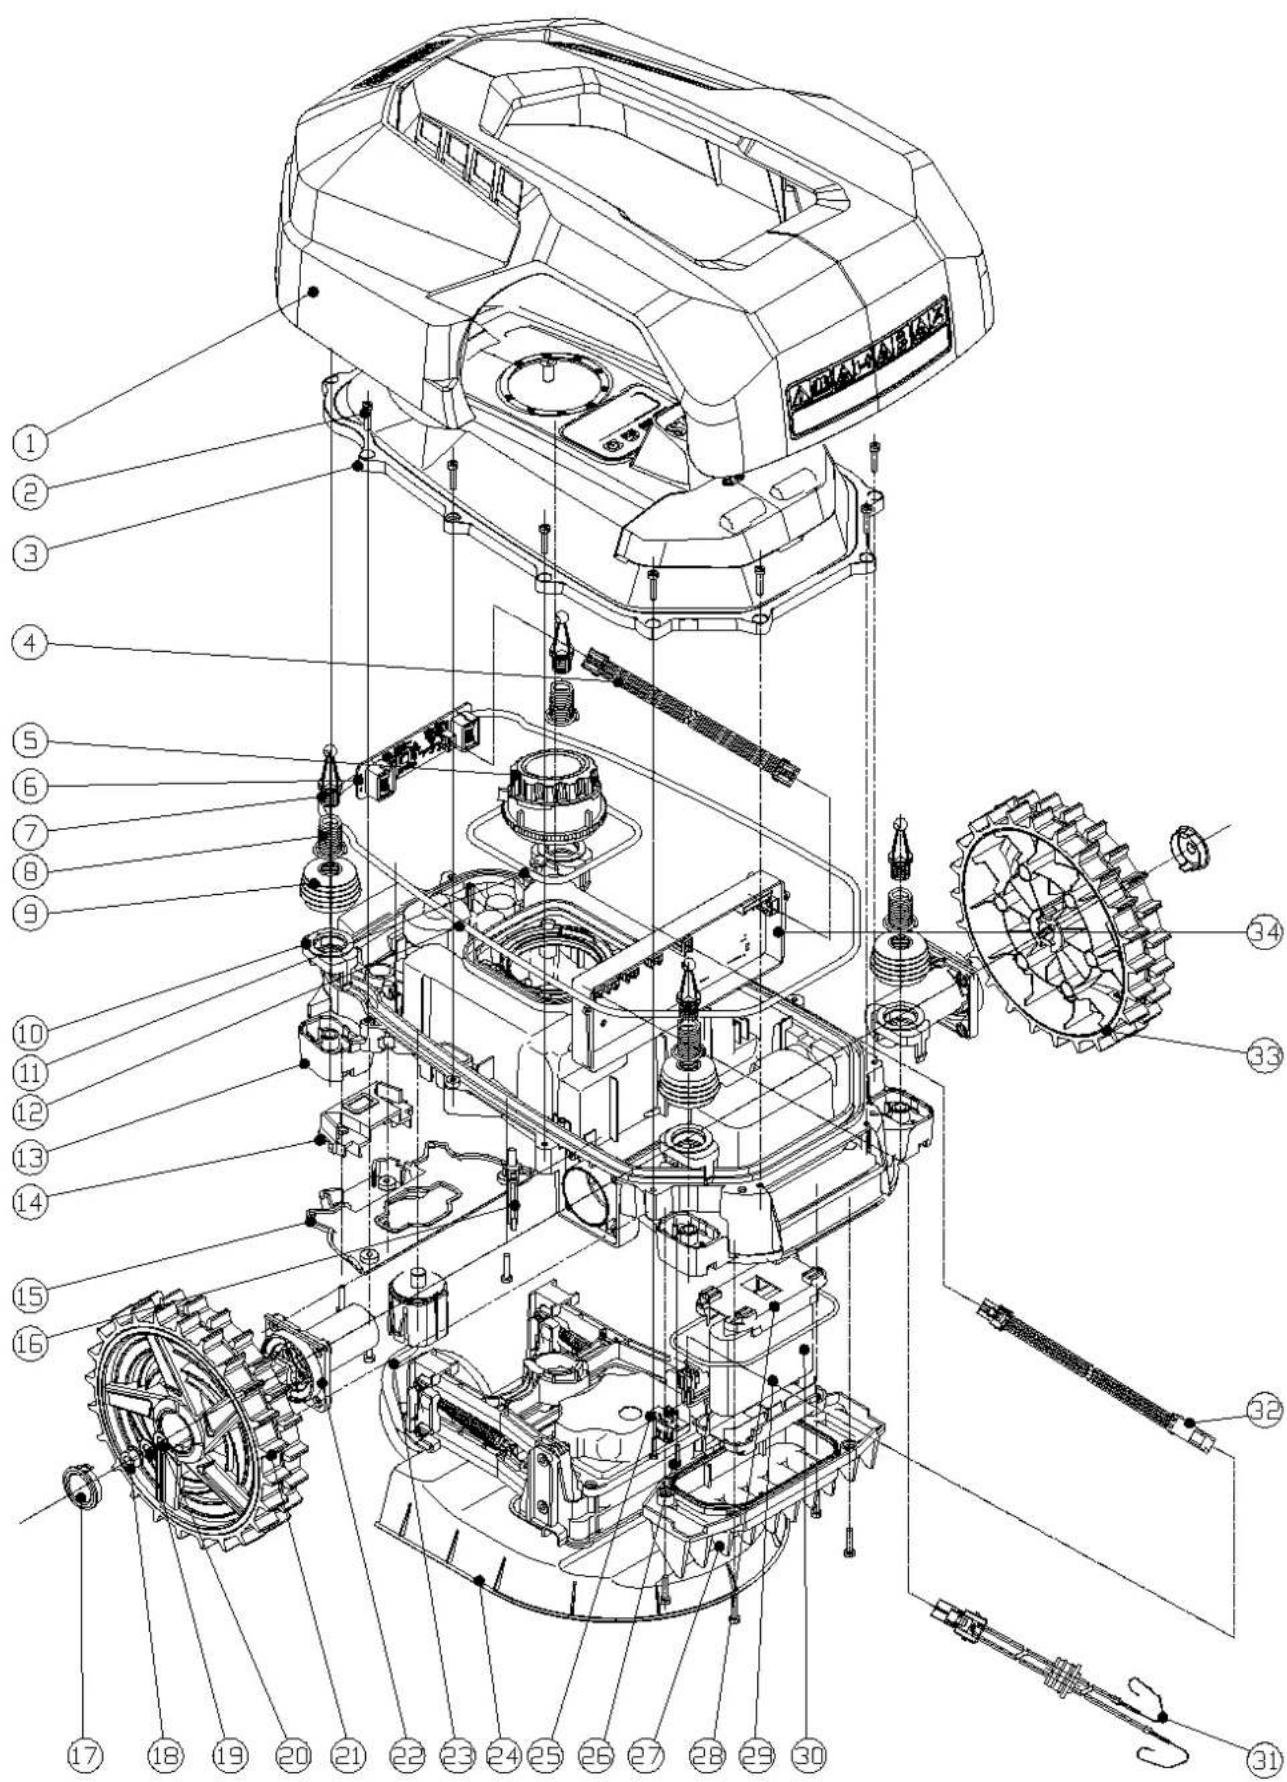
with charging station, battery and power supply
ROBOT LAWNMOWER RLM500W
Standard references:
EN 50636-2-107:2015+A1:2018+A2:2020; EN 60335-1:2012+A11:2014+A13:2017+A1:2019+A2:2019+A14:2019;
EN 60335-2-29:2004+A2:2010+A11:2018; EN 62233: 2008; EN 303 447 V1.1.1; EN 300 328 V2.1.1;
EN 300 328 V2.2.2; EN 50665:2017; EN 62311:2008; BS EN 55014-1:2017+A11:2020; EN 55014-2:2015;
BS EN IEC 61000-3-2:2019; BS EN 61000-3-3:2013+A1:2019; ISO 11094:1991; EN ISO 3744:2005; EN IEC 63000:2018
This declaration of conformity is issued under the sole responsibility of the manufacturer.
The object of the declaration described above fulfils the regulations of the directive 2011/65/EU of the European Parliament and Council from 8th June 2011, on the restriction of the use of certain hazardous substances in electrical and electronic equipment.