
GardenPump 18 - Water pump BOSCH - Free user manual and instructions
Find the device manual for free GardenPump 18 BOSCH in PDF.

User questions about GardenPump 18 BOSCH
0 question about this device. Answer the ones you know or ask your own.
Ask a new question about this device
Download the instructions for your Water pump in PDF format for free! Find your manual GardenPump 18 - BOSCH and take your electronic device back in hand. On this page are published all the documents necessary for the use of your device. GardenPump 18 by BOSCH.
USER MANUAL GardenPump 18 BOSCH
natural_image
Illustration of a charging device with a bulb and cable, next to a Bosch-branded electrical enclosure (no text or symbols visible)www.bosch-garden.com
▶ WARNING! Read all safety warnings and all instructions. Failure to follow the safety warnings and instructions may result in electric shock, fire and/or serious injury.
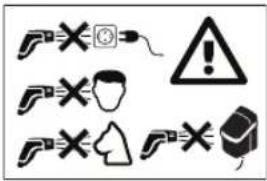
Explanation of symbols on the machine

General hazard safety alert.

Read instruction manual.
Do not use the charger if the cord is damaged.

Only use the battery charger indoors.

Battery charger contains a safety transformer.
Never direct the water jet against the face of people and animals, the machine itself or
electric components.
Operation
The operator must use the product in accordance with the regulations. The local conditions must be taken into account. When working, pay attention to other people, especially to children.
▶ Never allow children, persons with physical, sensory or mental limitations or a lack of experience and/or knowledge and/or people unfamiliar with these instructions to use the product. Local regulations may restrict the age of the operator.
▶ Children should be supervised to ensure that they do not play with the appliance.
▶ Do not use solvent-containing liquids, undiluted acids, acetone or solvents, including petrol, paint thinners, heating oil. The sprayed vapours are highly flammable, explosive and toxic.
▶ Materials containing asbestos and other materials which contain substances which are hazardous to your health must not be sprayed.
▶ Never use the product with salt water.
▶ The pump must not be used in places where people are in the water.
▶ Do not use the product if the water temperature exceeds 35^ C.
▶ Leaking lubricants can cause slight contamination of the water.
▶ When watering the garden, observe proper footing, especially on uneven or wet surfaces.
▶ Make sure that the water tank is always closed with a lid or the like, to ensure that no children or animals can fall into it.
▶ Do not insert anything into the pump impeller whilst in operation.
Application
Before use, check that the machine and operating equipment are in perfect condition and are safe to operate. Do not use if it is not in perfect condition.
▶ Do not modify the machine. Unauthorized modifications can impair the safety of your machine, lead to increased noise and vibrations, and poor performance.
▶ Always fasten the control unit firmly to a wall or water tank attachment. Take care if drilling holes.
▶ Do not submerge the control unit into water.
▶ The pump only operates when the cover of the control unit is closed
14 | English
and the locking handle is firmly in the bottom position.
▶ Position the control unit in a shady spot. For safety reasons, the control unit is equipped with a thermal circuit. When the control unit gets too hot, it switches off.
▶ Do not misuse the connection cable to carry, suspend or unplug the pump. Protect the connection cable against heat, oil and sharp edges.
▶ Some nozzle settings may cause objects to rebound. Wear suitable personnel protective equipment such as safety goggles.
▶ Never use the product without the filter or with a dirty or damaged filter.
▶ Do not use the anti-siphon connector elsewhere e.g. on a mains water supply with higher water pressure.
▶ Always keep the control unit cover closed.
Recommendations for Optimal Handling of the Battery Pack
▶ Do not open the battery. There is a risk of short-circuiting.

Protect the battery against heat (e.g., against continuous intense sunlight), fire, water, and moisture. There is a risk of explosion.
▶ Only use the battery with products from the manufacturer. This is the only way in which you can protect
the battery against dangerous overload.
The battery can be damaged by pointed objects such as nails or screwdrivers or by force applied externally. An internal short circuit can occur and the battery can burn, smoke, explode or overheat.
▶ Do not short-circuit the battery.
There is a risk of explosion.
▶ Occasionally clean the venting slots of the battery using a soft, clean and dry brush.
▶ Charge the machine only with the supplied battery charger.
- Keep any unfitted battery away from paper clips, coins, keys, nails, screws or other small metal objects, that can make a connection from one terminal to another. Shorting the battery terminals together may cause burns or a fire.
▶ In case of damage and improper use of the battery pack, vapours may be emitted. Ventilate the area and seek medical help in case of complaints. The vapours can irritate the respiratory system.
▶ Under abusive conditions, liquid may be ejected from the battery; avoid contact. If contact accidentally occurs, flush with water. If liquid contacts eyes, additionally seek medical help. Liquid ejected from the battery may cause irritation or burns.
Safety Warnings for Battery Chargers

Read all safety warnings and all instructions. Failure to follow the safety warnings and instructions may result in electric shock, fire and/or serious injury.
Save all safety warnings and instructions for future reference.
▶ Use the battery charger only when you fully understand and can perform all functions without limitation, or have received appropriate instructions.
▶ Never allow children, persons with physical, sensory or mental limitations or a lack of experience and/or knowledge and/or people unfamiliar with these instructions to use the battery charger. Local regulations may restrict the age of the operator.
▶ Supervise children at all times. This will ensure that children do not play with the battery charger.
▶ Charge only Bosch lithium-ion batteries with a capacity above 1.5 Ah (with at least 5 rechargeable battery cells). The battery voltage must match the battery charging voltage of the charger. Do not charge non-rechargeable batteries. Otherwise there is a danger of fire and explosion.

Keep the battery charger away from rain or moisture.
Penetration of water in the battery charger increases the risk of an elec- tric shock.
▶ Keep the charger clean. Dirt poses a risk of electric shock.
▶ Always check the charger, cable and plug before use. Stop using the charger if you discover any damage. Do not open the charger yourself, and have it repaired only by a qualified specialist using only original replacement parts. Damaged chargers, cables and plugs increase the risk of electric shock.
- Do not operate the charger on an easily ignited surface (e.g. paper, textiles, etc.) or in a flammable environment. There is a risk of fire due to the charger heating up during operation.
▶ Do not cover the ventilation slots of the battery charger. Otherwise, the battery charger can overheat and no longer operate properly.
For increased electrical safety, we recommend using a residual current device with a max. tripping current of 30 mA. Before using, always check your residual current device.
Storage
If there is a risk of frost in autumn and winter, remove the pump from the water tank.
▶ Always drain any water from the pump before storage.
- Store the pump and control unit in a frost-free environment.
16 | English
▶ Always remove the battery from the appliance when storing indoors.
Maintenance, Accessories, Spare Parts
▶ Always remove the battery before undertaking maintenance.
- Accessories and spare parts which have been approved by Bosch must be used. Original accessories and spare parts guarantee that the machine can be operated safely and without any breakdowns.
▶ Repairs may only be carried out by authorised Bosch Service Centres.
Symbols
The following symbols are important for reading and understanding the original instructions. Please take note of the symbols and their meaning. The correct interpretation of the symbols will help you to use the product in a better and safer manner.
Symbol Meaning
| Movement direction | |
| Reaction direction | |
| Switching On | |
| Switching Off | |
| Permitted action | |
| Prohibited action | |
| CLICK! | Audible noise |
Symbol Meaning
| Weight | |
| 1.8m | Max. submersion depth |
| 35°C max | Max. water temperature |
Intended Use
The product is intended for domestic use for pumping rainwater from a water tank to irrigate flower beds, lawns and vegetable beds. The product can also be used for minor cleaning tasks.
Do not use the product in a swimming pool or above 2000 m above sea level.
Product Features (see figure A)
The numbering of the product features refers to the illustration of the product on the graphics pages.
(1) On/Off switch
(2) Battery charge Indicator
(3) Warning triangle
(4) LED for timer function
(5) Setting button for timer function
(6) Battery control unit
(7) Locking handle
(8) Water tank attachment
(9) Securing screw
(10) Wall attachment
(11) Hose guide
(12) Anti-siphoning connector
(13) Connecting hose
(14) Universal connector
(15) Hose clamp
(16) Cable clamp
(17) Filter
(18) Rainwater pump
(19) Hose connection
(20) Connecting cable
(21) Plug
(22) Battery
(23) Battery charger
Technical Data
| Rainwater Pump GardenPump 18 | |
| Pump Battery Control Unit | |
| Article number | 3 600 HC4 1.. 3 600 HC4 0.. |
| Flow rate (Q) l/h 1800 | |
English | 17
| Rainwater Pump GardenPump 18 | |||
| Pump Battery Control Unit | |||
| Head pressure (H) m 17.5 | |||
| 1.8m Max. submersion depth | m 1.8 | ||
| 35°C max Max. water temperature | °C 35 | ||
| Rated voltage V 18 18 | |||
| Weight according to EPTA-Procedure 01:2014 kg 0.6 0.6 | |||
| Serial number see type plate on garden | see type plate on garden tool tool | ||
The pump should only be used with the, GardenPump 18, battery control unit.
Battery Li-Ion
| Recommended ambient temperature during charging ^ 0 ... +45 | |
| Permitted ambient temperature during operation ^A) and storage ^ -20 ... +50 | |
| Rated voltage V 18 | |
| Number of battery cells at battery capacity | |
| - Battery with 1.5 Ah | 5 |
| - Battery with 2.0 Ah | 5 |
| - Battery with 2.5 Ah | 5 |
| - Battery with 3.5 Ah | 5 |
| - Battery with 4.0 Ah | 10 |
| - Battery with 6.0 Ah | 10 |
A) Limited performance at temperatures < 0^
| Charger | AL 1810 CV | |
| Article number | ||
| EU | 2 607 226 385 | |
| UK | 2 607 226 387 | |
| Charging current | A | 1.0 |
| Charging period (battery discharged) | ||
| - Battery with 1.5 Ah | min 94 | |
| - Battery with 2.0 Ah | min | 124 |
| - Battery with 2.5 Ah | min | 154 |
| - Battery with 3.0 Ah | min | 185 |
| - Battery with 4.0 Ah | min | 244 |
| - Battery with 6.0 Ah | min | 364 |
| Weight according to EPTA-Procedure 01:2014 | kg | 0.17 |
| Protection class | ☐ / II | |
The specifications apply to a rated voltage [U] of 230 V. These specifications may vary at different voltages and in country-specific models.
Charging the Battery
▶ Pay attention to the mains voltage. The voltage of the power source must match the voltage specified on the rating plate of the charger.
The battery is equipped with temperature monitoring that allows charging only in the temperature range between 0 °C and 35 °C. In this manner, a high battery service life is achieved.
18 | English
Note: The battery is supplied partially charged. To ensure full battery capacity, completely charge the battery in the battery charger before using for the first time.
The lithium-ion battery can be charged at any time without reducing its service life. Interrupting the charging procedure does not damage the battery.
The "Electronic Cell Protection (ECP)" protects the lithium-ion battery against deep discharging. When the battery is empty, the product is switched off by means of a protective circuit: The pump no longer operates.
Observe the notes for disposal of the battery.
Charging Procedure (see figure H)
The charging procedure starts as soon as the mains plug of the charger is plugged into a socket outlet and the battery (22) is inserted onto the charger (23).
Due to the intelligent charging method, the charging condition of the battery is automatically detected and the battery is charged with the optimum charging current, depending on battery temperature and voltage.
This gives longer life to the battery and always leaves it fully charged when kept in the charger for storage.
Meaning of the Indication Elements (AL 1810)
Flashing battery charge indicator
The charging process is indicated by the flashing of the battery charge indicator.
Solid light on battery charge indicator
A solid light on the battery charge indicator signals that the battery is fully charged or that the temperature of the battery is not within the permitted charging temperature range, and
can therefore not be charged. The battery is charged as soon as the allowable charging temperature range is reached.
When the battery is not inserted, a solid light on the battery charge indicator signals that the mains plug is inserted in the plug socket and that the charger is ready for operation.
Assembly
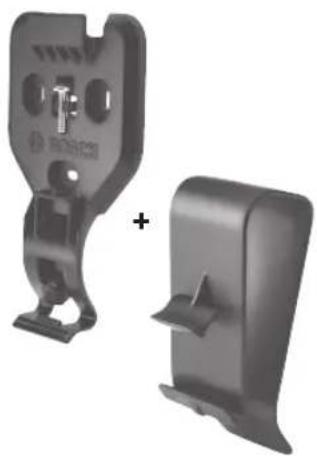
Fastening the Wall Attachment/Water Tank Attachment (see figure B)
Fasten the wall attachment (10) next to the water tank. Note that the distance to the water tank is limited due to the connecting cable length.
The distance to the water tank plus the water tank height may not be larger than the length of the connecting cable. When mounting the wall attachment to the wall, use the guide holes to mark the position of the screws.
If wall mounting is not possible, the provided water tank attachment (8) can be attached directly to the rim of the water tank.
NOTE: The battery control unit is switched off via a thermal switch at increased temperature. The attachment for the battery control unit should therefore be mounted in a shaded position.
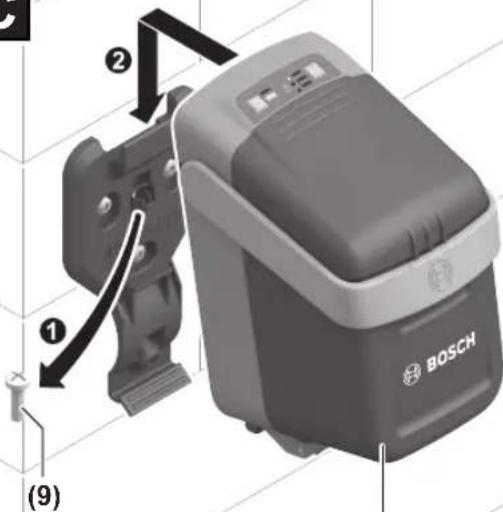
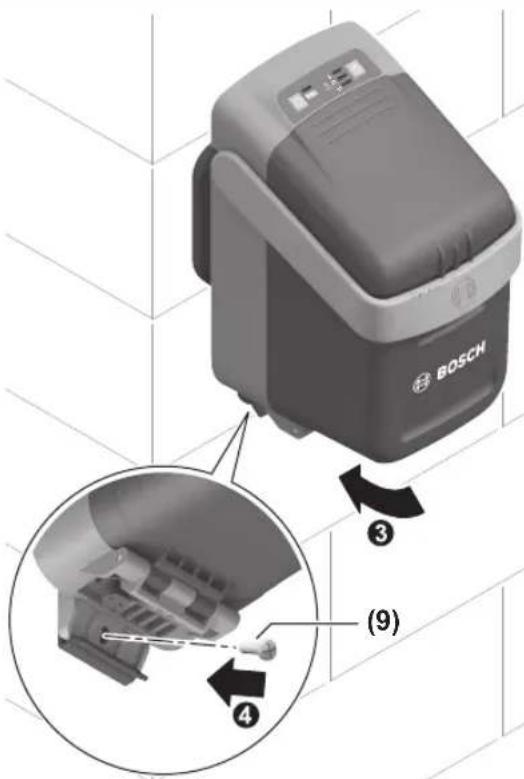
Inserting/Removing the Battery Control Unit (see figure C)
In the case of wall attachment take out the securing screw (9) from the attachment, attach the battery control unit (6) from above into the wall attachment and secure it at the bottom with the clip and securing screw (9).
In case of water tank attachment just clip the battery control unit on the attachment.
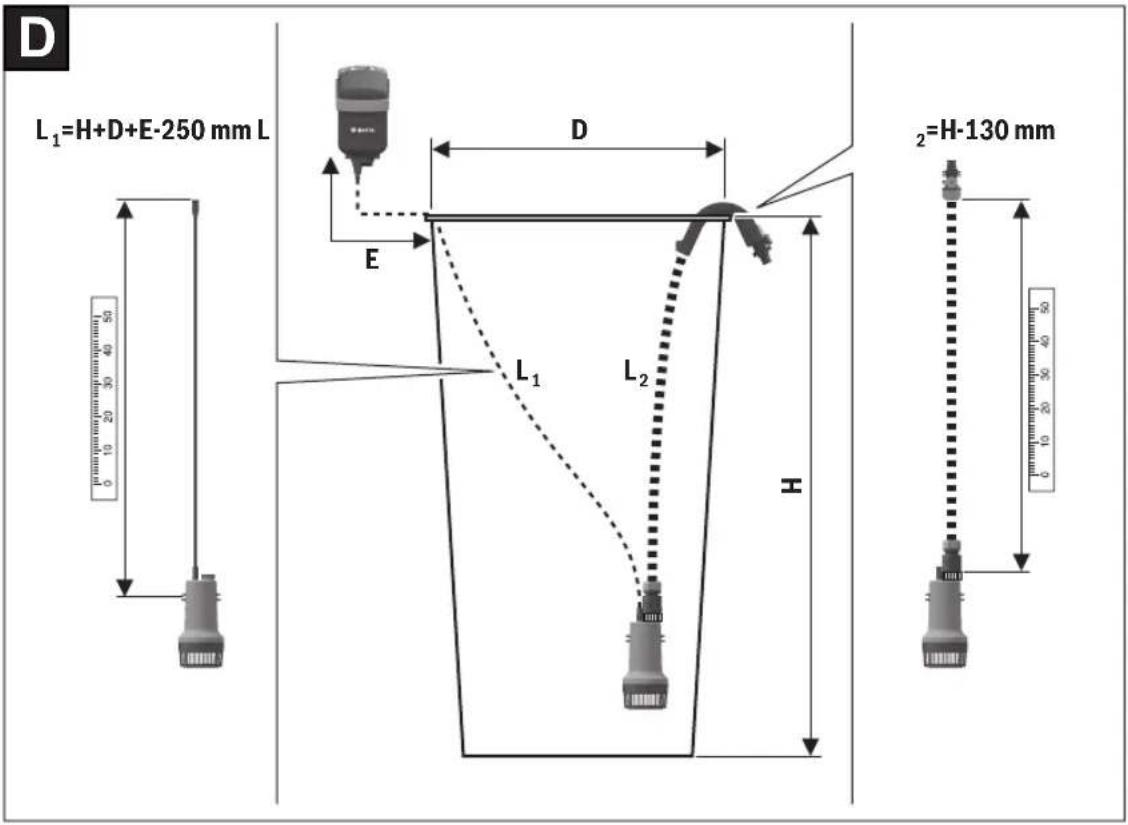
Determining the required length of cable and connecting hose (see figure D)
Note: The pump needs to be positioned 50 mm above the base of the tank, clear of any sediment that might damage the pump.
Measure the height H and the diameter D of the water tank as well as the distance E from the rim of the tank to the battery control box.
The length L_1 of the cable calculates as follows: H + D + E - 250 mm
The length L_2 of the connecting hose calculates as follows: H - 130 mm
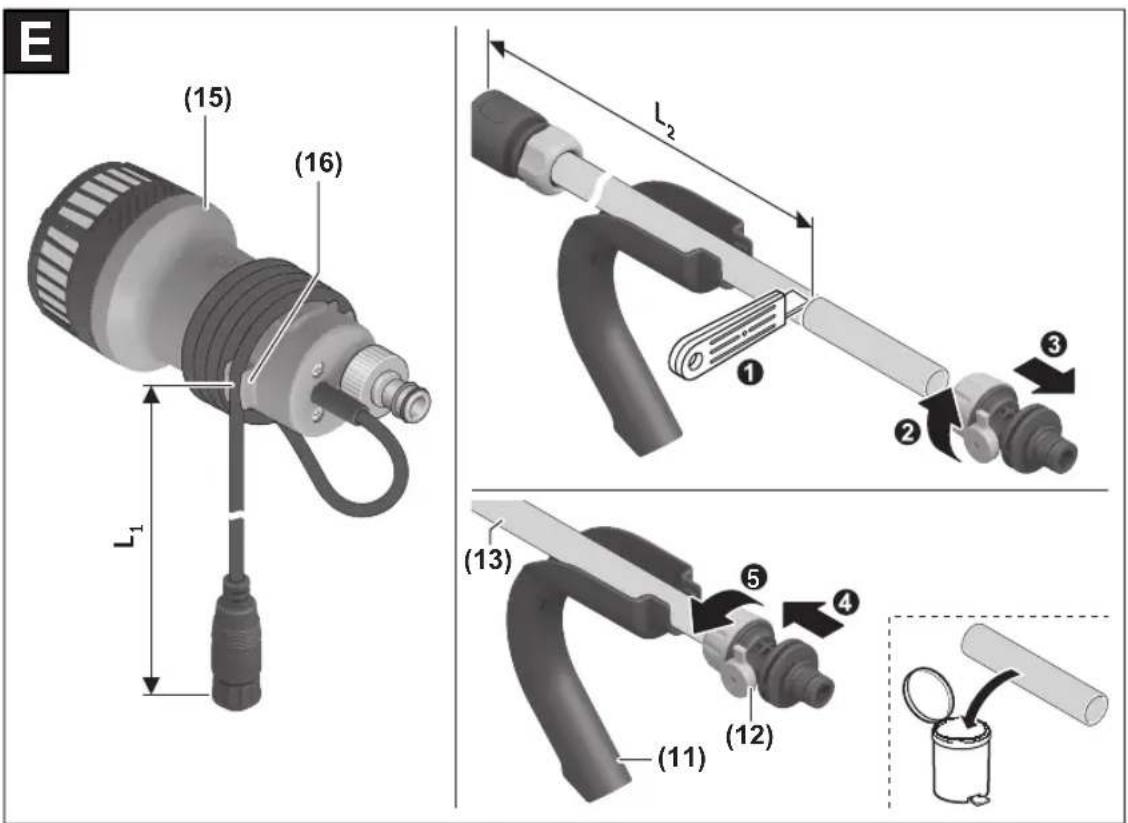
Wrapping the cable and cutting the connecting hose (see figure E)
Wrap the excess cable around the pump (18) and secure using the provided cable clamp (16).
Release the anti-siphon connector (12) with hose attached from the clamp on the hose guide (11).
Cut the connecting hose to length L_2 and re-attach the anti-siphon connector (12) on the remaining connecting hose.
Return the anti-siphon connector (12) with hose into the clamp on the hose guide (11).
You can leave the connecting hose uncut and let the hose protrude. Please note that for the anti-siphon connector to function the anti-siphon connector needs to be placed to its original position in the hose guide.
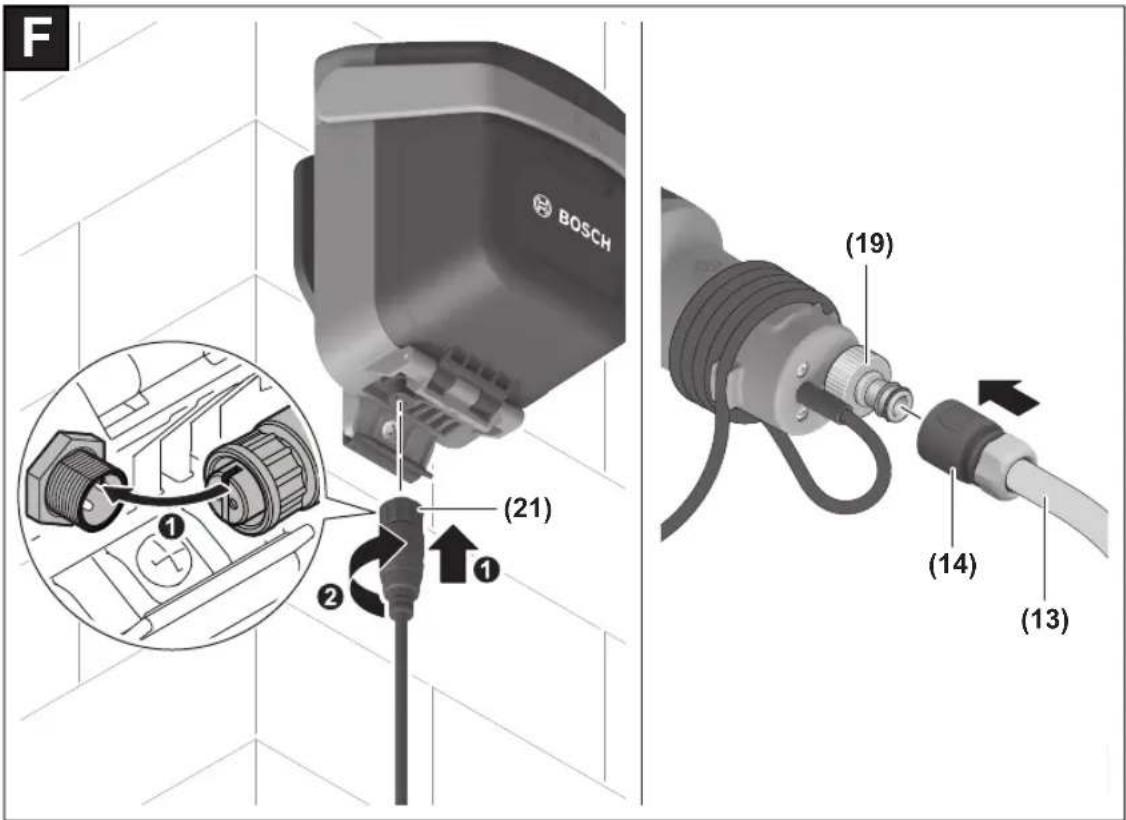
Connecting the hose and cable (see figure F)
Take the 2-pin plug connector (21) on the power cable and align it with the junction point on the battery control unit and insert until it is firmly seated.
Screw the union nut onto the cable connection to secure the plug and prevent water from entering.
Attach the universal connector (14) on the connecting hose (13) to the hose connection (19) on the pump.
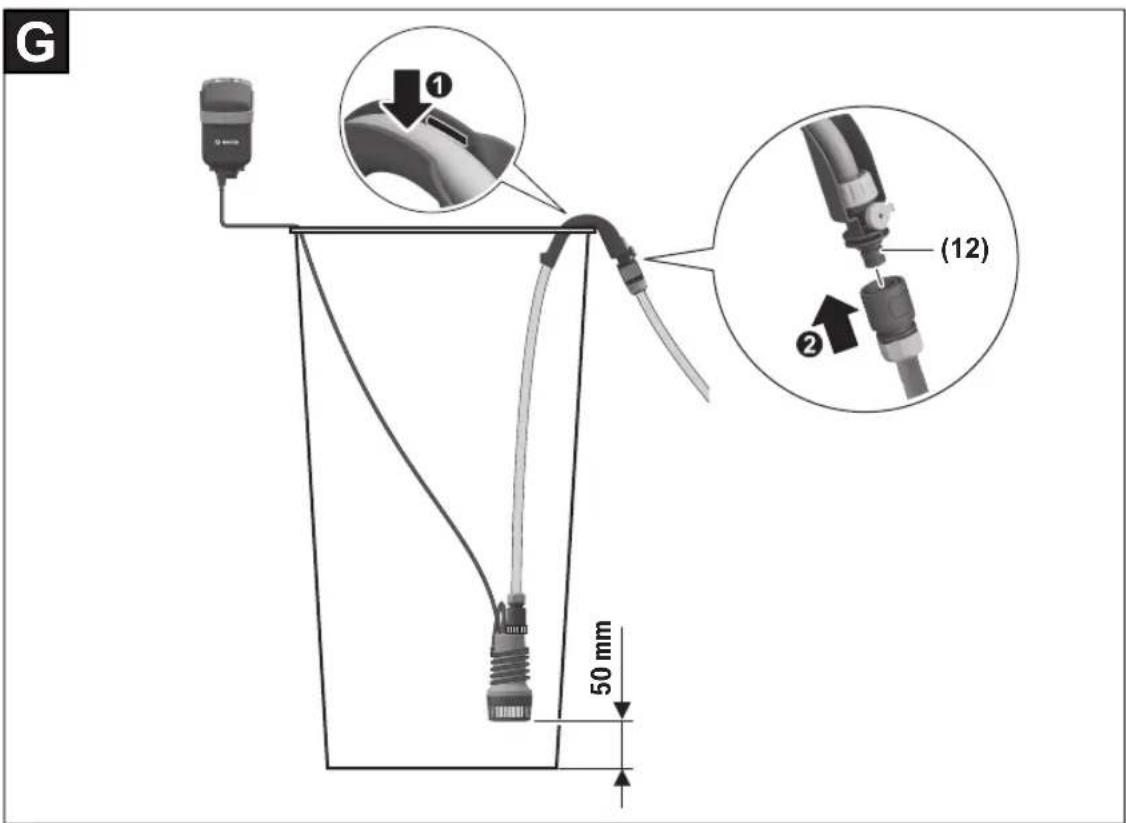
Placing the pump into the tank and connecting a garden hose (see figure G)
With the connecting hose attached lower the pump into the tank.
To aid submersion the pump is fitted with a small vent that allows air to escape when the pump is placed into water. A valve closes the vent when the pump is operating which accounts for the noise users may notice if the pump is shaken. Place the hose guide on the rim of the water tank and ensure that the pump is in the correct position. If necessary adjust accordingly.
Attach a garden hose with a standard hose coupling to the anti-siphon connector (12).
Note: Do not use a hose coupling with auto stop as this may reduce the flow.
Using closed Rainwater Tanks
The pump can also be used with closed water tanks. Depending on the version, use the access points for cable and hose at the top of the tank. In some cases the openings must be cut out. Make sure there are no sharp edges/burrs.
Inserting the Battery (see figure H)
To open the control unit (6), pivot the locking handle (7) upward and pull the control unit cover down. Insert the battery (22) from above into the control unit until it engages.
Close the cover and pivot the locking handle downward. The pump can only be started if the control unit is locked with the locking handle.
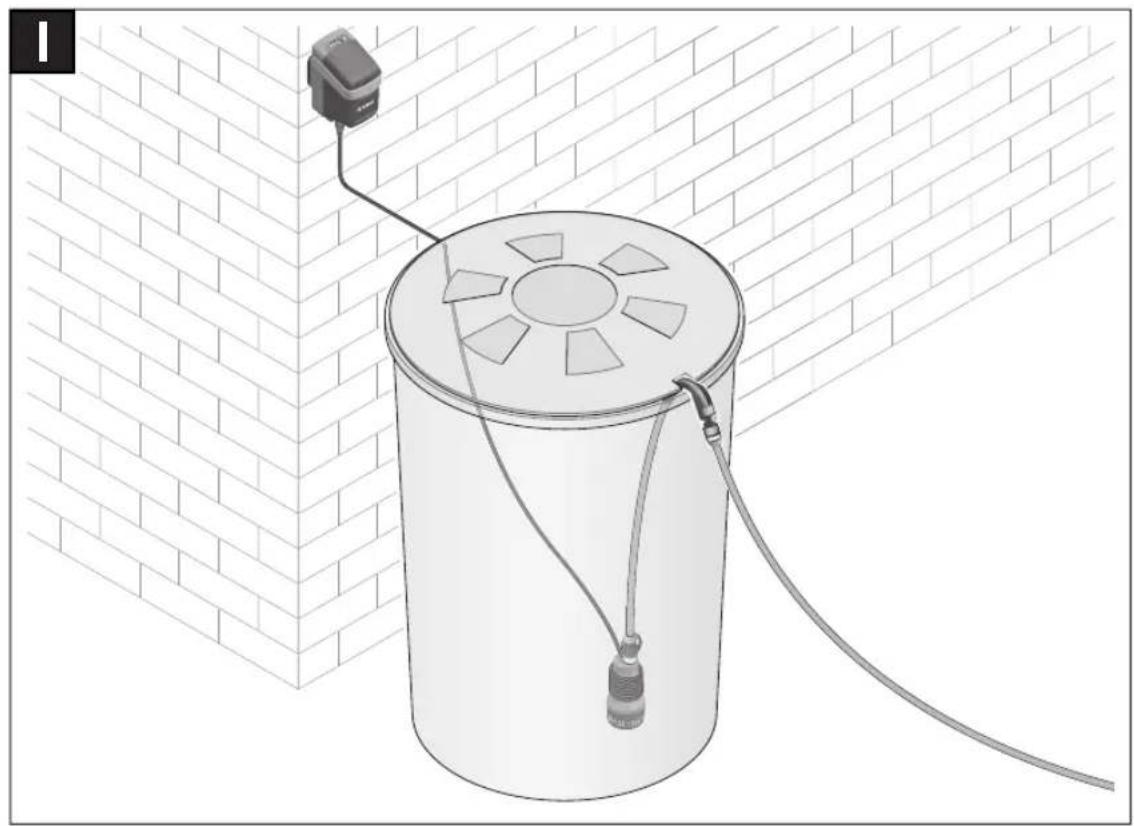
Finished assembly (see figure I)
Make sure that the water tank is always closed with a lid or the like, to ensure that no children or animals can fall into it.
Operation
If no more water can be pumped, a dry-run protection feature switches off the pump automatically.
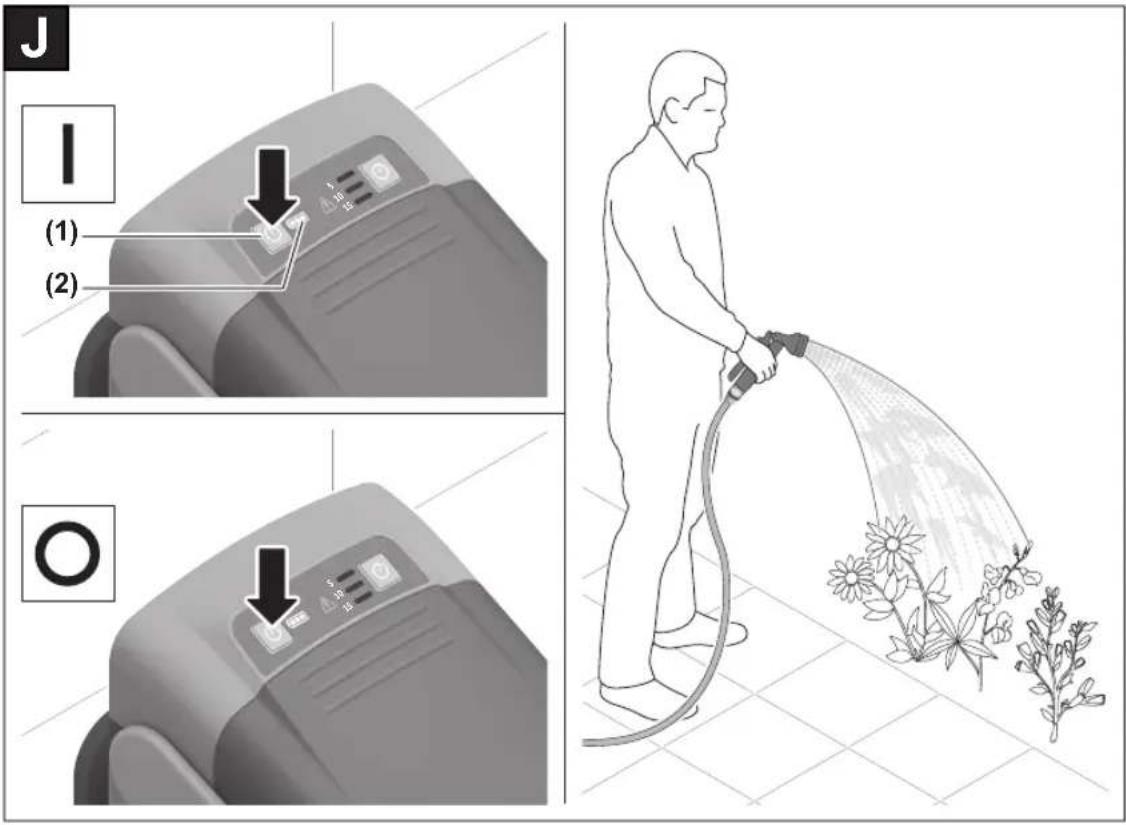
Switching On and Off (see figure J)
To switch on the pump, press the On/Off switch (1). The battery charge indicator lights up.
The battery charge-control indicator(2) indicates the charge condition of the battery:
LED Charge Condition
| Continuous lighting, green > 50 % | |
| Continuous lighting, yellow 50 % - 20 % | |
| Continuous lighting, red < 20 % | |
| Flashing, red Discharged, remove and recharge battery |
Note: An illuminated warning triangle indicates a malfunction in the device, see section "Troubleshooting - Causes and Corrective Measures".
To switch off the pump, press the On/Off switch (1) again.
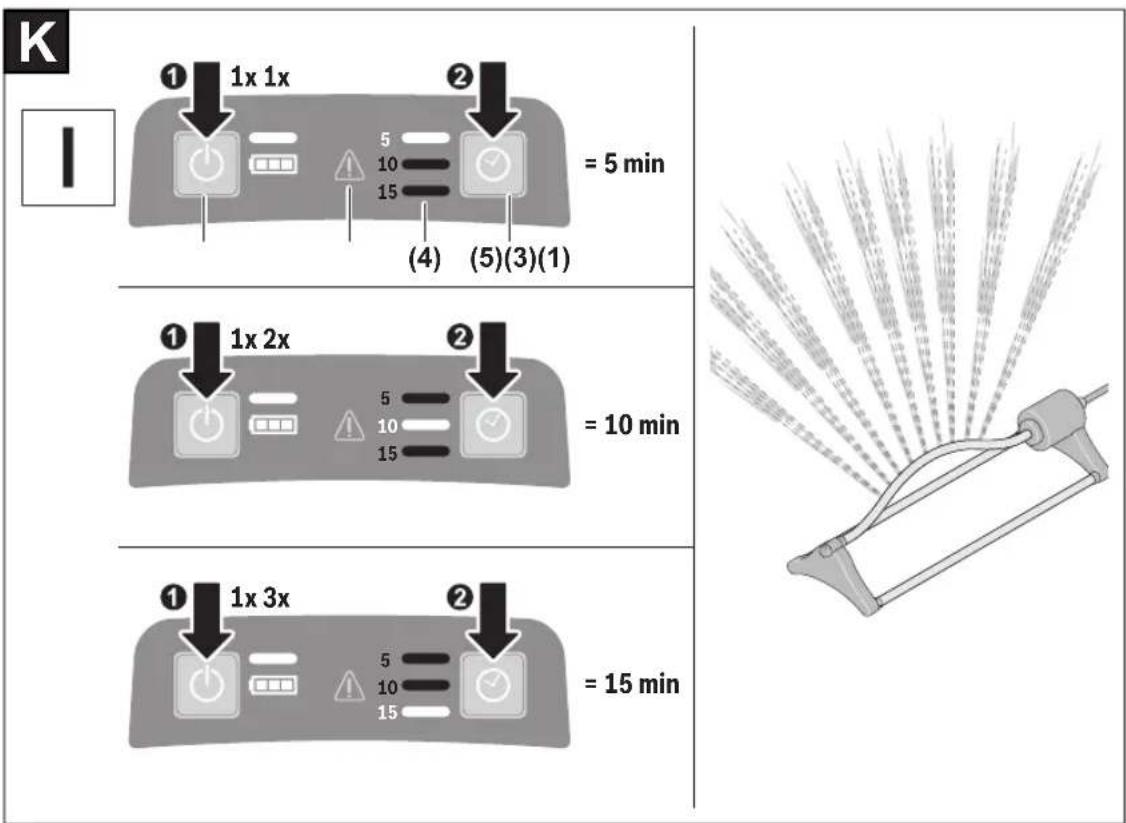
Timer function (see figure K)
To activate the time function, press the time function button (5) when the pump is switched on.
After pressing once, the running time is 5 min. With each further press, the running time of the pump increases by 5 min, up to 15 min.
The selected running time is indicated by the corresponding LED (4).
After the preset time has elapsed, the pump switches off automatically.
To switch off the time function, press the time function button (5) until the indication (4) goes out.
Removing the Battery (see figure L)
To open the control unit (6), pivot the locking handle (7) upward and fold the control unit cover down. Press the release button and pull the battery (22) upwards out of the control unit. Do not use force to do this.
Close the cover to prevent moisture from entering.
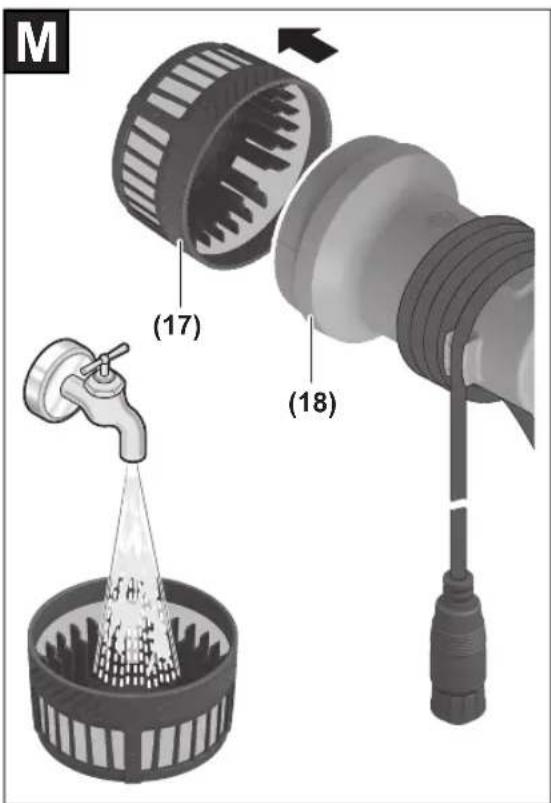
Cleaning the Filter (see figure M)
The pump (18) is equipped with a filter (17) to prevent damage from contamination. Inspect and clean the filter regularly.
Pull off the filter downward. Clean the filter under running water and then attach the filter onto the pump again.
Troubleshooting – Causes and Corrective Measures
Rainwater Pump

Problem Possible Cause Corrective Measure
| Warning triangle flashing Red | Battery too hot/cold Allow to cool/warm |
| Warning triangle flashing yellow | Dry-running protection has been activated Switch machine off and reposition pump so that is fully submerged |
| Pump does not start Battery control box not fully closed Ensure that the battery control box cover is closed and the locking handle is in the fully down position | |
| Battery not (properly) inserted Properly insert battery | |
20 | English
Problem Possible Cause Corrective Measure
| Cable not (properly) connected Ensure that the plug is fully inserted into the connection on the control box and the protective collar is in place | ||
| Battery discharged Recharge battery | ||
| Pump/water frozen Remove pump and wait until ice has completely melted | ||
| Pump running but no or limited working pressure/pulsating pressure | Water filter clogged up Remove filter and clean | |
| Insufficient water Check the water level and ensure that the pump is fully submerged | ||
| Air in the pump/hose Remove any spray attachment and run the pump with only hose attached until water flows smoothly | ||
| Auto stop connections fitted Exchange connectors for non autostop type | ||
| Hose Blockage Check hose for kinks and blockages | ||
| Water leaking from hose after pump use | Anti-siphon connector not fitted Fit the anti-siphoning connector provided | |
| Anti-siphon connector not properly positioned Reposition the anti-siphon connector so that it is positioned above the water level within the tank | ||
| Flashing red battery charge indicator. No charging procedure possible | Battery contacts contaminated Clean the battery contacts(e.g. by inserting and removing the battery several times) or replace the battery | |
| Battery defective Replace the battery | ||
| Battery charge indicator does not light up on charge | Mains plug of battery charger not plugged in (properly) | Insert mains plug (fully) into the socket outlet |
| Socket outlet, mains cable or battery charger defective | Check the mains voltage; have the battery charger checked by an authorised after-sales service agent for Bosch power tools | |
Maintenance, Cleaning and Storage
Maintenance
Note: To ensure long and reliable service, carry out the following maintenance regularly.
▶ Repairs may only be carried out by authorised Bosch Service Centres.
Check that covers and guards are undamaged and correctly fitted. Carry out necessary maintenance or repairs before using.
Regularly check for obvious defects such as loose fixings, and worn or damaged components.
Storage in Winter (see figure N)
Switch off the pump and remove the battery from the battery control unit. Pull the pump with the connecting hose out of the tank. Disconnect the connecting cable and the connecting hose.
Drain water from the pump.
Clean the exterior of the pump using a soft brush and a cloth. Do not use solvents or polishes. Remove all dirt/debris, in particular clean the filter.
Wrap the cable around the pump and secure it to the cable clamps. Remove the battery control unit from the wall/water tank attachment.
Store in a frost-free area.
Ensure that the cable is not pinched/wedged when storing. Do not bend/kink the connection hose.
Battery Maintenance
Use the following procedures to enable optimum usage of the battery:
- Protect the battery against moisture and water.
- Store the machine and battery only within a temperature range between -20^ and 50^ . As an example, do not leave the battery in the car in summer.
- It is recommended that the battery is not stored within the product but stored separately.
- Do not leave the battery in the product in direct sunlight.
- The ideal storage condition for the battery is 5^ .
- Occasionally clean the venting slots of the battery using a soft, clean and dry brush.
A significantly reduced working period after charging indicates that the battery is used and must be replaced.
After-sales Service and Application Service
www.bosch-garden.com
In all correspondence and spare parts orders, please always include the 10-digit article number given on the nameplate of the product.
Great Britain
Robert Bosch Ltd. (B.S.C.)
P.O. Box 98
Broadwater Park
North Orbital Road
Denham Uxbridge
UB 9 5HJ
At www.bosch-pt.co.uk you can order spare parts or arrange the collection of a product in need of servicing or repair.
Tel. Service: (0344) 7360109
E-Mail: boschservicecentre@bosch.com
Ireland
Origo Ltd.
Unit 23 Magna Drive
Magna Business Park
City West
Dublin 24
Tel. Service: (01) 4666700
Fax: (01) 4666888
Australia, New Zealand and Pacific Islands
Robert Bosch Australia Pty. Ltd.
Power Tools
Locked Bag 66
Clayton South VIC 3169
Customer Contact Center
Inside Australia:
Phone: (01300) 307044
Fax: (01300) 307045
Inside New Zealand:
Phone: (0800) 543353
Fax: (0800) 428570
Outside AU and NZ:
Phone: +61 3 95415555
www.bosch-pt.com.au
www.bosch-pt.co.nz
Republic of South Africa
Customer service
Hotline: (011) 6519600
Gauteng - BSC Service Centre
35 Roper Street, New Centre
Johannesburg
Tel.: (011) 4939375
Fax: (011) 4930126
E-Mail: bsctools@icon.co.za
KZN - BSC Service Centre
Unit E, Almar Centre
143 Crompton Street
Pinetown
Tel.: (031) 7012120
Fax: (031) 7012446
E-Mail: bsc.dur@za.bosch.com
Western Cape - BSC Service Centre
Democracy Way, Prosperity Park
Milnerton
Tel.: (021) 5512577
Fax: (021) 5513223
E-Mail: bsc@zsd.co.za
Bosch Headquarters
Midrand, Gauteng
Tel.: (011) 6519600
Fax: (011) 6519880
E-Mail: rbsa-hq.pts@za.bosch.com
Armenia, Azerbaijan, Georgia
Robert Bosch Ltd.
David Agmashenebeli ave. 61
0102 Tbilisi, Georgia
Tel. +995322510073
www.bosch.com
Kyrgyzstan, Mongolia, Tajikistan, Turkmenistan, Uzbekistan
TOO "Robert Bosch" Power Tools, After Sales Service
Muratbaev Ave., 180
050012, Almaty, Kazakhstan
Service Email: service.pt.ka@bosch.com
Official Website: www.bosch.com, www.bosch-pt.com
Transport
The contained lithium-ion batteries are subject to the Dangerous Goods Legislation requirements. The batteries are suitable for road-transport by the user without further restrictions.
When shipping by third parties (e.g.: by air transport or forwarding agency), special requirements on packaging and labelling must be observed. For preparation of the item being shipped, consulting an expert for hazardous material is required.
Dispatch battery packs only when the housing is undamaged. Tape or mask off open contacts and pack up the battery in such a manner that it cannot move around in the packaging. Please also observe the possibility of more detailed national regulations.
Disposal

Power tools, rechargeable batteries, accessories and packaging should be sorted for environmental-friendly recycling.

Do not dispose of power tools and batteries/re-chargeable batteries into household waste!
Only for EU countries:
According to the Directive 2012/19/EU, power tools that are no longer usable, and according to the Directive 2006/66/EC, defective or used battery packs/batteries, must be collected separately and disposed of in an environmentally correct manner.
Battery packs/batteries:
Li-ion:
22 | Français
Please observe the notes in the section on transport (see "Transport", page 21).
Français
www.bosch-garden.com
Robert Bosch (France) S.A.S.
www.bosch-garden.com
Robert Bosch Argentina Industrial S.A.
Calle Blanco Encalada 250 - San Isidro
B1642AMQ
Calle Robert Bosch No. 405
www.bosch-garden.com
www.bosch-garden.com
www.bosch-garden.com
www.bosch-garden.com
Bosch Service Center
Telegrafvej 3
2750 Ballerup
På www.bosch-pt.dk kan der online bestilles reservedele eller oprettes en reparations ordre.
Tlf. Service Center: 44898855
Fax: 44898755
E-Mail: vaerktoej@dk.bosch.com
Transport
www.bosch-garden.com
Bosch Service Center
Telegrafvej 3
2750 Ballerup
Danmark
Tel.: (08) 7501820 (inom Sverige)
Fax: (011) 187691
Transport
www.bosch-garden.com
www.bosch-garden.com
www.bosch-garden.com
www.bosch-garden.com
www.bosch-garden.com
Robert Bosch Sp. z o.o.
www.bosch-garden.com
Bosch Service Center PT
K Vápence 1621/16
692 01 Mikulov
www.bosch-garden.com
www.bosch-garden.com
www.bosch-garden.com
www.bosch-garden.com
www.bosch-garden.com
www.bosch-garden.com
Service scule electrice
Strada Horia Măcelariu Nr. 30–34, sector 1
013937 Bucureşti
www.bosch-garden.com
Service scule electrice
Strada Horia Măcelariu Nr. 30-34, sector 1
013937 Bucureşti, România
www.bosch-pt.com/bg/bg/
Транспортиране
www.bosch-garden.com
Nikada ne usmeravajte mlaz vode na lice ljudi i životinja, na sam uredaj ili
električne delove.
Rad
▶ Rukovalac sme da koristi proizvod samo za definisanu namenu. Moraju se uzeti u obzir lokalne okolnosti. Prilikom rada radu svesno pazite na druge ljude, a posebno decu.
Nikada ne dozvolite deci, osobama sa ograničenim fizičkim, čulnim ili psihičkim sposobnostima ili nedovoljnim iskustvom i/ili znanjem i/ili osobama koje nisu upoznate sa ovim uputstvima da koriste proizvod. Nacionalni propisi mogu da ograničavaju starost rukovaoca.
▶ Decu bi trebalo nadzirati da biste bili sigurni da se ne igraju uređajem.
▶ Ne smeju se upotrebljavati tečnosti koje sadrže rastvarače, nerazblažene kiseline, aceton ili rastvarači uključujući benzin, rastvarače za boje i ulje za grejanje, jer njihove izmaglice su još zapaljive, eksplozivne i otrovne.
▶ Materijali koji sadrže azbest i drugi koji sadrže materije koje ugrožavaju zdravlje, ne smeju se prskati.
▶ Ne koristite proizvod sa slanom vodom.
▶ Pumpu nije dozvoljeno koristiti na mestima na kojima postoje ljudi u vodi.
▶ Ne koristite proizvod ako je temperatura vode viša od 35 °C.
Zbog izlaženja maziva moguće je lako zagađenje vode.
Prilikom zalivanja bašte pazite na siguran hod, posebno na neravnim ili mokrim površinama.
Pazite na to da je bure za kišnicu uvek zatvoreno poklopcem ili sličnim da deca ili životinje ne bi mogli upasti u njega.
▶ Ne natičite ništa na zupčanik pumpe dok ona radi.
Upotreba
▶ Uredjaj sa priborom se mora pre upotrebe prekontrolisati u pogledu dobrog stanja i radne sigurnosti. Ako stanje nije besprekorno, nesme se koristiti.
▶ Ne preduzimajte nikakve promene na uredjaju. Nedozvoljene promene mogu oštetiti sigurnost Vašeg uredjaja i uticati na pojačane šumove i vibracije i lošiji učinak.
- Pričvrstite upravljačku jedinicu uvek čvrsto na zidni držač ili držač za bure.
Oprez prilikom bušenja rupa.
▶ Nikada ne uranjajte upravljačku jedinicu u vodu.
▶ Pumpa funkcioniše samo kada je poklopac upravljačke jedinice zatvoren i stremen za zatvaranje je čvrsto u donjem položaju.
▶ Postavite upravljačku jedinicu u senku. Radi bezbednosti je upravljačka jedinica opremljena zaštitnim termičkim sklopom. Ako se previše zagreje, isključiće se.
▶ Ne zloupotrebljavajte priključni vod da biste nosili, vešali ili iskopčavali pumpu. Zaštitite priključni vod od toplote, ulja i oštrih ivica.
Neki položaji mlaznice mogu objekte odbiti nazad. Nosite prikladnu ličnu zaštitnu opremu, npr. zaštitne naočare.
228 | Srpski
www.bosch-garden.com
Molimo da kod svih pitanja i poručivanja rezervnih delova neizostavno navedete broj artikla sa 10 brojčanih mesta prema tipskoj pločici proizvoda.
Srpski
Bosch Elektroservis
Dimitrija Tucovića 59
11000 Beograd
Tel.: +381 11 644 8546
Tel.: +381 11 744 3122
Tel.: +381 11 641 6291
Fax: +381 11 641 6293
E-Mail: office@servis-bosch.rs
www.bosch-pt.rs
Keller d.o.o.
Ljubomira Nikolica 29
18000 Nis
Tel./Fax: +381 18 274 030
Tel./Fax: +381 18 531 798
E-Mail: office@keller-nis.com
www.bosch-pt.rs
električne dele.
www.bosch-garden.com
Akumulator Litij-ionski
| Preporučena okolna temperatura prilikom punjenja °C 0 ... +45 | ||
| Dopuštena okolna temperatura prilikom rada ^A) i skladištenja °C -20 ... +50 | ||
| Nazivni napon | V | 18 |
| Broj ćelija pri kapacitetu akumulatora | ||
| - Akumulator sa 1,5 Ah | 5 | |
| - Akumulator sa 2,0 Ah | 5 | |
| - Akumulator sa 2,5 Ah | 5 | |
| - Akumulator sa 3,5 Ah | 5 | |
| - Akumulator sa 4,0 Ah | 10 | |
| - Akumulator sa 6,0 Ah | 10 | |
A) ograničeni učinak kod temperatura <0 °C
| Punjač | AL 1810 CV | |
| Broj artikla | ||
| EU | 2 607 226 385 | |
| UK | 2 607 226 387 | |
| Struja punjenja | A | 1,0 |
| Vrijeme punjenja (ispražnjen akumulator) | ||
| - Akumulator sa 1,5 Ah | min | 94 |
| - Akumulator sa 2,0 Ah | min | 124 |
| - Akumulator sa 2,5 Ah | min | 154 |
| - Akumulator sa 3,0 Ah | min | 185 |
| - Akumulator sa 4,0 Ah | min | 244 |
| - Akumulator sa 6,0 Ah | min | 364 |
| Masa prema postupku EPTA 01:2014 | kg 0,17 | |
| Razred zaštite | ☐ / II | |
Podaci vrijede za nazivni napon [U] od 230 V. U slučaju odstupanja napona i u izvedbama specifičnim za dotičnu zemlju, ovi podaci mogu varirati.
Punjenje akumulatora
www.bosch-garden.com
Prilikom naručivanja rezervnih dijelova i kod svih upita molimo svakako navedite 10-znamenkasti broj artikla prema označnoj pločici proizvoda.
Hrvatski
Robert Bosch d.o.o PT/SHR-BSC
Kneza Branimira 22
10040 Zagreb
Tel.: +385 12 958 051
Fax: +385 12 958 050
www.bosch-garden.com
www.bosch-garden.com
www.bosch-garden.com
لاالشمن والكابل وال Ratings.
www.bosch-garden.com
انسانها الوده شدن إندك آب حيوانات حود
طرز کار
www.bosch-garden.com
natural_image
3D diagram of a mechanical component with an arrow and label (8), no readable text or symbols present.C
(6)
304

natural_image
Illustration of a cylindrical device with a cable and connector, placed on a brick wall (no text or symbols)306


natural_image
3D rendering of a mechanical device with threaded body and attached cable, labeled 'N' in top-left corner (no text or symbols on device itself)308


natural_image
3D rendering of a mechanical gear or pulley component with visible teeth and central bore (no text or symbols)F 016 800 599
natural_image
Two black plastic electrical connectors shown, one with a pin and mounting bracket, the other with a plus button (no text or symbols visible)F016800598
CE
1
| de | EU-Konformitätserklärung | Wir erklären in alleiniger Verantwortung, dass die genannten Produkte allen einschlägigen Bestimmungen der nachfolgend aufgeführten Richtlinien und Verordnungen entsprechen und mit folgenden Normen übereinstimmen.Technische Unterlagen bei: * | |
| Regenwasser-pumpe | Sachnummer | ||
| en | EU Declaration of Conformity | We declare under our sole responsibility that the stated products comply with all applicable provisions of the directives and regulations listed below and are in conformity with the following standards.Technical file at: * | |
| Rainwater Pump | Article number | ||
| fr | Déclaration de conformité UE | Nous déclarons sous notre propre responsabilité que les produits décrits sont en conformité avec les directives, règlements normatifs et normes énumérés ci-dessous.Dossier technique auprès de : * | |
| Pompe à eau de pluie | N° d'article | ||
| es | Declaración de conformidad UE | Declaramos bajo nuestra exclusiva responsabilidad, que los productos nom-brados cumplen con todas las disposiciones correspondientes de las Directi-vas y los Reglamentos mencionados a continuación y están en conformidad con las siguientes normas.Documentos técnicos de: * | |
| Bomba de agua de lluvia | N° de artículo | ||
| pt | Declaração de Conformidade UE | Declaramos sob nossa exclusiva responsabilidade que os produtos mencionados cumprem todas as disposições e os regulamentos indicados e estão em conformidade com as seguintes normas.Documentação técnica pertencente à: * | |
| Bomba de água da chuva | N.° do produto | ||
| it | Dichiarazione di conformità UE | Dichiariamo sotto la nostra piena responsabilità che i prodotti indicati sono conformi a tutte le disposizioni pertinenti delle Direttive e dei Regolamenti elencati di seguito, nonché alle seguenti Normative.Documentazione Tecnica presso: * | |
| Pompa acqua pio-vana | Codice prodotto | ||
| nl | EU-conformiteitsverklaring | Wij verklaren op eigen verantwoordelijkheid dat de genoemde producten voldoen aan alle desbetreffende bepalingen van de hierna genoemde richtlijnen en verordeningen en overeenstemmen met de volgende normen.Technisch dossier bij: * | |
| Regenwaterpomp | Productnummer | ||
| da | EU-overensstemmelseserklæring | Vi erklærer som eneansvarlige, at det beskrevne produkt er i overensstem-melse med alle gældende bestemmelser i følgende direktiver og forordning-ger og opfylder følgende standarder.Tekniske bilag ved: * | |
| Regnvandspumpe | Typenummer | ||
| sv | EU-konformitetsförklaring | Vi förklarar under eget ansvar att de nämnda produkterna uppfyller kraven i alla gällande bestämmelser i de nedan angivna direktiven och förordningar-nas och att de stämmer överens med följande normer.Teknisk dokumentation: * | |
| Regnvattenpump | Produktnummer | ||
| no | EU-samsvarserklæring | Vi erklærer under eneansvar at de nevnte produktene er i overensstemmelse med alle relevante bestemmelser i direktivene og forordningene nedenfor og med følgende standarder.Teknisk dokumentasjon hos: * | |
| Regnvannspumpe | Produktnummer | ||
| fi | EU-vaatimustenmukaisuusvakuutus | Vakuutamme täten, että mainitut tuotteet vastaavat kaikkia seuraavien direktiivien ja asetusten asiaankuuluvia vaatimuksia ja ovat seuraavien standardi-en vaatimusten mukaisia.Tekniset asiakirjat saatavana: * | |
| Sadevesipumppu | Tuotenumero | ||
| el | Δήλωση πιστότητας EE | Δηλώνουμε με αποκλειστική μας ευθύνη, ότι τα αναφερόμενα προϊόντα αντιστοιχούν σε όλες τις σχετικές διατάξεις των πιο κάτω αναφερόμενων οδηγιών και κανονισμών και ταυτίζονται με τα ακόλουθα πρότυπα.Τεχνικά έγγραφα στη: * | |
| Αντλία βρόχινου νερού | Αριθμός ευρετηρίου | ||
| tr | AB Uygunluk beyani | Tek sorumlu olarak, tanimlanan ürünün aşağıdaki yönetmelik ve direktiflerin geçerli bütün hükümlerine ve aşağıdaki standartlara uygun olduğunu beyan ederiz.Teknik belgelerin bulunduğu yer: * | |
| Yağmur suyu pompasi | Ürün kodu | ||
||
CE
| pl | Deklaracja zgodności UE | Oświadczamy z pełną odpowiedzialnością, że niniejsze produkty odpowiadają wszystkim wymaganiom poniżej wyszczególnionych dyrektyw i rozporządzeń, oraz że są zgodne z następującymi normami.Dokumentacja techniczna:* | |
| Pompa do desz- czówki | Numer katalogowy | ||
| cs | EU prohlášení oshodě | Prohlašujeme na výhradní zodpovědnost, že uvedený výrobek splňuje všechna příslušná ustanovení níže uvedených směrnic anařízení aje vsouladu snásledujícími normami:Technické podklady u:* | |
| Čerpadlo na dešťovou vodu | Objednaci číslo | ||
| sk | EÚ vyhlásenie ozhode | Vyhlasujeme na výhradní zodpovednosť, že uvedený výrobok splňa všetky príslušné ustanovenia nižšie uvedených smerníc anariadení aje vsúlade snasledujúcimi normami:Technické podklady má spoločnosť:* | |
| Čerpadlo na dažďovú vodu | Vecné číslo | ||
| hu | EU konformitási nyilatkozat | Egyedüli felelőséggel kijelentjük, hogy a megnevezett termékek megfelelnek az alábbiakban felsorolásra kerülő irányelvek és rendeletek valamennyi idevágó előírásainak és megfelelnek a következő szabványoknak.Můszaki dokumentumok megőrzési pontja:* | |
| Esővíz-szivattyú | Cikkszám | ||
| ru | Заявление о соответствии EC | Мы заявляем под нашу единоличную ответственность, что названные продукты соответствуют всем действующим предписаниям нижеуказанных директив и распоряжений, а также нижеуказанных норм.Техническая документация хранится y:* | |
| Насос для дождевой воды | Товарный No | ||
| uk | Заява про відповідність ЄС | Мизаявляємо під нашу одноособову відповідальність, що названі вироби відповідають усім чинним положенням нищеозначених директив і розпоряджень, а також нижчеозначеним нормам.Технічна документація зберігається y:* | |
| Насос для дощової води | Товарний номер | ||
| kk | EO сәйкестік маглумдамасы | Өз жауапкершілікпен біз аталған өнімдер теменде жзылғандиректикалар мен жарлықтардың тиісті қағидаларына сәйкестігін жәнетемендері нормаларға сай екенін білдіреміз.Техникалық құжаттар:* | |
| Жауын суы үшін сорғыш | Өнім нөмірі | ||
| ro | Declaratie de conformitate UE | Declarăm pe proprie răspundere că produsele mentionate corespund tuturor dispozițiilor relevante ale directivelor și reglementărilor enumerate în cele ce urmează și sunt în conformitate cu următoarele standarde.Documentаție tehnică la:* | |
| Pompă pentru арă de ploaie | Număr de identificare | ||
| bg | ЕС декларация за съответствие | С пълна отговорностние декларираме, че посочените продукти отговарят на всички валидни изисквания на директивите и разпоредбите по-долу и съответства на следните стандарти.Техническа документация при:* | |
| Помпа за дъждовна вода | Каталожен номер | ||
| mk | EU-Изјава за сообразност | Со целосна одговорност изјавуваме, дека опишаните производи се во согласност со сите релевантни одредби на следните регулативи и прописи и се во согласност со следните норми.Техничка документација кај:* | |
| Пумпа за дождовница | Број на дел/артикл | ||
| sr | EU-izjava o usaglašenosti | Na sopstvenu odgovornost izjavljujemo, da navedeni proizvodi odgovaraju svim dotičnim odredbama naknadno navedenih smernica u uredaba i da su u skladu sa sledećim standardima.Tehnička dokumentacija kod:* | |
| Pumpa za kišnicu | Broj predmeta | ||
| sl | Izjava o skladnosti EU | Izjavljamo pod izključno odgovornostjo, da je omenjen izdelek v skladu z vse-mi relevantnimi določili direktiv in uredb ter ustreza naslednjim standardom.Tehnična dokumentacija pri:* | |
| Črpalka deževni- ce | Številka artikla | ||
| hr | EU izjava o sukladnosti | Pod punom odgovornošću izjavljujemo da navedeni proizvodi odgovaraju svim relevantnim odredbama direktiva i propisima navedenima u nastavku i da su sukladni sa sljedećim normama.Tehnička dokumentacija se može dobiti kod:* | |
| Pumpa za kišnicu | Kataloški br. | ||
| et | EL-vastavusdeklaratsioon | Kinnitame ainuvastutajatena, et nimetatud tooted vastavad järgnevalt loetletud direktiivide ja määruste kõikidele asjaomastele nõuetele ja on kooskõlas | |
| Vihmaveepump | Tootenumber | ||
CE
III
| järgmiste normidega.Tehnilised dokumendid saadaval: * | ||||
| Iv | Deklarācija par atbilstību ES standar-tiem | Mēs ar pilnu atbildību paziņojam, ka šeit aplūkotie izstrādājumi atbilst visiem tālāk minētajās direktīvās un rīkojumos ietvertajām saistošajām nostādnēm,kā arī sekojošiem standartiem.Tehniskā dokumentācija no: * | ||
| Üdens sūknis | Izstrādājuma numurs | |||
| It | ES atitikties deklaracija | Atsakingai pareiškiame, kad išvardyti gaminiai atitinka visus privalomus že-miau nurodytų direktyvų ir reglamentų reikalavimus ir šiuos standartus.Techninė dokumentacija saugoma: * | ||
| Lietaus vandens siurblys | Gaminio numeris | |||
| GardenPump 18 3 | 600 HC4 1.. | 2014/30/EU2011/65/EU | EN60335-1:2012+A11:2014+A13:2017EN60335-2-41:2003+A1:2004+A2:2010EN 55014-1:2017EN 55014-2:2015EN 50581:2012 | |
| AL 1810 CV 2 607 | 226 3852 607 226 387 | 2014/35/EU2014/30/EU2011/65/EU | EN 60335-1:2012+A11:2014EN 60335-2-29:2004+A2:2010EN 55014-1:2006+A1:2009+A2:2011EN 55014-2:2015EN 61000-3-2:2014EN 61000-3-3:2013EN 50581:2012 | |
 BOSCHHenk BeckerChairman ofExecutive Management BOSCHHenk BeckerChairman ofExecutive Management Robert Bosch Power Tools GmbH, 70538 Stuttgart, GERMANYStuttgart, 04.11.2019 Robert Bosch Power Tools GmbH, 70538 Stuttgart, GERMANYStuttgart, 04.11.2019 | * Robert Bosch Power Tools GmbH(PT/ECS)70538 StuttgartGERMANYHelmut HeinzelmannHead of Product Certificationi.V. KwL | |||