
DBB67DP60B - Range hood BOSCH - Free user manual and instructions
Find the device manual for free DBB67DP60B BOSCH in PDF.


| Type of product | Wall-mounted range hood |
| Brand | Bosch |
| Model | DBB67DP60B |
| Material | Stainless steel |
| Width | 60 cm |
| Height | 60 - 110 cm (adjustable) |
| Depth | 50 cm |
| Weight | 18 kg |
| Rated voltage | 220-240 V |
| Rated frequency | 50 Hz |
| Total connected load | 250 W |
| Extraction capacity | 650 m³/h |
| Number of fan speeds | 3 speeds + intensive |
| Control type | Touch control |
| Lighting | LED (2 x 3 W) |
| Filter type | Washable aluminum grease filter |
| Duct diameter | 150 mm |
| Noise level (max) | 70 dB |
| Energy efficiency class | A |
| Safety protection | Overheating and motor protection |
Frequently Asked Questions - DBB67DP60B BOSCH
User questions about DBB67DP60B BOSCH
0 question about this device. Answer the ones you know or ask your own.
Ask a new question about this device
Download the instructions for your Range hood in PDF format for free! Find your manual DBB67DP60B - BOSCH and take your electronic device back in hand. On this page are published all the documents necessary for the use of your device. DBB67DP60B by BOSCH.
USER MANUAL DBB67DP60B BOSCH
[en] User manual and installation instructions
Bosch BetterFood app
Discover your new appliance with a thousand flexible recipes!
• Vegan, low-carb or gluten-free? You can adapt all the recipes to your preferences.
• Discover recipes for the ingredients you already have at home.
• Healthy cooking made easy thanks to the Nutri-Check health compass.
• Get the optimum settings for your connected appliances in recipes.
This app is only available in certain European countries and languages.

Table of contents
INFORMATION FOR USE
1 Safety 2
2 Avoiding material damage 4
3 Environmental protection and saving energy ..... 5
4 Operating modes .... 5
5 Familiarising yourself with your appliance .... 5
6 Before using for the first time 6
7 Basic operation ...... 6
8 Additional functions in the Home Connect app 1 6
9 Home Connect .... 7
10 Hob-based hood control 8
11 Cleaning and servicing 8
12 Troubleshooting 10
13 Disposal 11
14 Customer Service 11
15 Accessories 12
16 Declaration of Conformity 12
17 Information regarding Free and Open Source Software 13
18 Test information 13
19 INSTALLATION INSTRUCTIONS .... 13
19.3 Secure installation 14

Safety
Observe the following safety instructions.
1.1 General information
- Read this instruction manual carefully.
- Keep the instruction manual and the product information safe for future reference or for the next owner.
■ Do not connect the appliance if it has been damaged in transit.
1.2 Intended use
This appliance is not intended to be used as a built-in appliance.
The appliance can only be used safely if it is correctly installed according to the safety instructions. The installer is responsible for ensuring that the appliance works perfectly at its installation location.
Only use this appliance:
■ For extracting cooking vapour.
■ in private households and in enclosed spaces in a domestic environment.
■ Up to an altitude of 4000 m above sea level.
1.3 Restriction on user group
This appliance may be used by children aged 8 or over and by people who have reduced physical, sensory or mental abilities or inadequate experience and/or knowledge, provided that they are supervised or have been instructed on how to use the appliance safely and have understood the resulting dangers.
Do not let children play with the appliance. Children must not perform cleaning or user maintenance unless they are at least 15 years old and are being supervised.
Keep children under the age of 8 years away from the appliance and power cable.
1.4 Safe use
⚠ WARNING – Risk of fire!
Fatty deposits in the grease filters may catch fire.
▶ Never operate the appliance without a grease filter.
- Clean the grease filters regularly.
▶ Never work with naked flames close to the appliance (e.g. flambéing).
- Do not install the appliance near a solid fuel heating appliance (e.g. wood- or coal-burning) unless the heating appliance has a sealed, non-removable cover. There must be no flying sparks.
Hot oil and fat ignites very quickly.
▶ Always supervise hot oil and fat.
▶ Never extinguish burning oil or fat with water. Switch off the hotplate. Extinguish flames carefully using a lid, fire blanket or something similar and leave to cool down.
When gas burners are in operation without any cookware placed on them, they can build up a lot of heat. A ventilation appliance installed above the cooker may become damaged or catch fire.
- Only operate the gas burners with cookware on them.
Operating multiple gas hobs at the same time generates a great deal of heat. A ventilation appliance installed above the cooker may become damaged or catch fire.
- Only operate the gas hobs with cookware on them.
▶ Select the highest fan setting.
▶ Never operate two gas hobs simultaneously on the highest flame for longer than 15 minutes. Two gas hobs correspond to one large burner.
▶ Never operate large burners of more than 5 kW with the highest flame for longer than 15 minutes, e.g. a wok.
Fatty deposits in the grease filters may catch fire.
▶ Clean the grease filters regularly.
⚠ WARNING – Risk of suffocation!
Children may put packaging material over their heads or wrap themselves up in it and suffocate.
- Keep packaging material away from children.
- Do not allow children to play with packaging material.
Children may breathe in or swallow small parts, causing them to suffocate.
- Keep small parts away from children.
- Do not let children play with small parts.
⚠ WARNING – Risk of poisoning!
Risk of poisoning from flue gases being drawn back in. Room-air-dependent heat-producing appliances (e.g. gas, oil, wood or coal-operated heaters, continuous flow heaters or water heaters) obtain combustion air from the room in which they are installed and discharge the exhaust gases into the open through an exhaust gas system (e.g. a chimney). With the extractor hood switched on, air is extracted from the kitchen and the adjacent rooms.
Without an adequate supply of air, the air pressure falls below atmospheric pressure. Toxic gases from the chimney or the extraction shaft are sucked back into the living space.
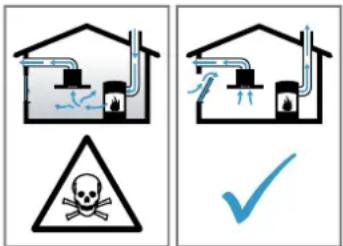
▶ Always ensure adequate fresh air in the room if the appliance is being operated in exhaust air mode at the same time as a
room-air-dependent heat-producing appli-
ance is being operated.
- It is only possible to safely operate the appliance if the pressure in the room in which the heating appliance is installed does not fall below 4 Pa (0.04 mbar). This can be achieved whenever the air needed for combustion is able to enter through openings that cannot be sealed, for example in doors, windows, incoming/exhaust air wall boxes or by other technical means. An incoming/exhaust air wall box alone is not sufficient to ensure compliance with the limit.
In any case, consult your responsible chimney sweep. They are able to assess the house's entire ventilation setup and will suggest the suitable ventilation measures to you.
- Unrestricted operation is possible if the appliance is operated exclusively in circulating-air mode.
Using a gas cooking appliance leads to a build-up of heat, moisture and combustion products in the room where the appliance is installed.
- Switch on the extractor hood when using a gas cooking appliance.
⚠ WARNING – Risk of burns!
The accessible parts of the appliance become hot during operation.
▶ Never touch these hot parts.
- Keep children at a safe distance.
The appliance becomes hot during operation.
- Allow the appliance to cool down before cleaning.
⚠ WARNING – Risk of injury!
Components inside the appliance may have sharp edges.
- Carefully clean the appliance interior. Changes to the electrical or mechanical assembly are dangerous and may lead to malfunctions.
- Do not make any changes to the electrical or mechanical assembly.
The light emitted by LED lights is very dazzling, and can damage the eyes (risk group 1).
- Do not look directly into the switched-on LED lights for longer than 100 seconds. Improper repairs are dangerous.
- Repairs to the appliance should only be carried out by trained specialist staff.
- If the appliance is defective, call Customer Service.
→ "Customer Service", Page 11
⚠ WARNING – Risk of electric shock!
If the appliance or the power cord is damaged, this is dangerous.
▶ Never operate a damaged appliance.
▶ Never pull on the power cord to unplug the appliance. Always unplug the appliance at the mains.
- If the appliance or the power cord is damaged, immediately unplug the power cord or switch off the fuse in the fuse box.
-
Call customer service. → Page 11 Improper repairs are dangerous.
-
Repairs to the appliance should only be carried out by trained specialist staff.
- Only use genuine spare parts when repairing the appliance.
- If the power cord of this appliance is damaged, it must be replaced by trained specialist staff.
An ingress of moisture can cause an electric shock.
▶ Before cleaning, pull out the mains plug or switch off the fuse in the fuse box.
- Do not use steam- or high-pressure cleaners to clean the appliance.
Penetrating moisture may cause an electric shock.
▶ Do not use wet sponge cloths.
⚠ WARNING – Risk of explosion!
Highly caustic alkaline or highly acidic cleaning agents in conjunction with aluminium parts in the interior of the appliance may cause explosions.
▶ Never use highly caustic alkaline or highly acidic cleaning agents. In particular, do not use commercial or industrial cleaning agents in conjunction with aluminium parts, e.g. grease filter on extractor hoods.
2 Avoiding material damage
ATTENTION
Condensate may cause corrosion damage.
- To prevent condensation from building up, switch on the appliance during cooking.
If moisture gets into the controls, this may result in damage.
▶ Never clean controls with a wet cloth. Incorrect cleaning damages the surfaces
▶ Follow the cleaning instructions. - Do not use harsh or abrasive detergents.
- Clean stainless steel surfaces in the direction of the finish only.
▶ Never clean controls with stainless steel cleaners. Condensation that flows back in may damage the appliance. - To prevent condensate from returning, fit the exhaust air pipe with a 1° gradient from the appliance.
If you put incorrect stress on the design elements, they may break off.
- Do not pull design elements.
- Do not place objects on the design elements or hang objects from them.
There is a risk of surface damage if you do not peel off the protective film.
- Remove the protective film from all parts of the appliance before using for the first time.
Painted surfaces are easily damaged.
▶ Follow the cleaning instructions.
→ "Cleaning the appliance", Page 8
- Ensure that the painted surfaces are not scratched.
3 Environmental protection and saving energy
3.1 Disposing of packaging
The packaging materials are environmentally compatible and can be recycled.
- Sort the individual components by type and dispose of them separately.
3.2 Saving energy
If you follow these instructions, your appliance will use less power.
Adjust the fan speed to the amount of steam produced during cooking.
√ The lower the fan speed, the less energy is consumed.
√ Only use the intensive mode as required.
If cooking produces large amounts of steam, select a higher fan speed in good time.
√ The odours are distributed around the room less.
Switch off the lighting if it is no longer required.
- When the lighting is switched off, it does not consume any energy.
Clean or replace the filters at regular intervals.
√ The effectiveness of the filter is retained.
Put the cooking lid on.
√ The cooking vapours and condensation are reduced.
Only use the additional functions if required.
√ Switching off additional functions reduces power consumption.
4 Operating modes
You can use your appliance in air extraction mode or circulating-air mode.
4.1 Air extraction mode
The air which is drawn in is cleaned by the grease filters and conveyed to the exterior by a pipe system.
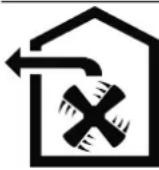
The air must not be discharged into a flue that is used for exhausting fumes from appliances burning gas or other fuels (not applicable to appliances that only discharge the air back into the room).
- If the exhaust air is to be conveyed into a non-functioning smoke or exhaust gas flue, you must obtain the consent of the heating engineer responsible.
- If the exhaust air is conveyed through the external wall, a telescopic duct should be used.
4.2 Air recirculation
The air which is drawn in is cleaned by the grease filters and an odour filter, and conveyed back into the room.

To bind odours in air recirculation mode, you must install an odour filter. The different options for operating the appliance in air circulation mode can be found in our catalogue. Alternatively, ask your dealer. The required accessories are available from specialist retailers, from our after-sales service or from the online shop.
5 Familiarising yourself with your appliance
5.1 Control elements
You can use the controls to configure all functions of your appliance and to obtain information about the operating status.


| ∅ | Switching the appliance on or off |
| 1 | Switching on fan setting 1 |
| 2 | Switching on fan setting 2 |
| 3 | Switching on fan setting 3 |
| Switching on intensive mode 1 |
| ☆ | Selecting the favourites function |
| Switching the lighting on or off | |
| Home Connect | |
| Remote display |
6 Before using for the first time
Configure the settings for initial start-up. Clean the appliance and accessories.
6.1 Setting an operating mode
Your appliance is set to air extraction mode by default.
Note: When using it in circulating-air mode, you require additional accessories.
7 Basic operation
7.1 Switching on the appliance
Note: When the glass panel is folded out, you can use ⏻ to switch the appliance on and off.
Requirement: The glass panel is folded in.
▶ Fold out the glass panel all the way.
√ The appliance starts at fan setting 2 and the lighting switches on.
7.2 Switching off the appliance
▶ Fold in the glass panel as far as it will go or press ⏻
√ The lighting switches off.
√ The fan automatically switches off after approx. 10 minutes.
7.3 Selecting a fan setting
▶ Press 1,2 or 3
7.4 Switching on intensive mode
▶ Press ↗
√ After approx. 6 minutes, the appliance automatically switches to fan setting 3.
7.5 Switching off intensive mode
- Reset to the required fan setting.
7.6 Selecting the favourites function
You can specify 2 favourites functions via the Home Connect app and then select these on your appliance.
Requirement: The appliance is connected to Home Connect.
- To assign functions, follow the instructions in the Home Connect app.
- To select the favourites function 1, press ☆briefly.
- To select the favourites function 2, press and hold ☆
7.7 Lighting
Switching on the lighting
The lighting can be switched on and off independently of the ventilation system.
▶ If required, select one of the options:
▶ If the glass panel is folded out, press ✿
- If the glass panel is folded in, touch the control panel with the palm of your hand.
√ The lighting switches on.
Setting the brightness
- Press and hold ⚙ until the required brightness is reached.
Switching off the lighting
▶ If required, select one of the options:
▶ If the glass panel is folded out, press ⚙
- If the glass panel is folded in, touch the control panel with the palm of your hand.
√ The lighting switches off.
7.8 Remote display
You can use the Home Connect app to set functions for your appliance that are not illustrated on the control panel. If you carry out a function for which there is no display on the control panel, the remote display lights up
8 Additional functions in the Home Connect app 1
You can find these functions in the Home Connect app:
8.1 Intelligent hood control
With the appropriate hob and the Home Connect app, cooking data is supplied continuously and the appliance uses this to automatically adjust the fan setting and to automatically switch the appliance on and off.
8.2 Performance profile
In the Home Connect app, you have the option to set your personal performance profile. You can choose between the noise-optimised or performance-optimised performance profile.
8.3 Cooktop-based Hood Control
You can connect your appliance to a Home Connect-compatible hob and, in this way, control the functions of your appliance via the hob.
8.4 Fan run-on
The fan run-on removes remaining odours and is used to dry the odour filter after the cooking process.
8.5 Interval ventilation
In order to regularly ventilate your kitchen, you can use the interval ventilation. With interval ventilation, the ventilation system switches on and off in the selected setting for the selected time.
8.6 Favourites button
You can specify 2 favourites functions via the Home Connect app and then select these on your appliance.
8.7 Voice Control
You can control your extractor hood using voice control with Amazon Alexa, for example.
8.8 Setting the colour temperature
In the Home Connect app, you can set the colour temperature for the light from cold to warm.
9 Home Connect
This appliance is network-capable. Connecting your appliance to a mobile device lets you control its functions via the Home Connect app, adjust its basic settings and monitor its operating status.
The Home Connect services are not available in every country. The availability of the Home Connect function depends on the availability of the Home Connect services in your country. You can find information about this at: www.home-connect.com.
The Home Connect app guides you through the entire login process. Follow the instructions, noting the information in the Home Connect app.
Notes
- Please note the safety precautions in this instruction manual and make sure that they are also observed when operating the appliance via the Home Connect app. → "Safety", Page 2
- Operating the appliance on the appliance itself always takes priority. During this time it is not possible to operate the appliance using the Home Connect app.
- In networked standby mode, the appliance requires a maximum of 2 W.
9.1 Setting up the Home Connect app
- Install the Home Connect app on your mobile device.
- Start the Home Connect app and set up access for Home Connect. The Home Connect app guides you through the entire login process.
9.2 Setting up Home Connect
Requirements
■ The appliance is switched off.
- You have a mobile device with a current version of the iOS or Android operating system, e.g. a smartphone.
- The appliance is receiving signals from the WLAN home network (Wi-Fi) at its installation location.
- The mobile device and the appliance are within range of your home network's Wi-Fi signal.
- Scan the following QR code.

You can install the Home Connect app and connect your appliance via the QR code.
- Follow the instructions in the Home Connect app.
9.3 Resetting the connection
Requirement: The appliance is switched off.
- To reset the saved connections to the home network and to Home Connect, press and hold twice.
9.4 Software update
Your appliance's software can be updated using the software update function, e.g. for the purposes of optimisation, troubleshooting or security updates.
To do this, you must be a registered Home Connect user, have installed the app on your mobile device and be connected to the Home Connect server.
As soon as a software update is available, you will be informed via the Home Connect app and will be able to start the software update via the app. Once the update has been successfully downloaded, you can start installing it via the Home Connect app if you are in your home network (Wi-Fi). The Home Connect app informs you once installation is successful.
You can find the current software version in the Home Connect app under the appliance information for the appliance.
Notes
■ The software update consists of two steps.
- The first step is the download.
- The second step is the installation on your appliance.
- You can continue to use your appliance as normal while updates are downloading. Depending on your personal settings in the app, software updates can also be set to download automatically.
- Installation takes a few minutes. You cannot use your appliance during installation.
■ We recommend that you install security updates as soon as possible.
9.5 Remote diagnostics
Customer Service can use Remote Diagnostics to access your appliance if you contact them, have your appliance connected to the Home Connect server and if Remote Diagnostics is available in the country in which you are using the appliance.
Tip: For further information and details about the availability of Remote Diagnostics in your country, please visit the service/support section of your local website: www.home-connect.com.
9.6 Data protection
Please see the information on data protection.
The first time your appliance is registered on a home network connected to the Internet, your appliance will transmit the following types of data to the Home Connect server (initial registration):
- Unique appliance identification (consisting of appliance codes as well as the MAC address of the installed Wi-Fi communication module).
■ Security certificate of the Wi-Fi communication module (to ensure a secure data connection). - The current software and hardware version of your appliance.
■ Status of any previous resetting to factory settings.
This initial registration prepares the Home Connect functions for use and is only required when you want to use the Home Connect functions for the first time.
Note: Please note that the Home Connect functions can only be utilised with the Home Connect app. Information on data protection can be retrieved in the Home Connect app.
10 Hob-based hood control
You can connect your appliance to a suitable hob and, in this way, control the functions of your appliance via the hob.
If the hob and the extractor hood are Home Connect-compatible, connect the two appliances to Home Connect and follow the instructions in the app.
Notes
- Please note the safety precautions in the instruction manual for your appliance and ensure that they are
also observed when operating the appliance via the hob-based hood control.
- Operating your appliance always takes priority. It is not possible to use the hob-based hood control during this time.
- You can only connect to the extractor hood via the Home Connect app.
11 Cleaning and servicing
11.1 Cleaning products
You can obtain suitable cleaning products from after-sales service or the online shop.
⚠ WARNING – Risk of electric shock!
An ingress of moisture can cause an electric shock.
- Before cleaning, pull out the mains plug or switch off the fuse in the fuse box.
- Do not use steam- or high-pressure cleaners to clean the appliance.
⚠ WARNING – Risk of burns!
The appliance becomes hot during operation.
- Allow the appliance to cool down before cleaning.
ATTENTION
Unsuitable cleaning products may damage the surfaces of the appliance.
- Do not use harsh or abrasive detergents.
- Do not use cleaning products with a high alcohol content.
- Do not use hard scouring pads or cleaning sponges.
▶ Only use glass cleaners, glass scrapers or stainless steel care products if recommended in the cleaning instructions for the relevant part.
- Wash sponge cloths thoroughly before use.
11.2 Cleaning the appliance
Clean the appliance as specified. This will ensure that the different parts and surfaces of the appliance are not damaged by incorrect cleaning or unsuitable cleaning products.
⚠ WARNING – Risk of explosion!
Highly caustic alkaline or highly acidic cleaning agents in conjunction with aluminium parts in the interior of the appliance may cause explosions.
▶ Never use highly caustic alkaline or highly acidic cleaning agents. In particular, do not use commercial or industrial cleaning agents in conjunction with aluminium parts, e.g. grease filter on extractor hoods.
⚠ WARNING – Risk of electric shock!
An ingress of moisture can cause an electric shock.
- Before cleaning, pull out the mains plug or switch off the fuse in the fuse box.
- Do not use steam- or high-pressure cleaners to clean the appliance.
⚠ WARNING – Risk of burns!
The appliance becomes hot during operation.
- Allow the appliance to cool down before cleaning.
⚠ WARNING – Risk of injury!
Components inside the appliance may have sharp edges.
- Carefully clean the appliance interior.
- Observe the information regarding the cleaning agents.
→ "Cleaning products", Page 8
-
Clean as follows, depending on the surface:
-
Clean stainless steel surfaces in the direction of the finish using a sponge cloth and hot soapy water.
- Clean painted surfaces using a damp sponge cloth and hot soapy water.
- Clean aluminium using a soft cloth and glass cleaner.
- Clean plastic using a soft cloth and glass cleaner.
-
Clean glass using a soft cloth and glass cleaner.
-
Dry with a soft cloth.
-
Apply a thin layer of the stainless steel cleaning product to stainless steel surfaces using a soft cloth. You can obtain stainless steel cleaning products from the after-sales service or the online shop.
11.3 Cleaning controls and lights
⚠ WARNING – Risk of electric shock!
Penetrating moisture may cause an electric shock.
- Do not use wet sponge cloths.
- Observe the information regarding the cleaning agents.
→ "Cleaning products", Page 8
-
Clean using a damp sponge cloth and hot soapy water.
-
Dry with a soft cloth.
11.4 Grease filter
Removing the grease filter
- Open the glass flap as far as it will go.
- Switch off the appliance.
- ATTENTION – Falling grease filters may damage the hob below.
▶ Grip below the grease filter with one hand.
Open the locks on the grease filters.
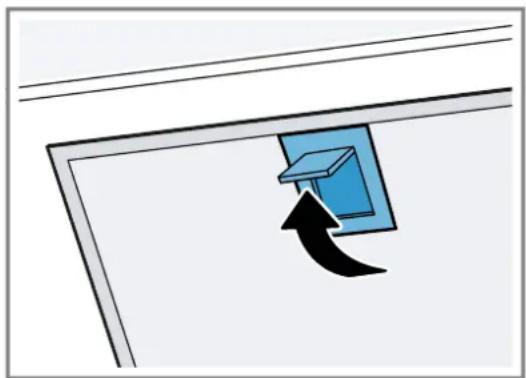
- Remove the grease filters from the holders. To prevent grease from dripping, hold the grease filter horizontally.
Cleaning grease filters manually
The grease filters filter the grease from the cooking vapour. Regularly cleaned grease filters guarantee a high level of grease removal. We recommend cleaning the grease filters every two months.
⚠ WARNING – Risk of fire!
Fatty deposits in the grease filters may catch fire.
- Clean the grease filters regularly.
Requirement: The grease filters have been removed.
→ "Removing the grease filter", Page 9
-
Observe the information regarding the cleaning agents.
→ "Cleaning products", Page 8 -
Soak the grease filter in hot soapy water. Use special grease solvent for stubborn dirt. You can obtain grease solvents from customer service or the online shop.
-
Use a brush to clean the grease filters.
-
Rinse the grease filters thoroughly.
-
Allow the grease filters to drain.
Cleaning grease filters in the dishwasher
The grease filters filter the grease from the cooking vapour. Regularly cleaned grease filters guarantee a high level of grease removal. We recommend cleaning the grease filters every two months.
WARNING – Risk of fire!
Fatty deposits in the grease filters may catch fire.
- Clean the grease filters regularly.
ATTENTION
The grease filters may become damaged if they are squeezed in the dishwasher.
- Do not squeeze the grease filters.
Note: When cleaning the grease filter in the dishwasher, light discolouration may occur. This discolouration has no effect on the performance of the metal grease filters.
Requirement: The grease filters have been removed.
→ "Removing the grease filter", Page 9
-
Observe the information regarding the cleaning agents.
→ "Cleaning products", Page 8 -
Place the grease filters loosely into the dishwasher. Do not clean heavily soiled grease filters with utensils. Use special grease solvent for stubborn dirt. You can obtain grease solvents from customer service or the online shop.
-
Start the dishwasher. Select a temperature of no more than 70° C.
-
Allow the grease filters to drain.
Installing the grease filters
ATTENTION
Falling grease filters may damage the hob below.
▶ Grip below the grease filter with one hand.
- Open the glass flap as far as it will go.
- Switch off the appliance.
-
Insert the grease filter on the lower edge.①
-
Fold the grease filters upwards and engage the locks. ②
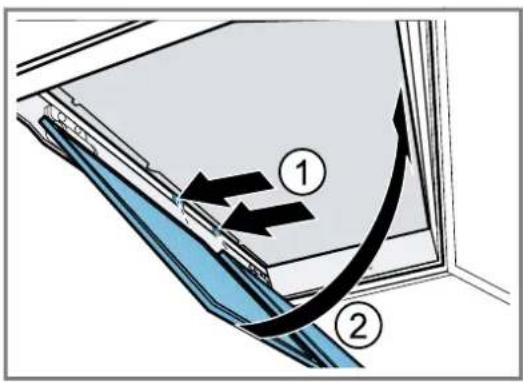
- Ensure that the grease filters are inserted correctly.
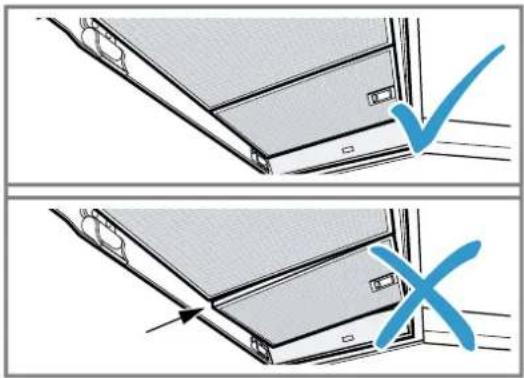
- Ensure that the locks engage.
- Close the glass flap.
12 Troubleshooting
You can rectify minor faults on your appliance yourself. Read the troubleshooting information before contacting after-sales service. This will avoid unnecessary costs.
Tip: Permanently connect your appliance to the Home Connect app to automatically receive software updates. This allows errors to be eliminated, performance to be improved and new functions to be made available.
⚠ WARNING – Risk of injury!
Improper repairs are dangerous.
- Repairs to the appliance should only be carried out by trained specialist staff.
- If the appliance is defective, call Customer Service.
→ "Customer Service", Page 11
⚠ WARNING – Risk of electric shock!
Improper repairs are dangerous.
- Repairs to the appliance should only be carried out by trained specialist staff.
▶ Only use genuine spare parts when repairing the appliance.
If the power cord of this appliance is damaged, it must be replaced by trained specialist staff.
12.1 Malfunctions
Fault Cause and troubleshooting
| The appliance is not working. The mains plug of the power cord is not plugged in. | |
| Connect the appliance to the power supply. | |
| The circuit breaker in the fuse box has tripped.Check the circuit breaker in the fuse box. | |
| There has been a power cut.Check whether the lighting in your room or other appliances are working. | |
| The LED lighting does not work. Different causes are possible.Defective LED lights may be replaced by the manufacturer, their customer service or a qualified technician (electrician) only.Call."Customer Service", Page 11 | |
| Home Connect is not working properly. | Different causes are possible.Go to www.home-connect.com. |
| The button illumination does not work. | Different causes are possible.Call."Customer Service", Page 11 |
| The hob-based hood control is not working properly. | It may be necessary to change the settings.Read the instruction manual for the hob.Go to www.home-connect.com. |
| Fault Cause and troubleshooting | |
| The appliance does not start when it is switched on for the first time. | Software updates may need to be run.▸ Wait around 15 minutes. |
| The appliance does not respond. It may need to be restarted.▸ Press and hold ⏻and □for at least 10 seconds.√ All of the buttons flash.√ The appliance is restarted. | |
| The restart does not work. Different causes are possible.1. Disconnect the appliance from the power supply.▸ Pull out the mains plug or switch off the fuse in the fuse box.2. After approx. 2 minutes, reconnect the appliance to the power supply.√ It may take a few minutes until all of the functions are available. | |
| General malfunctions occur. A software update may be required.▸ Update the software.→ "Software update", Page 7 | |
| The appliance does not start immediately when it is switched on for the first time and the remote display lights up. | The appliance tries to connect to a suitable hob automatically.▸ Wait until the appliances are connected.If there is no suitable hob, the appliance starts in fan setting 2. |
13 Disposal
13.1 Disposing of old appliance
Valuable raw materials can be reused by recycling.
- Unplug the appliance from the mains.
- Cut through the power cord.
- Dispose of the appliance in an environmentally friendly manner. Information about current disposal methods are available from your specialist dealer or local authority.
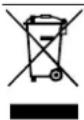
This appliance is labelled in accordance with European Directive 2012/19/EU concerning used electrical and electronic appliances (waste electrical and electronic equipment - WEEE). The guideline determines the framework for the return and recycling of used appliances as applicable throughout the EU.
14 Customer Service
Function-relevant genuine spare parts according to the corresponding Ecodesign Directive can be obtained from Customer Service for a period of at least 10 years from the date on which your appliance was placed on the market within the European Economic Area. Furthermore, our Customer Service will continue to provide you with other function-relevant and storable genuine spare parts for up to 15 years from the date on which your appliance was placed on the market. For more information, please contact our Customer Service team.
Note: Under the terms of the manufacturer's warranty the use of Customer Service is free of charge.
Detailed information about the warranty period and the warranty conditions in your country is available via the QR code on the enclosed document on service contacts and warranty conditions, from our customer service or on our website.
You can find the contact details for our customer service via the QR code on the enclosed document on service contacts and warranty conditions or on our website.
14.1 Product number (E-Nr.), production number (FD) and consecutive numbering (Z-Nr.)
If you contact Customer Service, you will require the product number (E-Nr.), the production number (FD) and the consecutive numbering (Z-Nr.), which you can find on the appliance's rating plate.
Depending on the model, the rating plate can be found:
■ Inside the appliance (remove grease filters for access).
■ On top of the appliance.
Make a note of your appliance's details and the Customer Service telephone number to find them again quickly.
15 Accessories
You can buy accessories from the after-sales service, from specialist retailers or online. Only use original accessories, as these have been specifically designed for your appliance.
Accessories vary from one appliance to another. When purchasing accessories, always quote the exact product number (E no.) of your appliance. → Page 11
You can find out which accessories are available for your appliance in our catalogue, in the online shop or from our after-sales service. www.bosch-home.com
16 Declaration of Conformity
BSH Hausgeräte GmbH hereby declares that the appliance with Home Connect functionality conforms to the essential requirements and other relevant provisions of Directive 2014/53/EU.
A detailed RED Declaration of Conformity can be found online at www.bosch-home.com among the additional documents on the product page for your appliance.

Hereby, BSH Hausgeräte GmbH declares that the appliance with Home Connect functionality is in compliance with relevant statutory requirements. 1 A detailed Declaration of Conformity can be found online at www.bosch-home.co.uk among the additional documents on the product page for your appliance. 1

2.4 GHz band (2400–2483.5 MHz): Max. 100 mW
5-GHz band (5150–5350 MHz + 5470–5725 MHz): max. 150 mW
| BE BG CZ DK DE EE IE EL ES | |
| FR HR IT CY LI LV LT LU HU | |
| MT NL AT PL PT RO SI SK FI | |
| SE NO CH TR IS UK (NI) |
5 GHz WLAN (Wi-Fi): For indoor use only.
| AL | BA | MD | ME | MK | RS | UK | UA |
| 5 GHz WLAN (Wi-Fi): For indoor use only. | |||||||
16.1 Statement of Compliance for Great Britain
Product type
This statement of compliance covers the products described in this information for use whose model identifier group is seen on the title page. The full model identifier is made up of the characters before the slash in the product number (E no.) which can be found on the rating plate. Alternatively, you can also find the model identifier in the first line of the UK Energy Label.
Name and address of manufacturer
This statement of compliance is prepared by the manufacturer.
The manufacturer, BSH Hausgeräte GmbH deems that it has complied with
■ provision 5.1-1 of ETSI EN 303 645 v2.1.1 and, where relevant, provision 5.1-2 of ETSI EN 303 645 v2.1.1;
■ provision 5.2-1 of ETSI EN 303 645 v2.1.1;
■ provision 5.3-13 of ETSI EN 303 645 v2.1.1.
Support period
BSH Hausgeräte GmbH will provide security updates that are necessary to maintain the main functions free of charge until at least 28/02/2034.
17 Information regarding Free and Open Source Software
This product includes software components that are licensed by the copyright holders as free software or open source software.
The applicable licence information is stored on your home appliance. You can also access the applicable licence information via your Home Connect app: "Profile -> Legal information -> Licence Information".¹ You can also download the licence information on the brand product website. (Please search on the product website for your appliance model and additional documents). Alternatively, you can request the relevant information
from ossrequest@bshg.com or BSH Hausgeräte GmbH, Carl-Wery-Str. 34, 81739 Munich, Germany.
The relevant source code will be made available on request.
Please send your request to ossrequest@bshg.com or BSH Hausgeräte GmbH, Carl-Wery-Str.34, 81739 Munich, Germany.
Subject: „OSSREQUEST“
The cost of performing your request will be charged to you. This offer is valid for three years from the date of purchase or at least as long as we offer support and spare parts for the relevant appliance.
18 Test information
This information has been produced to facilitate the inspection of the appliance.
■ Measured in accordance with EN 61591.
■ The appliance is operated in its as-delivered condition.
- Ensure that the filters do not move during the measurement (by changing the appliance position to the installation position).
19 Installation instructions
Observe this information when installing the appliance.
19.1 Included with the appliance
After unpacking all parts, check for any damage in transit and completeness of the delivery.
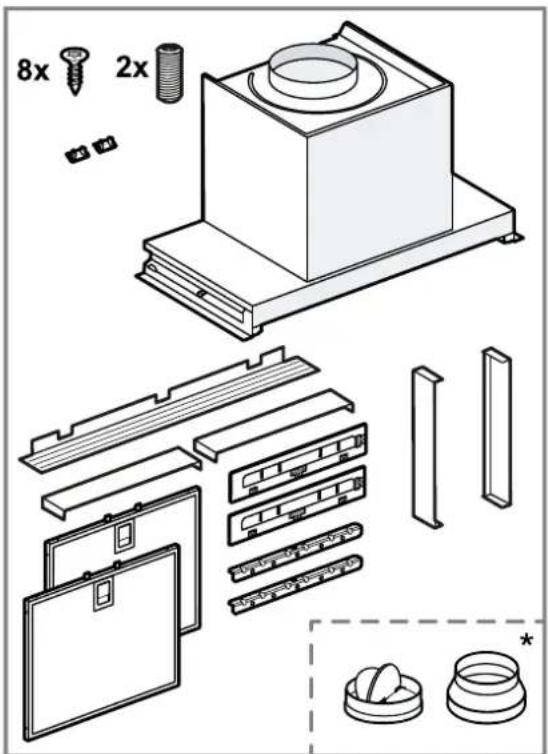
* Depending on the appliance type, this is not included in the scope of delivery.
19.2 Safety clearances
Comply with the safety clearances for the appliance.
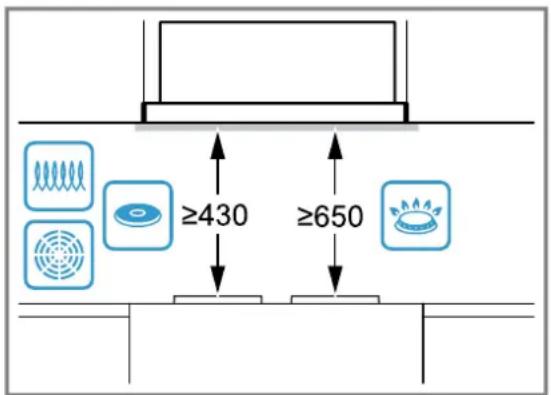
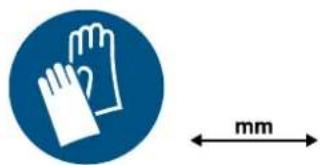
For Australia and New Zealand the minimum safety clearance above electrical cooktops must be 600 mm.

19.3 Secure installation
Follow these safety instructions when installing the appliance.

WARNING – Risk of poisoning!
Risk of poisoning from flue gases being drawn back in. Room-air-dependent heat-producing appliances (e.g. gas, oil, wood or coal-operated heaters, continuous flow heaters or water heaters) obtain combustion air from the room in which they are installed and discharge the exhaust gases into the open through an exhaust gas system (e.g. a chimney). With the extractor hood switched on, air is extracted from the kitchen and the adjacent rooms. Without an adequate supply of air, the air pressure falls below atmospheric pressure. Toxic gases from the chimney or the extraction shaft are sucked back into the living space.
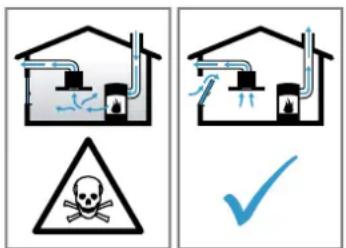
▶ Always ensure adequate fresh air in the room if the appliance is being operated in exhaust air mode at the same time as a room-air-dependent heat-producing appliance is being operated.
- It is only possible to safely operate the appliance if the pressure in the room in which the heating appliance is installed does not fall below 4 Pa (0.04 mbar). This can be achieved whenever the air needed for combustion is able to enter through openings that cannot be sealed, for example in doors,
windows, incoming/exhaust air wall boxes or by other technical means. An incoming/exhaust air wall box alone is not sufficient to ensure compliance with the limit.
In any case, consult your responsible chimney sweep. They are able to assess the house's entire ventilation setup and will suggest the suitable ventilation measures to you.
- Unrestricted operation is possible if the appliance is operated exclusively in circulating-air mode.
Risk of poisoning from flue gases being drawn back in.
▶ If an extractor hood with an open-flued heat production source is installed, the power supply for the extractor hood must be provided with a suitable safety switch.
Risk of poisoning from flue gases being drawn back in.
- Do not emit the exhaust air into a smoke or exhaust gas flue that is in operation.
- Do not emit the exhaust air into a shaft that is used to ventilate installation rooms for heat-producing appliances.
- If the exhaust air is to be conveyed into a smoke or exhaust gas flue, you must obtain the consent of the heating engineer responsible.
⚠ WARNING – Risk of suffocation!
Children may put packaging material over their heads or wrap themselves up in it and suffocate.
- Keep packaging material away from children.
- Do not allow children to play with packaging material.
⚠ WARNING – Risk of fire!
The grease deposits in the grease filter may catch fire.
- Never work with naked flames close to the appliance (e.g. flambéing).
- Do not install the appliance near a heat-producing appliance for solid fuel (e.g. wood or coal) unless a closed, non-removable cover is present. There must be no flying sparks.
- The specified safety clearances must be complied with in order to prevent a build-up of heat.
- Observe the specifications for your cooking appliances. If the installation instructions for the cooking appliances specify a different clearance, the larger of the two must always
be provided for. If gas hobs and electric hobs are operated together, the largest specified clearance applies.
⚠ WARNING – Risk of injury!
Components inside the appliance may have sharp edges.
▶ Wear protective gloves.
The appliance may fall down if it has not been properly fastened in place.
- All fastening components must be fixed firmly and securely in place.
Changes to the electrical or mechanical assembly are dangerous and may lead to malfunctions.
- Do not make any changes to the electrical or mechanical assembly.
⚠ WARNING – Risk of electric shock!
Sharp-edged components inside the appliance may damage the connecting cable.
- Do not kink or trap the connecting cable.
If the appliance or the power cord is damaged, this is dangerous.
▶ Never operate a damaged appliance.
▶ Never pull on the power cord to unplug the appliance. Always unplug the appliance at the mains. - If the appliance or the power cord is damaged, immediately unplug the power cord or switch off the fuse in the fuse box.
- Call customer service. → Page 11 Improper repairs are dangerous.
- Repairs to the appliance should only be carried out by trained specialist staff.
- Only use genuine spare parts when repairing the appliance.
▶ If the power cord of this appliance is damaged, it must be replaced by trained specialist staff.
Incorrect installation is dangerous.
- Connect and operate the appliance only in accordance with the specifications on the rating plate.
- Connect the appliance to a power supply with alternating current only via a properly installed socket with earthing.
- The protective conductor system of the domestic electrical installation must be properly installed.
- Never equip the appliance with an external switching device, e.g. a timer or remote control.
- When the appliance is installed, the mains plug of the power cord must be freely ac-
cessible. If free access is not possible, an all-pole isolating switch must be installed in the permanent electrical installation according to the conditions of Overvoltage Category III and according to the installation regulations.
- When installing the appliance, check that the power cable is not trapped or damaged.
19.4 General information
Follow these general instructions during the installation.
- For the installation, observe the currently valid building regulations and the regulations of the local electricity and gas suppliers.
- When discharging the exhaust air, the official and legal regulations, such as the regional building code., must be observed.
- In order to freely access the appliance for servicing, select an easy-to-reach installation site.
■ The surfaces of the appliance are sensitive. Avoid damaging them during installation.
19.5 Instructions for the electrical connection
In order to safely connect the appliance to the electrical system, follow these instructions.
⚠ WARNING – Risk of electric shock!
It must always be possible to disconnect the appliance from the electricity supply. The appliance must only be connected to a protective contact socket that has been correctly installed.
- The mains plug for the mains power cable must be easily accessible after the appliance is installed.
If this is not possible, an all-pole isolating switch must be integrated into the permanent electrical installation according to the conditions of overvoltage category III and according to the installation regulations.
The permanent electrical installation must only be wired by a professional electrician. We recommend installing a residual-current circuit breaker (RCCB) in the appliance's power supply circuit.
Sharp-edged components inside the appliance may damage the connecting cable.
- Do not kink or trap the connecting cable.
■ The connection data can be found on the rating plate. → Page 11
■ The connecting cable is approx. 1.30 m long. - This appliance complies with the EC interference suppression regulations.
- The appliance corresponds to protection class 1. You should therefore only use the appliance with a protective earth connection.
- Do not connect the appliance to the power supply during installation.
- Ensure that the protection against contact is guaranteed during installation.
19.6 Information on the installation situation
- We recommend standard installation → Page 16. For special installation situations, alternative installation → Page 20 from below is possible.
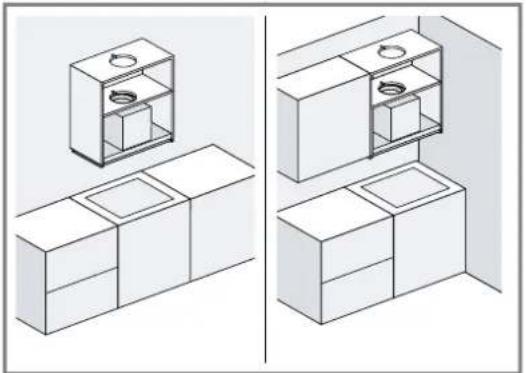
■ Install this appliance in a kitchen cupboard.
■ To install additional special accessory parts, observe the enclosed installation instructions. - The width of the extractor hood must correspond at least with the width of the hob.
■ To optimally detect the cooking vapours, install the appliance in the middle of the hob.
19.7 Instructions for the exhaust air pipe
The appliance manufacturer does not provide any warranty for faults attributable to the pipeline.
■ Use a short, straight exhaust air pipe with as large a pipe diameter as possible.
- Long, rough exhaust air pipes, many pipe bends or small pipe diameters reduce the suction power and increase the fan noise.
- Use an exhaust pipe that is made of non-combustible material.
- To prevent condensate from returning, fit the exhaust pipe with a 1° gradient from the appliance.
Flat ducts
Use flat ducts with an inner cross-section that corresponds to the diameter of the round pipes:
■ Diameter of 150 mm corresponds to approx. 177 cm 4 .
■ Diameter of 120 mm corresponds to approx. 113 cm 4 .
■ Use sealing strips for different pipe diameters.
- Do not use any flat ducts with sharp bends.
19.8 Instructions for the air extraction mode
For air extraction mode, a one-way flap should be installed.
Notes
■ If a one-way flap is not included with the appliance, one can be ordered from a specialist retailer.
- If the exhaust air is conveyed through the external wall, a telescopic duct should be used.
19.9 Installation video
If you scan this QR code with your smartphone, you can watch a video of the entire installation of the appliance.
Standard installation
Installation in a furniture cutout
19.10 Standard installation
Checking the units
- Check whether the fitted unit is level and has sufficient load-bearing capacity.
The maximum weight of the appliance is 12 kg. Do not place items weighing more than 10 kg on each side of the appliance.
Note: Note the furniture manufacturer's specifications with regard to the load-bearing capacity of the fitted unit. - Ensure that the fitted unit is heat-resistant up to 90 °C.
- Ensure that the fitted unit is still stable after the cut-outs have been made.
Preparing the units
Requirement: The unit is suitable for the installation.
-
Cover the hob to prevent damage.
-
Detach the cabinet door.
-
Cover the hob to prevent damage.
-
Detach the cabinet door.
-
Make the cut-out for the exhaust air pipe in the cabinet.
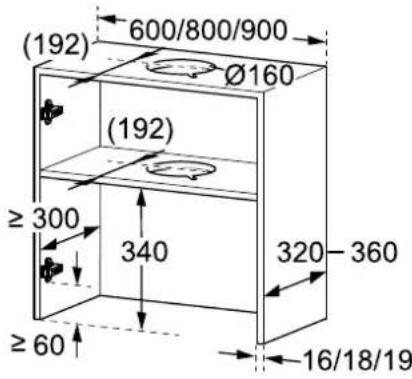
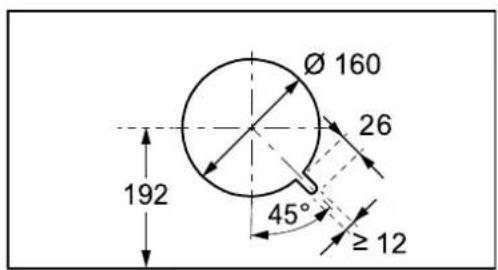
- Make the cut-out for the exhaust air pipe in the intermediate floor.
▶ Make the recess for the mains connection.
-
Ensure that the fitted unit is still stable after the cut-outs have been made.
-
Place the installation aid on the inside of the cabinet ① and mark the fixing points ②
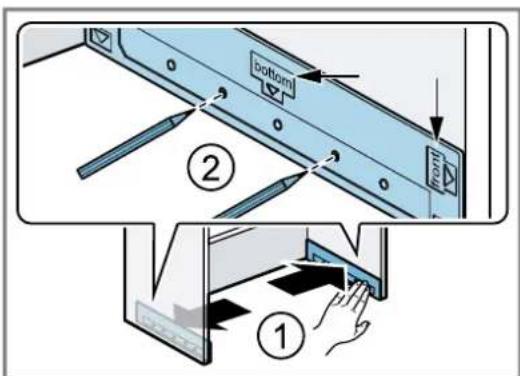
- Use a bradawl to mark the fixing points.
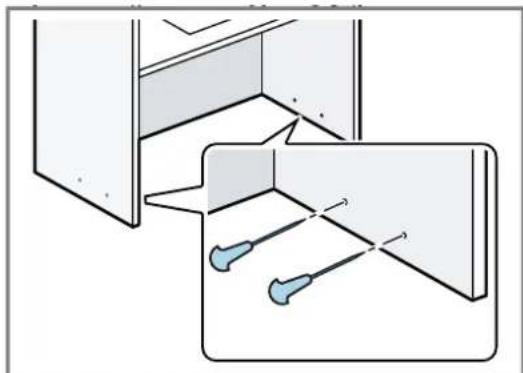
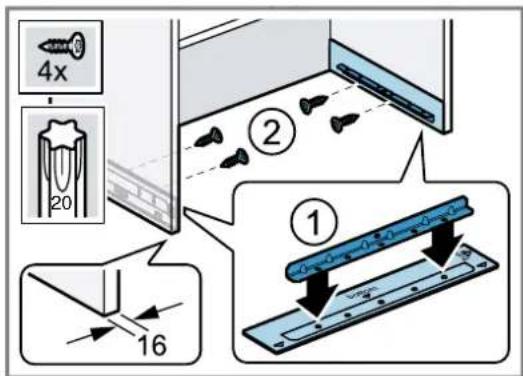
- For a wall thickness of 16 mm: Place the installation aids on the rails ① and screw the rails into the side walls of the cabinet ②
- For a wall thickness of 18 mm and 19 mm: Screw in the rails without the installation aid.
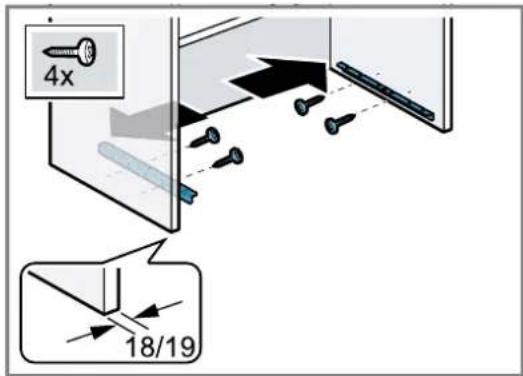
Preparing the appliance
-
Place the appliance on a soft surface.
-
Measure the installation depth and, if necessary, cut the wall finishing strips to size.
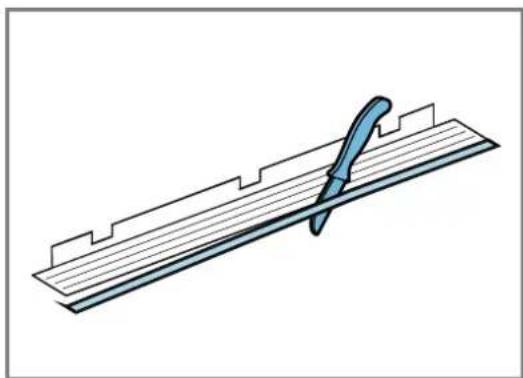
Note
Avoid damaging sensitive surfaces when installing the appliance.
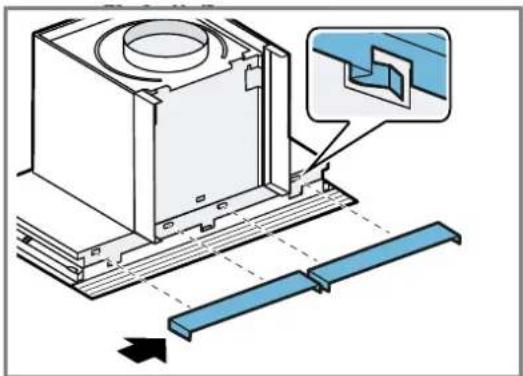
Mount the lower finishing strip to the appliance from left to right.
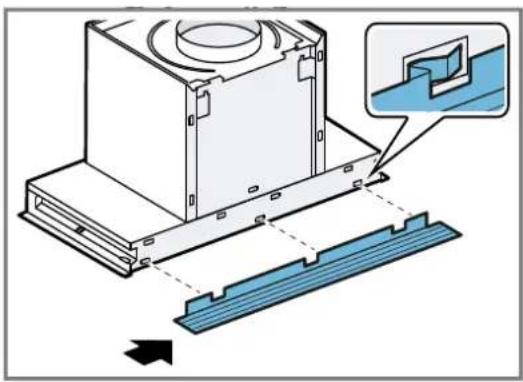
- For an installation depth (outer dimension) between 330°mm and 360°mm, mount the channel depth adjustment.
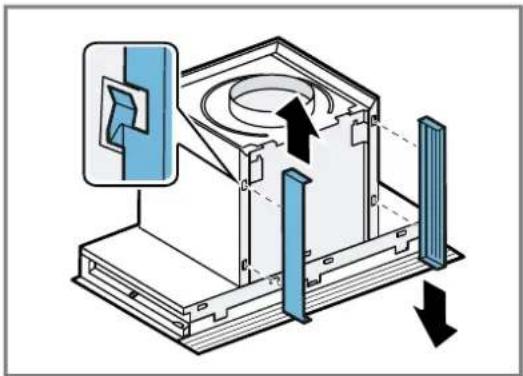
- Mount the right wall finishing strip first, followed by the left wall finishing strip.
Installing the appliance
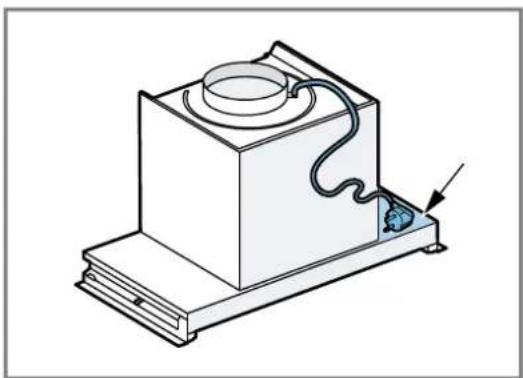
- Place the mains plug to the side of the appliance.
- Guide the mains plug through the cut-out ① and slide the appliance up to at least halfway into the rails ②
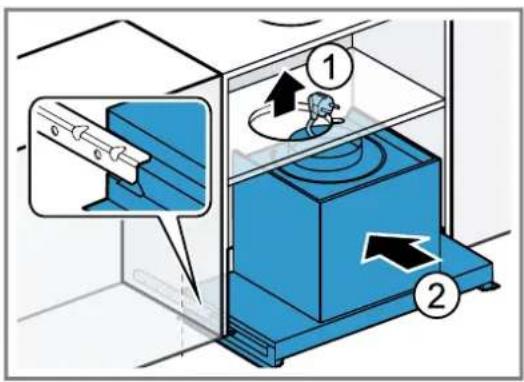
- Slide the appliance as far as it will go into the cabinet.
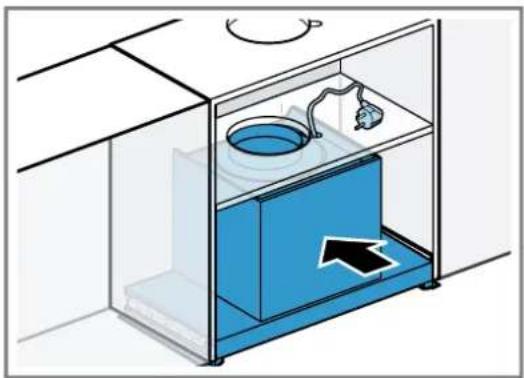
-
Fit the ducting.
-
Note: There may be a glass flap depending on the appliance type. If there is no glass flap present, continue with the next step. Gently push against the appliance with one hand and carefully open the glass flap.
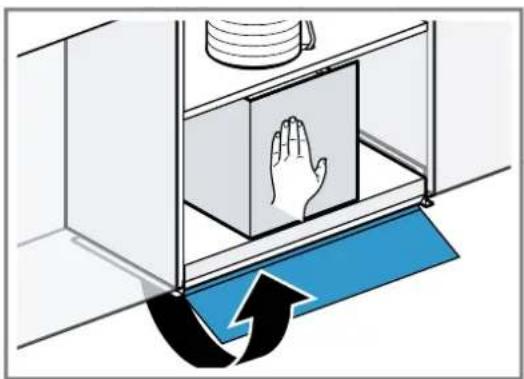
- Note: Ensure that the front of the appliance does not protrude over the front of the cabinet after it is screwed in.
Screw the threaded pins through the recess in the rail and tighten them alternately hand-tight until the appliance is flush with the cabinet.
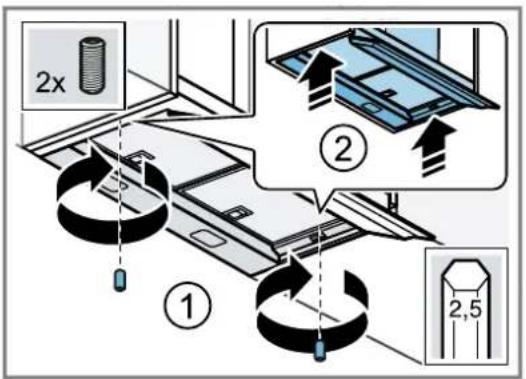
- Insert the covers.
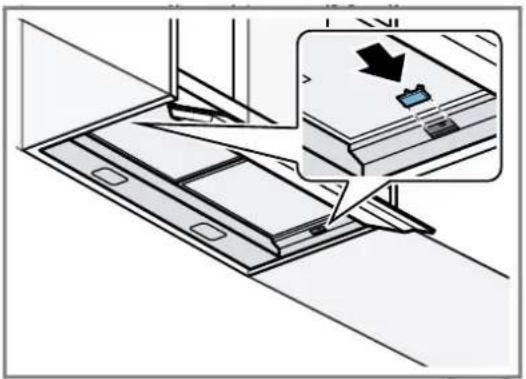
-
Remove the grease filters.
-
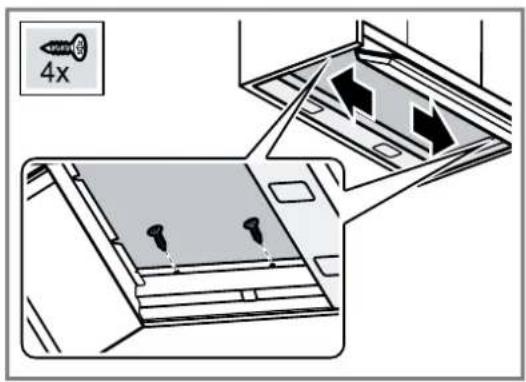
Note: Cabinets that hang freely on the wall or only adhere to one side of another cabinet must be stabilised using additional screws. If your cabinet is supported by additional cabinets from both sides, you can skip this step.
To stabilise the cabinet walls, screw in the screws on the right and left using a screwdriver.
-
Insert the mains plug.
-
Remove the protective film from the grease filters and insert the grease filters into the appliance.
-
Refit the cabinet door.
Removing the appliance
-
Unplug the mains plug.
-
Detach the cabinet door.
-
Remove the grease filters.
-
If the cabinet walls have been stabilised with 4 wooden screws, unscrew both screws.
-
Note: Before removing the appliance, remove any objects from the shelf. Carefully remove the covers.
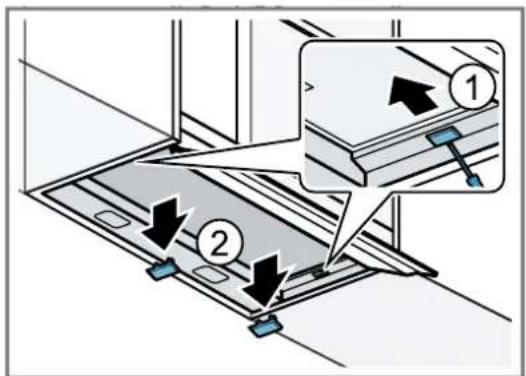
- Note: There may be a glass flap depending on the appliance type. If there is no glass panel present, continue with the next step.
Open the glass flap and unscrew the threaded pins in the rail.
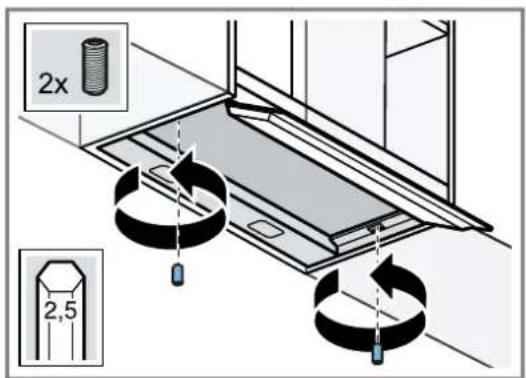
-
Loosen the pipework.
-
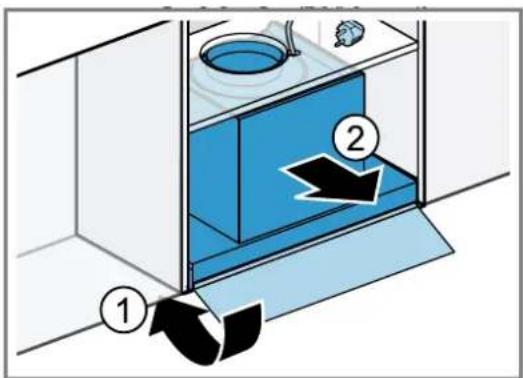
Close the glass flap ① and remove the appliance ②
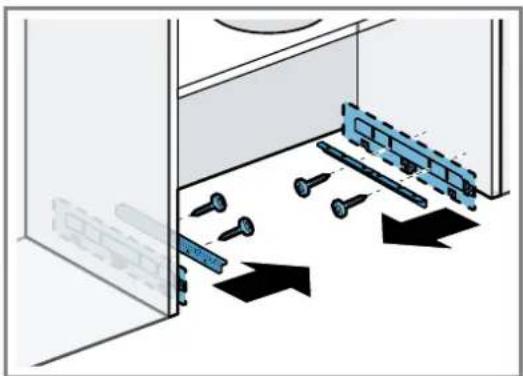
- Unscrew the rails and, if used, unscrew the installation aids.
Piping
Note: If you are using an aluminium pipe, smooth the connection area beforehand.
We recommend air extraction ducting with an exhaust air pipe diameter of 150 mm.
If the diameter of the air extraction ducting is less than 150 mm, you need a reducer piece available separately from a specialist retailer.
Establishing the exhaust air connection (exhaust air pipe, 120 mm diameter)
- Secure the reducing connector to the air-pipe connector. 1
- Secure the exhaust air pipe to the reducing connector.
- Establish the connection to the exhaust air opening.
- Seal the joints.
Establishing the exhaust air connection (exhaust air pipe, 150 mm diameter)
- Secure the exhaust pipe to the air pipe connector.
- Establish the connection to the exhaust air opening.
- Seal the joints.
19.11 Installation in a furniture cutout
Alternative installation is possible for special installation situations, e.g. for installation in a cabinet cut-out or if the standard installation from the front is not possible.
Note: We generally recommend standard installation.
Checking the units
- Check whether the fitted unit is level and has sufficient load-bearing capacity.
The maximum weight of the appliance is 12 kg. Do not place items weighing more than 10 kg on each side of the appliance.
Note: Note the furniture manufacturer's specifications with regard to the load-bearing capacity of the fitted unit. - Ensure that the fitted unit is heat-resistant up to 90 °C.
- Ensure that the fitted unit is still stable after the cut-outs have been made.
Preparing the units
Requirement: The unit is suitable for the installation.
- Detach the cupboard door, if required.
- Make the cut-out for the appliance.
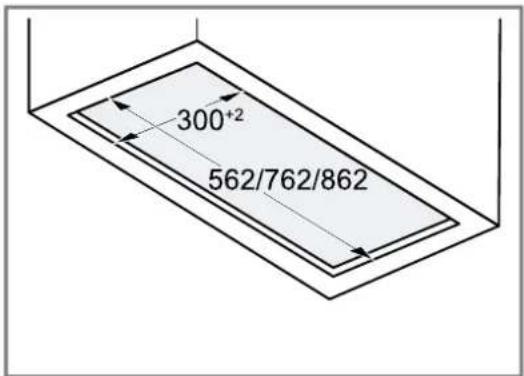
- Make the cut-out for the exhaust air pipe in the cupboard.
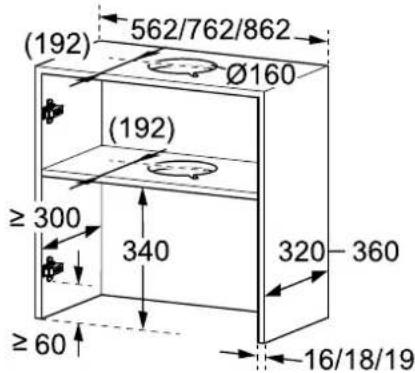
- Make the cut-out for the exhaust air pipe in the intermediate floor.
▶ Make the recess for the mains connection.
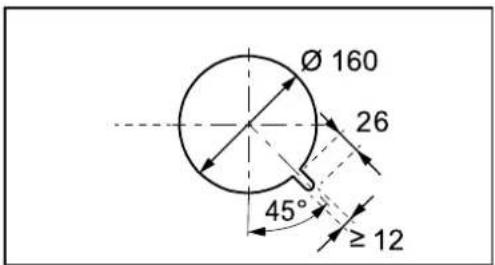
- Ensure that the fitted unit is still stable after the cut-outs have been made.
Preparing the appliance
- Cover the hob to prevent damage.
- Place the appliance on a soft surface.
- Open the glass flap and remove the grease filters.
-
Close the glass flap.
-
Note: Measure the installation depth from the wall to the end of the cabinet without the door. Measure the installation depth and, if necessary, cut the wall finishing strips to size.
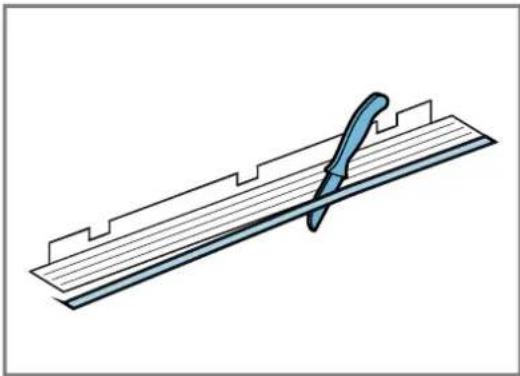
Note
Avoid damaging sensitive surfaces when installing the appliance.
Mount the lower finishing strip to the appliance from left to right.
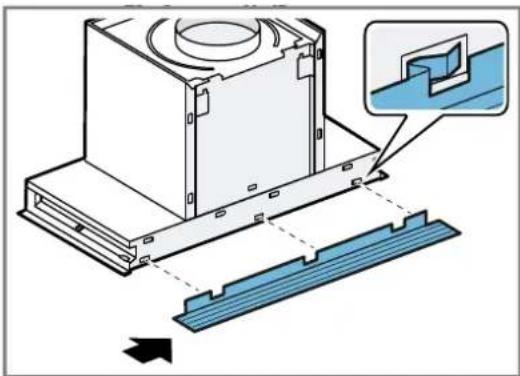
Installing the appliance
Requirement: Two people are required to install the appliance.
- Place the mains plug to the side of the appliance.
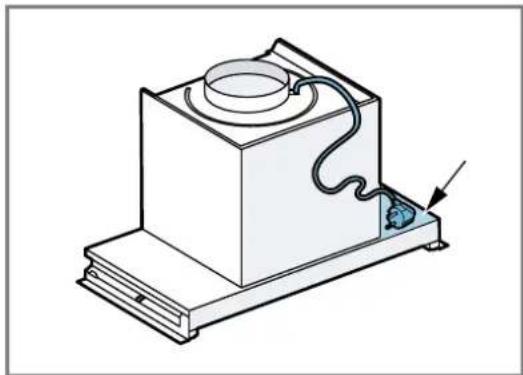
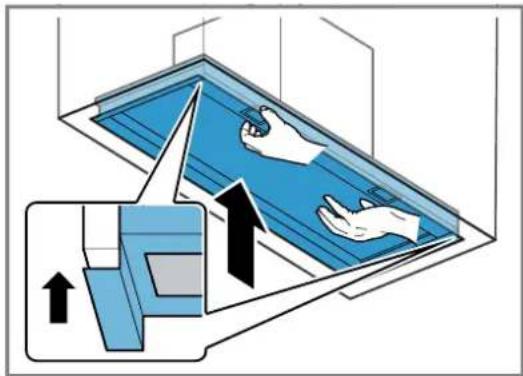
- One person lifts the appliance into the cabinet from below so that it is flush with the left and right sides. ▶ The appliance must be held until it is screwed tight into the cabinet.
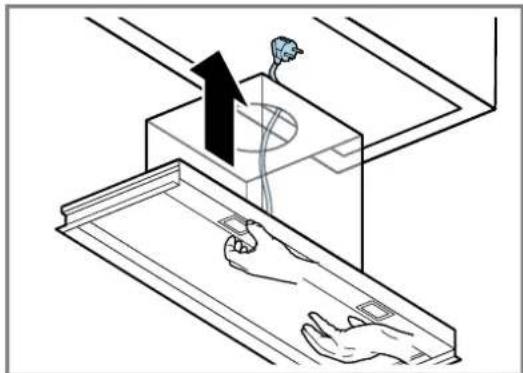
- Guide the mains plug through the cut-out.
-
Fit the ducting.
-
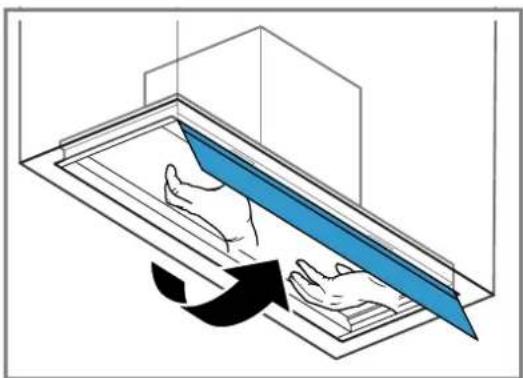
Note: There may be a glass flap depending on the appliance type. If there is no glass flap present, continue with the next step.
Carefully open the glass flap.
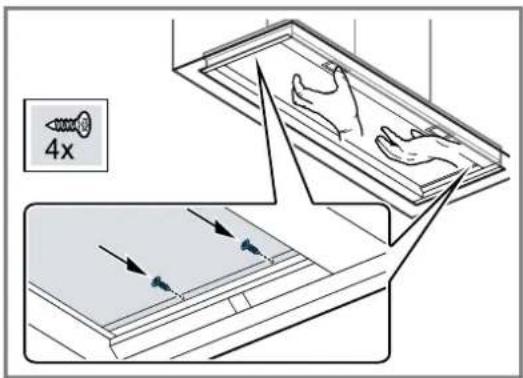
- Screw in the appliance on the left and right using two screws on each side.
- Insert the covers.
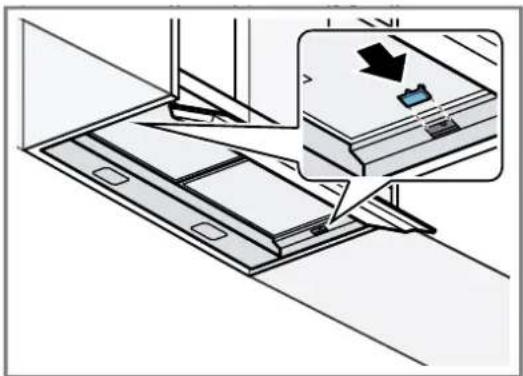
-
Insert the mains plug.
-
Remove the protective film from the grease filters and insert the grease filters into the appliance.
Removing the appliance
Requirement: Two people are required to remove the appliance.
- Cover the hob to prevent damage.
- Unplug the mains plug.
- Note: There may be a glass flap depending on the appliance type. If there is no glass flap present, continue with the next step. Open the glass flap.
- Remove the grease filters.
-
Loosen the pipework.
-
One person holds the appliance while the other loosens the screws.
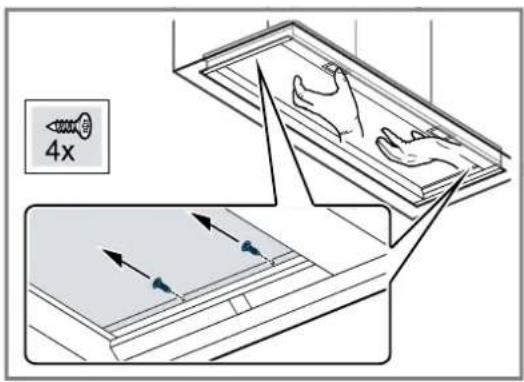
- Carefully remove the appliance.

Bosch Home Connect App
Connect your home appliance today and enjoy the following benefits:
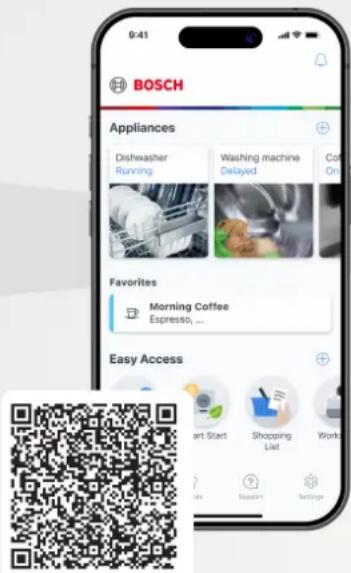
- Focus entirely on cooking. The extractor hood starts automatically when you begin cooking. (Compatible hob required)
- Do not forget to maintain the filters. When it's time, you will receive an app notification.
• Explore a world of additional functions and services within the app and enjoy direct access with the favourites button on your extractor hood. (available on selected models)
BOSCH HOME APPLIANCES SERVICE
Need some help? You can find it here.
Expert advice on your Bosch home appliances, help with problems or repairs by professionals from Bosch.
Discover all the different ways Bosch can assist you: www.bosch-home.com/service
The contact details of all countries are listed in the attached service directory.
BSH Hausgeräte GmbH
Carl-Wery-Straße 34
81739 München, GERMANY
www.bosch-home.com
A Bosch Company
Valid within Great Britain:
Imported to Great Britain by
BSH Home Appliances Ltd.
Grand Union House
Old Wolverton Road
Wolverton, Milton Keynes
MK12 5PT
United Kingdom

9001977556 (060330)
en





- BOSCH BETTERFOOD APP
- TABLE OF CONTENTS
- INFORMATION FOR USE
- SAFETY
- 1.1 GENERAL INFORMATION
- 1.2 INTENDED USE
- 1.3 RESTRICTION ON USER GROUP
- 1.4 SAFE USE
- ⚠ WARNING – RISK OF FIRE
- ⚠ WARNING – RISK OF SUFFOCATION
- ⚠ WARNING – RISK OF POISONING
- ⚠ WARNING – RISK OF BURNS
- ⚠ WARNING – RISK OF INJURY
- ⚠ WARNING – RISK OF ELECTRIC SHOCK
- ⚠ WARNING – RISK OF EXPLOSION
- 2 AVOIDING MATERIAL DAMAGE
- ATTENTION
- 3 ENVIRONMENTAL PROTECTION AND SAVING ENERGY
- 3.1 DISPOSING OF PACKAGING
- 3.2 SAVING ENERGY
- 4 OPERATING MODES
- 4.1 AIR EXTRACTION MODE
- 4.2 AIR RECIRCULATION
- 5 FAMILIARISING YOURSELF WITH YOUR APPLIANCE
- 5.1 CONTROL ELEMENTS
- 6 BEFORE USING FOR THE FIRST TIME
- 6.1 SETTING AN OPERATING MODE
- 7 BASIC OPERATION
- 7.1 SWITCHING ON THE APPLIANCE
- 7.2 SWITCHING OFF THE APPLIANCE
- 7.3 SELECTING A FAN SETTING
- 7.4 SWITCHING ON INTENSIVE MODE
- 7.5 SWITCHING OFF INTENSIVE MODE
- 7.6 SELECTING THE FAVOURITES FUNCTION
- 7.7 LIGHTING
- SWITCHING ON THE LIGHTING
- SETTING THE BRIGHTNESS
- SWITCHING OFF THE LIGHTING
- 7.8 REMOTE DISPLAY
- 8 ADDITIONAL FUNCTIONS IN THE HOME CONNECT APP 1
- 8.1 INTELLIGENT HOOD CONTROL
- 8.2 PERFORMANCE PROFILE
- 8.3 COOKTOP-BASED HOOD CONTROL
- 8.4 FAN RUN-ON
- 8.5 INTERVAL VENTILATION
- 8.6 FAVOURITES BUTTON
- 8.7 VOICE CONTROL
- 8.8 SETTING THE COLOUR TEMPERATURE
- 9 HOME CONNECT
- NOTES
- 9.1 SETTING UP THE HOME CONNECT APP
- 9.2 SETTING UP HOME CONNECT
- REQUIREMENTS
- 9.3 RESETTING THE CONNECTION
- 9.4 SOFTWARE UPDATE
- 9.5 REMOTE DIAGNOSTICS
- 9.6 DATA PROTECTION
- 10 HOB-BASED HOOD CONTROL
- 11 CLEANING AND SERVICING
- 11.1 CLEANING PRODUCTS
- 11.2 CLEANING THE APPLIANCE
- 11.3 CLEANING CONTROLS AND LIGHTS
- 11.4 GREASE FILTER
- REMOVING THE GREASE FILTER
- CLEANING GREASE FILTERS MANUALLY
- CLEANING GREASE FILTERS IN THE DISHWASHER
- WARNING – RISK OF FIRE
- INSTALLING THE GREASE FILTERS
- 12 TROUBLESHOOTING
- 12.1 MALFUNCTIONS
- 13 DISPOSAL
- 13.1 DISPOSING OF OLD APPLIANCE
- 14 CUSTOMER SERVICE
- 14.1 PRODUCT NUMBER (E-NR.), PRODUCTION NUMBER (FD) AND CONSECUTIVE NUMBERING (Z-NR.)
- 15 ACCESSORIES
- 16 DECLARATION OF CONFORMITY
- 16.1 STATEMENT OF COMPLIANCE FOR GREAT BRITAIN
- PRODUCT TYPE
- NAME AND ADDRESS OF MANUFACTURER
- SUPPORT PERIOD
- 17 INFORMATION REGARDING FREE AND OPEN SOURCE SOFTWARE
- 18 TEST INFORMATION
- 19 INSTALLATION INSTRUCTIONS
- 19.1 INCLUDED WITH THE APPLIANCE
- 19.2 SAFETY CLEARANCES
- 19.3 SECURE INSTALLATION
- WARNING – RISK OF POISONING
- 19.4 GENERAL INFORMATION
- 19.5 INSTRUCTIONS FOR THE ELECTRICAL CONNECTION
- 19.6 INFORMATION ON THE INSTALLATION SITUATION
- 19.7 INSTRUCTIONS FOR THE EXHAUST AIR PIPE
- FLAT DUCTS
- 19.8 INSTRUCTIONS FOR THE AIR EXTRACTION MODE
- 19.9 INSTALLATION VIDEO
- 19.10 STANDARD INSTALLATION
- CHECKING THE UNITS
- PREPARING THE UNITS
- PREPARING THE APPLIANCE
- NOTE
- INSTALLING THE APPLIANCE
- REMOVING THE APPLIANCE
- PIPING
- ESTABLISHING THE EXHAUST AIR CONNECTION (EXHAUST AIR PIPE, 120 MM DIAMETER)
- ESTABLISHING THE EXHAUST AIR CONNECTION (EXHAUST AIR PIPE, 150 MM DIAMETER)
- 19.11 INSTALLATION IN A FURNITURE CUTOUT
- BOSCH HOME CONNECT APP
- NEED SOME HELP? YOU CAN FIND IT HERE
Brand : BOSCH
Model : DBB67DP60B
Category : Range hood