TS310 - Saw SCHEPPACH - Free user manual and instructions
Find the device manual for free TS310 SCHEPPACH in PDF.
| Technical Specifications | SCHEPPACH TS310 table saw, 2000 W power, blade diameter 315 mm, rotation speed 5000 rpm. |
|---|---|
| Dimensions | Table dimensions: 800 x 600 mm, weight 45 kg. |
| Cutting Capacity | Cutting height at 90°: 85 mm, cutting width at 90°: 310 mm. |
| Usage | Ideal for cutting wood, particle boards, and MDF. |
| Maintenance | Regularly check the blade condition, clean the table after each use, lubricate moving parts. |
| Safety | Equipped with a blade guard, use safety glasses and gloves during operation. |
| General Information | 2-year warranty, CE compliant, user manual included. |
Frequently Asked Questions - TS310 SCHEPPACH
User questions about TS310 SCHEPPACH
0 question about this device. Answer the ones you know or ask your own.
Ask a new question about this device
Download the instructions for your Saw in PDF format for free! Find your manual TS310 - SCHEPPACH and take your electronic device back in hand. On this page are published all the documents necessary for the use of your device. TS310 by SCHEPPACH.
USER MANUAL TS310 SCHEPPACH
Günzburger Straße 69
D-89335 Ichenhausen
Verehrter Kunde,
Explanation of the symbols on the device
| Before commissioning, read and observe the operating manual and safety instructions! |
| Wear safety goggles! |
| Wear hearing protection. Excessive noise can result in a loss of hearing. |
| Wear a dust protection mask. When machining wood and other materials, harmful dust may be generated. Do not machine material containing asbestos! |
| Wear safety goggles. Sparks created during work or fragments, chippings and dust ejected by the product can cause sight loss. |
| Attention! Danger of injury! Do not reach into saw blade while it is running! |
| The product complies with the applicable European directives. |
| We have marked points in these operating instructions that impact your safety with this symbol |
| The product complies with the applicable Serbian directives. |
Table of contents: Page:
- Introduction 27
- Device description (Fig. A) 27
- Scope of delivery 27
- Proper use 28
- General safety instructions 28
- Technical data 31
- Assembly and operation 32
- Transport 33
- Working instructions 33
- Maintenance 35
- Storage 35
- Electrical connection 35
- Disposal and recycling 36
- Troubleshooting 37
- Declaration of conformity 343
1. Introduction
Manufacturer:
Scheppach GmbH
Günzburger Straße 69
D-89335 Ichenhausen
Dear Customer,
we wish you much pleasure and success in working with your new device.
Note:
In accordance with the applicable product liability laws, the manufacturer of this device assumes no liability for damage to the device or caused by the device arising from:
- Improper handling,
- Failure to comply with the operating instructions,
- Repairs carried out by third parties, unauthorised specialists,
- Installing and replacing non-original spare parts,
Application other than specified, - Failures of the electrical system in the event of the electrical regulations and VDE provisions 0100, DIN 57113 / VDE0113 not being observed.
Note:
Read the whole text of the operating manual before assembly and commissioning.
This operating manual should help you to familiarise yourself with your device and to use it for its intended purpose.
The operating manual includes important instructions for safe, proper and economic operation of the device, for avoiding danger, for minimising repair costs and downtimes, and for increasing the reliability and extending the service life of the device.
In addition to the safety instructions in this operating manual, you must also observe the regulations applicable to the operation of the device in your country.
Keep the operating manual at the device, in a plastic sleeve, protected from dirt and moisture. They must be read and carefully observed by all operating personnel before starting the work.
The device may only be used by personnel who have been trained to use it and who have been instructed with respect to the associated hazards. The required minimum age must be observed.
In addition to the safety instructions in this operating manual and the separate regulations of your country, the generally recognised technical rules relating to the operation of such machines must also be observed.
We accept no liability for accidents or damage that occur due to a failure to observe this manual and the safety instructions.
2. Device description (Fig. A)
- On/off switch
- Rip fence
- Saw blade
- Protective cover
- Suction hose
- Riving knife
- Table inlay
- Table width extension
8.1 Sliding carrier plate - Transport wheels
- Suction port
- Transport handle
- Height adjustment
3. Scope of delivery
Circular table saw TS310
Rip fence with angle rail
Sliding carrier plate
Saw blade guard with screw and wing nut
Riving knife
Push stick
Table extension
2 table length extension supports
2 table width extension supports
2 wheel and lug units
Saw blade 315× 30× 3.0 / 224Z
Sawblade 315× 30× 3.2 / 248Z
Saw blade key
Push grip
Suction hose and fastening clamp
Enclosed accessories bag
Operating instructions
- Open the packaging and carefully remove the device.
- Remove the packaging material, as well as the packaging and transport safety devices (if present).
- Check whether the scope of delivery is complete.
- Check the device and accessory parts for transport damage.
- If possible, keep the packaging until the expiry of the warranty period.
Attention
The device and the packaging are not children's toys! Do not let children play with plastic bags, films or small parts! There is a danger of choking or suffocating!
4. Proper use
The circular table saw is used for the longitudinal and transverse cutting (only with the transverse stop) of all types of timbers, in accordance with the machine size. It is not permitted to cut any type of round timber.
The machine may only be used in the intended manner.
Any use beyond this is improper. The user/operator, not the manufacturer, is responsible for damages or injuries of any type resulting from this.
Only suitable saw blades (HM or CV saw blades) may be used for the machine.
The use of any type of HSS saw blades or cutting wheels is prohibited. An element of the proper intended use is also the observance of the safety instructions, as well as the assembly instructions and operating information in the operating manual.
Persons who operate and maintain the machine must be familiar with the manual and must be informed about potential dangers. In addition, the applicable accident prevention regulations must be strictly observed.
Other general occupational health and safety-related rules and regulations must be observed.
Attention!
When using equipment, several safety warnings must be observed to prevent injuries and damage. For this reason, please carefully read this operating manual / safety instructions. Store this manual in a safe place so that the information is available at any time. If you hand the device over to another person, please hand over this operating manual / safety instructions as well.
We accept no liability for accidents or damage that occur due to a failure to observe this manual and the safety instructions.
The liability of the manufacturer and resulting damages are excluded in the event of modifications of the machine.
Despite use as intended, specific risk factors cannot be entirely eliminated. Due to the design and layout of the machine, the following risks remain:
- Contact with the saw blade in the exposed sawing area.
- Reaching into the running saw blade (cutting injury).
- Kick-back of workpieces and workpiece parts.
-
Saw blade breakage.
-
Ejection of faulty carbide parts of the saw blade.
- Hearing damage when the necessary hearing protection is not used.
- Harmful emissions of wood dusts during use in enclosed areas.
Please note that our equipment was not designed with the intention of use for commercial or industrial purposes. We assume no guarantee if the device is used in commercial or industrial applications, or for equivalent work.
5. General safety instructions
Attention! The following basic safety measures must be observed when using power tools for protection against electric shock, and the risk of injury and fire.
Read all these notices before using the power tool and store the safety instructions well for later reference.
Safe work
1 Keep the work area orderly
- Disorder in the work area can lead to accidents.
2 Take environmental influences into account
- Do not expose power tools to rain.
- Do not use electric tools in a damp or wet environment.
- Make sure that the work area is well-illuminated.
- Do not use power tools where there is a risk of fire or explosion.
3 Protect yourself from electric shock
-Avoid physical contact with earthed parts (e.g. pipes, radiators, electric ranges, cooling units).
4 Keep away from children!
- Do not let other people touch the tool or the cable, keep them away from your work area.
5 Securely store unused power tools
- Unused power tools should be stored in a dry, elevated or closed location out of the reach of children.
6 Do not overload your power tool
- They work better and more safely in the specified output range.
7 Use the correct power tool
- Do not use low-output electric tools for heavy work.
- Do not use the power tool for purposes for which it is not intended. For example, do not use handheld circular saws for the cutting of branches or logs.
- Do not use the electric tool to cut firewood.
8 Wear suitable clothing
-
Do not wear wide clothing or jewellery, which can become entangled in moving parts.
-
When working outdoors, anti-slip footwear is recommended.
-
Tie long hair back in a hair net.
9 Use protective equipment
Wear safety goggles.
- Wear a mask when carrying out dust-creating work.
10 Connect the dust extraction device
-
If connections for dust extraction and a collecting device are present, make sure that they are connected and used properly.
-
Operation in enclosed areas is only permitted with a suitable chip extraction system.
11 Secure the workpiece
-
Use the clamping devices or a vice to hold the workpiece in place. It is thus held more securely than with your hand and allows the machine to be operated with both hands.
-
An additional support is necessary for long workpieces (table, trestle, etc.) in order to prevent the machine from tipping over.
-
Always press the workpiece firmly against the working plate and stop in order to prevent bouncing and twisting of the workpiece.
12 Avoid abnormal posture
-
Make sure that you have secure footing and always maintain your balance.
-
Avoid awkward hand positions in which a sudden slip could cause one or both hands to come into contact with the saw blade.
13 Take care of your tools
-
Keep cutting tools sharp and clean in order to be able to work better and more safely.
-
Follow the instructions for lubrication and for tool replacement.
-
Check the connection cable of the electric tool regularly and have it replaced by a recognised specialist when damaged.
-
Check extension cables regularly and replace them when damaged.
-
Keep the handle dry, clean and free of oil and grease.
14 Pull the connector out of the socket
-
Never remove loose fragments, chips or jammed wood pieces from the running saw blade.
-
When the power tool is not in use or prior to maintenance and when replacing tools such as saw blades, drills, cutters.
15 Do not leave a tool key inserted.
- Before switching on, make sure that keys and adjusting tools are removed.
16 Avoid inadvertent starting
- Make sure that the switch is switched off when plugging the plug into an outlet.
17 Use extension cables for outdoors
-
Only use approved and appropriately identified extension cables for use outdoors.
-
Only use cable reels in the unrolled state.
18 Always pay attention Watch what you are doing. Remain sensible when working. Do not use the power tool when you are distracted.
19 Check the power tool for potential damage
-
Protective devices or other parts with minor damage must be carefully inspected to ensure that they function correctly and as intended prior to continued use of the power tool.
-
Check whether the moving parts function faultlessly and do not jam or whether parts are damaged. All parts must be correctly mounted and all conditions must be fulfilled to ensure fault-free operation of the power tool.
-
The moving protective hood may not be fixed in the open position.
-
Damaged protective devices and parts must be properly repaired or replaced by a recognised specialist workshop, insofar as nothing different is specified in the operating manual.
-
Damaged switches must be replaced at a customer service workshop.
-
Do not use any faulty or damaged connection cables.
-
Do not use any power tool on which the switch cannot be switched on and off.
20 ATTENTION!
Exercise elevated caution for double litre cuts.
21 ATTENTION!
- The use of other insertion tools and other accessories can entail a danger of injury.
22 Have your power tool repaired by a qualified electrician
- This power tool conforms to the applicable safety regulations. Repairs may only be performed by an electrician using original spare parts. Otherwise accidents can occur.
23 Do not use the cable for purposes for which it is not intended.
- Do not use the cable to pull the plug out of the outlet. Protect the cable from heat, oil and sharp edges.
Additional safety instructions, safety precautions
- Warning! Do not use damaged, cracked or deformed saw blades.
- Replace a worn table insert.
- Only use saw blades recommended by the manufacturer which conform to EN 847-1.
Warning! When changing the saw blade, ensure that the cutting width is not smaller and the width of the saw blade disc is not greater than the thickness of the riving knife!
- Make sure that a suitable saw blade for the material to be cut is selected.
Wear suitable personal protective equipment. This includes: Hearing protection to reduce the risk of hearing loss, respiratory protection to reduce the risk of inhaling hazardous dust.
Wear gloves when handling saw blades and rough materials. - Carry saw blades in a container whenever practical.
- Wear safety goggles. Sparks created during work or fragments, chippings and dust ejected by the device can case sight loss.
- Connect a dust collecting device to the electric tool when sawing wood. The emission of dust is influenced, among other things, by the type of material to be processed, the significance of local separation (collection or source) and the correct setting of the hood/guide plates/guides.
- Do not use saw blades made of high-speed alloy steel (HSS steel).
- Always keep the push stick or wooden push block in its holder on the electric tool when not in use.
Maintenance and service
- Pull out the mains plug for any adjustment or repair tasks.
- The generation of noise is influenced by various factors, including the characteristics of saw blades, condition of saw blade and electric tool. Use saw blades which were designed for reduced noise development, insofar as possible. Maintain the electric tool and tool attachments regularly and if necessary, initiate repairs in order to reduce noise.
- Report faults on the electric tool, protective devices or the tool attachment to the person responsible for safety as soon as they are discovered.
Safe work
-
Use a push stick or the handle with wooden push block in order to guide the workpiece safely past the saw blade.
-
Make sure that the riving knife is always used and that it is correctly adjusted.
-
Use and correctly set the upper saw blade guard.
-
Only use saw blades for which the maximum permissible speed is not lower than the maximum spindle speed of the insertion tool and which are suitable for the material to be cut.
-
Do not carry out rebating or grooving without a suitable protective device, such as a tunnel guard, being fitted over the saw table.
-
Circular saws must not be used for slotting (groove ends in the workpiece).
-
When transporting the electric tool, only use the transport devices. Never use the protective devices for handling or transport.
-
Make sure that the upper part of the saw blade is covered during transport, e.g. by the protective device.
-
Make sure to only use spacers and spindle rings that are suitable for the purpose specified by the manufacturer.
-
The floor around the machine must be level, clean and free of loose particles such as chips and cutting residue.
-
Working position always to the side of the saw blade.
-
Do not remove cutting waste or miscellaneous parts of the workpiece from the cutting area so long as the machine is running and the sawing unit has not yet come to a standstill.
-
Ensure that the machine is always attached to a workbench or table whenever possible.
-
Secure long workpieces against tipping at the end of the cutting process (e.g. with a reel-off stand or roller trestle).
-
Attention! Never remove loose fragments, chips or jammed wood pieces from the running saw blade.
- To rectify faults or remove jammed pieces of wood, switch the machine off. - Pull out the mains plug -
- Only carry out modifications, adjustments, measurements and cleaning work when the engine is switched off. -Pull out the mains plug
Before switching on, make sure that keys and adjusting tools are removed.
Warning! This power tool generates an electromagnetic field during operation. This field can impair active or passive medical implants under certain circumstances. In order to prevent the risk of serious or deadly injuries, we recommend that persons with medical implants consult with their physician and the manufacturer of the medical implant prior to operating the power tool.
Safety instructions for the use of saw blades
1 Only use insertion tools if you have mastered their use.
2 Observe the maximum speed. The maximum speed specified on the insertion tool may not be exceeded. If specified, observe the speed range.
3 Observe the motor / saw blade direction of rotation.
4 Do not use any insertion tools with cracks. Sort out cracked insertion tools. Repairs are not permitted.
5 Clean dirt, grease, oil and water off of the clamping surfaces.
6 Do not use any loose reducing rings or bushes to reduce holes on circular saw blades.
7 Make sure that fixed reducer rings for securing the insertion tool have the same diameter and have at least 1/3 of the cutting diameter.
8 Make sure that fixed reducer rings are parallel to each other.
9 Handle insertion tool with caution. They are ideally stored in the originally package or special containers. Wear protective gloves in order to improve grip and to further reduce the risk of injury.
10 Prior to the use of insertion tools, make sure that all protective devices are properly fastened.
11 Prior to use, make sure that the insertion tool meets the technical requirements of this electric tool and is properly fastened.
12 Only use the supplied saw blade for cutting wood, never for the processing of metals.
Residual risks
The power tool is state-of-the-art and has been built according to the recognised technical safety regulations. However, individual residual risks can arise during operation.
- Health hazard due to electrical power, with the use of improper electrical connection cables.
- Furthermore, despite all precautions having been met, some non-obvious residual risks may still remain.
- Residual risks can be minimised if the "safety instructions" and the "Proper use" are observed along with the whole of the operating instructions.
- Do not unnecessary stress the machine: too much pressure when sawing will damage the saw blade quickly. This results in reduced output of the machine in the processing and in cut precision.
- Avoid accidental starting of the machine: the operating button may not be pressed when inserting the plug in an outlet.
-
Use the tool that is recommended in this manual. In doing so, your saw provides optimal performance.
-
Keep your hands away from the working area when the machine is in operation.
- Before performing setting or maintenance work, switch the device off and unplug the mains plug.
6. Technical data
| AC motor 230 V~ 50Hz 400 V~ 50 Hz | ||
| Power 2200 W 2800 W | ||
| Operating mode S6 40%* S 6/40 % | ||
| Idle speed 2800 rpm 2800 rpm | ||
| Plug Schuko CEE 16 A | ||
| Weight approx. 55 kg | 57 kg | |
| Carbide saw blade 24 Z pre-mounted | Ø 315 x Ø 30 x 3 mm |
| Carbide saw blade 48 Z | Ø 315 x Ø 30 x 3.2 mm |
| Table size | 800 x 550 (950) mm |
| Cutting height max. 90° | 83 millimeters |
| Cutting height max. 45° | 53 millimeters |
| Height adjustment | 0 - 83 mm |
| Tilting saw blade | 0 - 45° |
- Operating mode S6 40%: Continuous duty with intermittent loading (operating time 10 mins). In order to avoid impermissible overheating of the motor, the motor should be driven for only 40% of the operating time with the stipulated nominal power and must then continue to run with no load for the remaining 60% of the operating time.
Noise level
The noise levels have been determined in accordance with EN 1870.
| Sound pressure level LpA | 90.2 dB |
| Uncertainty KpA | 3 dB |
| Sound power level LWA | 105.2 dB |
| Uncertainty KWA | 3 dB |
Wear hearing protection.
Excessive noise can result in a loss of hearing. Total vibration emission values (vector sum of three directions) determined per EN 1870.
7. Assembly and operation
Before commissioning
- Prior to commissioning, all covers and safety devices must be mounted correctly.
- The saw blade must be able to run freely.
- In case of previously machined wood, be aware of any foreign bodies, such as nails or screws, etc.
- Before pressing the on/off switch, make sure that the saw blade is correctly fitted, and that moving parts run smoothly.
- Before connecting the machine, make certain that the data on the type plate matches with the mains power data.
- Only connect the machine to a correctly installed protective contact socket, with fuse protection of at least 16A.
- Use a residual current circuit breaker with a trigger current of 30mA or less.
Attention! Remove the mains plug before any maintenance, modification and assembly work on the circular saw.
Place all supplied parts on a flat surface. Group identical parts.
Note: If connections are secured with a screw (round head/or hexagon), hexagonal nuts and washer, the washer must be placed under the nut.
Insert screws from the outside to the inside and secure connections with nuts from the inside.
Note: During assembly, tighten the nuts and bolts only to the extent that they cannot fall off.
If you tighten the nuts and screws fully before final assembly, the final assembly cannot be carried out.
Attention!
Always make sure the product is fully assembled before commissioning!
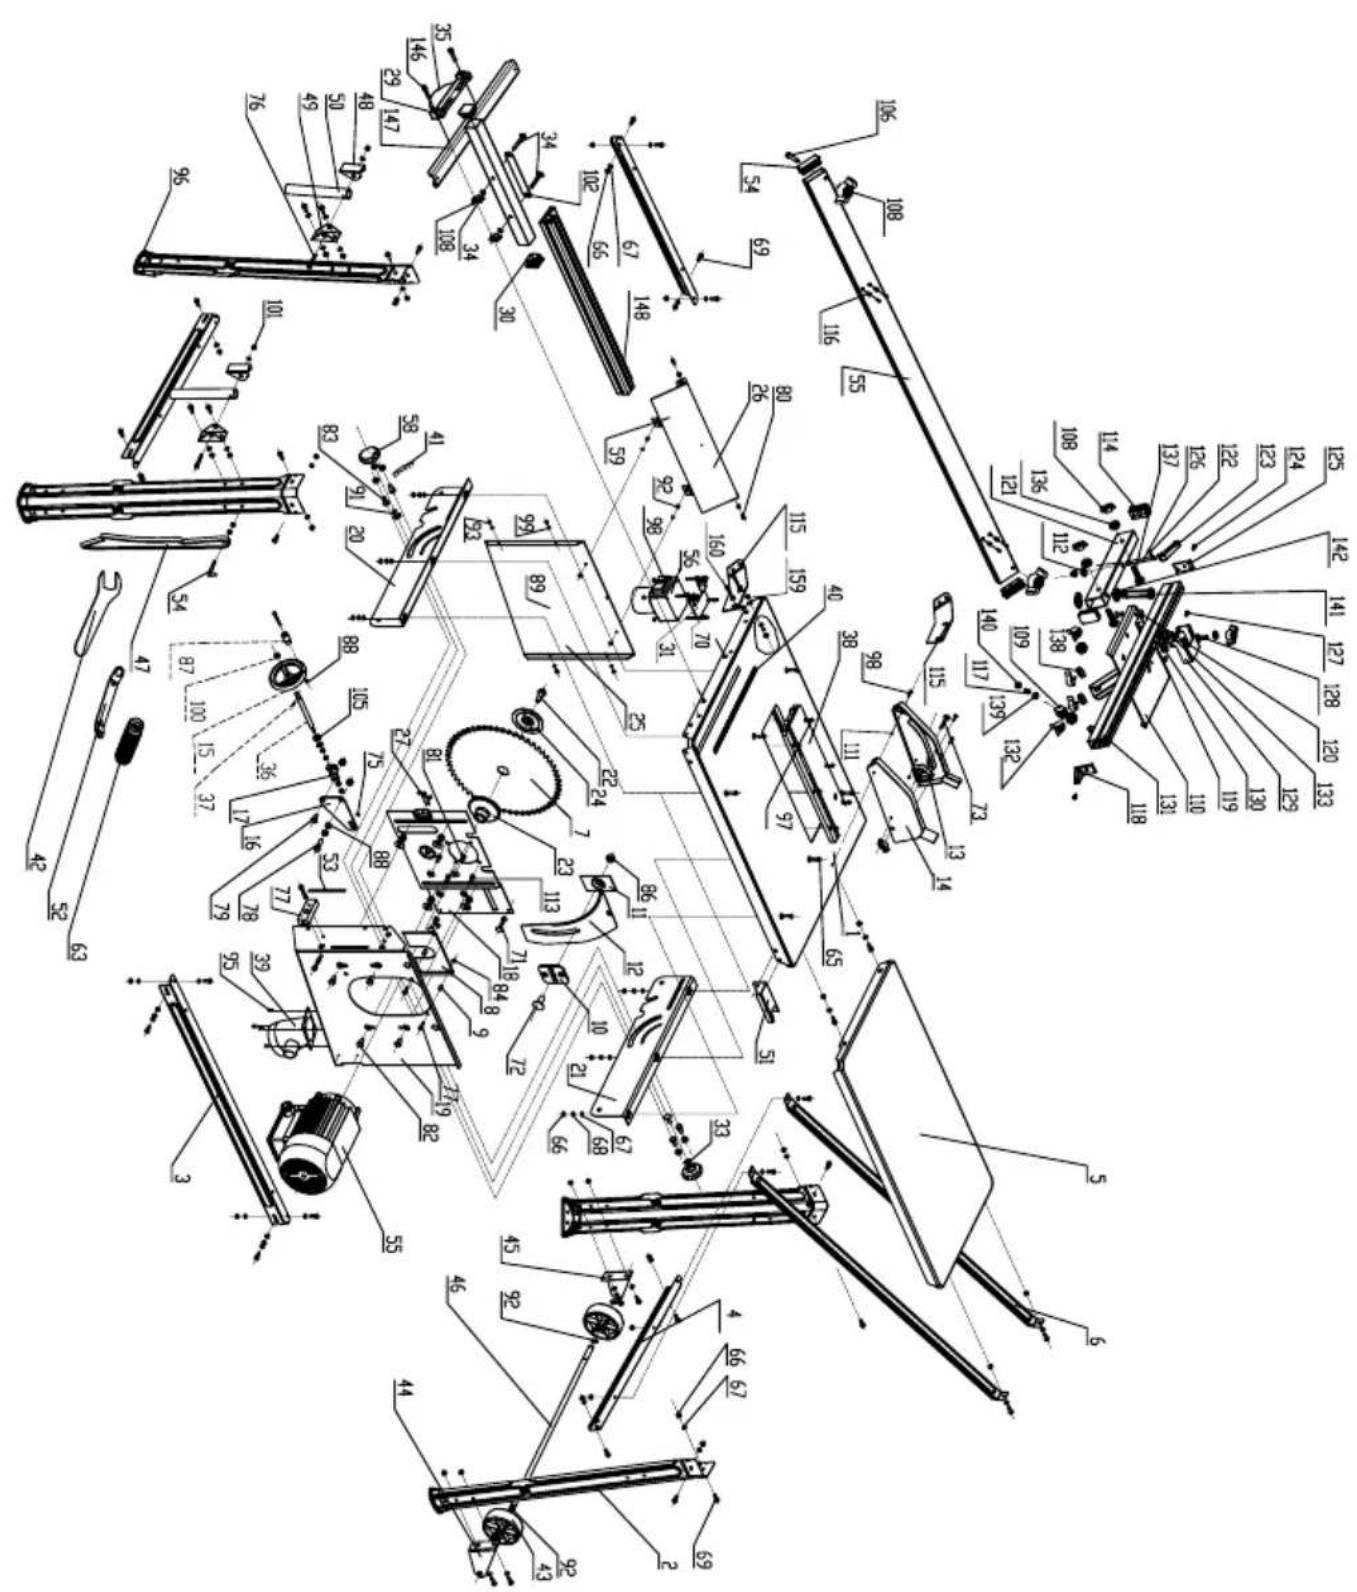
Fig. 1
Place the tabletop (1) on a workbench (remove packing pad a under the motor).
Fig. 1.1
Mount the frame leg (2) to the tabletop with 2 M6 x 16 hexagonal bolts, 2 washers 6 and 2 M6 nuts.
Fig. 2
Mount the switch (6) to the tabletop with 2 M6 x 16 hexagonal bolts, 2 washers 6 and 2 M6 nuts.
Fig. 3
Mount the frame leg (3) to the tabletop with 2 M6 x 16 hexagonal bolts, 2 washers 6 and 2 M6 nuts.
Fig. 4
Mount the frame leg (4) to the tabletop with 2 M6 x 16 hexagonal bolts, 2 washers 6 and 2 M6 nuts.
Fig. 5
Mount the frame leg (5) and the hose holder (b) to the tabletop with 2 M6 x 16 hexagonal bolts, 2 washers 6 and 2 M6 nuts.
Fig. 6 / 6.1
Mount 2 longitudinal struts (10) and 2 cross members (9), to the frame legs (2, 3, 4 and 5) with 12M6× 16 hexagonal bolts, 12 washers 6 and 12 M6 hexagonal nuts.
Fig. 7 / 7.1 / 7.2 / 7.3
Mount the table extension plate (8), with two struts (11), to the tabletop and cross member with 6 M6 x 16 hexagonal bolts, 6 washers 6, and 6 M6 hexagonal nuts. Tighten the bolts lightly by hand. (The tabletop (8) can also be mounted laterally as a table width extension with the shorter struts)
Fig. 8
Fit the suction port (14) to the lower saw blade guard (13) with 4M4× 10 hexagonal bolts and 4× washers 4.
Fig. 9
Mount the travel fixture (16) to the rear frame legs (4 and 5) with 4 M6 x 16 hexagonal bolts, 4 washers 6, and 4 M6 nuts.
Fig. 10
Place the machine on its feet, tighten all screws of the table, feet and struts (except the travel fixture).
Fig. 11
Tighten the travel fixture in position such that the wheels lightly touch the floor.
Fig. 12 / 12.1
Mount the riving knife to the saw blade as described in the illustration. Loosen the screw slightly (do not unscrew it completely) and tighten it again after the adjustment. In doing so, the saw blade insert (19, Fig. 13) must be removed.
Fig. 13 After adjusting the riving knife, refit the saw blade insert (19) with 4M6× 16 flange head screws.
Fig. 14 Fit the cover hood (20) to the splitting wedge (18) with a round-headed M6 x 25 screw, washer 6 and M6 wing nut.
Fig. 15 Connect the suction hose (21) to the suction hood (20) and the suction port.
Connecting the chip extraction system, Fig. 15 WARNING
Risk of eye injury from swirling chips
-
Wear safety goggles.
-
Only operate the product with a suitable chip extraction system. Do not use household vacuum cleaners.
-
Connect a suitable chip extraction system (not included in the scope of delivery) to the suction port.
The chip extraction system must fulfil the following requirements:
- Extraction port diameter: 0100mm
- Necessary air volume flow: at least 460m^3/h
- Negative pressure: min. 530 Pa
Recommended air speed: min. 20 m/s
ATTENTION
Check and clean the suction channels at regular intervals.
Fig.16/16.1 Fasten the hook bolt with 2 washers 6,2 M6 nuts on the right frame leg side. The saw blade key and the push stick are hung on it.
The two transport handles are mounted on the front of the saw, on the left and right legs with 4 M6 x 16 hexagonal bolts, 4 washers 6, 4 M6 nuts.
Fitting the longitudinal stop, Fig. 17 / 17.1
Connect the bearing piece to the clamping plate. Mount the clamping plate to the tabletop with 2 M6 x 30 cylinder screws, 2 A 6.4 serrated washers and 2 hexagonal nuts.
Installing the stop rail, Fig. 18
Mount the intermediate plate to the rip fence with 2 M6 x 50 flat round screws, 2 A 6 washers and 2 wing nuts. Slide the stop rail onto the intermediate plate and clamp it with the wing nuts.
Legend:
1 = High contact surface
2 = Low contact surface
To clamp, pull the clamping flap up; to release, press it down.
Saw blade replacement, Fig. 19 Attention! Pull out the mains plug and wear protective gloves. Loosen the wing screw from the suction hood (20) and remove it.
Fig. 20 Loosen the 4 Phillips screws from the table inlay (19) and remove it.
Fig.21 Set the saw blade all the way up and loosen the screw with the saw blade key. Attention! Left-handed thread
Fig. 22 Remove the saw blade flange (31) and then the saw blade (32).
Now change the saw blade.
When mounting the saw blade flange, pay attention to the recess.
After changing the saw blade, check the riving knife setting and refit the table inlay (19) and suction hood (20).
8. Transport
The machine may only be transported with a suitable lifting device (crane or forklift). The attachment point for the rope (crane) is located on the upper belt wheel housing. Do not lift the machine by the saw table.
By lifting at the front of the machine, it can be easily relocated in the workshop area to suit the space requirements.
9. Working instructions
After every new setting, we recommend performing a test cut, in order to check the dimensional settings. After switching on the saw, wait until the saw blade has reached its max. speed before making the cut.
Secure long workpieces against tipping at the end of the cutting process (e.g. with roller stand, etc.). Be careful when cutting in.
Only operate the device with an extraction system. Check and clean the suction channels at regular intervals.
Make sure that a suitable saw blade for the material to be cut is selected.
Connect a dust collecting device to the electric tool when sawing wood.
Do not use saw blades made of high-speed alloy steel (HSS steel).
Use a push stick or the handle with wooden push block in order to guide the workpiece safely past the saw blade. Always keep the push stick or wooden push block on the electric tool when not in use.
Inclined adjustment of the saw blade
After loosening the two clamping screws, the saw blade is continuously adjustable from 90^ to 45^ (see scale).
- Check the setting with a test cut.
- Re-adjust the set adjusting if necessary.
Height adjustment of the saw blade
The saw blade is continuously adjustable from 0 to 83 mm cutting height.
For safe and tidy work, select a small saw blade projection to the workpiece.
Adjust the riving knife as shown in Fig. 22.
The riving knife is an important safety device, which guides the workpiece and prevents the kerf closing behind the saw blade and the workpiece rebounding. Pay attention to the thickness of the splitting wedge.
The riving knife must not be thinner than the body of the saw blade and not thicker than its kerf width.
Only saw blades with a diameter of 315mm and a thickness of 2.4mm (teeth 3.0mm / 3.2mm ) may be used.
Lower the cover hood onto the workpiece during every working operation. The cover hood must be horizontal above the saw blade with each working operation.
Longitudinal cuts
For parallel cuts, use the rip fence. Use the stop ruler with the high stop side (1) for cutting work over 120mm and with the low stop side (2) for cutting widths under 120mm . Guide the workpiece with the enclosed push stick.
Cross cuts
Use the sliding carriage for cross cuts and angled cuts.
Working on circular sawing machines
Cutting wider workpieces, Fig. 24
Width of the workpiece to be machined more than 120 mm Work process: Set the longitudinal stop to suit the intended workpiece width. Ensure that you have a safe hand rest. If narrow workpieces are cut off by the cut, the feed is carried out in the tool area only with the right hand or with the aid of a push stick. If there is a risk of the workpiece jamming between the circular saw blade, riving knife and stop, the stop must be retracted to the centre of the saw blade or a short auxiliary fence must be used. In the pictures, the upper suction hood was only indicated, or in individual cases omitted, in order to show the work process or device more clearly.
The upper suction hood is required for all operations shown.
Cutting narrower workpieces, Fig. 25
Longitudinal cuts of workpieces with a width of less than 120mm must always be made with the aid of a push stick.
Push stick is included in the scope of delivery. Replace a worn or damaged push stick immediately.
- Set the parallel stop to suit the intended workpiece width.
- Push the workpiece forward with both hands, and be sure to use a push stick as a pushing aid in the area of the saw blade.
Always push the workpiece through to the end of the riving knife.
Attention! For short workpieces, use the push stick as soon as you start cutting.
Cutting edges and strips, Fig. 26
Work process: Mount the longitudinal stop with a low contact surface or use an auxiliary fence. Push the workpiece forward with the push stick until the end of the workpiece is in the area of the riving knife. Secure long workpieces against tipping at the end of the cutting process with a table extension.
Carrying out cross cuts, Fig. 27
Work process: Adjust the deflector strip such that pieces cut off the workpiece cannot come into contact with the rising part of the saw blade. Feed workpieces only by means of transverse stop or transverse slide.
Do not remove waste pieces from the area of the workpiece with your hands.
10. Maintenance
Warning! Pull out the mains plug before carrying out any setting, servicing or repair work!
General maintenance tasks
- Keep protective devices, air vents and the engine housing as free of dust and dirt as possible. Rub the device clean with a clean cloth or blow it off with compressed air at low pressure.
- We recommend that you clean the device directly after every use.
- Clean the device at regular intervals using a damp cloth and a little soft soap. Do not use any cleaning products or solvents; they could attack the plastic parts of the device. Make sure that no water can penetrate the device interior.
- Oil the rotating parts once monthly to extend the life of the tool. Do not oil the motor.
Service information
With this product, it is necessary to note that the following parts are subject to natural or usage-related wear, or that the following parts are required as consumables. Wearing parts*: Carbon brush, saw blade, batteries, table inlays, push stick, push grip, V-belt
- may not be included in the scope of delivery!
Spare parts and accessories can be obtained from our Service Centre. To do this, scan the QR code on the front page.
11. Storage
Store the device and its accessories in a dark, dry and frost-free place that is inaccessible to children. The optimum storage temperature is between 5 and 30^ . Cover the power tool to protect it from dust or moisture. Store the operating manual with the power tool.
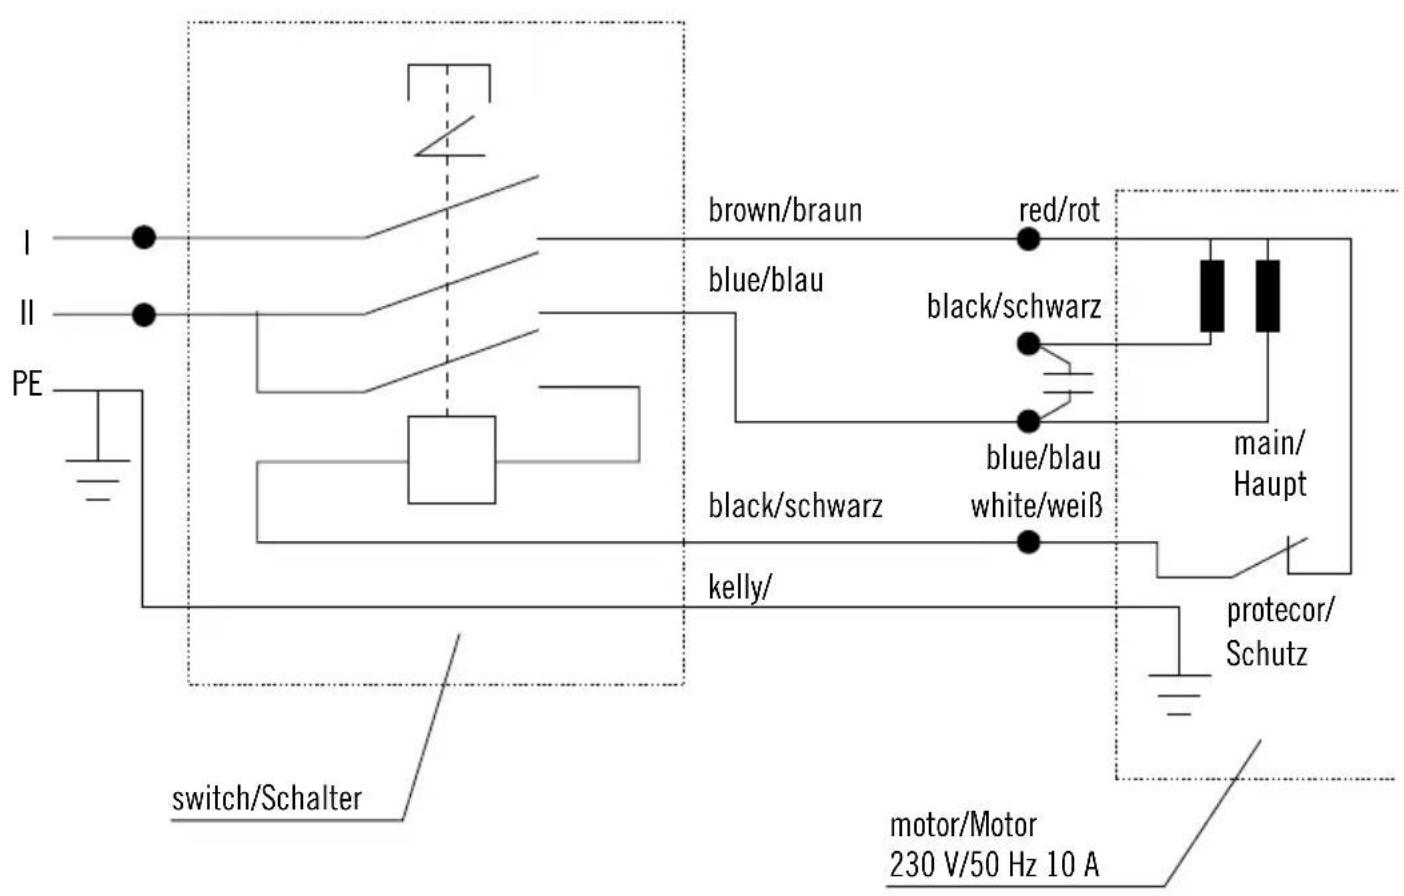
12. Electrical connection
The electrical motor installed is connected and ready for operation. The connection complies with the applicable VDE and DIN provisions. The customer's mains connection as well as the extension cable used must also comply with these regulations.
Important information
In the event of overloading, the motor will switch itself off. After a cool-down period (time varies) the motor can be switched back on again.
Damaged electrical connection cable
The insulation on electrical connection cables is often damaged.
This may have the following causes:
- Pressure points, where connection cables are passed through windows or doors.
- Kinks where the connection cable has been improperly fastened or routed.
- Places where the connection cables have been cut due to being driven over.
Insulation damage due to being ripped out of the wall outlet. - Cracks due to the insulation ageing.
Such damaged electrical connection cables must not be used and are life-threatening due to the insulation damage.
Check the electrical connection cables for damage regularly. Ensure that the connection cables are disconnected from electrical power when checking for damage.
Electrical connection cables must comply with the applicable VDE and DIN provisions. Only use connection cables with the designation H07RN-F.
The printing of the type designation on the connection cable is mandatory.
AC motor
- The mains voltage must be 230 Volts / 50 Hz.
- Extension cables up to 25m long must have a cross section of 1.5mm^2 , and over 25m long must have a cross section of 2.5mm^2 .
- The mains power connection is protected with a 16A slow-blow fuse.
3-phase motor
The mains voltage must be 400V / 50Hz
- Mains power connection and extension leads must be 5-core. 3P^N^SL .
- Extension cables must have a minimum cross section of 1.5mm^2
The mains power connection must be protected with a max. 16 A fuse.
- When connecting to the mains or in the event of the machine being moved to another location, check the turning direction of the saw blade. If necessary, the polarity must be changed with a CEE plug.
Connections and repair work on the electrical equipment may only be carried out by electricians.
Please provide the following information in the event of any enquiries:
Type of current for the motor
Machine data - type plate
- Motor data - type plate
13. Disposal and recycling
Notes for packaging


The packaging materials are recyclable. Please dispose of packaging in an environmentally friendly manner.
Notes on the electrical and electronic equipment act (ElektroG)
Waste electrical and electronic equipment does not belong in household waste, but must be collected and disposed of separately!
- Used batteries or rechargeable batteries that are not installed permanently in the old device must be removed non-destructively before disposal! Their disposal is regulated by the battery act.
- Owners or users of electrical and electronic devices are legally obliged to return them after use.
- The end user is responsible for deleting their personal data from the old device being disposed of!
- The symbol of the crossed-out dustbin means that waste electrical and electronic equipment must not be disposed of with household waste.
-
Waste electrical and electronic equipment can be handed in free of charge at the following places:
-
Public disposal or collection points (e.g. municipal works yards).
-
Points of sale of electrical appliances (stationary and online), provided that dealers are obliged to take them back or offer to do so voluntarily.
-
Up to three waste electrical devices per type of device, with an edge length of no more than 25 centimetres, can be returned free of charge to the manufacturer without prior purchase of a new device from the manufacturer or taken to another authorised collection point in your vicinity.
Further supplementary take-back conditions of the manufacturers and distributors can be obtained from the respective customer service.
- If the manufacturer delivers a new electrical device to a private household, the manufacturer can arrange for the free collection of the old electrical device upon request from the end user. Please contact the manufacturer's customer service for this.
These statements only apply to devices installed and sold in the countries of the European Union and which are subject to the European Directive 2012/19/EU. In countries outside the European Union, different regulations may apply to the disposal of waste electrical and electronic equipment.
14. Troubleshooting
| Fault Possible cause Remedy | ||
| Saw blade is loose after the motor is switched off | Fixing nut not tight enough Tighten fastening | nut, right-hand thread |
| Engine does not start Mains | fuse blown Check mains fuse | |
| Extension lead defective Replace the extension lead | ||
| Connection to the engine or switch not OK | Have this checked by an electrician | |
| Engine or switch faulty Have this checked by an electrician | ||
| Incorrect motor rotation direction | Capacitor defective Have this checked by an electrician | |
| Incorrect connection Have an electrician transpose the wall socket poles | ||
| Motor not supplying power, fuse tripping | Cross section of the extension cable insufficient | see Electrical connection |
| Overload due to blunt saw blade Replacing | the saw blade | |
| Burnt areas on the cutting surface | Blunt saw blade Sharpen, replace saw blade | |
| Incorrect saw blade Replace saw blade | ||
Günzburger Straße 69
D-89335 Ichenhausen
Cher client,
Günzburger Straße 69
D-89335 Ichenhausen
Geachte klant,
Günzburger Straße 69
Günzburger Straße 69
D-89335 Ichenhausen
Vázéný zákazniku,
Günzburger Straße 69
D-89335 Ichenhausen
Vázéný zákaznik,
Günzburger Straße 69
D-89335 Ichenhausen
Kedves Üglyfelünk!
Günzburger Straße 69
D-89335 Ichenhausen
Szanowny Kliencie,
Günzburger Straße 69
D-89335 Ichenhausen
Postovani kupci,
želimo vam mnogo zadovoljstva i uspjeha pri radu s novim urejadem.
Napomena:
Prema vazećem njemačkom Zakun o odgovornosti za proizvode, proizvodac ovog uredaja ne odgovara za stete koje nastanu na ovom uredaju ili koje ovaj uredaj uzrokuje u slućaju:
- nestručne obrade
- nepridržavanja prirucnika za uporabu
- popravaka koje obavlaju neovlăsteni strucnjaci,
- montaže i zamjene neoriginalnih rezervnih rijelova,
- nenamjenske uporabe
- kvarova elektricnog sustava zbog nepridržavanja propisa i odredaba o elektricnoj energiji VDE 0100, DIN 57113 / VDE0113.
Vodite računa o sljedecem:
Prijne montaze i stavljanja u pogon pročitajte cjelokupan tekst priručnika za uporabu.
Ovaj prisučnik za uporabu pomociće vam da upoznate uredaj i rabite ga na propisan način.
Priručnik za uporabu sadržava važne napomene za siguran, ispravan i učinkovit rad s uredajem te za izbegravanje opasnosti, smanjivanje troškova popravka i prekida rada te povećavanje pouzdanosti i vijeka trajanja uredaja.
Osim sigurnosnih propisa iz ovog prisučnika za uporabu svakako se pridržavajte i nacionalnih propisa koji se odnose na rad ovog ureda.
Cuvajte priručnik za uporabu u blizini uredaja, zasti-cenog od prljavstine i vlage u plasticnoj vrecici. Prije početka rada svi rukovatelji moraju procitati i pozorno se pridžavati ovog priručnika.
Na uredaju smiju raditi samo osobe koje su poducene u uporabi uredaja i upucene u opasnosti koje su povezane s njegovom uporabom. Strojem smiju rukovati samo osobe odgovarajuce minimalne dobi.
Osim sigurnosnih napomena sadrzanih u ovom prisucniku za uporabu i posebnih nacionalnih propisa valja se pridrzavati i opceprihvacenih tehnickih pravila za rad konstrukcijski identiñn haprava.
Ne preuzimamo odgovornost za nezgode ili stete koje nastanu zbog nepridržavanja ovog prisucnika i sigur-nosnih napomena.
2. Opis uredaja (sl. A)
- Glavna sklopka
- Uzdužni grančnik
- List pile
- Šitnik
- Usisno crijevo
- Rastavni klin
- Stolni umetak
- Prosirenje stola
8.1 Kligni stol - Vozna naprava
- Usisni nastavak
- Transportna rucka
- Regulator visine
3. Opseg isporuke
Stolna kružna pila TS310
Günzburger Straße 69
D-89335 Ichenhausen
Spostovani kupec,
želimo vam veliko veselja in uspeha pri delu z vašo novo napravo.
Napotek:
Günzburger Straße 69
D-89335 Ichenhausen
Austatud klien!
Günzburger Straße 69
D-89335 Ichenhausen
Gerbiamas klien,
Günzburger Straße 69
D-89335 Ichenhausen, Vacija
Godatais client!
Velam priekun sekmes, stradajot ar so jauno ierfci.
Norāde:
Sis icerces ražotajs saskaar spekeso likumu par ražotaja atbildibu par ražojumu kvaliti nav atbildigs par zaudejumiem, kas rodas sai icerei vai sis icerices del saistiba ar:
- nelietpratigu apkalpošanu,
- lietosanas instrukcijas neieverosanu,
treso personu, nepilvarotu specialistu veiktiem labosanas darbiem,
neoriginalorezervesdau montazu un nomainu, - noteikumiem neatabilstošu lietosanu,
- elektrioiekartasatteici,neieverojot elektribas noteikumus un VDE noteikumus 0100,DIN 57113/ VDE0113.
leverojiet!
Pirms montazas un lietoanas saksanas izlaset visu lietoanas instrukcjjas tekstu.
Günzburger Straße 69
D-89335 Ichenhausen
Bästa kund!
Günzburger Straße 69
D-89335 Ichenhausen
Arvoisa asiakas,
Günzburger Straße 69
D-89335 Ichenhausen, Tyskland
Kaere kunde,
Günzburger Straße 69
D-89335 Ichenhausen
Kjare kunde,
15 He octabraye noctabeHn KIOUOBe u Hctpy-MENTN
-Преди ВКИОВане npOBeРЯВaTe ДАЛ NКИчOBete И ИСТPyМENTITE 3a HAcTpoIka ca OT-CTpaHEn.
16 1368BaTe HeBOJHo C7apTnpaHe
- YBepaBeTeCe, Ye npEeBKnIOuBaTeJIe T e N3KIOUeH npn BkapBaHe Ha uenceJa B KOHTaTa.
17 N3noJ3BaIte yIbJIxKITeIeH Ka6e 3a yNoTpe6a Ha OTKpNUTo
HaOTKpIto n3NoJ3BaIte cMo dOnyctmM 3a Toba n CbOTBeTHO o6o3HaueH ydbJxNtHn Ka6eJI.
-ИЗнлзВайтмakapa c ka6eJcamo Bpa3MoTahO CBCTOЯHne.
18 BnHaH 6bTe 6dTeHN. △BnMaBaIte 3a ToBa, KaKTo npaBnte. NdoXoKaIte pa3ymHo KbM pa6OtaTa. He n3non3BaIte eNeKtpnueckn HnCTpyMeHT, KOrATo He cTe KOHcHTpnpaHn.
19 PpOBePbAaTe eEnKtpnueckn HnCtpyMeHT 3a eBeHtyaJIHn NOBpeDi
-Прети сдпьа ултpeba ha eilekpneckma INCTpymEnT pr6Ba BHMATEHNO da ce npobepraBa n3prnHTo n npabUNHO yHKUOHNpaHe Ha 3auNTHnTe yctpoNCTBa nHn Ha neko nobpeDeHnTe Yactn.
-Поберявate Далдвижшte ceЧа tinФункюнратИзрднои He 3aЖдТ,плднЯнma NOВpeDEHnЧа tin. BCuKn Chactn Tpr6BaДа ca MOHTnpaHn npabunHO n Da OTROBaprT haBCuKn YcNoBnA, 3a da CE rapaHTnpa IN3pHaTa pa6ToHa eJNEKTPNueckn INHCTpymEnT.
-ПОДВИЖНЯТnpeДиаЗЕнkanak He 6иBa da ce 3akpenBa B OTBopeHo CBCTOЯHne.
-Поврени 3аинтун устюпctва иauthи Тяб-Вада bдат ремонтupaани плноимен CB-rласно n3nCKBaHЯТа OT npn3HaT cneциAnuN3i-paH cepBn3,ocBeH ako He e nocoуHo dpyroВpbKOBOIDTBOTO 3a ynotpe6a.
-ПовренипевкювателТрабba da ce поМенгот ot cepBn3 3a Тхнческо obсnyЖBaHe.
-He n3noJ3BaIte DeΦeKTHn IIN NOBpeHn CBbp3BaU npOBODHn.
-He n3noJ3BaIte eIeKtpnueckn HNCTpyMeHTn,
yHTo npeBKnIOuBaTeJI He MoKe Da Ce BKnIOUBA
HIN N3KNIOUBA.
20 BHIMAHHE!
- Pn HAKNoHeHcKoCeHn pa3pe3n ce HaNara Oco6eHO BHHMaHHe.
21 BHIMAHHE!
-ИЗнолзВаHETo HaДpyг Pa6OTHn INHCTpyMeH Tn I npHaIeXHoCTn MoKe Da IpeIcTAbJIba onaCHOCT OT HapaHЯBaHe 3a Bac.
22 Bb3naraTe peMOHTa Ha Baunna eNEKtpueeKn HhctpyMeHt Ha eNEKtpoTexHnK
-To3n eNeKtpnueckn HNCTpyMeHT OTROBapr Ha npINOxIMnte Hopm 3a 6e3oNaCHOCT. PemOHn MORAT Da Ce N3BbPwBaT cAmO OT eNeKtpOTexHNK pR N3NoJ3BaHe Ha opRHaJIHn pe3epBHN qACTN; B IpOTnBEH CnyaH MoRt Da Bb3HnKHAT 3IonoJyKn 3a Notpe6nten.
23 He n3noJI3BaIte Ka6eJa 3a uei, 3a KOnTo ToJ He e npEHa3HaueH.
- He n3noJ3BaIte Ka6eJa, 3a Ja n3dIbPnBaTe UenCeJa OT KOHTa. Na3eTe Ka6eJa OT ropeu HHa, MaCNo N OCTpN p6OBe.
DonbHnTeHNyka3AHN 3a6e3oNaCHocT PpeIa3Hm MepKn 3a 6e3oNaCHocT
-Прдунрждени! He n3non3BaIte nobpeDeHn, HanykaHn nnn DeΦopMnpaHn peXeU nDnCKOBe.
-Подмени Te BnOxKata Ha Плota npи n3HocBaHe.
-ИЗползваite carmo npenopbuaHOn OT npon3BODNTeJIpekeuДИСКОBE, KONTO OTROBAPrT Ha EN 847-1.
A PpeDynpexdHne!PnCmHa Ha pexeunnaBnCK BnHMabaTe 3a TOBa,WIpOuHata Ha p3a-He Da He e NO-MaNka,a De6eHNHa Ta TAnotoHa DnCKa Da He e No-ronMa OT De6eHNHaTa Ha pa3deJnKa KInH!
-ObbphTe BHMaHHe Ha ToBa, Ye Tp86Ba da 6bde n36upan noxOra 3a pa3pa3BaHn MaTePnaI peKeu DNCK.
-Hocete noDxOJaJIuHa npEJa3Ha eknnpOBka.Toba BKnIOUBy:3aunTa 3a cnyXa 3a HamaJIbAHe Ha pNcKa OYBpeKdAHe Ha cNyXa,INxAteJIHa3aunTa 3a HamaJIBaHe Ha pNcKa OT BnUbaHe Ha onaceH npax.
-Hocete pBkauu np6bopabeHe cpekeun dNckoBe n rpyu maTepuaJIn.
-Binharu, KoraTo e yMeCTHO, HocTe peXeUHTe NCKOBe B KyTnI.
-Hocete 3aunTHn OuHa. Bb3HnKBaunTe no BpeMe Ha pa6ota nckpu nn n3nntaunTe ot ypeDa Tpec- KN, CTbprotHHn n npaxoBe MoraT da npnuHnT 3a- rhyba Ha 3peHneTo.
-При рязане на дбрвесина сбьрзваiteе щектучески ИНструмент Кьм прахоулавяю устpoистBO.Освобождаванeto на прах ce влияe, мени ду pyroTO, OT вда на образоваяни MaTeрпал, OT 3нанeнeto на поkanHOTO устpoистBO 3a сенипанe (улавяны ини n3пунсанe) и праинота настpoика на калци, оразжATEни ламарини и ВODач.
- He n3no3BaItepexeuIN DnCKOBeOT BnCOKoJIernpaHa 6bP3OpEkeuCA TOMHa (CTOMHa HSS).
-Binhar, Korato He ce n3noi3Ba, cbxpaHraBaiTe HCTpyMeHTa 3a 6yTaHe nn TpyuHcTo 3a 6yTaHe B HerOBnI DbpxaH np eNEKtpueckn HNCTpyMeHT.
PpBka npemOH
- PpeIN BCaKbN paobTu no HacTpoKa n noDpBka Ka n3IbPnBaTe MpeKOBn UenCen.
- Cb3daBaHTo Ha UyM Ce BInRe O T pa3NHyH PhaKToPn, KaTO HApnPmep XapaKTePncTKne Ha peXeUINdNCK, CbCToRHeTo Ha peXeUIN dNcN eJEnKTpn
YeCKnI INCTpyMeH. IIO Bb3MOxHOCT N3noJI3BaItepeKeUeN DnCKOBe, KOINTO Ca KOHCTpyuPaHn 3a HaMaJIraBaHe Ha Cb3DaBaHETo Ha Wym, NOdNbPkaItepeDobHO eNEKTPnuCeckn IINCTpyMeHT n pa6OTnITe INCTpyMeHTn I npn Hxkda rnpemOHtnpaITe, 3a daHaMaJInte Wyma.
-CbO6aBaIte Ha OTROBOPHO 3a 6e30nacHocTtA Iuue 3a DepeKtn No eNeKtpnueckn INHCTpyMeHT, PpeDna3HnTe yCTpoNCTBa nIN pa6oTHn INHCTpy-MENT BeDHara, UOM TAKNBA 6bDat OTkPNTn.
Be3oNa cha pa6ota
MoHTnpaTe KanaKa (20) KbMa pa3dEJIaNnKnnH (18) C NOMOuTa Ha BnHTa C KpbIgna rnaBa M 6 x 25, Wai-6ata 6 n KpUHaTa raKa M 6.
Фиг.15
CbpxTe Mapkya 3a n3cMyKBaHe (21) c npaxoynaBraun Kanak (20) n HkpaHnka 3a npaxoynabRe.
Cbbp3BaHe Ha cmykaTeJHnTa ype6a,Φnr.15 △PPEyIpyKJEHNE
OnachocT OHT HapaHbAHe Ha OuTe NopaIN BbPTaUN ce HaOKOJCTpyKKn
HocTe 3aunTHn OuHa.
- EknpnoatnpaTe ypeDa cAmO c noDxOJaHa ypeI6a 3a n3cMykBaHe Ha cTpyKn. He n3non3BaTe oBnKHOBeHa npaxocMykaKa.
- Cbpxke Te noDxOJa 3a ype6a 3a n3cMyKBaHe Ha cTpykkn (He e BkNoyeHa B o6ema Ha doCTaBKaTa) KbM HApaiHnka 3a npaxoynaBne.
CmykateJIHATA ype6Ba Tpr6Ba Da OTROBAPn Ha cneiHnTe n3nCKBaHn:
-Диаметбр Haнakраинka 3a 3acMykBaHe:0100mm
Heo6xoDm Bb3dyuWeH De6HT: MmH. 460 m³/h
-Пониженинога:
Мин. 530 Pa.
-ПpenopbчnteJIHa cKOpocT Ha Brtbpa:MnH.20 m/s
BHIMAHNE
PpOBepraBaTe n nouHCTbaIte peoBHO KaHaJIte 3a H3CMyKBAHe.
Φur.16/16.1
3aKpeTe cAmocpe3HaTa C-kyKa c 2 7aM6n 6 n 2 raKn M6 ot dAChata cTpAna Ha Kpaka. Bbpxy Hero ca Okayehn KInOua 3a pexeunr Dnck NnHcTpymenta 3a 6ytane.
Ibete TpaHcnpTHn DpbXkN Ca MOHTnpaHn B npedHaTa
yact Ha TpnoHa, Ha KpaKaTa OTnRABO N OTnRACHO C 4 BVNTa
C wectocTeHHa mBa M 6 x 16, 4 wai6n 6, 4 raikn M 6.
MoHTax Ha HauJIbXHHa orpaHnHTeI, Fnr. 17 / 17.1
HaTnchete JarepHIne eJemeHTN Bbpxy 3aTgraaata nlocka. MoTnpaIte 3aTgaucaT a NIOUka KbM NIOTa c NOMOuTa Ha 2 BnHTa C uINHdpuHa rnaBa M6 x 30, 2 BeTpnoo6pa3HN IaBn A 6.4 n 2 IecTOeHHn raKn.
MOHTAX Ha onophaTa peIca, r 18
MOnTnpaIte MeXdINHHaTa PJIaHka KbM HaJIbXHHa orpaHHTeI, KATO n3NoJ3BaTe 2 BnHTa C pIoCKa rJaBa M6 x 50, 2 wai6n A 6 n 2 kpiJUaTH raIKn.
Плб3HeTe onopHaTa peIca Bbpxy МждИнHaТа Пla-н haЯ 3aTeHete C KpUHaTte raIkn.
JIereHda:
1 = BncoKa OOnOpHa NOBbpxHOCT
2 = Иска onopна noьрховсT
3a da 3aterHete, n3dbpnaite Harope 3atraata kIana, a 3a da y oCBO6OHTe, HATNCHEr HaDOny.
CmHa Ha pexeunu Dnck,Φnr.19
BnmaHne! 3dpbnaTe qencena n Hocete npedna3- H npKaBn.
Pa3xna6te KpnUyataTn BnHT Ha npaxoynaBuaa Ka-nak (20) n ro cbanete.
Φnr.20
Pa3xna6eTe 4-Te BnHTa c Kpbctoo6pa3eH uNiu,OT BNOKKaTa Ha nnota (19) n r cbanete.
Фиг.21
IpeMeCTe peXeUINa DnCK DOKpaHarope n pa3Xna6BeTe BnHTa C NOMOuTa Ha KInOua 3a peXeUINaDnCK. BnMaHneI PnBa pe36a
Φnr.22
CbaTe ΦlaHeUa Ha pexeunr nnck (31) n pexeunr nnck (32).
CmeHetepeKeuIaNck.
OsbpheTe BnMaHne Ha BnBb6HaTHnHata, KOraTo MOHTnpate cnaHeca Ha pexKeunr dNck.
Cnei cmaHa hapekeuia nck npoBepe HacptpoKaTa Ha pa3deIaIIaIaIaIaIaIaIaIaIaIaIaIaIaIaIaIaIaIaIaIaIaIaIaIaIaIaIaIaIaIaIaIaIaIaIaIaIaIaIaIaIaIaIaIaIaIaIaIaIaIaIaIIota (19) II npaxoynaBraJn Kaapan (20).
8. TpaHcnpTnpaHe
MaunHata MoKe Da Ce TpaHCnOpTnpa camo C noDxOJaIIO NOEMHO npCNCOC6JIeHne (KpaH nIIN MOTOKap).
ToKaTa 3a CbP3BaHe Ha Ka6eNa (KpaHa) ce HAmnpa Ha RopHn KOpNc Ha KOneNoTo Ha JeHTaT.
Hukora He noBuaTe MaunHaTa 3a nnota 3a pra3aHe.
Upe3 NOBnirae Ha npedHaTa Yact Ha MaunHaTa TMOKe JecHO da ce npemecTBA B pa6OtnHnCata, 3a Da OTRObApHa HnNCKBaHNrTa 3a IpocTpaHCTBO.
9. Yukazаня 3a pa6oTa
CneB BcKa HOBa HAcTpoKa npenOpbYBaMe npo6eH pa3pe3, 3a Da npOBepTe HAcTpoEHte pa3Mepn.
CneB KInHouBaHe Ha UnpKyIpa N3aKaJTe, DOKaTo pexeunrT DnCK DOCTnHE CBOITe MaKcImaJIH No6OpOTn, Ppei Da n3BbPwITE pa3pe3a.
OcnrypraBaiTe DbIgN DeTaIIN CpeuY pneo6pbuaHe B Kpa H a P3aHTo (HaNP. poKOBn cToKn n dp.). BHMaHHe npi noDpr3BaHe.
I3noJ3BaIte ypeJa cAmO c npaxoyJABaHe. IpOBePraBaiTe nNoHCTBaIte peDobHO KaHaJIte 3a I3-CMyKBAHe.
O6bphETe BnHMaHHe Ha TOBa, Ye TpI6Ba Ia 6bIe n3bIpaH noXoDyU, 3a pa3pr3BaHm MaTePmaJ peKeu, NcK.
PpnaHa Ha dbpBecnHa Cbpb3BaTe eJeKtpueckn INHCTpyMeHT KbM npaxoyJabraUO yCTpoNCTBO.
He n3no3BaItepexeuIN DnCKOBeOT BucOKoJIerIupaHa 6b3OpExeUca CTOMaHa (CTOMaHa HSS).
N3noJI3BaIte INHCTpymeHTa 3a 6yTahe nn DpbXkata c noBnKHO bPBO, 3a da noDaBate DetaiNa 6e30-nacHO KbM pexeunia DNCK. BnHar, koraTo He ce n3-ON3Ba, CbXpaHraBaIte INHCTpymeHTa 3a 6yTahe nn TpyHcTe 3a 6yTahe npn eNeKTPnueckna INHCTpymeHT.
CkocBaHeHapeXeUyIuCK
Cnepa3xa6BaHe Ha Dbata 3ateraTeHH BnHTapeXeunrT NCK MoKe Da ce perynnpa 6e3teenHHOOT 90^ do 45^ (BnKTe cKaNata).
- Поберете Настpoикata с поцта на побен pa3pe3.
Ako e Heo6xOIMo, perynpaTe OTHOB perynpaunTe BNHTObE.
PerynnpaHe Ha BucOuHaTa Ha peKeunIaNCK
Pexeunr dNcK ce perynipa 6e3cteneHHO ot 0 do 83 mm BncouHa Ha p3aHe.
3a 6e3onacn H uHCTa pa6oTa n3bpaIte MaNka n3daHeHa Yact Ha pexeun IuCK OT o6pa6oTbaHna detaiJ.
HacptpoTe pa3dJIeJnIg KInH, KaKTo e Noka3aHo Ha n3o6paXKeHne 22.
Pa3deneiaynt KInH e BaxHo 3aunTHO yCTpoiCTBO, KOeTo HnnpabnBa o6pa6oTbaHnI n npedotbpaTBA 3atBapnHTo Ha npope3Ha T cyra cnepekeu N ICK N OTKaTa Ha dTeaHa. ObpHete BHMaHHe Ha De6eHHaTHa pa3deneiuaN Dnck.
Pa3dJIaIaIaI KINH He Tp8Ba Da e no-TbHbK OT TaIIO To Ha pexeunu Dnck n He Tp8Ba Da e no-De6en OT UpiHaT aHa HerOBaTa npope3Ha cyra.
Morat da ce n3no3BaT caMo peXeUdNCKOBc cDnameTpB 315 mm nDe6eInHa 2,4 mm (3b6n 3,0 mm / 3,2 mm).
CnyckaTe Kanaka Bbpxy 6pa6oTbaHnA DetaHnNo BpeMe Ha BcKa Oepaun. IIO BpeMe Ha BcKa Oepaun KaNAKbT Tp6Ba Da 6bJe pa3noJoxeH xOpH3OHTaHNO HAD peXeUINu DnCK
HaJIbXHn pa3pe3n
3a ycnopeDHnTe pa3pe3n n3noJ3BaIte HaadJIbK-Hnra orpaHnHTe. 3a p3aHe Ha DetaIIc IuPnHa Hau 120 mm n3noJ3BaIte orpaHnHTeJIHnRA JInHeaI C BnCokata orpaHnHTeJIHa cTpHa (1), a 3a p3a-He Ha DetaIIc IuPnHa noI 120 mm n3noJ3BaIte Hnckata orpaHnHTeJIHa cTpHa (2). HacouBaIte 6pb6oTBaHnra Detai n c NOMOuTa Ha npINOKeHn RAHCTpyMeNT 3a 6yTaHe.
HanpeHH pa3pe3n
N3noJ3BaIte nIb3raaTa ce weHa 3a HanpeHn IbrnoB pa3pe3n.
Pa6oTa CzIpKyIpyrH MaunHH
Praane Ha shnpokn Detaun, Fnr. 24
UnpouHa Ha o6pa6oTbHnA DetaI, no-roJMa ot 120 mm
Pa6oTHa onepauHn: HactpoTe HaJbXHHnO rpaHnHHTe cnopeI npedBndeHaTa shnpouHa Ha daTaNla.
BnHmBaIte 3a cnrypHa onopa Ha pbIeTe. Ako qpe3 pa3pe3a ce OTdEnr Tecn DeTaN, To B 3oHaTa Ha INCTpyMeNTA NODaBaHETo Ce N3BbPbWA camO C JAcHata PbKa NIN C NOMOHTA Ha INCTpyMeNT 3a 6yTaHe
Ako cbuectByBa onachocT deTaIbT da ce 3aknHmexdy pekeunia dNCK, pa3deJnKnn H onopata,TO onopata Tp6Ba da ce n3TeJn Ha3ad Do cpea-ta Ha pekeunia dNCK nn Da ce n3NoJ3Ba no-Kbca nomouna onopa. Ha n3o6paKeHHa ropHnr npa
Xoynabayu Kanak e cAmO OT6eJ3aH IIN B OTdENH cnUyau npOnyChAT, cAmO 3a da ce nokaxe No-rcHO pa60THata onepaun Hn pncnoc6neHneTo.
Pn Bcnyk noka3aHn pa60THn oepauu ropHnT npaxoynaBau, kanak e Heo6xoDm.
Prahe Ha TeCHn DeTaHn,Φr.25
HaIbXn pa3pe3n Ha DetaJIn C WnpOuHa noD 120 mm Tp86Ba HnpeMeHNO da ce n3BbPwBAT c NoMoUta Ha INCTpymEnT 3a 6yTaHe.
HCTpyMeHTbT 3a 6yTaHe He e BkIIOueH B O6ema Ha DoctabKaTa. He3a6abHo NODMeHnTe H3HOceH, Cb-OTB. NOBpeDeH INCTpyMeHT 3a 6yTaHe.
- HactpoTe ycnopeHnI orpaHnUHTeI cnopeI npdeBnDeHaTa WnpOuHa Ha DetaJa.
- BytaIte DeTaNHaHpeDc DBeTe pBue, B 3OHaTa Ha peKeunn DaNCK HEnPemEHNO 3N0J3BaInTe NHCtpyMeHT 3a 6bTaHe KaTO NOMOuHO CpeDCTBO 3a 6bTaHe.
Bunarnn36yTbaIte DeTaIIa do KpaHa pa3dienya
BHHMaHHe! Pn KbcN DeTaN INHCTpyMeHTbT 3a 6yTaHe Tp6Ba Da ce n3noJ3Ba OSe OT HaHaNoTo Ha pa3pe3a.
Prahe Ha p60Be n JeTbn, 26
Pa60Ha onepaun: MoHTpaIte HaJbXHnI orpaHnHTe nNo-HnCKata OOnOPHa NOBbpxHOCT nNn N3- no3BaIte NOMOeH orpaHnHTe. ByTaIe DeTaNc HnCTpymeHTa 3a 6yTaHe, DOKaTO KpaTn Ha DeTaNaCTnHE B 3oHATA Ha pa3dEJIaNkInn. OcnpyraTe DblnDetaNN Cpeu npoe6pbUaHe B KpaH a onepaunTA NO pR3aHTo Upe3 yDbJKNTe H nIOTA.
N3BbpuBaHe Ha HanpeuHa pa3pe3n, r 27
Pa60tha onepaun: HactpoTe OTKNOHbAuaTa nHaHKa Taka, ye OTPraHnte Yactn OT DeTaNda He MOrat Da DOKOCBat N3DInraUaTa ce Yact Ha peKeuN daNCK. POnabaTe DetaiNte camo NocpeDCTBOM Hanpeuen OrpaHnUHTe INn HAnpeuen 36yTBa.
He oTctpaHbAte c pIe OTnadHyHnte napyeta ot 3oHaTa Ha deTaNJa.
10. Nopdpbkka
PpeDynpexKeHne! PpeN BCaKaBn HacTpoKn, noDdpBkka nJIn pemOH n3dbpnaTe ueceJa!
06uMepK3a noDpBxxka
- PoiDbpkaIte npedna3HnTe npncnoc6neHn, BeHTnlaucnoHHnTe npouenu KOpnyca Ha DBurataeJI Bb3MOxHO Hau-NCtN OT npax N 3aMbpcaBaHn.
I36bpcbaTe ypea c Yncta Kbpna nIro npOdyBaTe CbC BcCTeH B3dYx NOHNCKo HaJraHe.
- PpenopbUbaMe da noHCTBaTe ypeDa BeHaRa cnEi BcraKa ynoTpe6a.
-Почнствашие урEDA peIDOВHO C Bлжна Кьрп Amalko Mek canyH. He n3noJ3BaIte noUcSTBaUnpenapatn nI npa3TbOpHTeN; Te 6nxA moRnД pa3ЯдТ пAACmOBITE qactn Ha ypeDA. BhIMaBaIte 3a TOBa, DA He MOKe dA nonaDHe BODa BB BbTpewHOCCTTa Ha ypeDA.
3a ydbjxbahe Ha XHBota Ha HNCTpyMeHTa, BeHbX MeceHo Cma3BaIte BbpTtCe ce Yactn. He Cma3BaIte DBratena.
CepBn3Ha HhOpMaun
Tp6Ba Da ce nMa npEbnI, ye CneHnTe qactn Ha To3n IpOdyKT ca 06eKTHa H3HocBaHe nopadn H3HocBaHe nnHa eCTeCTBeHO n3HocBaHe, pecn. CneHnTe qactn Ca Heo6xOdIMN KaTO KOHCymATNB.
Бьрзнзнocваши ceЧа'tn*:Вьгелрогна четka,pe-жднck,бatepin,Вложkn Ha пnota,Инстумент 3a 6утанe,пьлзяшдрьхka,Клнови徳пemьk
- He ca BKNIOUeH 3aIbJNKeTEnHO B O6ema Ha DocTabkata!
Pe3epBnIte qactn n akcecoapnte ce npednarat B haunca cepbn3en cHTbp. 3a ceta ckaHnpaTe QR Koda Ha 3aflnaBHata cTpaHnca.
11. CbXpaHeHne
CbXpaHЯBaIte ypeDa n HerOBnTe npHaJnHexHOCTn Ha TbMHO, cyxo n 3aunTeHO OT 3ampb3BaHe, KaKTo n HeIOCTbNHO 3a Deca MrcTo. ONTmAmHaTa TempePa-typa Ha cbXpaHene mexky 5 n 30^
IokpBaTe eNeKtpueeckn HhCTpyMeHT, 3a Da ro npedna3nte O Tnpax nBn Bnara.
CbxaHraBaTe pkoBocTBoTo 3a ynoTppe6a npneKtpueeckn uHcTpymeHT.
12. EneKtpnuecko CBbp3BaHe
MOnTnpaHnT eNeKtpoBnIraTeJe Cbbp3aH B rOtOB-Hoc 3a ekCnloatauHa. Cbbp3BaHTo OTROBapHa npINOxIMTe pa3nope6n Ha VDE n DIN. MpeXOBOTcBbp3BaHe OT cTpHa Ha KIneHTa, KaKTo n N3No13-BaHnT yDbJnxKaBaA u Ka6eI, Tpr6Ba Da OTROBaprHa Te3n PpeDnncAHn.
BaxHn yka3aHn
Pn npTeOBaHe Ha dBVaTeJra, ToI ce n3KJIIOUBa aBTOMATNUHO. CneBbpeMaOxnaXdaHe (pa3NJHNO BpeMe), DBVaTeJrT MoKe Da Ce BKNIQUH OTHOBO.
Pobpehen Cbbp3Baau eJeKtpnueckn npoBODHnK
No cBbP3BaUnte eNeKtpnueeckn npoBOHnCn YecTo Bb3HKnBAT NOBpeDN B N3OJaTAt.
PnHHH 3a TOBa MoRat da 6bDaT:
ToUKN Ha npuTnCKaHe, KOrato Cbbp3BaunTe npoBODHnCn Ca npokapAH npe3 npoceHn Ha npo3OpUHn BpaTu.
TocknHa npertbahe npaHn HnpabnHIO 3akpenBaHe nI npokapBaHe Ha Cbbp3Baun npoBOHNK.
- MecTa Ha npep3BaHe nopadn npera3BaHe Ha Cbbp3Baunn npoBOdHnK.
-ПоврдьИЗолациЯтaNopaДиДьрnaHe OT cTeHnI KONTaKT.
-PykHaTHH nopadn cTapeeHe Ha n3Olaunra. TaKbA DepeKTHN Cbbp3Baun eJeKtpnueckn npoBODHn He 6nBa da ce n3NoJ3Bat n nopadn nobpe-deHaTa n3Olaunca onaChn 3a KVBota.
PeDobHO npOBepaIte 3a nobpeDi CBbp3BaIte eJIeKtpnueckn npOBODHn. BHMabaiTe 3a TOBa, npnpOBepkata CBbp3BaIyT npOBODHK da He e CBbp3aH KbM eJEnKTPnueckaT Mpeka.
Cbpb3BaUnte eJneKtpnueckn npoBOHnU Tp6Ba da OTROBAPrHa npINOxMHTe pa3npoe6n Ha VDE n DIN. N3no3BaTe cAmO CBpb3BaU npoBOHnUc o6o3NaueHnE H07RN-F.
Otneaytahe Ha TnOBOTO 6o3haeHne BbpxCy CBbp3BaunKa6eJ e 3aBnKteJHo npednncahne.
DBrataeHa npomeHnB TOK
MpekoBTo HnpeKeHne Tpa da e 230 Bonta/50 Hz.
- Pn DbJxHa Do 25 m ydJIkaBaunTe npoBOnHnCn Tp8Ba da ca c HanpeHo ceueHne ot 1,5 mm, Pn DblxHa Hd 25 m -nohe 2,5 mm 2.
- PnucbeHnHaHeTo KbM MpeKata ce ocHpyBa c 6aBHOeJCTBaU npedna3nten 16A.
DbrateJ3a Tpuzaeh ToK
- Мерековто нарекене Тразба дe 400 V/50 Hz.
MpeXOBOTcBb3BaHe uYdbNxkBaUHnT npoBOHNK Tp6Ba Da ca 5-KuHn.3P*N*SL. - YIbJIkaBaUHTe npOBoHnU Tp8Ba Da nMaT MnHmAMHOceHHe O1,5mm2.
-ПисбеДинЯBaHeToКБМ МржKaTa ce OсИгурЯBa c MaKсИмУm 16A.
- Ppi Cbbp3BaHe KbM MpeXaTa NnN npomraHa Ha mCTOTO Ha ynoTpe6a Tp8Ba Da 6bDe npOBepHa nocOKata Ha BbPTeHe N, ppi Huxda, da 6bDe cMeHEN UeKepa CEE.
Cbbp3BaHnI n peMOHTn no eNeKtpuYeCKoTo o6OpyBaHe MORaT Da Ce H3BbPWBat CAMO OT eNEKtpoTeXHnK.
Pn 3aHTBaHna, MoJn NocOuBaNte CJeHNHe DaHHN:
TIN TOK Ha DnBratena
-ДаннOTТиOBaTаТаБeлkaHaуpeda
-ДаHHN OT TINOBATA Ta6eJIka Ha DBIgATEJIa
13. ɪəxVBpJIneɪ peɪnKnɪpaɪne
Yka3aHn 3a onakOBkata


OnakobbHnTe MaTePnaJIMorat da ce peuKnipat. MoIa, n3XbPneTe onakOBkata no npnpoDcbo6paeh HaHH.
Yka3aHnna 3a 3aKoHa 3a eNeKtpnueckOTo n eNeKtponHTo o6OpyDbAhe (ElektroG)
CTapTo eIeKtpnuecko n eIeKtpoHNo 06OpyDbaHe He Tp86Ba Da ce N3XBbPnla 3aeHc 6ntOBnTe OTnaDbu, a Tp86Ba Da ce cb6npa n N3XBbPnla pa3dennHO!
CTapnte 6atepnn n akymynatopn, KOnto He ca HenoDbuxxHO MOHTnpaHn B CTapny ypei, Tpr6ba da 6bDat n3BaDeHn npde npedeBaHahe 6e3 Da ce pa3pyuwaBt! TaXHOTo n3XBpbPnHe e pernaMeHTnpaHo ot 3akoha 3a 6atepnte n akymynatopte.
CobCTBeHnUte,pecn.noJI3BaTeIeHa eJIeKtpnuecko n eJIeKtpoHNO6OpyDbaHe ca 3aKOHOBO 3a-DbJxKeHn Da rN BbPHaT CneI yNoTppe6a.
KpaHnT noTppe6nteI e OTROBOpEN 3a n3TpNBa-HeTO Ha NnHInTe My DaHHN OT CTapnYpeD, KOITOr Tp6Ba Da 6bDe n3XBbPneH!
CIMBOJbT Ha 3auepkhata KoFa Ha KOJIeJa O3Ha-yaBa,Ye OTnAdbuIte OT eJIeKTPnueckOTO n eJIeK-TPoHHOTO obOpyDbaHe He Tp6Ba Da ce N3XBpJrT 3aeHc C bntOBtE OTnAbu.
-
EneKtpnueckoto n eNeKtpoHhTo 06OpyDbHe MoKe da ce npedaba 6e3nnaTHO Ha CJeDHNTE MeCTa:
-
Ny6nHn Cb6npuTeHn nyHKToBe (Ha npimep DBOPOBE Ha o6uHcK crpaH).
-Mara3HH 3a npoda6ha eNeKtpOHn ypeu (fH3nueckn OHnaH), npu ycNoBne ye TbproBcHTe ca JIbXHH Da rN B3Emat o6paTHO Hnnpednarat TOBa B3emaHe o6pOBONHO.
-MoKTe Da npedaeTe Do Tprn CTapn eNeKtpn-ueckn ypeDa OT BCEKn TIN ypeD C MaKcImaHa dIbJxHnHa Ha pb6a OT 25 caHTmEtpa 6e3 da KynyBaTe HOB ypeD OT npOn3BoDnteTna, nn Da rN npedaeTe B Dpyr OToPun3upan cb6npaTeJeH nyKT BB BaShn paOH.
- 3a DoIbIHNITeJIHNTe YCIOBnI 3a BpbUaHe Ha npOn3BOJNTeNn I DaCTpN6yTopn Ce O6bpHeTe KbM CBoTBeTHNr CEHTbp 3a O6cnyKBaHe Ha KJIneHTn.
Ako HO BnT eNektpneckypeDce DoCTabr OTo pO- n3BOIDNTeHa YacTHO DOMaKInHCTBO, ToM MoKe Da opraHn3npa 6e3nPaTHo N3BO3BaHe Ha CTapnE neKtpneckn ypeD npn NOuCKBaHe ot KpaHnnoTpe6nte. 3a ce Ta ce CbPkeTe c OTdela 3a obcnykBaHe Ha KNHeHTn Ha POn3BOIDNTeJr.
ToBa ce OTHacr cAmo 3a ypeIte, KOnTO ce HcTaNipat n npOabat B Ebponecknca bIO3 n ca npedMeT ha ebponeckata DnpeKTHBa 2012/19/ EC.B CtpaHn N3BbN Ebponecknca bIO3 Morat da ce npiIarat pa3NIuHN pa3npope6n 3a n3XBpIHe Ha OTNaDbUInTe OT eNEKTPuecko n eNEKTPoHHO obOpyDbaHe.
14. OtrpaHbAhe Ha Heu3npaBHOCTn
| Hein3npabnoct Bby3moxha npuynna OtctpaHaBaHe | ||
| Рекешил.T дsc Ke pa3xla6ba сдд n3KlIOUBAHe Ha DvIrgateЯ | П装配ално Лесо 3aterната 3akpenbauca raia Ka | Затяганe Ha зakpenbaцata raia Ka c Дяснa pe36a |
| ДвигателТ He ce 3aDbVixBa | Повета Ha Мреков пedingител Пюв | ерete Мрекови пedingител |
| Дefekten удьлжавацп ровodник Смян | н.a Ha удьлжавацп ровodник | |
| ВрьзкITE КБМ Двигател Или певклIOчВateЯ He ca HapeД | Вьзларанe Ha поверka ot eilektrpoTeхнik | |
| Дefekten Двигатel Или певклIOчВateЯ | Вьзларанe Ha поверka ot eilektrpoTeхнik | |
| Гразиносяка Ha BByrTeHe Na Двигател | Дefekten kondeнзатор Бызлаганe Ha | праверka ot eilektrpoTeхнik |
| Heprabinno CBbpr3BaHe | Вьзложete Ha eilektrpoTexнikда oblbpne поярноctTa Ha CTeHHNЯ kONTAKT | |
| ДвигателТ Нама MoцhoCT, пedingителТ ce 3aDeiCTBa | СechениTo Ha уdьлжавацьп повodник He e доctaTbUHO | Вижte „Еlektripecko CBbpr3BaHe" |
| Петоваранe поади 3aTbPEN pexeuz dIck | Смянa Ha рекшядick | |
| HaropelNi Mehta no NobBypxHoCtTa Na pr3aHe | Затьпен рекш. дsc | Заточанe, смянa Ha рекшядick |
| HendoxoJaS pexeuz dIck | Пдмянa Ha рекшядick | |
Eynonrwosuolwv Tavw otn oukeun
Günzburger Straße 69
D-89335 Ichenhausen
Aciotipe TtAatn,
Oa euyoae va atolauoet n vea oac ouakeun kai va exete kaata tneleopata kata tn xpontn.
Yπóδειξη:
O kataaekuaotnc autn tsouakeunc dev eueuvetai ouuwa vteovxovta vopo nepi euhuvnc poiovtwyia nmuic, Tpuokalouvtai oe autn tn ouokeun n atto autn tn ouakeun otis egnc peittwoeic:
Günzburger Straße 69
D-89335 Ichenhausen
Stimate client,
Vä dorim sa avei multe satisfactii si mult succes in lucrul cu noul dumneavoastraparat.
Indicatie:
Günzburger Straße 69
D-89335 Ichenhausen
Postovani kupce,
Günzburger Straße 69
D-89335 Ichenhausen
ithalatci:
Ankara Civata Hirdavat Baglanti Elemanlari Ithalat Ihracat Sanayi ve Ticaret A.S.
Macun Mahallesi 250. Cadde No:26
Yenimahalle/Ankara/Turkiye
Sayin Mûsterimiz,
Isletime almadan once
EU Declaration of Conformity
| 2000/14/EG_2005/88/EG | |
| Noise: measured LVA = xx dB; guaranteed LVIA = xx dB | |
| Annex V | |
| Annex VI |
| X 2006/42/EG | |
| X | Annex IV Notified Body: TÜV P. Notified Body No.: Certificate No.: BM BM |
| inland LGA Products GmbH |
| 07 |
| 607276 0001 (230V) |
| 607278 0001 (400V) |
| 2016/1628/EU |
| Emission. No: |
Standard references:
EN IEC 55014-1:2021; EN IEC 55014-2:2021; EN IEC 61000-3-2:2019+A1; EN 61000-3-3:2013+A1+A2;
EN ISO 19085-9:2020; EN ISO 19085-1:2021; EN 60204-1:2018; EN ISO 12100:2010
This declaration of conformity is issued under the sole responsibility of the manufacturer.
The object of the declaration described above fulfils the regulations of the directive 2011/65/EU of the European Parliament and Council from 8th June 2011, on the restriction of the use of certain hazardous substances in electrical and electronic equipment.
Subject to change without notice
Documents registrar: Dawid Hudzik
Günzburgrster.69,D-89335 Ichenhausen
EU Declaration of Conformity
Standard references:
EN IEC 55014-1:2021; EN IEC 55014-2:2021; EN IEC 61000-3-2:2019+A1; EN 61000-3-3:2013+A1+A2
EN ISO 19085-9:2020; EN ISO 19085-1:2021; EN 60204-1:2018; EN ISO 12100:2010
This declaration of conformity is issued under the sole responsibility of the manufacturer.
The object of the declaration described above fulfils the regulations of the directive 2011/65/EU of the European Parliament and Council from 8th June 2011, on the restriction of the use of certain hazardous substances in electrical and electronic equipment.
Subject to change without notice
Documents registrar: Dawid Hudzik
Günzburgrster.69,D-89335 Ichenhausen
EU Declaration of Conformity
Standard references:
EN IEC 55014-1:2021; EN IEC 55014-2:2021; EN IEC 61000-3-2:2019+A1; EN 61000-3-3:2013+A1+A2;
EN ISO 19085-9:2020; EN ISO 19085-1:2021; EN 60204-1:2018; EN ISO 12100:2010
This declaration of conformity is issued under the sole responsibility of the manufacturer.
The object of the declaration described above fulfils the regulations of the directive 2011/65/EU of the European Parliament and Council from 8th June 2011, on the restriction of the use of certain hazardous substances in electrical and electronic equipment.
Subject to change without notice
Documents registrar: Dawid Hudzik Gunzburger Str. 69, D-89335 Ichenhausen
EU Declaration of Conformity
AB uygunluk beyani
CE
Scheppach GmbH, Günzburger Str. 69, D-89335 Ichenhausen
| DE | erklärt folgende Konformität gemäß EU-Richtlinien und Normen für den Antikel | RO | declarár umtoarea conformitate corespunzator directivel.si normelor UE pentru articolul |
| GB | hereby declares the following conformity under the EU Directive and standards for the following article | GR | δηλώνει τήν ακόλουθη συμύρωση σύρωνα μέ τήν Εδη-γία EE και το πρότυτα γία το προίόν |
| BG | Демарupa с bóт党支部 с bóт党支部 с bóт党支部 с bóласно Ди-peк-тува на EC и Нормни за arтник | TR | Burada açıklanan urünün geleçeri yönetmeliklere ve standart-lara uygün olduğunu tamamen kendi sorumluluğumuz-altinda belyan ediyoruz. |
| RS | potvrduje sledeću usklaadenost prema smernicama EZ i normama za artikal |
Marke / Brand / Marque: SCHEPPACH
Article name: TABLE SAW - TS310
Urün Tanim:
TEZGAH TESTERE - TS310
Standard references:
EN IEC 55014-1:2021; EN IEC 55014-2:2021; EN IEC 61000-3-2:2019+A1; EN 61000-3-3:2013+A1+A2; EN ISO 19085-9:2020; EN ISO 19085-1:2021; EN 60204-1:2018; EN ISO 12100:2010
This declaration of conformity is issued under the sole responsibility of the manufacturer.
The object of the declaration described above fulfils the regulations of the directive 2011/65/EU of the European Parliament and Council from 8th June 2011, on the restriction of the use of certain hazardous substances in electrical and electronic equipment.
Subject to change without notice
Documents registrar: Dawid Hudzik Gunzburger Str. 69, D-89335 Ichenhausen
Garantie DE
Apparent defects must be notified within 8 days from the receipt of the goods. Otherwise, the buyer loses its rights of claim due to such defects are invalidated. We guarantee for our machines in case of proper treatment for the time of the statutory warranty period from delivery in such a way that we replace any machine part free of charge which provably becomes unusable due to faulty material or defects of fabrication within such period of time. With respect to parts not manufactured by us we only warrant insofar as we are entitled to warranty claims against the upstream suppliers. The costs for the installation of the new parts shall be borne by the buyer. The cancellation of sale or the reduction of purchase price as well as any other claims for damages shall be excluded.
Garantie FR
Apparent defects must be notified within 8 days from the receipt of the goods. Otherwise, the buyer's rights of claim due to such defects are invalidated. We guarantee for our machines in case of proper treatment for the time of the statutory warranty period from delivery in such a way that we replace any machine part free of charge which provably becomes unusable due to faulty material or defects of fabrication within such period of time. With respect to parts not manufactured by us we only warrant insofar as we are entitled to warranty claims against the upstream suppliers. The costs for the installation of the new parts shall be borne by the buyer. The cancellation of sale or the reduction of purchase price as well as any other claims for damages shall be excluded.
Záruka CZ
Apparent defects must be notified within 8 days from the receipt of the goods. Otherwise, the buyer is rights of claim due to such defects are invalidated. We guarantee for our machines in case of proper treatment for the time of the statutory warranty period from delivery in such a way that we replace any machine part free of charge which provably becomes unusable due to faulty material or defects of fabrication within such period of time. With respect to parts not manufactured by us we only warrant insofar as we are entitled to warranty claims against the upstream suppliers. The costs for the installation of the new parts shall be borne by the buyer. The cancellation of sale or the reduction of purchase price as well as any other claims for damages shall be excluded.
Garanti EE
Apparent defects must be notified within 8 days from the receipt of the goods. Otherwise, the buyer's rights of claim due to such defects are invalidated. We guarantee for our machines in case of proper treatment for the time of the statutory warranty period from delivery in such a way that we replace any machine part free of charge which provably becomes unusable due to faulty material or defects of fabrication within such period of time. With respect to parts not manufactured by us we only warrant insofar as we are entitled to warranty claims against the upstream suppliers. The costs for the installation of the new parts shall be borne by the buyer. The cancellation of sale or the reduction of purchase price as well as any other claims for damages shall be excluded.
rapanua BG
OeBnHn HeoctaTbun Tp6Ba da 6bDat DOKnaBauH B pAMKNTe Ha 8 dHn OT NONYuBaHeTo HA CTOKN, B IpOTNBEN Cnyau KynyBaHT rBy6BcKaKNB npTeHn 3a TaKINBA DepekTN. PpeINaIarame RapaHnHa HauNTe MaUNH C npABINHO To neHne Ha cPoka Ha deCTBne Ha KocBeHa rapAHn O TaTaTa Ha DoCTabKa No TaKbHauHH, Ye Hne 3aMeHN BCra Kauct B pAMKNTe Ha TOBa BpeMe OTKPUBA EEDN B MaTePNaHa IIN I3pa60TKaTA Tp6Ba Da 6bDe 6e3noJe3Ho, 6e3nPaTHo. 3a AcTn, KOITo Hne He CE npON3BExkdT, Hne npABm Camo KAto rapaHn, KAto IMAME npABo Ha rapaHnOHn INCKOB CpeSy DoCTabUHn. Pa3xOJnte 3a BMkBbaHe Ha HOB Naactn Ha KyuBaVa. PpeOpBa3yBaHe n HamaJIraBaHe B3emAHn n Dpyr INCKOBete 3a oBe3iTeHn, ca n3KnIOueHn.
Garancija RS
Ocigledni nedostaci se moraju prijaviti u roku od 8 dana nakon prijema robe, u suprotnom kopac gubi sva prava u pogledu takvih nedostataka. Za nase masne dajemogaranciju tokom trajanja zakonskog garantnog roka od datumaprimpredaje, pod uslovom da se sa njima pravilno rukju, na taj nacin besplatno vrslmo zamenu svakog dela masine koji tokom togo perioda postane neupotrebljivusled greke u materijalu ili proizvodnji. Za delove koje ne proizvodimo sami, dajemo garanciju samu o okviru ostvarivanja garantnih prava koja doobjamo od poddobavljača. Troškove za ugradnju novih delova snosi kopac. Pravo na zamenu i umanjenje i drugi zahtevi za nadoknadu šte su isklučeni.
Garantie RO
Defecte evidente trebuie sa fe raporate in termen de 8 zile de la primirea de bunuri, altfel cmparatorul pierde toate cerirel penru astfel de defece. Oferim o garantie de pe masinile noastre cu un tratament adevat pe durata unei garantiimplicite de la data delrare in a fa fel incat vom linocui ficare parte in acel moment detectabil intr-un rand in material Sau manoperar ar fi inutil, gratuit. Pentru paitle care nu ne produc, vom face doar o astfel de garantie, asa cum avem dreptul la pretentii de garantie impotrivafurnizorilor. Costurile pensu introducerea de piese noi la comparator. Conversie si reducerea creante si alte cererile de despagubire sunt excluse.
eyunon GR
Epaavw vattwpatw Tou TpTei va koivtoiouvtai Evtos 8 nepw ato thn tapaalaaTuv eptopeuatauw. diaopetiká, taikawata buyeris ts
aigws lwy w teoiw v aupwte. Eyyuopaote yia tic mxaevc pacsepiTTWON katalan an pateia yia to xpovo ts ek tou voupeio dou evyunans ato tv npadoon me teio poto wote va avikataoanei oioobntote epoc owv anou atodoeiyvea the axpneutei loyow
elattwatikou uikou n elattwata ts kataokeun cea oe ta tetoia xovikn tipeiod. Oov apopa ta tu npma Tou dev exouv kataoekuaotei ato esac
exoume movo eyuatai eooov exoume to diakaiwa va tic agiwoic eyyunong evavti twv tpountheutw. Ta eogda yia tnV eykataotaon twv veuv tmnatow
theta va bapuvovtov ayopaoht. PpTei va atokieietai n akupwn tnc Tiwns n meiwon tnc tiinc ayopac, kaowc kai ottoieohntote aalecs
aigweic yia antzniomega. H letida triioviu eiva avawipo iedoc kai eapouvtai pnta ato kaia eyunon.