PL55Li - Saw SCHEPPACH - Free user manual and instructions
Find the device manual for free PL55Li SCHEPPACH in PDF.
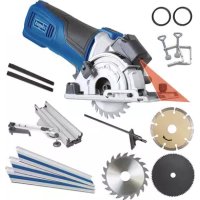
| Technical Features | Cordless circular saw, 18V lithium-ion battery, 150 mm blade diameter, cutting depth up to 55 mm. |
|---|---|
| Usage | Ideal for cutting work in wood, plywood, and similar materials. |
| Maintenance and Repair | Regularly check the condition of the blade and battery, clean after each use, replace the blade if necessary. |
| Safety | Use safety glasses, gloves, and a dust mask. Always disconnect the battery when changing the blade. |
| General Information | Lightweight for easy handling, ergonomic design, 2-year manufacturer warranty. |
Frequently Asked Questions - PL55Li SCHEPPACH
Download the instructions for your Saw in PDF format for free! Find your manual PL55Li - SCHEPPACH and take your electronic device back in hand. On this page are published all the documents necessary for the use of your device. PL55Li by SCHEPPACH.
USER MANUAL PL55Li SCHEPPACH
Battery-powered plunge saw Translation of original instruction manual
Description of the symbols The use of symbols in this handbook is designed to direct your attention to possible risks. You must make sure that you understand the safety symbols and explanations accompanying them. Warnings themselves cannot remove risks and cannot substitute correct action for the prevention of accidents. Caution - Read the operating instructions to reduce the risk of inquiry Wear ear-muffs! Wear a breathing mask! Wear safety goggles! Important! Risk of injury. Never reach into the running saw blade! m Attention! In this operating manual, we have used this sign to mark all sections that concern your safety. www.scheppach.com / service@scheppach.com / +(49)-08223-4002-99 / +(49)-08223-4002-58
Table of contents: Page:
We accept no liability for damage or accidents which arise due to non-observance of these instructions and the safety information.
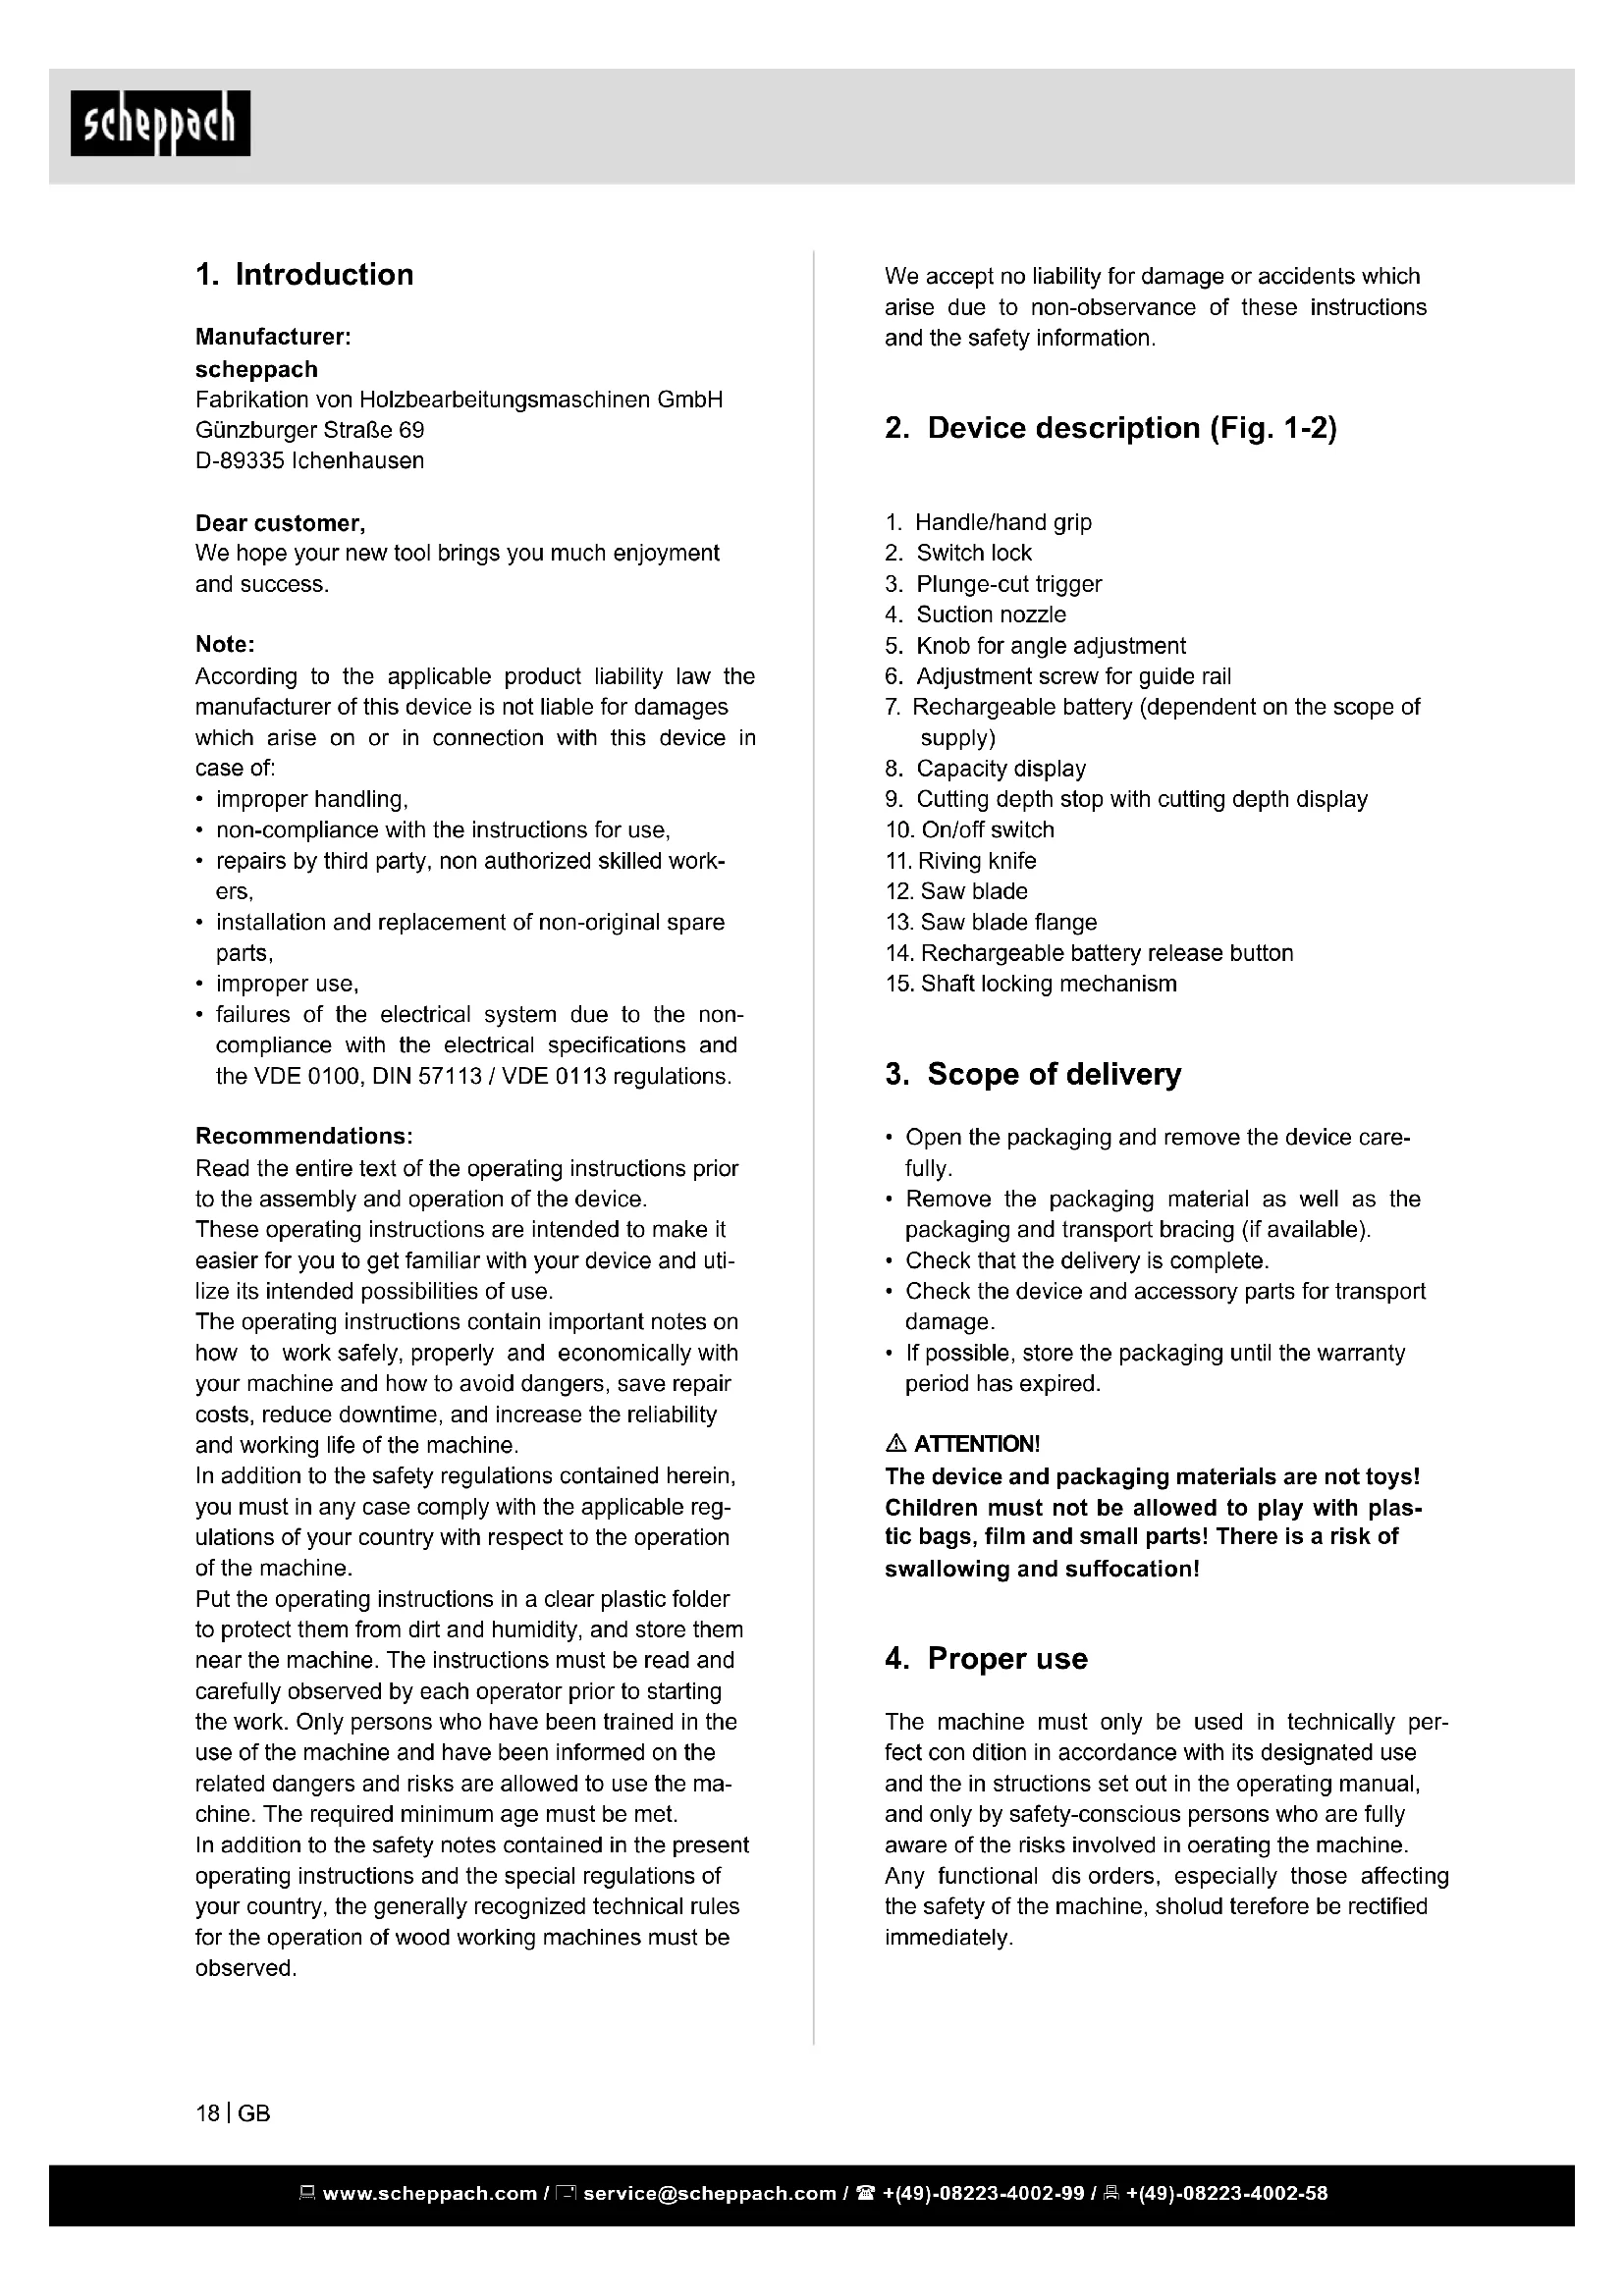
3. Plunge-cut trigger
5. Knob for angle adjustment
6. Adjustment screw for guide rail
7. Rechargeable battery (dependent on the scope of
9. Cutting depth stop with cutting depth display
14. Rechargeable battery release button
15. Shaft locking mechanism
3. Scope of delivery
- Open the packaging and remove the device care- fully.
- Remove the packaging material as well as the packaging and transport bracing (if available).
- Check that the delivery is complete.
- Check the device and accessory parts for transport damage.
- If possible, store the packaging until the warranty period has expired. m ATTENTION! The device and packaging materials are not toys! Children must not be allowed to play with plas- tic bags, lm and small parts! There is a risk of swallowing and suffocation!
The machine must only be used in technically per- fect con dition in accordance with its designated use and the in structions set out in the operating manual, and only by safety-conscious persons who are fully aware of the risks involved in oerating the machine. Any functional dis orders, especially those affecting the safety of the machine, sholud terefore be rectied immediately.
Manufacturer: scheppach Fabrikation von Holzbearbeitungsmaschinen GmbH Günzburger Straße 69 D-89335 Ichenhausen Dear customer, We hope your new tool brings you much enjoyment and success. Note: According to the applicable product liability law the manufacturer of this device is not liable for damages which arise on or in connection with this device in case of:
- non-compliance with the instructions for use,
- repairs by third party, non authorized skilled work- ers,
- installation and replacement of non-original spare parts,
- failures of the electrical system due to the non- compliance with the electrical specications and the VDE 0100, DIN 57113 / VDE 0113 regulations. Recommendations: Read the entire text of the operating instructions prior to the assembly and operation of the device. These operating instructions are intended to make it easier for you to get familiar with your device and uti- lize its intended possibilities of use. The operating instructions contain important notes on how to work safely, properly and economically with your machine and how to avoid dangers, save repair costs, reduce downtime, and increase the reliability and working life of the machine. In addition to the safety regulations contained herein, you must in any case comply with the applicable reg- ulations of your country with respect to the operation of the machine. Put the operating instructions in a clear plastic folder to protect them from dirt and humidity, and store them near the machine. The instructions must be read and carefully observed by each operator prior to starting the work. Only persons who have been trained in the use of the machine and have been informed on the related dangers and risks are allowed to use the ma- chine. The required minimum age must be met. In addition to the safety notes contained in the present operating instructions and the special regulations of your country, the generally recognized technical rules for the operation of wood working machines must be observed. www.scheppach.com / service@scheppach.com / +(49)-08223-4002-99 / +(49)-08223-4002-58
- Protect rechargeable battery pack against heat > 50 °C, e.g. also from lasting solar radiation and re!
- Never extinguish Li-ion battery packs with water! Use sand or a re blanket.
- Protect the device from moisture.
- Protect the cable from heat, oil and sharp edges.
- Regularly check the plug and cable to avoid any dan- ger. In the event of damage, have these replaced by an authorised customer service workshop. m WARNING! This electric tool generates an elec- tromagnetic eld during operation. This eld can im- pair active or passive medical implants under certain conditions. In order to prevent the risk of serious or deadly injuries, we recommend that persons with medical implants consult with their physician and the manufacturer of the medical implant prior to operat- ing the electric tool. Machine-specic safety instructions for hand- held circular saws Sawing method
- m DANGER! Do not place your hands in the sawing area or on the saw blade. Hold the ad- ditional handle or the motor housing with your second hand. If both hands hold the circular saw, the saw blade cannot injure them.
- Do not reach beneath the workpiece. The pro- tective hood cannot protect you from the saw blade beneath the workpiece.
- Adjust the cutting depth to the thickness of the workpiece. Less than one full tooth height should be visible beneath the workpiece.
- Never hold the workpiece that is to be sawn in the hand or over the leg. Secure the workpiece on a stable support. It is important to fasten the workpiece well, in order to minimise any risk of physical contact, jamming of the saw blade or loss of control.
- When performing work during which the elec- trical tool can meet with concealed power lines, take hold of the electrical tool by the insulated handle surfaces. Contact with a live cable will also energise the metal parts of the electrical tool and will lead to an electric shock.
- When performing a longitudinal cut always use a stop or a straight edge guide. This improves the cutting accuracy and reduces the possibility of the saw blade jamming.
- Always use the right size of saw blade and an appropriate location hole (e.g. star-shaped or round). Saw blades that do not t with the mount- ing parts of the saw will run out-of-centre and result in a loss of control. Any other use exceeds authorization. The manufac- turer is not responsible for any damages resulting from un authorized use; risk is the sole responsibility of the operator. The safety, work and maintenance instructions of the manufacturer as well as the technical data given in the calibrations and dimensions must be adhered to. Relevant accident prevention regulations and other, gene rally recognized safety-technical rules must also be adhered to. The machine may only be used, maintained, and op- erated by persons familiar with it and instructed in its operation and procedures. Arbitrary alterations to the machine release the manufacturer from all responsi- bility for any resulting damages. The machine may only be used with original acces- sories and tools made by the manufacturer. The machine may not be operated with sanding belts. Please note that our equipment has not been de- signed for use in commercial, trade or industrial appli- cations. Our warranty will be voided if the equipment is used in commercial, trade or industrial businesses or for equivalent purposes.
5. Safety instructions
General safety instructions
- m WARNING! Read all safety information and instructions. Failure to adhere to safety informa- tion and instructions can result in electric shock, re and/or serious injuries.
- Store all safety information and instructions for future reference.
- The term “electrical tool” used in the safety instruc- tions refers to mains-powered electrical tools (with a mains cable) and battery-powered electrical tools (without a mains cable). Machine-specic safety instructions for re- chargeable battery pack and charging unit
- This charging unit can be used by persons with re- duced physical, sensory or mental capabilities or with a lack of experience or knowledge, if they are supervised or if they have been trained in the safe use of the device and understand the resultant haz- ards. Children must not play with or use the device.
- Do not open the rechargeable battery pack and charging unit!
- Protect the charging unit from metal parts (e.g. met- al chips) or liquids!
- Do not use mains power units or external battery packs to operate the battery-powered electrical tool. Do not use external charging units to charge the rechargeable battery pack. The use of accesso- ries that are not intended by the manufacturer can lead to electric shocks and/or serious accidents. www.scheppach.com / service@scheppach.com / +(49)-08223-4002-99 / +(49)-08223-4002-58
- Do not use blunt or damaged saw blades. Saw blades with blunt or incorrectly aligned teeth cause increased friction, jamming of the saw blade and kickback due to the sawing gap being too tight.
- Before sawing, determine the cutting depth and cutting angle settings. If you change the settings during sawing, the saw blade can jam and result in kickback.
- Apply particular caution with “plunge cuts” in existing walls or other areas that are not vis- ible. The plunging saw blade can jam in concealed objects during sawing and result in kickback. Function of the protective hood
- Check that the protective hood closes correct- ly before every use. Do not use the saw if the protective hood does not move freely or does not close immediately. Never clamp or bind the protective hood; this would result in the saw blade being unprotected. If the saw should ac- cidentally fall to the oor, the protective hood may be bent.
- Make sure the protective hood moves freely and does not touch the saw blade or any other parts with all cutting angles and depths.
- Check the condition and function of the spring for the protective hood. Have the device main- tained before use, if the protective hood and spring do not function properly. Damaged parts, sticky deposits or adhered chips cause the protec- tive hood to function with a delay.
- With “plunge cuts” that are not executed at a right angle, secure the base plate of the saw against moving. Lateral movement can lead to the saw blade jamming and therefore also to kickback.
- Do not place the saw on the workbench or the oor without the protective hood covering the saw blade. An unprotected saw blade running on moves the saw against the cutting direction and saws anything in its path. Observe the run-on time of the saw here. Function of the riving knife
- Use the correct saw blade for the riving knife. In order that the riving knife functions, the disc of the saw blade must be thinner than the riving knife and the tooth width must be greater than the riving knife thickness.
- Never use the saw if the riving knife is bent. Even a slight disruption can slow the closure of the protec- tive hood. Additional safety instructions
- Avoid a blockage in the protective hood (e.g. with plastics), because this can impair the safety func- tion.
- Never use damaged or incorrect saw blade clamping anges or screws. The saw blade clamping anges and screws have been specially designed for your saw, for optimum performance and operational safety.
- Wear suitable personal protective equipment: Hearing protection, safety goggles, dust mask with work that generates dust, protective gloves when working with rougher materials and with a tool change. Kickback - cause and corresponding safety in- structions
- Kickback is a sudden reaction to a hooked, jammed or incorrectly aligned saw blade, which leads to an uncontrolled rebounding of the saw, whereby it moves out of the workpiece in the direction of the operator;
- If the saw blade hooks or jams in the closing sawing gap, it is blocked and the motor power forces the device back in the direction of the operator;
- If the saw blade skews or is incorrectly aligned in the saw cut, the teeth of the rear saw blade section can hook into the surface of the workpiece. This results in the saw blade jumping out of the sawing gap and the saw jumps back in the direction of the operator. Kickback is the result of incorrect or decient use of the saw. It can be prevented by suitable precaution- ary measures, as described in the following.
- Hold the saw rmly with both hands and bring your arms into a position in which you can absorb the kickback forces. Always stand to the side of the saw blade; never bring the saw blade in line with your body. During kickback, the circular saw can jump backwards, although the op- erator is able to control the kickback forces if suit- able measures have been implemented.
- If the saw blade jams or you interrupt your work, release the on/off switch and hold the saw calmly in the material, until the saw blade has come to a complete standstill. Never at- tempt to remove the saw from the workpiece or draw it backwards whilst the saw blade is mov- ing, otherwise kickback can occur. Determine and remedy the cause of the saw blade jamming.
- If you wish to restart a saw that is inserted in a workpiece, centre the saw blade in the saw- ing gap and check that the saw teeth are not hooked in the workpiece. If the saw blade is jammed, it can move out of the workpiece or cause kickback when the saw is restarted.
- Support large panels, in order to avoid the risk of kickback due to a jammed saw blade. Large panels may bend under their own weight. Panels must be supported on both sides, close to the saw- ing gap and at the edge. www.scheppach.com / service@scheppach.com / +(49)-08223-4002-99 / +(49)-08223-4002-58
Inserting the rechargeable battery (Fig. 3) Push a rechargeable battery (7) approved for the de- vice into the retainer, until it latches. Battery charge level (Fig. 2) Press the battery symbol on the capacity display (8) to display the charge level of the rechargeable bat- tery (7). Removing the rechargeable battery (Fig. 2) In order to remove the rechargeable battery (7), press the two unlock buttons (14) and draw the battery (7) out of the device. Setting the cutting depth The cutting depth can be set at the cutting depth stop (9) between 0 - 55 mm. The saw unit can now only be pressed down to the set cutting depth. Cutting depth without guide rail: max. 55 mm Cutting depth with guide rail: max. 49.5 mm Setting the cutting angle between 0° and 45°:
- Pivot the saw unit to the desired cutting angle.
- The two positions (0° and 45°) are set in the factory. Replacing the saw blade m ATTENTION! Remove the rechargeable bat- tery before changing the saw blade. Wear gloves when handling saw blades
1. Slide the switch lock (2) to the OFF position.
2. Press the handles (1) sufciently far down that the
3. Actuate the shaft interlock (15) and turn the saw
blade (12) until it latches.
4. Open the ange screw with the wrench provided.
5. First remove the saw blade ange (13) and then
6. Insert the new saw blade (12) and the saw blade
ange (13) again. m ATTENTION! Observe the direction of rotation of the saw blade.
7. Insert the ange screw again and rmly tighten it.
8. Return the saw to its initial position by pushing the
switch lock (2) into the ON position.
- Harmful/poisonous dust can arise during work (e.g. paint containing lead and some types of wood). Touching or inhaling this dust can pose a risk to the operator or persons in close proximity. Observe the safety instructions applicable in your country.
Saw blade angled position 0-45° Depth of cut 0° 55 mm Depth of cut 45° 41 mm Saw blade dimensions 160x20 mm Weight (without rechargeable bat- tery) 5,3 kg Emission values The values determined according to EN 60745 are typically: Sound pressure level L
- are also suitable for a provisional estimation of the vibration and noise pollution during use,
- represent the main applications of the electrical tool. Increase possible with other applications, with other tools and in case of inadequate maintenance. Ob- serve idle running and standstill times of the machine! www.scheppach.com / service@scheppach.com / +(49)-08223-4002-99 / +(49)-08223-4002-58
2. Turn on the machine by pressing the on/off switch.
3. Press the dip trigger (3).
4. Press the saw downwards to reach the sawing
depth. During rst use the rubber lip is sawn off and thus splitter protection is guaranteed up to the saw blade.
5. Push the saw uniformly forwards.
6. Turn off the machine and tilt the saw blade to the
top when the saw cutting is complete. Sawing with dust suction Connect the suction hose to the exhaust nozzle - Ø 38 mm (4).
9. Cleaning, maintenance and storage
m Risk of injury, electric shock
- Always remove the rechargeable battery pack from the electrical tool before performing maintenance and service work!
- All maintenance and repair work that requires an opening of the motor housing must be performed by an authorised customer service workshop. Cleaning
- Keep the device as free of dust and dirt as possible. Rub the device clean with a clean cloth or blow it off with compressed air at low pressure.
- We recommend that you clean the device directly after every use.
- Clean the device at regular intervals using a damp cloth and a little soft soap. Do not use any cleaning products or solvents; they could attack the plastic parts of the device. Make sure that no water can penetrate the device interior. Observe the following information:
- Always keep the cooling air openings in the hous- ing clean and clear for air circulation.
- Vacuum all openings to remove wooden splinters and chips from the electrical tool.
- Keep the connection contacts on the electrical tool, charging unit and rechargeable battery pack clean. Service information Please note that the following parts of this product are subject to normal or natural wear and that the fol- lowing parts are therefore also required for use as consumables. Wear parts*: Carbon brushes, saw blade, batteries, rechargeable batteries
- Not necessarily included in the scope of delivery!
8. Working with the machine
During work observe all safety instructions provided previously, as well as the following rules:
- Only guide the electrical tool against the workpiece when it is switched on.
- Only use the machine if it is functioning correctly.
- If the electrical tool has fallen, check it and the saw blade for damage. Have damaged parts repaired before use. Damaged machines can lead to injuries and machine instability.
- Always secure the workpiece such that it cannot move during processing.
- Always hold the electrical tool with both hands by the handles (1) during work. This reduces the risk of injury and is a precondition for precise work.
- Always slide the saw forwards, never draw it back- wards towards yourself.
- Avoid the saw blade cutting edge overheating by working at an appropriate feed speed, and when cutting plastics also do so to avoid the plastic melt- ing.
- Wear a mask when carrying out dust-creating work. Switching on/off
- Slide the switch lock (2) to the ON position and press the on/off switch (10) (pressed = ON / re- leased = OFF).
- After the sawing process is complete, slide the switch lock (2) to the right. Sawing
1. Place the front part of the machine onto the work
2. Switch the machine on using the on/off switch..
3. Press the plunge-cut trigger (3).
4. Push the saw downwards to reach the sawing
5. Push the saw forward evenly.
6. After nishing the sawing cut, switch the machine
off and move the saw blade upwards. Plunge-cuts (Fig. 5)
1. Place the saw onto the work piece.
2. Place the cutting indicator with the rear arrow (A)
on the marked plunge-cut position.
3. Switch the machine on and push the saw down-
wards until you reach the set cutting depth.
4. Move the saw forwards until the cutting indication
(C) has reached the marked point.
5. After completion of the plunge-cut, move the saw
blade upwards and switch the saw off. Cutting with rails (otional)
1. Place the machine in the guide rails. can be read-
justed using the hex driver included in the deliv- ery, when there is the risk of the adjusting screws releasing by themselves. www.scheppach.com / service@scheppach.com / +(49)-08223-4002-99 / +(49)-08223-4002-58
11. Trouble shooting
Problem Possible Cause Help The motor does not run. Battery not inserted Insert Battery Battery not charged Charge battery Battery/device defective Have battery/device checked/repaired by a spe- cialist workshop. Motor overheats easily Overload of the motor; inadequate cooling of the motor Prevent overloading the motor when cutting; re- move dust from the motor to ensure an optimum cooling of the motor Decrease in cutting power when sawing The saw blade is too small (sharpened too often) Re-adjust the end stop of the saw unit The saw cut is rough or wavy The saw blade is dull; the tooth shape is not suited to the thickness of the material Re-sharpen the saw blade or use an appropriate saw blade The work piece rips or splinters The cutting pressure is excessive or the saw blade is not suited to the application Use the correct saw blade Old devices must not be disposed of with house- hold waste! This symbol indicates that this product must not be disposed of together with domestic waste in compliance with the Directive (2012/19/EU) pertaining to waste electrical and electronic equipment (WEEE). This product must be disposed of at a designated collection point. This can occur, for example, by handing it in at an author- ised collecting point for the recycling of waste electri- cal and electronic equipment. Improper handling of waste equipment may have negative consequences for the environment and human health due to poten- tially hazardous substances that are often contained in electrical and electronic equipment. By properly disposing of this product, you are also contributing to the effective use of natural resources. You can obtain information on collection points for waste equipment from your municipal administration, public waste dis- posal authority, an authorised body for the disposal of waste electrical and electronic equipment or your waste disposal company. Information on the rechargeable battery packs
- Store in a dry, cool place at a temperature of 5 °C to 25 °C.
- Protect rechargeable battery packs from moisture, water and heat.
- Do not leave empty rechargeable battery packs plugged into the charging unit for more than ap- prox. one month, if the charging unit is disconnect- ed from the mains. Danger of deep discharge!
- If Li-ion battery packs are stored without use for an extended period of time, they should be charged to 40% capacity.
10. Disposal and recycling
The equipment is supplied in packaging to prevent it from being damaged in transit. The raw materials in this packaging can be reused or recycled. The equip- ment and its accessories are made of various types of material, such as metal and plastic. Defective com- ponents must be disposed of as special waste. Ask your dealer or your local council. www.scheppach.com / service@scheppach.com / +(49)-08223-4002-99 / +(49)-08223-4002-58
1. Set the saw on the guide rail.
2. Switch on the machine.
3. Press the saw slowly down to the set cut depth
and move this evenly forward along the rail. Plunge Cuts To Saw:
1. Set the saw on the guide rail at the marked cut-
2. Secure the rebound protection or fence (acces-
sory not included) at the back and front cut points on the guide rail.
3. Switch on the machine.
4. Press the saw down slowly to the set cut depth
and move this forward evenly on the rail up to the front cutting point. Tilt Protection: For miter cuts, it is advisable to install a tilt protection (accessory not included). This prevents the machine from tilting to one side while in an oblique position. Injuries to the body or damage to the machine can be avoided thereby.
This manual may contain descriptions of acces- sories that are not included in the scope of sup- ply of your machine! Guide Device (Fig. 1.1, 1.2) The guide rails (A) enable clean, precise cuts and protect the surfaces from damage. When sawing with the guide rail, the cut depth is 4.5 mm less than the scale value on the machine. For safety, the guide rail can be secured with screw clamps (B) (not included). The tilt protection (C) prevents the plunge saw from tilting during miter cuts and adjustment work. The rebound protection (D) ensures a safe guiding during plunging into the workpiece (not included). By means of the rail joiner (F), 2 guide rails can be connected and allow long, precise cuts The guide clearance of the assembly on the guide rail can be regulated with the two adjustment screws (E). With the offered accessories, miter cuts, corner cuts and other tting tasks can be carried out. Guide rail
1. Place saw on guide rail.
2. Turn cams (Fig 1.1 “E”) anti-clockwise until tight.
Then clockwise slightly to allow clearance. While holding dials in position lock in place by screwing down the Socket head Cap screws in the middle of each Cam (5 mm allen key supplied with ma- chine)
3. Pull saw back and forth along rail ensuring it
slides smoothly. Re-adjust as needed. Future adjustment may be needed depending on use of saw. Splinter Protection The guide rail comes with a splinter guard, which must be tted before the rst use.
1. Secure rail with the screw clamps to a piece of
2. Adjust the guide clearance on the rail with the two
adjustment screws (E).
3. Set the plunge saw to ca. 6 mm cut depth
4. Set up the saw at the back end of the rail.
5. Switch on the machine, press down to the set cut
depth and t the splinter guard along the whole length in one pass without stopping.
6. The edge of the splinter guard now corresponds
exactly to the cutting edge of the saw blade m CAUTION! Always secure the workpiece in such a way that it cannot shift. Always move the machine forward; never pull it toward the body. www.scheppach.com / service@scheppach.com / +(49)-08223-4002-99 / +(49)-08223-4002-58