MB-12 - Photo Accessories NIKON - Free user manual and instructions
Find the device manual for free MB-12 NIKON in PDF.
| Product Type | Power grip for Nikon digital SLR cameras |
| Brand and model | NIKON MB-12 |
| Dimensions (L × H × D) | Approx. 151 × 50 × 81 mm |
| Weight | Approx. 365 g (with MS-D12EN and EN-EL15 battery) ; approx. 460 g (with MS-D12 and 8 AA batteries) ; approx. 310 g (with MS-D12EN and EP-5B connector) ; approx. 425 g (with BL-5 and EN-EL18) ; approx. 280 g (MS-D12EN alone) ; approx. 270 g (MS-D12 alone) |
| Power supply | Li-ion battery EN-EL15 or EN-EL18; 8 AA batteries (LR6 alkaline, HR6 Ni-MH, or FR6 lithium); EH-5a/EH-5b AC adapter (via EP-5B connector) |
| Operating temperature | 0 °C to 40 °C |
| Main functions | Vertical shutter release, multi-selector, main and sub command dials, AF-ON button for portrait shooting |
| Compatibility | Compatible Nikon DSLR cameras (refer to camera manual) |
| Power source priority | Configurable in the Custom Settings menu (group d) of the camera |
| Command lock | Prevents unintentional operation of the grip controls |
| Supplied items | MB-D12, MS-D12EN holder (for EN-EL15), MS-D12 holder (for AA batteries), holder case, contact cap, user's manual, warranty |
| Optional items | EH-5a/EH-5b AC adapter, EP-5B power connector, BL-5 battery chamber cover (for EN-EL18) |
| Care and cleaning | Protect the contacts with the contact cap when the grip is not in use; remove batteries if the grip is not used for an extended period |
| Safety | Risk of explosion if incorrect battery type is used; avoid short circuits; stop use if smoke, odor, or abnormal noise occurs |
| Repairability | Have inspected by an authorized Nikon service center if malfunction occurs |
| General information | The MB-D12 does not have a power switch; use the camera's power switch. The memory card access lamp may light up when attaching/detaching the grip; this is not a malfunction. |
Frequently Asked Questions - MB-12 NIKON
User questions about MB-12 NIKON
0 question about this device. Answer the ones you know or ask your own.
Ask a new question about this device
Download the instructions for your Photo Accessories in PDF format for free! Find your manual MB-12 - NIKON and take your electronic device back in hand. On this page are published all the documents necessary for the use of your device. MB-12 by NIKON.
USER MANUAL MB-12 NIKON
Multi-Power Battery Pack
MB-D12
User's Manual
A

B
C
E
F
G

H

1

J

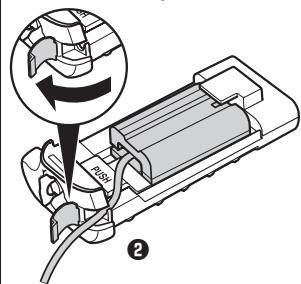
Table of Contents
MB-D12 Multi-Power Battery Pack
User's Manual
Safety Precautions 2
Notice for Customers in Europe. 2
Precautions for Use 2
Introduction 4
The MB-D12 and Accessories. 4
The MB-D12 and Supplied Accessories 4
Using the Optional EH-5a/EH-5b AC Adapter and
EP-5B Power Connector. 4
Using the Optional BL-5 Battery-Chamber Cover.....4
Parts of the MB-D12 5
The MB-D12 Shutter-Release Button, Multi Selector,
Command Dials, and AF-ON Button 5
The MB-D12 Control Lock 5
Using the Battery Pack 6
Attaching the Battery Pack 6
Removing the Battery Pack.. 6
Inserting Batteries 7
Removing Batteries. 9
Specifications. 10
Safety Precautions
To ensure proper operation, read this manual thoroughly before using this product. After reading, be sure to keep it where it can be seen by all those who use the product.
Notice for Customers in Europe
CAUTION
RISK OF EXPLOSION IF BATTERY IS REPLACED BY AN INCORRECT TYPE. DISPOSE OF USED BATTERIES ACCORDING TO THE INSTRUCTIONS.
This symbol indicates that this product is to be collected separately.
The following apply only to users in European countries:

- This product is designated for separate collection at an appropriate collection point. Do not household waste.
- For more information, contact the retailer or the local authorities in charge of waste management.
Precautions for Use
- The MB-D12 is for use with compatible cameras only.
- Do not use with batteries and battery holders not recommended in this manual.
- To prevent electrical shorts caused by metal objects touching the power terminals, replace the contact cap when the MB-D12 is not in use.
-
When a battery holder is removed from the MB-D12, remove the batteries or place the holder or cover in the holder case to prevent electrical shorts caused by contact with other metal objects.
-
The memory card access lamp may light up when the MB-D12 is attached or removed from the camera, but this is not malfunction.
- Should you notice smoke or an unusual smell or noise from the battery pack, discontinue use immediately. After removing the batteries, take the device to the retailer or a Nikon-authorized service representative for inspection.
- The MB-D12 is not equipped with a power switch. Use the camera power switch to turn the power on or off.
Notice for Customers in the U.S.A.
Federal Communications Commission (FCC) Radio Frequency Interference Statement
This equipment has been tested and found to comply with the limits for a Class B digital device, pursuant to Part 15 of the FCC rules. These limits are designed to provide reasonable protection against harmful interference in a residential installation. This equipment generates, uses, and can radiate radio frequency energy and, if not installed and used in accordance with the instructions, may cause harmful interference to radio communications. However, there is no guarantee that interference will not occur in a particular installation. If this equipment does cause harmful interference to radio or television reception, which can be determined by turning the equipment off and on, the user is encouraged to try to correct the interference by one or more of the following measures:
- Reorient or relocate the receiving antenna.
- Increase the separation between the equipment and receiver.
- Connect the equipment into an outlet on a circuit different from that to which the receiver is connected.
- Consult the dealer or an experienced radio/television technician for help.
Nikon
MB-D12

Tested To Comply
With FCC Standards
FOR HOME OR OFFICE USE
CAUTION
Modifications: The FCC requires the user to be notified that any changes or modifications made to this device that are not expressly approved by Nikon Corporation may void the user's authority to operate the equipment.
Nikon Inc.,
1300 Walt Whitman Road, Melville, New York
11747-3064,U.S.A.
Tel.: 631-547-4200

Notice for Customers in Canada
CAUTION
This Class B digital apparatus complies with Canadian ICES-003.
ATTENTION
Thank you for your purchase of an MB-D12 multi-power battery pack for use with all Nikon single-lens reflex digital cameras that list the MB-D12 as a compatible accessory in the camera manual. The MB-D12 takes one EN-EL15 or EN-EL18 rechargeable battery or eight AA batteries (alkaline, Ni-MH, or lithium) and includes an alternate shutter-release button, AF-ON button, multi selector, and main and sub-command dials for taking pictures in "tall" (portrait) orientation. Camera menu options allow the user to choose whether the camera battery or the batteries in the MB-D12 are used first; see the camera manual for details.
The MB-D12 and Accessories
The MB-D12 and Supplied Accessories
Confirm that the following items are supplied with the MB-D12 (batteries are sold separately).
MB-D12
MS-D12EN holder for EN-EL15 batteries

MS-D12 holder for AA batteries
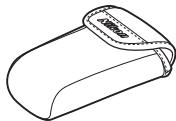
Holder case

Contact cap
The MS-D12EN is inserted in the MB-D12 at shipment. See "Inserting Batteries" for information on removing the battery holder.
- User's manual (this manual)
Warranty
Using the Optional EH-5a/EH-5b AC Adapter and EP-5B Power Connector
The optional EH-5a/EH-5b AC adapter and EP-5B power connector provide a reliable power source when the camera is used for extended periods. To use an AC adapter with the MB-D12, insert the EP-5B into the MS-D12EN battery holder as described on page 7 and then connect the EH-5a/EH-5b as described in the documentation provided with the EP-5B.
Using the Optional BL-5 Battery-Chamber Cover
A BL-5 battery-chamber cover (available separately) is required when using EN-EL18 batteries.
BL-5 battery-chamber cover
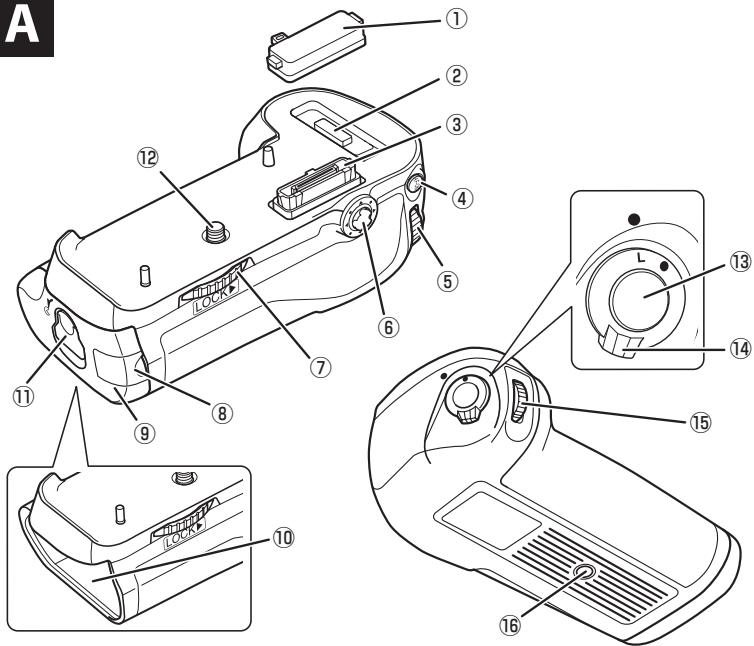
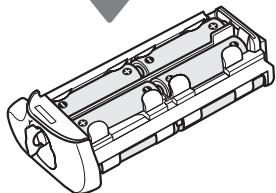
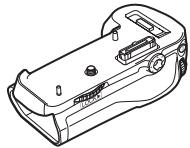
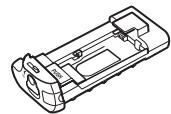
Parts of the MB-D12 (Figure A)
① Contact cap
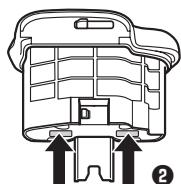
② Holder for camera contact cover
③ Power/signal contacts
④ AF-ON button
⑤ Main command dial
⑥ Multi selector
⑦ Attachment wheel
⑧ Holder power connector cover
(9) Battery-chamber cover
10 Battery chamber
11 Battery-chamber latch
12 Mounting screw
⑬ Shutter-release button
14 Control lock
15 Sub-command dial
16 Tripod socket
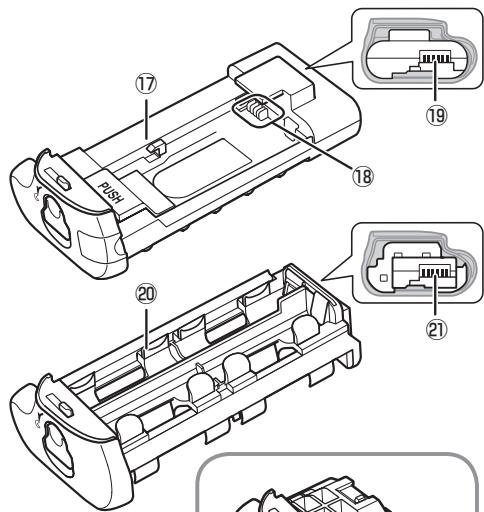
17 MS-D12EN holder for EN-EL15 batteries
18 Power terminals
19 Power terminals (MS-D12EN battery holder)
20 MS-D12 holder for AA batteries
② Power terminals (MS-D12 battery holder)
22 BL-5 battery-chamber cover (available separately)
The MB-D12 Shutter-Release Button, Multi Selector, Command Dials, and AF-ON Button
The MB-D12 is equipped with a shutter-release button (Figure A- ① 3 ), multi selector (Figure A- ⑥ ), main command dial (Figure A- ⑤ ), sub-command dial (Figure A- ⑤ ), and AF-ON button (Figure A- ④ ) for use when taking photographs in vertical ("tall," or portrait) orientation. These controls perform the same functions as the corresponding controls on the camera. See the camera manual for more information.
Changes to Multi selector center button, Multi selector, Customize command dials, and Assign MB-D12 AF-ON in the camera Custom Settings menu (Group f) also apply to the multi selector, command dials, and AF-ON button on the MB-D12.
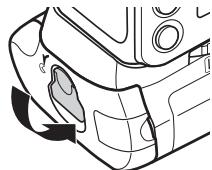
The MB-D12 Control Lock
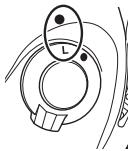
The control lock (Figure A-14) locks the controls on the MB-D12 to prevent unintended use. Before using these controls to take photographs in vertical (portrait) orientation, release the lock as shown at right.
The control lock is not a power switch. Use the camera power switch to turn the camera on and off.
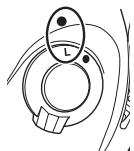
Locked


Unlocked
Using the Battery Pack
Attaching the Battery Pack
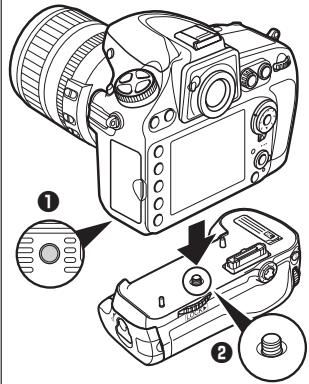
Before attaching the battery pack, be sure that the camera is off and that the MB-D12 control lock (Figure A-14) is in the L position (the illustrations show the D800).
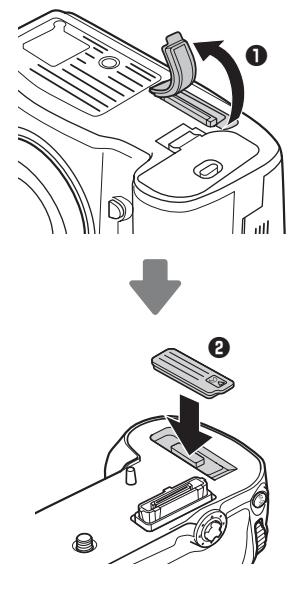
1 Remove the contact cap (Figure A- ① ) from the battery pack.
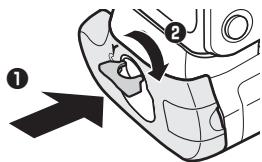
2 The contacts for the MB-D12 are in the base of the camera, where they are protected by a contact cover. Remove the contact cover as shown in Figure B-1 and place it in the contact cover holder on the MB-D12 (Figure B-2).
3 Position the MB-D12, keeping the MB-D12 mounting screw (Figure C-2) aligned with the camera tripod socket (Figure C-1) and tighten the attachment wheel by rotating it in the direction shown by the LOCK arrow (Figure D). There is no need to remove the battery from the camera before connecting the MB-D12. At default settings, the battery inserted in the camera will be used only after the battery in the MB-D12 is exhausted. The Battery order option in the camera Custom Settings menu (Group d) can be used to change the order in which the batteries are used.
Removing the Battery Pack
To remove the MB-D12, turn the camera off and set the control lock on the MB-D12 to L, then loosen the attachment wheel and remove the MB-D12. Be sure to replace the contact cover on the camera and the contact cap on the MB-D12 when the battery pack is not in use.
Be sure to place the camera contact cover in the contact cover holder and to keep the MB-D12 contact cap in a safe place to prevent loss.
A PB-6D and PK-13 auto-extension ring are required when using PB-6 bellows focusing attachment with the MB-D12.
Inserting Batteries
The MB-D12 can be used with one EN-EL15 or EN-EL18 rechargeable Li-ion battery, or with eight AA batteries. A BL-5 battery-chamber cover (available separately) is required when using an EN-EL18 battery.
Before inserting batteries, be sure that the camera is off and that the MB-D12 control lock is in the L position.
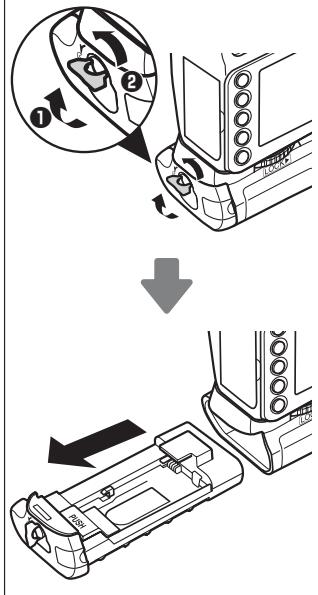
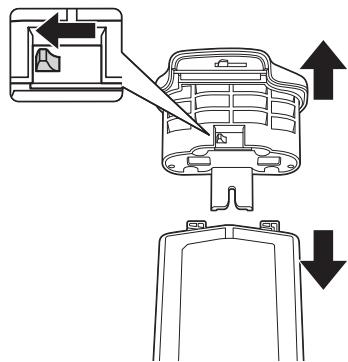
1 Turn the MB-D12 battery-chamber latch to and remove the battery holder (Figure E).
2 Ready the batteries as described below.
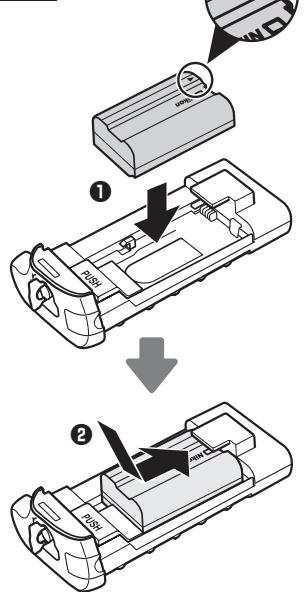
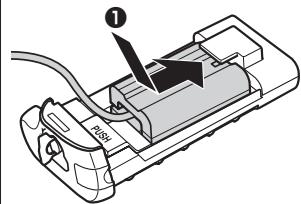
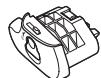
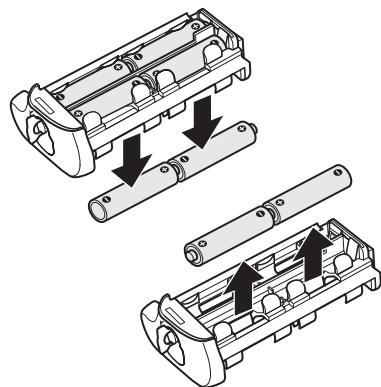
EN-EL15: Matching the indentations on the battery to the projections on the MS-D12EN holder, insert the battery with the arrow (▲) on the battery toward the battery holder power terminals (Figure F-①). Press the battery lightly downward and slide it in the direction of the arrow until the power terminals click into place (Figure F-②).
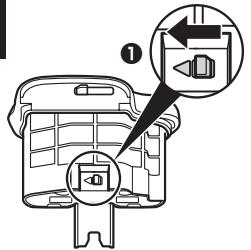
EN-EL18: If the battery release on the optional BL-5 battery-chamber cover is positioned so that the arrow is visible, slide the battery release to cover the arrow (Figure G-1). Insert the two projections on the battery into the matching slots on the BL-5 (Figure G-2) and confirm that the battery release has slid aside to reveal the arrow.
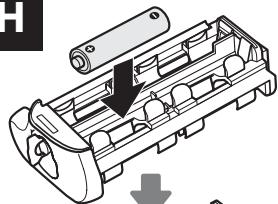
AA batteries: Place eight AA batteries in the MS-D12 battery holder as shown in Figure H, making sure that the batteries are in the correct orientation.
3 Insert the battery holder in the MB-D12 and latch the battery-chamber cover (Figure I). Make sure the holder is fully inserted before turning the latch.
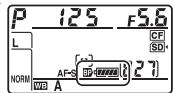
4 Turn the camera on and check the battery level in the control panel or viewfinder. If the camera does not turn on, check that the battery is correctly inserted.
The EP-5B Power Connector
When using the EP-5B power connector, insert it into the MS-D12EN holder with the arrow (▲) on the connector toward the battery power terminals. Press the connector lightly downward and slide it in the direction of the arrow until the power terminals click into place (Figure J-1). Open the holder power connector cover and pass the EP-5B power cable through the opening (Figure J-2).
Battery Level
The camera displays battery level as follows: EN-EL15/EN-EL18
| Control panel | Viewfinder | Description |
| - | - | Battery fully charged. |
| - | - | Battery partially discharged. |
| - | - | Low battery. Ready fully-charged spare battery or charge battery. |
| -(blinks) | -(blinks) | Battery exhausted. Charge or exchange battery. |
AA Batteries
| Control panel | Viewfinder | Description |
| - | — | Charge remaining. |
| - | - | Low batteries. Ready spare batteries. |
| -(blinks) | -(blinks) | Batteries exhausted.Shutter releasedisabled. |
An option in Group d ofthe camera Custom Settings menu can be usedto change the order inwhich the batteries are useis drawing power from theis displayed in the controlblinks, the battery-chamberClose and latch the battery
To ensure that the camera shows the correct battery level when AA batteries are used, choose the appropriate option for MB-D12 bat
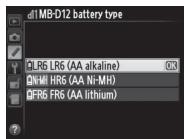
tery type in the camera Custom Settings menu (Group d). If the correct option is not selected, the camera may fail to function as expected.
| Option | Battery type |
| ΩLR6 LR6 (AA alkaline) | AA alkaline (LR6) |
| ΩN-MH HR6 (AA Ni-MH) | AA Ni-MH (HR6) |
| ΩFR6 FR6 (AA lithium) | AA Lithium (FR6) |
Remove the batteries when the MB-D12 is not in use.
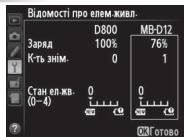
Battery Info
Battery information (including calibration information for EN-EL18 batteries) can be viewed from the camera setup menu (the camera bat
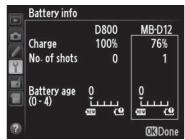
terry is listed on the left, the MB-D12 on the right). Only the battery level icon is shown when AA batteries are used. See the camera manual for details.
Note: The illustrations on this page are from the D800.
Removing Batteries
Be careful not to drop batteries or the holder.
1 Turn the MB-D12 battery-chamber latch to and remove the battery holder (Figure E).
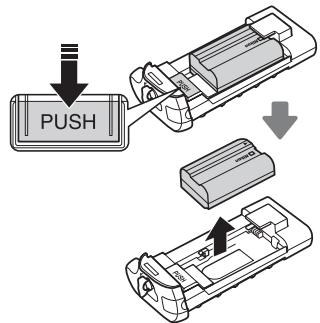
2 Remove the battery or batteries from the holder.
EN-EL15
While pressing the holder PUSH button, slide the battery toward the button. The battery can then be removed as shown.
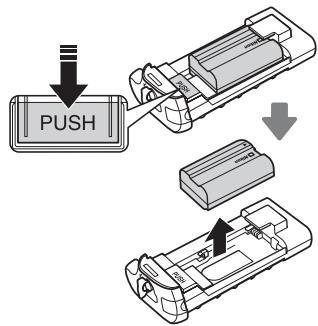
The procedure for removing the EP-5B power connector is the same as that for the EN-EL15.
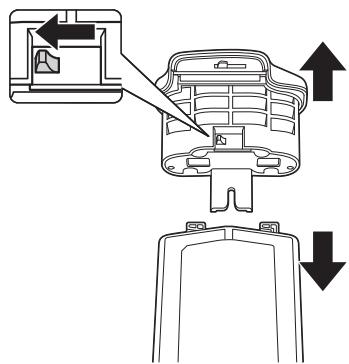
EN-EL18
Slide the battery release in the direction indicated by the arrow () and remove the battery-chamber cover.
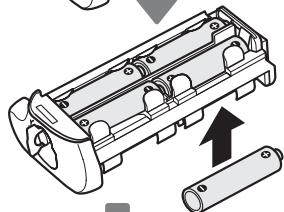
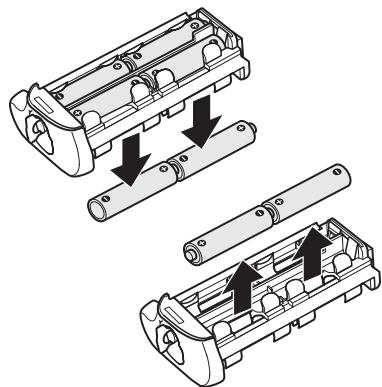
AA Batteries
Remove the batteries as shown. Be careful not to drop the batteries when removing them from the holder.
Specifications
| Power source | One EN-EL15 or EN-EL18 rechargeable Li-ion battery, eight LR6 alkaline, HR6 Ni-MH, or FR6 lithium AA batteries, or EH-5b/EH-5a/ EH-5 AC adapter (requires EP-5B power connector) |
| Operating temperature | 0–40°C (32–104°F) |
| Dimensions (W × H × D) | Approx. 151×50×81 mm (6.0×2.0×3.2 in.) |
| Weight | Approx. 365 g (12.9 oz) with MS-D12EN and optional EN-EL15 battery Approx. 460 g (16.3 oz) with MS-D12 and eight AA batteries (available separately from third-party suppliers) Approx. 310 g (11.0 oz) with MS-D12EN and optional EP-5B power connector Approx. 425 g (15.0 oz) with optional BL-5 and EN-EL18 battery Approx. 280 g (9.9 oz) with MS-D12EN Approx. 270 g (9.6 oz) with MS-D12 |
Specifications and design are subject to change without notice.
EN-EL15 and EN-EL18 Batteries
The performance of EN-EL15 and EN-EL18 batteries drops at temperatures below about 10^ (50°F). Be sure the battery is fully charged and keep a warm spare battery on hand ready to exchange as necessary. Cold batteries will recover some of their charge when warmed.
AA Batteries
Due to their limited capacity, AA LR6 alkaline batteries should be used only when no other alternative is available.
The capacity of AA batteries varies with make and storage conditions and may in some instances be extremely low; in some cases, AA batteries may cease to function before their expiry date. Note that the capacity of AA batteries may drop at temperatures below 20^ (68°F). Use is not recommended at low temperatures.
V Frame Advance Rate
EN-EL18 and AA batteries support higher frame advance rates than the EN-EL15; note, however, that in the case of AA batteries the frame advance rate will drop at low temperatures or if the batteries are low. For more information on frame advance rates, see the camera manual.
Inhaltsverzeichnis
Federal Communications Commission (FCC) Radio Frequency Interference Statement
1300 Walt Whitman Road, Melville, New York
11747-3064,U.S.A.
Tel.: 631-547-4200

This Class B digital apparatus complies with Canadian ICES-003.
Presentsation
1300 Walt Whitman Road, Melville, New York
11747-3064, EE.UU.
Tel.: 631-547-4200

Multi-power-batteripakke MB-D12
Bruksanvisning

BL-5 lucka for batterifack
Delarna pà MB-D12 (Figur A)
① Kontaktskydd
② Hållare für kamerakontaktskyddet
③ Ström/signalkontakter
④ AF-ON-knapp
⑤ Huvudkommandoratt
⑥ Multivaljare
⑦ Fasstkiva
⑧ Lock für hällarens strömkontakt
⑨ Batterifackslock
10 Batterifack
Batterifackslas
12 Monteringsskruv
Avtryckare
14 Knapplas
15 Underkommandoratt
16 Stativganga
⑰ MS-D12EN-hàllare for EN-EL15-batterier
18 Strömkontakter
19 Strömkontakter (Batterihällare MS-D12EN)
20 MS-D12-haillare for AA-batterier
② Stromkontakter (Batterihallare MS-D12)
22 BL-5 lucka for batterifack (säjs separat)
PpmeaHne IJnIb30BaTeJeB Ebpone. 2
Mepb npedoctoopoxnoctn pnp nCnoB30BaHH 2
BvBeHne 3
PykoTka MB-D12 n akceccayapbl...3
PykoTka MB-D12 n npinaraembe akceccyapbl...3
IcnoB3OBAHnE DOnOpHnTeBHoro CeTeBOrO 6Ioka
nitanHn EH-5a/EH-5b npa3bema nitanHa EP-5B ...3
IcnoB30BaHHe DoONHHTeHbHO KpbIshK
6atapeHoro oTceKa BL-5 3
KOMTOHENTbI pyKoTKn MB-D12 4
Cnyckobar KaHonka 3aTbopa, MynbTnceneKTop,
Dncky npabneHn KhoNka AF-ON pyKoTkn
MB-D12. 4
BloKnoBoUHyn nepeKJIouaTeNb MB-D12 4
IcnoJIb3ObaHne MHOrofoyHKuHOHaNbHo pyKoTKn.....5
PnpcoeHneHme MHOrofoyHKUHOHaJIbHoI pyKoTKn...5
I3BneueHne pykoTkn 5
UctahOBka 6atapei 6
I3BleueHne 6bapei. 8
Texnueckne xapaKtepcntukn 9
Hhopmaunia JnayuataTea
Длгправиьногдкрлугатуци Издени有很大еюпспolyбзовимьнамателно рpoчтайданhoeуруковозв.Послпpoчтеняхрашиerte зто руковдостvo BdoctytnHom Mecte,чTOбыснHIMMORЛи 03-нakOMITbCS BCE NOьБЗВОВЕТEN DaHNOTOИЗdени.
PpimmeuHne nIy noJIb3OBeTeJeB Ebpone
BHIMAHIVE
CUJECTBYET PICK B3PbIBA, ECJIN YCTAHOBJIEN HEBEPHbI TINBATAPEI. JIKBVINPYITE NCIPOIb3OBAHHbIE BATAPEN COITJACHONHCTPYKcIJAM.
Даньс CMBOJ O3HauaET,чTOИЗДЕЛNE DOJIKNHO YTNIN3NUPOBaTbCЯOTДeJIbHO.
CnedyuOuIe 3aMeUaHnKa cAaOTcT OJbKO nOJIb3OBaTeJeB eBpOneN- CKNX CtpaHax:

JaHHoe n3dene npedHa3NaeHo
He 3a6bIaIe KnaCTb KpbIbIy KOHTAOBfoToaannapaTa BnpdHa3NaeHHbI dIa HeepKaTeIb, I xpaHIne KpbIbIKoHTAOB MB-D12 B HaNExHOM MecTe, YTO6bI OHa He NOTepraIacb.
I3-3a orpaHnueHHoEMKocTn 7eNouchbix 6aTapei AA LR6, INx CneJeYET NcnoB3ObaT ToJbKO Tex cIyuaX, KOrJa HET pyroAJIbTePHaTINBbl.
EMKoctb 6atapei AA MojTe 6bItb pa3Hoi, B 3aBcImOCTn OT pOn3BODInTeI yCIOBNI xpaHeNII, IN HEKOToPbIX cIyuaX MoJTe 6bItb OueHb MaIa; B HeKOTopbIX cIyuaX 6atapei AA MOrYt nepeTatb pa60TaB DO nCTeUeHNII XcPoKa rOHOCTn. POMHInTe, YTO EMKoCTb 6atapei AA MojTe UMeHbUnTbcR npI Tempepatypax Hnke 20°C. He peKOMeHdyETcN CnONb3OBaTb PnI Hn3KnX Tempepatypax.
CKopoctb CbeMkn
BaTapeEN-EL18 n AA noDpeKnaIOT 6oJIe BbCOKne 3NaueHncaKOpCTn CbeMKn, Yem EN-EL15. Ondako NmEte B BVny, UTO pIn NCpOJIb3OBaHm 6atapeAaCKopocTb CBeMKn yEmhBUnTCn Pn Hn3Knx Tempeatypax IINPi Nn3KOM 3apJe 6atape. BoJIe npDo6HbIe CBeDeHnO 3NaueHnX cKopocTn CbeMKn CM. B pyko0oCTBe K φOTokamepe.
MB-D12 Multifunctionele battery pack
Gebruikshandleiding
Inhoudsopgave
MB-D12 Bedieningsvergrendeling. 4
Retirar as baterias 8
Especificações 9
Multi-power battery pack MB-D12
Manuale d'uso
Sommario
Multi power battery pack MB-D12 e accessory. 3
Multi power battery pack MB-D12 e accessory
in dotazione 3
Part del multi power battery pack MB-D12. 4
Multi power battery pack MB-D12 e accessory
Part del multi power battery pack MB-D12 (Figura A)
Evaalaaoou Pevuatoe EH-5a/EH-5b AC kai tou
Emloyeac Evtoov ka to Koumi AF-ON. 4
MB-D12 battery type (MB-D12 alkumulator
Sucasti battery pack-u MB-D12 4
Tlacidlo spuste, multifunkcny volic, prikazové
volice a tlacdlo AF-ON bloku batéri MB-D12 4
Ovladacia poistka battery pack-u MB-D12 4
Použivanie battery pack-u 5
Pripojenie battery pack-u 5
Odojenie battery pack-u 5
Vkladanie bateri 6
Vyberanie batérii 8
Technique parametre 9
MB-D12 battery type (MB-D12 aku tuup)
battery type (MB-D12
Blocare control MB-D12 4

Capac loca acu-mulator BL-5
Piese ale MB-D12 (Figura A)
① Capac de contact
② Suport pentru capacul contactelor
③ Contacte alimentare/semnal
④ Buton AF-ON
⑤ Selector principal de comanda
⑥ Selector multiplu
⑦ Disc ataşament
⑧ Capac conector carcasà alimentare
Capac loca acumulator
10 Locas accumulator
(1) Závor locaś accumulator
12 Surub de montare
13 Buton declanare
14Blocarecontrol
15 Selector secundar de comanda
16 Montura trepied
17 Carcasă MS-D12EN pentru accumulatori EN-EL15
Borne de alimentare
19 Borne de alimentare (carcasă accumulator MS-D12EN)
20 Carcasă MS-D12 pentru accumulatori AA
② Borne de alimentare (carcasã accumulator MS-D12)
Capac BL-5 (disponibil separat) pentru locaș accumulator
Blocare control MB-D12
KhONKa cnucky 3aTbopa, KhONKa AF-ON, MynbTnceneKtop i dNcKn KepyBaHnHa 6Nooi MB-D12
Bnok MB-D12 6bIaHaHO KhoNkoIO cnycky 3aTbopa (Pnc. A-13), MybltceNeKToPOM (Pnc. A-8), RONOBHM dNcKOM kepyBaHHra (Pnc. A-5), DOnOMIXHMM NDCKOM kepyBaHHra (Pnc. A-15) I KhoNkoIO AF-ON (Pnc. A-4) nIy BnKOpNCaTHAR NiI qac 3mOKn y BeptKaJIbHI (nopTpHeHII) opiEHTaIi. Li 3aCobN kepyBaHHY BnOKoHyTOB Ti camf HkUJI, II O J BiNDoJIH3 I 3aCOb N kepyBaHHra Ha foTOKamePi. DoaTKOBI BIDOMOCTI HabeDeHi y noci6Hmky KopriCyBaVa photokamePi.
3MiHn Do KOpNCTyBaIbKInx npaMeTpIB FOToKamepu LcHTp. KhoNka MylbTncen., MylbTncEneKtop, HanaStyB. dNckib KepyB. i Pnp3NaU. AF-ON y MB-D12 (rpyna f) TAKOX BnIbBaIOb Ha MylbTncEneKTop, DnCKn KepyBaHHa Ta KhoNky AF-ON 6Joka MB-D12.
BlokyBaHHa3ac06iB KepyBaHHHa 6noCi MB-D12
BnokyBaHHa 3ac06iB KepyBaHHa (Pnc. A-14) DOnOMaRe 6nOKyBatm 3ac06i KepyBaHHa Ha 6NoCi MB-D12, 3o6 3anobirx ix BnuaKOBomy BnKOpNCTAHIO. PpeD BnKOpNCTAHM cHx 3ac06i KepyBaHHa dny 3iOMKn y BeTnKaIbHi (nopTpTeHi) opieHTaQII BCTaHObITb 6nOkatop, kNoka3aHO npabOpuy.
BLOKYBaHHa3acobib KepyBaHH He BUMNKaE JINBLeHH. Lio6 yBMKHyTN QH BIMKHYTN JINBLeHH, BIKOPNCObYIe BIMNKaU JINBLeHHA FOtOKaMepu.
3a6JIOKOBaHo


Poz6IokoBaHo
BukopncTaHn6aTapeHoro 6Joka
Пикрления 6атapesteinoro 6лoka
Ipeep nip'ekHaHHa 6aTapeHoro 6loka nepekoHaTEcra, 10o foToKamepy BmKHeO, a fikcatop 3acobib KepyBaHHa Ha 6loci MB-D12 (Pnc. A-14) 3haxoDnBcra y noJoxeHHi L (Ha pncyHKy noka3aHo foToKamepy D800).
1 3HimiTb KpniuKy KOHTaKtIb (Pnc. A-①) i36aTapeHOrO 6JloKa.
2 KOnTaKtn 6Ioka MB-D12 3HaxOaTbCra Ha HnKHi CTopoHI fOToKaMepri. Ix 3aKpnto 3axNCHIO KpnikoIO. 3Himitb Kpniky KohtakTIB, kN oka3aHO Ha Pnc. B-1, i nomictib II do Biicky dny Kpnikn KOHTAKTIB HA 6Iooi MB-D12 (Pnc. B-2).
3 P03a7yIte 6nOK MB-D12, BnIPBnBm MOtJxHn rBnHT 6noka MB-D12 (Pnc. C- i3 rH3dom dny uTATBaHa fotokamepi (Pnc.C- 3aTARHITb koniuaKoikcauipnpkpyuBAHHM yHa npRMyCtpiKn LOCK (Pnc. D). Ipeep nIe'ENHnHM 6noka MB-D12 hEmae noTpe6bn BnMaTn enemEt XNBHeNn 3 fotokamepn. 3a npOMOBaHHm enemEt XNBLeHn H fotokamepn 6yde BnKOpNCBOByBaTc TINbkn nicra po3prJaHNH enemeta XNBLeHn y 6noCi MB-D12. NapamTp NopdoK enemetrib XNB. y MEHO KOPNCYBauchkNx npametpiB fotokamepn (Tpyna d) moXHa BnKOpNCBOByTaN D3MIHeHH NopdKy BVKnOpNCCTAHH enemetrib XNBLeHHN.
3HHTa 6aTaepuHoro 6loka
Ioo6 3nTn 6nok MB-D12, BmMknItb foToKaMepy i BCTaHOBIt fikCatop 3ac06iB kepyBaHHHa 6nOci MB-D12 y noNoKeHHa L, notim ocna6te KoniUaTaKO fikCaui Ta BmIMtB 6nok MB-D12. He 3a6yDbTe BCTaHOBNITK PkMIuKN KOHTAKTIB Ha foTOKaMepy Ta 6nok MB-D12, KOni 6aTapeHn 6nok He BnKOpNCTOByETcBcA.
He 3a6ydbte NOMICTN KPNiKhky KOHTAKTIB FOOTOKamepn Do BiCiKy Ha 6Ioui MB-D12. TpImaTe KpniKhky KOHTAKTIB 6Ioka y 6e3neuHomy Micui, uo6 He 3ary6tntii
Пд ус ВИКОРИСТАнHA ФOKСУВALEHOrO mixa PB-6 pa30 i3 6лOKOM MB-D12 noTpriHi npIcTpiI PB-6D И АВТOMATUне поДовЖУВALEНе кINьц PK-13.
BctablenHH enementib XMBlenH
BLOK MB-D12 MoXHa BnKOpNCtOByBaTn 3 OndHmpeEzapdKyBaHm IITI-IOHHM eMeHemTo XnBJIeHn EN-EL15 a6o EN-EL18, a6o 3 BiCbMOMa eMeHemAtmnn KnBJIeHn TIny AA. KpnUka BiDciky dny eMeHema XnBJIeHn BL-5 (npOdaetcbc OkpEmo) nOTpi6Ha dny BnKOpNCtAHn eMeHentB XnBJIeHn EN-EL18.
Ipeed BCTablenHm enementiv XINBleHn HnepeKohntec, 100 foToKamepy BmKHeNo, a fikcatop 3ac6iB kepyBaHn Ha 6loCi MB-D12 3haxoDtcb y noJoxeHHI L.
1 Ppokpyitb fikcaTOp BiDcKiNy dIa enelmentrib JxBHeHHa H6Iooi MB-D12 y nOIOKeHHg i BnIMt bBiCik dIa enelmentit XNBJIeHHa (Pnc. E).
2IidroTuTe eJeMeHTN KJbEnHЯ,ЯOncaHo HxKye.
EN-EL15. BvipBnIte Bvctytn Ha eIeMeHti XINBHeHHa BiIOBINO do 3aRnBleHb y BiCicky MS-D12EN, BCTaBe eIeMeHt XINBHeHHa CPTiKIOU (▲) y HaprMky KOHTAICBtB XINBHeHHa BiCicKy (Pnc.F-1).HaTNCHITb Ha eIeMeH tXINBHeHHa Bn3 i BCTaBe NOrO 3a HAprrkOM CPTiKN, POKN KOHTAKTN He cTaHyb Ha MlCe, a BN He noCuYTe KnaCaHHa (Pnc.F-2).
EN-EL18.ЯксатopelenentmaЖиьненHaДоаТКOBiKPNUZIbIDcIKyДЯelenentmaЖиьненBL-5po3aIOBaHOtaKIMuHOM,IOBnDNoCTpiKy<1,peceynbTe IoroBnoJoxeHHo,KOLINCTpIKyHeBnHO(Pnc.G-1).BCTaTe Dba BnCTuPmelenentMaЖиьнenHDoBnOBIdNHex3aRn6JIeHykpuiuBl-5(Pnc.G-2)Ta peceynbTe pikcatopelenentmaЖиьненBnoJoxeHHo,KOLINBnHO CTpiKy.
EneMeHTN XnBHeHn TnPy AA. Pomictb Bicim eemeHTIB XnBHeHn TnPy AA do KaceTn dIe eneMeHTIB XnBHeHn MS-D12, k noka3aHo ha pnc. H, nepebiTe nOJIpaHcIb.
3 BCTabTe Biicik Iy enemEnTIB JnBHeHry Do 6loka MB-D12 i 3akpiIte KpuKu Biiciky (Pnc. l). Ipeed 3akpmbaHHm KpuKu IpekoHaItecra, 0o Biicik BCTabJIeHO NOBHcIIO.
4 YbIMKnHtB foTOkAmpy Ta nepeBipTe pibHe 3apdY enEmeHTa KINBLeHHa Y BINOsoKaui abo Ha naHeni KepyBaHHa. RaIoo foToKamepa He yBIMKHeTbcR, pekeKoHaTEcra, IIO eIeMeHTn KINBLeHHa BCTaBHeO HaNEXHM CHHOM.
3'eDnyBaJxKnBneHnE P-5B
Piiuc BnKOpCTAHN 3'EnHyBaa JxBHeHnE P-5B BCTABe NOro Do Bicky MS-D12EN CtrpIKOIO (Ha 3'EnHyBaC HnPramky KOhtAeTb JxBHeHnHaTCHiB Ha 3'EnHyBaT DOHN3y Ta BCTABe NOro 3a HnPramKOM CTPIKIN, NOK KOhtAeTN He CTAnYbHa MlCe, a BN He NoCyTe KnaCaHHa (Pnc. J-1). BiDkpiTe KpnWky 3'EnHyBaHa XmBHeHHa H bICy Ta pOraTgHtB Shyp XmBHeHHa EP-5B Kpi3b OTBip (Pnc. J-2).
Pibeh3apany
Ha foToKaMepi pibeH 3apAnyeIeMeHtA JxNBlHeHH BIDo6paKaTeBcTakIM YHHom:
BmMItb eIemEnT JxNBeHnA, KOJIN 6nok MB-D12 He BVKOPNCOTByETbCA.
Bidiomocti npo enemt XnBneHHN
BidiOMOCTI npo enemeh TKNBJIeHHN (BKJIOHNO 3 BiIDOMOCTAMn npo kaniIbOpyBaHnH enemehTIB KINBJIeHHN EN-EL18) MOKHA nepeRJIaHyTN
yu MeHIO HalaHTyBaHHn FOToKamepn (eIemEnT JxNBJEHHa FOToKamepn IoK3aHO NIBOpyU,6NOK MB-D12 - npabOpyU). KOni BmOPcHcTOBvOtbcS c eIemEnTI XJXJIeHHn TIny AA,BIDOpbaxaETcbN liNe iNtKOrpAm pIBH zapA dy eIemEnTa JxNBJeHH. IDoatKOBI BiOMOci HabeJeHo y nociHnky do FOToKamepn.
Pnmitka. Ha pncyHKax Ha ciin ctopiHci noka3aHo photokamepy D800.
Ua
BnMaHHe enemTeB XuBHeHHa
He KndaTe eIemEnT XnBLeHnA 6o BiDcK.
1 Ppokpyitb fikcaTOp BicciKy dny enemertB xkBneHHa 6NoCi MB-D12 y noLoKeHHg E i BnMItb BiCik dny enementB xkBneHHa (Pnc.E).
2 BnmiTb eIeMeHTN XINBHeHHa 3 BiDciKy.
EN-EL15
HaNTCKAQUH KONKy PUSH Ha BiDcIKy, NOTARHtB
eNEMeHTN JINBJIeHHB HAnpRMAK Ky KONKNI.
Tenep eNEMeHTN JINBJIeHHM OMOHa BmMaTI,
KN KOa3aHO Ha pCMyHKy.
3'ENHyBaWJXnBHeHnE P5B BmMaIOb TaK cAmO, kI eIeMeHt XnBHeHnE EN-EL15.
EN-EL18
3cYbTe fikcTOp eIeMeHtA JINBHeHHy y BkazahOMy CTpIJIKOIO HApRmKy (A) Ta 3HIMiTb KpnuKBy BiCiKy dJa eIeMeHTa JINBHeHHa.
EnemEtN KINBHeHnTynyAA
BnIMtB eMeHTN JINBHeHHa KIOKa3aHO Ha pncyHKy.He KIJaTe eMeHTN JINBHeHH, KOIN BInMaTe ix i3 BiDciKy.
Texhui niapametpn
ENEMENTXKMBJIENHTHNYAA
JyKhi enemEnTH JnBHeHHA AAR6 MaTb Dyeke Ombexey EmHicTB,OTXe BIKOPNCTOBy Teix NWe ToiKONHemaI HINxAnBtpeHaTNB.
EMHCTb enemehTJXnBHeHH TINy AA 3mHOctbC BIIIOBINO BID BINO6HnK yM0B 36epirHnA. 3a neBHnx yMOB BOHa MOne 6Ty n DJeKHX BnADkAX eemehnTjXnBHeHH TINy AA 3pOZnIaHnD o 3akHnEHHy 36epirHnA. 3aYBaXte, 1o emHcTe bEmehtB XnBHeHH TINy AA Moze 3MeHsBuTaNc 3a TemnPtp YnKHe 20 C. He peKOMeHOBAO HnKOpNCTOBYBATi x 3nH3kNX TemPepatyp.
V Yactota Kaipib
Enemehn JxNbnHn EN-EL18 i Tnny AA nipTprmyoB 6iBbui aactotni KdpB, Hx EneMeHT XKBNHn EN-EL15; npote 3ayBaXte, uO xuO bVOKOPCTOByOtcb enemehn JxNbnHn Tny AA, To cactaTo kapB giye 3a Hn3bKnx TempeaTyp i 3mHeWeHHam pBn 3apJy enemehT BKNBnHn. DdoaTKoBI bIDomocI npo qactoty KdpB habeJeY y noci6hNky do fotokameepi.
Nikon
No reproduction in any form of this manual, in whole or in part (except for brief quotation in critical articles or reviews), may be made without written authorization from NIKON CORPORATION.
C E
NIKON CORPORATION
Printed in Japan
© 2012 Nikon Corporation
SB1L03(P2)
6MFC02P2-03