AD2 - Ash vacuum KARCHER - Free user manual and instructions
Find the device manual for free AD2 KARCHER in PDF.
User questions about AD2 KARCHER
0 question about this device. Answer the ones you know or ask your own.
Ask a new question about this device
Download the instructions for your Ash vacuum in PDF format for free! Find your manual AD2 - KARCHER and take your electronic device back in hand. On this page are published all the documents necessary for the use of your device. AD2 by KARCHER.
USER MANUAL AD2 KARCHER
natural_image
Line drawing of a portable air purifier with control panel and buttons (no text or symbols)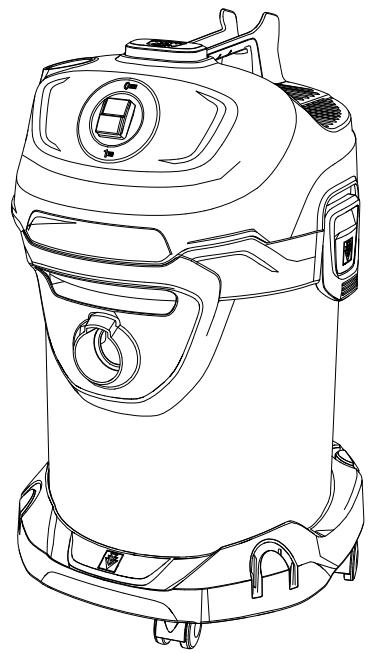
natural_image
Line drawing of a vacuum cleaner device with control panel and buttons (no text or symbols)Deutsch 5
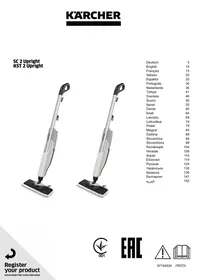
English 12
Français 18
Italiano 25
Nederlands 32
Español 39
Português 46
Dansk 53
Norsk 59
Svenska 65
Suomi 71
Ελληνικά 77
Türkçe 84
Русский 90
Magyar 98
Čeština 105
Slovenščina 111
Polski 117
Românește 124
Slovenčina 131
Hrvatski 137
Srpski 143
Български 150
Eesti 157
Latviešu 163
Lietuviškai 169
Українська 175
Қазақша 182
العربية 194
text_image
1 2 3 4 5 6 7* 8 9 10* 11* 12*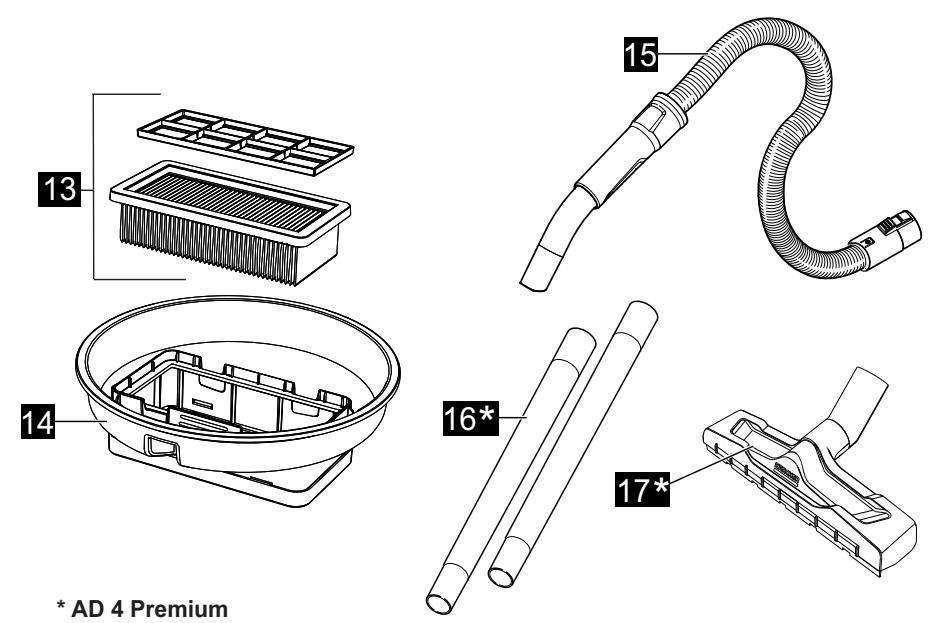
text_image
13 14 15 16* 17* * AD 4 Premium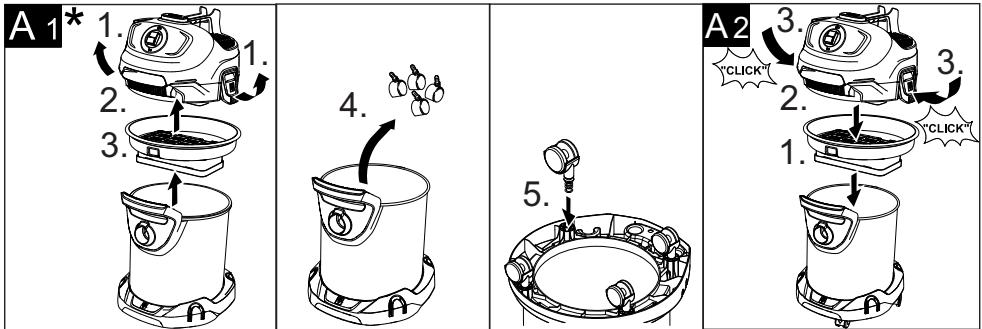
text_image
B 1 B 2 * C 1 C 2 0 ON 1 ON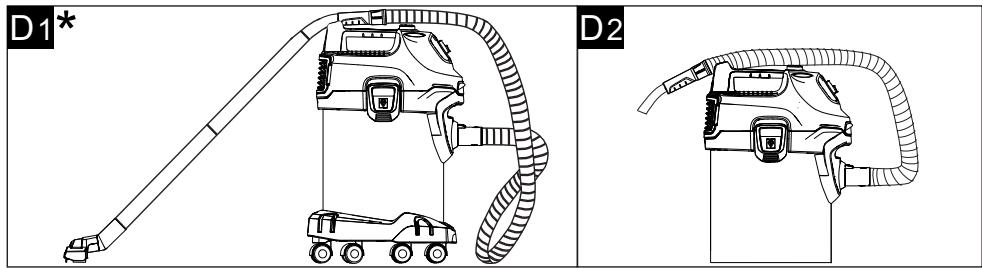
text_image
D1* D2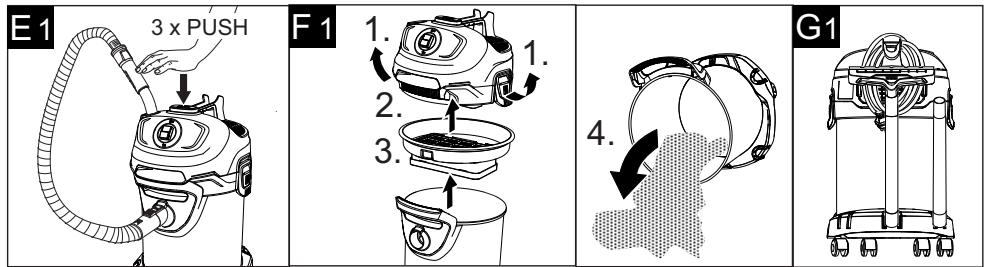
text_image
E1 3 x PUSH F 1 1. 2. 3. 4. G1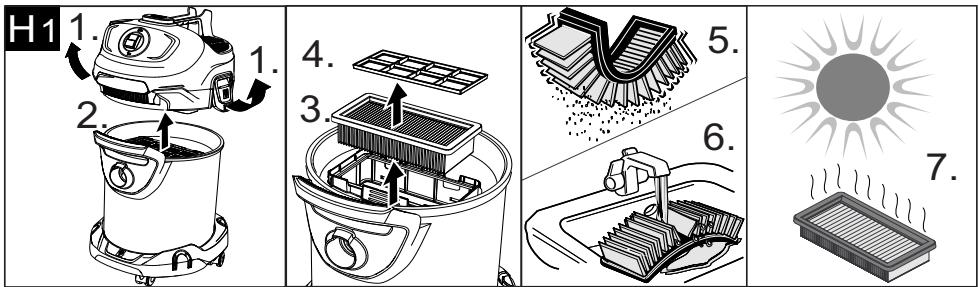
text_image
H1 1. 2. 4. 3. 5. 6. 7.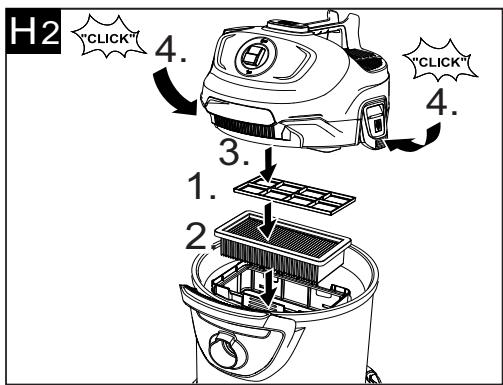
text_image
H2 "CLICK" 4. 3. 1. 2 "CLICK" 4.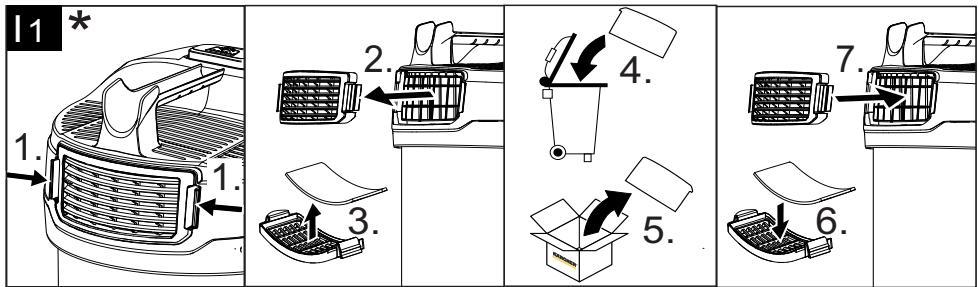
text_image
11 * 1. 2. 3. 4. 5. 6. 7.*AD 4 Premium
Inhaltsverzeichnis
General notes ...... EN 5
Safety instructions.... EN 6
Description of the Appliance ..... EN 9
Operation...... EN 9
Care and maintenance ..... EN 10
Troubleshooting.... EN 10
Technical specifications.... EN 10
General notes
Before using your appliance for the first time, read these original operating instructions, act in compliance with them, and keep them for later use or for subsequent owners.
Two models of this appliance are offered.
AD 2
AD 4 Premium with advanced features and accessories.
Proper use
The ash and dry vacuum cleaner is intended for household use only and not for commercial purposes.
The device is suitable for picking up:
– cold ashes from fireplaces, chimneys, ovens, ash-trays and similar places where ashes accumulate.
– Coarse dirt of all types, such as sand or rubble.
AD 4 Premium:
The floor nozzle supplied is not suitable for use on carpets.
The manufacturer is not liable for any damage that may occur on account of improper use or wrong operation.
Environmental protection

The packaging material can be recycled. Please do not place the packaging into the ordinary refuse for disposal, but arrange for the proper re-
cycling.

Old appliances contain valuable materials that can be recycled. Please arrange for the proper recycling of old appliances. Please dispose your old appliances using appropriate collection sys-
tems.
Electrical and electronic devices often contain components which could potentially pose a danger to human health and the environment if handled or disposed of incorrectly. However, these components are necessary for the proper operation of the device. Devices marked with this symbol must not be disposed of with regular household rubbish.
Disposing of flat fold fitler
Flat fold filters are made from environment-friendly materials.
They can therefore be disposed off through the normal household garbage provided you have not sucked in substances that are not permitted to be thrown into household garbage.
Notes about the ingredients (REACH)
You will find current information about the ingredients at:
www.kaercher.com/REACH
Warranty
The terms of the guarantee applicable in each country have been published by our respective national distributors. We will repair possible faults on your unit free of charge within the warranty period, insofar as the faults are caused by material defects or defective workmanship. Guarantee claims should be addressed to your dealer or the nearest authorized customer service centre, and supported by documentary evidence of purchase.
Customer Service
Our KÄRCHER branch will be pleased to help you further in the case of questions or faults.
Accessories and Spare Parts
Only use original accessories and spare parts, they ensure the safe and trouble-free operation of the device. For information about accessories and spare parts, please visit www.kaercher.com.
Symbols on the machine
text_image
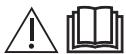
max 40°C 100°F 1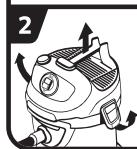
natural_image
Illustration of a medical or laboratory device with directional arrows indicating movement (no text or symbols)

→ Read the operating instructions.
1 WARNING: Risk of fire due to flammable materials.
Continuously check hoses and vacuum cleaner for heat while vacuuming ashes.
The vacuumed material must not exceed a temperature of 40^ C.
Do not vacuum up any moist ash.
Do not vacuum up soot or combustible material.
2-3 In order to avoid the collection of materials that may represent a fire risk (e.g. sawdust): Open, empty and clean the vacuum cleaner outside before and after vacuuming ashes.
Safety instructions
- Warning and information plates on the machine provide important directions for safe operation.
- Apart from the notes contained herein the general safety provisions and rules for the prevention of accidents of the legislator must be observed.
Hazard levels
⚠️ DANGER
Pointer to immediate danger, which leads to severe injuries or death.
⚠ WARNING
Pointer to a possibly dangerous situation, which can lead to severe injuries or death.
⚠️ CAUTION
Pointer to a possibly dangerous situation, which can lead to minor injuries.
ATTENTION
Pointer to a possibly dangerous situation, which can lead to property damage.
Electric components
⚠️ DANGER
Risk of electric shock.
■ Turn off the appliance and remove the mains plug prior to any care and maintenance works.
■ Repair work and work on the electrical components may only be performed by an authorised customer service.
■ Never touch the mains plug and the socket with wet hands.
■ Check the power cord with mains plug for damage prior to every use. Immediately have damaged power cord replaced by an authorised customer service / electrician. Do not operate an appliance if the power cord is damaged.
■ Do not use scouring agents, glass or multi-purpose cleaners!
■ Do not immerse the appliance into water!
■ Do not carry / transport the appliance on the mains cable.
■ Do not scrape the power cord across sharp edges and ensure that it does not get pressed.
■ Do not remove the mains plug from the socket by pulling on the power cord.
⚠ WARNING
■ The appliance may only be connected to an electric supply that has been installed by an electrician in accordance with IEC 60364.
■ The appliance may only be connected to alternating current. The mains voltage must correspond with the voltage indicated on the type plate.
■ For safety reasons, we recommend that you operate the appliance only via a residual current device (max. 30 mA).
■ Completely pull the power cord out of the appliance or completely uncoil it upon operation.
In case of visible smoke development: Pull out the mains plug and bring the device into the open.
Safe handling
⚠️ DANGER
■ Keep packaging films away from children, there is a risk of suffocation!
⚠ WARNING
■ This device must not be used by children or persons with restricted physical, sensory or mental abilities or those lacking in experience and/or lacking in knowledge.
■ Children must not play with this appliance.
■ Supervise children to prevent them from playing with the appliance.
■ Cleaning and user maintenance must not be performed by children without supervision.
⚠️ CAUTION
In case of extended breaks, switch the appliance off at the main switch / appliance switch or pull the mains plug.
■ Never leave the appliance unattended as long as it is in operation.
■ Switch off the appliance after every use and prior to every cleaning / maintenance and pull the mains plug.
ATTENTION
■ Never vacuum without inserting a flat fold filter and associated frame, otherwise the device can be damaged.
■ Protect the appliance from extreme weather conditions, moisture and heat.
Other risks
⚠️ DANGER
Risk of explosion!
Certain materials may produce explosive vapours or mixtures when agitated by the suction air! Never vacuum up the following materials:
■ Explosive or combustible gases, liquids and dust particles (reactive dust particles)
■ Reactive metal dust particles (such as aluminium, magnesium, zinc) in combination with highly alkaline or acidic detergents
■ Hot, burning or smoldering objects with temperatures greater than 40^ C. Temperatures above 40^ C represent a fire hazard.
■ Not suitable to separate health-hazardous dust (dust classes L, M, H).
■ The appliance may not be operated in explosive atmospheres.
In addition, these substances may cause the appliance materials to corrode.
⚠ WARNING
Risk of fire!
■ Do not pick up hot, glowing or burning ash.
Pick up only cold ash.
■ The dust container must be emptied and cleaned before and after each use.
■ Do not use dust collection bags made of paper or bags made of similarly combustible materials.
■ Do not use customary vacuum cleaners to vacuum ashes.
■ Do not store the ash vacuum on combustible or polymeric surfaces such as carpet or vinyl tiles.
■ Only ashes from permissible fuels (e.g. natural wood, wooden briquets, wood pellets, lignite and hard coal) must be vacuumed.
■ Do not vacuum up soot.
■ Vacuuming material which appears to have cooled down from the outside may still be very hot inside. Hot ash particles may ignite again in the air flow.
■ Stir up the ashes with a metal object to check whether the ashes are still hot.
■ Please make sure that the oven is cold before you vacuum clean ovens.
■ Wait until the ashes have cooled down before you begin with the cleaning. We do not recommend extinguishing
the fire rapidly with water. The chimney material will not withstand the quick temperature changes and may crack.
■ Continuously check hoses and vacuum cleaner for heat while vacuuming ashes. If you notice a temperature rise, switch off the vacuum cleaner immediately. Pull out the mains plug. Remove the vacuuming material from the ash and dry vacuum cleaner. Allow device to cool down outside under supervision.
⚠ WARNING
Risk of injury!
■ Do not vacuum in the vicinity of the head when using the nozzle and suction pipe.
⚠️ CAUTION
In order to prevent accidents or injuries, mind the weight of the appliance during transport (see technical data).
Stability
⚠️ CAUTION
■ Create stability for the appliance prior to any work on or with the appliance to prevent accidents or damage.
Safety Devices
⚠️ CAUTION
■ Safety installations serve the protection of the user and may not be modified or bypassed.
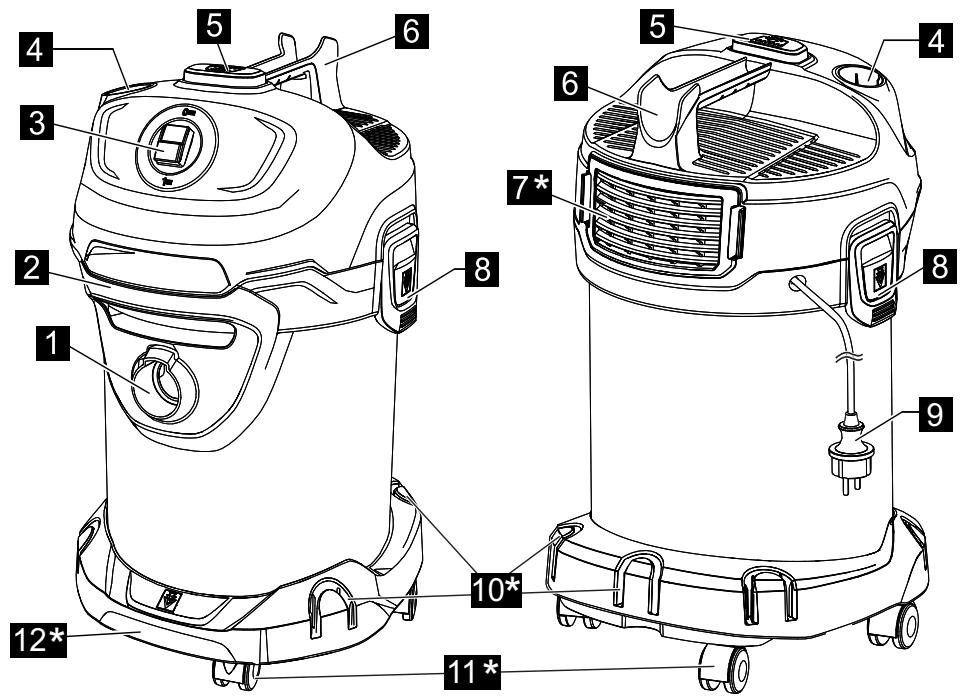
Description of the Appliance
Illustrations on fold-out page!

The scope of delivery of your appliance is illustrated on the packaging. Check the contents of the appliance for completeness when unpacking. In the event of missing accessories or any transport damage, please contact your dealer.
1 Suction hose connection
2 Handle
3 ON/OFF switch for appliance
4 Filter cleaning system connection
5 Filter cleaning button
6 Carrying handle/cable hook/leaning position
7 Exhaust grille and exhaust filter (already installed in the appliance)
8 Container closure
9 Mains cable with mains plug
10 Accessory mount
11 Steering roller
12 Handle/skirting protection
13 Flat fold filter with frame (already installed in the appliance)
14 Filter basket
15 Suction hose with handle
16 Suction tubes 2 x 0.5 m
17 Floor nozzle
Operation
ATTENTION
Flat fold filters and the associated frame must always be inserted during use.
Before Startup
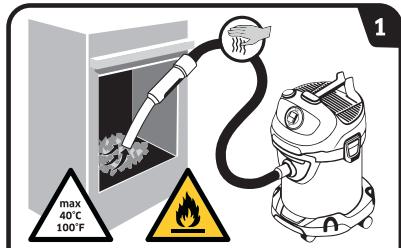
→ Illustration A 1
Remove the appliance head and the filter basket. Mount loose parts deliver with appliance prior to start-up.
→ Illustration A 2
Insert filter basket. Insert and lock the appliance head.
Start up
WARNING
Check whether the appliance was emptied and cleaned during the last vacuuming cycle.
The use of dust collection bags is not permitted.
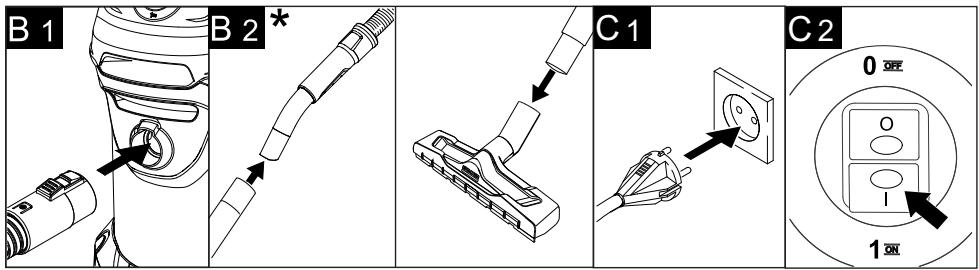
Illustration B1 - B2
Depending on equipment
Connect accessories.
→ Slide the suction hose into the connection, it will lock into place. In order to disconnect it, push down with your thumb and pull the suction hose out.
→ Connect both suction pipes and connect them to the suction hose.
→ Join suction pipes and floor nozzle together.
Illustration C 1
→ Plug in the mains plug.
Illustration C 2
→ Turn on the machine.
Position I: Suction operations
Interrupting operation
→ Turn off the appliance.
Position 0: Appliance is switched off
Illustration D 1
→ Place suction hose with handle and accessories in the trough of the cable hook.
Illustration D 2
→ Place suction hose with handle in the trough of the cable hook.
Integrated filter cleaning system
The filter cleaning system is intended for intermediate cleaning when vacuuming large amounts of ash.
Note: Thanks to the filter cleaning system the soiled flat pleated filter can be cleaned at the push of the button and the suction performance can be increased again.
Illustration E1
→ Insert the handle of the suction hose into the filter cleaning system connection on the device head. Press the filter cleaning button three times with the device switched on, waiting 4 seconds between the individual actuations.
Note: After operating the filter cleaning button several times, check the container for its filling volume. Otherwise, the dirt might escape when the container is opened.
Finish operation
→ Turn off the appliance and disconnect the mains plug.
Empty the container
Illustration F 1
→ Take off the device head.
→ Remove the filter basket.
→ Empty the container.
→ Clean the flat fold filter as needed.
Storing the appliance
Depending on equipment
Illustration G 1
→ Stow away the mains cable and accessory at the machine. Store the appliance in a dry room.
Care and maintenance
→ Clean the appliance and accessory parts made of plastic with a commercial plastic cleaner.
→ If required, rinse the container and accessories with water properly and dry them before reuse.
Clean flat fold filter
Note
The flat fold filter is located in the filter basket.
Illustration H 1
→ Remove the appliance head. Remove the frame and filter and knock the dirt out of the filter. Clean the filter under running water if necessary. Do not rub or brush the filter dry.
Let it dry completely prior to installation.
Illustration H 2
→ After that, insert the filter first and then the frame. Insert and lock the appliance head.
Replacing exhaust filter
Recommendation: In order to ensure good filtration, replace the exhaust filter once a year.
Illustration | 1
→ Press the side lugs of the exhaust grille inwards.
→ Take off exhaust grille with exhaust filter.
→ Remove exhaust filter from the exhaust grille.
→ Dispose of the used exhaust filter.
→ Insert a new exhaust filter into the exhaust grille.
→ Reinsert exhaust grille with exhaust filter.
Troubleshooting
Decreasing cleaning power
Note:
The amount that can be vacuumed up can vary depending on the vacuuming material.
If the cleaning power of the appliance deteriorates please check the following:
■ Accessories, suction hose or suction pipes are clogged.
→ Remove the clog with a suitable aid.
■ Flat fold filter and/or coarse dirt filters are dirty.
Illustration E1
→ Clean the filters.
Illustration H 1
→ Tap on the flat fold filter and clean it under running water.
If necessary, replace the flat fold filter with a new one.
■ Exhaust filter is very dirty or has not been changed regularly.
Illustration | 1
→ Replace old exhaust filter with a new one.
The device switches off automatically
■ To avoid overheating due to clogging of the accessories (e.g. suction hose, suction pipes, exhaust filter), the device switches off automatically (thermal protection contact).
→ Remove the clog with a suitable aid.
→ Clean the filters.
See chapter "Declining suction performance".
→ After cleaning and cooling, vacuuming operations can be resumed.
Technical specifications
| AD 2 | ||
| Voltage | 220 - 240 | V |
| Current type | 50-60 | Hz |
| Rated power input | 600 | W |
| Mains fuse (slow-blow) | 10 | A |
| Protective class | II | |
| Weight (without accessories) | 4.4 | kg |
| Container capacity | 14 | I |
| Action radius | 5.3 | m |
| Dimensions | ø 345 x 330 x 440 | mm |
| Sound power level L_WA | 82 | dB(A) |
Subject to technical modifications!
| AD 4 Premium | ||
| Voltage | 220 - 240 | V |
| Current type | 50-60 | Hz |
| Mains fuse (slow-blow) | 10 | A |
| Protective class | II | |
| Weight (without accessories) | 5.3 | kg |
| Container capacity | 17 | l |
| Action radius | 7.0 | m |
| Dimensions | 365 x330 x 565 | mm |
| Eco design as per 666/2013 | ||
| Energy efficiency category | A+ | |
| Indicative annual energy consumption | 20.1 | kWh/a |
| Carpet cleaning classThe floor nozzle supplied is not suitable for use on carpets. | - | |
| Hard floor cleaning class | B | |
| Dust emission class | B | |
| Sound power level L_WA | 80 | dB(A) |
| Rated power input | 600 | W |
Subject to technical modifications!
Table des matières
www.kaercher.com/REACH
Garantie
www.kaercher.com/REACH
Garanzia
www.kaercher.com/REACH
Garantie
Ecodesign conform 666/2013
www.kaercher.com/REACH
Garantía
www.kaercher.com/REACH
Garantia
www.kaercher.com/REACH
Garanti
www.kaercher.com/REACH
Garanti
www.kaercher.com/REACH
Garanti
www.kaercher.com/REACH
Takuu
www.kaercher.com/REACH
Εγγύηση
www.kaercher.com/REACH
Garanti
natural_image
Illustration of a person wearing a hooded garment with arrows indicating motion (no text or symbols)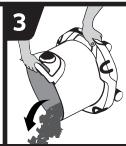
natural_image
Simple line icon showing a warning triangle above an open book, indicating caution or inquiry (no text or symbols present)www.kaercher.com/REACH
Гарантия
www.kaercher.com/REACH
Garancia
natural_image
Illustration of a medical or surgical device with arrows indicating motion or force direction (no text or symbols)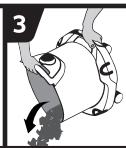
natural_image
Simple line icon showing a warning triangle above an open book, symbolizing education or knowledge (no text or symbols present)www.kaercher.com/REACH
Záruka
www.kaercher.com/REACH
Garancija
www.kaercher.com/REACH
Gwarancja
www.kaercher.com/REACH
Conditii de garantie
Design eco conf. 666/2013
www.kaercher.com/REACH
Záruka
www.kaercher.com/REACH
Jamstvo
www.kaercher.com/REACH
Garancija
U svakoj zemlji važe uslovi garancije koje je objavila naša prodajna služba. U garantnom roku besplatno otklanjamo sve smetnje na uređaju ako se radi o grešci materijala ili proizvodnim manama. U slučaju ostvarivanja garantnih prava obratite se svom prodavcu ili ovlašćenoj servisnoj službi; priložite pribor i originalni račun.
Servisna služba
www.kaercher.com/REACH
Гаранция
www.kaercher.com/REACH
Garantii
www.kaercher.com/REACH
Garantija
www.kaercher.com/REACH
Garantija
www.kaercher.com/REACH
Гарантія
www.kaercher.com/REACH
Кепілдеме
www.kaercher.com/REACH
الضمان
natural_image
Icon of a gear and wrench inside a square frame (no text or symbols)http://www.kaercher.com/dealersearch

text_image
QR code with a central logo, likely linking to a digital resource or website.71364 Winnenden (Germany)
Tel.: +49 7195 14-0
Fax: +49 7195 14-2212