USER MANUAL SC2 KARCHER
Description of the Appliance EN 5
Quick Reference EN 6
Operation. EN 6
How to Use the Accessories EN 7
Care and maintenance EN 8
Troubleshooting EN 8
Technical specifications. EN 8
Dear Customer,

Please read and comply with these original operating instructions and the enclosed safety instructions. Proceed ac
cordingly. Keep both booklets for future reference or subsequent owners.
Proper use
Use the steam cleaner only for private households. The appliance is intended to be used with steam and can be used with the appropriate accessories as described in these operating instructions. You will not need any detergent. Please adhere to the safety instructions.
Environmental protection

The packaging material can be recycled. Please do not place the packaging into the ordinary refuse for disposal, but arrange for the proper recycling.

Old appliances contain valuable materials that can be recycled. Please arrange for the proper recycling of old appliances. Please dispose your old appliances using appropriate collection systems.
Notes about the ingredients (REACH)
You will find current information about the ingredients at: www.kaercher.com/REACH
Scope of delivery
The scope of delivery of your appliance is illustrated on the packaging. Check the contents of the appliance for completeness when unpacking.
In the event of missing accessories or any transport damage, please contact your dealer.
Spare parts
Use only original KÄRCHER spare parts. You will find a list of spare parts at the end of these operating instructions.
Warranty
The warranty terms published by the relevant sales company are applicable in each country. We will repair potential failures of your appliance within the warranty period free of charge, provided that such failure is caused by faulty material or defects in manufacturing. In the event of a warranty claim please contact your dealer or the nearest authorized Customer Service centre.
Please submit the proof of purchase.
(See address on the reverse)
Safety Devices
CAUTION
Safety devices protect the user and must not be modified or bypassed.
Pressure controller
The pressure controller keeps the boiler pressure during the operation as constant as possible. The heating is turned off if the maximum operating pressure of 4 bar is reached in the boiler and is reactivated in case of a pressure drop in the boiler due to steam tapping.
Safety thermostat
The safety thermostat turns off the appliance if the pressure controller fails and the appliance overheats in case of a malfunction. Please contact your local KARCHER customer service to arrange for the reset of the safety thermostat.
Safety lock
The safety lock seals the boiler against the steam pressure that builds up in the boiler. If the pressure controller is defect and the steam pressure in the boiler rises, a pressure control valve in the safety lock opens, and steam is emitted through the lock to the outside.
Please contact your local KARCHER customer service before you put the appliance into operation again.
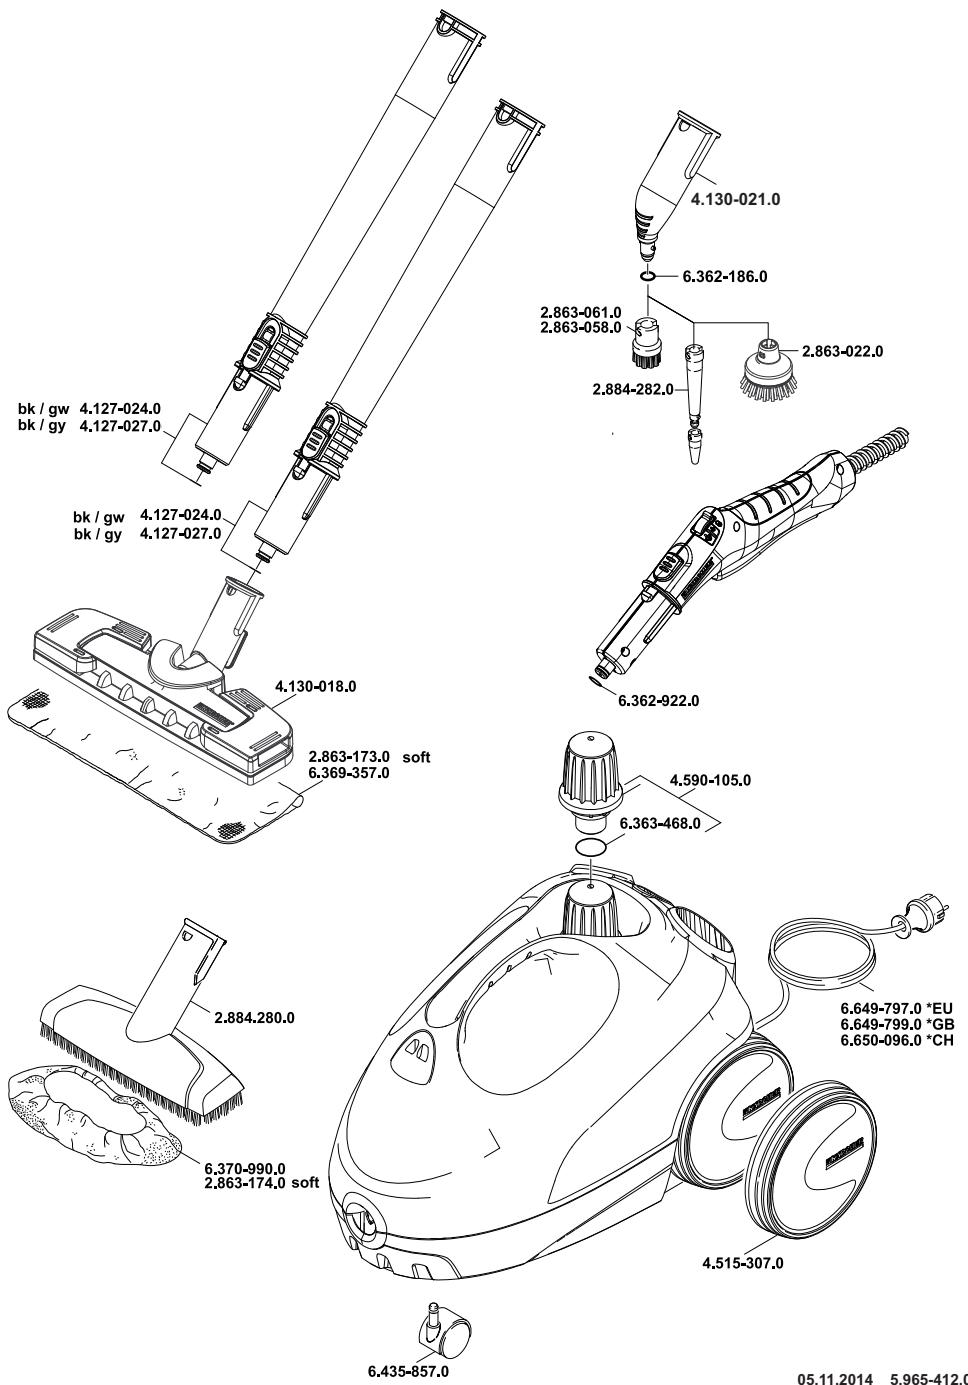
Description of the Appliance
The scope of delivery of your appliance is illustrated on the packaging. Check the contents of the appliance for completeness when unpacking.
In the event of missing accessories or any transport damage, please contact your dealer.
Illustrations on fold-out page!

A1 Indicator lamp (green) - line voltage is on
A2 Indicator lamp - heater (ORANGE)
A3 Safety cap
A4 Holder for accessories
A5 Storage holder for floor nozzle
A6 Mains cable with mains plug
A7 Running wheels (2 ea.)
A8 Steering roller
B1 Steam gun
B2 Unlocking button
B3 Selector switch for the steam volume (with child protection)
B4 Steam lever
B5 Steam hose
C1 Detail nozzle
C2 Round brush Black
C3 Round brush Red
C4 Power nozzle
C5 Round brush Large
D1 Hand nozzle
D2 Terry cloth cover
D3 Microfibre cloth cover
E1 Extension tubes (two tubes)
E2 Unlocking button
F1 Floor nozzle
F2 Retaining clip
F3 Terry floor cloth
F4 Microfibre floor cloth
G1 Decalcifying sticks
Quick Reference
Illustrations on Page 2
Illustration 1
Unscrew the safety lock and fill the steam cleaner with a max. of 1 litre of water.
Illustration 2
Screw in safety cap.
Illustration 3
Plug in the mains plug. The green and orange indicator lights are on.
Illustration 4
Wait until the orange indicator lamp goes out.
Illustration 5
Connect the accessories to the steam gun. The steam cleaner is ready to use.
Operation
Attaching the Accessories
Illustration A
Insert steering roller and transport wheels and lock them.
Illustration B
Connect the required accessories (see Chapter "How to use the accessories") to the steam gun. Insert the open end of the accessory on the steam gun and push onto the steam gun until the unlocking button of the steam gun locks into place.
Illustration D
Use the extension tubes if necessary. To do so, connect one or both extension tubes to the steam gun. Insert the required accessories on the free end of the extension tube.
Removing the Accessories
Move the selector switch for the steam volume back (steam lever locked).
Illustration E
To detach the accessory parts, press the unlocking button and pull the items apart.
Fill up with water
Notes
In case of continuous use of commercially available distilled water, no descaling of the boiler is necessary.
- You can reduce the heating-up time by using warm water.
Remove the safety lock from the device.
Illustration K
Completely empty the steam boiler to remove existing water.
Fill the boiler with a maximum of 1 liters of fresh tap water.
Screw the safety cap back onto the device.
Turning on the Appliance
Place the unit securely on a firm surface.
Insert the mains plug into a socket.
Both indicator lamps must illuminate.
The orange indicator lamp goes out after approximately 8 minutes.
The steam cleaner is ready to use.
Adjusting the Steam Quantity
Use the selector switch for the steam volume to regulate the discharged steam. The selector switch has three positions:

Maximum steam volume

Reduced steam volume

No steam - child protection Note:
In this lever position, the steam lever cannot be used.
Set selector switch to the required steam volume.
While operating the steam switch, always direct the steam gun at a separate piece of cloth until the steam is emitted evenly.
Note:
The heating of the steam cleaner is turned on in regular intervals during the operation of the appliance in order to maintain the pressure in the boiler at a constant level. When the heating is turned on, the orange indicator lamp (heater) lights up.
Refilling Water
Water needs to be filled into the boiler, if the steam volume decreases during work and no more steam is emitted in the end.
Disconnect the mains plug from the socket.
Push the steam switch until steam discharge stops. Now, the boiler of the appliance is unpressurized.
Remove the safety lock from the device.
Fill the boiler with a maximum of 1 liters of fresh tap water.
Screw the safety cap back onto the device.
Insert the mains plug into a socket.
The orange indicator lamp goes out after approximately 8 minutes.
The steam cleaner is ready to use.
Turning Off the Appliance
Illustration F
Disconnect the mains plug from the socket.
Illustration 6
Push the steam switch until steam discharge stops.
Now, the boiler of the appliance is unpressurized.
Storing the Appliance
Illustration H
Put the extension pipes into the large accessory compartments.
Insert the manual nozzle and detail nozzle onto each extension pipe.
Attach the big round brush to the small detail nozzle.
Put the small round brush and nozzles into the medium accessory compartment.
Hook the floor nozzle into the parking position.
Wrap the steam hose around the extension pipes and insert the steam pistol into the floor nozzle.
How to Use the Accessories
Important application instructions
Cleaning floor surfaces
It is recommended to sweep or vacuum the floor prior to using the steam cleaner. This way, the floor is already cleared of dirt/loose particles prior to the wet cleaning.
Refreshing textiles
Prior to treatment with the steam cleaner, always check the reaction of the textiles in an inconspicuous location: Steam at first, then let dry and then check for colour or shape changes.
Cleaning of Coated or Lacquered Surfaces
When cleaning painted or plastic-coated surfaces, as found on kitchen and living room furniture, doors, parquet; wax, furniture polish, plastic surfaces or paint can come loose or stains can be created. When cleaning these surfaces, briefly steam a cloth and wipe the surfaces with it.
ATTENTION
Never direct the steam jet at glued edges as the edge band may loosen. Do not use the steam cleaner on unsealed wooden or parquet floors.
Cleaning of Glass
In case of low outside temperatures, especially in the winter, warm up the window pane by slightly steaming the entire glass surface. This will prevent tensions on the surface which might lead to glass breakage. Then clean the window surface with the hand nozzle and attachment. Use a squeezegee to remove the water or wipe the surfaces dry.
ATTENTION
Do not direct steam onto the sealed locations of the window frame to prevent damage.
Steam gun
You can use the steam gun without any additional accessories, e.g.:
to remove light wrinkles from hanging clothes by steaming them at a distance of 10 to 20~cm
to remove dust from plants. Here, keep a distance of 20 - 40cm
for moist dusting, by briefly steaming the cloth and wiping the furniture with it.
Detail nozzle
Illustration B
Install detail nozzle on the steam gun.
The closer this nozzle is to the contaminated area, the higher the cleaning effect, as the temperature and the steam are highest at the nozzle output. Especially suited for cleaning difficult access locations, joints, fittings, drains, sinks, toilets, blinds and heaters. Heavy lime scale can be drenched in vinegar prior to steam-cleaning. Let the vinegar penetrate for about 5 minutes.
Round brush (small)
The round brush can be installed onto the detail nozzle as an accessory. Attached brushes can therefore be used to remove heavy soiling.
ATTENTION
Not suitable for cleaning sensitive surfaces.
Illustration C
Attach the round brush to the detail nozzle.
Power nozzle
The power nozzle can be installed onto the detail nozzle as an accessory.
The power nozzle increases the emission speed of the steam. Therefore, it is well-suited for cleaning very tough dirt, blowing out corners, grooves, etc.
Illustration C
Attach the power nozzle to the detail nozzle according to the round brush.
Round brush (big)
The round brush can be installed onto the detail nozzle as an accessory. This round brush allows to clean large rounded surfaces (e.g. sink, shower tray, bathtub, kitchen sink).
ATTENTION
Not suitable for cleaning sensitive surfaces.
Illustration C
Attach the round brush to the detail nozzle.
Hand nozzle
Illustration B
Install hand nozzle on steam gun.
Pull the cloth cover over the hand nozzle. Especially well-suited for small washable areas, shower stalls and mirrors.
Floor nozzle
Suited for all washable walls and floor coverings, e.g. stone floors, tiles and PVC floors. Work slowly on very dirty surfaces to allow the steam to act on the dirt for a longer period of time.
Note
Detergent residue or care emulsions that are still present on the surface to be cleaned can lead to streaks during steam cleaning. However, these will disappear with repeated cleaning procedures.
Illustration 1
Attach the floor cloth to the floor nozzle.
- Place the floor nozzle on top of the floor cloth. Depending on model - fold before the floor cloth the long way.
- Open holding clamps.
- Place the cloth ends into the openings and pull them tight.
- Close the holding clamps.
CAUTION
Do not insert fingers between the clamps.
Parking the floor nozzle
Illustration J
During work breaks, hook the floor nozzle into the parking holder.
Care and maintenance
Rinsing the boiler
Rinse the steam cleaner boiler at the latest after 10 boiler fillings.
Fill the boiler with water and swing it strongly. This dissolves lime scaling residing on the boiler bottom.
Empty water out.
Descaling the boiler
Note
In case of continuous use of commercially available distilled water, no descaling of the boiler is necessary.
As limescale builds up on the boiler walls, we recommend to descale the boiler in the following intervals (RF=reservoir fillings):
| Degree of hardness | ° dH | mmol/l | RF |
| I | soft | 0-7 | 0-1,3 | 55 |
| II | medium | 7-14 | 1,3-2,5 | 45 |
| III | hard | 14-21 | 2,5-3,8 | 35 |
| IV | very hard | >21 | >3,8 | 25 |
Note
The hardness of the tap water can be inquired at your water management office or the municipal utilities.
Disconnect the mains plug from the socket.
Allow device to cool down.
Remove the safety lock from the device.
Illustration K
Completely empty the steam boiler to remove existing water.
Use KARCHER descaler sticks for descending. Please follow the dosing instructions on the packaging when preparing the descaler.
Pour the descending solution into the boiler and allow it to react for approximately 8 hours.
Completely empty the descending solution after 8 hours. A small amount of the solution will remain in the boiler. Therefore, you should rinse the boiler two to three times with cold water to remove any residues of the descaler.
Illustration K
Completely empty the steam boiler to remove existing water.
Care of the Accessories
Note
The floor cleaning cloth and the cloth cover have been pre-washed and can be used immediately for working with the steam cleaner.
You can wash dirty floorcloths and cloth covers in the washing machine at 60^ . Do not use a liquid softener as this would affect the ability of the cloths to pick up dirt. You may tumble dry the terry cloths. The microfiber cloths are not suitable for the tumble.
Troubleshooting
Often, failures have simple causes and you can do the troubleshooting yourself using the following overview. If you are in doubt or if the failure is not listed here please contact the authorized customer service.
Long heating-up time
Steam boiler is decalcified
Descale the steam boiler.
No steam
No water in the steam boiler.
Turn off the appliance.
Refill water.
Steam lever cannot be pressed anymore
Steam switch is secured with the lock / child-proof lock.
Move the selector switch for the steam volume to the front.
High water output
Steam chamber too full
Steam boiler is decalcified
Press the steam gun until less water is emitted.
Descale the steam boiler.
Technical specifications
| Power connection |
| Voltage | 220-240 V |
| 1~50-60 Hz |
| Protective class | I |
| Protection class | IPX4 |
| Performance data |
| Heating output | 1500 | W |
| Operating pressure max. | 0,32 | MPa |
| Heating time | 6,5 | Minutes |
| Steam volume |
| Continuous steaming | 40 | g/min |
| Steam push max. | 100 | g/min |
| Dimensions |
| Boiler capacity | 1,0 | I |
| Weight (without accessories) | 3,1 | kg |
| Width | 254 | mm |
| Length | 380 | mm |
| Height | 260 | mm |
Subject to technical modifications!
Contenu
Consignes generales. FR 5
www.kaercher.com/REACH
www.kaercher.com/REACH
Fornitura
Geen water in reservoir.
www.kaercher.com/REACH
www.kaercher.com/REACH
www.kaercher.com/REACH
Leveringsomfang
To m kedlen helt for vand.
Pleje at tilbehør
OBS
www.kaercher.com/REACH
Leveringsomfang
Leveringsomfang for apparatet er vist pa emballasjen. Kontroller at innholdet i pakken er fullstendig, narr du pakker ut.
Ved manglende tilbehör eller ved transportskader, vennligst informer forhandleren.
Reservedeler
Det mä kun brukes originale KÄRCHER resedeler.
En resedelsoversikt finnes på slutten av deutschebruksanvisningen.
Garanti
www.kaercher.com/REACH
www.kaercher.com/REACH
Toimitus
www.kaercher.com/REACH
Σuσκεuaσία
To tapaaoteo uikto ntsuokueunc atneikoiceta otn sukeuaia. Kata tnv atnooukeuaia eLeyTe to Tpeixeoyu nTs wocipovntna.
EavLeiouv Eapntmuata n Exouv TpokAnei Znuiies Kata t n eapopa, npakaloue evnpewote toptoun- TheuTn OaC.
AvtaaakTiká
XpnaioTIOIEITE aTOKIAOTIKA yVnaiiaavTAAAKIKA KARCHER. EITKOITNOA vTAAALAKIKWvOaBpeite oTo TELOCTWAPOVTVOWOyIWxEIPIAOU.
Eyyunon
AkpopoueKaouo oneiou
Eiková B
(\rightarrow) (\Sigma \upsilon \upsilon \rho \upsilon \omega \rho \eta \upsilon \sigma \tau \upsilon \alpha \kappa \rho \phi \upsilon \upsilon \sigma \upsilon \psi \epsilon \kappa \sigma \mu \upsilon \upsilon \sigma \eta \epsilon \upsilon \upsilon \upsilon \sigma \tau \upsilon \tau \sigma \upsilon \sigma \tau \upsilon \sigma \tau \upsilon \sigma \tau \upsilon \sigma \tau \upsilon \sigma \tau \upsilon \sigma \tau \upsilon \sigma \tau \upsilon \sigma \tau \upsilon \sigma \tau \upsilon \sigma \tau \upsilon \sigma \tau \upsilon \sigma \tau \upsilon \sigma \tau \upsilon \sigma \tau \upsilon \sigma \tau \sigma \tau \upsilon \sigma \tau \upsilon \sigma \tau \upsilon
OoIO KOVtAOepeVoe Oneio BpiaKetai,Toa oATOTeAEuaTikotePEn Eivai N KaTHAPItIK DpaOn,ETeIOI nTheoKpaiaKa iAto aOcO sO nOteio Edoou AkoPoAoiuEivai KAUATEpa.IdtaIEPa TpAKIO yia ToV kaApioo duokola TPOObaMauW OneiUw apMuV, EapntuW, ATOXETeUeewv,VITINPwov,TouaELtw,OTopiN kAloipep. PIVov KaBAPIOe MAto, MTopeTe va malkawotet aETIiMoVAaataeE0iN KITPIKO eU, Va to aqHaeVa 8paoei 5AETTIAKi ETEITAva aTOaKpuVETe Ta aataa eAtuo.
www.kaercher.com/REACH
Teslimat kapsami
KpaTkoe pyKOBOdCTBO RU 6
3Kcnnyataua RU 6
IcnoJIb3OBAHHe npHaadnEJXHocTei .RU 7
YxOД n TeXHnueckoe 6ObcnyKnBaHne. RU 8
TmoBb Cnyae HenoJaok RU 9
Texnueckne daHHbIe RU 9
06uyme yka3aHnra
Ybaxaembl nokynateJIb!

Perepe nepbIMnIOBzOBaHmEn yctpoINCTBa HeoOxOdMnIO npOeCTb HcTaOuIyOpInrHaJIbHyNIO IHCTpyKUIMNo 3KcIIyJaA
taunni npnnaarBmey kya3aHnno 06e3oNaChOCTn.DaJIee DeIcTBoBaTb B COOTBeTCTBN C HmM. CoXpaHrTa 06e 6pOuOpbl Ira DaIbHeWero NOnb3OBAHnN INn DnI cNeDyUHwero BnAdeJeBua.
IcnoJIb3OBAHHe no Ha3HaueHHIO
IcnoJb3yIte np6op dIJI OUHCTKn napOM NCKHOnHTeJIbHO BDOMaHEM XO3RJCTBE.
Pnp60 npnnaeH nI npoeHnO uNCTKn npom. ONUCTKY MOHO pOBODITb CpIMEHEHmEOxOJauNX npHaJnEXKHOCTe, ONcaHHbIX B pyKOBOIDCTBe NO kCNpyatauM. MoUxne cpeCTBa He Tpe6yOTc. CJeYET COBLOdaTb HcHTpyKuINo TEXHnke 6e3-ONaCHOCTN
3aunta okpykaiooey cpebl

Ynakobouhble MaTePnaJIbI npriOndH IJN BTOpUHOH O6pa6OTKn. PO3OMy He Bbl6paCbIaHTe YnakOBky Bmecte CDOMaUHMN OTXoAMn, a CdaJIte ee B OINH N3 NYKTOB PnHema BTOpHNO HOrO CbIPbJ.

CTapbI npnbopbl coedepkaT ueHHbIe nepepa6baTbIaEBMeI MaTePnAbIb, NOJekaunne pepeDaue B nyKbTI pNEMKn BTOpUHoro cIbIpb. Po3OMy yTuINu3NpyTe CTapbI npnbopbl cepe3 COOTBETCTByUOJIe CNCTMebl npNEkMn OTXOOB.
www.kaercher.com/REACH
KomnjeKT noctabkn
Komplektaa npi6oba yka3aHa Ha ynakOBke. Ppi paacnakOBKe npi6oba npoBepntb Komplektauio.
PnObHApUxKeHHN HeoctaOnuXn PnHaJnEcxHOCTe Hnn NOBpeXdEnH, NOnyueHHbX BO BpEma TpAHCnpOTPOBKM,CneJeT yBeDoMnTb ToproByo opraHn3auHIO, npDabuHyo nPi6Op.
3anachbte yactn
Ucnpb3yte ToIbKo OpiHnHaBbHe 3aNaChbE cAChTbΦpMb KARCHER. OnOpCanHe 3aNaChbEs YachTe haoDNTB B KOHue DaHHN HInCTpyKuIM No 3KcPnYtaTuIN.
TapaHTn
B KaJdoI cTpaNe DeIeCTbYIO T COOTBeTCTBeHNO rapaHnIIhble YcONoBnI, I3dAnHbIe yNOnHMOUeHHo OPraHn3aIeMc6bIra NaHeI npOdyKmN B DaHNO CTpAne. Bo3MOxHbIe HEnCnPabHNOt n PnBOpBa B TeYeHene raPantnHOrO cPoKaMbYcTpaHaEM BeCcnPaTHO,ecnnpnInHa 3akNIOuaeTcB DEpeKTeX MATEpnaIbON Unn OUn6kax Pnpi N3rOToBLeHnN. B Cnyueae Bo3NHKnHObeHnnpTeH3ni B TeYeHene rapaHTnHOrO cPoKa npoc6Ba6o6paatbcz,IMe npri Ce6e Yek O Nokynke, B ToproByo opraHN3aCuHIO, npOdaBsuO BAM npnBop nn BblnxKaWyU yNOnHOMoUeHHyU cNy6by CepBncHOrO obcnyKBAHnI.
Pn3TOMOTDeIbHbIeZuΦpblNMeHOT CNeDyUOue 3NaHeHne::
Пгимер: 30190
3 roBvInycka
0 cToJeTne BbInycka
1 DecTINETNE BbInycka
9 BTOPAIcnpaMecaaBbInycka
0 nepBra zpa Mecaa BbInycka
TakIM o6pa3OM, B daHHOM npIMpe KoD 30190 03HaaeT DaTy BbInycka 09/(2)013.
3aunthbIe yctpoiCTBa
OCTOPOXHO
3aummbhe ycmpoocma cnjxam dnraaumbnoiobotamene. Budo3mehnue 3aummbhix ycmpoome unipne6pexene Hmu e donyckaemc.
Pernylantop daBneHna
PerynTOp dableny udepjxmbaet daBneHne B napobom KOTJe BO BVpeMa paOb0tI NO BO3MOXHOCT Na HOCToHHOM yPOBHe. PtN DoCTNXeHN MAKCMmaHBoro paOboOer daBne H B napOBom KOTJe noDOrpeB OTKIOuAeTc IN CHOBA BKJIOUaTeC npi naDeHN daBnHn B KOJIe B pe3yNbTaTe ydaNEHna napa.
AbarHbI TepMoCTaT
B cnyae bixoia n3 cTPO peryIaTOpaDabIeHnI nepeperba npbOba aparHnb TepMOCTat BklnHouaET npbOp.ДЯЗAMeHb abapuHoro TepMOCTa CneJy et OpatntbcBy yONHOMOueHHU cny6y cepBuHcHO to bcnyKBAHnI qmbl "KARCHER".
IpeoxpahnteJbna np6ka
IpeoxpaHntelbHa np6ka 3akpbIbaeT KOTeN OT co3daIOozerocdabNeHnnaPapa.Bcnyae HeNCnpaBHOCTN peryJITOPa dabNeHnN IO3NHKHOBeHnB KOTJe N3bItoHORo daBdneHn B npEdoXpaHntelbHn PO6Ke OTKpBaEtCppeOxpaHntelbHnKnlaanH, nnape3 np6kBy BbxOJNT HApKy.
Ipeep NOPTOBHIM BvOoM npIObopa B kCnIpyaTauIO 6pbntTeB y npONHOeHHy cnyk6y cepBnCHO 6cbNyKbHnA hqPmbl "KARCHER.
Oncanhe np6opa
KomnnekeTau na npu60pa yka3aHa ha ynaKOBKe. PnpacnakOBKe np6oBa npOBepntb KOMnnekeTau nIO. Pnpobnyekenn Hedeoctaohux npnaHadNkXhOtei nn NobpejdeHn, noyueHHbX BO Bpemr TpaHcnpotnOBKn, cneyeT ybeDMtB TOPROByo opraHn3aCuHO, npodabuyu np6oB.
306paXeHm. Ha pa3BopOte!

A1 KoHTpOlbHna lamna (3eHeHa) - HaJIuYe HAnpJxEHnB Cetn
A2 Kontrpoßhaj lamna - "HarpeB" (OPAHXEBA)
A3 PpeoOxApanHteBnaI np6ka
A4 DegerkaTeIb InpHaIaNExKHOCTeI
A5 NapkoobuHoe KpenJeHne HacaKn Dnra noHa
A6 CTeBoi KaebIb co 8TencJIbHO BnIKoI
A7 Pa6oue Kojeca (2 uTkyk)
A8 HanpaBlaHouzni poJiK
B1 NapoBoI nctOJeT
B2 KhoIka De6IOKIpOBKn
B3 PepeKIOUaTeIb KOJIuYeCTBa npa (c 3aUNToI OTBKJIUOeHnIg DeTbM)
B4 Pbyar noaynapa
B5 ⅢJaanr noaun npap
C1ΦopcyHkaToeueHNoCTpyu
C2 Kpyrnaa 电Tka YepHbI
C3 Kpyrnaa 1eTka KpacbIy
C4 BbICOKonpOn3BODnTeIbHaJΦOpCyHka
C5 Kpyrnaa zetka Bonyo
D1 Puyhna fopcyHka
D2 YexonI3 maxpoBoi TkaHn
D3 MmKpoBOJIOKOHHbI yexoJ
E1 YdInHHTeNbHbIe Tpy6Kn (2 wT.)
E2 KhoIIka de6nIOKpOBkN
F1 Φόρсύнka对阵чιςκην πολα
F2 3aKIM
F3 Maxpobar TkaHb dIa MybTa IOnA
F4 TkaHbIJaMbITbIyNoJIa IV3 MMKPOBOJIOKOH
G1 CpeIcTbO IyIaJIeHn I3BeCTn
KpatkoepykoBOdCTBO
→ 306paXeHnI np6opa cm. Ha cTp.2
PncyHok 1
→ BbIbePHTb npdeOxpAHnTeBHyIO npO6ky n 3aONHnTb npN6Op dny napoBoy NcCTKn BOdO o6BeMOM He 6Jone 1 JnTpa.
PncyHok 2
3aBepHnTe npedoxpaHnTeIbHyIO npo6ky.
PncyHOK 3
→ BCTaBtBe 1uTEnCeBHyU BnKy B 3JIeKtPoP03eTIy. 3eNeHЯ N opaHxEeBA KOHTPObHbIe JAmMb CBETCTA.
PncyHOK 4
UcTaHObKa npHaIaIeXHoCTeI
Pncyok A
BCTaBnTb a3aNkCIOpOBaHnAPBnIOoJIPOI NKn I TPAHCNOPTHBe KOeCA.
PncyHok B
CoeHINHTb Heo6xOIMMbIe IpnHaJNLeXHOctn (CM. pa3dJe "IcNoJIb3ObaHne IpnHaJNLeXHOctTe") c npAOBbIM NICTOJETOM.ДЯ 3TOrO OTKpbIb KpaI npHaJNLeXHOctn HaDeTb Ha npAOBoI NICTOJET HnADBnHTb Ha npAOBoI NICTOJET HAcTObKo, YTO-6bl KHOJa Pa3bOKnIPOBKn npAOBOI NICTOJETa 3aФнКсрOBaIacb.
PncyHok D
→ Pπr Heo6xOIMOCn IcNoIb3OaBt ydNInHtEnb HbIe Tpy6Kn.ДЯ STOrO CoeIMnTb CnapOBbIM NICTOT OHy INI INe YdY dNInHtEnbHbIX Tpy6Kn. HadBnHbTbe 6xOIMBe pInHaJNeXHOCTn Ha Cbo6OHNk KpaY yDInHtENbHOH Tpy6Kn.
Chrtne npnHaJnxKHOCTe
apeknoateBkoNueCTBa npa yctahOBHTB HnKhem noIooKeHn (Pbur nOdaun npa 3abNO-KPOBAH).
PncyHok E
→ДЯСЧТИЗПрINHДЛЕХСНЕТЕнHAKМITEHa KON-у Кра3БLOКИРОВКИ ИОТДENITEДETANIДУТ OTOpyRA.
3aINB BObl
Yka3aHne
PnIOCTOHHOM NcNOJIb3OBAHmN DcTnIINPOBaHHo BDoByUdaneHHe NaHInN 3KOTNa He Tpe-6yETc.
IcnoIb3OBAHMe TEnIOI BOBbI COKpaUaET BpEMr Harpeba.
OTBnHTb npedoxpahntbHyu npo6ky OT annpaata.
PncyHok K
→ ΠΟΝΟΥΤΙΟύ ηαλίπιθν BODY έπολη.
→ 3aIITb B KOTeI He 6OJee 1 IITpa CBExKeB BOIO- npOBoHoi BObl.
Пгебхарнельную побку с霍ва плотно 3a-BHNTbВ npn6op.
BkIIOueHne npn6opa
YCTaHOBInTe npHbOp Ha TBepdIyIO NOBepxHOCTb.
→ BCTaBtBe 1uTcEnbHyu BnIky 3NeKtpOnNTAHnB 3NeKtpOpO3eTyk. DAnKbHb 3aoropetcb o6e KOHTpObHbIe JAmMNoCHN.
ПгимерноЧебец 3 МИну оразанжевая КОНтюьпаяламна "Harpeв"norachet.Пгбордагческиnapomrotовкрабote.
Perynipobka konlnectba napa
C nomoIbIy peryIaTOpA KOIuYeCTBa npa BblOnHReTcpepyIaNPOBkA NOIaBeMOrO KOIuYeCTBa npa.PeryIaTOp IMeET TPNIOJoxEHIN:

MaKcImaJIbHoe KOJIuYeCTBO npa

OrpauHueHHoe KOJIuYeCTBO npa

OTcyTCTBnpe napa (3auntTa OT BKJIOueHnna DeTbMn)
Yka3aHue:
B 3mOM nOxKeHu pIyae nOaHu npa He-03MOxHNO npueecmu e deUcmeue.
→ Pbyar noaun npa yctanobntb Ha tpe6yeMOe KOJIneCTBO npa.
→ HακmITE Na hybIar nopadu npa, pni 3tOM ChauHa Na hapabIIra napoBOH nICtonET Ha TKAhb, nOKA nap He 6ydet BxHOJITb paBHOMePHO.
Yka3aHue:
Haapee npubopa dnyuocmku napom 60 epemucnlobn3o8aHnue nocmno HNO EKnUoayemc dny nodepxkanua daenlenu b komne. Ppu 3omocemumc opankceea KoHmponbna lamna Haapee".
ДоЛив ВОДы
KOTJI CNEyET HANOHNHTB BOOJ B TOM CNYae,ecNI B VO BPMa POBTb KOINHECTBO npa CHIKAeTcNHOBn Nap He BVpAbaBtBAeTcN.
CneuMb, yMo6bI nabUbI He nonanMu Mexdy 3axkumamU.
PapkoBanie fopcyHKn dny nola
PncyHok J
Bo BpMa nepepbBOB bpaOte BCTabIbTb op-cyHky dna nola B napKOboHoe KpeJIeHne.
Yxod n TeXHnueckoe o6cnyxuBaHne
Ppmbbka kOtla
Bcerda npombai Te KOTen np6o4 nIy nCTkn napOM He no3dnee KaJDo 10-ro HanoHHeHHKOTna.
→ HanoJIHnHTb npaOB KoTeI BOoI n 3HeprMNo npOnonocKaTb. B pe3ynbTaTe 3ToR oTdEnraTc8 OTIOKeHnHaKnPi, OceBwne Ha dHe npaOBOro KOTna.
→ BbIeIte BoIy.
YdaJIeHHe HAKINN m3 KOITna
Yka3aHne
PnIOCTOAHOM NcIOnJIb3OBaHIN DnCTUIIIpOBaHHO BODbydaJIeHHe NaKInN IN KOTla He Tpe6yETc.
PICKOBLKY HAKINb OCAXdaetcN HA CTENKAX KOTnA, MBI PEKOMEHyEM yaJANrB HAKINb CO cNeDyUChIMN INTEPBAMNI (HK=HanONNHENKOTnA):
BbiknIOuHTe npu6Op.
→ДОЛNTВБODY.
Hebo3MOxHO HaxaTb Ha pbIur noaunapa
PbUar nOaunn npaa 3aФNKcnpoBaH 6JOKnpoBko/3a- uHTOOT BKNIOUeHIN DeTbMn.
PiekeKIOUaTeIb KOINueCTBa npa piepeBecTn B nepeJHee nOIOKeHne.
BbICOKN BbIXO BOdbI
NapoboK KOteJ CInuKOM NJIHbI
HakimatbHa napOBnIncToIeTdoTexnop,oka He BbldET HEMHO BObl.
B napOBom kOTne 6pa3ObaJacb haknbl
→ YdaHnTe HAKINb n3 npoBOrO KOtna.
Texnueckne daHbte
| Повеклоуне К��точниу тoka |
| Нарраоженце | 220-240 1~50-60 | V Hz |
| Клasc Зашисты | I | |
| Стениь Зашисты | IPX4 | |
| Равочихарakтөрисөн | | |
| Мошносты нагөва | 1500 | Вт |
| Мамс. павоче давILLEнe | 0,32 | MПа |
| Врemsя нагөванney | 6,5 | Минүүү |
| Колочев STO пара | | |
| ПюдOLжпөлбэг StOBt БОТпарИВa- HINY | 40 | r/MMH |
| Мамс. сөрү пара | 100 | r/MMH |
| Размөрbl | | |
| Паровий кOTел | 1,0 | л |
| Вес бez (приhalдөхосте) | 3,1 | Кг |
| ШирINA | 254 | ММ |
| Длина | 380 | ММ |
| БыICOTA | 260 | ММ |
I3zomobumelb ocmaeJem 3a co6o npao eHeceHua mexHuueckux u3MeheHu!
Tartalom
www.kaercher.com/REACH
Szallitasi tétel
www.kaercher.com/REACH
Obsah dodávky
www.kaercher.com/REACH
Dobavni obseg
Obseg dobave Vaše naprave je prikazan na embalazi. Pri jemanju stroja iz embalaze preverite popolnost vse bine.
Pri manjkajocem priboru ali transportnih skodah obvestite Vasega prodajalca.
Nadomestni deli
www.kaercher.com/REACH
Zakres dostawy
Mult stimate client,

www.kaercher.com/REACH
Articole livrate
www.kaercher.com/REACH
Rozsaḥdodávky
Rozsah dodaVy vasho zariadenia je zobrazeny na obale. Pri vybaovani skontrolujte upnost obsahu balenia.
Ak niedtoré diely chybaju, alebo ak zistite skody vznikuté pri preprave, informujte prosim o tom predajcu.
Náhradné diely
Otklanjanesmetnji HR 8
Tehnicki podaci HR 8
Opé napomene
Poštovani kupče,

Prijve uporabe Vaseg ureada prociata te ove originale upute za rad prilozene sigurnosne upute i postupaje prema nji
ma. Obje biljeznice sačuvajte za kasniju uporabu ili za slejedeçeg vlasnika.
www.kaercher.com/REACH
Opseg isporuke
www.kaercher.com/REACH
Obim isporuke
Sadržaj isporuke Vaseg uredaja je prikazan na ambalazi. Pre vadenja uredaja iz ambalaze proverite da li jeadržaj potpun.
www.kaercher.com/REACH
06em Ha IOcTaBkaTa
06eBt Ha doctaKa Ha ypea e n3o6pa3eH ha onakobkata. Ppi pa3onakOBaHe npObePeT daNc bIbPxAHMeTo e PbNHO.
PnI IINCBaun npnaHdIeXHoCTn nI npI TpaHCnoptN H uETn MoJyBEdomTe BaunrTbproBeu.
Pe3epBn yactn
I3nOIpBbTe Cama opmHnHaHN pe3epBnH cAHTn Ha KARCHER.CmCbK ha pe3epBnTE qactn ue Hamepnte B kpaHa hactoTTO UyTBaHe 3a paObaT.
TapaHcH
Bb BcKa CtpaHa BaxKa rapaHIOHHTe yCIOBnA, nyBnKyBaHN OT OTOp3nPAHATA OT hAC nDCTPN6ByTopCKa FmPMA.EBeHTyaHnN NobpeDN Ha BaWN ypeD ueOTCTpaHIM B pAMKHTe H raPaHIOHHN cPCK 6e3nIaTHo, aKO CE KAcae 3a DeFeKT B MaTePnaJIte NIN npn pnpMBOCTBO. B rapaHIOHEn Cnyuay Ce o6bPheTe KbM DnCTPN6TOPO NIN Na-6NI3KgO TOpN3nAPn cepBn3, KATO npdctabNTe KACOBATA 6benkxa.
(AdpecnTe 电 Hamepnte Ha 3aHaTa cTpaHua)
PpeDna3Hn npncnoc6JeHna
PPEIINA3NIBOCT
IpeNa3Hume npucnoocbneu cnykam 3a 3auuma Ha nompe6umenu He mpr8ea da ce npomehern unu 3ao6ukanm.
Perynatop 3a HajraHaTeO
IIO Bpeme Ha paBota peryntaToptbT 3a HnlaRanHeTO noD- bPjka MAKCImaHIO NOCTOIRHO HnlaRanHeTO B KOTeHa.
PiN DOCTnA He MaKcIMaHHTo paBOTHO HnlaRanHe B KOTeHa HaprrBaHoTe Cnnpa, a pNIOHNJXabaHe Ha HnlaRanHeTO B KOTeHa BCNEdCTBHe Ha OTdJIeHrTe HO na- pata OTHOBOCBKIOUvBa.
IpeDna3eH TepMoCTaT
Ako perylaTOpbT Ha HailraHaTe OTKaKe I ypeDbT npepee, Toraba NpeDn3HnT TepMOCTat N3KlHObvBa ypeDa. 3a BpIshae Hn3XoDnIO nIoJKeHne Ha npdna3HnT TepMOCTat Ce 06bPhe Te kM OTOpN3nPaHnCepBn3 Ha KARCHER.
Ipepn3Ha 3anywana Ka
IpeNa3HaTa 3anyuAnka 3atBapra KOTena cpeSu noBnuBaAne Ha napoBTo HnraHe. Ako peryNaTOpbT Ha HnraHaeTO e DeEkeTeH, IN B KOTena B3HNKe CBpxhAnraHe, IpeNa3HaTa 3anyuAnka OTBapra EINH BeHTnCBpxhAnraHe n npapa NTn3n3a OT 3anyuAnkKaTa HABbH.
Ipei Da IycheTe OTHOBO ypeIa Ce oBpHeTe KbM OToPi3IpaH cepBn3 Ha KARCHER.
OnncanHe na ypeDa
06EmbT Ha ooctaKa Ha ypeDa e n3o6pa3eH ha onakobkata. Pn pa3oNaKOBaHe npObePeTe daJIu cbIbPxaHHeTo e pblNo.
PnI IINCBaUNI PnIHADJIeKHOCTN INI INI PtANCNOPTH NIO TMOY YBEDoMeTe BaUNI TbproBeu.
BuxTe cxemnte Ha pa3bHaTaTa cTpaHnca!

A1 KoHTpoJIHa JAMMa (3eJIeHa)-IMa HAppeKeHne OTMpeKata
A2 KoHTpOJHa JAmna - HarpBaHe (OPAHXKEBA)
A3 Ppepn3Ha 3aynwaIka
A4Дрьжka3a npHuaJIeJxHocTn
A5 Hocay 3a napknpaHe 3a noDobTa IIO3a
A6 MpekoBn 3axpaHbau Ka6eJ c uencen
A7 Xoobn Kojela (26poj)
A8 BodeuapoIka
B1 NapoctpyuH nuctoJet
B2 ByToN 3a De6IokpIaNe
B3 PpeKbCBAu 3a n36op Ha KOJIuYeCTBOTo npa (cbc 3aunTa 3a Deua)
B4 Ioc3a npa
B5 NapoctpyeH mapkyu
C1 CtpyHaI03a
C2 Kpbrga Yetka UepHa
C3 Kpbrga yetka YepBena
C4 CnloBaIIO3a
C5 Kpbra Yetka TOpJAM
D1 PbUHaIIO3a
D2 XabnneHO nokpmbano
D3 MinkpoΦn6bρHo no-Kpntne
E1 Ydbnkaaun Tpbn (26poa)
E2 ByToH 3a De6JIOKIPAHe
F1 POnOBAI03a
F2 3aIbpxkaa cko6a
F3 XaBmHeNa KbPna 3a noD
F4 MinkpoΦnbpbHa Kbp- na 3a noD
G1 CTnKOBe 3a npemaxBaHe Ha BapOBuKa
KpaTko ynbTbaHe
→ BnK n3o6paXeHnraHa cTpaHnca 2
Φnrgypa 1
→ Pa3BnHTeTe npEa3HaTa 3anyuAnka n HnBnHe-Te napoctpyHnrypeD cMaKcMym1 nIITbP Boda.
Da ce 3aBHTn npeDna3HaTa 3anyaIka.
Phi rypa 3
BkIIOUe TE IeNcena B eIeKtpueckaT MaPexa. CBeTBa 3eIeHATA N opahKeBaTA KOHTPOINn JAmmN.
Φnrgpa 4
→ ɪəʊkʌaɪte,ɒɡɑːtɔɪnɪʒræche opəhʌkebɑta KɔHTpɒnɪ- Na lamɪna.
Φιγρα 5
HapkaHnKa da ce BKNIOCh KbM npaOcTpyHnHa NICToTe. NapocTpyHnHType d e roTOB 3a pa6ota.
Ekcnnoatauia
MOHTIPAHe Ha npHaJdJeXHOCTNe
Φvrypa A
NocTaBete BoDeeMa poIka N TpaHcNOpTHN KOJIeNa n rN pIKCnPaaiTe.
Phi rypa B
→ Cbpxkete He6xDnIMNTe pInHaJNeKHOCTM (BVK rnaBa, /3nO13BaHe Ha npHaJNEXHOCHTne) c NaoctpyHnHn NtCTOnET. 3a CEENTa OTBpOeHn KpaI Ha pInHaJNeKHOCTTc Ce nOCTaB bPxy NaoctpyHnHn NtCTOnET nCe I36yTBA, Dokato ce fKnCnpa De6nKpuAunr8 ByTOH Ha naoctpyHnHn NtCTOnET.
D
→ Pπη Heo6xOIMOC N3N0L3BaIe Te yBbJnxITENHITepbSi. 3a CEJIa CbPxeTc napocrpyHnINTOJET eHaTae pecn. DBeTe yDblJnxITENHpB6i. Heo6xOIMata pπiNaIeNxHOCT da Ce noctabn Ha cbo6OHNkai Na yBbJnxITENHATA Tp6a.
DemOHtnpaHn npHnAdnHexHOCTnTe
ПоставETепекьсачазиборнКолиЧecвToHa napataHaazd(IocbT3a napatae6nokni-pah).
Φnγρa E
→ 3aДа demontpate npHnAJIeXHOCTNE, HATINCHETe De6IOKpaUIN6byTOH nOTDeJeTe cAHNTeEHAO nDpyra.
HanbIbAHe Ha Boda
Yka3aHn
PnnpocstHnHaNOTpe6aHaJeCTHINpHaB0aO Tbpr.Mpeka He e Heo6xOIMO NOHcTbaHe HaKOTJIeHNKAmbk B KOTena.
Tonnata Boda CkbcRa BpeMeTo 3a NpOdrpaBaHe.
Ппетдазната заушалka да ce pa3ве ot урда.
Φnrgypa K
→ Ⅲπpa3HeTe HaJIInuHaTa BOda HAnbJIHo OT KOTeJa.
HaneiteB KOTENA MAKCSMUMI 1nTbI pIprcha BODA OTOBONPOBOIDA.
Ппебразнata заллка отобу да ce 3abne 3драво на урда.
BkIIOUbaHe Ha ypeDa
YpeBbT da ce noCTaBn Bbpxy TBbpda oCHOBA.
BknHouTe uencena B KOHTaKaTa.
Dbete KOHTPOJHn JAMN Tp8Ba da CBETT.
3uakaiTe,OKaToIg3aChe opaHKeBbTa KOHTponHa Namna-HarpBaHe.
IapoctpyHnIyypeIe e roTOB 3a pa6oTa.
Perylnaphe KOJnueCTBOTO Ha napata
C npkeKbcaBaHa 3a n6bOp Ha KOJIeNCTBOTo Ha napata ce pyerIpa KaONJIeCTBOTo HA n3nIaUaTapa Na. PpeKbCaBt 3a n6bOp Ima TpI pNOJoxEHIN:

MaKcIMaJIHO KOJIuYeCTBO Ha napaTa

HamaJeHo KOJInueCTBO Ha napaTa

6e3 napa - 3aunita 3a deca
Yka3aHue:
Bmoea nonoxKeHue noCmbl 3a napama He moXe da bBe 3ade uCmeAH.
HactpoTe IpeKbCbaa 3a H36op Ha Heo6xoIMTO KOINueCTBO npa.
→ 3aDééntBaIte JIoCTa 3a napTa, npn TOBa mbpBO HAcOuBaIte napocctpyHINr NICTOJET KbM HRAKcBA KbPNa, DOKaTO napTa 3aONOHe da N3NIm3a paBHO-MepHO.
Yka3aHue:
HaapreaaHemo Ha napocmpyunu yped nepuoduyHo ce ekIpyea, 3a da noobbpxa nocmoHHo HanraHema o Komena. Ppu moea caemea opahkeeama KOHMponna naamna -3aepraeahe.
TbJIHeHe C BODa
Heo6xOIMOe OontbIbAne Ha BOa B KOtena, Ako NO BpeMe Ha pa60ta KOnUcEbTO Ha npata Hamaee n Happar cnp Da n3nIma napa.
→ ⅢBaTeTe UeIcena OT KOHTaKaTa.
→ Da ce HATNCKA NOCTA 3a npapa, DOKATO cnpe da n3n3a npapa. KOTeJbT Ha ype cera e 6e3 HANrAhe.
IpeDnA3HaTa 3anyuAnKa da ce pa3Bne ot ypeDa.
Haneite B KOteMa MAcCmym 1IITbP npra Cha BOda OTOBODnpoBOda.
Ппебпанота заллко OTнбОда ce 3abne 3dpaBOHa ypeda.
BkIIOyete Ie IeNceJa B KOHTaKaTa.
N3ukaJIte,doKATO n3rache opaHKeBaTa KOHTpOHa lamna-HarpaBaHe.
PapoctpyHnIyypeIe roTOB 3a pa6oTa.
N3kIIOUeTe ypeDa
F
→ ⅢBaTeTe UeNceNa OT KOHTaKaTa.
Dnrypa G
→Да ce hatacka locta 3a npapa,dokaTo cnpe da n3n-3a npapa.KoteIbT ha ype da cera e b3 hana rhe.
CbxpaheneHa ypeda
H
NocatabeTe ydbJnxIteJIHnIte TpbBn B rOJeMIte HOcau 3a npHaadJIeKHOCTn.
→ Poctabete pBunata IIO3a n ctpyHata IIO3a B no eHa yIbJnKInTeHa Tp6a.
→ 3akpenete roJma Kpbrrna Yetka KbmtoukOBaTa cTpyHa dIO3a.
IocTaBeTe MaIka Kpbfla YeTka NIO3N B CpeDNHn Hocay 3a npHaNDJeXHOCTN.
3aKaayeteIIO3aTa3aNODB HOCa7a NapKnpaHe.
→ 3aunite Mapkyua 3a npapa OKO NOyIbNIXeTNHITe Tpb6n NocTabete NICToTeTa 3a npapa BIO3aTa 3a NOD.
I3non3BaHe Na npHnAdnHexHoCTHTe
BaxHH yka3aHnna 3a ynotpe6a
IounCTBaHe Ha noOBOH noBbpxHOCTN
IpenopbUba c npedn n3non3BaHe ha na-pongpyHnna ypeoNt da ce m3MeTe nInn3cMcyue. Taka oOE npedn Blaekhoto NocHTBaHe nopBt ce OCB6OxJaDa oT MpbCOTn/CBO6OHNuactuNt.
OcbexbaheHaTeKCTnJ
IpeDn TpEtInaPe C npocptpyHnry ypeD MoN BnHaHn Da IpoBepBaTE YcTOHNOBCTT ha TeKCTINHNTe TbKaHN Ha cKpNTo MeCTo: TpbPO BoJeNeTe C npape, CneT OTOA OCTabeTe N 3cBxHe N HApKar pnpoBePeTe 3a NmMeHenHn Ha ZbEta N φOpMaTa.
IounCTBaHe Ha NOBbpxHOCTN C NOKpNTne IIN JAK
PnnouCTBaHe Ha IaKpAnH NmN oKpnTc C nIaCTMa CaNoBbpxHOCTn, KATO HApN. KyXHECNKn CTaNHN MeBeJI, BpATn, NapKet, Morat Da Ce OTdENrT BOCbK, MeBeJen NaK, N3KyCTBeHn NOpKtnTn IA BOn 6n Da neObaYbat NetHa. Pn noUcCTBaHTo Ha TeNs NOBbPxHOCTn HanoTe eJHa KbprNa C npA nN3bBpWete NobbpxHOCTtNe C HeR.
BHIMAHNE
He hacoueaume napama kmb 3aenehu pbooe, mbu kamo nenunomo moxe da ce omdu. He uon3aeu me yepda a noucmeane ha he 3aneyamahu dbpehu nodoee unnapkem.
Nouchtahe Ha CTbKNO
ПиMuHcNbHsHnTMeNepaTpyn3aTOnIeTeCTbKnataHa nP03OpUrTe, npeDi BcNtHo pIe3 3mIATA, kato JIeKo HnApbckAte CnapaCzIATA cTBKnHe NaobpXHOCT. ToTOu HauNCHn e3bBArBAT NaHpEzxHeHa NOBbPxHOCTa, KONTO MOrAT Da NOBeJat Do CuyNbAHe Ha cTBKnIoTo. HkPaar NoOCTeTe NoobpXHOCTTa Ha npO3opeua CpbHuHa TdIO3a NOKpNBaIOno. 3a N3terJnHe Ha BODaTa N3NOI3BaYTe PnOCTABKa 3a npO3OpU nII IN3bBpUeTe NOBpXHOCTTa do cyXo.
BHIMAHNE
He hacoueaume napama KbM 3aneyamahume Meema ha pamkama Ha npo3opeua, 3a da He zu nopeudume.
NapoctpyuennnncToJet
Bne moKe da n3nO3BaTe napocTyHnHnI pNCToJet n 6e3 npHaadnEcxHOCTn, HapnIMep:
3aOTCTpAHBAHHe HaJIeKINbHKNOT OKaehn DpeXN, KaTo IIn Hapbckate CnpaTOp pa3ctOHNTO 10-20 cm.
3aNouchTaBeHaIpaXnOuBETa.IpTuToBaCna3-BaIte pa3ctoHHe OTe 20-40 cm.
3a BnaXHO NocHCTBaHe Ha npax, KaTO HanoNTe KbPnata 3a KpaTko Cnapa nCneTo ToBaN36bPwTe Me6enITE C HeA.
CtpyHa dlo3a
Dnrypa B
→ MoHTnpaIte ToUcKOBA CtpuHa DIO3a Ha napoc-TPyHnI PInCToJET.
KoIKOto NO-6Hn3O e TЯ da 3aMbpcEHO MRCTO, TOnKOBA NO-BvCOK e EpeKbTbT O NocHTBaHETo, TbB KATO TEMnepaTpata nnapa ta Ca HauBvBCOKu HA n3XoDa Ha dIo3ata. OocboHo npakTuHNo 3a noNCTBaHe Ha TpyDHOOCtBnHm MeCTa, Fytn, apMaTyPi, KaHAn, yMnBaHnU, ToaJIeTHn, UOpri Hn pAduATOpri. PpEnIOnuCTBaHe C npapa CnHInTe BapOBuKOBu OTnparAHn MoRat Da 6bDat NaHpbckan C oet, OCTabete Da noPeJCTBa 5 MNHyTN, CneL TOBA 06NeIte C napa.
Kpbrrna yetka (MaJka)
Kpbrglata YeTka MoKeJa Ce MOHTnpa KaTo DonbIHeHne KbM ToOcKoBATA CStpyHa dO3a.Taka 6NaIarOpaHene Ha YeTKnTe MOrat JeCHO da 6bDaT OCTpaHene HynOpNTte 3aMbpcBaAHN.
BHIMAHNE
He e noxdoxoara 3a noucmeane Ha yecmeumenuoebpxhocmu.
Dnrypa C
→ 3akpenete KpbIraTa Yetka KbM TOnKOBaTa CtpyHa DIO3a.
CnIOBaIIO3a
CINOBaTaNIO3MOKeJaCeMOHTnpaKaToDOnbJIHeHneKbMTOUKOBAcTpyHaNIO3a.
CnIOBATAIIO3a yBeINUvBa CkOPOCTTa Ha n3IIN3aHe Ha napata. Iopadni TOBA TRe e NOxOJa 3a nouMCTBaHe HA oOcEHO yOpNtI 3AmbpcraBaHn, IpOdyXbaHe Ha bTfN,ФyR IN T.H.
Φnrypa C
3aKpeTe CnIObATA JIO3a KbM TOUKObATA CTpyHa JIO3a B CbOTBETCTBNE C KpbINaTAt YeTkA.
Kpbrtna yetka (rOJMa)
KpbIraTa YeTKa MoKeJa Ce MOHTnpa KaTo DoNbHHe-Ne KbM ToCKoBaTa CToyHa NIO3a.C Ta3n KpbIra YeTka MoRat Da 6bDat NoCHCTBaHN 3aObEnH NOBpXHOCTN (HAp. yMbAaHNu, DyUObE, BaH, KxHEnCk MNBKN).
BHIMAHNE
He e noxdoxodya 3a noucmeane Ha nuyeceumenu nOBpbxHocmu.
Φnrgya C
→ 3akpenete KpbIraTa Yetka KbM TOnKOBaTa CtpyHa DIO3a.
PbUHaIIO3a
Φuγpa B
MOHTIpaTte pTuHa NIO3a Ha npOcTpyHnN nIC-TOJET.
Ntternete nokpnbaloto bbyx pnuhata du03a.Oc0eHo noxdoxo7a 3a MaJIK MNEU c e NOBbpxHOCTN, dyuKa6bHHu Orneada.
IopOBAI03a
IpoxOja 3a Mneu Cc CTHeH N IOOBN OOKnTna. Hnp. KameHH NOPOE, NIOUKN IIOOBE OT PVC.CINHO 3AmbpcHeNTe NOBpXHOCTNo6aboTbaTe bABHO, 3a Da Bb3JeCTBa npata No-dblrfo BpeMe.
Yka3aHne
OctaBcHte OT NoCHCTBaU pENapATn IIN NOIdbpKaxu EMyCNs, KOINT OUI CE se HAMIPAT Na NOUCHCTBAHATA NOBbPxHCT, PNIO NOCHCTBaHe C napa MOrat da DOBeDat IO HepaOBHMePH N MeCTA, KOINT OUI Baeu N3ue3-BAT PNIO MHOROKPATNOPINOXeHne.
Φnγρa ■
3akpenete nooBata Kbpna Ha IIO3aTa 3a noi.
- Nocabete noDOba IIO3a Bbpyx KbPnata 3a nO. B 3aBncmOCT OT oboyDbaHeTo -IpeNi TOBA crH-he NaIbXkHO KbPnata 3a nO.
- OTBopTe 3aIbpxkaunTe cKo6n.
IocTaBeTe KpauaTaHa KbpNaT B OTBOpHTe I 3aTeHHeTe 3dpavo.
3aTbOpTe 3aIbpkaunTe cKo6n.
PPEI3NBOCT
He cnaaume npbcmume cu mexoy ckobume.
Napknpahe Ha yetkaTa 3a noD
Фигура J
→ PnI pKeBcBAHe na pa6Ota 3aKaHcTe Yetkata 3a NOB d Hoccaa 3a NapKpAe.
PnXn n oDpBxka
N3nlaKaHe Ha KOteNa
HnIaKHeTc KOTena Ha napOCTyHnYpeTd Hn- KbCHO cnEe BCKO DEcTHn HnBnBaHe HA KOTENA.
→ HantbHentepnapnKaTcBODaNroHakNoHete CnHIO. ITO3NHaCNHe pCa3TbApT octTaBtCtEOT BAPOBVK, OCTaHJN NO NDoHa NapnKaKToEN.
→ N3neIte BOdaTa.
www.kaercher.com/REACH
Tarnekomplekt
Lisavarustuse monteerimine
Joonis A
www.kaercher.com/REACH
Piegades komplekts
Jusu aparata piegades komplektis ir attelots uz iepakojuma. Izsainojt pbaraudiet, vai saturs ir pilnigs.
Ja trukst piederumi vai transportesanas laika radusies bojajumi, ludzu, informejet tirgotaju.
Rezerves dalas
Izmantoojiet tikai originalas KARCHER rezerves dalas. Parskatu pār rezerves dalam Jus varat atrast šs lieto-sanas pamacibas bejis.
Garantija
www.kaercher.com/REACH
Komplektacija
www.kaercher.com/REACH
Komnlekt noctaahna
KOMPNEKTAci npnCTPOIO 3a3haeHa Ha ynakobci. Pnnpo3nkyBaHNI pniCTPOIO nepeBipNTI KOMPNEKTAciIO. V pasi hctaici DoatkoBOrO obladHaHHa afo yukoJKeHb, OTPMaHNi nd TpaHcNpO TyBaHHa, cnid nobioDOMte npce B TOPOBebHy oprahi3aio, jka npoda-ana anapat.
3anachi yactnH
BukopntOByte TbIbKnOpnIbHaNbHbI 3anaChi TaCTHN HipM KARCHER. Onn 3anaChnx ActmH hapKInci daHOI hICTpykui 3 ekcnnyataaui.
Tapahtia
YKOxHII KpaiHi DIIOTb YMBOI rapaHTII, HadaHOI BIDNoBIDHOO fipMOIO-npoAdaBeM. HenoJAnkIM BPOoti NpCTPOIO MN yCyBaEMo Be3nAtoHO npOTAROM TepMiHy DII rapaHTI, JAKU BOHN BKNKANHI 6PakOM MATEPIANY NOMIKAMMI BRIOTOBNEHH. Y BUNaDKY UHHOCI rapaHTI 3BepITbC3 DO npOABuN CH BNAHONKCHy ABTOPI3OBAHNI CEPBICHN CEHTP3 DOKUMeHTaJIbHM NiTBPdKDEHNM NOKYNK.
(Adpecn nIb. Na 3BPOtI)
3axnchi npncTrooi
OBEPEXHO
3axuchi npucmpoi cyeyiomb dna 3axucmy kopucmyaeie. Budo3mHa 3axuchux npucmpoie yu Hexmyeahn HUMHe doynycaembcr.
Perynatop Tncky
PerynTop Tncky ytpmmye MaKcImaIbHO NoctiHnN Tnck y pe3epByapi niqvac pobotn npunady. HarpiBaHHa BMIMaCTbCra npDocarHeHHi MaKcImaIbHOrO 3HaueHHaPo0bOro Tncky y pe3epByapi, i npn naJinHi TnCKy Bpe3epByapi BhacniDok BiD6Opy napn HarpibAAH3HOBY BMIAkAeTcR.
3axnchn TepmoCTaT
Jkso perylantop BmioB 3nay i npictpi neperpiC,TO pncTpi BIMNkAeTcB 3aDOnOMOHO 3axHCORTopeMocTaty.3BepHtBcAo Bidiny 3abe3neuehenna 3axCNHM TePMOCTATMa BIDNOBIDH cnpyk6o6cbnyBaHH NkIcHTIB KOMNAHII "KARCHER".
3ano6ixHa npo6ka
3anobixka npo6ka 3amkkae pe3epByap BiD BNHmkaIOyoro Tncky napi. YBnadky, kauo perynatop Tncky noxkoJenH Ta Bpebpayi YTbOpmbc HAdnnKOBuN TnCK, y 3anobixki npo6ci BiDkPnaBaetcbaXncnH Knanah DnI BnBeDeHHnapnHa3OBIH.
3BepHtbc,6yIb Inacka,do pEmOHTHOro BiIDIny B iDIONBHIcnyK6IbO6CnpyroByAHNk NlEHTIB KOMNaHII KARCHER.
Onnc npnctpoH
KomnkeTauignpntpo 3a3haeHa ynaKoBu. Ipn 0p3NaKyBaHHi npIcTpoI nepeBipNTu KomnkeTauio. U pazl HeCTaui DoaTKOBOrO obnaDHaHnA a6o uKoJKeHb,OTPMaHNx nID Yac TpaHcNopTyBaHnR, cni NobiDomTe npCe B ToproBebHy oprAhiaQIO, Jka npoda-ana anapat.
→ 3o6paXeHHnIb. Ha po3BOpOTi!

A1 KoHTpoJIbHa IaMna (3eJIeHa)-HajBHiCTb Happyu y MepeXi
A2 KoHTpoJIbHa JAmNa - "Harpib" (IOMAPAHUEBA)
A3 3anobixhna npo6ka
A4 Tpimau dIa npinaJexKHOCTe
A5 NapkyBaIbHc KpInIeHHa HacaKn IJnPiDnI
A6 MepexeBn KaebIb 3i UTeNceIbHOIO BUNKOHO
A7 Pooboi koneca (2 wTuKn)
A8 CnpmaOyBaJbHn BaJIeCb
B1 Napobni nictolet
B2 Khonka po36jokybaHHa
B3 IpeemKau KInbKOci napy (3 3axnCTom BiD BMKNaHHa DiTbMn)
B4 Baxjnb noaipn
B5 Napobni shaHr
C1 ConIIO TOUKOBOrO CTpyMeHr
C2 Kpyrna Ⅲtka YopnH
C3 Kpyrna zitka YepBOHn
C4 BucOKoIpoIyKtNBHaΦopcyHka
C5 Kpyra uitka Beinkn
D1 Puchecoonno
D2 POKPITT3 eNoHky
D3 MikoBoNoKoHHn HoxOJ
E1 Iopobxbybhi Tpy6kn (2 wTykn)
E2 Khonka po36nokybaHHa
F1 Conno dny nony
F2 3aTnckau
F3 MaxpoBaTkAHnHa DnI niDnOu
F4 MikoBoNoKoHnA Tka-HnHa dny niDnOrn
G1 3ac6dIy BnDaeHnBaanHoro HnBoTy
Kopotka iNctpykci
→ДИВ.MaHONKHa cTOpIHci 2
PncyHok 1
→ BvBepHytn 3aO6bKHy np6kTy Ta 3aONBHTn pniJa dI npAOBOrO YIeHNEH BDOIO B o6'cMe He 6bnbI 1 nItpa.
PncyHok 2
3aKpyTITb 3an06iXHy np06ky.
PncyHok 3
BCTABTEtIeNcEJIbHy BIVIKy. 3aOropaTbc3eIeHn TaKOBToRaPauN KOHTpOblHi IHdNKATOpN.
PncyHok 4
3auekaIte,IOKHe 3rache XOBToIrapa KaHTpOJIbHa IaMna.
PncyHok 5
→ PπeɪdHaɪte Hacaɪky Do npəboR o nicToJeta. Napobn cenapatop roTobn do pObTi.
Eknpnyataia
3MOHTyBaTu 06JaHaHHa
PncyHOK A
Bctabnti 3aqiKcyBatn HaprrmHn poNk Ta TpaHCnpTHKOleca.
PncyHok B
3'ENHATN Heo6xIDHe npnAaD (INB. PO3dIN "3AcTocyBaHHnaPnIaD" ) 3 napOBIM NICTOJETOM.ДЯ lyBO rAO HADrHbIT BVIDKpHTN KpRnAPnHexNcHOTi Ha napOBIM NICTOJT A hacyhBe THa napOBIN NICTOJET HACTInbK, OIOb KONKa p03bOkYBaHHNa NapOBOR NICTOeta 3a@kCybanacn.
PncyHok D
→ Pπr Heo6xHocTi BnKOpNCTOByIte NODO8xBaIb- Hi Tpy6Kn.ДицBo 3'eHaiTe 3 napOBIM NiTO-NeTOM OHy aO bDi NODO8xBaIbHi Tpy6Kn. HaCyHbTe Heo6xiDiPiNHaJIeXHOcti H aBIIhN KpaI NODO8xBaIbHOI Tpy6Kn.
Bic'ednHaHnaHacaDOK
Peremukau kijbkocti napy nepebeceyn y 3aHc no-noxehn (Baxinb noaqi napu)
PncyHok E
→ДиЗнТТРиHAJIENKHOCTH HATINCHITb HA KONKY po36blOKyBaHnT a BiDOKPemTe DeTani OHy BiD oHoi.
3aJIINBaHHB ODN
Bka3iBkn
Ypaai 6e3nepepbBHO BmOPcTaNHcTAndapTHOJ DnCTINbObaHO BOHN He NotpioHo BuaIaTIHa-KnI.
BnKOpncTaanHra TeIIOI BOIN CKOpOyuEc HarpiBaHHra.
BidrBnHTn3an06jxHy np6ky BiD anapata.
PncyHok K
→ IOBnICTU BuaNTu BOy 3 KOtna.
→ 3aIITN B KOTeH He 6iNbSe HIX 1 Iitp CbIXoI BOIOnpOBiHOI BOIN.
3anobixHy npo6ky 3HOBy uinbHo 3aropHITb y npi-ctpi.
YbIMKHeHn npuNay
→ PπnnaI Heo6xioB OCTaHOBIOBaTn Ha MiCy OCHOBY.
BCTABTE MepeXHHI WTeKep y wTeNceIbHy po3ET Ky npnaJa. IOBHHI 3aoropitncsO6nDi KOHTpOblHi lamnni.
→Пибш�ноЧере3 8хилгх КовотогаякоТрольна Лamпа "Harpibанha"Зрасhe. Паровс сениарт rotoьд д роботn.
PerylboHHKijbKocti nap
3a donomoro nopeMknca hKnKocti npn peryIIOeTbc KInbKiCTb npn, kna oJaacBc. Iepmkau Mae TpN noJoxehnHa:

MaKcImaJIbHa KJIbKiCTb napi

OmbexeHa KInbKiCTb napi

Bicythictb nap - (3axnt BiD BMnKaHHa dtbMn)
Pumimka: B uoby noloxeHHi baxeI npaui napu He moxnueo 3admu.
BctaHOBtI NepemKau Ha Heo6xIDHy KInbKiCTb napy.
→ HataChiBb Na BaxiJIb Nodai napri, npu bOmy cnoaHTky HnaprablaHOn npoBn NiCToJeN HaTKaHNHy, nOKn npaHa Ne 6yBe VHxOOnDPiBOMHPO.
П Plumимka:
HaapieaHn npucmpoio dny uueHn npao nio 1c queukopumaHH nocmiiHO eKIOAeMcbd nia ndpumku mucky b omni. Ipu ubomy ceimumbcsoxoemoeapra KONhponbHa lamna HaepiaHn
DOnnBaHHBODN
KOTeI cIIH nAOBHNTH BOODO B TOMY BnPAky, JAKIO iJac po6oTNI KInbKiCTb napi 3NHHyETc bci I HOBA npa hep BnOp6JIbctcB.
→ BintarHrHb MepexHHn wTeKep 3i wTencelHoI po-3eTKn.
→ HataickaiTe Ha BaxiJIb noaui npn, noKHe npnHnHtBcBvNid npn. Tenep TnCK y KOTNI npn-CTPOIO BIcDcyTHI.
BidBnHTn3an06jxHy np6ky BiD anapata.
→ 3aJIITN B KOTeH He 6iNbIe HIX 1 IITp CbIXoI BOIOnpOBiDHOI BOIN.
3anobixHy np6ky 3HOy uINbHo 3aropHITb y npn-ctpi.
BCTaBTe MepeKHN WTEKeP y WTeNCeIbHy po3ETky npnIady.
Pn6bN3No Hepe3 8 XbNInH XOBtOrapAya KOnTpObnla JAmna "HarpiBaHH" 3rache. Napobni cenapaTOp roToBni do pOboTn.
BmKHeHH npnlaNy
PncyHok F
BntraHITb MepexHn WTekep 3i WTeNCeHbHOi po-3ETKn.
PncyHok G
→ HataickaiTe Ha BaxiInb NoadaH npn, noKHe npn nHHtBcBvNid npn. TeneP TCKy KOTJI npn-CTPOIO BIDcyTHI.
36epiratnpnctpi
PncyHok H
BCTaBtINIpoDObKByBaIbHy Tpy6Ky y TpIMaU dIpy npHAnEJxHOCTe BENIKKOro po3MIPy.
POMICTHTnpyHyΦopcyHkyTaΦopcyHkyTOKOBOroCTpyMeHaNIODBXyBaIbHyTpy6Ky.
3aKpInITn BeINKy KpyrIy 1tKy Ha cOnJI kpanKO BORO CTPMHeH.
BCTaBnTmMaIeHbkyKpyrIyUzIrkYi cOnna y cepeHi TpIMauchIpaOdaTKOBOr npinaJa.
BCTaBttnΦopcyHkyIpynIπIπnIbnapKyBaIbHe KpinIeHH.
6OmbotaTnIbnHrNIOaHi npArHbKONo NOOBKYBaBbHnx TpyoK Ta NOMictnI NapOBni nicToNETy fOpocNYk DaIIOJOni.
3aTocSyBaHn npJnaDn
Baxnbi Bka3iBkn 10do 3actocybaHHa
PnpnbpaTe nobepxHIO nIiJorN
Ipeed 3actocybaHHm npncTPO nIpyuHnEHHnnapoK peKOMHeYETcBnIIMecTu a60 npOnPiNOCOTn NiIIOr. TaKMM YINOM MOXHa 3BilbHTn NiIDNory BiD rpa3i/Hea3akpInNeHHx UACTOK nepeD npOBeEHnM BONORO npnbipahnn.
OcbixeHHa TeKCTnJIbHnx Bnpo6iB
Ipeep npOBeDeHnM oBpokn 3 donomoro npicctpoD anuueHHn napo cniD 3abXdn nepeBiprTcTIkiKCTbTeKtUNbHX BnO6iB Do BNIny Napn. Hacampeed, cniD o60bnnpo hOpO Bpi6, Notim npocuyntu noTo Ta, hapewi, npeBiprTcTIkiCt bap6ybaHHa Ta haBnHcTb deOpmaui.
OuHHeHHNoBepxohb3NokpTTTAMtaJaKOBaHnx NOBepxohb
Пи ришиенинлakobаних nobepxoHBabo nobepxoHB i3 nokpnTTaHapnKnd,kyxohnHex Me6nbT aMe6nbI dЯн KBAPTRiPn, DapeR, npkety, BicK, Me6neBa nonitypA, STyUHe NOkPNTTaBO AP6a MoKyt bpo3uHNITcNcA BOHa HNcMoKytB BuHKnHcyTN pIyMn.ДяnpoBeDeH NuaHsEHH cNl 3nerKa BiDnapHTu xCTky i NOT mnpTePTn HeO nepepaxOBaHI nobepxHi.
YBAGA
He napaenlme npay na npuknechki kpaiku, ockinbku obknaoka moxe eioKneimuc. He eukopucmoeyime npucpiui dnyuennn deeep'rahux abo npkemhux niado bez noqpumma.
OuHneHHcKa
ПинзькIns30BhiuHix TemnepaTypax, Hacampepei, y3MmKny, nporpiTe BIKOHeN cKnO. 3abJMy bOMy BN 3MOKeTe IeKko O6bOHTn napoIO BCIO NOBExHIO cKnA. Y TAKI CnoCIO BdAcTbCya YNHkHyTN HApYrN NOBExHni, 1O MOKe pIns3BeCTn Do pO3bHTTcKnA.
IOTIM NOBExHIO BIXHA CnID ONUCTNTI 3aCTOCyBaHnH RpyoHoi OPcOyHKn Ta cEpBeTKn. IJRA BUNaENHBOIN CnID BIKOPCtOByBaTHN HACAky IJRA MTTB BIKOH a60 DOxCyA npOtePtn NOBExHIO.
YBAGA
Iapy He Hanpaanlomb Ha yuinbnehi dinHku bIn eikohnoi paMu dna 3ano6iaaHn ii yukodKeHH.
Iapobni nictolet
BctaHOBuTnΦOpcyKky KpaNKoBOrO CTpyMeHa napOBm niCToJet.
IIM 6nKHe 3a6pyDHe MieC, TmBnEe eFekt YH-ENH, OCKJIbKn HauBnua TEMpePaTy Ta BxHID napN 3a6e3neuYtbc Ha NbxOdi 3 ophiCynHK. Oc0nbIO nIXdoNTB dOnuOChEnBaXKOdOCTyNHixMciB, CTNKB, apMaTyp, cTOKiB, paKOBHN, TyaneTIB, kAnHOi a6o pAdiaTOpB onaENH.N CnBnB BaINHn HaniIT nepeD qUHeHnM npAO MOKJNBO 3bpi3HyTN OCUTom a6o NMOHNO a6o NMOHNO KNCNoTO, 5XBnINn DaTn NDIOJAYA, a NICN bTOO o6bObHTn npAO.
Kpyrna zitka (MaJIeHbKa)
KpyrIy 1tKY MOxJIbO BCTaHOBHTn Ha CONIi KpAnKOBO-0 CTpyMeHBA JKOcTI DOnOBHeHNA.3aBdAaNIIeHNIO 1tKOo E MOxJIbICbTb NERKO BNDaJIeHNr CtiKNX 3a-6pyDneHB.
YBATA
He npuzhaueHa dno ouuueHry yumnueux noeepxohb.
PncyHOK C
3aΦikcyBaTn Kpyrny Μιrky Ha conlπi KpankoBoro CTpyMeHЯ.
EneKtpuHn po3nnIOBaay
BucokonpOdykTNbHy fOpcyHky MOKKnBO BCTaHOBNHa fOpCyHNI TOYIKOBORO CTyMeHIO B RKOCTI DOONBHeH.
BncoKo npOdykTnBaHa fOpcyHka NiDbuye WbNdkicTb BnnapoBvBaHHa.3iie pniuHn BOHa dope nIxDxode IyUeHennOOCbNbBO CTiKOrO 3a6pydHeHH, BnuDyBaHHa KytIB, CTiKIB, ToIO.
PncyHOK C
→ BnCOKonpoDyKTHBHy FOpCyHky 3rIHO 3 kpyrIHOU tIKoO 3aFikCyBaTn Ha FOpCyHci TOcKOBOrTOcPymeHO.
Kpyrna zitka (BENnka)
KpyrIy uItKY MOJNBO BCTaHOBHTn Ha cONII KpAnKOBO- O TcPymEnb B AkoCTi DOnOBHeHN. 3a,doNOMOHO ciE I KpyrIOI uITKN MOJHs OChuSyBaTH BeNIk OkpyrIi NOBepXH (HaNPnKnad, paKOBHnN, dyu, BaHn, kxyOHHi MmKi).
YBAGA
He npuzhaueHa dna ouuueHyaumux noeepxohb.
PncyHok C
3aΦikCyBaTn Kpyrny uitky Ha conJI kpanKOBoro CTpyMeHr.
Pунча Форсунka
Pucyok B
BctaHObItb pyHue conNo ha napOBn nictoet. HatraHITb 4oxON Ha pyHue conNO.Oco6NBO Do6pe iDxOINb TnI HeBEJIKNX NOBEXOHb, OIO MNOTcR, dyuOHN Ka6IHOK Ta d3eepKan.
Opcsnka nna nndorn
Pnncocobana DnA BCiX MnHnx CTIHnX Ta nOIOBnx NOKpnTITb, HnpanKnAd, KAM'HNx NiJNOR, NNNTK Ta nONiBiHInxNopNy. Ha cnIbHo 3a6pydHeHnx NOBepxHnx npaoTe NoBnHO dJa toro, 0o6 3bIbnTu TpBbanictb II napr.
Bka3iBka
3aannu 3acoby dny ueneneHna afo emybcii InydoTnry, kki 3aannuaoTbca na OHnuybani NOBepxhi, MoKyTp npri NtuueHni napoYo tvBOPOBaTN cMyr, kki BnDaIaIIOHTbce npri BgaratopazOBMOuyneHhi.
Pncyhok
→ 3akpinTu TkaHnHy dny MmTTa NiIIOHa fOpcyHu dny NiIIOr.
BctaHOBiTb fOpcyHKn dIy NuiSeHHN iNIOrHaTKaHNHy dIry iNIOrN. B3aJIeXHOCTi BiD oBnaHaHHN -ckNaIDtB 3a3daneRidb TKAHNHy dIry iNIOrN B3DOBx.
BiKpTN 3aTnCKn.
IOMICTNTNI KIHJI TKAHHN B OTBOPN Ta MIUCHO 3aTAYTN.
3akpntn 3aTnCKn.
OBEPEXHO
He 3acoeyamu naIbui mix 3amuckamU.
NapkybaHHaOpcyHKn dna nIDnorn
PncyHOK J
→ NOBHICTHO BnDaJIHTN BOy3 KOITNa.
Dorna3a npnlaadam
Bka3iBa
TkaHnHa dIa nIaONr Ta 0xOn Ta pyuHoro cOpaNa nopeHbO npOMti, TOM yix MoJHsA Opa3y BHKOpNCTOBByATIN iIc aac pOBoTn 3 napooCHNKoM.
→ 3abpyndeni TkaHHnI IJI niIDOnI npAT npi 60^ B npaIbHI MaHNI. He BVKOpIcTObyBAtN KOHNIOHeP, IO6 TkaHHn6 Bynn 3daTHI DO6pe npmMaTN 6pyd. MaxPOBy TkaHHy MOxHa cyuHTu cyuapui. MikoBOJIOKOHHy TkaHHNy He MOxHa cyuHTu cyuapui.
Donomora y BvnaKyu HenoJaok
Hacto noIkoJKeHH e Docntb npocTmN, TOMy 3a doNOMORO npBBeDeHO rHxue oRJaD y Bn cami 3MOKeTe ix yCyHyTN. JaIO Bu MaTe CymHiBn abO npHnaBHOCTi noIkoJKeHb, He 3raDaHnx yOrndi, 3BepTaIteCb, bYdb naCa,do ABTopu3ObaHoI cnyKo nObcnyroByBaHn KJIeHTB.
TpmbaJn yac HarpiBaHHa
Ynapobomype3epByapi3'ABVBCaHakn
→ BndaJIb hakm3 napoBOro pe3epByapa.
Hemac napu
Hemac BOu y napOBomy KOJI
Buknioitb npncpti.
→ DOnnTu BOy.
Baxinb noaipnap He moxha HATnCHyTN
Kannbl Hycaynap. KK 5
Kayincizik Kypanapbl KK 5
Bvibim cinnattamacbl KK 6
KbickaHa HycKayIbIK KK 6
KoIdaHy 6
KabdbkTapbl KOnlaHy KK 7
KyTu MeH TeXnHKaIbIK TeKcepy KymbICTapbl. KK 8
Kepeprinep 6oIFaHa KaMeK any KK 9
TexHnKaJIbIK MaFMyMaTTap. KK 9
Xannbl HycKaynap
KypmetTI TyTbIHyWbl,

БиьmblbIb3dI anfaW pet KONDAH anbIbHa oCbI cke NaiaDAny HcKayIbFbHJ XHe KaMTbIJrAh
Kayinci3diK 60bIiHa HcCKayIapDbI OkBIn IbIbIbI3.
Onapra cai apeket etiH3. Kitantapdbin ekeyih de KeHHri naaidanahy yuih nHe meoc sbyblde KieH i naadanaatbHn TuTnaP auyuHc kantan KOHbH3.
ByibIMbl MaKcaTbHa cOeK KOJaHy
By Ta3anaIbIbIH yIuapyaIbIbIbHa raHa
KoJIaDaHbIbI. ByIbIMdb ByMeH Ta3anay yUHH
aPahlanf HKeHe Ocbl naJdaIaNHy UckaybIHa
KepeTITnREh TnICTi Xa6DbIKTAPmEH KOnDAhyra 60NaIbI.
CoNDbIbTaN epeKeIe kayinc3dik epekeenepi h CaTkA bIbI.
KopwaHaOpTaHbI Kopray

KanTay MATEpNAnIaPbI ekHIIe HEnyReY
XapAMdbI. KaTaNAmHbI y KOKbICbHa
NaTkTbMpAybHbI3Db cypaMlb3,OnApdb
EHDey yUihB oBeKe KOHybI3.

O3 MEP3iIMn aKaTafan KypaIapda 6aFaNbl, EKHIIe HJeeye JApamMbIa MATEpnaIapd 6ap. CoHbTkAn KOJIbIbnfA HKeNe ecky BHyIMdpB apNaIbipIKTe nnHay kJyHepe apKbIbI kaNDbkTapfa TancbpyHbI3 naBIm.
Kypamblndafbl 3aTap Typalbl aHbIKtamajap (REACH)
BiyIMHbN KpyaMbIHaDaIb 3aTAP TypaIb COHfbl MaJIyMaTApDbI aCTbIa KePcTeIgRe HHTepHe6BeTepiIm3e OKI anaIb3: www.kaercher.com/REACH
KanTama iwiHdere 6eJweKTeP
C3dHbMbHb3dbH jKeTki3iNy KeNEMi Kopanwa da BeHneHEnr. BMyBIM KopanwacbH aWkaHa Kaopnwa iHJderi BMyBM MeH bIeKTePiHi TOnbIK XHe 6y3JIMaFAH Tpyde BoNFaHDbIbH TeKcePin AnbH3. Erep KeB6ip XabdkTap KOK bOca Hemece TaCbImaay Ke3IHderi akayapnBcOa, annapaTbI catKaH cnpMaHbXabapdAp etHi3.
Kocajb6eJweKTeP
Tek KaHa TynHcyKaanBk KARCHER Kocankblb6bnweKtep KOnlaHbHb3. Kocankblb6bnweKtePdH CypTeTMeci OcblhckayIbTkBtHcOcbHda6epiRtnE.
Kenijdeme
Biyimdapmbi3 yiwinepende xayantbIeTIM cepiktectepim3 tapanbHn anbH nbiarpabnatbH KeniIndeme wapTTapbl kUwTe bOandb. Erep matepnaanapdbH aKaynbfbHe MeHec DaBnHnday bapbcHnDafta Kateniktep TaBlnca, 613 bKtmanakaybnkTapdb KeniIn MEP3imi iuiHne akbcIs 3KHeJeM3. KeniIn MEP3imi iuiHne Hapa3bNbIKTapbHb3 6oLca, acnAnTb caTkaH caydaMekeMeCine HeMece XaKbIHDaFbEkinETTI cepBCTIK Kb3MeT KepeTy opbHaCatbIn any Yerih KepcetIn, xabapNaCbHb3.
THdipinre H KyHKepeTeiIReH Typ KeCTeciHe du
Keke caHapdbH MafbHacb KeleciJe60aIb:
MbicaJIbI:30190
3 ΘHπipijirehXbJIbI
0 ΘHdpipinreH facbipbl
1 ΘHπipinreHONKbINdbIK
9 ΘHdpinre h aibHbH ekiHsi caHbI
0 ΘHπipiIπeH aibHbH 6piHicHbI
CohImeH 6yI MbicaJa 30190 KoDbI 09/(2)013 eHdipinre H KyHn 6iJdpieJI.
Kayincizik Kypaapanapsi
△ ABAIJIAHbI3
Kayincidik KypanadapbHbM KAKcMbI KonDahHywblbHb Kayinmen cakmanbpy, ocbnapbIe3aepmye Hemece bblkncbsI3 KanobpIyra Bonmdu.
KbICbIMDbpeTteriu
KbICbIMDbpeTteriJxKymblcKe3IHDeKa3aHdaBfblcIMdbIe HXOFapbl6ipkAnblNTblMeUWepeDe caKTanTypaBl. Ka3aHdaBfblXyMlc KblCbIMblHbH eHXOFapbldeHreHneKTeKHDe, XblblTkbl3nEMeHTaBpIaNabI, an 0y WbIFbHbH aTNKcHde KbcIMToMeHeDece,KaTaKoCbIaNabI.
Kayinci3ik TepMoCTaTbI
Erep Kbcbim petteriichi katere 6aiaNaHbIcTb icTeh
uibKcza XeHe 6yBbIM KaTTb Kbl3In KETce, Kayinc3dik
TepMOCTaBb 6yBbIMDa eWipeDi. Kayinc3dik
TepMOCTaBH 6actanBk KaNbHa KaTapy ysiH
KARCHER KOMnAHHcbHbIKeJIeTTi Kb3Met KcpCey
6enimihe xaapnacbHbI3.
By Ka3aHbIbIH Kayinci3dk KaJNaKaWacbl
By ka3aHbHbH KANNAKUacBc Ka3aHdb By KbcMbHbHbX KOFapblAbyhnaKapcbTypaBb. KbcMbDbpeTterlI icten WbIKKaH JkaTdaNJaXeHeepaKaHaDaBb6 By KbcMbIBe TcKOFapblOcNla, By Ka3aHbHbH KANNAKUacBcHApBb KbcMbDb WeKTeY KlanaHbAaBbIaDb da, By KaNaK apkblnCbIptKa WbIFadb.By bIMDa KaTadaH naJanaHap aIbHda KARCHER cHpMaCbHbHekjIeTTi cepBNCtIK Kb3MeTIhe XabapnacyKaXET.
ByiYbIM CnPaTtMaCbI
C3dHbMbHb3dbH JKeTki3iNy KeNEMi Kopanwa da 6eHHeHEn. 6yBIM KopaIwacbH aWkaHda KopaIw aHJDeR 6yBIM MeH 6nueKTePiHi TOnbK XHe 6y3JIMaFAn Tpyde BoNfAdbfBt H TeKcePin Ablb3. Erep KeB6ip XabkTAP KOK bONca Hemece TaCbMmDany Ke3HJcER akaynap Bocna, annpaTTb catKaH fnpMaHbXabapdAp etHi3.
CypTep 6yKtemeni 6eTTe KapaHbI3!

A1 BaKbIay 7aMbI (Kacbl TycTI) -KeJIiIK KepHey 6ap
A2 BaKBJay WAmbl (KbI3FbIIT capbl TcyTj)- Kbl3y
A3 By ka3aHaBbHbH Kayinci3ik KaKnaFbI
A4 BenaekTepiH yctaftbbl
A5 Eeden copy wymek yctay ywiin Ttkacbi
A6 ΘneKtp ToKka Kocy Ka6eJep aUaCbIMeH
A7 Dnckiinep (2 daHa)
A8 BafttaBilpoJIK
B1 By nictoleti
B2 AxbipatKbIu Tynme
B3 Keenno3nuiybl6y bIbIbIH KCKbI (6aanaapdbH KocybHaH caTay)
B4 By 6epydiH deHreH peTteri
B5 By bepy wnahri
C1 Hykteni afbIH wMyeri
C2 έнгrelenk kblwaKapa
C3 DeHreIek KblnwaK Kb13bn
C4 Kyat wymeri
C5 DeHreNeK Kblnak YIkeN
D1 Kon wymeri
D2 Tykti MaTaDaH xacanfah Kan
D3 MinkpoΦn6paDan XacaIraH Xa6bH
E1 ¥3apTbIw TyTikTeP (2 daHa)
E2 Axbipatkbil TyIme
F1 Eden Kyyra aphanfah wymeri
F2 Bekitkiu
F3 EeHRe apHaIraI Teppn epIMdi yu6bepk
F4 MkhpoΦn6paJah
Xacanfah eJehre
aphanfah shybepek
G1 TaT Ketipyre apHaIaHaT TaKaIaIap
Kbickawa HycKaynbik
CypeTep 26Te KapaHbI3
Cyper 1
ByKa3aBbHbH kaiyinciAdik KaNfABHb6ypan aBbH, 1nITpre DeHH b7 Ta3anafBbHbToTbIbpHbH3.
Cyper 2
→ Kayinci3dk KaKaNaBbH 6ypan Ka6bHbI3.
Cyper 3
Xeni aushacbiH eHIri3iHi3.
Xacblxhe capblnt 6aKbInay waamdapblx
Xahadbl.
Cyper 4
→ Kb3fblnt capbl Tcyti 6aKblay WAMbl eWKEHRe DeHH KyTHi3.
CypeT 5
Ka6bIbIKTapbl6 By nCTOnetIHe XaIFaHbI3. By Ta3anaFbIiXyMbICKa daBbH.
KoIndaHy
БунбIM kepek-харазын ophaTy
Cyper A
BaftTaybI pONK nEH tacImanDay DeHReNekTePi opHaTbInB KanaTaHINdA KoYbIHb3.
Cypet B
KaKetKa6DbkTapbl(《Ka6DbkTapbl KOnlaHy》 6eimH KapaHb3)6y NiCToNETne H KaIraHb3.Ocb yuHn Ka6DbkTbH aUbIK YbHb6y NiCTOJTE opHaTBn, OBy6y NiCTOETiH 6bnKTah bIpy 6aTbPmacbIHn (C2)OpHaybHaJeH,6y NiCTOJIte Kapa KblNbItaBeepi3.
Cypet D
KaKeT 6oIaHAn XaIaIaY z3apTkblu TYtIKTepei KOnDaHy Kepe. Ocb yuiHbip HeMece eki y3apTkblu TKeTIepei By nCToIeTneH XaIraHbI3. KaKeT Xa6DbIaKapIbIy z3apTkblu TYtIKInbOc YuHaOpHaTbHbI3.
Ka6dbikTapdbiaxkbipaty
→ 由山bIbIcIbH KENNO3MUNaNbI aKbIpaTbI-N KOKbIbIH apTkBIO3NuaRFA KoIBHb3 (6y6epyIDn DeHreIne peTterII XkAbIrrA).
Cypet E
Xa6bdkTapdbH 6bnweKepiH axbipatuyuH, 6nokTah bHyfAp 6bIbPmacbH 6acbln, 6bnweKepdi 6biHIn iHHeH 6biH cybpH anbHb3.
Cy Kyo
Ha3apbIHbI3da 60JIcbIH
CaTbIbIMdAflMInCTINbIeHReH Cybl YHEMI KOJaHaHaFKe3Je,6y Ka3aHbHbI TaTbIH KOIODbH KAKETI JOK.
blctbIK cy KblbHy yaKtBHa a3aTaNbl.
→ ByiIMHaH Kayinc3dk KaINaKwacbH 6ypan WbIfapbIbI3.
CypeT K
→ Ka3aHdaBfI cyDbIH 6apNbIFbIH TObnIFbIMeH Terin TaCTaHbI3.
→ Ka3aHra eH KEN DeReHDe 1 NITp Ta3a Ky6bIp cyblH KyHbIbI3.
→ ByiBIMFaKayinci3iik KannakwacbIH HbIFbI3 6ypan Xa6bHbI3.
BvibMbIeawipy
→ ByibIMdbI TypaKbIbIbIbIH KAMTaMaCbI3 eteTIH 6eTKE KObIHbI3.
→ 3neKtp aushacbH 3neKtp po3eTkacbHa caIbHbI3. BaKbIay wAmbHbI h ekeyi de Jxahy KaKTe.
KbI3fbIIT capbl Tcyti 6aKbIay 7aMbI cHReHRe DeiH KyTIiH3.
By Ta3aJaFbIiX KymbIcKa daIbIH.
By meJIsepiH peTrey
Kenno3nunblb6yblfbcblHbAjkbpTaBn- KOKsbHbHbN KEMeIMHeu bFbIn JxATkAn 6ybln MeInepe pTeTenei.KeNo3nunbla axbpBat-bKockbblbYwNo3nunBc60naDb:

BydbIn eKn Mmepi

Будын КбICКAPТынган МELшepi

Bycb3-6anaanapdbin Kocbyihn Kopray Hcyay:
Ocbo n0zuiyda 6byepydiH deHeeiin pemmeiui KonoaHbIa anMaDbI.
→ Keπno3uŋaIbI axbIpaTbI-KocKbIwTbI 6yDbH KaJxet MeIupine opHaty.
6y bepydIH DeHreIH peTteriIH KcO, ocbI Ke3e, andbIMeH 6y tanAHsacBn, 6y bIPkAnblntbl 6bIKKaHsA deH, KaHdai da 6ip wSybepeke 6aBbTTay kaket.
Hyckay:
By ma3apmkbilbHjBxblmy 3JeMeHmi, OHJI nauaanany Ke3iHoe, Ka3aHOrabJI KbcIbMObJ ycmnA myy yuiH anCin-anCin KocbladO. OcbKe3de 6aKbIay wambl (Kb13fBImcapbl mycmi) xahBIn myp -Kb3y.
CydbieceenKyo
Kymbic KeiHde by MneIupei aaaBiln, XaHe coHbIHa 6y IbIKnai KoiHan Ke3e, 6y Ka3aHbHa cydbI eCenEn Kyo KaKeT.
→ ΘηεΚτp aʌaçbɪn ɜŋεΚτp pɔsEΤkɑsblɪH ʌbɪræpblɪn aʌbɪhɒl3.
→ 由IbIfybl ToKtAmaraHla,6y6bpYiDJeHreIH peTteriHb6acBhl3. ENDi 6yblMHbH 6y Ka3aHbHa KbcIm JxOk.
→ ByiBIMHaH kayinci3dk KaInaKaacbH 6ypan WblfapblHb3.
→ Ka3aHra eH KEN DeereHde 1 NITp Ta3a Ky6bIp cyBH KyBblHbI3.
→ ByiBIMFaKayinc3dik KannakwacbH HbIfb3 6ypan Xa6bHb3.
→ 3neKtp aUacbIH 3JIeKtp po3ETkAcbHa caJIbIbI3.
KbI3rBtnt capbl Tcyti bakbnay IaMbI cHReHre DeHH KyTHi3. By Ta3anaarblu XyMbICKa daBbIH.
ByibIMdbi icTeH wBifapy
Cypet F
→ ΘηεΚTp aʌaçbɪH əŋεΚTp pɔ3eTkacbɪHaH ʌbɪfapbɪn anbɪhɒl3.
CypTe
→ 5bIbIyIbIOKToMaHaHua,6y6bepyiIN deHeireIH peTteriuih 6acblH3E. EHNdi 6yblMHbH 6y Ka3aHbHda KbcIbIM JxOk.
ByibIMdbI caKray
Cyper H
→ 3apKbIu TytikTeepJia6dbkTap ywiH yIKeH yctaybiTuTpaehri3iH3.
KoJ WMyMerI MeH HyKTeni aFbIH WMyMerIH y3apTkblu TytikTrep eHri3iHi3.
YIKeH KbJIiHaKtBHyKTeJIaFbIH WJyMeRIHe OPhaTbIHbI3.
→ KiIiKeHTa KblJiWakTb KepeK-jaapakTapFa apHaHfahOpTaJIbIK yCTaFbIkaOpHaTbHb3.
Edeh kyyra aphanfah wymerih napk yctaybibha inihi3.
By xibiépyre apHaIraH wAnHiI y3apTkbiu TytikTeprdi aHaiIbIpa opAhi3 xHe 6y TaNaIHaBi eH eH xyyfa apHaIraH wMyerIe eHri3H3.
Xa6bIbIKTapdbI KOJaHaY
MaHbI3dbI KOJIpaHy TpyaJIbI HycKaynapbl
Kep 6etin ta3anay
By TaanaaBbIbH KOnDaH6ac 6bpyH eEneHdi CbInbpHy He uHaHcOpfbIay YcbHbIaNla. OcblauHa eEnbIbnfAbl Taanay aabHbIya KIP/boc KOkblCTah TaanahAaJI.
ToKbImaHbI KaHaPty
ToKbIma 6yIbIMapabH Ta3aIaydbI 6actMaC 6ypbH, anDbIMeH KePIH6eBHTIH aIMakTa TOKbIMahbH 6by 0cepiHe TpyaTbJIbFbH TeKcepY kKeT. AnDbIMen 6ymeh Ta3aIahbI3 da, KeTIPin, MaTahbI h Tyci, niiHi e3repYiH TeKcepH13.
KanTaNFaH, KaIaNFaH HEmeCe NaKTaNFaH 6etTerpi Ta3anay
Ac 6eNMeCihH xHe yJxHa3bI, ecKTeP, napKet CnKtbl NaKtTaNfAH HeMeE xKaHaBbMATEpMaIaDapMeH KaTaNfAN bETTePi TaaNAnaFah Ke3de, bKaYa3, xHa3 NOnIyTpaCb, JxACAHbMATEpMaIaDapdAn HxKaCaFAN bETTeR XeHb6eHInH, Tyci Kanybl, dakTap naJa D 60NyI MyMKHc. Ocb bETTePi TaaIay Ke3HDe MaTaHb KluKebe KpyrataHb3 XHe bETTePi cyPTIH3.
HA3AP AYdAPbIhbl3
KancbpbIraH Xuekmepee 6ybi 6aBImMaHaB3, ce6eBiXa6bcmbpRsiu mycin Kanby MyMKIH. BybIMoN kAn KafBmRaH arau Hemece napkem edeHepdi mazanay yuih naDanaHaBn3.
OHeKTePdi Ta3anay
Cbyk aya paib k3iHde, acipece KbIcTa, Tepe3e eHneKepiH, eHNeB6TeH bMyEn akIbpiHdAn eHden, KbltbHbIbIc. OcbInaIHa, eHKeTRe JapbIKwakTapdbHn naDa 6oBybHa aKenyi MymKiH eHNeB6TeiHiN deOpmaunany KePehy TiYcEi.
Cocan Kein Tepee 6etih KOnb ypiKkUImen XaHe KaTAMamEn Ta3aHbIc. Cyanb 6ocaty wIn pakeJIbDi KOndAhlBn HEMec 6etTeepi Kpyrak etin cyptIH3.
HA3AP AYdApbHb13
Tepese xakmaybHbN nakneh kanmanraH xepnepiHe HkycaH Kenmipin anmac yuiH, bdyoI oraH kapaB 6aBfImmaMaHbI3.
By nictoleti
C36 by nictoletin cantamanaapcbla da naiaana anaacb3, MbicaJIbI:
- iyni Tpyrah Khimderi Jxehin 6ypmeneri Ketipy yuhi onapdb10-20 cm KaabtkbikTah 6ymeh eHdEHH.
- eCIMdkTepDen WaHdbi Ketipy yuiH. CoN yuiH 20-40 cm KaUbIKtblfBih CaKtaHbI3.
- ⅢaHdbI bInraIdbI Ketipy yuiH, ocbI MaKcTaTb Iy6peKeTI a3dAn bMye HDen, OHbIMe HxHa3dbI CypTlH3.
HykTeJI aftbH wyMeri
Cyper B
HykTeJI afbIn wymerH 6y nictoTeIhe OPhaTbIHb3.
Tataaay canacbHykTei afbH yMerieHiH KipneHReh
xhepe xKaBldbIbHa Taeydi xOfarabnaiDb,ce6eBi
temepaType Mn bCIM yMerieHiH uBfa BepicinHe
eh xOfarab 60bn TTablaDb. Kon Xetye KInb
xepnerdi, fyraIapdb, apMaTypanapdb,
cyarapnapdb, uYHrbuIuaIapdb, dApetXaHanapdb,
xkanO3nIepdi XsHe XJbIy bTaPeRanpabH ta3aIayFa
ocipece TImDi O5bn TablaDb. kTtH KatbI N KaFAn
xepnerin 6ymen Ta3aIaydbn anDbHa cipke cybIme
Hemece NIMOH KbUkBbImeH cynan, cipKe cyb5 MHNyt
iwiHnde acep ety uYih TocbIn, codah KeHH 6yMeH
ta3aIan, ketipyre 6oanda.
DhenreJek KblIwaK (kiwKeHTaI)
LunHHdpnIK KblIaKtbl KocBIMwa petiHne HkyTeni aftbH yMWeHre opHatyra 60anaDb. KblIaKnEN TaaIaydbH apKaCbHa, TypbIN KaTrH kIpNepDi OHaHbPAK KetipyRE 60anaDb.
HA3AP AYdAPbIHbI3
Te3 akaynaHambiH bemmepoi mazanayra KeImeuOi. Cypet C
→ LInnHdpNik KblwakTbI WymeriHe OPhaTbIb3.
Kyat wymeri
KyaT WyMeriH KocbIMsa peTIne HkyTeJI aBbH WyyMeriHe opHatyra 6oJabl.
Kyaat ymueri byaftlbhItbHxblJaDmbIbH apTbIpaDbI. CoBbIbKaOn aca KaTbI JaCTaHyDbI Ta3anay, 6bybIITapdbi, caHbIaNaynapdbI xHe T.ypnen Ta3apTy uYiH xApamDbI.
CypeT C
→ Kyat yuMerHIn DeHReNek KBJUaKaKc CKeKec HkyTei npbH yuMerHine 6eKiTih3.
DehreJek Kblnka (yIkeH)
DeHreNEK KblIwAKTbI KocBIMwa petIHde HyKTei aBFIn UyMertHe opHaTyra 6oJabIb. OcI yNKeH DeHreNEK KbIwAKTne DeHreNEK 6tETepDi (MbCaIb dyu NOdONbI, BAHNa, YUHfBnua) Ta3aay bHraNbI.
HA3AP AYdAPbIhbl3
Te3 akaynahambH bemmepDi ma3anayFa KeJMeuDi.
CypeT C
→ LJIINHdpNIK KblIwaKTbI WymeriHe opHaTbIHb3.
KoJ wyMeri
Cypet B
KoJ WymerH 6y nncToJIteIe opHaTbIHb3.
KoJ WymerHH yciHderi KantamaHbI TapTbHb3.
Ocipece yIKeH eEmec, JyYfa 6oNaTbH 6eTTep yIiH JxakcbI KeNedi, MblCaIbI, dyu KaBnHaIapbI xHe iHaIanap yIiH.
EeH Kyyra apHaJFaH Wymeri
Kyyra bonaTbH bapIbK Ka6bIprHa Mece eHeNdi TeCEMep yuH xKaCbI keNeJI, MbIcAnI Ta cEHeDep, KaFeJI pIIiTanApB JxHe IIN BX XacAaRanE HEn TeCEMepyuiH. OTe KipIeHren BdTetPe 8y3aBipak Acep ety MaKCaTbHda bary KyMbIC icTeH3.
Hyckay
Erep Ta3anaHaTbH Tcem YcTiHe JyfB1w 3aTTbH
Hemece NOINPeNtiH 3MylBcINJaPabDIn KALDbIKTapbl
Kanca, OHa 6bEmuTa3anay Ke3iHDe, eDEHDe
cb3bIKTap NaJa 6Olyb MyMkiH, ONap aTeTte 6bEmu
Ta3anaydbipheWe pet KonlaHaHHaNKeIH
XoBlaNaBl.
CypeT
EdeH wSybepeKti eDeH kyyf aPhaHFaH wMyerIHe 6ekitih3.
EeH Kyyra apHaIarHan Wy6epekti eDen Ta3aay Wymerine Knri3iHi3.
KoJaHaBnTaBn MaKcTaBnHa BaJNaHbICTb eJeH JyyFa apHaIraH anBepeKeTI eH 60BaHb 6yKTeH3.
KbickblTapdblaWbHb3.
- Wy6pek wetepin cahbnaynapra cahbl, Tblfbl3dan TapTbIbI3.
Kbikbltapdbjka6bHb3.
△ ABAAJIAHbI3
CaycakmapbIbI3dbIh KbcIckblu apacbiHa mycin KaMbayIh KadaranaHbI3.
EeH xyyra apHaIFaH wUmeriH napK no3nucbHa KOblh13.
CypeT J
→ KymbictbTOKtATKaH Ke3Je, eHeh Kyyf a pHaHaH WymerIH nap kYctaybIbHa iIniJ3.
Kytu MeH TexHnKaJIbIK TeKcepy XyMbICTapbl
Ka3aHdbI waIO
By ta3anaIaIbIbIH Ka3aHdbI eP6ip 10 pet TontbipfAH CaIbIH KByIN OTbIpbl3.
→ By Ka3aHbHcymEn ToTbIpyBn,6enCeHdi TyPeDe 6bybHbI3.HoTmKecinHe dy Ka3aHbHbN TyBiHe werin KaTrafan Tst cyTeid.
→ CydAn 6ocatbIn aIbHbI3.
Ka3aHdafbI TaTbI Ta3anay
Hyckay
CatbIbIMDaIbIINCTbIbHEReH CyblY HEMi KOJaDAHFaH Ke3de, Ye bKa3aHbIHbT BatbIc KOJObIHb KAKEtj XOK.
Tat Ka3aH Ka6bIpranabIpHa Da 60aTaBtHbIbKTAh, 6i3 TaTbI KeNci HInTePbaMEn Ketipin OTbipyDbI cybIaMbI (KF=Ka3aHbI ToTbIpy):
| Сукатылысы | dH | Мольь/л | KF |
| I | Жумсak | 0-7 | 0-1,3 | 55 |
| II | орташa | 7-14 | 1,3-2,5 | 45 |
| III | Кермек | 14-21 | 2,5-3,8 | 35 |
| IV | аca Кермек | >21 | >3,8 | 25 |
HycKay
Ky6bplBcYdbH KATtBjIbfbH CymEH KAMTAMacbl3 ety 6aackmacbHaHHeMece KOMMyHaJIbIshaWpaAusbIbK BEOMCTBOnapbHAn bIlYe 6oNaIb.
→ 3neKtp aawacbHn 3neKtp po3eTKacbHaH wbfapbin anbHbI3.
→ Bynbim cybifaHwa TOcbHbI3.
→ ByiBIMHaH Kayinci3dk KaINaKuacbH 6ypan Iblrarpblh13.
CypeT K
→ Ka3aHdaBfCydbH 6apNbIFbIH TOnblIFbIMeH Terin TaCTaHbI3.
TaTbI Ketipy yuH KARCHER KOMnHaHnCbI eHdipreh TAT Ketipyre apHaJraH TAYKwAnapDbI KOJaHaBHyBIs. TAT Ketipyre apHaJraH 3aTbI naJdaanahFAn Ke3e, opaybIbHnda KeTtprInre MeJeepney 6oBuHnHa HcKaynapra Ha3ap aydapblH3.
Tatbkeipyre aphanfah epitihinika3aHaKaBbln, OHb con Xepde 8 cafTa KaanDbipbHbI3.
8 caraTtAH KeiH TaTbI KeTipyre apHaIraf
epiTInDiH TeIH3. Ka3aHda epiTnDInIH KaNDbIK
MeIWepi KaIaDbI, COHbIKTaH TaTbI KeTipyre
apHaIraH epITiHdiH 6apNbIK KaNDbIKTapbIHAn
apbIy yuH, Ka3aHdbI 2-3 pet cybIK cyMeH
XBylbH3.
Cypet K
→ Ka3aHdaBfI cybIH 6apNbIFbIH TObnIFbIMeH Terin TaCTaHbI3.
Xa6bikrtapblkyTy
HycKay
EeH JyyfA apHaJrAnu7y6epeK neH KOJ uMeryIHe apHaJrAn KaTama andIn ana KybIraH JeHe onApbl 6bpJeN XMyBcIka naiJaDnAhyr 6oJaIa.
EeH Jyyf a npanf an ybepe nen KaTama hbl kip jyfbu Maunna 60 C tempea Tpa da jybl3. YybepeKepdi Jyy Kei3i ne Kipi iaora apnraan 3aTtarpn b naJanaHbA h, onap Kpi ciipin anyby Mymkih. TykTI ybepeKepdi KeTIPriWte KeNTipyre BoJadBi. MinkpOfn6paan Hxacanf an ybepeKepdI KeTIPriWte KeNTipyre BoJmaDb.
KeedeprinepeonfahankaKemekany
Kemuiikertepin ce6eih acbda Kcpctiinre Tizimre caikec 3iH3 jno aybHb3 MymkH. KydkTI xafdainapda Hemece ocbHa atanfah emec ce6e bi kafdainapda KblMeT Kcpcety bemimiH apnabi MaMaHdpImeXaapnaCbHb3.
blcTbIK cy XbiJIbIHy yaKbiTbI y3aK
By ka3aHbInDa TaT naJa 6oNdbI.
→ Ka3aHHHaT TaTbI Ketipy
By xok
By Ka3aHbIHda 6y Jxok.
→ ByIbIMdbI ICTEHbIFapbIHb3.
→ CydbI ToTbIPbIN KyHbIHb3.
By 6epyind dehenre peTteriin bacy Mymkin emec.
CaKaThaBbIpyBbIuNeH /6aIanapdbIn KocbIn XiIbepyIneH KopfayMeH Ka6bInn KaIbI.
→ Keiio3nuiybl6y bIbIbIbIH KCKblbIH aIbIHfbl No3uJraFa OPhaTbHbI3.
Cydibn6nik Wbifybl
By Ka3aHbI TbIM TOJIbl.
By nctonetine KIkehe cy IbKaHa 6acbl3.
By Ka3aHbIHda TaT naIda 6oIdbI.
→ Ka3aHHHaT TaTTbI KeTipy
TexHnkaIbIK MaflymaTtap
| Электpre кocу |
| Электр керneyi | 220-240 V 1~50-60 Hz |
| Корray Кпасы | I | |
| Корray Дарегесi | IPX4 | |
| ЖуMbIC синатары |
| Жыл汞 eнимдinirì | 1500 | ВТ |
| КысыМнын eн жогарсы дeнгейi | 0,32 | бap |
| Жыл汞 уakыты | 6,5 | Минут |
| Бу келemi |
| Чзak уakытсы by ябepy | 40 | r/MinH |
| Бу afыны макс. | 100 | r/MinH |
| Келemi |
| Бу казаны | 1,0 | Л |
| БуныМнын кер ek-жарakтарсы саима RF | 3,1 | Кг |
| Еhi | 254 | ММ |
| Чьнды RF | 380 | ММ |
| Биiktiri | 260 | ММ |
Texhukanbik 03epicme npaoda 6onbln kanybl Mymkhi!
aalbllgol aolabaaalhbs
olbaal gl albaal bawl lbi sic
0gollllss
gJgJgJgJgJgJgJgJgJgJgJgJgJgJgJgJgJgJgJgJgJgJgJgJgJgJgJgJgJgJgJgJgJgJgJgJgJgJgJgJgJgJgJgJgJgJg
gJgJdJdSdSdSd
g aSswLl aalbllg Lgag
aBaa. gai jgi JJI JIJI
jia jao jaeo 0a jio
2bawl a cbi oo
4
S OBC = S COD + S BOC - S BOC
J 1
1/1 1/1 1/1 1/1 1/1
aui/1uic aJg/aui
jll
1234567890
glogaaiaeaioaJzllOj
g jlll gjg jy jz jz
Jg. JolKJIa>JJIbaw
sllg a jjll bawll jle baii
j j 1
a9 p1sawb wab
pdoall jn oalld. wla9 g d
jglgllbawl aaxy ggl jglgll
4
a2 = 12,a3 = 2
g y 1/11
iio/0a//o i.o./j
jglj
F
Jgill ss no a kssll
Goo
aLc cddi dic. lolj Jg
.baiall no aulljgl
jLJI
Hoo
aJlJolgJl 2dJdJll oJgwo lo g
aJdJIy aJdJI
Jl 29g aagg g aagg jk
logio JSL 2aill oogwlo lc
aagj ljc ojxuall olwjll c
| x - 2x| = 12x^2 + 15x + 3
aJdA aJdA oJdA Jds
JalalbawgaiJolalj
1
oJw aJyAaJg Jss
.
oogwlo Jg>Jzll gbsj 1
aagj jll
.
JL
aol@p
a
gabgj aRy jss oJrjz,2a
auiugjduuuljgl>lo
a a //g/
JbJI JJIJI
Jzll aos 0s>ll
Jx Jx
jglgaiy jgJgJgJgJg
jLlal aos Jld
J 20
a.aaeea 12
Jl6b7JIaIlaJ-1J2
Salyg/11i:abg2lo
Jll Jaaoo


aLc caii dic. lolai jllg
.1234567890
jIJ1JnJnJnJIOJIOJIOJIO
0012 aic jgol ola axlalI yolg
1
jgeJIeJooIyOoJooJgclpK>lp
.5j
J 000000000000000000000000000000000000000000
J
9 2011 aol bui j
aJllrJrrJrJr
a aaa
.2a
aLalal
()callljlaaJzjjbai
(jll
Eoo
jLbaxolclallcljJ 1
clll
Jd
aJy Jy
aJll aJdawl alJ> 4yAeJ Jn
a aaa
.
jIJI JIOJLOJIOJIOJIO
Ko
aJdJl j0gall clalj
.
a 2 aic jio ool aixl lolg
1
jIJI IJIOIJOIIOOIOOO
.5j
jglj
aui 1jg jglg 1y
a aall jg g
J
Jgssllllaa a 1
00000000000000000000000000000
.
g jjll a bll jge 2a
.
#
2 aaaa- -a>laal all
10
aill jgeXolg Jololl oJdss
1 0aolal no aocj
20
.
30
.
aJlljIg eliaJl aSJIuLoo
40
Jgssll 2a0:abai bui
J
50
JLJI JI JI JI JI JI JI JI JI
g jjll aaiill jge 2a.1
.
J
J
Aoo
Jalll 1jIbog a>glll Jsr
Lg
Boo
Jzjbl) aojUu UaLJI Juaogp
Jll Wssss "Jlalall
Jl Jc
f baf jlll lgeo pddwla. aJzlll fablll Jrcl 1n sGg jlll faplll jleI Jao 1kss aawiaaall aacaaal 20 gdo dssu 1d Jus 1d Jds 1d Jds 1d 1d 1d 1d 1d 1d 1d 1d 1d 1d 1d 1d 1d 1d 1d
aui 1 a la>
oIg glll algl flll lal 10
1000000000000000000000000000000000000000000000000000000000000000000000000000000000000000
Lgauu uuuu uuuu
JgJgJgJgJgJgJgJgJgJgJgJgJgJgJgJgJgJgJgJgJgJgJgJgJgJgJgJgJgJgJgJgJgJgJgJgJgJgJgJgJgJgJgJgJgJgJgJgJgJgJ

http://www.kaercher.com/dealersearch

71364 Winnenden (Germany)
Tel.: +49 7195 14-0
Fax: +49 7195 14-2212