
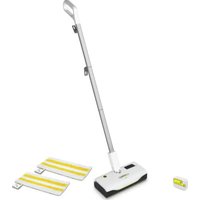
SC 3.100 B - Steam cleaner KARCHER - Free user manual and instructions
Find the device manual for free SC 3.100 B KARCHER in PDF.


| Product Type | Steam cleaner |
| Brand | Kärcher |
| Model | SC 3.100 B |
| Power supply | 220-240 V ~ 50/60 Hz |
| Heating power | 1800 W |
| Iron power (optional) | 700 W |
| Max. operating pressure | 0.35 MPa |
| Boiler capacity | 1.0 L |
| Weight (without accessories) | 3.1 kg |
| Dimensions (L x W x H) | 382 x 250 x 256 mm |
| Heating time | Approx. 6 minutes |
| Continuous steam output | 50 g/min |
| Max. steam output | 110 g/min |
| Protection class | I |
| Protection degree | IPX4 |
| Included accessories | Steam gun, steam hose, 2 extension tubes, floor nozzle, floor cloth, manual nozzle, sponge cover, pencil jet nozzle, round brush, force injector, window squeegee |
| Main functions | Steam cleaning without detergent, cleaning floors, surfaces, windows, textiles, ironing (with optional iron) |
| Safety | Safety lock, pressure switch, safety thermostat, child safety on steam flow selector |
| Maintenance and cleaning | Rinse boiler every 10 fills, descale according to water hardness, accessories machine washable at 60°C |
| Warranty | According to seller's terms, material and manufacturing defects covered during the warranty period |
Frequently Asked Questions - SC 3.100 B KARCHER
User questions about SC 3.100 B KARCHER
0 question about this device. Answer the ones you know or ask your own.
Ask a new question about this device
Download the instructions for your Steam cleaner in PDF format for free! Find your manual SC 3.100 B - KARCHER and take your electronic device back in hand. On this page are published all the documents necessary for the use of your device. SC 3.100 B by KARCHER.
USER MANUAL SC 3.100 B KARCHER
Register and win! www.karcher.com
Deutsch 5
English 14
Français 23
Italiano 33
Nederlands 43
Español 53
Português 63
Dansk 73
Norsk 82
Svenska 91
Suomi 100
Ελληνικά 109
Türkçe 119
Русский 128
Magyar 139
Čeština 149
Slovenščina 158
Polski 168
Românește 178
Slovenčina 188
Hrvatski 197
Srpski 206
Български 215
Eesti 225
Latviešu 234
Lietuviškai 244
Українська 253
العربية 273
| DE Kurzanleitung | SV Snabbguide | RO Instructiuni pe scurt |
| EN Quick reference | FI Pikaohje | SK Krátky návod |
| FR Instructions abrégées | EL Σύντομες οδηγίε | HR Krakte upute |
| IT In sintesi | TR Kısa Kullanım Talimati | SR Kratko uputstvo |
| NL Korte handleiding | RU Краткое руководство | BG Кратко упътване |
| ES Descripción breve | HU Rövid bevezetés | ET Lühijuhend |
| PT Instruções resumidas | CS Stručný návod | LV Îsa lietošanas instrukcija |
| DA Kort brugsanvisning | SL Kratko navodilo | LT Trumpa instrukcija |
| NO Kortveiledning | PL Skrócona instrukcja obsługi | UK Стислий посібник |






![graph TD A["Device with upper body"] --> B["Component with lower body"] B --> C["Container with liquid pouring"]](/content/2026/06/1241783/images/c05213fd8cd321761f16235c15cf666c973132f7528308250fcd6da68fb38560.jpg)

Inhalt
Description of the Appliance EN 6
Quick Reference EN 6
Safety instructions EN 6
Operation EN 8
How to Use the Accessories EN 10
Maintenance and care EN 12
Troubleshooting EN 13
Technical specifications EN 13
General information
Dear Customer,

Please read and comply with these original instructions prior to the initial operation of your appliance and store them for later use or subsequent owners.
Proper use
Use the steam cleaner only for private households.
The appliance is intended to be used with steam and can be used with the appropriate accessories as described in these operating instructions. You will not need any detergent. Please adhere to the safety instructions.
Symbols in the operating instructions
⚠️Danger
Immediate danger that can cause severe injury or even death.
⚠ Warning
Possible hazardous situation that could lead to severe injury or even death.
Caution
Possible hazardous situation that could lead to mild injury to persons or damage to property.
Symbols on the machine

Steam
CAUTION - Danger of scalding

CAUTION – Please read the operating instructions!
Environmental protection

The packaging material can be recycled. Please do not place the package to the ordinary refuse for disposal, but ge for the proper recycling.

Old appliances contain valuable materials that can be recycled. Please arrange for the proper recycling of old licences. Please dispose your old appli- s using appropriate collection sys-
Notes about the ingredients (REACH)
You will find current information about the ingredients at:
www.kaercher.com/REACH
Scope of delivery
The scope of delivery of your appliance is illustrated on the packaging. Check the contents of the appliance for completeness when unpacking.
In the event of missing accessories or any transport damage, please contact your dealer.
Spare parts
Use only original KÄRCHER spare parts.
You will find a list of spare parts at the end of these operating instructions.
Warranty
The warranty terms published by the relevant sales company are applicable in each country. We will repair potential failures of your appliance within the warranty period free of charge, provided that such failure is caused by faulty material or defects in manufacturing. In the event of a warranty claim please contact your dealer or the nearest authorized Customer Service centre.
Please submit the proof of purchase.
(See address on the reverse)
Description of the Appliance
These operating instructions describe the maximum equipment. Depending on the model, there are differences in the scopes of delivery (see packaging).
→ Illustrations on fold-out page!

A1 Appliance connector with cover
A2 Indicator lamp - heater (ORANGE)
A3 Indicator lamp (green) – line voltage is on
A4 Switch - ON
A5 Switch - OFF
A6 Safety cap
A7 Holder for accessories
A8 Storage holder for floor nozzle
A9 Mains cable with mains plug
A10Running wheels (2 ea.)
A11Steering roller
B1 Steam gun
B2 Unlocking button
B3 Selector switch for the steam volume (with child protection)
B4 Steam lever
B5 Steam hose
B6 Steam plug
C1 Detail nozzle
C2 Round brush
C3 Power nozzle
D1 Hand nozzle
D2 Terry cloth cover
E1 Extension tubes (two tubes)
E2 Unlocking button
F1 Floor nozzle
F2 Retaining clip
F3 Terry floor cloth
G1 Window wiper
Option
H1 Steam pressure iron
H2 Upper steam button
H3 Indicator lamp - heater (ORANGE)
H4 Lower steam button
H5 Steam lock
H6 Temperature controller
H7 Steam plug
Quick Reference
→ Illustrations on Page 2
1 Unscrew the safety lock and fill the steam cleaner with a max. of 1 litre of water.
2 Screw in safety cap.
3 Insert the steam plug into the appliance connector.
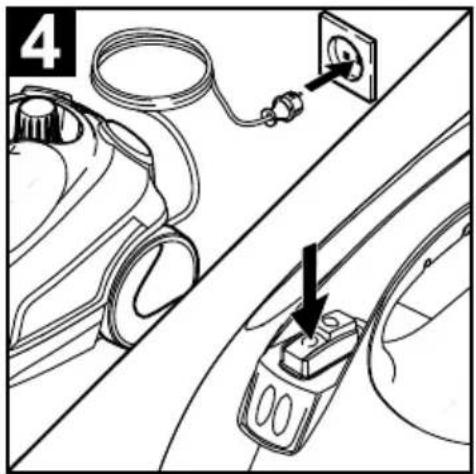
4 Plug in the main plug. Turn on the appliance. The green and orange indicator lamps light up.
5 Wait until the orange indicator lamp goes out.
6 Connect the accessories to the steam gun.
The steam cleaner is ready to use.
Safety instructions
⚠️Danger
■ The appliance may not be used in areas where a risk of explosion is present.
If the appliance is used in hazardous areas the corresponding safety provisions must be observed.
■ Never use the appliance in pools containing water.
■ The device should not be used to clean electrical appliances such as oven, exhaust, micro-wave, televisions, lamps, hair-dryer, electrical heating systems, etc.
- Check the faultless condition of the appliance and the accessories before using it. Otherwise, the appliance must not be used. Please check in particular the power cord, the safety lock, and the steam hose.
If the power cord is damaged, please arrange immediately for the exchange by an authorized customer service or a skilled electrician.
■ Please arrange for the immediate exchange of a damaged steam hose. You may only use a steam hose that is recommended by the manufacturer (see spare parts list for the order number).
■ Never touch the mains plug and the socket with wet hands.
■ Never use the appliance to clean objects containing hazardous substances (e.g. asbestos).
■ Never touch the steam jet from a short distance with your hands and never direct the steam jet to persons or animals (risk of scalds).
⚠ Warning
■ The appliance may only be connected to an electrical supply which has been installed in accordance with IEC 60364.
■ The appliance may only be connected to alternating current. The voltage must correspond with the type plate on the appliance.
In wet rooms, e.g. bathrooms, connect the appliance to sockets with a series connected RCD adapter.
■ Unsuitable extension cables can be hazardous. Only use a splashproof extension cable with a minimum section of 3 × 1 mm2 .
■ The connection between power cord and extension cable must not lie in water.
If couplings of the power cord or extension cable are replaced the splash protection and the mechanical tightness must be ensured.
■ The operator must use the appliance correctly. When working with the appliance, he must consider the local conditions and pay due care and attention to other persons, in particular children, who are nearby.
This appliance can be used by children aged from 8 years and above and persons with reduced physical, sensory or mental capabilities or lack of experience and knowledge if they have been given supervision or instruction concerning use of the appliance in a safe way and understand the hazards involved. Children shall not play with the appliance. Cleaning and user maintenance shall not be made by children without supervision.
■ Never leave the appliance unattended when it is in operation.
■ Be very careful while cleaning tiled walls with sockets.
Caution
■ Make sure that the power cable or extension cables are not damaged by running over, pinching, dragging or similar. Protect the power cable from heat, oil, and sharp edges.
■ Never fill solvents, solvent-containing liquids or undiluted acids (e.g. detergents, benzene, paint thinner, and acetone) into the water reservoir as these substances affect the materials used on the appliance.
■ The appliance must provide of a stable ground.
■ Use and store the unit only in accordance with the specifications in the description and/or figure.
■ The steam switch must not be locked during the operation.
■ Protect the appliance from rain. Do not store outside.
Safety Devices
Caution
Safety devices protect the user and must not be modified or bypassed.
Cleaning floor surfaces
It is recommended to sweep or vacuum the floor prior to using the steam cleaner. This way, the floor is already cleared of dirt/loose particles prior to the wet cleaning.
Pressure controller
The pressure controller keeps the boiler pressure during the operation as constant as possible. The heating is turned off if the maximum operating pressure of 4 bar is reached in the boiler and is reactivated in case of a pressure drop in the boiler due to steam tapping.
Safety thermostat
The safety thermostat turns off the appliance if the boiler thermostat and the pressure controller fails and the appliance overheats in case of a malfunction. Please contact your local KÄRCHER customer service to arrange for the reset of the safety thermostat.
Safety lock
The safety lock seals the boiler against the steam pressure that builds up in the boiler. If the pressure controller is defect and the steam pressure in the boiler rises, a pressure control valve in the safety lock opens, and steam is emitted through the lock to the outside.
Please contact your local KÄRCHER customer service before you put the appliance into operation again.
Operation
→ Illustrations on fold-out page!

Attaching the Accessories
Illustration A
→ Insert steering roller and transport wheels and lock them.
→ Open the cover of the appliance socket.
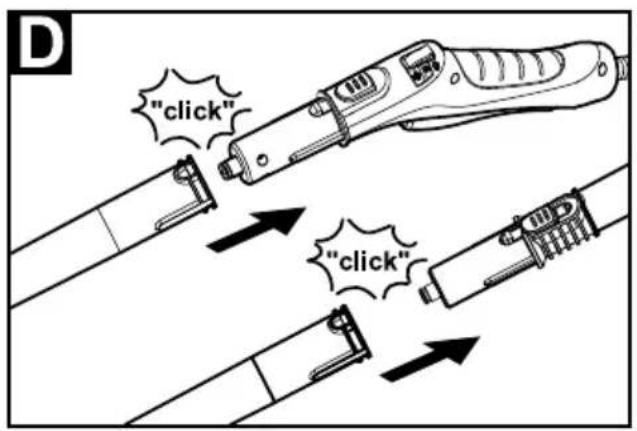
→ Tightly insert the steam plug into the appliance connector. The plug must click into place audibly.
To disconnect: Press the cover of the appliance connector down and disconnect the steam plug from the appliance connector.
Illustration B
→ Connect the required accessories (see Chapter "How to use the accessories") to the steam gun. Insert the open end of the accessory on the steam gun and push onto the steam gun until the un-locking button of the steam gun locks into place.
Illustration D
→ Use the extension tubes if necessary. To do so, connect one or both extension tubes to the steam gun. Insert the required accessories on the free end of the extension tube.
Removing the Accessories ⚠️Danger
Hot water may drip out of the accessory parts while you are detaching them! Never detach accessory parts while steam streams out - risk of scalding!
→ Move the selector switch for the steam volume back (steam lever locked).
→ IllustrationE
To detach the accessory parts, press the unlocking button and pull the items apart.
Fill up with water
Note: If you always use usual commercial distilled water it is not necessary to descale the boiler.
Caution
Do not use condensation water from the drier!
Do not fill in detergents or other additives!
→ Remove the safety cap from the device.
→ Completely empty the steam boiler to remove existing water (see fig. 1)
→ Fill the boiler with a maximum of 1 liters of fresh tap water.
Note: You can cut down the heating-up time by using warm water.
→ Screw the safety cap back onto the device.
Turning on the Appliance
→ Place the unit securely on a firm surface.
Caution
The appliance must not be carried during cleaning.
→ Insert the mains plug into a socket.
→ Press the ON switch to turn on the appliance.
Both indicator lamps must illuminate.
Caution
Do not turn the appliance on without water in the boiler. Otherwise, the appliance may overheat (see Help with faults).
→ The orange indicator lamp goes out after approximately 8 minutes. The steam cleaner is ready to use.
Adjusting the Steam Quantity
Use the selector switch for the steam volume to regulate the discharged steam. The selector switch has three positions:

Maximum steam volume

Reduced steam volume

No steam - child protection
Note: In this lever position, the steam lever cannot be used.
→ Set selector switch to the required steam volume.
→ While operating the steam switch, always direct the steam gun at a separate piece of cloth until the steam is emitted evenly.
Note: The heating of the steam cleaner is turned on in regular intervals during the operation of the appliance in order to maintain the pressure in the boiler at a constant level. When the heating is turned on, the orange indicator lamp (heater) lights up.
Refilling Water
Water needs to be filled into the boiler, if the steam volume decreases during work and no more steam is emitted in the end.
Note: The safety lock cannot be opened as long as slight pressure remains in the boiler.
→ Push the steam switch until steam discharge stops. Now, the boiler of the appliance is unpressurized.
→ Press the OFF switch to turn off the appliance.
→ Disconnect the mains plug from the socket.
→ Remove the safety cap from the device.
⚠️Danger
A residual amount of steam may be emitted when you open the safety lock. Be careful when opening the safety lock, there is a risk of scalding.
→ Fill the boiler with a maximum of 1 liters of fresh tap water.
⚠️Danger
If the boiler is hot, there is the risk of scalding as the water may splash back during the filling process! Do not fill any detergents or other additives into the boiler!
→ Screw the safety cap back onto the device.
→ Insert the mains plug into a socket.
→ Press the ON switch to turn on the appliance.
Both indicator lamps must illuminate.
→ The orange indicator lamp goes out after approximately 8 minutes.
The steam cleaner is ready to use.
Turning Off the Appliance
→ Press the OFF switch to turn off the appliance.
→ Disconnect the mains plug from the socket.
→ Press the cover of the appliance connector to the bottom and disconnect the steam plug from the appliance connector.
Storing the Appliance
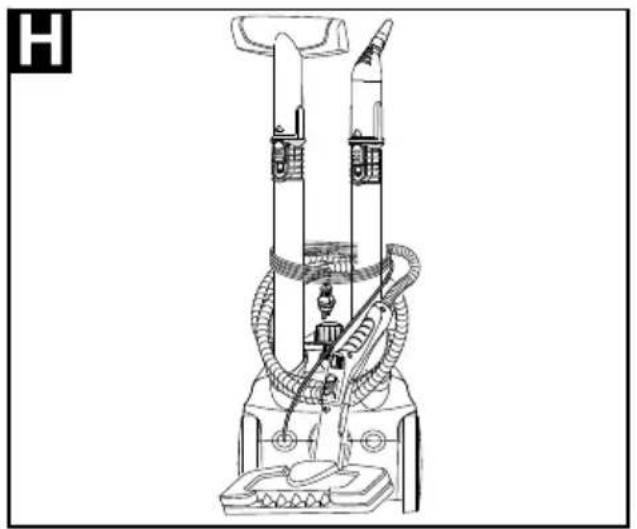
Illustrations G H
→ Fasten the power nozzle to the detail nozzle.
→ Insert the manual nozzle and detail nozzle onto each extension pipe.
→ Put the extension pipes into the large accessory compartments.
→ Put the round brush into the medium accessory compartments.
→ Hook the floor nozzle into the parking position.
→ Wrap the steam hose around the extension pipes and insert the steam pistol into the floor nozzle.
How to Use the Accessories
Important application instructions
Refreshing textiles
Prior to treatment with the steam cleaner, always check the reaction of the textiles in an inconspicuous location: Steam at first, then let dry and then check for colour or shape changes.
Cleaning of Coated or Lacquered Surfaces
When cleaning painted or plastic-coated surfaces, as found on kitchen and living room furniture, doors, parquet; wax, furniture polish, plastic surfaces or paint can come loose or stains can be created. When cleaning these surfaces, briefly steam a cloth and wipe the surfaces with it.
Caution
Never direct the steam jet at glued edges as the edge band may loosen. Do not use the steam cleaner on unsealed wooden or parquet floors.
Cleaning of Glass
In case of low outside temperatures, especially in the winter, warm up the window pane by slightly steaming the entire glass surface. This will prevent tensions on the surface which might lead to glass breakage. Then clean the window surface with the hand nozzle and attachment. Use a squee-gee to remove the water or wipe the surfaces dry.
Caution
Do not direct steam onto the sealed locations of the window frame to prevent damage.
Steam gun
You can use the steam gun without any additional accessories, e.g.:
- to remove odours and wrinkles from hanging clothes by steaming them at a distance of 10 to 20cm .
– to remove dust from plants. Here, keep a distance of 20-40 cm.
– for moist dusting, by briefly steaming the cloth and wiping the furniture with it.
Detail nozzle
The closer this nozzle is to the contaminated area, the higher the cleaning effect, as the temperature and the steam are highest at the nozzle output. Especially suited for cleaning difficult access locations, joints, fittings, drains, sinks, toilets, blinds and heaters. Heavy lime scale can be drenched in vinegar prior to steam-cleaning. Let the vinegar penetrate for about 5 minutes.
Round brush
The round brush can be installed onto the detail nozzle as an accessory. Attached brushes can therefore be used to remove heavy soiling.
Caution
Not suited for the cleaning of sensitive surfaces.
→ IllustrationC
Attach the round brush to the detail nozzle.
Power nozzle
The power nozzle can be installed onto the detail nozzle as an accessory.
The power nozzle increases the emission speed of the steam. Therefore, it is well-suited for cleaning very tough dirt, blowing out corners, grooves, etc.
→ IllustrationC
Attach the power nozzle to the detail nozzle according to the round brush.
Hand nozzle
Pull the terry cloth cover over the hand nozzle. Especially well-suited for small washable areas, shower stalls and mirrors.
Floor nozzle
Suited for all washable walls and floor coverings, e.g. stone floors, tiles and PVC floors. Work slowly on very dirty surfaces to allow the steam to act on the dirt for a longer period of time.
Note: Detergent residue or care emulsions that are still present on the surfaces to be cleaned, can lead to smears when steam cleaned. However, these will disappear with repeated cleaning procedures.
→ IllustrationF
Attach the floor cloth to the floor nozzle.
1 Fold the floor cloth the long way and place the floor nozzle on top of it.
2 Open holding clamps.
3 Place the cloth ends into the openings.
4 Close the holding clamps.
Caution
Do not insert fingers between the clamps.
Parking the floor nozzle
→ IllustrationG
During work breaks, hook the floor nozzle into the parking holder.
Window wiper
Application:
- Windows, mirrors
– Glass surfaces on showers - other smooth surfaces
→ Perform a fat dissolving basic cleaning using the hand nozzle and a terry cloth cover before using the window wiper.
→ Apply steam to the glass surface from a distance of approximately 20 cm until the surface is moistened evenly.
→ Strip the glass surface in straight lines from the top to the bottom using the rubber lip of the window wiper. Wipe the rubber lip and the bottom edge of the window dry after each strip.
Steam iron
⚠️Danger
■ The steam pressure iron must not be used if it has been dropped, shows visible signs of damage or if it leaks.
The steam pressure iron is hot and so is the steam jet! Point out to other people the possible risk of being scalded or burnt. Never direct the steam jet at people or animals (risk of scalding). Do not touch any electrical leads or combustible objects with the hot steam pressure iron.
⚠ Warning
■ The steam pressure iron and its connecting cable must be kept out of reach of children under the age of 8 during the heating and cooling down periods.
■ The steam pressure iron must be used and placed on a stabile surface.
Note: We recommend using the Kärcher ironing table with active steam extraction (2.884-933.0). This ironing table has been designed to match your new steam cleaner. It facilitates and, thus, accelerates the ironing process substantially. In any case, you should use an ironing table which is covered with a mesh-type underlay allowing the steam to pass through.
→ Tightly insert the steam plug of the iron into the appliance connector. The plug must click into place audibly.
→ Make sure that there is fresh tap water in the boiler of the steam cleaner.
→ Start-up the steam cleaner according to the description.
→ Wait until the steam cleaner is ready to use.
Steam ironing
All fabrics can be steam ironed. Delicate imprints or fabrics should be ironed on the reverse or according to the manufacturer's specifications.
Note: For these sensitive textiles, we recommend using the KÄRCHER non-stick ironing sole BE 6006 (Ordner no. 2.860-142.0).
→ Adjust the temperature control of the steam iron within the notched range ( .../MAX ).
→ As soon as the indicator lamp of the heater of the iron switches off, you can start ironing.
Note: The sole plate must be hot to prevent the steam from condensing on the sole plate and dripping onto the garment to be ironed.
→ Use the top or bottom steam switch.
- Steaming at intervals: Press the steam switch. Steam will be emitted while the switch is pressed.
- Continuous steaming: Pull the latch for the steam switch toward the rear until it locks in. Steam will escape continuously. To unlock, push the lock forward.
→ Direct the first burst of steam at the start of the ironing process or after ironing breaks at a separate piece of cloth until the steam is emitted evenly.
→ You can hold the iron in an upright position to apply steam to curtains, dresses, etc.
Dry ironing
Note: Even if you iron without steam, there must be water in the boiler.
→ Adjust the temperature of the iron according to the garment you want to iron.
| • Synthetics |
| •• Wool, silk |
| ••• Cotton, linen |
Note: Please observe the ironing and washing instructions in your garment.
→ As soon as the indicator lamp of the heater of the iron switches off, you can start ironing.
Maintenance and care
⚠️Danger
Always disconnect the mains plug and allow the steam cleaner to cool down before performing any maintenance work.
Rinsing the boiler
Rinse the steam cleaner boiler at the latest after 10 boiler fillings.
→ Fill the boiler with water and shake it strongly. This dissolves lime scaling residing on the boiler bottom.
→ Completely empty the steam boiler to remove existing water (see fig. 1)
Descaling the boiler
Note: If you always use usual commercial distilled water it is not necessary to descale the boiler.
As limescale builds up on the boiler walls, we recommend to descale the boiler in the following intervals (RF=reservoir fillings):
| Degree of hardness ° dH mmol/l RF | |||
| I soft 0-7 0-1,3 55 | |||
| II medium 7-14 1,3-2,5 45 | |||
| III hard | 14-21 | 2,5-3,8 | 35 |
| IV very hard | >21 | >3,8 | 25 |
Note: Please contact your Conservancy Board or the local water supply company to inquire about the hardness of your water.
→ Disconnect the mains plug from the socket.
→ Allow device to cool down.
→ Remove the safety cap from the device.
→ Completely empty the steam boiler to remove existing water (see fig. 1)
⚠ Warning
Only use products approved by KÄRCHER to exclude any damages of the appliance.
→ User the KÄRCHER decalcifier sticks (order no. 6.295-047) to decalcify the water. Please follow the dosing instructions on the packaging while using the decalcifying solution.
Caution
Use caution when filling and emptying the steam cleaner. The descaling solution can have an aggressive effect on delicate surfaces.
→ Pour the descaling solution into the boiler and allow it to react for approximately 8 hours.
⚠ Warning
Do not screw the safety lock on the appliance during the decalcifying.
Do not use the steam cleaner as long as there is decalcifying agent in the boiler.
→ Completely empty the descaling solution after 8 hours. A small amount of the solution will remain in the boiler. Therefore, you should rinse the boiler two to three times with cold water to remove any residues of the descaler.
→ Completely empty the steam boiler to remove existing water (see fig. 1)
Care of the Accessories
Note: The floorcloth and the terry cloth cover have been pre-washed and can be used immediately for working with the steam cleaner.
→ You can wash dirty floorcloths and terry cloth covers in the washing machine at 60° C. Do not use a liquid softener as this would affect the ability of the cloths to pick up dirt. You may tumble dry the cloths.
Troubleshooting
Often, failures have simple causes and you can do the troubleshooting yourself using the following overview. If you are in doubt or if the failure is not listed here please contact the authorized customer service.
⚠️Danger
Always disconnect the mains plug and allow the steam cleaner to cool down before performing any maintenance work.
Repair works may only be performed by the authorized customer service.
Long heating-up time
Steam boiler is decalcified
→ Descale the steam boiler.
No steam
No water in the steam boiler.
→ Turn off the appliance.
→ See „Refilling Water“ Page 9.
Steam lever cannot be pressed anymore
Steam switch is secured with the lock / child-proof lock.
→ Move the selector switch for the steam volume to the front.
Steam iron "spits out" water!
→ Set the thermostat to level ….
→ Rinse or decalcify the boiler of the steam cleaner.
After breaks during ironing, water drops will come out of the steam pressure iron.
During longer breaks from ironing, the steam in the steam line can condense.
→ Direct the first burst of steam at a separate piece of cloth.
High water output
Steam chamber too full
→ Press the steam gun until less water is emitted.
Steam boiler is decalcified
→ Descale the steam boiler.
Technical specifications
Power connection
Voltage 220-240 V
1\~50/60 Hz
Protective class I
Protection class IPX4
Performance data
Heating output 1800 W
Heating output steam iron 700 W
Operating pressure max. 0,35 MPa
Heating time 6 Minutes
Steam volume
- Continuous steaming 50 g/min
- Steam push max. 110 g/min
Dimensions
Boiler capacity 1,0 l
Weight (without accessories) 3,1 kg
Width 250 mm
Length 382 mm
Height 256 mm
Subject to technical modifications!
Contenu
Contenu FR 5
www.kaercher.com/REACH
www.kaercher.com/REACH
Fornitura
www.kaercher.com/REACH
Leveringsomvang
H4 Schakelaar Stoom (bovenaan)
Geen water in reservoir.
www.kaercher.com/REACH
www.kaercher.com/REACH
www.kaercher.com/REACH
Leveringsomfang
www.kaercher.com/REACH
Leveringsomfang
Leveringsomfang for apparatet er vist på emballasjen. Kontroller at innholdet i pakken er fullstendig, när du pakker ut.
H4 Bryter Damp (oppe)
H5 Låsing for bryter Damp
H6 Temperaturregulator
H7 Dampplugg
Kortveiledning
→ Still valgbryteren for dampmengden for-over.
Dampstrykejernet "spytter" vann!
www.kaercher.com/REACH
www.kaercher.com/REACH
Toimitus
www.kaercher.com/REACH
Συσκευασία
www.kaercher.com/REACH
Teslimat kapsamı
Isitici performansi 1800 W
Isitici performans Ütü 700 W
www.kaercher.com/REACH
Комплект поставки
www.kaercher.com/REACH
Szállítási tétel
www.kaercher.com/REACH
Obsah dodávky
www.kaercher.com/REACH
Dobavni obseg
Obseg dobave Vaše naprave je prikazan na embalaži. Pri jemanju stroja iz embalaže preverite popolnost vsebine.
H6 Regulator temperature
H7 Parni vtič
Kratko navodilo
www.kaercher.com/REACH
Zakres dostawy
H6 regulator temperature
Mult stimate client,

www.kaercher.com/REACH
Articolele livrate
www.kaercher.com/REACH
Rozsah dodávky
www.kaercher.com/REACH
Opseg isporuke
H6 Regulator temperature
H7 Parni utikač
Kratke upute
www.kaercher.com/REACH
Obim isporuke
Sadržaj isporuke Vašeg uređaja je prikazan na ambalaži. Pre vađenja uređaja iz ambalaže proverite da li je sadržaj potpun.
Ako pribor nedostaje ili je došlo do oštećenja prilikom transporta, molimo da o tome obavestite svog prodavca.
Rezervni delovi
Upotrebljavajte samo originalne rezervne delove firme KÄRCHER. Pregled rezervnih delova naći ćete na kraju ovog uputstva za rad.
Garancija
U svakoj zemlji važe garantni uslovi koje je izdala naša nadležna distributivna organizacija. Eventualne smetnje na uređaju za vreme trajanja garancije uklanjamo besplatno, ukoliko je uzrok greška u materijalu ili proizvodnji. U slučaju koji podleže garanciji obratite se sa potvrdom o kupovini Vašem prodavcu ili najbližoj ovlašćenoj servisnoj službi.
H6 Regulator temperature
H7 Parni utikač
Kratko uputstvo
www.kaercher.com/REACH
Обем на доставката
www.kaercher.com/REACH
Tarnekomplekt
Lisavarustuse monteerimine
Joonis A
www.kaercher.com/REACH
Piegādes komplekts
www.kaercher.com/REACH
Komplektacija
www.kaercher.com/REACH
Комплект постачання
NZ Karcher Limited, 12 Ron Driver Place, East Tamaki, Auckland, New Zealand,
09 274 4603 • www.karcher.co.nz
PL Kärcher Sp. z o.o., Ul. Stawowa 140, 31-346 Kraków,
012 6397 222 • www.karcher.pl
PT Neoparts S.A., Av. Infante D. Henrique, Lote 35, 1800-218 Lisboa,
218 558 300 • www.karcher.pt
RO Karcher Romania s.r.l., Sos. Odaii 439 Sector 1, RO-013606 Bucureşti,
0372 709 001, www.kaercher.ro
SG Karcher South East Asia Pte. Ltd., 5 Toh Guan Road East, #01-00 Freight Links Express Distripark, Singapore 608831.
6897-1811 • www.karcher.com.sg
SK Kärcher Slovakia, s.r.o., Bratislavská 25, 94901 Nitra,
037 6555 798 • www.kaercher.sk
TR Kärcher Servis Ticaret A.S., Mahmutbey Mahallesi İstoç, Petrol Plaza C-Blok Kat: 2-3, Bağcılar, 34218 Istanbul
0212 659 43 69 • www.karcher.com.tr
TWKarcher Limited, 7/F, No. 66, Jhongijheng Rd., Sinjhuang City, Taipei County 24243,
2 2991 5533 • www.karcher.tw
UA Kärcher Ltd., Petropavlivska Str., 4, Petropavlivska Borschagivka, Kyiv region, 08130,
0800 500 48 90 • www.karcher.ua
ZA Kärcher (Pty) Ltd., 144 Kuschke Street, Meadowdale, Edenvale, 1614,
011 574 5360 • www.karcher.co.za



- INHALT
- GENERAL INFORMATION
- DEAR CUSTOMER
- PROPER USE
- SYMBOLS IN THE OPERATING INSTRUCTIONS
- ⚠️DANGER
- ⚠ WARNING
- CAUTION
- SYMBOLS ON THE MACHINE
- STEAM
- ENVIRONMENTAL PROTECTION
- NOTES ABOUT THE INGREDIENTS (REACH)
- SCOPE OF DELIVERY
- SPARE PARTS
- WARRANTY
- DESCRIPTION OF THE APPLIANCE
- → ILLUSTRATIONS ON FOLD-OUT PAGE
- OPTION
- QUICK REFERENCE
- → ILLUSTRATIONS ON PAGE 2
- SAFETY INSTRUCTIONS
- SAFETY DEVICES
- CLEANING FLOOR SURFACES
- PRESSURE CONTROLLER
- SAFETY THERMOSTAT
- SAFETY LOCK
- OPERATION
- ATTACHING THE ACCESSORIES
- ILLUSTRATION A
- ILLUSTRATION B
- ILLUSTRATION D
- REMOVING THE ACCESSORIES ⚠️DANGER
- FILL UP WITH WATER
- TURNING ON THE APPLIANCE
- ADJUSTING THE STEAM QUANTITY
- REFILLING WATER
- TURNING OFF THE APPLIANCE
- STORING THE APPLIANCE
- HOW TO USE THE ACCESSORIES
- IMPORTANT APPLICATION INSTRUCTIONS
- REFRESHING TEXTILES
- CLEANING OF COATED OR LACQUERED SURFACES
- CLEANING OF GLASS
- STEAM GUN
- DETAIL NOZZLE
- ROUND BRUSH
- POWER NOZZLE
- HAND NOZZLE
- FLOOR NOZZLE
- → ILLUSTRATIONF
- PARKING THE FLOOR NOZZLE
- → ILLUSTRATIONG
- WINDOW WIPER
- APPLICATION
- STEAM IRON
- STEAM IRONING
- DRY IRONING
- MAINTENANCE AND CARE
- RINSING THE BOILER
- DESCALING THE BOILER
- CARE OF THE ACCESSORIES
- TROUBLESHOOTING
- LONG HEATING-UP TIME
- STEAM BOILER IS DECALCIFIED
- NO STEAM
- NO WATER IN THE STEAM BOILER
- STEAM LEVER CANNOT BE PRESSED ANYMORE
- STEAM IRON "SPITS OUT" WATER
- AFTER BREAKS DURING IRONING, WATER DROPS WILL COME OUT OF THE STEAM PRESSURE IRON
- HIGH WATER OUTPUT
- STEAM CHAMBER TOO FULL
- TECHNICAL SPECIFICATIONS
- POWER CONNECTION
- PERFORMANCE DATA
- DIMENSIONS
- CONTENU
- FORNITURA
- LEVERINGSOMVANG
- GEEN WATER IN RESERVOIR
- LEVERINGSOMFANG
- KORTVEILEDNING
- TOIMITUS
- ΣΥΣΚΕΥΑΣΊΑ
- TESLIMAT KAPSAMI
- КОМПЛЕКТ ПОСТАВКИ
- SZÁLLÍTÁSI TÉTEL
- OBSAH DODÁVKY
- DOBAVNI OBSEG
- KRATKO NAVODILO
- ZAKRES DOSTAWY
- MULT STIMATE CLIENT
- ARTICOLELE LIVRATE
- ROZSAH DODÁVKY
- OPSEG ISPORUKE
- KRATKE UPUTE
- OBIM ISPORUKE
- REZERVNI DELOVI
- GARANCIJA
- KRATKO UPUTSTVO
- ОБЕМ НА ДОСТАВКАТА
- TARNEKOMPLEKT
- LISAVARUSTUSE MONTEERIMINE
- JOONIS A
- PIEGĀDES KOMPLEKTS
- KOMPLEKTACIJA
- КОМПЛЕКТ ПОСТАЧАННЯ
Brand : KARCHER
Model : SC 3.100 B
Category : Steam cleaner