
SC 2 Upright EasyFix - Steam cleaner KARCHER - Free user manual and instructions
Find the device manual for free SC 2 Upright EasyFix KARCHER in PDF.


| Product type | Steam mop cleaner |
| Brand | Kärcher |
| Model | SC 2 Upright EasyFix |
| Usage | Cleaning of hard flat floors (tile, stone, PVC, sealed parquet, laminate) |
| Technology | Detergent-free steam |
| Heating power | 1600 W |
| Voltage | 220-240 V ~ 50-60 Hz |
| Protection class | IPX4 |
| Heating time | 30 seconds |
| Steam output | 38 g/min |
| Steam modes | 2 (wood and tile/stone) |
| Water tank capacity | 0.4 L |
| Weight | 2.7 kg |
| Dimensions (L x W x H) | 314 x 199 x 1185 mm |
| Included mop pad | 1 microfiber, 1 abrasive (optional) |
| Descaling cartridge | Included, replaceable |
| Safety | Safety valve, fuse, non-slip handle |
| Maintenance | Automatic descaling via cartridge, wash mop pad at 60 °C max |
| Power cord | Detachable, storage on hooks |
| Additional accessories | Floor nozzle, hook-and-loop fastener |
| Warranty | According to country conditions |
| Compliance | Household use only |
| Environmental protection | Recyclable, do not dispose of with household waste |
Frequently Asked Questions - SC 2 Upright EasyFix KARCHER
User questions about SC 2 Upright EasyFix KARCHER
0 question about this device. Answer the ones you know or ask your own.
Ask a new question about this device
Download the instructions for your Steam cleaner in PDF format for free! Find your manual SC 2 Upright EasyFix - KARCHER and take your electronic device back in hand. On this page are published all the documents necessary for the use of your device. SC 2 Upright EasyFix by KARCHER.
USER MANUAL SC 2 Upright EasyFix KARCHER
natural_image
Two identical electric vacuum cleaner units with black handlebars and blue base plates, shown from different angles (no text or symbols visible)Deutsch 5
English 10
Français 15
Italiano 21
Nederlands 26
Español 32
Português 37
Dansk 42
Norsk 48
Svenska 52
Suomi 57
Ελληνικά 62
Türkçe 68
Русский 73
Magyar 79
Čeština 84
Slovenščina 89
Polski 94
Românește 100
Slovenčina 105
Hrvatski 111
Srpski 116
Български 121
Eesti 127
Latviešu 132
Lietuviškai 137
Українська 142
Қазақша 147
العربيه 158
A
flowchart
graph TD
    A["1. Device"] -->|2. Insert| B["2. Bag with lid"]
    B -->|3. Insert| C["3. Bag with handle"]
    C --> D["MAX 0,4 I"]
natural_image
Diagram of a person climbing a vertical structure with directional arrows indicating movement (no text or symbols)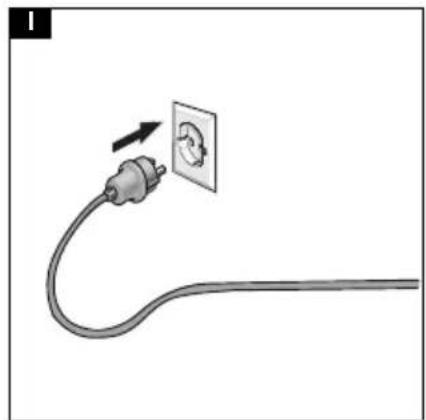
natural_image
Diagram of a cable with an electrical outlet connected to a wall socket (no text or symbols)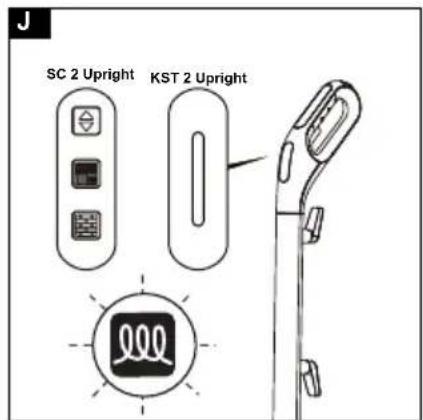
natural_image
Diagram of a vacuum cleaner with attached mounting base and three control knobs below (no text or symbols)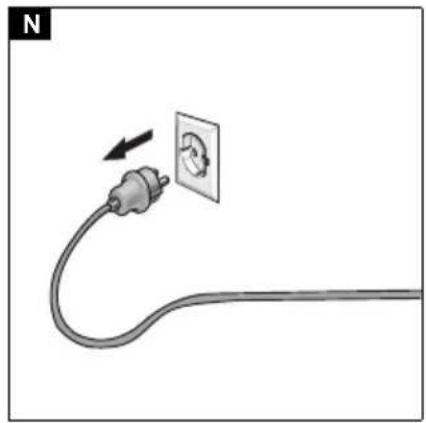
natural_image
Diagram of a cable with a wall socket and an arrow indicating direction (no text or symbols)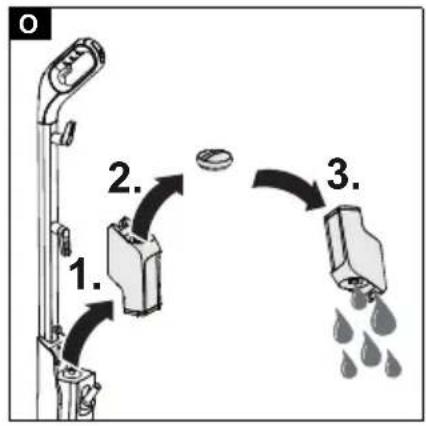
flowchart
graph TD
    A["Device with lever"] -->|1.| B["Container with two parts"]
    B -->|2.| C["Box with liquid droplets"]
    C -->|3.| D["Drain drop with liquid droplets"]
natural_image
Illustration of a mechanical clamp holding a coiled cable and connector (no text or symbols)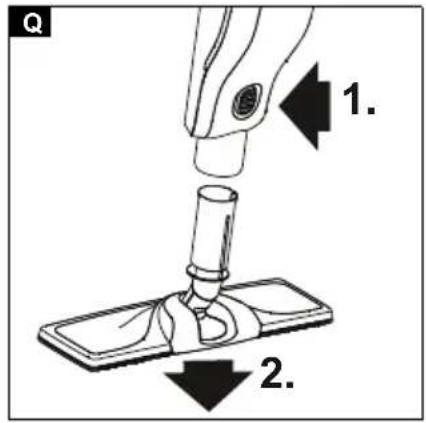
Inhalt
| General notes | 10 |
| Intended use | 10 |
| Environmental protection | 10 |
| Accessories and spare parts | 10 |
| Scope of delivery | 10 |
| Safety devices | 10 |
| Description of the device | 11 |
| Installation | 11 |
| Initial Start-Up | 11 |
| Operation | 11 |
| Important application instructions | 13 |
| How to use the Accessories | 13 |
| Care and service | 13 |
| Troubleshooting guide | 14 |
| Warranty | 14 |
| Technical data | 15 |
General notes
| Read these original operating instructions and the enclosed safety instructions before using the device for the first time. Proceed accordingly.Keep both books for future reference or for future owners. |
Intended use
Use the device only in private households for cleaning level hard floors (e.g stone floors, tiles, PVC floors, as well as sealed wooden floors such as parquet and laminate) that can withstand the high temperature, pressure and moisture of the device. Do not clean any water-sensitive coverings such as untreated cork floors (moisture can penetrate and damage the floor).
Cleaning agents are not required.
Environmental protection
| The packing materials can be recycled. Please dispose of packaging in accordance with the environmental regulations. |
| Electrical and electronic appliances contain valuable, recyclable materials and often components such as batteries, rechargeable batteries or oil, which - if handled or disposed of incorrectly - can pose a potential threat to human health and the environment. However, these components are required for the correct operation of the appliance. Appliances marked by this symbol are not allowed to be disposed of together with the household rubbish. |
Notes on the content materials (REACH)
Current information on content materials can be found at: www.kaercher.com/REACH
Accessories and spare parts
| Only use original accessories and original spare parts. They ensure that the appliance will run fault-free and safely.Information on accessories and spare parts can be found at www.kaercher.com. |
Scope of delivery
The scope of delivery for the appliance is shown on the packaging. Check the contents for completeness when unpacking. If any accessories are missing or in the event of any shipping damage, please notify your dealer.
Safety devices
△CAUTION
Missing or modified safety devices
Safety devices are provided for your own protection.
Never modify or bypass safety devices.
Symbols on the device
(according to type of appliance)
 | Risk of burns, surface of appliance becomes hot during operation |
 | Risk of scalding from steam |
 | Read operating instructions |
Safety valve
In the case of excessively high pressure in the event of a fault, a safety valve relieves the pressure into the atmosphere.
Fuse
The fuse prevents the device from overheating. If the device overheats, the fuse disconnects the device from the power supply.
Before re-commissioning the device, contact the responsible KÄRCHER Customer Service.
Description of the device
The maximum amount of equipment is described in these operating instructions. Depending on the model used, there are differences in the scope of delivery (see packaging).
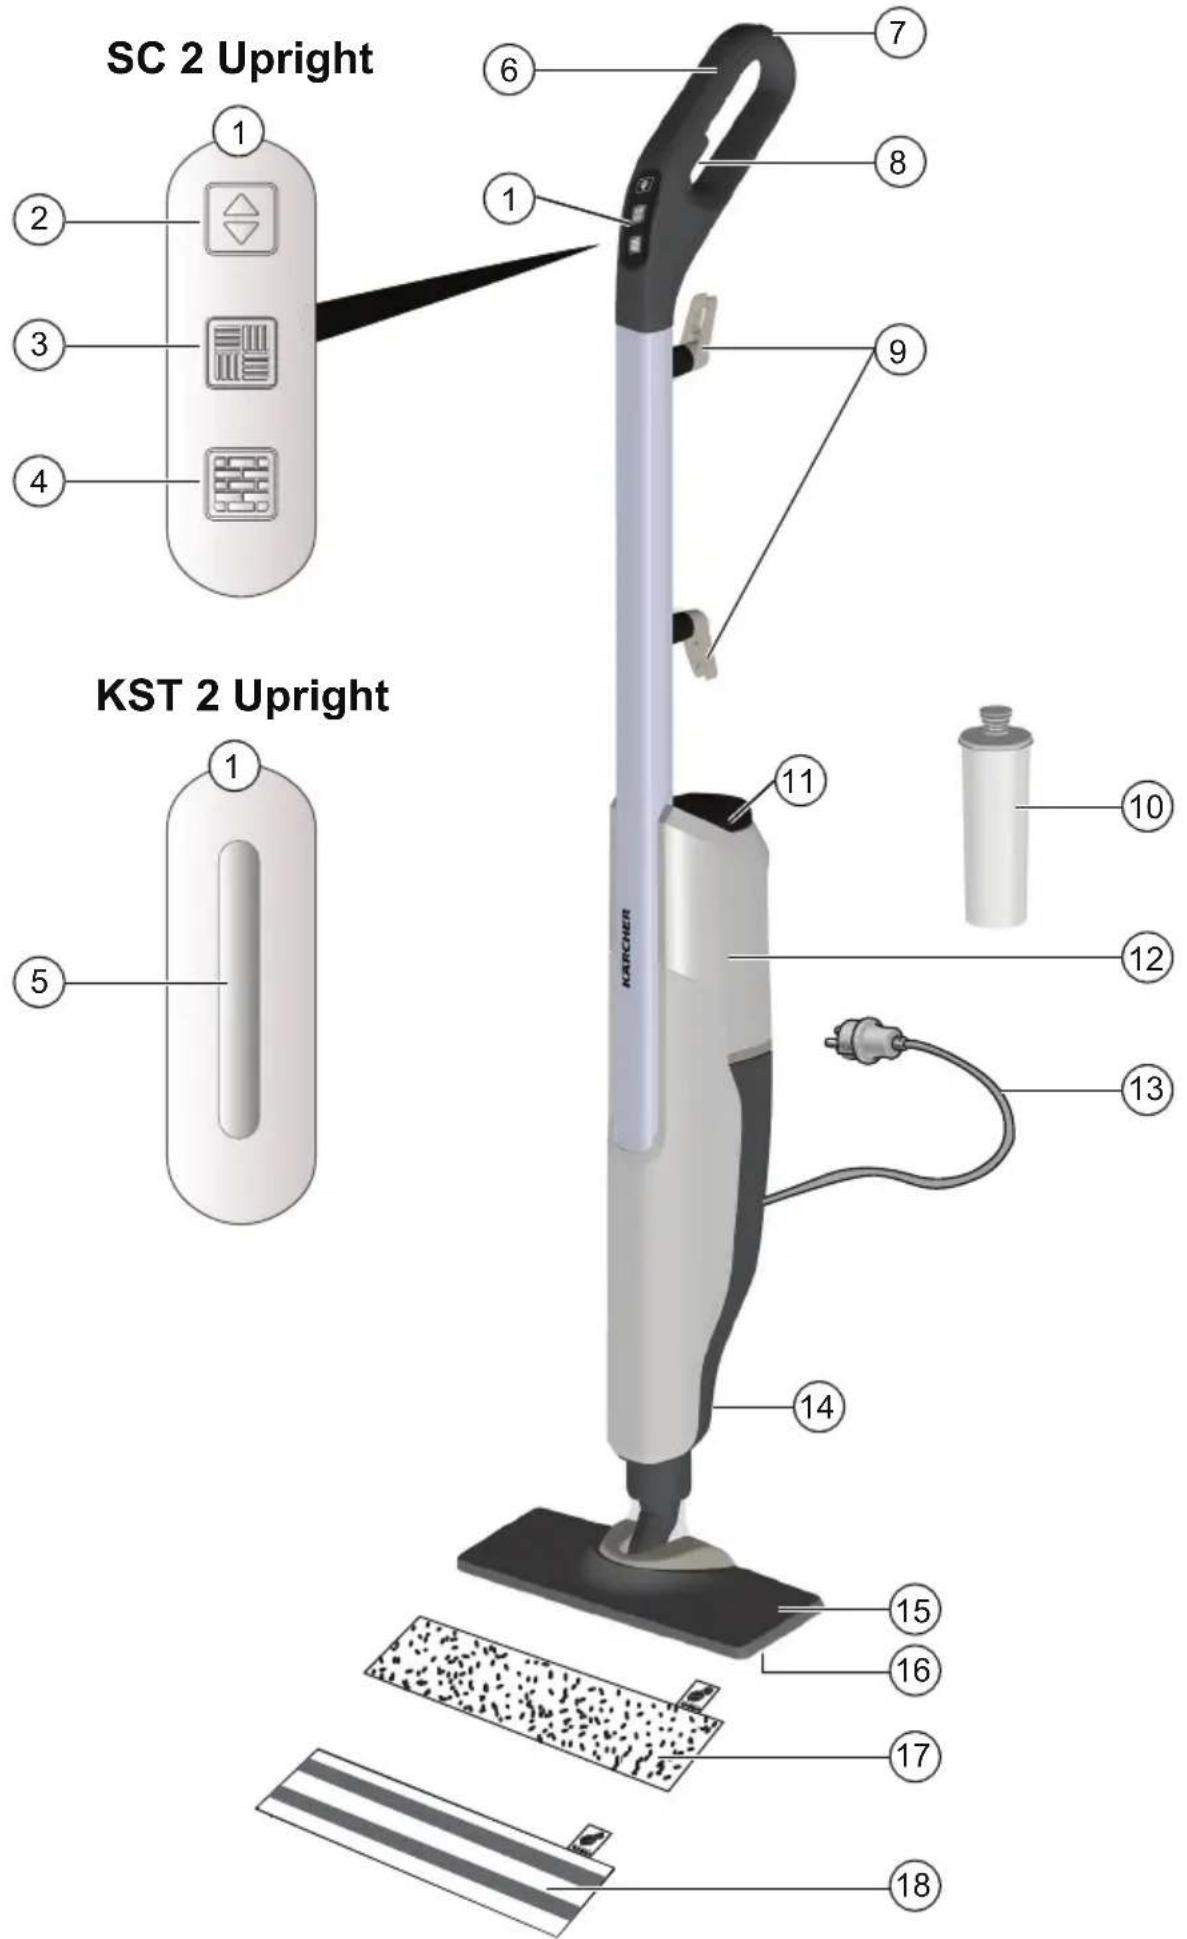
For the illustrations, see graphics page. Illustration A
① Display for steam stage setting
② Button for steam stage setting
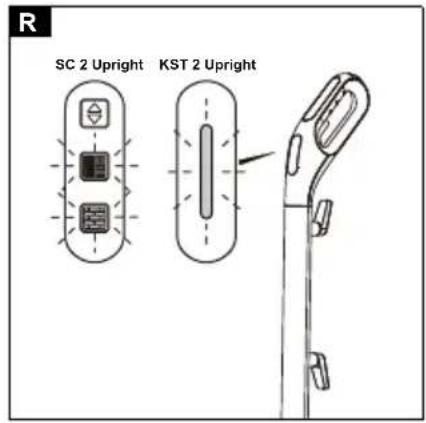
③ SC 2 Upright indicator light: Steam stage 1 - wood Flashes red alternately - mains voltage present and device is heating up
Lights up green continuously - device is operable
Flashes red quickly - indicates that the decalcification cartridge needs to be replaced. To replace the decalcification cartridge, see chapter Replacing the decalcification cartridge.
④ SC 2 Upright indicator light: Steam stage 2 - tiles / stone Flashes red alternately - mains voltage present and device is heating up Lights up green continuously - device is operable Flashes red quickly - indicates that the decalcification cartridge needs to be replaced. To replace the decalcification cartridge, see chapter Replacing the decalcification cartridge.
⑤ KST 2 Upright indicator light
⑥ Handle
⑦ Wall anti-slip handle
⑧ Steam lever
⑨ Cable hook with cable fastener
⑩ Decalcification cartridge
⑪ Filling hole for water
⑫ Water reservoir with reservoir cover and carrying handle
⑬ Mains connection with mains plug
⑭ Unlocking button for floor nozzle
⑮ Floor nozzle
⑯ Hook and loop fastener
⑰ Microfibre floor cloth (1 x)
18* Abrasive floor cloth (1 x)
* optional
Installation
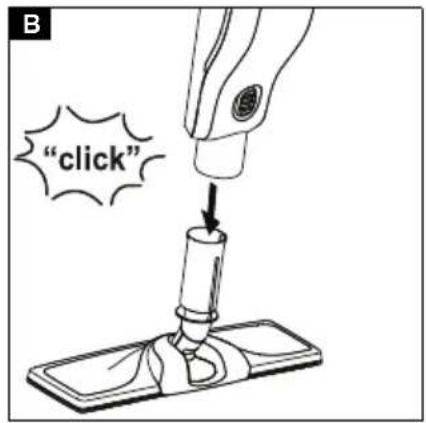
Installing the floor nozzle
- Hold the device by the handle.
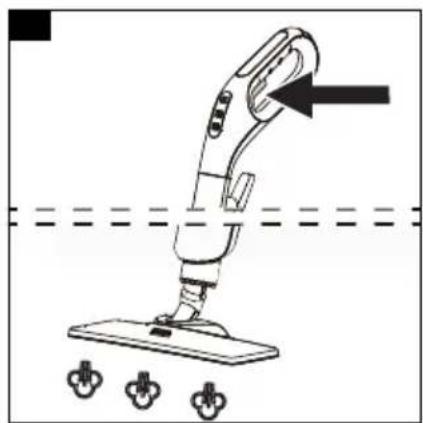
- Connect the lower section of the basic unit to the floor nozzle until it audibly latches into place. Illustration B
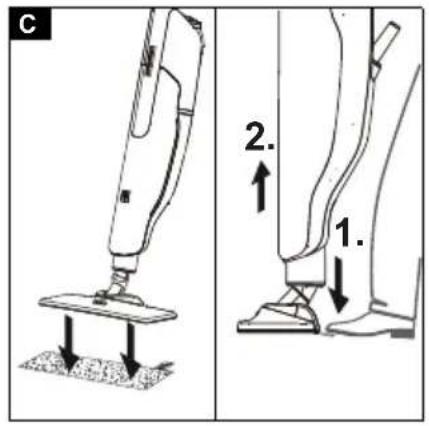
Installing the floor cleaning cloth
- Attach the floor cleaning cloth to the floor nozzle. a Place the floor cleaning cloth with the hook and loop strips pointing upwards on the floor.
b Place the floor nozzle onto the floor cleaning cloth, applying slight pressure.
Illustration C
The floor cleaning cloth will stick to the floor nozzle of its own accord due to the hook and loop fastener.
Initial Start-Up
ATTENTION
Device damage due to calcification
Always work with a decalcification cartridge.
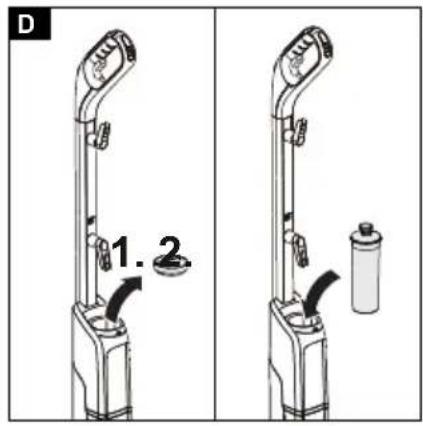
- Insert the decalcification cartridge into the water reservoir and press it firmly into place.
Illustration D
Installation information
When steaming for the first time after removing and re-inserting the decalcification cartridge, the steam jet may be weak or irregular, and individual drops of water may be expelled. The device requires a short running-in period in which the decalcification cartridge fills with water. The steam volume that is expelled increases constantly until the maximum steam volume has been reached after approx. 50 seconds.
Note
Please note that here it is set to steam stage 2 (tiles/ stone), since the running-in period will otherwise be extended.
Operation
Unwinding the power cable
⚠ WARNING
Risk of electric shock
If the power cable is not completely unwound, the danger exists of you straining and damaging the power cable by overestimating the range of the cable. Always completely unwind the power cable.
Note
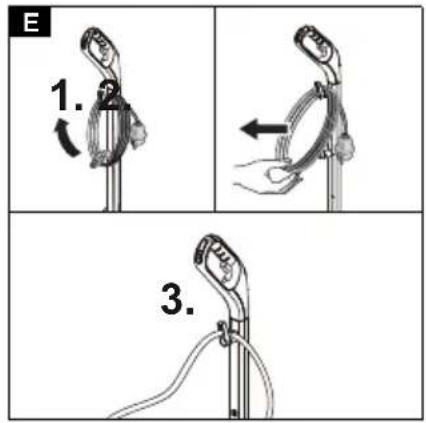
The lower cable holder can be rotated by 360^ for removing the cable. The upper cable hook cannot be rotated.
- Turn the lower cable holder upwards.
- Remove the power cable completely from the cable hook.
- Fasten the cable in the fastener of the upper or lower cable hook to prevent it from being run over during cleaning work.
Illustration E
Filling water
The water reservoir can be filled at any time.
ATTENTION
Material damage through open reservoir cover or incorrectly seated or loose water reservoir
Liquid can escape and damage the floor covering if the reservoir cover is not correctly closed or the water reservoir is not correctly inserted into the device.
Take care to ensure that the reservoir cover is securely closed and the water reservoir is seated tightly in the device when the water reservoir is full.
ATTENTION
Damage to the device
Unsuitable water can block the nozzles.
Do not use condensation from the clothes dryer for filling.
Do not use collected rain water for filling.
Do not use cleaning agents or other additives (e.g. scents) for filling.
Note
The decalcification cartridge must be installed in the water reservoir when filling the water reservoir.
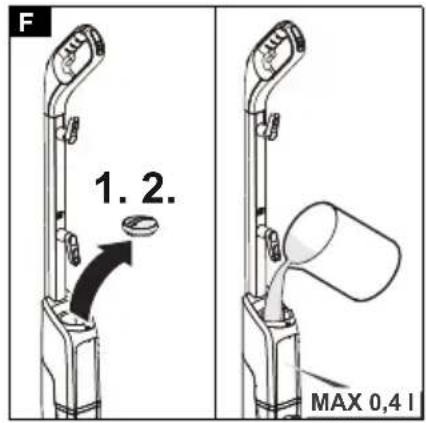
Filling the water reservoir directly on the device
-
Hold the device firmly.
-
Open the reservoir cover, and fill the water reservoir with max. 0.4 l tap water, directly at the device.
Illustration F
- Close the reservoir cover.
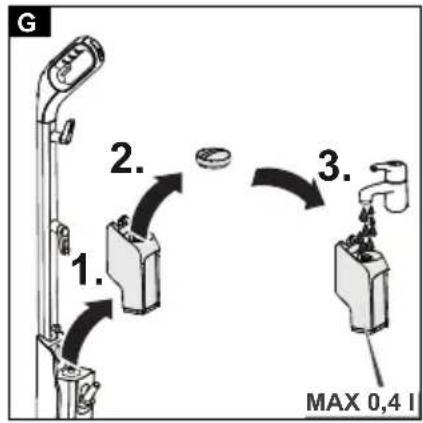
Removing the water reservoir for filling
-
Hold the device firmly.
-
Pull the water reservoir vertically upwards by the handle.
-
Open the reservoir cover, and fill with max. 0.4 l tap water.
Illustration G
-
Close the reservoir cover.
-
Insert the water reservoir and press downwards until it locks into place.
Switching on the device
ATTENTION
Device and material damage due to tipping over
The device can fall over and be damaged if inadequately secured during work breaks or storage. Liquid can also leak out and damage the floor covering in the process.
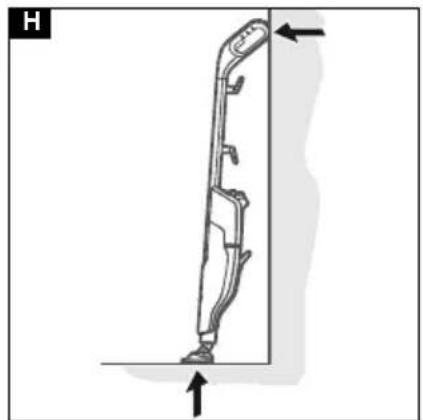
Position the device with the floor nozzle on a solid base, or the handle with the wall anti-slip protection in a vertical position on a solid wall.
Installation information
When steaming for the first time after removing and re-inserting the decalcification cartridge, the steam jet may be weak or irregular, and individual drops of water may be expelled. The device requires a short running-in period in which the decalcification cartridge fills with water. The steam volume that is expelled increases constantly until the maximum steam volume has been reached after approx. 50 seconds.
Note
Please note that here it is set to steam stage 2 (tiles/ stone), since the running-in period will otherwise be extended.
- Place the device on a firm surface.
Illustration H
-
Plug the mains plug into a mains socket. Illustration I
-
The indicator light flashes red alternately. Illustration J
-
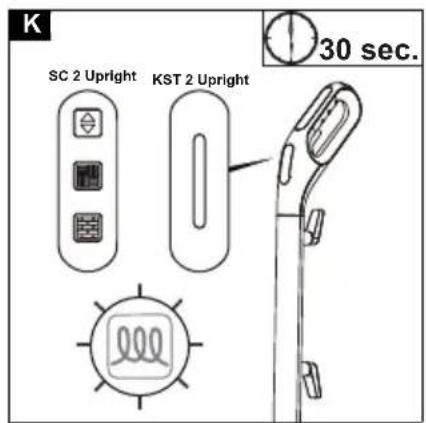
The indicator light lights up constantly green after approx. 30 seconds.
Illustration K
The device is ready for use.
Regulating the steam volume
The steam volume setting depends on the surface to be cleaned.
Note
Controlling the volume of steam only works for the SC 2 Upright EasyFix. Only one steam stage is available for the KST 2 Upright.
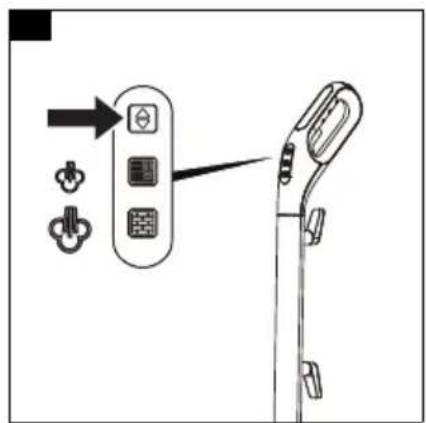
- Press the button with the direction arrows on the handle repeatedly until the desired steam stage is selected.
Illustration L
2 different steam stages are available:
| Tiles/stone - maximum steam stage | |
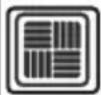 | Wood - minimum steam stage |
Note
The maximum steam stage (Tiles/stone) is always selected when the device is switched on.
- Press the steam lever after setting the steam volume.
Illustration M
Refilling water
Note
The water level can be seen through the partially transparent fresh water reservoir.
When the water is refilled, the decalcification cartridge remains fixed in the device.
- Open the reservoir cover, and fill the water reservoir with max. 0.4 l tap water, directly at the device.
Illustration F
or
- Remove the water reservoir, open the reservoir cover, and fill with max. 0.4 l tap water, see chapter Filling water.
Illustration G
Interrupting operation
ATTENTION
The floor covering can be damaged by moisture remaining on the floor cleaning cloth or floor nozzle/device after cleaning.
Remove the floor cleaning cloth and dry the floor nozzle/the device after finishing the cleaning work.
Do not place or store the device on heat-sensitive surfaces.
In order to save energy, we recommend that you switch off the device for breaks in operation of longer than 20 minutes.
- Pull the mains plug out of the socket.
Illustration N
Switching off the device
- Pull the mains plug out of the socket.
Illustration N
ATTENTION
Device damage due to water putrefaction
The water in the reservoir may putrefy if the device is not put into operation for more than 2 months.
Drain the water reservoir before longer breaks in operation.
- To drain the water reservoir, see chapter Draining the water reservoir.
Illustration O
Storing the device
- To remove the floor cleaning cloth, see chapter Floor nozzle.
Illustration C
-
Remove the moisture from the floor nozzle/device.
-
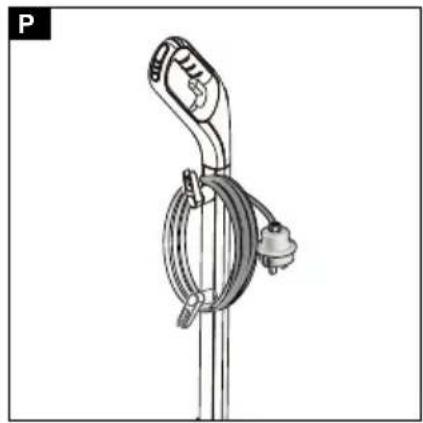
Wind the power cable around the lower and upper cable hooks.
Illustration P
- Store the device in vertical position on a solid base or on a wall.
Illustration H
- Store the device in a dry location that is protected from frost.
Important application instructions
Cleaning the floor areas
We recommend sweeping the floor or vacuum cleaning it before using the appliance. In this way the floor will be cleared of dirt and loose particles before the wet cleaning.
Cleaning coated or painted surfaces
ATTENTION
Damaged surfaces
Steam can loosen wax, furniture polish, plastic coatings or paint and edge band from edges.
Do not direct the steam at glued laminated edges as the edge band may loosen.
Do not use the device for cleaning unsealed wood or parquet floors.
Do not use the device for cleaning painted or plastic coated surfaces such as kitchen or living room furniture, doors or parquet.
How to use the Accessories
Floor nozzle
The floor nozzle is suitable for cleaning washable floor coverings, e.g. stone floors, tiles and PVC floors, as well as sealed wooden floors such as parquet and laminate.
ATTENTION
Damage due to steam effect
Heat and the effects of steam can lead to damage. Check the heat resistance and steam effect on an inconspicuous area using a minimal volume of steam prior to use.
Steam clean sealed wooden floors using the correct, preset steam level, and do not remain in the same position on the floor for too long.
Note
Detergent residues or care emulsions on the surface to be cleaned can cause streaks during steam cleaning, but these disappear after repeated use.
△CAUTION
Beware of burns to your feet
The floor nozzle/floor cleaning cloth heats up during steaming.
Hot water may drip out when pulling off the floor cloth. Only operate or remove the floor nozzle/floor cleaning cloth with suitable footwear.
For fastening the floor cleaning cloth to the floor nozzle, please refer to chapter Installing the floor cleaning cloth
Microfibre floor cloth
The microfibre floor cloth is suitable for cleaning stone floors, tiles and PVC floors, and also sealed wooden floors such as parquet and laminate.
Abrasive floor cloth
The abrasive floor cloth is suitable for cleaning insensitive surfaces such as tiles or stone.
ATTENTION
Damage to floor coverings
The abrasive floor cloth can damage sensitive floor coverings and surfaces.
Do not use the abrasive floor cloth for cleaning wooden surfaces.
Do not use the abrasive cloth with the carpet glider.
Removing the floor cleaning cloth
- Place one foot on the bottom corner of the floor cleaning cloth and lift the floor nozzle up. Illustration C
Note
Initially, the floor cleaning cloth's hook and loop fastener strip is very strong and cannot be removed from the floor nozzle easily. After the floor cleaning cloth has been used several times and washed, it is easier to remove from the floor nozzle and it has reached the optimum adhesion.
Removing the floor nozzle from the basic unit
ATTENTION
Material damage due to an unstable device
Removing the floor nozzle makes the device unstable and it can tip over and damage the device and floor covering.
Do not remove the floor nozzle from the basic unit after installation.
Remove the floor nozzle only when sending the device for servicing.
- Pull the mains plug out of the socket.
Illustration N
- Drain the water reservoir.
Illustration O
-
Hold the device tightly by the handle.
-
Actuate the unlocking button for the floor nozzle.
-
The floor nozzle releases from the device and can be removed.
Illustration Q
- Store the device safely in a horizontal position.
Care and service
Draining the water reservoir
ATTENTION
Device damage due to water putrefaction
If the device is not put into operation for more than 2 months, the water in the reservoir may putrefy.
Drain the water reservoir before breaks in operation.
- Pull the mains plug out of the socket.
Illustration N
-
Remove the reservoir cover.
-
Remove the decalcification cartridge.
-
Drain the water reservoir.
Illustration O
Replacing the decalcification cartridge
ATTENTION
Device damage and shortened service life
If the replacement intervals (indicator light) for the de-calcification cartridge are not observed, there is a risk of device damage and the service life of the device may be shortened.
Observe the replacement intervals (indicator light).
Note
The anti-calcification effect of the decalcification cartridge is activated as soon as the reservoir is filled with water, and the device is put into operation. Lime in the water is absorbed by the granulate in the decalcification cartridge. Additional descaling is not required.
Note
The granulate in the decalcification cartridge may change colour after it comes into contact with water. This depends on the mineral content in the water. This discolouration is harmless and does not have a negative effect on the device, the cleaning work or the functionality of the decalcification cartridge.
Indicator light at end of the run time
The indicator light shows you when the decalcification cartridge needs to be replaced.
- The indicator light flashes red 1 hour before the run time expires.
- When the run time of the decalcification cartridge is exhausted, the indicator light flashes quickly. The pump switches off automatically (no water steam) to prevent damage to the device.
Illustration R
Inserting the decalcification cartridge
ATTENTION
Device damage
There is a risk of damage to the device if the used de-calcification cartridge is re-used.
Work carefully in order to prevent mixing up the cartridges.
Installation information
When steaming for the first time after removing and re-inserting the decalcification cartridge, the steam jet may be weak or irregular, and individual drops of water may be expelled. The device requires a short running-in period in which the decalcification cartridge fills with water. The steam volume that is expelled increases constantly until the maximum steam volume has been reached after approx. 50 seconds.
Note
Removing the water reservoir makes it easier to remove and install the decalcification cartridge.
- Pull the mains plug out of the socket.
Illustration N
- Remove the reservoir cover.
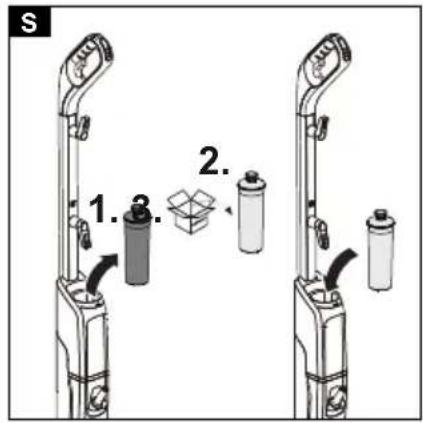
- Remove the decalcification cartridge.
- Insert the new decalcification cartridge and press it firmly into place.
Illustration S
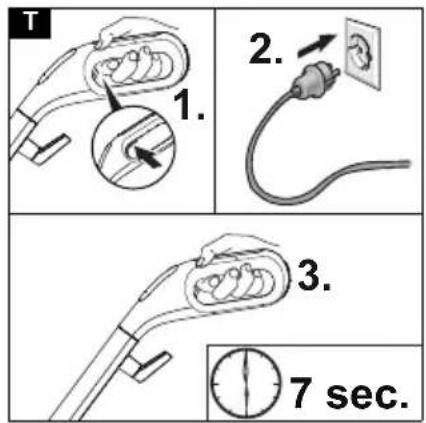
- Press the steam lever and insert the mains plug into a socket.
- Keep the steam lever pressed for 7 seconds.
Illustration T
- After a successful reset, the device flashes green twice and then switches to heating mode.
- Press and hold the steam lever for approximately 50 seconds to vent the decalcification cartridge.
Care of accessories
(Accessories - depending on scope of delivery)
Note
The micro fibre cloths are not suitable for dryer.
Note
Observe the instructions on the washing tag when washing the cloths. Do not use any liquid softeners as this will affect the ability of the cloths to pick up dirt.
- Wash the floor cleaning cloths in a washing machine at a max. temperature of 60^ C.
Troubleshooting guide
Malfunctions often have simple causes that you can remedy yourself using the following overview. When in doubt, or in the case of malfunctions not mentioned here, please contact your authorised Customer Service.
⚠ WARNING
Risk of electric shock and burns
Trying to eliminate faults while the appliance is connected to the mains or has not yet cooled down is always dangerous.
Remove the mains plug.
Allow the appliance to cool down.
No steam / little steam although there is sufficient water in the reservoir
The decalcification cartridge has not been inserted or has been inserted incorrectly.
- Fit the decalcification cartridge and/or check that the decalcification cartridge sits tightly in the reservoir and press in again if necessary.
The decalcification cartridge has been removed when filling with water and/or a new decalcification cartridge has been fitted
● Always leave the decalcification cartridge in the water reservoir during filling.
- Press and hold the steam lever constantly. The full steam output is reached after approximately 50 seconds.
The indicator light flashes red at regular intervals
Run time of the decalcification cartridge ends soon.
- Fit a new decalcification cartridge, see chapter Inserting the decalcification cartridge.
No steam although there is sufficient water in the reservoir. The indicator light flashes red quickly. Run time for the decalcification cartridge has expired
- Fit a new decalcification cartridge, see chapter Inserting the decalcification cartridge.
- If a new decalcification cartridge has already been installed and this error still occurs, the reset process has probably not been carried out correctly. Please follow the steps below to reset it:
1 Pull the mains plug out of the socket.
2 Press and hold the steam lever constantly.
3 Plug in the mains plug and hold the steam lever for 7 seconds until the indicator lights flash green twice. See chapter Replacing the decalcification cartridge.
Warranty
The warranty conditions issued by our relevant sales company apply in all countries. We shall remedy possible malfunctions on your appliance within the warranty period free of cost, provided that a material or manufacturing defect is the cause. In a warranty case, please contact your dealer (with the purchase receipt) or the next authorised customer service site.
(See overleaf for the address)
Technical data
| SC 2 Up-right | KST 2 Upright | ||
| Electrical connection | |||
| Voltage | V | 220-240 | |
| Phase ~ 1 1 | |||
| Frequency Hz 50-60 50-60 | |||
| Degree of protection IPX4 IPX4 | |||
| Protection class I I | |||
| Device performance data | |||
| Heating capacity | W 1600 | 1600 | |
| Heating-up time | Sec- 30 onds | 30 | |
| Continuous steaming | g/min 38 | 38 | |
| Filling quantity | |||
| Water reservoir | I | 0.4 | 0.4 |
| Dimensions and weights | |||
| Weight (without accessories) | kg | 2.7 | 2.7 |
| Length | mm | 314 | 314 |
| Width | mm | 199 | 199 |
| Height | mm | 1185 | 1185 |
Subject to technical modifications.
Contenu
(alt after maskintype)
⑤ KST 2 Dik Kontrol Lambasi
⑥Tutamak
www.kaercher.com/REACH
www.kaercher.com/REACH
natural_image
Black silhouette of a hand giving a thumbs-up gesture (no text or symbols)THANK YOU!
MERCI! DANKE! iGRACIAS!

Register your product and benefit from many advantages.
www.kaercher.com/welcome


Rate your product and tell us your opinion.
natural_image
Icon showing a gear and wrench, no text or symbols presentwww.kaercher.com/dealersearch
Alfred Kärcher SE & Co. KG
Alfred-Kärcher-Str. 28-40
71364 Winnenden (Germany)
Tel.: +49 7195 14-0
Fax: +49 7195 14-2212
- Inhalt
- Notes on the content materials (REACH)
- △CAUTION
- Fuse
- Description of the device
- For the illustrations, see graphics page. Illustration A
- Installation
- Installing the floor nozzle
- Installing the floor cleaning cloth
- Illustration C
- Initial Start-Up
- ATTENTION
- Illustration D
- Installation information
- Note
- Operation
- Unwinding the power cable
- ⚠ WARNING
- Illustration E
- Filling water
- Filling the water reservoir directly on the device
- Illustration F
- Removing the water reservoir for filling
- Illustration G
- Switching on the device
- Device and material damage due to tipping over
- Illustration H
- Illustration K
- Regulating the steam volume
- Illustration L
- Illustration M
- Refilling water
- Interrupting operation
- Illustration N
- Switching off the device
- Device damage due to water putrefaction
- Illustration O
- Storing the device
- Illustration P
- Important application instructions
- Cleaning the floor areas
- Cleaning coated or painted surfaces
- Damaged surfaces
- How to use the Accessories
- Floor nozzle
- Damage due to steam effect
- Beware of burns to your feet
- Microfibre floor cloth
- Abrasive floor cloth
- Damage to floor coverings
- Removing the floor cleaning cloth
- Removing the floor nozzle from the basic unit
- Material damage due to an unstable device
- Illustration Q
- Care and service
- Draining the water reservoir
- Replacing the decalcification cartridge
- Device damage and shortened service life
- Indicator light at end of the run time
- Illustration R
- Inserting the decalcification cartridge
- Device damage
- Illustration S
- Illustration T
- Care of accessories
- Troubleshooting guide
- Risk of electric shock and burns
- No steam / little steam although there is sufficient water in the reservoir
- The indicator light flashes red at regular intervals
- No steam although there is sufficient water in the reservoir. The indicator light flashes red quickly. Run time for the decalcification cartridge has expired
- Warranty
- THANK YOU!
- MERCI! DANKE! iGRACIAS!
- www.kaercher.com/welcome
- www.kaercher.com/dealersearch
Brand : KARCHER
Model : SC 2 Upright EasyFix
Category : Steam cleaner