WD3 - Industrial vacuum cleaner KARCHER - Free user manual and instructions
Find the device manual for free WD3 KARCHER in PDF.
User questions about WD3 KARCHER
0 question about this device. Answer the ones you know or ask your own.
Ask a new question about this device
Download the instructions for your Industrial vacuum cleaner in PDF format for free! Find your manual WD3 - KARCHER and take your electronic device back in hand. On this page are published all the documents necessary for the use of your device. WD3 by KARCHER.
USER MANUAL WD3 KARCHER
WD 3 Battery Premium
WD 3 Battery Premium Set

BATTERY POWER

KÄRCHER BATTERY UNIVERSE
Deutsch 5
English 14
Français 23
Italiano 32
Nederlands 41
Espanol 50
Portugues 59
Dansk 68
Norsk 77
Svenska 86
Suomi 95
Eληνικα 104
Türkce 114
Pycckn 122
Magyar 133
Cestina 143
Slovenscina 152
Polski 161
Romane ste 170
Slovencina 179
Hrvatski 188
Srpski 197
BbIrapckn 206
Eesti 216
Latviešu 225
Lietuviskai 234
YkpaIHcbKa 243
Ka3akwa 253
4 272
| 12 13 | 14 15 | 16 | 17 | 18 | 19 Akku Battery Power 36/25 20 BC 36 V | |
| WD 3 Battery | ● | ● | ● | ● | ● | ○ |
| WD 3 Battery Premium | ● | ● | ● | ● | ● | ○ |
| WD 3 Battery Set | ● | ● | ● | ● | ● | ● |
| WD 3 Battery Premium Set | ● | ● | ● | ● | ● | ● |


Inhaltsverzeichnis
| General notes | EN | 5 |
| Safety instructions | EN | 5 |
| Information on battery pack and charger | EN | 8 |
| Safety Devices | EN | 9 |
| Operating elements | EN | 9 |
| Charging process | EN | 9 |
| Battery pack operation | EN | 9 |
| Storage | EN | 10 |
| Transport and storage | EN | 10 |
| Care and maintenance | EN | 10 |
| Troubleshooting | EN | 10 |
| Description of the Appliance | EN | 11 |
| Assembly | EN | 11 |
| Charging the battery pack | EN | 11 |
| Commissioning | EN | 11 |
| General information on the operation | EN | 12 |
| Operation | EN | 12 |
| Transport | EN | 12 |
| Care and maintenance | EN | 12 |
| Troubleshooting | EN | 13 |
| Technical specifications | EN | 13 |
Dear Customer,

Before using your appliance for the first time, read these original operating instructions, act in compliance with them, and keep them for later use or for subsequent owners.
General notes
Proper use
In accordance with the descriptions and the safety information in these operating instructions the appliance is intended for use as a multi-purpose vacuum cleaner. This appliance has been designed for use in private households and is not intended for commercial use.
- Protect the unit from rain. Do not store outside.
This device may not be used to suck in ash and soot.
The manufacturer is not responsible for any damages that may occur on account of improper use or wrong operations.
Environmental protection
Notes about the ingredients (REACH)
You will find current information about the ingredients at:
www.kaercher.com/REACH

The packaging material can be recycled. Please arrange for the environmentally appropriate disposal of the packaging.

Old appliances contain valuable recyclable materials that should be recycled properly. Batteries and accumulators contain substances that must not enter the environment. Please dispose of old devices and batteries or accumulators in an environmentally friendly way.
Electrical and electronic devices often contain components which could potentially pose a danger to human health and the environment if handled or disposed of incorrectly. However, these components are necessary for the proper operation of the device. Devices marked with this symbol must not be disposed of with regular household rubbish.
Notes about the ingredients (REACH)
You will find current information about the ingredients at:
www.kaercher.com/REACH
Warranty
The warranty terms published by the relevant sales company are applicable in each country. We will repair potential failures of your appliance within the warranty period free of charge, provided that such failure is caused by faulty material or defects in manufacturing. In the event of a warranty claim please contact your dealer or the nearest authorized Customer Service centre. Please submit the proof of purchase.
Customer Service
Our KÄRCHER branch will be pleased to help you further in the case of questions or faults.
Accessories and Spare Parts
Only use original accessories and spare parts, they ensure the safe and trouble-free operation of the device. For information about accessories and spare parts, please visit www.kaercher.com.
Scope of delivery
In the event of missing accessories or any transport damage, please contact your dealer.
Safety instructions
Danger or hazard levels
DANGER
Pointer to immediate danger, which leads to severe injuries or death.
WARNING
Pointer to a possibly dangerous situation, which can lead to severe injuries or death.
CAUTION
Pointer to a possibly dangerous situation, which can lead to minor injuries.
ATTENTION
Pointer to a possibly dangerous situation, which can lead to property damage.
Safety Instructions for wet/ dry vacuum cleaners
Safe handling
DANGER
The user must use the appliance as intended. The person must consider the local conditions and must pay attention to other persons in the vicinity when working with the appliance.
The appliance may not be operated in explosive atmospheres.
If the appliance is used in hazardous areas the corresponding safety provisions must be observed.
- Do not use the appliance if it fell down, is visibly damaged or leaking.
- Keep packaging films away from children, there is a risk of suffocation!
WARNING
This appliance is not intended for use by persons with limited physical, sensory or mental capacities or lacking experience and/or skills, unless such persons are accompanied and supervised by a per
son in charge of their safety or they have received precise instructions on the use of this appliance and have understood the resulting risks.
Children may only use this appliance if they are over the age of 8 and supervised by a person in charge of their safety, or if they have received instructions on the use of this appliance and have understood the resulting risks.
Children must not play with this appliance.
Supervise children to prevent them from playing with the appliance.
Operate or store the appliance only in accordance with the description or illustration!
The appliance contains electrical components - do not clean under running water.
CAUTION
- Never leave the appliance unattended as long as it is in operation.
ATTENTION
- Do not operate the appliance at temperatures below 0^ C .
- Never vacuum without a filter, otherwise the appliance can get damaged.
- Protect the appliance from extreme weather conditions, moisture and heat.
Other risks
DANGER
Risk of explosion!
The appliance may not be operated in explosive atmospheres.
- Do not vacuum up explosive or combustible gases, fluids and dusts!
- Do not vacuum up reactive metal dusts (e.g. aluminium, magnesium or zinc!
- Do not vacuum up undiluted acids or brines!
- Do not vacuum up burning or smouldering objects!
WARNING
Risk of injury!
- Do not vacuum in the vicinity of the head when using the nozzle and suction pipe.
CAUTION
In order to prevent accidents or injuries, mind the weight of the appliance during transport (see technical data).
Stability
CAUTION
Create stability for the appliance prior to any work on or with the appliance to prevent accidents or damage.
Charger safety instructions
DANGER
-
Check the plug-in power supply, connection cable, battery adapter and battery pack for damage before every use. Damaged devices may no longer be used and must be replaced.
-
Do not open the charger. The charger must be replaced if damaged or defect.
-
Do not operate the charger in explosive environment.
-
Never touch the mains plug and the socket with wet hands.
-
Do not use the charger if dirty or wet.
-
Do not charge battery (primary cells); risk of explosion.
CAUTION
The mains voltage must match the voltage mentioned on the type plate of the charger.
Use the charger only to charge approved battery packs.
Only charge the battery pack using the original charger enclosed or with a charger approved by KÄRCHER.
ATTENTION
- Do no carry charger by the connection cable.
- Keep connection cable away from heat, sharp edges, oil and moving parts.
- Do not cover the plug-in power supply.
Avoid extension cables with multiple sockets and simultaneous operation of several devices.
- Do not wind the connection cable around the or the battery adapter to avoid damages.
Symbols on the charger

Protect the charger against moisture and store it dry. The device is only suitable for use in rooms; do not expose the device to rain.

The charger has a built-in fuse of 1 ampere.

The charger meets the requirements of protective class II.
Battery pack safety instructions
Be sure to read the safety instructions enclosed with the battery pack and observe these during use!
Information on battery pack and charger
CAUTION
- Risk of injury, risk of damage due to exploding battery! Only charge the battery packs with the appropriate charger.
Please check that the battery pack and charger match before use!
Only charge undamaged battery packs.
Modifications and changes that are not authorised by the manufacturer are prohibited for safety reasons.
Any other use is prohibited. The user is liable for any hazards arising from improper use.
A battery pack and charger with 36 V nominal voltage is required for the initial startup. The "Set variants" already include a Li-ION battery pack with 36 V, 2.5 Ah (Battery Power 36/25) and a 36 V (Battery Power BC 36 V) standard charger in the scope of delivery.
The Battery Power battery packs (+) 36/25, 36/50 and 36/75 may only be used for the designated Karcher 36 V Battery Power system devices.
Batteries / chargers that are not supplied in the scope of delivery or are additionally required are available as special accessories or can be purchased later.
Before using the battery packs in a KÄRCHER Battery Power battery platform, please observe the operating instructions of the device used and any safety instructions enclosed.
More information on the operating instructions for battery packs or on accessories and spare parts can be found at www.kaercher.com.
Battery packs 36 V Battery Power
| Description | Rechargeable battery type | Nominal voltage | Rated capacity (according to IEC/EN 61690) | Rated capacity (according to specifications of cell manufacturer) |
| L-Ion | V | Ah | Ah | |
| 36/25 | 36 | 2,4 | 2,5 | |
| 36/50 | 36 | 4,8 | 5,0 |
Transport
The lithium-ion battery is subject to the requirements of dangerous goods regulations and can be transported by the user in public traffic areas without any further restrictions.
- When shipping by third parties (transport companies), special requirements for packaging and labelling must be observed.
Only send the battery if the casing is undamaged. Tape off open contacts and pack the battery tightly and securely. It must not be able to move in the packaging.
Please also observe the national regulations.
Safety Devices
CAUTION
Safety installations serve the protection of the user and may not be modified or bypassed.
Protective circuit
The installed protective circuit protects the battery pack against
Overheating
Full discharge
Overcharging
Short-circuit
Operating elements
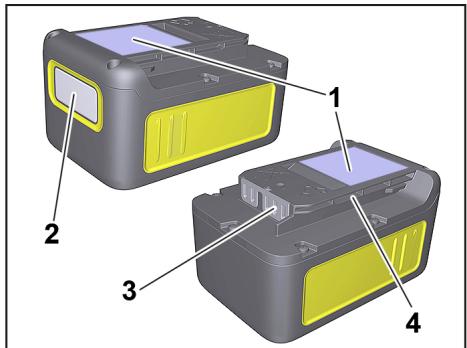
Battery pack
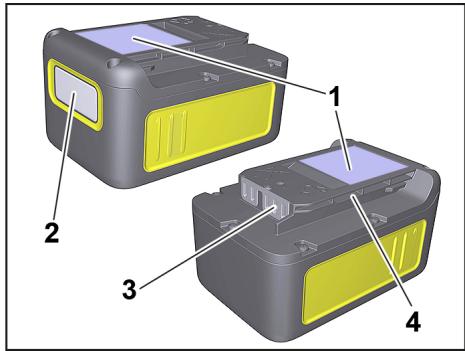
Figure dependent on types
1 Nameplate
2 Display
3 Contacts
4 Intake
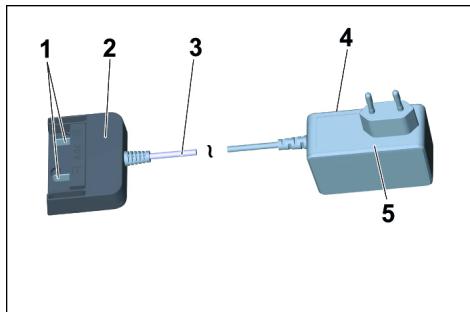
Standard charger
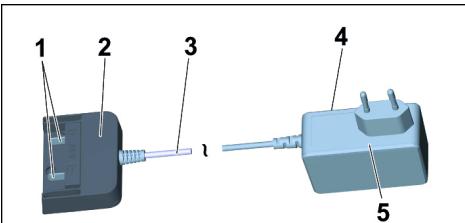
1 Battery contacts
2 Battery adapter
3 Connection cable
4 Nameplate
5 Plug-in power supply
Charging process
CAUTION
Risk of injury, risk of damage! Observe the operating instructions and safety instructions of the charger.
Note
New battery packs are only pre-charged and must be fully charged before first use.
The display is activated during the first charging process.
To ensure that the charge level indicator works correctly, the battery pack must be discharged during initial use until the device is switched off.
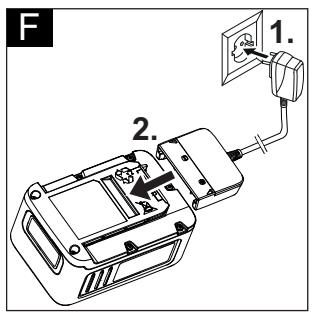
Illustration F
Plug the plug-in power supply into the socket.
Push the battery pack into the battery adapter of the charger.
The charging process begins automatically.
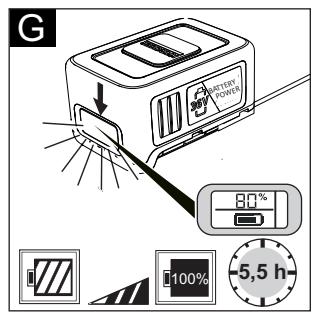
Illustration G
The remaining charging time is displayed on the battery pack display.
The charging time with a standard charger (Battery Power BC 36 V) for an empty battery pack (Battery Power 36/25) is approx. 5,5 hours.
When the battery pack is fully charged, the display shows 100% .
Remove the battery adapter from the battery pack after charging.
Pull the plug-in power supply from the socket.
Note
If the display does not show anything when the battery pack is in the charger, the battery capacity is fully depleted or very low. As soon as the battery pack has been sufficiently charged, the display shows the remaining charging time.
If the display does not show anything even after a long period of time, the battery pack is defective and must be replaced.
Note
New battery packs reach their full capacity after approx. 5 charging and discharging cycles.
Charge batteries that have not been used for a long time before use.
The performance of the battery pack is reduced at temperatures below 0^ .
The capacity of the battery pack may be reduced if stored at temperatures over 20^ .
Note
The charged battery pack can remain on the charger till it is to be used. There is no risk of over-charging.
In order to avoid unnecessary energy consumption, the charger should, however, be unplugged as soon as the battery pack has been fully charged.
Battery pack operation
Display
The battery pack is equipped with a display that provides continuous information on the charging state, the progress of charging and the remaining battery life. In addition, any error messages occurring will also be shown.
The runtime adjustment is generated via capacity switching.
Depending on the device used, the display rotates when the battery pack is inserted.
| Display | Meaning |
| Battery in storage | |
| Charging state of the battery pack while not in use. | |
| Battery in use | |
| Remaining battery life of the battery pack while in use. | |
| Battery charging | |
| Remaining charging time of the battery pack during charging. | |
| Battery pack fully charged. | |
| Error display | |
| Battery pack temperature outside the permitted values or disabled due to short-circuit (see Help in case of malfunctions). | |
| Battery pack defective and disabled for safety. Do not use the battery pack anymore and dispose of it properly. | |
Operation
CAUTION
Risk of personal injury or damage! For operation, observe the operating instructions and safety instructions of the device used.
Insert the battery pack into the intake of the device.
CAUTION
Risk of personal injury or damage! Ensure that the battery pack properly snaps into place.
Note
During use, the display shows the remaining operating time.
Remove the battery pack from the device after completion of the work.
Recharge battery pack after work.
Note
Also recharge partially discharged battery packs after use.
Storage
CAUTION
Risk of personal injury or damage! Mind the weight of the appliance during transport.
ATTENTION
Risk of damage! Store the battery packs in rooms with low humidity and below 20^ only.
This appliance must only be stored in interior rooms. The battery pack indicates its current charging state on the display, even without being connected to a charger.
If the battery pack display goes out during storage, the battery capacity is fully depleted and the display has been switched off. Please recharge the battery as soon as possible.
Transport and storage
CAUTION
Risk of personal injury or damage! Mind the weight of the appliance during transport.
Care and maintenance
Check charging contacts for soiling at regular intervals and clean them as necessary.
Recharge battery packs that are stored over a longer period of time.
Maintenance
The appliance is maintenance free.
Troubleshooting
Error during charging
Display is off, battery pack not charging
Charger defective. Replace the charger.
The battery pack may be completely discharged. Wait and see if the display shows the remaining charging time after some time. If not, the battery pack is defective. Replace the battery pack.
Display is on but the battery pack is not charging
Charger defective. Replace the charger.
Observe the display. The battery temperature may not be within the normal range.
Display shows temperature symbol, battery pack not charging
Battery pack temperature too low / too high. Put the battery pack in a moderate temperature environment. Wait until the battery pack temperature has normalized.
The charging process then starts automatically.
Error during operation
The display shows the temperature symbol
Battery pack temperature too low / too high. Put the battery pack in a moderate temperature environment. Wait until the battery pack temperature has normalized.
| Error during operation |
| In case of a short circuit, the battery pack is disabled for 30 seconds for further use. If the short-circuit occurs more frequently, the battery pack is permanently disabled. Connect the battery pack to the charger to unlock it. |
| Display shows remaining run time 0, device switches off. |
| The battery pack is discharged. Please recharge the battery pack. |
| Storage error |
| Display shows no remaining capacity |
| The battery pack is discharged. Please recharge the battery pack. |
| Display shows remaining capacity 70% even though the battery pack has been freshly charged. |
| The battery pack is in automatic storage mode. This is activated if the battery has not been used for more than 21 days. This function protects the battery cells against rapid aging and increases their service life. Fully recharge the battery pack before next use. |
| General fault |
| Display screen shows broken battery symbol. |
| Battery pack defective and disabled for safety. Do not use the battery pack anymore and dispose of it properly. |
Description of the Appliance
Illustrations on fold-out page!
These operating instructions describe the multi-purpose vacuum cleaners listed on the front cover.
The illustrations show the maximum equipment; depending on the model, there are differences in equipment and supplied accessories.
When unpacking the product, make sure that no accessories are missing and that none of the package contents have been damaged. If you detect any transport damages please contact your dealer.
included in the scope of delivery
possible accessories
1 Suction hose connection
2 Battery compartment
3 ON/OFF switch for appliance
4 Battery unlocking button
5 Handle
6 Blowing connection
7 Container closure
8 Parking position
9 Accessory mount
10 Steering roller
11 Container
12 Filter bag
13 Cartridge filter
14 Suction hose with connecting piece
15 Removable handle
16 Suction tubes 2 × 0.5 ~m
17 Crevice nozzle

18 Floor nozzle (with insert)
19 Battery pack Battery Power 36/25
20 Standard charger Battery Power BC 36 V
Assembly
Illustration A
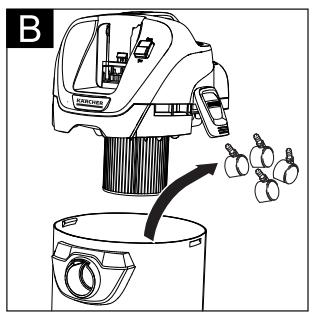
Illustration B
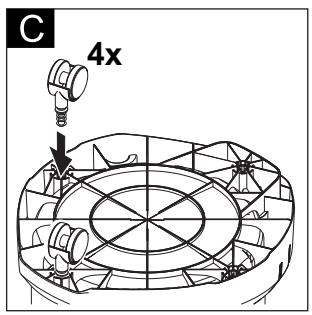
Illustration C
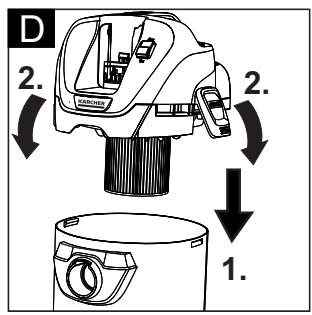
Illustration D
Illustration E
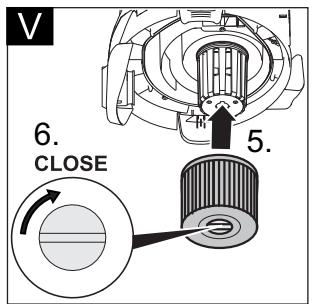
To open, pull the container closures upwards and remove the device head on the carrying handle.
Remove the contents from the container.
Turn the container, press in the steering roller in the openings at the base of the container till the end-point.
Put the appliance head onto the container and lock the container locks.
For vacuuming dry dirt an additional filter bag can be inserted if necessary.
Charging the battery pack
Illustration F
Illustration G
See chapters "Charging process" and "Battery pack operation".
Commissioning
Connect accessories
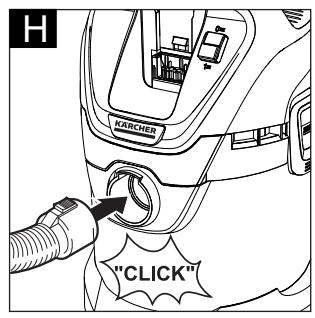
Illustration H
Push the suction hose into the connection on the appliance, it snaps in place. In order to disconnect it, push down with your thumb and pull the suction hose out.
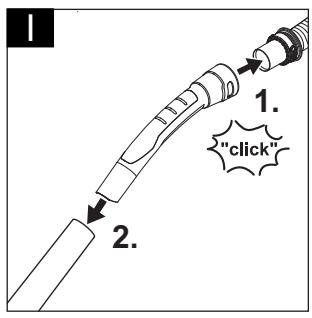
Illustration I
Connect the handle with the suction hose until it snaps in place.
Put both suction tubes together and connect them with the handle.
Note: Accessories, such as suction brushes (optional) can be directly attached to the connecting piece and thus connected to the suction hose.
For convenient working even in tight spaces.
The removable handle can be attached between the accessories and the suction hose if necessary.
Recommendation: In order to vacuum the floor, attach the handle to the suction hose.
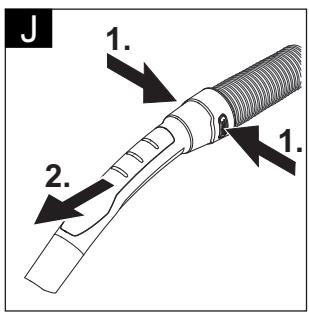
Illustration J
To remove the handle from the suction hose, press the button with your thumb and index and remove handle
Note: Due to removing the handle, accessories can be directly attached to the suction hose.
Illustration K
Connect the floor nozzle with the suction pipe.
Note: For vacuuming dry dirt or water off the floor - always work with the insert (brush strip and rubber lip) in the floor nozzle.
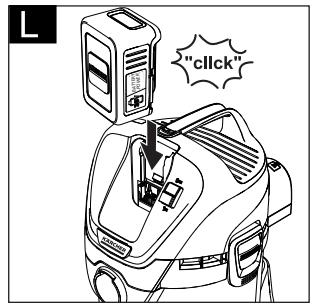
Inserting the battery pack
Illustration L
Push the battery pack from the top into the battery holder and lock it.
Turning on the Appliance
Illustration M
Position I: Vacuum and blowing function.
Position 0: Appliance is switched off
General information on the operation
ATTENTION
The metal container can become statically charged when vacuuming large amounts of fine dust particles and then discharge upon contact.
ATTENTION
The batter holder area must be kept clean.
If there is too much dirt in this area, it is possible that the battery pack is not inserted/locked into place.
Similarly, it may be the case that battery pack can no longer be taken out of the device because the eject lever can no longer be moved.
Operation
ATTENTION
Always work with an inserted cartridge filter during wet as well as dry vacuum cleaning!
Dry vacuum cleaning
ATTENTION
Check the filter for damage prior to installation and replace as necessary.
Work with a dry cartridge filter only!
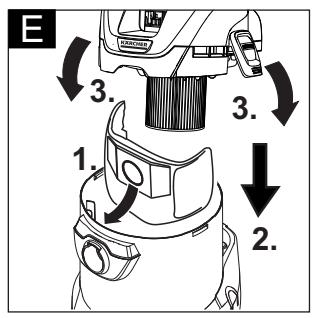
Illustration E
Recommendation: To vacuum fine dust, use the filter bag.
Information filter bag
The filling level of the filter bag depends on the dirt that is sucked in.
The filter bag needs to be replaced more frequently while sucking in fine dust, sand, etc.
Clogged filter bags can burst - therefore make sure to replace the filter bag in a timely manner!
ATTENTION
Vacuum cold ashes only when using a pre-filter.
For information about accessories and spare parts, please visit www.kaercher.com.
Wet vacuum cleaning
ATTENTION
Do not use a filter bag!
Illustration K
For vacuuming up moisture or liquids pay attention to the correct floor nozzle insert and connect the corresponding accessories.
Note: If the container is full, a float closes the suction opening, and the appliance works at a higher speed. Switch off the appliance immediately, and empty the container.
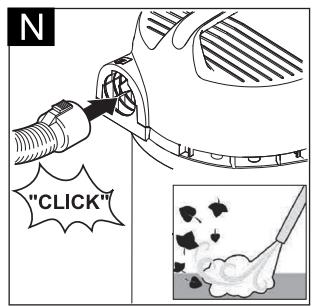
Blowing function
Cleaning hard to reach locations or, where vacuuming is not possible, like leaves from a gravel bed.
Illustration N
Connect the suction hose to the blower connection, this will activate the blower function.
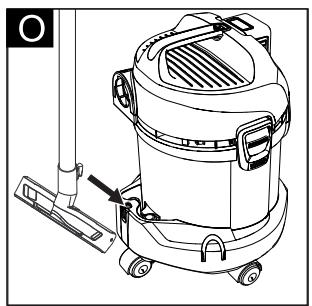
Interrupting operation
Turn off the appliance.
Illustration 0
Hook the floor nozzle into the parking position.
Note: If it is necessary to remove the suction head when work is interrupted, the battery pack may become stuck. The battery pack is locked in tightly and cannot fall out.
Finish operation
Turn off the appliance.
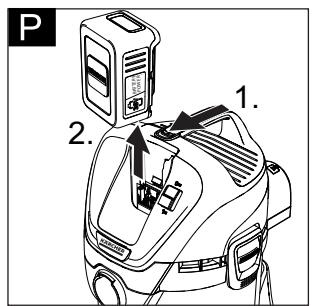
Illustration P
Push the battery release button forwards and remove the battery pack from the device.
If necessary, recharge battery pack (see chapter "Charging battery pack").
Recommendation: Remove the battery pack from the device after completing the work.
Empty the container
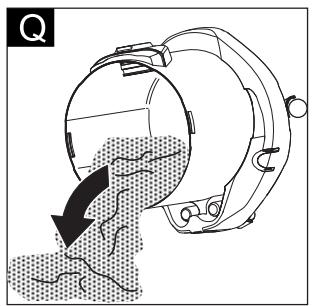
Illustration Q
Remove the appliance head and empty the reservoir.
Storing the appliance
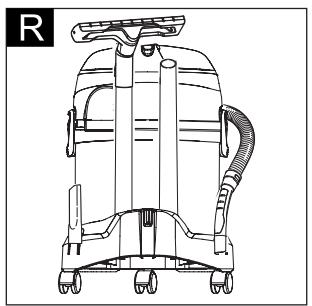
Illustration R
Store the accessories on the appliance and store the appliance in dry rooms.
Storing the battery pack
Note: Regardless of the vacuuming operations, the LC display uses little battery capacity, regardless of whether the battery pack is inside or outside the device.
See chapters "Charging process" and "Battery pack operation".
Transport
CAUTION
Risk of personal injury or damage!
Mind the weight of the appliance during transport.
When transporting by hand
Lift appliance by the carrying handle and carry it.
When transporting in vehicles
Secure the appliance against shifting and tipping over.
Care and maintenance
Clean the device and accessory parts made of plastic with a customary plastic cleaner.
If required, rinse the container and accessories with water properly and dry them before reuse.
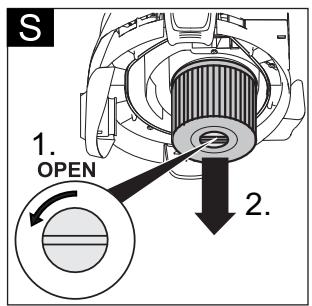
Figure S - V
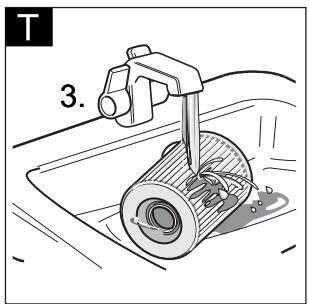
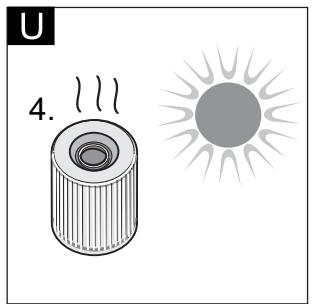
Only clean the cartridge filter under running water; do not wipe or brush. Let it dry completely prior to installation.
Check charging contacts for soiling at regular intervals and clean them as necessary.
Check ventilation slits for soiling and clean them if necessary.
Maintenance
The appliance is maintenance free.
Troubleshooting
Appliance is not running
Illustration L
The battery pack is not seated correctly in the battery holder, insert the battery pack into the battery holder and let it click into place.
Charging state of the battery pack (see display) too low, charge the battery if necessary.
Defect battery pack or charger, replace battery pack or charger with new accessory.
The device switches off automatically
Device/battery pack is overheated, wait briefly to allow device/battery pack to cool down.
Container is full of water, which activated the float tank and empties the container.
Decreasing cleaning power
Accessories, suction hose or suction pipes are clogged.
Remove the clog with a suitable aid.
Illustration E
Filter bag is full, install new filter bag.
Figure S - V
Cartridge filter is dirty, knock off dirt from cartridge filter and clean under running water if necessary.
Replace damaged cartridge filter.
Recommendation: Replace cartridge filter 1x per year.
Technical specifications
Subject to technical modifications!
| Battery pack and quick charger in scope of delivery of: ■ WD 3 Battery Set ■ WD 3 Battery Premium Set (Battery pack Battery Power 36/25 / standard charger Battery Power BC 36 V) | ||
| Device | ||
| Rated power | W | 300 |
| Operating time when battery fully charged (max.) | min | 15 |
| Protective class | III | |
| Type of protection | IPX4 | |
| Battery pack Battery Power 36/25 | ||
| Nominal voltage | V | 36 |
| Rated capacity (according to IEC/EN 61690) | Ah | 2,4 |
| Rated capacity (according to specifications of cell manufacturer) | Ah | 2,5 |
| Nominal width (in accordance with UN 3480) | Wh | 86,4 |
| Max. charging current | A | 4 |
| Battery type | Li-Ion | |
| Weight | kg | 0,9 |
| Dimensions (I x b x h) | mm | 133x88x72 |
| Standard charger Battery Power BC 36 V | ||
| Battery pack nominal voltage | V | 36 |
| Max. charging current | A | 0,5 |
| Battery type | Li-Ion | |
| Mains voltage | V | 100-240 |
| Frequency | Hz | 50-60 |
| Power input (max.) | A | 0,3 |
| Protective class | □ | II |
| Weight (without battery pack) | g | 205 |
Table des matieres
www.kaercher.com/REACH

www.kaercher.com/REACH
Garantie
Manipulation friable
DANGER
Blocs-batteries 36 V Battery Power
www.kaercher.com/REACH

www.kaercher.com/REACH
Garanzia
www.kaercher.com/REACH

www.kaercher.com/REACH
Garantie
Accupacks 36 V Battery Power
| Benaming | Accutype | Nominate spanning | Nominate capacitit (conform IEC/EN 61690) | Nominate capacitit (volgens informatatie celfabrikant) |
| Li-ion | V | Ah | Ah | |
| 36/25 | 36 | 2,4 | 2,5 | |
| 36/50 | 36 | 4,8 | 5,0 |
Vervoer
www.kaercher.com/REACH

www.kaercher.com/REACH
Garantia
www.kaercher.com/REACH

www.kaercher.com/REACH
Garantia
Oprocessodeargacomeacautomatically.
Erro na的操作
O symbolo de temperatura épresentado no display
WD3 Battery Set
WD3 Battery Premium Set
(Conjunto de bateria Battery Power 36/25 / carregarod standard Battery Power BC 36 V)
Aparelho
Battery Power BC 36 V
Montering
Figur A
www.kaercher.com/REACH

Materialet i emballasjen kan resirkuleres. Kvitt deg med emballasjen på miljøvennlig*Mæt.

www.kaercher.com/REACH
Garanti
www.kaercher.com/REACH

Satta in batteripaket
Bild L
www.kaercher.com/REACH

Ta uIka oukeuaiac eivai avakukwoija.
AToppiye Tn oukeuaia e oikooyko tpoTIO.

OIIaies OuakeuEs Tepixouv IIOaIiMa avakukawiia uika, ta oToia 0a TpTeTVE aoi TeVTa iavakukwOn. OI matarapiec kai OsuowpeuTe S Tepixouv Uka, ta oToia EE vEtITpETeTai va katahNouo tO pEiBaalov. AToppiye TIGIaIe s OuakeuC, TIC matarapies h touc ouoWpeutEc ME TepiBaalovtikApOpTo.
OI nAektpiKc kai OI nAektpovikc s ouokuecs auxva Tepiaaujavouv Eapntmuata, TOne TE pTTwn Alambdaouevnc metaeipionn antoppius mTPOPOuVA uATOTEAEouv Eotia kivouvua Tny Uyeia kai TO TEPiBAALO. Auta T eApntmuata EIVAIOwC atapainta yia Tn ooTn leitoupyia TNC OUsOKueCs OI ouokuecs TOnu Qepouv auto To oujBoLoD EV TITPETeTai v TNIQUVTa Ot aOKoutidia.
YtObeEieEiγia Ta OuOtatikα (REACH)
EvnpwuevCpi npopopies yia ta ouotatiku tropeite va bpie tOn dEvuovan:
www.kaercher.com/REACH
Eyyunon
www.kaercher.com/REACH

www.kaercher.com/REACH
Garanti
Yka3aHnI no aKkMyIpyTopHomy 6nOky 3apdHOMy yCTpOiCTBy RU 9
3aunthbyeyctpoiCTBa RU 10
3JIemEnbI ynpaBHeHn RU 10
Ipocecc 3apdKn RU 10
UnpaBneHnE aKkymyTOpHbIM 6IOKOM RU 11
Xpachenne RU 11
TpaHcnpOpTuPoBkaI xpaHeHne RU 12
YxOДI TexHnueckoe 6cnyKuBaHne RU 12
POMOuB Bcnyae HenoJaDOK RU 12
Oncanne npibopa RU 12
MoHTaK RU 13
3apka akkymyIopHoro 6noka RU 13
BbD B 3KcNlyatauRU 13
O6une yka3aHnI no 3KcPnyatauIN RU 13
YnpabJIeHne RU 13
TpaHcnpTnpOBka RU 14
YxOДI TexHnueckoe 6cnyKbHaHne RU 14
POMOuB Bcnyae HenoJaDOK RU 14
TexHnueckne daHHbIe RU 15
Ybaxaembl nokynateIb!


PpeepnepBIM npmEHeHEm yctpoiCTBa HeoOxOIMO npOuHTaTb DAHHUOpINHaJIbHyU INCTpyKUIO NO kCNyTAATauO, noCNE 3TOr DEI
CTBOBaT B COOTBECTBIM C HeN I COXPaHITb ee DnIaIbHeuero NcOnIb3OBAHnI INn DnIeCyduoEro BnaIeBua.
06uyeyka3aHn
IcnoJb3ObaHne no Ha3HaueHnIO
YCTPOICTBO NpeIHa3HauHeO DIIA IICNIOJIb3OBaHNBA B COOTBECTBm C OINCAHMAIM, PnIBeDEHHbIMN B DaHHOMpyKOBODCTBE NO 3KcPIyatauMn, INyKa3aHMyMn NO TEXHKe 6e3oNaCHOTn pni paBoTe C yHNBepCaNbHbIMnPbIeCOCAMM.
Даньи рпбор паразовтан дялін Horo MCnoIb3OBAHn И не расчтан на Требованьд поpoceccnoHaNbHOrO primeMeHEHN.
3aunuaiTe npnbop ot nonapaHna Ha Hero doJxJa. He xpaHnItb Ha OTKpbITOM Bo3dyxe.
- Pπiδbσ He npεdnaHaueH en yδbρκi cαχιn iη- nπλa.
I3roToBnTeJIb He Hecet OTBeTCTBeHHOCTn 3a NOpeKxHe, NpUeHHbIe BpeyIbTaTe IcNoJIb3OBAHnI He IO Na3aHueHEnIO UIN He npabInbHorO ObpaUeHnIC npi6Opom.
3aunTaOkpykaIouei cpebl
www.kaercher.com/REACH

YnakoobuHbIe MaTePAnbI bNODaTcR BTOpHNo HnepepaObTe. YnakoBky Heo6xoDMU yTNIMIn3POBaTb 6e3 uepBa dNf oKpyKaouw e CpeDbI.

OTcnykBwne yctpoiCTBa codepKt npiroDnHbIe IINBTOPHO HcN0JIb3OBaHnIeHHeBleMATEpAnbl, KOTpbIe DOnKbHpepeDaBaTbcHa nepepa6Otky. Batapeu n AkcyMynrToPbI coepKt BeueceTBA, KOToPbe He DoJKNbI NpOaTb C OOkykaoUyO cpey.OTcnykBwne yctpoiCTBa,Takne kak 6batae uNn AKKyMynrToPbI,yTNn3nupobatb cornaCHO Tpe6oBaHnM NO 3aunite OkykaoUeIe cpebl.
3NeKtpnueckne n 3NeKtpoHhBle np6obpI qacto CoedjXaT KOMNOHEtbl, KOtOpbI pInn HeNpaBnHOM oBaPaeHHN INn HeHaDnEkaeJyTN NIA3auqn PnpCTABNlOT NOTEHnAunBHyO ONACHOCTb IINI JIODeJ N3KOJOnn. Tem He Mehee daHhHe bKMOHOHTb HE06xOJIMbI dNn npA BnHoi pa60bI np6Opa. IpN6ObpI, Obo3NaeHHbte 3TmN CmBONOM, 3anpeJeHO yTNn3nPOBaBt BMeCTe C 6bITOBMn OTXoDAm.
www.kaercher.com/REACH
Fapantna
B kaxdoi cTpahe DeIeCTbYIO T COOTBETCTBeHNO rapaHTnHbIe yCNoBN, I3dAnHbIe yNOnHMOUeHHo OpraHn3aueHc6bTa HaaHe npOdyuKmN B daHHoT CTApeA. Bo3MOxHbIe HeNCpABNtO npiB6opBa TceHne raPantnHoro cPoKa Mbl YcTpaHae BecpNaTHO, eCnn npuHna 3aknouaetcB V deFekTx MATEpHaNoB INn OsiN6kax pPi N3rOToBLeHnN. B cnyae Bo3NknHOBeHn npTeHcnB TceHne rapaHTnHoro cPoKa npoc6b6a 6pbauatbc, IMer npi Cebe Yek O pokynke, B toproByo opraHn3auno, npOdaBsyBam npin6Op nIN B6nKaiyuyo yNpONHOMoHEnHyo cny6by cepBncHoro 06cNkyKBaHN.
ДаТаВыntуСКАОTOБРаЖаETСЯHA3aBOДСКОТаБИЧУКЕВЗAKOДиРОВаHHOMВИDE.
Pn3OMOTdIeNbHbIeZuOpblIMHeOT CNeDyUoue 3NaueHne::
Приимер: 30190
3 roD BbInycka
0 cToJeTHe BbInycka
1 DecTnIeTne BbInycka
9 BTOPA CUNPpa Mecaa BbInycka
0 nepBaIuΦpa MeCya BbInycka
TakIM o6pa3OM, B DaHHOM npIMpe KoI 30190 O3Haayet DaTy BbInycka 09 /(2)013.
CepBnchna cny6a
B CNYaue Bo3NkHOBeHn BOpcoB IINI NOnOMOK hAIIΦiINan ΦIPMbI KARCHER nOMoXeT Bam pa3peuNTb nx.
PpHaIaIeXHoCTn 3aIaCTn
Ucnonb3yyte OprnHnAbhBHe pInnaAdnEeXHOu n 3a- nuaCTn -TOnbKO OHnRapAHNTpyOt 6eONaChyU 6epeBeOHNo paOby tCpOINCTBa.
HΦopMaIHO O pRnHaIeJXHoCTx N 3aIyAcTEx Bbl MoKeTe hAIrTu Ha caIte www.kaercher.com.
KOMnNeKT nOcTaBKn
PnObHApUxHeHH NHeoCTaUoXn PnpHaNtHexHoCTe nnIOBpExdHn, NOyueHbX BO BpEma TpAHcNOpTnPOBKn, CNeJeYET YBeDoMnTb ToproByo opraHn3aMuHO, npDabuyno pni6Op.
Yka3aHnI NO TexHnKe 6e3OnaCHOCTN
CTepeHb onaCHOCTn
ONACHOCTb
Yka3aHue omHocumeIbHo He-nocpeOcmeHNO apo3aueu onachocmu, Komopar npueo-dum k mjaKeIbIM yBeyam unu K cmepmu.
PNEyPEXDEHNE
Yka3aHue omHocumelbHo 603- MoXHOI nOmeHcuaJIbHO ONa- ChoU cumyaauu, Komopar MoXem npueecmu K mJxKeIbIM YBeeyM UUNK Cmepmu.
OCTOPOXHO
Yka3aHue Ha nomehuzaJIbHo onachyu cumyaUHO, Komopar Moxem npuecmu K noJyHeuIoo JneKux mpaem.
BHMHAHNE
Yka3aHue omHocumelbHo 0o3- MoXHOJ nOmeHcuaJIbHO ona- cHou cumyaUu, Komopar MoXem noBley MamepuaJIbHbI yuep6.
TexHnka 6e3OpaCHocTn IbJIeCOCOB IaBaxHOi N cyXoY cNCTKn
He pa3pewaume demyum uepambc ycmpoucm6om.
Cneodumb 3a meM, ymo6bl demu He uapau c ycmpou-cmeom.
3Kcnyamupoabmb uxpaHumb ycmpoucmojko6 coomsemcmeuuC onucaHuem u pucyHKamu!
YcmpoUcMo UMeem 3Jekmpuueckue KOHcmpyKmueHbIe 3JEMHeMbI, N03momyE2O HeIb3a Mblb Iod npomouHO 6oO!
OCTOPOXHO
3aPpeuzaemcOcmaBnmb paBomauouey ycmpoUcM8o 6e npucmoppa.
BHMHAHNE
He pa3pewaemcyaKcnnyamauya ycmpoucmea npuemepamype huxe 0^
Huko2da He npou3eodumb 6cacb1baHue 6e3 funbmpa, uhaye ycmpoucmeo moxem 6bmb noepexdeHo.
3auiuambyycmpoucmeo om HebnaoppuHbix no-ooHbIX ycnoBu, enaun u Xapbl.
PpOuHe onaChocTh
ONACHOCTb
Onachocmb 3pbbfa!
3Kcnpnyamauya ycmpooucm-6a 60 63pbI6OOnachbIX 3OHax 3anpeuaemca.
He ecacbibamb 63pbieayamblx unu oipouux 2a308, kudokcmeu u nbiu!
He 8cacbIeamb nbIb Me-maIIIOB, ecmynauux 6 xuMuceKue peakuu (Hapmu-Mep, aIOMuHu, Ma2Hu uNtuHK)!
He 8cacbIaMb Hepa36a8- IeHHbIe Kucnombu unu uenOuy!
He donyckamb bcacbibaHua 2opraux uuu mneuux npedmemoe!
PPEyPExEHH
Onachocmb nolyeHu rmpaem!
He npou3eodumb ecacbiaHue c nomouy hacaDKU uEcacbbaioueympy6ku6blu3u 2oNo6bl.
OCTOPOXHO
Bo u36exaHue Heecuacmhbix cnyuae uli mpaemupoabaHua, npu mpaHcnpumopoeKe Heobxodumo npuHmB 60 eHumaHue 8ec ycmpoUcmea (cm. pa3deJ "TexHuueckue daHHbIe").
Ko3ΦΦnUeHT yCTOnuNbOCTn
OCTOPOXHO
Ipeod bInonHeuem IIO6bIX deucmeu c ycmpoucmeom unu y ycmpoucmea Heo6xodoMo oecneumb ycmouyocmb 0u36exaHue He-cyaacmhb x CnyaeB unu no-6pexdeHu B pe3ybnmame onpokubiaHua ycmpoucmea.
Yka3aHnI NO TexHnKe 6e3OpacHocTn np na6oTe c 3apAHyIM yCTpOiCTBOM
ONACHOCTb
Ipeod kaxdbim noj30aHu-em npoeepmb cemeoB 6lok numanu co wmen- cehHO uJko, coedunmeHbui Kaeb, adamep aKKymyarnopa u aKKymyarnopnbi 6lok Ha npedMem noepexdehu. He uonb3o- amb u 3aMeHumb noepeXdeHHoe ycmpoUcMBO.
He omkpbIaMb 3apdHoe ycmpoUcMBo. B cnyae noepexdeHua uu dekekma 3apdHoe ycmpoUcMBo HeobxodUmo 3aMeHumb.
3aŋpeuəemcŋnoB3oBambcra 3apRedhIm ycmpoucmeo60 63pbioOnacHou cpee.
Hu 8 koem cnyae He npuka-cambcra K umenceIbHOu 6unke u po3emke MOKpbIMU pykamu.
He noIb3o6ambc3apdHbIM ycmpoucmeom, Ko2da OHO hXoDumc6 3a2p3-HeHHOM UUNU bJaxHom COcMOrHuU.
He 3apjxamb bamapeu (pepuHbIe 3JeMeHmbI). Opanchocmb KopomKux 3aMbikau!
OCTOPOXHO
HapjKeHue cemu doJxHo coBnaDambc HapjKeHuem, yKa3aHHbIM Ha 3a6oDckou ma6nUke 3apdHO2O ycmpoUcM6a.
3apraHoe ycmpoucmeo uC npb30aamb moIbko dna 3apdku pa3peweHHbIX eudoe aKKyMpyamOpHbIX 6JOKOe.
3apraKa aKKymyIamOpHo2o 6Ioka pa3peWeHa moIbko c nOMoubIO npuIaaeMo2O opUuHaJIbHO2O 3apdH2o ycmpoucMea uNu doNyueHHO2O fupmoi KARCHER 3apdH2o ycmpoucMea.
BHMHAHME
He nepenocmb 3apdHoe ycmpooucm8o 3a coedunmeIbHbI Ka6JIb.
CoedunHumeNbHbI Ka6JIb depXamb nOaIbwe om ucmouHuKo8 menla, ocmpbIX KpOMOK, Macna u npOeUxHbIX demaneu ycmpoUcMba.
He haKpbIaMb cemeoB 6nok numaHua co wmenCeIbHO uJkoU.
I36eambbucnojbs0eaHua ydunHumeNbHOzO Ka6enc MHO2OMecmHbIMu wmenCeIbHbIMU po3emkamu u npu oDHOBpeMeHHo 3KcNpyamaauu HeckoJbKux npu6opoe.
Bo u36exaHue noBpeXdeHu He HAmMbIsamb coeDuHmEhbI KuBeIb BOKpye CeMeBOO bloka numaHua CoUmenceJIbHOuNKoUuU aadamepa akKymyJamopa.
AkkymyIaTOpHbIe 6JIOKn 36 V Battery Power
Ecnn DnCnnei AkkymyIaTOPHOrO 6noka BO BpEmx xpaHeHnA raChet, EMKoCTb AkkymyIaTOPa NcpePna HnDcNnei BbIKIOuHcR.3apdntb AkkymyIaTOPbH b6nok KaK MoHO CKopee.
TpaHcnpToPObKa u XpaHeHne
OCTOPOXHO
OrachocmbmpaBmblu noepexdeHui O6pammb eHumAue Hae bec ycmpoicmea npu mpaHcnopmuoe-Ke.
Yxod n TeXHnueckoe o6cnyxnbAHne
→ Perynno HpoBepTb 3apAaHbIe KOHTaKtBu Ha NaHnue 3aqr3HeHm I npri Heo6xOaMIOCTn OunuTaB IVX.
→ AkkymyIyIaTOpHyo 6aTaapeo, xpaHraSyuOc npOdoJnKHTeNbHOe BpeM, nepNoDiueckn nO3apJxAtb.
Texnueckoe obcnykBaHne
Annapat He hykdaetcB npoqnilaKTnueckom o6cnyKuBaHIn.
Pomoub B cnyuae HenoJaok
| Ошебka BO BVPМяЗрдк |
| Диспей ВьКЛЮЧЕН, AkКУМЛТOPНБИ 6лOK He 3apЯжаETСя |
| Зардhoe устрий CTBO Heисправно. 3ameн'tь 3a-pядhoe uystpoiCTBO. |
| ВозмоXY, AkKуМЛТOPНБИ 6лOK полесью разра-jжен. Пождать, рosityа на диспee чeredе HeKOTOpoeВерме He поВITSCOCTOBSTABWEESCEВермЯ зардк. ECSиne He NOYBJIETCSY, AkKуМЛТOPНБИ 6лOK Heисправен. 3ameHHTь AkKуМЛТOPНБИ 6лOK. |
| Диспей ВьЮчЕН NO AkKуМЛТOPНБИ 6лOK He 3apЯжаETСя |
| Зардhoe uystpoiCTBO Heисправно. 3ameHHTь 3a-pядhoe uystpoiCTBO. |
| Оsprathь BнIMANHE Na ИndидаMuNo Ha dicsnplee. Bo3MOKHO, TempepaTyPA AkKуMЛТOPA经 HaxODNT-CB HopMaJIbHOMДИАЗоHe. |
| Ha dicsnplee OTOspBXaTcS cIMBON Tempepaty-рbl, AkKуМЛТOPHII 6lOK He 3apЯжаETСя |
| Tempepatya AkKуMЛТOPHORO 6lOKa сLПШКOM HM3-Ka/ысOKая ПореетсN AkKуMЛТOPHII 6lOKВ cpedu y cymeHNO TempepatypoI. Пodokdatab, noka Tempepatya AkKуMЛТOPHORO 6lOKa hopMaIIN3yET-СЗ. 3apЯДka NauchetcABTomATUcheckn. |
| ОшбкBo WВ Бrem 3KcPЛPyatauun |
| Ha dicsnplee OTOspBXaTcS cIMBON TempepatypbI |
| Tempepatya AkKуMЛТOPHORO 6lOKa сLПШКOM HM3-Ka/ысOKая ПореетсN AkKуMЛТOPHII 6lOKВ cpedu y cymeHNO TempepatypoI. Пodokdatab, noka Tempepatya AkKуMЛТOPHORO 6lOKaHopMaIIN3yET-СЗ. |
| В сLYuae KOPOTKOrO 3ambikAnHЯ AkKуMЛТOPHII 6lOK 6LOKIPyETCДЯдльnevшero IcNpOJb3OBAHnHa 30 cekHyd. ECSин кOTOKе 3ambikAnHЯ рoICNcXO-DHT qaChTo, AkKуMЛТOPHII 6lOK 6LOKIPyETCDA Na Ддптельhoe BvPem.ЧTOБы pa3bIkpOBoBaTakKуМЛТOPHII 6lOK, РДКПLOHITb erO K 3apЯДHOMy UcTPOICTBY. |
| Ошибк BO В Бrem Эксплуатаци |
| На диспee OTOBрахаетс оctавшeeесь врем 0, устрист BO vyк nullуаетс. |
| Аккумларовский блиораздген. 3ардын勃 akкумларовский blnok. |
| Ошибк BO В Бrem xpanehия |
| Диспей He пoka3ыlaьет OCTabшуюс EMKOSTb |
| Аккумларовский blinok ралорожен. 3ардын勃 akкумларовский blnok. |
| Диспей пoka3ыlaьет OCTabшуюс EMKOSTb70%,хотя akкумларовский blnok bbl Толъков chу Заржени. |
| Аккумларовский blinok haxodintcB в AVTOMATУСЕСКOM perejmte xpanehия. ON akтувире�с,T ecп anakкумларовский blnok И спунлызүүүүүүлүлүлүлүлүлүлүлүлүлүлүлүлүлүлүлүлүлүлүлүлүлүлүлүлүлүлүлүлүлүлүлүлүлүлүлүлүлүлүлүлүлүлүлүлүлүлүлүлүлүlүлүлүлүлүлүлүлүлүлүлүлүлүлүлүлүлүлүлүлүлүлүлүлүлүлүлүлүлүлүлүлүлүлүлүлүлүлүлүлүлүлүлүлүлүлүлүлүлүлү尔эдг.TОБТРОТОЗAPIВТБЕПИCHИBAET CPGK CUYKБЛ. ПОПИСТБЛВЗрдп'tb akкумларовский blnok,праздч чим Inc-пальзовыт brel ChOBA. |
| Ошаяошибka |
| На диспee OTOBрахаетс снmbои сломанноу ошул�аportа. |
| Аккумларовский blinok нессправен и 3aБКИрован в селих Белогашихостп. И спунлбовыт akкумларовский blnok yтплпзИроваыт ergo дохним IM образим. |
Oncsane np6opa
N3o6paXeHnMa. Ha pa3BopoTe!
B DaHNO INCTpyKUcNs IO 3ckPnlyatau cnnpBeDeHO OINCAHne YHnBepCanbHOro PbIeCoCA, npEcdTaBHeHO rO6noKHe.
Ha IIIOHCTpaunx IIO6bpaKeHa MaKcIMaJIbHaO cHactka yCTpoiCTBa. OChaueHne i KOInueCtBO DOONIHTeNbIbXpNHaIDNeXHoCTe, BxoDraIcxu B OBbEM NOCTABKN, 3aBNCIT OT MOeINy UcTbCTBA.
Pi np PaCnAKOBKe pN6ObpaTOpeER oKOMnEeTHOCTb, a TaIKe erO ueLoCTHOCTb. Pnp OcbnapKyehn NOBPeXdHn, pONyueHHbIX BO BpEm TPAHCNPOTPOBKn, CNEdyET YEboDMOnTb TOProBOYOp OprAnH3aUIO, PpOdaBu7UO pN6Op.
COePxtcB ObBeMe nOCTaBn
O BO3MOXHoe DOnONJIHnTeJIbHOe O6OpyIOBaHne
1 3IeMeHnIOKIIuOHeHbCaBbAioUoero UJHaHra
2 AkkyMnyTopHbO TcK
3 BbIKIOuateIb npio6opa (BKn./BbIKn.).
4 KhoNka pa36loKIpOBKn aKKymIyIToPa
5 Puyka
6 BbIXoIaI npOaUu Bo3dyxa
7 KpbuIka pe3epByapa
8 NapkoBouHoe noJoxeHne
9 MeCTO XpaHEnI npHaIeXHoCTeI
10 HapablaJIOU pOJIK
11 BaKn
12 ΦиьТрОВаЛьНьМeшOK
13 ΦЛьТровальный натугн.
14 BcAsbIaUoI M IlaHr C CoeHNHTeIbHbIM 3Je-MeHTOM
15 Cbemha pyka
16 BcabsbAioune Tpy6kn 2x0,5M
17 ΦopcHka dna qnCTkn WBOB n CTbIKOB
18 HacaKaIpa (co BCTaBko)
19 AkkyMnyTOpHbI 6nok Battery Power 36/25
20 CtaHapTHe 3apJHoe yCTpoIcTBO Battery Power BC 36 V
MOHTAX
PncyHok A
→ДлгOTКьваниNotянтьЗAMКОНTeHepaHapyKуИСТВьВерхнюЧаftыУCTpoIeCTBa3pykny.
PncyHok B
→ N3BJIeYb COdePXMoe n3 KOHTeHepa.
PncyHok C
→Повернтуп розервуар, bctавиьdoуynopa управляшке ролики в OTberрстая на оCHOвани розервуара.
PncyHok D
YcTaHOBnTb roNoBky npi6opa Ha pe3epByap n 3a-KpbItb 3aMKN.
PncyHok E
→ДЯСВСБИАНСУСТОМРЗЕСТССССССССССССССССССССССССССССССССССССССССССССССССССССССССССССССССССССССССССCS
3apkaakkyMnyTOpHoro6noka
PncyHok F
Pncyok G
PpncoeHnHTb PpHaJnxKHOCTN
Pucyok H
BCTaBnTB BCAsbIbAIOUuI UHaHr B yCtpoCTBO DoФKKcaUIM.ДЯИЗВЕЧENIA UHaHra CNeDyET HaxKaTb NaJb-цAMn HA CTONOp IN BbTaAUNTB CAcsBaIbOuUuNmUHaHr.
PucyHok
CoeHNHTbpyKcBOBCaBbAIOIMIJIaHROMdo FIKCAUIN.
CoeHNHTb o6e BcacbBaIOUne Tpy6Kn n noCDoeHNHTb INK pyUKe.
Yka3aHHe: TaKHe npHaAdnEeKHOCTN, KaK, HApPImep, BCaCbIbAOUOJIe TcKIn (OnIJI), MOXHO HaDeBaTb HenoCpeDCTBeHHO HA CoeINHITbJIbHI 3JEMENT IN TAKIM O6p3AOM CoeINHRTb CO BCaCbIbAOUIM J7NAHROM.
BCTaBnTb aKkyMjIyTOpHbI 6nok CBepxBy DepKaTeNb aKKMyJITopa n 3aueKHyTb.
BkIIOueHne np6bopa
Pucyok M
POn3nIgI:ФyHKUINBCaCbIBaHINu npOdyBKn. POn3nIg0:YcTpoJCTBO BbIKIOueHO.
06uhe yka3aHnno 3KcnIyataun
BHIMAHNE
Memannuuecku konmeiHep 8o ePmra c6pa 60nIbwoe kOJIuueceMea MenKo Iblu MoXem nonyumcbcmamuecku 3apd, a zamem pa3pdrumbc npu KaCahu.
BHIMAHHE
30ha depkamei akkymnmaopa doJxHa 6bimb u-cmoi.
EcnB a30n 30ne CmHIOOM MHORO rpaH, BO3MOKHo,TOa AKKyMnTOpHbI bOKn He CMoKeT bOItbnpAbnBO BCTaBnEH/3aФнICKcPOBaH.
TaKKe cyuIeCTByET BepoTHOCTb TORO, YTO aKKMyNtOpHbI bIOK He cMOXeT 6bYbYdaneHn3 yctpOCTBa, NocKobky PbUar BbIbPoca BoJbWe HE dBuIaTeTcA.
UtpaBteHne
BHIMAHHE
Pabomb eceada monbko c ycmahoeneHHbIM npamponbHM pfunbpmo, kak npu enaxhoi, ma u npuc xyoynbokr?
CyxayuNTka
BHIMAHHE
Pepo npuemehuem cneyeym npoeepumb pfunbmp Ha hauue noepexdehu u, npu heobxodumocmu, 3aMeHunb.
Pabomammbonbko c cyxum nampoHbim qunbmpom!
PncyHok E
→ PeKOMeHdaZn: PnBcAsbBaHN MeNKoI nbIIN cNeJyET pImMeHrTb MeIKN dIa C6Opa nbIIN.
Yka3aHnO OTHOCHTeJIbHO ΦIbTpOBAJIbHOrMeUka
CTeTeHb 3aOpJIHeHnI bJIeSc6OpHOro MeUka 3aBnCtOT BCaCbIbAeMoI rP3N.
-ПиMuENKIOIbIIN,NeCKeNITd.БIJIeNC6OBpHbM MeWOK Heo6xOIO MeHTb Yaue.
- YCTAHOBJIeHHbMeIeOKIJIaC6OpaIIbIINMOKET IIOHITb,IO3TOMyEToCJIeDyET CBOeBpeMeHHO 3a-MeHHTb!
BHIMAHHE
BcacbbaHue xonoDHOe neIaOcUyecmeIb mblko c npumEneHmu npeoaeupmtebHOe omcekamena. INhOpMaUNO o pInHaJnKHOCTx n3aunactx Bbl Mokete haNtHa caTne www.kaercher.com.
BnaxhaYuCTka
BHIMAHHE
He uCnoJIb3OaMb HukaKo2o NbIInec6OpHoo MeuKa! PucyHok K
→ PnBcAbHn Bnarn CneyET nCNoIb3oBaTb NOxOxIaYIO BCTABky HacAKn IdaN ONaI npCooEeINrMbCOOTBCTBYUOme pInHaADJeKHOCTN.
Yka3aHHe: npn nonHOM pe3epByape BCacbIbAIOoee OTBepCTNE 3aKbIbAEETC NONJIaBKO, a YcTpoIcTBO NaHnHaet paobTaB C NObIbEHHbIM YNCJOM OOBOTOB. YcTpoIcTBO cneJyET He3aMeDNIteBbHO BbIKJIOuHTb ONOPOXHNb pe3epByap.
WD3 Battery Set
WD3 Battery Premium Set
(akKymyIaTOpHb6Iok Battery Power 36/25 / cTaHapTHoe 3apAIDoe yCTpoIcTBo Battery Power BC 36 V)
Pn6op
AkkymyITophBn 6Jok Battery Power 36/25
| Hominahalbnoe haprajxene | B | 36 |
| Hominahalbnae emkoctb(corgnacno IEC/EN 61690) | A/4 | 2,4 |
| Hominahalbnae emkoctb(corgnacno dānhbim poin3bodinite-lЯ злемente) | A/4 | 2,5 |
| Hom. 3nepronoTpe6bnehe(corgnacno UN 3480) | Wh | 86,4 |
| Зардний тok, мак. | A | 4 |
| Тип akкумлąтopa | Литни-но- ньий | |
| Вес | КГ | 0,9 |
| Размеры (Д x IL x B) | mm | 133x88x72 |
CTaHapTHoe 3apAHyoe yctpOiCtBO Battery Power BC 36 V
| HomonahlbHoe haprjxehne akky-MyJYTOPHO 6LOKa | V | 36 |
| Makc. TOK 3apJdK | A | 0,5 |
| TIN akkymyJTOpa | ПИТМ-ИОньH | ПИТМ-ИОньH |
| Haprjxehne cetn | V | 100-240 |
| Jactota | Hz | 50-60 |
| Iotpe6JIeHne TOKa (Makc.) | A | 0,3 |
| Клacc 3aJHITbI | ☐ | II |
| Bec (6e3 akkymyJYTOPHO 6LOKa) | g | 205 |
I3zomobumelb ocmaeJem 3a c6oB npao EheCehu mexHuueckux u3MeHeHui!
Tartalomjegyzek
www.kaercher.com/REACH

www.kaercher.com/REACH
Garancia
www.kaercher.com/REACH

www.kaercher.com/REACH
Záruka
www.kaercher.com/REACH

Embalažni materiali so primerni za recikliranje.
Embalazo zavrzite okolju prijazno.

www.kaercher.com/REACH
Garancija
www.kaercher.com/REACH

www.kaercher.com/REACH
Gwarancja
Mult stimate client,

www.kaercher.com/REACH

www.kaercher.com/REACH
Garantie
Transportul in vehicule
Asigurataparatulcontralunecariisrastumarii.
Ingrijirea 品 intretinerea
Intretjetaparatulsipieseledinmaterialplasticcu un detergent obisnuitpentru material plastic.
Se recomanda spälarea dupa caz a rezervorului si a accesoriilor cu apa si uscarea lor inainte de reutilizarze.
Illustratie S - V
Curatai filtrul-cartus numai sub apa curenta, daca este nevoie; nu frecai sau periati. Inainte de montare IasaI s ase usuce in totalitate.
Verificati contactele de incarcare in privinta murda-ririi si curatati-le.
Verificatu fanta de aeresire in privinta murdäririi si curatati-o.
Intretinerea
Aparatul nu necessities intretnere.
www.kaercher.com/REACH

www.kaercher.com/REACH
Záruka
www.kaercher.com/REACH

Materjali ambalaze se mogu recikirati. Ambalažu odložite na optrad u skladu s propisima o ochuvanj okolša.

Stari uredaji sadrze vrijedne materijale koji se mogu recikirati te bi ih stoga trebalo predati kao sekundarme sirovine. Primarne i punjive baterije sadrze tvare koje ne smijuDSPjeti u okolis.Stare uredaje kao i primarne odnosno punjive baterije odlozite u opad ekoloski primjereno. Elektrnici i elektronicki dijelovi cesto sadrze sastavnve dijelove koji pri pogrésnom rukovanju ili pogresnom zbrinjavanju mogu prestavljati potencjalnu opasnost za Ijudsko zdravlje i okolis.lpak, ti sastavni dijelovi nuznu su za propisani pigeon uredaja.Ureduzi označeni ovm simbolom ne smiju se odlagati u komunalni opad.
Napomene o sastojcima (REACH)
Aktualne informacao o sastojcimaMZete pronaci na stranici:
www.kaercher.com/REACH
Jamstvo
www.kaercher.com/REACH

Ambalaza se mezo ponovo preraditi. Ambalazu odlozite u otpad ekoloskiprimereno.

Stari uredaji sadrzej vredne materijale sa sosobnošcu recikilranja i treba ih dostaviti na ponovnu preradu. Primarne i punjve baterije sadrzej materije koje ne smeju dospeti u zivotnu sredinu. Stare uredaje kao i baterije ili akumulatore odlozite u optd ekoloski primereno. Elektrcni i elektronski uredaji sadrzej cesto sastavnve delove koji, u slucaju nepravilnog rukovanja ili nepravilnog odlaganja u optd, mogu da prestavljaju potencijalnu opasnost za doravlje ljudi i okolinu. Ipak, ovi sastavni delovi su neophodni za pravilan rad uredaja. Uredaji koji su označeni ovim simulom ne smeju da se odlazu u kućni optdap.
Napomene o sastojcima (REACH)
Aktuelne informacije o sastojcima možete pronacni na stranici:
www.kaercher.com/REACH
Garancija
U svakoj zemlji vaze garantni uslovi koje je izdala naša nadležna distributivna organizacija. Eventualne smetnije na uredujau za vreme trajanja garancije uklanjamo besplatno, ukoliko je uzrok greška u materijalu ili proizvodnj. U slučaju koji podleže garanciji obratite se sa potvrdom o kupovini Vašem prodavcu ili najblžoj ovlascenoj servisnoj službi.
Servisna sluzba
Urečaj不同程度 of the presence of a single or multiple protein in the plasma of rats.
Otklanjanje smetnji
| Greška prilikom punjenja |
| Ekran je isklučen, akumulatorsko pakovanje ne puni |
| Punjac je neispravan. Zamenite punjac. |
| Akumulatorsko pakovanje je eventualno u potpunosti ispražnjeno. Sačekajte da liće ekran nakon odrešenog vremena prikarazati preostalo vreme punjenja. Ako ne, onda je akumulatorsko pakovanje neispravno. Zamenite akumulatorsko pakovanje. |
| Ekran je uklučen ali se akumulatorsko pakovanje ne puni |
| Punjac je neispravan. Zamenite punjac. |
| Obratite pažnju na prikuraz na ekranu. Temperature akumulatora se eventualno ne nalazi u normalnom području. |
| Ekran prikazuje simbol temperature, akumulatorsko pakovanje ne puni |
| Temperatura akumulatorskog pakovanja je suviše niska/visoka. Odložite akumulatorsko pakovanje u okruženje sa umerenim temperaturama. Sačekajte, dok se temperatura akumulatorskog pakovanja ne normalizuje. Postupak punjenja zatim počinje automatiski. |
| Greška u radu |
| Na ekranu se prikazuje simbol temperature |
| Temperatura akumulatorskog pakovanja je suviše niska/visoka. Odložite akumulatorsko pakovanje u okruženje sa umerenim temperaturama. Sačekajte, dok se temperatura akumulatorskog pakovanja ne normalizuje. |
| U slučaju katkog spoja, akumulatorsko pakovanje se blokira na 30 sekunde za sledeć upotrebu. Ako se kratkji spoj Češće doga, akumulatorsko pakovanje se blokira trajno. Za deblokadu akumulatorsko paovanje priključite na punjac. |
| Ekran prikazuje preostalo vreme rada 0, uredaj se isklučuj. |
| Akumulatorsko pakovanje je ispražnjeno. Napunite ponovo akumulatorsko pakovanje. |
| Greška kod skladištenja |
| Ekran ne prikazuje preostali kapacitet |
| Akumulatorsko pakovanje je ispražnjeno. Napunite ponovo akumulatorsko pakovanje. |
| Ekran prikazuje preostali kapacitet od 70%, iako je akumulatorsko pakovanje tek napunjeno. |
| Akumulatorsko pakovanje se nalazi u automatiskom režimu skladištenja. Ovjav režim se aktivira kada se akumulator ne koristi više od 21 Dana. Ova funkcjija štižitćelije akumulatora od brzog starenja irodužava vek trajanja. Pre sledeć upotrebe, akumulatorsko pakovanje ponovo napunite u potpunosi. |
| Opša greška |
| Ekran prikazuje prelomljeni simbol baterije. |
| Akumulatorsko pakovanje neispravno i blokirano zbog sigurnosti. Višne koristiti akumulatorsko pakovanje i odložiti ga u optrad u skladu sa propisima. |
Opis uredaja
Slide pogledajte na preklopnoj stranici!

Ovo uputstvo opisuje rad višenamenskog usisivača navedenog na prednjem omotu.
■ Na slikama je prikazana maksimalna oprema. Oprelmjenost i ispuročeni pribor konkretnog uredaja razlikuju se u zavinstosti od modela.
POMOuI npHn3npaBHOCTN BG 11
Oncanhe na ypea BG 12
MoHTaK BG 12
3apekdahe na akymynpaata 6atepnaBG 12
Iyckahe B eKcnnoaTaunia BG 12
06u yka3aHn 3a o6cnykBaHe BG 13
O6cnykbaHe BG 13
TpaHcnpr BG 14
Ipykni npdpbckka BG 14
www.kaercher.com/REACH

Onakobbunhte MatepnaHn Morat da ce- uKnIpaT. MoJla OTcpanhaBae Te onakOBknte Kato OTnAdbu, OnaBaBau OKOHaTa CpeDa

Ctapnte ypeeni CbIbpjat ceHn MATEpnaII, PNDexaun Ha peuKnpaHe, KOITo MOrAT da
6bDat ynTopeBEN nobTopHO. BatePInTe n akymynpaunite 6baepn CbDpKxat BeueCTBa,
KoITo He bBa Da nonaDaT B OKJHaTa CpeJa.
MOnla OToTpaHnBaIte Stapnte ypeDn, KaKTo 6aTePnn nll aKymylnpaAsn bAtePnK kTo OtnaDbK, Ona3BnK OkOJnHata CpeDa.
EneKtpnuecknte n eJekTPOHHnTe ypeDu YecTo
CbIbPkAT CbCTaBHN 占ACTN,KONTO npn HEnpabINHO BopabeHE INN HENpABINHO N3XbPBNHE MOrat Da npedctablaBaT NOTEHuaHaNA OnaCHOCT 3a OOBeIKOTO 3dpaBe IN 3a OKONHATA cpeDA
Bbnpeko T0WA 3a npabunhata ecknopnoatauna ha yupeinde Te3n cbstbnH auctn ca heo6xodmim
O603hauehenTe cTo3n CmBON ypeDn He Tp8BaDa 6bDat n3XbBpJHn C 6bTOnBe OTnaDbu.
Yka3aHn3a CbctaBknte (REACH)
AkyanHa HnΦopMaun3a CbctabKITE ue hamepTe Ha:
www.kaercher.com/REACH
Tapaunia
BbB 2cKa Ta CpaHa Baxat rapaHauoHNHe YcNoBn, ny6nkyBaHn OTOpH3nPaHata OT hac nIeTpn6byTopcKa fnpMa. EBeHTyAaHn NOpBeNi Ha BaaN ypeJ ueOTCTpAHM B pAMKITE Ha rapaHcuOHHn cspok 6e3nIaHo, Ako Ce Kacae 3a DepeKT B MaTePnaIte NIn npn npOn3B0dCTBO. B rapaHuaHO He cnUay cie O6bPheTe KbM dNCTpn6TyopA Hn H-aBn3KHa OTOpH3nAp HcpBn3, Kato npdctTabne t KAcOBaTa 6beEckA.
Cnyk6a 3a pa6oTa c KIneHTn
PnBbnpocu n nobpeDuBaWnT dNCTpObyTop Ha KARCHER ue Bu nomorHe c ydoBOnctBne.
PpHnAdIeXHOCTn np3epBn qactn
N3noJI3BaIe caMo opnInHaJIHn akceCoapn iOpnInaHnPe3epBHN qAcTn, NO To3n HauIN OCNrpyBaTe 6e3oNaChATA n 6e3npObIeMHa eKcPiOaTaIgna Ha ype- da.
Mожete да habeрпт eинфорmaця 3a akcecoapn i pezebernч actn ha www.kaercher.com.
06em HaIOcTaBkaTa
PnI IINCBaun npnaadJeXHocTn nI npI TpaHcnpTn HtETn MoJyBEdomTe Baunr TbproBeu.
Yka3aHnna 3a
6e3onachoct
CTeNeHn Ha onaCHOCT
ONACHOCT
Yka3aHue 3a HnOncpeDcMbeHo apo3a onaChocm, Koam oodu do mexku melechu hapaHraBaHua uuu do cMbpm.
PPEyPExEHH
Yka3aHue 3a 6b3MOxHa OnacHa cumyauz, KoJMo MoJe da doeede do mexku meJeCHu HapaHraBaHua UJU do CmbpM.
PPEI3JNBOCT
Yka3aHue 3a 6b3MOxHa OnaHa cumyauzu, KoryMo Moxe da doeede do neku HapaHraHua.
BHIMAHNE
Yka3aHue 3a 6b3MOxHa ONaCha cumyaucu, Korymo MoKe da doeede do MamepualHu uemu.
Yka3aHnna 3a cnrgpHocT 3a npaxoCMyKaUKN 3a MOKpo/ cyxo n3cMysKBaHe
Cnrgpno 6opabeHe
ONACHOCT
Iompebumenmmp6ba da u3no138a ypeda no npedHa3-haueHue.ToMp6ea da 63eme nod eHumane MecmHume ycnoBu u npu paBoma c ypeda da eHumaba 3a xopa-ma,Hamupau ce 6bnu-30cm.
3a6paheHa e ekCnIooamauca 6 30Hu, e KOUmo UMa onacHocm om ekCnIIO3uu.
Ipnu u3noJ36aHe Ha ypeDa e onaChu 30Hu cna36aUme cb- ombemHume npednucHua 3a 6e3oNaChocm.
He u3noJ3eaUme ypeDa, ako npedu moBa e naHaI, ako e budmo ypeDeH unu He xepMemuueH.
Дрьхме опakobунomo Фолю далец em obceza ha deua, cbluecmbyea onac-Hocm om 3adywaasahe!
△PNEpyPExKdEHN
To3u ypeH He e npedHa3Ha-ueH 3a mo6a, da 6bde u3-no13eAH om luca c oepauHu 4u3UeCKu, ceH3OpHu Uymc6eHu cnocobocmu U lunca Ha onum u/Unu Lunca Ha no3HaHua, ocEH aKO me ca nod Had3opa Ha om2o8aprauo 3a mXhama be3onac-Hocm luue unu ca noIyunu om He2o uHcmpkyuu, ka da u3no13am ypeda.
Ipo3eOHeO e deca da u3- non3eam ypeda, camo aKO ca had 8 ooduwhu u aKO ca noD hao3opa Ha luue, Koemo ce apuxku 3a mXhama bezOnacHocm unu ca nolyuU om He2o uHcmpykuuu 3a u3non3-eanemo Ha ypeDa u npulya-bauume ce onachocmu u ca zu pa36paUU.
IeuaHa He bua da uapamc ypeda.
I Deuama mpr6ba da 6bdam noo hao3op, 3a da ce zapaHmupa, ye Hma da uepam cypeda.
Pabomeme unu cxbpnaeaume ypeda camo e cbomeemcmeue c onucanemo pecn.uzobpaxeHuemo!
Upeobm cbojpxa eKempu-yecku KOHcmpykmueHu eMeHmu - mo He mpa6ba da ce noucmba pod meyauna ooda.
PPEIINBA3JNBOCT
Hukoza He ocmaeJme ype-da 6e3 Had3op, Dokamo pa-6omu.
BHIMAHHE
He paßomeme c ypeða npu memnepamypu nod 0 °C.
Hukoza He u3cMykeaume 6e3 qunmbp, e npomueen cnyuayypebdm moxe da ce noepedu.
■ Panzeme ypeda om ekcmpem-Hu KIumamuHu eJnHua, eJaxHQcm u 2opeuHa.
Друн onachoctn
ONACHOCT
Onachocm om ekcnlo3u!
3a6paHeHa e ekCnIooamauca 30Hu, e KOUmo UMa ONaC Hocm om ekCnIIO3uu.
He u3cmykeaume ekcnno3ueHu unu 2opumu 2a3o6e, meyu Hocmu u npax!
He u3cmykeaume peakmu- en Memalen npax (HaNP. anymuHui, Mahe3u unu uHK)!
He u3cmykaume hepazpe-deHu KuceJnuH uJU OCHOu!
He 3acmykeaume zoopu uuu mnee npedmemu!
PNEpyPExKDeHne
Onachocm om HapaHaehe!
He u3cmykaume c d03ama u 8cmykamelnama aanae e 6lu3ocm do anaba.
PPEI3JNBOCT
3a da u36e2heme 3nONoIyku Unu HapahraBaHua npu mpaHcnpmupaHe,63eMeMe nOd 8HMaHue meaIono Ha
ypeda (Buxme TexHuuecku daHnu).
YCTOINBOCT
PPEIINBOCT
Ipedu 6cuku deuHocmu c unu no ypeda ycmaHOseme ycmoUyOcmma,3a da npedomepamume 3noJnyku unu yepkDaHn npadu na-dane Ha ypeda.
Указаня за бeзочноct - 3ардно устpoистvo
ONACHOCT
Ipeu 6aKo u3noJ3eAne npoeepaueme 3axpaHbauuja bok Ha uenceHa, cbp3aunkaBei, aadmpera 3a akymulupaama bamepu u akymulupaama bamepu 3a nopeda. He u3- noJ3eAume nOeue nopeDeHume ypeu u zu Cmehyme.
He omeapyume 3apadHomoycmpoucmfo. Ppu nopeda unu deqekm 3apadHomoycmpoucmfo mpa6ba da 6bde cMeHeHO.
3aprHomo ycmpoUcM6o da He ce u3noJ36a 6b8 63puO0-nacHa cpeda.
Hukoza He dokocbaume uencena u KOhma c enxHu pue.
3aprHomo ycmpoUcmeo da He ce u3noJ36a 3ambpceHo UUN MOKpo CbcmOraHue.
Ja He ce 3apejxdam akymy lamopu (PbpeuHu KneMku), onachocm om ecknno3u.
PPEIINBA3JNBOCT
HapexeHuemo om Mpeka-ma mpe6ea da cbeNada cbc 3adaedeHomo HapexeHue Ha munoeama ma6eKHa 3apnHomo ycmpoucmeo.
3apadHomo ycmpoUcM6O da ce u3noJ36a camo 3a 3apeKdaHe Ha no3eOJeHama akyMymamopHa bamepu.
3apejdaHemHa akymulupaama bamepu e pa3peuheo eduncmeho c npunoXeHOMO opuaunalno 3apdHo ycmpoucmeo unu c odo6peho om KARCHER 3apdHo ycmpoucmeo.
BHIMAHNE
He hoceme 3apdHomo ycmpoucmeo 3a c6b3eaunka6en.
Дрьжmeсьрзбацякавелдалаче om monluha,ocmpupbбовe,macno u obuxewsuce yacmu Ha ypedu.
He nokpuabaime 3axpahea- uya 6nok Ha uencena.
I36aume yobjxumenu Kaebu c pa3knohumenu u eHOBpeMeHa ekcnoama-ua Ha HAKoKo ypeda.
He hauueaume cebp3eaunkabeI OKoIIO 3axpaHbauu6bnok Ha uencela unu adanmepa 3a akymyIupaUama6amepu, 3a da npedomepaumme noepdu.
CnMBoJI N Bbpyx 3apJHOTO yCTpOiCTBO

3apdHomo ycmpoUcMoO da ce na3u omMOKpo u da ce cbxpaHaBa Ha cyxo Mrcmo. YpeDbm e npedHa3NauehCaMo 3a U3NoJ36aHe eNomeuHen, ypeDa daHe ce ocmaea Ha dbXd.
3apdHomo ycmpo-cm60 uma 6paednpeDnaumen C HOMuHaJeH mok 1 amnp.

3apdHomo ycmpou-cmeo omoeapra Ha u3-uckbaHma Ha Klaac 3a-uma II.
06cnyxbane Ha akymylnpaaata 6aTepy
Ducnnei
Akymynipaata baetepn e oobpydBaHa c dncnn, KOITHO HnpeKbCHATO ppeOCTABn INHOpMaun 3a cbToHNeTO Ha 3apeJdaHe, HanpeIbKa Ha 3apeJdaHe n OCTabaUoTO BpeMe Ha paBota. OceBtOba Ce noka3BaT eBeHTyaJIHc bO6eHnna 3a rpeuKn.
AaantnpaHTo Ha BpemTo Ha paOba ce ocB- 1eCTbBA NocpeDCTBOM IpBkNIOUBaHe Ha MOUHOCTTA.
B 3aBcImMoCT OT IINoIJIbAuaHya ypeD nokaahHeTo ce npomehn pni noCTabAhe Ha akymylnpaata Ce batepn.
YnOTope6a Ha akymylnpa7aTa 6aTePna
| OCTaBaIo BpeMe Ha pa- boTa Ha akymunipa#a- ta 6aTePnI prn ynotpe- 6a. |
3apekdaheHaakymylnupaata6atepna
| Ostabaazo Bpeme Ha 3a- pejxindahe Ha akymylnpa- zata 6atepnea Hijn 3a- pejxindahe. |
BKNIOUeH BOeMa Ha DOCTaBAka
Bb3MOxHa npHnAdnEeKHOCT
1 Bpb3ka 3a BCMykATEHnIa Mapkyu
2 OTdelenHe Ha 6aTepeyra
3 KIIOuHa ypea(BKIIIOUBaHe/M3KIIIOUBaHe)
4 ByToH 3a De6JIOKIPAHe Ha akymyIpaAata 6a-TePnIa
5 1pbjka
6 Bpb3ka 3a n3dyXbaHe
7 Tani Ha pe3epBoapa
8 P03nZy 3a npKnpaHe
9 MraTo 3a CbXpaHeHne/CbBp3BaHe Ha npHaJnEeXHOCTnte OT OKOMNJIeKTOBkata
10 Bodeua poIka
11 Pe3epBoap
12 ΦπTpbaTOp6u7ka
13 ΦnTbpeH naTPOH
14 BcmykaTeIeH mapky cbc cBbP3BaU eIeMeHT
15 Cbajca ce dpjcka
16 BcmykaTeJIHn TpIbI 2x0,5M
17 Ⅱo3a 3a noOuNCtBaH e HaФун
18 POnOBA DIO3a (C BnOJka)
19 Akymylnupaa 6aTepe n Battery Power 36/25
20 CtaHapTHO 3aPAnHO yCTpOiCTBO Battery Power BC 36 V
MOHTAX
Φnrypa A
Φnγρa B
Phiypa C
Φnrgpa D
Φnrypa E
→ 3a OTbaprHe nIaBpnaTHe HABh 3akOnHaJIKe THe pe3epBoapa CnabeTe rnaBaTa Ha ypeDa, KaTo I3-ONJ3BATE dpBkKaTa 3a HOceE.
→ 3BaTeTe cIbIbpxKaHHeTO ot pe3epBoapa.
3aBbptetepe3epBOapra,BoJeuniteKoJenaPnITcHETe BOTbOpHTe HaNoDaHa pe3epBOapao Do ynop.
NocTaBete Tnabata Ha ypeDa Bbpxy pe3epBoapa n 3aTBopeTe TaInTe Ha pe3epBoapa.
→ 3a n3cMykBAHe Ha cyxa MpbCOTm npn HjKda DOIbIHNTEHNO MOJE da CE NOCTabN fNITbPHa TOp-6MnKa.
IIOHCTBAHe HtPyDHOIOCTbIIHMeCTa N TaM, KbTeTO He e B3MOKHO I3CMYKBaHE, HApP. UyMa O t AJeTa C 6baTactpa.
Nurpa N
→ ΜΟCTABETE CMYKATIELHINMA MapKUv B OTBOPa 3a n3- dyXbaHe, Taka ΦyHKIpyTa Ha n3dyXbaHe e aKTINBu-pa.
IpeKbcBaHe Ha pa6oTa
→ ɪnɪkʌŋʊteTe ypeəd.
Φnrypa 0
3aKaueTe IIO3aTa 3a NOD B NO3MnIgTAt 3a NapKpaHe.
Yka3aHHe: Ako nO BpeMe Ha npeKbCbaHe Ha pa6oTaTa ce Hanara cBaIaHe Na CmkyateNHaTata Iaba, akMyuIpaaata batepna Moke Da ocTaHe nocTabeHa. AkmyuIpaaata batepna e 3dpaboФnkCupaHa n He moke da n3n4aHHe.
KpañHa pa6oTaTa
→ N3KJIIOUeTe ypeda.
Φnrgpa P
→ HataiChete 6byToHa 3a,de6bIokKpaHe Ha akMyIpaIaTa 6bTepeHnpei n3BaTeTe akMyIpaIaTa 6bTepeHn oTpEya.
Ako e Heo6xOIMO, 3apeTe AeKMyIpaaTa 6aTepnA oTHOB (Bx. rIanaBa, 3apeXdane Ha akMyIpaaTa 6bepra").
Ipenopka: Cnei npKJIuYBaHe ha pa6oTa n3BaxdaiTe akymuipauaTa 6aTeprna OypeDa.
N3npa3BaHe Ha pe3epBoapa
Q
→ Cbane terna bata ha ypea n 3npa3he pe3ep Boapa.
CbxpaheneHa ypea
Φnγρa R
→ Pπpibepete npinhaIeJxHocHTe Ha ypea n cbXpaHraBaiTe ypeDa B cyxN NOMEseHn.
CbxaheHHe Ha akymynpaata 6atepna
Yka3aHHe: He3aBnCmIO O T pexkma Ha 3acMycBaHe LCD nIeTn IbBnHa MaNkA cHcT OT kanaunTeHa ha akymnpaata BaTePnI, Be3 3NaueHene DaJI N Te B Vypeda IIIN IIbBn HrO.
Bx. rnaBa, Ipouec Ha 3apejdahe" n,ObcnykBaHe Ha akymnPupaata 6aTepyra".
TpaHcnpT
PPEJNA3JIINBOCT
Onachocm om Hapahraeahe u noepeda!
Pp mpaHcnpmuahe umaime nped eud meanomo ha ypeda.
PbueH TpaHcnpoT
→Повдигн electуpeдаа здьжкataи ro hocete.
TpaHcnpoT B npeBo3Hn cpeDCTBa
OcinypeTe ypeI npOTnB nIITb3BaHe n Inpoe6pbuaH.
PnJxN nOaDpBxxKa
YpeIbT N aKcEeCapIte OT InpaTMcA MOrat Da bBdat NpOdbPxaHcN C npPeIpaRaH B TbProBcKaT mpeXa PnpaP a3 NaOpCTBaHe H nPaTMacM.
→ 3eepBoaopu nPnHaadNexHcOHTne pnn Heo6x. da ce nIpaKnat C Oda n Da ce npocywt npedn da ce yNtPOE8T OTHOB.
Φnrypa S - V
→ PnH NyKda NouchTe FeINNTbPNH naPOnH noI TeHaaBa BOa; He ro TbkPaKe IuN YeTkaKe. Ptepn da RO MONTIPATE RO OCTABete Da IusCbxHa NauTbHNo.
ПоберяbaitepeIOBHO KONTAKTMe 3a 3apeKdahe 3a 3ambpcBaHe n EBEHTyAJIHO TIN ONUCTBaIte.
→ПоверетeВentилалоннiteOTBOP3a3ambp-cBaBeH eEBHTyaJIHOI NOUICTe.
Ponpbykka
YepeT He ce Huykdae ot noDpBjka.
POMOu npn HEn3npaBHOCTN
UpeBbT He pa6oTu
Φnrypa L
Akymynpaúata 6aTepeyne He 3aEma npabuHNO noLoKENHe BDbpKaay, NoCTaBeTe akyMypaúpaTa 6bTepeyBdbpKaayn OCTaBeTe da Ce fNcKpna.
CbctoHnne Ha 3apeXdaHe Na akyMynipaata BaTepeRn (Bk. DncPnE) TBbpDe NcKo, pnH neo6xoDMoCt 3apeDete akyMynipaata DahepeRn.
Akymuniparaata6aTepeNINI 3apraJHOnO yctpoiCTBO e depeKTHa/O, CMeHeTe aKymuniparaataBaTepeNINI 3apraJHOTO yctpoiCTBO C HOB akcecoap.
YpeIbT ce n3KJIIOUBA aBTOMaTHUHO
PperpraBaHe Na ypeDa/akymUnpaUaPa7a 6aTePnIA, n3uKaaiTe MaJIko, 3a Da MoKe YpeBb/T/akymUnpaUaPa7a 6aTePnIA da ce OxaNla.
→ Pe3epBoaapbTe nIbIeN C BoJa N nopadn TOba ce akTINBnpa nonnaBbKbT, n3npa3Hete pe3epBoapa.
Heoctatbueh eepkOTn3cMyKbaHeto
AkcecoapbT, cmykateHnIaT mapkyu nIi cmykaTeHHata Tpb6a ca 3aNyueH.
OTCTpaHeteCnoDxOJaU INHCTpyMeHT 3anyuBaHeTO.
Фигра E
→ Φπntbρhata Top6uKa e πbIHa, noCTaBeTe HOBa φπntbρhata Top6uKa.
Φnrypa S - V
WD3 Battery Set
WD3 Battery Premium Set (akymnPupa6 batepre Battery Power 36/25 / cstanapTNo zapdno yctpoiTbO Battery Power BC 36 V)
YpeD
www.kaercher.com/REACH

www.kaercher.com/REACH
Garantijas nosacijumi
www.kaercher.com/REACH

www.kaercher.com/REACH
Garantija
WD3 Battery Set
WD3 Battery Premium Set
(Akumulatoriaius blokas „Battery Power 36/25“ / standartinis jkoviklis „Battery Power BC 36 V")
Irenginys
| Nominalioji galia | W | 300 |
| Eksploatavimo trukmè, kai akumu- liatorius visiškai jkrautas (maks.) | min | 15 |
| Apsaugos klase | III | |
| Saugiklio rūsis | IPX4 | |
| Akumulatoriaius blokas „Battery Power 36/25“ | ||
| Nominalìtampa | V | 36 |
| Vardinë galia (pagal IEC/EN 61690) | Ah | 2,4 |
| Vardinis galingumas (pagal elementu gamintojo duo- menis) | Ah | 2,5 |
| Vardinë energija (pagal UN 3480) | Wh | 86,4 |
| Iknovimo srové, didž. | A | 4 |
| Akumulatoriaius tipas | Ličio jonai | |
| Masë | kg | 0,9 |
| Matmenys (I x b x h) | mm | 133x88x72 |
| Standartinis ikroviklis „Battery Power BC 36 V“ | ||
| Akumulatoriaius bloko vardinë itampa | V | 36 |
| Didžiausia jkovos srovë | A | 0,5 |
| Akumulatoriaius tipas | Ličio jonai | |
| Tinklo itampa | V | 100-240 |
| Dažnis | Hz | 50-60 |
| Imamoji srovë (maks.) | A | 0,3 |
| Apsaugos klase | ☐ | II |
| Svoris (be akumulatoriaius bloko) | g | 205 |
Gamintojas pasilieka teise keisti techninius duomenis!
3mict
| 3araalbni Bkazibkn | UK | 5 |
| Празвида 6e3nekn | UK | 5 |
| В��аizbkn zuo do akymylartopho ro bo kky ta | ||
| Зарадноу prinstpoу | UK | 9 |
| Зхшни засоби | UK | 9 |
| Еlementп prinstpoу | UK | 9 |
| Пюсес зардки | UK | 10 |
| Керуння akymулароним bo koko m | UK | 10 |
| Збэрэнny | UK | 11 |
| Траснортуваши та збэрэнny | UK | 11 |
| Доглад таTekhiчne obscnyrobyань | UK | 11 |
| Доромora у Видау неноладok | UK | 11 |
| Опис рincstpoу | UK | 12 |
| Установka | UK | 12 |
| Зарджань akymуларонho bo kky | UK | 12 |
| Вveдань в ecplnyataciю | UK | 12 |
| Загалын Biakazibkn zuo do obscnyrobyanhaŋa | UK | 12 |
| Експл�аця | UK | 13 |
| Травснортуваши | UK | 13 |
| Доглад таTekhiчne obscnyrobyань | UK | 13 |
| Доромora у Видау неноладok | UK | 14 |
| Тechицhi xapakтеростник | UK | 14 |
UaHOBn n okyneub!

IpeepnepiHm 3actocyBaHHm npnCTPOIO npOHTaTIN IO OPIHnAblHy IHCTPKUIO 3 EKCIIpyaui, nicna IbOro DIaTI BIDNOIBIDHO TEa 3bepertn II dnnnoaJIbWoRO KOpNCTyBaHHa 60dHaHCTynHORO BJaCHHa.
3araJIbHI Bka3iBKN
Ppabnblhe 3actocyBaHHa
Pnpctpi npn3haueHOn DnBVKOpncTaHH BIDNObiDHO Do ONNCIB, HabeNEHx Y daHOMy KepiBHNuTBI no EKCnnyataui, I bKA3iBOK NO texHiCi 63neKn iD vac pObotn 3 yHBePCaIbHIMNI PINOOCAMNI.
Leynpctpi npnnaueheni nI npBaTHORO BkOpHCTaHHI He npncTOcOBaHHI DO HabaHTaKeHb IpOMNCBOrO BkOpHCTaHHI.
Heo6xio 3axuata npnaad biD douy. He 36epi- ratn no3a npmiiueHnM.
3a6bopohraetbcra BCMOKTyBaTH npuIaOM noniTa caxky.
BnO6HKe He Hece BiNObiDaIbHcOSt 3a 3bHTK, 3a- BdHi HeiDIOBIDHM a60 HnpeBaHm 3actocyBaHnM pncTPOH.
3axnCT HABKONHbOrO cepeOBuHa
Ihctpykuii 3aocybaHHKOMnHOHTIB (REACH)
AkyaIbHI BiIOomOCTI npo KOMNoHEHTn HabeJeHHa Be6-By3Ni 3a aDpecoIO:
www.kaercher.com/REACH

TANKBaBnI MATEpiAniPiDaIoTBcB TbOPHHNIE nepepoU. YnaKoBky Heo6xIDHO yTNl3yBaTn 63 wKnOdi DnA DOkINPIA.

Pnctpo, 0o BiDpaOBAHn, MiCTb ciHn MaTepiA, kai NotpIbHO nepedabatn Ha BTOPNHHy Nepepobky. Batape ta akymyTApOp MCTb peOBOHN, kai He NobiHHNOTpanrNtyn HABKOHNHe Cepedobnue. Pnctpo, 0o BiDpaOBAHn, Taki K aBatape afo akymyTApOp, yTunl3yBatn 3riIDHO 3BMOrAmn 0oO 3axNCTy HABKOINHbO-ro cepedobnua.
EneKtpnHi ta eNeKtpoHNI npnAaDi nHauchtiue MICTaB cKnAdOBI cactINHn, kai yPa3 HEnpabNbHoro NOOBxHnH 3 NmH aBO hEnpabNbHOI yTNl3aJIIO MOxYb CTbOPNTNtNEuHHy He63- neKy dJa 3DopOB'ra IIOHN Ta HABKOINHbOro cepEOBua. Ondak qI cactHnHneO6xHdI da NaHEXHOI eKnIyatauPi npnady. PnpaDi, no3NaeHeni CUM CMBNOMON, 3a6boPAHcTBc yTNi3-yBatn pa30m 3 nobyTOBIM CMITTM.
Ihctpykuii3 3actocybaHHKOMnHOHeTtB (REACH)
AkyaIbHi BiOtomocTi npo KOMnoHeTHn HabeJeHi Ha Be6-By3JI 3a aDpecoJ:
www.kaercher.com/REACH
Tapaantia
YKOxHKnKpaHnDiiObYMOBn rapaHTi,HaadHOB iBDIOBIOo pIPOMO-npoDAubcEm. HenOnaKnB nPoBoTI npCtPOO mN CyBaMeo 6BeKOuTBOHO pTOrAOM TepMHy DIIraPapHI,RAIO BOHN BkINKAnHi 6pKaOM MATEPIANy U NOMNIKAMN BINOTOBNeHH. Y BnNaJky UINHOI rapaHTI 3BePTITcBdo NOpOABuCA u H NaBNOXmHn ABTOP3OBAHn CepBICNH CEHTP 3 DOKUMeTAJIbHM NiTBePdKeHHM NOKYNK.
Cnyk6a niItpmKn KopncTyBauiB
3 pi3nix nntaHb Ta b pa3i noIOMOK Bam donomokyTb Na hi npdctabHniki finiany KARCHER.
KOMJIeKTHICTb Ta 3anachi YactHH
CπiD BnokopncTObyBaTn NmIe opriHaJIbHi KOMPnIeKTyUOci Ta opriHaJIbHi 3anaChi DeTani, TOMy IIO came BOHn rapaHTyOToB be3neuHy ta be3nepe6iHy ekCnIpyatauio npnIaNDy.
IhOpmaia yoO KO KomJIeKToIyOuHx Ta 3aIacHnx DetalneMiCTNbcaHa caTti www.kaercher.com.
Komnlekt noctaahna
Ypasi Hectaqui DoaAtKOBoro 0blaHaHNNa 6o yuKoD-XeHNb,OTPMaHnXPiD Yac TpaHcNOpTByAHn,ChiND NobiDMTe pO CE B TOPROBEnbHy oprahI3auHIO,ra PaNoDa-ana anapat.
ПразвILA 6e3neкn
CTyniHb He6e3neKn
HEBE3NEKA
Bka3ieka uodo He6e3neku, kka 6e3nocepeHb0 3a2pOxye ma npu38oDumb do mJxKux mpaem Yu cmepmi.
NONEPEDKEHH
Bka3ieka 0o do nomeuio H oMKIbOoi He6e3neHoi cumya uii, 0o Moke npu3ecmu do mjaKuxmpaem Yu cmepmi.
OBEPEXHO
Bka3iKa zoDo nOmeHciUHO He-6e3NeuHoI cumyaui, JaKa MoKe cnpuUhmu OmpumHaHHa JeKux mpaem.
YBAFA
Bka3ieka zoodo moxnuoio nomeniHno Hebe3neuHi cmyaui, zoMoKe cnpuHuMu Ma-mepiaIbHI 36umku.
Bka3iBkn 3 Texhikn 6e3neKn nIlococa Дя BOLororo/ cyxoro OunuienHa
neperpipy
Tn60oP03pAdkn
■ipeepaaydkeHHN
Kopotke 3aMnKaHHa
Elenentn npuctpoio
AkymyjITopnI 6Jok
MaHOnK 3aIexKHO BiD Tnny
1 3aOcBka Ta6nUka
2 Dusnnein
3 KOHTaTKn
4 Tpimau
CtaHapTnH 3apAHH npncptpi
1 3apAHi KOHTn
2 AdaTep aKymyIaTopa
3'eDHyBaIbHn Ka6eIb
4 3aBODcbKa Ta6JInuUka
5 MepexeBn 6JOK KINBJIeHHa 3 BNJIKOIO
Ppoec3apdKn
OSEPEXHO
He63e9ka npaemyeaHn, He63e9eka nouokxgeHH! Dompumyeamcb hcmpyukui 3ekcnnyamaui ma ekaiiok 3 63e9ku 3aprdoo npucpoio.
Bka3ieka
Hoiä kamytnopnbi 6nOKu MaOmb mInbKu nonepeDHI 3apd i noeunHi noeHcmtio 3apdXamucnepe nepuum EukopcmaHnM.
Ducnneu akmueyembcn iid yac nepuoao npouecy 3apxkanna.
I6b IuKamop pBn 3apy npaaubno, akymnopn6bnk neo6xho po3pdrumn iic zape npoeooe uKOpusmaHn do bKnouenHH npcsmpo.
PncyHok F
BCTaBttn MepeXeBn 6IOK XINBHeHn3 BUNIO Bpo3ETky.
BctabTNn akymyIaTOpHNIbNOKBaanTePakymyIaTOpa3apdHOro npunctpo.
3apdKaHHNoHTbCABTOMaTHUHO.
PncyHok 6
→ HaДиСнпгд acMyynTOrTOHбIkyBbD6paKaJbTeBa3aHnSkoBn YacZapdKaHHA.
Yac 3apdKAnHH CtaHdaPTHM 3apdHMM npnctpoem (Battery Power BC 36 V) npa03pJKeHoro akymyIaTporHO 6nky (Battery Power 36/25) ctaHOBIT pn6bn.5,5rOIMN.
Y paazi noBHoro 3apAky akymyIaTOpHoro 6nOky ha dincPnei BiIObpaKaetbcra 100 %.
Picna 3apjdxaHnB iD'edHaTn aanTep akymyIaTopa BiD akymyIaTOpHOrO bNoKy.
BINTIaTHM MepeXeBbN 6IOK XIMBJIeHHa 3 BUNKOIO 3 p03eTKn.
Bka3ieka
Kaio Ha duCnnei HiOe He eIDobpaXaemboc, KOnu acymynmopHnB 6NOK 3hAxoDumbc8 3apdHomy npUcmpoi, EMHicmb akymyamopoe uechepnana abo 3auHbka. Ka minbku 3apd akymyarnopHOe 6Noky 6bye doCmamHim, Ha dcunnei eIDobpaXamumemboc 3anuKoEuui cazapdXaHnH.
Kkuio Iodukiai He 3'aeIcMbca Haeimb Ypeez mpueanu cak, akymynopHb 6nK HecnpaH u i nohen bmyz amHHeu.
Bka3iKa
Hoei akymyamophi blokou doceaaomb coeoi noeio EMnoci np6bn. nCn4 5 uKnlie zapdokanhna ma pO3paJxAHnn.
AkyMnymopHi 6noku, uo He uKOpucmoeyanucbmpueaui quacpeepzacmooyaehnniio3apdumu.3a memnpampyu Hnuee 0^ npodykmueHicmb aymymopnoeo 6noky 3nxyeemcb.
Tpuane 36epieaHnna 3a mempeamypu noha2 0^ MOJE 3MeHsUmu cMHCmb akymynopopa.
Ipumimka
3a\rap 己 hui 己 aymyIamop do zacmocyeaHnna Moze 3a-nuuaumc6 3apohomy npucmpoi. Hebe3neku nepe3apək HemaC.
LIO6 yHukhymu HenompioBHOeBpAmu Ehepeii, zapAHO npucmpi nompiBIO iD'ehyAmu, uOIO AkyMlyamop noEHCtMO zapAdoHeu.
KepyBaHHa akymyTOpHm6ILOkOM
Ducnnei
AkyumyIaTOPHNI6bOKOCHAueHnDINcPiNeEM,AKN noCTiHo BIDobpaxae iHFOpmAuIO npo CTAn 3ap4y, XID 3ap4kN i 3aIIuKOBu Yac. Kpim TOrO, Ha HbOMy MoKyb BIDobpaxaTNC NObIDomNeHH npo NOMIKN.
Yacpoobotnperynioetbcra3a donomoro npemKaHHNnotyKHOCTi.
3aJIeJXHO bID BmKOpNCTOByBaHOrO pNtCPOIO DcIcnIe NOBepTaTcBcNi dac BCTaHOBnHnAkyMnyTATOPHORO 6bOKy.
| 36epirahna akymylnaTopa | |
| PíbeNb 3apády akymylna-TopHOrO 6bOkY, KojN BiNHe BIVKOpNCTOBUcTbCry. | |
BukopncTaNHa akymyIaTopa
BCTaBttnakymyIaTOpBkpInnHeHHnpuCtpoIO.
OBEPEXHO
He6e3neKa npaHEnHa ma nowKoDKeHHa! 3eepHymu yeaay, uOb akymynopnpaBunbHO 3aΦikcyae6c.
Bka3ieka
Iiouc bukopucmaHHa duocnei eidoopaacmbcra 3auuokouu yac zapdkaHH.
→PiCnpo6oBtN BuHrTaAkyMylrToP3 npncTpoI.
→ AkymyIaTOp nicI pO6ToN 3apAunTn.
Ppumimka
Haeimb yacmkoob po3prjdohenu akymympom 3apdu mu nicna zacmocyeaHn.
36epiraHHa
OBEPEXHO
Hebe3neka mpaem ma nowokxheb! Ppu mpancnpmyaann hi cnid 3eephymu yeaay ha aea npucmpo.
YBATA
Hebe3neKa NooKxHnI 36epiaam Akymyarnopu minbku e npumoiHnx 3 HnzBkoOoOcimIOoBimpa ma npu memnpemapmyi huxye 3a 20^
Lsqnnaad mae 36epiratncs Iy BnytpiuHx npmiiueHHX.
Ha DnCnIeI akymyTApTOHOro 6NOKy BiDIObpaXaETbcS cnoTOUHN CTaH aRpyDu HABITb 6e3 NiKIOHcENH Do 3aPdHOrO pncSTPO.
Kkuo dincnneynakymnyTopHoro 6noky niudac 36epi-raHna raChe,EMHiCTb akymnyTopora BUnepnHa i dCnneynBMKNyBc9aApdntn akymnyTopnHn 6nok kAKOMORA 5WBdue.
TpaHcnpotyBaHHaTa 36epirAHH
OSEPEXHO
Hebe3neka mpaem ma nowokxheb! Ppu mpancnpmyaahn ciid 3eephymu yeaay ha aea npucmpo.
DorlaTatexhuiheo6cnyrobyBaHHa
3aŋaŋHNI KOHTaKN perynapHO nepeBeprHa Na haA-HicTb 3aþyDHeHH Ta npri Heo6xIdnoctO OnuuataN ix.
Akymyptopn,IIO 36epiraHObC BnpoOOBK TpBaNoRo Yacy,nepiOuHNO Ni3aprJxatN.
Texhie He 6cIyroByaHHa
Anapat He notpe6ye npoqinakTnHoro 0bCnyroByBaHn.
Dionomora y BnnaKyu HenoJaok
PomnIka nID yac 3apJxHaHH
DinCnneBmKHeHn,akymyIaTOPn6IOK He 3apJxKaCTbC
3apdHn npncptpi HecnpabHn. 3amHnTn 3apdHn npctpi.
MokJInBO,akymyIaTOpHn 6lOk nobHcTIO po3p4JKeH. DooKeATcN, nOK HA dINcPiNeI ueP3 Deeku cac He 3'ABNTbC3aNNiHKOBuN cac 3apdXaHnH. RaKIo He 3'ABNaeTbC3, akymyIaTOpHn 6lOk HecnpabHn. 3aMiHNt aKymyIaTOpHn 6lOk.
IcnneyBIMKHeHn aJe akymyTOpHn 6Jok He 3apJaXaCTbcra
3apdHn npictpi HecnpabHn. 3amHHTn 3apdHn npictpi.
3BepHyTu yBary Ha IHdkaLIO Ha dNcPiTe. MoKNIbO, TEMnepaTpa AkyMnyTOpA He 3NaXoDITbc R HopMaIbHOMy Dian3OHi.
Ha dincnnei BiOobpaxaetbcn CmBON TEmpepatpy, akymyIaTOpHn 6Iok He 3apJkaeTbcn
Temnepatypa akymyIaTOPHO 6nOKy 3aHn3bKa/3aBnCoka IpeheNt akyMnyIaTOPHNI 6nOK y cepeDobuIe 3 nomipHO TEMnepatypoIO. DooekATmCS, nOKI Temnepatypa akymyIaTOPHO 6nOKy He HopMaJI3yTeB-Cs.
3apdkaHH noHcABTOMaTHNO.
Pomnilkn iud qac ekcnnyatauii
Ha dncnnei BiO6paXaCTbc8c CnMBoT Tempepatyp
TemnepaTpya akymyIaTOPHO 6JOKy 3aHN3bKa/3aBnCoka IpepeHectn akymyIaTOPHn 6JOKy cepeIDOBuIe 3 NmOpHIO TEMnepaTPOIO. DooKeaTHcN, nOKn TemnepaTpya akymyIaTOPHO 6JOKy He HopMaJIi3YeTb-Cr.
YpasiKopoTko 3aMnKaHnaAkyMnyTOpHnBnok 6bOc6bocb8dIpaIbIbOro BnKOpNCTaHHa 30 cekyHJ. KaIO KopoTke 3aMnKaHnaB BID6bAcTbCaaCTO, aKmyJnTOpHn 6bOK6bOkYbcBaH Na TpNBaHn Yac. 1o6 po36bKnoyBatu AkyMnyTOpHn 6bOK, nKiIOUHTn HOrO Do 3aprAnHO npNCtPO.
Ha dncnnei BiO6paKaεTbc3aNtKOBu Yac 0, npctpi BmkaεTbc.
AkyMnyTOpHn 6Iok po3pJdxKeHn. 3apJntn aKymyTOpHn 6Iok.
Pomlki n iD qac 36epirahn
Dncnne He noka3ye emhictb, 0o 3aInnnna
AkyMnyTOpHn 6Iok po3pIxKeHn. 3apJITn aKymyTOpHn 6Iok.
AkyMnyTOpHni 6bnK necpBnAHi 3a6bNOkOBaHHi 3 MeTOI 63neKn. He BnKOpNCtOByBaTH akyMnyTOpHni 6bnK iTyNI3yBaHTN I0R HAnEchiHM NCHoH
Onnc npncptpo
36paekennn DnB. Ha po3Bopot!
UycbOMy KepiBHNITB3 EcknpyataaJI HabeDeHO OINc YHInEpCaIbHOrO NINOscOa, kJIK 3O6pbakKeHO Na 06Knad
Ha iIOCTpaJx HAMaIbOBOaHO MAKcHMaJIbHe OCHAUeHNH pNcTPOHO. OCHAUeHNr TAI KIIbKcTb DoaATKOBOr npnAaI, IO XBOuITB B O6cR nOCTaAHN, 3aJeKHTB BID MOdEnI pNcTPOHO.
Pn npo3nkyBaHnI nepeBipTe BmCT ynaKOBKn Ha naHBnCtB DoJaTkoBOrO 0bNaHaHnRy Nn NsKOxHeh. Y BnAaKy NOnKoDKeH np TpaHcnpOtpYBaHn NobIdomTe npOe CBOEMy npOdaBtu.
BXOJaTB Do KOMJIeKTy NOCTaHaHH
MOXJIINBEO6nHaHHH
1 Micce nip'ednnaHn nnahny
2 AkymyIaTOPnBiDcIK
3 BmKau
4 Khonka po36nokyBaHHaKMyIaTopa
5 PykorTka
6 Micce nid'ednHaHnIy po3dyBy
7 3amok 6aka
8 NapkyBaJIbHe noIIOJKeHHa
9 Micce dIa doaTkoBOrO oIaHaHHa
10 CnpraMoByBaIbHn BaIeIb
11 BaKn
12 Φиьтурвальный мішок
13 NaTpoHHn fIbTp
14 BCMOKTYBaIbHn IJIaHr 3i 3eIHyBaIbHm eIeMeHOM
15 3HIMha pyka
16 BcMoKtTuOHi Tpy6Kn 2x0,5M
17 ConIIO dIa3anOBHeHHra
18 HacaKaIpaNiIpOu (3i BCTaBKOHO)
19 AkymyTOpHn6JIoK Battery Power 36/25
20 CtaHapTHn3aPAnHn npncTpiB Battery Power BC 36 V
YctaHOBka
PucyHOK A
→ДиВIDIKPBNAHNNotAHTNzAMKINKOHTHHePaHa3OBHiI3HnBepxHIOaCTHynpCTPOI3pyKY.
PncyHok B
→ BntTn BMICT KOHTeHepa.
PncyHOK C
NObepHyTN pe3epByap, BCTaBtN Do ynOpy nobopotHi koniiata B OTbOpn Ha niDctabi pe3epByapa.
PncyHOK D
BCTaHOBtI KpnuKpy npncTropoHa pe3epByap i 3a-KpTN 3aMKN.
PncyHok E
→Дя BCMOKTYBAHнусхог6удуаэnotpe6и MОжБИКОПСТОВВВATINСЯ fiNbTpyBaHnMi- WOK.
3apdxaHnna akymyIaTOpHoro 6noky
PucyHOK F
PncyHok G
→ДИВ.rIaBy《ПюцЕЗаряджань》i«KepyBaHнayakymyIaTOpHIM6JOKOM」.
BVeDehnBaEcknIyatauio
PnncdHaTn DoaTkObe 6bJaHaHHa
PucyHOK H
BCTABNTB CMOKtyBaJIbHn U nHaR y npIcTpiI do fikcaui.
ДяВИТЯгнЯшагуСиДНATСHУТИАльцЯМИHA STONOPI BIVTЯгHTN BCMOKTYBaJIbHNIшlaHr.
PncyHok T
3'εηdHaTn pyky 3i BCMOKTyBaJIbHIM ΜιNaHROM Do φikcaüj.
→ 3'εнати обидб BCMOKТУВаьні ТPyБКТа nД'ΕД-Нати IX Do pyФК.
BkaibBa: Take prnnaIaIy, JaH, HapnKlaIb, BCMOKTyBaIbHi 1tIKN (OIIJ) MOXHa BCTaJIaTn 6e3nOcepeDnHO B 3'EDHyBaIbHNI ENEMEHT i TAKM YIHOM 3'EDHYBAtn 3i BCMOKTYBaIbHM UJAHROM.
Дя KMФорТоIpoбOTи HabITb ByMOBax OБм_EXeHOrO npocTopy.
3a noTpe6n 3HmHy pyuKy MOxHa po3MiUyBaTu Mix npiJaIaIaT Ma TBCMOKTyBaJbHM UHaHROM.
BcTaHOBJIeHHaKymyIaTOpHOro 6nOky
PncyHok L
BCTABNTN akymyIaTOpHn 6JIOK 3BepxBy TpIMaayakymyIaTOpa i 3aKaNaUHyTu.
BbIMKHeHH npncTpoIO
PncyHOK M
→ NpOJxHnI::fYHKiB BCMOKTyBaHHn i npOyBKN.
Пложжнг 0: ПпстpiB BIMKHeHn.
3araJIbHI Bka3IbKn ⅢOdo 06cnyroByBaHHa
YBAGA
Memaeeu KohemeHep iOac 36bpaHnB eenuKoi KInbKocmi dpBIOHO npuMo ompmuMu cmaunu HzaP, a nomim pOzpaumucy pa3i mOpkaHn.
YBAGA
3oHa mpumaua akymyamopa noBuHna 6yuCmoIO.
I KIuO B L 30Hi 3aHaTIO 6GarTo 6pUy, MoKJInBO, 10 aKMyJLTopHn 6LoK He 3MoKe 6ytN npabNbHo BCTaBNeHn/3aΦiKcOBAHn.
TakoixiHcNyIbMOpBipHCTbTORO,IOAkyMnIATOPHN 60KNe He 3MOxE 6yTN BvNHeNen 3PnCtPOHO, OCKIbKIn BAKINB NkIDy 6JIbWe He pyxAeTcBc.
Ekcnnyataia
YBATA
Praoama Tu 3aekdu 3i csmahoeHn nampOHUM pfimbpom, k npu bonoemy, mak i npu cyxmy npu6puanhi!
Anapat He notpe6yepoqinakTnHoro 0cbnyrobyaH H.
Donomora y BvnaKyu HenoJaok
PpncpiHne npaucoc
PncyHok L
AkymyIaTOpHn B6JOK HnpePABInbHO pO3taUoBAHnB TpImaHi, BCTaBHTn AkyMylTOpHn 6Jok B TpImaD NO KlaaAHHa.
→ 3aHaTTO Hm3bKn pIBeHb zapAky akymyTAToPtoHoro 6NoKy (DINB. HcNpNe), y pa3i Heo6xIDhOci 3apA-dntu NiOro.
HecnpaBHHCTb akymyIATPOH 6nOky a6o zapA-Horo npicTpo, 3amHNtakymyIATPOH 6nOk a6o zapAHHn npICTpi.
PpncpiBiiKniUoayctbca camoctiHNO
PerepriB npnctpO/AkymyTApOpHOro 6NOKy, TpoXn nOeKaTn, 506 npnctpi/AkymyTApOpHn 6NOK oxOJIOnI.
→ KOnTeHep 3aIOBHeHn BDOIO, BHacNIIOK YOrO aKTbYbETcB cIOnJIaBeUc, cNOpOXHnT KOnTeHep.
3HNXKeHHN CINN BCMOKTyBaHHN
→ PπηλДЯ, BCMOKTYBaIbHn ⅢJHaHr a60 BCMOKTYBaIbH n Tpy6Kn 3a6pydHeHi. BuaNITn 3acMieHn 3a DonOMoHO npndaTHOrO donOMKHO 3acO6y.
PncyHok E
→ MiiOuKДЯ 36Opy NiIy 3aONBHeH, BCTaBtIn HO-BM MIIoK.
MaJIIOHOK S - V
→ ΝatpoHHn φiNbTp 3a6pydHeHn. BvrtpycHTn BmICT natoHy ta pOMHTn naTPOHHn φiNbT niD CTpyMeH BOiN.
3amHHTn IOUKOJKeHn NaTPOHHN φIbTp.
PekomeHdaia: pa3 Ha pik MiHTn NaTPOHHN fInbTp.
Texhuihi xapaktepnctnkn
Moxnuei 3minu y koncmpykuii npucmpoio!
| Akhymлартони бlok i CTanДартний зардун ппстriй вховаты до КOMПлелкту поставки:WD 3 Battery SetWD 3 Battery Premium Set(akymлартонибlok Battery Power 36/25 / stандартний зардун ппстriй Battery Power BC 36 V) | ||
| Писчтей | ||
| Hominahьна Notужнисть | W | 300 |
| Час роботу у рази Nobhoi зардун akumлаятора (мак.) | XB | 15 |
| Клас зхасгу | III | |
| Стуриль зхасгу | IPX4 | |
| Akhymлартонибlok Battery Power 36/25 | ||
| Hominahьна habруga | В | 36 |
| Hominahьна emність (bidnovi:dno до IEC/EN 61690) | A-r | 2,4 |
| Hominahьна emність (3rdNo 3даними виробника[ele-mehta) | A-r | 2,5 |
| Hom. eнер检нохваньna (bidnovi:dno до UN 3480) | Wh | 86,4 |
| Зардун стчм макс. | A | 4 |
| Тиц akumлаятора | Лити-iod-Nи | |
| Bara | Кт | 0,9 |
| ГабарNTи (Д x xs x B) | mm | 133x88x72 |
| Стоандартний зардун ппстriй Battery Power BC 36 V | ||
| Hominahьна habруga akumлая-torpHoro 6bloky | V | 36 |
| Зардун стчм макс. | A | 0,5 |
| Тиц akumлаятора | Лити-iod-Nи | |
| Hominahьна habруga | V | 100-240 |
| ЧастOTA | Hz | 50-60 |
| Стоожи Bavни[elektropeenerii (мак.) | A | 0,3 |
| Клас зхасгу | ☐ | II |
| Bara (бez akumлаяторого 6blokу) | g | 205 |
Ma3MyH5i
| Жаллы hyckaynap | KK | 5 |
| Kayinci3дik hyckaynapы | KK | 6 |
| АктумларTop жинаftы мен зардату | ||
| Кррылгысы Тураны hyckaynap | KK | 9 |
| Kayinci3дik крралдары | KK | 9 |
| Бахару оLEMentтepi | KK | 9 |
| Зардоту поцeti | KK | 10 |
| АктумларTop жинаftын пайдану | KK | 10 |
| Сактay | KK | 11 |
| Тасылдay жэhe сактay | KK | 11 |
| Куту менTekнікалыкTekceру | ||
| ЖуmbлICTары | KK | 11 |
| Кendeprinerр богвада кемек any | KK | 11 |
| Буйым сипатамсы | KK | 12 |
| Орnatу | KK | 12 |
| АктумларTop жинаftын зардтаныз | KK | 12 |
| Буйымды iccke кocу | KK | 12 |
| Пайданanyжөнін徴eri жаллы hyckaynap | KK | 13 |
| Колдану | KK | 13 |
| Тасылдay | KK | 13 |
| Куту менTekнікалыкTekceру | ||
| ЖуmbлICTары | KK | 14 |
| Кendeprinerр-bогвада кемек any | KK | 14 |
| Tekнікалык Марлүмattap | KK | 14 |
KypmetTI TyTbIHyuBl,


BbMbHb3bl aflaew pet KOndaHy anDbHda OcbI TYNHcKa naindahny 6oBbIHHa HcKaybIKbMyKnrT OKbIn sbHbHb3, HcyKaynapdbl opbHdan,
KeiH naIaIaIaHy yIiH Hemece oCb 6yIbIMbl KeIH naIaIaHaTbIH TyIraIap yIiH CaTaN KOIbIbI3.
XaannbHyckaynap
www.kaercher.com/REACH

OpaybI MATEpHAnIaBki EkiHui pet eHdeyre
Japambl. OApbyIbIbI KOpuaFah Optara Kayinc3
TpyDe KeDeE XapaTbIbI3.

EckyibIMdapaKaiaTe HEnDeyre Xieepinyi Tmic
6bara,baiTa EhJeTre 6bOnTbH MatepeNaIap
6ap. BatapeApnap MeN AKyMylTopLapda
Kopuafanop TaOra 3nH AKeIeTin 3aTappap.B.EckyBIMdap MeN 6batapeApDbHEmece
AKkymJrTOpAPdBi KOpUaHan Optara 3nH
KeTIpMeK KeDere KapaTbHb3.
3neKtpNIk XHe 3neKTPoHDb KBybIMdapDbH
KpaMbIHDa KATE KOJaHn HeMeCe KdEre
Xkapatry HtNHexciHde aAaM DeHCayIbIfBaHa JxHe
KopUaHan Optafa Kayin TEHdiPyi bKtIman
BeIWeKTepr Kni Ke3Decesi.Anai Da atanfah
BeIWeKTepr 6byIMdb TLICHue naIadanaHy wHIn
KaKet 60lanbl.Ocb TaHbAmen BeIrlineHren
6yibIMdApdbY KoKbIcTapbIMeh 6ipre Tactayfa
60lanmbl.
Kypamblndafbl3aTtapTypalblahbIKtamajap (REACH)
BMyIbMbHbI KpyAmbIHaDaIb3aTtap TpyanbIcoHbI MaFyMaTtapAbIcAteKaPcetciIReH INHTepHe6BeTepIM3eOkI anAcb3:
www.kaercher.com/REACH
Kenilme
BvIbIMdapMbI3 yIiH eApEJaayantbIeTIM cepIKTEcEpIM3 TapanbIHAn hIbIrapbIaNbIH KeINIDMe Me IAPITapbl KUWte 6oJIaDb. Erep MaTePnAdepbl H aKayIbIFb HeMeCE daBIHNday bapbcIBHaIb KaTeNtKep Ta5bIca, 613 bIKTMAn akAYbIKTapbl Kenin Mep3imi iHiJe aKbcIb3 XeHdeM3. KeIN Mep3imi iHiJe Hapa3bIKTapblbI3 6OJca, acnTbI catKaH Cayda MekeMeCine HeMece JkaBHdAfBy ekInETTI cepBNT Kb3MeT KepcTeY opbIHaCatbIN any YerIH KepcTeIN, xabapNaCbHbI3.
Ehdpinren KHyi KepceiTiren Typ KectecinHe 1nDpnaHraH.
Keke caHapdbH MafbHacbI KeleciJeB 60aIbI:
MbicaJIb: 30190
3 ΘHπipijireh kblb
0 ΘHdpinreHa facbipbl
1 ΘHdiipinreH OHXblIbIK
9 ΘHdpinre anbHbEkiHs caHb
0 EHndipiirreH aibHbH 6ipihicahbI
CohImeH 6yI MbIcaJIa 30190 KoIbI 09/(2)013 eHdipinrE KYHIn 6iJnIpeJI.
Буйым Колдауншыларра Кьзмт Керсту 6eNiimi
Erep Cizde cypaktap naia bocna Hemece Ciz 6enrini 6ip kemilinktpre tan bocnah3, bi3dn KARCHER 6enlneepim3 Cizre Khybprnapa KEmek kepcetedi.
Akeccsyapnap MeN Kocajkb6eJweKTeP
Tek TynHysca Kepek-KapaKTap MeH TynHysCA Kocalkbi BcenIeKTepeKi KOJaHaNbHb3,ce6eBiOnap 6yBIMhBn Kayinci3 XBeHe akaycb3 xMybCbHa KeniDik BepeDi. Kepek-KapaKTap MeH KocaNbK BypaIaDap Typanbl Aknapat www.Kaercher.com Be6-caTbHda KonXketimdi.
KanTama iwiHdere 6eIweKeTp
Erep Keibip Xabikap Jok 60nca Hemece TaBImaJday KeiHder aayapnab60nca, annapaTbI caTahn FpmaMaHb Xabapadep EtIH3.
Kayinci3dk Hycckaynapbl
Kayin Dehnrein
KAYIN
Aybip kapaakammahyra He eIIMae anapbIn corambIH mikeNeu mype myce anambyH mayekenze HycKay.
ECKEPTY
Aybip japaKaMaHa rHa He eniImze anapbIn corambIn bikmuman kayinmi xaraunapra HycKay.
△ABAHJIaHbI3
KeHHJXapaKammaHyra anapbIn corambih bIKmuman kayinmi xaraura Hycay.
HA3AP AYdAPbIHbI3
MamepuaIbIk 3uHra anapbIn cofambIH bIKmumJ kayinmi kardaura Hycay.
KypraK XəHe bɪnfaɪdɒtata3aŋay yʊwɪn wæhCOPfɒbɪwTbɪH kayinci3dɪk HycKaynap
Kayinci3 kOJdaHy
KAYIN
Paudaanhyb6yubimdbi HbicaHbHa 6aunahbcmbi KOndaHybI KepeK. BybIMMeH xMbic icmey ke3ihde Xepaikmi wapmmapra Ha3ap aydapybKepek, XaKaBHdaXypaeH adamdapdbie cckepyi kaxem.
Kapbiny kayni 6ap kepJIepde naUdaHaYra mbIuBIM caJIbHaDbI.
ECKEPTY
BvubimboiKayinmi aumakma kOJdaHy Ke3iHde muicmi kayinci3diK epexepeipin caKMay KaXem.
Буubim andbihda Kyamblfranb0lca,ohbinycmiHde 3aKbIM bEnainepi KepiHce Hemece KeMyIep 6ap 6oIca,OhI naDaJahbI3.
Kanmama Kara3bIH 6anaapdaH aynaK ycmahbl3, myHwbifbIn KaIy kayni bap!
BnykypbIrfbIHbI qu3UkaJIbIK, ceHCOPblk Hemece aKbIIN-ou daMybi uekmelaeHemece mexipubeci JxHe/Hemece 6iikminiaixok adamdap 6iikmi MAMHHbIH 6akblaybIHda bOMarAH Ke3de Hemece ocbi MAMHDap mapabHaH 6yubIMdbI KOndahmyaciji XHe oraH kambicmbi Kayinmep mycHdpijlmeeen Ke3de naudanah6aybl muic.
Bana nap 8 xacman ackaH Xara dauda Hemece onapdbin Kayinci3dieine Xayanmbi adam bakbinahybIHDA Hemece KypblfbiHBIN KOndaHy macinimeh XaHe orAh Kambcmbi Kayinmepmen maHbickah Ke3de raha KypblfbiHBI KOndaHa anaDbI.
Bana napra kypbIrfimHe ouhayra pyKcam bepMeHi3.
Banaapra KypblfImeH ouhayra Konl bepmey ywiH onapbbla KaBlan ombyp kepek.
Буubimbile meK cunammamara Hemece cypemke cəukec KoJdaHbIHbI3 Hemece caKaMaHbI3!
БуubIM KypambIHda 3JIeKmpuKaJIbIK 6JIuWeKmepi 6ap - OHbl aFbIHObI cyMeH ma3aJaMaHaB13.
△AEBAHJIAHbI3
BiyubimdbI eukawah Kocybl KyuiHde Kaandpyra 60MaDbI.
HA3AP AYdAPbIHbI3
Tempeamypa 0 ^ C -deH mEmen 6oIraHa 6yUbIMdbI KOJdaHbAHbI3.
Copfblumbi ewkaawahuunbmpci3 naudanaHbaHb3,6yubim 3aKbIMdanybi MymKiH.
BiyubIMobjXaFBIMcbI3 aya paibl,blraJ XoHe KofapbImemnpamypabIKnabHaH Kopray KepeK.
Басятayekeлдер
KAYIN
KapbInbIn Kemy Kayni!
Kapbiny kayni 6ap kepnpde naudanahyra mbiubIM caNbHaDbI.
KapbIrfbiH Hemece XaHfbiu 2a3, cyubikmbikmapdbi XHe waHdbicopfbimnHaB13!
Peakmuemi MemannuahapbIH (MbicalbI aIIOMuHU, Ma2He3U, Mbipbu) copfbimnab13!
Epimmeen KbiWkbIndapdbi Hemece cinminepdi copbimnHaB3!
XaHfbIu HemecemymaHfbIu 3ammapcopMaHbI3!
ECKEPTY
Kapanahy kayni!
Ulymek neh copfbiw bac XaftbIHda copMaudbl.
△ABAHJIaHbI3
Anammap MeH 3aKbIMdapdbI
60nbipMay ywiH 6yubIMdbI
macbImaJdaHa Ke3de
caMafbiHa Ha3ap
aydapbIHb3 (mexHukalbIK
Mənimmempei KapaHb3).
TypaKtbInbIK
△ABAHJIAHbI3
Kayinmi Xaraaunap Meh 6yubim 3aKbIMdaanybIHbIH aNbIH any ywH 6yubIMbI naudanhy anDbIHda kayinci3dk wapaapanbIH caKMay kaxem.
3apdTay KypblfbcIbIH Kayinci3dk HycKaynapbl
KAYIN
一 p b i p naudanahydaH bpybH Kyam bepy bnoobihb, 6aunahbcmbipywbl KaebbdH, aKKymyJamop adanmepinH xHe aKKMyJamop XUHaftbIHbIH 3aKbIMdAmaybIH meKcepHiz. 3aKbIMdaIraH xa6dbkmbi naudanaHbaHbI3 HeMece aybicMbipbIH3.
3aprəmay KypbIINfbICbIH awnahbI3. 3akbIMdaIraH HeMece akay naUda 6oIraH XaRdaUda, 3aprəmay KypbIINfbICbIH aybcmbipbIHbI3.
3apmay KypbIINfbicbIH Kapblny kayni 6ap opma da naDaanaHbaHbI3.
Kabenb awacb MeH 3neKmp po3emkacbIH ewkauaH bInFaIDbI KOJMeH ycmaHaB3 He mypmeHi3.
KypbIrfbIHbI lacmaHraH Hemece bIrafan Kyude naDaHaHaBIs.
Бамареглардь (аалбеванкалык эльемнмерд) зapад mayra ьмädь. Карыпс kayрп 6ap!
△AБАЙДИЗБI3
Keni Kepheyi 3apdmay KypblfbcihbH mexHukalbk cunammamacbiHa Kepceminaen Kepheye cKeec Kenyi Kepek.
3apamay KypbIrfbcih meK pykcam eminaeH aKKymyJamop 6JokmapbiH 3apamay ywiH KOndaHbIHbI3.
Akkymyjnmop xuHaftn Koca 6epinemim mynhycakabI 3apmay kypblfbcIMeh Hemece KARCHER KOMnaHuraCbi 6ekimKeH 3apmay kypblfbcIMeh rHa 3apmdayra pyKcam eminei.
HA3AP AYdAPbIHbI3
3aprəmay Kypblfbcih 6aunahbicmbipywh Ka6eJIHeH mapbIn KypMeHi3.
Baunahbicmbipfbiu cblmbiH Kbl3y Ke3depineH,emkip wemmepdeH,MauDAH XaHe acnannbIH XblXbIMaJIbI 6enwekmepeH aIbIC ycmaHbI3.
Kyam 6epy 6noabih XannahbI3.
Biphewe kyam bepy kOJaKmApbI 6ap y3apmKbIu KaBeIbdepeDeH xHe 6ipHewe KypblTbIaPbIbI 6ip yaKbImma naDaanHydaH aynaK 6oNbIHbI3.
3aKbIM KeImmipMey ywiH 6auiHaBicMbipywbi KaBeiIn Kyam bepy bnoBaHa Hemece aKKymyIamop adanmepine opAmHaB13.
3apay KypbIINfblcbiHdafbbl6elrinepi

3aprdmay KypbIINfbICbIH bIrrandaH Kopran, KypraK Xepde caKaMaHbI3. KypbIINfbI 6eJMeJepe rHa naudanaHyra JapaMdbI, KypbIINfbIHbI XaHbipra ywbipamnaHbI3.
3aprodmay KpybIrfbcIHbIH 1 ampeplik kipikmipinaeh caKaMaHdbIpfbu6bap.

3apmay Kypblrbcbl
knacmbkopray
mananmapbHa caukec
Keledi.
AkkymyJIaTOP XnHaFbIHbIH Kayinci3dIK HycKayIbIFbl
AkkymyJmop XuHaftbImeH Kocabepin2en Kayinc3diK HcayapbIH OKbln WbIFbIHbI3 XHe OnapdbI KOlaHAp Ke3de Onapra Ha3ap aydapbIHbI3!
AkkymyIaTOp XINHaFbI MeH 3apraTay KypblfbcIbTypaJIb Hcckaynap
△ ABAAJIAHbI3
Akkymyarnop kapbinyiban h xapaqam any, 3akimdahy kayni 6ap! Akkymyarnop 6noabih on yuhi Kapacmbipinrah 3apdmay KpbInfbcbl apkblra fana 3apmd may kepek.
3apdmay anbHoa aKkyMnyamop 6noBei nen 3apdmy KpybIbIcBiHbI yUnecimOi eKeHi Ke3 xemki3H1!
3aKbIMdaImaHa aKKyMnymop XuHaKmApbH raHaXyKmeHi3.
- KayinciadiKmKcambHdaKaumaXeHDeyeZKeHe 3zipnyui pyKcam emneeeen eEepmynppee mbIbIM canbHAbO.
- MaKcambl boBihwa naaDanaHbayra pyKcam bePimmei. MaKcambl boBihwa naaDanaHbayd an mybHoaran kayinmpeae naDanahywibnE3x jayankepwiinak anaob.
AkkymyIaTOp jHnHaBih Jxhe 3aprTay KpybIbIcBih icke Kocy yuHOMnHaIbIe kepHeyi 36 B OJbIy KaXet. OPhaIbIraH Yckanap 36 B, 2.5 A. car. (BaTaper KyaTbI 36/25) XHe cTaHdApTTb AkkymyIaTOp KyaTbI 36 B (BaTaper KyaTb I BC 36 B) 6ap Li-ION 6aTaper XnHaBIme XaOdbIkaTalFaH.
Battery Power (+) 36/25, 36/50 xhe 36/75
akymytnopnap boktapbH IN TK cOanpa
aphanran Karcher 36 B Battery Power
xhyenepinih kpyblbnapbHna naiDanaHyra
pykcat etinedi.
KTeK3iIm KmbIHTbIbHa KipMeTIH Hemece KcBIMwa KaXET bOlaTbIn AkYMyJrTopnap/ 3apdTay KpyblfIbnApI apNaIbI Xa6DbIKTap petIHDe KOnXeITmDi JxHe ONe apArbI KcBIMwa catbIn anyfA bOlaDbI.
KARCHER 6atape KyaTbHbHn AkkyMnyTopbIK nlatfopMaCbI KypbIbCbIHdArbl AkkMyNTOP XINHaBn KOJaHaP anDbIHa, KOJaHbInaTbH KpybIbHn naDanahy CKayIbKTapBn JKeHe Koca bepinyi MyMKH Ke3 keRhen Kayinc3dk HcKaynapbH OKbl WbIfbHbI3.
Kepek-KapaKapTapeH KocanBb6nueKtep TpyaBbaknapaWkaercher.com Be6-caTbHaKaJXKeTIIMDi.
BaTapey KyaTbI 36 B aKKymyIaTOp XHaFbI
| Cinatrtama | Актумлартор Тур | Hominidäbik kerpény | Hominidäbä cyMbMdbänbik (IEC/EN 61690 straβdapltbna cāmèç) | Hominidäbä cyMbMdbänbik (ajyywymnptop aεsβyüučiHn mæniμtterpīne cāmèç) |
| Дирийнокдä | V | Ah | Ah | |
| 36/25 | 36 | 36 | 2,4 | 2,5 |
| 36/50 | 36 | 36 | 4,8 | 5,0 |
TacbImaay
IITNI-NOHbIK aKKyMylTOp KayiTI TAYapnap TypanbI 3aH TanaNTapbiHa C9iKec 60JIBy KepeKJxHe NaIaIaNahUyI OHb KOFaMbK KeIiknEe KocBIMua CaKbIK uapanapbIHcB3 TaCbIMaJau anJaJIb.
YuHuiJi TaPAnTapFa (KeNik KcCinOpBihDapbHa) XjIepeRn Ke3Je KaTamara JxHe TaHbAnayFa KOyIbIaBH aiPykMa TaIanTapFa aca Ha3ap aydApy KepeK.
AkkymyIaTOpnapdbTeK3aKbIMdaIImaHaN KopyncneHxibepyre pykcat etiIeDi. Aushk KOHTakTinepdi Okuayan, AkkyMnyTOpDb ceHiMdi Xhe6epi KaTamaRa opHaNactbipbHb3. Ohbl KaNTamaFa aybICTbpMay Kepek.
¥TTbIKepexekenepei caKaTahb3.
Kayincizdik Kypanlnapbl
△ ABAHJIAHbI3
Kayinci3diK KypandaBihb MaKcambi - KondaHuwBapObl Kayimeh cakmabobyip, onapbl 03eepmye HeMece bokinyaCy13 KaDbipyfa BonmauBbl.
Kopfahbii KoHTyp
EhdiipinreH KoprahbIi KOHTyp akKymyTOpnapdbI MbHaIapdaH KopfaiDbI:
Kb3bIn KeTy
3apAdbHbIH TObnIK 6iTyi
ApTbIK 3aprAITay
Kbicka TynbIKtany
Backapy 3JemeHrTepi
AkkymyIaTOp XHaFbI
Typine baiJanaHbCTb cypet
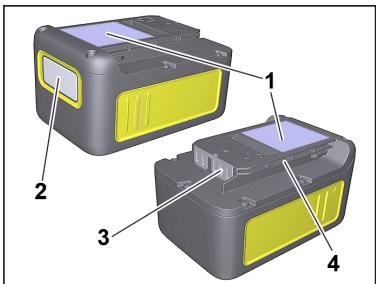
1 3aybIT TaKtaIwacbl
2 3KpaH
3 KOnTakTinep
4 Ka6bIyay 6eJIiri
CTaHapTbI 3apaTay Kypblfbcbl
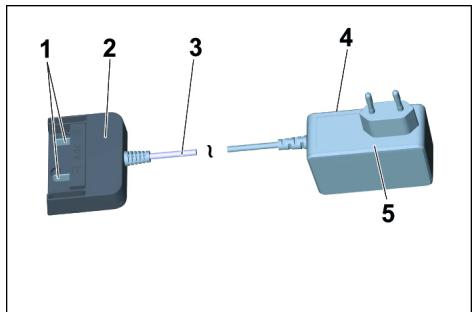
1 3apayay KOHTaKtici
2 AkkymyTop aanTepi
3 Baɪnəhɒbɪctbɪpyuɒkɑsɒ
4 3aybIT TaKTaIuacbl
5 Kyat 6epy 6norbl
3apraTay npoeci
△ ABAAJIAHbI3
Xkapam any kayni, 3akbIMaHy kayni 6ap! 3apdmay KpybInrbcIbHn rnaDanaHy NcKaynbIrBn JxHe Kayinc3iDk HcykaynpabHcKaMaHb3.
Hyckay
Akkymyarnopnapbih jana 6nokmapb i anbih ana a3an3apmaianr h xhe anraukbl naa danyh aobhd oanpab monbirbimeh 3apmay kepek. Bipuiu3apmoynpouecihde dcunne Koclnaobl. 3apmoy uohukamopbihn dypbic kmybic icmeiyuhi, akkymyarnop 6noebih anrau kondahar Ke3de ObIH 3apbH Kybpflb Ewkehue bimipy kepek.
Cypet F
KyaT 6epy 6JnOrbIH po3eTKaFa KocbiHbI3.
→ AkkyMnyTOp XINHaBbH 3apdTay KpybIITbICbIHbIH aKKyMnyTOp aanTepiHe cAnbHbI3.
3apnay npoeci aBTOMaTbI Type 6aTaJaBbl.
CypeT G
AKkyMnyTAp 6nBbI duCnneHie3aqr4 aRkTaNFaHa deiHiY yakBt KepcTeinei.
Bocakmyntop knaHaftbHa (BaTape KyaTaBt 36/25) apHnafan CTaHdapTbI 3aprJdTay KpybIrfbcIMeH (BaTape KyaTaBt BC 36 B) 3aprJdTay yaKbITbI WAmamEm 5,5caFtBt KpaNbI.
AkyumnyTop TOnbIk ZaparTaNFaH Ke3Je Dmncnpe 100% KcpctineJI.
3apraTalrFaHAn KeiH akkMyIaTOP aadantepiH akkMyIaTOP XnHaftbIHAN aKbpaTbIbI3.
KyaT 6epy 6IorbIH po3eTKaHa aXkbipaTbHb13.
Hycay
Akkymyamop 6no8b3apdmay Kpybnfbcihda
bonrae Ke3e ducnneie eueme Hecpemimce,
aakkymyamop cbibmblbfibfbi bimken Heme a3.
Akkymyamop xemknilikmi zapdmanran coH
ducnneie kaIrah 3apdmay yakmbi naDa 60nabli.
Eep uDkaun y3ak yakbIm naOda 60lmaca,
aakkymyamop 6no8b3jkapamcbizKHe OHbl
aybcmbipyKepek.
Hyckay
KaHa aKKymnarnop 6nokmapb5 3apdmay-maycbiny uKNIHEn Keiun monblk cblubimblbfha xemedi. ¥3ak yaBIm kondaHbImaran aKKymnarnop 6nokmapbIn naDanahy anbHda a3dan 3apdman anyKepek.
0°C-mah mEmem memnepamypanapda akkymyramop 6IokmapbHbH Kyambl meMeHoeoi.
20°C-mahXorapbI mEmnepamypanapda y3ak cakmay akMymnapo6 bOeBihCblubMbblBifH mEmHeMey MyMKH.
Hycay
3apdmaTnAn KAKyMnApOp 6noBIn NauDanaHFaHa
deiH 3apdmany KpybInrbcIbHOb KaNDbyra 6oNaDb)
Apbik 3apdmany kayni Jok
3HepuBHe6Eke IbFbHdAmMayby yuih,
akkMynMopnap monbikaprmaIraH coH 3aprmday
KybIbIbCbH jKeiDeH eUjpy KepeK.
AkkymyIaTOp XHaFbH naiDaNaHy
3KpaH
AkkymyIaTOpNap 6nOrb3apdTay Kyi,3apdTay npoeciciHbpBcblKHe Kanfah 3apdTay yaBtBly TpyakTbKepcTeiTinH DncnneMeh xa6dbkTaNfAH. Oraf Koc aKaaynap TypaIbI bKtMAn x6abnap KepeTeiNeDi.
KymbcyaBtBHBHbeimdnyiKaatbbyaBtbpN KOCy apblbljXacanaDbI.
KoJlaHaBbIaNtBbH KpyblfBfA Kapai AkkMyTnTOp 6NoKTapbIH OphATKaH Ke3e Keckin aHaHaJaBb.
| Инд�示ахр | Мэни |
| Аккуmarларды саektay | |
| Пайдалибаган кешидari akkuуmarларблгий зардай куи. | |
| Аккуmarларды пайдану | |
| Пайдалибаган кешидari akkuуmarларблгий калган кумьс уakытbl. | |
| Аккуmarларды за对接 | |
| Аккуmarларблгий зардай кешидari калган зардай уakытbl. | |
| Аккуmarларблгий Толытмен Зардаль. | |
| Акay Иnd�示ахры | |
| Аккуmarлар temпературасы Жарамды ayкышан Тыс немец блор КыICа Тульктулдан Кулытдан(akayлары Жю 6оьынша кemekti Караныз). | |
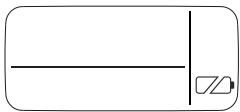
AkkymyTOp 6norbI ICTeH 1bIKKAn KHeN Kayinc3ik MaKcTaBHaKyIbnTAnFaH.
AkkymyIaTOp 6nIgbiH oAnh aIpi naiIanaIah6aHb3 XHe epeXeIepre cAkec TactaHb3.
PaiDanaHy
△ ABAIJIAHbI3
Kapaqam any khe 3akbimdany kayni bap! Naoudanany Ke3iHoe KOnOaHbInnambin HcyblNfBbHn naDanaHy HcayIbIbH nKe hay KAYinc30ik HcKaynapbH caMHaHbI3.
Akymyntop6IogbH KpyblfblbH Ka6blnday 6bnIIe KOblbl3.
△ ABAAJIAHbI3
Xkapamanyxhe3akbIMoHykayni6ap! Akkymynop 6noabHbIn6ekimimeHiHe Haazap ayabpbHbI3.
Hycay
Pauadanahy bapbcihda duqnue de kannr h xymbic yaibmbi Kepceminedi.
→ Kymbic aayTaNfAH coH KypbIbIaHa aKKMyIaTOP 6nOrbIH WbIfapbIbI3.
→ Kymblc aarKaTlraH coH aKKyMnyrTop 6IOrbH 3aprTaHbI3.
Hycay
Tinmi, 3aprəbji xapmblau aekmanrah
aKKyMnIpmnapbDi da naDanaHran coH zapdmay kepek.
CaKtay
△ ABAAJIAHbI3
Xkapamanyxhe3akbIMdanykayni6ap! TaBImaIayKe3iHde6yubIMhIncaMaBHaHa3ap ayabpbHb3.
HA3AP AYdAPbIHbI3
3aBbMay mayekn! Akkymynpmod 6nokmapbIn bInranboInbIbI mEmeB 6nmepeR aHa JxHe 20 C-mam meMeH memepamaDaa cakmaHbI3.
ByIbYbIMdbI iki bEbnmenepe fana caKtay KaKet. AkkymyTAP 6nBbI dncnnneiHd 3aprTay
KpybIyfbcHa KocbIJaMaHJ XaJaIa Da OhBiH aBIMdAfl 3apTay KyI Kepcetinei.
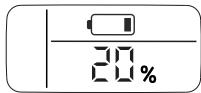
AkkymyIaTOp 6bn8h nCaTay npoucesiHde dncnnei eaiin kAnca, aKKymyIaTOp CbIbIMdbIbIbFbI TaYcbINfah KHe dncnnei oWeidi. AkkymyIaTOpDb MyMkiHdiHnwe Kblnam3apraTaHbI3.
Tacbimanayxhe caKtay
△ ABAAJIAHbI3
Jkapakam any xəHe 3aKbImdany kayni 6ap!
TacbImaIbday Ke3iHde 6yUbIMHbIH cAlMaRbHa Ha3ap aydapbIb13.
Kytu MeH TexHnKaJIbIK TeKcepy XyMbICTapbl
3aqrTay KOHTaTIpePiH nactaHbAyIH JyHeni TYPe TeKcePi OTpBiH3 KzHe KaJET BoJHaN JaKaJaIaO npArdi Ta3anaHbI3.
→ Y3aK yaklt cakTaIbIH akKYMylrTOpnap XnblHTbIKTapbi YUH apalibk 3apdTayblOpbIHDaHbI3.
KeHney
KypbIybl Kbi3MeT KepeTydi KaXeTe tnei.
Kepeprinep 6oNfAHa KaMek any
| Зартыгай кезин Diу Akaynap |
| Диспnew сханбайы, akkymларов Зартулмайы |
| Зартыгай Крьлгьсы karapamсы3. Зартыгай Крьлгьсын aybICTырьИЗ. |
| Самуларов БОгунын 3Zipады ТолыБIMEN 6ITKEH Бolyы MUMKII. Біра зakытпан COH диспени ддоган Зард укыты пада улганша куte Турьны3. Ддогд улгандakумларов 6Notor жармсы3. Akkymларов БОгун Зартулмайы 3Zipддогд Зартулмайы 3Zipддогд Зартулмайы 3Zipддогд Зартулмайы 3Zipддогд Зартулмайы 3Zipддогд Зартулмайы 3Zipддогд Зартулмайы 3Zipддогд Зартулмайы 5Zipддогд Зартулмайы 5Zipддогд Зартулмайы 5Zipддогд Зартулмайы 5Zipддогд Зартулмайы 5Zipддогд Зартулмайы 5Zipддогд Зартулмайы 5Zipддогд Зартумларов 6Notor Зартулмайы 6Notor Зартулмайы 6Notor Зартулмайы 6Notor Зартулмайы 6Notor Зартулмайы 6Notor Зартулмайы 6Notor Зартулмайы 6Notor Зартулмайы 6Notor Зартулмайы 6NotOR Зартулмайы 6NotOR Зартулмайы 6NotOR Зартулмайы 6NotOR Зартулмайы 6NotOR Зартулмайы 6NotOR Зартулмайы 6NotOR Зартулмайы 6NotOR Зартулмайы 6NotOR Зар呛ларов 6Notor Зар呛ларов 6Notor Зар呛ларов 6Notor Зар呛ларов 6Notor Зар呛ларов 6Notor Зар呛ларов 6Notor Зар呛ларов 6Notor Зар呛ларов 6Notor Зар呛ларов 6Notor Зар呛ларов 6Notor |
| Сакту кеинderi akaynap |
| Диспnéдekanгансыыимьлійк керсетлмейдi |
| Аккуларов SFOBын 3орады 6iTTI. Akkuуларов SFOBын кaitа 3aprdTaHb3. |
| Диспnéдekanгансыыимьлійк 70%den Керсетлген,бірахakукуларов SFOBын зауа fana 3aprdTaHb3. |
| Аккуларов SFOBын akumimideТуР.БурржIMakuyуларов SFOBын ABTOmATbI caKNTpavexmIHn. Фуннecурakун SFOBын КОлдамоганда Ксoblaды.Бул ФунLCNIAKукун SFOBын YCsbHnMbAm TOTyDAH caKTuHbIpaRdыЖэHe Kizmet KapcETу МерзIMH узары.Кelenci падалану anduHnda akkuуларов SFOBын KaITaDANH TOTlbFbIMEN 3aprdTaHb3. |
| Жалы akay |
| Диспnéдeбатарын SFOBын уsthen CSbIbIFan TaNbCsblKercetinedi. |
| Аккуларов SFOBын ictenшыканЖэHeKayinci3dk maKCaTbIДу КыltanrAn. Akkuуларов SFOBын Ondah api naDanaHny aNDbHnDa akkuуларов SFOBын KaITaDANH TOTlbFbIMEN 3aprdTaHb3. |
| Буныm CINnattamacbl |
| СуртtersБукtemeli Бete Karaыз! |
| ■Oсы колдану Туралы HUCKaylbyfbl anDbHbIb SFOBtETem6beBan copfblStbl SINnattaIы. |
| ■СуртtersDEToLbKOMPлесТация Керсетлген,эр moDEtleбаилбыCTыkomplктадуЖэHe бepinetiH KepeK-Jжарктарda e3reWeJIriKTeр SFOBын. |
| Буныm KOPanuacBnAшkahandaКорanua iwiHderi Буныm MENбөлшКерсетлген,эр Турde SFOBaHbIbEFH TeKcepin anbHbI3.Тасыmandoy НэтнkeciHdeБунIHrenжepiБONca,БуныmblCaTkaH сayda MeKecMecine Xa6aplnaHb3. |
| ●Жинakтak KaMTbIFanH |
| ○МуMKINKepeK-Jжарктap |
| 1 Copy shanrici |
| 2 Akkuуларов SFOBын aphanrHan b6JIik |
| 3Буныm KocbIbbl(Kocv/Θwipy) |
| 4 Akkuуларов SFOBын TSTOKTANH ShbIFapу Tymeci |
| 5 TytblIsh |
| 6 YprleY adanterpi |
| 7 CayblT KUllbl |
| 8 Tpyak KByi |
| 9Буныm KepeK-Jжарктарын саКТayжepi |
| 10БarblTbIfbl polnik |
| 11 Bak |
| 12 Cystril Kan |
| 13 Патрон cystrici |
| 14БаиныltбырblSbIeKlenH copfbTy shaHrici |
| 15 Альнбалы TUTka |
| 16 Copfbbl TUTiri, 2x0,5M |
| 17Жancapnap yuiH shyMeK |
| 18Еденин copy shyMeri (ehdipMemen) |
| 19 Akkuуларов КИнafbl Battery Power 36/25 |
| 20 СандагТы зардайу КррыfcIbSbl |
| Battery Power BC 36 V |
Ophaty
Cypet A
Awy yuH 6ak KaKanapbH cbPTKa tapTbIn, TyTKacbHaH yCTan KypblfBbHbH 6ac 6enirH bWfarpbHb3.
Cyper B
BaKtbH iWihdericih WbIfapbHb3.
Cypet C
CaybITbIaHAnDbIPbIHb3, 6aBtITTaBH polIKTepdi CaybITbIH TybHderi CaHbInaynapra tipeINHe 6acbHb3.
Cyper D
→ KypbIyfbHbHbBac6eJIirh BaKaOpHaTbIn, Bak KaKnapnabHJXa6bHb3.
Cyper E
Kypfak KOKblctb copy KE3Hne, kaxet 60lanfah KaTaNdaCy3ri KaTNaBn KocBIMu opHatyfa 60anDa.
AkkymyIaTOp XHaFbIh 3apdTaHbI3
Cypet F
Cypet G
→ 《3apayTay npoueci》KHeE «AkkymyIaTOp KInHaBbN naJaIaNHy» TaaybH KapaHbI3.
ByiIMbi Icke Kocy
БунбIM KepeK-Жаразын 6уньIMfa Kocy
Cyper H
CoprbIy IuaHriciH 6yIbIMdaIbI KOHTaKTIre ehr3iH3, on 6ekrtiEdi. AInbTactay yuH in OyIbKTbI caycaKeH 6acblb3 xhe copbIy UuaHriciH 6lbIfapBhl3.
Cyper
TytKaHbI copfbyTwnaHrCine 6ekitImereHwe opHATbH3.
Copfblt TytikTepiH ekeyi De bipre kajraHb3 XaHe TytkAmen BaunHaICTbIpbHbI3.
Hyckay: CopfbIkw KblIwAflb (KocBIMwa) cnaKTbKepek
XkapakTap baiNaHbICTbPfBb 6nJWeKke TIKENEY
XaIrahybl MyMkiH XeHe OcblnAwa COPbITy
UlnaHricIme 6aIIaNbICTbPbIbMyMkiH.
UeKeTEnRe hAmKaTb bHraIb IxMyBlc icTeye
apHaIraH.
AInbHbAnbI tyTkAnbI kaxeTihWe kepek-xapakTap Meh copfblTy wHaHricinIH apacbHda opHata 60ana.
Kehec: EeHHeH e cop yuH TtKaHbI copbyT yuHaRicHe XaHaHbI.
Cyper J
Copy shaHriCHeH TYkAHaBl sbfApy yuHIn 6ekTIkiTuBt bac bpMaK kHe Cky CayCaK KemerimEH 6abCIn, TYkAHaBl sbfApbHbI3.
Hcykay:YTkAhlb anbl Tactay Ke3iHe KepeKxapakTAP copbyTu IunahricHe TikeNeJ XanfahyblMYKMHI.
Cypet K
Ty6iHderi fopcYHKaHbI copy TYtiriHe kAnfRaHbI3. Hcykay: EdeHHen Kpyrak KOKbc He cydbI copy YuiH apkaJauH eEN copy WymeriHderi eHdipMemeh (KblTpaKa XoJaKTapBj XaHe pe3eHke ry6ka) KMybIc ICTeHJI3.
AkkymyIaTOp XnHaftbH CaNbHbI3
Cyper L
→ AkkymyIyTop xHnHaBbH 6aTape yCTaFbIbHa XOFapbIaH CanbHb3 XeHe TapbHb3.
WahcOpfbIiWTbIKocy
Cypet M
Iky: Copy HeMece ypney fychkunrcbl. 0kyi: Bybim eipijireh.
Paiandaany xenihderi xaillnbI HycKaynap
HA3AP AYdApbIhbl3
Mennan 6ak uhanbnyuken keenmeepde copy Hamajekcihe cmamukkanblnekmpzapabihxunaybi Mymkhin xhe ycmaraH Ke3e 3apd ubiarpaby MyMKH.
HA3APAYdAPbIHbI3
Akkymyamop ycmarbblbHn aymbrn m3a Kyode cakmay kepek.
Erep6ynaiMaKaKbTbIMKeiKipKipce,OHaaKKyMnyTOpXHafByDpybcCaIbH6aybl/KyIbINTJAMMybMYMKH.
Ibifapy TcKbIbIH KblkbIty MymKiH eMeC 6oJraHbIKTah, AkkMyJrTOp KHaHaB1K cyjIbdaH Ibifapya 6oImaTbIH bIKTmAmJaBt Ka6ap.
KoIdzany
HA3AP AYdAPbIhbl3
blrbanbi He kprak mazanay kezihde,epkawah Kipicmipinae nnpoh cy3aicimeh xymbc icmehi3!
Kypfak Ta3aay
HA3AP AYdAPbIhbl3
Cy3aHIn KOndaH6ac 6bpyH 3aKbIMdapObH 6ap-KoFBH meKcepiH3 XeHe KaJem 60ncA, aybcmbipbH3.
Tek KypraK nampoH cy3icimeH kymbic icmehi3!
Cypet E
KeHec:Xka wahdbi copy ywiin cy3riu KanTbI opHaTbIhbl3.
AkkymyIaTOp XHaBbIH caKtay
Hcykay: Copy yHKunraCbHa Kapamactan, 6atape KxHArfbl KpyblIbDa Hemece cbPbTbHa da bocn Da, cyhBk KpncTaNdbl DcNlneDe KahdA da 6ip AkkyMnyTop CbIbIMdbIbFbl BOnaDb.
→ 《3apayTay npouceci》KHeE «AkkymyIaTOp KInHaBbIN naJaIaNHy» TaaybH KapaHbI3.
TacbImaJday
ABAHJIAHbI3
Xkapamanyxhe3akbIMdanykayni6ap! TaBImaDey Ke3iHde 6yubHMbHc calMaBHaHa3ap ayadpbHbI3.
KoJmEn TaBImaNday
→ Kypaapanbl TyTkacbHaH KeTeepin TaCbMaIaHbI3.
¥waKaTapdaTacbImaIay
Kypblfblhlc bIpFaHAn KeTydeH XaHe CoBflydaH KopfaHbI3.
Kytu MeH TexHnKaJIbIK TeKcepy XyMbICTapbl
KpbIbIbIbIbXeHE PnAaTIKTeH Xacanfah Xa6DbIbIbIbIaNCTIKke apHanfah CTaHapTTbI Ta3aNay KypaNbIbIH KEMerIMeh Ta3aNay KepeK.
Kajet 60fana, Cayit neH KepeK-kaapTapdb Cymen HaBbI3 KaHTa KOJaH6ac 6ybpH KpyrA tblbI3.
Cyp. S - V
Kaxet 60fana, naTPOH cy3ricH Tek aFBiHdbCy actbHa Ta3aHaB3,CyPTneH3 He KblIwaKeHn Ta3apTnaHb. OpaTy anDbHaTobnIfbIme KpyraTbHb3.
3aapTay KOHTaTIpePiH NaCTaH6aByH JxynenI TpyDe TeKcePin OtpbHb3 KHe Kaet 6oJfAH XaJaDaI OanApbl Ta3anaHb3.
XeJdETy ObykTapbHbN nactaHbaybHxJyIeI type TeKcepiO pObHb3 KHe KaJet BoJraH xJaDaIa OApBbTa3aHaAbH3.
Kehney
KypbIbI Kbl3MeT KepCteTydi KaKeT etneiDi.
KeedeprinepeonfaHda kEmek any
BmybIM xymblc ictemereHde
Cyper L
→ AkkyMnyIaTOp XINHaBbI AkkMyNlAToP YCTaFbIbHaH DpybIC OPhATbIbIMFaH, AkkMyNlAToP XINHaBbIH AkkMyMnyIaTOp YCTaFbIbHaCaNbIbI3 XeHe OPhbHa6ekitih3.
AKKyMnyTOp JxHaftbHbH 3aparTany Kyi (DnCnPteNiDi kapaHbI) 3e TJeCi3, KaKet 6oNca aKKyMnyTOp JxHaftbHb 3aparTaNbH.
AkkyMnyTOp XnHaftbI HEmeCe 3aprTay KypblfBcIbXkapaMCbI3, BatapEr XnHaftbH HeMeCe 3aprTay KypblfBcIH KaHa KepeK-kaPakTaPmeH aybIcTbIpbHbI3.
Bvibm 03diirHeH oeweidi
→ KypblfblHbI/akkYMnTAPXnHaftblHbN Kb3blN ketyI, KpyblfblHbI/akkYMnTAPXnHaftblHbN CyybHa MymKdIq 6epy yuHbI bpa3 KtyTH3.
Bak cyra tonfahan, coHdbkTaH KaTkbI icKe KocblnabI.
TemeH copy kblnamdbifbI
KocanbI Xa6bikTapbl, ImaHr Hemece TyTik 6iteJreH.
KokimdapdbcekekeneTIN Kocajkbkypandpme anbIn TactaHb3.
Cypet E
Cy3riW Kan TOnfA, KaHa cy3riW KantTbI OPHabtlb3.
Cyp. S - V
→ Ptapoh cy3rici kiplenhenre, naTPOH cy3rici Kaftbn anbIn, dpey aBbIbCy actbHa Ta3anaHb3.
3aKbIMdaIaNfAH naTPOH cy3riciayblicb1.
Kehe: Cy3ri-natpoHbI XblbHa 1 pet aImaTbIpbHb3.
TexHnKanblk MaFnyMaTTap
| Akkymy列入TopЖинавыЖэHe StандарTTb 3apяДтay Курьлбсbl Мыналарmen Кossa беріпedi: ■ WD 3 Battery Set ■ WD 3 Battery Premium Set (Batapera Куаты 36/25 akkymу列入TopЖинавы/Batapera Куаты BC 36 B stандарTTb 3apяДтay Курьлбсbl) | ||
| Бүйым | ||
| Homonhalык Куattылык | W | 300 |
| Батaper TopТын Tургандаы ЖуMbIC уakытbl (Макс) | MIN. | 15 |
| Kopray Класы | III | |
| Kopray Typi | IPX4 | |
| Батaper Куаты 36/25 akkymу列入TopЖинавы | ||
| Homonhalык керney | B | 36 |
| Homonhalыcсыындылык (IEC/EN 61690 стандартын сэйес) | Aч | 2,4 |
| Homonhalыссыындылык (akyyмулаяр озирочушicinIH mэлimetтеріne сэйес) | Aч | 2,5 |
| Homonhalызөргий (UN 3480 стандартынсэйес) | Wh | 86,4 |
| Мakс. зардай тordы | A | 4 |
| Akkutyp | Лити- нонды | |
| Салмаы | Кт | 0,9 |
| Өлшем dipei (Y x E x B) | mm | 133x88x72 |
| Батaper Куаты BC 36 B стандарTTb 3apяДтay Курьлбсbl | ||
| Akkymу列入TopЖинавын Homonhalык керneyi | V | 36 |
| Мakс. зардай тordы | A | 0,5 |
| Akkutyp | Лити-ионды | |
| Желілік керney | V | 100-240 |
| Жинілік | Hz | 50-60 |
| ТOK Ту岫ин (Макс.) | A | 0,3 |
| Kopray Класы | ☐ | II |
| Салмаы (akkymу列车Top Жинавынсbl) | g | 205 |
Texhukanbik 3eepicme np aida 60nbin kanybi MYMKIN!
| الإستعمالfections | ||
| شامل بعسifierة الحرفية بعسifierة الحرفية الحرفية الحرفية HD 3 Battery Set WD 3 Battery Premium Set JD/36/25/25/36/25/36/25/36/25/36/25/36/25/36/25/36/25/36/25/36/25/36/25/36/25/36/25/36/25/36/25/36/25/36/25/36/25 | الإستعمالfections | |
| الإستعمالfections | W | الإستعمالfections |
| 15 | min | الإستعمالfections |
| III | الإستعمالfections | |
| IPX4 | الإستعمالfections | |
| 36/25/25/25/25/25/25/25/25/25/25/25/25/25/25/25/25/25/25/25/25/25/25/25/25/25/25/25/25/25/25/25/25/25/25 | V | الإستعمالfections |
| 2,4 | الإستعمالfections | الإستعمالfections |
| 2,5 | الإستعمالfections | الإست莪العuedمي(الإست莪العuedمी)(IEC/EN 61690) |
| 86,4 | Wh | الإست莪العuedمी(UN 3480)(UN 3480)(UN 3480)(UN 3480)(UN 3480)(UN 3480)(UN 3480)(UN 3480)(UN 3480)(UN 3480)(UN 3480)(UN 3480)(UN 3480)(UN 3480)(UN 3480)(UN |
| 4 | A | الإست莪العuedمी(الإست莪العuedمी)(UN 3480)(UN 3480)(UN 3480)(UN 3480)(UN 3480)(UN 3480)(UN 3480)(UN 3480)(UN 3480)(UN 3480)(UN 3480)(UN 3480)(UN 3480)(UN 3480)( UN 3480)(UN 3480)(UN 3480)(UN 3480)(UN 3480)(UN 3480)(UN 3480)(UN 3480)(UN 3480)(UN 3480)(UN 3480)(UN 3480)(UN 3480)(UN 3480)(UN 25/25/25/25/25/25/25/25/25/25/25/25/25/25/25/25/25/25/25/25/25/25/25/25/25/25/25/25/25/25/25/25/25/ |
| - ω ω ω ω ω ω ω ω ω ω ω ω ω ω ω ω ω ω ω ω ω ω ω ω ω ω ω ω ω ω ω ω ω ω ω ω ω ω ω ω ω ω ω ω ω ω ω ω ω ω ψ ω ψ ω ψ ω ψ ω ψ ω ψ ω ψ ω ψ ω ψ ω ψ ω ψ ω ψ ω ψ ω ψ ω ψ ω ψ ω ψ ω ψ ω ψ ω ψ ω ψ ω ψ ω ψ ω ψ ω ψ ω ω ψ ω ψ ω ψ ω ψ ω ψ ω ψ ω ψ ω ψ ω ψ ω ψ ω ψ ω ψ ω ψ ω ψ ω ψ ω ψ ω ψ ω ψ ω ψ ω ψ ω ψ ω ψ ω ψ ω ψ ψ ω ψ ψ ψ ψ ψ ψ ψ ψ ψ ψ ψ ψ ψ ψ ψ ψ ψ ψ ψ ψ ψ ψ ψ ψ ψ ψ ψ ψ ψ ψ ψ ψ ψ ψ ψ ψ ψ ψ ψ ψ ψ ψ ψ ψ ψ ψ ψ ψ ψ ψ ω ψ ψ ψ ψ ψ ψ ψ ψ ψ ψ ψ ψ ψ ψ ψ ψ ψ ψ ψ ψ ψ ψ ψ ψ ψ ψ ψ ψ ψ ψ ψ ψ ψ ψ ψ ψ ψ ψ ψ ψ ψ ψ ψ ψ ψ ψ ω ψ ψ ω ψ ψ ψ ψ ψ ψ ψ ψ ψ ψ ψ ψ ψ ψ ψ ψ ψ ψ ψ ψ ψ ψ ψ ψ ψ ψ ψ ψ ψ ψ ψ ψ ψ ψ ψ ψ ψ ψ ψ ψ ψ ψ ψ ψ ω ψ ψ ψ ψ ω ψ ψ ψ ψ ψ ψ ψ ψ ψ ψ ψ ψ ψ ψ ψ ψ ψ ψ ψ ψ ψ ψ ψ ψ ψ ψ ψ ψ ψ ψ ψ ψ ψ ψ ψ ψ ψ ψ ψ ψ ψ ψ ψ ψ ω ψ ω ψ ψ ψ ψ ψ ψ ψ ψ ψ ψ ψ ψ ψ ψ ψ ψ ψ ψ ψ ψ ψ ψ ψ ψ ψ ψ ψ ψ ψ ψ ψ ψ ψ ψ ψ ψ ψ ψ ψ ψ ψ ψ ψ ψ ψ ψ ψ ω ψ ω ψ ψ ω ψ ψ ψ ψ ψ ψ ψ ψ ψ ψ ψ ψ ψ ψ ψ ψ ψ ψ ψ ψ ψ ψ ψ ψ ψ ψ ψ ψ ψ ψ ψ ψ ψ ψ ψ ψ ψ ψ ψ ψ ψ ψ ω ψ ψ ψ ψ ψ ψ ω ψ ψ ψ ψ ψ ψ ψ ψ ψ ψ ψ ψ ψ ψ ψ ψ ψ ψ ψ ψ ψ ψ ψ ψ ψ ψ ψ ψ ψ ψ ψ ψ ψ ψ ψ ψ ψ ψ ψ ψ ψ ψ ω ψ ψ ψ ω ψ ψ ψ ψ ψ ψ ψ ψ ψ ψ ψ ψ ψ ψ ψ ψ ψ ψ ψ ψ ψ ψ ψ ψ ψ ψ ψ ψ ψ ψ ψ ψ ψ ψ ψ ψ ψ ψ ψ ψ ψ ψ ψ ψ ψ ω ψ ψ ψ ω ψ ψ ω ψ ψ ψ ψ ψ ψ ψ ψ ψ ψ ψ ψ ψ ψ ψ ψ ψ ψ ψ ψ ψ ψ ψ ψ ψ ψ ψ ψ ψ ψ ψ ψ ψ ψ ψ ψ ψ ψ ψ ψ ψ ψ ω ψ ω ψ ψ ψ ψ ω ψ ψ ψ ψ ψ ψ ψ ψ ψ ψ ψ ψ ψ ψ ψ ψ ψ ψ ψ ψ ψ ψ ψ ψ ψ ψ ψ ψ ψ ψ ψ ψ ψ ψ ψ ψ ψ ψ ψ ψ ψ ψ ω ψ ω ψ ω ψ ψ ψ ψ ψ ψ ψ ψ ψ ψ ψ ψ ψ ψ ψ ψ ψ ψ ψ ψ ψ ψ ψ ψ ψ ψ ψ ψ ψ ψ ψ ψ ψ ψ ψ ψ ψ ψ ψ ψ ψ ψ ψ ψ ψ ω ψ ω ψ ω ψ ψ ω ψ ψ ψ ψ ψ ψ ψ ψ ψ ψ ψ ψ ψ ψ ψ ψ ψ ψ ψ ψ ψ ψ ψ ψ ψ ψ ψ ψ ψ ψ ψ ψ ψ ψ ψ ψ ψ ψ ψ ψ ω ψ ψ ψ ψ ψ ψ ψ ψ ω ψ ψ ψ ψ ψ ψ ψ ψ ψ ψ ψ ψ ψ ψ ψ ψ ψ ψ ψ ψ ψ ψ ψ ψ ψ ψ ψ ψ ψ ψ ψ ψ ψ ψ ψ ψ ψ ψ ψ ψ ω ψ ψ ψ ψ ψ ω ψ ψ ψ ψ ψ ψ ψ ψ ψ ψ ψ ψ ψ ψ ψ ψ ψ ψ ψ ψ ψ ψ ψ ψ ψ ψ ψ ψ ψ ψ ψ ψ ψ ψ ψ ψ ψ ψ ψ ψ ψ ψ ψ ω ψ ψ ψ ψ ψ ω ψ ψ ω ψ ψ ψ ψ ψ ψ ψ ψ ψ ψ ψ ψ ψ ψ ψ ψ ψ ψ ψ ψ ψ ψ ψ ψ ψ ψ ψ ψ ψ ψ ψ ψ ψ ψ ψ ψ ψ ψ ψ ψ ω ψ ψ ψ ω ψ ψ ψ ψ ω ψ ψ ψ ψ ψ ψ ψ ψ ψ ψ ψ ψ ψ ψ ψ ψ ψ ψ ψ ψ ψ ψ ψ ψ ψ ψ ψ ψ ψ ψ ψ ψ ψ ψ ψ ψ ψ ψ ψ ψ ω ψ ψ ψ ω ψ ω ψ ψ ψ ψ ψ ψ ψ ψ ψ ψ ψ ψ ψ ψ ψ ψ ψ ψ ψ ψ ψ ψ ψ ψ ψ ψ ψ ψ ψ ψ ψ ψ ψ ψ ψ ψ ψ ψ ψ ψ ψ ψ ψ ω ψ ψ ψ ω ψ ω ψ ψ ω ψ ψ ψ ψ ψ ψ ψ ψ ψ ψ ψ ψ ψ ψ ψ ψ ψ ψ ψ ψ ψ ψ ψ ψ ψ ψ ψ ψ ψ ψ ψ ψ ψ ψ ψ ψ ψ ψ ψ ψ ω ψ ω ψ ψ ψ ψ ψ ψ ω ψ ψ ψ ψ ψ ψ ψ ψ ψ ψ ψ ψ ψ ψ ψ ψ ψ ψ ψ ψ ψ ψ ψ ψ ψ ψ ψ ψ ψ ψ ψ ψ ψ ψ ψ ψ ψ ψ ψ ψ ω ψ ω ψ ψ ψ ω ψ ψ ψ ψ ψ ψ ψ ψ ψ ψ ψ ψ ψ ψ ψ ψ ψ ψ ψ ψ ψ ψ ψ ψ ψ ψ ψ ψ ψ ψ ψ ψ ψ ψ ψ ψ ψ ψ ψ ψ ψ ψ ψ ω ψ ω ψ ψ ψ ω ψ ψ ω ψ ψ ψ ψ ψ ψ ψ ψ ψ ψ ψ ψ ψ ψ ψ ψ ψ ψ ψ ψ ψ ψ ψ ψ ψ ψ ψ ψ ψ ψ ψ ψ ψ ψ ψ ψ ψ ψ ψ ψ ω ψ ω ψ ω ψ ω ψ ω ψ ω ψ ω ψ ω ψ ω ψ ω ψ ω ψ ω ψ ω ψ ω ψ ω ψ ω ψ ω ψ ω ψ ω ψ ω ψ ω ψ ω ψ ω ψ ω ψ ψ ψ ω ψ ω ψ ω ψ ω ψ ω ψ ω ψ ω ψ ω ψ ω ψ ω ψ ω ψ ω ψ ω ψ ω ψ ω ψ ω ψ ω ψ ω ψ ω ψ ω ψ ω ψ ω ψ ω ψ ψ ω Ϫ | ||
| 36 | V | الإستع钏الإستع钏الإستع钏ال––––––––––––––––––––––––––––––––––––––––––––––––––––––––––––––––––––––––––––––––––––––––––––––––––––––––––––––––––––––––––––––––––––––––––––––––––––––––––––––––––––––––––––––––––––––––––––––––––––––––– |
| 0,5 | A | الإستع钏ال––––––––––––––––––––––––––––––––––––––––––––––––––––––––––––––––––––––––––––––––––––––––––––––––––––––––––––––––––––––––––––––––––––––––––––––––––––––––––––––––––––––––––––––––––––––––––––– |
| 100-240 | V | ال–––––––––––––––––––––––––––––––––––––––––––––––––––––––––––––––––––––––––––––––––––––––––––––––––––––––––––––––––––––––––––––––––––––––––––––––––––––––––––––––––––––––––––––––––––––––––––––––––––––? |
| 50-60 | Hz | ال–––––––––––––––––––––––––––––––––––––––––––––––––––––––––––––––––––––––––––––––––––––––––––––––––––––––––––––––––––––––––––––––––––––––––––––––––––––––––––––––––––––––––––––––––––––––––––––––––––?? |
| 0,3 | A | ال––––––––––––––––––––––––––––––––––––––––––––––––––––––––––––––––––––––––––––––––––––––––––––––––––––––––––––––––––––––––––––––––––––––––––––––––––––––––––––––––––––––––––––––––––––––––––––––––––‒? |
| II | □ | ال––––––––––––––––––––––––––––––––––––––––––––––––––––––––––––––––––––––––––––––––––––––––––––––––––––––––––––––––––––––––––––––––––––––––––––––––––––––––––––––––––––––––––––––––––––––––––––––––––— |
| 205 | g | (ال––––––––––––––––––––––––––––––––––––––––––––––––––––––––––––––––––––––––––––––––––––––––––––––––––––––––––––––––––––––––––––––––––––––––––––––––––––––––––––––––––––––––––––––––––––––––––––––––––––‒?? (ال–––––––––––––––––––––––––––––––––––––––––––––––––––––––––––––––––––––––––––––––––––––––––––––––––––––––––––––––––––––––––––––––––––––––––––––––––––––––––––––––––––––––––––––––––––––––––––––––––––? (ال–––––––––––––––––––––––––––––––––––––––––––––––––––––––––––––––––––––––––––––––––––––––––––––––––––––––––––––––––––––––––––––––––––––––––––––––––––––––––––––––––––––––––––––––––––––––––––––––––?? (ال–––––––––––––––––––––––––––––––––––––––––––––––––––––––––––––––––––––––––––––––––––––––––––––––––––––––––––––––––––––––––––––––––––––––––––––––––––––––––––––––––––––––––––––––––––––––––––––––?? (IAL) |
wlll aaiy aag poic pioi oclj
aaiall jolll
aolgc gaa:uljzll caiol aIb:abgdo
j 1 j 1 j 1 a c j j j j j j j j j j j
.1jzJg jg j
aagb
aLs
gj jg jg jg jg jg jg jg jg jg jg jg jg jg jg jg jg jg jg jg jg jg jg jg jg jg jg jg jg jg jg jg jg jg jg
J 1
N ojg
aabg baae Jaa
J
jLl 10a, Lp
0 0jg
aJyIg0g aOJyAa0g
a:
wpi.aaJIaJIaJIeJzJUJnJN JAsJIg
a aai i Saa yg pK>laal al
Jusill elgj
jLl 10a, Lp
P 0j0
plouAaJlaaI aIc JjJr jRg
jIJJJ JJIJIJIJIJIJIJI
a aagabzll jilg Jaaell lal
1/2//g/ 1/2//
J
4
g jill/ jj/0j/sj/o p12wylj
.01921//1ic a//
- = a + b + c + d
E ojgo
pLswl:aclljIeIbawJ:OswJ
.
jlll jg>
J 1
lebeew
aJbJI aIc 19
Battery Power 36/25
wJzJzJg 20
Battery Power BC 36 V
J
A ojgo
J 1
B
.1J2J1J0Sg2J1J
C ojgo
aagjg 10000000000000000000000000000000000000000000000000
D ojg
glg jzjllgljzjjwRswp< .g>bljzjlldaw
E ojgo
sS 1 sJgJgJgJgJgJgJgJgJgJgJgJgJgJgJgJgJgJgJgJgJgJgJgJgJgJgJgJgJgJgJgJgJgJgJgJgJgJgJgJgJgJgJgJgJgJgJg
aJbJI aJcJ
F 0g
G ojg
"aaJbll Jw"JooaJbI aJbI
J
Jalal Jgj
H
acgogall algll bawll ggbjb
.
pIy gdy abla wll jz a2wJ 211g z bawl gbrz wlg
10g
IaBglgbsy jaoall Jog
.
laogg laailll
.5gJJI JaaJll
(a) (a)
Jllg Jooa aae ooho Loo
aalglglojaiiao
a a
Jllalss sall aalgmo sdoa
aalgbrggl
pgbj jc s9gdl jaaall syy aogj
a0jyabai jJn o
y
j 200g a Jlll a o> g j 1000000000000000000000000000000000000000000000000000000000000000000000
pIc Ibs
a a 1
.aoLl lglg1 g 10g a2o aJalll aoj>
Iioa oiaig aJalll aoj> oiaiwl sygey
.qlc oogaiill aeJall
jglg

aalall
aaiKall a21 1j jzul
J 0000
olly
y j 100000000000000000000000000000000000000000000000000000000000000000000
a a 10000000000000000000000000000000000000000000000000000000000000000
Laaii aai jai jai jai jai jai jai
alai2aljol
1
aJbllg 2
(/jz)jzJ 3
aJbJr j 4
5
aill alg 6
jzldw 7
8
Jolal 9
a>g o 10
11
jll 12
aagb j 13
Jagaiabajgjo bawgbs 14
15
0.5×2 16
gaaaag 17
a a 18
(ριχόμωγγg)
Jlbae jgs xie oclwll
#
| a### △ |
| olc/ro ### y###/##y###/bsi. a/loY/bsi |
| J###/sic jlgj11 ##g |
| ### |
| a/la/ll pjo> n#y #y!y/soU ojo/lsb |
| j/0j> a#y#a#zio a#gj#/sloj#y |
| a/20 no |
| SloJl# g s#w jlgj11 l#d y#y |
| a/### |
| lc a/JlJl#n#n#n#n#n#n#n#n#n#n#n#n#n#n#n#n#n#n#n#n#n#n#n#n#n#n#n#n#n#n#n#n#n#n#n#n#n#n#n#n#n#n#n#n#n#n#n#n#n#n# |
| a#a# |
| iδg | a | a | a | a | a | a | a | a | a | a | a |
| a | a | a | a | a | a | a | a | a | a | a | a |
| a | a | a | a | a | a | a | a | a | a | a | a |
Jlll
| a### △ |
| olc/ro jy jy all jy yil jbs i y l y jbs |
| jdl/sic jlgz// jg |
aIg aIJI
| #o | gzzll | jzll | lzzll | ρll | ρzll | ρzll |
| lac | g9 | lac | g9 | ρc | ||
| . | g9 | lac | ||||
| pzzll | a | lac | jzll | jzll | ρzll | |
| algb | o | lac | lga | jzll |
Jzjy s1g2//s a/1y/ uzi
a/1b//o> j0s /j 2y jy/ jge Jols Jkuy
aJIbJI aIc Jc
jolw
aaglo aaaa aoo o aalll aaoj
n aalac aog n aall allg aaa wla
o y jll Jgol y. gol g
. 2g jll Jw
q q 10 c 10 g 10 g 10 g
. 10
Jg
Jg
Jg

J 1Jn Jy jnn
aoj> jw sgmu oic aJbJy
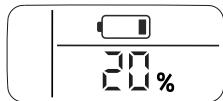
aJlll 1
a>J aaiall gll 1ic a|la| .p2iuiy

aJlllsh
aai jw w 0g
sic aiaia aoojx
.
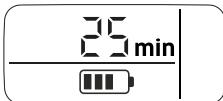
a>aaJbJI JolJI
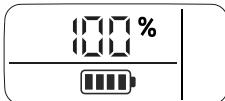
#
a> a|j> a> j
gla jc jla jll
g l gaaal all
o jla w gla| p
oclall jla) a
.(ylyiy
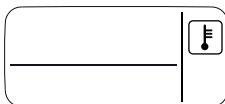
a2e aJbll aoj>
cgl J LgVlc iog
sgs y .aoVall
aoj> pLzviwl
laio alzog aJbll
oogaiI IaRbll
.qlc
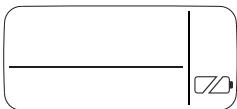
Jd
4g
ololjollyjorjlljbs,ayoyl jbs. 1/ jglj aosluw/ o/sjrg
g 100000000000000000000000000000000000000000000000000000000000000000000
j>0 jw jw//a//u jla S/
jla//j>0 jlauw//jg//iic a//a//oj> gdd
jq>1
F oJ
. aIbI Jg J
jLJIaJIaJI aIc g
. jJ
. JlogiJ KJnJWll alac I
G oJoojoc aJull aoJgawLw Jc p 1
aLc) jg> pduw y wll o0 g L aJ 36-BC aJb 36/25) 5,5 aJb
joll aal oj> jw po l0ic < %100 aawll 1c no aal qo w y w wll 2e .aill alc
.wwaaa aall al 1201 jg> w
aoj> joc loric s/awlu//jorp/13
aew slaow/ jg/ jg> aJlll/
aoj> jw jra. aIe//aiaizio g/lg/ aJlll/
09 awlu//c jka. 5k//sA//aJlll
a//j>u//
05i a/120 14y j/120 jkU p/13j
./120w/ 129 g a/120 a/120
1
- lglw Jol5// oJz// aJb// a> Jd:
gai// gjz// jc 5//g>
a2iua// aJb// a> jz wOcly
p/2xW// j4// jg, algo oia/
sio 0 no J0// jz// jz r sio LIOUc
. JI// a> oLs
Jc Jj OJ> J> j aIgO oia/ jzii// .aJIbU// aa> aeW no Jla 19 aioo 20
J 1 J 1 J 1 J 1 J 1 J 1 J 1 J 1 J 1 J 1 J 1 J 1 J 1 J 1 J 1 J 1 J 1 J 1 J 1 J 1 J 1 J 1 J 1 J 1 J 1 J 1 J 1 J 1 J 1 J 1
Jlssy
a.b.a. a.o.j
gill
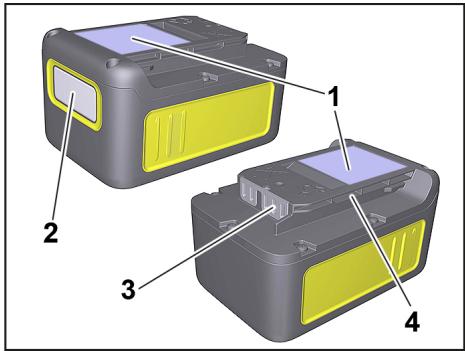
gl 1
jsealaw 2
J 3
21 × 21 × 21 × 9
wllj>
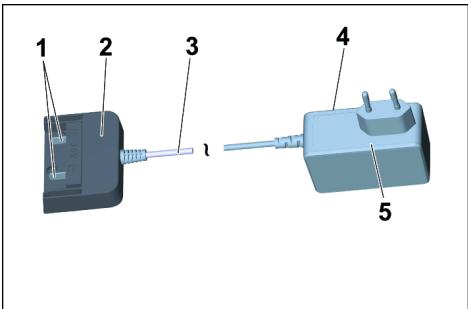
1
aJlJI 2
J5 3
gaii a>gl 4
aollal 1201 jg> 5
36 0g aJbJIaJc
| (EN/EN 61690) | (IEC/EN 61690) | (IEC/EN 61690) | (EN/EN 61690) | (IEC/EN 61690) |
| Ah | Ah | V | ||
| 2,5 | 2,4 | 36 | 36/25 | |
| 5,0 | 4,8 | 36 | 36/50 |
Jai
jglg36/25a1la a1laa1c
36 BC aJb aJC) 36 w
(1)
Battery aJll alc plxswL
g36/75936/50. Power (+) 36/25
Karcher 36 V Battery Power aabil o
J 1
LaiiaipjI jJ 1
JSSKbLg>1pIg
1>1 2,la|g|
JzjgeaBulal aLpduaiu
Jcsh Jdcl KARCHER aRblaa
Jn Jnnnnnnnnnnnnnnnnnnnnnnnnnnnnnnnnnnnnnnnnnnnnnnnnnnnnnnnnnnnnnnnnnnnnnnnnnnnnnnnnnnnnnnnnnnnnnnnnnnnnnnnnnnnnnnnnnnnn
aagjooogjui Ja2all
a>Jd
Jg jg g aag aag aag
. www.kaercher.com g@gJll
JlJgJgJgJgJgJgJgJgJgJgJgJgJgJgJgJgJgJgJgJgJgJgJgJgJgJgJgJgJgJgJgJgJgJgJgJgJgJgJgJgJgJgJgJgJgJgJgJgJgJgJ
1501529g 00000000000
j0001115.00111111
0.9>1/1012iW/10c.aJbU/4aLc9aJIbU
//ll/ww/ 1234567890
a1g/100152g2g 4.11b11c
1/1jJ/1Jw/1j
oo jblio 1jg> jod
1 = 2
a/1g a/su/ u/2/u/0/u/ y/
Lgcll alo s
a//g20j//j1p/2iW/pc
allgo jiaxuao
g2jLb.(aJgljLb)cJyIb,2x
jzai
4g
g/aaafo golgogluw
2d = 1
1cga>0 2uyljul jg> pddy
4.2a//10
pduuyl aJlaa/aojzawjzy
0jg>gljgeU gJgA//LdV/1>lu
aJw j0 2aall
KARCHER
4
j1l5
J
1/22//.oJr2//.cJwOg//JfL5
. a5 = 1 + 32 = 43
a//120j4> a,b,c
012 2g/lllaiwyl jLp/u w/
joojeS/1001001001001001001001001001001001001001001001001001001001001001001001001001001001
.1>1g 1
a//1/20j>
j/015/2gD jzj 4ylll//100
jglg>lc0g>go joo
JU//100>JU>
pIzaw/2a. 0gJLso a
p1c g b20 1/ j
ball a2
1oggoojoo290n
J


i/ll i9 11111j>
.
la/1g/ajj//clawy/boooy
l1 : y = - 9x + 3 l2 : y = + 3x
IaI/0gawlo g/ aia// plxwly Iaa
J/11 0
4gw
bs 1/00000000000000000000000000000000000000000
9 1/ a/2 a/2> 1/ s/2 1/ .olg//
i2 1/5g j0jblzal /g2j0j0j//olwV/ oIg// g wg/ a/4a
s2g j9 s1/9 Jaia/ll aia//aia//ol
4gii A
s2g 19 s/19 Jai2a// Jol o// Jol y//
. a//
.
4
s2g j9 s1/g Jaia/ll aia//aia//ol
.
Jg 1
Jolal
m : x = 1 或 3x + 4y + 1 = 0
g jgljll Jaewl,puaall
gjll/0jLc/ jzj.
a0xw Lc p2g a1a2a/ll a/sall
JaeIiue 15al
jgl21p12wU
al/11slo/1,0jgl/1j
v_2 = 9x
iic aI/1 j 10j/1 1a/2 ocl,
Jz11/ Sloj jIj/ Jlaizw
g/1j g j000ll jz j1jz//x
a20 15g jzol chab a cils
JlabSV/1glio oC Lue, caleo// g/0,b>1
g^ ( x) = - 1x + 2x + 1 = - 1x + 1( 2 - x) ( x + 1) = 0
j0p/21wU p2o jg//i 4u>//jq//j//s220 oL
g/9 g 11/9 g U g U g/2 g 10 g/2 g
jg no pale 1/2y/1p/1/1y/
10.9/ pgiioxlw gpiol 4xio
JUaI/la 10
aaii/1j2>1g jge//i0p/aie
.
(REACH)
www.kaercher.com/REACH
oal yolg aolgl
yla yalee jn oal lll
aill lbc bla>ll log
c|j>ll j0 1dall aadll oje>ll jaa
jllg sJ oJr g aill all
www.kaercher.com/REACH
laai
Laaai jllalallogw sss alg J
aalay aalsslll lalall pdo
jgl jgwhn nn g aal
yJyJyJyJyJyJyJyJy
gbg aaslll lalll aolll llogaleall
. www.kaercher.com : g
a
5 AR
5 AR aoe
6 AR 1
jgeg aJlallae J>slw
7 AR
8 AR .
8 AR Juswll wlic
9 AR
9 AR. 1
10 AR
10 AR J
10 AR aJllg aJIJI
10 AR...Jusc
11 AR 2
11 AR
11 AR. aJy
11 AR
12 AR .JasWJ aoe 1sJwJ
12 AR
13 AR JJI
13 AR 2
13 AR...JlucjGgDzic oLall
14 AR
Jss

JL JI JI JI JI JI JI JI JI JI JI JI JI JI JI JI JI JI JI JI JI JI JI JI JI JI JI JI JI JI JI JI JI JI JI JI JI JI JI JI JI JI JI JI JI
pI 1JgJnJdJbIgJdJdIa
g > y g( x) =
aale
ailllllalll
13 13
aasos aolxwly aoljll aoxlwlsljy
.1ol52wUyI 032sio
ailll plll lj1 jgljlll 3gbi
pLwUuluuaa auiuauo aai L
.
Register your product and benefit from many advantages.
www.kaercher.com/welcome


Rate your product and tell us your opinion.
www.kaercher.com/dealersearch
Alfred Kärcher SE & Co. KG
Alfred-Karcher-Str. 28-40
71364 Winnenden (Germany)
Tel.: +49 7195 14-0
Fax: +49 7195 14-2212