
VH196D - Monitor ASUS - Free user manual and instructions
Find the device manual for free VH196D ASUS in PDF.
| Product Type | LCD Monitor |
| Brand | ASUS |
| Model | VH196D |
| Native Resolution | 1440 x 900 pixels |
| Maximum Refresh Rate | 75 Hz |
| Video Input Connectors | VGA, DVI-D (depending on model) |
| Audio Input | 3.5mm Jack (for models with speakers) |
| Backlight Technology | LED |
| SPLENDID Function | 5 preset video modes |
| Auto Adjustment | Yes, by long pressing the button |
| OSD Settings | Contrast, brightness, position, phase, frequency, color temperature, volume |
| Power Supply | 110-240 V AC, 50/60 Hz |
| Built-in Speakers | Optional (on some models) |
| Safety | Do not expose to humidity or rain |
| Maintenance | Soft, dry cloth |
Frequently Asked Questions - VH196D ASUS
User questions about VH196D ASUS
0 question about this device. Answer the ones you know or ask your own.
Ask a new question about this device
Download the instructions for your Monitor in PDF format for free! Find your manual VH196D - ASUS and take your electronic device back in hand. On this page are published all the documents necessary for the use of your device. VH196D by ASUS.
USER MANUAL VH196D ASUS
ASUS COMPUTER GmbH (Germany and Austria)
Address Harkort Str. 21-23, D-40880 Ratingen, Germany
Telephone +49-2102-95990
Fax +49-2102-959911
Web site www.asus.de
Online contact www.asus.de/sales
Technical Support
Telephone +49-1805-010923
Support Fax +49-2102-9599-11
Online support support.asus.com
ASUS
VH196 Series LCD Monitor
Quick Start Guide

Safety information
- Before setting up the monitor, carefully read all the documentation that came with the package.
- To prevent fire or shock hazard, never expose the monitor to rain or moisture.
- The monitor should be operated only from the type of power source indicated on the label. If you are not sure of the type of power supplied to your home, consult your dealer or local power company.
- Use the appropriate power plug which complies with your local power standard.
- To ensure satisfactory operation, use the monitor only with UL listed computers which have appropriate configured receptacles marked between 100-240V AC.
If you encounter technical problems with the monitor, contact a qualified service technician or your retailer.
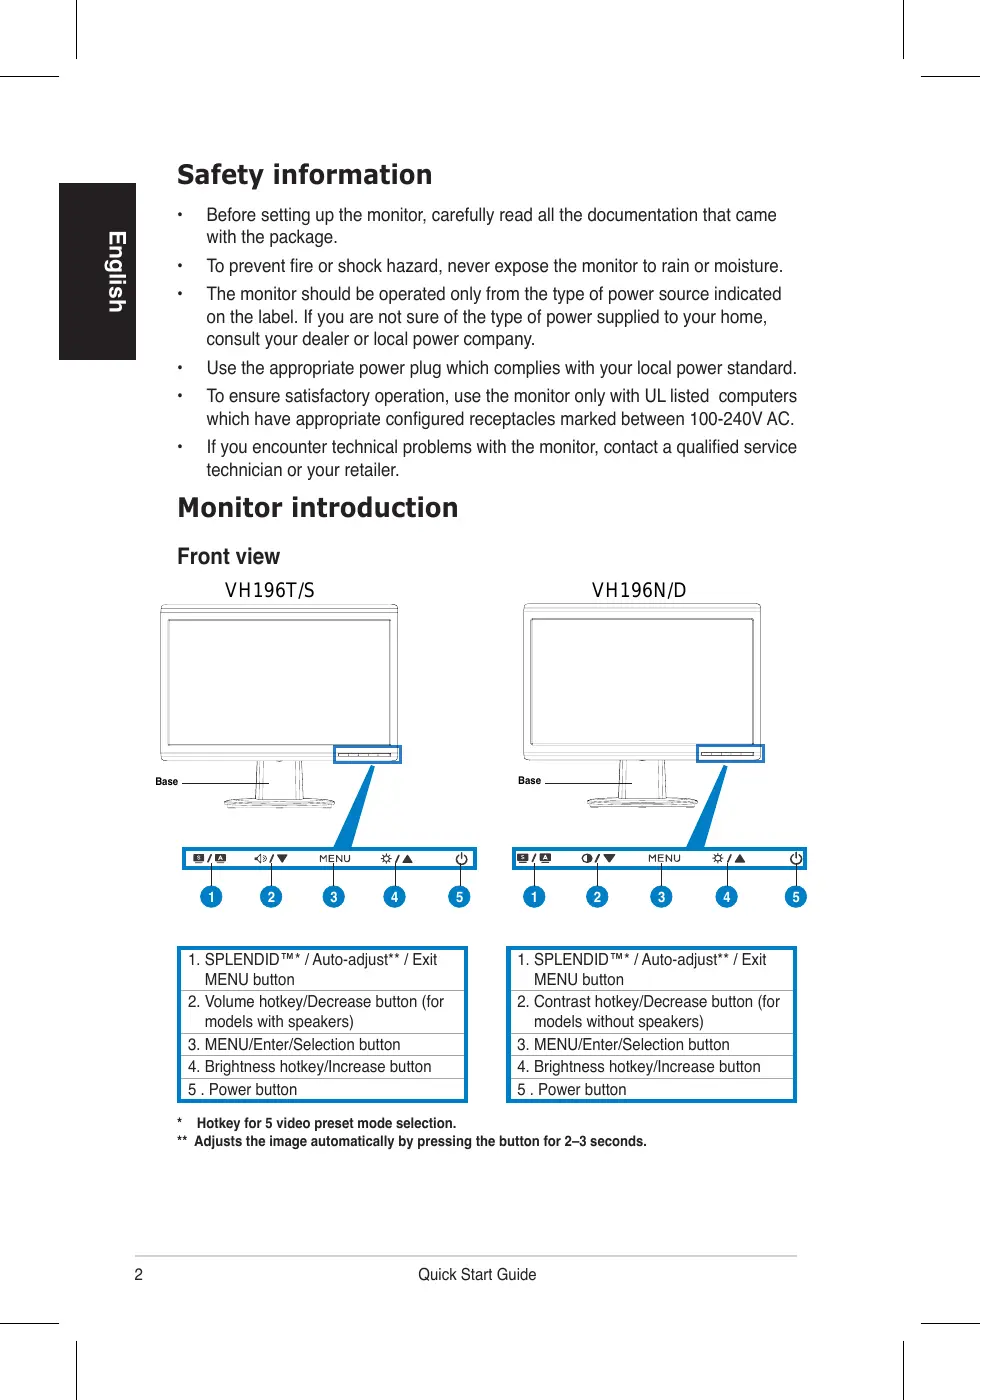
Monitor introduction
Front view


- SPLENDIDTM*/Auto-adjust*/Exit MENU button
- Volume hotkey/Decrease button (for models with speakers)
- MENU/Enter/Selection button
- Brightness hotkey/Increase button
-
Power button
-
SPLENDIDTM*/Auto-adjust*/Exit MENU button
- Contrast hotkey/Decrease button (for models without speakers)
- MENU/Enter/Selection button
- Brightness hotkey/Increase button
- Power button
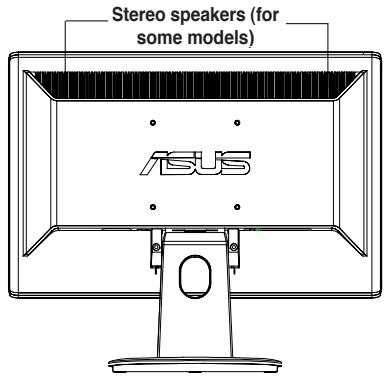
Rear view
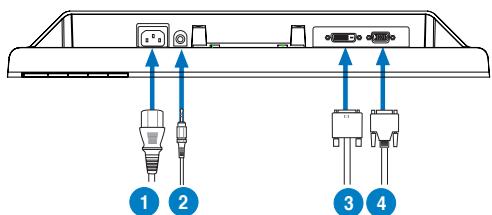
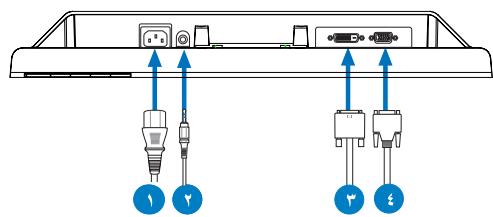
Connecting the cables
Connect the cables as shown:
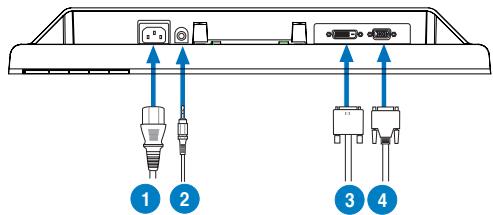
- Power cord
- Audio-in cable (for models with speakers)
- DVI signal cable (for some models)
-
VGA signal
-
To connect the power cord: connect one end of the power cord securely to the monitor's AC input port, and the other end to a power outlet.
To connect the VGA/DVI cable:
a. Plug the VGA/DVI connector to the LCD monitor's VGA/DVI port.
b. Connect the other end of the VGA/ DVI cable to your computer's VGA/ DVI port.
c. Tighten the two screws to secure the VGA/DVI connector.
- To connect the audio cable (For those models with speakers): connect one end of the audio cable to the monitor's Audio-in port, and the other end to the computer's audio-out port.

When both the VGA and the DVI cables are connected, you can choose either VGA mode or DVI mode from the Input Select item of the OSD functions (for some models).
Troubleshooting (FAQ)
| Problem | Possible Solution |
| Power LED is not ON | ·Press the按钮 to check if the monitor is in the ON mode. ·Check if the power cord is properly connected to the monitor and the power outlet. |
| The power LED lights amber and there is no screen image | ·Check if the monitor and the computer are in the ON mode. ·Make sure the signal cable is properly connected the monitor and the computer. ·Inspect the signal cable and make sure none of the pins are bent. ·Connect the computer with another available monitor to check if the computer is properly working. |
| Screen image is too light or dark | ·Adjust the Contrast and Brightness settings via OSD. |
| Screen image is not centered or sized properly | ·Press the按钮 for 2-3 seconds to automatically adjust the image (VGA input only). ·Adjust the H-Position or V-Position settings via OSD (VGA input only). |
| Screen image bounces or a wave pattern is present in the image | ·Make sure the signal cable is properly connected to the monitor and the computer. ·Move away electrical devices that may cause electrical interference. |
| Screen image has color defects (white does not look white) | ·Inspect the signal cable and make sure that none of the pins are bent. ·Perform All Reset via OSD. ·Adjust the R/G/B color settings or select the Color Temperature via OSD. |
| Screen image is blurry or fuzzy | ·Press the按钮 for 2-3 seconds to automatically adjust the image (VGA input only). ·Adjust the Phase and Clock settings via OSD (VGA input only). |
| No sound or sound is low (for models with speakers) | ·Ensure that the audio cable is properly connected to the monitor and the computer ·Adjust the volume settings of both your monitor and computer. ·Ensure that the computer sound card driver is properly installed and activated. |
Supported operating modes
| Resolution | Refresh Rate | Horizontal Frequency |
| 640 x 480 | 60 Hz | 31.5 kHz |
| 640 x 480 | 72 Hz | 37.9 kHz |
| 640 x 480 | 75 Hz | 37.5 kHz |
| 720 x 400 | 70 Hz | 31.5 kHz |
| 800 x 600 | 56 Hz | 35.1 kHz |
| 800 x 600 | 60 Hz | 37.9 kHz |
| 800 x 600 | 75 Hz | 46.9 kHz |
| 1024 x 768 | 60 Hz | 48.4 kHz |
| 1024 x 768 | 70 Hz | 56.5 kHz |
| 1152 x 864 | 75 Hz | 67.5 kHz |
| 1280 x 720 | 60 Hz | 44.7 kHz |
| 1280 x 768 | 60 Hz | 47.4 / 47.8 kHz |
| 1280 x 768 | 75 Hz | 60.3 kHz |
| 1280 x 800 | 60 Hz | 49.6 kHz |
| 1280 x 960 | 60 Hz | 60.0 kHz |
| 1280 x 1024 | 60 Hz | 64.0 kHz |
| 1360 x 768 | 60 Hz | 47.7 kHz |
| 1440 x 900 (Primary) | 60 Hz | 55.5 kHz / 55.9 kHz |
- Modes not listed in the table may not be supported. For optimal resolution, we recommend that you choose a mode listed in the table above.
ASUS
*PekimbI He yka3aHHbIe B Ta6nIe MOrT He NIOdEpeKHMBaTbcra. IJIa ONTMaJIbHOrO pa3peSeHINr Mbl peKoMeHdyem Bbl6paTb peKIM m3 Bblweyka3AHON Ta6nIcbl.
ASUS
VH196
LCD-monitor
Snelstartgids

*5.
** 2\~3KJnFJHJFJFJFJFJFJFJFJFJFJFJFJFJFJFJFJFJFJFJFJFJFJFJFJFJFJFJFJFJFJFJFJFJFJFJFJFJFJFJFJ
华
克莱贝尔 1
Arae IaIgEi eai Eaeiluee aeelae aee
- OdiO KeIeBnJF(StPfK FIOHMOE的KEU):OdiOKeIeBnJF的hF'FJIeMTO NITrO的OdiO IeRy FOTrEJFJFJFJFJFJFJFJFJFJFJFJFJFJFJFJFJFJFJFJFJFJFJFJFJFJFJFJFJFJFJFJFJFJFJFJFJFJFJFJFJFJFJFJFJFJFJFJFJFJFJ

*F.4E#A#J#J#J#J#J#J#J#J#J#J#J#J#J#J#J#J#J#J#J#J#J#J#J#J#J#J#J#J#J#J#J#J#J#J#J#J#J#J#J#J#J#J#J#J#J#J#J#J#J#J#
= ( x_1,y_1) , = ( x_2,y_2)
aalld 1 aaiy iay gao aaiy gaiy
| ↓LJ-1 |
| ↓LJ-1 |
| ↓LJ-1 |
| ↓LJ-1 |
| ↓LJ-1 |
| ↓LJ-1 |
| ↓LJ-1 |
| ↓LJ-1 |
| ↓LJ-1 |
| ↓LJ-1 |
| ↓LJ-1 |
| ↓LJ-1 |
| ↓LJ-1 |
| ↓L2-1 |
| ↓L2-1 |
| ↓L2-1 |
| ↓L2-1 |
| ↓L2-1 |
| ↓L2-1 |
| ↓L2-1 |
| ↓L2-1 |
| ↓L2-1 |
| ↓L2-1 |
| ↓L2-1 |
| ↓L2-1 |
| ↓L2-1 |
Jill Jill Jill Jill Jill Jill Jill Jill Jill Jill Jill Jill Jill Jill Jill Jill Jill Jill Jill Jill Jill Jill Jill Jill Jill Jill Jill Jill Jill Jill Jill Jill Jill Jill Jill Jill Jill Jill Jill Jill Jill Jill Jill Jill Jill Jill Jill Jill Jill Jill Jill
:VGA/DVI
VGA/DVI VGA/DVI 1 VGA/DVI 2
VGA/DVI 3 VGA/DVI 4 VGA/DVI 5 VGA/DVI 6 VGA/DVI 7 VGA/DVI 8 VGA/DVI 9 VGA/DVI 10 VGA/DVI 11 VGA/DVI 12 VGA/DVI 13 VGA/DVI 14 VGA/DVI 15 VGA/DVI 16 VGA/DVI 17 VGA/DVI 18 VGA/DVI 19 VGA/DVI 20
VGA u DVI u n nn nnnnna VCA
u DVI anan an an an an an an an an an an an an an an an an an an an an an an an an an an an an an an an an an an an an an an an an an an
nun (FAQ)
Connecting the cables
Connect the cables as shown:

Monitor LCD VH196 Series
Panduan Ringkas

- ASUS COMPUTER GmbH (Germany and Austria)
- Technical Support
- ASUS
- VH196 Series LCD Monitor
- Quick Start Guide
- Safety information
- Monitor introduction
- Front view
- Connecting the cables
- Troubleshooting (FAQ)
- Supported operating modes
- VH196
- LCD-monitor
- Snelstartgids
- 克莱贝尔 1
- a = ( x_1,y_1) ,b = ( x_2,y_2)
- :VGA/DVI
- nun (FAQ)
- Monitor LCD VH196 Series
- Panduan Ringkas
Brand : ASUS
Model : VH196D
Category : Monitor