
ATR 26 J - Grass trimmer ALPINA - Free user manual and instructions
Find the device manual for free ATR 26 J ALPINA in PDF.

User questions about ATR 26 J ALPINA
0 question about this device. Answer the ones you know or ask your own.
Ask a new question about this device
Download the instructions for your Grass trimmer in PDF format for free! Find your manual ATR 26 J - ALPINA and take your electronic device back in hand. On this page are published all the documents necessary for the use of your device. ATR 26 J by ALPINA.
USER MANUAL ATR 26 J ALPINA
natural_image
Silhouette of a person reading a book inside a circle (no text or symbols)IT Tagliaerba a motore portatile manualmente
MANUALE DI ISTRUZIONI
ATTENZIONE: prima di usare la macchina, leggere attentamente il presente libretto.
BG Преносим ръчен моторен тревен тример УПЪТВАНЕ ЗА УПОТРЕБА
ВНИМАНИЕ: преди да използвате машината прочетете внимателно настоящата книжка.
BS Ručna motorna kosilica
UPUTSTVO ZA UPOTREBU
PAŽNJA: prije nego što koristite ovu mašinu, pažljivo pročitajte priručnik s uputama.
CS Ručně prénosný motorový vyžínač
NÁVOD K POUŽITÍ
UPOZORNĚNÍ: před použitím stroje si pozorně přečtěte tento návod k použití.
DA Bærbar, håndholdt motordreven græstrimmer BRUGSANVISNING
ADVARSEL: læs instruktionsbogen omhyggeligt igennem, før du tager denne maskine i brug.
DE Tragbarer handgehaltener motorbetriebener Rasentrimmer GEBRAUCHSANWEISUNG
ACHTUNG: vor inbetriebnahme des Geräts die Gebrauchsanleitung aufmerksam lesen.
EL Φορητό χειροκατευθυνόμενο χλοοκοπτικό βενζίνης
ΟΔΗΓΙΕΣ ΧΡΗΣΠΣ
ΠΡΟΣΟΧΗ: πριν χρησιμοποιησετε το μηχανημα, διαβαστε προσεκτικα το παρον εγχειρίδιο.
EN Portable hand-held powered grass-trimmer OPERATOR'S MANUAL
WARNING: read thoroughly the instruction booklet before using the machine.
ES Cortacésped de motor portátil manualmente MANUAL DE INSTRUCCIONES
ATENCIÓN: antes de utilizar la máquina, leer atentamente el presente manual.
ET Käeskantav mootoriga murulõikur (trimmer)
KASUTUSJUHEND
TÄHELEPANU: enne masina kasutamist lugeda tähelepanelikult antud kasutusjuhendit.
FI Käsin kannateltava moottorikäyttöinen ruohonleikkuri
KÄYTTÖOHJEET
VAROITUS: lue käyttöopas huolellisesti ennen koneen käyttöä.
FR Coupe-herbe portatif à moteur
MANUEL D'UTILISATION
ATTENTION: lire attentivement le manuel avant d'utiliser cette machine.
HR Prijenošni motorni ručno upravljani šišač trave PRIRUČNIK ZA UPORABO
POZOR: prije uporabe stroja, pažljivo pročitajte ovaj priručnik.
HU Hordozható motoros kézi fünyíró HASZNÁLATI UTASÍTÁS
FIGYELEM! a gép használata előtt olvassa el figyelmesen a jelen kézikönyvet.
LT Nešiojama rankinė motorinė žoliapjovė (trimeris) NAUDOJIMO INSTRUKCIJOS
DÉMESIO: prieš naudojant jrenginj, atidžiai perskaityti šj naudotojo vadovą.
LV Ar piedziņu aprīkotā rokturamā portatīva zāles pļāvējs LIETOŠĀNAS INSTRUKCIJA
UZMANIBU: pirms aparāta lietošanai rūpīgi izlasiet doto instrukciju.
MK Жива ограда (потнаструвач)
УПАТСТВА ЗА УПОТРЕБА
ВНИМАНИЕ: прочитајте го внимателно ова упатство пред да ја користите машината.
NL Met de hand draagbare grasmaaier met motor GEBRUIKERSHANDLEIDING
LET OP: vooraleer de machine te gebruiken, dient men deze handleiding aandachtig te lezen.
NO Bærbar, håndholdt motordrevet gresstrimmer INSTRUKSJONSBOK
ADVARSEL: les denne bruksanvisningen nøye før du bruker maskinen.
PL Ręczna, przenośna podcinarka spalinowa INSTRUKCJE OBSŁUGI
OSTRZEŻENIE: przed użyciem maszyny, należy uważnie przeczytać niniejszą Instrukcję.

natural_image
Line drawing of hands operating a mechanical engine component (no text or symbols)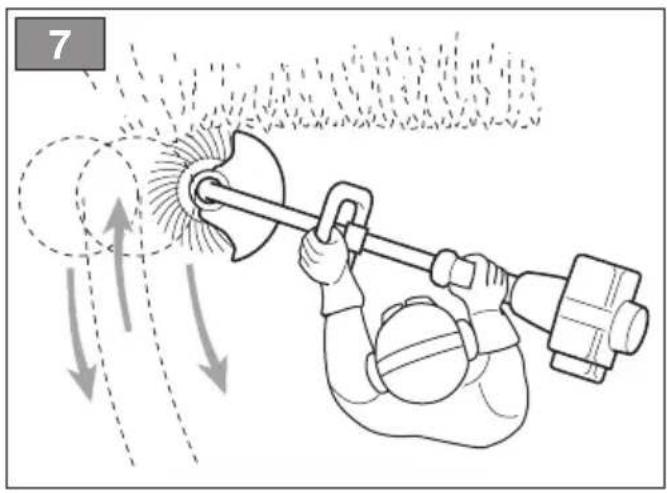

| [1] | DATI TECNICI T 26 J - T 26 JA | ||
| [2] | Motore [3] 2 tempi raffreddamento ad aria | ||
| [4] | Cilindrata cm | ^3 | 25,4 |
| [5] | Potenza kW 0,7 | ||
| [6] | Velocità di rotazione del motore a vuoto min ^-1 3000 ±300 | ||
| [7] | Velocità massima di rotazione del motore min ^-1 8200 | ||
| [8] | Velocità massima di rotazione dell'utensile min ^-1 8200 | ||
| [9] | Capacità serbatoio carburante I 0,65 | ||
| [10] | Miscela (Benzina : Olio 2 tempi) 40:1 = 2,5% | ||
| [11] | Candela | L8RTF / NHSP | |
| [12] | Larghezza di taglio | cm 38 | |
| [13] | Attacco testina porta filo | M8 x 1,25 dx F | |
| [14] | Diametro filo testina (max) | mm | 2,0 |
| [15] | Codice dispositivo di taglio |  | 118801753/0 |
| [16] | Codice protezione | 118803158/0 | |
| [17] | Peso | kg 5,8 | |
| [18] | Dimensioni | ||
| [19] | Lunghezza | cm | 160 |
| [20] | Larghezza | cm 35 | |
| [21] | Altezza | cm 35 | |
| [22] | Impugnatura anteriore, posteriore | √ | |
| [23] | Asta separabile | √ | |
| [24] | Livello di pressione sonora | dB(A) | 94 |
| [25] | Incertezza | dB(A) | 3 |
| [26] | Livello di potenza sonora misurato | dB(A) | 106 |
| [25] | Incertezza | dB(A) 2,58 | |
| [27] | Livello di potenza sonora garantito | dB(A) | 109 |
| [28] | Vibrazioni trasmesse alla mano sull'impugnatura anteriore | m/s ^2 | 3,497 |
| [25] | Incertezza | m/s ^2 | 1,5 |
| [29] | Vibrazioni trasmesse alla mano sull'impugnatura posteriore | m/s ^2 | 5,796 |
| [25] | Incertezza | m/s ^2 | 1,5 |
| [40] | OPZIONI | ||
| [41] | Parzializzatore | √ | |
| [1] BG - ТЕХНИЧЕСКИ ДАННИ[2] Двигател[3] двутактов с въздушно охлаждане[4] Обем на цилиндъра[5] Мощност[6] Скорост на въртене на двигателя на празен ход[7] Максимална ротационна скорост на двигателя[8] Максимална ротационна скорост на инструмента[9] Вместимост на резервоара за гориво[10] Смес (Бензин : Масло двутактов)[11] Свещ[12] Ширина на рязане[13] Бръзка за глава за корда[14] Диаметър за глава за корда (max)[15] Код на инструмента за рязане[16] Код на защитата[17] Тегло[18] Размери[19] Дължина[20] Ширина[21] Височина[22] Предна, Задна ръкохватка[23] Отделяща се щанга[24] Ниво на звуковото налягане[25] Несигурност[26] Ниво на измерената звукова мощност[27] Гарантирано ниво на звукова мощност[28] Вибрации, предадени на ръката върху предна дръжка[29] Вибрации, предадени на ръката върху задна дръжка[40] ОПЦИИ[41] Приспособление за подпомагане задействането на машината | [1] BS - TEHNIČKI PODACI[2] Motor[3] 2-taktni motor hlađenje vazduhom[4] Kubikaža[5] Snaga[6] Brzina okretanja motora na prazno[7] Maksimalna brzina okretanja motora[8] Maksimalna brzina okretanja alatke[9] Kapacitet rezervoara za gorivo[10] Smjesa goriva (Benzin : Ulje 2-taktni)[11] Svjecica[12] Širina reza[13] Priključak za glavu s reznom niti[14] Promjer niti glave (maks.)[15] Šifra rezne glave[16] Šifra štitnika[17] Težina[18] Dimenzije[19] Dužina[20] Širina[21] Visina[22] Prednji, Stražnji rukohvat[23] Odvojivi štap[24] Razina zvučnog pritiska[25] Nesigurnost[26] Izmjerena razina zvučne snage[27] Garantirana razina zvučne snage[28] Vibracije koje se prenose na ruku na prednjem rukohvatu[29] Vibracije koje se prenose na ruku na zadnjem rukohvatu[40] OPCIJE[41] Okidač | [1] CS - TECHNICKÉ PARAMETRY[2] Motor[3] Dvoutaktní, vzduchem chlazený[4] Zdvihový objem[5] Výkon[6] Rychlost otáčení motoru při chodu naprázdno[7] Maximální rychlost otáčení motoru[8] Maximální rychlost otáčení nástroje[9] Kapacita palivové nádrže[10] Směs (Benzin: olej pro dvoutaktní motory)[11] Zapalovací svíčka[12] Záběr[13] Uchyt strunové hlavy[14] Průměr struny (max.)[15] Kód sekacího zařízení[16] Kód ochranného krytu[17] Hmotnost[18] Rozměry[19] Délka[20] Šířka[21] Výška[22] Přední, Zadní rukojeť[23] Dělený hřídel[24] Úroveň akustického tlaku[25] Nejistota měření[26] Naměřená hladina akustického výkonu[27] Zaručená úroveň akustického výkonu[28] Vibrace přenášené na ruku na přední rukojeti[29] Vibrace přenášené na ruku na zadní rukojeti[40] MOŽNOSTI[41] Omezovač | |
| [1] DA - TEKNISKE DATA[2] Motor[3] 2-taktsmotor med luftkøling[4] Slagvolumen[5] Effekt[6] Omdrejningshastighed med motor i tomgangshastighed[7] Maksimalt omdrejningstal for motoren[8] Maksimalt omdrejningstal for redskabet[9] Brændstofstankens kapacitet[10] Blanding (Benzin: 2-taktsolie)[11] Tændrør[12] Skærebredde[13] Montering af trådhoved[14] Diameter af tråd i hovedet (maks.)[15] Skæreanordningens varenr.[16] Beskyttelsens varenummer[17] Vægt[18] Mål[19] Længde[20] Bredde[21] Højde[22] Forreste, Bagerste håndtag[23] Adskillelig stang[24] Lydtryksniveau[25] Usikkerhed[26] Målt lydeffektniveau[27] Garanteret lydeffektniveau[28] Vibrationer overført til hånden på forreste håndtag[29] Vibrationer overført til hånden på bagerste håndtag[40] EKSTRAUDSTYR[41] Udløserknap | [1] DE - TECHNISCHE DATEN[2] Motor[3] 2-Takt mit Luftkühlung[4] Hubraum[5] Leistung[6] Motordrehzahl im Leerlauf[7] Maximale Drehgeschwindigkeit des Motors[8] Maximale Drehgeschwindigkeit des Werkzeugs[9] Fassungsvermögen des Kraftstofftanks[10] Gemisch (Benzin: Zweitaktöl)[11] Zündkerze[12] Schnittbreite[13] Anschluss Fadenkopf[14] Durchmesser Faden Fadenkopf (max.)[15] Code Messer[16] Nummer Schutzeinrichtung[17] Gewicht[18] Abmessungen[19] Länge[20] Breite[21] Höhe[22] Griff vorne, hinten[23] Trennbare Stange[24] Schalldruckpegel[25] Messungenauigkeit[26] Gemessener Schallleistungspegel[27] Garantierter Schallleistungspegel[28] Zulässige auf die Hand am vorderen Handgriff übertragene Vibrationen[29] Zulässige auf die Hand am hinteren Handgriff übertragene Vibrationen[40] OPTIONEN[41] Begrenzer | [1] EL - TEXNIKA XAPAKTHPIŠTIKA[2] Kvintntrpaç[3] dixpovos' aepóψυκτος[4] Kuβισμος[5] loxus[6] Taxútnta περιστροφής κινητήρα χωρίς φορτίο[7] Méviotn'ta περιστροφής κινητήρα[8] Méviotn'ta περιστροφής εργαλείου[9] Xwρητικότητα pežερβουάρ kaoušimou[10] Mećyma (Bevčivn; ládi yia dixpovous' kivntntrpeç)[11] Mtouč[12] Plátoc 'kontis[13] Žuvdešmos' keфалн' výmatos[14] Diáμετρος výmatos' keфалн' (μέγ.)[15] Kwódk'os suotn'umatoc 'kontis[16] Kwódk'os prostaśias[17] Báros[18] Diaostaeis[19] Mńkos[20] Plátoc[21] Yüos[22] Émproc, Písow xeirolaβή[23] Apootn'meves' ačovacs[24] Štaθμη nχητικής πίεσης[25] Aβεβαιότητα[26] Metron'mevens' stáθμη nχητικής ioxúos[27] Štaθμη' eγγυώμενης nχητικής ioxúos[28] Kradapoujo' oto xěpi otn'ev emiproc' xeirolaβή[29] Kradapoujo' oto xěpi otn'v nísow xeirolaβή[40] ПРОАРРЕТИКА[41] Katavemn'ths | |
| [1] EN - TECHNICAL DATA[2] Engine[3] 2-stroke air-cooled[4] Displacement[5] Power[6] Engine rotation speed when idle[7] Maximum engine rotation speed[8] Maximum tool rotation speed[9] Fuel tank capacity[10] Fuel mixture (Petrol: 2-stroke oil)[11] Spark plug[12] Cutting width[13] Connecting cutting line head[14] Diameter of cutting line (max)[15] Cutting means code[16] Protection code[17] Weight[18] Dimensions[19] Length[20] Width[21] Height[22] Front, rear handle[23] Separable rod[24] Sound pressure level[25] Uncertainty[26] Measured sound power level[27] Guaranteed sound power level[28] Vibrations transmitted to hand on front handle[29] Vibrations transmitted to hand on rear handle[40] OPTIONS[41] Shutter | [1] ES - DATOS TÉCNICOS[2] Motor[3] 2 tiempos enfriamiento de aire[4] Cilindrada[5] Potencia[6] Velocidad de rotación del motor envacío[7] Velocidad máxima de rotación del motor[8] Velocidad máxima de rotación dela herramienta[9] Capacidad depósito gasolina[10]Mezcla (Gasolina: Aceite 2 Tiempos[11]Buja[12] Ancho de corte[13] Enganche cabezal porta hilo[14] Diámetro hilo cabezal (máx)[15] Código dispositivo de corte[16] Código de protección[17]Peso[18] Dimensiones[19] Longitud[20] Anchura[21]Altura[22] Empuñadura anterior, posterior[23] Varilla separable[24] Nivel de presión sonora[25] Incertidumbre[26] Nivel de potencia sonora medido[27] Nivel de potencia sonoragarantizado[28] Vibraciones transmitidas a la manoen la empuñadura anterior[29] Vibraciones transmitidas a la manoen la empuñadura posterior[40] OPCIONES[41] Parcializador | [1] ET - TEHNILISED ANDMED[2] Mootor[3] 2 taktiline öhkjahutusega[4] Töömaht[5] Võimsus[6] Mootori põörlemise kiirus tühikäigul[7] Masina mootori maksimumpõördekiirus[8] Lõikeseadme maksimumpõördekiirus[9] Kütuse paagi maht[10] Segu (bensiin: öli 2 taktiline)[11] Küünal[12] Lõikelaius[13] Nõöripea ühendus[14] Nõöripea läbimõõt (maks.)[15] Lõikeseadme kood[16] Kaitse kood[17] Kaal[18] Mõõtmed[19] Pikkus[20] Laius[21] Kõrgus[22] Eesmine, Tagumine käepide[23] Eraldatav varras[24] Helirõhu tase[25] Määramatus[26] Helivõimsuse mõõdetav tase[27] Garanteeritud helivõimsuse tase[28] Eesmiselt käepidemelt käele ülekanduv vibratsioon[29] Tagumiselt käepidemelt käele ülekanduv vibratsioon[40] VALIKUD[41] Osaline gaas | |
| [1] FI - TEKNISET TIEDOT[2] Moottori[3] 2-tahti ilmajäähdytteinen[4] Tilavuus[5] Teho[6] Moottorin pyõrimisnopeusjoutokäynnillä[7] Moottorin maksimipyõrimisnopeus[8] Tyõkalun maksimipyõrimisnopeus[9] Polttoainetankin tilavuus[10] Polttoaineseos (Bensiini: Öljy2-tahti)[11] Sytytystulppa[12] Leikkuuleveys[13] Siimapään kiinnitys[14] Siimapään siiman halkaisija (max)[15] Leikkuuvälineen koodi[16] Suojakoodi[17] Paino[18] Koko[19] Pituus[20] Leveys[21] Korkeus[22] Etukahva, takakahva[23] Irrotettava tanko[24] Äänenpaineen taso[25] Epävarmuus[26] Mitattu äänitehotaso[27] Taattu äänitehotaso[28] Etukahvaan kohdistuva tärinä[29] Takakahvaan kohdistuva tärinä[40] VALINNAT[41] Rajoitin | [1] FR - CARACTERISTRIQUESTECHNIQUES[2] Moteur[3] 2 temps refroidissement à air[4] Cylindrée[5] Puissance[6] Vitesse de rotation à vide dumoteur[7] Vitesse maximum de rotation dumoteur[8] Vitesse maximum de rotation del'outil[9] Capacité du réservoir de carburant[10] Mélange (Essence : Huile 2 temps)[11] Bougie[12] Largeur de coupe[13] Fixation tête à fil[14] Diamètre fil tête (max.)[15] Code organe de coupe[16] Code protection[17] Poids[18] Dimensions[19] Longueur[20] Largeur[21] Hauteur[22] Poignée avant, arrière[23] Tige séparable[24] Niveau de pression sonore[25] Incertitude[26] Niveau de puissance sonoremesuré[27] Niveau de puissance sonoregaranti[28] Vibrations transmises à la main surla poignée antérieure[29] Vibrations transmises à la main surla poignée postérieure[40] OPTIONS[41] Régulateur | [1] HR - TEHNIČKI PODACI[2] Motor[3] 2-taktni sa zračnim hlađenjem[4] Radni obujam[5] Snaga[6] Brzina vrtnje motora na prazno[7] Maksimalna brzina rotacije motora[8] Maksimalna brzina rotacije alata[9] Zapremnina spremnika goriva[10] Mješavina (benzin: ulje za 2-taktnemotore)[11] Švjećica[12] Sirina rezanja[13] Spoj za glavu s reznom niti[14] Promjer niti glave (maks.)[15] Šifra noža[16] Šifra štitnika (glava s reznom niti,trokrai nož)[17] Težina[18] Dimenzije[19] Dužina[20] Širina[21] Visina[22] Prednja, Stražnja ručka[23] Odvojiva osovina[24] Razina zvučnog tlaka[25] Nesigurnost[26] Izmjerena razina zvučne snage[27] Zajamčena razina zvučne snage[28] Vibracije koje se prenose na rukuputem prednje ručke[29] Vibracije koje se prenose na rukuputem stražnje ručke[40] OPCIJE[41] Prekidač za srednji položaj | |
| [1] HU - MÜSZAKI ADATOK[2] Motor[3] 2 ütemü, léghütéses[4] Hengerúrtartalom[5] Teljesítmény[6] A motor forgási sebessége üresben[7] A motor maximális forgási sebessége[8] A szerszám maximális forgási sebessége[9] Uzemanyagtartály kapacitása[10] Keverék (Benzin: Olaj kétütemü motorokhoz)[11] Gyertya[12] Munkaszélesség[13] Huzaltár fej csatlakozó[14] Fej huzal keresztmetszet (max.)[15] Vágóegység kódszáma[16] Védelem kódja[17] Tömeg[18] Méretek[19] Hosszúság[20] Szélesség[21] Magasság[22] Elülső, hátsó markolat[23] Leválasztható rúd[24] Hangnyomásszint[25] Mérési bizonytalanság[26] Mért zajteljesítmény szint[27] Garantált zajteljesítmény szint[28] Az elülső markolatnál a kéz felé továbbított rezgések[29] A hátsó markolatnál a kéz felé továbbított rezgések[40] OPCIOK[41] Szabályozó | [1] LT - TECHNINIAI DUOMENYS[2] Variklis[3] 2 taktu aušinimas oru[4] Variklio türis[5] Galia[6] Tuščios eigos variklio sukimosi greitis[7] Maksimalus variklio sukimosi greitis[8] Maksimalus jrankio sukimosi greitis[9] Kuro bako talpa[10] Mišinys (Benzinas: alyva 2 taktu)[11] Žvaké[12] Pjovimo plotis[13] Pjovimo valo galvutės jungtis[14] Valo galvutės skersmuo (maks.)[15] Pjovimo įtaiso kodas[16] Apsaugos kodas[17] Svoris[18] Išmatavimai[19] Ilgis[20] Plotis[21] Aukštis[22] Priekinė, Galinė rankena[23] Nuimamas kotas[24] Garso slėgio lygis[25] Paklaida[26] Išmatuotas garso galios lygis[27] Garantuotas garso galios lygis[28] Vibracijos lygis, priekinė rankena[29] Vibracijos lygis, galinė rankena[40] PASIRENKÁMI PRIEDAI[41] Ribotuvas | [1] LV - TEHNISKIE DATI[2] Dzinējs[3] 2 taktu ar gaisdzesi[4] Cilindru tilpums[5] Jauda[6] Dzinēja griešanās ātrums tukšgaitā[7] Maksimālais dzinēja griešanās ātrums[8] Maksimālais instrumenta griešanās ātrums[9] Degvielas tvertnes tilpums[10] Maisījums (benzins : ella 2-taktu dzinējiem)[11] Svece[12] Plaušanas platums[13] Auklas turēšanas galvinas stiprinājums[14] Galvinas auklas diametrs (maks.)[15] Griežējierices kods[16] Aizsarga kods[17] Svars[18] Izmēri[19] Garums[20] Platums[21] Augstums[22] Priekšējais, Aizmugurējais rokturis[23] Nonemams kāts[24] Skaņas spiediena līmenis[25] Klūda[26] Mērītas skaņas jaudas līmenis[27] Garantētais skaņas jaudas līmenis[28] No priekšējā roktura rokai nododamā vibrācija[29] No aizmugurējā roktura rokai nododamā vibrācija[40] PAPILDAPRÍKOJUMS[41] Fiksators | |
| [1] MK - TEXHNIЧКИ ПОДАТОЦИ[2] Мотор[3] 2-тактен и воздушно ладење[4] Капацитет[5] Мокност[6] Мойност на ротација со мотор на празно[7] Максимална брзина на ротација на моторот[8] Максимална брзина на ротација на дополнителната опрема[9] Капацитет на резервоарот за гориво[10] Мешавина (бензин: масло за двотактни мотори)[11] Свекичка[12] Ширина на косење[13] Прицврстен калем со конец[14] Дијаметар на калемот со конец (макс)[15] Код на уредот за сечење[16] Код на заштитата[17] Тежина[18] Димензии[19] Должина[20] Ширина[21] Висина[22] Предна, Задна рачка[23] Делив дрячач[24] Ниво на звучен притисок[25] Отступување[26] Измерено ниво на бучава[27] Гарантирано ниво на бучава[28] Вибрации што се пренесуваат на раце од предната рачка[29] Вибрации што се пренесуваат на раце од задната рачка[40] ОПЦИИ[41] Регулатор | [1] NL - TECHNISCHE GEGEVENS[2] Motor[3] 2-takt luchtkoeling[4] Cilinderinhoud[5] Vermogen[6] Rotatiesnelheid van de motor zonder belasting[7] Maximale rotatiesnelheid van de motor[8] Maximale rotatiesnelheid van het werktuig[9] Vermogen brandstofreservoir[10] Mengeling (Benzine : Olie 2-takt)[11] Bougie[12] Snijbreedte[13] Bevestiging draadhouder[14] Diameter draadhouder (max)[15] Code snij-inrichting[16] Code bescherming[17] Gewicht[18] Afmetingen[19] Lengte[20] Breedte[21] Hoogte[22] Handvat vooraan, achteraan[23] Verwijderbare staaf[24] Niveau geluidsdruk[25] Onzekerheid[26] Gemeten geluidsvermogenniveau[27] Gegarandeerd geluidsniveau[28] Trillingen overgedragen op de hand op de voorste handgreep[29] Trillingen overgedragen op de hand op de achterste handgreep[40] OPTIES[41] Partialiseerinrichting | [1] NO - TEKNISKE DATA[2] Motor[3] Luftkjolt totakts[4] Slagvolum[5] Ytelse[6] Motorens rotasjonshastighet på tomgang[7] Maksimal omdreiningshastighet for motoren[8] Maksimal omdreiningshastighet for verktøyet[9] Drivstofftankens volum[10] Blanding (Bensin: 2-takts olje)[11] Tennplugg[12] Klippebredde[13] Feste for trådspole[14] Diameter for trådspolens tråd (maks)[15] Artikelnummer for klippeinnretning[16] Artikelnummer for vern[17] Vekt[18] Mål[19] Lengde[20] Bredde[21] Høyde[22] Fremre, Bakre håndtak[23] Avtagbar arm[24] Lydtrykknivå[25] Måleusikkerhet[26] Målt lydeffektnivå[27] Garantert lydeffektnivå[28] Vibrasjoner overført til hånden på det fremre håndtaket[29] Vibrasjoner overført til hånden på det bakre håndtaket[40] EKSTRAUTSTYR[41] Gasspjeld | |
| [1] PL - DANE TECHNICZNE[2] Silnik[3] 2-suwowy chłodzony powietrzem[4] Pojemność skokowa[5] Moc[6] Prędkość obrotowa silnika bez obciążenia[7] Maksymalna prędkość obrotowa silnika[8] Maksymalna prędkość obrotowa urządzenia[9] Pojemność zbiomika paliwa[10] Mieszanka (Benzyna : Olej do silnika 2-suwowego)[11] Swieca zapłołowa[12] Szerokość cięcia[13] Montaż głowicy żyłkowej[14] Srednicą głowicy żyłkowej (maks)[15] Kod agregatu tnącego[16] Kod żabezpieczenia[17] Cężar[18] Wymiary[19] Długość[20] Szerokość[21] Wysokość[22] Uchwytu przedniego, tylnego[23] Wał podzięlny[24] Poziom ciśnienia akustycznego[25] Bład pomiaru[26] Mierzony poziom mocy akustycznej[27] Gwarantowany poziom mocy akustycznej[28] Wibracje przekazywane na rękę poprzeż uchwyt przedni[29] Wibracje przekazywane na rękę poprzeż uchwyt tylny[40] OPCJE[41] Ogranicznik | [1] PT - DADOS TÉCNICOS[2] Motor[3] 2 tempos arrefecimento a ar[4] Cilindrada[5] Potência[6] Velocidade de rotação do motor com a máquina parada[7] Velocidade máxima de rotação do motor[8] Velocidade máxima de rotação da ferramenta[9] Distribuição do depósito de combustível[10] Mistura (Gasolina : Oleo 2 tempos)[11] Veła[12] Largura de corte[13] Engate cabeça porta-fio[14] Diâmetro fio da cabeça (máx)[15] Código dispositivo de corte[16] Código de proteção[17] Peso[18] Dimensões[19] Comprimento[20] Largura[21] Altura[22] Pega dianteira, traseira[23] Hašte separável[24] Nivel de pressão sonora[25] Incerteza[26] Nivel medido de potência sonora[27] Nivel garantido de potência sonora[28] Vibrações transmitidas na mão sobre a pega dianteira[29] Vibrações transmitidas na mão sobre a pega traseira[40] OPCÕES[41] Parcializador | [1] RO - DATE TEHNICE[2] Motor[3] 2 timpi cu răcire cu aer[4] Cilindree[5] Putere[6] Viteză de rotație cu motorul în gol[7] Viteză maximă de rotație a motorului[8] Viteză maximă de rotație a sculei[9] Capacitate rezervor carburant[10] Amestec (Benzină: Ulei pt. motoare în doi timpi)[11] Bujie[12] Lătime de tăiere[13] Punct de prindere a unității de suport fir[14] Diametru fir unitate (max)[15] Codul dispozitivului de tăiere[16] Codul protectiei[17] Greutate[18] Dimensiuni[19] Lungime[20] Lătime[21] Înăltime[22] Mâner față, spate[23] Tijă separabilă[24] Nivel de presiune sonoră[25] Nesiguranță[26] Nivel de putere sonoră măsurat[27] Nivel de putere sonoră garantat[28] Vibrații percepute de mãna operatorului, pe mânerul anterior[29] Vibrații percepute de mãna operatorului, pe mânerul posterior[40] OPTIUNI[41] Buton de întrerupere | |
| [1] RU - ТЕХНИЧЕСКИЕ ХАРАНТЕРИСТИКИ[2] Двигатель[3] 2 такта воздушного охлаждения[4] Объем[5] Мощность[6] Скорость холостого хода двигателя[7] Максимальная скорость вращения двигателя[8] Максимальная скорость вращения инструмента[9] Емкость топливного бака[10] Смесь (Бензин : Масло 2 такта)[11] Свеча[12] Ширина скашивания[13] Крепление триммерной головки[14] Диаметр корда (макс.)[15] Код режущего приспособления[16] Код защиты[17] Вес[18] Габариты[19] Длина[20] Ширина[21] Высота[22] Передняя, Задняя рукоятка[23] Съемный шток[24] Уровень звукового давления[25] Погрешность[26] Уровень измеренной звуковой мощности[27] Гарантируемый уровень звуковой мощности[28] Вибрация, сообщаемая руке на передней рукоятке[29] Вибрация, сообщаемая руке на задней рукоятке[40] ОПЦИИ[41] Фиксатор | [1] SK - TECHNICKÉ PARAMETRE[2] Motor[3] 2-taktný, vzduchom chladený[4] Zdvihový objem[5] Výkon[6] Rýchlost otáčania motora pri chode naprázdno[7] Maximálna rýchlost otáčania motora[8] Maximálna rýchlost otáčania nástroja[9] Kapacita palivovej nádrže[10] Zmes (benzín: olej pre 2-taktné motory)[11] Zapaľovacia sviečka[12] Záber[13] Uchyt strunovej hlavy[14] Priemer struny (max.)[15] Kód kosiaceho zariadenia[16] Kód ochranného krytu[17] Hmotnosť[18] Rozmery[19] Dĺžka[20] Širka[21] Výška[22] Predná, Zadná rukovát[23] Delený hriadel’[24] Úroveň akustického tlaku[25] Neistota merania[26] Hladina nameraného akustického výkonu[27] Zaručená úroveň akustického výkonu[28] Vibrácie prenăšané na ruku na prednej rukováti[29] Vibrácie prenăšané na ruku na zadnej rukováti[40] MOŽNOSTI[41] Obmedzovač | [1] SL - TEHNIČNI PODATKI[2] Motor[3] 2-taktni; zračno hlajenje[4] Gibna prostornina motorja[5] Moč[6] Hitrost rotacije neobremenjenega motorja[7] Največja hitrost rotacije motorja[8] Največja hitrost rotacije orodja (glava z nitjo)[9] Prostornina rezervoarja za gorivo[10] Mešanica (bencin : olje 2-taktni motor)[11] Svečka[12] Širina košnje[13] Priključek za glavo z nitjo[14] Premer niti (max)[15] Šifra rezalne naprave[16] Šifra zaščite[17] Teža[18] Dimenzije[19] Dolžina[20] Sirina[21] Višina[22] Prednji, Zadnji ročaj[23] Ločljivi drog[24] Raven zvočnega pritiska[25] Negotovost[26] Raven izmerjene zvočne moči[27] Raven zagotovljene zvočne moči[28] Vibracije, ki se prenašajo na roko na sprednjem ročaju[29] Vibracije, ki se prenašajo na roko na zadnjem ročaju[40] OPCIJE[41] Parcializator | |
[1] SR - TEHNIČKI PODACI
[2] Motor
2.5 RISCHI RESIDUI 4
6.3 ARRESTO DELLA MACCHINA (FIG. 5)
8.9 OBDOBÍ DLOUHODOBÉ NEČINNOSTI .....11
- MIMORÁDNÁ ÚDRŽBA .....11
9.1 SEŘÍZENÍ VOLNOBĚŽNÝCH OTÁČEK......11
9.2 SEŘÍZENÍ KARBURÁTORU .....11
- DIAGNOSTIKA 11
1. VŠEOBECNÉ INFORMACE
1.1 JAK ČÍST NÁVOD
4.2 MONTÁŽ OCHRANNÉHO KRYTU (OBR. 2)
8.9 OBDOBÍ DLOUHODOBÉ NEČINNOSTI
5.3 PÅFYLDNING AF BRÆNDSTOF
7.2 AFSLUTNING AF ARBEJDET
1.1 How to read the manual 1
- SAFETY REGULATIONS .... 1
2.1 TRAINING 1
2.2 PRELIMINARY OPERATIONS....2
2.3 DURING USE 2
2.4 MAINTENANCE AND STORAGE....3
2.5 RESIDUAL RISKS....4
2.6 TRANSPORTATION AND HANDLING 4
2.7 ENVIRONMENTAL PROTECTION 4
- GETTING TO KNOW THE MACHINE 4
3.1 DESCRIPTION OF THE MACHINE AND ITS RANGE OF USE....4
3.2 IDENTIFICATION LABEL AND MACHINE COMPONENTS....5
3.3 DESCRIPTION OF EXPLANATORY SYMBOLS (where applicable) 5
3.4 SAFETY REQUIREMENTS 5
- MACHINE ASSEMBLY 6
4.1 COMPLETING THE MACHINE (Fig. 1)...... 6
4.2 FITTING THE GUARD (Fig. 2)....6
4.3 ASSEMBLY AND DISASSEMBLY OF THE CUTTING LINE HEAD (Fig. 3)6
4.4 MOUNTING THE ROD (Fig. 4) 6
- PREPARING TO WORK....6
5.1 CHECKING THE MACHINE....6
5.2 PREPARING THE FUEL MIXTURE 6
5.3 REFUELLING....7
- USING THE MACHINE....7
6.1 STARTING THE MACHINE....7
6.2 ADJUSTING THE SPEED OF THE CUTTING DEVICE (Fig. 5)....8 6.3 STOPPING THE MACHINE (Fig. 5)....8
- OPERATING MODES AND WORK TECHNIQUES .... 8
7.1 MACHINE OPERATING MODES......8
7.2 WHEN WORK IS FINISHED 9
- ROUTINE MAINTENANCE 9
8.1 STORAGE....9
8.2 CLEANING THE ENGINE AND THE SILENCER....9
8.3 STARTING UNIT 10
8.4 NUTS AND SCREWS 10
8.5 CLEANING THE AIR FILTER (Fig. 11) ...... 10
8.6 5.6 CHECKING THE SPARK PLUG (Fig. 12)... 10
8.7 HEAD LINE REPLACEMENT (Fig. 13 A/B) ..... 10
8.8 SHARPENING THE LINE CUTTING KNIFE (Fig. 14) 10
8.9 LONG PERIODS OF DISUSE 10
- EXTRAORDINARY MAINTENANCE 10
9.1 TUNING MINIMUM SPEED 10
9.2 CARBURETTOR ADJUSTMENTS.... 10
- DIAGNOSTICS ....11
1. GENERAL INFORMATION
1.1 HOW TO READ THE MANUAL
Certain paragraphs in the manual contain particularly significant information and are marked with various levels of highlighting with the following meaning:
NOTE or
IMPORTANT These give details or further information on what has already been said, and aim to prevent damage to the machine or cause other damage.
WARNING! Non-observance will result in the risk of injury to oneself or others.
▲ DANGER! Non-observance will result in the risk of serious injury or death to oneself or others.
2. SAFETY REGULATIONS
2.1 TRAINING
WARNING! Read these instructions carefully before operating the machine.
1) Become acquainted with the controls and the proper use of the machine. Learn how to stop the engine quickly. Save all warnings and instructions for future reference.
2) Never allow children or persons unfamiliar with these instructions to use the machine. Local laws can restrict the minimum age of the operator.
3) Never operate while people, especially children, or pets are nearby.
4) Never use the machine if the user is tired or unwell, or has taken medicine, drugs, alcohol or any substances which may slow his reflexes and compromise his judgement.
5) Bear in mind that the operator or user is responsible for accidents or unexpected events occurring to other people or their property. It is the user's responsibility to assess the potential risk of the area where work is to be carried out, and to take all the necessary precautions to ensure his own safety and that of others, particularly on slopes or rough, slippery and unstable ground.
6) If the machine is sold or lent to others, make
sure that the operator looks over the user instructions contained in this manual.
7) Before tackling a mowing job for the first time it is advisable to gain the necessary familiarity with the machine and the most suitable cutting techniques, finding out how to wear the harnesses correctly, firmly gripping the machine and maki
ng the movements required by the job.
2.2 PRELIMINARY OPERATIONS
1) Always wear adequate clothing which does not hamper movements when using the machine.
- Always wear slim-fitting protective clothes, anti-vibration gloves, protective goggles, half-mask respirator, protective earplugs, anti-shear safety boots with non-slip soles.
- Never wear scarves, shirts, necklaces or any hanging or flapping accessory that could catch in the machine.
- Tie your hair back if it is long.
2) Thoroughly inspect the entire work area and remove anything that could be thrown by the machine or damage the cutting means (stones, branches, iron wire, bones, etc.).
3) Before using the machine, check its general condition and in particular:
- The throttle trigger and the safety lever must move freely, they must not need forcing and should return automatically and rapidly back to the neutral position;
- The throttle trigger must remain locked until the safety lever is pressed;
- The engine stop switch must easily move from one position to the other;
- The electric cables and in particular the spark plug cable must be in perfect condition to avoid the generation of any sparks, and the cap must be correctly fitted on the spark plug;
- The machine handgrips and protection devices must be clean and dry and well fastened to the machine;
- Check the correct position of the handgrips and the connection point of the harness, and the proper balance of the machine.
- Make sure that the guards are suitable for the cutting means being used and are fitted correctly.
- There must be no signs of damage on the cutting means. Make sure the cutting means is not worn or damaged. Replace the damaged or worn cutting means to preserve balance. Any repairs must be done at a specialised centre.
4) ▲ WARNING! : ▲ DANGER! Petrol is highly flammable.
- Keep the fuel in containers which have been specifically manufactured and homologated for such use;
- add fuel, using a funnel, only outdoors; do not smoke during this operation and each time fuel is handled;
- Slowly open the fuel tank to allow the pressure inside to decrease gradually;
- Add fuel before starting the engine. Never remove the tank cap or add fuel while the engine is running or when the engine is hot;
- if you have spilled some fuel, do not attempt to ignite the engine but move the machine away from the area of spillage and avoid creating any source of ignition until the fuel has evaporated and fuel vapours have dissipated:
- Always put the tank and fuel container caps back on and tighten well;
- Immediately clean up all traces of fuel spilt on the machine or on the ground;
- Never start the machine in the same place you refilled it with fuel; the engine must be started in an area at least 3 metres from where you refilled the fuel tank;
- Make sure your clothing does not come into contact with the fuel, on the contrary, change your clothes before starting the engine.
5) Replace faulty or damaged silencers.
2.3 DURING USE
1) Do not operate the engine in a confined space where dangerous carbon monoxide fumes can develop.
2) Work only in daylight or with good artificial light in good visibility conditions. Keep persons, children and animals away from the working area.
3) Always use caution and take on a firm and well-balanced position
4) Where possible, avoid working on wet, slippery ground or in any case on uneven or steep ground that does not guarantee stability for the operator;
5) Make sure you have a steady foothold on slopes.
6) Never run, always walk.
7) Pay particular attention to uneven ground or the presence of obstacles.
8) Always work across the face of the slope and never up and down it, being very careful when changing direction, making sure the cutting means is always downstream.
9) Do not use the machine if you are unable to hold it with both hands or keep it steady on your legs while working.
10) The machine must never be used by more than one person.
11) When working, the machine must always be firmly held in both hands, keeping the power unit on the right of the body and the cutting-means assembly below the line of the belt.
14) Pay attention to traffic when using the machine near roads.
13) Never use the machine with damaged or missing guards.
14) Always keep hands and feet away from the cutting means, when starting and when using the machine.
15) Beware of injuries caused by devices used to cut the line length. After releasing the new line, always put the machine in a working position before starting the engine.
16) Be careful of flying debris coming from the cutting means.
17) Warning: the cutting means continues to rotate even after the engine has been switched off.
18) Make sure the machine is securely locked when you start the engine:
- Check that there is nobody within at least 15 metres of the machine's range of action or at least 30 metres for heavier cutting;
- Do not direct the silencer and therefore the exhaust fumes towards inflammable materials.
19) Do not change the engine settings or over-speed the engine.
20) Do not strain the machine too much and do not use a small machine for heavy-duty works. If you use the right machine, you will reduce the risk of hazards and improve the quality of your work.
21) Check that when the machine is running idle, there is no movement of the cutting means and, after pressing the throttle trigger, the engine quickly returns to minimum speed.
22) Always keep the machine connected to the harness when working.
23) Stop the engine:
- Whenever you leave the machine unattended;
- Before refuelling;
- When moving between work areas.
24) Stop the engine and disconnect the spark plug cable:
- Before checking, cleaning or working on the machine;
- After the intake of a foreign body. Inspect the machine for damage and make repairs before restarting and operating the machine;
- If the machine begins to vibrate abnormally (Immediately look for the causes of the vibrations and take it to a Specialised Centre for necessary inspections);
- When the machine is not in use.
25) Avoid using the machine in environments or at times of the day when it may disturb others.
26) To avoid the risk of fire, do not leave the machine with the engine hot on leaves, dry grass or other inflammable material.
27) Never assemble metal cutting means. The use of metal or rigid cutting means of any type with this machine is prohibited.
28) WARNING! If something breaks or an accident occurs while working, turn off the engine immediately and move the machine away to prevent further damage; if an accident occurs with injuries or third parties are injured, carry out the first aid measures most suitable for the situation immediately and contact the medical authorities for any necessary health care. Carefully remove any debris that might cause damage or harm persons or animals should it not be seen.
29) WARNING! The noise and vibration levels shown in these instructions are the maximum levels for use of the machine. The use of an unbalanced cutting means and the absence of maintenance have a significant influence on noise emissions and vibrations. Consequently, it is necessary to take preventive steps to eliminate possible damage due to high levels of noise and stress from vibration. Maintain the machine well, wear ear protection devices, and take breaks while working.
30) Prolonged exposure to vibrations can cause injuries and neurovascular disorders (also called "Raynaud's syndrome" or "white hand"), especially to people suffering from circulation disorders. The symptoms can regard the hands, wrists and fingers and are shown through loss of sensitivity, torpor, itching, pain and discolouring of or structural changes to the skin. These effects can be worsened by low ambient temperatures and/or by gripping the handgrips excessively tightly. If the symptoms occur, the length of time the machine is used must be reduced and a doctor consulted.
2.4 MAINTENANCE AND STORAGE
1) WARNING! Before cleaning or doing maintenance work, disconnect the spark plug cap and read the relevant instructions. Wear proper clothing and protective gloves whenever your hands are at risk.
2) WARNING! I never use the machine with worn or damaged parts. Faulty or worn-out parts must always be replaced and not repaired. Use original spare parts only: the use of non-original and/or incorrectly fitted parts will jeopardize the safety of the machine, may cause accidents or personal injuries for which the Manufacturer is under no circumstance liable or responsible.
3) Any adjustments or maintenance operations not described in this manual must be carried out
by your Dealer or a specialized Service Centre with the necessary knowledge and equipment to ensure that the work is done correctly maintaining the machine's original safety level. Any operations performed in unauthorized centres or by unqualified persons will totally invalidate the Warranty and all obligations and responsibilities of the Manufacturer.
4) After each use, disconnect the spark plug cable and check for damage.
5 Keep all nuts, bolts and screws tight to be sure the machine is in safe working condition. Routine maintenance is essential for safety and for maintaining a high performance level.
6) Check that the cutting means screws are properly tightened on a regular basis.
7) Wear work gloves and apply the cutting means guard to handle, remove or remount the same.
8) Be careful during adjustment of the machine to prevent entrapment of the fingers between the cutting means and fixed parts of the machine.
9) Do not touch the cutting means until the spark plug cable has been disconnected and the cutting means is completely stationary. When servicing the cutting means, bear in mind that, even though the spark plug cable is disconnected, the cutting means can still move.
10) Check the guard frequently for wear or deterioration. Replace it if it is damaged.
11) Replace any instruction or warning message stickers, if damaged.
12) Store the machine out of the reach of children.
13) Do not store the machine with fuel in the tank in an area where the fuel vapours could reach an open flame, a spark or a strong heat source.
14) Allow the engine to cool down before storing in any enclosure.
15) To reduce fire hazards, clean the machine and especially the engine thoroughly to get rid of any grass cuttings, leaves or excess grease, never leave containers with the cut debris inside the storage area.
16) If the fuel tank has to be emptied, this should be done outdoors once the engine has cooled down.
17) Before putting the machine away, check you have removed wrenches or tools used for maintenance.
2.5 RESIDUAL RISKS
1) Even when all safety prescriptions are complied with, there may be certain residual risks that can not be excluded. Potential foreseeable hazards depend on the type and construction of the machine and can include:
- Injuries to fingers and hands if caught in the rotation of the cutting means
– Injuries to feet if struck by the cutting means - Injuries to eyes if protection goggles are not worn (hurling of stones and soil)
- Injuries to hearing ability if no ear protection devices are worn.
2.6 TRANSPORTATION AND HANDLING
1) Whenever the machine is to be handled or transported you must:
- Turn off the engine, wait for the cutting means to stop and disconnect the spark plug cap;
- Fit the cutting means guard;
- Only hold the machine using the handgrips and position the cutting means in the opposite direction to that used during operations.
2) When using a vehicle to transport the machine, position it so that it can cause no danger to persons and fasten it firmly in place to avoid it from tipping over, which may cause damage or fuel spillage.
2.7 ENVIRONMENTAL PROTECTION
1) Environmental protection should be a priority of considerable importance when using the machine, for the benefit of both social coexistence and the environment in which we live. Try not to cause any disturbance to the surrounding area.
2) Scrupulously comply with local regulations and provisions for the disposal of packaging, oils, petrol, filters, damaged parts or any elements which have a strong impact on the environment; this waste must not be disposed of as normal waste, it must be separated and taken to specified waste disposal centres where the material will be recycled.
3) Scrupulously comply with local regulations for the disposal of waste materials after mowing.
4) At the time of decommissioning, do not pollute the environment with the machine, hand it over to a disposal centre, in accordance with the local laws in force.
3. GETTING TO KNOW THE MACHINE
NOTE - The images corresponding to the references are found on page ii of this manual.
3.1 DESCRIPTION OF THE MACHINE AND ITS RANGE OF USE
This machine is a garden tool, and precisely a
portable brush cutter/grass edge trimmer with combustion engine for home use.
The machine is essentially composed of an engine which, employing a transmission shaft enclosed in a tube and an angle transmission, drives a cutting device that is configured in various ways for carrying out different functions. The operator is able to sustain the machine with the aid of a harness and can operate the main controls, always keeping a safe distance from the cutting device.
3.1.1 Intended use
This machine was designed and manufactured for:
- cutting grass and non-woody vegetation, using a nylon line (e.g. around the edges of lawns, flowerbeds, walls, fences and small grassy areas to tidy up the cutting done using a mower).
3.1.2 User types
This machine is intended for use by consumers, i.e. non-professional operators. The machine is intended for “DIY” use only.
3.1.3 Improper use
Any other use differing from the above mentioned ones could be hazardous and harm people and/or damage things.
Examples of improper use may include, but are not limited to:
– using the machine for sweeping;
- trimming hedges or other jobs in which the cutting device is not used on ground level;
- using the machine with the cutting device above the operator's belt level;
– use of the machine for cutting non-plant material;
– use of the machine by more than one person.
3.2 IDENTIFICATION LABEL AND MACHINE COMPONENTS
- Sound power level
- Conformity marking
- Month / Year of manufacture
- Type of machine
- Serial number
- Name and address of manufacturer
- Emission number
-
Article code
-
Power unit
- Drive tube
-
Drive tube terminal
-
Cutting line head
- Cutting device guard
- Front handgrip
- Rear handgrip
- Spark plug
- Engine stop switch
- Throttle control
- Throttle lockout
- Starter grip
- Choke
- Primer
- Throttle shutter (if provided)
- Fuel mixture tank cap
The example of the conformity declaration is found in the penultimate page of the manual.
3.3 DESCRIPTION OF EXPLANATORY SYMBOLS (WHERE APPLICABLE)
- Fuel mixture tank
- Engine stop switch positions
- Choke
- Primer
- Cutting device rotation direction
$$ \begin{array}{l} \mathbf {a} = \text { stop } \ \mathbf {b} = \text { running } \ \end{array} $$
3.4 SAFETY REQUIREMENTS
Your machine must be used carefully. Symbols have therefore been placed on various parts of the machine to remind you of the main precautions to be taken. Their meaning is explained below. You are also asked to carefully read the safety regulations in the specific chapter of this manual.
Replace damaged or illegible labels.
- Warning! Danger. The failure to use this machine correctly can be hazardous for oneself and others.
- Read the instruction manual before using the machine.
- Anyone operating the machine under normal conditions for continuous daily use may be exposed to a noise level equal to or exceeding 85 dB (A). Wear ear protectors, safety goggles and a protective helmet.
- Projectile object hazard! Keep any people or pets at least 15 m away when using the machine!
- Maximum cutting device speed. Only use suitable cutting devices.
- Do not use pointed, rigid or metal blades or
circular saw blades.
- Only one cutting line head can be used on this machine.
- Warning! Petrol is flammable. Allow engine to cool at least 2 minutes before refuelling.
- Warning! Keep away from hot surfaces.
NOTE - The figures mentioned in the text are found on page iii and following of this manual.
4. MACHINE ASSEMBLY
IMPORTANT The machine is supplied with some of the components disassembled and the fuel tank empty.
WARNING! Always wear strong protective gloves to handle the cutting devices. Mount the components very carefully so as not to impair the safety and efficiency of the machine. If in doubt, contact your dealer.
WARNING! Unpacking and completing the assembly should be done on a flat and stable surface, with enough space for moving the machine and its packaging, always making use of suitable equipment.
Disposal of the packaging should be done in accordance with the local regulations in force.
4.1 COMPLETING THE MACHINE (FIG. 1)
- Position the upper part (1) of the front handgrip and apply the lower cap (2) using the screws (3), making sure the two anti-vibration halves of the shell remain in position (4)
- Before tightening the screws (3), align the handgrip correctly with respect to the drive tube.
– Fully tighten the screws (3).
4.2 FITTING THE GUARD (FIG. 2)
- Remove the guard plug (1) from the end of the bottom part of the rod (2).
- Secure the guard (3) to the support (4) using the supplied bolts (5).
4.3 ASSEMBLY AND DISASSEMBLY OF THE CUTTING LINE HEAD (FIG. 3)
a) Assembly
- Block rotation of the shaft (1) with a proper wrench.
- Fit the cutting line head (2) screwing it clockwise.
c) Disassembly
- Block rotation of the shaft (1) with a proper wrench.
- Remove the cutting line head (2) unscrewing it anticlockwise.
4.4 MOUNTING THE ROD (FIG. 4)
- Pull out the stop pin (1) and push the lower part of the rod (2) right down until the stop pin (1) clicks into the hole (3) in the rod. This is easier to do if you rotate the bottom of the rod (2) slightly in both directions. The pin (1) is in place when it is completely lodged in the hole.
- Once inserted, tighten the knob (4) securely.
5. PREPARING TO WORK
5.1 CHECKING THE MACHINE
Before starting work please:
- check that all the screws on the machine and the cutting device are tightly fastened;
- make sure the cutting device is not damaged;
- make sure the protection devices are well fastened and working efficiently;
– check the handgrips are well fastened.
5.2 PREPARING THE FUEL MIXTURE
This machine is fitted with a two-stroke engine which requires a mixture of petrol and lubricating oil.
IMPORTANT Using petrol alone will damage the engine and is cause for invalidation of the warranty.
IMPORTANT Use only quality fuels and oils maintain high performance and guarantee the duration of the mechanical parts over time.
5.2.1 Petrol characteristics
Only use unleaded petrol with a fuel grade of at least 90 ON.
IMPORTANT Unleaded petrol tends to create deposits in the container if preserved for more than 2 months Always use fresh petrol!
5.2.2 Oil characteristics
Only use top quality synthetic oil specifically for two-stroke engines.
Your Dealer can provide you with oils which have been specifically developed for this type of engine, and which are capable of guaranteeing a high level of protection.
The use of these oils makes it possible to prepare a 2,5% mixture, consisting in 1 part oil to 40 parts petrol.
5.2.3 Preparation and preservation of the fuel mixture
DANGER! Petrol and the fuel mixture are highly inflammable!
- Keep the petrol and fuel mixture in homologated fuel containers, in a safe place, away from any flames or heat sources.
- Never leave the containers within the reach of children.
- Never smoke whilst preparing the mixture and avoid inhaling the petrol fumes.
To prepare the fuel mixture:
- Place about half the amount of petrol in a homologated tank.
- Add all the oil, according to the chart.
- Add the rest of the petrol.
- Close the top and shake well.
IMPORTANT The fuel mixture tends to age. Do not prepare excessive amounts of the fuel mixture to avoid the formation of deposits.
IMPORTANT Keep the petrol and fuel containers separate and easily identifiable avoid the mistake of using one in place of the other.
IMPORTANT Periodically clean the petrol fuel mixture containers to remove any deposits.
5.3 REFUELLING
DANGER! Never smoke whilst refuelling and avoid inhaling the petrol fumes.
WARNING! Carefully open the tank as pressure could have formed inside. Before refuelling:
- Shake the fuel mixture container well.
- Place the machine on a flat stable surface, with the fuel tank cap facing upwards.
- Clean the fuel tank cap and the surrounding area to avoid any dirt from entering the tank
during refilling.
- Carefully open the fuel tank cap to allow the pressure inside to decrease gradually. Use a funnel to refill and avoid filling the tank to the brim.
▲ WARNING! Always close the fuel tank cap firmly.
▲ WARNING! Immediately clean all traces of fuel which may have dripped on the machine or the ground and do not start the engine until the petrol fumes have dissipated.
6. USING THE MACHINE
6.1 STARTING THE MACHINE
WARNING! The machine must be started in an area at least 3 metres from where you refilled the fuel tank.
Before starting the engine:
- Place the machine firmly on the ground.
6.1.1 Cold starting
WARNING! A "cold" start of the engine means starting it after at least 5 minutes from when it was switched off or after refuelling.
To start the machine (Fig. 5):
- Set the switch (1) to position «I».
- Operate the choke, turning the lever (4) to the mixture to “B” position”.
- Press the primer device button (5) 3 or 4 times to prime the carburettor.
4 Press the safety lever (3), activate the throttle and trigger (2) and hold it in this position using
the shutter button (7); then release the safety eventual lever (3). - Hold the machine firmly on the ground with one hand on the power unit, in order not to lose control of the machine during startup (Fig. 6).
IMPORTANT To prevent distortions, the drive tube must not be used as a support for the hand or knee during startup.
top
- Pull the starter grip slowly for 10 - 15 cm until you feel some resistance, then tug it a few times until you hear the engine turn over.
IMPORTANT To avoid breaking the starter cable, do not pull the whole length of it or let it slide along the edge of the cable guide hole. Release the starter grip gradually, to avoid letting it fly back uncontrollably.
- Pull the starter grip again until the engine starts as normal.
⚠ WARNING! Starting the engine with the choke engaged causes the cutting device to move, only stopping when the choke is disconnected.
- When the engine is started, disconnect the starter by turning the lever (2) to «ON».
- Disconnect the shutter (7 - if provided) briefly activating the throttle trigger (2), to take the engine back to minimum speed.
- Let the engine run idle for at least 1 minute before using the machine.
IMPORTANT If the starter grip is pulled repeatedly with the choke on, it may flood the engine and make starting difficult.
If you have flooded the engine, remove the spark plug and gently pull the starter grip to eliminate any excess fuel; then dry the spark plug electrodes and replace it on the engine.
6.1.2 Warm starting
When warm starting (immediately after stopping the engine), follow the procedure indicated above in points 1-5-6-7.
6.2 ADJUSTING THE SPEED OF THE CUTTING DEVICE (FIG. 5)
Cutting device speed is regulated by the throttle trigger (2), located on the rear handgrip (6). The throttle trigger only works if the lockout (3) is pressed at the same time. The movement is transmitted from the engine to the transmission shaft by a centrifugal mass clutch that prevents the shaft from moving when the engine is running at minimum speed.
⚠ WARNING! The cutting device must not move when the engine is running idle. If the cutting device moves when the engine is running idle, contact your dealer to correctly regulate the engine.
The correct running speed will be achieved by pressing the throttle trigger (2) as far as possible.
IMPORTANT Avoid using the engine at full power for the first 6-8 working hours.
6.3 STOPPING THE MACHINE (FIG. 5)
To stop the machine:
- Release the throttle trigger (2) and allow the engine to run idle for a few seconds.
- Set the switch (1) to position «O».
WARNING! When you have reduced speed to a minimum, it will take a few seconds for the cutting device to stop.
7. OPERATING MODES AND WORK TECHNIQUES
To respect people and the environment:
– Try not to cause any disturbance.
- Scrupulously comply with local regulations and provisions for the disposal of waste materials after cutting.
- Scrupulously comply with local regulations and provisions for the disposal of oils, petrol, damaged parts or any elements which have a strong impact on the environment.
▲ WARNING! Always wear suitable clothing when using the machine. Your dealer can provide you with all the information on the most suitable accident-prevention devices to guarantee your safety.
WARNING! When working, the machine must always be firmly held in both hands, keeping the power unit on the right of body and the cutting group below the line of the belt.
Before tackling a mowing job for the first time it is advisable to gain the necessary familiarity with the machine and the most suitable cutting techniques, finding out how to wear the harnesses correctly, firmly gripping the machine and making the movements required by the job.
The cutting line head can eliminate tall grass and non-woody vegetation near fences, walls, foundations, pavements, around trees, etc. or to completely clean a particular area of the garden.
WARNING! The use of metal or rigid blades of any type with this machine is prohibited.
WARNING! Use ONLY nylon lines. The use of metal lines, plasticised metal lines
and/or lines not suitable for the head can cause serious injuries and wounds.
During use it is advisable to stop the engine periodically and remove the weeds wound round the machine, so as to prevent the drive tube from overheating due to the grass caught under the guard.
Remove the caught-up grass with a screwdriver to allow the rod to be properly cooled.
⚠ WARNING! Do not use the machine for sweeping, tilting the cutting line head. The power of the engine could throw objects and small stones 15 metres or more, causing damage or injuries to people.
a) Cutting in motion (Scything) (Fig. 7)
Proceed at a regular pace, with a circular motion similar to a traditional scythe, without tilting the cutting line head during the operation.
First try cutting at the right height in a small area, so as to then achieve a uniform cutting height keeping the cutting line head at a constant distance from the ground.
For heavier cutting it can be useful to tilt the cutting line head by about 30^ .
⚠ WARNING! Do not work in this there is the possibility of causing objects to be thrown, which could harm people, animals or cause damage.
b) Precision cutting (Trimming)
Keep the machine slightly tilted so that the lower part of the cutting line head does not touch the ground and the cutting line is at the required point, always keeping the cutting device at a distance from the operator.
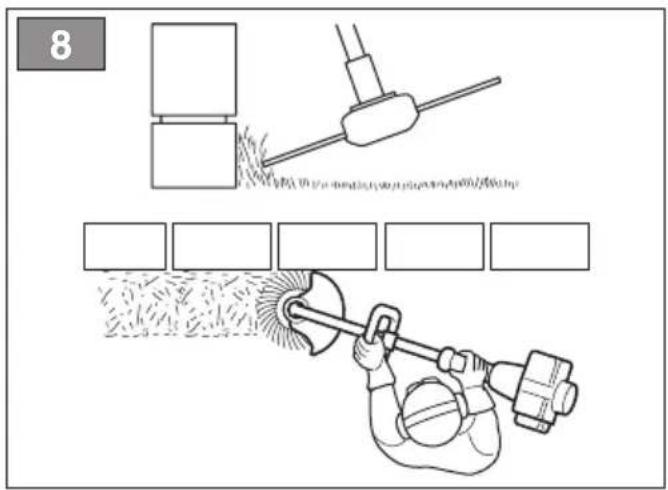
c) Cutting near fences/foundations (Fig. 8)
Slowly move the cutting line head near fences, posts, rocks, walls, etc. without hitting them hard. If the line strikes a solid object it could break or become worn; if it gets tangled in a fence it could break abruptly.
In any case, cutting around pavements, foundations, walls, etc. can cause greater wear than normal to the line.
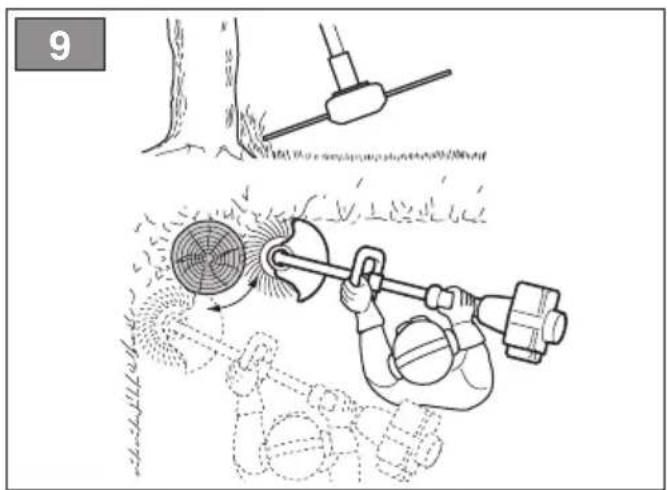
d) Cutting round trees (Fig. 9)
Walk round the tree from left to right, approaching the trunks slowly so as not to strike the tree with the line and keeping the cutting line head tilted forward slightly.
Remember that the nylon line could lop off or damage small shrubs and that the impact of the nylon line against the trunk of bushes or trees with soft bark could seriously damage the plant.
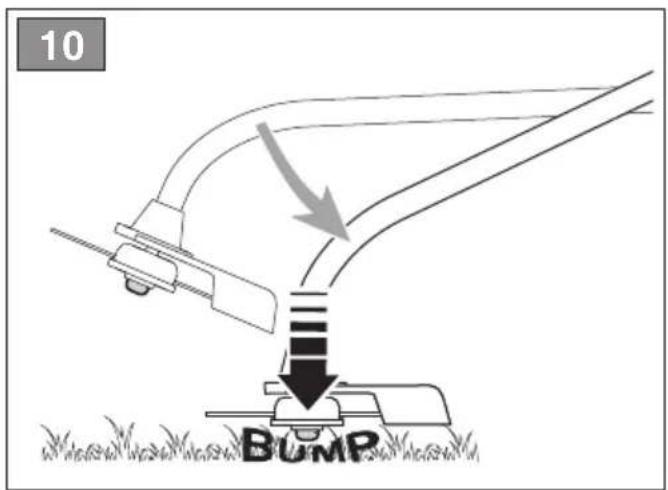
e) Adjusting line length when working (Fig. 10)
This machine is fitted with a “Tap & Go” head. To release more line, tap the cutting line head against the ground with the engine at top speed: the line will be released automatically and the knife will cut off the excess length.
7.2 WHEN WORK IS FINISHED
When you have finished your work:
- Stop the machine as indicated previously (see 6.3).
- ROUTINE MAINTENANCE
Correct maintenance is essential to maintain the original efficiency and safety of the machine over time. way if
WARNING! During maintenance operations:
- Remove the spark plug cap.
- Wait until the engine is sufficiently cold.
- Never dispose of oils, fuel or other polluting materials in unauthorised places.
8.1 STORAGE
At the end of each working session, carefully clean the machine of dust and debris, and make sure that there are no damaged parts, replacing any faulty parts. The machine must be stored in a dry place away from the elements and with the cover correctly fitted.
8.2 CLEANING THE ENGINE AND THE SILENCER
To reduce fire risks, periodically clean the cylinder fins with compressed air and clear the silencer area to get rid of sawdust, branches, leaves or other debris.
8.3 STARTING UNIT
To avoid overheating and damage to the engine, always keep the cooling air vents clean and free of sawdust and debris.
If you notice signs of wear on the starter cable, contact your Dealer for a replacement.
8.4 NUTS AND SCREWS
Periodically check that all the nuts and screws are securely tightened and the handgrips are tightly fastened.
8.5 CLEANING THE AIR FILTER (FIG. 11)
IMPORTANT Cleaning the air filter is essential to guarantee the efficiency and duration of the machine. Do not work with a damaged filter or without a filter, as this could permanently damage the engine.
It must be cleaned after every 15 working hours. Clean the filter as follows:
- Loosen the knob (3), remove the cover (1) and the filter element (2).
- Wash the filter element (2) with soap and water. Do not use petrol or other solvents.
- Leave the filter to dry in the open air.
- Fit the filter element (2) and the cover (1) back on, tightening the knob (3) again.
8.6 5.6 CHECKING THE SPARK PLUG (FIG. 12)
Periodically remove and clean the spark plug using a metal brush to get rid of any deposits. Check and reset the correct distance between the electrodes.
Replace the spark plug and fasten it firmly using the supplied wrench.
The spark plug must be replaced with one with the same characteristics whenever the electrodes have burnt or the insulation has worn, and in any case every 100 working hours.
8.7 HEAD LINE REPLACEMENT (FIG. 13 A/B)
- Follow the sequence indicated in the figure.
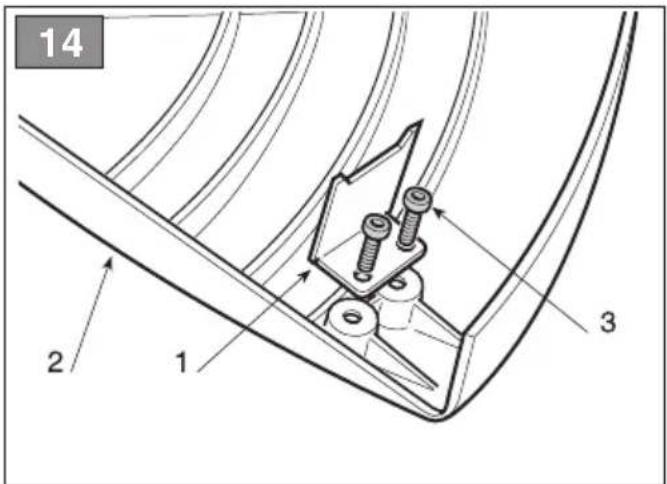
8.8 SHARPENING THE LINE CUTTING KNIFE (FIG. 14)
- Remove the line cutting knife (1) from the guard (2) by unscrewing the screws (3).
- Fix the line cutting knife in a vice and sharpen it using a flat file, being careful to retain the original cutting angle.
- Refit the knife on the guard.
8.9 LONG PERIODS OF DISUSE
IMPORTANT If you are not going to use the machine for a period of more than 2-3 months, we recommend you do a few things before putting it away. This will make it easier when you want to use the machine again and will also prevent permanent damage to the engine.
Before putting the machine away:
- Empty the fuel tank.
- Start the engine and run it idle until it comes to a halt, so that it uses up all the fuel that is left in the carburettor.
- Wait for the engine to cool down before storing the machine.
When you wish to start using the machine again, prepare it as indicated in chapter "2. Preparing to work".
9. EXTRAORDINARY MAINTENANCE
This work must be done exclusively by your Dealer.
All and any operations performed in unauthorised centres or by unqualified persons will totally invalidate the warranty.
9.1 TUNING MINIMUM SPEED
⚠ WARNING! If the cutting device moves when the engine is running idle, contact your Dealer to correctly regulate the engine.
9.2 CARBURETTOR ADJUSTMENTS
The carburettor is tuned by the manufacturer to achieve maximum performance in all situations, with a minimum emission of toxic gas in compliance with the regulations in force.
In the case of poor performance contact your Dealer for a check of the carburation and engine.
10. DIAGNOSTICS
| What to do when ... | |
| Source of problem Corrective action | |
| 1. The engine will not start or will not keep running | |
| Incorrect starting procedure | Follow the instructions (see chapter 3) |
| Dirty spark plug or incorrect distance between the electrodes | Check the spark plug (see chapter 5) |
| Air filter clogged Clean and/or replace the filter (see chapter 5) | |
| Carburation problems Contact your Dealer | |
| 2. The engine starts but is lacking in power | |
| Air filter clogged Clean and/or replace the filter (see chapter 5) | |
| Carburation problems Contact your Dealer | |
| 3. The engine runs irregularly and lacks in power when revved | |
| Dirty spark plug or incorrect distance between the electrodes | Check the spark plug (see chapter 5) |
| Carburation problems Contact your Dealer | |
| 4. The engine makes too much smoke | |
| Incorrect composition of the fuel mixture | Prepare the fuel mixture according to the instructions (see chapter 2) |
| Carburation problems Contact your Dealer | |
| 5. The cutting device must not move when the engine is running idle | |
| Incorrect carburation regulation | Contact your Dealer |
| 6. The machine starts to vibrate abnormally | |
| Damaged or loose parts Stop | the machine and disconnect the spark plug cableInspect for damageCheck for and tighten any loose partsHave all checks, repair work and replacements carried out by a specialized Centre only. |
ÍNDICE
2.5 ÜLEJÄÄNUD OHUD 4
2.6 TRANSPORTIMINE JA LIIGUTAMINE ..... 4
2.7 KESKKONNAKAITSE 4
- MASINAGA TUTVUMINE 4
3.1 MASINA KIRJELDUS JA KASUTUSALA 4
3.2 IDENTIFITSEERIMISETIKETT JA MASINA KOMPONENDID 5
1.1 KUIDAS KASUTUSJUHENDIT LUGEDA
5.2 SEOKSEN VALMISTUS....6
5.3 POLTTOAINEEN TANKKAUS 7
- LAITTEEN KÄYTTÖ 7
6.1 LAITTEEN KÄYNNISTYS 7
6.2 LEIKKAUSVÄLINEEN NOPEUDEN SÄÄTÖ (Kuva 5)....8
6.3 LAITTEEN PYSÄYTYS (Kuva 5)....8
- KÄYTTÖTAPA JA -TEKNIIKKA 8
7.1 LAITTEEN KÄYTTÖ....8
7.2 TYÖN LOPETTAMINEN....9
- SÄÄNNÖLLINEN HUOLTO 9
8.1 VARASTOINTI....9
8.2 MOOTTORIN JA ÄÄNENVAIMENTIMEN PUHDISTUS....9
8.3 KÄYNNISTYSYKSIKKÖ 10
8.4 KIINNIKKEET 10
8.5 ILMANSUODATTIMEN PUHDISTUS (Kuva 11) 10
8.6 SYTYTYSTULPANTARKISTUS (Kuva 12)....10
8.7 SIIMAPÄÄN VAIHTO (Kuva 13 A/B) ...... 10
5.2 SEOKSEN VALMISTUS
2.6 TRANSPORT ET MANUTENTION 5
2.7 PROTECTION DE 'ENVIRONNEMENT...... 5
- CONNAÎTRE LA MACHINE 5
3.1 DESCRIPTION DE LA MACHINE ET DOMAINE D'UTILISATION....6
3.2 ÉTIQUETTE D'IDENTIFICATION ET COMPOSANTS DE LA MACHINE....6
3.3 DESCRIPTION DES SYMBOLES D'EXPLICATION (si prévus)......6
3.4 PRESCRIPTIONS DE SÉCURITÉ ...... 6
- MONTAGE DE LA MACHINE....7
4.1 MONTAGE COMPLET DE LA MACHINE (Fig. 1)....7
4.2 MONTAGE DE LA ROTECTION (Fig. 2) ..... 7
4.3 MONTAGE ET DÉMONTAGE DE LA TÊTE À FIL (Fig. 3)....7
4.4 MONTAGE DE LA TIGE (Fig. 4)....7
- PRÉPARATION AU TRAVAIL 8
5.1 VÉRIFICATION DE LA MACHINE....8
5.2 PRÉPARATION DU MÉLANGE 8
5.3 APPROVISIONNEMENT EN CARBURANT....8
- UTILISATION DE LA MACHINE....9
6.1 DÉMARRAGE DE LA MACHINE 9
6.2 RÉGLAGE DE LA VITESSE DU DISPOSITIF DE COUPE (Fig. 5)....9
6.3 ARRÊT DE LA MACHINE (Fig. 5)....10
- MODALITÉS OPÉRATIONNELLES ET TECHNIQUES DE TRAVAIL .... 10
7.1 MODALITÉS D'UTILISATION DE LA MACHINE.... 10
7.2 FIN DU TRAVAIL 11
- ENTRETIEN COURANT .....11
8.1 CONSERVATION....11
8.2 NETTOYAGE DU MOTEUR ET DU SILENCIEUX....11
8.3 GROUPE DE DÉMARRAGE....11
8.4 FIXATIONS....11
8.5 NETTOYAGE DU FILTRE AIR (Fig. 10) .....11
8.6 CONTRÔLE DE LA BOUGIE (Fig. 12)...... 12
8.7 REMPLACEMENT DU FIL DE LA TÊTE (Fig. 13 A/B)....12
8.8 AFFÛTAGE DU COUTEAU COUPE-FIL (Fig. 14)....12
8.9 INACTIVITÉ PROLONGÉE 12
- ENTRETIEN SUPPLÉMENTAIRE 12
9.1 RÉGLAGE DU MINIMUM.... 12
9.2 RÉGLAGES DU CARBURATEUR 12
- DIAGNOSTIC 12
1. GÉNÉRALITÉS
1.1 COMMENT CONSULTER LE MANUEL
2.6 TRANSPORT ET MANUTENTION
6.3 ARRÊT DE LA MACHINE (FIG. 5)
- PASIRUOŠIMAS DARBUI 6
5.1 IRENGINIO PATIKRINIMAS....6
5.2 MIŠINIO PARUOŠIMAS....6
5.3 DEGALU UŽPILDYMAS 7
5. PASIRUOŠIMAS DARBUI
5.1 JRENGINIO PATIKRINIMAS
Prieš pradedant darba reikia:
- PLĀNOTĀ TEHNISKĀ APKOPE 10
8.1 UZGLABĀŠANA....10
8.2 DZINĒJA UN TROKŠNU SLĀPĒTĀJA TĪRĪŠANA....10
8.3 IEDARBINĀŠANAS MEZGLS 10
8.4 STIPRINĀJUMI 10
8.5 GAISA FILTRA TİRİŞANA (att. 11)...... 10
8.6 SVECES PÄRBAUDE (att. 12) ...... 10
8.7 GALVINAS AUKLAS MAINA (att. 13 A/B)...... 10
8.8 AUKLAS GRIEŠANAS NAŽA ASINĀŠANA (att. 14)....10
8.9 ILGSTOŠA DĪKSTĀVE 10
- ĀRKĀRTAS TEHNISKĀ APKOPE ......11
9.1 MINIMĀLO APGRIEZIENU REŽĪMA REGULĒŠANA....11
9.2 KARBURATORA REGULĚŠANA....11
- DIAGNOSTIKA ....11
1. VISPĀRĪGA INFORMĀCIJA
1.1 KĀ JĀLASA ROKASGRĀMATA
8. PLĀNOTĀ TEHNISKĀ APKOPE
2.4 VEDLIKEHOLD OG OPPBEVARING.... 3
2.5 RESTRISIKO 4
2.6 TRANSPORT OG FLYTTING 4
2.7 MILJ∅VERN 4
- BLI KJENT MED MASKINEN 4
3.1 BESKRIVELSE AV MASKINEN OG BRUKSOMRÅDET 4
3.2 IDENTIFIKASJONSETIKETT OG MASKINDELER....5
3.3 BESKRIVELSE AV FORKLARENDE SYMBOLER (hvor slike finnes)......5
3.4 SIKKERHETSBESTEMMELSER.... 5
- MONTERING AV MASKINEN 5
4.1 FULLF∅RING AV MONTERINGEN AV MASKINEN (Fig. 1)....6
4.2 MONTERING AV VERNET (fig. 2) ...... 6
4.3 MONTERING OG DEMONTERING AV TRÅDSPOLEN (fig. 3) ...... 6
4.4 MONTERING AV ARMEN (Fig. 4)......6
- FORBEREDELSE TIL ARBEIDET......6
5.1 ETTERSYN AV MASKINEN....6
5.2 KLARGJ∅RING AV DRIVSTOFFBLANDINGEN 6
5.3 ETTERFYLLING AV DRIVSTOFF....7
- BRUK AV MASKINEN....7
6.1 START AV MASKINEN 7
6.2 REGULERING AV KLIPPEANORDNINGENS HASTIGHET (fig. 5)....8
6.3 STOPPE MASKINEN (fig. 5) 8
- BRUKSMÅTER OG ARBEIDSTEKNIKKER...... 8
7.1 BRUK AV MASKINEN 8
7.2 VED ARBEIDETS SLUTT 9
- ORDINÆRT VEDLIKEHOLD 9
8.1 OPPBEVARING....9
8.2 RENGJ∅RING AV MOTOREN OG LYDPOTTEN....9
8.3 STARTENHET 9
8.4 FESTINGER....9
8.5 RENGJ∅RING AV LUFTFILTERET (fig. 11)....9
8.6 KONTROLL AV TENNPLUGGEN (fig. 12) ..... 10
8.7 BYTTE AV TRÅDEN PÅ SPOLEN (fig. 13 A/B) 10
8.8 SLIPING AV TRÅDKUTTEREN (fig. 14) ...... 10
8.9 LANG PERIODE UTEN BRUK.... 10
- EKSTRAORDINÄERT VEDLIKEHOLD 10
9.1 REGULERING AV TOMGANGEN 10
9.2 REGULERING AV FORGASSEREN.... 10
- FEILS∅KING 10
1. GENERELT
1.1 HVORDAN LESE BRUKSANVISNINGEN
2.4 VEDLIKEHOLD OG OPPBEVARING
3. BLI KJENT MED MASKINEN
5.3 ETTERFYLLING AV DRIVSTOFF
7.2 VED ARBEIDETS SLUTT
Ved arbeidets slutt:
- Stopp maskinen som forklart tidligere (se 6.3).
8. ORDINÆRT VEDLIKEHOLD
8.6 KONTROLL AV TENNPLUGGEN (FIG. 12)
9. EKSTRAORDINÆRT VEDLIKEHOLD
- TRYBY OPERATYWNE I METODY PRACY ..... 9
7.1 SPOSOBY UŻYTKOWANIA MASZYNY...... 9
7.2 ZAKOŃCZENIE PRACY.... 10
- KONSERWACJA ZWYCZAJNA 10
8.1 KONSERWACJA.... 10
8.2 CZYSZCZENIE SILNIKA I TŁUMIKA....11
8.3 ZESPÓŁ NAPEDOWY....11
8.4 POŁACZENIA....11
8.5 CZYSZCZENIE FILTRA POWIETRZA (Rys. 11)11
8.6 KONTROLA ŚWIECY ZAPŁONOWEJ (Rys. 12) 11
8.7 WYMIANA ŻYŁKI W GŁOWICY (Fig. 13 A/B)....11
- KONSERWACJA NADZWYCZAJNA .....11
9.1 REGULACJA MINIMALNYCH OBROTÓW SILNIKA....12
9.2 REGULACJA GAŹNIKA.... 12
- DIAGNOSTYKA 12
1. INFORMACJE OGÓLNE
1.1 JAK POSŁUGIWAĆ SIĘ INSTRUKCJĄ OBSŁUGI
7. TRYBY OPERATYWNE I METODY PRACY
8.9 DLHODOBÁ NEČINNOST....11
- MIMORIADNA ÚDRŽBA 11
9.1 NASTAVENIE VOLNOBEŽNÝCH OTÁČOK.....11
9.2 NASTAVENIE KARBURÁTORA .....11
- DIAGNOSTIKA 11
1. VŠEOBECNÉ INFORMÁCIE
1.1 AKO ČÍTAŤ NÁVOD
4.2 MONTÁŽ OCHRANNÉHO KRYTU (OBR. 2)
8.9 DLHODOBÁ NEČINNOST
- PRIPRAVA NA DELO....6
5.1 PREGLED STROJA 6
5.2 PRIPRAVA MEŠANICE 6
5.3 DOLIVANJE GORIVA....7
- UPORABA STROJA 7
6.1 ZAGON STROJA 7
6.2 URAVNAVANJE HITROSTI REZALNE NAPRAVE (SI. 5)....8
6.3 ZAUSTAVITEV STROJA (SI. 5)......8
- OPERATIVNO-TEHNICNI NACINI UPORABE......8
7.1 NACINI UPORABE STROJA 8
7.2 KONEC DELA....9
- REDNO VZDRŽEVANJE 9
8.1 SHRANJEVANJE 9
8.2 ČIŠČENJE MOTORJA IN DUŠILCA 9
8.3 ZAGANJALNI SKLOP 9
8.4 SPOJI 9
8.5 ČIŠČENJE ZRAČNEGA FILTRA (Sl. 11) ...... 10
8.6 PREGLED SVEČKE (SI. 12)....10
8.7 ZAMENJAVA NITI V GLAVI (SI. 13 A/B) ..... 10
8.8 BRUŠENJE NOŽA ZA REZANJE NITI (SI. 14). 10
8.9 DALJŠE OBDOBJE NEUPORABE.... 10
- IZREDNO VZDRŽEVANJE 10
9.1 NASTAVITVE MINIMUMA.... 10
9.2 REGULIRANJE UPLINJAČA 10
- UGOTAVLJANJE NAPAK 11
1. SPLOŠNE INFORMACIJE
1.1 KAKO BEREMO PRIROČNIK
2.2 POSTOPKI PRED UPORABO
8.9 DALJŠE OBDOBJE NEUPORABE
INNEHÅLLSFÖRTECKNING
- ALLMÄN INFORMATION....1
4.4 ÇUBUĞUN MONTAJI (RES. 4)
8.5 HAVA FILTRESI TEMIZLIĞI (RES. 11)
| UK DECLARATION OF CONFORMITY (Supply of Machinery (Safety) Regulations 2008, S.I. 2008 No. 1597, Annex II, part A) | |
| 1. The company: ST. S.p.A. - Via del Lavoro, 6 - 31033 Castelfranco Veneto (TV) - Italy 2. Hereby declares under its own responsibility that the machine: portable hand-held powered brush-cutter (grass cutting) | |
| a) Homologation type: T 26 J - T 26 JA c) Serial number: 24A••TRB000001 ÷ 99L••TRB999999 d) Engine: petrol | |
| 3. Conforms to UK Regulations: • S.I. 2008/1597 - Supply of Machinery (Safety) Regulations 2008 • S.I. 2001/1701 - Schedule 8 - Noise Emission in the Environment by Equipment for use Outdoors Regulations 2001 e) Notified body: / • S.I. 2016/1091 - Electromagnetic Compatibility Regulations 2016 • S.I. 2016/2032 - The Restriction of the Use of Certain Hazardous Substances in Electrical and Electronic Erg. Regulations 2012 efer to harm and standards: E' 11806 12 J/O 1499 19 IEC 63° 18 | |
| g) Measured sound power level: 106 dB(A h) Guaranteed sound power: 109 dB i) Cutting width: 38 c | |
| n) Person authorised to compile the technical f Via. Lavoro, 6 3103s Castelfranco Veneto (TV) - Italia | |
| o) Castelfranco Veneto, 10/09/2025 | O Stiga Group Sean Robinson |
| STIGA LTD (UK Importer) Stansted Courtyard, Parsonage Road, Takeley, Bishops Stortford, Essex, England, CM22 6PU, United Kingdom | UK CA |
EN • The content and images in this User Manual were produced expressly for ST. S.p.A. and are protected by copyright – any unauthorised reproduction or modification to the document, either partially or in full, is prohibited.
STIGA LTD (UK Importer)
Stansted Courtyard, Parsonage Road, Takeley, Bishop's Stortford, Essex, England, CM22 6PU, United Kingdom


- [1] SR - TEHNIČKI PODACI
- ARRESTO DELLA MACCHINA (FIG. 5)
- VŠEOBECNÉ INFORMACE
- JAK ČÍST NÁVOD
- MONTÁŽ OCHRANNÉHO KRYTU (OBR. 2)
- OBDOBÍ DLOUHODOBÉ NEČINNOSTI
- PÅFYLDNING AF BRÆNDSTOF
- AFSLUTNING AF ARBEJDET
- GENERAL INFORMATION
- HOW TO READ THE MANUAL
- NOTE or
- WARNING! Non-observance will result in the risk of injury to oneself or others.
- ▲ DANGER! Non-observance will result in the risk of serious injury or death to oneself or others.
- SAFETY REGULATIONS
- TRAINING
- WARNING! Read these instructions carefully before operating the machine.
- PRELIMINARY OPERATIONS
- DURING USE
- MAINTENANCE AND STORAGE
- RESIDUAL RISKS
- TRANSPORTATION AND HANDLING
- ENVIRONMENTAL PROTECTION
- GETTING TO KNOW THE MACHINE
- DESCRIPTION OF THE MACHINE AND ITS RANGE OF USE
- Intended use
- User types
- Improper use
- IDENTIFICATION LABEL AND MACHINE COMPONENTS
- DESCRIPTION OF EXPLANATORY SYMBOLS (WHERE APPLICABLE)
- SAFETY REQUIREMENTS
- MACHINE ASSEMBLY
- COMPLETING THE MACHINE (FIG. 1)
- FITTING THE GUARD (FIG. 2)
- ASSEMBLY AND DISASSEMBLY OF THE CUTTING LINE HEAD (FIG. 3)
- c) Disassembly
- MOUNTING THE ROD (FIG. 4)
- PREPARING TO WORK
- CHECKING THE MACHINE
- PREPARING THE FUEL MIXTURE
- Petrol characteristics
- Oil characteristics
- Preparation and preservation of the fuel mixture
- DANGER! Petrol and the fuel mixture are highly inflammable!
- REFUELLING
- DANGER! Never smoke whilst refuelling and avoid inhaling the petrol fumes.
- WARNING! Carefully open the tank as pressure could have formed inside. Before refuelling:
- ▲ WARNING! Always close the fuel tank cap firmly.
- USING THE MACHINE
- STARTING THE MACHINE
- Cold starting
- top
- ⚠ WARNING! Starting the engine with the choke engaged causes the cutting device to move, only stopping when the choke is disconnected.
- Warm starting
- ADJUSTING THE SPEED OF THE CUTTING DEVICE (FIG. 5)
- ⚠ WARNING! The cutting device must not move when the engine is running idle. If the cutting device moves when the engine is running idle, contact your dealer to correctly regulate the engine.
- STOPPING THE MACHINE (FIG. 5)
- WARNING! When you have reduced speed to a minimum, it will take a few seconds for the cutting device to stop.
- OPERATING MODES AND WORK TECHNIQUES
- ▲ WARNING! Always wear suitable clothing when using the machine. Your dealer can provide you with all the information on the most suitable accident-prevention devices to guarantee your safety.
- WARNING! The use of metal or rigid blades of any type with this machine is prohibited.
- WARNING! Use ONLY nylon lines. The use of metal lines, plasticised metal lines
- STARTING UNIT
- NUTS AND SCREWS
- CLEANING THE AIR FILTER (FIG. 11)
- 5.6 CHECKING THE SPARK PLUG (FIG. 12)
- HEAD LINE REPLACEMENT (FIG. 13 A/B)
- SHARPENING THE LINE CUTTING KNIFE (FIG. 14)
- LONG PERIODS OF DISUSE
- EXTRAORDINARY MAINTENANCE
- TUNING MINIMUM SPEED
- CARBURETTOR ADJUSTMENTS
- DIAGNOSTICS
- ÍNDICE
- KUIDAS KASUTUSJUHENDIT LUGEDA
- SEOKSEN VALMISTUS
- GÉNÉRALITÉS
- COMMENT CONSULTER LE MANUEL
- TRANSPORT ET MANUTENTION
- ARRÊT DE LA MACHINE (FIG. 5)
- PASIRUOŠIMAS DARBUI
- JRENGINIO PATIKRINIMAS
- VISPĀRĪGA INFORMĀCIJA
- KĀ JĀLASA ROKASGRĀMATA
- PLĀNOTĀ TEHNISKĀ APKOPE
- GENERELT
- HVORDAN LESE BRUKSANVISNINGEN
- VEDLIKEHOLD OG OPPBEVARING
- BLI KJENT MED MASKINEN
- ETTERFYLLING AV DRIVSTOFF
- VED ARBEIDETS SLUTT
- ORDINÆRT VEDLIKEHOLD
- KONTROLL AV TENNPLUGGEN (FIG. 12)
- EKSTRAORDINÆRT VEDLIKEHOLD
- INFORMACJE OGÓLNE
- JAK POSŁUGIWAĆ SIĘ INSTRUKCJĄ OBSŁUGI
- TRYBY OPERATYWNE I METODY PRACY
- VŠEOBECNÉ INFORMÁCIE
- AKO ČÍTAŤ NÁVOD
- DLHODOBÁ NEČINNOST
- SPLOŠNE INFORMACIJE
- KAKO BEREMO PRIROČNIK
- POSTOPKI PRED UPORABO
- DALJŠE OBDOBJE NEUPORABE
- INNEHÅLLSFÖRTECKNING
- ÇUBUĞUN MONTAJI (RES. 4)
- HAVA FILTRESI TEMIZLIĞI (RES. 11)
- STIGA LTD (UK Importer)
Brand : ALPINA
Model : ATR 26 J
Category : Grass trimmer