
T 1.0 EJ - Grass trimmer ALPINA - Free user manual and instructions
Find the device manual for free T 1.0 EJ ALPINA in PDF.

| Product type | Electric grass trimmer |
| Brand | ALPINA |
| Model | T 1.0 EJ |
| Supply voltage | 230 V~ |
| Frequency | 50 Hz |
| Motor power | 1000 W |
| Cutting width | 37 cm |
| Weight | 4.70 kg |
| Idle speed | 7000 min⁻¹ |
| Line type | Nylon, "Tap & Go" head |
| Sound pressure level | 79.33 dB(A) |
| Guaranteed sound power level | 96 dB(A) |
| Vibration level | 2.56 m/s² (uncertainty ±1.5) |
| Power supply | Mains (extension max 30 m, cross-section 1.5 mm²) |
| Protection | Cutting device guard, line cutter |
| Safety | Double insulation, safety switch, rapid stop |
| Standards | CE, WEEE (2012/19/EC) |
| Included accessories | Harness, guard, cutting guide |
| Maintenance | Clean cooling grilles, replace spool, sharpen blade |
| Repairability | Original parts from dealer or authorized center |
Frequently Asked Questions - T 1.0 EJ ALPINA
User questions about T 1.0 EJ ALPINA
0 question about this device. Answer the ones you know or ask your own.
Ask a new question about this device
Download the instructions for your Grass trimmer in PDF format for free! Find your manual T 1.0 EJ - ALPINA and take your electronic device back in hand. On this page are published all the documents necessary for the use of your device. T 1.0 EJ by ALPINA.
USER MANUAL T 1.0 EJ ALPINA
ENGLISH - Translation of the original instructions ...... EN
natural_image
Illustration of a person using a tool to clean or wear a tree trunk, with no visible text or symbols.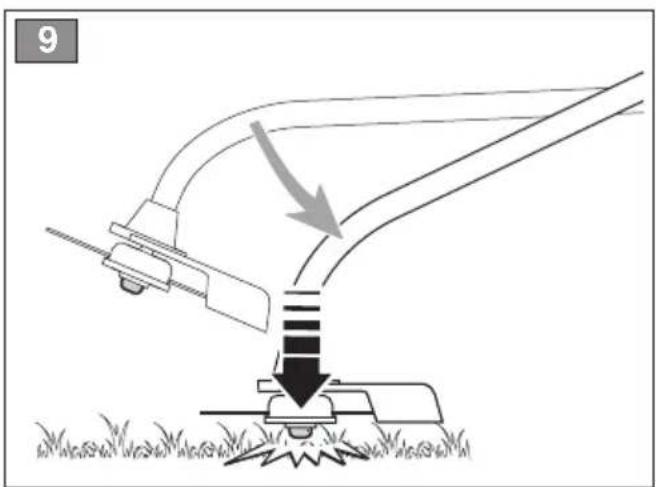
natural_image
Diagram of a irrigation system with a curved pipe and a base, showing a downward arrow indicating flow direction (no text or symbols)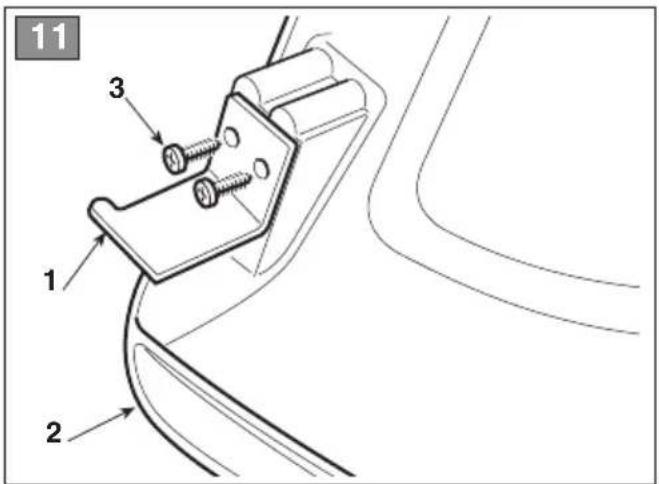
Gentile Cliente,
COMANDI ED ELEMENTI FUNZIONALI
thank you for choosing one of our products. We hope that you will be completely satisfied with this machine and that it fully meets your expectations. This manual has been compiled in order to provide you with all the information you need to get acquainted with the machine and use it safely and efficiently. Don't forget that it is an integral part of the machine; keep it handy so that it can be consulted when necessary, and pass it on to a further user if you resell or loan the machine.
Your new machine has been designed and manufactured in pursuance with current regulations, and is safe and reliable if used in compliance with the instructions provided in this manual (proper use). Using the machine in any other way, or non-compliance with the safety specifications relative to use, maintenance and repair is considered “improper use” which will invalidate the warranty, relieve the manufacturer from all liabilities, and the user will consequently be liable for all and any damage or injury to himself or others.
Since we regular improve our products, you may find slight differences between your machine and the descriptions contained in this manual. Modifications can be made to the machine without notice and without the obligation to update the manual, although the essential safety and function characteristics will remain unaltered. In case of any doubts, please contact your dealer. And now enjoy your work!
TABLE OF CONTENTS
- Identification of the main components 2
- Symbols 3
- Safety warnings 4
- Machine assembly 6
- Preparing to work 7
- How to start - Stop the motor 7
- Using the machine 8
- Maintenance and storage 10
- Accessories 10
1. IDENTIFICATION OF MAIN COMPONENTS
MAIN COMPONENTS
- Power unit
- Drive tube
- Drive tube terminal
- Cutting line head
- Cutting device guard
- Front handgrip
- Guard
- Rear handgrip
- Connection point (of the webbing)
-
Webbing
-
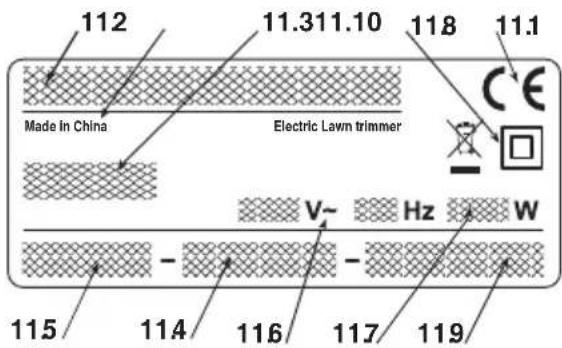
Identification plate
- Power cable
- Extension lead (not supplied)
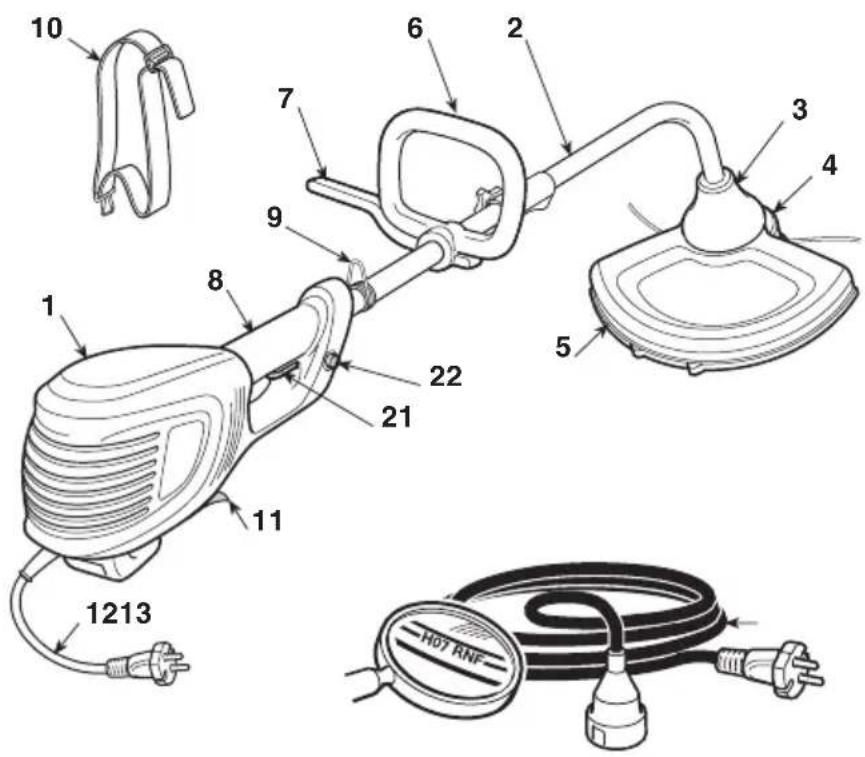
CONTROLS AND FUNCTIONAL PARTS
- Trigger switch
- Safety button
IDENTIFICATION PLATE
11.1) EC Conformity marking
11.2) Name and address of the manufacturer
11.3) Machine model
11.4) Serial number
11.5) Year of manufacture
11.6) Power supply frequency and voltage
11.7) Motor power
11.8) Dual insulation
11.9) Article Code
11.10) Manufacturing country
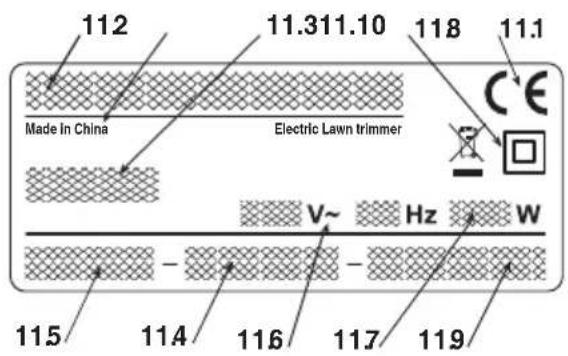
The example of the Declaration of Conformity is provided on the penultimate page of the owner's manual.

Do not dispose of electric equipment together with household waste material! In observance of European Directive 2012/19/EC on waste electrical and electronic equipment and its implementation in accordance with national law, electric equipment that have reached the end of their life must be collected separately and returned to an environmentally compatible recycling
facility. If electrical appliances are disposed of in landfills or dumps, hazardous substances can leak into the groundwater and get into the foodchain, damaging your health and well-being. For further information on the disposal of this product, please contact your dealer or your nearest domestic waste collection service.
| Maximum noise and vibration levels [1] | T 1.0 EJ | |
| Sound pressure level– Measurement uncertainty | dB(A) dB(A) | 79.3 3 |
| Guaranteed sound power level | dB(A) 96 | |
| Vibration level– Measurement uncertainty | m/s2 m/s2 | 2.56 1.5 |
[1]
Notice:
The vibration value indicated was determined with a standardized tool and can be used to make comparisons with other electric equipment as well as temporary estimates of the load through the vibrations.
WARNING!
The vibration value may vary according to the usage of the machine and its fitted equipment, and be higher than the one indicated. Safety measures must be established to protect the user and must be based on the load estimate generated by the vibrations in real usage conditions. In this regard, all the operational cycle phases must be taken into consideration, such as switching off or idle running.
The noise level may vary according to machine usage if working or running idle.
| TECHNICAL DATA | T 1.0 EJ | |
| Power supply voltage | V~230 | |
| Power supply frequency | Hz 50 | |
| Engine Power | W 1000 | |
| Cutting width | cm 37 | |
| Mass | kg 4,70 | |
| No-load Speed | min^-1 | 7000 |
| Maximum engine and tool rotation speed | r.p.m 7000 | |
2. SYMBOLS


flowchart
graph TD
    A[" "] --> B[" "]
    B --> C[" "]
    C --> D[" "]

3) If you are using the machine every day in normal conditions, you can be exposed to a noise level of 85 dB(A) or higher. Wear earmuffs or ear-plugs, eye protection and a protective helmet.
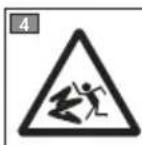
4) Danger of flying objects! Keep any people or pets at least 15 m away when using the machine!
5) Disconnect the plug from the mains before commencing maintenance work or if the power cord is damaged.
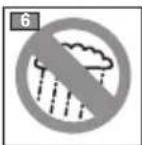
6) Do not leave the machine in the rain (or in damp conditions).
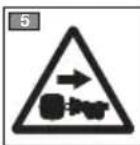
7) Only one cutting line head can be used on this machine.
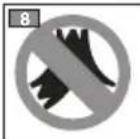
8) Do not use pointed, rigid or metal blades or circular saw blades.
9) Keep bystanders away.
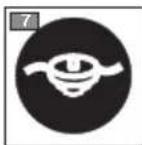
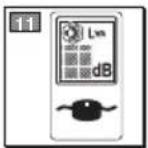
10) Cutting device rotation direction.
11) Acoustic output level LWA.
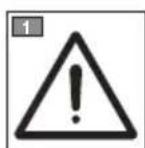
1) Warning! Danger. The failure to use this machine correctly can be hazardous for oneself and others.
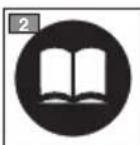
2) Read the instruction manual before using themachine.
3. SAFETY WARNINGS
HOW TO READ THE MANUAL
Certain paragraphs in the manual contain particularly significant information and are marked with various levels of highlighting with the following meaning:
NOTE
or
IMPORTANT
These give details or further information on what has already been said, with the aim of preventing damage to the machine.

WARNING!
Non-observance will result in the risk of injury to oneself or others.

DANGER!
Non-observance will result in the risk of serious injury or death to oneself or others.
ELECTRIC GRASS TRIMMER SAFETYWARNINGS

WARNING!
The safety rules must be observed during machine use. Before starting the machine, read the instructions regarding per sonal safety and the safety of unauthorized persons. Keep the instructions in a good state for future use.
The term “power tool” in the warnings refers to your mains-operated (corded) power tool.
1) Intended machine use: "cutting grass and non-woody vegetation, using a nylon line (e.g. around the edges of lawns, flo werbeds, walls, fences and small grassy areas to tidy up the cutting done using a mower)". Any other use, such as using accessories not specified in this manual, may be hazardous and also damage the machine.
Examples of improper use may include, but are not limited to:
- use the machine for sweeping;
- trimming hedges or other jobs in which the cutting device is not used on ground level;
- using the machine with the cutting device above the operator's belt level;
- using the machine for cutting non-plant material;
- use of the machine by more than one person.
2) This appliance can be used by children aged from 8 years and above and persons with reduced physical, sensory or mental capabilities or lack of experience and knowledge if they have been given supervision or instructions concerning use of the appliance in a safe way and understand the hazards involved. Children shall not play with the appliance. Cleaning and user maintenance shall not be made by children without supervision.
3) Residual risks: even all the safety rule are obeyed, there still can be some other risks.
- Danger of injury of the fingers and hands involved into the rotating thread.
- Danger of injury of the feet by affecting the cutting line.
- hrowing of stones and earth. The moreover one obvious residual risks can exist despite all met precautions.
4) Wear protective glasses or goggles.
5) Never allow children or people unfamiliar with the instructions to use the machine.
6) Stop using the machine while people, especially children, or pets are nearby.
7) Only use the machine in daylight or good artificial light.
8) Do not use the appliance in bad weather especially if lightning might occur.
9) Before using the machine and after any impact, check for signs of wear or damage and repair as necessary.
10) Never operate the machine with damaged guards or without the guards in place.
11) Keep hands or feet away from the cutting means at all times and especially when switching on the motor.
12) Take care against injury from any device fitted for trimming the filament line length. After extending new cutter line always return the machine to its normal operating position before switching on.
13) Never fit metal cutting elements.
14) Never user replacement parts or accessories not provided or recommended by the manufacturer.
15) Disconnect the machine from the mains before checking, cleaning or working on the machine and when it is not in used.
16) Always ensure that ventilation openings are kept clear of debris.
17) After use, disconnect the machine from the mains and check for damage.
18) When not in use store the machine out of the reach of children.
19) Mains powered trimmers should only be repaired by an authorised repairer.
20) Only use manufacturer recommended replacement parts and accessories.
ADDITIONAL SAFETY WARNINGS
1) Read the instructions carefully.
2) Be familiar with the controls and proper use of the equipment.
3) Before use check the supply and extension cord for signs of damage or ageing.
4) If the cord becomes damaged during use, disconnect the cord from the supply immediately. DO NOT TOUCH THE CORD BEFORE DISCONNECTING THE SUPPLY.
5) Do not use the machine if the cords are damaged or worn.
6) Warning: cutting elements continue to rotate after the motor is switched off.
7) Keep extension cords away from cutting elements.
8) Power the machine using a residual current device (RCD Residual Current Device) with max. 30 mA tripping current.
• How to use the electric grass trimmer
When using the machine, always use caution and take on a firm and well-balanced position.
- Where possible, avoid working on wet, slippery ground or in any case on uneven or steep ground that does not guarantee stability for the operator.
- Never run, but walk carefully paying attention to the lay of the land and any eventual obstacles.
- Assess the potential risks of the ground to be mown and take all necessary precautions to en sure your own safety, especially on slopes or on bumpy, slippery or unstable ground.
- Work along the contour on slopes, never when walking up or down and always keep downhill of the cutter.
Do not use the machine if you are unable to hold it with both hands or keep it steady on your legs while working.
The machine must never be used by more than one person.
Never use the machine if the user is tired or unwell, or has taken medicine, drugs, alcohol or any substances which may slow his reflexes and compromise his judgement.
- Techniques for using the electric grass trimmer
Always observe the safety regulations and use the most suitable cutting techniques (see chapter 7 for in structions and examples).
• Handling the electric grass trimmer safety
Whenever the machine is to be handled or transported you must:
- turn off the motor, wait for the cutting device to stop and unplug the machine from the mains;
- only hold the machine using the handgrips and position the cutting device in the opposite direction to that used during operation.
When using a vehicle to transport the machine, position it so that it can cause no danger to persons and fasten it firmly.
- Recommendations for first-time users
Before tackling a mowing job for the first time it is advisable to gain the necessary familiarity with the machine and the most suitable cutting techniques, finding out how to firmly grip the machine and making the movements required by the job.
GENERAL POWER TOOL SAFETY WARNINGS
1) Work area safety
a) Keep work area clean and well lit. Cluttered or dark areas invite accidents.
b) Do not operate power tools in explosive atmospheres, such as in the presence of flammable liquids, gases or dust. Power tools create sparks which may ignite the dust or fumes.
c) Keep children and bystanders away while operating a power tool. Distractions can cause you to lose control.
2) Electrical safety
a) Power tool plugs must match the outlet. Never modify the plug in any way. Do not use any adapter plugs with earthed (grounded) power tools.
Unmodified plugs and matching outlets will reduce risk of electric shock.
b) Avoid body contact with earthed or grounded surfaces, such as pipes, radiators, ranges and refrigerators. There is an increased risk of electric shock if your body is earthed or grounded.
c) Do not expose power tools to rain or wet conditions. Water entering a power tool will increase the risk of electric shock.
d) Do not use the cord improperly. Never use the cord for carrying, pulling or unplugging the power tool. Keep cord away from heat, oil, sharp edges or moving parts. Damaged or en tangled cords increase the risk of electric shock.
e) When operating a power tool outdoors, use an extension cord suitable for outdoor use. Using a cord suitable for outdoor use reduces the risk of electric shock.
f) If operating a power tool in a damp location is unavoidable, use a residual current device (RCD) protected supply. Using an RCD reduces the risk of electric shock.
3) Personal safety
a) Stay alert, watch what you are doing and use common sense when operating a power tool. Do not use a power tool while you are tired or under the influence of drugs, alcohol or medication. A moment of inattention while operating power tools may result in serious personal injury.
b) Use personal protective equipment. Always wear eye protection. Protective equipment such as dust mask, non-skid safety shoes, hard hat, or hearing protection used for appropriate conditions will reduce personal injuries.
c) Prevent unintentional starting. Ensure the switch is in the off-position before connecting to power source, picking up or carrying the tool. Carrying power tools with your finger on the switch or energising power tools that have the switch on invites accidents.
d) Remove any adjusting key or wrench before turning the power tool on. A wrench or a key left attached to a rotating part of the power tool may result in personal injury.
e) Do not overreach. Keep proper footing and balance at all times. This enables better control of the power tool in unexpected situations.
f) Dress properly. Do not wear loose clothing or jewellery. Keep your hair, clothing and gloves away from moving parts. Loose clothes, jewellery or long hair can be caught in moving parts.
g) If devices are provided for the connection of dust extraction and collection facilities, ensure these are connected and properly used. Use of dust collection can reduce dust-related hazards.
4) Power tool use and care
a) Do not force the power tool. Use the correct power tool for your application. The correct power tool will do the job better and safer at the rate for which it was designed.
b) Do not use the power tool if the switch does not turn it on and off. Any power tool that cannot be controlled with the switch is dangerous and must be repaired.
c) Disconnect the plug from the power source before making any adjustments, changing accessories, or storing power tools. Such preventive safety measures reduce the risk of starting the power tool accidentally.
d) Store idle power tools out of the reach of children and do not allow persons unfamiliar with the power tool or these instructions to operate the power tool. Power tools are dangerous in the hands of untrained users.
e) Maintain power tools. Check for misalignment or obstruction of moving parts, breakage of parts and any other condition that may affect the power tool's operation. If damaged, have the power tool repaired before use. Many accidents are caused by poorly maintained power tools.
f) Keep cutting tools sharp and clean. Properly maintained cutting tools with sharp cutting edges are less likely to become jammed and are easier to control.
g) Use the power tool, accessories and tool bits etc. in accordance with these instructions, ta king into account the working conditions and the work to be performed. Using the power tool for operations other than those intended could result in a hazardous situation.
5) Service
a) Have your power tool serviced by a qualified re pair person using only identical replacement parts. This will ensure that the safety of the power tool is maintained.
4. MACHINE ASSEMBLY
WARNING!
Mount the components
ve ry carefully so as not to impair the safety and efficiency of the machine. If in doubt, contact your dealer.
WARNING!
Make sure the machine is
not plugged into the mains socket.
WARNING!
Unpacking and complet-
ing the assembly should be done on a flat and stable surface, with enough space for moving the machine and its packaging, always making use of suitable equipment.
Disposal of the packaging should be done in accordance with the local regulations in force.
1. MOUNTING THE FRONT HANDGRIP (Fig. 1)
- Fit the lower part (3) with guard on the drive tube
- Fit the front handgrip (4) by using the screws (5).
- Before tightening the screws (4), align the hand-grip correctly with respect to the drive tube.
- Fully tighten the screws (4).
2. MOUNTING THE ROD (Fig. 2)
- Push the lower part of the rod (1) right down until the stop pin (2) clicks into the hole (3) in the rod. This is easier to do if you rotate the lower part of the rod (1) slightly in both directions; insertion is completed when the stop pin (2) protrudes completely from the hole (3).
- Once inserted, tighten the knob (4) securely.
3. MOUNTING THE GUARD (Fig. 3)
WARNING!
The guard must be fitted correctly to respect the safety requirements and the correct position of the line cutting knife.
- Assemble the guard (1) using the four screws (2) to fasten it.
IMPORTANT
Once mounted, the guard can never be removed.
5. PREPARING TO WORK
1. CHECKING THE MACHINE

WARNING!
Make sure the machine is not plugged into the mains socket.
Before starting work please:
- check that the mains frequency and voltage is the same as the rating data on the "Identification Plate" (see chap. 1 - 11.8).
- check that the trigger switch and the safety button should move freely without forcing and return automatically and rapidly back to their neutral position;
- Check that the trigger switch must remain locked until the safety button is pressed;
- check that the cooling air vents are not obstructed;
– check that the power cable and extension lead are not damaged; - check that handgrips and protection devices are clean and dry, correctly mounted and well fastened to the machine;
- check that the cutting devices and guards are not damaged;
- check that the machine is not showing signs of wear or damage due to knocks or other causes, and carry out the necessary repairs.
2.ELECTRICALCONNECTIONS

DANGER!
Electricity and moisture are not compatible.
- Always handle and connect electric cables in dry conditions.
- Keep electric sockets or cables away from wet and damp areas (e.g. puddles or wet ground).
The quality of the extension leads must be no less than H07RN-F or H07VV-F, with a minimum section of 1.5 mm and a recommended maximum length of 30 m.
To avoid overheating, do not keep the extension lead rolled up during use.

DANGER!
The permanent connection of any electrical equipment to the mains of a building must be installed by a qualified electrician in conformity with the regulations in force. Incorrect wiring can cause serious injury and even death.
6. HOW TO START - STOP THE MOTOR
STARTING THE MOTOR (Fig. 4)
Before starting the motor:
- Fasten the extension lead (1) to the cable clamp on the rear handgrip.
- FIRST connect the power cable plug (2) to the extension lead (3) and THEN plug the extension lead into the mains socket (4).
To start the motor:
– Hold the machine firmly with both hands.
- Press the safety button and then the switch (6).
NOTE
When you release the
switch, the safety button is also released and the motor stops.
STOPPING THE MOTOR (Fig. 4)
To stop the motor:
- Release the switch (6).
- FIRST unplug the extension lead (3) from the mains socket (4) and THEN disconnect the power cable (2) of the machine from the extension lead (3).
7. USING THE MACHINE
WARNING!
For your safety and that of others:
1) Keep in mind that the operator or user is re responsible for accidents or hazards occurring to other people or their property.
2) Always wear suitable clothing when using the machine. Your dealer can provide you with all the information on the most suitable accident-prevention devices to guarantee your safety.
3) Thoroughly inspect the whole work area and remove anything that could be thrown up by the machine or damage the cutting de vice (stones, branches, iron wire, bones, etc.).
4) Use the cable clamp to prevent the extension lead from disconnecting accidentally. Make sure it is connected to the socket without being forced. Ne ver touch a live electric cable if it is poor ly insulated.
5) Be careful of flying debris coming from the cutting device.
6) Stop the motor and unplug the machine from the mains:
- if the machine starts to vibrate abnormally: find the cause of the vibration imme dia tely and have it inspected at a Spe cia li sed Centre;
- whenever you leave the machine unattended.
IMPORTANT
Remember that an electric grass trimmer used incorrectly can be a disturbance to others. To respect people and the environment:
- Avoid using the machine in environments or at times of the day when it may disturb others.
- Scrupulously comply with local regulations and provisions for the disposal of waste materials after cutting.
- To avoid the risk of fire, do not leave the machine with the motor hot on leaves or dry grass.
- Scrupulously comply with local regulations and provisions for the disposal of damaged parts or any elements which have a strong impact on the environment.
WARNING!
Prolonged exposure to vibra tions can cause injuries and neurovascular disorders (also called “Renaud’s syndrome” or “white hand”), especially to people suffering from circulation disorders. The symptoms can regard the hands, wrists and fingers and are shown through loss of sensitivity, torpor, itching, pain and discolouring of or structural changes to the skin. These effects can be worsened by low ambient temperatures and/or by gripping the handgrips excessively tightly. If the symptoms occur, the length of time the machine is used must be reduced and a doctor consulted.
1. USING THE MACHINE
WARNING!
When working, the machine must always be firmly held in both hands, keeping the cutting group below the line of the belt.
The cutting line head can eliminate tall grass and non-woody vegetation near fences, walls, foundations, pavements, around trees, etc. or to completely clean a particular area of the garden.
WARNING!
The use of metal or rigid bla des of any type with this machine is prohibited.
2. USING THE HARNESS (Fig. 5)
WARNING!
The machine must al ways be used connected to the webbing worn correctly. Frequently check the efficiency of the quick release mechanism used to quickly free the machine from the belts in case of danger.
The webbing must be put on before connecting the machine to the special coupling and the belts must be adjusted to suit the operator's height and stature.
The belt (1) must go over the left shoulder towards the right hip.
Fasten the snap hook (2) to the provided fitting (3) on the drive tube.
3. WORKING TECHNIQUES

WARNING!
Use ONLY nylon lines. The
use of metal lines, plasticised metal lines and/or lines not suitable for the head can cause serious injuries and wounds.
During use it is advisable to stop the motor periodically and remove the weeds wound round the machine, so as to prevent overheating due to the grass caught under the guard.
Remove the caught-up grass with a screwdriver.

WARNING!
Do not use the machine
for sweeping, tilting the cutting line head. The power of the motor could throw objects and small stones 15 metres or more, causing damage and injuries to people.
• Cutting in motion (Scything) (Fig. 6)
Proceed at a regular pace, with a circular motion similar to a traditional scythe, keeping the cutting device parallel to the ground.
First try cutting at the right height in a small area, so as to then achieve a uniform cutting height keeping the cutting line head at a constant distance from the ground.
For heavier cutting it can be useful to tilt the cutting line head by about 30^ .

WARNING!
Do not work in this way if
there is the possibility of causing objects to be thrown, which could harm people and animals and cause damage.
• Cutting near fences/foundations (Fig. 7)
Slowly approach the cutting line head to fences, posts, rocks, walls, etc. without hitting them hard.
If the line strikes a solid object it could break or become worn; if it gets tangled in a fence it could break abruptly.
In any case, cutting around pavements, foundations, walls, etc. can cause greater wear than normal to the line.
• Cutting round trees (Fig. 8)
Walk round the tree from left to right, approaching the trunks slowly so as not to strike the tree with the line and keeping the cutting line head tilted forward slightly.
Remember that the nylon line could lop or damage small shrubs and that the impact of the nylon line against the trunk of bushes or trees with soft bark could seriously damage the plant.
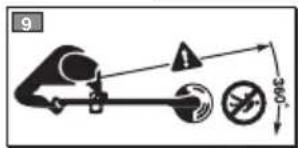
- Adjusting line length when working (Fig. 9)
This machine is fitted with a "Tap & Go" head.
To release more line, tap the cutting line head against the ground with the motor running; the line will be released automatically and the knife cuts off the excess length.
If the line is not long enough:
- stop the motor and disconnect the extension lead from the mains:
- press the bottom of the head and tug on the ends of the line, until it reaches the desired length.
If the line has run out, the coil must be replaced.

WARNING!
After working on the cut-
ting-line head, always put the machine in a working position before starting the motor.
4. END OF OPERATIONS
When you have finished your work:
- Switch off the motor as indicated above (Chap. 6).

WARNING!
Allow the motor to cool
before storing in any enclosure.
To reduce fire hazards, clean the machine thoroughly to get rid of any remains of grass, leaves or excess grease, never leave containers with the cut debris inside the storage area.
8. MAINTENANCE AND STORAGE
WARNING!
For your safety and that of others:
- After each use, disconnect the machine from the mains and check for damage.
- Correct maintenance is essential to maintain the original efficiency and safety of the machine over time.
- Keep all nuts, bolts and screws tight to be sure the equipment is in safe working condition.
- Never use the machine with worn or damaged parts. Damaged parts are to be replaced and never repaired.
- Only use original spare parts. Parts that are not of the same quality can seriously damage the equipment and compromise safety.
WARNING!
During maintenance operations unplug the machine from the mains.
1. MOTOR COOLING
To avoid overheating and damage to the motor, always keep the cooling air vents clean and free of sawdust and debris.
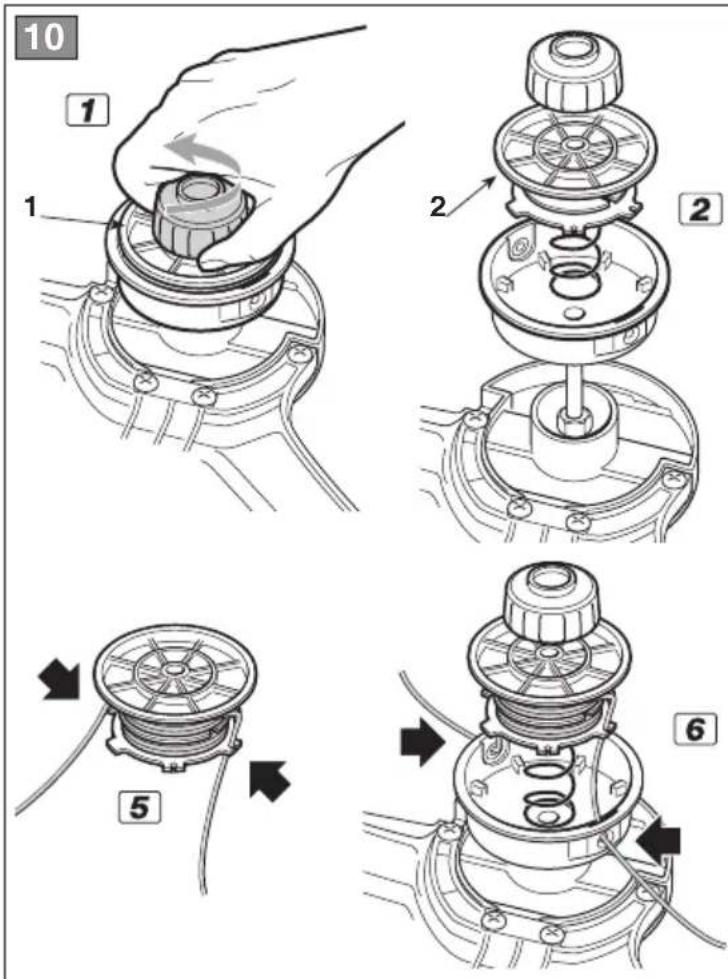
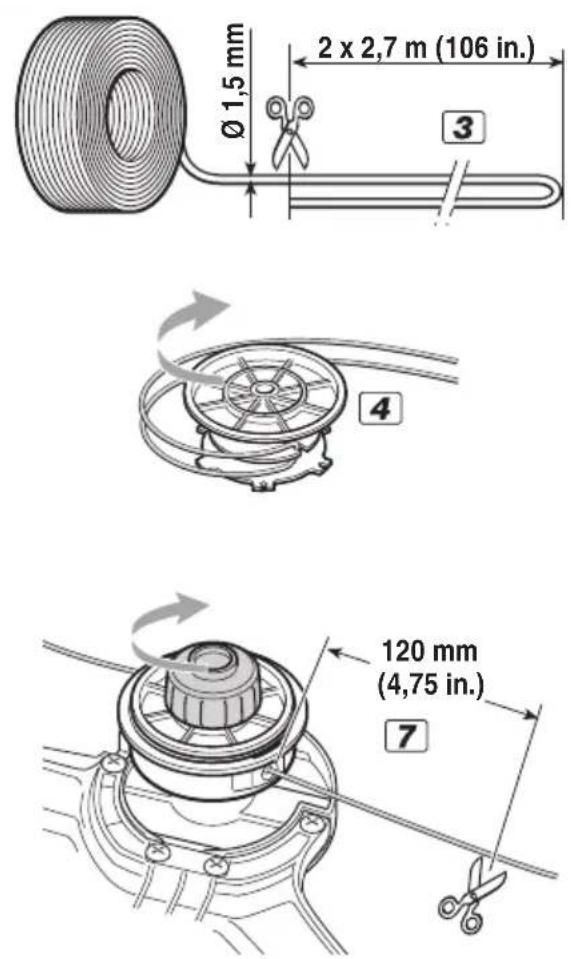
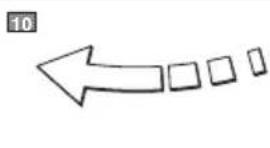
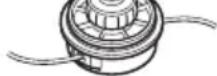
2. HEAD COIL REPLACEMENT (Fig. 10)
– Follow the sequence indicated in the figure.
3. SHARPENING THE LINE CUTTING KNIFE (Fig. 11)
- Unscrew the two screws (1) and remove the line cutting knife (2) from the guard (3).
- Fix the line cutting knife in a vice and sharpen it using a flat file, being careful to retain the original cutting angle.
- Refit the knife on the guard.
4. ELECTRIC CABLES
WARNING!
Check the condition of the electric cables regularly and replace them if they are worn or their insulation looks damaged.
If the appliance's power supply wire is damaged, it must be replaced by the manufacturer, service agent or a similar qualified person.
5. EXTRAORDINARY MAINTENANCE
All maintenance operations not foreseen in this manual must be performed exclusively by your dealer.
All and any operations performed in unauthorised centres or by unqualified persons will totally invalidate the warranty.
6. STORAGE
After every work stint, clean the machine thoroughly to remove all dust and debris, and repair or replace any faulty parts.
The machine must be stored in a dry place away from the elements and out of the reach of children.
9. ACCESSORIES
The table contains a list of all available accessories, indicating those which may be used on each machine, marked with the symbol “*”.
WARNING!
In consideration that the selection, application and usage of the accessory to be fitted in the variety of possible us-
age are actions made solely by the user, the latter assumes responsibility for damages of any kind due to such actions. When in doubt or if lacking knowledge of the specificity of each accessory, contact your retailer or specialised gardening centre.
Code Model
T 1.0 EJ
118801750/0 (M8 x 1,25 dx M)

Cher Client,
flowchart
graph TD
    A["10"] --> B[" "]
    B --> C[" "]
    C --> D[" "]
MAKİNE ETİKETİ
MOTOR STOPU (Res. 4)
GŁÓWNE CZE, ŚCI SKŁADOWE
KOMANDE FUNKCIONALNIH ELEMENTOV
UPRAVLJAČKI UREĐAJI I FUNKCIONALNI ELEMENTI
- Ručica prekidača
- Sigurnosni gumb
PLOČICA S PODACIMA
11.1) Oznaka sukladnosti EZ
11.2) Naziv i adresa proizvođača
11.3) Model stroja
11.4) Serijski broj
11.5) Godina proizvodnje
11.6) Napon i frekvencija mrežnog napajanja
11.7) Snaga motora
11.8) Dvostruka izolacija
11.9) Šifra Artikla
11.10) Zemlja proizvodnje
DODATNE SIGURNOSNE UPUTE
1) Pažljivo pročitajte upute.
2) Upoznajte se s načinom upravljanja i primjerenom uporabom stroja.
3) Prije početka rada, provjerite da napojni i produžni kabeli ne pokazuju znakove oštećenja ili dotrajalosti.
4) Ako se produžni kabel tijekom uporabe ošteti, od-mah ga iskopčajte iz električne mreže. NEMOJTE DIRATI KABEL PRIJE NEGO ŠTO ISKOPČATE PRODUŽNI KABEL.
5) Nemojte nikad koristiti stroj ako su kabeli oštećeni ili istrošeni.
6) Pozor: rezni element se nastavlja okretati i nakon gašenja motora.
7) Produžni kabel držite daleko od reznih elemenata.
8) Napajati uređaj preko jednog diferencijalnog sistema (RCD - Residual Current Devi ce) sa strujom na prekid koja na prelazi 30 mA.
- Kako rukovati s električnim rubnim šišačem
Za vrijeme uporabe, zauzmite čvrst i stabilan položaj te budite uvijek na oprezu.
INNEHÅLLSFÖRTECKNING
KOMMANDON OCH FUNKTIONELLA ENHETER
- Strömbrytare
- Säkerhetsknapp
MÄRKPLÅT
KÄSKYT JA TOIMINTAOSAT
FUNKTIONSBETJENINGER
4. AFLSUTNING AF ARBEJDET
8. VEDLIKEHOLD OG LAGRING
ADVARSEL! het:
5. PASIRUOŠIMAS DARBUI
1. PRIETAISO PATIKRINIMAS

DÉMESIO!
КОМАНДИ И ФУНКЦИОНАЛНИ ЕЛЕМЕНТИ
KUIDAS KASUTUSJUHENDIT LUGEDA
the bus e 5-10-June 6
| NL | SY | DA |
| EF-Samvorsarklaaring(Maskindelinktr 2004d2E, Vredegg II, del A)1. Firmast2. Erkaran på egel anwar at musikinen: Barbar elektrats direkt von- og kanditrimmer / grossklipping3. Typo / ModellModellensimum4. Produtogonpar5. Sertfittersgesorgan6. Appyler kravone i direktivene:7. Sertflüssingsorgan8. EF-typoprevling9. Herstivning till harmoniserte standarder10. Maliy telfyldelivne11. Garantert lydeffektiniva2. Klippebrede3. Pensions som bar fullmakti tl å utdienige teknik dokumentasjon:3. Stad og dato | EB-Drättig/Erkansprestimnere (Modellensimum 2004d2E, bliga II, del A)1. Afagat je begt anwar at musikinen: Barbar elektrats direkt von- og kanditrimmer / grossklipping2. Egyr:3. Dey:4. Egyr:5. Devl:5. Derivate erwerer motima i direktivene:1. Annal:2. ES typy:3. Rufenlar:4. Hominierede standarder 1. Uppmatt lydeffektiniva2. Garantard lydeffektiniva3. Stad:4. Auurforserord person für upprüttander od den telemiske dokumentationen: r. Ort och datum | EF-sovernen (Modellensimum 2004d2E, bliga II, del A)1. Formast2. Pergrist erwar at musikinen: Barbar elektrats direkt von- og musikinen: Frieftung der grassset.2. Typo / Mode3. Befremlandgavlase4. Fremdlingsdter5. Sertkumerum:6. Motor: seltkirk1. Er i overnomstammose mod specifikationno rologe direktivene:7. Cortifloringsorgan8. EF-typeaprenning9. Heinstning til harmoniserede standarder 1. Malt lydeffektiniveau2. Garantert lydeffektiniveau3. Klippebrede4. Persion, dor har bomyndigalse tl at udarbejde del telemiske dusaler: r. Sted og dato |
| FI-EV-YAATNIUSTENNUKABISUWAVKUUTUS (Konsedinktrivil 2006d2EY, Lille II, osa A)1. Ytity2. Kauzlatzse omala vastullainen, etis kone: Kaian kermatelnax salskyktiliten, rohnaflikorging/mikmonikon reunjojn vinnemstelykan? rohnoniklaus:1. Typo? Perussnali2. Myrniimalis3. Varismatsus:4. Sertanumex:5. Moctort? : sinkölnen3. On yhdenmatelnsten searservlen direktivien4. Viitusa bermontelsiteln standardeihin5. Mitella sartebellose6. Sertfilidilyltysa7. EF-yyppalkosbelu8. Viitusa bermontelsiteln standardeihin9. Mitella sartebellose10. Taitlu sartebelose11. Lätkuplevogs12. Tieteklast einklerijen belaimisen vollustellu henkilo:1. Pulska ja pällvänärä | CS | RL |
| HUEK-mehtelloskogi nyitikdzozeta (2006d2EK periatryev, il. melleket "A" rosz! 1. Velek?2. Festelek:4. Tejes de loses tatsatban juktent, hogy az alabó épig: radbochato elektrômes fiumyrték/zegélyrgynie i rýperte3. Typo / Alapitopus4. Kreskedoketil typus6. Gyrdávi av:7. Komstel:8. Motor: elektrômes3. Megilelet az elabbi zirányvek elózásimine:9. Topolo spore3. Applia / Alapitopus4. Hivatkozca a harmonizität szabávoryne3. Melt szabjelnostny szint3. Finsjedte zajelyeziny arzini3. Vagaszi szelesseg4. Mizaki Dossze sporkelesztostre helvathamandi szemity:9. Heye ot idoge | Diplureación participantes normos EC (Prorotipara mažsinynon ostrudorami 2006d2E, Prorotipara ni, часть Ay 1. Propresstat:2. Zvesnitat pod coabitamente oportecnostniece, что машин: Porretmania elektronicola zagnoxoscakla / trinapacce kranne kranne / strukna, razona3. Typ Tiasasma nockaly4. Konoclasma naštitinovanejne4. Guid kralizovane5. Tabnerpt3. Garmerski elektrorouj3. Costrontetrukt u prabodomnico smujuvanicne diurniktimo:4. Cortefničkursuć urorai orgi3. Keslična na garriornskoryne amine normy4. Imposnoryn urrojei zuzvojno mochostni j parapurmyr unvrtey zuzvojno mochostni3. Alpitulatun konminni4. Laika uluokcshostene na podotcsku technickosolí danguinistic:4. Mesto ot data | DKI-derakcja zgodnosci WE (Dvyknystva micsznynova 2006d2I WE, Žažučnik II, cacić AI)2. Spálka2. Orniczda za na wiesan odpadniezdnost, ze maszycn: Przyczneke do trawnyprzyczneka kowazedničke do trazy ovstityrzna brzymana w ryckoh i ciplecy travya3. Typ I Model podstewony4. Model komercsjny5. Rob akvidl6. Numor serzyjky7. Silnik, elektryczny3. Spelniz postendowarnymogyi inwlepujscych Dvyktys4. Jednotskia certyfiklajpra5. Bednise typu WE6. Dilmietanica da Norm zhamenlizowanych i zmierzony porzion mocy skutyzicznji j Granatowny pozylom mocy skutyzicznji k Szrekovića stęcia4. Oceba upowatżsiona do zredagowania Dokumentacji technicznej: r. Kimpasowci i data |
| HU | HR | |
| SL | BS | SK |
| ES Izjava o uskladnosti(Directiva 2006/42/E5), prloga ili, doi AI1. Drutza2. pod vlastno odgovornosimo izjelvila, da je stroj: Výhošni oletněřní oroszovaniňk trizl / tržchte ruberůkopla ztrave3. U/P, osmání model4. tříbal model5. Loto iztajevá6. Serijta sladitla7. Motor oletněčno8. Skloden je z odocili direktiv: j. Ustanová, klíža potrìdiogi ES projeled tipá3. Šklovnović na usklajene predpisje i izmerjení nivo zvočne idemi j. Zagodovlení nivo zvočne idemi k. Obasje košinje6. Oseba, poslečstena za sastave tehněne knjišllo: r. Kraj in datum | EZ Izjava o sukladnosti(Directiva o smatnama 2006/42/EZ, Prlog ii, deo AI1. Firina2. Dalaj pod vlaststom odgovornosću da je modina: pujna oletněčna kositickrimor makaze, Komětve šlavaa) a Tip: Osnovni modelb Komercijalni model c Duslina predvidanjec Sertijekraj eMotor: elektrídno 3. sukisidna o osnovani zahtojevima direktive: f Certifikacije tijalo e EZ lophiklanje tipá4. Pozvanje na uskladene norme j. Tomjereni nivo zvočne snage g Granitorišni nivo zvočne snage iršina košenja e Oseba ovledzama za iznadu tehněkta brokurne; r. Mjesto i datum | ES vyhlásenie o zhode (Bintimica 2006/42/E9, zariadenlach 2006/42/E5, Prloha II, čist A)1. Spědnotar2. Vyklasuje na vlastní zodpovednost, že stroj: Prensner elektricky výdlnačnoszavao okrajov traviska, košina na žtravau type I Zszkodny modelb Orchodny modelc Rck výrdity dvyrobe zlosee motor: elektrické3. Ve je zdoce s zariadenami smemici: f Certifikacyjne orginaf Sklouka typo ES4. Odzak na Kamontzované normy h Namerané úrovan akustického výkonu j. Zerstanično úrovan akustického výkonu k Strka košetla oseba autorizované na vytorenie Technickágot spazr; r. Mesco a sativum |
| ROCE-Doclarate de Conformitate (Directiva Mešini 2006/42/CE, Anexa II, partes A)1. Szolotzea2. Osobera pe proprie resquandna ca mašina: musmá di lurna neblatmejni ofn murs margini de gaszen electrica portabila! Bial terba3. Tip / Model do baza4. Model commercial5. Ain de fabricaje6. Numar de serle7. Motor electrici8. Esto in conformitate cu specificadite direktiver.9. Oltigensiem de certifikam e Extimnitru CE de Tip4. Referings le Standarské amonizatej i Nivel de putene sonord ideuari i Nivel de putere satoria generati k. Lijmes de lišne e Persana autorizanta sa informasica Dosarul Ternic; r. Lesui di Guita | LTES ablikties deklaracija (Mášiny direktiva 2006/42/CE, Priedes II, dalia A) 1. Bandrová2. Palustrum skvalmytes, kad jreningys: Reinke veklnitrov vejnajová -limera vejas kožtams i zona jovimnaa) b Typa & Bizatis Models c Komerciniya models c Pagaminnimo metal d Baršios numerals a Lipa gladi, elektrice 3. Altitinka direktyvo se potičkas specifikacijas: f Certifikavine jedijsa e CE spodu cyrmas, k Noorada i sudanitins Normas j Limuteckes gareo galina lygis i Utkomremie gareo galina lygis k Pavrimo plaša q Autorizantes semno sudaniti Technine Dokumentacijs: r Viela i Date | LVEK aktivibus diskas deklaracija (Direktiva 2006/42/EK per makistram, platikums II, daja A)1. Uprimuma u 2. Uzpermatis par lo pilna atitidbus, parigo ka mšina: no elektriskle derivista roka rotuna zlatenu plajnadsa i zlitmu apmuju plajmodina zeta plažana a tipi Užisea modela b Komerciatais modela c Rečoteras geta d Sertijas numurs a Motors elektrikais a Altitinka dudivu praxistam: f Certifikacijas lestađa g CE lipvalej darabusa a Alvascu se harmontplom stepizdiem j izmerstals skapes internalizas limena j Garantistala skapes intensitilites limena k Pajlašma plałums q Pluvraties technikaks, kas negatsenje teknisko dokumentacijs: r Viela un datum |
| SREC decieracja o usseljesnosti (Directiva o smatnama 2006/42/CE, Prlog ii, deo A)1. Preduzce2. Daje izjavu pod vlaststom odgovornosću da je masina: rutina dreštrina koračkostrimir makaze, kusbanje trava3. Tip/ Osnovni modelb Komercijalni modelc Mardine prevedingje i Serijali kraj4. Motor elektridi i Serijali oletněčno5. Kortivskozna telai e EC impilvodenje tips4. Pozvanje na usklajene norme i Osnovni nivo zvočne snage j Garantovani nivo zvočne snage k Iršina košinja...... Oseba ovledzama za sastavljanje tehnikte brokuror i Mesto i datum | BEEO elektrapiere za įstostentstavio (Direktira/ralizsami 2006/42/EO, Preprozionne i, kast A)1. Druječnostra2. Na obstojnanne otvorovnost deklaripera, cha машинasta: trimpičnoj sktrickniosi trobovn trimprirjnump a pirdano na tropa i Bodj i Bozianom medan i Uparcijas koperen i Faderna na производство j Cemien novemr2. Biomor elektripsnosi3. E. S. S. S. S. S. S. S. S. S. S. S. S. S. S. S. S. S. S. S. S. S. S. S. S. S. S. S. S. S. S. S. S. S. S. S. S. S. S. S. S. S. S. S. S. S. S. S. S. S. S. | ETEU vastuizandeklasson (Magradirektliv 2006/42/EU, Lisa II, osta A)1. Firme2. Knitslab osmi vastuturi, et masin: Kasaskantukat elektrifine muradukturalinkur / munnilija3. Tilup i Pohimudot kuašubnikul model c Enhusaasta4. Matikeliq i Moota elektriline 5. Vastab direktivs reubatele: j Kirnivu sutansu e EU biuhrbindanjme vida bilihedil standenitilde j Modebud helvămicuse base j Garantombud helvămicuse base k Lodičeku sponjej Telnilise Lehe autorisentud koostaja: j Kohlt ja Kuropdev |
the hau r 5-Abwarden 0
GGP ITALY SPA
Via del Lavoro, 6
I-31033 Castelfranco Veneto (TV) ITALY

GLOBAL GARDEN PRODUCTS


- COMANDI ED ELEMENTI FUNZIONALI
- TABLE OF CONTENTS
- IDENTIFICATION OF MAIN COMPONENTS
- MAIN COMPONENTS
- CONTROLS AND FUNCTIONAL PARTS
- IDENTIFICATION PLATE
- SYMBOLS
- SAFETY WARNINGS
- HOW TO READ THE MANUAL
- NOTE
- IMPORTANT
- WARNING!
- DANGER!
- ELECTRIC GRASS TRIMMER SAFETYWARNINGS
- ADDITIONAL SAFETY WARNINGS
- GENERAL POWER TOOL SAFETY WARNINGS
- 4) Power tool use and care
- 5) Service
- MACHINE ASSEMBLY
- MOUNTING THE FRONT HANDGRIP (Fig. 1)
- MOUNTING THE ROD (Fig. 2)
- MOUNTING THE GUARD (Fig. 3)
- PREPARING TO WORK
- CHECKING THE MACHINE
- 2.ELECTRICALCONNECTIONS
- HOW TO START - STOP THE MOTOR
- STARTING THE MOTOR (Fig. 4)
- STOPPING THE MOTOR (Fig. 4)
- USING THE MACHINE
- USING THE MACHINE
- USING THE HARNESS (Fig. 5)
- WORKING TECHNIQUES
- • Cutting in motion (Scything) (Fig. 6)
- • Cutting near fences/foundations (Fig. 7)
- • Cutting round trees (Fig. 8)
- - Adjusting line length when working (Fig. 9)
- END OF OPERATIONS
- MAINTENANCE AND STORAGE
- MOTOR COOLING
- HEAD COIL REPLACEMENT (Fig. 10)
- SHARPENING THE LINE CUTTING KNIFE (Fig. 11)
- ELECTRIC CABLES
- EXTRAORDINARY MAINTENANCE
- STORAGE
- ACCESSORIES
- MAKİNE ETİKETİ
- MOTOR STOPU (Res. 4)
- GŁÓWNE CZE, ŚCI SKŁADOWE
- KOMANDE FUNKCIONALNIH ELEMENTOV
- UPRAVLJAČKI UREĐAJI I FUNKCIONALNI ELEMENTI
- PLOČICA S PODACIMA
- DODATNE SIGURNOSNE UPUTE
- INNEHÅLLSFÖRTECKNING
- KOMMANDON OCH FUNKTIONELLA ENHETER
- MÄRKPLÅT
- KÄSKYT JA TOIMINTAOSAT
- FUNKTIONSBETJENINGER
- AFLSUTNING AF ARBEJDET
- VEDLIKEHOLD OG LAGRING
- ADVARSEL! het:
- PASIRUOŠIMAS DARBUI
- PRIETAISO PATIKRINIMAS
- DÉMESIO!
- КОМАНДИ И ФУНКЦИОНАЛНИ ЕЛЕМЕНТИ
- KUIDAS KASUTUSJUHENDIT LUGEDA
Brand : ALPINA
Model : T 1.0 EJ
Category : Grass trimmer