ADL 120-P - Measuring equipment Flex - Free user manual and instructions
Find the device manual for free ADL 120-P Flex in PDF.

| Product Type | Digital Spirit Level |
| Brand | Flex |
| Model | ADL 120-P |
| Length | 1200 mm |
| Weight (with batteries) | 1.2 kg |
| Power Supply | 2 LR6/AA batteries (1.5 V) |
| Battery Life | Approximately 100 hours |
| Measuring Range | 0° to 90° |
| Digital Accuracy (0°/90°) | ±0.05° |
| Digital Accuracy (other angles) | ±0.1° |
| Spirit Level Accuracy | ±0.5 mm/m |
| Protection Rating | IP65 |
| Display | Digital, backlit |
| Main Functions | Angle measurement, reference function, memory for 9 values, audible signal, lighting |
| Calibration | Yes, by user (4 steps) |
| Cleaning | With a dry cloth, avoid aggressive solvents |
| Storage | In the protective pouch, remove batteries if not used for long periods |
| Safety | Read the manual, repair by qualified personnel only |
| Spare Parts | Use only original spare parts |
| Warranty | See manufacturer's terms |
Frequently Asked Questions - ADL 120-P Flex
User questions about ADL 120-P Flex
0 question about this device. Answer the ones you know or ask your own.
Ask a new question about this device
Download the instructions for your Measuring equipment in PDF format for free! Find your manual ADL 120-P - Flex and take your electronic device back in hand. On this page are published all the documents necessary for the use of your device. ADL 120-P by Flex.
USER MANUAL ADL 120-P Flex
natural_image
Illustration of two cylindrical industrial control units with digital displays and ventilation slots (no text or symbols)de Originalbetriebsanleitung 3
en Original operating instructions 10
fr Notice d'instructions d'origine 17
it Istruzioni per l'uso originali 25
es Instrucciones de funcionamiento originales 33
pt Instruções de serviço originais 41
nl Originele gebruiksaanwijzing 49
da Originale driftsvejledning 57
no Originale driftsanvisningen 64
sv Originalbruksanvisning 71
f1 Alkuperäinen käyttöohjekirja 78
el Auθεντικές οδηγίες χειρισμού 85
pl Instrukcja oryginalna 93
hu Eredeti üzemeltetési útmutató 101
cs Originální návod k obsluze 108
sk Originálny návod na obsluhu 115
et Originaalkasutusjuhend 122
It Originali naudojimo instrukcija 129
Iv Lietošanas pamācības oriģināls 136
ru Оригинальная инструкция по эксплуатации ..... 144
152
de
ADL 60-P / ADL 120-P
Inhalt
ADL 60-P / ADL 120-P
Symbols on the power tool....10
For your safety 10
Overview 11
Control panel 12
Technical specifications 13
Instructions for use 13
Checking measurement precision 14
Calibration 14
Maintenance and care 15
Disposal information 16
Exemption from liability 16
Symbols on the power tool

Before switching on the power tool, read the operating manual!
For your safety
Intended use
This measuring instrument is designed for commercial use in industry and trade.
The digital spirit level is designed for measuring and transferring gradients and angles indoors and outdoors.
Safety instructions

WARNING!
Read all safety instructions and other instructions to be able to work safely and securely with the measuring instrument. Keep all safety instructions and other instructions in a safe place for the future.
■ Have the measuring instrument repaired by qualified technicians and with original spare parts only.
This ensures that the safety of the measuring instrument is maintained.
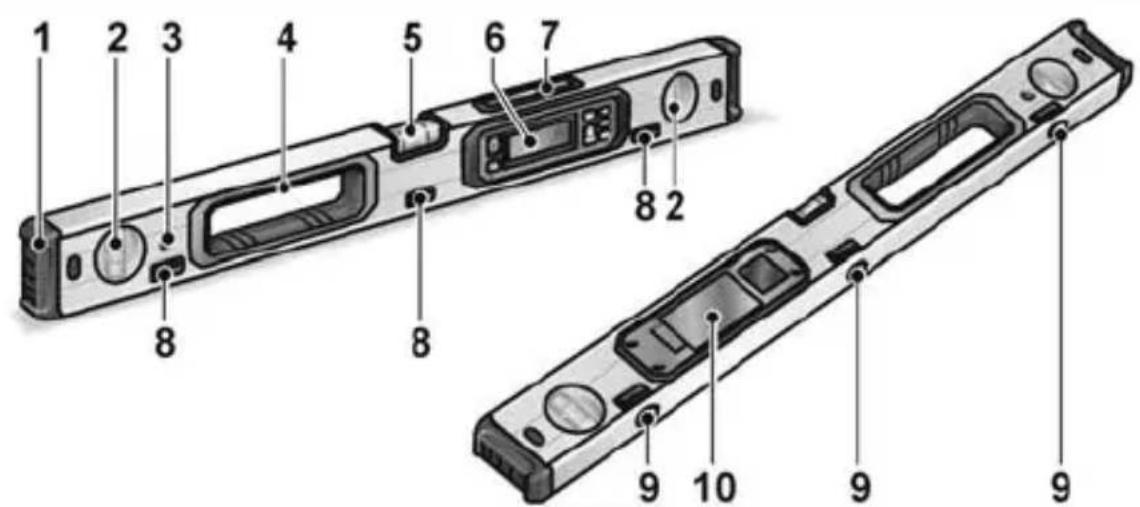
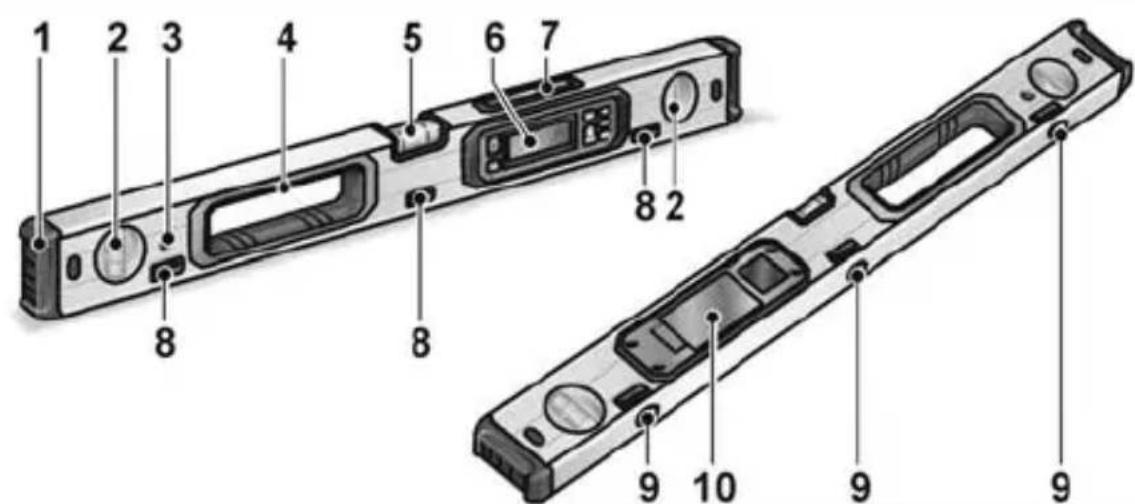
Overview

1 End cap
2 Vertical bubble tube
3 Hook hole
4 Handle openings
5 Horizontal bubble tube
6 Control panel
7 Display up
8 Belt guide
9 Magnets
10 Battery compartment
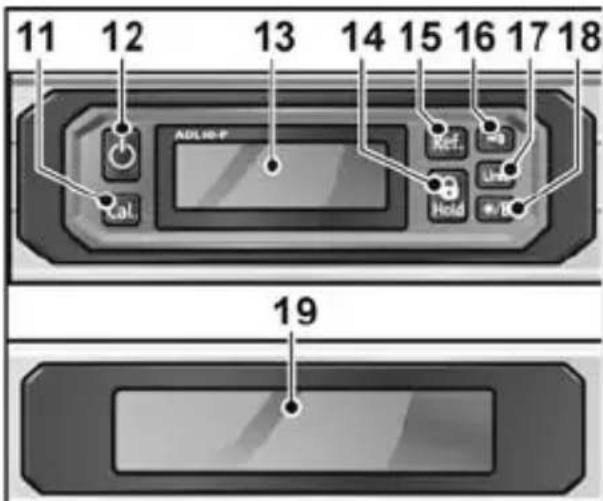
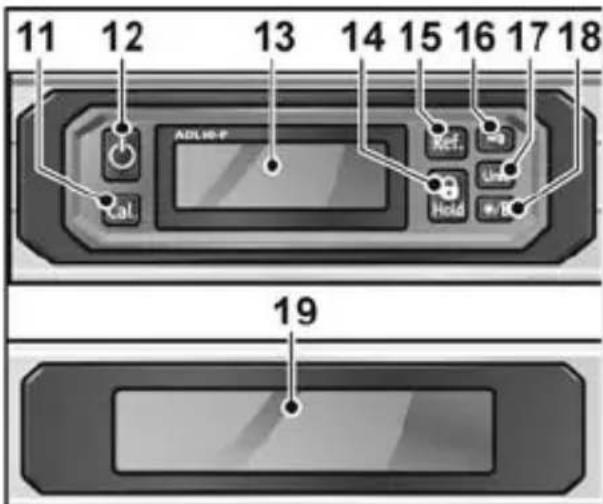
Control panel

11 Calibration button
For vertical and horizontal contact surfaces.
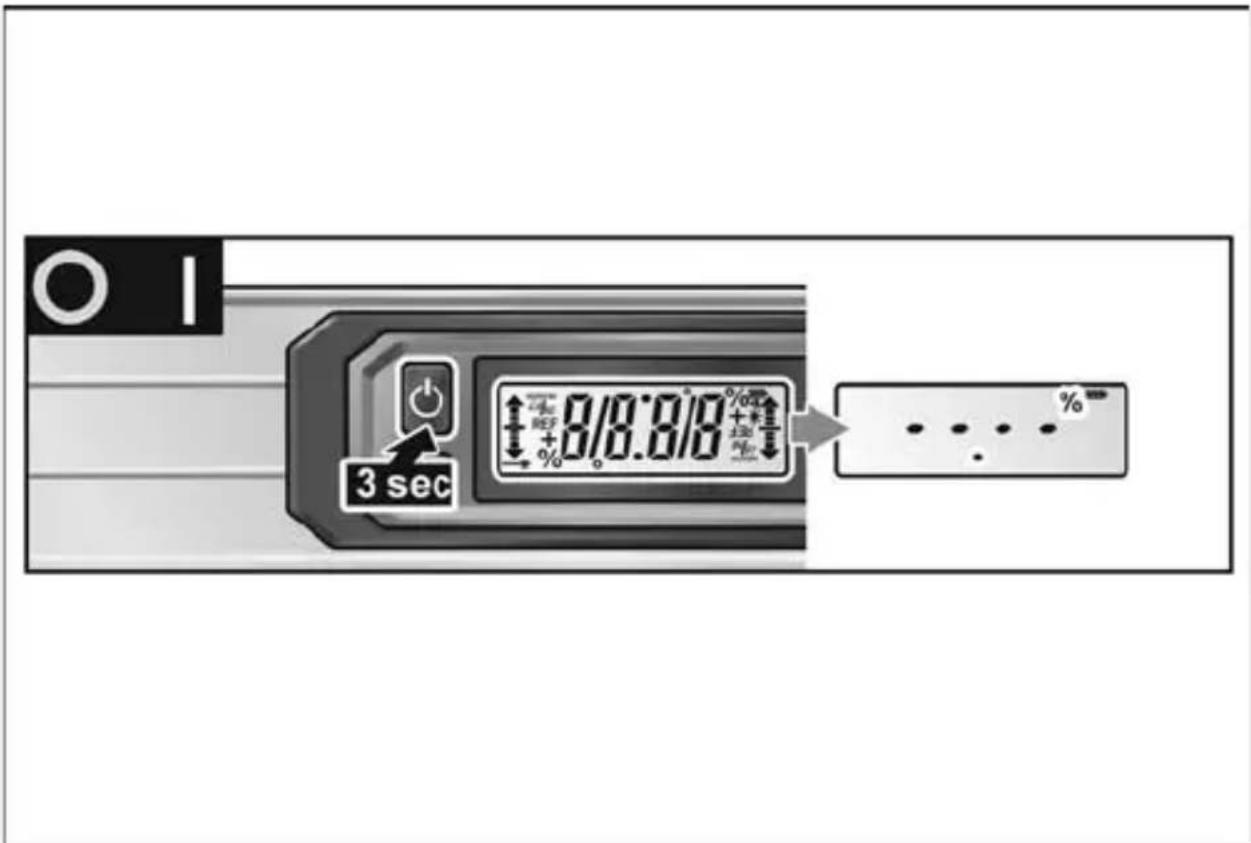
12 On/Off button
Switches the power tool on and off.
To switch off the measuring instrument, hold down the button for approx. 3 seconds.
13 Display control panel
14 Save button
Saves the currently displayed measured value (9 storage locations).
Attention: When another value is saved, the previous 9 measurements are deleted.
15 Reference button
For transferring angles. The display jumps to 0.0^ and REF flashes on the display. To delete the reference value, switch off the spirit level.
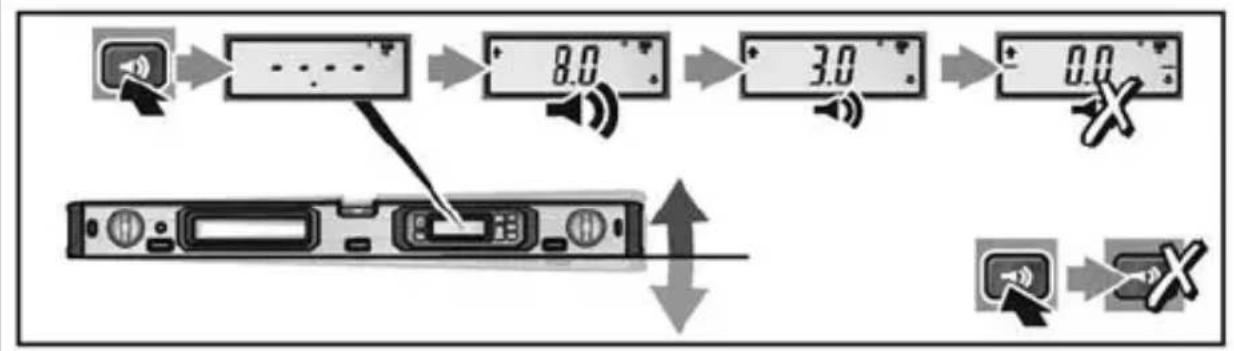
16 Signal button
Switches the acoustic signal off and on. If the angle of inclination is on 0^ , 45^ , 90^ or the last saved value, this is signalled acoustically. Note: When the angle reference value (13) is activated, this becomes the signalling zero point.
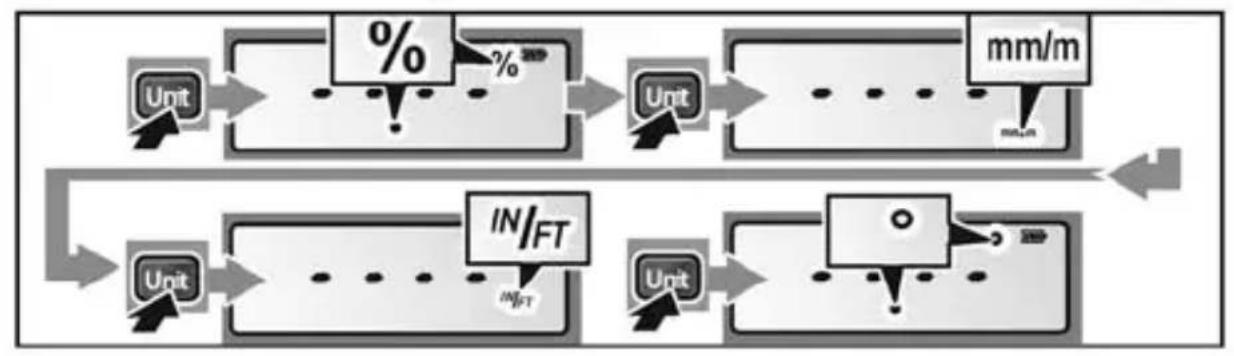
17 Unit of measurement button
Switches the units of measurement in succession: °, in/ft, %. When the measuring instrument has been switched on, the display in ° is always active.
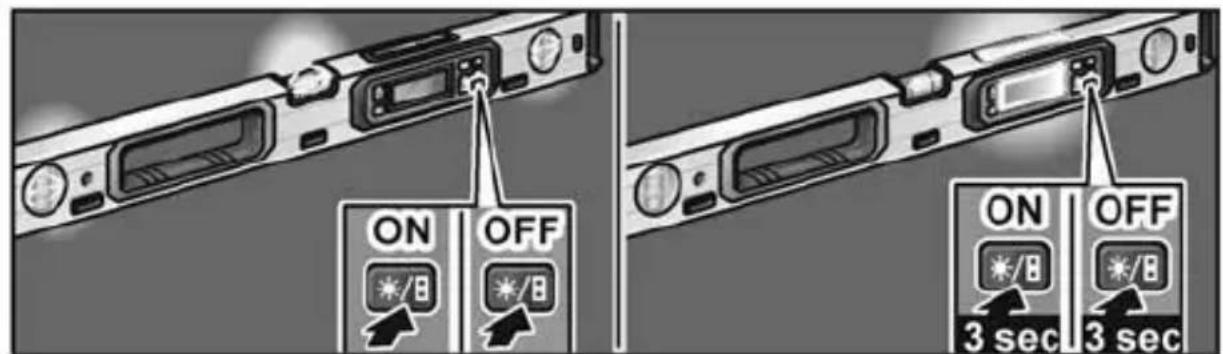
18 Light button
Switches the light on and off.
19 Display up
Technical specifications
| Digital spirit level ADL 60-P / ADL 120-P | ||
| Display (digital) 0°.... 90° | ||
| Precision (digital) =0°/90° ± 0.05°>0°...<90° ± 0.1° | ||
| Precision (bubble tube) ± 0.5 mm/m | ||
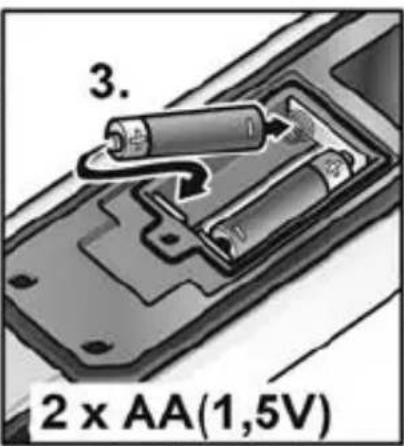
| Power supply 2x1.5V LR6/AA | ||
| Operating duration 100 h | ||
| Automatic switch-off 300 s | ||
| Length ADL 60-P ADL 120-P 600 mm | ||
| Weight (with batteries) | ADL 60-P ADL 120-P 0.8 kg | |
| Protection class IP65 | ||
Instructions for use
| CAUTION!If the device is brought from a very cold to a warmer environment or vice versa,you should allow the device to acclimatise before using it.The most important operating steps are explained at the end of these instructions on the illustrated pages.See from page 152.Inserting/changing batteries ...... Switching the device on and off ...... Setting unit of measurement ...... Automatic rotation of display ...... Switching acoustic signal on and off ...... Setting reference angle ...... Using measured value memory ...... Switching light on/offn ...... Checking precision ...... Calibrating the measuring instrument .... |
Checking measurement precision
See also from page 168.
Check precision of the measuring instrument
■ before starting work,
■ after large temperature changes
■ after violent impacts.
Before measuring angles up to 45^ , check the precision on a horizontal surface ( 0^ ), before measuring angles over 45^ , vertical surface ( 90^ ).
■ Switch on the measuring tool and place it on a horizontal or vertical surface.
Wait 10 seconds and make a note of the measured value.
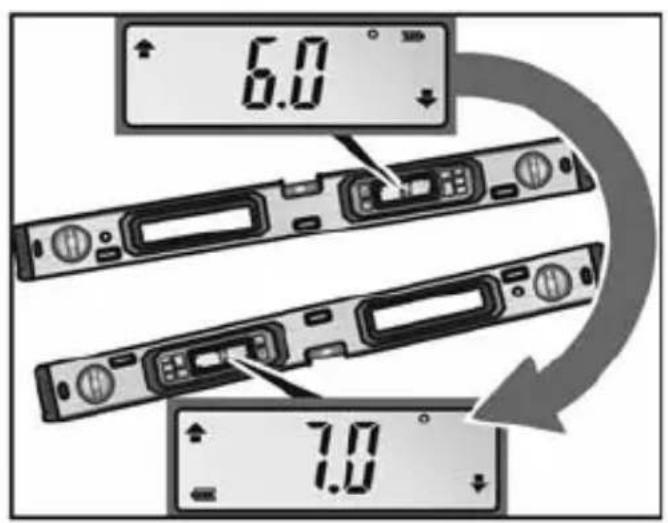
■ Rotate the measuring tool (as shown in the picture) 180° about the vertical axis. Wait 10 seconds and make a note of the second measured value.

NOTE
The measuring tool only needs to be calibrated if the difference between both measured values is greater than 0.1°!
Calibrate the measuring tool in the position (vertical or horizontal) that the difference of the measured values was determined in.
Calibration
Vertical contact surfaces
See also from page 170, figure A.
Place the contact surface on a surface that is as vertical as possible. The surface must not deviate more than 5° from the vertical. If the deviation is greater, the calibration will be aborted and the display will show "---".
■ Switch on the measuring tool and place it on the vertical surface in such a way that the spirit level 2 points upwards and the display 7 is pointing towards you. Wait for 4 seconds!
Horizontal contact surfaces
See also from page 170, figure B.
■ Position the contact surface on an even surface that is as horizontal as possible. The surface must not deviate more than 5° from the horizontal. If the deviation is greater, the calibration will be aborted and the display will show "---".
■ Switch on the measuring tool and place it on the horizontal surface in such a way that the spirit level 1 points upwards and the display 7 is pointing towards you. Wait for 4 seconds!
en
ADL 60-P / ADL 120-P
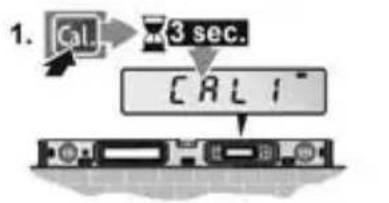
Worksteps for both versions:
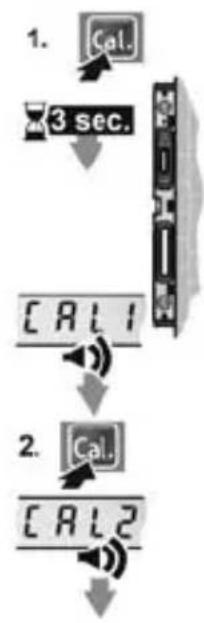
- Press the calibration button "Cal"- a for approx. 3 sec. until "CAL1" appears briefly in the display.
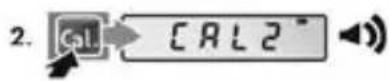
- Press the calibration button "Cal"-a again. "CAL1" will flash until "CAL2" is shown in the display with an audible tone.
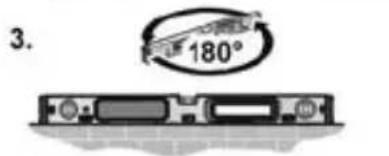
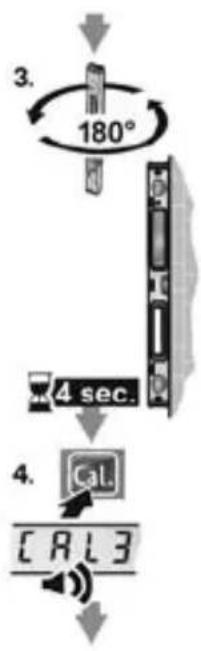
- Turn the measuring tool 180° about the vertical axis so that the spirit level is still pointing upwards but the display 7 is on the opposite side to you.
- Wait for 4 seconds. Press the calibration button "Cal"- a again. "CALI2" will flash until "CAL3" is shown in the display with an audible tone.
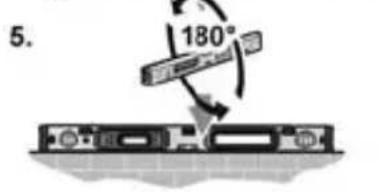
- Turn the measuring tool 180° about the horizontal axis so that the spirit level is pointing downwards but the display 7 is on the side facing you.
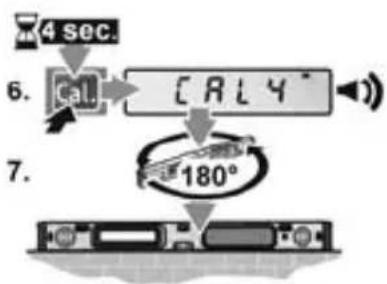
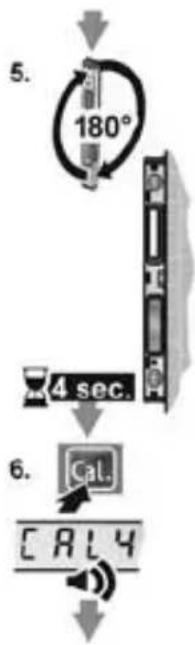
- Wait for 4 seconds. Press the calibration button "Cal"- a again. "CALI3" will flash until "CAL4" is shown in the display with an audible tone.
-
Turn the measuring tool 180° about the vertical axis so that the spirit level is still pointing downwards but the display 7 is on the opposite side to you.
-
Press the calibration button "Cal"-a again. "SUCC" then appears in the display.
The measuring tool is now recalibrated for this contact surface.

NOTE
If the measuring tool is not rotated about the axis shown in the figures for steps 3, 5 and 7, the calibration cannot be completed. ("SUCC" does not appear in the display.)
Maintenance and care
Observe the following instructions:
■ Handle the measuring instrument with care and protect it from impacts, vibrations and extreme temperatures.
When the measuring instrument is not in use, keep it in the protective pouch.
If not used for a prolonged period, take the batteries out of the measuring instrument.
■ Replace used batteries immediately
■ Have the measuring instrument repaired by qualified technicians and with original spare parts only.
This ensures that the safety of the measuring instrument is maintained.
Disposal information

EU countries only:
Do not throw electric power tools into the household waste!
In accordance with the European Directive 2012/19/EU on Waste Electrical and Electronic Equipment and transposition into national law used electric power tools must be collected separately and recycled in an environmentally friendly manner.

Recycling raw materials instead of waste disposal.
Device, accessories and packaging should be recycled in an environmentally friendly manner. Plastic parts are identified for recycling according to material type.

WARNING!
Do not throw accumulators/batteries into the household waste, fire or water. Do not open disused batteries. EU countries only: In accordance with Directive 2006/66/EC defective or used batteries must be recycled.

NOTE
Please ask your dealer about disposal options!
Exemption from liability
The manufacturer and his representative are not liable for any damage and lost profit due to interruption in business caused by the product or by an unusable product.
The manufacturer and his representative are not liable for any damage which was caused by improper use of the power tool or by use of the power tool with products from other manufacturers.

ADL 60-P / ADL 120-P
Table des matières
ADL 60-P / ADL 120-P
Bandeau de commande

ADL 60-P / ADL 120-P
Indice
ADL 60-P / ADL 120-P
Pannello comandi

ADL 60-P / ADL 120-P
Contenido
ADL 60-P / ADL 120-P
Panel de manejo

ADL 60-P / ADL 120-P
es
ADL 60-P / ADL 120-P
Índice
ADL 60-P / ADL 120-P
Painel de comandos
ADL 60-P / ADL 120-P
Inhoud
ADL 60-P / ADL 120-P
Bedieningsveld
ADL 60-P / ADL 120-P
ADL 60-P / ADL 120-P
Indhold
ADL 60-P / ADL 120-P
Betjeningspanel

11 Kalibreringsknap
ADL 60-P / ADL 120-P
ADL 60-P / ADL 120-P
Tekniske data
| Digitalt vater (pass) ADL 60-P / ADL 120-P | |
| Indikasjon (digital) 0°.... 90° | |
| Nøyaktighet (digital) =0°/90° ± 0,05°>0°...<90° ± 0,1° | |
| Nøyaktighet (libelle) ± 0,5 mm/m | |
| Strømforsyning 2x1,5V | LR6/AA |
| Driftsvarighet 100 h | |
| Lengde ADL 60-P | 600 mmADL 120-P 1200 mm |
| Vekt (med batterier) ADL 60-P | 0,8 kgADL 120-P 1,2 kg |
| Beskyttelsesklasse IP65 | |
Bruksanvisning

FORSIKTIG!
ADL 60-P / ADL 120-P
ADL 60-P / ADL 120-P
Innehåll
Symboler på maskinen....71
För din säkerhet 71
Översikt 72
Manöverpanel 73
Tekniska data 74
Bruksanvisning 74
Kontrollera mätnoggrannheten 75
Kalibrering 75
ADL 60-P / ADL 120-P
Manöverpanel

11 Kalibreringsknapp
ADL 60-P / ADL 120-P
Kontrollera mätnoggrannheten
Se from sida 168.
ADL 60-P / ADL 120-P
ADL 60-P / ADL 120-P
Kuva koneesta
ADL 60-P / ADL 120-P
Tekniset tiedot
ADL 60-P / ADL 120-P
ADL 60-P / ADL 120-P
Περιεχόμενα
ADL 60-P / ADL 120-P
Πεδίο χειρισμού

ADL 60-P / ADL 120-P
el
ADL 60-P / ADL 120-P
Spis treści
ADL 60-P / ADL 120-P
Pulpit obsługi

ADL 60-P / ADL 120-P
ADL 60-P / ADL 120-P
Tartalom
ADL 60-P / ADL 120-P
Kezelőmező

11 Kalibráló gomb
ADL 60-P / ADL 120-P
ADL 60-P / ADL 120-P
ADL 60-P / ADL 120-P
Na první pohled
ADL 60-P / ADL 120-P
Technické údaje
ADL 60-P / ADL 120-P
ADL 60-P / ADL 120-P
Obsah
Symboly na náradí.... 115
ADL 60-P / ADL 120-P
Ovládací panel

ADL 60-P / ADL 120-P
11 Kaliibrimisnupp
ADL 60-P / ADL 120-P
ADL 60-P / ADL 120-P
Turinys
ADL 60-P / ADL 120-P
Valdymo pultas

ADL 60-P / ADL 120-P
ADL 60-P / ADL 120-P
ADL 60-P / ADL 120-P
ADL 60-P / ADL 120-P

ADL 60-P / ADL 120-P
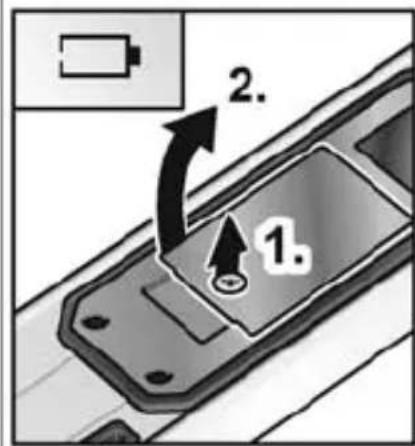
de Batterie einlegen/wechseln
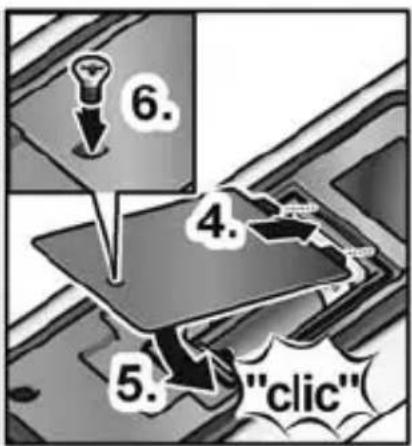
en Inserting/changing batteries
fr Mise en place / Changement des piles
it Inserire/sostituire le pile
es Colocar/cambiar las baterías
pt Inserir/trocar pilhas
nl Batterijen inzetten of vervangen
da Ilægning/skift af batterier
no Innlegging/skift av batteri
sv Insättning/byte av batteri
fi Paristojen asennus/vaihto
el Εισαγωγή/Αλλαγή μπαταριών
pl Zakładanie/wymiana baterii
hu Elemek behelyezése/cseréje
cs Vložení/výměna baterií
sk Vloženie/výmena batérií
et Patareide sissepanemine/vahetamine
It Elementų įdėjimas (keitimas)
Bateriju ielikšana/mainišana
ru Вкладывание/Замена батареек
ADL 60-P / ADL 120-P
ADL 60-P / ADL 120-P
de Gerät ein- und ausschalten
en Switching the device on and off
fr Allumer et éteindre l'appareil
it Accendere e spegnere l'apparecchio
es Encendido y apagado del equipo
pt Ligar e desligar aparelho
nl Gereedschap in- en uitschakelen
da Tænd og sluk for apparatet
no Inn- og utkopling av apparatet
sv Till- och frånslagning
fi Laitteen päälle- ja poiskytkentä
el Ενεργοποίηση και απενεργοποίηση της συσκευής
pl Włączanie i wyłączanie urządzenia
hu A készülék be- és kikapcsolása
cs Zapnutí a vypnutí přístroje
sk Zapnutie a vypnutie prístroja
et Seadme sisse- ja väljalülitamine
It Prietaiso jungimas ir išjungimas
Iv lerīces ieslēgšana un izslēgšana
ru Включение и выключение прибора
ADL 60-P / ADL 120-P
ADL 60-P / ADL 120-P
| de | Maßeinheit einstellen |
| en | Setting unit of measurement |
| fr | Régler l’unité de mesure |
| it | Impostare l’unità di misura |
| es | Ajuste de la unidad de medición |
| pt | Definir a unidade de medida |
| nl | Maateenheid instellen |
| da | Indstilling af måleenhed |
| no | Innstilling av måleenhet |
| sv | Inställning av mättenhet |
| fi | Mittayksikön valinta |
| el | Púθμιση μονάδας μέτρησης |
| pl | Nastawianie jednostki pomiarowej |
| hu | Mértékegység beállítása |
| cs | Nastavení měrné jednotky |
| sk | Nastavenie mernej jednotky |
| et | Mõõtühikute seadistamine |
| lt | Matavimo vienetų nustatymas |
| lv | Mērvienības iestatīšana |
| ru | Установка единиц измерения |
ADL 60-P / ADL 120-P
flowchart
graph TD
    A["Unit"] --> B["%"]
    B --> C["Unit"]
    C --> D["mm/m"]
    D --> E["Output"]
    F["Unit"] --> G["IN/FT"]
    G --> H["Unit"]
    H --> I["mm/m"]
    I --> J["Output"]
ADL 60-P / ADL 120-P
| de | Automatisches Drehen der Anzeige |
| en | Automatic rotation of display |
| fr | Rotation automatique de l'affichage |
| it | Rotazione automatica dell'indicatore |
| es | Giro automático de la visualización |
| pt | Rotação automática da indicação |
| nl | Automatisch draaien van de indicatie |
| da | Automatisk rotation af visningen |
| no | Automatisk rotering av visningen |
| sv | Automatisk vridning av indikeringen |
| fi | Näytön automaattinen kääntö |
| el | Autóματη περιστροφή της ένδειξης |
| pl | Automatyczny obrót wskazania |
| hu | Automatikus kijelzőelforgatás |
| cs | Automatické otáčení displeje |
| sk | Automatické otočenie zobrazenia |
| et | Näidu automaatne keeramine |
| lt | Automatinis rodmenų sukimas |
| lv | Automātiska rādījuma pagriešana |
| ru | Автоматический поворот индикации |
ADL 60-P / ADL 120-P
| de | Signalton ein- und ausschalten |
| en | Switching acoustic signal on and off |
| fr | Activer et désactiver le signal sonore |
| it | Attivazione e disattivazione del segnale acustico |
| es | Activar y desactivar la señal acústica |
| pt | Ligar e desligar o sinal sonoro |
| nl | Geluidssignaal in- en uitschakelen |
| da | Tænd og sluk for signaltonen |
| no | Signallyden slås på og av |
| sv | Till- och frånslagning av signalen |
| fi | Merkkiäänen päälle- ja poiskytkentä |
| el | Ενεργοποίηση/Απενεργοποίηση ήχου σήματος |
| pl | Włączanie i wyłączanie sygnału dźwiękowego |
| hu | Jelzőhang be- és kikapcsolása |
| cs | Zapnutí a vypnutí akustického signálu |
| sk | Zapnutie a vypnutie akustického signálu |
| et | Helisignaali sisse- ja väljalülitamine |
| lt | Garso signalo jungimas ir išjungimas |
| lv | Signāla skaņas ieslēgšana un izslēgšana |
| ru | Включение и выключение звукового сигнала |
ADL 60-P / ADL 120-P
flowchart
graph TD
    A["Device 8.0"] --> B["Display 8.0"]
    B --> C["Display 3.0"]
    C --> D["Display 0.0"]
    D --> E["Device 0.0"]
    E --> F["Device 0.0"]
    style A fill:#f9f,stroke:#333
    style B fill:#ccf,stroke:#333
    style C fill:#ccf,stroke:#333
    style D fill:#ccf,stroke:#333
    style E fill:#ccf,stroke:#333
    style F fill:#ccf,stroke:#333
ADL 60-P / ADL 120-P
| de | Referenzwinkel einstellen |
| en | Setting reference angle |
| fr | Régler l'angle de référence |
| it | Impostazione angolo di riferimento |
| es | Ajuste del ángulo de referencia |
| pt | Definir ângulo de referência |
| nl | Referentiehoek instellen |
| da | Indstil referencevinklen |
| no | Innstilling av referansevinkelen |
| sv | Referensvinkelinställning |
| fi | Referenssikulman asetus |
| el | Púθμιση γωνίας αναφοράς |
| pl | Nastawianie kąta odniesienia |
| hu | Referencia szög beállítása |
| cs | Nastavení referenčního úhlu |
| sk | Nastavenie referenčného uhla |
| et | Võrdlusnäidu seadistamine |
| lt | Atskaitos kampo nustatymas |
| lv | References leŋka iestafišana |
| ru | Установка контрольного угла |
ADL 60-P / ADL 120-P
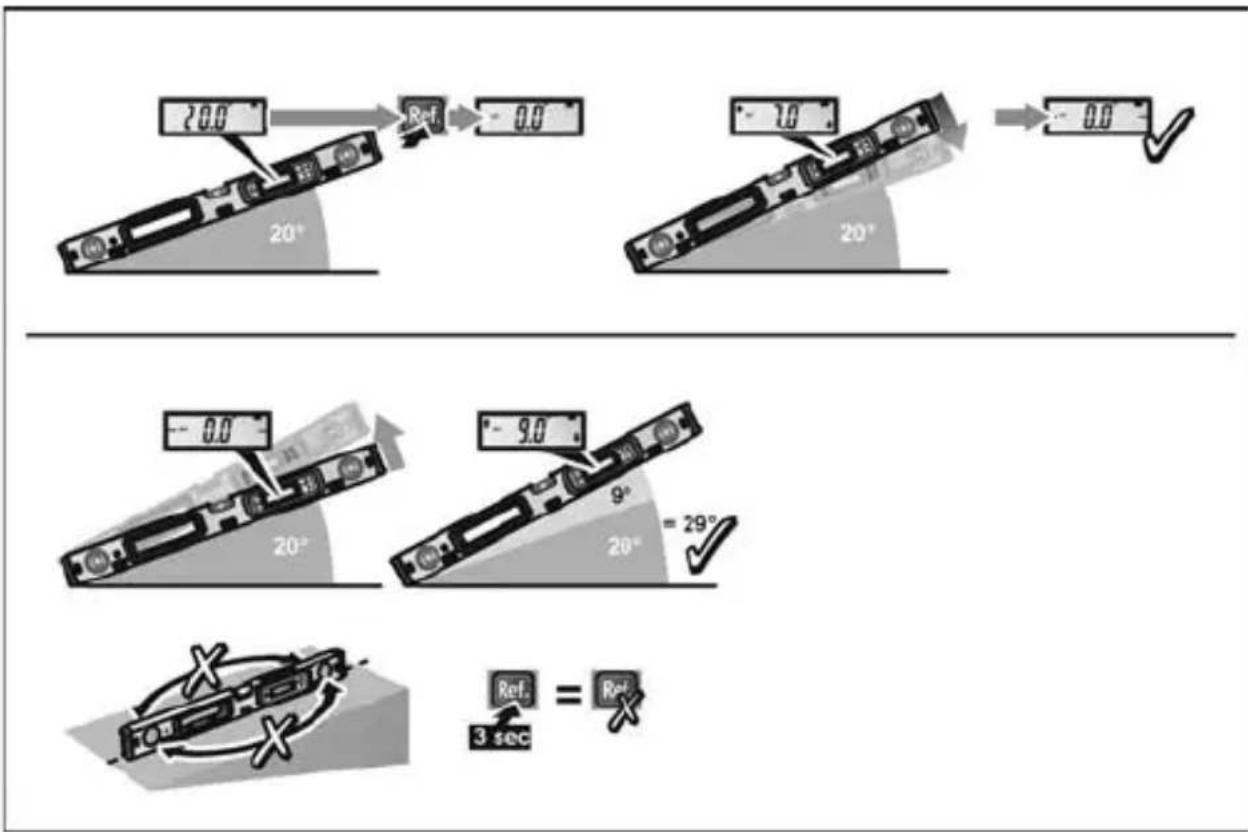
flowchart
graph TD
    A["20.0"] --> B["Ref"] --> C["-0.0"]
    D["10"] --> E["Ref"] --> F["-0.0"]
    G["20°"] --> H["Ref"] --> I["-0.0"]
    J["20°"] --> K["Ref"] --> L["-9.0"]
    M["20°"] --> N["Ref"] --> O["-29°"]
    P["3 sec"] --> Q["Ref"] = R["Ref"]
ADL 60-P / ADL 120-P
de Verwendung des Messwertspeichers
en Using measured value memory
fr Utilisation de la mémoire de valeur mesurée
it Memoria dei valori misurati
es Empleo de la memoria de valores de medición
pt Utilização da memória de valores medidos
nl Gebruik van het meetwaardegeheugen
da Brug af måleværdihukommelsen
no Bruk av måleverdiminnet
sv Användning av mätvärdesminne
fi Mittauslukemamuistin käyttö
el Χρήση της μνήμης τιμών μέτρησης
pl Zastosowanie pamięci wartości mierzonych
hu Mérésiérték-tároló használata
cs Použití paměti naměřených hodnot
sk Použitie pamäte pre namerané hodnoty
et Mööteväärtuste mälu kasutamine
It Matavimo verčių įrašymo prietaiso naudojimas
Iv Mērījumu atmiņas lietošana
ru Использование памяти результатов измерений
ADL 60-P / ADL 120-P
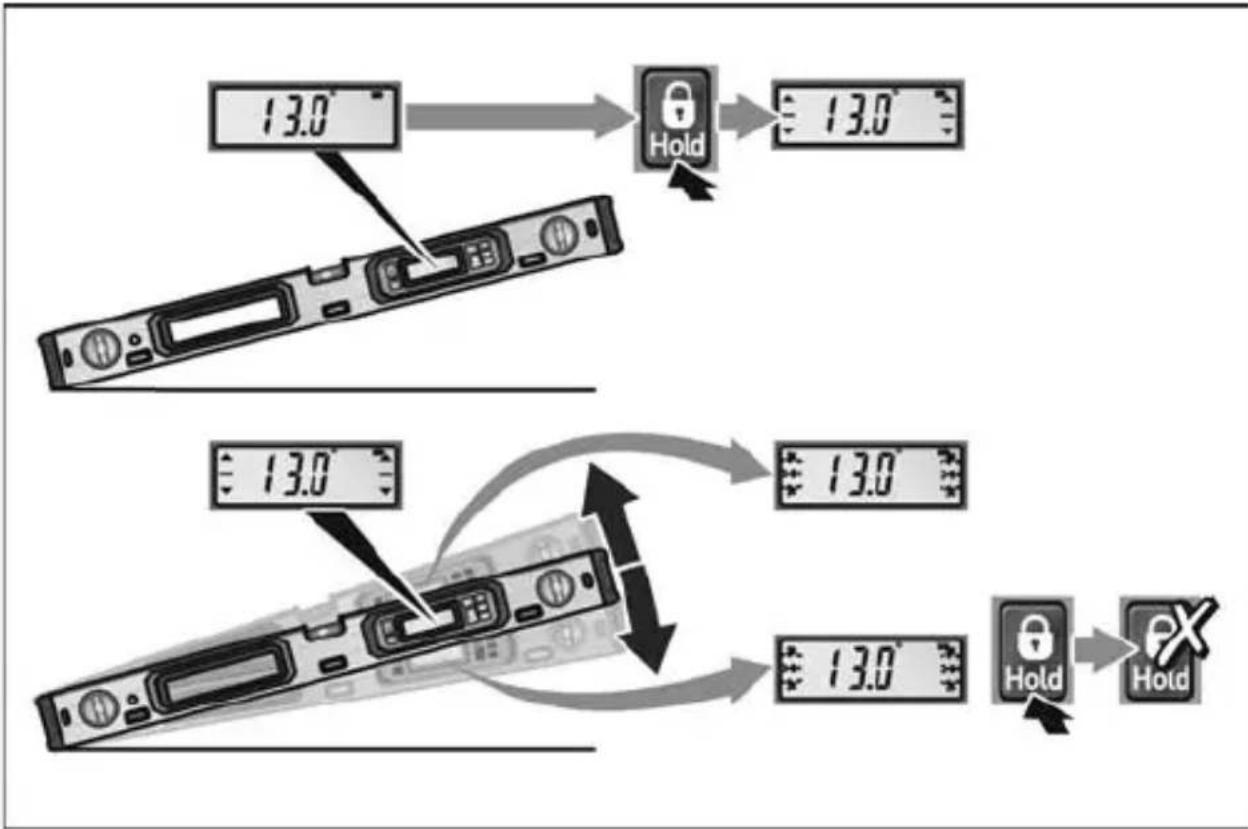
flowchart
graph TD
    A["13.0°C Display"] --> B["Lock"]
    B --> C["13.0°C Display"]
    D["13.0°C Display"] --> E["Lock"]
    E --> F["13.0°C Display"]
    G["13.0°C Display"] --> H["Lock"]
    H --> I["13.0°C Display"]
    J["13.0°C Display"] --> K["Lock"]
    K --> L["13.0°C Display"]
ADL 60-P / ADL 120-P
de Beleuchtung ein-/ausschalten
en Switching light on/off
fr Activation/désactivation de l'éclairage
it Accensione/spegnimento dell'illuminazione
es Encendido/apagado de la iluminación
pt Ligar/desligar a iluminação
nl Verlichting in-/uitschakelen
da Tænding/slukning af lyset
no Slå lys på/av
sv Till- och frånslagning av belysning
fi Valon kytkeminen päälle ja pois
el Ενεργοποίηση/απενεργοποίηση φωτισμού
pl Włączanie/wyłączanie oświetlenia
hu Világítás be-/kikapcsolása
cs Zapnutí/vypnutí podsvícení
sk Zapnutie/vypnutie osvetlenia
et Valgustuse sisse-/väljalülitamine
It Apšvietimo jungimas / išjungimas
Iv Apgaismojuma ieslēgšana/izslēgšana
ru Включение/выключение подсветки
ADL 60-P / ADL 120-P
ADL 60-P / ADL 120-P
| de | Prüfung der Genauigkeit |
| en | Checking precision |
| fr | Vérification de la précision |
| it | Controllo della precisione |
| es | Control de la exactitud |
| pt | Verificação da precisão |
| nl | Controle van de nauwkeurigheid |
| da | Brug af laseren |
| no | Kontroll av nøyaktigheten |
| sv | Kontroll av noggrannheten |
| fi | Tarkkuuden testaus |
| el | 'Ελεγχος της ακρίβειας |
| pl | Sprawdzenie dokładności pomiaru |
| hu | A pontosság ellenőrzése |
| cs | Kontrola přesnosti |
| sk | Kontrola presnosti |
| et | Täpsuse kontrollimine |
| lt | Tikslumo tikrinimas |
| lv | Precizitätes pârbaude |
| ru | Проверка точности |
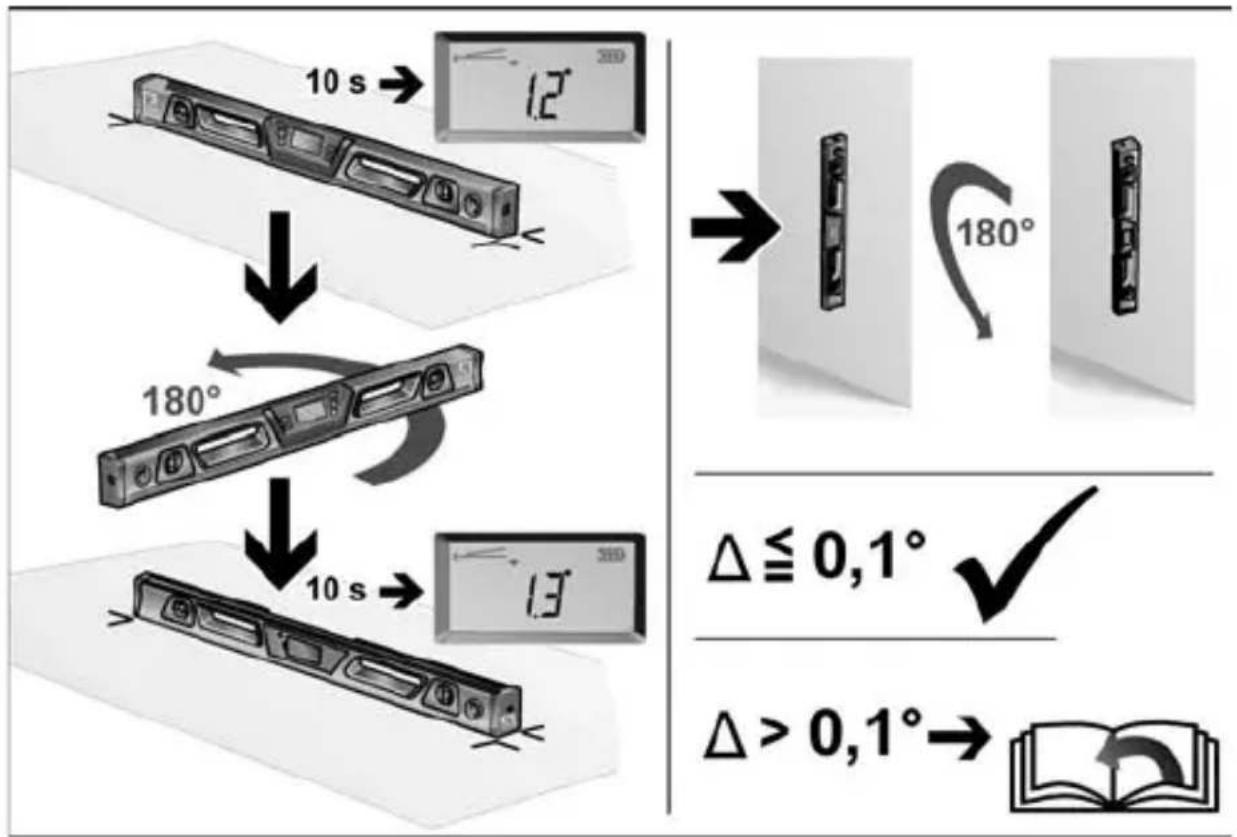
flowchart
graph TD
    A["Device with 10s rotation"] --> B["12°"]
    B --> C["180°"]
    C --> D["13°"]
    D --> E["10s rotation"]
    E --> F["180° rotation"]
    F --> G["Δ ≤ 0,1° ✓"]
    G --> H["Δ > 0,1° → Bookbook"]
ADL 60-P / ADL 120-P
| de | Kalibrierung vornehmen |
| en | Calibrating the measuring instrument |
| fr | Effectuer une calibration |
| it | Eseguire la taratura |
| es | Ejecución del calibrado |
| pt | Proceder à calibração |
| nl | Kalibratie uitvoeren |
| da | Udfør kalibrerin |
| no | Foreta kalibreringen |
| sv | Kalibrering |
| fi | Kalibrointi |
| el | Διεξαγωγή βαθμονόμησης |
| pl | Przeprowadzanie kalibracji |
| hu | Kalibrálás végzése |
| cs | Provedení kalibrace |
| sk | Vykonanie kalibrácie |
| et | Kalibreerimine |
| lt | Kalibravimas |
| lv | Kalibrēšana |
| ru | Выполнение калибровки |
A
![4 sec. 4. [Cal] CAL3](/content/2026/04/681544/images/37083ccbe7a3d93985473b492521f0b5bffcc4251f764e81e63cee9378a3d458.jpg)

B
flowchart
graph TD
    A["1. Cal"] --> B["3 sec."]
    B --> C["2. Cal"]
    C --> D["2.5 Cal 2"]
    D --> E["Signal Signal"]
flowchart
graph TD
    A["3."] --> B["180°"]
    B --> C["4 sec."]
    C --> D["4."]
    D --> E["3."]
    E --> F["3."]
    style A fill:#f9f,stroke:#333
    style B fill:#ccf,stroke:#333
    style C fill:#cfc,stroke:#333
    style D fill:#fcc,stroke:#333
    style E fill:#cff,stroke:#333
    style F fill:#ffc,stroke:#333
flowchart
graph TD
    A["180°"] --> B["4 sec."]
    B --> C["Cal."]
    C --> D["CALY"]

flowchart
graph TD
    A["7."] --> B["180°"]
    B --> C["4 sec."]
    C --> D["8."]
    D --> E["500000"]
ADL 60-P / ADL 120-P