BGX500 - Glue gun RAPID - Free user manual and instructions
Find the device manual for free BGX500 RAPID in PDF.

| Product Type | Cordless Electric Glue Gun |
| Brand | Rapid |
| Model | BGX500 |
| Dimensions (L x W x H) | 193 x 57 x 231 mm |
| Weight (without battery) | 380 g |
| Rated Voltage | 18 V |
| Recommended Battery Type | Power for all 2.5 Ah, 4.0 Ah, 6.0 Ah |
| Recommended Charger Type | Power for all AL1810CV, AL1830CV, AL18V-2D |
| Glue Stick Diameter | 12 mm |
| Heating Time | Approximately 3 to 4 minutes |
| Operating Temperature | Self-regulating, nozzle up to 190 °C |
| Battery Charge Indicator | 4 red LEDs (indicator light) |
| Heating LED Indicator | Green LED: flashing during heating, solid when ready |
| Main Functions | Flow trigger, stroke adjustment, metal stand, nozzle change |
| Safety | Electronic Cell Protection (ECP), battery protection shutdown, hot surface indication |
| Maintenance and Cleaning | Clean with a dry or damp cloth, do not use solvent, do not oil |
| Spare Parts and Repairability | Repairs by manufacturer or authorized service center only, removable nozzle |
| Warranty | 2 years from date of purchase, upon presentation of receipt |
| Recycling | Batteries and appliance subject to WEEE directive, do not dispose of with household waste |
Frequently Asked Questions - BGX500 RAPID
User questions about BGX500 RAPID
0 question about this device. Answer the ones you know or ask your own.
Ask a new question about this device
Download the instructions for your Glue gun in PDF format for free! Find your manual BGX500 - RAPID and take your electronic device back in hand. On this page are published all the documents necessary for the use of your device. BGX500 by RAPID.
USER MANUAL BGX500 RAPID
WARNING!! Read all safety warnings and all instructions.

Failure to follow all instructions listed below may result in electric shock, fi re and/or us personal injury.
Save all warnings and instructions for future reference. The term "power tool" in the warnings refers to your mains-operated (corded) power tool or battery-operated (cordless) power tool.
1) WORK AREA SAFETY
a) Keep your work area clean and well lit. Cluttered benches and dark areas invite accidents.
b) Do not operate power tools in explosive atmospheres, such as in the presence of fl ammable liquids, gases, or dust. Power tools create sparks which may ignite the dust or fumes.
c) Keep bystanders, children, and visitors away while operating a power tool. Distractions can cause you to lose control.
2) ELECTRICAL SAFETY
a) Do not expose power tools to rain or wet conditions. Water entering a power tool will increase the risk of electric shock.
3) PERSONAL SAFETY
a) Stay alert, watch what you are doing and use common sense when operating a power tool. Do not use a power tool while you are tired or under the influence
of drugs, alcohol or medication. A moment of inattention while operating power tools may result in serious personal injury.
b) Use personal protective equipment. Always wear eye protection. Protective equipment such as dust mask, nonskid safety shoes, hard hat, or hearing protection used for appropriate conditions will reduce personal injuries.
c) Prevent unintentional starting. Ensure the switch is in the off-position before connecting to power source and/or battery pack, picking up or carrying the tool. Carrying power tools with your finger on the switch or energizing power tools that have the switch on invites accidents.
d) Do not overreach. Keep proper footing and balance at all times. This enables better control of the power tool in unexpected situations.
e) Dress properly. Do not wear loose clothing or jewellery. Keep your hair, clothing and gloves away from moving parts. Loose clothes, jewellery or long hair can be caught in moving parts.
f) Do not let familiarity gained from frequent use of tools allow you to become complacent and ignore tool safety principles. A careless action can cause severe injury within a fraction of a second.
a) Do not force the power tool. Use the correct power tool for your application. The correct power tool will do the job better and safer at the rate for which it was
b) Do not use the power tool if the switch does not turn it on and off. Any power tool that cannot be controlled with the switch is dangerous and must be repaired.
c) Disconnect the plug from the power source and/or the battery pack from the power tool before making any adjustments, changing accessories, or storing power tools. Such preventive safety measures reduce the risk of starting the power tool accidentally.
d) Store idle power tools out of the reach of children and do not allow persons unfamiliar with the power tool or these instructions to operate the power tool. Power tools are dangerous in the hands of untrained users.
e) Maintain power tools. Check for misalignment or binding of moving parts, breakage of parts and any other condition that may affect the power tool's operation. If damaged, have the power tool repaired before use. Many accidents are caused by poorly maintained power tools.
f) Use the power tool, accessories and tool bits etc. in accordance with these instructions, taking into account the working conditions and the work to be performed. Use of the power tool for
operations different from those intended could result in a hazardous situation.
g) Keep handles and grasping surfaces dry, clean and free from oil and grease. Slippery handles and grasping surfaces do not allow for safe handling and control of the tool in unexpected situations.
5) BATTERY TOOL USE AND CARE.
6) CHARGER TOOL USE AND CARE
a) Make sure to follow the battery manufacturer's instructions.
b) Only use the battery types recommended in the “Technical specification” section below.
c) Do not open the battery.
d) Be careful not to short-circuit batteries.
e) Do not throw batteries into fi re.
f) Do not leave any used batteries in the device. These can corrode, releasing chemicals that harm your health and the device.
g) When not in use for a long time, remove the batteries from the device to prevent them from leaking.
a) Only use the charger types recommended in the “Technical specification” section below.
b) Only charge Bosch Li-Ion batteries with a capacity of 1,5 Ah or more (4 battery cells or more). The battery voltage must match the battery charging voltage of the charger. Do not charge any non-rechargeable batteries. Otherwise there is a risk of fire and explosion.
c) Keep the charger away from dirt and moisture.
d) Always check the charger, cable and plug before use. Stop using the charger if you discover any damage. Do not open the charger yourself, and have it repaired only by a qualified specialist using only original replacement parts. Damaged chargers, cables and plugs increase the risk of electric shock.
e) Do not operate the charger on an easily ignited surface (e.g. paper, textiles, etc.) or in a fl ammable environment. There is a risk of fi re due to the charger heating up during operation.
f) Rechargeable batteries are to be removed from the appliance before being charged.
7) SERVICE
a) Have your power tool serviced by a qualified repair person using only identical replacement parts. This will ensure that the safety of the power tool is maintained.
b) Never service damaged battery packs. Service of battery packs should only be performed by the manufacturer or authorised service providers.
GLUE GUN SAFETY WARNINGS

WARNING: This tool must be placed on its stand when not in use.
- This appliance can be used by children aged from 8 years and above and persons with reduced physical, sensory and mental capabilities or lack of ex-
perience and knowledge if they have been given supervision or instruction concerning use of the appliance in a safe way and understand the hazards involved. Children shall not play with the appliance. Cleaning and user maintenance shall not be made by children without supervision.
-
Never insert objects other than ∅12mm Rapid glue sticks into the machine.
-
Never remove a glue stick that has already been inserted.
-
It is normal for this tool to become quite warm during use. This is normal and does not indicate a problem.
-
Hot Surfaces: the nozzle of the appliance and the glue can reach a temperature of approx. 190°C. Do not touch the heated nozzle or the hot adhesive. Avoid any contact with the skin. If you burn yourself, put the burn in cold water immediately. Never try to remove a large quantity of glue without medical help.
-
Some materials are heat-sensitive and can be damaged by the hot nozzle or even the hot glue. Whenever possible, test a piece of scrap material or a hidden portion of the object being repaired.
-
When you have fi nished using the machine, turn the switch off and wait until it has cooled. Ne- ver immerse glue gun in water or other liquids to speed cooling process. Allow it to air cool only. The glue gun should be stored in a closed dry and secure place (tool box, drawer, cupboard,
etc.).
- Do not leave the glue gun unattended while it is switched on. Protect the glue gun against heat, e.g. against continuous sunlight, fire, water, and moisture. There is a risk of explosion.
TECHNICAL SPECIFICATION
| Tool Weight (bare-tool) 380 g | |
| Dimensions (bare-tool) 193 x 57 x 231 | L*W*H (mm) |
| Voltage 18 V | |
| Temperature Self-regulated | |
| Glue sticks Rapid ∅12mm | |
| Heat-up time approx. 3 – 4 min |
| Recommended Battery type Power for all 2.5 Ah, 4.0 Ah, 6.0 Ah |
| Recommended Charger type Power for all AL1810CV, AL1830CV, AL18V-20 |
| Permitted ambient temperature | |
| During charge 0 to +35°C | |
| During usage -20 to +50°C | |
| During storage -20 to +50°C |
Battery Charging
Note: The battery supplied is partially charged. To ensure full capacity of the battery, completely charge the battery in the battery charger before using your power tool for the first time.
The lithium-ion battery can be charged at any time without reducing its service life. Interrupting the charging procedure does not damage the battery.
The lithium-ion battery is protected against deep discharging by the "Electronic Cell Protection (ECP)". When the battery is empty, the machine is switched off by means of a protective circuit: The inserted tool no longer rotates.
Do not continue to press the On/Off switch after the machine has been automatically switched off. The battery can be damaged.
Observe the notes for disposal.
Removing the battery
To remove the battery, press the battery release button and pull the battery to the rear and out of the power tool. Do not use force to do this.
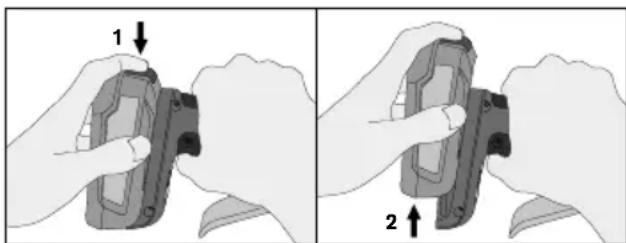
natural_image
Two-panel illustration showing hands holding a device, labeled 1 and 2 with arrows indicating movement (no text or symbols on the devices themselves)BATTERY RESIDUAL CAPACITY
This indication (C) is made up of four red LEDs which shows the residual capacity of the inserted battery. (Figure 1)
The indication is turned on when a battery is inserted into the tool, or the trigger alone is pressed. Stays on for 5 seconds.
As the residual capacity in the battery decreases, less and less LEDs will be turned on.
Once residual capacity is below 6% one LED will start flashing.
BATTERY ERROR INDICATIONS
If an error in the battery is detected, the LEDs (C) will instead of residual capacity show the following indications, and the tool will not operate. (Figure 1)
| Battery Error Indications | |||
| Error type | Battery indicator (Figure 1.C) | Solution | |
| Battery voltage is critically low | Frist LED flashing for 10sec |  | Battery will soon need charging |
| Battery is too warm | All LEDs flashing for 10sec |  | Allow the battery to reach normal temperature prior use |
| Battery not recognized | First and last LEDs flashing for 10sec |  | Use a recommended battery in section “Technical specification” |
| Battery information | |
| Battery type | Approx. Operating time (min) |
| 2.5 Ah | 150 |
| 4.0 Ah | 270 |
| 6.0 Ah | 480 |
FEATURES
1.A. Nozzle
1.B. Power switch
1.C. Battery capacity indicator
2.D. LED Indicator
2.E. Glue feeder
2.F. Stroke adjuster
| LED Indicator (Fig 2.D.) | ||
| Power Switch | Green LED | Explanation |
| OFF | OFF | Power off |
| ON | Flashing | Heating up |
| ON | ON | Ready to be used |
INTRUCTIONS FOR USE
- Make sure the battery is charged and connected to the glue gun.
- Turn on the power switch.
- Allow the tool to heat until the green LED stop flashing. (approx. 3-4 minutes)
- Insert a glue stick in the back of the tool (Fig 2.E).
- When the glue gun is fully heated, squeeze the trigger slowly, until the melted material begins to flow from the nozzle. Release the trigger to stop the glue flow.
- Work with the stroke adjuster and the trigger to adjust the output and speed of melted glue (Fig 2.F).
- To change the nozzle, the glue gun should be slightly warm but turned off. Unscrew the nozzle using gloves.
-
To prevent the clogging of this glue gun, keep feeding mechanism and melt chamber free from dirt and other foreign debris.
-
Store unused glue sticks in a clean environment.
- Do not pull glue sticks from the back of this glue gun. The feed mechanism may be damaged or impaired. If you need to change glue type, cut off the protruding end and feed the remainder through with the new glue stick.
- Do not lay the heated gun on its side. Keep the heated gun in an upright position, on the metal stand or workbrench, with nozzle pointed down.
- If melted glue has escaped from the melt chamber entrance and is interfering with the feed mechanism; allow gun to cool, and gently remove the obstruction glue.
- Do not use glues other than those recommended by Rapid.
- Once fi nished, turn the power switch off.
In any case, you should never:
- Force the trigger before the tool has heated up to its working temperature.
- Push hard on the glue stick, never attempt to remove it from the back.
- Repair the glue gun, any repair work on the glue gun should be carried out by manufacturer or other by Rapid appointed staff.
MAINTENANCE
- Remove the battery before any maintenance.
- Keep the tool, especially the glue outlet free from dust and dirt.
- Clean the tool by a dry or damp cloth. NEVER use any solvent.
- DO NOT oil or grease any parts.
- Be sure the tool is not damaged.

WARNING!
DO NOT alter any parts on this tool or attach special fixtures, it can lead to personal injury.
If the supply cord is damaged, it must be replaced by the manufacturer, its service agent or similarly qualified persons in order to avoid a hazard.
WARRANTY
Warranty and repairs under warranty
Warranty period: This product is guaranteed for
2 years from the date of purchase (original sales receipt acting as proof).
Warranty conditions: All points mentioned in this document must have been fully adhered to.
Warranty repairs: The Rapid After-Sales Service is the only approved service to carry out warranty repairs on this tool.
In the event of a claim under the warranty:
- Return the product in its original packaging to the shop or outlet that supplied you with this product,
- Accompany the returned product with the original dated receipt.
Any breach of one of these points would prevent consideration by RAPID under the manufacturer's warranty.
BATTERY DISPOSAL
Exhausted batteries are to be removed from the appliance and safely disposed of.
Batteries may not be disposed of with the usual domestic waste, they may contain toxic heavy metals and are subject to hazardous waste regulations.
For this reason, dispose of used batteries at a local collection point.

2012/19/EU
Waste Electrical and Electronic Equipment (WEEE)
Electrical and electronic devices contain materials and substances that can have damaging effects on human health and the environment. This symbol indicates that this device must not be treated as unsorted municipal waste but must be collected separately. Dispose of the device via a collection point for the recycling of waste electrical and electronic equipment within the EU, UK and in other European countries that operate separate collection systems for waste electrical and electronic equipment. By disposing of the device in the proper manner, you help to avoid possible hazards for the environment and public health that could otherwise be caused by improper treatment of waste equipment. The recycling of materials contributes to the conservation of natural resources.
BGX500
natural_image
Two-panel illustration showing hands holding a device, labeled 1 and 2 with arrows indicating movement (no text or symbols on the devices themselves)AKKU-RESTKAPAZITÄT
natural_image
Two-panel illustration showing hands holding a device, labeled 1 and 2 with arrows indicating movement (no text or symbols on the devices themselves)CAPACITÉ DE CHARGE RESTANTE
VEILIGHEIDSWAARSCHU- WINGEN VOOR LIJMPISTOLEN
natural_image
Two-panel illustration showing hands holding a device, with arrows indicating movement (no text or symbols)natural_image
Two-panel illustration showing hands holding a device, labeled 1 and 2 with arrows indicating movement (no text or symbols on the devices themselves)CAPACITÀ RESIDUA DELLA BATTERIA
natural_image
Illustration of hands holding a device with a downward arrow indicating a step (no text or symbols present)
natural_image
Illustration of hands holding a device with a numbered arrow indicating direction (no text or symbols present)natural_image
Two-panel illustration showing hands holding a device, labeled 1 and 2 with arrows indicating movement (no text or symbols on the devices themselves)CAPACIDADE DA BATERIA
natural_image
Two-panel illustration showing hands holding a device with a lock, labeled 1 and 2 (no text or symbols on the devices themselves)KVARVARANDE BATTERIKAPACITET
natural_image
Illustration of hands holding a device with a downward arrow indicating a step (no text or symbols present)
natural_image
Illustration of hands holding a device with a numbered arrow indicating step 2 (no text or symbols present)RESTERENDE BATTERIKAPACITET
1) SIKKERHET PÅ ARBEIDSOMRÅDET
a) Arbeidsområdet må holdes rent og godt belyst. Det kan lett oppstå ulykker på rotete eller mørke arbeidsområder.
| Tillatt omgivelsestemperatur | |
| under lading 0 to +35°C | |
| under bruk -20 to +50°C | |
| under lagring -20 to +50°C |
natural_image
Illustration of hands holding a device with a labeled arrow pointing to the top part (no text or symbols present)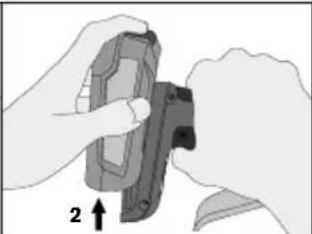
natural_image
Illustration of hands holding a device with a numbered arrow indicating step 2 (no text or symbols present)RESZTKOWA POJEMNOŚĆ AKUMULATORA
natural_image
Illustration of hands holding a device with a downward arrow indicating a step (no text or symbols present)
natural_image
Illustration of hands holding a device with a numbered arrow indicating step 2 (no text or symbols present)natural_image
Illustration of hands holding a device with a downward arrow indicating a step (no text or symbols present)
natural_image
Illustration of hands holding a device with a numbered arrow indicating direction (no text or symbols present)AKU JÄÄKVÕIMSUS
natural_image
Two-panel illustration showing hands holding a device, labeled 1 and 2 with arrows indicating movement (no text or symbols on the devices themselves)AKUMULIATORIAUS GALINGUMO LIKUTIS
natural_image
Two-panel illustration showing hands holding a device, labeled 1 and 2 with arrows indicating movement (no text or symbols on the devices themselves)ATLIKUŠAIS AKUMULATORA UZLĀDES LĪMENIS
natural_image
Two-panel illustration showing hands holding a device with arrows indicating movement (no text or symbols)KAPACITA BATERIE
natural_image
Two-panel illustration showing hands holding a device with arrows indicating movement (no text or symbols)KAPACITA BATÉRIE
natural_image
Two-panel illustration showing hands holding a device, labeled 1 and 2 with arrows indicating movement (no text or symbols on the devices themselves)PREOSTALA KAPACITETA BATERIJE
natural_image
Illustration of hands holding a device with a downward arrow indicating a step (no text or symbols present)
natural_image
Illustration of hands holding a device with a numbered arrow indicating step 2 (no text or symbols present)natural_image
Illustration of hands holding a device with a downward arrow indicating a step (no text or symbols present)
natural_image
Illustration of hands holding a device with a numbered arrow indicating direction (no text or symbols present)AKKUMULÁTOR FENNMARADÓ KAPACITÁS
natural_image
Illustration of hands holding a device with a downward arrow indicating a step (no text or symbols present)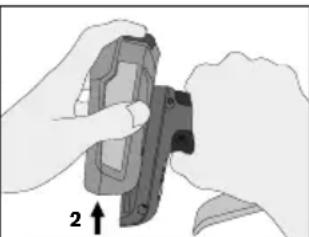
natural_image
Illustration of hands holding a device with a numbered arrow indicating step 2 (no text or symbols present)NIVEL INCARCARE ACUMULATOR
natural_image
Illustration of hands holding a device with a downward arrow indicating a step (no text or symbols present)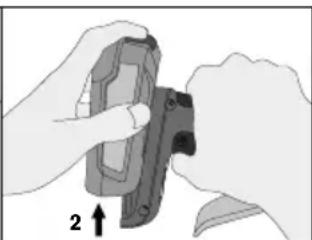
natural_image
Illustration of hands holding a device with an arrow indicating direction (no text or symbols)UK Importer and authorised representative:
ACCO UK Limited
Oxford House Oxford Road
Aylesbury HP21 8SZ
United Kingdom

Isaberg Rapid AB
SE-335 71 Hestra, Sweden
www.rapid.com
BGX500 Operating Instructions