PRO EG320 - Glue gun RAPID - Free user manual and instructions
Find the device manual for free PRO EG320 RAPID in PDF.

| Product type | Electric glue gun |
| Model | PRO EG320 |
| Brand | Rapid |
| Dimensions (W x H x D) | 20.5 x 24 x 4.5 cm |
| Weight | 0.47 kg |
| Supply voltage | 220-240 V~, 50 Hz |
| Power consumption (start-up) | 120 W |
| Power consumption (operation) | 15 W |
| Operating temperature | Self-regulating (approx. 200 °C at nozzle) |
| Compatible glue stick | Rapid ∅ 12 mm |
| Heating time | 3 to 5 minutes |
| Adjustable flow | Yes, by trigger pressure |
| Rest stand | Integrated (metal stand) |
| Replaceable nozzle | Yes |
| Safety | Thermal self-regulation, overheat protection |
| Maintenance | Clean the outside, avoid dust and dirt |
| Warranty | 2 years |
| Environment | Do not dispose of with household waste (WEEE directive) |
| Usage | Indoors only, clean and dry surface |
| Storage | Unplug, let it cool down, store in a dry place |
Frequently Asked Questions - PRO EG320 RAPID
User questions about PRO EG320 RAPID
0 question about this device. Answer the ones you know or ask your own.
Ask a new question about this device
Download the instructions for your Glue gun in PDF format for free! Find your manual PRO EG320 - RAPID and take your electronic device back in hand. On this page are published all the documents necessary for the use of your device. PRO EG320 by RAPID.
USER MANUAL PRO EG320 RAPID
natural_image
Two RapidR4K® PRO electric glue gun holders displayed against a plain background (no text or symbols visible on the gun body beyond branding)
CE UK CA

GB Electric hot melt applicator
Technical Characteristics EG320
Dimensions (HxLxW) 20,5 x 24 x 4,5 cm
Weight : 0,47 kg
Working voltage : 220V-240V\~, 50Hz
Power rating : 120W at start-up, 15W in use
Temperature : Self-regulated
Glue sticks: Rapid ∅ 12mm

Technical Characteristics EG313
Dimensions (HxLxW) 23,5 x 22 x 4 cm
Weight : 0,38 kg
Working voltage : 100V-240V\~, 50-60Hz
Power rating : 100W at start-up, 12W in use
Temperature : Self-regulated
Glue sticks: Rapid ∅ 12mm
Safety Instructions
Read safety rules and instructions carefully before using this machine.
Warning: This tool must be placed on its stand when not in use.


- This appliance can be used by children aged from 8 years and above and persons with reduced physical, sensory and mental capabilities or lack of experience and knowledge if they have been given supervision or instruction concerning use of the appliance in a safe way and understand the hazards involved. Children shall not play with the appliance. Cleaning and user maintenance shall not be made by children without supervision.
- Do not use or store this machine in a humid environment. Do not place it where it may be splashed by water. Do not expose it to
extreme changes in temperature during or directly after use.
- Only use it indoors on a clean, dry work surface. Excessive dust and dirt may reduce lifetime of this tool.
- Never unplug the machine by pulling the cable.
- If the power cable is damaged or cut, remove the plug from the electric socket immediately and do not use the machine. It must be replaced by the manufacturer or its service agent or a similar qualified person in order to avoid a hazard.
- Unplug the machine when not in use, before any servicing operations (maintenance, cleaning etc.)
- Never use the tool if it is damaged in any way.
- Never insert objects other than ∅12mm Rapid glue sticks into the machine.
- Never remove a glue stick that has already been inserted.
- It is normal for this tool to become quite warm during use. This is normal and does not indicate a problem.
- Hot Surfaces: the nozzle of the appliance and the glue can reach a temperature of approx. 200°C. Do not touch the heated nozzle or the hot adhesive. Avoid any contact with the skin. If you burn yourself, put the burn in cold water immediately. Never try
to remove a large quantity of glue without medical help.
- Keep children away. Children should not use this glue gun.
- When applying at a height, take all the necessary precautions to ensure that the glue does not run onto the operator or onto any object. Make sure that you have enough protection wear (skin, eyes)
- Some materials are heat-sensitive and can be damaged by the hot nozzle or even the hot glue. Whenever possible, test a piece of scrap material or a hidden portion of the object being repaired.
- Stay alert. Pay attention to your work. Beware of any dripping hot glue from your project. Use common sense. Do not operate this gun when you are tired. Do not operate under the influence of alcohol or other drugs that may impair your physical abilities.
- When you have finished using the machine, unplug it and wait until it has cooled. Never immerse glue gun in water or other liquids to speed cooling process. Allow it to air cool only. The glue gun should be stored in a closed dry and secure place (tool box, drawer, cupboard, etc.).
Instructions for Use
- Plug the glue gun into a suitable socket. Turn on the power switch.
- Allow the tool to heat for approximately 3-5 minutes (EG320) / 2-4 minutes (EG313). Insert a glue stick in the back of the tool.
- When the gun is fully heated, squeeze the trigger slowly, until
the melted material begins to flow from the nozzle. Release the trigger to stop the glue flow.
- Work with glue gun trigger to adjust the output and speed of the glue stick.
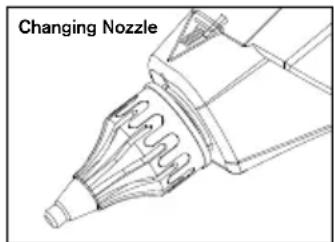
- To change the nozzle, the glue gun should be slightly warm but unplugged.
- Unscrew the nozzle using gloves.
Breakdowns and remedies
- To prevent the clogging of this glue gun, keep feeding mechanism and melt chamber free from dirt and other foreign debris.
- Store unused glue sticks in a clean environment.
- Do not pull glue stick from the back of the glue gun. The feed mechanism may be damaged or impaired. If you need to change glue type, cut off the protruding end and feed the remainder through with the new glue stick.
- Do not lay the heated gun on its side. Keep the heated gun in an upright position, on the metal stand or workbench, with nozzle pointed down.
- If melted glue has escaped from the melt chamber entrance and is interfering with the feed mechanism; allow gun to cool, and gently remove the obstructing glue.
- Replace the nozzle if glue drips excessively. Do not attempt to
change the nozzle when glue is cold. To change the nozzle, the gun must be heated until the glue is softened enough to remove the nozzle (about 1 minute). Use gloves and remove the old nozzle. Flush glue through the gun, to clean out the melting chamber. Replace with a new nozzle. Tight-en only until snug. Do not over tighten.
- Keep outside of glue gun clean.
- Do not use glues other than those recommended by Rapid
- Leaving the tool switched on for too long without use can lead to risks. Unnecessary overheating over a long period of inactivity, without use, depending on the length of time and type of glue used, can have adverse effects:
* Melting and softening of the glue stick at the back of the tool, or even adhesion of the stick in the back entrance sleeve at the entrance of the heater. In this case, restarting your tool for subsequent operation may take longer and be more diffi cult. In the event of such a problem, Rapid recommends that you follow these steps:
- Plug in the tool and leave it heating for around fifteen minutes.
- Start to push the glue by pressing lightly on the trigger from time to time. Continue to let the tool warm up and repeat this action until it unblocks. The unblocking time may be longer or shorter depending on: The type and
composition of the glue that would have been used and the duration for which the tool has been left heating up unnecessarily, without being used for gluing.
If start-up is still difficult after this action:
- Remove the nozzle, beware with the device being hot.
- Place the tool on its stand. Leave it plugged in and heated.
- Purge the tool by letting the hot glue flow out under gravity, onto a disposable support (container, paper, cardboard,...).
- Start to push the glue by pressing lightly on the trigger from time to time. Continue to let the tool warm up and repeat this action until it unblocks. Pull the trigger a few times, to make sure that the old glue has been completely cleared and the tool has been completely purged.
* Charring of the glue, depending on the nature and composition of the glue used, occurs when the glue remains molten, trapped inside the tool, for too long. Once charred, the glue will begin to obstruct the nozzle and thus lead to a glue leakage of glue towards the back of the tool which in the long-term can be serious consequences such as a system blockage at the front or a break in the heating system.
In this event:
- Remove the nozzle, beware with the device being hot.
- Place the tool on its stand. Leave it plugged in and heated. Purge the tool by letting the hot glue flow out under gravity, onto a disposable support (container, paper, cardboard,...).
- Insert a new glue stick, pushing lightly on the trigger.
- Pull the trigger a few times, to make sure that the old glue has been completely cleared and the tool has been completely purged.
- Replace the nozzle with a new one.
- In any case, you should never:
- Force the trigger before the tool has heated up to its working temperature
- Push hard on the glue stick, never attempt to remove it from the back.
- Repair work on the glue gun should be carried out by qualified staff only.
- If the power supply cable is damaged it must be replaced by the manufacturer, the manufacturer's after sales service or a similarly qualified person in order to avoid any danger.
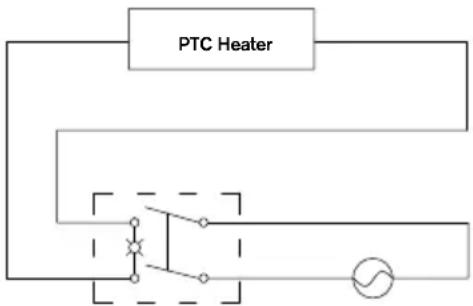
Electric wiring diagram
flowchart
graph TD
    A["PTC Heater"] --> B["Switch"]
    B --> C["Power Source Symbol"]
    style A fill:#f9f,stroke:#333
    style B fill:#ccf,stroke:#333
    style C fill:#cfc,stroke:#333
ON/OFF Switch AC 220\~240V
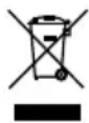
ENVIRONMENT
Separate Collection. Do not dispose power tools into household waste! According to the European Directive 2012/19/EC on waste of electrical and electronic equipment.
When the tool needs to be replaced, or if it is of no further use it should be brought to a separate collection centre for recycling.
Warranty and repairs under warranty
Warranty period: This product is guaranteed for 2 years from the date of purchase (original sales receipt acting as proof).
Warranty conditions: All points mentioned in this document must have been fully adhered to.
Warranty repairs: The Rapid After-Sales Service is the only approved service to carry out warranty repairs on this tool.
In the event of a claim under the warranty:
1 Return the product in its original packaging to the shop or outlet that supplied you with this product,
2 Accompany the returned product with the original dated receipt.
Any breach of one of these points would prevent consideration by RAPID under the manufacturer's warranty.
Klebstoff: Rapid ∅ 12mm

kg
Klebstoff: Rapid ∅ 12mm
kg
Sicherheitshinweise
Glue sticks: Rapid ∅ 12mm

Glue sticks: Rapid ∅ 12mm
UK Importer and authorised representative:
ACCO UK Limited
Oxford House Oxford Road
Aylesbury HP21 8SZ
United Kingdom

Isaberg Rapid AB
SE-335 71 Hestra, Sweden
www.rapid.com
EG320, EG313 Operating Instructions