
AOS-B 130NV - Grinder Mirka - Free user manual and instructions
Find the device manual for free AOS-B 130NV Mirka in PDF.

| Product Type | Electric Random Orbital Sander |
| Brand | Mirka |
| Model | AOS-B 130NV |
| Voltage | 10.8 V DC |
| Rotation Speed | 4000 to 8000 rpm (adjustable in steps) |
| Eccentricity | 3.0 mm (1/8") |
| Pad Diameter | 32 mm (1 1/4") |
| Weight (with battery) | 0.57 kg |
| Battery Type | Rechargeable Li-ion (compatible with Mirka BPA 10820/10825/10850) |
| Available Battery Capacity | 2.0 Ah / 2.5 Ah / 5.0 Ah |
| Charger | Mirka BCA 108 (100-240 VAC, 50/60 Hz) |
| Charging Time | < 40 min (for 2.0 Ah battery) |
| Sound Pressure Level (LpA) | 61.2 dB(A) |
| Sound Power Level (LwA) | 72.2 dB(A) |
| Vibration Emission (ah) | 2.54 m/s² |
| Technologies | Integrated Bluetooth® |
| Variable Speed | Yes, with lockable feature |
| Battery Charge LED Indicator | Yes (green/red) |
| Maintenance | Clean with soft brush; replace pad |
| Spare Parts and Repairability | Use Mirka original parts; repair by authorized center |
| Compliance | CE, RCM, FCC, IC |
| Manufacturer | Mirka Ltd, 66850 Jeppo, Finland |
Frequently Asked Questions - AOS-B 130NV Mirka
User questions about AOS-B 130NV Mirka
0 question about this device. Answer the ones you know or ask your own.
Ask a new question about this device
Download the instructions for your Grinder in PDF format for free! Find your manual AOS-B 130NV - Mirka and take your electronic device back in hand. On this page are published all the documents necessary for the use of your device. AOS-B 130NV by Mirka.
USER MANUAL AOS-B 130NV Mirka
natural_image
Three MIRKA pushpin buttons with black and white stripes, displayed against a plain background (no text or symbols visible on the buttons themselves).
natural_image
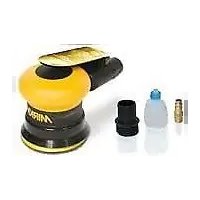
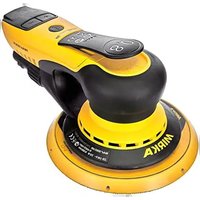
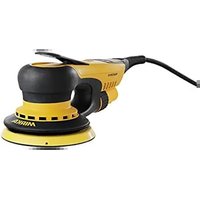
Stylized illustration of a bulldog in aggressive posture (no text or symbols)Mirka® AROS-B 150NV Mirka® AOS-B 130NV
32 mm (1 ¼") · 10.8 V
United States of America, Mexico & Canada
en | us • ca Operating instructions ..... 227
Picture 1

Picture 2
Picture 3
Parts list - kits
| Mirka code Item Description Kit Quantity | ||
| 8991120311 Counter weight kit for AOS-B A | ||
| 3 Counter weight 1 | ||
| 4 Set screw 1 | ||
| 8991120511 Spindle bearing kit for AOS-B B | ||
| 5 Retaining ring | 1 | |
| 6 Ball bearing | 1 | |
| 7 Ball bearing | 1 | |
| 8 Balance shaft | 1 | |
| 9 Assembly screw | 1 | |
| 8991121111 Quick lock plate assembly for AOS-B C | ||
| 11 Quick lock plate | 1 | |
| 12 Assembly screws | 4 | |
| 8991121411 Spindle bearing kit for AROS-B D | ||
| 14 Retaining ring | 1 | |
| 15 Ball bearing | 1 | |
| 17 Ball bearing | 1 | |
| 19 Washer | 1 | |
| 20 Retaining ring | 1 | |
| 8991122411 Speed controller kit E | ||
| 24 Speed controller | 1 | |
| 25 Battery wires | 1 | |
| 26 Motor connector assembly 1 | ||
| 27 Trigger wires | 1 | |
| 28 Battery terminal | 1 | |
| 29 Assembly screws for switch | 2 | |
| 31 Switch | 1 | |
| 32 Holder | 1 | |
| 33 Assembly screws for switch holder | 2 | |
| 8991162411 Speed controller (variable) kit E | ||
| 24 Speed controller | 1 | |
| 26 Motor connector assembly 1 | ||
| 28 Battery terminal | 1 | |
| 29 Assembly screws for switch | 2 | |
| 31 Switch | 1 | |
| 32 Holder | 1 | |
| 33 Assembly screws for switch holder | 4 | |
| 45 PCB switch | 1 | |
| 8991123411 Trigger button kit F | ||
| 34 Assembly screws for trigger button cover | 4 | |
| 35 Trigger button cover | 1 | |
| 36 Trigger spring | 1 | |
| 37 Trigger button | 1 | |
| 8991022511 Trigger button (variable) kit F | ||
| 34 Assembly screws for trigger button cover 4 | ||
| 35 Trigger button cover 1 | ||
| 36 Trigger spring 1 | ||
| 37 Trigger button | 1 | |
| 46 Magnet | 1 | |
| 8991123811 | PCB cover kit | G |
| 38 PCB cover | 1 | |
| 39 Assembly screws | 4 | |
| 8991124011 | Cover kit | H |
| 40 Cover | 1 | |
| 41 Assembly clamps | 2 | |
| 44 Assembly screws for cover | 2 | |
| 8991124211 | Label kit (EU) for AROS-B and AOS-B | I |
| 42 Type label, AROS-B | 10 | |
| 42 Type label, AOS-B | 10 | |
| Label kit (North America) for AROS-B and AOS-B | I | |
| 42 Type label, AROS-B | 10 | |
| 42 Type label, AOS-B | 10 | |
| 8991110231 | AOS-B motor kit orbit 3.0 mm | J |
| 2 AOS-B motor orbit 3.0 mm | 1 | |
| 3 Counter weight | 1 | |
| 4 Set screw | 1 | |
| 5 Retaining ring | 1 | |
| 6 Ball bearing | 1 | |
| 7 Ball bearing | 1 | |
| 8 Balance shaft | 1 | |
| 9 Assembly screw | 1 | |
| 10 Rubber mount | 1 | |
| 11 Quick lock plate | 1 | |
| 12 Assembly screws | 1 | |
| 8991110251 | AROS-B motor kit orbit 5.0 mm | K |
| 2 AROS-B motor orbit 5.0 mm | 1 | |
| 14 Retaining ring | 1 | |
| 15 Ball bearing | 1 | |
| 17 Ball bearing | 1 | |
| 19 Washer | 1 | |
| 20 Retaining ring | 1 | |
| 23 Spindle quick lock insert | 1 | |
Spare parts & accessories on page 8–9.
NOTE! Repairs done by non-authorized repairer will breach the Mirka warranty.
Electrical tool must be serviced by a qualified repair person and in accordance with national requirements.
Parts list – spareparts & accessories
| Mirka code Item Description Kit Quantity | ||||
| 8991110111 | 1 | Housing for AROS-B, 5.0mm | 1 | |
| 8991110211 | 1 | Housing for AOS-B, 3.0mm | 1 | |
| 2 | AOS-B motor orbit 3.0 mm | J | 1 | |
| 2 | AROS-B motor orbit 5.0 mm | K | 1 | |
| 3 | Counter weight for AOS-B | A, J | 1 | |
| 4 | Set screw for AOS-B | A, J | 1 | |
| 5 | Retaining ring for AOS-B | B, J | ||
| 6 | Ball bearing for AOS-B | B, J | 1 | |
| 7 | Ball bearing for AOS-B | B, J | 1 | |
| 8 | Balance shaft for AOS-B | B, J | 1 | |
| 9 | Assembly screw for AOS-B | B, J | 1 | |
| 8991111011 | 10 | Rubber mount | J | |
| 11 | Quick lock plate assembly for AOS-B | C, J | ||
| 12 | Assembly screws for AOS-B | C, J | ||
| 8991111311 | 13 | Soft ring | ||
| 14 | Retaining ring for AROS-B | D, K | ||
| 15 | Ball bearing for AROS-B | D, K | ||
| 17 | Ball bearing for AROS-B | D, K | ||
| 19 | Washer for AROS-B | D, K | ||
| 20 | Retaining ring for AROS-B | D, K | ||
| 8991122111 | 21 | Battery pack 2.0 Ah | ||
| 8991122211 | 21 | Mirka intelligent battery BPA 10825 10.8 V 2.5 Ah | ||
| 8991122311 | 21 | Mirka intelligent battery BPA 10850 10.8 V 5.0 Ah | ||
| 8991112211 | 22 | Power cord 2.0 m EU | ||
| 8991112311 | 22 | Power cord 2.0 m US | ||
| 8991112411 | 22 | Power cord 2.0 m UK | ||
| 8991112611 | 22 | Power cord 2.0 m CN | ||
| 8991112711 | 22 | Power cord 2.0 m ANZ | ||
| 8991112301 | 23 | Spindle quick lock insert | K | |
| 24 | Speed controller | E | ||
| 26 | Motor connector assembly | E | ||
| 28 | Battery terminal | E | ||
| 29 | Assembly screws for switch | E | ||
| 8991123011 | 30 | Battery charger | ||
| 31 | Switch | E | ||
| 32 | Holder | E | ||
| 33 | Assembly screws for switch holder | E | ||
| 34 | Assembly screws for trigger button cover | F | ||
| 35 | Trigger button cover | F | ||
| 36 | Trigger spring | F | ||
| 37 | Trigger button | F | ||
| 38 | PCB cover | G | ||
| 39 | Assembly screws | G | ||
| 40 Cover H 1 | ||||
| 41 Assembly clamps H 2 | ||||
| 42 | Type Label | I | 1 | |
| 8294595311 | 43 | Backing pad Quick lock 32 mm PSA Hard | 1 | |
| 8294598311 | 43 | Backing pad Quick lock 32 mm Grip Soft | 1 | |
| 44 Assembly screws for cover | H 2 | |||
| 45 | PCB switch | E | 1 | |
| 46 | Magnet | F | 1 | |
NOTE! Repairs done by non-authorized repairer will breach the Mirka warranty.
Electrical tool must be serviced by a qualified repair person and in accordance with national requirements.
Firma Stefan Sjöberg, CEO
Fabrikant/Lieferant
Mirka Ltd
Dirt and grease may be removed from the exterior of the charger using a cloth or soft non metallic brush. Do not use water or any cleaning solutions.

Περαιτέρω σέρβις
Declaration of conformity
| Mirka Ltd, 66850 Jeppo, Finlanddeclare under our sole responsibility that the products Mirka® AROS-B & AOS-B 32 mm (1 1⁄4") 8000 rpm Electrical Random Orbital Sander (see "Technical data" table for particular model) to which this declaration relates are in conformity with the following standards or other normative documents: EN 62841-1:2015, EN 62841-2-4:2014 in accordance with the regulations 2006/42/EC, 2014/30/EU, 2015/863/EU. Charger safety specification according to EN 60335-1:2012/A13:2017, EN 60335-2-29:2004/A2:2010, EN 62233:2008. Charger EMC according to EN 55014-1:2017, EN 55014-2:2015, EN 61000-3-2:2014, EN 61000-3-3:2013. | ||
| Jeppo 13.8.2020Place and date of issue |  Company Stefan Sjöberg, CEO Company Stefan Sjöberg, CEO |  |
| Operating instructions include: Exploded view, Parts list, Declaration of conformity, Required personal safety equipment, Warning, Caution, Additional safety warnings, Technical data table, Noise and vibration information, Proper use of tool, Battery and charger, How to get started, Operating instructions, Maintenance, Further service, Troubleshooting guide, Disposal information. | Manufacturer / SupplierMirka Ltd66850 Jeppo, FinlandTel. +358 20 760 2111Fax +358 20 760 2290www.mirka.com |  |
Original instructions. We reserve the right to make changes to this manual without prior notice.
Important
Read these safety and operating instructions carefully before installing, operating or maintaining this tool. Keep these instructions in a safe and accessible place.
Required personal safety equipment

Read operator's manual

Wear safety glasses

Wear
ear protection

Wear safety gloves

Wear
face mask
Symbols


Complies with EU relevant standards

Complies with China Rohs requirement
Complies with Australia & New Zealand RCM requirement

Warning: Potential hazardous situation that may result in death or serious injury and/or property damage. Caution: Potential hazardous situation that may result in minor or moderate injury and/or property damage.
Please read and comply with
- General Industry Safety & Health Regulations, part 1910, OSHA 2206, available from: Superintendent of Documents; Government Printing Office; Washington DC 20402
• State and local regulations

WARNING
- Always wear required personal safety protection in accordance with manufacturer's instructions and local/national standards while using this tool.
- Read the Materials Safety Data Sheet (MSDS) for the work surface.
- If any physical hand/wrist discomfort is experienced, stop working and seek medical attention. Hand, wrist and arm injury may result from repetitive work, motion and overexposure to vibrations.
Safety rules for battery pack and charger
WARNING!
- Important safety and operating instructions for your battery and charger. Before using the charger, read all instructions and warnings on the charger, the battery pack and the tool.
- If the battery pack casing is cracked or damaged, do not insert into charger. There is a danger of electric shock or electrocution.
- Do not allow any liquid to get inside charger. Electric shock may result.
• This charger is not intended for any uses other than charging rechargeable batteries. - Do not place any object on top of the charger, near any heat source or place the charger on a soft surface that may result in excessive internal heat.
• Make sure the cord is located so it will not be stepped on, tripped over, or otherwise subjected to damage or stress. - Do not use the charger if it has received a sharp blow, been dropped or otherwise damaged in any way.
- DO NOT store or use the tool and battery pack in locations where the temperature may reach or exceed 50 °C (122 °F).
- The charger is designed to operate on standard household electrical power (100–240 VAC). Do not attempt to use it on any other voltage.

CAUTION
• Always ensure the work piece to be sanded is firmly fixed in place.
- Before changing the abrasive always disconnect the power source.
- Never carry, store or leave the tool unattended with the power source connected.).
- Keep hands clear of the spinning pad during use.
- Do not allow the tool to free speed without taking precautions to protect any persons or objects from the loss of the abrasive or backing pad.

Additional safety warnings
- Read all instructions before using this tool. All operators must be fully trained in the proper, safe use of this tool.
- All maintenance must be carried out by trained personnel. For service, contact a Mirka authorized service center.
- If the tool appears to malfunction, stop using it immediately and arrange for service and repair.
Additional information on battery and charger
- Never attempt to open the battery pack for any reason. If the plastic housing of the battery pack breaks or cracks, immediately discontinue use and do not recharge.
Technical data
Sander Mirka® AROS-B 150NV Mirka® AOS-B 130NV
| Voltage 10,8 VDC 10,8 VDC | |
| Speed 4000–8000 rpm 4000–8000 rpm | |
| Orbit 5,0 mm (3/16") 3,0 mm (1/8") | |
| Size of backing pad ∅ 32 mm (1 1⁄4") ∅ 32 mm (1 1⁄4") | |
| Weight (incl. battery) * 0,56 kg (1,24 lbs) | 0,57 kg (1,26 lbs) |
| Battery charger | Mirka BCA 108 |
| Input | 100–240 VAC, 50/60 Hz |
| Charging time | < 40 min (2,0 Ah) |
| Storage temperature range | -20 °C ... 80 °C (-4 °F ... 176 °F) |
| Charging temperature 4 °C ... 40 °C (32 °F ... 104 °F) | |
| Dimension | 191 x 102 x 86 mm |
| Weight 0,66 kg (1,46 lbs) | |
| Degree of protection | II / ☐ |
| Battery pack Mirka BPA 10820 | Mirka BPA 10825 | Mirka BPA 10850 | |
| Type | RechargeableLi-ion 3IXR19/65 | RechargeableLi-ion 3INR19/65 | RechargeableLi-ion 3INR19/65-2 |
| Battery voltage | 10.8 VDC | 10.8 VDC | 10.8 VDC |
| Capacity | 2.0 Ah / 21.6 Wh | 2.5 Ah / 27.0 Wh | 5.0 Ah / 54.0 Wh |
| Weight | 0.18 kg (0.4 lbs) | 0.18 kg (0.4 lbs) | 0.38 kg (0.83 lbs) |
| Intelligent battery | No | Yes | Yes |
Noise and vibration information
Measured values are determined according to EN 62841.
Sander Mirka® AROS-B 150NV Mirka® AOS-B 130NV
| Sound pressure level (LpA) | 61,6 dB(A) | 61,2 dB(A) |
| Sound power level (LWA) | 72,6 dB(A) | 72,2 dB(A) |
| Sound measurement uncertainty K | 3,0 dB(A) 3,0 dB(A) | |
| Vibration emission value an* | 1,9 m/s2 | 2,54 m/s2 |
| Vibration emission uncertainty K* | 1,5 m/s2 | 1,5 m/s2 |
Specifications subject to change without prior notice. Model range may vary between markets.
* In order to reflect normal working conditions of the sander the operating conditions did deviate from the standard method as follows: Grain size of the abrasive was 5 m. Feed force was 10 N.
The values stated in the table are derived from laboratory testing in conformity with stated codes and standards and are not sufficient for risk evaluation. Values measured in a particular work place may be higher than the declared values. The actual exposure values and amount of risk or harm experienced by an individual are unique to each situation and depend upon the surrounding environment, the way in which the individual works, the particular material being worked, work station design and the user's exposure time and physical condition. Mirka Ltd accepts no responsibility for the consequences of using declared values instead of actual exposure values for any individual risk assessment.
Further occupational health and safety information can be obtained from the following websites:
https://osha.europa.eu/en (Europe) or http://www.osha.gov (USA)
Proper use of tool
This sander is designed for sanding all types of materials such as paints, metals, wood, stone, plastics, etc., using abrasives specially designed for this purpose. Do not use this sander for any other purpose than that specified without consulting the manufacturer or the manufacturer's authorized supplier. Do not use backing pads with an operating speed of less than 8 000 rpm free speed. Any maintenance or repair work requiring the motor housing to be opened may only be carried out by an authorized service center.
Battery and charger
- The battery pack is not fully charged out of the carton. First read the safety instructions and then charge your battery according to the instructions.
- For optimal charging capacity the battery should be charged at an ambient temperature between 18 °C (64 °F) and 24 °C (75 °F). To prevent damage to the battery pack, do not charge the battery pack where the air temperature is below 4 °C (32°F) or above 40 °C (104 °F).
• To obtain the longest possible battery life, we suggest the following: - Store and charge your battery in a cool area. Temperatures above or below normal room temperature will shorten battery life.
- Never store the battery in a discharged condition. Recharge it immediately after it has been discharged.
- All batteries gradually lose their charge. The higher the temperature, the quicker they lose their charge.
If you store your tool for long periods of time without use, recharge the battery every month. This practice will prolong battery life.
Charging procedure
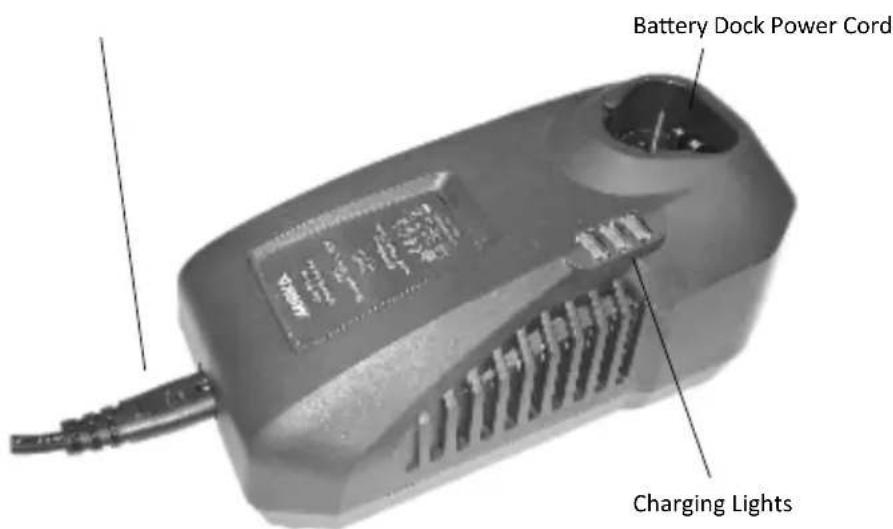
- Connect the power cord to the charger, and then plug into an outlet before inserting battery pack. All three charging lights will be on for two seconds and then turn off.
- Insert the battery pack into the charger. The lights will start to flash within 30 seconds.
- During the charging process, the charging lights will indicate the status as follows:
- Three charging lights will flash in sequence during the charging process.
– Fully charged, all three lights will remain on continuously. - The charging process will last approximately 40 minutes for Mirka 10.8 V 2.0 Ah battery pack.
NOTE: This charger can only charge Mirka 10.8 V battery packs.
NOTE: Charging times may be longer depending on the surrounding temperature and battery conditions.
LED indication of 10.8 V charger
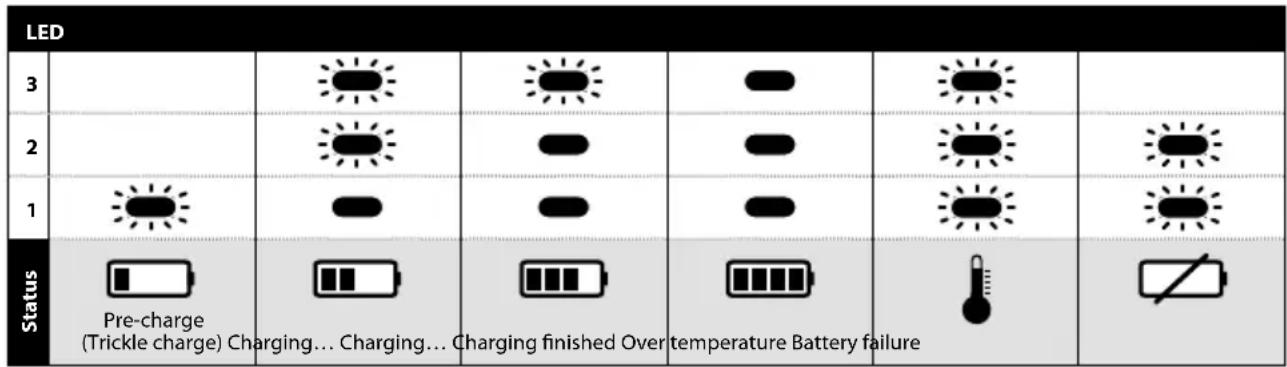

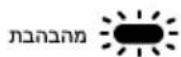
Remain continuously on

Flashing
Charger diagnostics
The charger will indicate if:
- A battery pack is overheated. All three charging lights will flash. Remove the battery and allow it to cool down for 15–30 minutes and re-insert.
- A malfunction occurs in the battery or the charger. Two charging lights will flash. Remove the battery and allow it to cool down. Re-insert the battery pack into the charger. If two charging lights still flash, the battery or charger may require service.
How to get started
- When unpacking the tool, make sure it is intact, complete and has not been damaged in transport. Never use a damaged tool.
- Before use, check that the backing pad is correctly mounted.
• Install the fully charged battery pack into the sander until it locks in place with a click.
Operating instructions
- The tool is intended to be operated as a hand-held tool. The tool can be used in any position.
- Select a suitable abrasive and secure it to the backing pad. Make sure the abrasive is centered on the backing pad.
- The sander can now be activated / turned on and started by pressing the switch trigger.
- The sander will run and stay in active mode as long as the trigger is pressed. After the trigger is released the sander will stop but continue to stay in active mode for a short time before it automatically deactivates / turns off.
- When sander is in active mode the right LED is green.
• In active mode the left LED shows the battery status:
- Green: Battery charge level is OK.
- Flashing green/red: Battery charge level is weak.
- Red: Battery voltage too low. Sander is not operable.
- In active mode the max rpm can be adjusted by pressing rpm+ or rpm−, Figure 1. The rpm can be adjusted in steps of 4 000, 5 000, 6 000, 6 500, 7 000, 7 500 and 8 000 rpm.
- The rpm can be locked to prevent an accidental rpm change. Wait until the sander is not in active mode. Simultaneously press and hold both rpm+ and rpm− buttons and then pull the switch trigger. In order to unlock the tool, repeat same operation. If rpm+ or rpm− is pressed in speed lock mode the right led flashes red twice but no speed change occur.
- When sanding, always place the tool on the work surface before starting the tool. Always remove the tool from the work surface before stopping it. This will prevent gouging of the work surface due to excess speed of the abrasive.
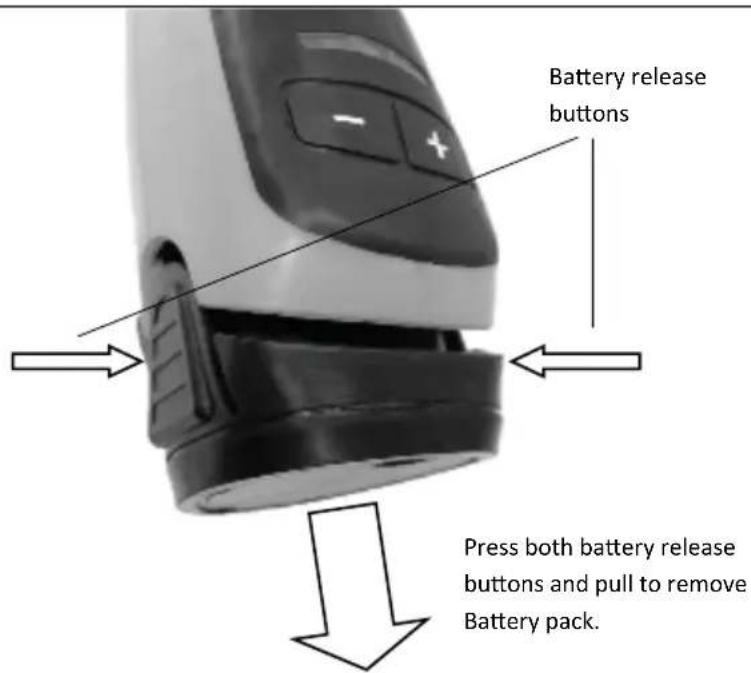
- When sanding is finished, remove the battery from the sander by simultaneously pressing the button on both sides and removing the battery from the tool. Charge the battery.
Bluetooth
This tool is equipped with Bluetooth low energy technology and can be connected to an App from which additional tool functionality can be accessed. For more information on the App functionality and if it is available in your country, go to www.mirka.com.
Activate Bluetooth on your Mirka® AROS-B and Mirka® AOS-B as follows:
- Connect the battery to the tool.
- Press and hold the rpm+ button while activating the tool by pressing the switch trigger.
- Middle LED is flashing green, to indicate that Bluetooth is active and ready for connections.
- Middle LED is lit green when the tool is connected to another Bluetooth device.
- Bluetooth is deactivated when the tool is deactivated/turned off.
NOTE! If the App is not installed or if it is not available in your country, Bluetooth shall not be activated.
The Bluetooth ^® word mark and logos are registered trademarks owned by the Bluetooth SIG, Inc. and any use of such marks by Mirka Ltd is under license. Other trademarks and trade names are those of their respective owners.
Compliance with the radio regulations in North America has been verified in accordance with FCC Part 15 subpart B and C, RSS-GEN, RSS-247 and FCC §15.247.
Maintenance

Always disconnect the power before maintenance!
Only use original Mirka spare parts!
Replacing the backing pad
- Hold the spindle with fingers.
- Turn the backing pad counterclockwise to remove it.
- Fit and tighten the new backing pad.
Cleaning
Use a soft brush to remove any accumulated dust. Wear safety glasses to protect your eyes while cleaning. If the body of the tool needs cleaning, wipe it with a soft damp cloth. A mild detergent can be used.

WARNING: Never use alcohol, petrol or other cleaning agent. Never use caustic agents to clean plastic parts.
Charger cleaning instructions
Dirt and grease may be removed from the exterior of the charger using a cloth or soft non metallic brush. Do not use water or any cleaning solutions.

Further service
Servicing must always be performed by trained personnel. To keep the tool warranty valid and ensure optimal tool safety and function, servicing must be carried out by a Mirka authorized service center. To locate your local Mirka authorized service center, contact Mirka Customer service or your Mirka dealer.
Troubleshooting guide
Symptom Possible cause Solution
| No light from sander right LED when trigger is pressed. | Battery pack not properly attached to the sander.Battery totally empty. | Insert the battery properly.Charge the battery. |
| The right sander LED is red and the sander slows down to 4 000 rpm or stops when sanding. | Temperature too high in the sander. Heavy load for too long. | Reduce the load on the sander for some time and the sander will speed up again. |
| The right sander LED is red and rpm is slightly reduced. | Too heavy short-term load. Use lighter load or wait a moment and the LED will automatically change to green. | |
| The left LED is red and the sander is not running. | The battery voltage is too low. Charge the battery. | |
Disposal information
DANGER: Disposal guidelines for old appliances. Render redundant power tools unusable by removing the power cord. Only for EU countries. Do not dispose of electric tools along with household waste. According to European Directives 2011/65/EU, 2015/863/EU and 2012/19/EU on waste electrical and electronic equipment and its implementation under national law, electric tools that have reached the end of their life must be collected separately and taken to an environmentally compatible recycling facility.

Conforme aux exigences
RoHS chinoises
.0711 10.8 μον τω LED νιν νιν
הַרְשָׁה
תְקַרָה בְּרָה
| Mirka® AOS-B 130NV | Mirka® AROS-B 150NV | הכלה |
| 10.8 VDC | 10.8 VDC | "בְרַעֹרָה" |
| "7o 8,000 - 4,000 | "7o 8,000 - 4,000 | "בְרַעֹרָה" |
| n" n 3.0 | n" n 5.0 | "בְרַעֹרָה" |
| n" n 32 ∅ | n" n 32 ∅ | "בְרַעֹרָה" |
| "7 0.57 | "7 0.56 | "(בְרַעֹרָה)" |
| Mirka BCA 108 | הכלהה |
| 100–240 VAC, 50/60 Hz | הכלהה |
| (2.0 Ah) 40-70 Hz | הכלהה |
| 0000000000000000000000000000000000000000000000000000000000000000000000000000000000000000000000000000 | הכלהה |
| 0000000000000000000000000000000000000000000000000000000000000000000000000000000000000000000 | הכלהה |
| n" n 191 x 102 x 86 | הכלהה |
| x" p 0,66 | הכלהה |
| 回 / II | הכלהה |
| Mirka BPA 10850 | Mirka BPA 10825 | Mirka BPA 10820 | הכלהה |
| Li-ion 3INR19/65-2 | Li-ion 3INR19/65 | Li-ion 3IXR19/65 | ### |
| 10.8 VDC | 10.8 VDC | 10.8 VDC | ### |
| 5.0 Ah / 54.0 Wh | 2.5 Ah / 27.0 Wh | 2.0 Ah / 21.6 Wh | ### |
| ### 0.38 | ### 0.18 | ### 0.18 | ### |
| P | P | P | ### |
בְרָה אַלְרָה בְרָה
. EN 62841
(ב"ה) http://www.osha.gov (USA) is (הכלה) https://osha.europa.eu/en (Europe)
.T"70 8,000-1,7,500,7,000,6,500,6,000 5,000,4,000
Azienda Stefan Sjöberg, CEO

- 일반 산업 안전 보건 규정(General Industry Safety & Health Regulations, part 1910, OSHA 2206, 자료 제공: Superintendent of Documents; Government Printing Office; Washington DC 20402).
- 국가 및 현지 법규

Intertek
4000415
UL STD
other
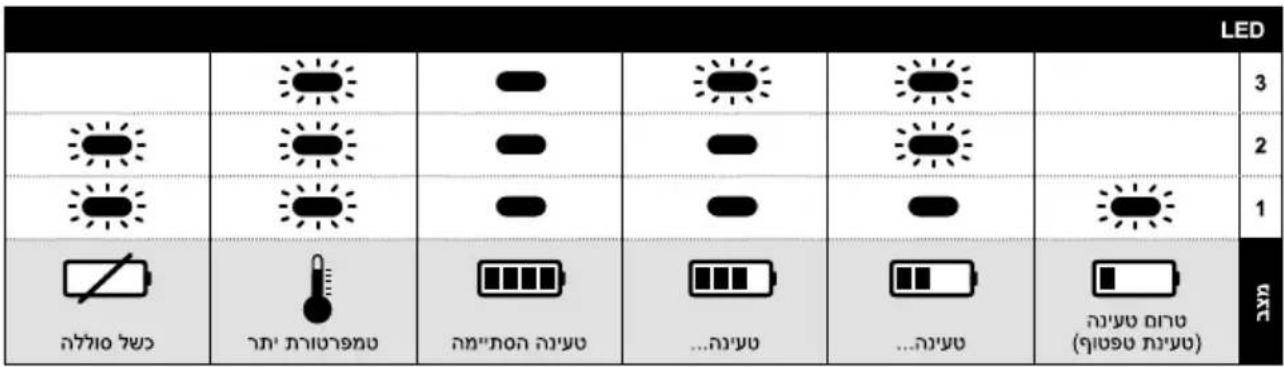
LED | Status | Color | Value | | :--- | :--- | :--- | | 1 | Light Circle | - | | 2 | Dark Circle | - | | 3 | Medium Circle | - | | 4 | Medium Circle | - | | 5 | Medium Circle | - | | 6 | Medium Circle | - | | 7 | Medium Circle | - | | 8 | Medium Circle | - | | 9 | Medium Circle | - | | 10 | Medium Circle | - | | 11 | Medium Circle | - | | 12 | Medium Circle | - | | 13 | Medium Circle | - | | 14 | Medium Circle | - | | 15 | Medium Circle | - | | 16 | Medium Circle | - | | 17 | Medium Circle | - | | 18 | Medium Circle | - | | 19 | Medium Circle | - | | 20 | Medium Circle | - | | 21 | Medium Circle | - | | 22 | Medium Circle | - | | 23 | Medium Circle | - | | 24 | Medium Circle | - | | 25 | Medium Circle | - | | 26 | Medium Circle | - | | 27 | Medium Circle | - | | 28 | Medium Circle | - | | 29 | Medium Circle | - | | 30 | Medium Circle | - | | 31 | Medium Circle | - | | 32 | Medium Circle | - | | 33 | Medium Circle | - | | 34 | Medium Circle | - | | 35 | Medium Circle | - | | 36 | Medium Circle | - | | 37 | Medium Circle | - | | 38 | Medium Circle | - | | 39 | Medium Circle | - | | 40 | Medium Circle | - | | 41 | Medium Circle | - | | 42 | Medium Circle | - | | 43 | Medium Circle | - | | 44 | Medium Circle | - | | 45 | Medium Circle | - | | 46 | Medium Circle | - | | 47 | Medium Circle | - | | 48 | Medium Circle | - | | 49 | Medium Circle | - | | 50 | Medium Circle | - | | 51 | Medium Circle | - | | 52 | Medium Circle | - | | 53 | Medium Circle | - | | 54 | Medium Circle | - | | 55 | Medium Circle | - | | 56 | Medium Circle | - | | 57 | Medium Circle | - | | 58 | Medium Circle | - | | 59 | Medium Circle | - | | 60 | Medium Circle | - | | 61 | Medium Circle | - | | 62 | Medium Circle | - | | 63 | Medium Circle | - | | 64 | Medium Circle | - | | 65 | Medium Circle | - | | 66 | Medium Circle | - | | 67 | Medium Circle | - | | 68 | Medium Circle | - | | 69 | Medium Circle | - | | 70 | Medium Circle | - | | 71 | Medium Circle | - | | 72 | Medium Circle | - | | 73 | Medium Circle | - | | 74 | Medium Circle | - | | 75 | Medium Circle | - | | 76 | Medium Circle | - | | 77 | Medium Circle | - | | 78 | Medium Circle | - | | 79 | Medium Circle | - | | 80 | Medium Circle | - | | 81 | Medium Circle | - | | 82 | Medium Circle | - | | 83 | Medium Circle | - | | 84 | Medium Circle | - | | 85 | Medium Circle | - | | 86 | Medium Circle | - | | 87 | Medium Circle | - | | 88 | Medium Circle | - | | 89 | Medium Circle | - | | 90 | Medium Circle | - | | 91 | Medium Circle | - | | 92 | Medium Circle | - | | 93 | Medium Circle | - | | 94 | Medium Circle | - | | 95 | Medium Circle | - | | 96 | Medium Circle | - | | 97 | Medium Circle | - | | 98 | Medium Circle | - | | 99 | Medium Circle | - | | Note: The image contains only the actual data for the chart. The 'Status' label is 'Voorladen (druppelladen) Bezig met laden... Bezig met laden... Laden klaar Te hoge temperatuur Fout accu'.
Brandt continu

Knippert
Laderdiagnostiek
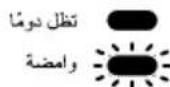
- Groen: Accuniveau is OK.
- Knippert groen/rood: Accuniveau is laag.
Superintendent of Documents; Government Printing Office; Washington DC 20402
Superintendent of Documents; Government Printing Office; Washington DC 20402
Superintendent of Documents; Government Printing Office; Washington DC 20402
· 州与地方法规

警告
Declaration of conformity
| Mirka Ltd, 66850 Jeppo, Finlanddeclare under our sole responsibility that the products Mirka® AROS-B & AOS-B 32 mm (1 1⁄4") 8,000 rpm Electrical Random Orbital Sander (see "Technical data" table for particular model) to which this declaration relates are in conformity with the following standards or other normative documents: EN 62841-1:2015, EN 62841-2-4:2014 in accordance with the regulations 2006/42/EC, 2014/30/EU, 2015/863/EU. Charger safety specification according to EN 60335-1:2012/A13:2017, EN 60335-2-29:2004/A2:2010, EN 62233:2008. Charger EMC according to EN 55014-1:2017, EN 55014-2:2015, EN 61000-3-2:2014, EN 61000-3-3:2013. | ||
| Jeppo 13.8.2020Place and date of issue |  Company Stefan Sjöberg, CEO Company Stefan Sjöberg, CEO |  |
| Operating instructions include:Exploded view, Parts list, Declaration of conformity, Required personal safety equipment, Warning, Caution, Additional safety warnings, Technical data table, Noise and vibration information, Proper use of tool, Battery and charger, How to get started, Operating instructions, Maintenance, Further service, Troubleshooting guide, Disposal information. | Manufacturer/SupplierMirka Ltd66850 Jeppo, FinlandTel. +358 20 760 2111Fax +358 20 760 2290www.mirka.com |  |
Translation of the original instructions. We reserve the right to make changes to this manual without prior notice.
Important
Read these safety and operating instructions carefully before installing, operating or maintaining this tool. Keep these instructions in a safe and accessible place.
Required personal safety equipment

Read operator's manual

Wear
safety glasses

Wear
ear protection

Wear
safety gloves

Wear
face mask
Symbols

Official Mexican standard

Warning: Potential hazardous situation that may result in death or serious injury and/or property damage. Caution: Potential hazardous situation that may result in minor or moderate injury and/or property damage.
Please read and comply with
- General Industry Safety & Health Regulations, part 1910, OSHA 2206, available from:
Superintendent of Documents; Government Printing Office; Washington DC 20402
• State and local regulations

Intertek 4000415
CONFORMS TO UL STD
62841-1, 62841-2-4
CERTIFIED TO CSA STD
C22.2 No. 62841-1, C22.2 No. 62841-2-4
This device contains licence-exempt transmitter(s)/receiver(s) that comply with Innovation, Science and Economic Development Canada's licence-exempt RSS(s). Operation is subject to the following two conditions:
- This device may not cause interference.
- This device must accept any interference, including interference that may cause undesired operation of the device.

Compliance
This device complies with part 15 of the FCC Rules. Operation is subject to the following two conditions:
- This device may not cause harmful interference.
- This device must accept any interference received, including interference that may cause undesired operation.
NOTE: This equipment has been tested and found to comply with the limits for a Class B digital device, pursuant to part 15 of the FCC Rules. These limits are designed to provide reasonable protection against harmful interference in a residential installation. This equipment generates, uses and can radiate radio frequency energy and, if not installed and used in accordance with the instructions, may cause harmful interference to radio communications. However, there is no guarantee that interference will not occur in a particular installation. If this equipment does cause harmful interference to radio or television reception, which can be determined by turning the equipment off and on, the user is encouraged to try to correct the interference by one or more of the following measures:
• Reorient or relocate the receiving antenna.
- Increase the separation between the equipment and receiver.
- Connect the equipment into an outlet on a circuit different from that to which the receiver is connected.
- Consult the dealer or an experienced radio/TV technician for help.
CAUTION TO THE USER: Changes or modification not expressly approved by the party responsible for compliance could void the user's authority to operate the equipment.
This device complies with Industry Canada's licence-exempt RSSs. Operation is subject to the following two conditions:
- This device may not cause interference; and
- This device must accept any interference, including interference that may cause undesired operation of the device.

WARNING
- Always wear required personal safety protection in accordance with manufacturer's instructions and local/national standards while using this tool.
- Read the Materials Safety Data Sheet (MSDS) for the work surface.
- If any physical hand/wrist discomfort is experienced, stop working and seek medical attention. Hand, wrist and arm injury may result from repetitive work, motion and overexposure to vibrations.
Safety rules for battery pack and charger
WARNING!
- Important safety and operating instructions for your battery and charger. Before using the charger, read all instructions and warnings on the charger, the battery pack and the tool.
- If the battery pack casing is cracked or damaged, do not insert into charger. There is a danger of electric shock or electrocution.
- Do not allow any liquid to get inside charger. Electric shock may result.
- This charger is not intended for any uses other than charging rechargeable batteries.
-
Do not place any object on top of the charger, near any heat source or place the charger on a soft surface that may result in excessive internal heat.
-
Make sure the cord is located so it will not be stepped on, tripped over, or otherwise subjected to damage or stress.
- Do not use the charger if it has received a sharp blow, been dropped or otherwise damaged in any way.
- DO NOT store or use the tool and battery pack in locations where the temperature may reach or exceed 50^ (122°F).
- The charger is designed to operate on standard household electrical power (100–240 VAC). Do not attempt to use it on any other voltage.

CAUTION
• Always ensure the work piece to be sanded is firmly fixed in place.
- Make sure the abrasive is perfectly centered and firmly attached to the backing pad.
• Always pay attention to work safety.
- Keep hands clear of the spinning pad during use.
- Do not allow the tool to free speed without taking precautions to protect any persons or objects from the loss of the abrasive or backing pad.

Additional safety warnings
- Read all instructions before using this tool. All operators must be fully trained in the proper, safe use of this tool.
- All maintenance must be carried out by trained personnel. For service, contact a Mirka authorized service center.
- If the tool appears to malfunction, stop using it immediately and arrange for service and repair.
Additional information on battery and charger
- Never attempt to open the battery pack for any reason. If the plastic housing of the battery pack breaks or cracks, immediately discontinue use and do not recharge.

Additional warnings
Some dust created by power sanding, sawing, grinding, drilling, and other construction activities contains chemicals known to cause cancer, birth defects or other reproductive harm. Some examples of these chemicals are:
- lead from lead-based paints,
• crystalline silica from bricks and cement and other masonry products, and
• arsenic and chromium from chemicallytreated lumber.
Your risk from these exposures varies, depending on how often you do this type of work. To reduce your exposure to these chemicals: work in a well ventilated area, and work with approved safety equipment, such as those dust masks that are specially designed to filter out microscopic particles.
Technical data
Sander Mirka® AROS-B 150NV Mirka® AOS-B 130NV
| Voltage 10.8 VDC 10.8 VDC |
| Speed 4,000–8,000 rpm 4,000–8,000 rpm |
| Orbit 5.0 mm (3/16") 3.0 mm (1/8") |
| Size of backing pad ∅ 32 mm (1 1⁄4") ∅ 32 mm (1 1⁄4") |
| Weight (incl. battery) * 0.56 kg (1.24 lbs) 0.57 kg (1.26 lbs) |
| Battery charger | Mirka BCA 108 |
| Input | 120 VAC, 60 Hz |
| Charging time | < 40 min (2.0 Ah) |
| Storage temperature range | -20°C ... 80°C (-4°F ... 176°F) |
| Charging temperature | 4°C ... 40°C (32°F ... 104°F) |
| Dimension | 191 x 102 x 86 mm |
| Weight 0.66 kg (1.46 lbs) | |
| Degree of protection | II / 回 |
| Battery pack Mirka BPA 10820 | Mirka BPA 10825 | Mirka BPA 10850 | |
| Type | RechargeableLi-ion 3IXR19/65 | RechargeableLi-ion 3INR19/65 | RechargeableLi-ion 3INR19/65-2 |
| Battery voltage | 10.8 VDC | 10.8 VDC | 10.8 VDC |
| Capacity | 2.0 Ah / 21.6 Wh | 2.5 Ah / 27.0 Wh | 5.0 Ah / 54.0 Wh |
| Weight | 0.18 kg (0.4 lbs) | 0.18 kg (0.4 lbs) | 0.38 kg (0.83 lbs) |
| Intelligent battery | No | Yes | Yes |
Noise and vibration information
Measured values are determined according to EN 62841.
| Sander Mirka® AROS-B 150NV Mirka® AOS-B 130NV | ||
| Sound pressure level (LpA) 61.6 dB(A) 61.2 dB(A) | ||
| Sound power level (LWA) 72.6 dB(A) 72.2 dB(A) | ||
| Sound measurement uncertainty K 3.0 dB(A) 3.0 dB(A) | ||
| Vibration emission value ah* | 1.9 m/s2 | 2.54 m/s2 |
| Vibration emission uncertainty K* | 1.5 m/s2 | 1.5 m/s2 |
Specifications subject to change without prior notice. Model range may vary between markets.
* In order to reflect normal working conditions of the sander the operating conditions did deviate from the standard method as follows: Grain size of the abrasive was 5 µm. Feed force was 10 N.
The values stated in the table are derived from laboratory testing in conformity with stated codes and standards and are not sufficient for risk evaluation. Values measured in a particular work place may be higher than the declared values. The actual exposure values and amount of risk or harm experienced by an individual are unique to each situation and depend upon the surrounding environment, the way in which the individual works, the particular material being worked, work station design and the user's exposure time and physical condition. Mirka Ltd accepts no responsibility for the consequences of using declared values instead of actual exposure values for any individual risk assessment.
Further occupational health and safety information can be obtained from the following websites: https://osha.europa.eu/en (Europe) or http://www.osha.gov (USA)
Proper use of tool
This sander is designed for sanding all types of materials such as paints, metals, wood, stone, plastics, etc., using abrasives specially designed for this purpose. Do not use this sander for any other purpose than that specified without consulting the manufacturer or the manufacturer's authorized supplier. Do not use backing pads with an operating speed of less than 8,000 rpm free speed. Any maintenance or repair work requiring the motor housing to be opened may only be carried out by an authorized service center.
Battery and charger
- The battery pack is not fully charged out of the carton. First read the safety instructions and then charge your battery according to the instructions.
- For optimal charging capacity the battery should be charged at an ambient temperature between 18 °C (64 °F) and 24 °C (75 °F). To prevent damage to the battery pack, do not charge the battery pack where the air temperature is below 4 °C (32 °F) or above 40 °C (104 °F).
• To obtain the longest possible battery life, we suggest the following: - Store and charge your battery in a cool area. Temperatures above or below normal room temperature will shorten battery life.
- Never store the battery in a discharged condition. Recharge it immediately after it has been discharged.
- All batteries gradually lose their charge. The higher the temperature, the quicker they lose their charge.
If you store your tool for long periods of time without use, recharge the battery every month. This practice will prolong battery life.
Charging procedure
- Connect the power cord to the charger, and then plug into an outlet before inserting battery pack. All three charging lights will be on for two seconds and then turn off.
- Insert the battery pack into the charger. The lights will start to flash within 30 seconds.
- During the charging process, the charging lights will indicate the status as follows:
- Three charging lights will flash in sequence during the charging process.
– Fully charged, all three lights will remain on continuously. - The charging process will last approximately 40 minutes for Mirka 10.8 V 2.0 Ah battery pack.
NOTE: This charger can only charge Mirka 10.8 V battery packs.
NOTE: Charging times may be longer depending on the surrounding temperature and battery conditions.
LED indication of 10.8 V charger
| LED | ||||||
| 3 | ||||||
| 2 | ||||||
| 1 | ||||||
| Status | Pre-charge(Trickle charge) Charging... Charging... Charging finished Over temperature Battery failure | |||||

Remain continuously on

Flashing
Charger diagnostics
The charger will indicate if:
- A battery pack is overheated. All three charging lights will flash. Remove the battery and allow it to cool down for 15–30 minutes and re-insert.
- A malfunction occurs in the battery or the charger. Two charging lights will flash. Remove the battery and allow it to cool down. Re-insert the battery pack into the charger. If two charging lights still flash, the battery or charger may require service.
How to get started
- When unpacking the tool, make sure it is intact, complete and has not been damaged in transport. Never use a damaged tool.
- Before use, check that the backing pad is correctly mounted.
• Install the fully charged battery pack into the sander until it locks in place with a click.
Operating instructions
- The tool is intended to be operated as a hand-held tool. The tool can be used in any position.
- Select a suitable abrasive and secure it to the backing pad. Make sure the abrasive is centered on the backing pad.
- The sander can now be activated / turned on and started by pressing the switch trigger.
- The sander will run and stay in active mode as long as the trigger is pressed. After the trigger is released the sander will stop but continue to stay in active mode for a short time before it automatically deactivates / turns off.
- When sander is in active mode the right LED is green.
- In active mode the left LED shows the battery status:
- Green: Battery charge level is OK.
- Flashing green/red: Battery charge level is weak.
-
Red: Battery voltage too low. Sander is not operable.
-
In active mode the max rpm can be adjusted by pressing rpm+ or rpm−, Figure 1. The rpm can be adjusted in steps of 4,000, 5,000, 6,000, 6,500, 7,000, 7,500 and 8,000 rpm.
- The rpm can be locked to prevent an accidental rpm change. Wait until the sander is not in active mode.
Simultaneously press and hold both rpm+ and rpm- buttons and then pull the switch trigger. In order to unlock the tool, repeat same operation. If rpm+ or rpm- is pressed in speed lock mode the right led flashes red twice but no speed change occur. - When sanding, always place the tool on the work surface before starting the tool. Always remove the tool from the work surface before stopping it. This will prevent gouging of the work surface due to excess speed of the abrasive.
- When sanding is finished, remove the battery from the sander by simultaneously pressing the button on both sides and removing the battery from the tool. Charge the battery.
Bluetooth
This tool is equipped with Bluetooth low energy technology and can be connected to an App from which additional tool functionality can be accessed. For more information on the App functionality and if it is available in your country, go to www.mirka.com.
Activate Bluetooth on your Mirka® AROS-B and Mirka® AOS-B as follows:
- Connect the battery to the tool.
- Press and hold the rpm+ button while activating the tool by pressing the switch trigger.
- Middle LED is flashing green, to indicate that Bluetooth is active and ready for connections.
- Middle LED is lit green when the tool is connected to another Bluetooth device.
- Bluetooth is deactivated when the tool is deactivated/turned off.
NOTE! If the App is not installed or if it is not available in your country, Bluetooth shall not be activated.
The Bluetooth ^® word mark and logos are registered trademarks owned by the Bluetooth SIG, Inc. and any use of such marks by Mirka Ltd is under license. Other trademarks and trade names are those of their respective owners.
Compliance with the radio regulations in North America has been verified in accordance with FCC Part 15 subpart B and C, RSS-GEN, RSS-247 and FCC §15.247.
Maintenance

Always disconnect the power before maintenance!
Only use original Mirka spare parts!
Replacing the backing pad
- Hold the spindle with fingers.
- Turn the backing pad counterclockwise to remove it.
- Fit and tighten the new backing pad.
Cleaning
Use a soft brush to remove any accumulated dust. Wear safety glasses to protect your eyes while cleaning. If the body of the tool needs cleaning, wipe it with a soft damp cloth. A mild detergent can be used.

WARNING: Never use alcohol, gasoline or other cleaning agent. Never use caustic agents to clean plastic parts.
Charger cleaning instructions
Dirt and grease may be removed from the exterior of the charger using a cloth or soft non-metallic brush. Do not use water or any cleaning solutions.

Further service
Servicing must always be performed by trained personnel. To keep the tool warranty valid and ensure optimal tool safety and function, servicing must be carried out by a Mirka authorized service center. To locate your local Mirka authorized service center, contact Mirka Customer service or your Mirka dealer.
Troubleshooting guide
| Symptom Possible cause Solution | ||
| No light from sander right LED when trigger is pressed. | Battery pack not properly attached to the sander.Battery totally empty. | Insert the battery properly.Charge the battery. |
| The right sander LED is red and the sander slows down to 4,000 rpm or stops when sanding. | Temperature too high in the sander. Heavy load for too long. | Reduce the load on the sander for some time and the sander will speed up again. |
| The right sander LED is red and rpm is slightly reduced. | Too heavy short-term load. Use lighter load or wait a moment and the LED will automatically change to green. | |
| The left LED is red and the sander is not running. | The battery voltage is too low. Charge the battery. | |
Disposal information
DANGER: Disposal guidelines for old appliances. Render redundant power tools unusable by removing the power cord. Only for EU countries. Do not dispose of electric tools along with household waste. According to European Directives 2011/65/EU, 2015/863/EU and 2012/19/EU on waste electrical and electronic equipment and its implementation under national law, electric tools that have reached the end of their life must be collected separately and taken to an environmentally compatible recycling facility.

Empresa Stefan Sjöberg, CEO

geo
| Location | Marker | | -------- | ------ | | Mirka Ltd | 1 | | Finland | 2 |Mirka Ltd
Finland
Brazil Mirka Brasil Ltda.
Belgium Mirka Belgium Logistics NV
Canada Mirka Canada Inc.
China Mirka Trading Shanghai Co., Ltd
Finland & Baltics Mirka Ltd
France Mirka France Sarl
Germany Mirka GmbH
India Mirka India Pvt Ltd
Russia Mirka Rus LLC
Singapore Mirka Asia Pacific Pte Ltd
Spain Mirka Ibérica S.A.U.
Sweden Mirka Scandinavia AB
Turkey Mirka Turkey Zimpara Ltd Şirketi
United Kingdom Mirka (UK) Ltd
United Arab Emirates Mirka Middle East FZCO
USA Mirka USA Inc.
For contact information,
please visit www.mirka.com


- Mirka® AROS-B 150NV Mirka® AOS-B 130NV
- United States of America, Mexico & Canada
- Fabrikant/Lieferant
- Περαιτέρω σέρβις
- Declaration of conformity
- Important
- Required personal safety equipment
- Symbols
- Please read and comply with
- WARNING
- Safety rules for battery pack and charger
- WARNING!
- CAUTION
- Additional safety warnings
- Additional information on battery and charger
- Technical data
- Noise and vibration information
- Proper use of tool
- Battery and charger
- Charging procedure
- LED indication of 10.8 V charger
- Charger diagnostics
- How to get started
- Operating instructions
- Bluetooth
- Maintenance
- Replacing the backing pad
- Cleaning
- Charger cleaning instructions
- Further service
- Troubleshooting guide
- Disposal information
- .0711 10.8 μον τω LED νιν νιν
- Laderdiagnostiek
- 警告
- Compliance
- Additional warnings
- Mirka Ltd
Brand : Mirka
Model : AOS-B 130NV
Category : Grinder