
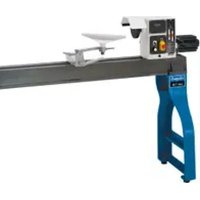
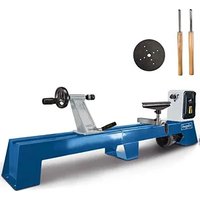
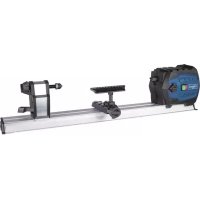
DM500T - Wood lathe SCHEPPACH - Free user manual and instructions
Find the device manual for free DM500T SCHEPPACH in PDF.

| Product Type | Wood Lathe |
| Brand | Scheppach |
| Model | DM500T |
| Dimensions (L x W x H) | 890 x 325 x 414 mm |
| Weight | 18 kg |
| Power Supply | 230-240 V ~ 50 Hz |
| Power Consumption | 400 W (S6 15 %) |
| Available Speeds | 890 / 1260 / 1760 / 2600 rpm |
| Max workpiece length | 500 mm |
| Max workpiece diameter | 350 mm |
| Spindle thread | M18 x 2.5 |
| Sound pressure level | 71 dB(A) (uncertainty 3 dB) |
| Sound power level | 84 dB(A) (uncertainty 3 dB) |
| Supplied accessories | Wood lathe in 2 parts, faceplate, tailstock, tool rest in 2 parts, 2 wood chisels (1 straight, 1 curved), 2 open-end wrenches, hex key, mounting hardware (screws, washers, nuts), user manual |
| Motor type | Single-phase AC motor |
| Speed switching | By moving the V-belt |
| Safety device | Locking switch on transmission covers |
| Regular maintenance | Oil rotating parts once a month; clean chips and dust regularly |
| Wear parts | Carbon brushes, V-belt |
| Recommended storage | Dark, dry, frost-free place, between 5 and 30 °C |
| Warranty | Legal warranty of conformity |
Frequently Asked Questions - DM500T SCHEPPACH
User questions about DM500T SCHEPPACH
0 question about this device. Answer the ones you know or ask your own.
Ask a new question about this device
Download the instructions for your Wood lathe in PDF format for free! Find your manual DM500T - SCHEPPACH and take your electronic device back in hand. On this page are published all the documents necessary for the use of your device. DM500T by SCHEPPACH.
USER MANUAL DM500T SCHEPPACH
natural_image
Mechanical lathe machine with a control panel and levers (no visible text or symbols)
Made in P.R.C.
DM500T
| DE | DrechselmaschineOriginalbetriebsanleitung | 5 |
| GB | Wood latheTranslation of original instruction manual | 20 |
| FR | Tour à boisTraduction des instructions d'origine | 32 |
| IT | TomioLa traduzione dal manuale di istruzioni originale | 45 |
| NL | HoutdraaibankVertaling van de originele gebruikshandleiding | 58 |
| ES | Máquina de tornearTraducción del manual de instrucciones original | 71 |
| PT | Máquina de tornearTradução do manual de operação original | 84 |
| CZ | 6 R X V W U X K Q D G H Y RPréklad originálního návodu k obsluze | 97 |
| SK | SústruhPreklad originálneho návodu na obsluhu | 109 |
| HU | EsztergagépEredeti használati utasítás fordítása | 121 |
| PL | TokarkaTlumaczenie oryginalnej instrukcji obsługi | 134 |
| HR | TokarilicaPrijevod originalnog priručnika za uporabu | 147 |
| SI | 6 W U R M ] D D V W U X H Q M HPrevod originalnih navodil za uporabo | 159 |
| EE | TreimasinOriginaalkältusjuhendi tõlge | 171 |
| LT | 0|H|G|L|R|W|H|N|L|Q|L|P|R|V|W|D|N|O|YOriginalios naudojimo instrukcijos vertimas | 183 |
| LV | KokvirpaOriginäläs lietošanas instrukcijas tulkojums | 195 |
| SE | SvarvmaskinÖversättning av original-bruksanvisning | 207 |
| FI | SorvikoneKäännös alkuperäisestä käyttöohjeesta | 219 |
| DK | DrejemaskineOversættelse fra den oprindellige betjeningsvejledning | 231 |
| NO | DreiemaskinOversettelse av den originale brukerveiledningen | 243 |
| BG | ">|t|j|\h|^__|e|k|d|b|l|k|l|j|m|]Превод на оригиналното ръководство за експлоатация | 255 |
| GR | [11]1111"Метафраоң тоу прштотúттоу тшв обŋγιών χρήσης | 269 |
| RO | 0|D|` L|Q|□□□G|H|□V|W|U|X|Q|M|L|U|HTraducere din manualul de exploatare original | 283 |
| RS | Obrtna mašinaPrevod originalnog uputstva za upotrebu | 295 |
| TR | Torna makinesiOrijinal kullanım talimatı çevírisi | 307 |
Günzburger Straße 69
D-89335 Ichenhausen
Verehrter Kunde
Homepage: https://www.scheppach.com/de/service
Explanation of the symbols on the device
Symbols are used in this manual to draw your attention to potential hazards. The safety symbols and the accompanying explanations must be fully understood. The warnings themselves will not rectify a hazard and cannot replace proper accident prevention measures.
 | Observe warning and safety instructions! |
 | Before commissioning, read and observe the operating manual and safety instructions! |
 | Wear hearing protection. Excessive noise can result in a loss of hearing. |
 | Wear a dust protection mask. When machining wood and other materials, harmful dust may be generated. Do not machine material containing asbestos! |
 | Wear protective goggles. Sparks created during work or fragments, chippings and dust ejected by the device can case sight loss. |
 | Do not leave long hair loose. Use a hair net. |
 | The use of gloves is prohibited! |
 | The product complies with the applicable European directives. |
△  n! n! | We have marked points in this operating manual that impact your safety with this symbol. |
 | The product complies with the applicable Serbian directives. |
Table of contents: Page:
- Introduction....22
- Device description 22
- Scope of delivery 22
- Proper use 23
- General safety information 23
- Remaining hazards....26
- Technical data....26
- Unpacking 26
- Assembly 27
- Operation 27
- Working instructions....29
- Electrical connection 29
- Cleaning and maintenance....29
- Transport....30
- Storage 30
- Disposal and recycling.... 30
- Troubleshooting 31
- Declaration of conformity 321
1. Introduction
Manufacturer:
Scheppach GmbH
Günzburger Straße 69
D-89335 Ichenhausen
Dear Customer
We hope your new tool brings you much enjoyment and success.
Note:
In accordance with the applicable product liability laws, the manufacturer of this device assumes no liability for damage to the device or caused by the device arising from:
- Improper handling
- Failure to comply with the operating manual.
• Repairs carried out by third parties, unauthorised specialists
• Installing and replacing non-original spare parts, - Improper use
- Failures of the electrical system in the event of the electrical regulations and VDE provisions 0100, DIN 57113 / VDE 0113 not being observed
Note:
Read the whole text of the operating manual before assembly and commissioning.
This operating manual should help you to familiarise yourself with your device and to use it for its intended purpose.
The operating manual includes important instructions for the safe, proper and economic operation of the product, for avoiding danger, for minimising repair costs and downtimes and for increasing the reliability and extending the service life of the device.
In addition to the safety instructions in this operating manual, you must also observe the regulations applicable to the operation of the device in your country.
Keep the operating manual at the device, in a plastic sleeve, protected from dirt and moisture. They must be read and carefully observed by all operating personnel before starting the work.
The device may only be used by personnel who have been trained to use it and who have been instructed with respect to the associated hazards. The required minimum age must be observed.
In addition to the safety instructions in this operating manual and the separate regulations of your country, the generally recognised technical rules relating to the operation of such machines must also be observed.
We accept no liability for accidents or damage that occur due to a failure to observe this manual and the safety instructions.
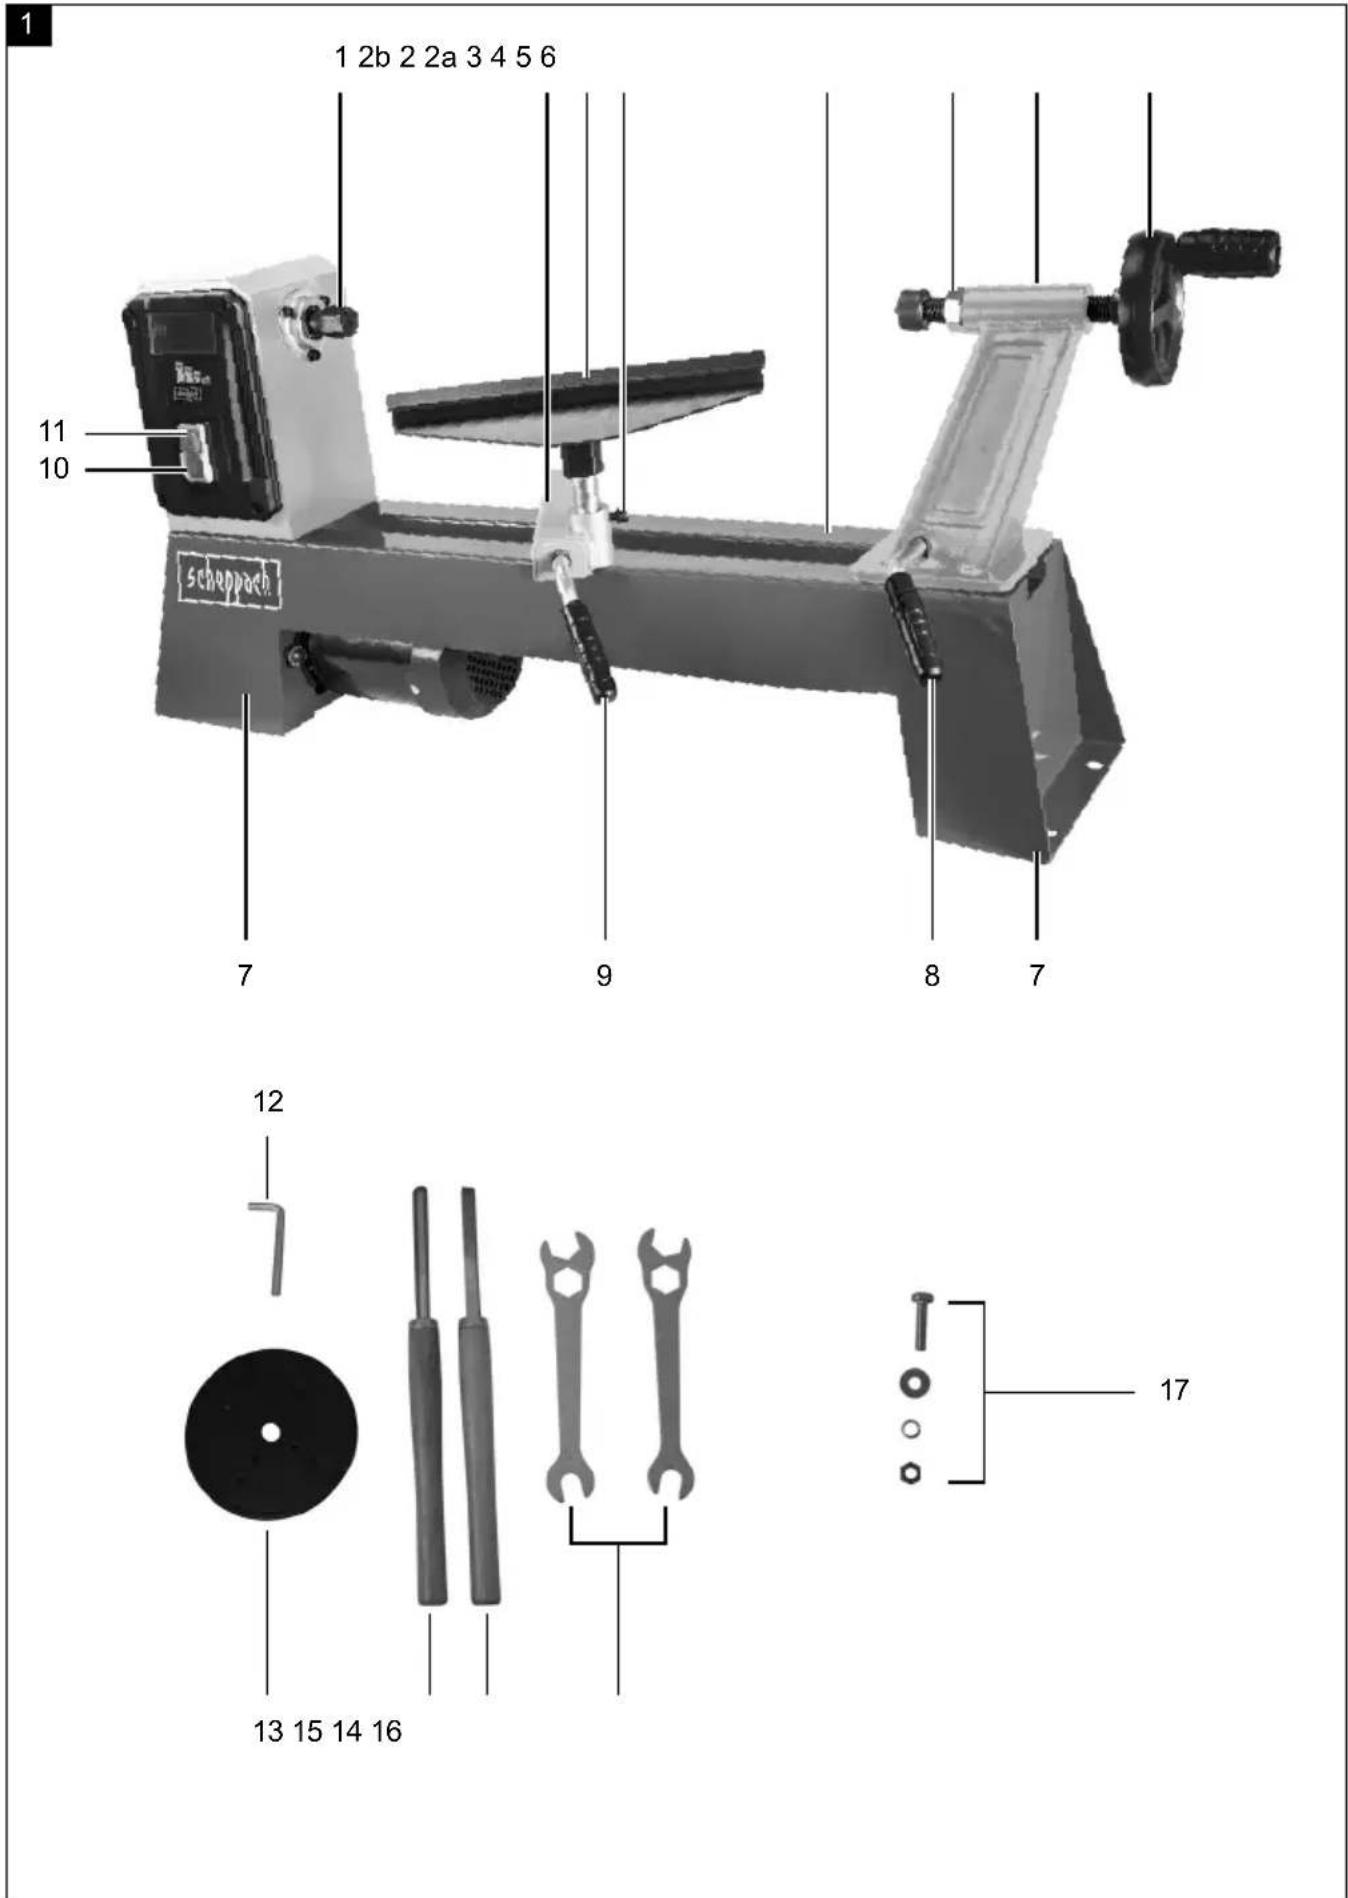
2. Device description
- 4-prong centre tip
- Tool support
2a. Screw, height adjustment
2b. Bottom part of the tool support - Rail with motor unit
- Lock nut
- Tailstock
- Hand wheel
- Base
- Lever, tailstock
- Lever, tool support
- On switch
- Off switch
- Allen key
- Face plate
- Wood-turning chisel, straight
- Wood-turning chisel, hollow
- Open-ended spanner
- Hexagonal bolt with spring washer, standard washer and nut
- Drive shaft
- Locking screw
- Gearing cover
- Locking screw
- Motor unit
- Lever, motor unit
- Drive disc
- V-belt
- Interlock switch
3. Scope of delivery
• Wood-turning lathe (two-part)
- Face plate
- Tailstock
- Tool support (two-part)
• 2 wood-turning chisels, (1x straight, 1x hollow)
- 2 x open-ended spanners
- Allen key
- Assembly material:
- 4 hexagonal bolts
- 4 spring washers
- 4 washers
- 4 nuts
- Operating manual
4. Proper use
The lathe is used for working wood with suitable wood-turning chisels.
The clamped workpieces are rotated, whereby various different speeds can be set. Please refer to the following descriptions for the function of the controls.
The machine complies with the applicable EC machinery directive.
- The safety, operating and maintenance specifications of the manufacturer, as well as the dimensions specified in the technical data, must be observed.
- The applicable accident prevention regulations and the other generally accepted safety rules must be observed.
- The machine may only be used, maintained or repaired by competent persons who are familiar with it and have been informed of the dangers. Any liability of the manufacturer for damages resulting from arbitrary changes to the machine is excluded.
- The machine may only be operated with original accessories and original tools from the manufacturer.
- Any use beyond this is improper use. The manufacturer is not responsible for the resultant damages, the user bears this risk alone.
Please observe that our equipment was not designed with the intention of use for commercial or industrial purposes. We assume no guarantee if the equipment is used in commercial or industrial applications, or for equivalent work.
5. General safety information
General power tool safety warnings
⚠ WARNING! Read all safety warnings, instruct- □W□L□R□Q□V□, □L□O□O□X□V□W□U□D□W□L□R□Q□V□ □D□C with this power tool. Failure to follow all instructions listed below may result in electric shock, fire and/or se- rious injury.
Save all warnings and instructions for future reference.
The term "power tool" in the warnings refers to your mains-operated (corded) power tool or battery-operated (cordless) power tool.
Work area safety
a) Keep work area clean and well lit. Cluttered or dark areas invite accidents.
b) Do not operate power tools in explosive at- P□R□V□S□K□H□U□H□V□, □ V□X□F□K□ D□V□ L□Q□ W□K□H□ S□U mable liquids, gases or dust. Power tools create sparks which may ignite the dust or fumes.
c) Keep children and bystanders away while operating a power tool. Distractions can cause you to lose control.
Electrical safety
a) Power tool plugs must match the outlet. Never modify the plug in any way. Do not use any adapter plugs with earthed (grounded) power tools. Unmodified plugs and matching outlets will reduce risk of electric shock.
b) Avoid body contact with earthed or grounded surfaces, such as pipes, radiators, ranges and refrigerators. There is an increased risk of electric shock if your body is earthed.
c) Do not expose power tools to rain or wet conditions. Water entering a power tool will increase the risk of electric shock.
d) Do not use the cable for another purpose, for example, carrying or hanging the power tool or pulling the plug out of the socket. Keep the cable away from heat, oil, sharp edges or moving device parts. Damaged or coiled cables increase the risk of an electric shock.
e) If you work with a power tool outdoors, only use extension cables that are also suitable for outdoor use. Using an extension cable suitable for outdoor use reduces the risk of an electric shock.
f) If you cannot avoid using the electrical tool in a wet environment, use a fault-current circuit breaker. Use of an RCD reduces the risk of electric
V S H P L F D W L R Q V S U R Y L G H G
Personal safety
a) Stay alert, watch what you are doing and use common sense when operating a power tool. Do not use a power tool while you are tired or ☐X☐Q☐G☐H☐U☐W☐K☐H☐L☐Q☐☐X☐H☐Q☐F☐H☐☐R☐I☐☐G☐Uication. A moment of carelessness when using electrical tools can result in serious injuries.
b) Use personal protective equipment. Always wear eye protection. Protective equipment such as a dust mask, non-skid safety shoes, hard hat or hearing protection used for appropriate conditions will reduce personal injuries.
c) Prevent unintentional starting. Ensure the VZLWFK LV LQ WKH R-1-SRVL to power source and/or battery pack, picking up or carrying the tool. Carrying power tools with your finger on the switch or energising power tools that have the switch on invites accidents.
d) Remove any adjusting key or wrench before turning the power tool on. A tool or spanner that is located in a rotating device part may result in injuries.
e) Do not overreach. Keep proper footing and balance at all times. This enables better control of the power tool in unexpected situations.
f) Dress properly. Do not wear loose clothing or jewellery. Keep hair, clothing and gloves away from moving parts. Loose clothes, jewellery or long hair can be caught in moving parts.
g) If dust extraction and collection devices can be mounted, make sure that they are connected and used properly. Use of dust collection can reduce dust-related hazards.
h) Do not let familiarity gained from frequent use of tools allow you to become complacent and ignore tool safety principles. A careless action can cause severe injury within a fraction of a second.
Power tool use and care
a) Do not overload the device. Use the correct power tool for your application. The correct power tool will do the job better and safer at the rate for which it was designed.
b) Do not use the power tool if the switch does ☐Q☐R☐W☐ W☐X☐U☐Q☐ L☐W☐ R☐Q☐ D☐Q☐G☐ RAny not be controlled with the switch is dangerous and must be repaired.
c) Disconnect the plug from the power source and/or remove the battery pack, if detachable, from the power tool before making any adjustments, changing accessories, or storing power tools. Such preventive safety measures reduce V, D, G, R, K, R, Q, R, P, R, H, G, I, J, K, L, M, N, O, P, Q, R, S, T, U, V, W, X, Y, Z, A, B, C, D, E, F, G, H, I, J, K, L, M, N, O, P, Q, R, S, T, U, V, W, X, Y, Z
d) Store idle power tools out of the reach of children and do not allow persons unfamiliar with the power tool or these instructions to operate the power tool. Power tools are dangerous in the hands of untrained users.
e) Maintain power tools and accessories. Check for misalignment or binding of moving parts, breakage of parts and any other condition that may affect RQ the Power Tool's Breakout H F W Managed, have the power tool repaired before use. Many accidents are caused by poorly maintained power tools.
f) Keep cutting tools sharp and clean. Properly maintained cutting tools with sharp cutting edges are less likely to bind and are easier to control.
g) Use the power tool, accessories and tool bits etc. in accordance with these instructions, taking into account the working conditions and the work to be performed. Use of the power tool for operations different from those intended could result in a hazardous situation.
h) Keep handles and grasping surfaces dry, clean and free from oil and grease. Slippery handles and grasping surfaces do not allow for safe handling and control of the tool in unexpected situations.
Service
a) +D[YH] [R[X]U] [S[R]Z[H]U] [W[R]R'O] [V[H]U[Y]L]I repair person using only identical replacement parts. This will ensure that the safety of the power tool is maintained.
Warning! This power tool generates an electromagnetic field during operation. This field can impair active or passive medical implants under certain conditions. In order to prevent the risk of serious or deadly injuries, we recommend that persons with medical implants consult with their physician and the manufacturer of power tool and implant prior to operating the power tool.
Operational Safety Instructions for the Wood Turning Lathe
- The machine may only be connected to a properly earthed mains socket.
- Familiarise yourself with the machine's features and wood-turning techniques before using the machine.
- Examine all workpieces for splits or knots. Glued joints must set completely before turning.
- Ensure that the workpiece is securely locked in position and all attachments are secured.
- Before turning the machine ON ensure that the workpiece can rotate freely by rotating it by hand.
- Keep your hands and fingers away from the rotating workpiece.
- Switch the machine OFF and wait until it has come to a full stop before making any adjustments on the workpiece, tailstock, or tool rest.
- Maintenance, adjustment, calibration and cleaning may only be performed with the motor turned off.
- The machine is designed for use with wood-turning chisels only.
• Always store away the wood-turning chisels safely before you leave the workplace. - Do not run the lathe without its covers and guards in place.
- Keep cutting tools sharp.
- Use the lowest speed when starting a new workpiece.
- Always stop the lathe at its slowest speed. If the lathe is run so fast that it vibrates, there is a risk that the workpiece will be thrown or the cutting tool jerked from your hands.
- Do not allow cutting tools to bite into the workpiece. The wood could be split or thrown from the lathe.
• Always position the tool rest above the center line of the lathe when shaping a piece of stock. - Before attaching a workpiece to the faceplate, always rough it out to make it as round as possible. This minimizes the vibrations while the piece is being turned. Always fasten the workpiece securely to the faceplate. Failure to do so could result in the workpiece being thrown away from the lathe.
- Use a brush or compressed air to remove wood shavings; never your hands. The wood shavings will be sharp.
- The cutting tool must always be tight within the tool post or chuck and adjusted to limit projection from the post. This will reduce the possibility of the tool breaking or bending.
-
Do not reach a cross the lathe while it is running.
-
Only feed workpiece into a cutting tool against the direction of rotation. The workpiece must always be rotating toward you.
- Do not leave the tool unattended when it is plugged into an electrical outlet. Turn off the ool, and unplug it from its electrical outlet before leaving.
• This product is not a toy. Keep it out of reach of children. - Some dust created by power sanding, sawing, grinding, drilling, and other construction activities, contains chemicals known to cause cancer, birth defects or other reproductive harm. Some examples of these chemicals are:
- Lead from lead-based paints
- Crystalline silica from bricks and cement or other masonry products
– Arsenic and chromium from chemically treated lumber - Your risk from these exposures varies, depending on how often you do this type of work.
To reduce your exposure to these chemicals: work in a well ventilated area, and work with approved safety equipment, such as those dust masks that are specially designed to filter out microscopic particles.
- People with pacemakers should consult their physician(s) before use. Electromagnetic fields in close proximity to heart pacemaker could cause pacemaker interference or pacemaker failure. In addition, people with pacemakers should:
- Avoid operating alone.
– Properly maintain and inspect to avoid electrical shock.
- The warnings, precautions, and instructions discussed in this user manual cannot cover all possible conditions and situations that may occur. It must be understood by the operator that common sense and caution are factors which cannot be built into this product, but must be supplied by the operator.
Additional safety instructions for the use of faceplates
- Ensure that the faceplate is the appropriate size to support the workpiece.
- Ensure that the workpiece is securely fastened to the faceplate.
- Rough cut the workpiece as close as possible to the final shape before mounting onto a faceplate.
- Only use scrapings chisels for faceplate turning. Cutting chisels can easily be tornout of your hands.
- Pay attention that the woodturning chisel cannot interfere with the holding screws at the finished dimensions of the workpiece.
6. Remaining hazards
The machine has been built using modern technology in accordance with recognized safety rules. Some remaining hazards, however, may still exist.
- Only process selected woods without defects such as: Branch knots, edge cracks, surface cracks. Wood with such defects is prone to splintering and hazardous.
- Wood which is not correctly glued can explode when being processed due to centrifugal force.
- Trim work piece to a rectangular shape, center and correctly secure before processing. Unbalanced work pieces can be hazardous.
- Injuries can occur when feeding work pieces if tool supports are not correctly adjusted or if turning tools are blunt. Sharp turning tools which are free of defects are necessary for professional turning.
- Long hair and loose clothing can be hazardous when the work piece is rotating. Wear personal protective gear such as a hair net and tight fitting work clothes.
- Saw dust and wood chips can be hazardous. Wear personal protective gear such as safety goggles and a dust mask.
- The use of incorrect or damaged mains cables can lead to injuries caused by electricity.
- Even when all safety measures are taken, some remaining hazards which are not yet evident may still be present.
- Remaining hazards can be minimized by following the instructions in "Safety Precautions", "Proper Use" and in the entire operating manual.
7. Technical data
Dimensions L x W x H 890 x 325 x 414 mm
| Speed 890/1260/1760/2600 rpm | |
| Max. workpiece size 500 mm | |
| Max. workpiece diameter 350 mm | |
| Spindle head thread | M18 x 2.5 |
| Weight | 18 kg |
| Engine | 230-240 V / 50 Hz |
| Rated input | 400 W S6 15% |
Subject to technical changes
* S6 15%, continuous operation periodic duty. Identical duty cycles with a period at load followed by a period at no load. Running time 10 minutes; duty cycle is 15% of the running time.
The noise and vibration levels have been determined in accordance with EN 61029.
| Sound pressure level L_pA | 71 dB |
| Uncertainty K_pA | 3 dB |
| Sound power level L_WA | 84 dB |
| Uncertainty K_WA | 3 dB |
Wear hearing protection.
Excessive noise can result in a loss of hearing. Total vibration emission values (vector sum of three directions) determined per EN 61029.
8. Unpacking
- Open the packaging and carefully remove the device.
- Remove the packaging material, as well as the packaging and transport safety devices (if present).
- Check whether the scope of delivery is complete.
- Check the device and accessory parts for transport damage. In the event of complaints the carrier must be informed immediately. Later claims will not be recognised.
- If possible, keep the packaging until the expiry of the warranty period.
- Familiarise yourself with the product by means of the operating instructions before using for the first time.
- With accessories as well as wearing parts and replacement parts use only original parts. Replacement parts can be obtained from your dealer.
- When ordering please provide our article number as well as type and year of manufacture for your equipment.
ATTENTION!
The device and the packaging material are not children's toys! Do not let children play with plas-
W-L-F-E-D-J-V, O-P-V-R-U-V-P-D-O-O-S-D-U-W-VH
F K R N L Q J R U V X - R F D W L Q J!
9. Assembly
Setting up the lathe (Fig. 1)
- Place the lathe on a firm surface.
- Screw the lathe to the surface. Use the two holes in each of the two feet (7) for this.
- You can use the hexagonal bolts (17) supplied with the lathe for this.
- Place the standard washer and spring washer on the hexagonal bolt (17) (see Fig. 1).
- Screw the lathe to the surface with the help of the hexagonal bolt, standard washer, spring washer and nut (17).
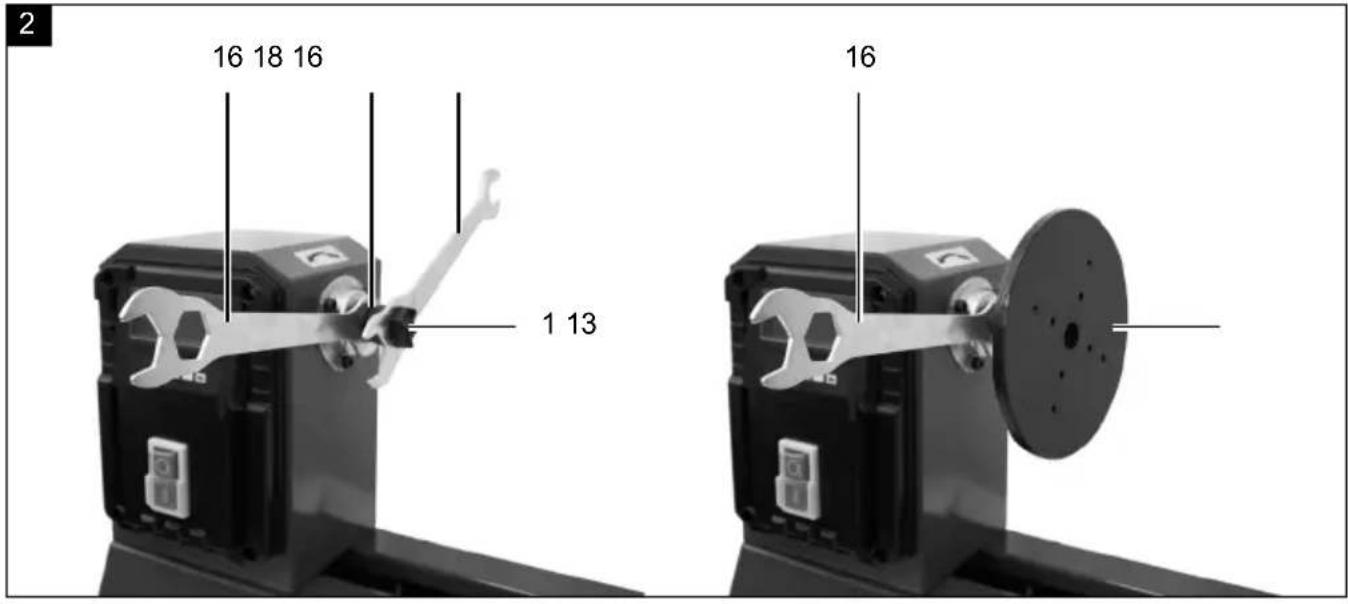
Fitting/replacing the workpiece mount (Fig. 2)
ATTENTION!
6ZLWFKWKHIGHYLFHIR-DQGISXO
Fitting the 4-prong centre tip
- Loosen the face plate (13) if necessary. To do this, hold the drive shaft (18) firmly in place with the open-ended spanner (16) and unscrew the face plate (13) from the drive shaft (18).
- Hold the drive shaft (18) firmly in place with the open-ended spanner (16).
- Tighten the 4-prong centre tip (1) onto the drive shaft using the second open-ended spanner (16).
For turning bowls or pots, for example, the face plate (13) must be used instead of the 4-prong centre tip (1).
Mounting the face plate
- If necessary, loosen the 4-prong centre tip (1). To do this, place the two open-ended wrenches (16) on the drive shaft (18) and on the 4-prong centre tip (1) and unscrew the 4-prong centre tip (1).
- Hold the drive shaft (18) firmly in place with the open-ended spanner (16).
- Screw the face plate (13) onto the drive shaft (18).
10. Operation
⚠ Important!
You must fully assemble the appliance before using it for the first time!
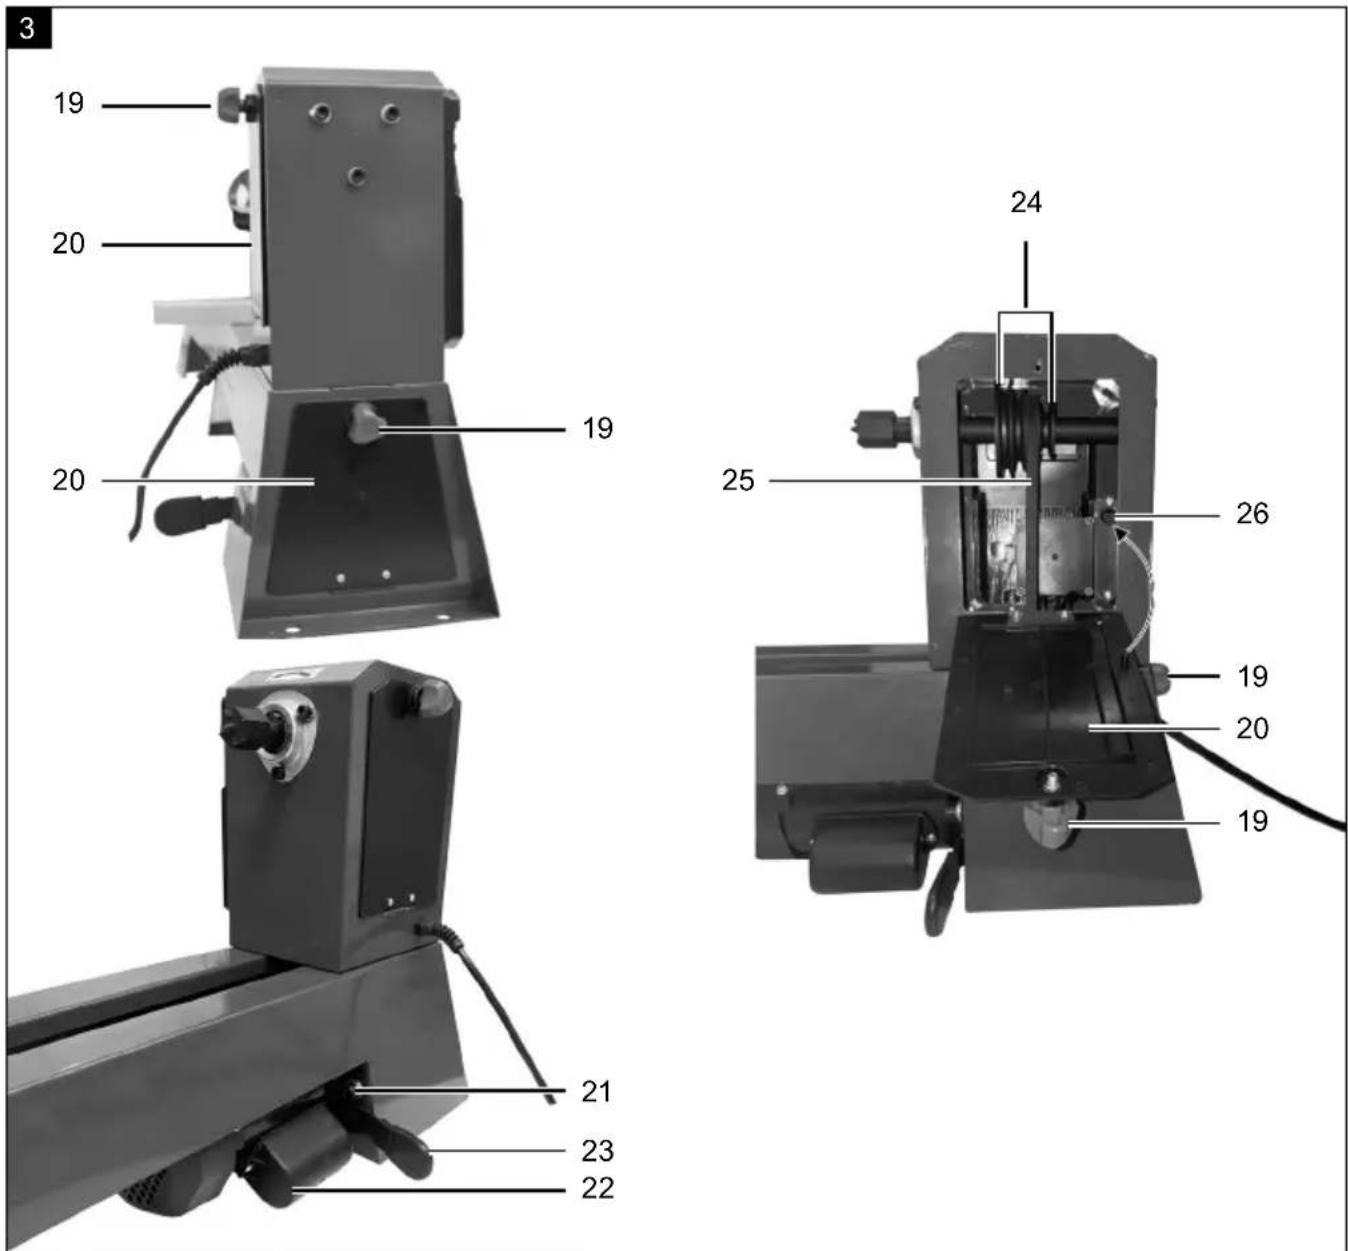
Selecting the speed (Fig. 3)
ATTENTION!
The mains plug shall not be plugged in when adjusting the speed.
Select the correct speed:
- With new workpieces, select a low speed first. Increase the speed as the weight of the workpiece increases.
- The selection of the correct speed depends on several factors, e.g. material, diameter, length and unbalance of the workpiece. In principle: Choose a low speed for hard timber, non-round, long or large-diameter workpieces.
- Use the table as a guide when selecting the speed:
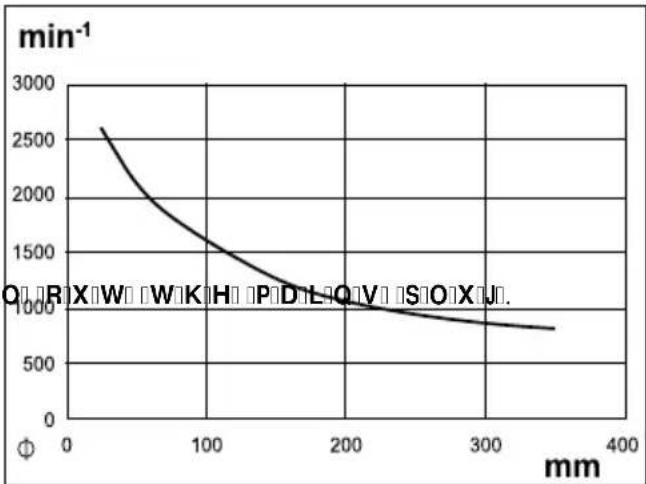
line
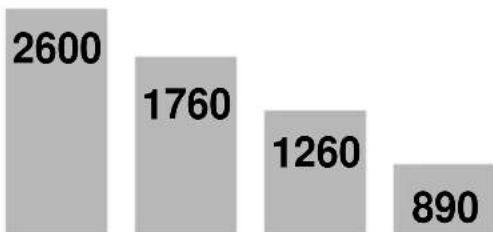
| φ | min⁻¹ | | ---- | ----- | | 0 | 2600 | | 100 | 1600 | | 200 | 1000 | | 300 | 800 | | 400 | 700 |The workpiece diameter is indicated on the x-axis. The speed can be read off the y-axis. Go up vertically from the diameter of the workpiece and read off the speed where an imaginary perpendicular line meets the curve.
- Loosen the two locking screws (19) on the two gearing covers (20).
- Open the gearing covers (20).
- Loosen the locking screw (21) of the motor unit with the Allen key (12).
- Lift the motor unit (22) by operating the lever (23) to relieve the load on the V-belt (25).
- Fix the motor unit (22) by tightening the locking screw (21).
- Place the V-belt (25) in the desired groove of the drive pulley (24) to achieve the specified speed:
bar
| Category | Value | |---|---| | 1 | 2600 | | 2 | 1760 | | 3 | 1260 | | 4 | 890 |The V-belt must lie in the same groove on the upper and lower drive pulley.
Note: The two gearing covers (20) are equipped with an interlock switch (26).
The interlocking switches (26) are actuated automatically when the gearing covers (20) are closed. The device cannot be switched on if a gearing cover (20) is not closed correctly.
- Loosen the locking screw (21) and lower the lever with the motor unit to tighten the V-belt.
- Tighten the locking screw (21).
- Close the gearing covers (20). Secure the gearing covers with the locking screws (19).
Securing the workpiece
Securing with the 4-prong centre tip (1) and tailstock (5) (Fig. 1)
- Draw a diagonal line at both ends of the workpiece to locate the centre. The centre is where the lines meet. Make a centring hole where the 4-prong centre tip and tailstock are to meet the workpiece. This ensures a better hold.
- Make an approx. 2 mm deep saw cut along the diagonal to enable the 4-prong centre tip (1) to grip better.
- Fit the dismounted 4-prong centre tip (1) centrally to the centre of the workpiece. Lightly tap the 4-prong centre tip (1) into the workpiece with a mallet (not included in the scope of delivery). Take care to protect the thread of the 4-prong centre tip (1) with a wooden board, for example.
- Remove the 4-prong centre tip (1) from the workpiece again.
- Then (re)mount the 4-prong centre tip (1) onto the device.
Note: The mounting and dismounting of the 4-prong centre tip can be found in the chapter "Mounting/changing the workpiece holders".
- Position the workpiece on the 4-prong centre tip (1). Make sure that the 4-prong centre tip (1) engages with the notch, otherwise secure clamping is not guaranteed.
- Loosen the lever (8) of the tailstock.
- Slide the tailstock towards the 4-prong centre tip (1) until it makes firm contact with the workpiece to clamp it.
- Fix the tailstock by pushing the lever (8) down.
- Use the hand wheel (6) for fine adjustment.
- Fix the position of the handwheel with the counternut (4).
Securing with the face plate (13) (Fig. 2)
- Hold the drive shaft (18) firmly in place with the open-ended spanner (16).
- Unscrew the face plate (13) from the drive shaft (18).
- Fix the workpiece to the face plate (13) with wood screws (not included in the scope of delivery).
ATTENTION!
Danger of injury! Position the wood screws such that they will not be accidentally exposed by the tool when machining the workpiece.
- Hold the drive shaft (18) firmly in place with the open-ended spanner (16).
- Screw the face plate (13) with the pre-mounted workpiece onto the drive shaft (18).
Adjusting the tool support (Fig. 1)
ATTENTION!
Danger of injury! Make sure that the tool support is
Fixing/releasing the tool support
- The tool support (2) is fixed by pushing the lever (9) downwards.
- The tool support (2) is released by pushing the lever (9) upwards. You can now move the tool support.
Note:
,II L W L V G L-F X O W W R P R Y H W K H W F tailstock (5), adjust the nut on the underside with a spanner or ratchet (19 mm).
Height adjustment of the tool support
- Loosen the screw (2a) on the lower part of the tool support (2b).
- Set the desired height.
- Fix the tool support (2) by tightening the screw (2a).
6ZLWIFKLOQJ RQQ//R-□(□□J.□1)
- Connect the device to the mains voltage.
- Switching on: Press the On switch (10) to switch the device on.
- Switching off: To switch the device off, press the Off switch (11) again.
ATTENTION!
, I | R | X | O | H | D | Y | H | W | K | H | G | H | Y | L | F | H | X | Q | D | W | W working, pull out the mains plug.
11. Working instructions
- Before you start working, read up on the subject in detail in technical literature.
- When selecting your workpiece, look out for knots, knotholes, cracks or similar.
You could lose control of your tool, which could result in serious injury. Cracked workpieces can rupture during turning. There is a danger of injury!
• Always cut the workpiece into shape as much as possible before machining. - Observe the maximum workpiece length and the maximum workpiece diameter! You will find these in the technical data.
- The workpiece must be fixed in the centre, an unbalanced workpiece will affect the service life of the machine.
- Only use tools suitable for turning.
- Never stand in the trajectory of the workpiece.
- Before starting work, with the mains plug removed, check the following by turning manually:
- Is the workpiece stuck?
- Does the workpiece come into contact with the tool support?
• Always start with a lower speed and increase it gradually. - Do not apply the tool to the workpiece until it has reached the set rotational speed.
Remove blockages
6ZLWFKWKHGHYLFH-R-DQG-SXO
Clean the device of dust and chippings to remove the blockage.
12. Electrical connection
The electrical motor installed is connected and ready for operation. The connection complies with the applicable VDE and DIN provisions. The customer's mains connection as well as the extension cable used must also comply with these regulations.
Damaged electrical connection cable
The insulation on electrical connection cables is often damaged.
This may have the following causes:
- Pressure points, where connection cables are passed through windows or doors.
-
Kinks where the connection cable has been improperly fastened or routed.
-
Places where the connection cables have been cut due to being driven over.
• Insulation damage due to being ripped out of the wall outlet.
• Cracks due to the insulation ageing.
Such damaged electrical connection cables must not be used and are life-threatening due to the insulation damage.
Check the electrical connection cables for damage regularly. Ensure that the connection cables are disconnected from electrical power when checking for damage.
Electrical connection cables must comply with the applicable VDE and DIN provisions. Only use connection cables with the designation H05VV-F.
The printing of the type designation on the connection cable is mandatory.
AC motor
• The mains voltage must be 230 V\~.
- Extension cables up to 25 m long must have a cross-section of 1.5 ~mm^2 .
Connection type X
If the mains connection cable of this device is damaged, it must be replaced by a special connection cable which can be obtained from the manufacturer or its service department.
Connections and repair work on the electrical equipment may only be carried out by electricians. O□R□X□W□W□K□H□P□D□L□Q□V□S□O□X□J□.
Please provide the following information in the event of any enquiries:
• Type of current for the motor
• Machine data - type plate
• Machine data - type plate
13. Cleaning and maintenance
Warning! Pull out the mains plug before carrying out any adjustments, maintenance or repair work!
General maintenance tasks
Wipe swarf and dust off the machine from time to time with a cloth. Oil the rotating parts once monthly to extend the life of the tool. Do not oil the motor.
Do not use corrosive agents for cleaning the plastic.
Maintenance
The device has no further internal parts that require maintenance.
Service information
With this product, it is necessary to note that the following parts are subject to natural or usage-related wear, or that the following parts are required as consumables.
Wearing parts*: Carbon brushes, V-belts
* may not be included in the scope of supply!
Spare parts and accessories can be obtained from our service centre. To do this, scan the QR code on the cover page.
14. Transport
If you want to transport the device to a different location, disconnect the device from the power supply and set it down in another appropriate area.
Attention!
Hot surface. There is a risk of burns. Do not transport the machine until the motor unit (22) has cooled down completely.
Carry the lathe with a second person if possible. When transporting, hold the lathe by the outer feet (7), by the rail with the motor unit (3).
15. Storage
Store the device and its accessories in a dark, dry and frost-free place that is inaccessible to children. The optimum storage temperature lies between 5 and 30 °C. Store the tool in its original packaging.
Cover the tool to protect it from dust or moisture. Store the operating manual with the tool.
16. Disposal and recycling
Notes for packaging


The packaging materials are recyclable. Please dispose of packaging in an environmentally friendly manner.
Notes on the electrical and electronic equipment act [ElektroG]
Waste electrical and electronic equipment does not belong in household waste, but must be collected and disposed of separately!
- Used batteries or rechargeable batteries that are not installed permanently in the old appliance must be removed non-destructively before disposal. Their disposal is regulated by the battery law.
- Owners or users of electrical and electronic devices are legally obliged to return them after use.
- The end user is responsible for deleting their personal data from the old device being disposed of!
- The symbol of the crossed-out dustbin means that waste electrical and electronic equipment must not be disposed of with household waste.
- Waste electrical and electronic equipment can be handed in free of charge at the following places:
- Public disposal or collection points (e.g. municipal works yards)
- Points of sale of electrical appliances (stationary and online), provided that dealers are obliged to take them back or offer to do so voluntarily.
- Up to three waste electrical devices per type of device, with an edge length of no more than 25 centimetres, can be returned free of charge to the manufacturer without prior purchase of a new device from the manufacturer or taken to another authorised collection point in your vicinity.
- Further supplementary take-back conditions of the manufacturers and distributors can be obtained from the respective customer service.
- If the manufacturer delivers a new electrical appliance to a private household, the manufacturer can arrange for the free collection of the old electrical appliance upon request from the end user. Please contact the manufacturer's customer service for this.
- These statements only apply to devices installed and sold in the countries of the European Union and which are subject to the European Directive 2012/19/EU. In countries outside the European Union, different regulations may apply to the disposal of waste electrical and electronic equipment.
17. Troubleshooting
The following table shows fault symptoms and describes remedial measures in the event of your product failing to work properly. If you cannot localise and rectify the problem with this, please contact your service workshop.
| Fault Possible cause Remedy | ||
| The cut quality is poor. Cutting tool is brunt. Sharpen or replace cutting tool. | ||
| Excessive vibration when turning thin workpieces. | The cutting tool is below the workpiece centreline. | Raise the cutting tool to the centreline of the workpiece. |
| Too strongly cut Reduce the working pressure. | ||
| Excessive vibration when turning large workpieces or bowls. | Headstock and/or tailstock incorrectly positioned at the ends of the workpiece. | Check that the workpiece tips on the headstock and/or tailstock are correct. |
| The workpiece is not balanced. Cut the end of the part until the work-piece is balanced. | ||
| Lathe does not turn. Cable not connected to the mains socket. | Connect it to the mains socket. | |
| Replace the safety switch of the open door. | ||
| Lathe does not turn off. Damaged or defective power switch and/or internal wiring. | Pull the lathe's plug out of the socket immediately. Do not operate the lathe until it has been repaired by a qualified service technician. | |
Günzburger Straße 69
D-89335 Ichenhausen
Cher client,
6pO H F W L R Q G X U p J L P H (∅ J . 3)
ATTENTION!
/□D□□F□K□H□V□H□F□W□H□X□U□□G□R□L□W□r□W□U□H□ glage du régime.
) L [D] W L R Q D Y H F O H S O D W H D X F L U A F ATOENTION H (1 3) I (J J . 2)
Günzburger Straße 69
D-89335 Ichenhausen
Egregio cliente,
Günzburger Straße 69
D-89335 Ichenhausen
Geachte klant,
Günzburger Straße 69
D-89335 Ichenhausen
Estimado cliente:
, Q V W D O D U W R U Q R S D U D P D G H U D (
) L M H / D R M H | H O | V R S R U W H | G H | O D | K H
Günzburger Straße 69
D-89335 Ichenhausen
Estimado cliente,
5L\V:F'R[G:H]LQJH\V\W:m'R[H]D\V:o[L:D!
9. Montagem
\$ F K D G H U H G H Q m R I G H Y H V H U O L J 200 D G X U D Q W H D + F R Q
JIXUDomRIGD[YHORFLGDIGH].
Günzburger Straße 69
D-89335 Ichenhausen
9iHQí ]iN□□]QtN□X,
8 V F K R Y H M W H I V L G R E X G R X F Q D I Y H, N SH U R p X G R Y S I H i C K R I V W Q i c P o u z i t i v l o z k y pro pr pokyny a instrukce.
[O H N W U L F N i E H ] S H C Q R V W
b) =D E U D 3 W H N R Q W D N W X I W ) O D V V X M D N R W U X E N D P L , W R S H Q t P L , V S kami. -H -O L Y D , H W ) O R X ] H P Q ) Q p , U L ] L N R ] D V D H Q t H O H N W U L F N i P
e)E:H3)F6XH6YQIRWHVQILH:O:H:N:W:U:L:F:NÍI:Q:IV Y:H:M:W:H ISURG:O:X:R:Y:D:F:t IN:D:E:H:O:N
3R×tYiQtD P D Q L S X O D F H V H O H N
, Q V W D O D F H O R H V R X V W U X K X (R
9R0E0V5U1YQ1F0K0RWi0H0N:
[1]H E H]S H c t ]U D Q)Q t! 9 U X W N P X W D N, [D E V W H I M H I S 9 L I R S U D F R Y i F K W )Q)I Q H X Y R O Q L O L I Q i V W U R M H I
3RNXG MGH SRVRXYiQt XORHQt QiV
Q[N[X][(5)]W]N[D],X[SUDYWH]QDVWDYI
VWUDQ) ISRPRF YLGOLF RYpKR NOtCH QHI
1DVIDWIDYHQQtIYI, N\XORHQtIQiVWUR
12. (OHNWULFNp IS9LSRMH
9D G Q I H O H N W U L F N I S 9 t Y R G Q t
17. 2GVWUD3RYiQtSIRUXFK
Günzburger Straße 69
D-89335 Ichenhausen
9iHQí ]iN[D]Q[tN],
[OHNWULFNii EHH]SHCHQRV"
b) 1HISRXtYDMWHHOOHNWULFNpQiUQDcRIP. (OHNWULFNpQiUDGLH, NWW
'R'G'D'W'R'C'Q'p'E'H']S'H'C'Q'R'V'W'Q'p'X'S'R']R'U'Q'H'Q'L'D'W'Í 'N'D'M\~'F'H'V'D
S□R□X□t□Y□D□Q□L□D□□O□t□F□Q□F□K□X□S□t□Q□D□F□t□F□K□G□R□V□H□N□V 890×325×414 mm
9R-EDVSSUYQFKKRWiCRI:
DEN [V]D [S]RčDV [SU]H[YiG]N [Q]HPRKOD
8S H Y Q H Q L H / X Y R - Q H Q L H G R V D G D F H I
9, H R E H F Q p \~ G U E R Y p R S D W U H Q
Raz za čas zo stroja utrite handrou triesky a prach. Raz za mesiac naolejujte otočné diely na predíženie životnosti nástroja. Motor neolejujte.
Günzburger Straße 69
D-89335 Ichenhausen
Kedves Ügyfelünk!
9HJHJQJHHOHPHEHDN|YHWNH]5N
5[J]tWVH[D]QpJ\pO&FV\~FVRR(W[(1)]pV
(1. ábra)
L O O H W Y H O H N H O O D G Q L 5 N H W i U W D O P D W O D Q t W i V U D!
2E M D; Q L H Q L H V P E R O L Q D X U] G] H Q L X
6SILV WUH;FLL: 6WURQD:
Günzburger Straße 69
D-89335 Ichenhausen
Szanowny Kliencie,
2. 2S L V X U ] G ] H Q L D
[%H] [S|L|H|F] H11V|W|Z|R |HO|H|N|W|U|F] Q|H
3D V H N N O L Q R Z V Q D J y U Q H M L G R C G R Z H M P X V L V L I ] Q D M G R Z D i c Z W P
[—H]* [H]O[L] [S]U] H\V X Z D Q L H [S] R Z L H U] F K G [G] L D [(2)] O X E N R Q L N D [(5)] G] L D · D I * \ R G S R Z L H G Q L R I Z U H J X O R Z D é G R X* \ F L X N O X F] D Z L G O D V W H J R I O X E J
[5]HJXODFMD [ZVRRNR;FL[SIRZLHU]]FK [U]]G]LD
2E M D Q M H Q M H V L P E R O D Q D X U H d D M X
Günzburger Straße 69
D-89335 Ichenhausen
Poštovani kupci
(OHNWULCQDIVLJXUQRVW
a) 8W□L□N□D□č □H□O□H□N□W□U□L□č□Q□R□J □D□O□D□W□D □X□W□L□č□Q□L□F□L□Utikač nije dopušteno ni na koji način izmijeniti. Ne rabite adapterske utikače zajedno s uzemljenim električnim alatima. Originalni utikači i odgovarajuće utičnice smanjuju rizik od električnog udara.
b) Izbjegavajte dodir tijela s uzemljenim površinama kao što su cijevi, radijatori, štednjaci i hladnjaci. 3RVWRML SRIYHćDQ U L] L N udara ako je vaše tijelo uzemljeno.
c) [1]H [L]O[D]L[W]H [H]O[H]N[W]U[L]č[Q]H [D]O[D] ranje vode u električni alat povećava rizik od električnog udara.
d) [1]H [U]D [E]L [W]H [N]D [E]H [O] [ ]D [Q]R [H]Q[M]H [L]Q[R]J [D]O [D]W [D]L [O]L [ ]D [L]Y [O]D [C]H [Q]M [H]X žite kabel dalje od izvora topline, ulja, oštrih rubova i pomičnih dijelova uređaja. Oštećeni ili zapleteni kabeli povećavaju rizik od električnog udara.
H ^1 Q ^1 H ^1 U ^1 D ^1 G ^1 X ^1 V ^1 H ^1 O ^1 H ^1 N ^1 W ^1 U ^1 L ^1 C ^1 Q ^1 L ^1 P ^1 D ^1 O ^1 D ^1 V ^1 E ^1 L ^1 W ^1 H ^1 V ^1 D ^1 P ^1 R ^1 S ^1 U ^1 R ^1 G ^1 X ^1 Q ^1 H ^1 N ^1 D ^1 E ^1 H ^1 O ^1 H ^1 N ^1
6DcXYDMWHVYHVLJXUQRVQHQQDSRjBrHoGHiubiXsXWHH]DxEGcXcHISRWUHEH.
Pojam “električni alat” koji se rabi u sigurnosnim napomenama odnosi se na električne alate s napajanjem iz električne mreže (s mrežnim kabelom) ili na električne alate s akumulatorskim napajanjem (bez električnog kabela).
a) Budite pozorni, pazite na ono što radite i po- □V□W□X□S□D□M□W□H□□U□D□]□X□P□Q□R□□S□U□L□O□L□N□R□P alatom. □1□H□□U□D□E□L□W□H□□H□O□H□N□W□U□L□č□Q□L□□D ili pod utjecajem droge, alkohola ili lijekova. Trenutak nepozornosti pri uporabi električnog ala- ta može uzrokovati ozbiljne ozljede.
8S R U D E D L R G U D Y D Q M H H O H N W U
a) 11H1 S1U1H1R1S1W1H1U1H1ć1X1M1W1H1 X1U1H1d1 trični alat za vaš zadatak. Prikladnim električnim alatom radit ćete bolje i sigurnije u specificiranom rasponu snage.
b) 1H [U]D E L W H I H O H N W U L C Q L D O D W I D N R I M H I V N O R S N D I R ,W H c H na. [(O H N W U L C Q L D O D W I N R M L V H Si Q H o Br e n p y m e r l z K t K o M X s o L W L I L O L I L V N O M X C L W L I R S D V D Q I M H I L U P e R J U d s v h e s r R S U D s Y n o W a L pravilno uze-
c) ,, ]Y X F L W H X W L N D C L ] X W L C sivi akumulator prije obavljanja namještanja X U H d D M D , P L M H Q M D Q M D U H O H N W U L c Q R J D O D W D.
lster priksdian ožljeda, preporučujemo da se osobe s medicinskim implantatima prije rukovanja električnim alatom savjetuju sa svojim liječnikom i proizvođačem tog medicinskog implantata.
W|D|N|R|M|H|V|N|O|R|S|N|D|R|,W|H|c|H
Sig|H|d|Br|e|hap|y|len|h|z|t|k|o|M|k|x|s|o|L|W|L|
L|U|P|R|U|L|D |S|v|h|e |S|r|S|u|D}s |Y|n|o|W\L pravilno uze-
• Upoznajte se sa svojstvima stroja i tehnikom toka-
G Qruk K prde QeD Wd strb j Otl vits S R o g D J D Q M D
N W Q R U Q R J R I G O D I W D Q K N D O R D O M L W F D U H
L N P Q M X P C U X D E R Y Y A U M H P D Q M H 1 C H ] D S L Q
kontrolirati.
g) 5D E L W H I H O H N W U L C Q L D O D W , S U L
O'Rme MInMipulHnHnRcom vodite računa o radnim
X'YuLjMeH NzaBaGUKoD VYJQ MaMTHUpDByQer-
tričnih alata za primjene za koje on nije predviđen
može uzrokovati opasne situacije.
O'Rme MInMipulHnHnRcom vodite računa o radnim
X'YuLjMeH NzaBaGUKoD VYJQ MaMTHUpDByQer-
tričnih alata za primjene za koje on nije predviđen
može uzrokovati opasne situacije.
H) N&SnXs#tN#h#o#u [S]U*L*K\Y*D\W[Q]H [S]R\Y[U],L\Q[H] R\V[X]J\N#M\M#H#C[X]BLLJ#XHNQDHY[BG]X\O\M\D[L] ke i prihvatne površine ne omogućavaju sigurno rukovanje i nadzor nad električnim alatom u ne-
H) N&SnXs#tN#h#o#u [S]U*L*K\Y*D\W[Q]H [S]R\Y[U],L\Q[H] R\V[X]J\N#M\M#H#C[X]BLLJ#XHNQDHY[BG]X\O\M\D[L] ke i prihvatne površine ne omogućavaju sigurno rukovanje i nadzor nad električnim alatom u ne-
QID SpledvideHim]sQuaXjVmbVIDYID
SarVidiqoraba susta-
a) (O|H|N|W|U|L|č|Q|L| D|O|D|W| V|P|L|M|H| S|R|S|I
R V iMFIHIOIDIQLVIVWXUUXQROVMMDLNILLOMMIR IVIDIP D I Jz DovtnioDHiNoWIdaLCaGoHeteDiOi DsMyHl,da je V U O MtiGhIalXIsDBJUsDjEhl EX S IR MeRblmo postupanje
Upozorenje! Ovaj električni alat tijekom rada proizvo- di elektromagnetsko polje. To polje može u određenim Ukõl Q-Riha D-DoRaWdAktivne ili pasivne medicinske implantate. Kako bi se smanjila opasnost od teških ili
, V N O M X C L W H X U H d D M L L ] Y X F L
Čistite uređaj od prašine i strugotina kako biste otklonili blokade.
12. 3U L N O M X C L Y D Q M H Q D
Montirani elektromotor priključen je pripravan za rad. Priključak ispunjava važeće propise VDE i DIN. Kori- snikov mrežni priključak i korišteni produžni kabel mo- raju udovoljavati tim propisima.
2, W H c H Q H O H N W U L c Q L S U L N O M
Na električnim priključnim vodovima često nastaju oštećenja izolacije.
13. L, c H Q M H L R G U D Y D Q M H
HOOHNWU L'QX P U H X
2S ^ć H P M H U H R G U D Y D Q M D
1D S R P H Q H R D P E D O D L


Ambalažni materijali mogu se re- ciklirati. Molimo zbrinite ambalažu na ekološki način.
- Mjesta prodaje električnih uređaja (stacionarna i internetska), ako su trgovci obvezni preuzeti ih ili ako besplatno nude tu uslugu.
- Do tri otpadna električna uređaja po svakoj vrsti uređaja, s duljinom rubova od maksimalno 25 centimetara, možete bez prethodne nabave novog uređaja besplatno predati proizvođaču ili nekom drugom obližnjem ovlaštenom sabiralištu.
2 W S D G Q L I H O H N W U L C Q L I L I H O H N W U R Q L C N L I X U H d D M L I Q H V S D G D M X I X N X C Q L I R W S D G, I Q H J R I L K I Y D O M D I R G Q L M H ti na odvojeno mjesto prikupljanja i zbrinja- vanja!
- Stare baterije ili akumulatore koji nisu fiksno ugrađeni u otpadni uređaj potrebno je prije predaje izvaditi tako da se ne unište! Njihovo zbrinjavanje regulirano je zakonom o baterijomo.
Günzburger Straße 69
D-89335 Ichenhausen
Spoštovani kupec,
želimo vam veliko veselja in uspeha pri delu z vašo novo napravo.
Napotek:
H O H N W U L C Q D R U R G M D I W X G L I C H V W H S R Y H C N U D W Q L I X S R
U D E L H O H N W U L C Q H J D I R U R G M D S R D S R O H Q R P D W U E L F Q R D I R U R G M H V P H vestni pri njegovi uporabi. Nepazljiva uporaba lahko v delčku sekunde privede do hudih poškodb. N Y D O L F L U D Q R I V W U R N R Y Q R I R V H nalnimi nadomestnimi deli. Tako je zagotovlje- no, da električno orodje ostane varno.
8SRUDEDHOHNWULCQHJD RURGMD LQUDYQDQMHI]QMLLP
1□R□V□L□W□H□□]□D□,□č□L□W□R□□]□D□□V□O□X□K□.
1D S U D Y D L Q H P E D O D Q L P D W H U L D
2WURFILVHQHVPHMRLJUDWLVSC
3R V W D Y L W H Y V W U X Q L F H (V O . I 1)
- Stružnico postavite na stabilno podlago.
- Stružnico privijte na stabilno podlago. Pri tem si pomagajte z dvema izvrtanima luknjama in dvema podpornima nogama (7).
- V ta namen lahko uporabite priložene šesterorobe vijake (17).
- Podložko in objemko nataknite na šesterorobi vijak (17) (glejte sl. 1).
- Stružnico privijte na podlago s šesterorobim vija-kom, podložko, objemko in matico (17).
, ] N O R S L W H Q D S U D Y R L Q L ] Y O H F L
9JUDGQMD 4-WRCHNRYQHJD VUHGL
3U L W U G L W H Y V S O D Q V N R S O R,
- Pridržite pogonsko gred (18) z viličastim ključem (16).
- Plansko ploščo (13) odvijte s pogonske gredi (18).
- Obdelovanec z lesenimi vijaki (niso priloženi obsegu dostave) pritrdite na plansko ploščo (13).
⚠ POZOR!
Nevarnost poškodb! Leseni vijaki morajo biti [X]Y[L]W[L] [Q]D [Q]D[č]L[Q], [G]D [M]L[K] S[U]L [R] namenoma razkrili z orodjem.
- Pridržite pogonsko gred (18) z viličastim ključem (16).
- Plansko ploščo (13) z vgrajenim obdelovancem privijte na pogonsko gred (18).
1D V W D Y L W H Y O H L, C D ] D R U R G M H
⚠ POZOR!
Nevarnost poškodb! [3:D]L:W:H, G:D:M:H:O:H:L,,č:Prdvo:prHrjankl,inč da Rse(med del OvaNjeRnOnMnboče odtegniti.
3U L W U G L W H Y V S U R V W L W H Y O H L, C
H QD SUDY R S X V W L W H Q H Q D G] R U R Y N R Q C D O L, L] Y O H F L W H R P U H Q L] Y W L
11. Delovna navodila
, ] N O R S L W H Q D S U D Y R L Q L ] Y O H F L M K E: R P U H Q L Y W L C.
Z naprave očistite prah in ostružke, da sprostite blokade.
12. (O'H:N'W'U'L'c'Q'L'S'U'L'N'O'M'X'c'H'N
13. L, C H Q M H L Q Y] G U H Y D Q M
Opozorilo! Pred vsakim nastavljanjem, servisiranjem ali popravilom izvlecite omrežni vtič!
6SOR,QLY]GUHYDIOQLIXNUHSL
1D S R W N L ] D H P E D O D R
![SCHEPPACH DM500T - 6SOR,QLY]GUHYDIOQLIXNUHSL - 1](/content/2026/04/675646/images/b94f99bf637320e5c692ad0b74bb05ed83dda2e2fefb41428e26ca64af731ea7.jpg)
![SCHEPPACH DM500T - 6SOR,QLY]GUHYDIOQLIXNUHSL - 2](/content/2026/04/675646/images/d21cd753c69d094c0c9ab27902061d5774e1d70c05b45102fb5d18a3eb3f8a6c.jpg)
Embalažne materiale je mogoče reciklirati. Embalažo zavrzite okolju prijazno.
1|D|S|R|W|N|L|J|O|H|G|H|J|D|N|R|Q|D|R|H|O|H|N|W|U|L|č|Q|L|K|L|Q|H|O|H|N|W|U|R|Q|V|N|L|K| napravah
![SCHEPPACH DM500T - 6SOR,QLY]GUHYDIOQLIXNUHSL - 3](/content/2026/04/675646/images/c46ac18c36848e16bd02802533ac25d8b01a86b2c11349ccda1b32c262cc41c7.jpg)
[6]W|D|U|H| [H|O|H|N|W|U|L|c|Q|H| L|Q| H|O|H|N|W|U|R|Q|V|N|H| [Q|D|S|U|D|Y|H| Q|H| V|R|G|L|M|R| P|H|G| J|R|V|S|R|G|L|Q|M|V|N|H|, [S|D|c| S|D | M|L|K| [P|R|U|D|W|H] ]D|Y|U|H|c|L| R]].[R|G|G|D|W|L| Q|D] ]E|L|U|Q|R | P|H|V|W|R | O|R|c|H|Q|R]!
- Stare baterije in akumulatorje, ki niso fiksno vgrajeni v staro napravo, je treba pred oddajo na zbirno mesto odstraniti brez uničenja komponent! Navodila za njihovo odstranjevanje ureja zakon o baterijah.
17. 3|R|P|R|C|S|U|L|P|R|W|Q|M|D|K
Günzburger Straße 69
D-89335 Ichenhausen
Austatud klient!
Günzburger Straße 69
D-89335 Ichenhausen
Gerbiamas kliente,
N L W H W L N L R U L Q H L V U L L D L
\$V P H Q - V D X J D
b) 1HQQDXGRRNLWHHHOHNWULQLRL≥U VXJHGVV. (OHNWULQLV)≥UDQNL
a) L'U'E'G'D'P'L'V'X'H'O'H'N'W'U'L'Q'L'X'≥U'D'Q'N'D'X'D'UE'E'D'L'W'H'E'B'M',IV'G'M'X'Q'J'L'D',I'U'L'U'J'D'O'Y'R'N'L'W'H'D'S'L'H'W'D'L',I'N''Gr'KiaR'Mahyidokite H'O'H'N'W'U'L'Q'L'R'≥U'D'Q'N'L'R',I'N'D'L'H)V'D'W'HHS,D'I'Q'D'V'M,W'D'W'U'E'DPYL'H'S'U'L'H'W'D'L' N'L'D'P'L'O'D'U'N'R'W'L'Q'L'- 'P'H'G'L'D'J'- I,I'D'O'N'R'K'R'O'N'B'R'DIG'E'DILPVH'D'U'E'D'S'U'L'H', G'L:N'D'P'H'O'W'-Jei naudodami elektrinj jrankj bûsite ≥U'D'Q'N≥I ≥I',D'O≥I,LI',W'U'D'X'N'L'W'H',NL neatidûs, galite rimtai susižaloti. G'R'L'U'(D'U'E'D')S'D',D'O'L'Q'N'L'W'H',LI',LI
b) Naudokite asmenines apsaugines priemones Ši atsargumo priemonė saugo L'U'Y'L'V'D'G'DI'X'V'L'G'I°N'L'W'H'D'S'V'D'X'JelQnBhX'FrenkDnNaIeQnBaX'V.
f) 6WHE°N'LWH, N'DG S'MD XV W\W XY U V. U X R S, L D L S U L L U°W L I S M
e) 9HQNLIWHI QHVVWDQGDUWLIQV NQQVUQBIPINVSSMORRYMPR EUILDIXQRPILV Y°NLIWHI VWDEILOLDL LIU YLVDGDJuds,ngVlaNvaNlyiWHI S-XVLDIXVY
f) 9L O N°N L W H I W L Q N D P X V I G U D E X L X M A K O N D L W y a s S O d u s, kuriuos rei- L I - I G U D E X L I - I L U I Q X V L L P N L W H kia Sa i li N u d o j k e v e k r i n i u s j r a n k i u s k i t i e m s, J R N L W H , I N D G I S O D X N D L , I G U D E X L R h u l a t y i e S i L k s l a n l . G a i m o s p a v o j i n g o s S D W H N W I - I D U W L I M X G D Q L I - I G L i s G i s s e d j a s u z i u s ,
h) 5DQNHQRVILU VIX°PILPRI S D Y L U, L
(OHNWULQLR)≥UDQNLRQQDXGRMLPDVLUHOJVHQDI VXIMXR
△□ '□0(6,2!
≤UHQJLQN V L U ISDNDYLP R P H G L D J R N
las! 9D L N D P V G U D X G L D P D D D L V W L I
P D L ,H O L D L V , S O Y H O O P L V L U P D F
M X V S U D U W L L U X G X V W L I
9. Montavimas
7HNLQLPRVWDINOIL- ISDVIDWIDW\PDIV
4 G D Q W - D W U D P R V F H Q W U R P R Q
BIBYWIMXV10YXLVILDDUCNROWNIXUH LISIN LIW UIXR, LQLRLD WU D P D E W- JH U D L XoI WXR M D Q W Q H D W V L O D L V Y L Q W- .
3U L M X Q J L P R E G D V ;
%%HQQGULHMMLWHHFKQLQ°VISUHLHLLUR
7HFKQLQ°V SULHLLU R V LQI RUPD F
17. 6XWULNLP- "DOLQLPDIV
Günzburger Straße 69
D-89335 Ichenhausen
* [R]G [W]D [L]V [N]O [L]H [Q]W!
[OHNWULVIN] [GUUR] [OED
e) D G G D U E R M D W L H V D U H O H N W
VIXWIGQISRPOELDIPIDQIRVLRMLHWOWILNIDLIMDIMIXUQILWUHSKLCHLPYUNRFWILLIDDUMGDUEILHPbiem arpus telpam piemeroa pagarinata kabeja isit lietošana mazina elektriskā trieciena risku.
f) -D H O H N W U R L Q V W U X P H Q W D O L H Q R Y U, D P D, L P D Q W R M L H W Q R S V D U J V O G] L Nopludstrāvas aizsargslēdža lietoša-
3HUVRQXIGURO,∅ED
a) 50N R M L H W L H V S L H V D U G ] 0 J L X Q W D P , I N R G D U W , X Q S U W 0 J L V F L troinstrumentu.
Nelietojiet elektroinstrumentu, ja esat noguris vai atrodaties narkotisko vielu, alkohola YDIL PHHGLNDPHQWIX LHHVS DLElektroinstrumenta lietošanas laikā var izraisīt nopietnus savainojumus.
[V]WHEMIXMRUHJWWVWDDEHΦXM LQVWUXPHHQ D EIMSLISHOMLONIRISWYLTAJWXJH]M LQVWUXPHH M P DIO P P P D]N L H V W U I J V W X Q L U
g) Izmantojiet elektroinstrumentu, piederumus,
U R,0 E D V Q R U G M X P L N R N Y L U
3D S L O G X G U R ,0 E D V Q R U G 0 M X P L S
,]V O G ]L H W | L H U 0 F L | X Q | L ]Y H O F L H W | W 0 N O D | N R Q W D N W V S U D X G Q L .
4]REX|Y|L|US|DIV|E|D|O|V|W|D|F|H|Q|W|U|D
3D U H L] D D S J U L H] L H Q X V N D L W D L] Y
, Q V W U X P H Q W D E D O V W D U H J X O , D Q D
, Q V W U X P H Q W D E D O V W D D X J V W X P D O U G I J X H W D Q H D Y F R H X Q L ] Y H O F L H W nisms
- D | M | V | D | W | V | W | M | D | W | L | H | U | O | F | L | E | H | ] X - ] U | P | X | G | S | V | E | D | J | P | i e | Y | Q | U | M a | N | I | R | W | J a | S | C | A u r
[EH L G] L V I G D U E X, D W Y L H Q R M L H W W Q N Q D J N B Q W D N W V S U D X G Q L.
11. D'UEDQ'RUGMIXPIVH
W10gNQdUjBqW,DNWWVSUDIXGQL.
0D L° V W U Y D V P R W R U V
1 R U G H V S D U L H S D N R M X P X


17. 7U D X F M X P X Q R Y U, D Q D
Günzburger Straße 69
89335 Ichenhausen
Bästa Kund!
g) 2P G H W Q Q V P R Q W H U D G H D Q R U G Q L Q J D U I U
Günzburger Straße 69
D-89335 Ichenhausen
Arvoisa asiakas
Günzburger Straße 69
D-89335 Ichenhausen
Kære kunde,
2S V W L O O L Q J D I G U H M H E Q N (J J 1)
, Q G V W L O O L Q J D I O D Q G H W (10 J. 11)
⚠️ Pas på!
V L G H Q P H G H Q J D - H O Q ° J O H H O O H U H
Günzburger Straße 69
D-89335 Ichenhausen
Kjære kunde
9H0JH WXUWDIOO (J.3)
▲ OBS!
Günzburger Straße 69
D-89335 Ichenhausen, Германия
□M□\□Z□`□Z□_□f□b□□d□e□b□_□g□l□b□
△□□□<□G□B□F□:□G□B□?□
D[h]Z[lh]gZ[k]j[h:c\Z[l]_h[h[j:h[l]b[l]_s[i]k_/_e[d]j[bq]_k[dZ[l]Z[f]j_`Z[g]_l[j:y[[\Z]^Z]
B a [ ] \_ j \_ l \_ i j Z \ b e g b l \_ h [ h j h l b ]
A□□□<□G□B□F□:□G□B□?□
[H]i[Z]k[g]h[k]l[h]l[Z]j[Z]g[y]N[Z]g[__][b]g[l]h[N]l[__la[a]h[j]l[j]y][\Z]o[A]Z[k]__i[i]h[k]l[Z]y[l]l[l]Z[d]Z[Oq]_oh[l]d[j]b[y]l[o[i]h[g]_g[b]f[Z]g[b]_k[k]b[g[k]l[jm]f[j]Z][h[l]Z[O[t]j[o[m]^/_l[Z]c[e]Z]
G-Z-k-l-j-h-c-d-Z-g-Z-i-h^e-h`-d-Z-l-Z-a-Z-b-g-k-l-j-m
△□□□<□G□B□F□:□G□B□?□
[H]i[Z]k[g]h[k]l[ ]h[l] [g[Z]j[Z]g[y]\Z[g]_□□□□ [M]N_[]j_[]I_ ]k [e]h`d[Z]l[Z]aZ□a b[g]k[l]j[mf]_g[l]b□□_□□a^j[Z]\h[ a-Z[d] [g]_□f[h`_□□^Z□k_□j[Z]a o e[Z][b□i i h□□\j_f]_□g Z□j
Günzburger Straße 69
D-89335 Ichenhausen
\$70)270:009-25
Günzburger Straße 69
D-89335 Ichenhausen
Stimate client
5. I, Q G L F D L L J H Q H U D O H G H V D H F X U F L W D W K R V F X O I H O H F
[.,Q|G|L|F|D|LL|G|H|V|H|F|X|U|L|W|D|W|H|J|H|Q|H|U|D|D|B|H|S|H|Y|Q|W|U|X}s|M|F|S|K|G|I|W|H|O|X|H|F]V|R|Q|L|D|F|H|I]
6HFXU L W D W H D H O H F W U L F
U D D B H S H X Q D W U X S M F X I O G W H L O X H F V R I Q I D F I H [ ]
△ 9 (57),= 15 (!! &LWLL L W R D W H L Q G L F A B d m l Q H Z G H I d V He E X d u t a r e.
WWDWH, LQVWUXF LXQLOH, LOXVMUDDLQHXVSHSCRDWHIQHYIMWKILSFHRDF
F D U H H V W H S U H Y ] X W I D F H D V W V F W O L H D N G M P U H G R X I X P H G I , I X W L O L ]
, Q G L F D L L G H V H F X U L W D W H S H
(S D U D W X O [s L] P D W H U L D O X O G H D P E D O D W Q X V X Q W M X F U L L S H Q W U X F R S L L ! & R S L L Q X D X Y R U H H V U H V D H M K J D F H H F L X (V J D F 3 L I G L Q S O D V W L F, I R O L L O H s L S L H V H O H P L F L ! (L V W I S H U L F R O G H v Q J K L L U H [s L V X I R F D U H! (\Delta) (7) (1,1,(!
9. Montajul
, Q V W D O D U H D V W U X Q J X O X L (J J . ) \$ O H J H U H D W X U D L H L F R U H F W H :
2SULLLDSDUDWXOILVFRDWHLL0RQWDUHDYKUIXOXLGHIVWUXQJ
D P E D O D W Q X V X Q W M X F U L L
Y\$ROLHHUHVUHVDDHWMXFUDDFTHIHFLXI(DVJDIF3L)LI
H ^O H ^P L ^F L ^I ·☐(☐L ^V W ^S H ^U L ^F R ^O G ^H )
△! \$17(100,0(!
1) L□□D □G□H □U□H□□H□D □Q□X □W□U□H□E□X□L□H □V□□∅□H □U□H□D □W□X□U□D□□L□H□L.
G L V F X O G H D F L R Q D U H V X S H U L R U I L L Q I H U L R U v Q D F H-
HIDLLIFDIQHOXUDI.
\$V L J X U D U H D F X G L V F X O S D U D O H O
\$V L J X U D U H D F X Y k U I X O G H V W U X Q J F X 4 G L Q L L (1) L S -
S□X□□D□P□R□E□L□O□□(□5)□(□□J□.□1)
S R D W G H V I D F H v Q W L P S X O I X Q F L
) L [D] U H D G H V I D F H U H D V X S U D I H H L i n d e D H b o D u V F x a Q h l e a scoasă
[1] [2] [3] [4] [5] [6] [7] [8] [9] [10] [11] [12] [13] [14] [15] [16] [17] [18] [19] [20] [21] [22] [23] [24] [25] [26] [27] [28] [29] [30] [31] [32] [33] [34] [35] [36] [37] [38] [39] [40] [41] [42] [43] [44] [45] [46] [47] [48] [49] [50] [51] [52] [53] [54] [55] [56] [57] [58] [59] [60] [61] [62] [63] [64] [65] [66] [67] [68] [69] [70] [71] [72] [73] [74] [75] [76] [77] [78] [79] [80] [81] [82] [83] [84] [85] [86] [87] [88] [89] [90] [91] [92] [93] [94] [95] [96] [97] [98] [99] [100] [11, 12, 13, 14, 15, 16, 17, 18, 19, 20, 21, 22, 23, 24, 25, 26, 27, 28, 29, 30, 31, 32, 33, 34, 35, 36, 37, 38, 39, 40, 41, 42, 43, 44, 45, 46, 47, 48, 49, 50, 51, 52, 53, 54, 55, 56, 57, 58, 59, 60, 61, 62, 63, 64, 65, 66, 67, 68, 69, 70, 71, 72, 73, 74, 75, 76, 77, 78, 79, 80, 81, 82, 83, 84, 85, 86, 87, 88, 89, 90, 91, 92, 93, 94, 95, 96, 97, 98, 99, 100
& R U H F L D I V Q O L P L L V X S U D I H H L C G H J D A H J D V H I S D S M F X O H L n l a t u r a b l o-
「D F I O V D L D S D U D W X O Q H V X S U D Y H J K H R W A P X G D F I D L
W|H|U|P|L|Q|D|W|O|X|F|U|X|O|V|F|R|D|W|H|L|ø|D|P|C|H|e|H|re|H|Die,G|A|N|G|c|S|u|t|g|r|i.de legătură trec prin ferestre sau fante de uși.
G Ha de DoiHie DeguHa D I V F X O H L
DH (15) PHUJH PHFDQLF
HOLGIS ISIMUDVHHDDLEQDIRHFUDLTRIOORIBIX
12|S|U|L|V|F|K|D|G|B|U|B|W|G|H|O|11|9|L|V|F|R|D|W|H|L|0|I
LCuGulHj DaparHuJDeUrHfSiDascViiFpXnQuHuInlătura blo-
cajul.
- Ⅱ%U□D□Q□s□D□P□H□Q□W□X□O□H□O□H□F□W□U
, Q I R U P D L L F X S U L Y L U H O D V H U Y L F H
, Q G L F D L L U H I H U L W R D U H O D D P E D C

( F K L S D P H Q W H O H X ) D W H H O H F F H Q X U H S U H L Q W I J X Q R L P H colectate separat, respectiv eliminate ca G H H X !
Günzburger Straße 69
D-89335 Ichenhausen
3R, WRYDQL NXSICH
8 S R W U H E D L U X N R Y D Q M H H O H N W U L
a) %X|G|L|W|H |S|D|O|M|L|Y|L|, |Y|R|G|L|W|H a|U|D|I|K|G|D|H|R|M|W|H|U|D|H|G|L|X|V|M|W|H||X|U|H|d|D2|Mra |R|S|K|R|G|L|W|H |V|H |U|D|I|X|P|Q|R|W|R|N|R|P |U|D|G|D a|y|u|H|O|K|N|R|W|J|A|L|C|Q|d|m
alatom. 11H X S R W U H E O M D Y D M W H H O H N W A J L G Q K T R D G D A W t a D N B precizniji
GRIED RIGUIDYDWH UDYQRWHfXTaODEWHu]D UH]DQMH RIGUDDYDMWH
neočekivanim situacijama imati bolju kontrolu nad 3DOMLYR RGUDYDQL DODWLI]D
[UH]QLPILYLFDPIDPIDQMHI]DISLQMIX
f) [1]R\V\L\W\H]R\G\J\R\Y\D\U\D\M\X\c\X]R\G\H\c\X\g)1\HB\SQR\W\U\W\EO,M\D\R\D\M\W\H]H\O\H\N\W\U\L\I
R G H c X L O L Q D N L W . I U L W H N R V X za R u e t a n y, l i d U x e n d Y dat m H uputstvima.
[E]H]E H G Q R V Q D S U D Y L O D ] D H O H N W U L C Q H D O D W H, C D N L
N D G D I V W H I X S R J Q D W L I V D I H O H N A W U I R C J R F O D I O E W G R D P J Q D I N H R Q H N W U L I C Q L
[č]H]V]W]R]J]N]R]U]L],[ć]H]Q]M]D]nepažljivo postupanjN]K]D]O]L]øN]R]Y[D]Q[R] V]W[U]X[č]Q[R] R]V[R]E
8UHdDM L PDWHU LMDO ]D S D N R Y D Q M H Q L V X L J U D c N H ] D G H F X
'H:F:D'Q:H'V:P:H:M:X'G:D'V:H'L:J:U:D:M:X'SA:B:S:W:S:CQL:P'N:H:V:D:P:D',
folijama i sitnim delovima! Postoji opasnost od gutanja i gušenja!
9. 00RQWDD
Postavljanje obrtnog radnog stola (sl. 1)
- Postavite obrtni radni sto na čvrstu podlogu.
- Zašrafite obrtni radni sto na podlogu. U tu svrhu koristite dve rupe na dve stope (7).
- Za ovo možete da koristite isporučene šestougaone zavrtnje (17).
- Nataknite podlošku i zateznu pločicu na šestougaoni zavrtanj (17) (vidi sl. 1).
- Zašrafite obrtni radni sto na podlogu uz pomoć šestougaonog zavrtanja, podloške, stezne pločice i navrtke (17).
[0]RQWD[D/]]DPHQDSU LKYDWDIUDG(Sl.2)
△1 [3]\1-[\]!
, V N O M X č L W H X U H d D M L L ] Y X F L W 0 R Q W D D Y U K D ] D R E H O H D Y D Q M H
- Ako je potrebno odvijte ravnu ploču (13). U tu svrhu čvrsto držite pogonsko vratilo (18) viljuškastim ključem (16) i odvrnite ravnu ploču (13) sa pogonskog vratila (18).
- Držite pogonsko vratilo (18) viljuškastim ključem (16).
- Zategnite vrh za obeležavanje sa 4 šiljka (1) uz pomoć drugog viljuškastog ključa (16) na pogonskom vratilu.
Za izradu npr. činija ili dubokih posuda, ravna ploča (13) mora da se koristi umesto vrh za obeležavanje sa 4 šiljka (1).
0RQWIDUDYQHISO RCH
- Ako je potrebno odvijte vrh za obeležavanje sa 4 šiljka (1). U tu svrhu postavite oba viljuškasta ključa (16) na pogonsko vratilo (18) i na vrh za obeležavanje sa 4 šiljka (1) i odvrnite vrh za obeležavanje sa 4 šiljka (1).
- Držite pogonsko vratilo (18) viljuškastim ključem (16).
- Navrnite ravnu ploču (13) na pogonsko vratilo (18).
10. Rad
QMHQLVX LJUDČNH]DGHFIX!!
SABYW-SCQLPI NHIVDIPID,
Pre stavljanja u pogon, proizvod obavezno montirati u potpunosti!
Izbor broja obrtaja (sl. 3)
3\1-\!
3ULOLNRPISRGH, DYDQMD EUROMD R ne sme da bude utaknut.
,] E R U R G J R Y D U D M X c H J E U R M D R E U V
2S D V Q R V W R G S R Y U H G D ! 9 R G L W H
DIOIDWD EIXGH GRIEUR NIVLUDQ LIGD tokom rada.
Fiksiranje/otpuštanje oslonca alata
- Oslonac alata (2) se fiksira tako što pritisnete polugu (9) na dole.
- Oslonac alata (2) se otpušta tako što pritisnete polugu (9) na gore. Sada možete da pomerite oslonac alata.
Napomena:
Ako pomeranje oslonca alata (2) odn. velike stege (5) ide teško, dodatno podesite navrtku na donjoj
VWUDQLI SRPRIĆXI YLOMIX,NDIVWRJ NDGMXčDajLdpradičojlakaYH Oisteloklonili blokadu.
Podešavanje visine oslonca alata
- Otpustite zavrtanj (2a) na donjem delu oslonca alata (2b).
- Podesite željenu visinu.
- Fiksirajte oslonac alata (2) zatezanjem zavrtnja (2a).
, V N O M X č L W H X U H d D M L L ] Y X F L W H
VOGIMX črdaj Llc Pradni Deč Opljaka Y Ha Oisteloklonili blokadu.
12. (O·H·N·W·U·L·C·Q·L·S·U·L·N·O·M·X·C)
Instalirani električni motor fabrički je priključen. Priključak je usklađen s relevantnim propisima VDE i DIN. Mrežni priključak na mestu upotrebe, kao i produžni kabl koji će Helkovisni mdraju da budu u skladu sa ovim propisima.
2. W H c H Q H O H N W U L c Q L S U L N O M X c
Na električnim priključnim kablovima često nastaju oštećenja izolacije.
Uzroci mogu biti:
- Spljoštena mesta na kablovima kada se provode kroz zazor otvorenog prozora ili otvorenih vrata.
GIPRIJHD UsleQ Le pYaMHD pdiRvMwRanjlailiVdtenja čl.priključnog kabla. - Posekotine usled prelaženja preko priključnog kabla.
- Oštećenja izolacije usled naglog izvlačenja kabla iz zidne utičnice.
- Pukotine uslovljene starenjem izolacije.
Tako oštećene električne priključne kablove nije dozvoljeno koristiti, jer zbog oštećenja na izolacionom omotaču mogu da budu opasni po život.
13. L, c H Q M H L R G U D Y D Q M
Upozorenje! Pre svakog podešavanja, održavanja ili servisiranja, izvucite mrežni utikač iz struje!
2S, W H P H U H R G U D Y D Q M D
S vremena na vreme obrišite krpom piljevinu i prašinu sa mašine. Da produžite životni vek alata jednom mesečno nauljite rotirajuće delove. Ne podmazujte uljem motor.
Za čišćenje plastike ne koristite nagrizajuća sredstva.
2GUDYDQMH
U unutrašnjosti uređaja se ne nalaze nikakvi dodatni delovi za održavanje.
Informacije o servisu
Imajte u vidu da su sledeći delovi ovog proizvoda podložni habanju usled upotrebe ili prirodnom habanju, odn. da se sledeći delovi koriste kao potrošni materijal. Potrošni delovi*: Ugljene četkice, klinasti remen
* nije obavezno sadržano u opsegu isporuke!
Rezervne delove i dodatnu opremu možete nabaviti u našem servisnom centru. Potrebno je da skenirate QR kod na naslovnoj strani.
14. Transport
1D S R P H Q H R ] D N R Q X ] D H O H N W U L X U H d D M H [(O H N W U R \*)]
![SCHEPPACH DM500T - 1D S R P H Q H R ] D N R Q X ] D H O H N W U L X U H d D M H [(O H N W U R \*)] - 1](/content/2026/04/675646/images/c09fdc41600b47f247757e3a704a8578b27cd44f1aca6392c38644a8f2ad4e3b.jpg)
. R U L , ć H Q L [ H O H N W U L ć Q L ] L [ H O H V S D G D M X ] X [ N X ć Q L ] [ R W S D G ], Y H odvojeno prikupljati i odlagati na otpad!
- Korišćene baterije i punjive baterije koje nisu fiksno ugrađene u uređaj, pre predaje se moraju nedestruktivno ukloniti! Njihovo odlaganje na otpad je regulisano Zakonom o baterijama.
- Vlasnici, odn. korisnici električnih i elektronskih aparata su po zakonu u obavezi da ih vrate nakon njihove upotrebe.
- Krajnji korisnik snosi sopstvenu odgovornost za brisanje podataka o ličnosti sa korišćenog uređaja koji se odlaže na otpad!
- Simbol sa precrtanom kantom za smeće znači da se električni i elektronski uređaji ne smeju odlagati preko kućnog otpada.
Günzburger Straße 69
D-89335 Ichenhausen
WIKDOWDwo:
4. P D F Q D X J X Q N X O O D Q a
(OHNOUNO DOHWOHU oQ JHQHO JY
U N R U X X F X N X O D N O N N X O O D Q Q
G H g O G U ! d R F X N O D U ; S O D V W N W A U B D Q T D U , I R O R O D U Y H N
o N I S D U o D O D U O H R Q D P D P D O G U I (O X W M D U M H I E R G) K O U D V D V D V D D U O D Q
W□H□K□O□N□H□V□V□□] □N□R□Q□X□V□X□G□X□U□!
9. Montaj
7R□U□Q□D□D□W□D□g□□Q□□N□X□U□X□O□X□P□X□(5H
R F X N O D U o Q X J X Q
A U B D D D U, I R O N R O D U Y H N
!(QXHMWDUIMHISERGJHXOUFDVDDVVDDUOODQ
P D O G U.
RgUXGHYUVDVHoP:
[1] D V Q D (13) O H V D E W O H P H (5 H V 2)
9 N D V S V W Y H D O W W D K U N N D V G D i g Q G D I D V Q R O X N-
W□D□□R□O□P□D□O□G□U□.
7D N P P H V Q H G Q Q I V D E W O H Q P H V / o
7D N P P H V Q H G Q Q (12) D G D J H] H U
N D G U O P D V ] R U V D , D O W W D U D I W
Dğ]O]DQĐKWĐU]DIGDIPIĐQGIDO[6:]
7DINIP PHVQHIGQQIVNVHNOINI DIVDU
[&K:D] [J] [H] W[P] V [E] U D N D F D N V D Q [W] V H [H] O H N W U N [I] § Q [o] N D U Q.
11. dDIOsPDiEIOJIOHU
[&K:D]N,D:S:D:W:Q[Y:H:H:O:H:N:W:U:N:I:s:Q]
\$ P E D O D M I O H I O J O I E O J O H U


[O H N W U N O Y H H O H N W U R Q N H D W N O D U D D W G H g O G U, D U U Y H D W D V I H G O P H O G U]
EU Declaration of Conformity
Article name: WOOD LATHE DM500T
| X 2006/42/EG | |
| Annex IV Notified Body: Notified Body No.: Certificate No.: | |

Standard references:
[1] 62841-11:2015; [1],62 12100:20100; [1] 55014-11:2017/\$11:20020; [1] 55014-11:6100-3-2:2014; [1],(&6100-3-2:2019); [1] 6100-3-3:2013; [1] 6100-3
This declaration of conformity is issued under the sole responsibility of the manufacturer.
The object of the declaration described above fulfils the regulations of the directive 2011/65/EU of the European Parliament and Council from 8th June 2011, on the restriction of the use of certain hazardous substances in electrical and electronic equipment.
Subject to change without notice
Documents registrar: Matthias Herz
Günzburger Str. 69, D-89335 Ichenhausen
EU Declaration of Conformity
Article name: WOOD LATHE DM500T
Standard references:
[1] 62841-11:20115; [1],62 12100:20100; [1] 55014-11:20117/\$11:20020; [1] 55014-11:61000-3-2:2014; [1],(&61000-3-2:2019); [1] 61000-3-3:2013; [1] 61000-3
This declaration of conformity is issued under the sole responsibility of the manufacturer.
The object of the declaration described above fulfils the regulations of the directive 2011/65/EU of the European Parliament and Council from 8th June 2011, on the restriction of the use of certain hazardous substances in electrical and electronic equipment.
Subject to change without notice
Documents registrar: Matthias Herz
Günzburger Str. 69, D-89335 Ichenhausen
EU Declaration of Conformity
Standard references:
(1[6284]1-[1:2015];([1,6212100:2010];([1[55014]-1:2017/1\square1:\square2\square0\square2\square0];\square([1\square5\square5\square0\square1]\cdot \ \square(1\square[6\square1\square0\square0]\cdot[-3\square-2\square:2\square0\square1\square4];\square([1\square],(\&[6\square1\square0\square0]\cdot-3\square-2:\square2\square0\square19];\square([1]\square6\square1\square0\square0]\cdot-3]\cdot[-3:\square2\square0\square13];\square([1]\square6\square1\square0\square0]\cdot-$
This declaration of conformity is issued under the sole responsibility of the manufacturer.
The object of the declaration described above fulfils the regulations of the directive 2011/65/EU of the European Parliament and Council from 8th June 2011, on the restriction of the use of certain hazardous substances in electrical and electronic equipment.
Subject to change without notice
Documents registrar: Matthias Herz
Günzburger Str. 69, D-89335 Ichenhausen
EU Declaration of Conformity
\$1% | X\JXQO|X|N|E|H\D|Q|
CE
Scheppach GmbH, Günzburger Str. 69, D-89335 Ichenhausen
| DE | erklärt folgende Konformität gemäß EU-Richtlinien und Normen für den Artikel | RO | declară următoarea conformitate corespunzător directivelor și normelor UE pentru articolul |
| GB | hereby declares the following conformity under the EU Directive and standards for the following article | GR | δηλώνει την ακόλουθη συμμόρφωση σύμφωνα με την Οδηγία ΕΕ και τα πρότυπα για το προϊόν |
| BG | декларира съответното съответствие съгласно Дирек-тива на ЕС и норми за артикул | TR | Burada açıklanan ürünün geçerli yönetmeliklere ve standartlara uygun olduğunu tamamen kendi sorumluluğumuz altında beyan ediyoruz. |
| RS | potvrđuje sledeću usklađenost prema smernicama EZ i normama za artikal |
Article name: WOOD LATHE DM500T
Ürün Tanım:
| 2000/14/EG_2005/88/EG | ||
| Noise: measured L_WA = xx dB; guaranteed L_WA = xx dB | ||
| Annex V | ||
| Annex VI | ||
| X 2006/42/EG | |
| Annex IVNotified Body:Notified Body No.:Certificate No.: | |
| 2016/1628/EU | |
| Emission. No: |
Standard references:
(1 62841-1:2015;)(1 ,6212100:2010;)(1 5014-1:2017/\$11:2020;)(1 5014
□(□1□6□1□0□0□-3□-2□:2□014;□(□1□,)(&□6□1□0□0□-3□-2□:2□019;□(□1□6□1□0□0□-3□-3□:2□013;□(□1□6□1□0□0□-
This declaration of conformity is issued under the sole responsibility of the manufacturer.
The object of the declaration described above fulfils the regulations of the directive 2011/65/EU of the European Parliament and Council from 8th June 2011, on the restriction of the use of certain hazardous substances in electrical and electronic equipment.
Subject to change without notice
Documents registrar: Matthias Herz
Günzburger Str. 69, D-89335 Ichenhausen
Garantie DE
Apparent defects must be notified within 8 days from the receipt of the goods. Otherwise, the buyer loses its rights of claim due to such defects are invalidated. We guarantee for our machines in case of proper treatment for the time of the statutory warranty period from delivery in such a way that we replace any machine part free of charge which provably becomes unusable due to faulty material or defects of fabrication within such period of time. With respect to parts not manufactured by us we only warrant insofar as we are entitled to warranty claims against the upstream suppliers. The costs for the installation of the new parts shall be borne by the buyer. The cancellation of sale or the reduction of purchase price as well as any other claims for damages shall be excluded.
Garantie FR
Apparent defects must be notified within 8 days from the receipt of the goods. Otherwise, the buyer's rights of claim due to such defects are invalidated. We guarantee for our machines in case of proper treatment for the time of the statutory warranty period from delivery in such a way that we replace any machine part free of charge which provably becomes unusable due to faulty material or defects of fabrication within such period of time. With respect to parts not manufactured by us we only warrant insofar as we are entitled to warranty claims against the upstream suppliers. The costs for the installation of the new parts shall be borne by the buyer. The cancellation of sale or the reduction of purchase price as well as any other claims for damages shall be excluded.
Záruka CZ
Apparent defects must be notified within 8 days from the receipt of the goods. Otherwise, the buyer's rights of claim due to such defects are invalidated. We guarantee for our machines in case of proper treatment for the time of the statutory warranty period from delivery in such a way that we replace any machine part free of charge which provably becomes unusable due to faulty material or defects of fabrication within such period of time. With respect to parts not manufactured by us we only warrant insofar as we are entitled to warranty claims against the upstream suppliers. The costs for the installation of the new parts shall be borne by the buyer. The cancellation of sale or the reduction of purchase price as well as any other claims for damages shall be excluded.
Garantii EE
Apparent defects must be notified within 8 days from the receipt of the goods. Otherwise, the buyer's rights of claim due to such defects are invalidated. We guarantee for our machines in case of proper treatment for the time of the statutory warranty period from delivery in such a way that we replace any machine part free of charge which provably becomes unusable due to faulty material or defects of fabrication within such period of time. With respect to parts not manufactured by us we only warrant insofar as we are entitled to warranty claims against the upstream suppliers. The costs for the installation of the new parts shall be borne by the buyer. The cancellation of sale or the reduction of purchase price as well as any other claims for damages shall be excluded.
гаранция BG


- DM500T
- Verehrter Kunde
- Explanation of the symbols on the device
- Table of contents: Page:
- Introduction
- Manufacturer:
- Dear Customer
- Note:
- Device description
- Scope of delivery
- Proper use
- General safety information
- Work area safety
- Electrical safety
- Personal safety
- Power tool use and care
- Service
- Operational Safety Instructions for the Wood Turning Lathe
- Additional safety instructions for the use of faceplates
- Remaining hazards
- The machine has been built using modern technology in accordance with recognized safety rules. Some remaining hazards, however, may still exist.
- Technical data
- Wear hearing protection.
- Unpacking
- ATTENTION!
- Assembly
- Setting up the lathe (Fig. 1)
- Fitting/replacing the workpiece mount (Fig. 2)
- Fitting the 4-prong centre tip
- Mounting the face plate
- Operation
- ⚠ Important!
- Selecting the speed (Fig. 3)
- Select the correct speed:
- Securing the workpiece
- Securing with the 4-prong centre tip (1) and tailstock (5) (Fig. 1)
- Securing with the face plate (13) (Fig. 2)
- Adjusting the tool support (Fig. 1)
- Danger of injury! Make sure that the tool support is
- Fixing/releasing the tool support
- Height adjustment of the tool support
- 6ZLWIFKLOQJ RQQ//R-□(□□J.□1)
- Working instructions
- Remove blockages
- Electrical connection
- Damaged electrical connection cable
- AC motor
- Connection type X
- Cleaning and maintenance
- General maintenance tasks
- Maintenance
- Service information
- Transport
- Storage
- Disposal and recycling
- Notes for packaging
- Troubleshooting
- Cher client,
- Egregio cliente,
- Geachte klant,
- Estimado cliente:
- , Q V W D O D U W R U Q R S D U D P D G H U D (
- ) L M H / D R M H | H O | V R S R U W H | G H | O D | K H
- Estimado cliente,
- Montagem
- 9iHQí ]iN□□]QtN□X,
- [O H N W U L F N i E H ] S H C Q R V W
- 3R×tYiQtD P D Q L S X O D F H V H O H N
- , Q V W D O D F H O R H V R X V W U X K X (R
- 9R0E0V5U1YQ1F0K0RWi0H0N:
- (OHNWULFNp IS9LSRMH
- 9D G Q I H O H N W U L F N I S 9 t Y R G Q t
- 2GVWUD3RYiQtSIRUXFK
- [OHNWULFNii EHH]SHCHQRV"
- 9R-EDVSSUYQFKKRWiCRI:
- 8S H Y Q H Q L H / X Y R - Q H Q L H G R V D G D F H I
- 9, H R E H F Q p \~ G U E R Y p R S D W U H Q
- Kedves Ügyfelünk!
- 9HJHJQJHHOHPHEHDN|YHWNH]5N
- 5[J]tWVH[D]QpJ\pO&FV\~FVRR(W[(1)]pV
- (1. ábra)
- 2E M D; Q L H Q L H V P E R O L Q D X U] G] H Q L X
- 6SILV WUH;FLL: 6WURQD:
- Szanowny Kliencie,
- 2S L V X U ] G ] H Q L D
- [5]HJXODFMD [ZVRRNR;FL[SIRZLHU]]FK [U]]G]LD
- 2E M D Q M H Q M H V L P E R O D Q D X U H d D M X
- Poštovani kupci
- (OHNWULCQDIVLJXUQRVW
- 6DcXYDMWHVYHVLJXUQRVQHQQDSRjBrHoGHiubiXsXWHH]DxEGcXcHISRWUHEH.
- 3U L N O M X C L Y D Q M H Q D
- 2, W H c H Q H O H N W U L c Q L S U L N O M
- L, c H Q M H L R G U D Y D Q M H
- HOOHNWU L'QX P U H X
- 2S ć H P M H U H R G U D Y D Q M D
- Spoštovani kupec,
- Napotek:
- ⚠ POZOR!
- Delovna navodila
- (O'H:N'W'U'L'c'Q'L'S'U'L'N'O'M'X'c'H'N
- L, C H Q M H L Q Y] G U H Y D Q M
- 6SOR,QLY]GUHYDIOQLIXNUHSL
- 3|R|P|R|C|S|U|L|P|R|W|Q|M|D|K
- Austatud klient!
- Gerbiamas kliente,
- Montavimas
- %%HQQGULHMMLWHHFKQLQ°VISUHLHLLUR
- 7HFKQLQ°V SULHLLU R V LQI RUPD F
- 6XWULNLP- "DOLQLPDIV
- [OHNWULVIN] [GUUR] [OED
- 3HUVRQXIGURO,∅ED
- U R,0 E D V Q R U G M X P L N R N Y L U
- 3D S L O G X G U R ,0 E D V Q R U G 0 M X P L S
- 4]REX|Y|L|US|DIV|E|D|O|V|W|D|F|H|Q|W|U|D
- 3D U H L] D D S J U L H] L H Q X V N D L W D L] Y
- D'UEDQ'RUGMIXPIVH
- 0D L° V W U Y D V P R W R U V
- R U G H V S D U L H S D N R M X P X
- 7U D X F M X P X Q R Y U, D Q D
- Bästa Kund!
- Arvoisa asiakas
- Kære kunde,
- ⚠️ Pas på!
- Kjære kunde
- ▲ OBS!
- B a [ ] \_ j \_ l \_ i j Z \ b e g b l \_ h [ h j h l b ]
- Stimate client
- I, Q G L F D L L J H Q H U D O H G H V D H F X U F L W D W K R V F X O I H O H F
- [.,Q|G|L|F|D|LL|G|H|V|H|F|X|U|L|W|D|W|H|J|H|Q|H|U|D|D|B|H|S|H|Y|Q|W|U|X}s|M|F|S|K|G|I|W|H|O|X|H|F]V|R|Q|L|D|F|H|I]
- 6HFXU L W D W H D H O H F W U L F
- U D D B H S H X Q D W U X S M F X I O G W H L O X H F V R I Q I D F I H [ ]
- , Q G L F D L L G H V H F X U L W D W H S H
- Montajul
- 00RQWDD
- Postavljanje obrtnog radnog stola (sl. 1)
- 0RQWIDUDYQHISO RCH
- Rad
- Izbor broja obrtaja (sl. 3)
- Fiksiranje/otpuštanje oslonca alata
- Napomena:
- Podešavanje visine oslonca alata
- (O·H·N·W·U·L·C·Q·L·S·U·L·N·O·M·X·C)
- W H c H Q H O H N W U L c Q L S U L N O M X c
- L, c H Q M H L R G U D Y D Q M
- 2S, W H P H U H R G U D Y D Q M D
- 2GUDYDQMH
- Informacije o servisu
- 1D S R P H Q H R ] D N R Q X ] D H O H N W U L X U H d D M H [(O H N W U R \*)]
- P D F Q D X J X Q N X O O D Q a
- U N R U X X F X N X O D N O N N X O O D Q Q
- Montaj
- 7DINIP PHVQHIGQQIVNVHNOINI DIVDU
- dDIOsPDiEIOJIOHU
- \$ P E D O D M I O H I O J O I E O J O H U
- EU Declaration of Conformity
- Standard references:
- Garantie DE
- Garantie FR
- Záruka CZ
- Garantii EE
- гаранция BG
Brand : SCHEPPACH
Model : DM500T
Category : Wood lathe