
DM1100T - Wood lathe SCHEPPACH - Free user manual and instructions
Find the device manual for free DM1100T SCHEPPACH in PDF.

| Brand | Scheppach |
| Model | DM1100T |
| Product type | Wood lathe |
| Dimensions (L x W x H) | 1375 x 325 x 415 mm |
| Weight | 20.5 kg |
| Power supply | 230-240 V / 50 Hz |
| Power consumption | 400 W (S2 15 min) |
| Rotation speeds | 890 / 1260 / 1760 / 2600 min⁻¹ |
| Max workpiece length | 1000 mm |
| Max workpiece diameter | 350 mm |
| Spindle thread | M18 x 2.5 |
| Sound pressure level | 71 dB(A) |
| Sound power level | 84 dB(A) |
| Safety devices | Emergency stop switch, safety hood lock |
| Intended use | Wood turning only |
| Included accessories | Faceplate, tailstock, tool rest, 2 wood chisels, 2 open-end wrenches, hex key |
| Wear parts | Carbon brushes, V-belt |
| Routine maintenance | Cleaning with a cloth, monthly oiling of rotating parts |
| Motor type | AC motor |
Frequently Asked Questions - DM1100T SCHEPPACH
User questions about DM1100T SCHEPPACH
0 question about this device. Answer the ones you know or ask your own.
Ask a new question about this device
Download the instructions for your Wood lathe in PDF format for free! Find your manual DM1100T - SCHEPPACH and take your electronic device back in hand. On this page are published all the documents necessary for the use of your device. DM1100T by SCHEPPACH.
USER MANUAL DM1100T SCHEPPACH
natural_image
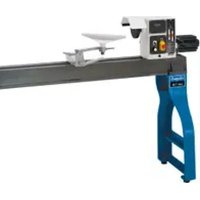
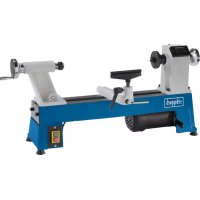
Industrial machine labeled 'scheppach' with no visible text or symbols on the device itselfDM1100T
| DE | DrechselmaschineOriginalbedienungsanleitung | 5 |
| GB | Wood turning latheTranslation of original instruction manual | 18 |
| FR | Machine de tournageTraduction des instructions d'origine | 29 |
| IT | TornitriceLa traduzione dal manuale di istruzioni originale | 41 |
| ES | Máquina de tornearTraducción de la instrucción de original | 53 |
| NL | HoutdraaibankTraducción de la instrucción de original | 65 |
Günzburger Straße 69
D-89335 Ichenhausen
Verehrter Kunde
Explanation of the symbols on the device
Symbols are used in this manual to draw your attention to potential hazards. The safety symbols and the accompanying explanations must be fully understood. The warnings themselves will not rectify a hazard and cannot replace proper accident prevention measures.
 | Observe warning and safety instructions! |
 | Before commissioning, read and observe the operating manual and safety instructions! |
 | Wear hearing protection. Excessive noise can result in a loss of hearing. |
 | Wear a dust protection mask. When machining wood and other materials, harmful dust may be generated. Do not machine material containing asbestos! |
 | Wear protective goggles. Sparks created during work or fragments, chippings and dust ejected by the device can case sight loss. |
 | Do not leave long hair loose. Use a hair net. |
 | The use of gloves is prohibited! |
Table of contents: Page:
- Introduction......20
- Device description.... 20
- Scope of delivery....20
- Proper use....21
- General safety information 21
- Remaining hazards 23
- Technical data 24
- Unpacking 24
- Assembly 24
- Operation....25
- Working instructions....26
- Electrical connection 26
- Cleaning and maintenance....27
- Transport 27
- Storage....27
- Disposal and recycling 27
- Troubleshooting....28
1. Introduction
Manufacturer:
scheppach
Günzburger Straße 69
D-89335 Ichenhausen
Dear Customer
We hope your new tool brings you much enjoyment and success.
Note:
In accordance with the applicable product liability laws, the manufacturer of this device assumes no liability for damage to the device or caused by the device arising from:
- Improper handling
- Failure to comply with the operating instructions.
- Repairs carried out by third parties, unauthorised specialists
- Installing and replacing non-original spare parts,
- Improper use
- Failures of the electrical system in the event of the electrical regulations and VDE provisions 0100, DIN 57113 / VDE 0113 not being observed
Note:
Read the whole text of the operating manual before assembly and commissioning.
This operating manual should help you to familiarise yourself with your device and to use it for its intended purpose.
The operating manual includes important instructions for the safe, proper and economic operation of the product, for avoiding danger, for minimising repair costs and downtimes and for increasing the reliability and extending the service life of the device.
In addition to the safety instructions in this operating manual, you must also observe the regulations applicable to the operation of the device in your country.
Keep the operating manual at the device, in a plastic sleeve, protected from dirt and moisture. They must be read and carefully observed by all operating personnel before starting the work.
The device may only be used by personnel who have been trained to use it and who have been instructed with respect to the associated hazards. The required minimum age must be observed.
In addition to the safety instructions in this operating manual and the separate regulations of your country, the generally recognised technical rules relating to the operation of such machines must also be observed.
We accept no liability for accidents or damage that occur due to a failure to observe this manual and the safety instructions.
2. Device description
- 4-prong centre tip
- Tool support
2a Screw, height adjustment
2b Bottom part of the tool support
3a Rail with motor unit
3b Rail - Lock nut
- Tailstock
- Hand wheel
- Base
- Lever, tailstock
- Lever, tool support
- On switch
- Off switch
- Allen key
- Face plate
- Wood-turning chisel, straight
- Wood-turning chisel, hollow
- Open-ended spanner
- Drive shaft
- Locking screw
- Gearing cover
- Locking screw
- Motor unit
- Lever, motor unit
- Drive disc
- V-belt
-
Interlock switch
-
Screws with spring washer and standard washer
-
Hexagonal bolt with spring washer, standard washer and nut
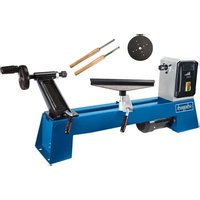
3. Scope of delivery
• Wood-turning lathe (two-part)
- Face plate
- Tailstock
- Tool support (two-part)
• 2 wood-turning chisels, (1x straight, 1x hollow)
- 2 x open-ended spanners
- Allen key
- Assembly material:
- 6 hexagonal bolts
- 6 spring washers
- 6 washers
- 6 nuts
- 3 screws
- 3 spring washers,
- 3 washers
- Operating manual
4. Proper use
The lathe is used for working wood with suitable wood-turning chisels.
The clamped workpieces are rotated, whereby various different speeds can be set. Please refer to the following descriptions for the function of the controls.
The machine complies with the applicable EC machinery directive.
- The safety, operating and maintenance specifications of the manufacturer, as well as the dimensions specified in the technical data, must be observed.
- The applicable accident prevention regulations and the other generally accepted safety rules must be observed.
- The machine may only be used, maintained or repaired by competent persons who are familiar with it and have been informed of the dangers. Any liability of the manufacturer for damages resulting from arbitrary changes to the machine is excluded.
- The machine may only be operated with original accessories and original tools from the manufacturer.
- Any use beyond this is improper use. The manufacturer is not responsible for the resultant damages, the user bears this risk alone.
Please observe that our equipment was not designed with the intention of use for commercial or industrial purposes. We assume no guarantee if the equipment is used in commercial or industrial applications, or for equivalent work.
5. General safety information
Attention! The following basic safety measures must be observed when using electric tools for protection against electric shock, and the risk of injury and fire. Read all these notices before using the electric tool and keep the safety instructions for later reference.
Safe work
1 Keep the work area orderly
– Disorder in the work area can lead to accidents.
2 Take environmental influences into account
- Do not expose electric tools to rain.
- Do not use electric tools in a damp or wet environment.
- Make sure that the work area is well-illuminated.
- Do not use electric tools where there is a risk of fire or explosion.
3 Protect yourself from electric shock
- Avoid physical contact with earthed parts (e.g. pipes, radiators, electric ranges, cooling units).
4 Keep children away
- Do not allow other persons to touch the equipment or cable, keep them away from your work area.
5 Securely store unused electric tools
– Unused electric tools should be stored in a dry, elevated or closed location out of the reach of children.
6 Do not overload your electric tool
– They work better and more safely in the specified output range.
7 Use the correct electric tool
- Do not use low-output electric tools for heavy work.
- Do not use the electric tool for purposes for which it is not intended. For example, do not use handheld circular saws for the cutting of branches or logs.
- Do not use the electric tool to cut firewood.
8 Wear suitable clothing
- Do not wear wide clothing or jewellery, which can become entangled in moving parts.
- When working outdoors, anti-slip footwear is recommended.
– Tie long hair back in a hair net.
9 Use protective equipment
- Wear protective goggles.
- Wear a mask when carrying out dust-creating work.
10 Connect the dust extraction device if you will be processing wood, materials similar to wood, or plastics.
- If connections for dust extraction and a collecting device are present, make sure that they are connected and used properly.
- When processing wood, materials similar to wood, and plastics. operation in enclosed spaces is only permitted with the use of a suitable extraction system.
11 Secure the workpiece
- Use the clamping devices or a vice to hold the workpiece in place. In this manner, it is held more securely than with your hand.
- An additional support is necessary for long workpieces (table, trestle, etc.) in order to prevent the machine from tipping over.
- Always press the workpiece firmly against the working plate and stop in order to prevent bouncing and twisting of the workpiece.
12 Avoid abnormal posture
- Make sure that you have secure footing and always maintain your balance.
- Avoid awkward hand positions in which a sudden slip could cause one or both hands to come into contact with the saw blade.
13 Take care of your tools
- Keep cutting tools sharp and clean in order to be able to work better and more safely.
– Follow the instructions for lubrication and for tool replacement.
- Check the connection cable of the electric tool regularly and have it replaced by a recognised specialist when damaged.
- Check extension cables regularly and replace them when damaged.
- Keep the handle dry, clean and free of oil and grease.
14 Pull the plug out of the outlet
- Never remove loose splinters, chips or jammed wood pieces from the running saw blade.
- During non-use of the electric tool or prior to maintenance and when replacing tools such as saw blades, bits, milling heads.
- When the saw blade is blocked due to abnormal feed force during cutting, turn the machine off and disconnect it from power supply. Remove the work piece and ensure that the saw blade runs free. Turn the machine on and start new cutting operation with reduced feed force.
15 Do not leave a tool key inserted
– Before switching on, make sure that keys and adjusting tools are removed.
16 Avoid inadvertent starting
- Make sure that the switch is switched off when plugging the plug into an outlet.
17 Use extension cables for outdoors
- Only use approved and appropriately identified extension cables for use outdoors.
- Only use cable reels in the unrolled state.
18 Remain attentive
– Pay attention to what you are doing. Remain sensible when working. Do not use the electric tool when you are distracted.
19 Check the electric tool for potential damage
- Protective devices and other parts must be carefully inspected to ensure that they are fault-free and function as intended prior to continued use of the electric tool.
- Check whether the moving parts function faultlessly and do not jam or whether parts are damaged. All parts must be correctly mounted and all conditions must be fulfilled to ensure fault-free operation of the electric tool.
- The moving protective hood may not be fixed in the open position.
- Damaged protective devices and parts must be properly repaired or replaced by a recognised workshop, insofar as nothing different is specified in the operating manual.
– Damaged switches must be replaced at a customer service workshop. - Do not use any faulty or damaged connection cables.
- Do not use any electric tool on which the switch cannot be switched on and off.
20 Attention!
– The use of other insertion tools and other accessories can entail a risk of injury.
21 Have your electric tool repaired by a qualified electrician
- This electric tool conforms to the applicable safety regulations. Repairs may only be performed by an electrician using original spare parts. Otherwise accidents can occur.
22 Do not use the cable for purposes for which it is not intended. Do not use the cable to pull the plug out of the outlet. Protect the cable from heat, oil and sharp edges.
Warning! This electric tool generates an electromagnetic field during operation. This field can impair active or passive medical implants under certain conditions. In order to prevent the risk of serious or deadly injuries, we recommend that persons with medical implants consult with their physician and the manufacturer of the medical implant prior to operating the electric tool.
Operational Safety Instructions for the Wood Turning Lathe
- The machine may only be connected to a properly earthed mains socket.
- Familiarise yourself with the machine's features and wood-turning techniques before using the machine.
- Examine all workpieces for splits or knots. Glued joints must set completely before turning.
- Ensure that the workpiece is securely locked in position and all attachments are secured.
- Before turning the machine ON ensure that the workpiece can rotate freely by rotating it by hand.
- Keep your hands and fingers away from the rotating workpiece.
- Switch the machine OFF and wait until it has come to a full stop before making any adjustments on the workpiece, tailstock, or tool rest.
- Maintenance, adjustment, calibration and cleaning may only be performed with the motor turned off.
- The machine is designed for use with wood-turning chisels only.
• Always store away the wood-turning chisels safely before you leave the workplace. - Do not run the lathe without its covers and guards in place.
- Keep cutting tools sharp.
- Use the lowest speed when starting a new workpiece.
- Always stop the lathe at its slowest speed. If the lathe is run so fast that it vibrates, there is a risk that the workpiece will be thrown or the cutting tool jerked from your hands.
- Do not allow cutting tools to bite into the workpiece. The wood could be split or thrown from the lathe.
- Always position the tool rest above the center line of the lathe when shaping a piece of stock.
- Before attaching a workpiece to the faceplate, always rough it out to make it as round as possible. This minimizes the vibrations while the piece is being turned. Always fasten the workpiece securely to the faceplate. Failure to do so could result in the workpiece being thrown away from the lathe.
- Use a brush or compressed air to remove wood shavings; never your hands. The wood shavings will be sharp.
- The cutting tool must always be tight within the tool post or chuck and adjusted to limit projection from the post. This will reduce the possibility of the tool breaking or bending.
- Do not reach a cross the lathe while it is running.
- Only feed workpiece into a cutting tool against the direction of rotation. The workpiece must always be rotating toward you.
- Do not leave the tool unattended when it is plugged into an electrical outlet. Turn off the tool, and unplug it from its electrical outlet before leaving.
- This product is not a toy. Keep it out of reach of children.
- Some dust created by power sanding, sawing, grinding, drilling, and other construction activities, contains chemicals known to cause cancer, birth defects or other reproductive harm. Some examples of these chemicals are:
– Lead from lead-based paints
- Crystalline silica from bricks and cement or other masonry products
– Arsenic and chromium from chemically treated lumber
- Your risk from these exposures varies, depending on how often you do this type of work. To reduce your exposure to these chemicals: work in a well ventilated area, and work with approved safety equipment, such as those dust masks that are specially designed to filter out microscopic particles.
- People with pacemakers should consult their physician(s) before use. Electromagnetic fields inclose proximity to heart pacemaker could cause pacemaker interference or pacemaker failure. In addition, people with pacemakers should:
- Avoid operating alone.
– Properly maintain and inspect to avoid electrical shock.
- The warnings, precautions, and instructions discussed in this user manual cannot cover all possible conditions and situations that may occur. It must be understood by the operator that common sense and caution are factors which cannot be built into this product, but must be supplied by the operator.
Additional Safety Instructions for the use of Faceplates
- Ensure that the faceplate is the appropriate size to support the workpiece.
- Ensure that the workpiece is securely fastened to the faceplate.
- Rough cut the workpiece as close as possible to the final shape before mounting onto a faceplate.
- Only use scrapings chisels for faceplate turning. Cutting chisels can easily be tornout of your hands.
- Pay attention that the woodturning chisel cannot interfere with the holding screws at the finished dimensions of the workpiece.
6. Remaining hazards
The machine has been built using modern technology in accordance with recognized safety rules. Some remaining hazards, however, may still exist.
- Only process selected woods without defects such as: Branch knots, edge cracks, surface cracks. Wood with such defects is prone to splintering and hazardous.
- Wood which is not correctly glued can explode when being processed due to centrifugal force.
- Trim work piece to a rectangular shape, center and correctly secure before processing. Unbalanced work pieces can be hazardous.
- Injuries can occur when feeding work pieces if tool supports are not correctly adjusted or if turning tools are blunt. Sharp turning tools which are free of defects are necessary for professional turning.
- Long hair and loose clothing can be hazardous when the work piece is rotating. Wear personal protective gear such as a hair net and tight fitting work clothes.
- Saw dust and wood chips can be hazardous. Wear personal protective gear such as safety goggles and a dust mask.
- The use of incorrect or damaged mains cables can lead to injuries caused by electricity.
- Even when all safety measures are taken, some remaining hazards which are not yet evident may still be present.
- Remaining hazards can be minimized by following the instructions in „Safety Precautions“, „Proper Use“ and in the entire operating manual.
7. Technical data
Dimensions L x W x H 1375 x 325x 415 mm
| Speed 890/1260/1760/2600 min | -1 |
| Max. workpiece size 1000 mm | |
| Max. workpiece diameter | 350 mm |
| Spindle head thread M18 x 2,5 | |
| Weight 20,5 kg | |
| Engine 230-240 V /50 Hz | |
| Rated input | 400 W S2 15 min |
Subject to technical changes
* Operating mode S2 – short-term operation
Operation at a constant load for 15 minutes or less, followed by a time out of operation and a pause of sufficient duration to allow the machine to cool to within 2 K of the ambient temperature.
The noise and vibration levels have been determined in accordance with EN 61029.
| Sound pressure level L_pA | 71 dB(A) |
| Uncertainty K_pA | 3 dB |
| Sound power level L_WA | 84 dB(A) |
| Uncertainty K_WA | 3 dB |
Wear hearing protection.
Excessive noise can result in a loss of hearing. Total vibration emission values (vector sum of three directions) determined per EN 61029.
8. Unpacking
- Open the packaging and carefully remove the device.
- Remove the packaging material, as well as the packaging and transport safety devices (if present).
- Check whether the scope of delivery is complete.
- Check the device and accessory parts for transport damage. In the event of complaints the carrier must be informed immediately. Later claims will not be recognised.
- If possible, keep the packaging until the expiry of the warranty period.
- Familiarise yourself with the product by means of the operating instructions before using for the first time.
- With accessories as well as wearing parts and replacement parts use only original parts. Replacement parts can be obtained from your dealer.
- When ordering please provide our article number as well as type and year of manufacture for your equipment.
ATTENTION!
The device and the packaging material are not children's toys! Do not let children play with plastic bags, films or small parts! There is a danger of choking or suffocating!
9. Assembly
Assembling the lathe (Fig. 2)
- Slide the tool support (2) onto the rail with motor unit (3a).
- Slide the tailstock (5) to the tool support (2) on the rail with the motor unit (3a). Check that the tailstock (5) and tool support (2) are correctly inserted by pulling them upwards.
- Connect the rail with the motor unit (3a) and the rail (3b) without the motor unit together.
- Screw the two rails together with the three screws with spring washer and standard washer (17) using the Allen key (12).
Note:
If it is difficult to move the tool support (2) or the tailstock (5), adjust the nut on the underside with a spanner or ratchet (19 mm).
Setting up the lathe (Fig. 1)
- Place the lathe on a firm surface.
- Screw the lathe to the surface. Use the two holes in each of the three feet (7) for this.
- You can use the hexagonal bolts (18) supplied with the lathe for this.
- Place the standard washer and spring washer on the hexagonal bolt (18). See fig. 1.
- Screw the lathe to the surface with the help of the hexagonal bolt, standard washer, spring washer and nut (18).
Fitting/replacing the workpiece mount (Fig. 3)
ATTENTION!
Switch the device off and pull out the mains plug.
Fitting the 4-prong centre tip
- Loosen the face plate (13) if necessary. To do this, hold the drive shaft (19) firmly in place with the open-ended spanner (16) and unscrew the face plate (13) from the drive shaft (19).
- Hold the drive shaft (19) firmly in place with the open-ended spanner (16).
- Tighten the 4-prong centre tip (1) onto the drive shaft using the second open-ended spanner (16).
For turning bowls or pots, for example, the face plate (13) must be used instead of the 4-prong centre tip (1).
Mounting the face plate
- If necessary, loosen the 4-prong centre tip (1). To do this, place the two open-ended wrenches (16) on the drive shaft (19) and on the 4-prong centre tip (1) and unscrew the 4-prong centre tip (1).
- Hold the drive shaft (19) firmly in place with the open-ended spanner (16).
- Screw the face plate (13) onto the drive shaft (19).
10. Operation
Select speed (Fig. 4)
ATTENTION!
The mains plug shall not be plugged in when adjusting the speed.
Select the correct speed:
- With new workpieces, select a low speed first. Increase the speed as the weight of the workpiece increases.
- The selection of the correct speed depends on several factors, e.g. material, diameter, length and unbalance of the workpiece. In principle: Choose a low speed for hard timber, non-round, long or large-diameter workpieces.
- Use the table as a guide when selecting the speed:
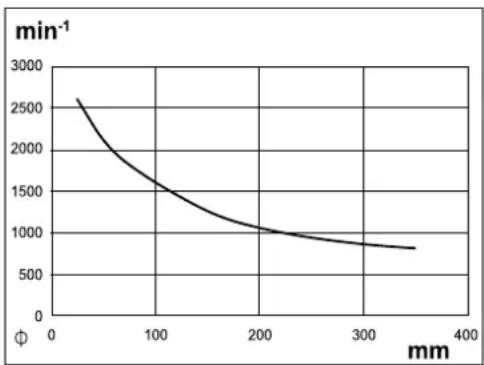
line
| φ (mm) | min⁻¹ | |---|---| | 0 | 2600 | | 100 | 1600 | | 200 | 1050 | | 300 | 850 | | 350 | 780 |The workpiece diameter is indicated on the x-axis. The speed can be read off the y-axis. Go up vertically from the diameter of the workpiece and read off the speed where an imaginary perpendicular line meets the curve.
- Loosen the two locking screws (20) on the two gearing covers (21).
- Open the gearing covers (21).
- Loosen the locking screw (22) of the motor unit with the Allen key (12).
- Lift the motor unit (23) by operating the lever (24) to relieve the load on the V-belt (26).
- Fix the motor unit (23) by tightening the locking screw (22).
- Place the V-belt (26) in the desired groove of the drive pulley (25) to achieve the specified speed:

bar
| Category | Value | |---|---| | 1 | 2600 | | 2 | 1760 | | 3 | 1260 | | 4 | 890 |The V-belt must lie in the same groove on the upper and lower drive pulley.
Note: The two gearing covers (21) are equipped with an interlock switch (27). The interlocking switches (27) are actuated automatically when the gearing covers (21) are closed. The device cannot be switched on if a gearing cover (21) is not closed correctly.
- Loosen the locking screw (22) and lower the lever with the motor unit to tighten the V-belt.
- Tighten the locking screw (22).
- Close the gearing covers (21). Secure the gearing covers with the locking screws (20).
Securing the workpiece
Securing with the 4-prong centre tip (1) and tailstock (5) (Fig. 1)
- Draw a diagonal line at both ends of the workpiece to locate the centre. The centre is where the lines meet. Make a centring hole where the 4-prong centre tip and tailstock are to meet the workpiece. This ensures a better hold.
- Make an approx. 2 mm deep saw cut along the diagonal to enable the 4-prong centre tip (1) to grip better.
- Fit the dismounted 4-prong centre tip (1) centrally to the centre of the workpiece. Lightly tap the 4-prong centre tip (1) into the workpiece with a mallet (not included in the scope of delivery). Take care to protect the thread of the 4-prong centre tip (1) with a wooden board, for example.
- Remove the 4-prong centre tip (1) from the workpiece again.
- Then (re)mount the 4-prong centre tip (1) onto the device.
Note: The mounting and dismounting of the 4-prong centre tip can be found in the chapter "Mounting/changing the workpiece holders".
-
Position the workpiece on the 4-prong centre tip (1). Make sure that the 4-prong centre tip (1) engages with the notch, otherwise secure clamping is not guaranteed.
-
Loosen the lever (8) of the tailstock.
-
Slide the tailstock towards the 4-prong centre tip (1) until it makes firm contact with the workpiece to clamp it.
-
Fix the tailstock by pushing the lever (8) down.
-
Use the hand wheel (6) for fine adjustment.
-
Fix the position of the handwheel with the counternut (4).
Securing with the face plate (13) (Fig. 4)
- Hold the drive shaft (19) firmly in place with the open-ended spanner (16).
- Unscrew the face plate (13) from the drive shaft (19).
- Fix the workpiece to the face plate (13) with wood screws (not included in the scope of delivery).
ATTENTION!
Danger of injury! Position the wood screws such that they will not be accidentally exposed by the tool when machining the workpiece.
- Hold the drive shaft (19) firmly in place with the open-ended spanner (16).
- Screw the face plate (13) with the pre-mounted workpiece onto the drive shaft (19).
Adjusting the tool support (Fig. 1)
ATTENTION!
Danger of injury! Make sure that the tool support is well fixed and cannot come loose during operation.
Fixing/releasing the tool support
- The tool support (2) is fixed by pushing the lever (9) downwards.
- The tool support (2) is released by pushing the lever (9) upwards. You can now move the tool support.
- Loosen the screw (2a) on the lower part of the tool support (2b).
- Set the desired height.
- Fix the tool support (2) by tightening the screw (2a).
Height adjustment of the tool support
Switching on/off (fig. 1)
- Connect the device to the mains voltage.
- Switching on: Press the On switch (10) to switch the device on.
- Switching off: To switch the device off, press the Off switch (11) again.
ATTENTION!
If you leave the device unattended or have finished working, pull out the mains plug.
11. Working instructions
- Before you start working, read up on the subject in detail in technical literature.
- When selecting your workpiece, look out for knots, knotholes, cracks or similar. You could lose control of your tool, which could result in serious injury. Cracked workpieces can rupture during turning. There is a danger of injury!
• Always cut the workpiece into shape as much as possible before machining. - Observe the maximum workpiece length and the maximum workpiece diameter! You will find these in the technical data.
- The workpiece must be fixed in the centre, an unbalanced workpiece will affect the service life of the machine.
- Only use tools suitable for turning.
- Never stand in the trajectory of the workpiece.
- Before starting work, with the mains plug removed, check the following by turning manually:
- Is the workpiece stuck?
- Does the workpiece come into contact with the tool support?
• Always start with a lower speed and increase it gradually. - Do not apply the tool to the workpiece until it has reached the set rotational speed.
Remove blockages
Switch the device off and pull out the mains plug.
Clean the device of dust and chippings to remove the blockage.
12. Electrical connection
The electrical motor installed is connected and ready for operation. The connection complies with the applicable VDE and DIN provisions. The customer's mains connection as well as the extension cable used must also comply with these regulations.
Damaged electrical connection cable
The insulation on electrical connection cables is often damaged.
This may have the following causes:
- Pressure points, where connection cables are passed through windows or doors.
- Kinks where the connection cable has been improperly fastened or routed.
- Places where the connection cables have been cut due to being driven over.
- Insulation damage due to being ripped out of the wall outlet.
- Cracks due to the insulation ageing.
Such damaged electrical connection cables must not be used and are life-threatening due to the insulation damage.
Check the electrical connection cables for damage regularly. Ensure that the connection cables are disconnected from electrical power when checking for damage.
Electrical connection cables must comply with the applicable VDE and DIN provisions. Only use connection cables with the designation H05VV-F.
The printing of the type designation on the connection cable is mandatory.
AC motor
- The mains voltage must be 230 V\~.
- Extension cables up to 25 m long must have a cross-section of 1.5 mm ^2 .
Connections and repair work on the electrical equipment may only be carried out by electricians.
Please provide the following information in the event of any enquiries:
• Type of current for the motor
• Machine data - type plate
• Machine data - type plate
13. Cleaning and maintenance
Warning! Pull out the mains plug before carrying out any adjustments, maintenance or repair work!
General maintenance tasks
Wipe swarf and dust off the machine from time to time with a cloth. Oil the rotating parts once monthly to extend the life of the tool. Do not oil the motor.
Do not use corrosive agents for cleaning the plastic.
Maintenance
The device has no further internal parts that require maintenance.
Service information
With this product, it is necessary to note that the following parts are subject to natural or usage-related wear, or that the following parts are required as consumables.
Wearing parts*: Carbon brushes, V-belts
* may not be included in the scope of supply!
14. Transport
If you want to transport the device to a different location, disconnect the device from the power supply and set it down in another appropriate area.
Attention!
Hot surface. There is a risk of burns. Do not transport the machine until the motor unit (23) has cooled down completely.
Carry the lathe with a second person if possible. When transporting, hold the lathe by the outer feet (7), by the rail with the motor unit (3a) and by the rail (3b).
15. Storage
Store the device and its accessories in a dark, dry and frost-free place that is inaccessible to children. The optimum storage temperature lies between 5 and 30 °C.
Store the tool in its original packaging.
Cover the tool to protect it from dust or moisture.
Store the operating manual with the tool.
16. Disposal and recycling
The device is supplied in packaging to avoid transport damages. This packaging is raw material and can thus be used again or can be reintegrated into the raw material cycle.
The device and its accessories are made of different materials, such as metals and plastics. Take defective components to special waste disposal sites.
Check with your specialist dealer or municipal administration!
Do not throw old equipment away with household waste!
This symbol indicates that this product must not be disposed of in household waste as per Waste Electrical and Electronic Equipment directive (2012/19/EU) and national laws. This product must be handed over at the intended collection point. This can be done, for example, by returning it when purchasing a similar product or delivering it to an authorised collection point for the recycling of old electrical and electronic devices. Improper handling of old devices can have negative effects on the environment and on human health due to potential hazardous materials which are often contained in old electrical and electronic devices. By disposing of this product properly, you are also contributing to the effective use of natural resources. Information about collection points for old devices can be found at your municipal authority, the local disposal provider, an authorised location for the disposal of old electrical and electronic devices or your waste collection service.
17. Troubleshooting
| Fault Possible cause Remedy | ||
| The cut quality is poor. | Cutting tool is brunt. Sharpen or replace | cutting tool. |
| Too strongly cut Reduce the working | pressure. | |
| The cutting tool is positioned below the workpiece centreline. | Do not apply the cutting tool any lower than 3 mm above the centre of the workpiece. | |
| Rotation speed too slow, increase rotation speed | Adjust speed | |
| Excessive vibration when turning thin workpieces. | The cutting tool is below the work-piece centreline. | Raise the cutting tool to the centreline of the work-piece. |
| Too strongly cut Reduce the working | pressure. | |
| Excessive vibration when turning large workpieces or bowls. | Headstock and/or tailstock incorrectly positioned at the ends of the workpiece. | Check that the workpiece tips on the headstock and/or tailstock are correct. |
| The workpiece is not balanced. Cut the end of the part until the workpiece is balanced. | ||
| Lathe does not turn. Cable not connected to the mains socket. | Connect it to the mains socket. | |
| Replace the safety switch of the open door. | ||
| Lathe does not turn off. Damaged or defective power switch and/or internal wiring. | Pull the lathe's plug out of the socket immediately. Do not operate the lathe until it has been repaired by a qualified service technician. | |
Günzburger Straße 69
D-89335 Ichenhausen
Cher client,
Günzburger Straße 69
89335 Ichenhausen
Egregio cliente,
Günzburger Straße 69
Günzburger Straße 69
D-89335 Ichenhausen
Geachte klant,
Günzburger Straße 69
D-89335 Ichenhausen
Kære kunde,
Günzburger Straße 69
D-89335 Ichenhausen
Bästa Kund!
Günzburger Straße 69
D-89335 Ichenhausen
Szanowny Kliencie,
Günzburger Straße 69
D-89335 Ichenhausen
Vážený zákazník,
Günzburger Straße 69
D-89335 Ichenhausen
Vážený zákazníku,
Günzburger Straße 69
D-89335 Ichenhausen
Kedves Ügyfelünk!
CE - Declaration of Conformity
| 2014/29/EU | 2004/22/EC | 89/686/EC_96/58/EC | 2000/14/EC_2005/88/EC | ||||
| 2014/35/EU | 2014/68/EU | 90/396/EC | Annex V | ||||
| X | 2014/30/EU | X | 2011/65/EU* | Annex VINoise: measured L_WA = xx dB(A); guaranteed L_WA = xx dB(A)P = xx KW; L/∅ = cmNotified Body:Notified Body No.: | |||
 | |||||||
| Annex IVNotified Body:Notified Body No.:Certificate No.: | 2010/26/ECEmission. No: | ||||||
Standard references:
EN 61029-1:2009+A11:2010; EN ISO 12100:2010; EN 55014-1:2017; EN 55014-1:2006/A2:2011; EN 55014-2:2015 EN 55014-2:1997/A2:2008; EN 61000-3-2:2014; EN 61000-3-3:3013
This declaration of conformity is issued under the sole responsibility of the manufacturer.
The object of the declaration described above fulfils the regulations of the directive 2011/65/EU of the European Parliament and Council from 8th June 2011, on the restriction of the use of certain hazardous substances in electrical and electronic equipment.
Apparent defects must be notified within 8 days from the receipt of the goods. Otherwise, the buyer's rights of claim due to such defects are invalidated. We guarantee for our machines in case of proper treatment for the time of the statutory warranty period from delivery in such a way that we replace any machine part free of charge which provably becomes unusable due to faulty material
or defects of fabrication within such period of time. With respect to parts not manufactured by us we only warrant insofar as we are entitled to warranty claims against the upstream suppliers. The costs for the installation of the new parts shall be borne by the buyer. The cancellation of sale or the reduction of purchase price as well as any other claims for damages shall be excluded.
Garantie FR


- DM1100T
- Verehrter Kunde
- Explanation of the symbols on the device
- Table of contents: Page:
- Introduction
- Manufacturer:
- Dear Customer
- Note:
- Device description
- Scope of delivery
- Proper use
- General safety information
- Safe work
- Operational Safety Instructions for the Wood Turning Lathe
- Additional Safety Instructions for the use of Faceplates
- Remaining hazards
- Technical data
- Wear hearing protection.
- Unpacking
- ATTENTION!
- Assembly
- Assembling the lathe (Fig. 2)
- Setting up the lathe (Fig. 1)
- Fitting/replacing the workpiece mount (Fig. 3)
- Fitting the 4-prong centre tip
- Mounting the face plate
- Operation
- Select speed (Fig. 4)
- Select the correct speed:
- The V-belt must lie in the same groove on the upper and lower drive pulley.
- Securing the workpiece
- Securing with the 4-prong centre tip (1) and tailstock (5) (Fig. 1)
- Securing with the face plate (13) (Fig. 4)
- Adjusting the tool support (Fig. 1)
- Fixing/releasing the tool support
- Height adjustment of the tool support
- Switching on/off (fig. 1)
- Working instructions
- Remove blockages
- Electrical connection
- Damaged electrical connection cable
- AC motor
- Cleaning and maintenance
- Maintenance
- Service information
- Transport
- Storage
- Disposal and recycling
- Do not throw old equipment away with household waste!
- Troubleshooting
- Cher client,
- Egregio cliente,
- Geachte klant,
- Kære kunde,
- Bästa Kund!
- Szanowny Kliencie,
- Vážený zákazník,
- Vážený zákazníku,
- Kedves Ügyfelünk!
- CE - Declaration of Conformity
- Standard references:
- Garantie FR
Brand : SCHEPPACH
Model : DM1100T
Category : Wood lathe