GlueMatic 7011 - Glue gun STEINEL - Free user manual and instructions
Find the device manual for free GlueMatic 7011 STEINEL in PDF.
| Product Type | Hot glue gun |
| Brand | STEINEL |
| Model | GlueMatic 7011 |
| Temperature range | 40 °C - 230 °C (adjustable to the nearest degree) |
| Factory setting temperature | 190 °C |
| Display | LCD screen with LED |
| Stroke adjustment | Yes, to adjust the amount of glue per stroke |
| LOC function | Yes, locks settings |
| Rest mode | Yes, automatically lowers temperature after inactivity |
| Interchangeable nozzle | Yes, several nozzles available as options |
| Glue type | Original STEINEL hot melt glue sticks |
| Power supply | Mains, power cord |
| Recommended use | Indoors, dry and well-ventilated areas |
| Manufacturer warranty | 1 year |
| Safety instructions | Do not use with liquid glue, risk of burns, do not leave unattended |
| Country of manufacture | Germany |
| After-sales service | +33/3/20 30 34 00 |
Frequently Asked Questions - GlueMatic 7011 STEINEL
User questions about GlueMatic 7011 STEINEL
0 question about this device. Answer the ones you know or ask your own.
Ask a new question about this device
Download the instructions for your Glue gun in PDF format for free! Find your manual GlueMatic 7011 - STEINEL and take your electronic device back in hand. On this page are published all the documents necessary for the use of your device. GlueMatic 7011 by STEINEL.
USER MANUAL GlueMatic 7011 STEINEL
natural_image
Steinel brand hairpin with visible model number 7 and control panel (no text or symbols on body)professional
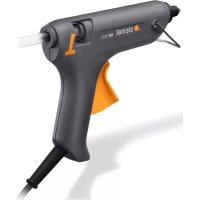
GluePRO 300
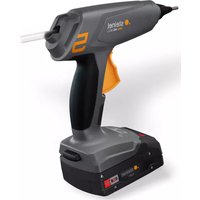
GlueMatic 7011
DE
Please familiarise yourself with these operating instructions before using this product, because prolonged reliable and trouble-free operation will only be ensured if it is handled properly.
We hope your hot-melt glue applicator brings you lasting satisfaction.
About this document
Please read carefully and keep in a safe place.
- Under copyright. Reproduction either in whole or in part only with our consent.
- Subject to change in the interest of technical progress.

Safety precautions
Read and observe this information before using the tool. Failure to observe the operating instructions may result in the tool becoming a source of danger.
When using electric power tools, observe the following basic safety precautions to avoid electric shock as well as the risk of injury and fire. Used carelessly, the tool can start an unintentional fire or injure persons.
Check the tool for any damage (power cord, housing etc.) before putting it into operation and do not use the tool if it is damaged.
Do not leave the tool switched on unattended.
Children should be supervised to make sure they do not play with the tool.
Take the ambient conditions into account.
Do not expose electric power tools to rain. Do not use electric power tools when they are damp or in a damp or
wet environment. Exercise care when using the tool in the proximity of flammable materials. Do not direct the tool at one and the same place for a prolonged period. Do not use in the presence of an explosive atmosphere. Heat emitted may be conducted to flammable materials that are hidden from direct sight.
Protect yourself from electric shock.

Avoid coming into contact with earthed objects, such as pipes, radiators, cookers or refrigerators. Do not leave the tool unattended while in operation.
Store your tools in a safe place.
After use, set the tool down on its standing surface and let it cool before putting it away.
When not in use, tools must be stored in a dry, locked room out of children's reach.
This tool may be used by children aged 8 or above and by persons with reduced physical, sensory or mental capabilities or lack of experience and knowledge if they are supervised or have been given instructions on how to use the tool safely and understand the hazards involved.
Do not allow children to play with the tool.
Children are not allowed to clean or carry out maintenance work on the tool without supervision.
Do not overload your tools.
Your work results and safety will be enhanced if you operate the tool within the specified output range. Do not carry the tool by the power cord. Do not unplug the tool by pulling on the power cord. Protect the power cord from heat, oil and sharp edges.
Beware of toxic gases and fire hazards.
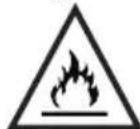
Toxic gases may develop when working on plastics, paints, varnishes or similar materials.
Beware of fire and ignition hazards.
For your own safety, only use accessories and attachments that are specified in the operating instructions or recommended or specified by the tool manufacturer.
Using attachments or accessories other than those recommended in the operating instructions or catalogue may result in personal injury.
Repairs by a qualified electrician only.
This electric power tool complies with the relevant safety regulations. Repairs should only be performed by a qualified electrician. Otherwise the user may run the risk of accidents.
If this tool's main power cord is damaged, it must be replaced by the manufacturer or its customer service department or a similarly qualified person so as to avoid hazards.
Keep these safety precautions with the tool.
Tool features
1 Enclosure
2 Hanger
Stroke adjustment
Glue stick guide
ON / OFF button
SET button (GlueMatic 7011 only)
UP button for increasing temperature (GlueMatic 7011 only)
DOWN button for reducing temperature (GlueMaitic 7011 only)
LCD information display (GlueMatic 7011 only)
1Power cord
Stand (removable)
12 Feed trigger
Exchangeable gluing nozzle
1 Nozzle cap
Important advice
- Do not use liquid or pasty adhesives.
- Nozzle and molten glue can reach temperatures of over 200 degrees Celsius. Beware of burns!
- You could burn yourself! After skin contact with hot glue: immediately cool with cold water. Do not try to remove hot-melt glue from the skin. If necessary, seek medical attention.
- After eye contact with hot-melt glue: immediately cool for approx. 15 minutes with running water and consult a doctor straight away.
- The area you are gluing must be free of grease, dry and absolutely clean.
- Trouble-free operation can only be guaranteed when using genuine STEINEL glue sticks.
- Do not use in conjunction with highly flammable / combustible materials.
- Glue marks on clothing cannot be removed.
-
Make sure heat-sensitive materials are suitable for gluing with hot-melt adhesive.
• Drips of glue are best removed when cold. -
Do not pull glue sticks out of the applicator. Hot glue running into the applicator may cause damage.
- Optimum adhesion is achieved when the bond is established instantly on applying the glue.
- Unplug when not in use or during prolonged work breaks (more than 30 min.).
- Before inserting a new glue stick, wait a moment for the cold cartridge to heat up. Never force the glue stick through the applicator.
- After changing nozzle, screw on hand-tight (4.2 Nm) using a tool, or the newly fitted nozzle may not provide a tight seal, causing it to leak.
- Once heated up, the applicator must be stood on the stand. It must not be laid on its side.
- Unplug after use. Let the tool cool down completely before putting it away.
- On leaving the factory, the tool is automatically set to stay switched OFF when the power supply is restored after a power cut.
Proper use
Hot-melt glue applicator for use with genuine STEINEL glue sticks. The tool must only be used indoors in a dry and well-ventilated environment.
Operation / Function
Startup
- Plug the tool in.
- Switch the tool ON by pressing the ON/OFF button for two seconds. The tool immediately heats up to the selected temperature.
- While it is heating up, the LED flashes red / the display lights up blue.
- Once the LED shows red / the display lights up green, the temperature setting range has been reached and the hot-melt glue applicator is ready for use.
- If the temperature range is too high, the LED / display lights up red.
- Insert the hot-melt glue stick into the opening at the rear of the tool.
- Switch the tool OFF by briefly pressing the ON / OFF button.
Temperature setting
GlueMatic 7011
- The temperature can be selected to an accuracy of one degree from 40 to 230 degrees Celsius. On leaving the factory, the tool is set to 190 degrees Celsius.
- Press the SET button 6. Keeping the SET button pressed, select the chosen temperature via the 7 + 8 UP and DOWN buttons. The temperature you select is shown on the display.
- Releasing the 6 SET button shows you the temperature now reached in the heating chamber.
-
Keep the SET button pressed. Pressing the UP or DOWN button automatically increases or reduces temperature in steps of 1 degree. Keeping the UP or DOWN button pressed for at least 3 seconds increases or reduces temperature by 5 degrees.
-
Do not select any temperature higher than is needed for applying the hot-melt adhesive!Stroke adjustment
- Glue feed can be adjusted to suit any particular application, giving you precision in selecting an exact quantity of glue per stroke and letting you set the feed trigger 12 for ease of use.
- The slide control for adjusting glue feed 3 adjusts the trigger 12 to reduce or increase the quantity of glue delivered.
- Pull the trigger and move the glue feed slide control 3 towards the nozzle until the tool delivers the chosen quantity of glue per trigger pull or gives you the delivery rate you find easy to work with.
- Adjust the slide control in the opposite direction to restore the initial position.
Changing nozzles
Customised nozzles are available for specific applications. To change the nozzle, the tool must be warm and unplugged. For this, heat up the GluePRO 300 for no more than 45 seconds.
Heat the GlueMatic 7011 to no more than 100 degrees Celsius.
Switch the tool OFF once it has reached temperature.
- Hold the tool with heat-protective gloves.
- Unscrew nozzle 13.

At this point, never pull the trigger!
- Screw the replacement nozzle on hand-tight.
Other functions of GlueMatic 7011
Other functions of GlueMatic 7011
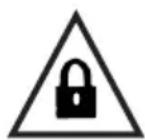
LOC function
To avoid altering the chosen settings unintentionally, the GlueMatic 7011 comes with the Lockable Override Control function (LOC). To find out how to set the LOC function, contact our Service Department on 05245 448 188.
Idle mode
After any selectable period, idle mode automatically reduces the temperature in the heating element to a temperature you can select. This depends on when the button was last pressed. Idle state is indicated by the blue flashing LED / blue flashing display. On leaving the factory, this function is deactivated. To find out how to set idle mode, contact our Service Department on 05245 448 188.
Explanations of the technical specifications on page 3
| L×W×HDimensions PmaxMaximum output in watts | ||
| U Rated voltage in volts P | o** Rated input power in watts | |
| T Temperature in °Celsius t | 190 Heat-up time in minutes | |
| m/t* Delivery rate per hour in kg m Weight without power cord in grams | ||
| * Depending on temperature and glue viscosity | ** For 30 s of gluing / 60 s pause | |
Accessories
Your retailer keeps a stock of accessory nozzles.
Nozzles
- Long nozzle, 3 mm Prod. No. 052737
- Long nozzle, fine, 1.5 mm Prod. No. 052928
- Long nozzle, large, 4.5 mm Prod. No. 052935
Glue sticks
- General-purpose glue sticks, 300 mm, 600 g Prod. No. 050092
- Acrylate glue sticks, 300 mm, 600 g Prod. No. 052416
- Fast glue sticks, 300 mm, 600 g Prod. No. 052430
- Flex glue sticks, 300 mm, 600 g Prod. No. 052423
- Low Melt glue sticks, 300 mm, 600 g Prod. No. 052409
- MR Polyurethan (PUR) glue sticks 250, mm 200 g Art.-Nr. 087388
Note:
Refer to data sheet with information on applying the hot-melt adhesive. Data sheets and further information are available at www.steinel-professional.de.
GlueMatic 7011 status indicators and error messages
| Display | Heating element | Cause Remedy | |
| "- - - " | LOC function activated | Deactivate LOC function.(See "Other functions of GlueMatic 7011") | |
| "Err" Warm Maximum temperatureexceeded | Let tool cool down.Switch tool OFF and ON. | ||
| "Err" Cold Sensor short circuitor sensor break | Replace heating chamber.Please contact your service partner. |
GluePRO 300 fault indication
The LED on the GluePRO 300 flashes rapidly to indicate that a fault has occurred.
If the fault is indicated for more than 5 minutes, please contact your service partner.
Disposal
Electrical and electronic equipment, accessories and packaging must be recycled in an environmentally compatible manner.
Do not dispose of electrical and electronic equipment as domestic waste.
EU countries only:
Under the current European Directive on Waste Electrical and Electronic Equipment and its implementation in national law, electrical and electronic equipment no longer suitable for use must be collected separately and recycled in an environmentally compatible manner.
Manufacturer's warranty of STEINEL GmbH, Diesel strasse 80-84, DE-33442 Herzebrock-Clarholz, Germany
All STEINEL products meet the highest quality standards. For this reason, we, the manufacturer, are pleased to provide you, the customer, with a warranty under the following terms and conditions: The warranty covers the absence of deficiencies which are proven to be the result of a material defect or fault in manufacturing and which are reported to us immediately after detection and within the warranty period. The warranty shall cover all STEINEL Professional products sold and used in Germany.
Our warranty cover for consumers
The provisions below apply to consumers. A consumer is any natural person who, on entering into the purchase transaction, neither acts in exercising their commercial nor their self-employed activity.
You can opt for warranty cover in the form of repair or replacement which will be provided free of charge (if applicable, in the form of a successor model of the same or higher quality) or in the form of a credit note.
In the case of sensors, floodlights, outdoor and indoor lights, the warranty period for the STEINEL Professional product you have purchased is 1 year for hot-air and hot-melt gluing products in each case from the date on which the product was purchased.
We shall bear the shipping costs but not the transport risks involved in return shipment.
Our warranty cover for entrepreneurs
The provisions below apply to entrepreneurs. Entrepreneur is a natural or legal person or partnership with legal personality who or which, on entering into the purchase transaction, acts in exercising their or its commercial or self-employed activity.
We have the option of providing warranty cover by rectifying deficiencies free of charge, replacing a product free of charge (if applicable, in the form of a successor model of the same or higher quality) or by issuing a credit note.
In the case of sensors, floodlights, outdoor and indoor lights, the warranty period for the STEINEL Professional product you have purchased is 1 year for hot-air and hot-melt gluing products in each case from the date on which the product was purchased.
Within the scope of warranty cover, we shall not bear your expenses accruing from subsequent fulfillment nor shall we bear your expenses for removing the defective product and installing a replacement product.
Statutory rights accruing from defects, gratuitousness
The warranty cover described here shall be applicable in addition to the statutory rights of warranty – including special consumer protection provisions – and shall not restrict or replace them. Exercising your statutory rights in the event of defects is gratuitous.
Exemptions from the warranty
All replaceable lamps are expressly excluded from this warranty.
In addition to this, the warranty shall not cover:
– any wear resulting from use or any other natural wear of product parts or any deficiencies in the STEINEL Professional product that are attributable to wear caused by use or other natural wear,
– any improper or non-intended use of the product or any failure to observe the operating instructions,
– any unauthorised additions, alterations or other modifications to the product or any deficiencies attributable to the use of accessory, supplementary or replacement parts which are not genuine STEINEL parts,
– any maintenance or care of products that is not carried out in accordance with the operating instructions,
– any attachment or installation that is not in accordance with STEINEL's installation instructions,
– any damage or loss occurring in transit.
Application of German law
The warranty shall be governed by German law excluding the United Nations Convention concerning the International Sale of Goods (CISG).
Making claims
If you wish to make a warranty claim, please send your product complete and carriage paid with the original receipt of purchase, which must show the date of purchase and product designation, either to your retailer or directly to us at STEINEL (UK) Ltd. – 25 Manasty Road, Axis Park, Orton Southgate, GB- Peterborough Cambs PE2 6UP United Kingdom. For this reason, we recommend that you keep your receipt of purchase in a safe place until the warranty period expires.
FR
Pulsador SET (solo GlueMatic 7011)
http://steinelshop.ro/termeni-si-conditii#answer10
Lupp SET (ainult GlueMatic 7011)
natural_image
World map silhouette in grayscale, showing continents and oceans without any text or labelsContact
www.steinel.de/contact