iSpin Grow - Car seat Joie - Free user manual and instructions
Find the device manual for free iSpin Grow Joie in PDF.
| Product Type | i-Size rotating car seat with harness and booster |
| Brand | Joie |
| Model | iSpin Grow |
| Category | Car seat |
| Standard | ECE R129 (i-Size) |
| Rear-facing usage | Height 40-105 cm / Weight ≤ 18.5 kg (approx. 0-4 years) |
| Booster usage (forward-facing) | Height 100-125 cm / Weight ≤ 25 kg (approx. 3-7 years) |
| Seat weight | Approximately 12 kg |
| Approximate dimensions | 45 x 45 x 65 cm |
| Power supply | 2 AAA batteries (1.5 V) not included |
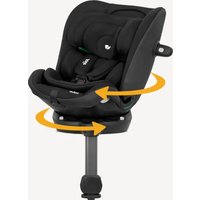
| Main functions | 360° rotation, 5-point harness, recline adjustment (6 positions), headrest adjustment (7 positions), ISOFIX connectors, top tether strap, side impact protection, LED and sound indicators |
| Materials | Plastic, metal, fabric |
| Care and cleaning | Cover washable in cold water ≤ 30°C, no ironing or bleach, dry in shade |
| Safety | ISOFIX and tether strap indicators (LED + sound), removable side impact protection, compliant with R129 |
| Spare parts and repairability | Replaceable cover and infant insert, ISOFIX connectors and straps not modifiable |
| General information | Batteries for electronic module (LED and alarm). Keep the manual in the storage compartment at the back of the seat. |
Frequently Asked Questions - iSpin Grow Joie
User questions about iSpin Grow Joie
0 question about this device. Answer the ones you know or ask your own.
Ask a new question about this device
Download the instructions for your Car seat in PDF format for free! Find your manual iSpin Grow - Joie and take your electronic device back in hand. On this page are published all the documents necessary for the use of your device. iSpin Grow by Joie.
USER MANUAL iSpin Grow Joie
enhanced child restraint
GB Instruction Manual
PT Manual de instruções
es Manual de instrucciones
FR Manuel d'instructions
NL Instructiehandleiding
Manuale di istruzioni
Bedienungsanleitung
SE Bruksanvisning
Eeyepioo oyniuv xphons
PL Instrukcja obstugi
Cz Navod k obsluze
sk Navod na pouzitie
sl Navodila za uporabo
TR Kullanim Kilavuzu
RU PykoBOIDCTBO NO 3KcPnyaTaUM
DA Brugervejledning
AB Clljiajj
ECE R129/O3: i-Size

Welcome to Joie
Congratulations on becoming part of the Joie family! We are so excited to be part of your journey with your little one. While traveling with the i-Spin™ Grow enhanced child restraint you are using a high quality, fully certified safety I-Size enhanced child restraint. Please carefully read this manual and follow each step to ensure a comfortable ride and best protection for your child.
To use this Joie enhanced child restraint with the i-Size ISOFIX connections according to the ECE R129 Regulation, your child must meet the following requirements.
Rearward Facing: Child height 40cm-105cm/ max. 18.5kg; Booster: Child height 100cm-125cm/ max. 25kg;
Base
Please read all the instructions in this manual before installing and using the product.
I IMPORTANT: KEEP FOR FUTURE REFERENCE. PLEASE READ CAREFULLY.
Please keep the instruction manual in the storage compartment at the back of the seat as right figure.
For warranty information, please visit our website at joiebaby.com
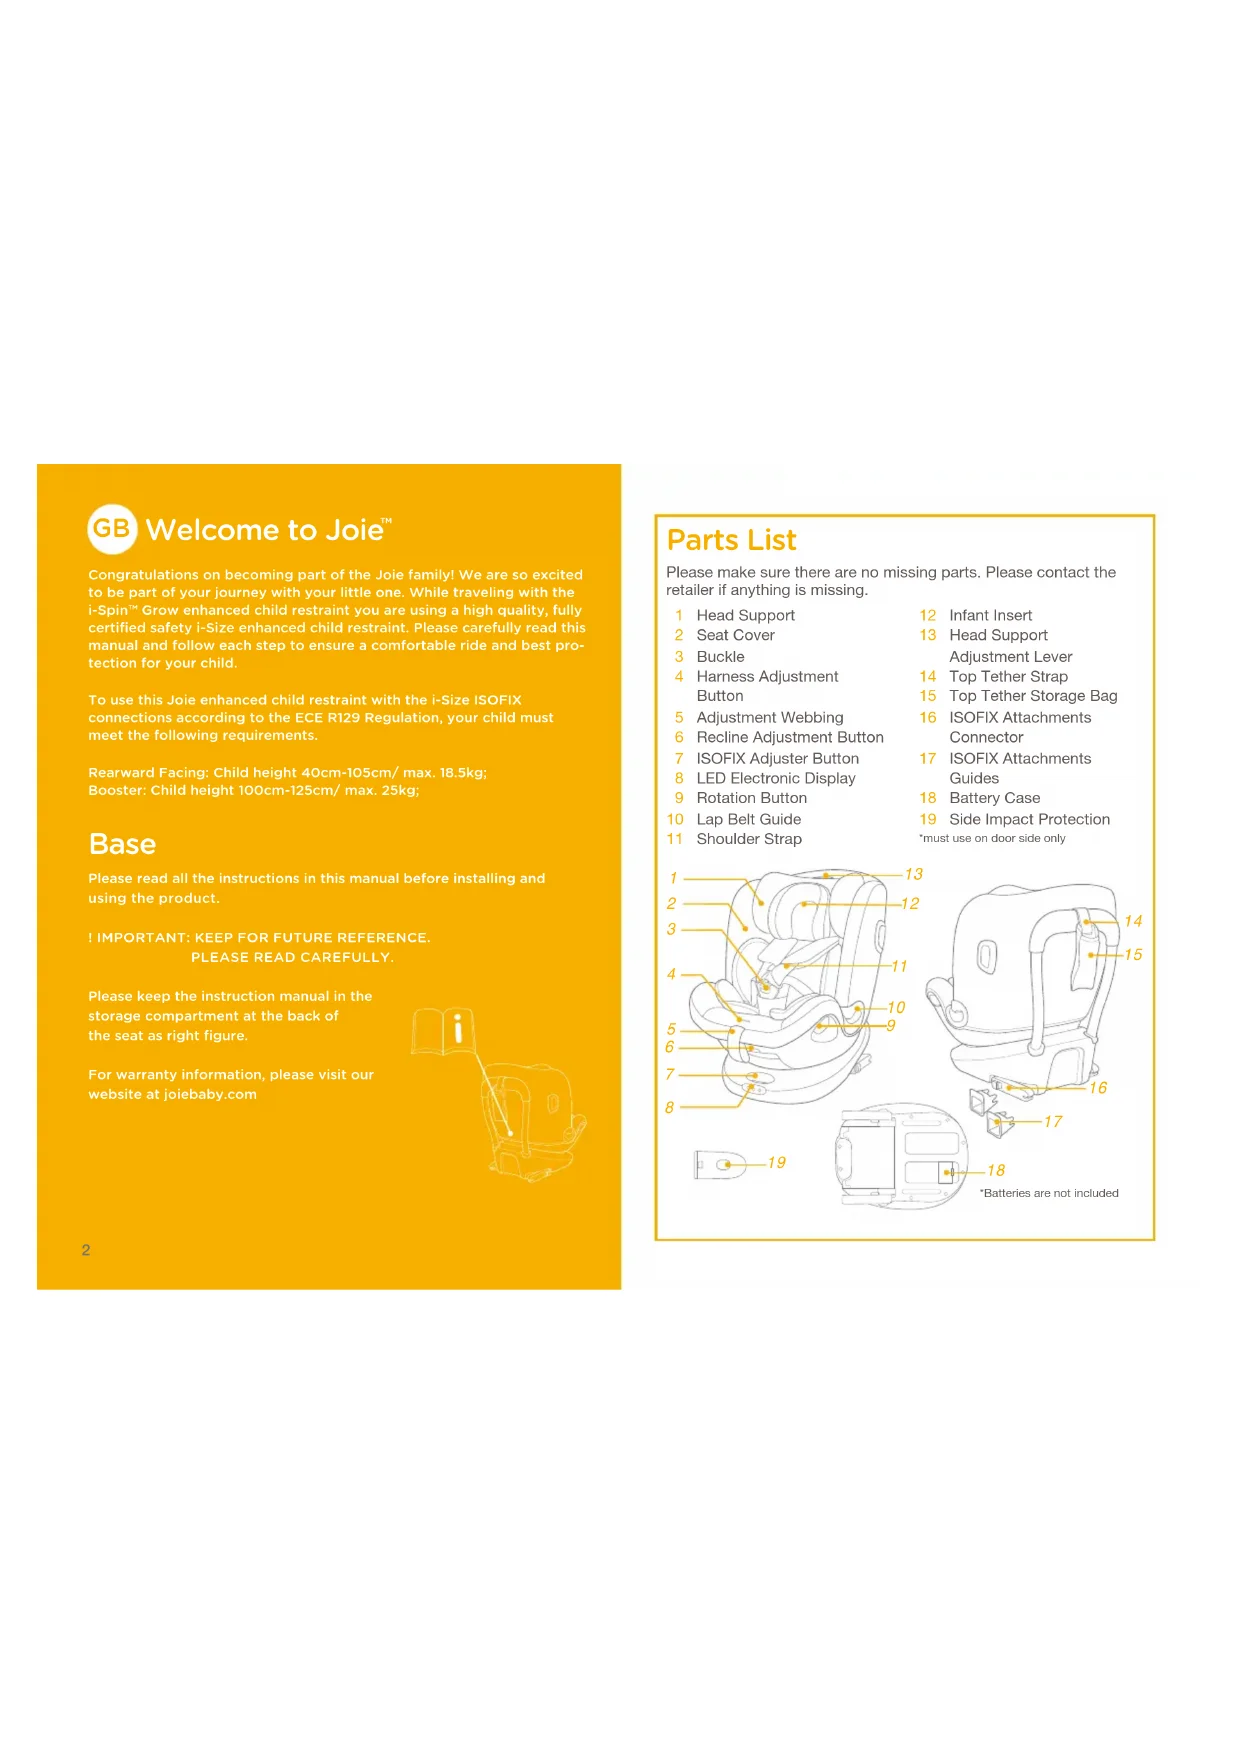
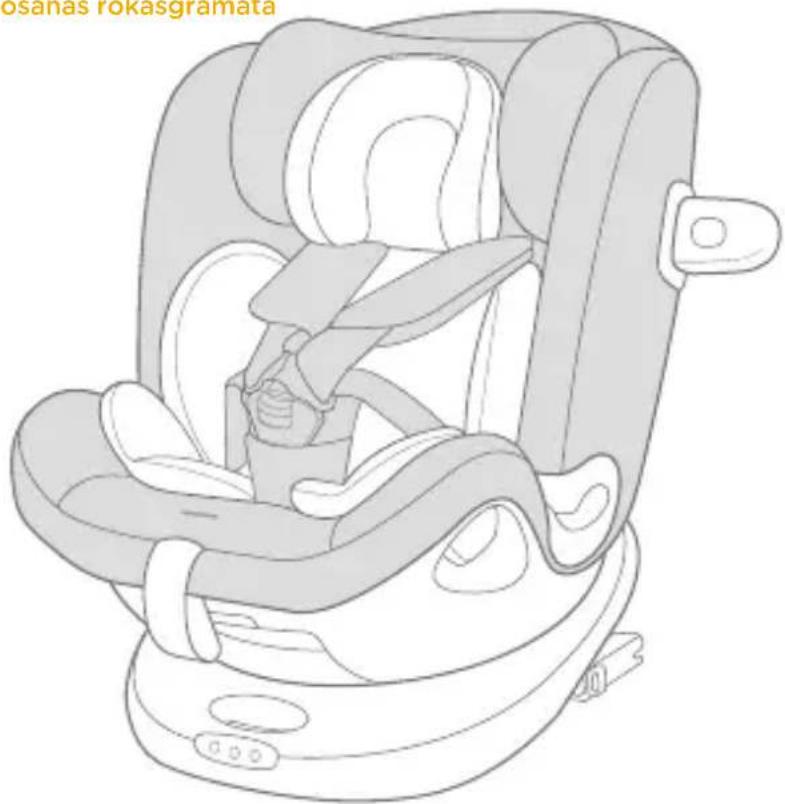
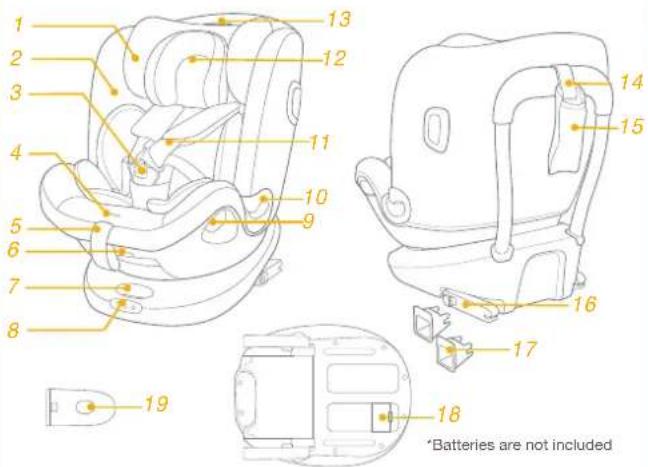
Parts List
Please make sure there are no missing parts. Please contact the retailer if anything is missing.
1 Head Support
2 Seat Cover
3 Buckle
4 Harness Adjustment Button
5 Adjustment Webbing
6 Recline Adjustment Button
7 ISOFIX Adjuster Button
8 LED Electronic Display
9 Rotation Button
10 Lap Belt Guide
11 Shoulder Strap
12 Infant Insert
13 Head Support Adjustment Lever
14 Top Tether Strap
15 Top Tether Storage Bag
16 ISOFIX Attachments Connector
17 ISOFIX Attachments Guides
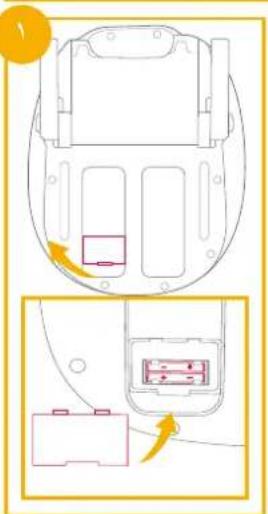
18 Battery Case
19 Side Impact Protection must use on door side only
WARNING
! BE cautious that the rigid items and plastic parts of the enhanced child restraint system shall be so located and installed that they are not liable to become trapped by a movable seat or in the door of the vehicle.
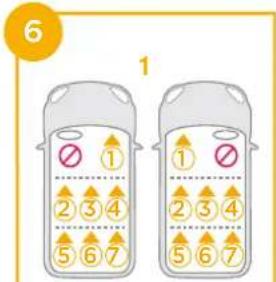
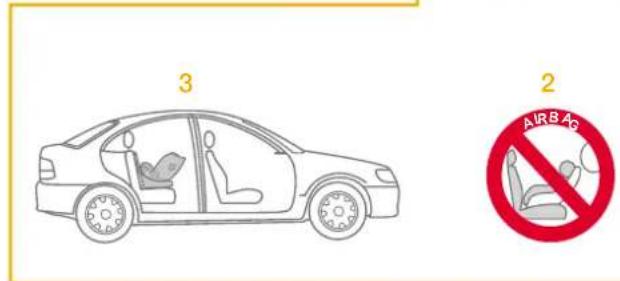
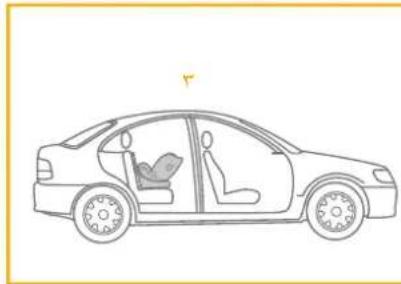
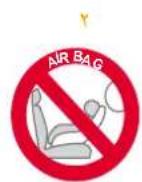
! DO NOT use the rearward facing enhanced child restraint systems in seating positions where there is an active frontal airbag installed.
! To use this enhanced child restraint according to the UN Regulation No.129, your child must meet the following requirements.
! Rearward Facing: Child height 40cm -105cm / max. 18.5kg
! Booster (Forward Facing): Child height 100cm - 125cm / max. 25kg
IMPORTANT - DO NOT USE IT AS BOOSTER MODE BEFORE THE CHILD'S HEIGHT MORE THAN 100CM (Refer to instructions).
! The enhanced child restraint may not fit in all approved vehicles. Please refer to the fitting list included for more details.
! Any straps holding the enhanced child restraint to the vehicle should be tight. Any straps restraining the child should be adjusted to the child's body, and straps should not be twisted.
WARNING
! DO NOT use any load bearing contact points other than those described in the instructions and marked on the enhanced child restraint.
! After your child is placed in this enhanced child restraint, the safety belt must be used correctly. Ensure that any lap strap is worn low down, so that the pelvis is firmly engaged, shall be stressed.
This enhanced child restraint should be replaced when it has been subject to violent stresses in an accident. An accident can cause damage to it that you cannot see.
! Consider the danger of making any alterations or additions to the device without approval of the adequate authority, and the danger of not following closely to the installation instructions provided by the enhanced child restraint manufacturer.
! Please keep this enhanced child restraint away from sunlight, otherwise it may be too hot for child's skin. Always touch the enhanced child restraint before placing child in it.
! DO NOT leave your child unattended in the enhanced child restraint system.
! Any luggage or other objects liable to cause injuries in the event of a collision shall be properly secured.
WARNING
! The enhanced child restraint system shall NOT BE USED without the soft goods.
! The soft goods should not be replaced with any other than the one recommended by the manufacturer, because the soft goods constitutes an integral part of the restraint performance.
! Please check if this enhanced child restraint can be installed properly in your vehicle before you purchase it.
! NO enhanced child restraint can guarantee full protection from injury in an accident. However, proper use of this enhanced child restraint will reduce the risk of serious injury or death to your child.
! DO NOT install this enhanced child restraint without following the instructions in this manual or you may put your child at serious risk of injury or death.
! DO NOT use this enhanced child restraint if it has damaged or missing parts.
DO NOT have your child in large/oversized clothes because this may prevent your child from being, properly and securely fastened by the shoulder harness straps and the crotch strap between the legs.
Emergency
In case of emergency or accidents, it is most important to have your child taken care of with first aid and medical treatment immediately.
Product Information
For installation with ISOFIX system + Top Tether
- This is an i-Size Enhanced Child Restraint System. It is approved according to UN Regulation No.129, for use in, i-Size compatible vehicle seating positions as indicated by vehicle manufacturers in the vehicle users' manual.
- If in doubt, consult either the Enhanced Child Restraint System manufacturer or the retailer.
For installation with 3-point belt + ISOFIX system + Top Tether
- This is an i-Size booster seat Enhanced Child Restraint System. It is approved according to UN Regulation No.129, for use primarily in "i-Size seating positions" as indicated by vehicle manufacturers in the vehicle user's manual.
- If in doubt, consult either the Enhanced Child Restraint System manufacturer or the retailer.
Materials Plastics, metal, fabrics
Patent No. Patents pending
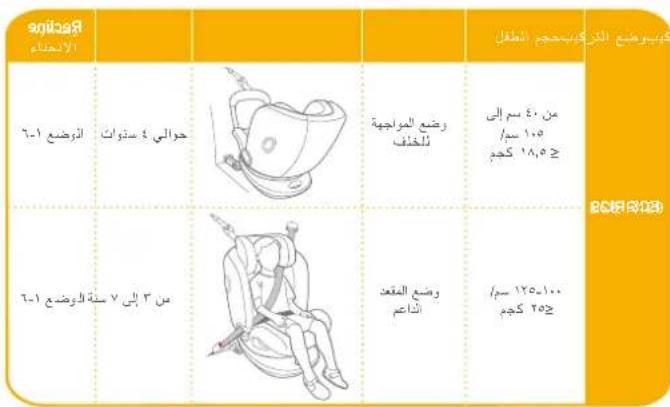
Choose the Installation Mode
| ECE R129 | Child's Size | Installation Mode | Installation | Reference Age | Decline Position |
| 40cm-105cm/ ≤18.5kg | Rear Facing mode | Approx 4 years | Position 1-6 | ||
| 100cm-125cm/ ≤25kg | Booster mode | 3 years to 7 years | Position 1-6 |
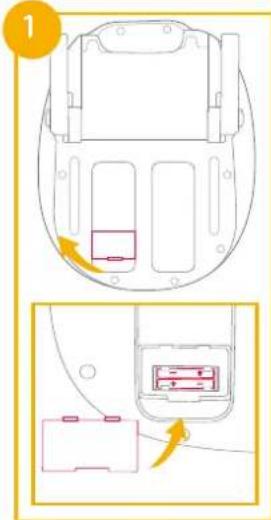
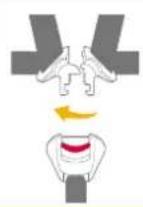
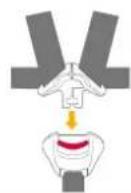
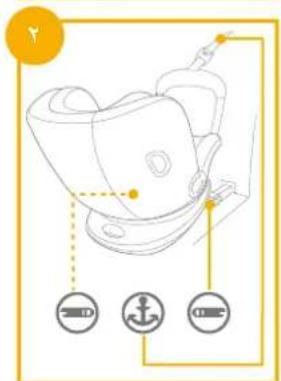
Use Electronic Module
see images

The ISOFIX alert system will engage when any of the 3 connectors is hooked onto an anchorage point. If any of the 3 required connections are incorrectly installed and tensioned, the LED indicator will light up and you will hear a notification sound. The sound will gradually increase in volume for 3.5 minutes, and then will repeat once after 15 minutes if any of the connectors are still not securely connected.
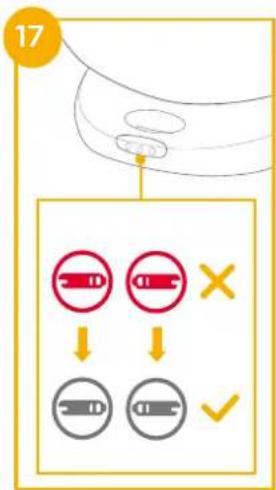
When low battery, the alert system will sound and last for 15 secs to remind to replace with new batteries.
! Batteries are not included.
Recommended type batteries- alkaline disposables, size AAA (2X1.5V).NEVER mix battery types.
! The indicator LED light will be off when all ISOFIX connectors are securely attached and tensioned.
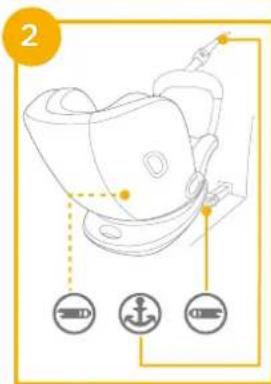
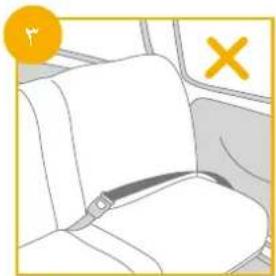
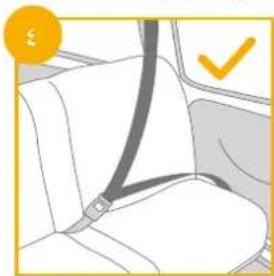
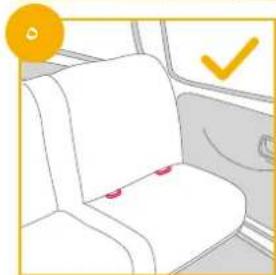
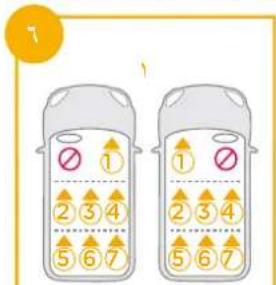
Concerns on Installation
see images 3-6

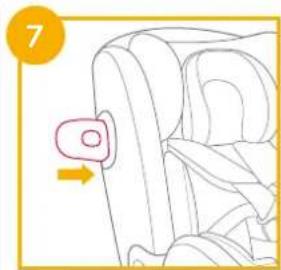
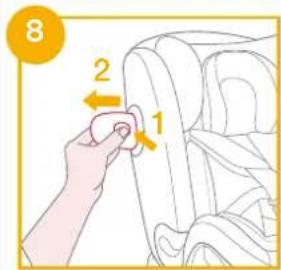
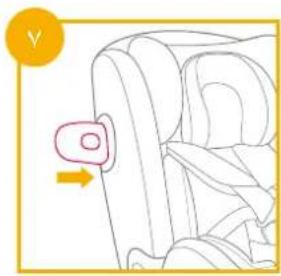
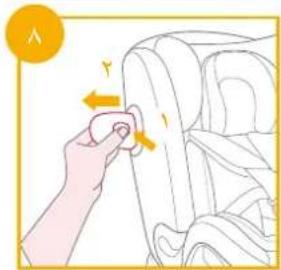
Use Side Impact Protection
see images 7-8
- The enhanced child restraint is delivered with removable side impact protection. This side impact protection must be used on the door side of the vehicle for best protection. Installation shown in 7.
- Press the release button to remove Side Impact Protection.
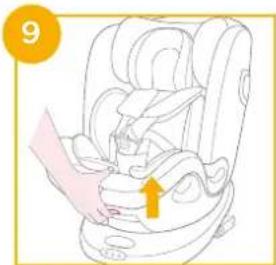
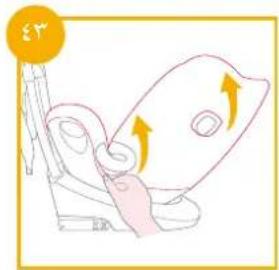
Recline Adjustment
see images 9-10
Squeeze the recline adjustment button to adjust the enhanced child restraint to the proper position. The recline angles are shown as
Both rear facing mode and booster mode have 6 recline positions.

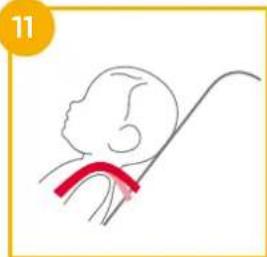
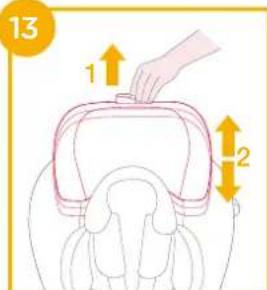
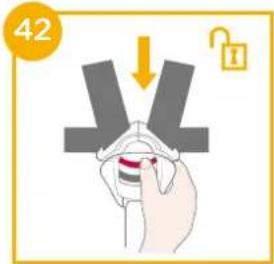
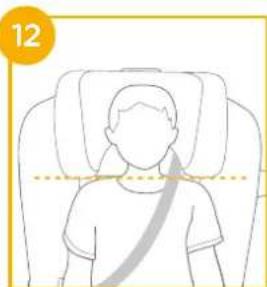
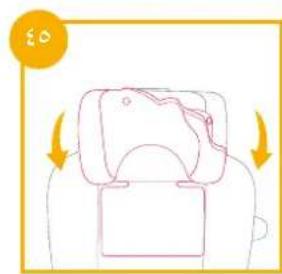
Height Adjustment
for Head Support and Shoulder Harnesses
see images 11-18
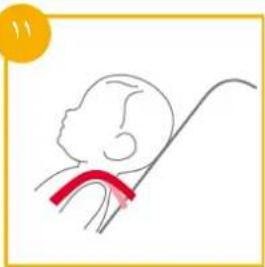
- Please adjust the head support and check if the shoulder harnesses are at the correct height according to 1&12&15
When used in rear facing mode, the shoulder harness height must be even with or just below the top of child's shoulders.
When used in booster mode, the shoulder belt guides must be even with child's shoulders.
- Lift up the head support adjustment lever, while pull up or push down on the head support until it snaps into one of the 7 positions. The head support positions are shown as

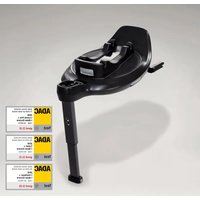
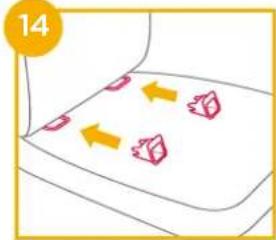
Installing the Base
see images 14-25
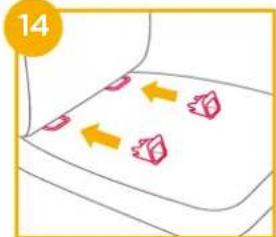
! Insert ISOFIX guides into ISOFIX anchor points (see vehicle owner's manual). 14
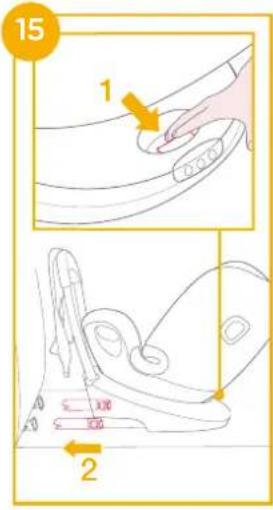
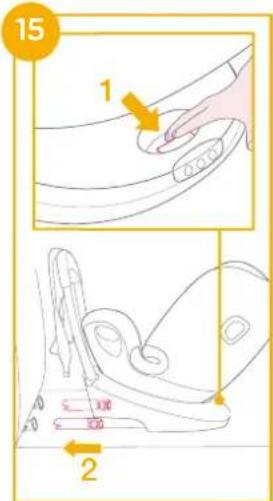
To extend the ISOFIX connectors, press in and hold the ISOFIX adjustment button first. 15
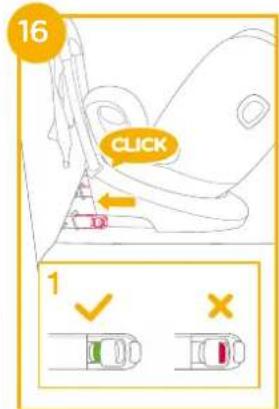
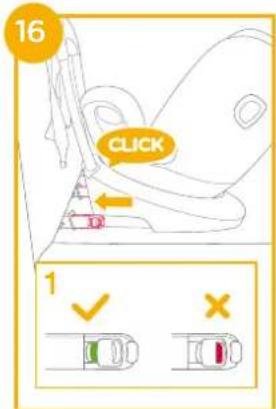
Make sure that both ISOFIX attachments connectors are securely attached to their ISOFIX anchor points. The colors of the indicators on both ISOFIX connectors should be completely green.
! Pull on both ISOFIX connectors to make sure they are securely connected.
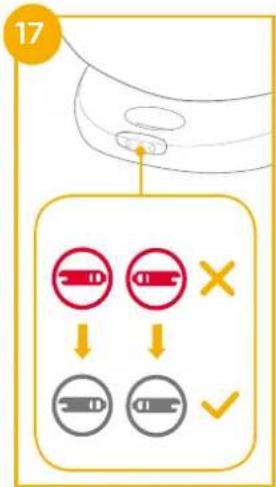
Make sure that both two ISOFIX indicator LEDs turn off after the ISOFIX connectors are connected. Each LED indicates if the ISOFIX connector on the same side is properly connected or not.
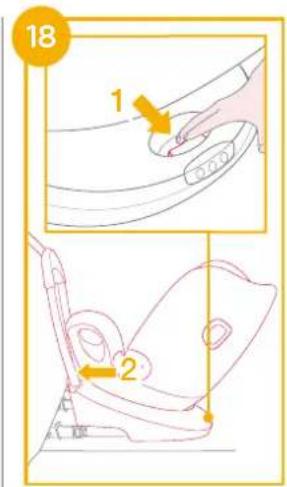
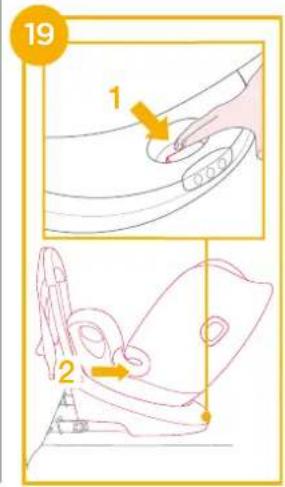
Press the ISOFIX adjustment buttons again while pushing the seat back until it comes in contact with the vehicle seat backrest. 18

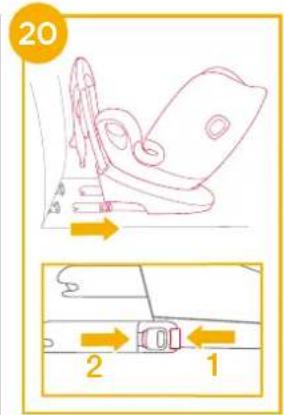
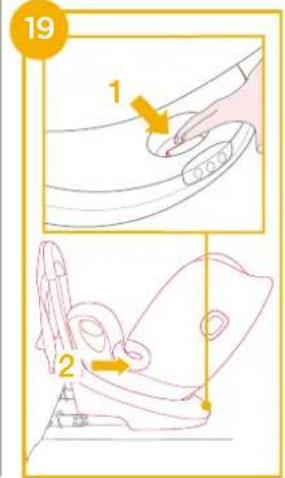
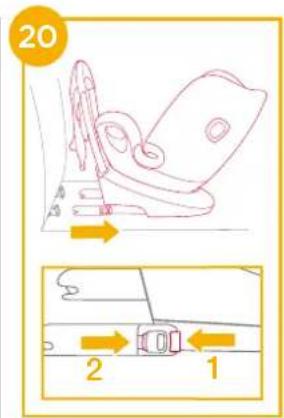
Press and release ISOFIX connectors connectors from ISOFIX anchorage. 20
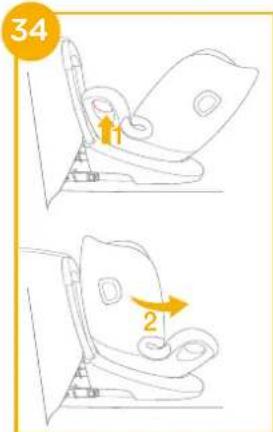
Removing the seat
To remove from the vehicle press the ISOFIX adjuster button and pull the enhanced child restraint away from the seat.
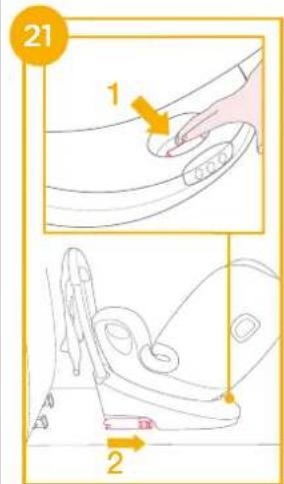
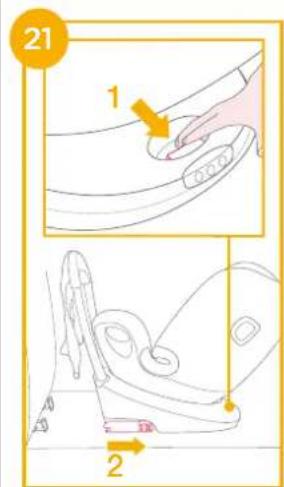
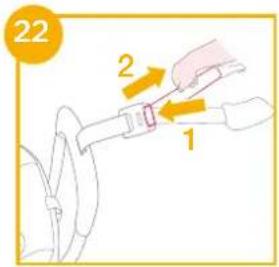
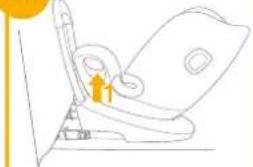
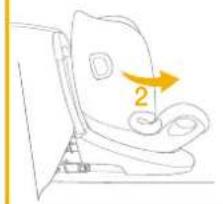
To prevent damage during transit, press the ISOFIX adjuster button 1-1 and fold the connector completely. 21-2
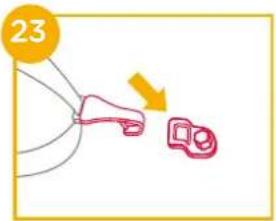
To extend top tether for use, press the button on tether adjuster and pull to lengthen.
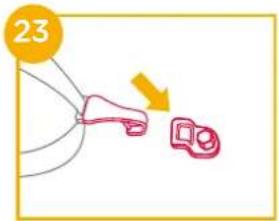
Connect the tether hook securely to vehicle's anchorage point. (see vehicle owner's manual).
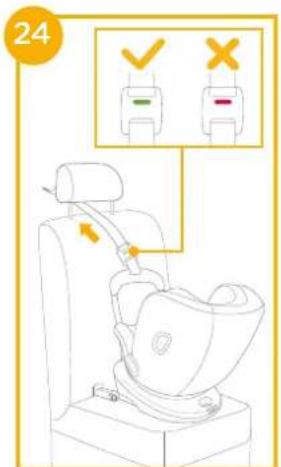
Make sure that tether hook is securely attached to the anchorage point. The color of the indicator on tether strap adjuster should be completely green. 24

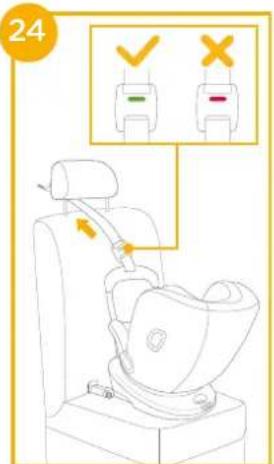
If recline angle is adjusted, check the tension on the top tether, or loosen to adjust angle then re-tension.
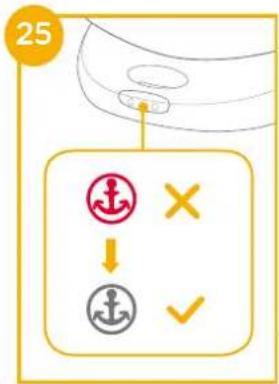
The top tether indicator LED (in the middle) does not light up means the top tether is securely connected.

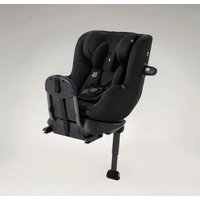
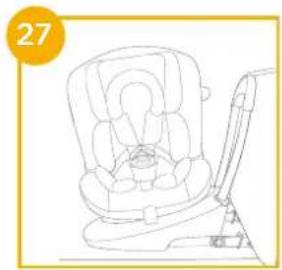
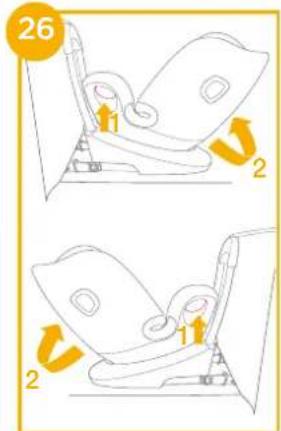
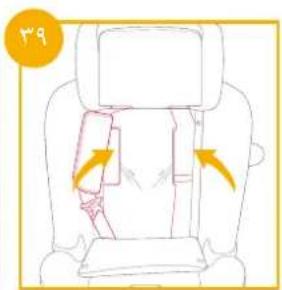
Using in the rear facing mode (Child height 40cm-105cm/Child weight ≤slant 18.5kg / infant - 4 years old)
see images 26-38
Please install the enhanced child restraint on the rear vehicle seat and then put the child in the enhanced child restraint.
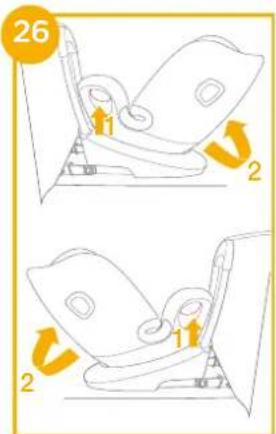
Press the rotating button to rotate for easier side loading/unloading of the child, then rotate the seat to the rear facing position.
Press the rotating button on either side to rotate the enhanced child restraint.
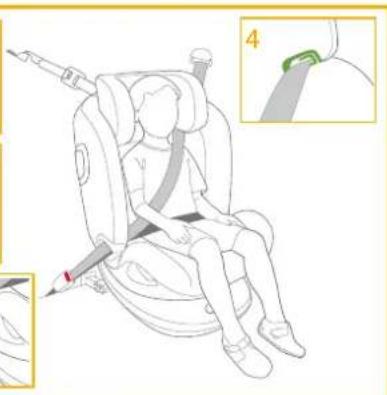
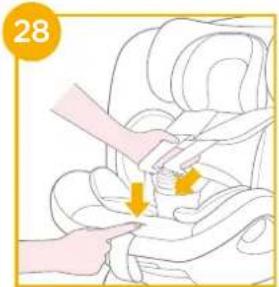
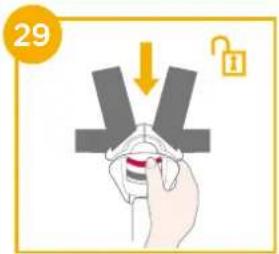
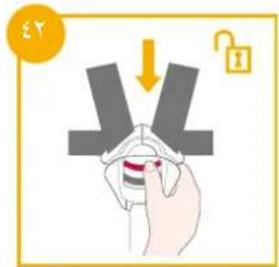
Securing Child
- To lengthen the shoulder harness belts, press the harness adjustment button while pulling out the shoulder harnesses to loosen. (grab the both two shoulder pads to pull).
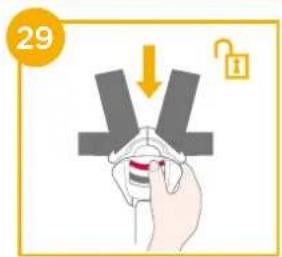
- Unlock the buckle of the harnesses by pressing the red button.
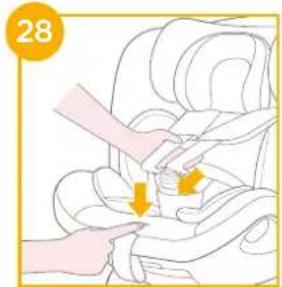
- Fix the buckles on the both sides of seat where the buckle markings are to make placing the child in rear facing mode more convenient.
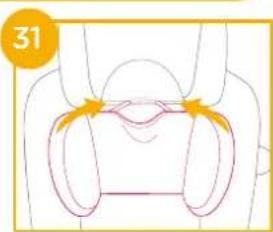
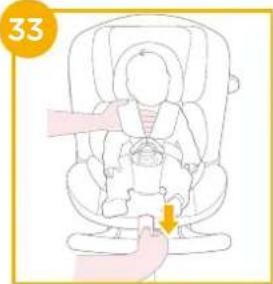
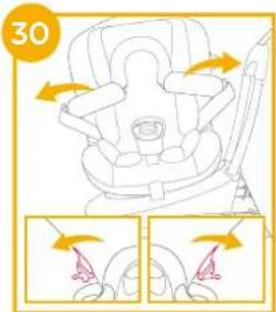
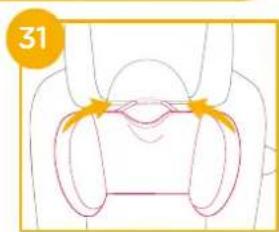
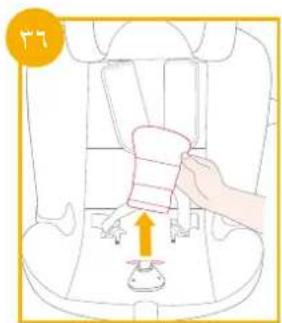
Use Infant Insert
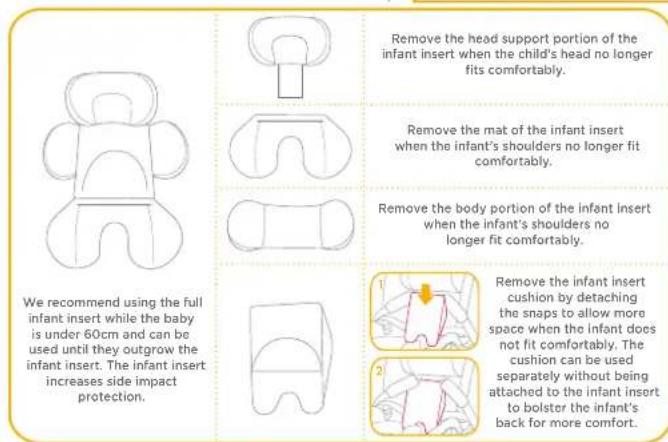
- If the child outgrows and no longer fit comfortably then remove toddler side cushion. 31
- Place the child into the enhanced child restraint and pass both arms through the harnesses.
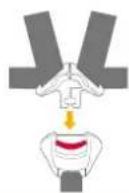
- Engage the buckle. Please refer to
32

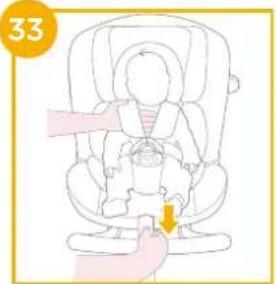
7.Pull down the adjustment webbing and adjust it to the proper length to make sure your child is properly secured.
Always keep child secured in harness and properly tightened by removing any slack.
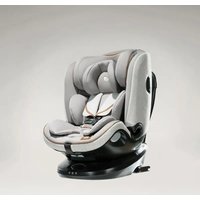
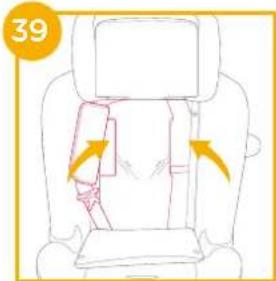
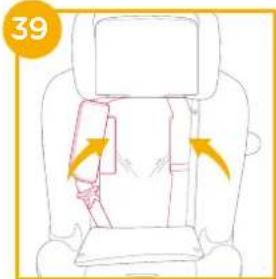
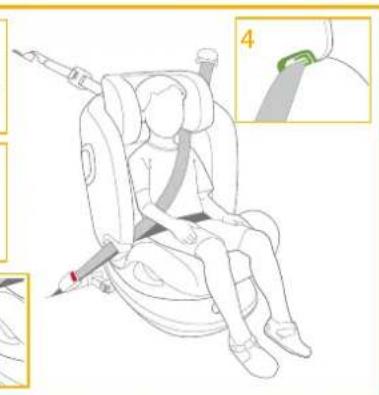
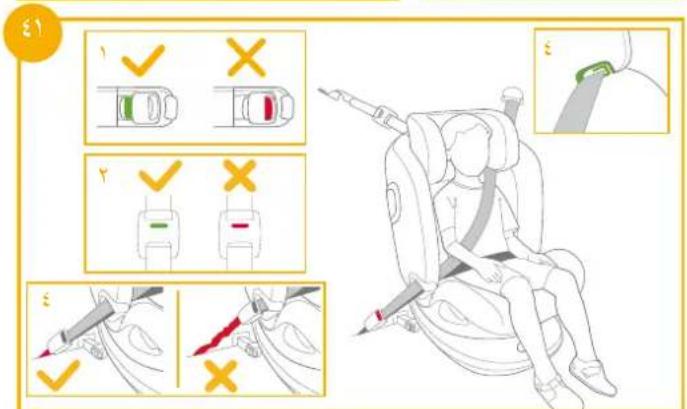
Using in the booster mode (Child height 100cm-125cm/Child weight ≤slant 25kg / 3 - 7 years old)
see images 34-41
! Please install the enhanced child restraint on the vehicle seat, and then put the child in the enhanced child restraint.
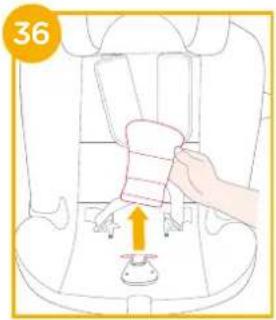
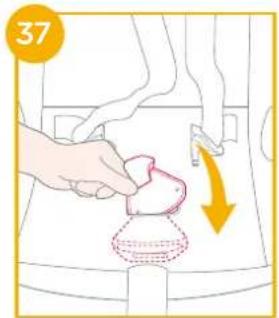
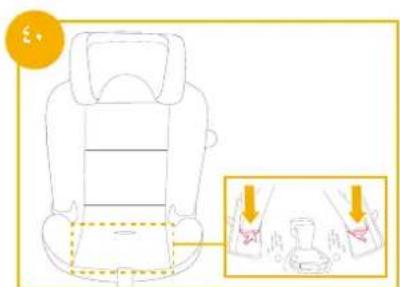
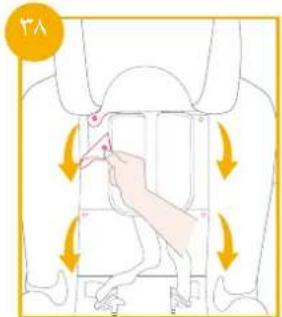
! Remove the infant insert when booster mode.
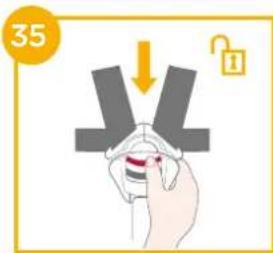
! Store the crotch belt cover in a safe place.
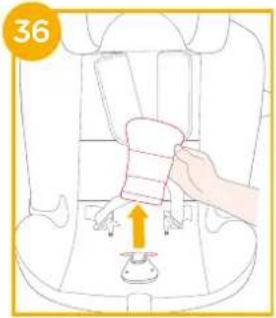
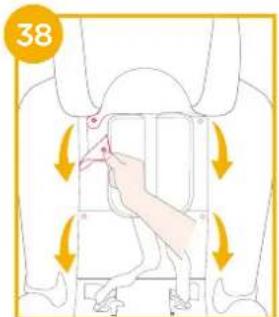
! Store the buckle and harness strap along with harness strap cover in the compartment as the images shown.


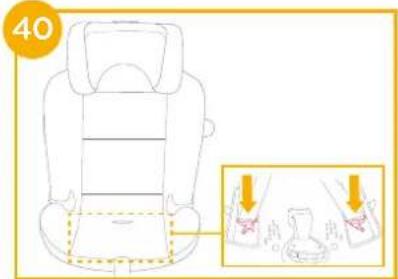
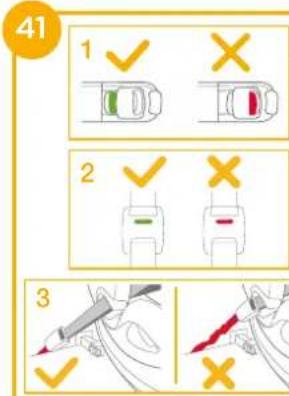
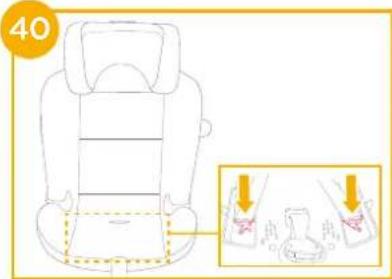
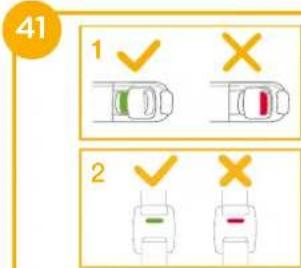
The colors of the indicators on both ISOFIX attachments connectors should be completely green. 1-1
The colors of the indicators on tether strap adjuster should be completely green. 2
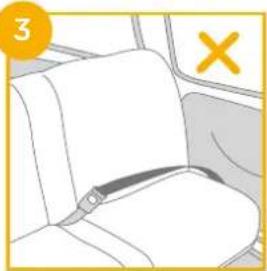
The enhanced child restraint can not be used if the vehicle safety belt buckle (female buckle end) is too long to anchor the enhanced child restraint securely. 3
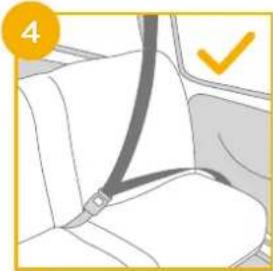
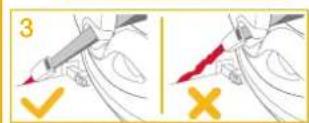
! Shoulder belt must pass through shoulder belt guide. 4
! Check to make sure the child restraint is securely installed by pulling on the both ISOFIX connectors.
! Never use a vehicle waist-only belt across front of child.
! Do not use shoulder belt loose or positioned under arm.
Do not use shoulder belt behind child's back.
! Do not allow child to slide down in the enhanced child restraint in case of strangulation.
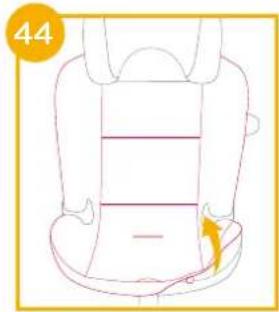
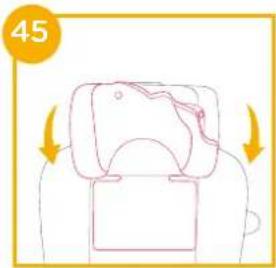
Detach Soft Goods
see images 45-45
Press the red button to disengage the buckle.
Follow steps 43 - 45 to detach soft goods.
To re-attach the soft goods please repeat the above steps in the reverse step.
Care and Maintenance
! Please wash the seat cover and inner padding with cold water under 30^ .
Do not iron the soft goods.
Do not bleach or dry clean the soft goods.
! Do not use undiluted detergents gasoline or other organic solvent to wash the enhanced child restraint or base. It may cause damage to the enhanced child restraint.
! Do not wring out the seat cover and inner padding to dry. It may leave the seat cover and inner padding with wrinkles.
Please hang dry the seat cover and inner padding in the shade.
! Please remove the enhanced child restraint and base from the vehicle seat if not in use for a long period of time. Put the enhanced child restraint in a cool, dry place where your child cannot access it.
! Do not tamper with the harness connectors during cleaning.

NOTE

Bem-vindo à Joie
I3roTOBNTenb 1. China Bambino Prezioso Co., Ltd
- China Wonderland Nurserygoods Co.,LTD
- CM. ΜιΓΟΤΟΒΙΝΕΝΑ Μα ΚιΚΕΤΚ ΜιδεΝΑ
**Ha Kopo6ke Bo3MoXHa MapKupOBka Allison GmbH (ebponeckoe nopa3eIeHne kOmnaHn)
BbI6Op cnocoba yctaHOBKn
IODRONOBHnKa I NneueBbIX peMHei
CM. pncyHKn


1.OTperpynyteNoIroIobHnIK npOBepbTe BbICOTy NpeYeBBIX peMHeN No pnc. 111213
BpeKIMeIINQOM npOTNB HnpaBHeHnI DnKHeHn IneEeBbIe pEmHIOJXHbI paONaratbcraHa ypOBHe nHnKe InepepehKa.
BpeKIMe CnEhBa-6yctepa nneueBbIe HnpaBnIoune Ipn peMHg 630NaChOCTN DoJKNbI paonaratbcn Ha ypoBHe nnepeBekka.
2.ПОДHIMITEpbYarDЯpeRyINPOBKNNoIroNOBHnKa n npN3TOMNOTAHNTeNOIRONBHKBBEpxnnBnH3TaK,TO6bI OHaueJIKNyCRB OOnHom N37NoJoxHeN.INoJoxHeNnNOIroNOBHnKa NOKa3aHbHa pnc.


YCTaHOBka OCHOBaHnA
CM.pncyHKn

!BCTaBbTe HnapBaNIOuOme ISOFIX B TOckK KpenneHnI ISOFIX (cm. pyKOBOcTBNO 3KcPnyataun ABTOMOJIJA).
1YTO6bI BbIDBHyTbФKcTopbI ISOFIX,HaxMNTe uJdepXnBaHTe KHOKNypeRyINpOBKn ISOFIX.15
!y6eNTecbTOM,TOo6a KpennneHnФKcaTopOBISOFIX HAdEHXO3aKpennHeBTOckax KpennneHnISOFIX.LBet INdikatopoB 06oxΦNKcATopOB ISOFIXdoJKeH6bITb3eJIeHbIM.18
I NotaHnTe 3a o6a qnkcatopa ISOFIX, YTO6bI npOBepuTb HAdexKHOCTb IN KpENHeH.
Y6eTeCb,TOO6aHnDnKaTopa ISOFIXnoracnInocne npcoeINHeHHaNkCaTOpOB ISOFIX.KaKdbnIHnDnKaTOpOB noka3bIbAeTnpaBnblHoCTb npcoeINHeHHaNkCaTopaISOFIX Ha coOTBeTCTByUoEi CTopoHE.17
!HaxMMTe Ha KhONky perynyTopa ISOFIXeue pa3 npxMMTe CnEHeK cINHKe KpeCna ABTOMOBnJ.18
!HakmTeHaKhONkyNbICBO6oDnTeФkCaTopbISOFIXn3CnCTemblKpennHeIISOFIX.
Chartne cnndHB
Ytobu n3Bneuy n3 aBTOMo6nna, HAKMITE Ha KHONky peyIaTopa ISOFIX uDocTaHbTe yNyUeHHOe detCKoe aBTOKpeCNo CcDHehba aBTOMo6nla.
Bo n36bexaHHe NOBpeXeHn BO BpEma DnNKeHn HaKmnte Ha KHOnKy peryIaTopa ISOFIX-1 n nonHocTBIO cNoxHTe qKCaTOp.2-2
BbHTHHe BepxHn KpeNekHbI pEmeHb Ha pa6oyu DnHy, HaxaB KHONky Ha peryIaTope KpeNexKhoro pemHra.
HaedekHO NOcOeHnHTe KpIok
KpeNEXKHO pEMH KToyKaM
KpeNEnHNAbTOMoBnIa.(CM.
pykoBOdCTBO No 3KnnyatauIN
abTOMoBnIa).
!KpOcK KpEnEKNHO pEMnH
DOnJKeH 6bIb HApExHo
NoCoeINHeN K KpeIneHIO.
HNkaTOp Ha peryIaTope
KpEnEKNHO pEMnH DoJIKeH 6bITb
NoHIOCTbO 3eJIeHbIM.
!Peped perynipobko yrna haKnnoHa npBepBe HaTaeKeHbe BepxHero KpeNekHO peMHra nIOocna6bTe erO,a noCte perynipOBkn 3aHOBn HATAHTE.
I INHnKaTOp BepxHoro KpeNexHoro peMnB(ueHTpe) He 3aropaetcB cnlyae HndexHoro npCoeDInHeHn BepxHoro KpeNexHoro peMn.
YcTaHOBKa BpeXmE JnC0m IpOTNB HApPabJIeHnI DnIXKeHnI
(PocT pe6eHka: 40-105 cm/ Bec pe6eHka: ≤ 18,5 Kr/ c MnaJeHcTeBa do 4 net)
CM.pncyHKn 39
YctahOBInTe ynyuWeHoe DetCkoe ABTOKpeCnHa 3aDHee CnDEhBe aBtOMoBnI. 3aTeM nOcaNte pe6EhKa BnyUWeHoe DetCkoe ABTOKpeCnIO.
HaXmIte Ha KhoNky nobopoTa, YTo6bl NOBepHyTb ABTOKpeCNO Dnry yOboCTBa NOcAkn/ BbICaKn peBeHka C60ky, a3aTeM NoBepHIte ABTOKpeCNO B NOJIOXeHne IINOM pOTNB HAnpaBHeHH DBXKeHH AEYABTOMO6nna.

!HaxMnTe Ha KhoNky NobopoTa C nObo CTOpObH, YTO6bI NOBepHyt bnyuueHHoe DetCKOE aBtOKpeCNO.
Фикcaцяpeбeнka
- YTo6bI yBEnuHTb DnHy nneYeBbIX pemHei, HaxMMTe Ha KhoNky peryunipOBKn pemHei N BbTaUNTe nneyeBOI pemHb Ha Heo6xOaMMyo DnHy. (TJHtE, DePkAcb 3a oBa noDnpeHuHa).
2.HaXMMTE Ha KpachyIO KHONkyIpacCTeHHTe npKKy pemHe.

3.3aФнксypуTe npKcO6eNx CTOpOH CnDeHbC MeTKaMn DnI npJKeK, YTObI yDo6Hee ycAnITb pe6eHkA B NOIOKeHH NlUcOM npOTNB HApBaJIeHr IDbIXeHnI.
IcnoJIb3OBAHne BknaDbIsha dJa MnaJeHueB
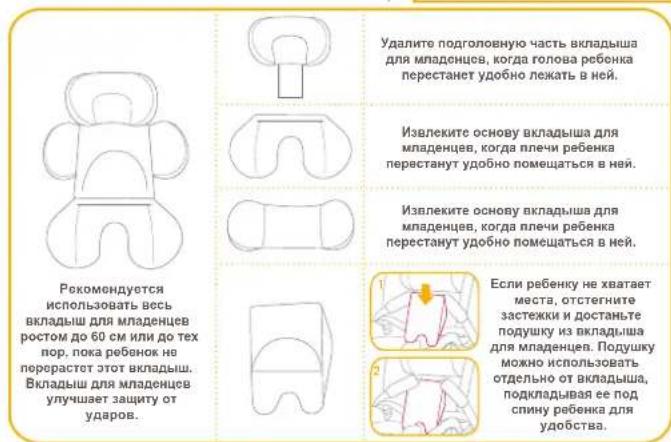
4.Ecnipe6eHOKBbipocnEmyHe XbataetMeCTa,N3BNEKeNTe NOIOKOTHNKnIINMaHEhKnX DeTei
- IocadntpebeKa B ynyuweHHoe DeTCKoe aBtOKpecno n nomecnte o6e pykn noP peMHn.
- 3acterHnTe npKky. Cm. pnc.
32


- Notarynte Bn3 perynipoboyhpeMeHb Ha HyKHyIO dINHy, cyTo6bXopoio 3aФNKcnpoBaTb peBeka.
063aTeIbHo npicteNbaIte pe6eHka pemHmM. PEmHn DOJXHBi 6bITb XopoOHaTHyTb, 6e3 npOBuCAHn.
IcnoIb3OBaHne BpeXnme cndeHb86yctepa
(PocT pe6eHka: 100-125 cm/ Bec pe6eHka: ≤ 25 Kr/ c 3 do 7 JeT)
CM.pncyHK 4-1
!YcTaHOBInTe ynyuWeHHoe DeTCKoe aBTOKpeCnO Ha cnDeHbe aBTOMObIy.3aTEM nocaIte pe6eHka B ynyuWeHHoe DeTCKoe aBTOKpeCnO.
34
!I3BNEKHTE BknaDbIu DnIaMnaDeHueBpeXmE CnDeHb86yctepa.
35
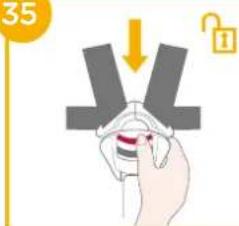
XpaHnTe HaknaKy dny naxOBoropemHb63oNacHom MeCTe.
XpaHnTe npRkky n pEmHn Bmectc HaKnJaKoI JnpeMHeB OTCKe IJxpaHeHn, KaK NOKa3aHO Ha PnCyHKax. 37183940
1BET INHINKATOPOB KpePHeHn o6oX fHKcaTOpOB ISOFIXdoJKeH 6bIb3eNEHbIM.
INHnKAtOp Ha peryIaTope KpenExHo rPeMHr DOJIKeH 6bITb NOJHOCTbIO 3eNEHbIM.12
YnyuHHeDcKoe ABTOKpeCNO 3anpeaetcNcNoB3ObaTb,ecn npKka peMHa630NaChOCTN (HHe3IOBAAyactb) CnIKoM DnIHHa n He No3BOJat HAdEXHO 3aKePmNTb yNyUHHeDeTcKoe ABTOKpeCNO.
IПпeчьагачбтpeMH6e3OanachocHTДОнЖHAIpoxoHtBuYepe3 IПпeчБуHnHaPnabJIryuOyDINPEmH6e3OanachocTn.4
IpoBepbTe HaJeXHocTh 3aKepeHnE HdTeCKOro ABToKpeCna,NotHyB 3a o6aФNKcatopa ISOFIX.
Kateropueckn 3anpeaaetc nCOnb3oBaTb TOnBko NOrCHO peMeHb, fKnCnpuyuou nToIbKO 6epa pe6eHa.
3aPepaaetcOCTabnTbIneueByuYacThpeMn6e3onachocHT HeHaTAYTo, a TAKKe paCNoIarTaB ee NODMbIKoN.
3anpeaaetcpaacnoaraTb nleuebyo qactb peHra 6e0nacHOCTN a cnHNOpe6eHa.
He donyckaTe cnon3aHnpe6eHaBHnB ynyuweHHOM DetCKOM abTOKpecne, TAK KAK 3TO MOKET PnBecTu KdyuWeHIO.
m = 311
i 1
jia jia jia jia jia jia jia jia jia jia jia jia jia jia jia jia jia jia jia jia jia jia jia jia jia jia jia jia jia jia jia jia jia jia jia jia jia jia jia
a jie 1jie jie jie jie jie jie
#
aill 1 jai jy jj gall pail y
J 1
gag aolal jn jy jba jas yu pbl gai jil 1
y 1 y
0a gaa e jai ay jil lalj 15! jball pail bil 12 aiai
Jabll Cnnn Jy 130 150 140 120 110 100 90 80 70 60 50 40 30 20 10 0
aui jui 1

ISOFIX aai paaa 1
yai yai i yai yai ai yai ai yai ai yai ai yai ai yai ai yai ai yai ai yai ai yai ai yai ai yai ai yai ai yai ai yai ai yai ai yai ai yai ai yai ai yai ai yai ai yai ai yai ai yai ai yai ai yai ai yai ai yai ai yai ai yai ai yai ai yai ai yai ai yai ai
Caa aalai jy jaygaiy
i
#
- -
y j 15j y jai ai ay jai jai ai jai i jai jai jai jai jai jai jai jai jai jai jai jai jai jai jai jai jai jai jai jai jai jai jai jai jai jai jai jai jai jai jai jai jai jai jai jai jai jai jai jai jai jai jai jai jai jai jai jai jai jai jali jali jali jali jali jali jali jali jali jali
yjss j 1
#
- -
eai jai bua
10.2.2.2.2.2
aia jao aai jil iinaia 1
13 13
yaii 11 yaiyaiyaiyaiyaiyaiyaiyaiyaiyaiyaiyaiyaiyaiyaiyaiyaiyaiyaiyaiyaiyaiyaiyaiyaiyaiyaiyaiyaiyaiyaiyaiyaiyaiyaiyaiyaiyaiyaiyaiyaiyaiyaiyaiyaiyaiyaiyaiyaiyaiyai
Jn JnJnJnJnJnJnJnJnJnJnJnJnJnJnJnJnJnJnJnJnJnJnJnJnJnJnJnJnJnJnJnJnJnJnJnJnJnJnJnJnJnJnJnJnJnJnJnJnJnJnJn
AaJyraJyI Jda JyaIgaaIgai Iy
- JALSLJNISIISIOISIOISIOISIOISIOISIOISIOISIOISIOISIOISIOISIOISIOISIOISIOISIOISIOISIOISIOISIOISIOISIOISIOISIOISIOISIOISIOISIOISIOISIOISIOISIOISIOISIOISIOISIOISIOISIOISIOISIOISIOISIOISIOISIOISIOISIOISIOISIOISIOISIOIS
jol jso jylll jao plj oIe 1


Jalil aqal jae laa jayla wali li jai ai
EJIJI EIGIJA JEAJAAIJI PAJA
jibai jbi ciis icciipjia jpi
gaa 15 jaihail gaijai jaih
1
Materiali Plastmasa, metals, audums
Patenta numurs Gaida patentu
Izvelieties uzstadisanas metodi
| ECE R129 | Bärna augums | Uzstädisana metode | Uzstädisana | Atsauces vecums | Atlekti stävokliss |
| 40 cm-105 cm/≤18,5 kg | Ar seju uz aizmuguri | aptuveni 4 gadi | 1.-6. pozificja | ||
| 100 cm-125 cm/≤25kg | Paliktna režimi | no 3 gadiem ildz 7 gadlem | 1.-6. pozificja |
Allison Baby UK Ltd,
Venture Point, Towers Business Park
Rugeley, Staffordshire, WS15 1UZ
NUNA International B.V.
Van der Valk Bourmanweg 178 C, 2352 JD Leiderdorp, The Netherlands