
GAS 15 Professional - Vacuum Cleaner BOSCH - Free user manual and instructions
Find the device manual for free GAS 15 Professional BOSCH in PDF.

| Product type | Wet and dry vacuum cleaner |
| Brand | Bosch |
| Model | GAS 15 Professional |
| Rated power input | 1,100 W (at 220–240 V) |
| Tank capacity (gross) | 15 L |
| Net liquid volume | 8 L |
| Dust bag volume | 8 L |
| Max. vacuum (vacuum cleaner) | 22 kPa |
| Max. flow rate (vacuum cleaner) | 33 L/s |
| Max. vacuum (turbine) | 27 kPa |
| Max. flow rate (turbine) | 53 L/s |
| Weight (EPTA 01:2014) | 9.6 kg |
| Voltage / Frequency | 220–240 V / 50–60 Hz |
| Protection class | II (double insulation) |
| Protection type | IP X4 |
| Main functions | Dry vacuuming, wet vacuuming, blowing, semi-automatic filter cleaning (SFC) |
| Automatic start/stop | Yes (only for model GAS 15 PS), max. connected tool power: 2,200 W (220–240 V) |
| Sound pressure level | 74 dB(A); uncertainty K = 3 dB |
| Vibrations (total value) | < 2.5 m/s²; uncertainty K = 1.5 m/s² |
| Maintenance and cleaning | Filter cleaning by SFC, replacement of pleated filter, cleaning the tank with non-abrasive detergent |
| Safety | Automatic shut-off float for wet vacuuming, splash water protection (IP X4), emergency stop |
| Spare parts and repairability | Filter, dust bag, gaskets, connectors; cable replacement by Bosch only |
| General information | Professional use on construction sites, workshops and industry for non-flammable dusts and liquids |
Frequently Asked Questions - GAS 15 Professional BOSCH
User questions about GAS 15 Professional BOSCH
0 question about this device. Answer the ones you know or ask your own.
Ask a new question about this device
Download the instructions for your Vacuum Cleaner in PDF format for free! Find your manual GAS 15 Professional - BOSCH and take your electronic device back in hand. On this page are published all the documents necessary for the use of your device. GAS 15 Professional by BOSCH.
USER MANUAL GAS 15 Professional BOSCH
OBJ_BUCH-3290-001 book Page 1 Thursday, July 13, 2017 9:41 AM
natural_image
Illustration of a Bosch vacuum cleaner with control panel and wheels (no text or symbols visible)Robert Bosch Power Tools GmbH
70538 Stuttgart
GERMANY
www.bosch-pt.com
1 609 92A 40A (2017.07) AS / 205 EURO

GAS Professional
15|15PS

BOSCH
OBI_BUCH-3290-001.book Page 5 Thursday, July 13, 2017 9:41 AM
5
1 609 92A 40A | (13.7.17) Bosch Power Tools
OBJ_BUCH-3290-001.book Page 6 Thursday, July 13, 2017 9:41 AM
6
1 609 92A 40A | (13.7.17) Bosch Power Tools
OBJ_BUCH-3290-001.book Page 7 Thursday, July 13, 2017 9:41 AM
7
Bosch Power Tools 1 609 92A 40A | (13.7.17)
8|Deutsch
Deutsch
Sicherheitshinweise


Read all safety warnings and all instructions. Failure to follow the warnings and instructions may result in electric shock, fire and/or serious injury.
Save these instructions.
This vacuum cleaner is not intended for use by children and persons with reduced physical, sensory or mental capabilities, or lack of expe-
rience and knowledge. Otherwise, there is a danger of operating errors and injuries.
▶ Supervise children. This will ensure that children do not play with the vacuum cleaner.
WARNING Do not vacuum materials that are harmful to one's health, e. g. dust from beech or oak wood, masonry dust, asbestos. These materials are considered carcinogenic.
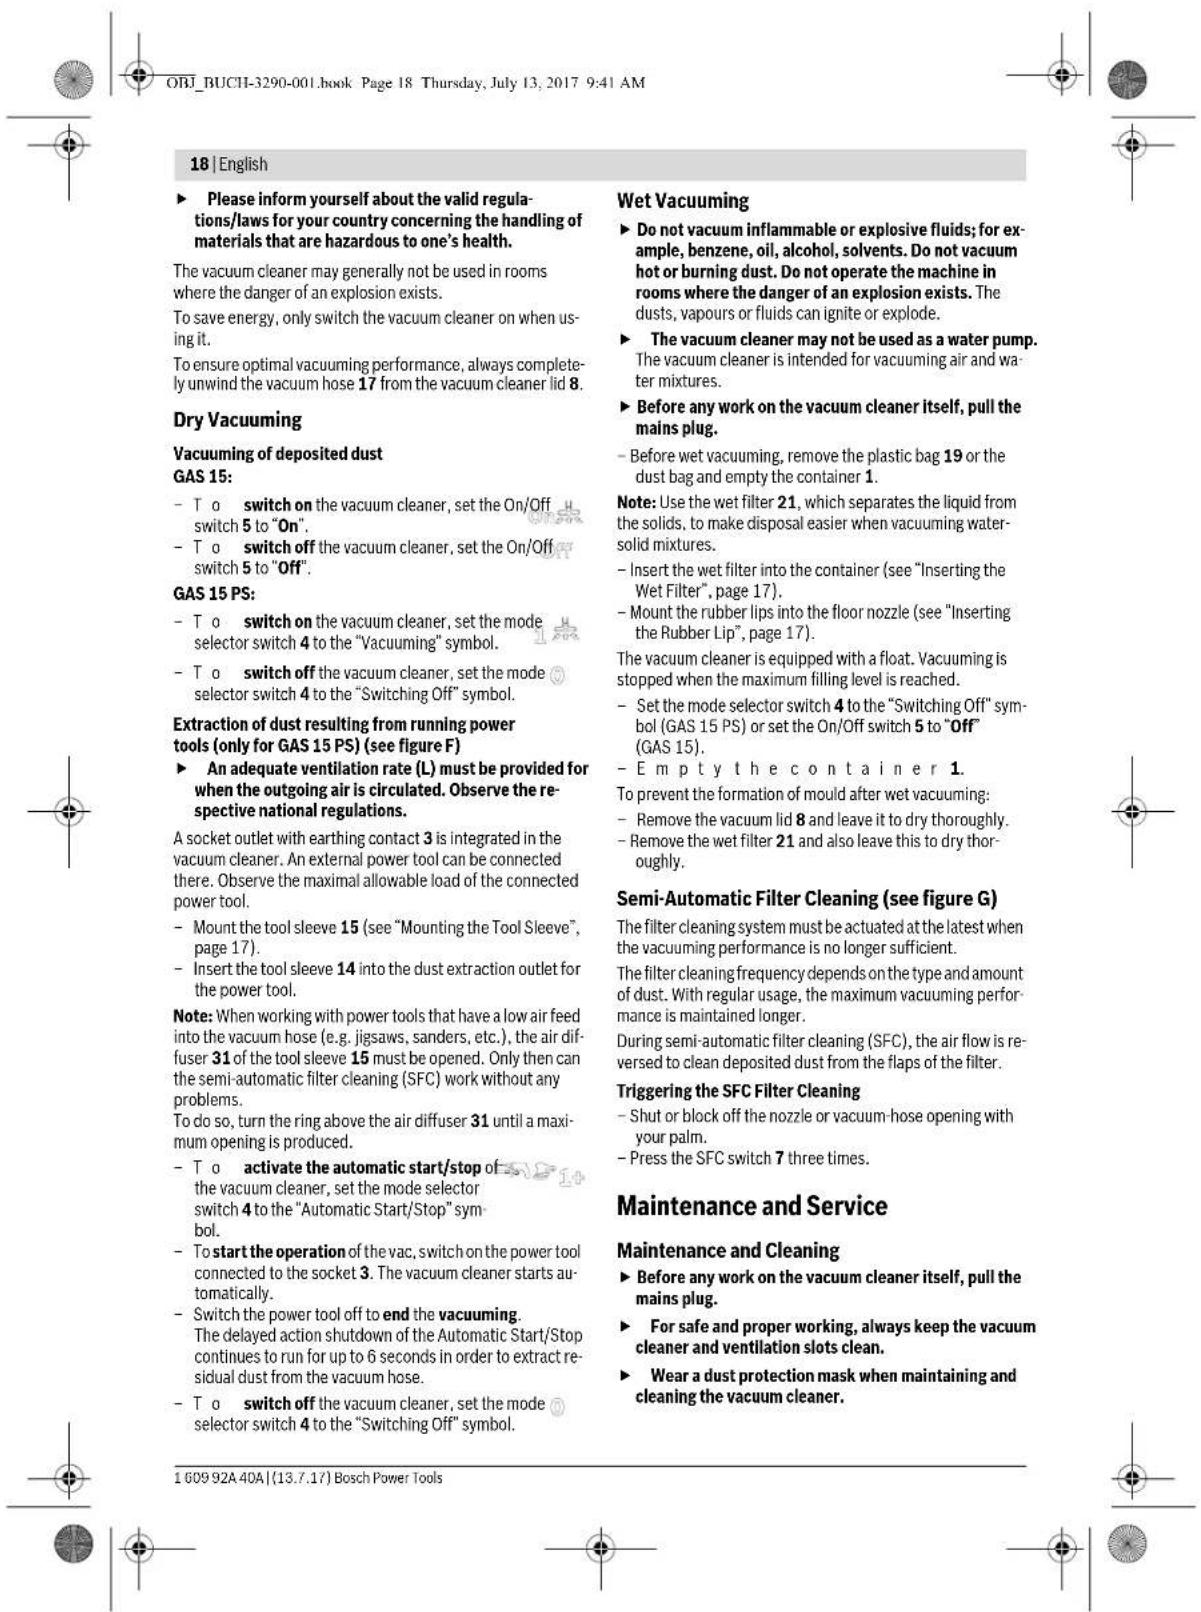
Inform yourself about the valid regulations/laws for your country concerning the handling of materials that are hazardous to one's health.
WARNING Use the vacuum cleaner only after having received sufficient information on its usage. A thorough introduction reduces operating errors and injuries.
WARNING The vacuum cleaner is suitable for vacuuming dry materials and, by taking suitable measures, also for vacuuming liquids. The penetration of liquids increases the risk of an electric shock.
▶ Do not vacuum inflammable or explosive fluids; for example, benzene, oil, alcohol, solvents. Do not vacuum hot or burning dust. Do not operate the machine in rooms where the danger of an explosion exists. The dusts, vapours or fluids can ignite or explode.
WARNING Use the socket only for the purposes specified in the operating instructions.
WARNING Switch the vacuum cleaner off immediately as soon as foam or water comes out, and empty the container. Otherwise, the vacuum cleaner can become damaged.
IMPORTANT Keep the vacuum cleaner away from rain or moisture. The penetration of water into the vacuum cleaner lid increases the risk of an electric shock.
IMPORTANT The vacuum cleaner may only be stored indoors.
IMPORTANT Clean the float at regular intervals, and check it for damage. Otherwise, its function can be impaired.
▶ When operating the vacuum cleaner in damp environments, use a residual current device (RCD). Using a residual current device (RCD) reduces the risk of an electric shock.
▶ Connect the vacuum cleaner to a properly earthed mains supply. The socket outlet and the extension cable must have an operative protective conductor.
Before each use, check the vacuum cleaner, cable and plug. Do not use the vacuum cleaner when defects are detected. Do not open the vacuum cleaner yourself and have it repaired only by qualified personnel using orig-
1 609 92A 40A | (13.7.17) Bosch Power Tools


inal spare parts. Damaged vacuum cleaner, cables and plugs increase the risk of an electric shock.
Do not drive over, crush or stretch the cable. Do not pull the cable to unplug the plug from the socket outlet or to move the vacuum cleaner. Damaged cables increase the risk of an electric shock.
Before maintaining or cleaning the vacuum cleaner, making any adjustments, changing accessories or placing the vacuum cleaner aside, remove the plug from the socket outlet. This safety measure prevents accidental starting of the vacuum cleaner.
▶ Provide for good ventilation at the working place.
▶ Have the vacuum cleaner repaired only through qualified specialists and only using original spare parts. This ensures that the safety of your vacuum cleaner is maintained.
Before restarting, check the proper condition of the vacuum hose. When doing this, leave the vacuum hose mounted to the vacuum cleaner to prevent dust from coming out. Otherwise, you could possibly inhale dust.
▶ Do not use the vacuum cleaner as a seat. The vacuum cleaner could become damaged.
▶ Use the mains cable and the vacuum hose carefully. Other persons could be harmed.
▶ Do not clean the vacuum cleaner with a water jet pointed directly at it. The penetration of water into the vacuum cleaner lid increases the risk of an electric shock.
Symbols
The following symbols could have a meaning for the use of your vacuum cleaner. Please take note of the symbols and their meaning. The correct interpretation of the symbols will help you to use the vacuum cleaner in a better and safer manner.
Symbols and their meaning

CAUTION Read all safety warnings and all instruc-
tions. Failure to follow the warnings and instructions may result in electric shock, fire and/or serious injury.


Symbols and their meaning

Do not hang the vacuum cleaner, e. g. for transport purposes, to a crane hook. The vacuum cleaner is not suitable for handling by crane. Danger of injury and causing damage.

▶ Do not use the vacuum cleaner as a seat, ladder or stepladder. The vacuum cleaner can tip over and become damaged. Danger of injury.
Symbols and their meaning (GAS 15)


Switching Off

Vacuuming
Vacuuming of deposited dust
Symbols and their meaning (GAS 15 PS)


Automatic Start/Stop feature
Extraction of dust resulting from running power tools
The vacuum cleaner automatically switches on and off with a time delay
Switching Off

Vacuuming
Vacuuming of deposited dust
Specification of the allowable load of the connected power tool (country-specific)
Product Description and Specifications
Intended Use
The vacuum cleaner is intended for collecting, vacuuming, conveying and separating non-flammable dry dusts, non-flammable liquids and a water-air mixture. It is suitable for the increased demands in professional use, e.g. in trade, industry and workshops.
Use the vacuum cleaner only when you fully understand and can perform all functions without limitation, or have received appropriate instructions.


Bosch Power Tools 1 609 92A 40A | (13.7.17)


16 | English
Product Features
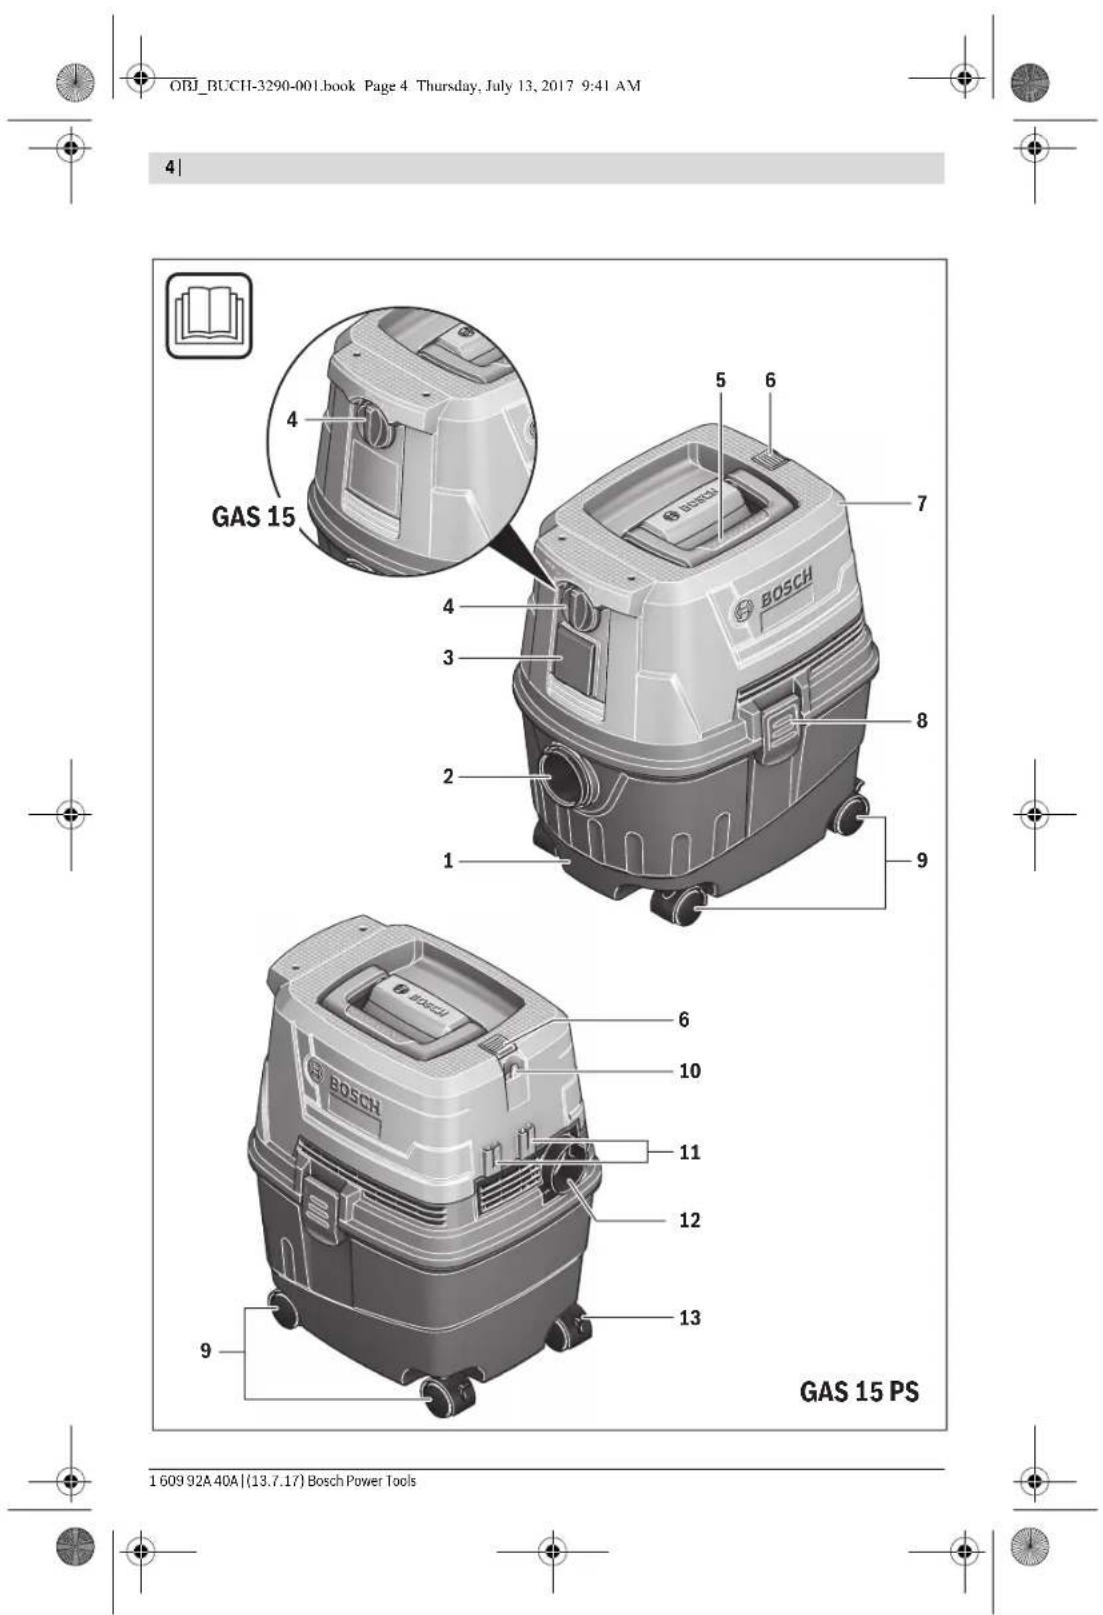
The numbering of the product features refers to the illustration of the vacuum cleaner on the graphics page.
1 Container
2 Hose connection piece (vacuuming function)
3 Socket for power tool(GAS 15 PS)
4 Mode selector switch(GAS 15 PS)
5 On/Off switch(GAS 15)
6 Carrying handle
7 SFC switch
8 Vacuum lid
9 Latch of the vacuum cover
LO Castor
L1 Vacuum-hose holder
L2 Holder for vacuum tubes
L3 Hose connection piece (blower function)
L4 Castor brake
L5 Tool sleeve(GAS 15 PS)
16 Retaining strap of the vacuum hose
17 Vacuum hose
18 Elbow
19 Plastic bag/Dust bag*
20 Filter
21 Wet filter
22 Crevice nozzle
23 Rubber lip
24 Brush insert
25 Floor nozzle
26 Vacuum tube
27 Snap-fastener
28 Clips for securing the plastic bag
29 Filter holder
30 Filter basket
31 Air diffuser
*Accessories shown or described are not part of the standard delivery scope of the product. A complete overview of accessories can be found in our accessories program.
Technical Data
| Wet/dry vacuum cleaner | GAS 15 | GAS 15 PS | |
| Article number | 3 601 JE5 0.. 3 601 JE5 1.. | ||
| Rated power input | W | 1 | 1 |
| Frequency | Hz 50/60 50/60 | ||
| Container volume (gross) | l | 1 | 5 |
| Net volume (for fluids) | l | 8 | 8 |
| Dust bag contents | l | 8 | 8 |
| Max. vacuum pressure* | |||
| - Dust extractor | kPa | 22 | 22 |
| - Turbine | kPa | 27 | 27 |
| Max. flow rate* | |||
| - Dust extractor | l/s | 33 | 33 |
| - Turbine | l/s | 53 | 53 |
| Automatic Start/Stop feature | - | ● | |
| Weight according to EPTA-Procedure 01:2014 | kg | 9,6 | 9,6 |
| Protection class | ☐ /II | ⊕ /I | |
| Degree of protection | IP X4 | IP X4 | |
* Measured with a ∅ 35 mm and 3 m long vacuum hose
The values given are valid for nominal voltages [U] of 230 V. For lower voltage and models for specific countries, these values can vary.
Automatic Start/Stop feature*
| Rated voltage | max. power output | min. power output | |
| JP | 100 V | 1050 W | 100 W |
| TW | 115 V | 1050 W | 100 W |
| CN | 220 V | 1100 W | 100 W |
| High voltage | 220–240 V | 2200 W | 100 W |
* Specification of the allowable load of the connected power tool (country-specific)
Noise/Vibration Information
Sound emission values determined according to EN 60335-2-69.
Typically the A-weighted sound pressure level of the vacuum cleaner is 74dB(A). Uncertainty K=3 dB.
The noise level when working can exceed 80 dB(A).
Wear hearing protection!
Vibration total values a_h (triax vector sum) and uncertainty K determined according to EN 60335-2-69:
a_1<2,5m/s^2,K=1,5m/s^2.


OBJ_BUCH-3290-001.book Page 17 Thursday, July 13, 2017 9:41 AM
English | 17
Assembly
▶ Before any work on the vacuum cleaner itself, pull the mains plug.
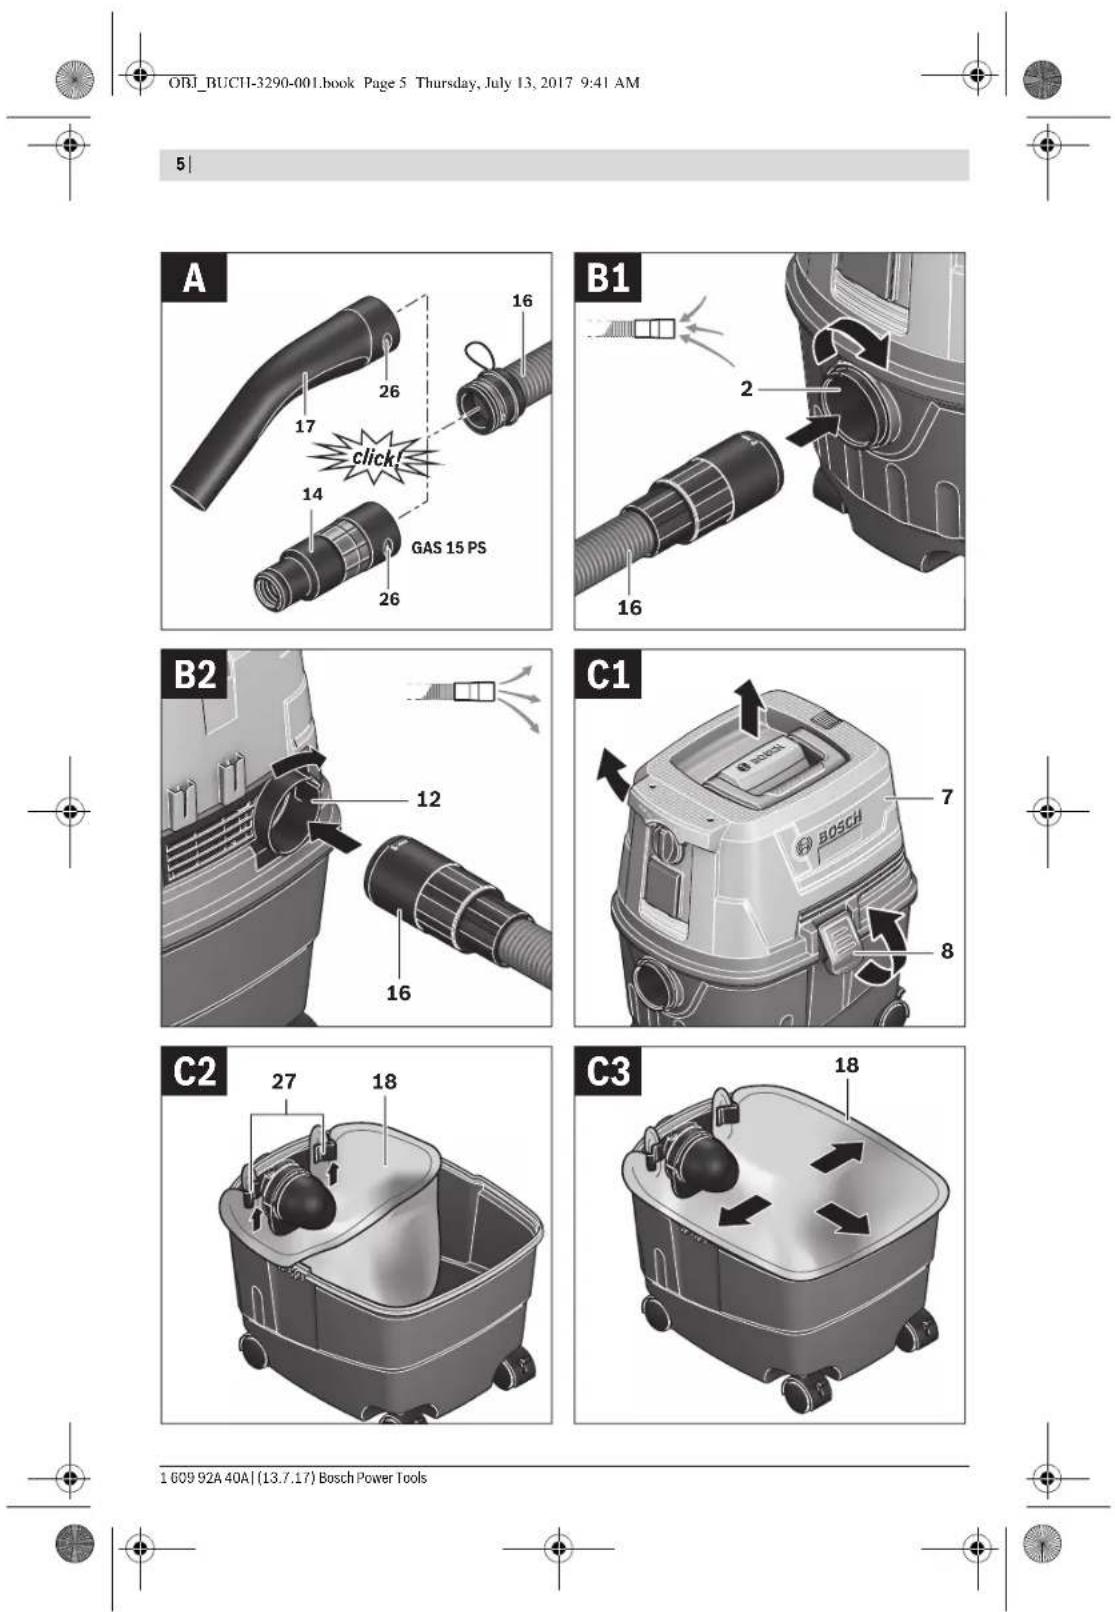
Mounting VAC Accessories (see figure A)
The vacuum hose 17 is equipped with a clip system, with which the VAC accessories (tool sleeve 14, elbow 17) can be connected.
Mounting the Tool Sleeve (GAS 15 PS)
- Mount the tool sleeve 15 onto the vacuum hose 17 until both snap-fasteners 27 of the vacuum hose can be heard to engage.
- To disassemble, press both snap-fasteners 27 inward and pull the components apart.
Mounting Nozzles and Tubes
- Mount the elbow 18 onto the vacuum hose 17 until both snap-fasteners 27 of the vacuum hose can be heard to engage.
- Afterwards, mount the desired VAC accessory (floor nozzle, crevice nozzle, vacuum tube, etc.) firmly onto the elbow 18.
- To disassemble, press both snap-fasteners 27 inward and pull the components apart.
Mounting the Vacuum Hose
Vacuuming function (see figure B1)
- Insert the vacuum hose 17 into the hose connection piece 2 and turn it all the way in clockwise direction.
Note: While vacuuming, an electrostatic charge develops in the vacuum hose and accessories caused by the friction of the dust, which the operator could experience in the form of static discharging (dependent on environmental influences and physical perception).
As a general rule, Bosch recommends using an anti-static vacuum hose (accessory) when vacuuming fine dusts and dry materials.
Blower Function (see figure B2)
The vacuum cleaner has a blower function. Do not blow the outgoing air randomly in enclosed areas. Use the blower function only with the a clean hose. Dusts can be hazardous to one's health.
- Switch on the vacuum cleaner for at least 5 seconds (GAS 15: On/Off switch 5 to "On"; GAS 15 PS: Mode selector switch 4 to the "Vacuuming" symbol) to clean the vacuum hose 17 of dust deposits.
- Turn the vacuum hose 17 all the way in anti-clockwise direction and pull it out of the hose connection piece 2.
- Insert the vacuum hose 17 into the hose connection piece 13 and turn it all the way in clockwise direction.
Inserting/Removing the Plastic Bag or Dust Bag (Dry Vacuuming) (see figures C1 -C4)
For dry vacuuming, you can insert a plastic bag 19 or a dust bag (accessory) into the vacuum cleaner. This makes the dust easier to dispose of.
Inserting the Plastic Bag
- Unlock the latches 9 and remove the vacuum lid 8.
- Insert the plastic bag 19 into the container 1 with the intake hole facing forward. Secure the plastic bag under the suction hole using the clips 28.
- Ensure that the plastic bag 19 is completely up against the inner walls of the container 1.
- Fold the rest of the plastic bag 19 over the rim of the container 1.
- Reattach the vacuum lid 8 again and lock the latches 9.
Removing and Sealing the Plastic Bag
- Unlock the latches 9 and remove the vacuum lid 8.
- Pull the edge of the full plastic bag 19 backwards out of the clips 28.
- Carefully take the plastic bag 19 out of the vacuum cleaner without damaging it.
When doing so, make sure that the plastic bag does not scrape against the suction hole or other sharp objects.
Replacing/Inserting the Dust Bag (Accessory)
- Unlock the latches 9 and remove the vacuum lid 8.
- Pull off the full dust bag 18 from the connection flange toward the rear. Close the opening of the dust bag by folding down the lid. Remove the closed dust bag from the vacuum cleaner.
- Work the new dust bag over the connection flange of the vacuum cleaner. Make sure that the dust bag faces completely against the interior sides of the container 1 over its full length.
- Reattach the vacuum lid 8 again and lock the latches 9.
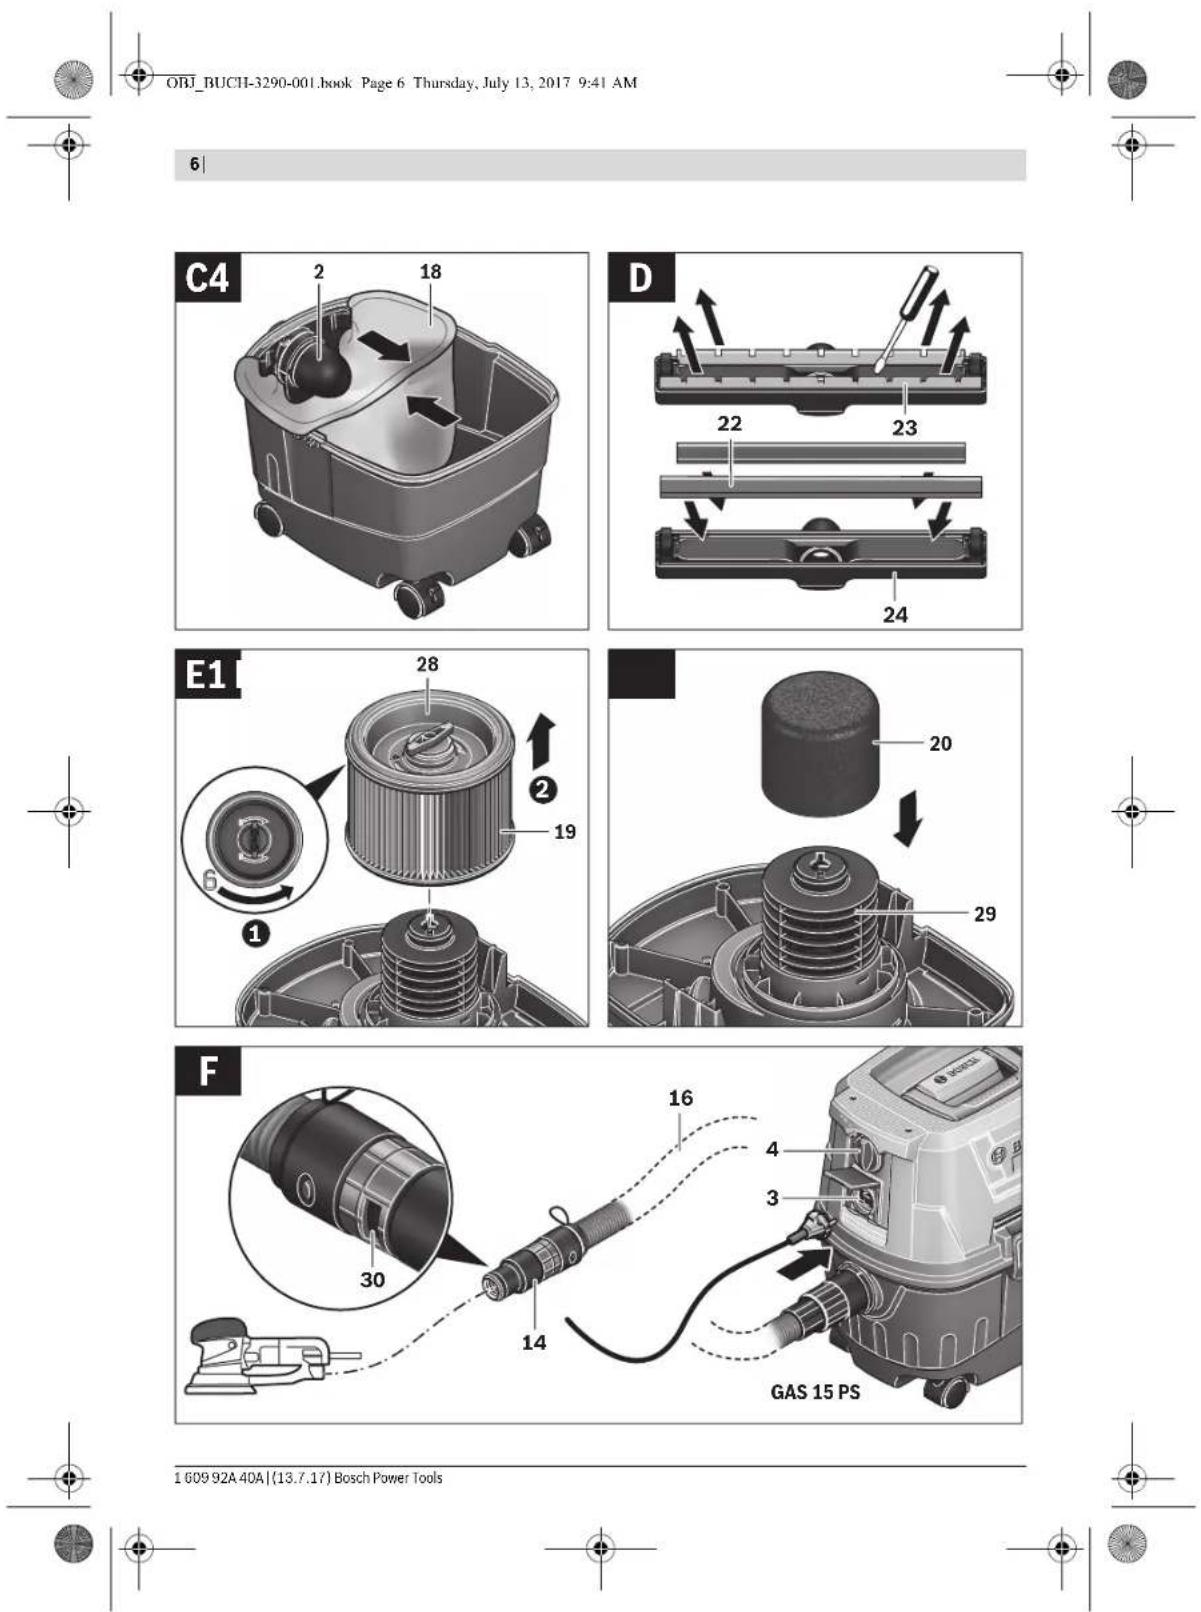
Inserting the Rubber Lip (Wet Vacuuming) (see figure D)
- Carefully pry the brush inserts 24 out of the floor nozzle 25 using a suitable tool.
- Insert the rubber lips 23 into the floor nozzle 25.
Note: The structured side of the rubber lips must face outward.
Inserting the Wet Filter (Wet Vacuuming) (see figures E1–E2)
- Unlock the latches 9 and remove the vacuum lid 8.
- Turn the filter holder 29 all the way in direction of rotation "6" and take the filter holder together with the filter 20 out of the container 1.
- Put the wet filter 21 over the filter basket 30.
- Reattach the vacuum lid 8 again and lock the latches 9.
Operation
Starting Operation
▶ Observe the mains voltage! The voltage of the power source must correspond with the data on the type plate of the vacuum cleaner.
English | 19
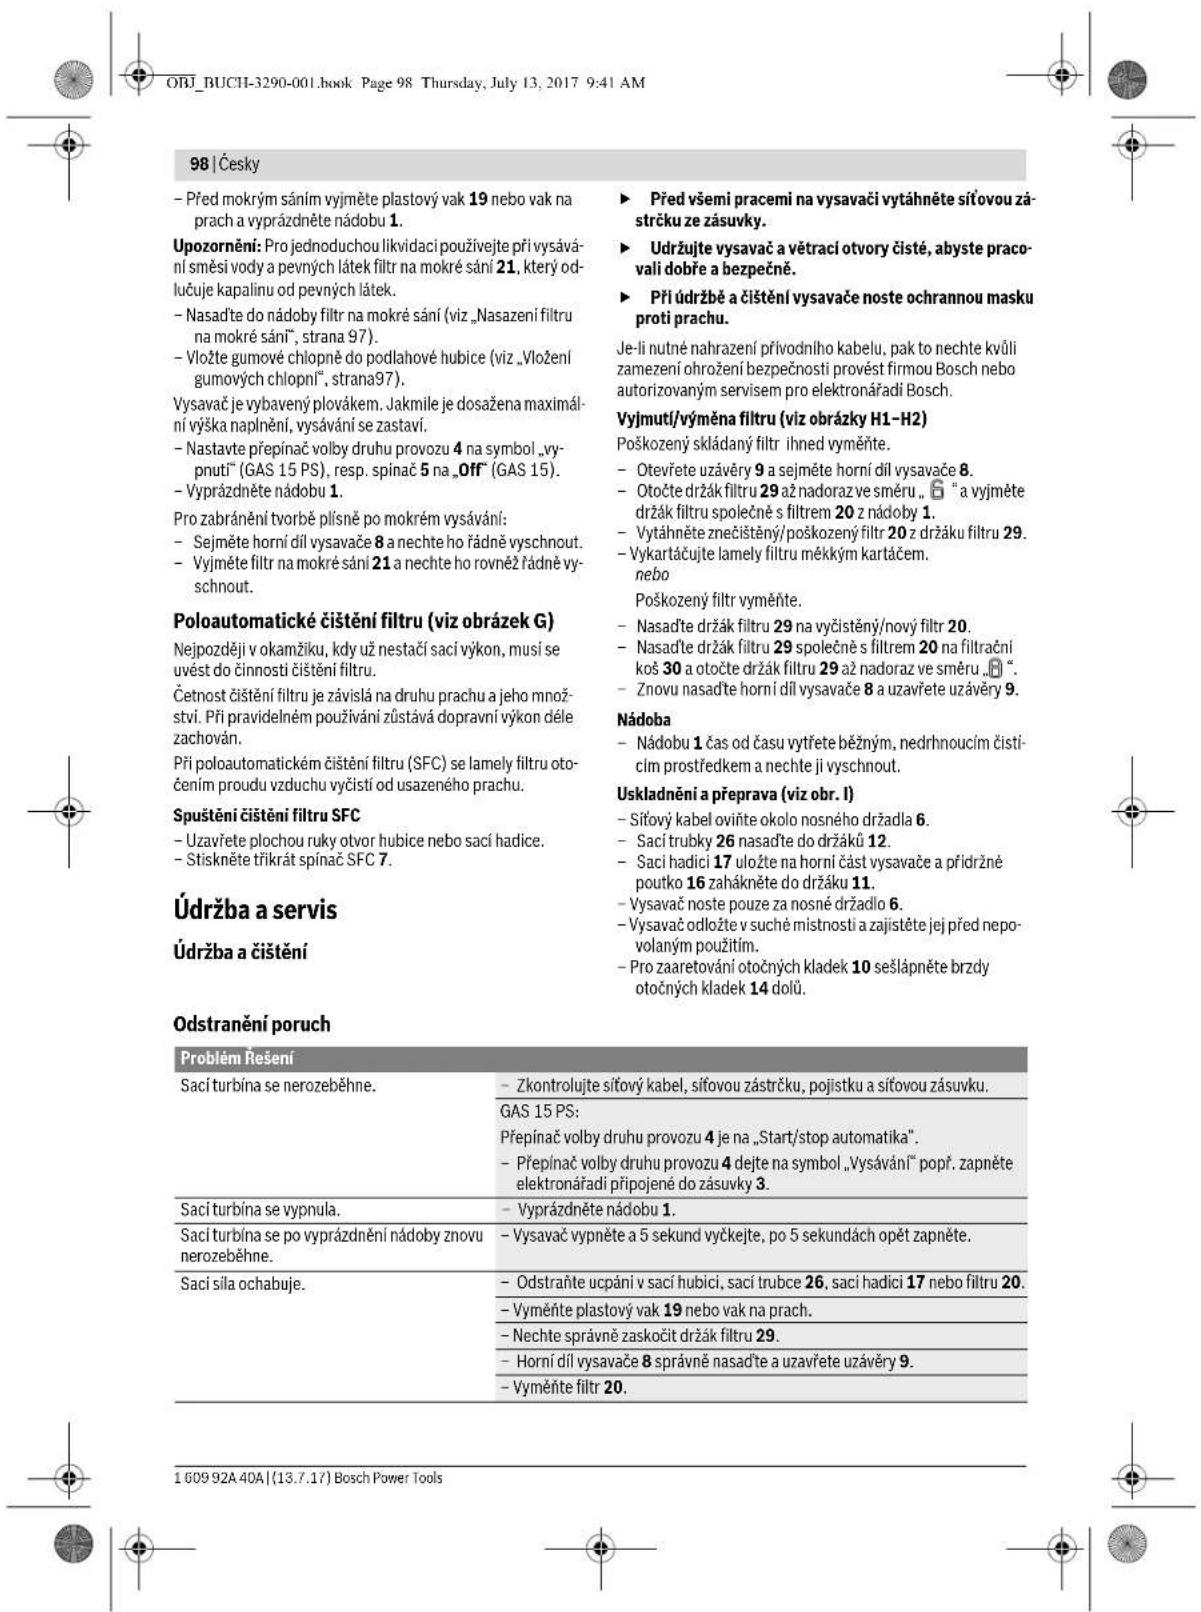
If the replacement of the supply cord is necessary, this has to be done by Bosch or an authorized Bosch service agent in order to avoid a safety hazard.
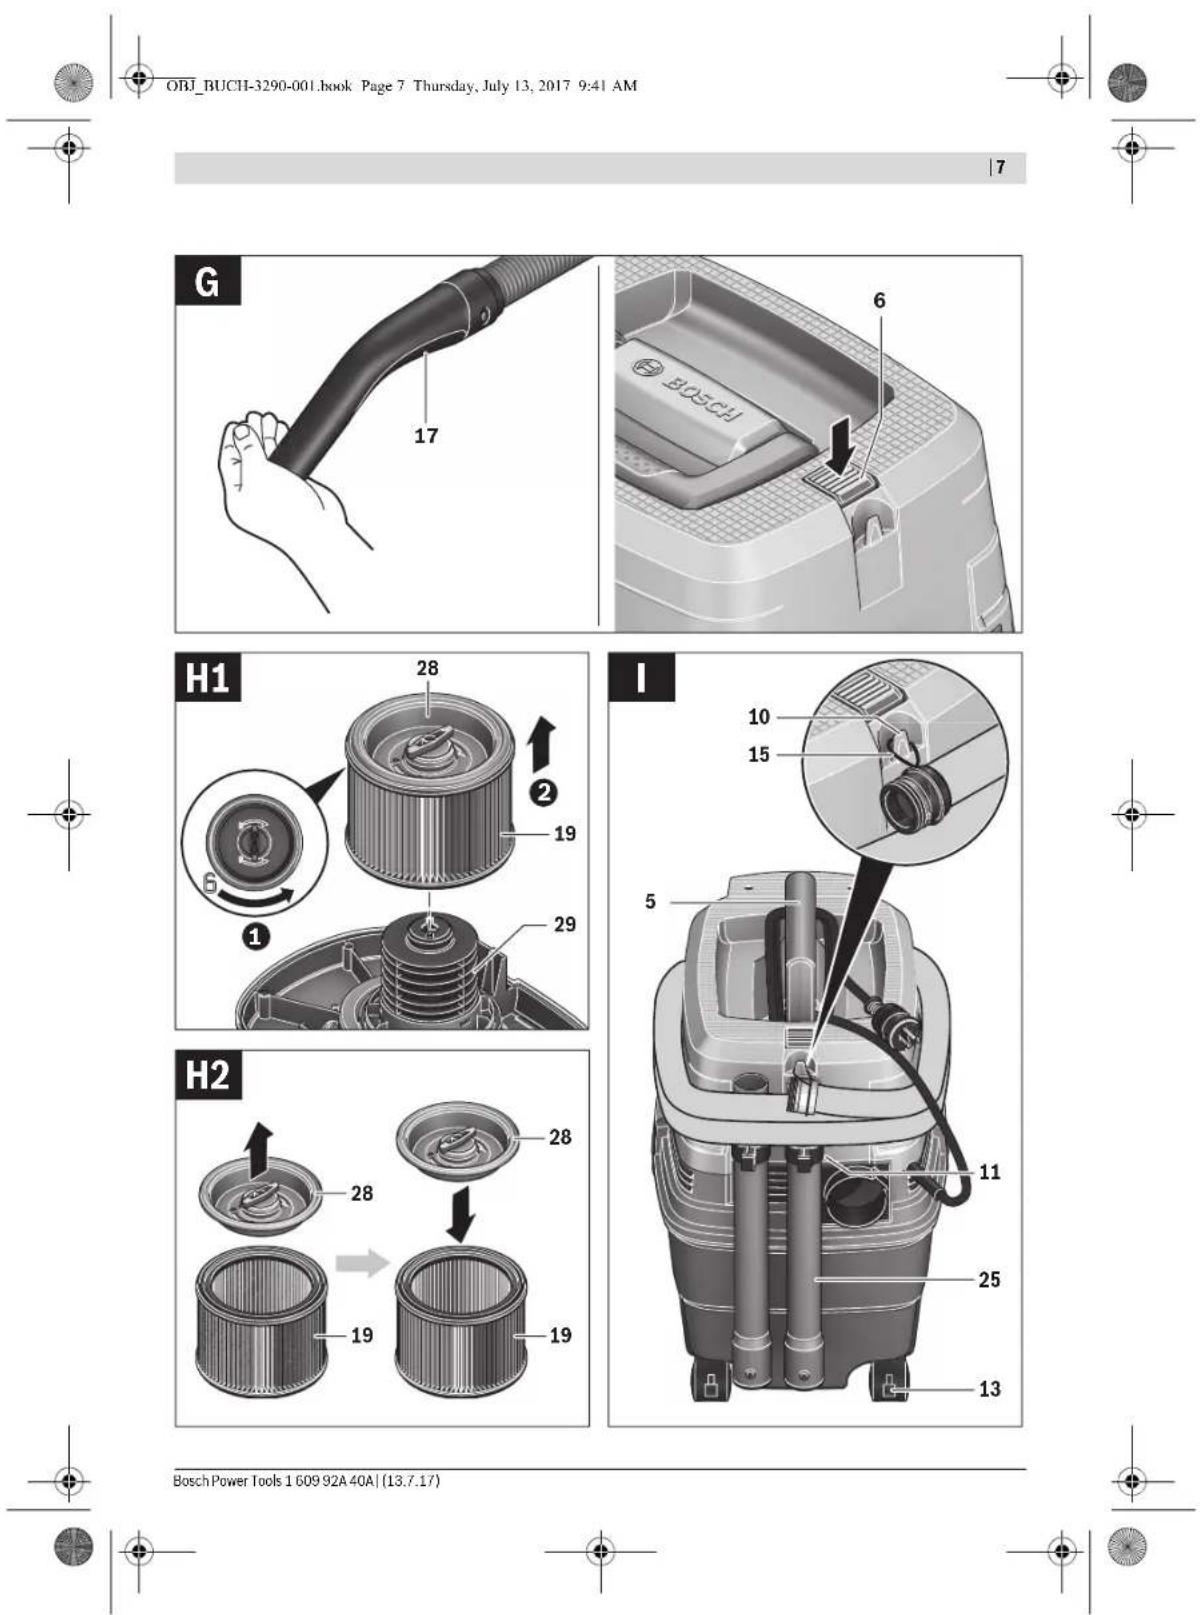
Removing/Changing the Filter (see figures H1-H2)
Replace a damaged pleated filter immediately.
- Unlock the latches 9 and remove the vacuum lid 8.
- Turn the filter holder 29 all the way in direction of rotation "6" and take the filter holder together with the filter 20 out of the container 1.
- Pull the dirty/damaged filter 20 off the filter holder 29.
- Brush down the flaps of the filter with a soft brush. or
Replace a damaged filter. - Attach the filter holder 29 to the cleaned/new filter 20.
- Put the filter holder 29 together with the filter 20 over the filter basket 30 and turn the filter holder 29 all the way in direction of rotation
- Reattach the vacuum lid 8 again and lock the latches 9.
Container
- Wipe out the container 1 from time to time with a commercially available, non-scouring cleaning agent and allow to dry.
Storage and Transport (see figure I)
- Wrap the power cable around the carrying handle 6.
- Insert the vacuum tubes 26 into the holders 12.
- Put the vacuum hose 17 around the vacuum lid and hang the retaining strap 16 on the holder 11.
- Carry the vacuum cleaner only by the carrying handle 6.
- Store the vacuum cleaner in a dry room and secure it against unauthorised use.
- To lock the castors 10, actuate the castor brakes 14 by pushing down.
Correction of Malfunctions
| Problem Corrective Measure | |
| The vacuum turbine does not start. | - Check the mains cable, mains plug, fuse and socket. |
| GAS 15 PS:Mode selector switch 4 set to "Start/Stop automatic".- Set mode selector switch 4 to the "vacuum" symbol and switch the power tool connected to the socket outlet 3 on. | |
| Vacuum turbine switches off. | - Empty container 1. |
| Vacuum turbine does not restart after emptying the container. | - Switch vacuum cleaner off and wait 5 seconds; switch on again after 5 seconds. |
| Vacuuming power decreases. | - Remove any blockages from the vacuum nozzle, vacuum tube 26, vacuum hose 17 or filter 20. |
| - Change the plastic bag 19 or dust bag. | |
| - Properly engage the filter holder 29. | |
| - Mount vacuum cleaner lid 8 properly and lock latches 9. | |
| - Change the filter 20. | |
| Dust escapes during vacuuming | - Check that the filter 20 has been installed correctly. |
| - Change the filter 20. | |
| The automatic shut-off (wet vacuuming) does not respond. | The automatic shut-off does not function with non-conductive liquids or foam/bubbles.- Monitor the level continuously. |
| Filter cleaning inoperative. | - Press the SFC switch 7. |
After-sales Service and Application Service
Our after-sales service responds to your questions concerning maintenance and repair of your product as well as spare parts. Exploded views and information on spare parts can also be found under:
www.bosch-pt.com
Bosch's application service team will gladly answer questions concerning our products and their accessories.
In all correspondence and spare parts orders, please always include the 10-digit article number given on the nameplate of the product.
Bosch Power Tools 1 609 92A 40A | (13.7.17)
20 | Français
Great Britain
Robert Bosch Ltd. (B.S.C.)
P.O. Box 98
Broadwater Park
North Orbital Road
Denham
Uxbridge
UB 9 5HJ
At www.bosch-pt.co.uk you can order spare parts or arrange
the collection of a product in need of servicing or repair.
Tel. Service: (0344) 7360109
E-Mail: boschservicecentre@bosch.com
Ireland
Origo Ltd
Unit 23 Magna Drive
Magna Business Park
City West
Dublin 24
Tel. Service: (01) 4666700
Fax: (01) 4666888
Australia, New Zealand and Pacific Islands
Robert Bosch Australia Pty. Ltd.
Power Tools
Locked Bag 66
Clayton South VIC 3169
Customer Contact Center
Inside Australia:
Phone: (01300) 307044
Fax: (01300) 307045
Inside New Zealand:
Phone: (0800) 543353
Fax: (0800) 428570
Outside AU and NZ:
Phone: +61 3 95415555
www.bosch-pt.com.au
www.bosch-pt.co.nz
Republic of South Africa
Customer service
Hotline: (011) 6519600
Gauteng - BSC Service Centre
35 Roper Street, New Centre
Johannesburg
Tel.: (011) 4939375
Fax: (011) 4930126
E-Mail: bsctools@icon.co.za
KZN - BSC Service Centre
Unit E. Almar Centre
143 Crompton Street
Pinetown
Tel.: (031) 7012120
Fax: (031) 7012446
E-Mail: bsc.dur@za.bosch.com
Western Cape - BSC Service Centre
Democracy Way, Prosperity Park
Milnerton
Tel.: (021) 5512577
Fax: (021) 5513223
E-Mail: bsc@zsd.co.za
Bosch Headquarters
Midrand, Gauteng
Tel.: (011) 6519600
Fax: (011) 6519880
E-Mail: rbsa-hq.pts@za.bosch.com
Disposal
The vacuum cleaner, accessories and packaging should be sorted for environmental-friendly recycling.

Do not dispose of the vacuum cleaner into house-hold waste!
Subject to change without notice.
Français

OBJ_BUCH-3290-001.book Page 28 Thursday, July 13, 2017 9:41 AM
28 | Español


Bosch Service Center
Telegrafvej 3
2750 Ballerup
På www.bosch-pt.dk kan der online bestilles reservedele eller oprettes en reparations ordre.
Tlf. Service Center: 44898855
Fax: 44898755
E-Mail: vaerktoej@dk.bosch.com
Bortskaffelse

Bosch Service Center
Telegrafvej 3
2750 Ballerup
Danmark
Tel.: (08) 7501820 (inom Sverige)
Fax:(011)187691
Avfallshantering
OBJ_BUCH-3290-001.book Page 67 Thursday, July 13, 2017 9:41 AM
Norsk|67

OBJ_BUCH-3290-001.book Page 76 Thursday, July 13, 2017 9:41 AM
76 | Ελληνικά

Robert Bosch Sp. z o.o. BSC


OBJ_BUCH-3290-001.book Page 97 Thursday, July 13, 2017 9:41 AM
Česky|97
The Ground Truth image displays a single, solid horizontal line. According to Rule 2 (UNDERSCORE & LINE RULES), if the GT contains lines used for text emphasis or as background lines (like ruled paper), the OCR result must ignore them. The line in the GT is a stylistic or background line, not a placeholder for text input. Therefore, the OCR should not have output any underscores. Outputting `____` constitutes an error under Rule 2, as it hallucinates placeholder symbols where none are semantically intended. Hence, the OCR result is inconsistent with the Ground Truth.


Bosch Service Center PT
K Vápence 1621/16
692 01 Mikulov


Service scule electrice
Strada Horia Măcelariu Nr. 30–34, sector 1
013937 Bucureşti
Service scule electrice
Strada Horia Măcelariu Nr. 30-34, sector 1
013937 Bucureşti, România
www.bosch-pt.com/bg/bg/
Бракуване

▶ Ne vešajte usisivač na primer za transport za kuke za dizalicu. Usisivač nije pogodan za dizalicu. Postoji opasnost od povrede i oštećenja.

▶ Ne koristite usisivač kao priliku da sednete, kao merdevine ili hodanje. Usisivač se može prevrnuti i oštetiti. Postoji opasnost od povrede.
OBJ_BUCH-3290-001.book Page 156 Thursday, July 13, 2017 9:41 AM
156 | Srpski
Usisavanje nastale prašine od električnog alata koji je u radu (samo za GAS 15 PS) (pogledajte sliku F)
Ako se u prostoriju vraća odlazni vazduh, u prostoriji se mora obezbediti dovoljan broj izmena vazduha (L). Treba poštovati odgovarajuće nacionalne propise.
U usisivač je ugradjena jedna utičnica sa zaštitnim kontaktom 3. Možete tu priključiti neki spoljni električni alat. Obratite pažnju na maksimalno dozvoljenu snagu priključivanja priključenog električnog alata.
- Montirajte naglavak za alat 15 (pogledajte „Montiranje naglavka za alat“, Stranu 154). - Utaknite usisni adapter 14 u usisne nastavke električnog alata.
Uputstvo: Prilikom radova sa električnim alatima, čiji je dotok vazduha u usisno crevo mali (npr. ugaone testere, brusilice itd.), morate da otvorite otvor za infiltrirani vazduh 31 na nastavku alata 15. Na taj način bez problema može da radi poluautomatsko čišćenje filtera (SFC). Uz to obrnite prsten iznad otvora za infiltrirani vazduh 31, dok ne nastane maksimalan otvor.
- Z a puštanje u rad automatskog pokretanja/zaustavljanja usisivača prekidač za biranje režima rada 4 postavite na simbol „Automatsko pokretanje/zaustavljanje“. - Uključite za puštanje u rad usisivača električni alat 3 priključen na utičnicu. Usisivač automatski startuje. - Isključite električni alat, da bi usisavanje završili. Dodatna funkcija Start/Stop-Automatike radi još do 6 sekundi, da bi usisao zaostalu prašinu iz usisnog creva. - K a k o b i s t e isključili usisivač, prekidač za bir vrsta režima rada 4 postavite na simbol „Isključivanje“.
Mokro usisavanje


OBJ_BUCH-3290-001.book Page 170 Thursday, July 13, 2017 9:41 AM
170 | Eesti

TÄHELEPANU
Tolmuimejat tohib hoida vaid si-seruumides.

TÄHELEPANU

- Ärge riputage tolmuimejat (nt transportimiseks) tösteseadeldise konksu otsa. Tolmuimeja ei ole teisaldatav tösteseadeldisega. Vigastuste ja kahjustuste oht. - Ärge kasutage tolmuimejat istme, redeli ega taburetina. Tolmuimeja vöib ümber minna ja kahjustada saada. Vöite ennast vigastada.

OBJ_BUCH-3290-001.book Page 176 Thursday, July 13, 2017 9:41 AM
176 | Latviešu

Central Motors & Equipment LLC
: 1984 البريد
:+ 964 7901906953hatف
Malatan Trading & Contracting LLC
: 131 البريد
سلطنة عمان
:+968 99886794hatf
: malatanpowertools@malatan.net الابتراني
قطر
International Construction Solutions W L L
البريد 51 : الدوحة
ال,’م,”و’ي,”م“ا ي,”م“ق,”م“ع,”م“ع,”م“ع,”م“ع,”م“ع”
(E1 - E2 Manufacturer)
( Cancer 1 - Cancer 2 - Cancer 3 - Cancer 4 - Cancer 5 - Cancer 6 - Cancer 7 - Cancer 8 - Cancer 9 - Cancer 10 - Cancer 11 - Cancer 12 - Cancer 13 - Cancer 14 - Cancer 15 - Cancer 16 - Cancer 17 - Cancer 18 - Cancer 19 - Cancer 20 - Cancer 21 - Cancer 22 - Cancer 23 - Cancer 24 - Cancer 25 - Cancer 26 - Cancer 27 - Cancer 28 - Cancer 29 - Cancer 30 - Cancer 31 - Cancer 32 - Cancer 33 - Cancer 34 - Cancer 35 - Cancer 36 - Cancer 37 - Cancer 38 - Cancer 39 - Cancer 40 - Cancer 41 - Cancer 42 - Cancer 43 - Cancer 44 - Cancer 45 - Cancer 46 - Cancer 47 - Cancer 48 - Cancer 49 - Cancer 50 - Cancer 51 - Cancer 52 - Cancer 53 - Cancer 54 - Cancer 55 - Cancer 56 - Cancer 57 - Cancer 58 - Cancer 59 - Cancer 60 - Cancer 61 - Cancer 62 - Cancer 63 - Cancer 64 - Cancer 65 - Cancer 66 - Cancer 67 - Cancer 68 - Cancer 69 - Cancer 70 - Cancer 71 - Cancer 72 - Cancer 73 - Cancer 74 - Cancer 75 - Cancer 76 - Cancer 77 - Cancer 78 - Cancer 79 - Cancer 80 - Cancer 81 - Cancer 82 - Cancer 83 - Cancer 84 - Cancer 85 - Cancer 86 - Cancer 87 - Cancer 88 - Cancer 89 - Cancer 90 - Cancer 91 - Cancer 92 - Cancer 93 - Cancer 94 - Cancer 95 - Cancer 96 - Cancer 97 - Cancer 98 - Cancer 99 - Cancer 100
19 چەت مەكىش خىشى مى توانيد يى كىسە يى يلاستيىكى یا يىك كىسە يى گرد غبار (متعلقات) را در جارو بر قى قرار دەيد. اینگونە برداشتن كىسە يى گرد و غبار آسان تەر مى شود.
تعويض كیسه ی پلاستیکی

- GAS Professional
- BOSCH
- Deutsch
- Sicherheitshinweise
- Symbols
- Symbols and their meaning
- CAUTION Read all safety warnings and all instruc-
- Symbols and their meaning (GAS 15)
- Symbols and their meaning (GAS 15 PS)
- Product Description and Specifications
- Intended Use
- | English
- Product Features
- Noise/Vibration Information
- Wear hearing protection!
- Assembly
- Mounting VAC Accessories (see figure A)
- Mounting the Tool Sleeve (GAS 15 PS)
- Mounting Nozzles and Tubes
- Mounting the Vacuum Hose
- Vacuuming function (see figure B1)
- Blower Function (see figure B2)
- Inserting/Removing the Plastic Bag or Dust Bag (Dry Vacuuming) (see figures C1 -C4)
- Inserting the Plastic Bag
- Removing and Sealing the Plastic Bag
- Replacing/Inserting the Dust Bag (Accessory)
- Inserting the Rubber Lip (Wet Vacuuming) (see figure D)
- Inserting the Wet Filter (Wet Vacuuming) (see figures E1–E2)
- Operation
- Starting Operation
- English | 19
- Removing/Changing the Filter (see figures H1-H2)
- Container
- Storage and Transport (see figure I)
- After-sales Service and Application Service
- www.bosch-pt.com
- | Français
- Great Britain
- Ireland
- Australia, New Zealand and Pacific Islands
- Republic of South Africa
- Gauteng - BSC Service Centre
- KZN - BSC Service Centre
- Western Cape - BSC Service Centre
- Bosch Headquarters
- Disposal
- Français
- | Español
- Bortskaffelse
- Avfallshantering
- Бракуване
- | Srpski
- Usisavanje nastale prašine od električnog alata koji je u radu (samo za GAS 15 PS) (pogledajte sliku F)
- Mokro usisavanje
- | Latviešu
- (E1 - E2 Manufacturer)
- ( Cancer 1 - Cancer 2 - Cancer 3 - Cancer 4 - Cancer 5 - Cancer 6 - Cancer 7 - Cancer 8 - Cancer 9 - Cancer 10 - Cancer 11 - Cancer 12 - Cancer 13 - Cancer 14 - Cancer 15 - Cancer 16 - Cancer 17 - Cancer 18 - Cancer 19 - Cancer 20 - Cancer 21 - Cancer 22 - Cancer 23 - Cancer 24 - Cancer 25 - Cancer 26 - Cancer 27 - Cancer 28 - Cancer 29 - Cancer 30 - Cancer 31 - Cancer 32 - Cancer 33 - Cancer 34 - Cancer 35 - Cancer 36 - Cancer 37 - Cancer 38 - Cancer 39 - Cancer 40 - Cancer 41 - Cancer 42 - Cancer 43 - Cancer 44 - Cancer 45 - Cancer 46 - Cancer 47 - Cancer 48 - Cancer 49 - Cancer 50 - Cancer 51 - Cancer 52 - Cancer 53 - Cancer 54 - Cancer 55 - Cancer 56 - Cancer 57 - Cancer 58 - Cancer 59 - Cancer 60 - Cancer 61 - Cancer 62 - Cancer 63 - Cancer 64 - Cancer 65 - Cancer 66 - Cancer 67 - Cancer 68 - Cancer 69 - Cancer 70 - Cancer 71 - Cancer 72 - Cancer 73 - Cancer 74 - Cancer 75 - Cancer 76 - Cancer 77 - Cancer 78 - Cancer 79 - Cancer 80 - Cancer 81 - Cancer 82 - Cancer 83 - Cancer 84 - Cancer 85 - Cancer 86 - Cancer 87 - Cancer 88 - Cancer 89 - Cancer 90 - Cancer 91 - Cancer 92 - Cancer 93 - Cancer 94 - Cancer 95 - Cancer 96 - Cancer 97 - Cancer 98 - Cancer 99 - Cancer 100
- تعويض كیسه ی پلاستیکی
Brand : BOSCH
Model : GAS 15 Professional
Category : Vacuum Cleaner