MoistureFinder Compact - Measuring equipment Laserliner - Free user manual and instructions
Find the device manual for free MoistureFinder Compact Laserliner in PDF.
| Product Type | Capacitive moisture meter for materials |
| Brand | Laserliner |
| Model | MoistureFinder Compact |
| Dimensions (L x H x D) | 81 x 154 x 36 mm |
| Weight | 226 g (with battery) |
| Power supply | 1 9V battery (6LR61) |
| Battery life | Approx. 35 hours |
| Auto shut-off | After 3 minutes |
| Measurement range softwood | 6.7% - 51.4% |
| Measurement range hardwood | 3.8% - 31.6% |
| Measurement range cement screed | 0% - 5% |
| Measurement range plaster coating | 0% - 23.5% |
| Accuracy wood | ± 2% |
| Accuracy materials | ± 0.2% |
| Resolution | 0.1% |
| Main functions | Capacitive measurement, 4 characteristic curves, LED display, HOLD function, acoustic signal |
| LED display | 12 bars: green (dry), yellow (damp), red (wet) |
| Working conditions | 0 °C to 40 °C, RH max 85% |
| Storage conditions | -10 °C to 60 °C, RH max 85% |
| Maintenance | Clean with a slightly damp cloth, solvent-free |
| Storage | Dry and clean place, remove battery for prolonged storage |
| Calibration | Recommended annually |
| Safety | Do not modify, keep out of reach of children |
Frequently Asked Questions - MoistureFinder Compact Laserliner
User questions about MoistureFinder Compact Laserliner
0 question about this device. Answer the ones you know or ask your own.
Ask a new question about this device
Download the instructions for your Measuring equipment in PDF format for free! Find your manual MoistureFinder Compact - Laserliner and take your electronic device back in hand. On this page are published all the documents necessary for the use of your device. MoistureFinder Compact by Laserliner.
USER MANUAL MoistureFinder Compact Laserliner
MoistureFinder Compact
text_image
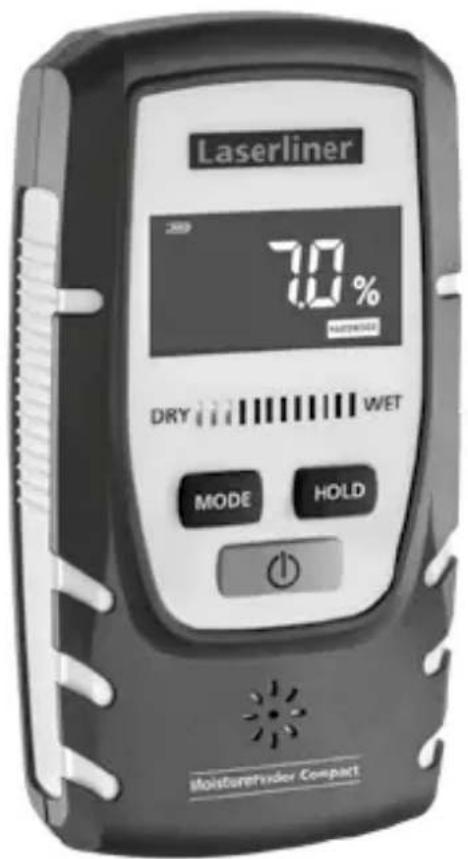
Laserliner 70% MUSTAINED DRY WET MODE HOLD Moisturetender Compact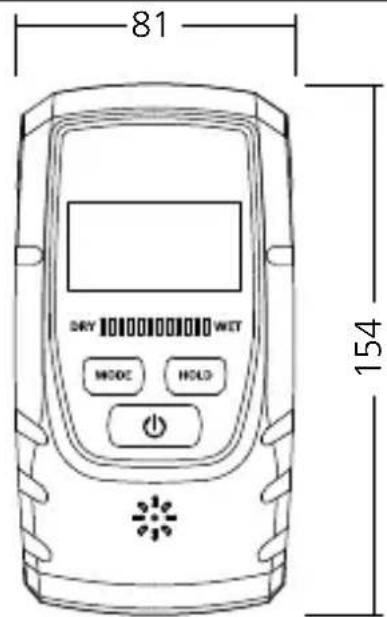
text_image
81 DRY 100000000 WET MODE HOLD 154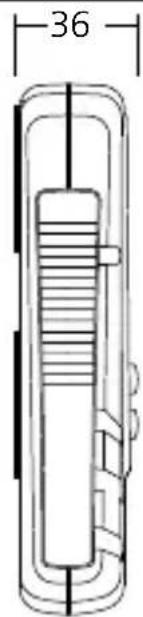
text_image
36Laserliner

text_image
DE 02 EN 08 NL 14 DA 20 FR 26 ES 32 IT 38 PL 44 FI 50 PT 56 SV 62 NO 68 TR 74 RU 80 UK 86 CS 92 ET 98 RO 104 BG 110 EL 116 SL 122 HU 128 SK 134 HR 140!
natural_image
Illustration of a digital payment device with sound waves and directional arrows indicating signal flow (no text or symbols)
natural_image
Hand pressing a digital payment terminal on a scale, showing a 2.5 kg weight (no text or symbols on the device itself)natural_image
Hand holding a mobile phone with a screen and keypad (no visible text or symbols)- In beheizten Räumen (12°C ... 21°C): 9% ... 13%
- In beheizten Räumen (> 21°C): 6% ... 10%
Beispiel:
https://packd.li/ll/apr/in
Laserliner
!
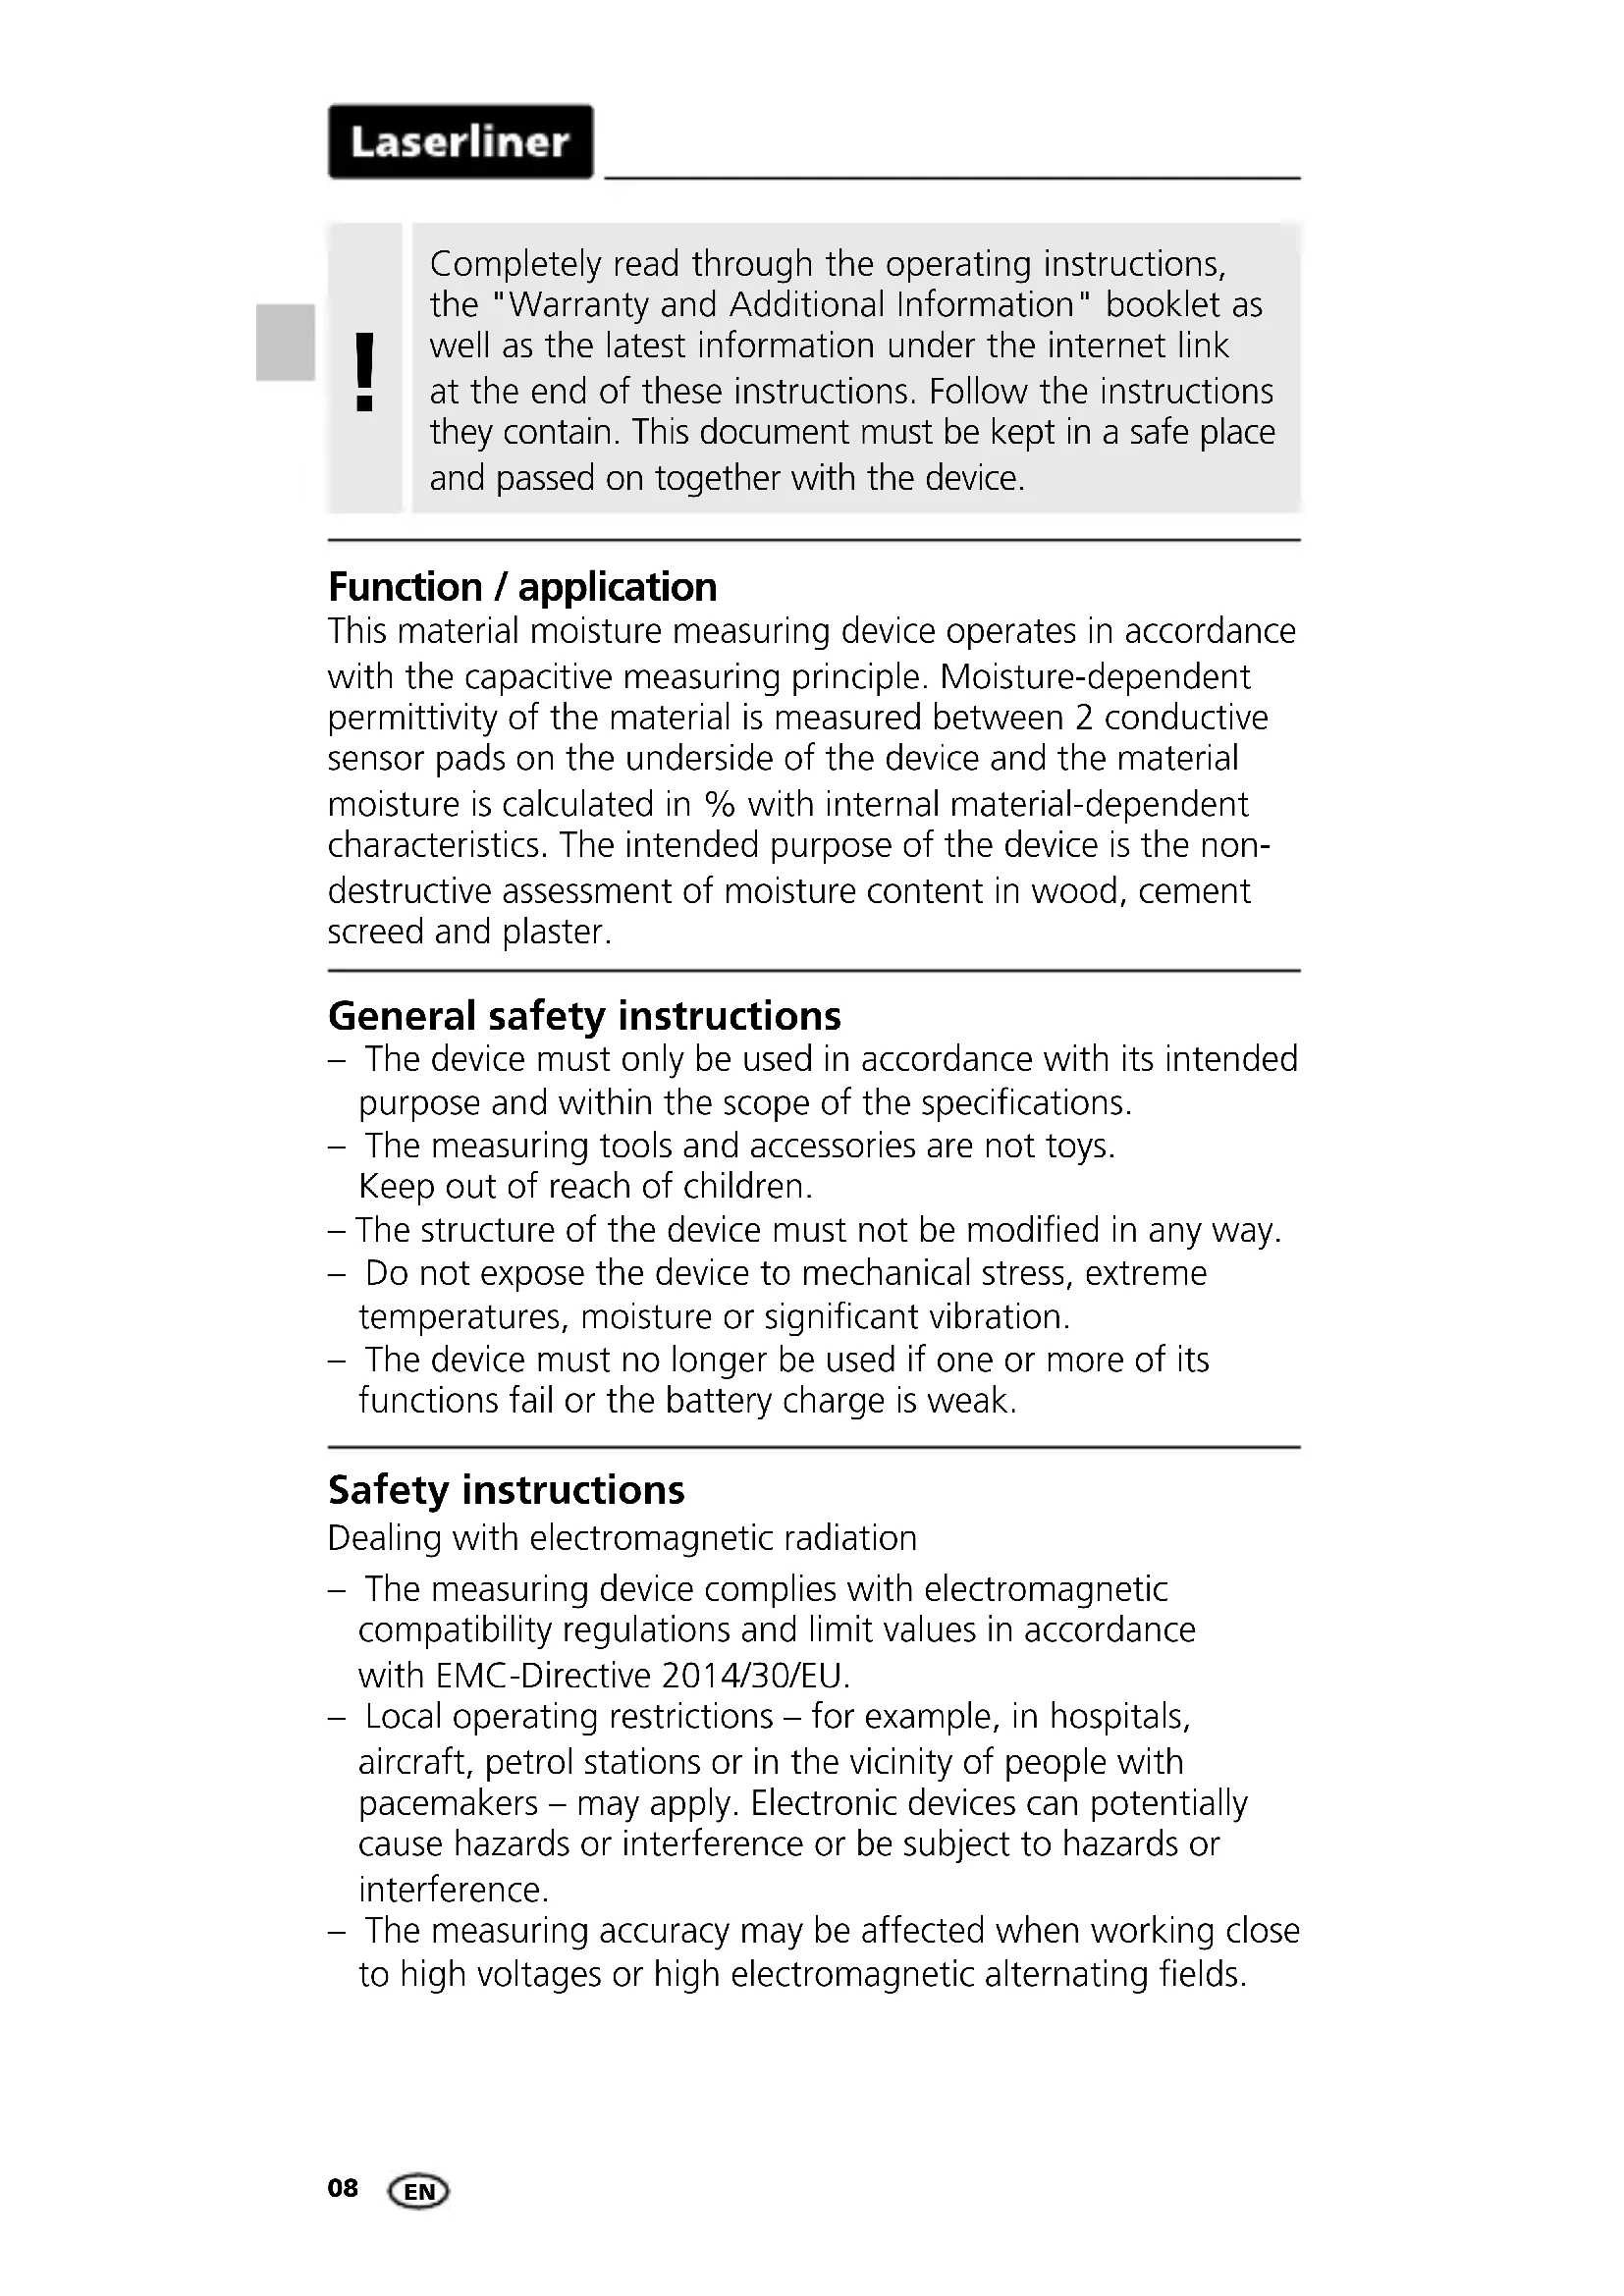
Completely read through the operating instructions, the "Warranty and Additional Information" booklet as well as the latest information under the internet link at the end of these instructions. Follow the instructions they contain. This document must be kept in a safe place and passed on together with the device.
Function / application
This material moisture measuring device operates in accordance with the capacitive measuring principle. Moisture-dependent permittivity of the material is measured between 2 conductive sensor pads on the underside of the device and the material moisture is calculated in % with internal material-dependent characteristics. The intended purpose of the device is the non-destructive assessment of moisture content in wood, cement screed and plaster.
General safety instructions
- The device must only be used in accordance with its intended purpose and within the scope of the specifications.
- The measuring tools and accessories are not toys. Keep out of reach of children.
- The structure of the device must not be modified in any way.
- Do not expose the device to mechanical stress, extreme temperatures, moisture or significant vibration.
- The device must no longer be used if one or more of its functions fail or the battery charge is weak.
Safety instructions
Dealing with electromagnetic radiation
- The measuring device complies with electromagnetic compatibility regulations and limit values in accordance with EMC-Directive 2014/30/EU.
- Local operating restrictions – for example, in hospitals, aircraft, petrol stations or in the vicinity of people with pacemakers – may apply. Electronic devices can potentially cause hazards or interference or be subject to hazards or interference.
- The measuring accuracy may be affected when working close to high voltages or high electromagnetic alternating fields.
MoistureFinder Compact
Information on maintenance and care
Clean all components with a damp cloth and do not use cleaning agents, scouring agents and solvents. Remove the battery(ies) before storing for longer periods. Store the device in a clean and dry place.
Calibration
The meter needs to be calibrated and tested on a regular basis to ensure it produces accurate measurement results. We recommend carrying out calibration once a year.
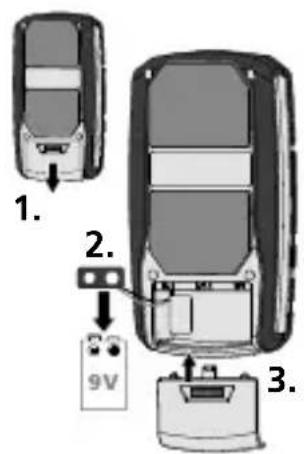
1 Insert battery
Open the battery compartment on the housing's rear side and insert a 9V battery. Correct polarity must be observed.
text_image
1. 2. 3. 9V6LR61 9V
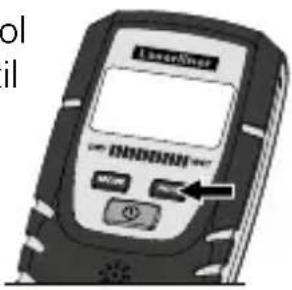
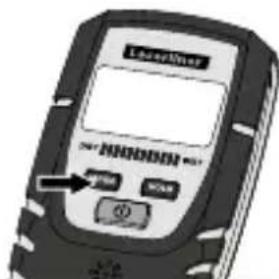
2 ON

text_image
ON OFF Laserlimax ON/OFF 2 secAutomatic switch-off after 3 minutes.
HOLD
Hold symbol flashes until the value is stable.
text_image
UserIcon 00000000000000000000000000000000000000000000000000000000000000000000000000000000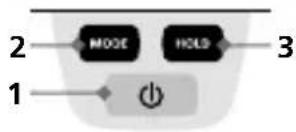

text_image
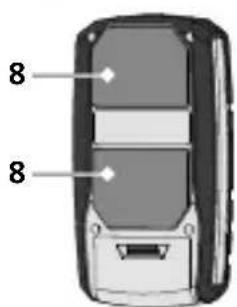
8 81
2 Material setup / switchover
3 Hold current measurement
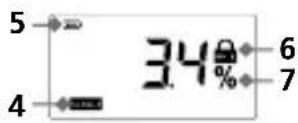
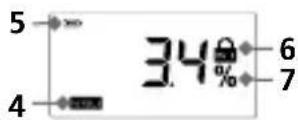
4 Selected material characteristic
5 Battery charge
6 Present measurement is retained
7 Measured value in % of relative material moisture
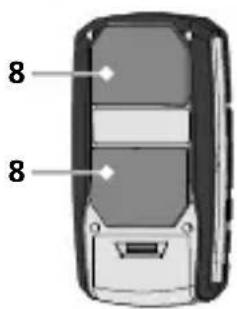
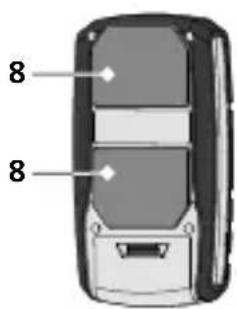
8 Sensor pads
text_image
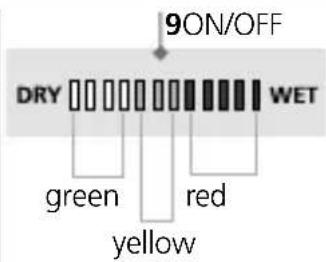
9ON/OFF DRY WET green red yellow9 Wet/dry LED display
12-position LED:
0...4 LEDs green = dry
5...7 LEDs yellow = moist
8...12 LEDs red = wet
Laserliner
B Material characteristics
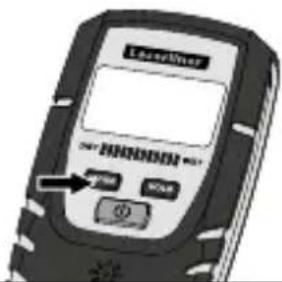
This instrument has 4 selectable material characteristics. Before making a measurement, press the MODE button to select the appropriate material.
text_image
LaserDriver H00000 OK| Screed cement screed CT-C30-F4 DIN EN 13813 | |
| Plaster | gypsum plaster (machine plaster) in accordance with DIN EN 13279-1/plaster thickness = 10 mm |
| Soft-wood | low-density woods: e.g. spruce, pine, limewood, poplar, cedar, mahogany |
| Hard-wood | higher-density woods: e.g. beech, oak, ash, birch |
4 Wet/dry LED indicator
In addition to numeric measurement display in \% of relative material moisture, the LED display also provides a material-dependent evaluation of moisture. The LED display bar becomes larger, from left to right, with increasing moisture content. The 12-position LED display is subdivided into 4 green (dry), 3 yellow (moist) and 5 red (wet) segments. Wet material causes an additional acoustic signal.

The classification „dry“ means that materials in a heated room have reached a balanced moisture level and are thus suitable for further processing.
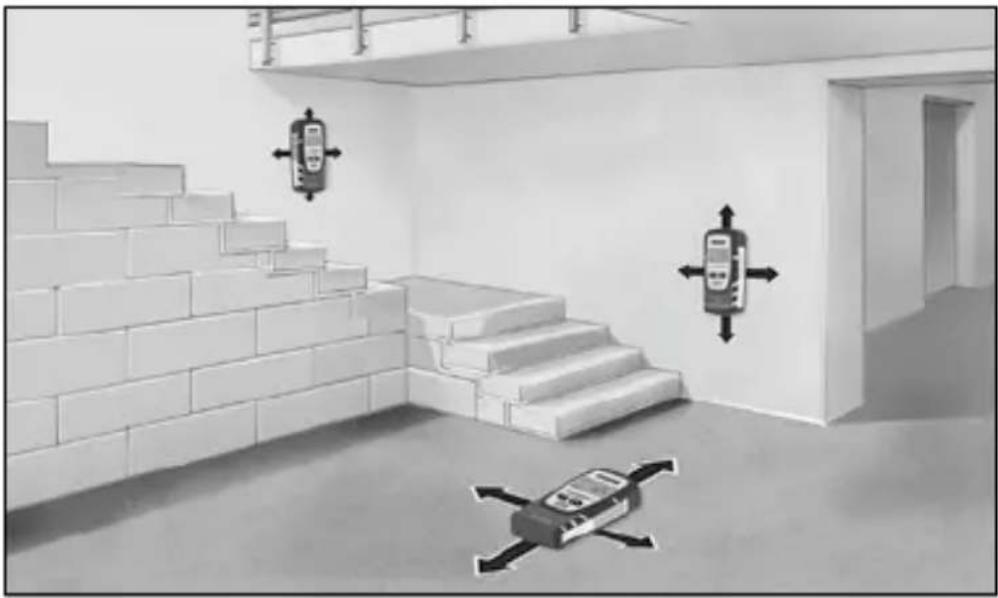
5 Application notices
natural_image
Illustration of a mobile phone with sound waves and directional arrows indicating signal flow (no text or symbols)
natural_image
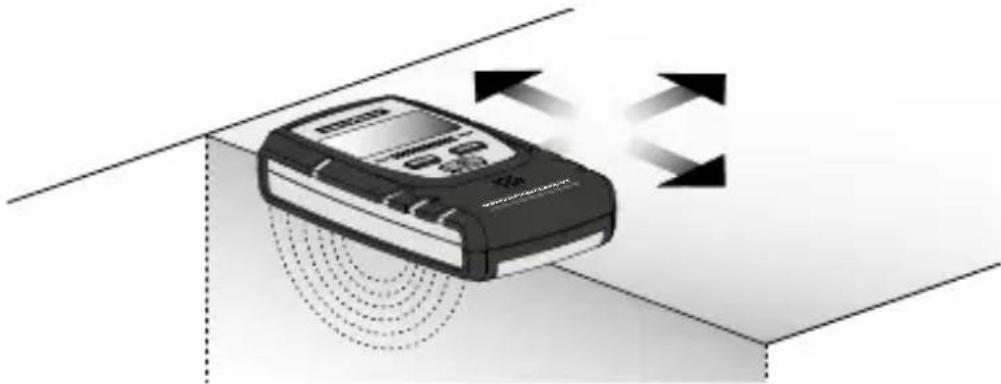
Hand pressing a digital payment terminal on a scale, showing a 2.5 kg weight (no text or symbols on the device itself)Place the device such that the sensor pads fully rest on the material to be measured and exert a pressure of about 2.5 kg onto the surface to be measured. TIP: Use scales to test the contact pressure.

natural_image
Hand holding a mobile phone with a screen and keypad (no visible text or symbols)Always hold and press down the measuring device in the same way (see illustration).
- Make sure that the sensor pads make good contact with the material with no air inclusions.
- The contact pressure compensates for unevenness of the surface and small dust particles.
- Measured surface should be free of dust and dirt
- Always take spot measurements while exerting a contact pressure of 2.5 kg.
- For quick checks, while exerting light pressure, you can slide the device over the surface. (Look out for nails and pointed objects! Danger of injury and damage to sensor pads!) Measure again at the highest deflection point while applying 2.5 kg contact pressure.
- Keep at least a 5 cm distance from metal objects
- Metal pipes, electric lines and reinforcing steel can falsify measurement results
- Always measure at several different spots
The operating principle of the device can only determine the material moisture measurement in % and show the moisture content on the LED display when the material matches the specified internal material characteristics.
Laserliner
Plaster with wallpaper: Wallpaper affects the measurement to such an extent that the displayed value is falsified. Nevertheless, the reading can still be used to compare the measurement at this spot with the measurement at another spot.
The same is true of tiles, linoleum, vinyl and wood used to cover building materials.
In some cases the measuring device can measure through these materials as long as they contain no metal. The reading should however be taken as a relative measured value.
Plaster: Plaster mode is configured for a plaster thickness of 10 mm applied on concrete, lime-sand brick, cellular concrete. Other masonry must be checked beforehand.
Wood: The measured depth in wood is 30 mm maximum but does vary somewhat with differing wood densities. Measurements made on thin wood boards should, if possible, be made on a stack of these boards as otherwise the measurement will be too low. Measurements made on installed wooden structures are influenced by the structural conditions and their chemical treatments (e.g. paints) with various materials. Thus such measurements should only be viewed relatively.
Maximum accuracy is achieved between 6% and 30% wood moisture. In very dry wood (< 6%) irregular moisture distribution can be detected, in very wet wood (> 30%) saturation of the wood fibres begins.
Material relative moisture reference values, in %, for use with wood:
- Outdoor usage: 12% ... 19%
- Use in unheated rooms: 12% ... 16%
- In heated rooms (12°C ... 21°C): 9% ... 13%
- In heated rooms (> 21°C): 6% ... 10%
Example:
100% material moisture for 1 kg of wet wood = 500 g water.

Functional and operational safety is only warranted when the instrument is operated within the specified climatic conditions and is only used for those purposes for which it is designed. The assessment of measurement results and actions taken as a consequence lie in the user's scope of responsibility, depending on the given type of work.
Technical data
| Variable | Moisture content of material(capacitive) |
| Mode | Wood (2 groups)Building materials (2 materials) |
| Measuring range wood | Softwood 6.7% ... 51.4%Hardwood: 3.8% ... 31.6% |
| Accuracy (absolute) wood ± | 2% |
| Resolution wood 0,1% | |
| Measuring rangebuilding materials | Cement screed: 0% ... 5%Plaster: 0% ... 23,5% |
| Accuracy (absolute)building materials | ± 0,2% |
| Resolution buildingmaterials | 0,1% |
| Power supply 1 x 9V 6LR61 (9-volt block) | |
| Operating time approx. 35 h | |
| Automatic shut-down after 3 minutes | |
| Operating conditions | 0°C ... 40°C, max. humidity85% rH, no condensation,max. working altitude 2000 mabove sea level |
| Storage conditions | -10°C ... 60°C, max. humidity85% rH, no condensation |
| Dimensions (W x H x D) 81 x | 154 x 36 mm |
| Weight 226 g (incl. battery) | |
Technical revisions reserved. 25W14
EU and UK directives and disposal
This device complies with all necessary standards for the free movement of goods within the EU and the UK.
This product is an electric device and must be collected separately for disposal according to the European Directive on waste electrical and electronic equipment.
Further safety and supplementary notices at:
https://packd.li/ll/apr/in
Laserliner
!
text_image
2 MODE HOLD 3 1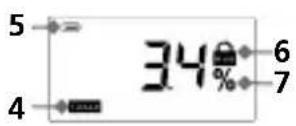
text_image
8 8natural_image
Illustration of a digital payment device with sound waves and directional arrows indicating signal flow (no text or symbols)
natural_image
Hand pressing a digital payment terminal on a scale, showing a 2.5 kg weight (no text or symbols on the device itself)natural_image
Hand holding a mobile phone with a screen and keypad (no visible text or symbols)text_image
2 MODE HOLD 3 1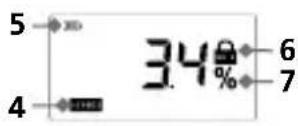

text_image
8 8natural_image
Illustration of a payment terminal with sound waves and directional arrows indicating signal flow (no text or symbols)
natural_image
Hand pressing a digital payment terminal on a scale, showing a 2.5 kg weight (no text or symbols on the device itself)natural_image
Hand holding a mobile phone with a screen and keypad (no visible text or symbols)Måleapparatet skal altid holdes lige og presses ind mod materialet (se figur)
https://packd.li/ll/apr/in
Laserliner
!
MoistureFinder Compact
text_image
2 ON OFF 2 sectext_image
Laserless on e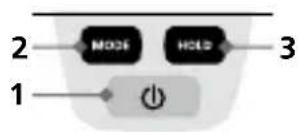
text_image
2 MODE HOLD 3 1 + -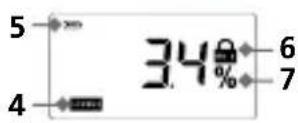

text_image
8 8natural_image
Illustration of a digital payment terminal with sound waves and directional arrows indicating signal flow (no text or symbols)
natural_image
Hand pressing a digital payment terminal on a scale, showing a 2.5 kg weight (no text or symbols on the device itself)natural_image
Hand holding a mobile phone with a screen and keypad (no visible text or symbols)MoistureFinder Compact
text_image
LaterIcon MAY MINDI MAY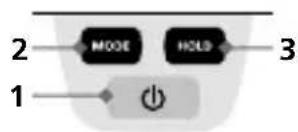
text_image
2 MODE HOLD 3 1 +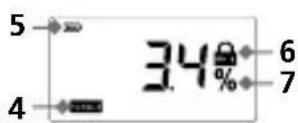

text_image
8 8natural_image
Illustration of a payment terminal with directional arrows indicating signal flow (no text or symbols)
natural_image
Hand pressing a digital payment terminal on a scale, showing a 2.5 kg weight (no text or symbols on the device itself)natural_image
Hand holding a mobile phone with a screen and keypad (no visible text or symbols)https://packd.li/ll/apr/in
Laserliner
!
text_image
2 ON OFF Take/Write 2 sectext_image
Image of a mobile phone with visible control panel and buttons, accompanied by partial text fragments.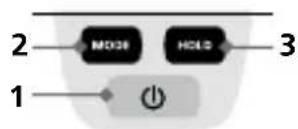

text_image
8 8text_image
9ON/OFF DRY WET verdi rossi giallinatural_image
Illustration of a payment terminal with bidirectional arrows indicating signal flow (no text or symbols)
natural_image
Hand pressing a digital payment terminal on a scale, showing a 2.5 kg weight (no text or symbols on the device itself)natural_image
Hand holding a mobile phone with a screen and keypad (no visible text or symbols)https://packd.li/ll/apr/in
Laserliner
!
text_image
ON OFF Laser/Inner ON/OFF 2 sectext_image
Id UserMain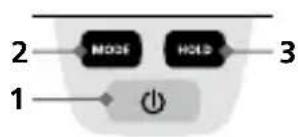
text_image
2 MODE HOLD 3 1 +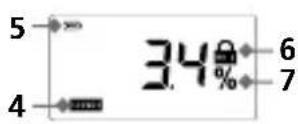
text_image
8 80...4 diod zielone = suche
text_image
Laser/Max OK Cancel OKnatural_image
Illustration of a mobile payment device with sound waves and directional arrows indicating signal flow (no text or symbols)
natural_image
Hand pressing a digital payment terminal on a scale, showing a 2.5 kg weight (no text or symbols on the device itself)natural_image
Hand holding a mobile phone with a screen and keypad (no visible text or symbols)https://packd.li/ll/apr/in
Laserliner

MoistureFinder Compact
text_image
2 ON OFF Davatine 2 sectext_image
2 MODE HOLD 3 1

text_image
8 8natural_image
Illustration of a payment terminal with bidirectional arrows indicating signal flow (no text or symbols)
natural_image
Hand pressing a digital payment terminal on a scale, showing a 2.5 kg weight (no text or symbols on the device itself)natural_image
Hand holding a mobile phone with a screen and keypad (no visible text or symbols)https://packd.li/ll/apr/in
Laserliner
!
MoistureFinder Compact
text_image
2 MODE HOLD 3 1 + -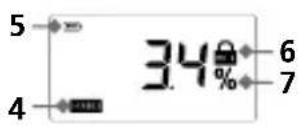

text_image
8 8natural_image
Illustration of a payment terminal with bidirectional arrows indicating signal flow (no text or symbols)
natural_image
Hand pressing a digital payment terminal on a scale, showing a 2.5 kg weight (no text or symbols on the device itself)natural_image
Illustration of a hand inserting a mobile payment card into a device (no text or symbols visible)MoistureFinder Compact
text_image
2 MODE HOLD 1 3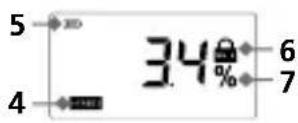

text_image
8 8text_image
LaserView OK Cancel (1)natural_image
Illustration of a mobile phone with sound waves and directional arrows indicating sound or signal flow (no text or symbols)
natural_image
Hand pressing a digital payment terminal on a scale, showing a 2.5 kg weight (no text or symbols on the device itself)natural_image
Hand holding a mobile phone with a screen and keypad (no visible text or symbols)MoistureFinder Compact
Tekniska data
https://packd.li/ll/apr/in
Laserliner
!
MoistureFinder Compact
text_image
2 MODE HOLD 3 1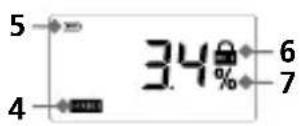

text_image
8 8text_image
9ON/OFF DRY WET grønn rød gul9 LED-indikator
for våt/tørr
LED med
12 posisjoner:
0-4 LED
grønn = tørr
5-7 LED
gul = fuktig
8-12 LED
rød = våt
Laserliner
3 Materialkarakteristikker
Måleinstrumentet har fire material-karakteristikker. Før du starter målingen, trykker du på MODE-tasten for å velge material.
text_image
LaserLine OK Cancelnatural_image
Illustration of a handheld electronic device with sound waves and directional arrows indicating signal flow (no text or symbols)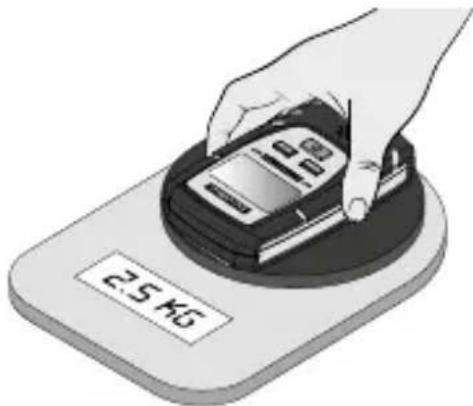
natural_image
Hand pressing a digital payment terminal on a scale, showing a 2.5 kg weight (no text or symbols on the device itself)natural_image
Hand holding a mobile phone with a screen and keypad (no visible text or symbols)https://packd.li/ll/apr/in
!
MoistureFinder Compact
text_image
ON OFF Laser/Inner 2 secnatural_image
Illustration of a handheld electronic device with sound waves and directional arrows indicating signal flow (no text or symbols)
natural_image
Hand pressing a digital payment terminal on a scale, showing a 2.5 kg weight (no text or symbols on the device itself)natural_image
Hand holding a mobile phone with a screen and keypad (no visible text or symbols)https://packd.li/ll/apr/in
Laserliner
!
MoistureFinder Compact
text_image
Diagram of a medical or electronic device with labeled buttons and an arrow pointing to the button.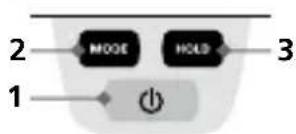
text_image
2 MODE HOLD 3 1

text_image
8 8text_image
Leather OK Cancel (①)natural_image
Illustration of a payment terminal with sound waves and directional arrows indicating signal flow (no text or symbols)
natural_image
Hand pressing a digital payment terminal on a scale, showing a 2.5 kg weight (no text or symbols on the device itself)natural_image
Hand holding a mobile phone with a screen and keypad (no visible text or symbols)https://packd.li/ll/apr/in
Laserliner
!
MoistureFinder Compact
natural_image
Illustration of a payment terminal with directional arrows indicating flow or signal movement (no text or symbols)
natural_image
Hand pressing a digital payment terminal on a scale, showing a 2.5 kg weight (no text or symbols on the device itself)natural_image
Hand holding a mobile phone with a screen and keypad (no visible text or symbols)https://packd.li/ll/apr/in
Laserliner
!
MoistureFinder Compact
text_image
2 ON OFF Taser/line 2 sectext_image
2 MODE HOLD 3 1

text_image
8 80...4 diody zelená = sucho
5...7 diody žlutá = vlhko
natural_image
Illustration of a payment terminal with digital display and signal waves, no text or symbols present
natural_image
Hand pressing a digital payment terminal on a scale, showing a 2.5 kg weight (no text or symbols on the device itself)natural_image
Hand holding a mobile phone with a screen and keypad (no visible text or symbols)https://packd.li/ll/apr/in
Laserliner

natural_image
Illustration of a mobile payment device with sound waves and directional arrows indicating signal flow (no text or symbols)
natural_image
Hand pressing a digital payment terminal on a scale, showing a 2.5 kg weight (no text or symbols on the device itself)natural_image
Illustration of a hand holding a mobile phone with a screen and keypad (no text or symbols visible)https://packd.li/ll/apr/in
Laserliner
!
text_image
2 ON OFF ONOFF 2 sectext_image
2 MODE HOLD 3 1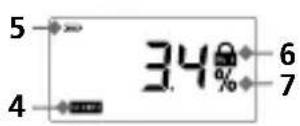

text_image
8 88...12 leduri roşu = ud
Laserliner
3 Caracteristici material
natural_image
Illustration of a mobile phone with sound waves and directional arrows indicating signal flow (no text or symbols)
natural_image
Hand pressing a digital payment terminal on a scale, showing a 2.5 kg weight (no text or symbols on the device itself)natural_image
Hand holding a mobile phone with a screen and keypad (no visible text or symbols)MoistureFinder Compact
text_image
ON ON TaserNet 2 sectext_image
2 MOOR HOLD 1 3

text_image
8 8text_image
Laser/Max OK Cancel (①)natural_image
Illustration of a handheld electronic device with sound waves and directional arrows indicating signal flow (no text or symbols)
natural_image
Hand pressing a digital payment terminal on a scale, showing a 2.5 kg weight (no text or symbols on the device itself)natural_image
Hand holding a mobile phone with a screen and keypad (no visible text or symbols)https://packd.li/ll/apr/in
Laserliner
!
MoistureFinder Compact
text_image
ON OFF Laserizer 2 sectext_image
2 MODE HOLD 3 1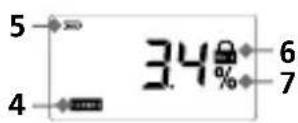

text_image
8 8natural_image
Illustration of a medical or electronic device with sound waves and directional arrows, no text or symbols present.
natural_image
Hand pressing a digital payment terminal on a scale, showing a 2.5 kg weight (no text or symbols on the device itself)natural_image
Illustration of a hand holding a mobile phone with a screen and keypad (no text or symbols visible)https://packd.li/ll/apr/in
Laserliner
!
MoistureFinder Compact
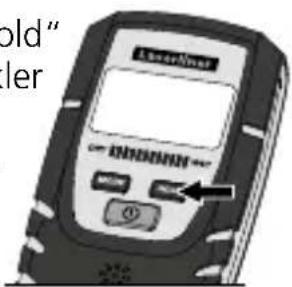
text_image
ON OFF ON/OFF 2 secSamodejni izklop po 3 minutah.
HOLD
Simbol „Hold“ utripa, dokler vred-nost ni stabilna.
text_image
old" ler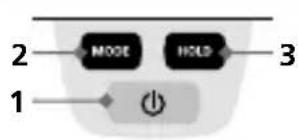
text_image
2 MODE HOLD 3 1

text_image
8 8text_image
Laserless OK OKnatural_image
Illustration of a medical or electronic device with sound waves and directional arrows, no text or symbols present.
natural_image
Hand pressing a digital payment terminal on a scale, showing a 2.5 kg weight (no text or symbols on the device itself)Senzorske blazinice v celoti položite na merjeni material in napravo s pribl. 2,5 kg pritiska pritisnite ob merilno površino.
NAMIG: Pritisk izmerite s tehtnico.

natural_image
Hand holding a mobile phone with a screen and keypad (no visible text or symbols)https://packd.li/ll/apr/in
Laserliner
!
MoistureFinder Compact
text_image
ON OFF ON/OFF 2 secnatural_image
Illustration of a handheld electronic device emitting sound waves, with no visible text or symbols.
natural_image
Hand pressing a digital payment terminal on a scale, showing a 2.5 kg weight (no text or symbols on the device itself)natural_image
Hand holding a mobile phone with a screen and keypad (no visible text or symbols)https://packd.li/ll/apr/in
Laserliner
!
MoistureFinder Compact
text_image
ON OFF 2 sectext_image
LaserWare t,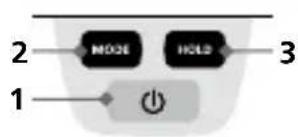
text_image
2 MO2 HOLD 3 1 Power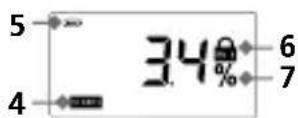
text_image
8 8text_image
LaserVaser H500001 ①natural_image
Illustration of a handheld electronic device with sound waves and directional arrows, no text or symbols present.
natural_image
Hand pressing a digital payment terminal on a scale, showing a 2.5 kg weight (no text or symbols on the device itself)natural_image
Hand holding a mobile phone with a screen and keypad (no visible text or symbols)MoistureFinder Compact
text_image
2 ON OFF 1 second 2 secnatural_image
Illustration of a payment terminal with bidirectional arrows indicating signal flow (no text or symbols)
natural_image
Hand pressing a digital payment terminal on a scale, showing a 2.5 kg weight (no text or symbols on the device itself)natural_image
Illustration of a hand inserting a mobile payment card into a device (no text or symbols visible)https://packd.li/ll/apr/in
MoistureFinder Compact
natural_image
Interior view of a building with stairs and floating devices (no text or symbols visible)Manuale
PAP 22
CARTA
RACCOLTA CARTA