NikolaTesla Switch PRF0146212A - Cooker ELICA - Free user manual and instructions
Find the device manual for free NikolaTesla Switch PRF0146212A ELICA in PDF.
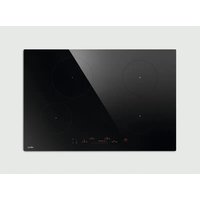
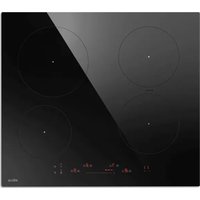
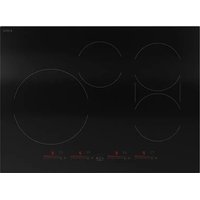
| Product type | Induction cooktop with integrated aspiration system |
| Brand | Elica |
| Model | NikolaTesla Switch PRF0146212A |
| Number of cooking zones | 4 induction zones |
| Power supply | 220-240 V, 50/60 Hz |
| Maximum power (Power Booster) | Level P (intensive) for 5 minutes |
| Power levels | 9 levels + Power Booster (P) |
| Cooking functions | Bridge, Temperature Manager, Power Limitation, Timer, Pause/Recall, Child Lock |
| Safety | Safe Activation, Pot Detector, Residual Heat Indicator (H), Safety Shut Down |
| Aspiration system | Integrated, extraction or filtering version |
| Aspiration speeds | 10 levels (0-8 + 9 for 15 min, 10 for 5 min) |
| Grease filter | Metal, washable monthly (hand or dishwasher) |
| Odor filter (filtering version) | Activated carbon, regenerable in oven (200°C, 45 min) every 2-3 months |
| Cleaning the hob | Soft cloth or paper, specific products. Forbidden: abrasive sponges, steam |
| Indicators | Residual heat (H), filter saturation, timer, Child Lock |
| Dimensions (estimated) | Approximately 90 x 50 cm (not specified in the manual) |
| Weight (estimated) | Approximately 15-20 kg (not specified) |
| Spare parts | Grease and odor filters available |
| Repairability | Consult an Elica approved technician |
| User manual | 136 pages, available in PDF |
Frequently Asked Questions - NikolaTesla Switch PRF0146212A ELICA
User questions about NikolaTesla Switch PRF0146212A ELICA
0 question about this device. Answer the ones you know or ask your own.
Ask a new question about this device
Download the instructions for your Cooker in PDF format for free! Find your manual NikolaTesla Switch PRF0146212A - ELICA and take your electronic device back in hand. On this page are published all the documents necessary for the use of your device. NikolaTesla Switch PRF0146212A by ELICA.
USER MANUAL NikolaTesla Switch PRF0146212A ELICA
EN Use and Maintenance
text_image
QR code image containing encoded data, no visible human-readable text
Download a QR Code Reader app

Scan QR code
Download your Manual
1a
text_image
Diagram illustrating a procedure for removing a component from a device, showing step-by-step assembly and final removal.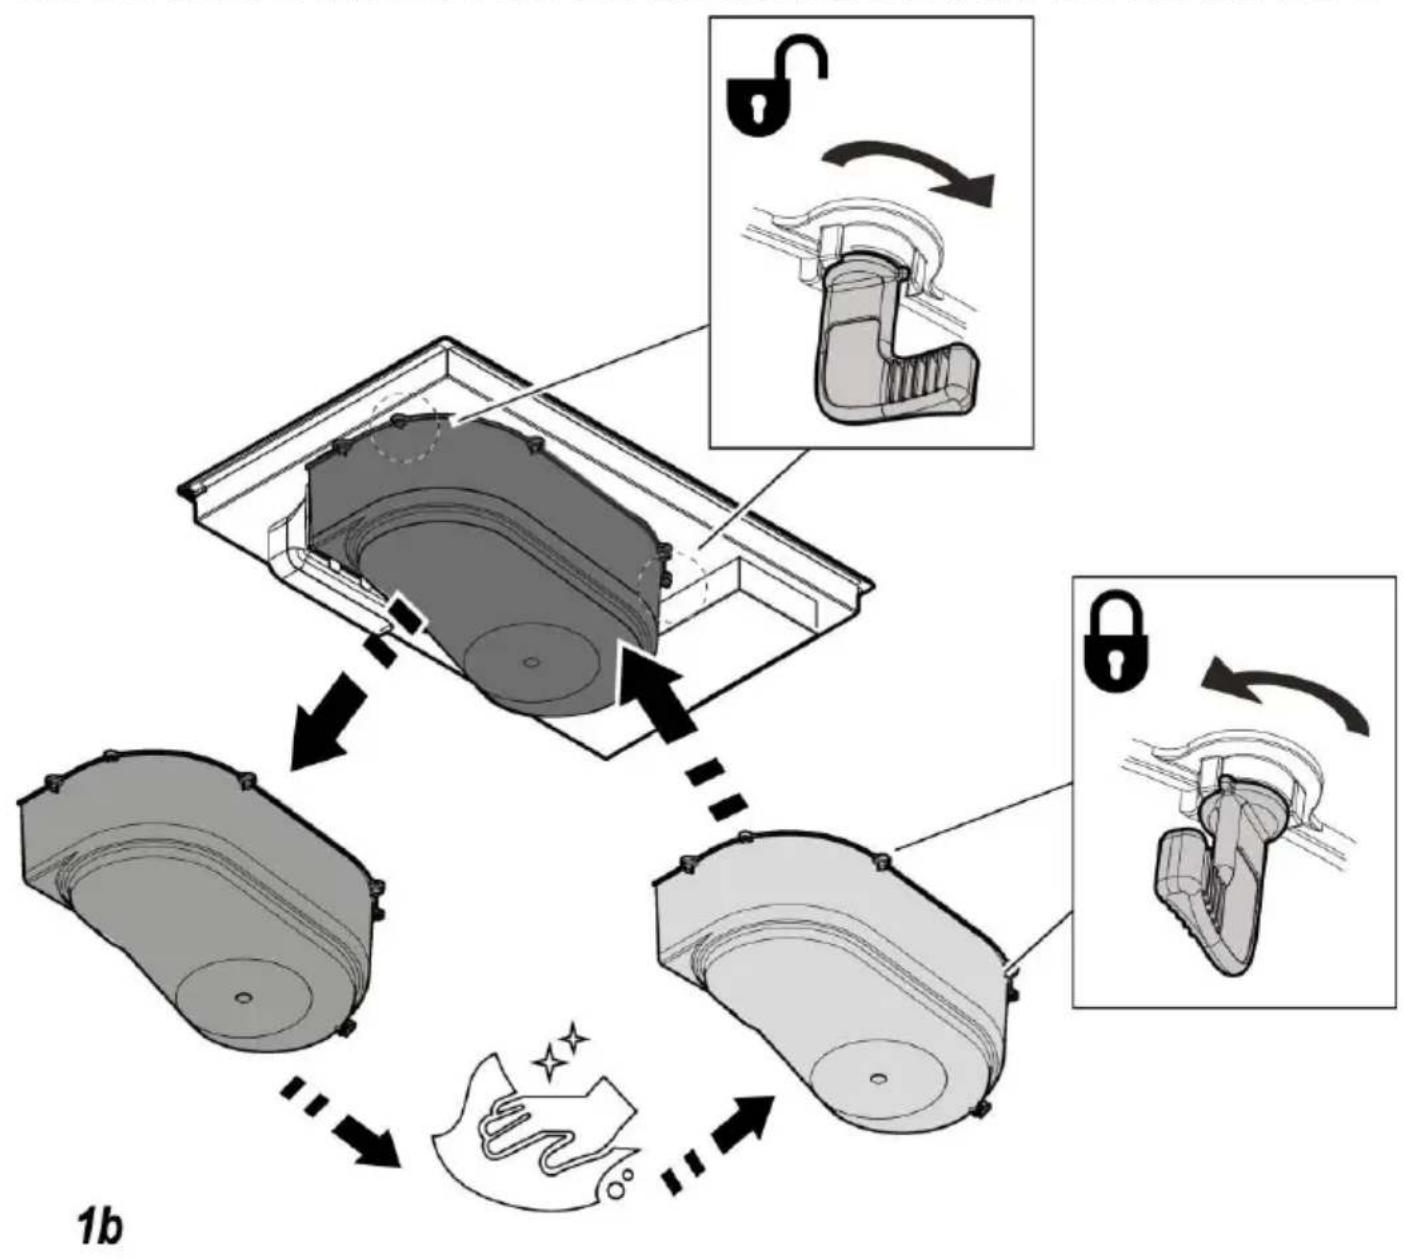
flowchart
graph TD
    A["Device with lock mechanism"] --> B{Disassembly}
    B -->|Open/Unlocked| C["Assembly"]
    B -->|Unlocked| D["Final Assembly"]
    D --> E["Final Component"]
    style A fill:#f9f,stroke:#333
    style B fill:#ccf,stroke:#333
    style C fill:#cfc,stroke:#333
    style D fill:#fcc,stroke:#333
    style E fill:#ffc,stroke:#333
text_image
.1 .2 .3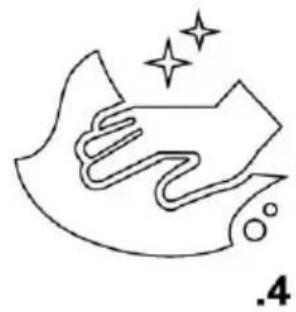
natural_image
Simple line drawing of a hand washing a garment with sparkles above (no text or symbols)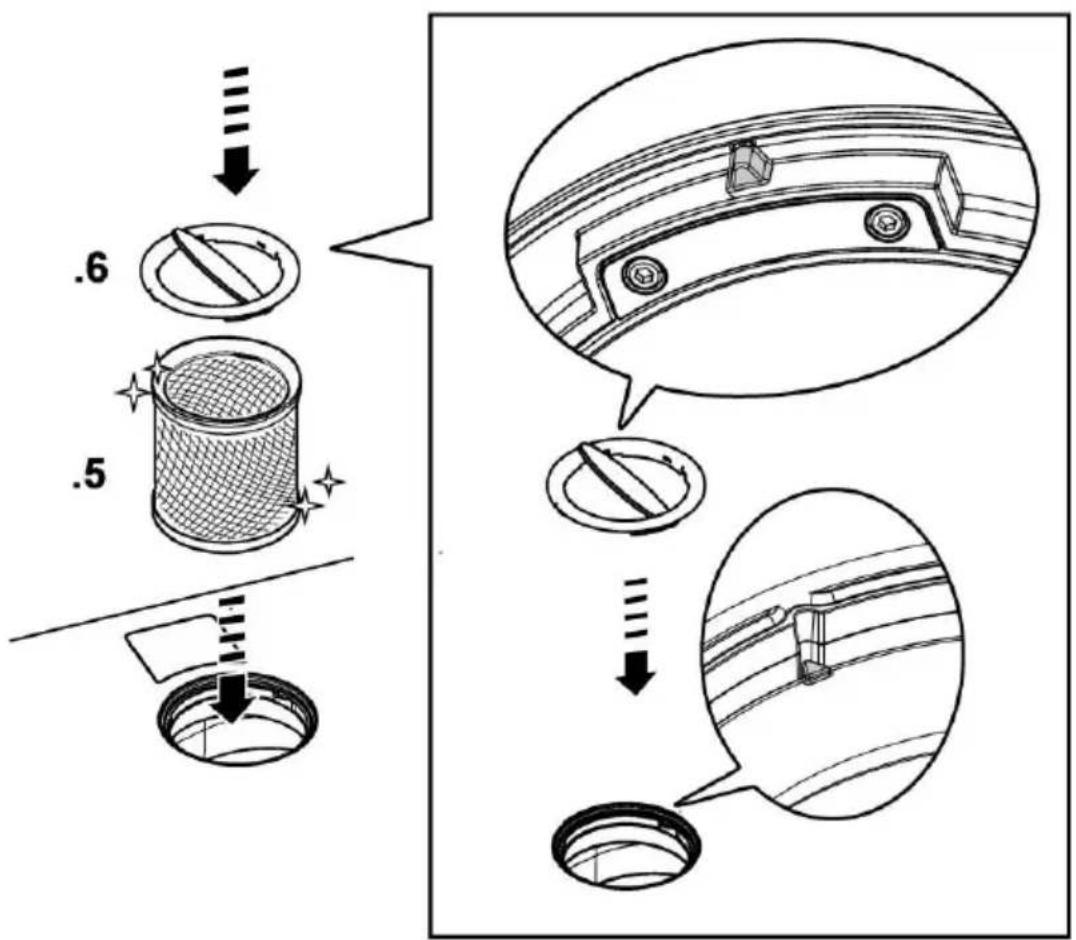
text_image
.6 .5

text_image
3a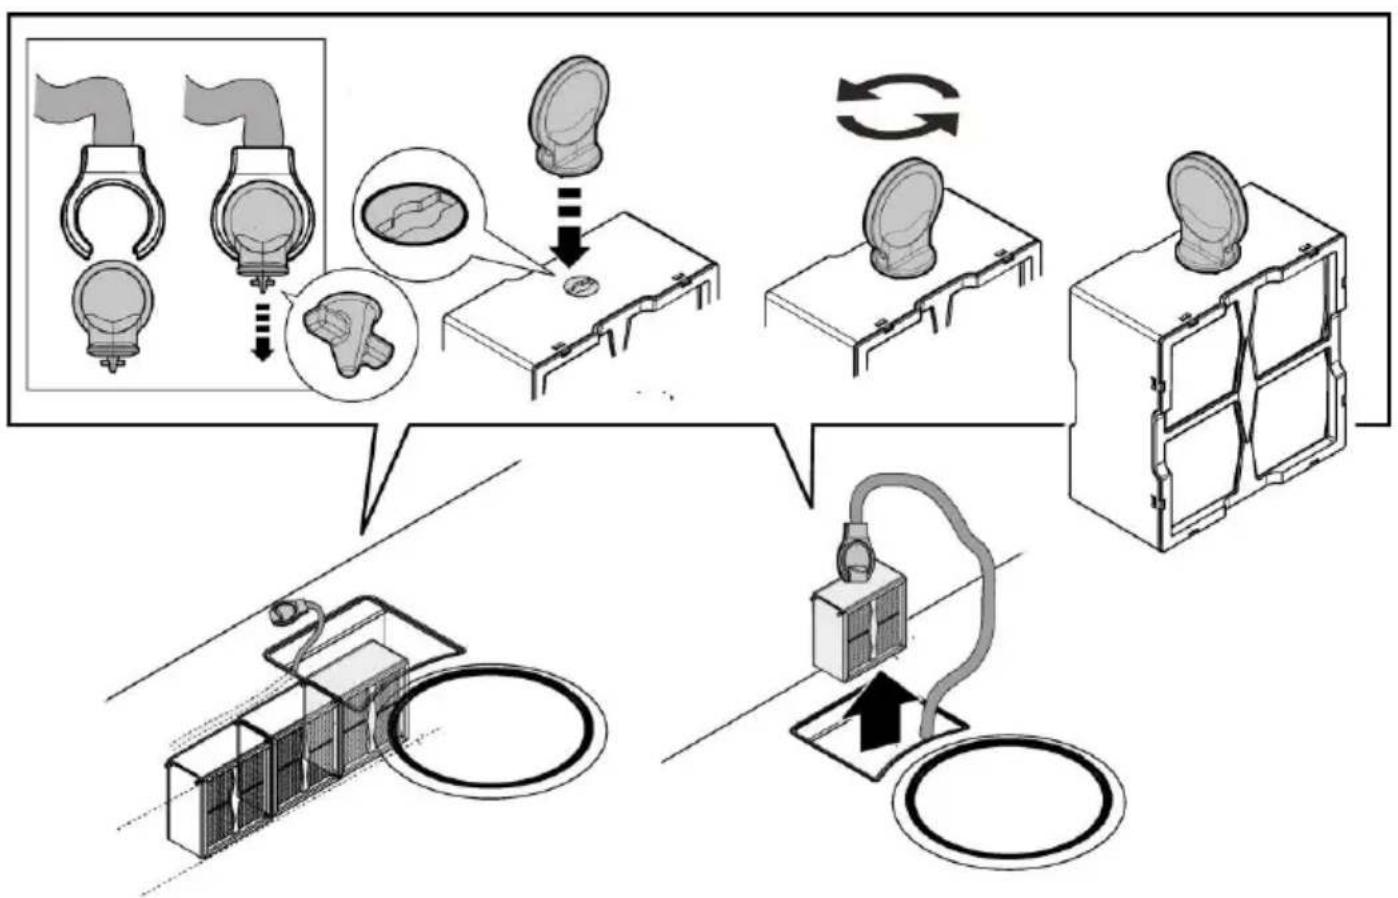
flowchart
graph TD
    A["Implant placement"] --> B["Anatomical diagram of catheter placement"]
    B --> C["Initial implantation with a bulb, tube, and magnified inset"]
    C --> D["Retraction of catheter placement"]
    D --> E["Final catheter placement"]
    E --> F["Retraction of catheter placement"]
    F --> G["Final catheter placement"]
3b
text_image
3cIT
1. ISTRUZIONI D'USO
natural_image
Illustration of cooking utensils including a plate with a cross symbol and a pan with a lid, alongside a partial 'NO!' text (no other symbols or labels)natural_image
Two cooking panes with handles, one showing a side dish and the other showing a pan with a grater (no text or symbols)natural_image
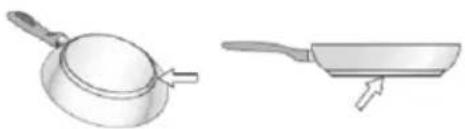
Illustration of a frying pan and its side view with an arrow, alongside the word 'SI!' (no other text or symbols)text_image
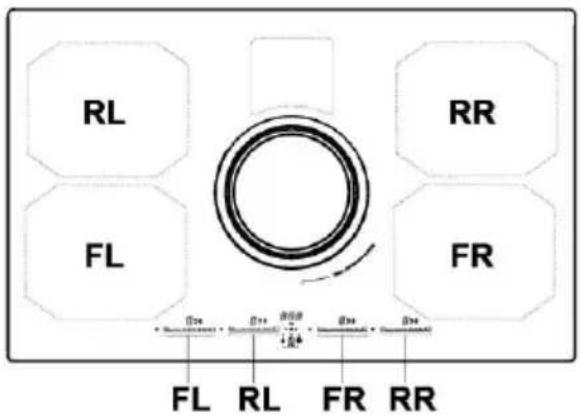
RL RR FL FR FL RL FR RR
text_image
8 8 8 — 15 20 —— min —— + —● + —— 8 1 —— LOCK —— 10 9 —— 19 16 —— 2 —— 13 —— 21 OE —— 4 —— 11 □ 3 .5 —— 19 OPEN —— 23 —— 14 —— 22 FILTER —— 17 —— {A} —18 ● —— 12 7 —— 61.1 Cooking containers
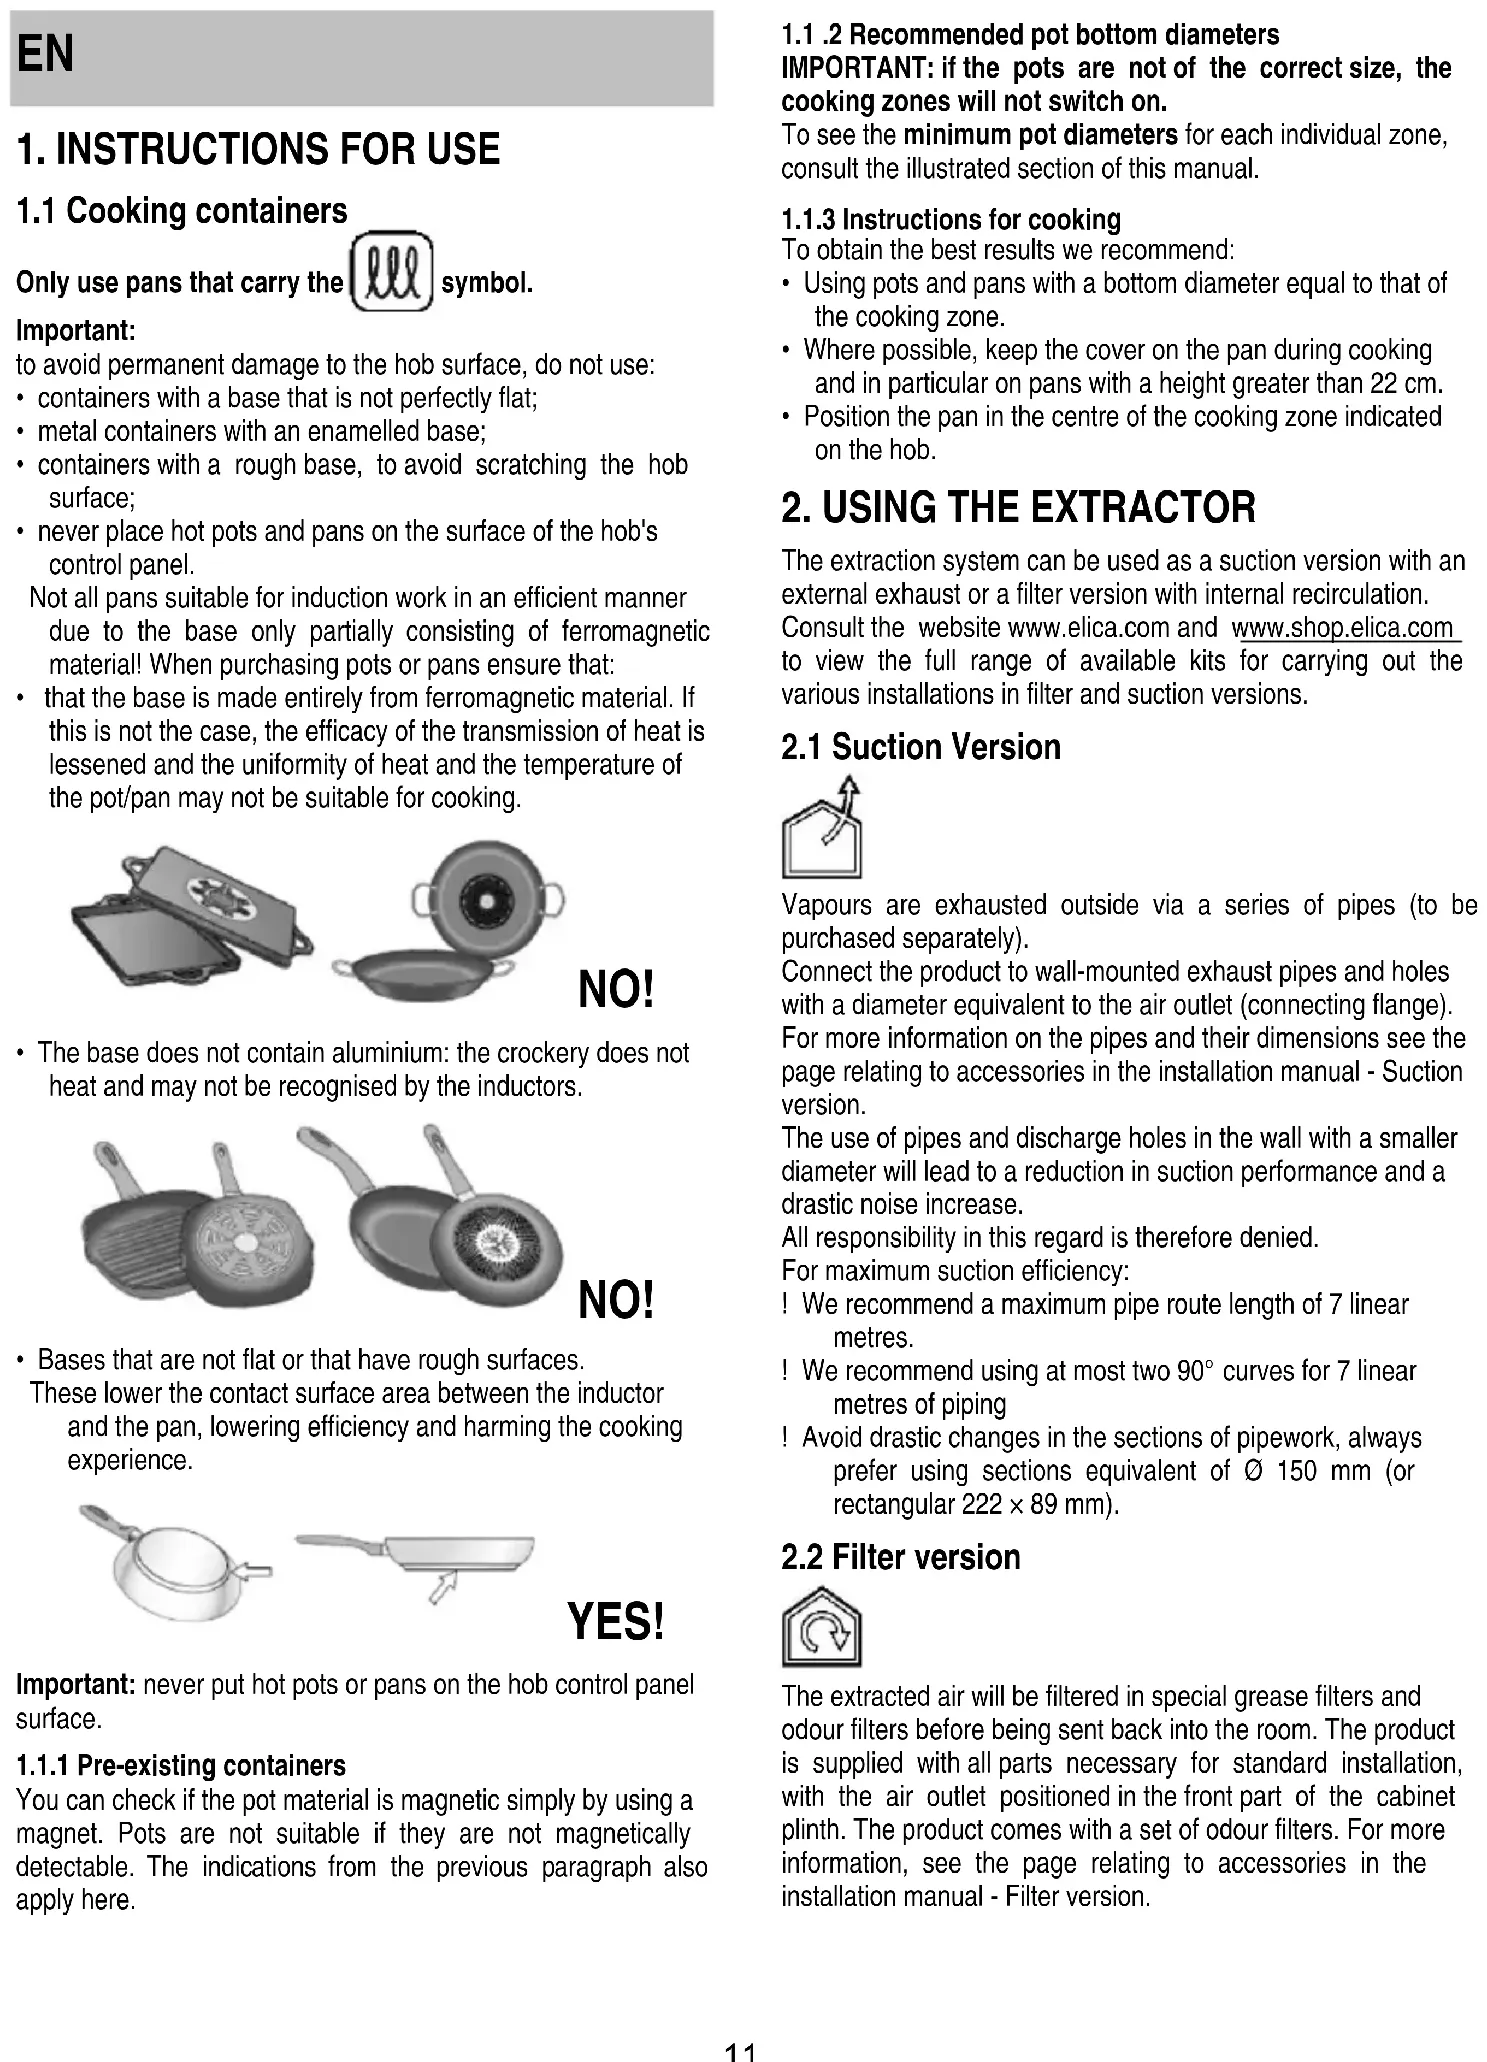
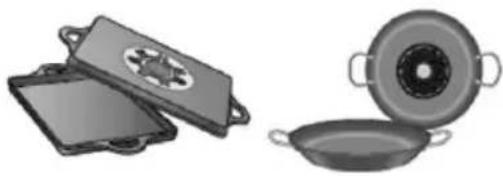
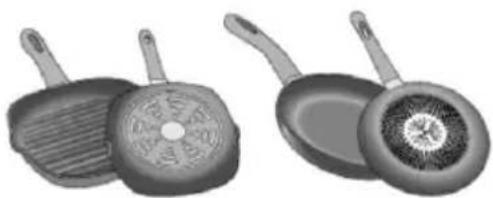
Only use pans that carry the

symbol.
Important:
to avoid permanent damage to the hob surface, do not use:
- containers with a base that is not perfectly flat;
• metal containers with an enamelled base; - containers with a rough base, to avoid scratching the hob surface;
- never place hot pots and pans on the surface of the hob's control panel.
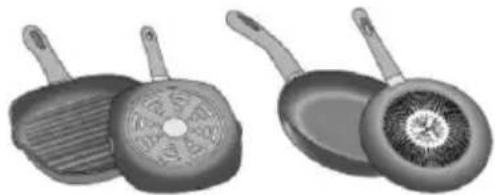
Not all pans suitable for induction work in an efficient manner due to the base only partially consisting of ferromagnetic material! When purchasing pots or pans ensure that:
- that the base is made entirely from ferromagnetic material. If this is not the case, the efficacy of the transmission of heat is lessened and the uniformity of heat and the temperature of the pot/pan may not be suitable for cooking.
natural_image
Illustration of kitchenware including a plate with a lid and a pot (no text or symbols)NO!
- The base does not contain aluminium: the crockery does not heat and may not be recognised by the inductors.
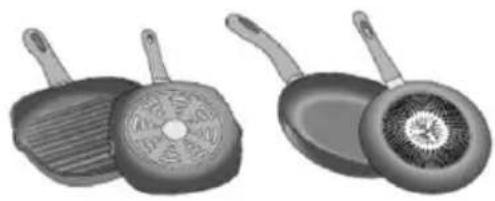
natural_image
Two grayscale illustrations of frying panes with handles and a side view showing interior (no text or symbols)NO!
- Bases that are not flat or that have rough surfaces.
These lower the contact surface area between the inductor and the pan, lowering efficiency and harming the cooking experience.
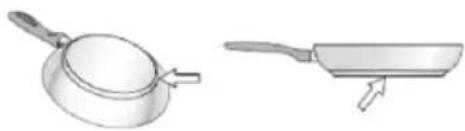
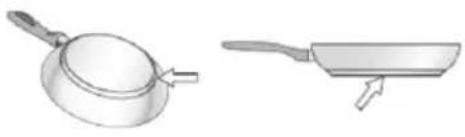
natural_image
Illustration of a pan and its cooking pan (no text or symbols)YES!
Important: never put hot pots or pans on the hob control panel surface.
1.1.1 Pre-existing containers
You can check if the pot material is magnetic simply by using a magnet. Pots are not suitable if they are not magnetically detectable. The indications from the previous paragraph also apply here.
1.1 .2 Recommended pot bottom diameters
IMPORTANT: if the pots are not of the correct size, the cooking zones will not switch on.
To see the minimum pot diameters for each individual zone, consult the illustrated section of this manual.
1.1.3 Instructions for cooking
To obtain the best results we recommend:
- Using pots and pans with a bottom diameter equal to that of the cooking zone.
- Where possible, keep the cover on the pan during cooking and in particular on pans with a height greater than 22 cm.
- Position the pan in the centre of the cooking zone indicated on the hob.
2. USING THE EXTRACTOR
The extraction system can be used as a suction version with an external exhaust or a filter version with internal recirculation.
Consult the website www.elica.com and www.shop.elica.com to view the full range of available kits for carrying out the various installations in filter and suction versions.
2.1 Suction Version
Vapours are exhausted outside via a series of pipes (to be purchased separately).
Connect the product to wall-mounted exhaust pipes and holes with a diameter equivalent to the air outlet (connecting flange).
For more information on the pipes and their dimensions see the page relating to accessories in the installation manual - Suction version.
The use of pipes and discharge holes in the wall with a smaller diameter will lead to a reduction in suction performance and a drastic noise increase.
All responsibility in this regard is therefore denied.
For maximum suction efficiency:
! We recommend a maximum pipe route length of 7 linear metres.
! We recommend using at most two 90° curves for 7 linear metres of piping
! Avoid drastic changes in the sections of pipework, always prefer using sections equivalent of ∅ 150 mm (or rectangular 222 × 89 mm).
2.2 Filter version

The extracted air will be filtered in special grease filters and odour filters before being sent back into the room. The product is supplied with all parts necessary for standard installation, with the air outlet positioned in the front part of the cabinet plinth. The product comes with a set of odour filters. For more information, see the page relating to accessories in the installation manual - Filter version.
3. OPERATION
3.1 Control panel
text_image
RL RR FL FR FL RL FR RR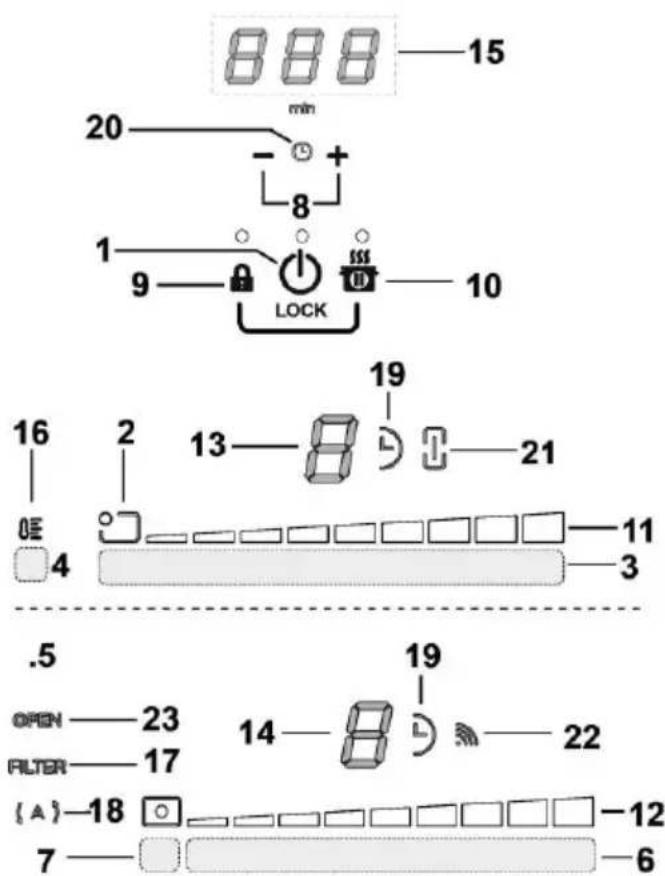
text_image
8 8 8 — 15 20 —— min —— + —● + —— 8 1 —— LOCK —— 10 9 —— 19 16 —— 2 —— 13 —— 21 OE —— 4 —— 11 □ 3 .5 —— 19 OPEN —— 23 —— 14 —— 22 FILTER —— 17 —— {A} —18 ● —— 12 7 —— 6Touch-sensitive buttons (TOUCH)
- ON/OFF hob/extractor system
- Cooking zone position indicator
- Selection of the cooking zones and power adjustment
- Temperature Manager activation
- Extractor fan buttons
- Extractor fan selection Increase/Decrease extraction speed (power)
- Activate automatic functions Reset filter saturation
- Activate Timer Increase/Decrease Timer value
- Key Lock
9+10.Child Lock - Pause / Recall
Display / LED
- View power
- View extraction speed (power)
- Cooking zone display
- Extractor fan display
- Timer display
- Temperature Manager Indicator
- Filter assistance indicator
- Automatic extraction function indicator
- Timer indicator active
- Egg Timer indicator active
- Bridge indicator active
- SNAP operation indicator
- FLAP indicator
3.2 Using the hob
3.2.1 Things to know before starting
This manual describes the main functions. Use the QR code at the front of the manual to access the full instructions online. All the functions of this hob respect the most rigorous safety norms. For this reason:
- Some functions do not activate, or deactivate automatically, if pans are removed or when they are incorrectly positioned on top of the hob.
- In other cases functions deactivate automatically after a few seconds when the selected function requires further settings that have not been input.
Wait for the display to turn off before approaching the cooking zone.
3.2.2 Cooking zone display
On the displays relating to the cooking areas, the following is indicated:
| Cooking zone on | 0 |
| Power level | 1...3 P |
| Residual Heat Indicator | H |
| Pot Detector | U |
| Temperature Manager Function active | U |
| Pause function | II |
| Child Lock | L |
| Automatic Heat UP function | R |
3.2.3 Hob features
- Safe Activation: The product is activated only in the presence of pots on the cooking zone: the heating process does not start or is interrupted if there are no pots, or if these are removed.
-
Pot Detector: The product automatically detects the presence of pots on the cooking zones.
-
Safety Shut Down: For safety reasons, each cooking zone has a maximum operating time, which depends on the maximum power level set.
- Residual Heat Indicator: When switching off one or more cooking zones, the residual heat is indicated with a specific visual signal on the display of the corresponding zone by the "H" symbol.
3.2.4 Operation
Note: activate the required zone first
- Switching on: touch ON/OFF hob/ extractor system. touch again to switch off.
- Cooking Zone Selection

the selection bar (3) corresponding with the desired cooking zone.
- Power Level
Touch the selection bar (3) and slide right with fingers to increase the Power Level, left to decrease.
There are 9 power levels available + an intensive power level indicated on the display by the "P" symbol (Power Booster). The "P" power level (Power Booster) remains active for 5 minutes, after which the power returns to the previous level.
- Bridge Zones: Cooking Zones FL (“Master”) and RL (“Secondary”) and the zones FR (“Master”) and
RR (“Secondary”) can work as a pair or in combined mode creating a single zone thanks to the Bridge function (2 in total: 1 on the right and 1 on the left) with the same power level. This function allows evenly distributed cooking with large-sized pots and pans.
To activate the Bridge Function:
- select both cooking zones to be used simultaneously
- The Bridge indicator (21) of the “Secondary” cooking zone lights up
- using the Selection area (3), of the "Master" cooking zone the Operating power level can be set
- to disable the Bridge Function all you have to do is to repeat the activation procedure
• Power Limitation
The Power Limitation function allows for operation of the product to be set to limit the power consumption (kW)
Note : the setting of the hob must be made with the hob switched off at the time it is connected to the electrical supply, or when reconnected to the electrical supply, within 2 minutes,
without pressing the button.
To set the Power Limitation:
- touch and hold the


buttons until you hear a brief
acoustic signal.
- slide simultaneously on the FL and RL selection bars
, from left to right,
then press and hold the corresponding area at the last power
until a brief acoustic signal is emitted

- the Timer (15) display shows the symbols "CF6", to indicate that it is possible to run the setup
-
then press the button and the display timer (15) will display PHA (Phase Power Limit):
-
the FL zone ○ display shows the current setting**
0 = 7.4 KW (default setting)
1 = 4.5 KW
2 = 3.1 KW
- to change the Power Limitation settings, slide on the
selection areas FL


buttons for 1
. to save the selection made, press the 🔒 buttons for 1 second; an audible signal will be emitted to confirm the setting and the function quits.
3.3 Using the extractor system
- Switching on: Touch ON/OFF of the hob/extractor system.
Touch again to switch off.
- Switching the extractor system off: Open the Flap ttouch the Selection bar (6) to activate the extractor system.
Note: The extractor zone is fitted with a mechanical rotating FLAP. The FLAP must be opened before switching on the hood to activate the extractor system. The hood has a sensor which when the extractor is on stops the motor automatically if the FLAP is closed. Extraction only starts again when the FLAP is reopened.
- Extraction speed (power):
Touch and slide your fingers along the Selection bar (6): to the right to increase extraction speed (power) (0-8); to the left to decrease extraction speed (power) (8-0).
The product has an additional 2 timed extraction speeds (power levels):
"9" for 15 minutes,
"10" for 5 minutes after that the power returns to level 8
Note: both speeds are indicated on the display (13) of the selected cooking zone with the " symbol.
3.4 Power tables
| Power level | Cooking type | Use (depending on cooking experience and habits) | |
| Max power | P | Heat quickly | raises the temperature of food in a short space of time to boiling point for water, or to quickly heat cooking liquids |
| 8-9 | Fry - boil | browning, starting cooking, fry frozen products, boil quickly | |
| High power | 7-8 | Brown - fry - boil - grill | browning, fast rolling boil, cooking and grilling (for brief periods, 5-10 minutes) |
| 6-7 | Brown - cook - stew - fry - grill | browning, slow rolling boil, cooking and grilling (for medium periods, 10-20 minutes), pre-heat accessories | |
| Medium power | 4-5 | Cook - stew - fry - grill | stewing, light rolling boil, cooking (for long periods), dressing pasta |
| 3-4 | Cooking - simmering - thickening - creaming | longer cooking (rice, sauces, roasts, fish) with accompanying liquids (e.g. water, wine, stock, milk), dressing pasta | |
| 2-3 | Cooking - simmering - thickening - creaming | longer cooking (volumes less than one litre: rice, sauces, roasts, fish) with accompanying liquids (e.g. water, wine, stock, milk) | |
| Low power | 1-2 | Melt - thaw - keep warm - stir | melting butter, gently melting chocolate, defrosting small products |
| 1 | Melt - thaw - keep warm - stir | keeping small portions of just-cooked food warm or maintaining dishes at serving temperature and creaming risottos | |
| OFF | 0 | Support surface | Hob in stand-by or off (possible presence of residual heat from the end of cooking, signalled by H-L-O) |
4. MAINTENANCE
Caution! Before any cleaning or maintenance, make sure the cooking zones are switched off and the heat indicator has turned off.
4.1 Maintaining the hob
4.1.1 Cleaning
The hob must be cleaned after each use.
Important: Do not use abrasive sponges or pads, they may ruin the glass. Do not use irritant chemical detergents such as oven sprays or stain removers. After each use, let the hob cool down completely to remove encrusted on dirt and stains. Use a soft cloth, paper towel or specific products to clean the hob (follow the Manufacturer's instructions).
DO NOT USE STEAM JET CLEANERS!!!
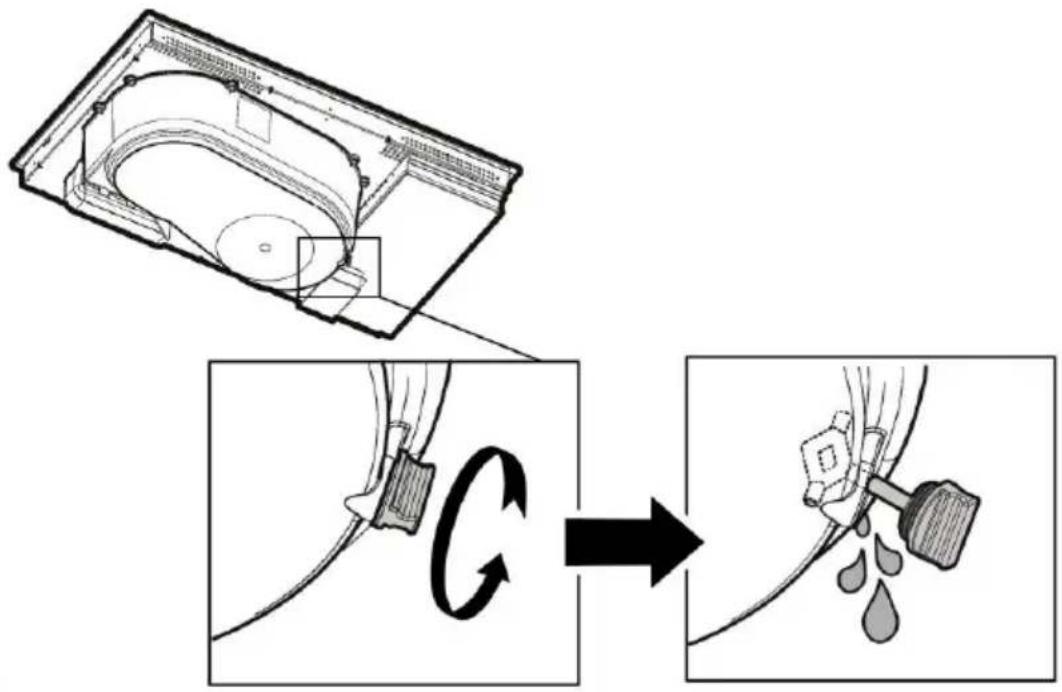
Important: In the event of the accidental spillage of large quantities of liquid from pans it is possible to drain by using the discharge valve, on the lower section of the product, in order to remove any residues and ensuring maximum hygiene levels are maintained. Fig. 1a
For a more thorough and in-depth clean the lower tank can be removed completely. Fig. 1b
Cleaning the metal grille:
The grille must be washed by hand with hot water and neutral detergent, then dried thoroughly to prevent oxidation.
4.2 Maintenance of the extractor system
4.2.1 Cleaning
Clean using ONLY a cloth dampened with neutral liquid detergent. DO NOT CLEAN WITH TOOLS OR INSTRUMENTS. Do not use abrasive products. DO NOT USE ALCOHOL!
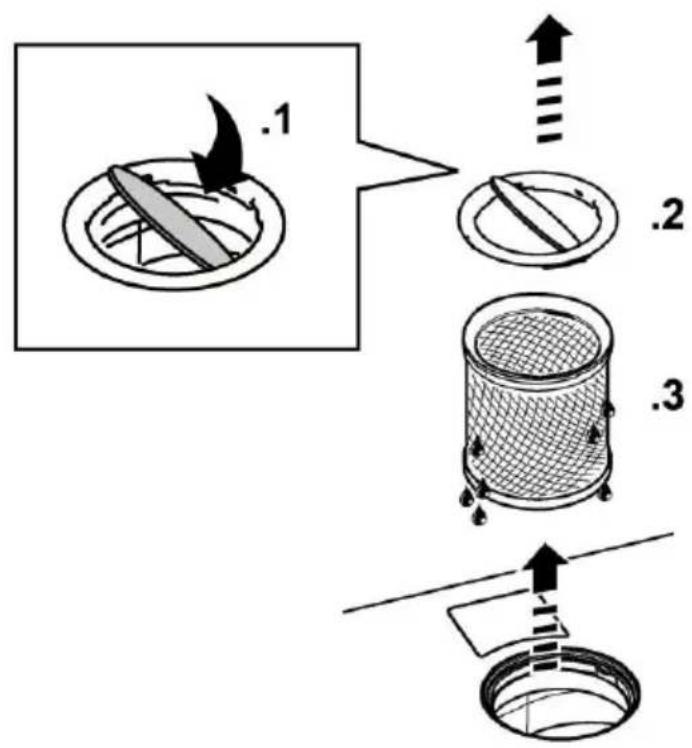
4.2.2 Grease filter
Fig. 2
Traps cooking grease particles.
The grease filter must be cleaned once a month using non aggressive detergents, either by hand or in the dishwasher, which must be set to a low temperature and a short cycle. When washed in a dishwasher, the grease filter may discolor slightly, but this does not affect its filtering capacity.
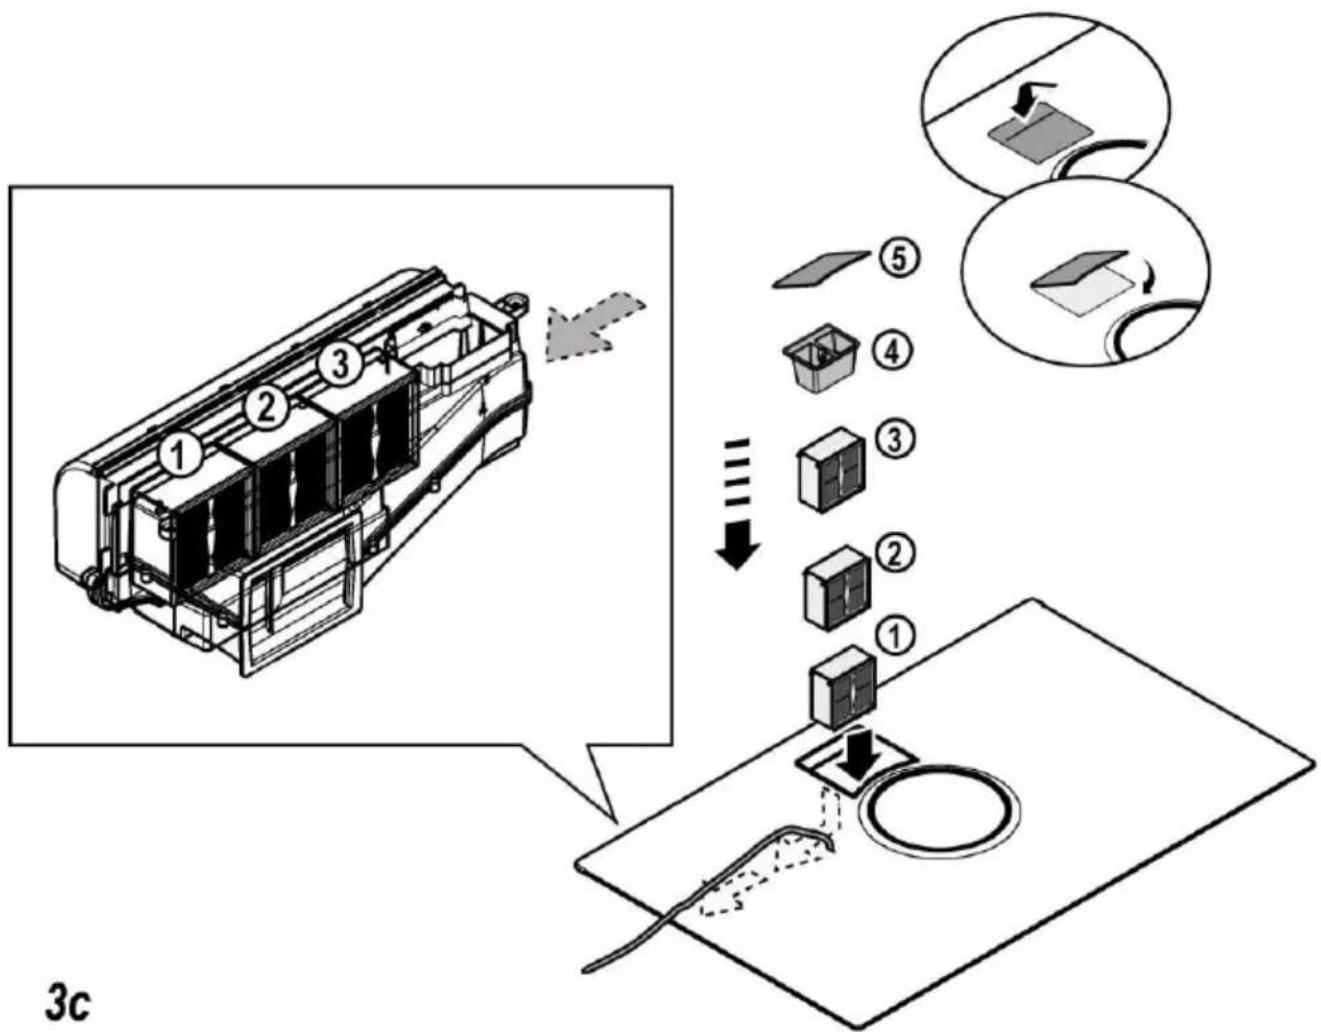
4.2.3 Odour filter
(For filter version only) Fig. 3a-b-c It absorbs unpleasant odors caused by cooking.
The product comes with a set of odour filters. The saturation of the odour filters can occur after somewhat prolonged use depending on the type of cooking and how regularly the grease filter is cleaned. The odour filters can be thermally regenerated every 2/3 months in an oven pre-heated to 200^ C for 45 minutes. The correct regeneration of the filter ensures that it can constantly filter efficiently for 5 years.
Warning! Do not leave filters on the bottom of the oven, but place it on a baking tray and position it at a mid height..
DE
natural_image
Illustration of kitchenware including a plate, cooking pan, and pot (no text or symbols)NEIN!
natural_image
Two grayscale illustrations of cooking utensils: a flat pan with a side panel and a closed pan with a circular cutter (no text or symbols)NEIN!
natural_image
Illustration of a frying pan and its side view showing the exterior (no text or symbols)JA!
natural_image
Illustration of kitchenware including a cooking pan, lid, and pot (no text or symbols)NON!
natural_image
Two grayscale illustrations of frying panes with different interior designs (no text or symbols)NON!
natural_image
Illustration of a frying pan and its side view showing the cooking process (no text or symbols)OUI!
natural_image
Illustration of kitchen utensils including a plate, pot, and lid (no text or symbols)NEE!
natural_image
Two grayscale illustrations of cooking utensils: a flat pan with a circular lid and a pan with a flower-shaped lid (no text or symbols)NEE!
natural_image
Illustration of a frying pan and its side view showing a cooking step (no text or symbols)JA!
$$ 2 = 3, 1 \mathrm{KW} $$
natural_image
Illustration of cooking utensils including a pan, lid, and pot (no text or symbols)¡NO!
natural_image
Two grayscale illustrations of frying panes with handles, one showing a side dish and the other showing a pan with a circular pattern (no text or symbols)¡NO!
natural_image
Illustration of a frying pan and its side view showing the exterior (no text or symbols)¡sí!
natural_image
Illustration of kitchenware including a plate, cooking pan, and pot (no text or symbols)NÃO!
natural_image
Two black-and-white illustrations of frying panes, one with a side panel showing a textured surface and the other with a circular pattern (no text or symbols)NÃO!
natural_image
Illustration of a frying pan and its side view showing a cooking step (no text or symbols)SIM!
natural_image
Illustration of kitchenware including a cooking pan, lid, and pan (no text or symbols)OXI!
natural_image
Two grayscale illustrations of cooking utensils: a flat pan with a side lid and a closed pan with a circular vent, both open (no text or symbols visible)OXI!
natural_image
Illustration of a frying pan and its side view showing the exterior (no text or symbols)NAI!
$$ 2 = 3, 1 \mathrm{KW} $$
natural_image
Illustration of kitchenware including a plate with lid and a pan with lid (no text or symbols)NEJ!
natural_image
Two grayscale illustrations of cooking utensils: a flat pan with lid and a side pan with lid (no text or symbols)NEJ!
natural_image
Illustration of a frying pan and its side view showing the exterior (no text or symbols)JA!
natural_image
Illustration of cooking utensils including a plate with a cross symbol and a pot with a lid, alongside an open pan (no text or symbols)natural_image
Two black frying panes with handles, one showing a side dish and the other showing a circular vent (no text or symbols)natural_image
Illustration of a frying pan and its side view showing the exterior (no text or symbols)KYLLÄ!
natural_image
Illustration of cooking utensils including a flat pan, lid, and pot (no text or symbols)NEI!
natural_image
Two grayscale illustrations of frying panes with different interior designs (no text or symbols)NEI!
natural_image
Illustration of a frying pan and its side view showing a drop (no text or symbols)JA!
Viktig: Ikke sett varme kjeler på overflaten til platetoppens kontrollpanel.
1.1.1 Allerede eksisterende kokekar
0 = 7,4 KW (standardinnstilling)
1 = 4,5 KW
2 = 3,1 KW
natural_image
Illustration of kitchenware including a cooking pan, lid, and pot (no text or symbols)NEJ!
natural_image
Two black frying panes with handles, one showing a side dish and the other showing a circular opening (no text or symbols visible)NEJ!
natural_image
Illustration of a frying pan and its side view showing the exterior (no text or symbols)JA!
$$ 2 = 3, 1 \mathrm{KW} $$
natural_image
Two kitchen utensils: a lid with a circular opening and a pan with handles (no text or symbols visible)NIE!
natural_image
Two grayscale illustrations of frying panes with different surfaces (no text or symbols)NIE!
text_image
RL FL RR FR FL RL FR RR
text_image
8 8 8 — 15 20 —— min —— + —● + —— 8 1 —— LOCK —— 10 9 —— 19 16 —— 2 —— 13 —— 21 OE —— 4 —— 11 □ 3 .5 —— 19 OPEN —— 23 —— 14 —— 22 FILTER —— 17 —— {A} —18 ○ —— 12 7 —— 6natural_image
Illustration of cooking utensils including a plate, lid, and pan (no text or symbols)NE!
natural_image
Two kitchen utensils: one with a side dish and another with a pan, shown from different angles (no text or symbols visible)NE!
natural_image
Illustration of a frying pan and its side view showing the exterior (no text or symbols)ANO!
natural_image
Illustration of cooking utensils including a plate with a lid and a pan with a lid (no text or symbols)NIE!
natural_image
Two grayscale illustrations of frying panes with different interior designs (no text or symbols)NIE!
natural_image
Illustration of a cooking pan and its side view showing a frying pan (no text or symbols)ÁNO!
natural_image
Illustration of kitchenware including a cooking pan, plate with lid, and a pot (no text or symbols)NEM!
natural_image
Two kitchen utensils: a flat pan with a circular cutout and a pan with a flower-like opening (no text or symbols visible)NEM!
natural_image
Illustration of a pan and its cooking pan (no text or symbols)IGEN!
natural_image
Illustration of kitchenware including a cooking pan, a pot, and a plate (no text or symbols)HE!
natural_image
Two grayscale illustrations of frying panes with handles, one showing a side dish and the other showing a circular interior (no text or symbols)HE!
natural_image
Illustration of a frying pan and its side view showing the exterior (no text or symbols)ДА!
natural_image
Illustration of kitchenware including a cooking pan, a pot, and a lid (no text or symbols)NU!
natural_image
Two black-and-white photos of frying panes with handles and a side panel showing interior (no text or symbols)NU!
natural_image
Illustration of a frying pan and its side view showing a cooking step (no text or symbols)DA!
$$ 2 = 3, 1 \mathrm{KW} $$
"9" timp de 15 minute,
"10" timp de 5 minute
natural_image
Illustration of kitchenware including a plate with a lid, a pan with a lid, and a pot (no text or symbols)HET!
natural_image
Two grayscale illustrations of frying panes with handles and a circular lid, shown from different angles (no text or symbols)HET!
natural_image
Illustration of a frying pan and its side view showing the exterior (no text or symbols)ДА!
natural_image
Illustration of kitchenware including a cooking pan, lid, and pot (no text or symbols)natural_image
Two black frying panes with handles, one showing a side dish and the other showing a circular pattern (no text or symbols)natural_image
Illustration of a frying pan and its side view showing the exterior (no text or symbols)natural_image
Illustration of kitchenware including a plate, lid, and pan (no text or symbols)БОЛМАЙДЫ!
natural_image
Two grayscale illustrations of frying panes with handles, one showing a side panel and the other showing a closed pan (no text or symbols)БОЛМАЙДЫ!
natural_image
Illustration of a frying pan and its side view showing the cooking process (no text or symbols)БОЛАДЫ!
text_image
RL FL RR FR FL RL FR RR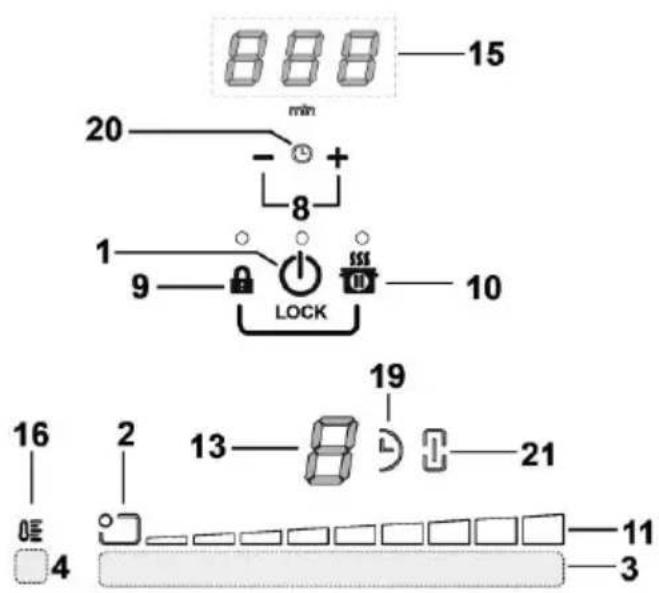
natural_image
Illustration of cooking utensils including a plate with a lid and a pan with a lid (no text or symbols)natural_image
Two grayscale illustrations of frying panes with handles and a side panel showing interior (no text or symbols)natural_image
Illustration of a pan and its cooking pan (no text or symbols)JAH!
natural_image
Illustration of kitchenware including a cooking pan, lid, and pot (no text or symbols)natural_image
Two kitchen utensils with handles, one open and one closed, labeled 'NE!' (no other text or symbols)natural_image
Illustration of a frying pan and a cooking pan with an arrow, labeled 'TAIP!' (no other text or symbols)natural_image
Two kitchen utensils: a lid with a circular opening and a pan with handles (no text or symbols visible)NÊ!
natural_image
Two grayscale illustrations of frying panes with handles, one showing a side dish and the other showing a pan with a central dish (no text or symbols)NÊ!
text_image
RL FL RR FR FL RL FR RR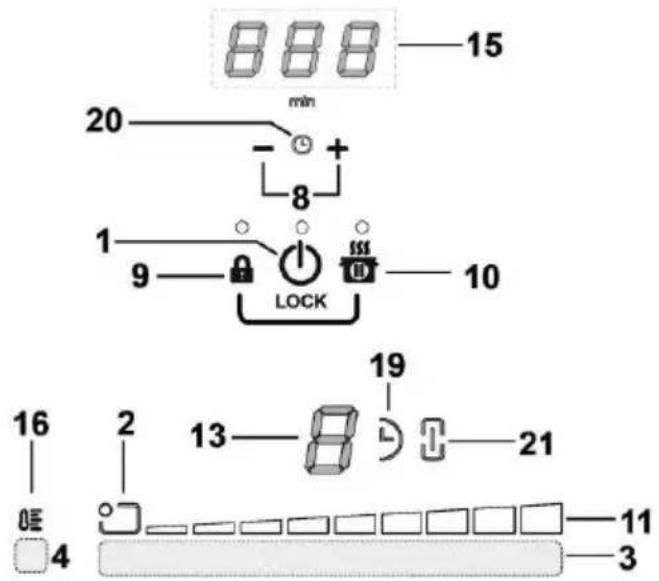
text_image
888 —15 20 min — + 8 1 9 LOCK $$$ 10 16 2 13 —8 —21 —11 0E 4 3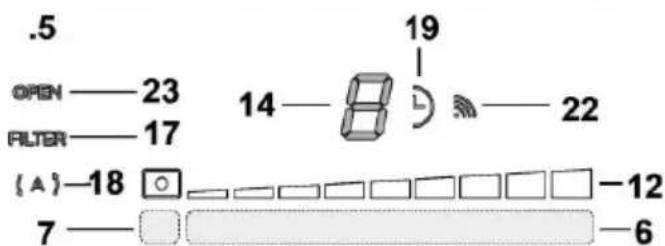
text_image
.5 OPEN — 23 FILTER — 17 14 — 8 19 — 22 (A) — 18 7 — □ — 6natural_image
Illustration of kitchenware including a cooking pan, lid, and pan (no text or symbols)NE!
natural_image
Two grayscale illustrations of cooking utensils, one with a side pan and another with a pan, both showing interior cutouts (no text or symbols)NE!
- Dno koje nije ravno ili je sa hrapavom površinom. Takva dna oduzimaju kontaktnu površinu između induktora i posuđa, smanjujući efikasnost i pogoršavajući iskustvo kuvanja.
natural_image
Illustration of a frying pan and its side view showing a cooking step (no text or symbols)DA!
Važno: nikada ne stavljajte vruće lonce i tave na površinu kontrolne ploče.
natural_image
Illustration of kitchenware including a cooking pan, a lid, and a pot (no text or symbols)NE!
- da dno ne vsebuje aluminija: posoda se ne segreva ker induktorji morda je niti ne prepoznajo.
natural_image
Two grayscale illustrations of frying panes with handles, one showing a side dish and the other showing a pan with a circular cutter (no text or symbols)NE!
natural_image
Illustration of a frying pan and its side view showing a cooking step (no text or symbols)DA!
natural_image
Illustration of kitchenware including a cooking pan, lid, and pot (no text or symbols)NE!
- Dno ne smije sadržavati aluminij: posuđe se ne zagrijava i induktori ne mogu prepoznati takvo posuđe.
natural_image
Two kitchen utensils showing different cooking methods: one with a flat pan and one with a pan with a circular cutter (no text or symbols visible)NE!
- Dna koja nisu ravna ili su s hrapavom površinom. Oduzimaju kontaktnu površinu između induktora i posuđe, smanjujući učinkovitost i pogoršavajući iskustvo kuhanja.
natural_image
Illustration of a frying pan and its side view showing the exterior (no text or symbols)DA!
natural_image
Illustration of kitchenware including a cooking pan, a lid with a pot, and a flat plate (no text or symbols)HAYIR!
natural_image
Two grayscale illustrations of frying panes with handles, one showing a side dish and the other showing a side pan (no text or symbols)HAYIR!
natural_image
Illustration of a frying pan and its side view showing the cooking process (no text or symbols)EVET!
natural_image
Two kitchen utensils: a lid with a pan and a side bowl (no text or symbols visible)!
natural_image
Two grayscale images of cooking panes with handles, one showing a side dish and the other showing a circular pattern (no text or symbols)!