
PRF0104116 - Cooker ELICA - Free user manual and instructions
Find the device manual for free PRF0104116 ELICA in PDF.


| Product type | Freestanding gas and electric cooker |
| Brand | Elica |
| Model | PRF0104116 |
| Width | 60 cm (standard) |
| Depth | 60 cm |
| Height | 85-90 cm (adjustable) |
| Net weight | Approximately 55 kg |
| Power supply | Gas (natural gas or butane/propane) and 230 V ~ 50 Hz |
| Number of burners | 4 gas burners (various power levels) |
| Oven type | Static and convection electric oven |
| Oven capacity | Approximately 70 liters |
| Oven functions | Traditional cooking, convection, grill, bottom heat, defrost |
| Ignition | Integrated ignition (push button) |
| Safety | Gas leak safety device (thermocouple), oven child lock |
| Oven door | Removable cool glass, double glazing |
| Oven lighting | Interior light |
| Cleaning | Easy-clean enamel cavity; removable grids |
| Controls | Rotary knobs for gas and oven, programming knob |
| Supplied accessories | Grid, drip tray, spit (depending on model) |
| Spare parts | Available from Elica after-sales service (burners, thermocouples, heating elements, etc.) |
| Repairability | High repairability index (standardized parts) |
| General information | User manual in French included; energy class A (oven) |
Frequently Asked Questions - PRF0104116 ELICA
User questions about PRF0104116 ELICA
0 question about this device. Answer the ones you know or ask your own.
Ask a new question about this device
Download the instructions for your Cooker in PDF format for free! Find your manual PRF0104116 - ELICA and take your electronic device back in hand. On this page are published all the documents necessary for the use of your device. PRF0104116 by ELICA.
USER MANUAL PRF0104116 ELICA
EN Instruction on mounting and use
natural_image
3D diagram of a rectangular plate with four circular holes, no text or symbols present



900mm

natural_image
3D diagram of a rectangular plate with four circular indentations and an asterisk pointing to it (no text or symbols)




natural_image
Isometric line drawing of a cabinet or enclosure with an arrow pointing to the front panel (no text or symbols present)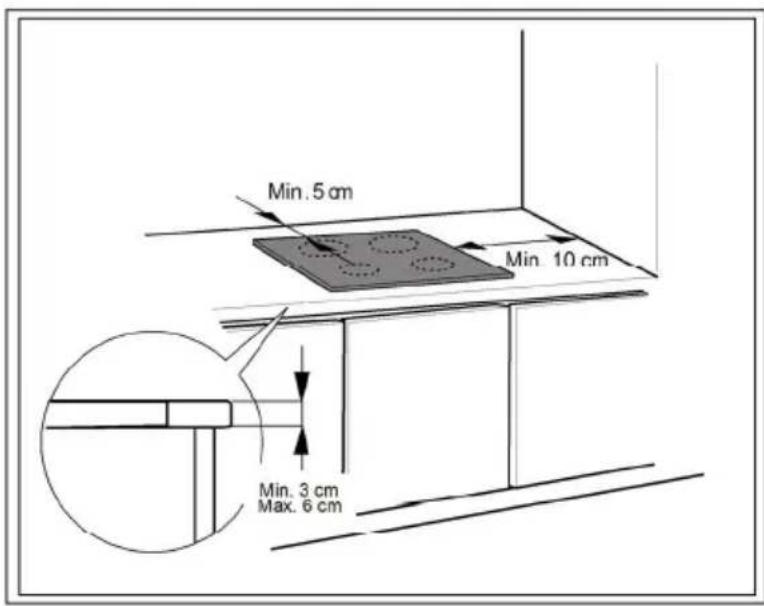
natural_image
Line drawing of an oven with a door and front panel, showing a warning symbol with an arrow (no text or labels present)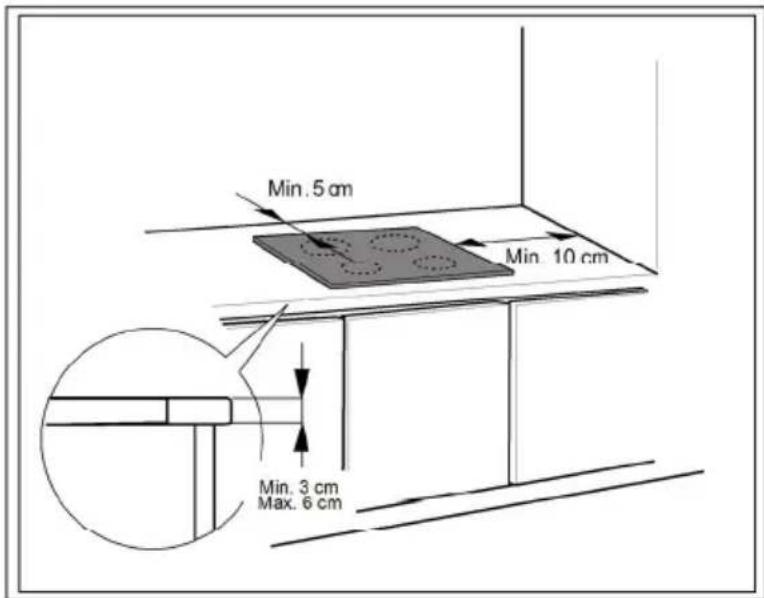

natural_image
Line drawing of an oven with doors and ventilation system (no text or symbols)



natural_image
Circular object with concentric rings, labeled with dimensions 1 x and 2.8 m (no other text or symbols)a.
natural_image
3D diagram of a curved arrow emerging from a rectangular plate with three circular holes, no text or symbols presentb.

natural_image
Pure diagram of a rectangular frame with directional arrows indicating flow or force, no text or symbols present.

natural_image
Illustration of hands performing a procedure on a curved object (no text or symbols visible)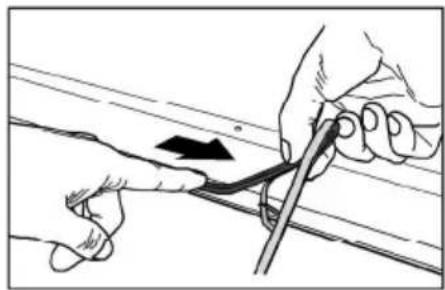
natural_image
Illustration of hands performing a cable cutting operation with a pen (no text or symbols)
natural_image
Pure technical line drawing of a mechanical component or pipe fitting (no text or symbols)4

natural_image
Diagram showing a tray with four circular holes and two downward arrows indicating movement or force (no text or symbols)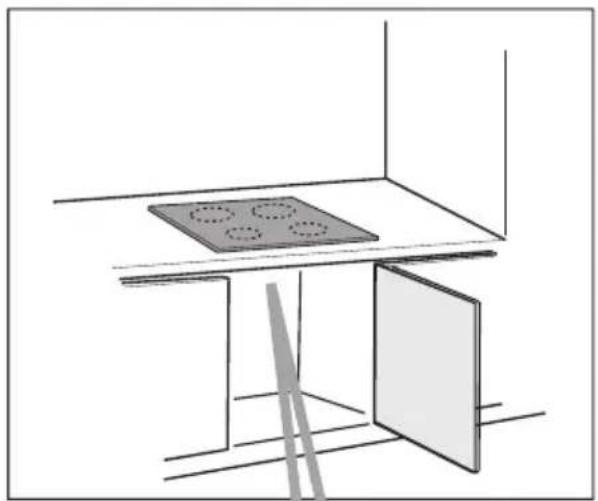
natural_image
Line drawing of a kitchen table with a microwave oven and a door, no text or symbols present

natural_image
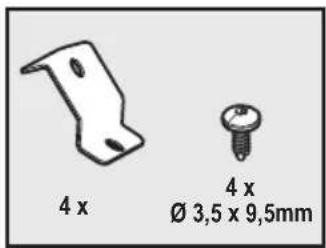
Technical line drawing of a mechanical component with a dashed circular outline (no text or symbols)
flowchart
graph TD
    A["Rectangular Frame"] --> B["Directional Arrow"]
    B --> C["Device with Horizontal Line"]
    C --> D["Bottom Circular Diagram"]


natural_image
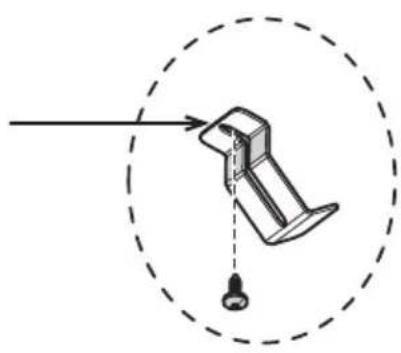
Diagram of a mechanical component with a dashed circular outline and a hanging pin (no text or symbols)
flowchart
graph TD
    A["Rectangular Frame"] --> B["Main Component"]
    B --> C["Circular Component with Valve"]
    C --> D["Bottom Product"]



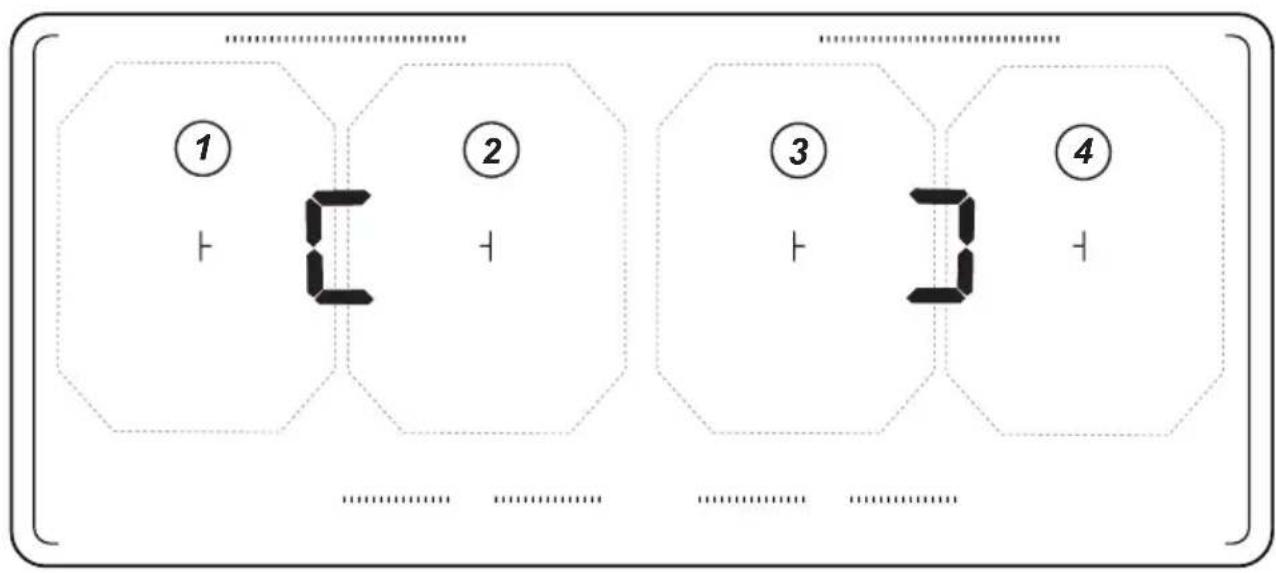
①②③④ ○ ○
①—② ③—④
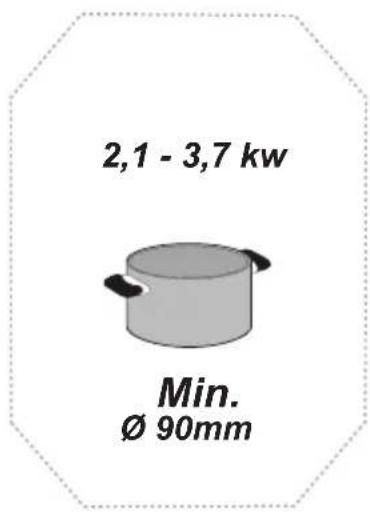
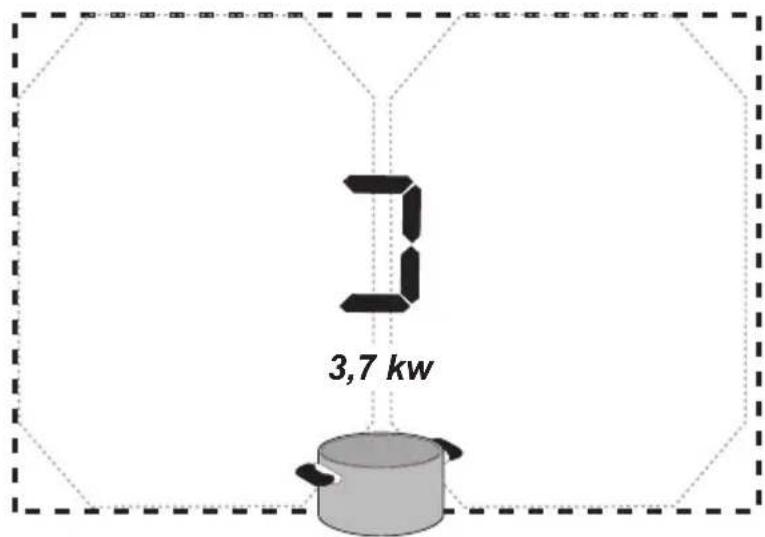
Min. ∅ 110mm
EN - Installation and operating instructions
Strictly observe the instructions in this manual. No liability is taken for any problems, damage or fires caused by not complying with the instructions in this manual. The device is designed exclusively for domestic use for cooking food. No other use is allowed (e.g. heating rooms). The manufacturer declines any liability for inappropriate use or incorrect setting of the controls.
The hob may look different to the model shown in the drawings in this manual, however, the operating, maintenance and installation instructions remain the same. It is important to keep this manual for future reference. If sold, transferred or moved, make sure that it remains with the product.
! Read the instructions carefully: they contain important information on installation, operation and safety.
! Do not make electrical changes to the product
! Before installing the device, verify that none of the components are damaged. Otherwise, contact the dealer and do not continue with the installation.
Note: The parts marked with the symbol "(*)" are optional accessories supplied only with some models or not supplied, to be purchased.
Warnings
Attention! Strictly observe the following instructions:
-The device must be disconnected from the electric network before doing any installation work.
-Installation or maintenance must be performed by a qualified technician, in compliance with the manufacturer's instructions and with the local regulations on safety. Do not repair or replace any part of the device unless specifically stated in the operating manual.
-Earthing the device is compulsory.
-The power cable must be long enough to allow the connection of the device, recessed in the cabinet, to the electric network.
-So that the installation complies with current safety standards, a regular omnipolar switch is required that assures the complete disconnection of the mains under conditions of overvoltage category III, in accordance with the installation rules.
- Do not use multiple sockets or extensions.
-Once installation is complete, the electrical components must no longer be accessible by the user.
-The equipment and the accessible parts become very hot during use. Be careful not to touch the heating elements.
-This device can be used by children from the age of 8 and by people with reduced physical, sensory or mental capabilities or lack of experience and knowledge if they are properly supervised or if they have been trained on safely using the device and if they are aware of the related dangers. Children must not play with the device. Cleaning and maintenance should not be performed by unsupervised children.
- Be careful that children do not play with the device; keep children away and supervise them, because the accessible parts may become very hot during use.
- For people with pacemakers and active implants it is important to check, prior to using the induction hob, that their pacemaker is compatible with the device.
- During and after use, do not touch the heating elements of the device.
- Avoid contact with cloths or other flammable material until all the device components have sufficiently cooled.
- Do not place flammable materials on or near the device.
- Overheated fats and oils easily catch fire. Supervise the cooking of foods rich in fat and oil.
- Cleaning and maintenance operations executable by the user must not be performed by children without the supervision of a responsible person.
- It is compulsory to install a separator panel (not supplied) in the space under the device.
- If the surface is cracked, switch off the device to avoid the possibility of electric shock.
- The device is not intended to be put into operation by means of an external timer or a separate remote control system.
- Unattended cooking on a hob with oil or fat can be dangerous and can cause a fire.
- The cooking process must be supervised. A short-term cooking process must be constantly monitored.
- NEVER attempt to put out fires using water. Instead, turn off the device and smother the flames, for example with a lid or a fire blanket. Fire hazard: do not place objects on the cooking surfaces.
- Do not use steam cleaners.
- Do not place metal objects such as knives, forks, spoons and lids on the hob surface as they may overheat.
- Before connecting the model to the electric network: check the data plate (on the bottom of the device) to ensure that the voltage and power correspond to the network and that the connection socket is suitable. If in doubt, consult a qualified electrician.
Important:
- After use, switch off the hob from its control device and do not rely on the pan detector.
- Avoid spills, when boiling or heating liquids, reduce the heat supply.
- Do not leave the heating elements on with pots and pans empty or without containers.
- Once cooking is completed, turn off the relevant zone.
- Never use aluminium foil to cook with, or place products packaged with aluminium. The aluminium would melt and irreparably damage your device.
- Never heat a tin or a tin can containing foods without first opening it: it might explode!
This warning applies to all types of hobs.
- The use of a high power such as the booster function is not suitable for heating some liquids such as oil for frying. Excessive heat can be dangerous. In these cases we recommend the use of a lower power.
- The containers must be placed directly on the hob and should be centred. Under no circumstances insert anything between the pan and the hob.
- In situations of high temperature, the device automatically decreases the power level of the cooking zones.
This device is marked in compliance with the European Directive 2002/96/EC, Waste Electrical and Electronic Equipment (WEEE). By ensuring that this product is disposed of correctly, the user is helping prevent potential negative consequences for the environment and health.

The symbol ■ on the product or accompanying documentation indicates that this product should not be treated as household waste but should be handed over at a suitable collection point for recycling electrical and electronic equipment. Discard it following the local regulations on waste disposal. For further information about treatment, recovery and recycling this product, please contact your local authority, a collection service for household waste or the shop where the product was purchased.
This device, intended to come into contact with food, complies with Regulation (EC) no.1935/2004 and has been designed, manufactured and marketed in accordance with the safety requirements of the "Low voltage" Directive 2006/95/EC (which replaces 73/23/EEC and subsequent amendments), the protection requirements of "EMC" Directive 2004/108/EC.
Use
The induction cooking system is based on the physical phenomenon of magnetic induction. The key feature of this system is the direct transfer of energy from the generator to the pan.
Benefits:
When compared to electric hobs, your induction hob is:
- Safer: lower temperature on the glass surface.
- Faster: lower food heating times.
- More accurate: the hob immediately reacts to your commands.
- More efficient: 90% of the absorbed energy is transformed into heat. Moreover, once the pan is removed from the hob, the heat transmission is immediately interrupted, avoiding unnecessary heat losses.
Cooking containers

Only use pans bearing the symbol
Important:
to avoid permanent damage to the hob surface, do not use:
- containers with bottoms not perfectly flat.
- metal containers with enamelled bottom.
- containers with rough base, to avoid scratching the hob surface.
- never place hot pots and pans on the control panel surface of the hob
Pre-existing containers
Induction cooking uses magnetism to generate heat. Containers must contain iron. Check if the pan material is magnetic using a magnet. The pans are not suitable if they are not magnetically detectable.
Recommended pan bottom diameters
IMPORTANT: if the pans are not correctly sized, the cooking zones do not turn on
To see the diameter of the pan to be used on each zone, see the illustrated part in this manual.
Energy saving
Recommendations for better results:
- Use pots and pans with a bottom diameter equal to that of the cooking zone.
- Only use pots and pans with flat bottoms.
- Where possible, keep the lid on pans during cooking
- Cook vegetables, potatoes, etc. with a little water to reduce cooking time.
- Use a pressure cooker, it further reduces the energy consumption and cooking time
- Place the pan in the centre of the cooking zone drawn on the hob.
Installation
The electrical and mechanical installation must be performed by qualified personnel.
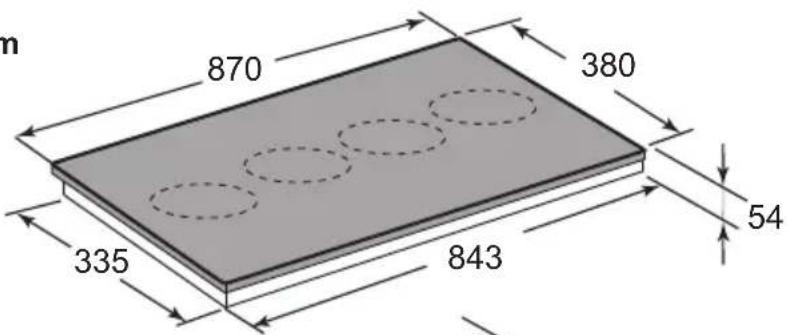
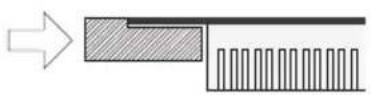
The household appliance is designed to be recessed in a worktop (3-6 cm thick)
The minimum distance between the hob and the wall must be at least 5cm at the front and at least 10 cm on the sides.

Electrical connection
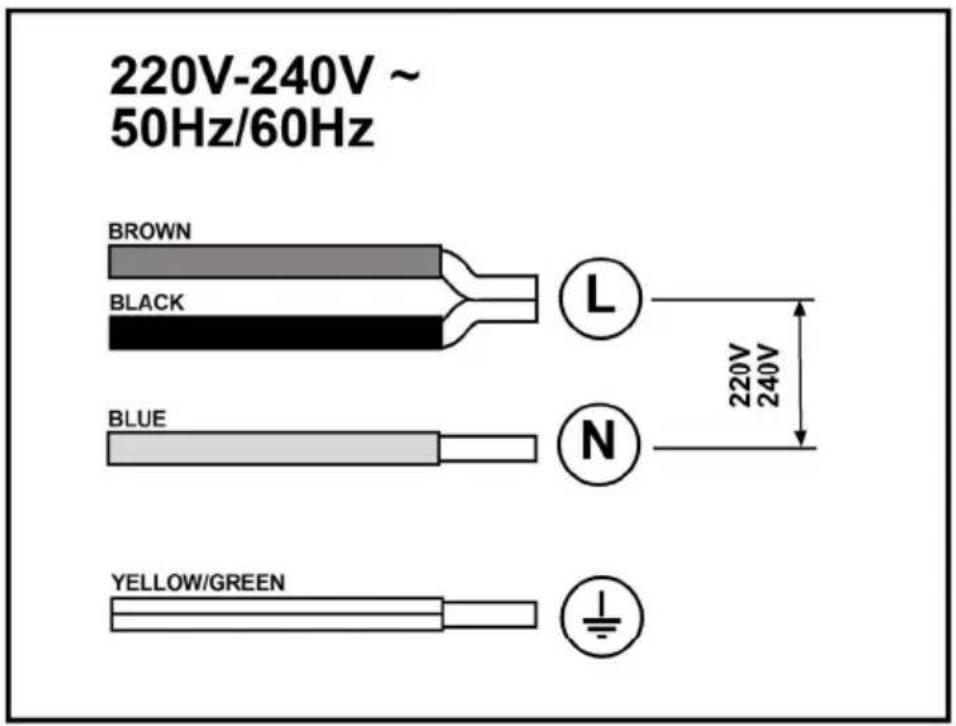
Fig. 2
- Disconnect the device from the electric network.
- The installation must be performed by professionally qualified personnel familiar with the applicable installation and safety standards.
-The manufacturer declines any liability to people, animals or things in the case of failure to follow the guidelines provided in this chapter.
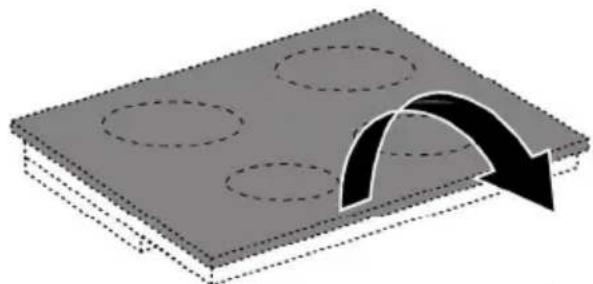
-The power cable must be long enough to allow removal of the hob from the worktop
-Make sure that the voltage on the rating plate on the bottom of the device corresponds to that of the house where it will be installed.
-Do not use extensions.
-Earthing is legally compulsory
-The earth power cable must be 2cm longer than the other cables
-If the household appliance is not equipped with a power cable, use one with minimum conductor section of 2.5 mm2 for power up to 7200 Watt; whereas for higher powers it must be 4 mm2.
-At no point in the cable must it reach a temperature of 50^ C above the ambient temperature.
-The device is intended to be permanently connected to the electric network, therefore, make the connection to the fixed network via a standard omnipolar switch which assures the complete disconnection of the mains under conditions of overvoltage category III, and that is readily accessible after the installation.
Attention! Before reconnecting the circuit to the mains power supply and checking its correct operation, always check that the network cable is correctly assembled.
Attention! The interconnection cable must be replaced by the authorised customer service.
Assembly
Before starting the installation:
• After unpacking the product, check that it was not damaged during transport and in case of problems, contact your dealer or Customer Service, before proceeding with the installation.
- Check that the product is of the right size for the installation location.
- Check for accessories inside the packaging (placed there for ease of transport) such as bags containing screws, the warranty card, etc. Remove them and keep them safe.
- Also verify that near the area of installation there is an electrical socket
Preparing the cabinet for installation:
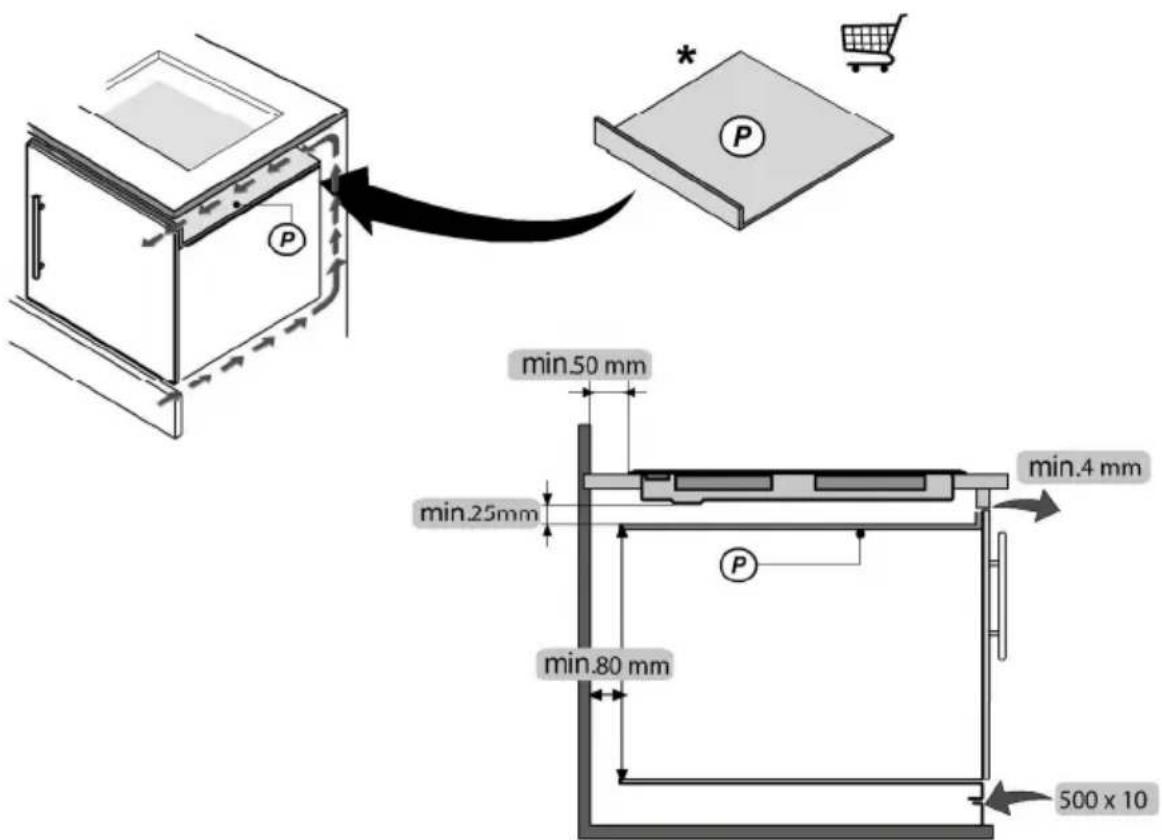
- As the bottom of the product must not be accessible after installation, a separator panel must always be installed (for protection) under the hob (not supplied with the product), if it is accessible after installation.
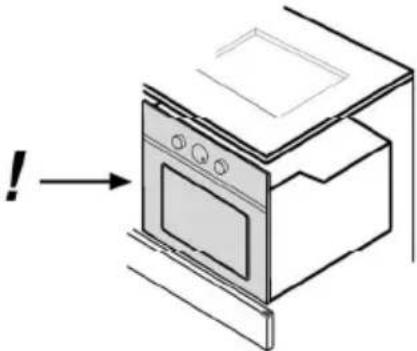
- If installing an oven under the top, do not interpose the separator panel.
- If an oven is positioned under the induction hob it is preferable that it is equipped with a cooling fan.
- Do not use the induction hob while the PYROLYTIC cleaning of the oven is in operation.
- Avoid installing the hob above dishwashers or washing machines so that the electronic circuits do not come into contact with steam and moisture which could damage them.
- The distance between the bottom of the device and the partition panel (or any device installed below the induction hob) must comply with the sizes indicated.
- To correctly operate the product, do not obstruct the minimum opening between the worktop and the upper side of the cabinet top.
- For adequate ventilation and to allow fresh air to circulate, there must be openings in the kitchen cabinet, following the dimensions indicated.
- Cut the cabinet before inserting the hob and carefully remove shavings or sawdust.
Fig. 1a/1b
ATTENTION! Failure to install screws and fasteners in accordance with these instructions may result in electrical hazards.
Operation
Control panel
The hob has a smart and sophisticated wireless communication system, able to communicate with some special connectible Elica hoods. Depending on the use of the hob and what you are cooking, such hoods receive information from the surface, process it and automatically and optimally activate so as to eliminate any waste. See www.elica.com to check the range of hoods connectible with your hob.
Note: To select the commands, simply touch (press) the symbols representing them.

Main Functions
- Hob ON/OFF function
- "Chef Cook" Function
- "Lock" Function (if pressed together with 2.)
- Timer activation (if pressed together with 5.) /Timer Increase
- Timer activation (if pressed together with 4) /Timer Decrease
- Timer display
- Pre-set operating level (power) selector
- Cooking zone display
- Operating level (power) adjustment and cooking zone selection bar.
To know before you begin:
All functions of this hob are designed in order to comply with the more stringent safety regulations.
For this reason:
- Some functions do not activate, or automatically deactivate, in the absence of pans on the fires or when they are badly positioned.
- In other cases the activated functions automatically deactivate after a few seconds when the selected function requires a further setting that is not given (e.g.: “Turn on the hob” without “Selecting the cooking zone” and the “Operating temperature”, or the “Lock Function” or the “Timer”).

Attention! In the case (for example) of prolonged use, cooking zone may not immediately shut down because it is the cooling phase; the display of the cooking zones is the symbol "H" to indicate that it is at this stage.
Wait for the display to go off before approaching the cooking zone.
Cooking zone display
the display of the cooking areas indicates:
| Cooking zone on | 0 |
| Operating level (power) | 1...9 P |
| cooking zone cooling | 8 |
| pan detection problems | 6 |
| Bridge function active | 3 |
| Power levels (pre-set) function active | U |
| Lock function "on" | L |
Turning on the hob:
Press (touch) the Hob ON/OFF function (1), the warning light turns on to indicate that the hob is ready for operation.
Press again to turn off the hob
Note: This function has priority over the others.
Selecting the cooking zone:
Touch (press) the Selection bar (9) of the desired cooking zone.
Note: the cooking zone is automatically selected by putting the pan on it
Operating level (power):
Touch and scroll your fingers along the Selection bar (9): to the right to increase the level of power; to the left to decrease the level of power.
Booster Level (Power) "P" (timed):
to activate the Booster level (power) scroll your fingers along the Selection bar (9) to the right (or press the zone relating to the letter "P")
The “Booster” lasts 10 minutes, then the temperature drops to the previous level.
Note: the timer keeps the "Booster" pre-set even if the pan is removed: the cooking zone deactivates to reactivate in "Booster" mode for the remaining minutes as soon as the pan is repositioned.
Bridge Function
It allows you to use two cooking zones simultaneously; it is possible to use two adjacent cooking zones in combination. (see the illustrated section of this manual)
To activate the Bridge Function:
- Simultaneously select the two cooking zones to be used:
- the display (8) of the right cooking zone shows the symbol "3"
- the display (8) of the left cooking zone shows (and can be set) the Operating level (Power).
Note: to deactivate the Bridge Function simply bring the cooking zone to temperature "☐".
Timer (4 -5)
The Timer activates by simultaneously pressing the symbols “+” (4) and “-” (5);;
as soon as the timer has completed the countdown a buzzer sounds (for 2 minutes, or stop it by pressing any hob key), while the display (6) with the symbol "0.0" flashes.
Timer function adjustment
- Selecting the cooking zone.
- Simultaneously press “+” (4) and “-” (5) to access the adjustment function.
- Adjust the duration of the Timer: use the symbols “+” (4) and “-” (5), respectively, to increase or decrease the automatic switch-off time. If desired, repeat the operation for the other cooking zones.
Note: Each cooking zone can have a different Timer set; display (6) will show the countdown with less time;
To switch-off the Timer:
- set the timer value at "☐"
- turn off the hob (1)
Note: the function remains active if no other key is pressed.
Note: the display of the cooking zone with Timer in use
displays the symbol "S"
"Lock" Function
The Lock function is used to prevent accidentally turning on the hob.
Activation:
- remove any pans from the hob - simultaneously press and hold the "Lock" Function (3) and the "Chef Cook" Function (2), a double beep indicates that the function is active, and a "L" is shown in the displays (8).
Repeat the operation to deactivate.
Pre-set operating level (power)
- Select the desired cooking zone (9).
- Press the Pre-set operating level (power) selector (7) once or repeatedly to select the most appropriate level from those available:
 | Melting* |  | |
 | Warming* |  | |
 | Simmer* |  | |
| * See the table “Pre-set operating level (power)” at the end of this chapter. | |||
- Press again to switch-off.
"Chef Cook" Function
This function assigns a level of power to the hobs, based on the position, as in many professional kitchens, for convenience of use; to the left, the cooking zone with lower operating level (power) and going towards the right is the highest operating level (power).
| Warming | |
| Level 3 | |
| Level 6 | |
| Level 9 |
Activating the function
- Press the "Chef Cook" Function (2) selector to activate the function
Repeat the operation to deactivate.
Power tables
| Power level Cooking type | Use of level(display combines the experience and cooking habits) | ||
| Max power | Boost Heat quickly | Ideal to quickly increase the temperature of the food up to fast boiling in the case of water or quickly heat cooking liquids | |
| 8-9 Fry - boil | Ideal for browning, starting to cook, frying frozen products, boiling rapidly | ||
| High power | 7-8 Brown - fry - boil - grill | Ideal for frying, keeping the boil, cooking and grilling (for short times, 5-10 minutes) | |
| 6-7 Brown - cook - stew - fry - grill | Ideal for frying, maintaining a simmer, cooking and grilling (for average times, 10-20 minutes), preheating accessories | ||
| Medium power | 4-5 Cook - stew - fry - grill | Ideal for stewing, maintaining a light boil, cooking (for longer times). Stir pasta | |
| 3-4 | Cook - simmer - thicken - stir | Ideal for slow cooking (rice, sauces, roasts, fish) in the presence of liquid (e.g. water, wine, broth, milk), stirring pasta | |
| 2-3 | Ideal for slow cooking (volume less than one litre: rice, sauces, roasts, fish) in the presence of liquid (e.g. water, wine, broth, milk) | ||
| Low power | 1-2 | Melt - thaw - keep warm - stir | Ideal for softening butter, gently melting chocolate, thawing small products |
| 1 | Ideal for keeping small portions of freshly cooked food warm or keeping the temperature of serving dishes and stirring risotto | ||
| OFF | Zero power | Support surface | Hob in stand-by or off (possible presence of residual heat from the end of cooking, signalled by H-L-O) |
| Power level (pre-set) Description | ||
 | Melting | Identifies a power level suitable to slowly melt delicate products without compromising the sensory characteristics (chocolate, butter, etc.). |
 | Warming | Identifies a power level suitable to gently maintain the temperature of food, without reaching boiling temperatures. |
 | Simmer | Identifies a power level suitable for simmering dishes for prolonged times. Suitable for cooking tomato sauces, meat sauces, soups, minestrone, maintaining a controlled cooking level (ideal for bain-marie cooking). Avoids unpleasant spillage of food or possible burns on the bottom, typical of these preparations.Use this function after bringing food to boil. |
Cooking tables
| Category of foods | Dishes or type of cooking | Power level and cooking pattern | |||
| First stage Powers Second stage Powers | |||||
| Pasta, rice | Fresh pasta Heating water Booster-9 | Cooking pasta and maintaining the boil | 7-8 | ||
| Fresh pasta Heating water Booster-9 | Cooking pasta and maintaining the boil | 7-8 | |||
| Boiled rice Heating water Booster-9 | Cooking pasta and maintaining the boil | 5-6 | |||
| Risotto Frying and roasting 7-8 | |||||
| Vegetables, legumes | Boiled | Heating | water | Booster-9 | |
| Fried | Heating | oil | 9 | F | |
| Sauté | Heating accessory | 7-8 | Cooking | 6-7 | |
| Stewed | Heating accessory | 7-8 | Cooking | 3-4 | |
| Fried | Heating accessory | 7-8 | Browning fried | 7-8 | |
| Meats | Roast | Meat browning with oil (if with butter, power 6) | 7-8 | Cooking | 3-4 |
| Grilled | Pre-heating pan | 7-8 | Grilling on both sides | 7-8 | |
| Browning | Browning with oil (if with butter, power 6) | 7-8 | Cooking | 4-5 | |
| Stew | Browning with oil (if with butter, power 6) | 7-8 | Cooking | 3-4 | |
| Fish | Grilled | Pre-heating pan | 7-8 | Cooking | 7-8 |
| Stew | Browning with oil (if with butter, power 6) | 7-8 | Cooking | 3-4 | |
| Fried | Heating oil or fat | 8-9 | Frying | 7-8 | |
| Eggs | Omelettes | Heating pan with butter or fat | 6 | Cooking | 6-7 |
| Omelettes | Heating pan with butter or fat | 6 | Cooking | 5-6 | |
| Soft boiled/boiled | Heating water Booster-9 | Cooking | 5-6 | ||
| Pancakes | Heating pan with butter | 6 | Cooking | 6-7 | |
| Sauces | Tomato | Browning with oil (if with butter, power 6) | 6-7 | Cooking | 3-4 |
| Meat sauce | Browning with oil (if with butter, power 6) | 6-7 | Cooking | 3-4 | |
| Béchamel | Preparing the base (melt butter and flour) | 5-6 | Bring to simmering point | 3-4 | |
| Desserts, creams | Custard | Boil the milk | 4-5 | Keep simmering | 4-5 |
| Puddings | Boil the milk | 4-5 | Keep simmering | 2-3 | |
| Rice pudding | Heat the milk | 5-6 | Keep simmering | 2-3 | |
Maintenance
Attention! Before any cleaning or maintenance, make sure the cooking zones are switched off and the heat warning light has disappeared.
Cleaning
The hob must be cleaned after each use.
Important:
Do not use abrasive sponges, scouring pads. Their use, over time, may ruin the glass.
Do not use chemical irritants, such as oven sprays or stain removers.
After each use, leave the hob to cool and clean it to remove deposits and stains caused by food residues.
Sugar or food with a high sugar content damage the hob and must be immediately removed.
Salt, sugar and sand may scratch the glass surface.
Use a soft cloth, kitchen paper or specific products for cleaning the hob (follow the Manufacturer's instructions).
DO NOT USE STEAM JET CLEANERS!!!
Troubleshooting
| ERROR CODE DESCRIPTION POSSIBLE CAUSES ERROR REMOVAL | |||
| ER03 - the hob turns off after 10 seconds and beeps permanently | Permanent pressure on the command zone | Water or kitchen utensils on the command zone | Clean the command zone |
| ER40 | The network voltage is causing overheating | The secondary voltage of the network is too low | Disconnect the hob from the mains and check the connection |
| ER47 | Communication with the electric network is faulty (the control panel switches off - the cooking zones no longer respond) | The power cable was incorrectly connected or is faulty | Disconnect the hob from the mains and check the connection |
| U400 | The hob connection is not of the correct voltage (wrong connection/overvoltage) | A different voltage is detected from that of the connection | Disconnect the hob from the mains and check the connection |
| ER21 - E/2 | The command zone switches off due to too high a temperature | The temperature inside the electronic parts is too high | Wait for the hob to cool before reusing it |
| ER20,ER22,ER31,ER36 E/4, E/5, E/6, E/8, E/9 E/A | Call customer service and report the error code | ||
Customer service
Before contacting Customer Service
-
Check that you cannot solve the problem yourself based on the points described in "Troubleshooting".
-
Switch the device off and on again to see if the problem resolves itself.
If, after the above checks, the fault persists, contact the nearest Customer Service.
Waste, EC/96/2002. What was it's a correct meeting for the Canadian Aurobiy Electrical and Electronic Equipment (WEEE) in the context of this meeting. I know the most effective questions to be called in the way that we think that the meeting will be done.


- EN - Installation and operating instructions
- Warnings
- Important:
- Use
- Benefits:
- Cooking containers
- Only use pans bearing the symbol
- Pre-existing containers
- Recommended pan bottom diameters
- IMPORTANT: if the pans are not correctly sized, the cooking zones do not turn on
- Energy saving
- Installation
- The electrical and mechanical installation must be performed by qualified personnel.
- Electrical connection
- Fig. 2
- Assembly
- Before starting the installation:
- Preparing the cabinet for installation:
- Operation
- Control panel
- Main Functions
- To know before you begin:
- Cooking zone display
- Turning on the hob:
- Selecting the cooking zone:
- Operating level (power):
- Bridge Function
- Timer (4 -5)
- Timer function adjustment
- To switch-off the Timer:
- "Lock" Function
- Activation:
- Pre-set operating level (power)
- "Chef Cook" Function
- Activating the function
- Power tables
- Cooking tables
- Maintenance
- Cleaning
- Troubleshooting
- Customer service
Brand : ELICA
Model : PRF0104116
Category : Cooker