RTX2300 - Grass trimmer EGO - Free user manual and instructions
Find the device manual for free RTX2300 EGO in PDF.
| Product type | String trimmer (Rotocut head) |
| Brand | EGO |
| Model | RTX2300 |
| Weight | 1.9 kg |
| Idle speed | Up to 450 rpm |
| Blade | ABR2300 (metal blade) |
| Protection rating | IPX5 (protected against water jets) |
| Guaranteed sound power level | 100 dB(A) |
| Sound pressure level | 83.2 dB(A) K=2.5 dB(A) |
| Vibration level (left handle) | 0.7 m/s² K=1.5 m/s² |
| Vibration level (right handle) | 0.6 m/s² K=1.5 m/s² |
| Recommended operating temperature | 0 °C to 40 °C |
| Recommended storage temperature | -20 °C to 70 °C |
| Power supply | Battery (compatible with EGO STX3800/BCX3800 motors) |
| Main functions | Cutting grass around obstacles, edging, cutting along walls |
| Safety protection | Blade guard, protective cover |
| Maintenance | Clean with damp cloth and mild soap; lubricate gearbox every 50 hours |
| Repairability | Identical spare parts, repair by qualified professional |
| Package contents | 1x Rotocut, 1x cover assembly, 1x wrench, 1x Allen key, 1x ring, 1x user manual |
Frequently Asked Questions - RTX2300 EGO
User questions about RTX2300 EGO
0 question about this device. Answer the ones you know or ask your own.
Ask a new question about this device
Download the instructions for your Grass trimmer in PDF format for free! Find your manual RTX2300 - EGO and take your electronic device back in hand. On this page are published all the documents necessary for the use of your device. RTX2300 by EGO.
USER MANUAL RTX2300 EGO
natural_image
Line drawing of a mechanical gear assembly with a central rotating component (no text or symbols)RTX2300
ROTOCUT
FOR USE WITH 56V LITHIUM-ION LINE TRIMMER STX3800/BRUSH CUTTER BCX3800
EN Rotocut 5
DERotocut 11
FR Rotocut 18
ESRotocut25
PT Roçadora 32
IT Rotocut 38
NL Rotocut 44
DK Drejeklipper 51
SERotorskärare57
Fl Pyöröleikkuri 63
NO Rotocut 69
natural_image
Simple line drawing of a mechanical lever or fulcrum with a handle and pointer (no text or symbols)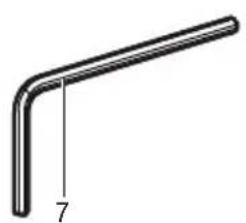
natural_image
Simple L-shaped metal pipe or angle bracket diagram with no text or symbols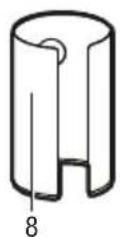
B1
natural_image
Technical line drawing of a mechanical assembly with arrows indicating motion or force direction (no text or symbols)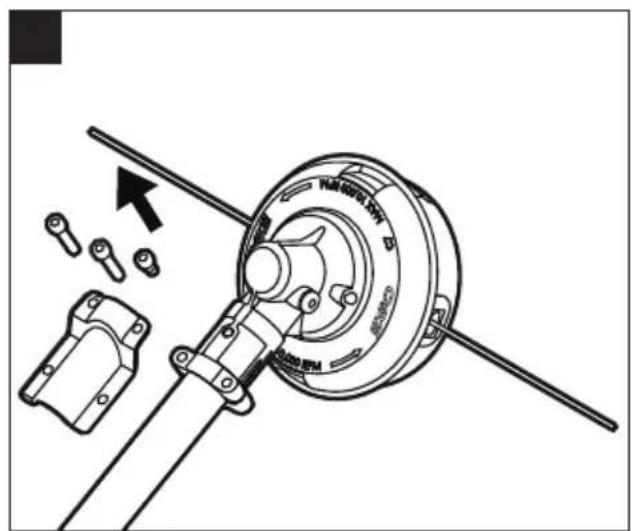
natural_image
Mechanical assembly diagram showing a robotic arm interacting with a circular base component (no text or symbols)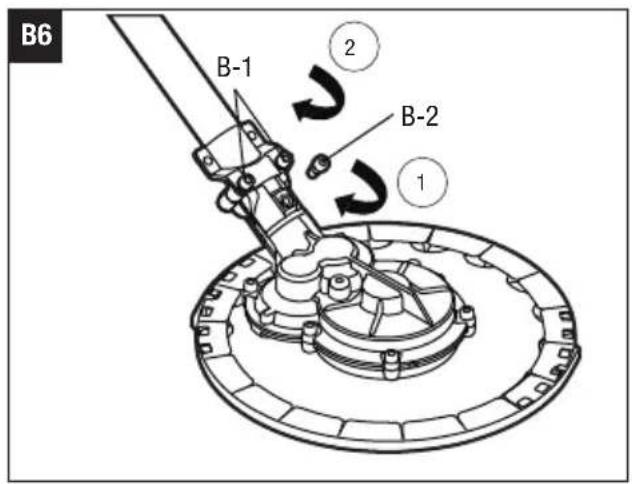
natural_image
Mechanical assembly diagram showing a lever mechanism with rotating components and a curved blade (no text or symbols)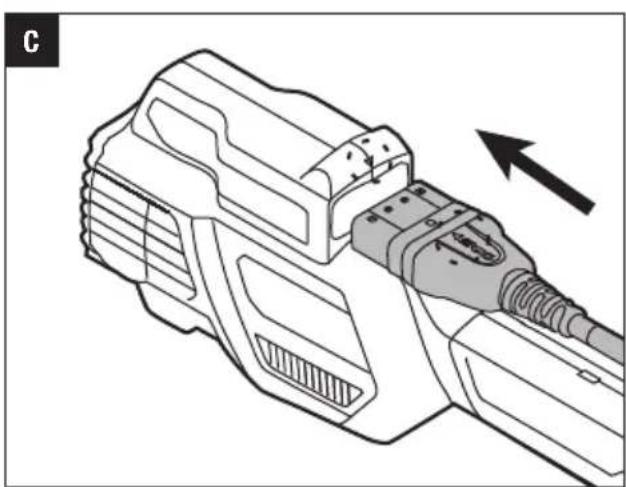
natural_image
Technical line drawing of a mechanical connector with an arrow indicating direction (no text or symbols present)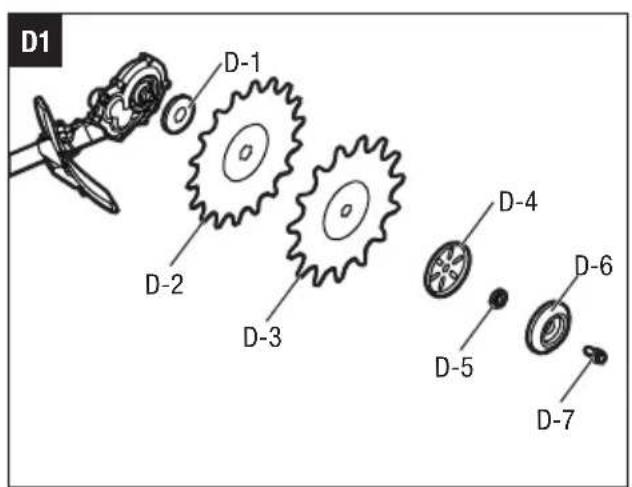
natural_image
Illustration of a hand using a gear to cut a circular component, with scissors and tools nearby (no text or symbols)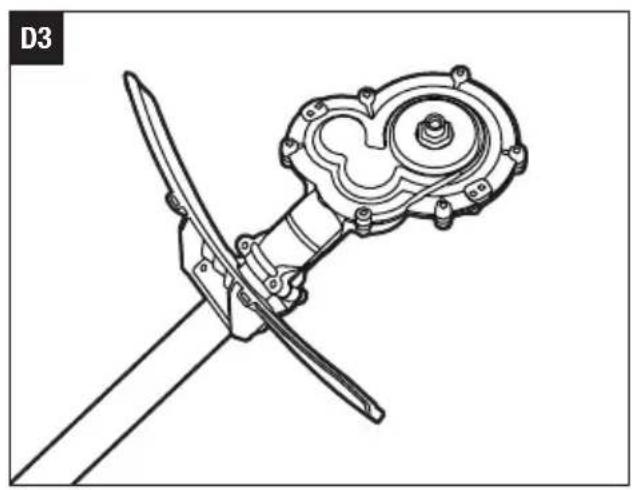
natural_image
Technical line drawing of a mechanical clamp or tool with a circular component and two blades (no text or symbols)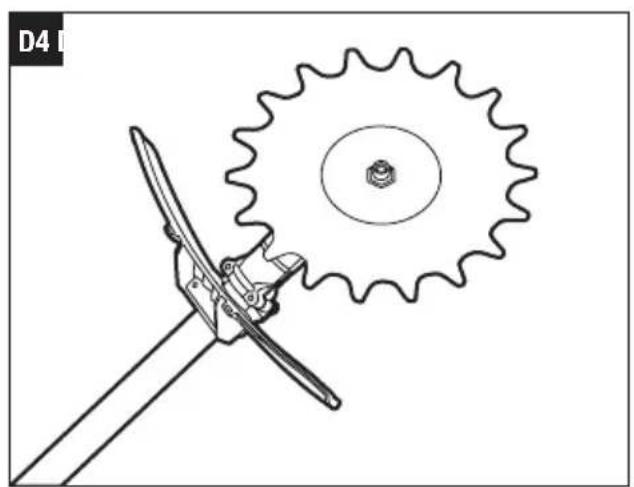
natural_image
Technical line drawing of a mechanical gear and cutting tool (no text or symbols)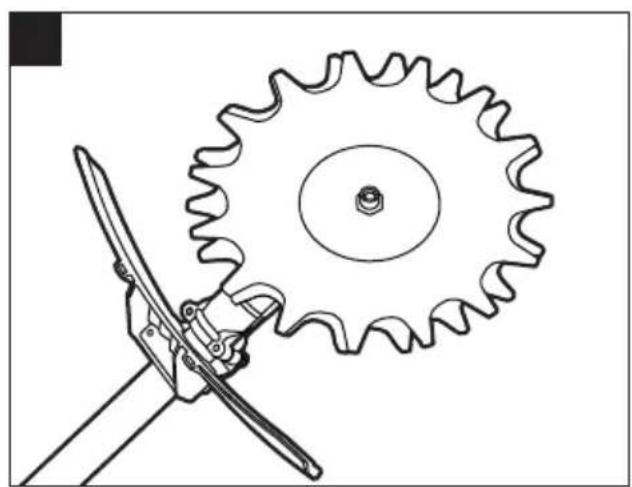
natural_image
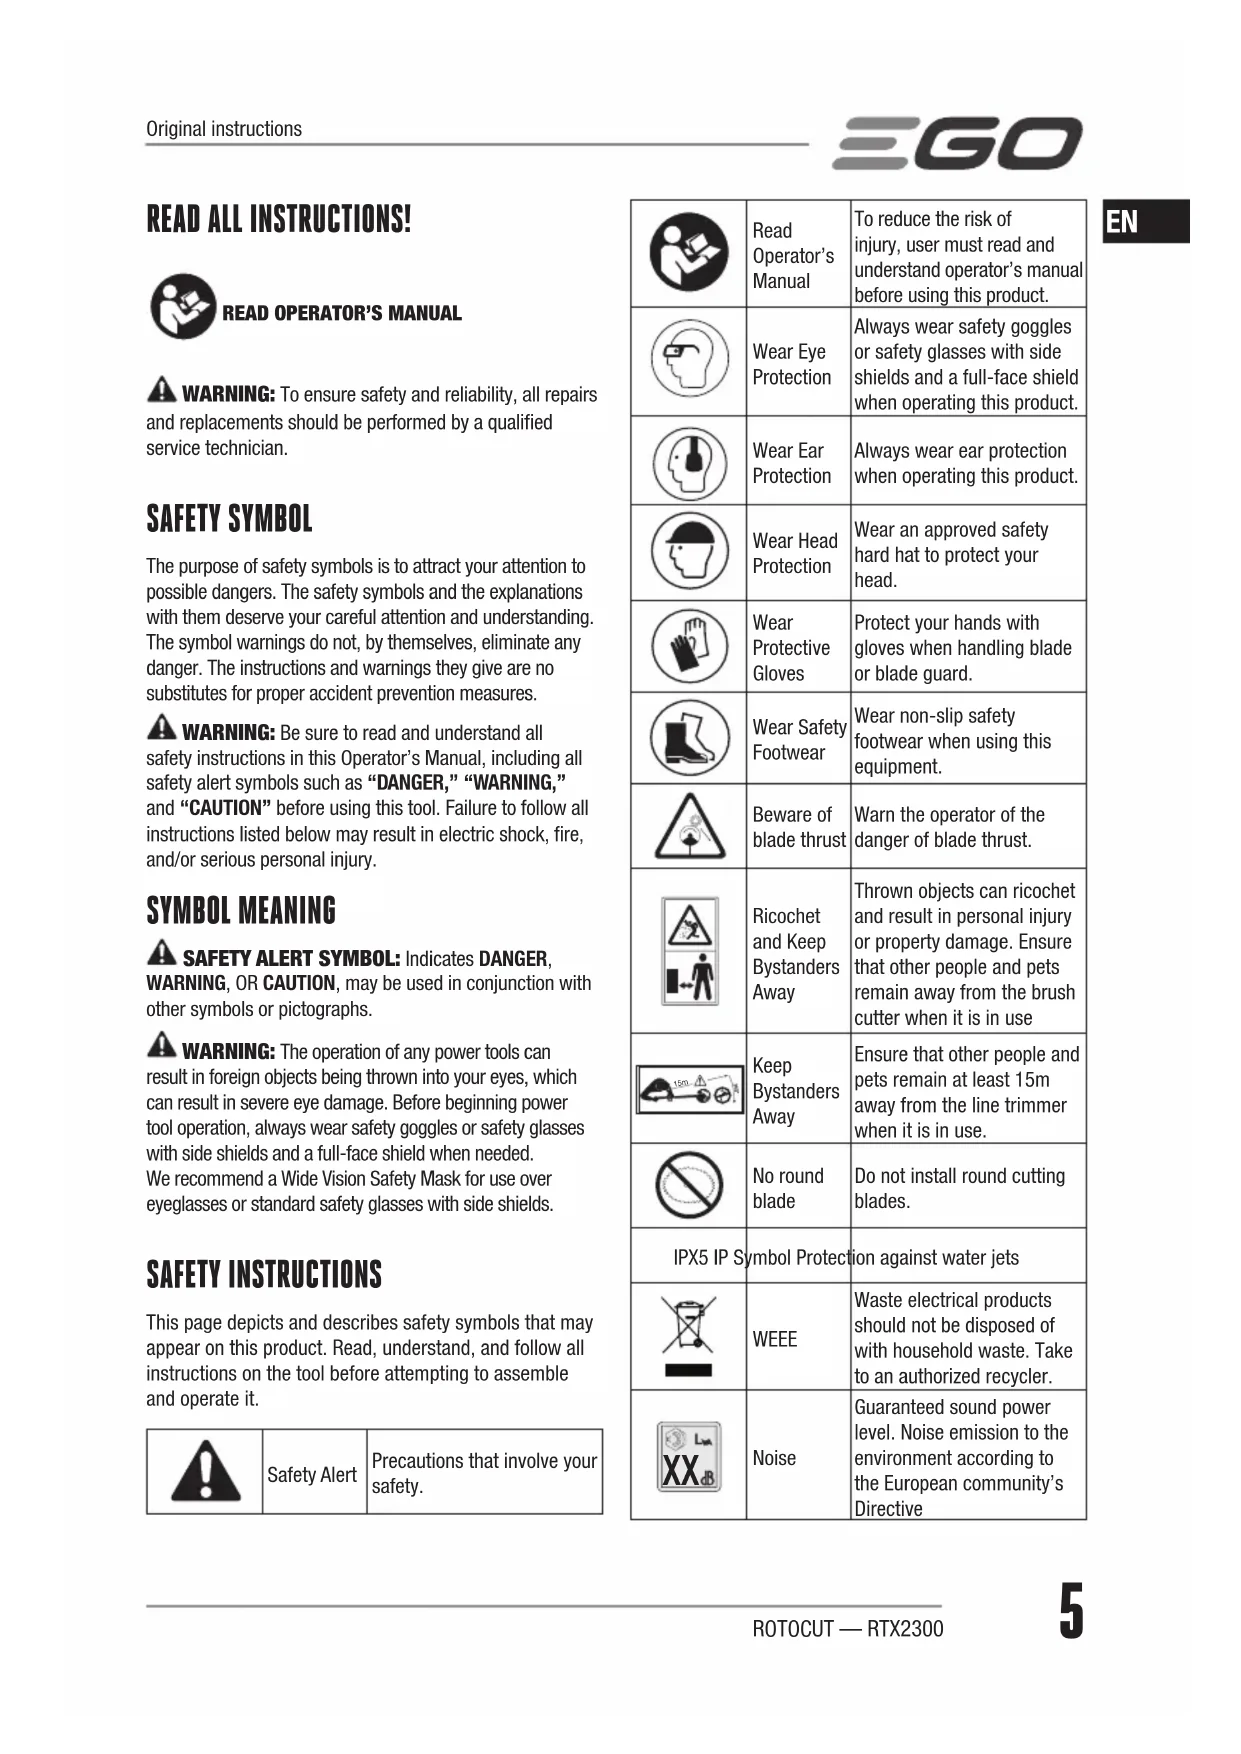
Technical line drawing of a mechanical gear assembly with a tool (no text or symbols)READ ALL INSTRUCTIONS!

READ OPERATOR'S MANUAL
WARNING: To ensure safety and reliability, all repairs and replacements should be performed by a qualified service technician.
SAFETY SYMBOL
The purpose of safety symbols is to attract your attention to possible dangers. The safety symbols and the explanations with them deserve your careful attention and understanding. The symbol warnings do not, by themselves, eliminate any danger. The instructions and warnings they give are no substitutes for proper accident prevention measures.
WARNING: Be sure to read and understand all safety instructions in this Operator's Manual, including all safety alert symbols such as "DANGER," "WARNING," and "CAUTION" before using this tool. Failure to follow all instructions listed below may result in electric shock, fire, and/or serious personal injury.
SYMBOL MEANING
SAFETY ALERT SYMBOL: Indicates DANGER, WARNING, OR CAUTION, may be used in conjunction with other symbols or pictographs.
WARNING: The operation of any power tools can result in foreign objects being thrown into your eyes, which can result in severe eye damage. Before beginning power tool operation, always wear safety goggles or safety glasses with side shields and a full-face shield when needed. We recommend a Wide Vision Safety Mask for use over eyeglasses or standard safety glasses with side shields.
SAFETY INSTRUCTIONS
This page depicts and describes safety symbols that may appear on this product. Read, understand, and follow all instructions on the tool before attempting to assemble and operate it.
| Safety Alert | Precautions that involve your safety. |
 | Read Operator's Manual | To reduce the risk of injury, user must read and understand operator's manual before using this product. |
 | Wear Eye Protection | Always wear safety goggles or safety glasses with side shields and a full-face shield when operating this product. |
 | Wear Ear Protection | Always wear ear protection when operating this product. |
 | Wear Head Protection | Wear an approved safety hard hat to protect your head. |
 | Wear Protective Gloves | Protect your hands with gloves when handling blade or blade guard. |
 | Wear Safety Footwear | Wear non-slip safety footwear when using this equipment. |
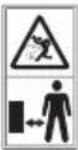
 | Beware of blade thrust | Warn the operator of the danger of blade thrust. |
 | Ricochet and Keep Bystanders Away | Thrown objects can ricochet and result in personal injury or property damage. Ensure that other people and pets remain away from the brush cutter when it is in use |
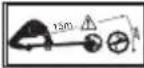 | Keep Bystanders Away | Ensure that other people and pets remain at least 15m away from the line trimmer when it is in use. |
 | No round blade | Do not install round cutting blades. |
| IPX5 IP Symbol Protection against water jets | ||
 | WEEE | Waste electrical products should not be disposed of with household waste. Take to an authorized recycler. |
 | Noise | Guaranteed sound power level. Noise emission to the environment according to the European community's Directive |
EN
| CE | CE | This product is in accordance with applicable EC directives. |
| V Volt Voltage | ||
| n_0 | No Load Speed | Rotational speed, at no load |
| min^-1 | Per Minute Re | Revolutions per minute |
| Direct Current | Type or a characteristic of current | |
| kg Kilogram Weight | ||
IMPORTANT SAFETY INSTRUCTIONS
WARNING: Read all safety warnings, instructions, illustrations and specifications provided with this power tool. Failure to follow all instructions listed below may result in electric shock, fire and/or serious injury.
Save all warnings and instructions for future reference.
- Avoid Dangerous Environments – Don't use appliances on damp or wet slope.
- Keep guards in place and in working order.
- Keep hands and feet away from the cutting area.
■ To reduce the risk of injury, never work on a ladde or on any other insecure support. Never hold the cutting unit above waist height.
- Check the cutting unit at regular short intervals during operation, or immediately if there is a noticeable change in cutting behavior.
■ For best results, your battery should be charged in a location where the temperature is greater than 5^ C and less than 40^ C. Do not store it outside or in vehicles.
■ If you are approached, stop the motor and cutting uni
■ Warn the operator of the danger of blade thrust.
■ Blade thrust may occur when the spinning blade contacts an object that it does not immediately cut.
■ Blade thrust can be violent enough to cause the unit and/or operator to be propelled in any direction, and possibly lose control of the unit.
■ Blade thrust can occur without warning if the blade snags, stalls or binds.
■ Blade thrust is more likely to occur in areas where it is difficult to see the material being cut.
- Do not attach any blade to a unit without proper installation of all required parts. Failure to use the proper parts can cause the blade to fly off and seriously injure the operator and/or bystanders. Discard blades that are bent, warped, cracked, broken, or damaged in any way. Use a sharp blade A dull blade is more likely to snag and thrust.
■ A coasting blade/line can cause injury while it continues to spin after the motor is stopped or trigger is released. Maintain proper control until the blade/line has completely stopped rotating.
■ Battery tools do not have to be plugged into an electrical outlet; therefore, they are always in operating condition. Be aware of possible hazards even when the tool is not operating. Take care when performing maintenance or service.
■ Do not wash with a hose; avoid getting water in motor and electrical connections.
■ If situations occur that are not covered in this manual, use care and good judgment. Contact the EGO Customer Service Center for assistance.
SAVE THESE INSTRUCTIONS!
SPECIFICATIONS
| No-load Speed Up to 450/min | |||
| Cutting Blade ABR2300 | |||
| Recommended Operating Temperature | 0°C-40°C | ||
| Recommended Storage Temperature | -20°C-70°C | ||
| Optimum Charging Temperature | 5°C-40°C | ||
| Weight 1.9 kg | |||
| Measured sound power level L_WA | 96.1 dB(A)K = 3.8 dB (A) | ||
| Sound pressure level at operator's ear L_PA | 83.2 dB(A)K = 2.5 dB(A) | ||
| Guaranteed sound power level L_WA (measured according to 2000/14/EC) | 100 dB(A) | ||
| Valuation of vibration a_h : | Machine | With STX3800 | With BCX3800 |
| Left handle | 0.7 m/s^2K = 1.5 m/s^2 | 0.6 m/s^2K = 1.5 m/s^2$ | |
| Right handle | |||
■ The declared vibration total value has been measured in accordance with a standard test method and may be used for comparing one tool with another;
■ The declared vibration total value may also be used in a preliminary assessment of exposure.
NOTICE: The vibration emission during actual use of the power tool can differ from the declared value in which the tool is used; In order to protect the operator, user should wear gloves and ear protectors in the actual conditions of use.
DESCRIPTION
KNOW YOUR ROTOCUT (Fig. A)
- Sealing Screw
- Gear Case
- Blade
- Blade Sheath
- Guard Assembly
- Wrench
- Allen Key
- Bush (For using with 25mm diameter tube)
PACKING LIST
| PART NAME QUANTITY | |
| ROTOCUT 1 | |
| Guard Assembly 1 | |
| Wrench 1 | |
| Allen Key 1 | |
| Bush 1 | |
| Operator's Manual 1 |
ASSEMBLY
WARNING: If any parts are damaged or missing, do not operate this product until the parts are replaced. Use of this product with damaged or missing parts could result in serious personal injury.
WARNING: Do not attempt to modify this product or create accessories not recommended for use with this machine. Any such alteration or modification is misuse and could result in a hazardous condition leading to possible serious personal injury.
WARNING: To prevent accidental starting that could cause serious personal injury, always unplug the battery connector from the socket when assembling parts.
REPLACE THE TRIMMER HEAD WITH ROTOCUT HEAD
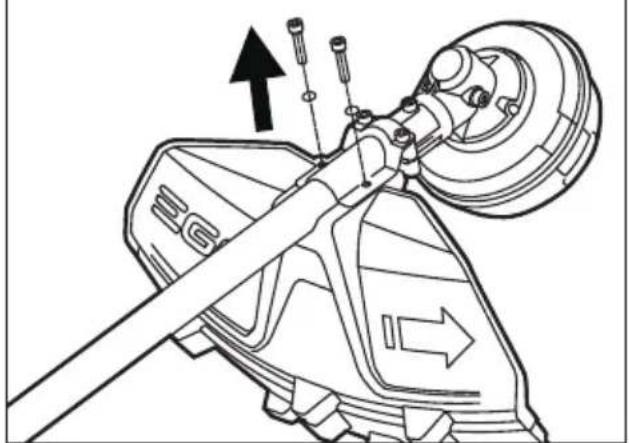
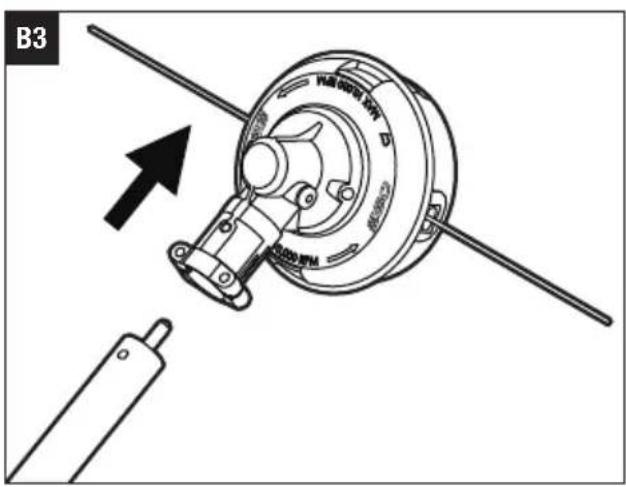
- Hold your line trimmer/brush cutter and use the allen key to remove trimmer guard, trimmer head and gear case from the drive shaft (Fig. B1-B3). The drive shaft will be used for assembly of the ROTOCUT later.
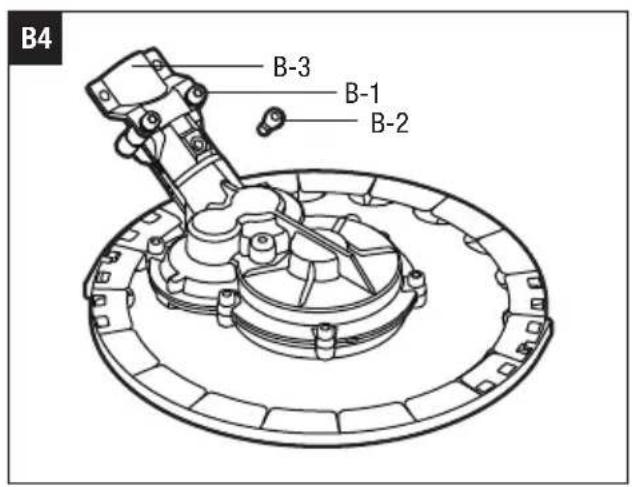
- Remove the ROTOCUT from its packaging, loosen the two Screw 1# and hold them on the fixing plate, loosen and remove the Screw 2# from the fixing plate. (Fig. B4)
| B-1 Screw 1# B-2 Screw 2# | ||
| B-3 The fixing plate |
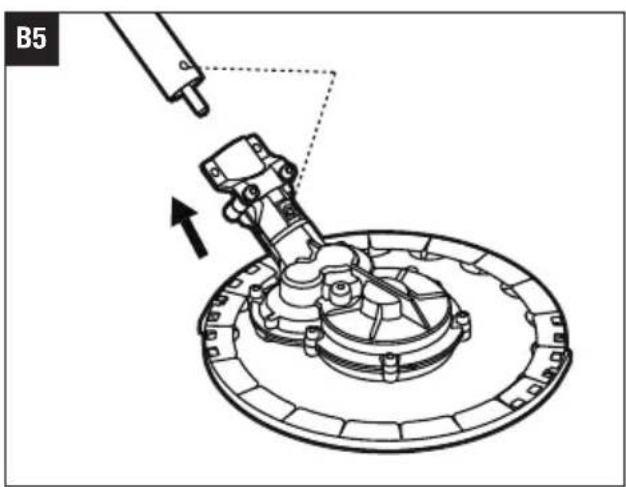
- Insert the ROTOCUT head onto the drive shaft removed in step 1, make sure the hole of B-2 screw is aligned with the hole on the drive shaft (Fig. B5).
- Insert the B-2 screw first and tighten it, and then tighten the two screws of B-1 (Fig. B6).
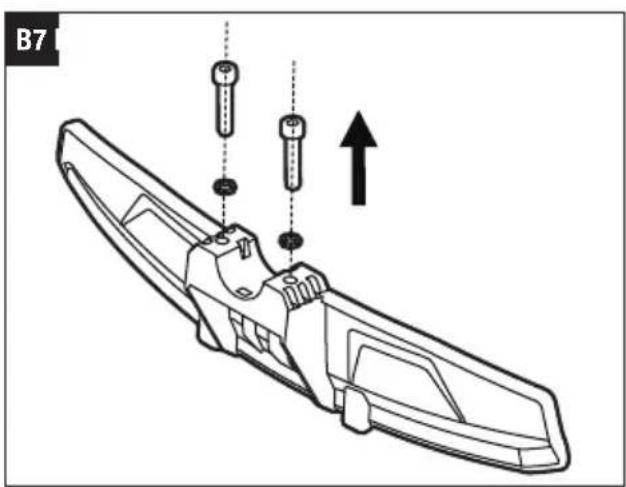
- Remove the ROTOCUT guard from its packaging and loosen the two bolts in the guard. Remove and reserve the two bolts and spring washers from the guard (Fig. B7).
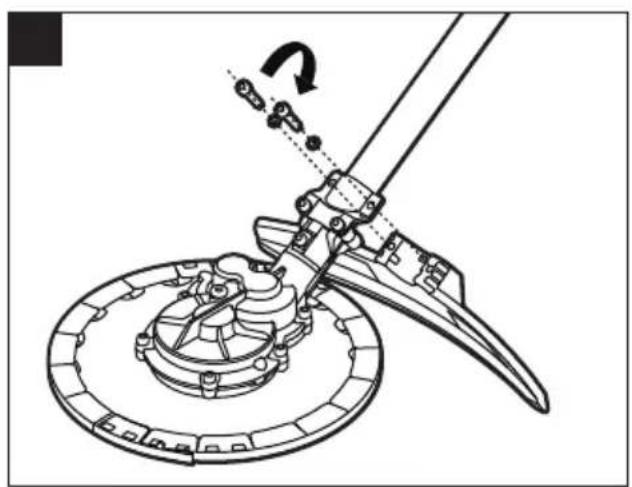
- Lift the ROTOCUT head and face it downward; align the two mounting holes in the guard with the two assembly holes in the ROTOCUT fixing plate. Make sure the guard direction is as the picture below, the arc shape around the cutting teeth. (Fig. B8).
- Use the allen key to lock the guard in place.
- Remove the blade sheath from the blade during operation.
OPERATION
WARNING: Do not allow familiarity with this product to make you careless. Remember that a careless fraction of a second is sufficient to inflict serious injury.
WARNING: Always wear eye protection, along with hearing protection. Failure to do so could result in objects being thrown into your eyes and other possible serious injuries.
WARNING: Do not use any attachments or accessories not recommended by the manufacturer of this product. The use of attachments or accessories not recommended can result in serious personal injury.
EN
WARNING: To prevent serious personal injury, disconnect the battery power from the tool before servicing, cleaning, changing attachments or removing material from the unit.
APPLICATIONS
The product may be used in rain.
You may use this product for the purposes listed below:
Cutting: used for cutting the grass around stakes or guard rails, wall edges, road curbs, fences in the running traffic, or trimming the vegetation on parking lots.
NOTICE: When using the ROTOCUT, ensure that no foreign objects are thrown out which entails strong risks: broken windows, dented car bodies, slit fences, torn tree bark or personal injury.
TO CONNECT/DISCONNECT THE BATTERY POWER (Fig. C)
Fully charge before first use.
Align ▲ of plug with ▲ of the machine. Insert the plug into the tool until the green seal completely disappeared into the socket.
To disconnect the battery power, just unplug it by holding and pull backward.
STARTING/STOPPING THE TOOL (FOR STX3800 & BCX3800)
See "STARTING/STOPPING THE LINE TRIMMER/THE BRUSH CUTTER" section in STX3800/BCX3800 operator's manual.
USING THE TOOL
WARNING: To avoid serious personal injury, wear goggles or safety glasses at all times when operating this unit. Wear a face mask or dust mask in dusty locations.
Clear the area to be cut before each use. Remove all objects, such as rocks, broken glass, nails, wire, or line, that can be thrown or become entangled in the cutting attachment. Clear the area of children, bystanders, and pets. At a minimum, keep all children, bystanders and pets at least 15m away; there still may be risk to bystanders from thrown objects. Bystanders should be encouraged to wear eye protection. If you are approached, stop the motor and cutting attachment immediately.
Before each use, check for damage/worn parts
Check the ROTOCUT head, guard and loop handle and replace the parts that are cracked, warped, bent, or damaged in any away.
WARNING: Always wear gloves when mounting the guard or servicing the blade. Take care of the blade and protect your hand from cutting.
After each use, clean the tool.
CAUTION: Obstructions in the vents will prevent the air from flowing into the motor housing and result in overheating or damaged of the motor.
■ Use only mild soap and a damp cloth to clean the tool. Never let any liquid get inside the tool; never immerse any part of the tool into a liquid.
- Keep air vents in the motor housing from debris at all times.
MAINTENANCE
WARNING: When servicing, use only identical replacement parts. Inspect and maintain the tool regularly. To ensure safety and reliability, all repairs should be performed by a qualified service technician.
WARNING: Battery tools do not have to be plugged into an electrical outlet; therefore, they are always in operating condition. To prevent serious personal injury, take extra precautions and care when performing maintenance, service or for changing the cutting attachment or other attachments.
WARNING: To prevent serious personal injury, disconnect the battery power from the tool before servicing, cleaning, changing add-on attachments or removing material from the unit.
ROTOCUT BLADE REPLACEMENT
WARNING: If the blades become loose after it is fixed in position or the blades are badly worn, replace the blades immediately. Never use a tool with a loose or ineffective cutting attachment.
Know the ROTOCUT head as Fig. D1 shown.
| D-1 Shaft Cup D-2 Top-Blade | |
| D-3 Bottom-Blade D-4 Support Cup | |
| D-5 Washer D-6 Gliding Bowl | |
| D-7 Nut |
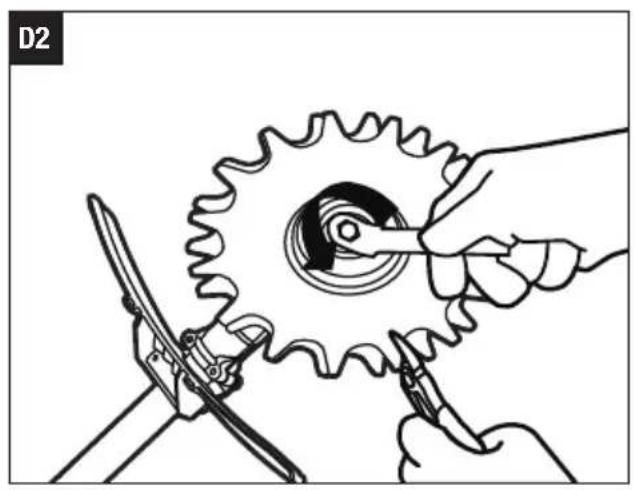
-
Place the gear case of the ROTOCUT head against a solid surface. Clamp the up and down blades with pliers or in a vise, then use the wrench to loosen the nut (Fig. D2).
-
Remove the nut, gliding bowl, washer, support cup, down blade, up blade and shaft cup in sequence as Fig. D1 shown.
- Before installing new blades, put the shaft cup on the shaft (Fig. D3). Put the top-blade with big hexagonal hole onto the shaft with the surface printed "EGO" logo facing toward the gear case (Fig. D4), then put the bottom-blade with small hexagonal hole onto the shaft with the surface printed EGO" logo facing toward operator (Fig. D5).
NOTICE: Make sure the hexagon holes on the blades and hexagon shaft shoulder fit in place. Otherwise once the blades are mounted reversely, the ROTOCUT cannot work correctly and will damage the blades.
- Follow the sequence shown in Fig. D1 to reassemble them.
LUBRICATE THE GEAR CASING
For best operation and longer lifetime, lubricate the gear case with a special grease (4-5g each time) after every 50 hours operation.
The special grease should meet the following requirements.
- Belong to DIN51818: NLGI-1 cone penetration degree.
- Ester base grease.
- Excellent low-temperature startup, EP, mechanical shearing, abrasion resistance and oxidative stability properties.
- Operation temperature must contain -40\~180°C. Remove the sealing screw. Fill grease into the gear case through the oil-hole.

WARNING: Do not lubricate while the tool is still nected with battery or running.
CLEANING THE UNIT
■ Clean the unit using a damp cloth with a mild detergent.
- Do not use any strong detergents on the plastic housing or the handle. They can be damaged by certain aromatic oils, such as pine and lemon, and by solvents such as kerosene. Moisture can also cause a shock hazard. Wipe off any moisture with a soft dry cloth.
STORING THE UNIT
EN
■ Disconnect the battery power from the tool when it is not in use.
■ Clean the tool thoroughly before storing it.
■ Store the unit in a dry, well-ventilated area, locked-up or up high, out of the reach of children. Do not store the unit on or adjacent to fertilizers, petrol, or other chemicals.
■ Use of a transport cover for metal blades during transport and storage.
Protecting the environment

WEEE (Waste Electrical and Electronic Equipment)
Do not dispose of electrical equipment, used battery and charger into household waste! Take this product to an authorized recycler and make it available for separate collection. Electric tools must be returned to an environmentally compatible recycling facility.
EN TROUBLESHOOTING
| PROBLEM | CAUSE SOLUTION | |
| ROTOCUT fails to start. | ■ The battery pack is not properly connected to the power head.■ The battery pack is depleted.■ The lock-off lever and trigger are not depressed simultaneously. | ■ Connect the battery pack to the power head.■ Charge the battery pack with an EGO charger listed in this manual.■ Press the lock-off lever and hold it, then depress the trigger to turn on the unit. |
| ROTOCUT stops while cutting. | ■ The motor is overloaded.■ The battery pack is too hot.■ The battery pack is disconnected from the tool | ■ The motor will recover when the load is removed. For continuous work, decrease the load on the ROTOCUT and avoid deep cutting; instead, make progressively deeper cuts.■ Allow the battery pack to cool down naturally, or air blow to speed up the cooling.■ Reconnect the battery pack. |
WARRANTY
EGO WARRANTY POLICY
Please visit the website egopowerplus.eu for full terms and conditions of the EGO Warranty policy.
WAARSCHUWING: Lees alle
HET APPARAAT SCHOONMAKEN
HET APPARAAT OPBERGEN
RENG∅RING AF APPARATET
OPBEVARING AF APPARATET
WEEE (Waste Electrical and Electronic Equipment)
WEEE (Waste Electrical and Electronic Equipment)
WŁĄCZANIE/WYŁĄCZANIE NARZĘDZIA (STX3800 I BCX3800)
POLITYKA GWARANCYJNA EGO
DÔLEŽITÉ BEZPEČNOSTNÉ POKYNY
CITIȚI MANUALUL DE INSTRUCTIUNI
LUGEGE KASUTUSJUHENDIT

OLULISED OHUTUSJUHISED
NOTICE: When using the ROTOCUT, ensure that no foreign objects are thrown out which entails strong risks: broken windows, dented car bodies, slit fences, torn tree bark or personal injury.
ngynggnggnggnggnggnggnggngggggggggggggggggggggggggggggggggggggggggggggggggggggggggggggggggggggggggggggggggggggggggggggggggggggggggggggggggggggggggggggggggggggggggggggggggggggggggggggggggggggggggggggggggggggggggggggggggggggggggg
g_3d_0f_0d_0g_0 m g_3g_0g_0m _5m_0d_0b _3g_0 , _3d_3g_3g_0 g_3f_6s_0 _3h_6h_6m_0g_0d_0 _5b_0g_0g_0m_0 , g_3s_0g_0m b_0f_6m_0g_0 , m_0g_0g_0g g_3d_3s_0g_0m_0 , g_3s_0g_0s_0g_0m , s_3g_0 g_3s_0m _3m_0g_0m g_3m_0s s_3g_0s_0s_0s_0s_0s_0s_0s_0s_0s_0s_0s_0s_0s_0s_0s_0s_0s_0s_0s_0s_0s_0s_0s_0s_0s_0s_0s_0s_0s_0s_0s_0s_0s_0s_ 1
VAŽNA SIGURNOSNA UPUTSTVA
⚠ UPOZORENJE: Pročitajte sva sigurnosna upozorenja, uputstva, ilustracije i specifikacije priložene uz ovaj električni alat. Nepridržavanje svih dolenavedenih uputstava može da dovede do strujnog udara, požara i/ili ozbiljne povrede
VAŽNA SIGURNOSNA UPUTSTVA
⚠ UPOZORENJE! Pročitajte sva sigurnosna upozorenja, uputstva, sve ilustracije i specifikacije isporučene s ovim električnim alatom. Zanemarivanje svih uputstava navedenih u nastavku može rezultirati strujnim udarom, požarom i/ili teškim povredama.
natural_image
Line drawing of a mechanical gear assembly with a knife and chain, no text or symbols presentRTX2300
He
القاطع AR