BCX3800E - Grass trimmer EGO - Free user manual and instructions
Find the device manual for free BCX3800E EGO in PDF.
| Product type | Cordless grass trimmer (brushcutter) |
| Voltage | 56 V DC |
| No-load speed | 4000 - 5800 rpm (with cutting head and 3-tooth blade) |
| Cutting width (cutting head) | 38 cm |
| Cutting width (3-tooth blade) | 30 cm |
| Weight (with cutting head) | 6.8 kg |
| Weight (with 3-tooth blade) | 6.46 kg |
| Cutting line diameter | 2.4 mm |
| Guaranteed sound power level (cutting head) | 96 dB(A) |
| Guaranteed sound power level (3-tooth blade) | 98 dB(A) |
| Sound pressure level (cutting head) | 81.9 dB(A) |
| Sound pressure level (3-tooth blade) | 83.4 dB(A) |
| Left handle vibration (cutting head) | 1.9 m/s² |
| Right handle vibration (cutting head) | 1.5 m/s² |
| Left handle vibration (3-tooth blade) | 1.9 m/s² |
| Right handle vibration (3-tooth blade) | 1.3 m/s² |
| Recommended operating temperature | 0 °C to 40 °C |
| Recommended storage temperature | -20 °C to 70 °C |
| Compatible battery | EGO BAX1500 |
| Compatible charger | EGO CHX5500E |
| Package contents | Brushcutter, cutting head, 3-tooth blade with blade guard, protective cap, nut, outer flange, hex key, multi-function key, hip pad, user manual |
| Maintenance | Lubricate gear housing every 50 hours with special NLGI-1 grease (4-5 g). Clean the tool after each use with a damp cloth and mild detergent. |
| Safety | Wear eye protection, hearing protection, gloves, safety shoes. Keep others at least 15 m away. Do not use in rain. Remove battery before maintenance. |
| Repairability | Use only identical replacement parts. Have repairs done by a qualified repairer. |
Frequently Asked Questions - BCX3800E EGO
User questions about BCX3800E EGO
0 question about this device. Answer the ones you know or ask your own.
Ask a new question about this device
Download the instructions for your Grass trimmer in PDF format for free! Find your manual BCX3800E - EGO and take your electronic device back in hand. On this page are published all the documents necessary for the use of your device. BCX3800E by EGO.
USER MANUAL BCX3800E EGO
WARNING: To ensure safety and reliability, all repairs and replacements should be performed by a qualified service technician.
SAFETY SYMBOLS
The purpose of safety symbols is to attract your attention to possible dangers. The safety symbols and the explanations with them deserve your careful attention and understanding. The symbol warnings do not, by themselves, eliminate any danger. The instructions and warnings they give are no substitutes for proper accident prevention measures.
WARNING: Be sure to read and understand all safety instructions in this Operator's Manual, including all safety alert symbols such as "DANGER," "WARNING," and "CAUTION" before using this tool. Failure to follow all instructions listed below may result in electric shock, fire, and/or serious personal injury.
SYMBOL MEANING
SAFETY ALERT SYMBOL: Indicates DANGER, WARNING, or CAUTION, may be used in conjunction with other symbols or pictographs.
SAFETY INSTRUCTIONS
This page depicts and describes safety symbols that may appear on this product. Read, understand, and follow all instructions on the machine before attempting to assemble and operate it.
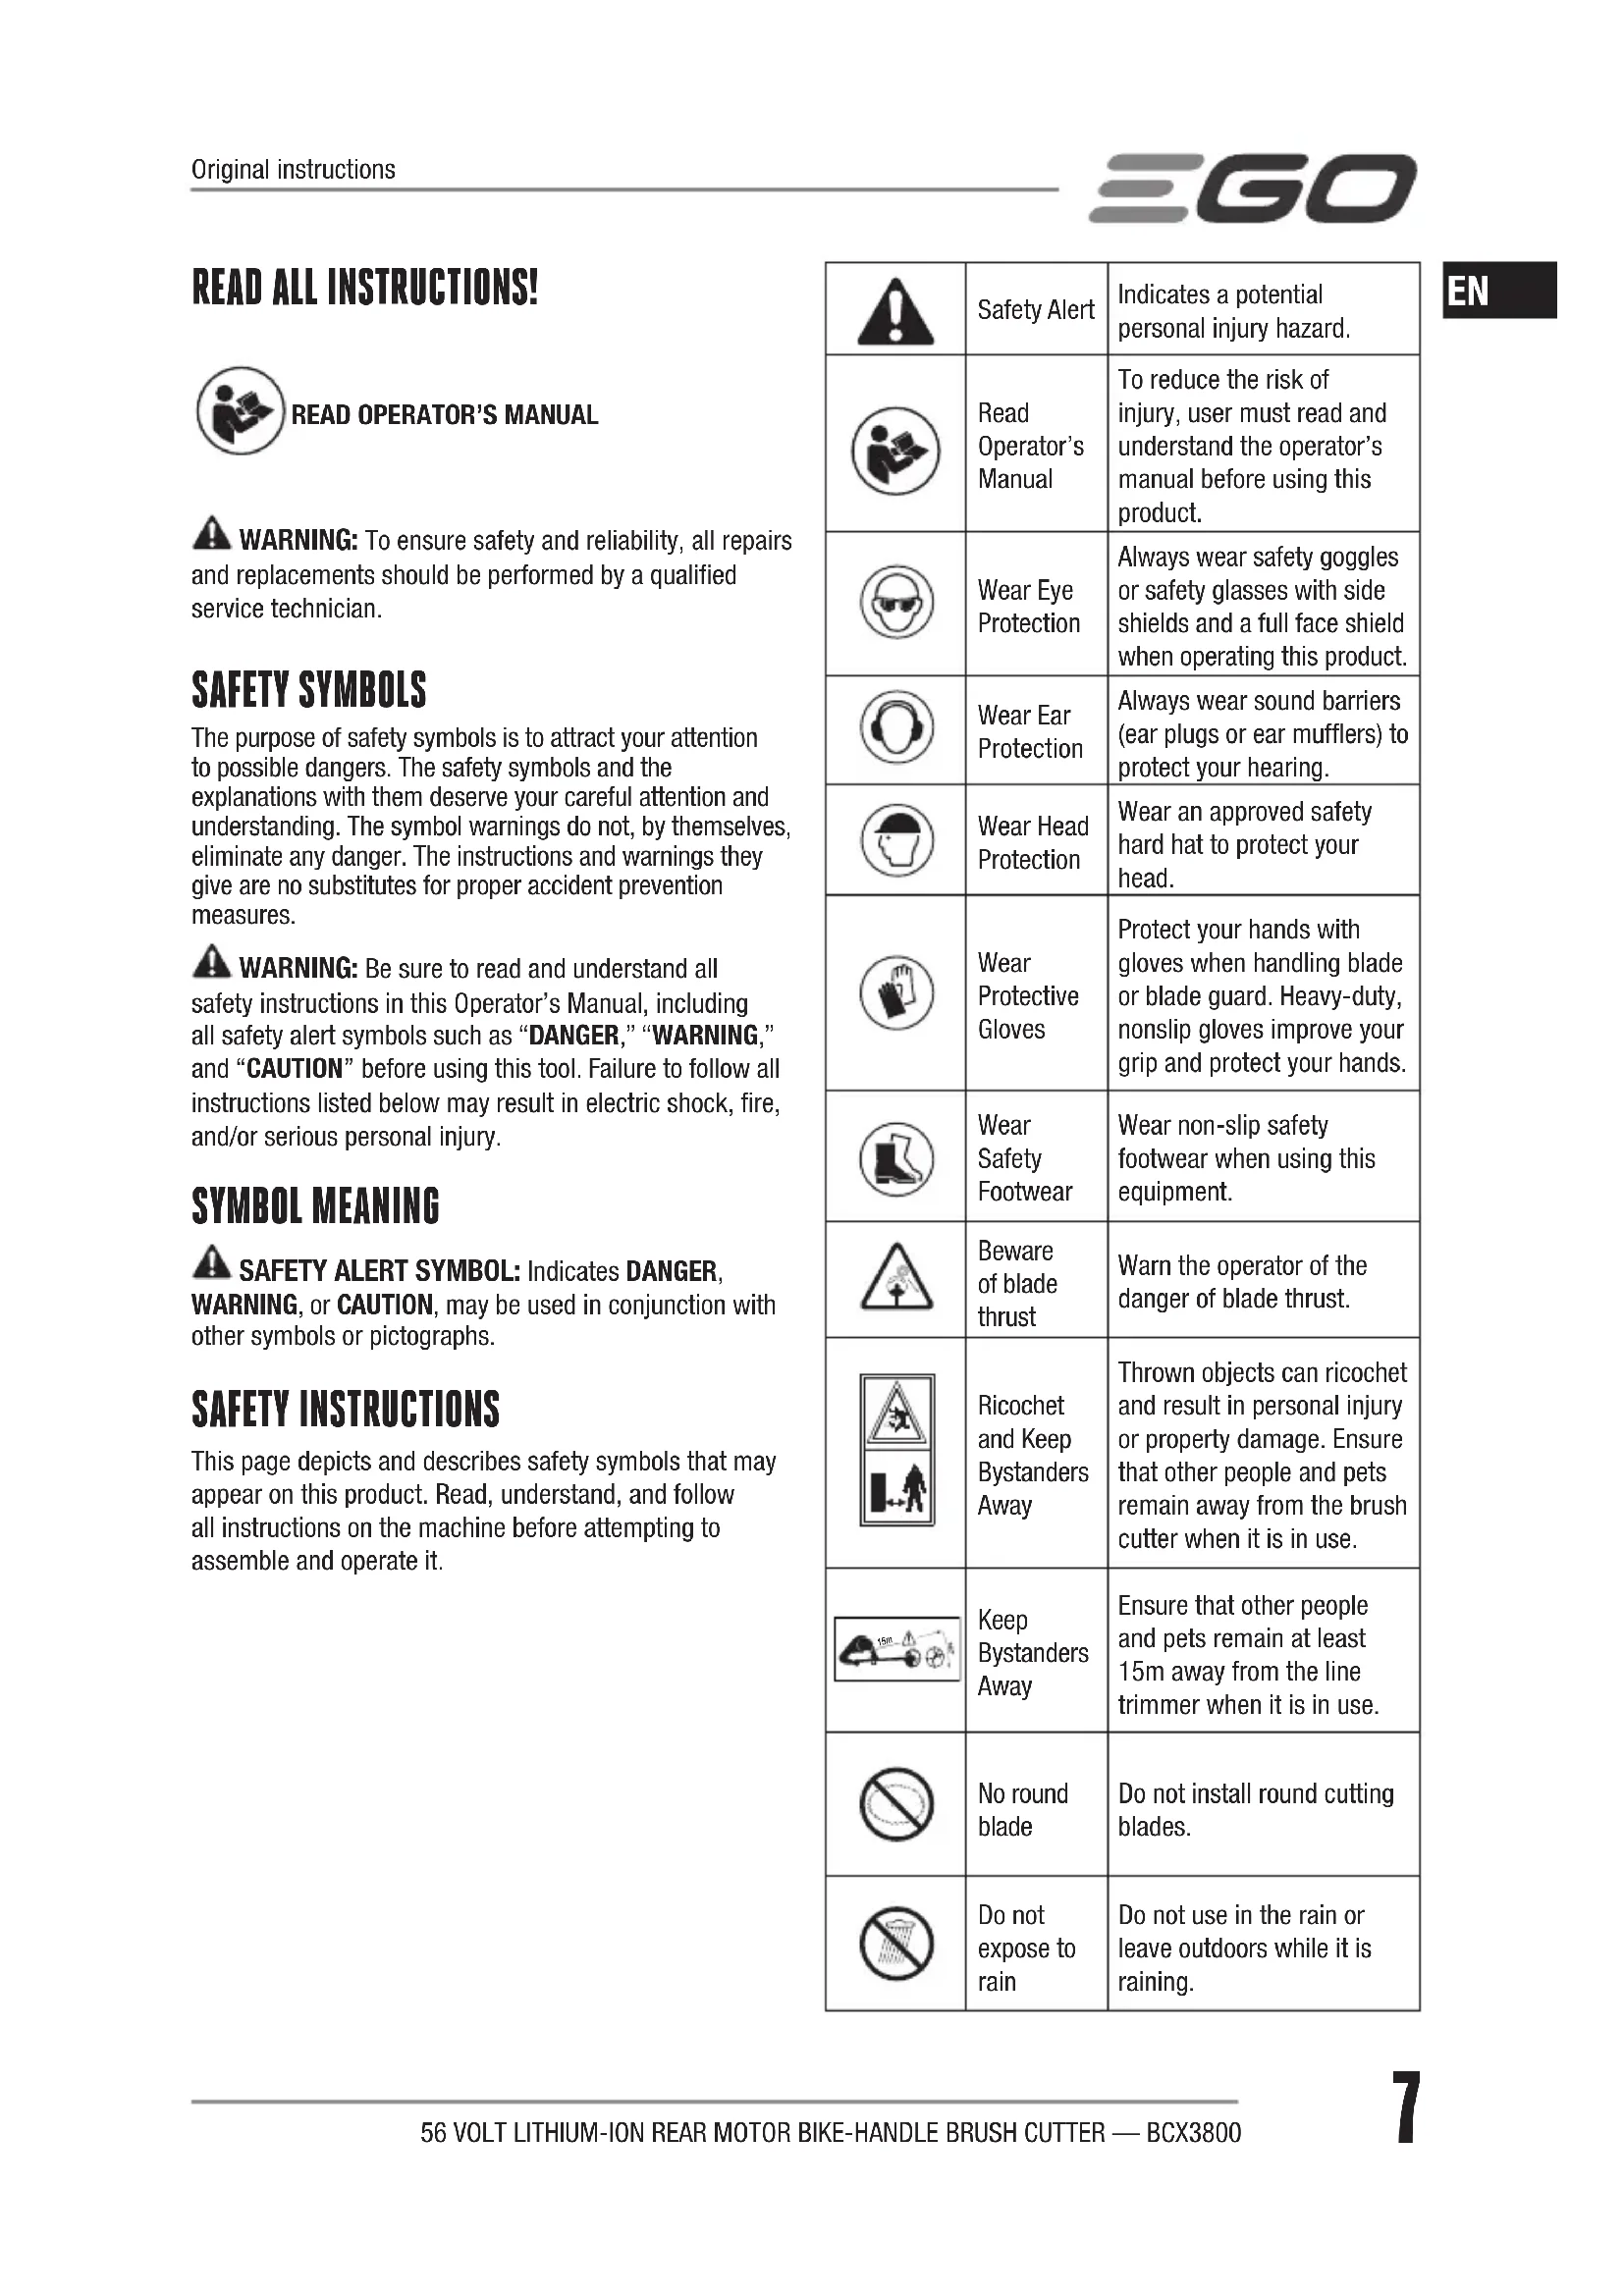
| Safety Alert | Indicates a potential personal injury hazard. | |
| Read Operator's Manual | To reduce the risk of injury, user must read and understand the operator's manual before using this product. | |
| Wear Eye Protection | Always wear safety goggles or safety glasses with side shields and a full face shield when operating this product. | |
| Wear Ear Protection | Always wear sound barriers (ear plugs or ear mufflers) to protect your hearing. | |
| Wear Head Protection | Wear an approved safety hard hat to protect your head. | |
| Wear Protective Gloves | Protect your hands with gloves when handling blade or blade guard. Heavy-duty, nonslip gloves improve your grip and protect your hands. | |
| Wear Safety Footwear | Wear non-slip safety footwear when using this equipment. | |
| Beware of blade thrust | Warn the operator of the danger of blade thrust. | |
| Ricochet and Keep Bystanders Away | Thrown objects can ricochet and result in personal injury or property damage. Ensure that other people and pets remain away from the brush cutter when it is in use. | |
| Keep Bystanders Away | Ensure that other people and pets remain at least 15m away from the line trimmer when it is in use. | |
| No round blade | Do not install round cutting blades. | |
| Do not expose to rain | Do not use in the rain or leave outdoors while it is raining. |
EN
EN
| CE | CE | This product is in accordance with applicable EC directives. |
| WEEE | Waste electrical products should not be disposed of with household waste. Take to an authorized recycler. | |
| Noise | Guaranteed sound power level. Noise emission to the environment according to the European community's Directive. | |
| V Volt Voltage | ||
| Direct Current | Type or a characteristic of current | |
| No Load Speed | Rotational speed, at no load | |
| min-1Per Minute Revolutions per minute | ||
GENERAL POWER TOOL SAFETY WARNINGS
WARNING: Read all safety warnings, instructions, illustrations and specifications provided with this power tool. Failure to follow all instructions listed below may result in electric shock, fire and/or serious injury.
Save all warnings and instructions for future reference.
The term "power tool" in the warnings refers to your mains-operated (corded) power tool or battery-operated (cordless) power tool.
WORK AREA SAFETY
- Keep work area clean and well lit. Cluttered or dark areas invite accidents.
- Do not operate power tools in explosive atmospheres, such as in the presence of flammable liquids, gases or dust. Power tools create sparks which may ignite the dust or fumes.
- Keep children and bystanders away while operating a power tool. Distractions can cause you to lose control.
PERSONAL SAFETY
- Stay alert, watch what you are doing and use common sense when operating a power tool. Do not use a power tool while you are tired or under the influence of drugs, alcohol medication. A moment of inattention while operating power tools may result in serious personal injury.
Use personal protective equipment. Always wear eye protection. Protective equipment such as a dust mask, non-skid safety shoes, hard hat or hearing protection used for appropriate conditions will reduce personal injuries.
- Prevent unintentional starting. Ensure the switch is in the off-position before connecting to power source and/or battery pack, picking up or carrying the tool. Carrying power tools with your finger on the switch or energizing power tools that have the switch on invites accidents.
- Remove any adjusting key or wrench before turning the power tool on. A wrench or a key left attached to a rotating part of the power tool may result in personal injury.
- Do not overreach. Keep proper footing and balance at all times. This enables better control of the power tool in unexpected situations.
- Dress properly. Do not wear loose clothing or jewellery. Keep your hair, clothing and gloves away from moving parts. Loose clothes, jewelry or long hair can be caught in moving parts.
If devices are provided for the connection of dust extraction and collection facilities, ensure these are connected and properly used. Use of dust devices can reduce dust-related hazards.
- Do not let familiarity gained from frequent use of tools allow you to become complacent and ignore tool safety principles. A careless action can cause severe injury within a fraction of a second.
POWER TOOL USE AND CARE
- Do not force the power tool. Use the correct power tool for your application. The correct power tool will do the job better and safer at the rate for which it was designed.
- Do not use the power tool if the switch does not turn it on and off. Any power tool that cannot be controlled with the switch is dangerous and must be repaired.
- Store idle power tools out of the reach of children and do not allow persons unfamiliar with the power tool or these instructions to operate the power tool. Power tools are dangerous in the hands of untrained users.
-
Maintain power tools and accessories. Check for misalignment or binding of moving parts, breakage of parts and any other condition that may affect the power tool's operation. If damaged, have the power tool repaired before use. Many accidents are caused by poorly maintained power tools.
-
Keep cutting tools sharp and clean. Properly maintained cutting tools with sharp cutting edges are less likely to bind and are easier to control.
-
Use the power tool, accessories and tool bits etc. in accordance with these instructions, taking into account the working conditions and the work to be performed. Use of the power tool for operations different from those intended could result in a hazardous situation.
-
Keep handles and grasping surface dry, clean and free from oil and grease. Slippery handles and grasping surfaces do not allow for safe handling and control of the tool in unexpected situations.
-
Keep cables away from the working area of the tool. During operation cables may be hidden from view and can be accidentally damaged by the tool.
BATTERY TOOL USE AND CARE
- Recharge only with the charger specified by the manufacturer. A charger that is suitable for one type of battery pack may create a risk of fire when used with another battery pack.
Use power tools only with specifically designated battery packs. Use of any other battery packs may create a risk of injury and fire.
-
When battery pack is not in use, keep it away from other metal objects, like paper clips, coins, keys, nails, screws or other small metal objects, that can make a connection from one terminal to another. Shorting the battery terminals together may cause burns or a fire.
-
Under abusive conditions, liquid may be ejected from the battery; avoid contact. If contact accidentally occurs, flush with water. If liquid contacts eyes, additionally seek medical help. Liquid ejected from the battery may cause irritation or burns.
-
Do not use a battery pack or tool that is damaged or modified. Damaged or modified batteries may exhibit unpredictable behavior resulting in fire, explosion or risk of injury.
-
Do not expose a battery pack or tool to fire or excessive temperature. Exposure to fire or temperature above 100^ may cause explosion.
-
Follow all charging instructions and do not charge the battery pack or tool outside the temperature range specified in the instructions. Charging improperly or at temperatures outside the specified range may damage the battery and increase the risk of fire.
SERVICE
EN
Have your power tool serviced by a qualified repair person using only identical replacement parts. This will ensure that the safety of the power tool is maintained.
- Never service damaged battery packs. Service of battery packs should only be performed by the manufacturer or authorized service providers.
WARNING: Read all safety warnings, instructions, illustrations and specifications provided with this power tool. Failure to follow all instructions listed below may result in electric shock, fire and/or serious injury. Save all warnings and instructions for future reference.
Save all warnings and instructions for future reference.
TRAINING
- Read the instructions carefully. Be familiar with the controls and the proper use of the machine.
- Never allow people unfamiliar or children with these instructions to use the appliance. Local regulations can restrict the age of the operator.
- Keep in mind that the operator or user is responsible for accidents or hazards occurring to other people or their property.
PREPARATION
- Never operate the machine while people, especially children, or pets are nearby.
- Wear eye protection and stout shoes at all times while operating the machine.
The distance between the machine and bystanders shall be at least 15m - Never operate the machine while the operator is tried, ill or under the influence of alcohol or other drugs.
OPERATION
Use the machine only in daylight or good artificial light.
- Never operate the machine with damaged guards or shields or without guards or shields in place.
- Switch on the motor only when the hands and feet are away from the cutting means.
Always disconnect the machine from the power supply (i.e. remove the battery pack).
whenever leaving the machine unattended;
before clearing a blockage;
before checking, cleaning or working on the machine.
EN
after striking a foreign object;
whenever the machine starts vibrating abnormally.
Take care against injury to feet and hands from the cutting means.
Always ensure that the ventilation openings are kept clear of debris.
MAINTENACE AND STORAGE
- Disconnect the machine from the power supply (i.e. remove the battery pack) before carrying out maintenance or cleaning work.
Use only the manufacturer's recommended replacement parts and accessories.
Inspect and maintain the machine regularly. Have the machine repaired only by an authorized repairer. - When not in use, store the machine out of the reach of children.
OTHER SAFETY WARNINGS
-
Avoid Dangerous Environments - Don't use appliances on damp or wet slope.
-
Keep guards in place and in working order.
- Keep hands and feet away from the cutting area.
To reduce the risk of injury, never work on a ladder or on any other insecure support. Never hold the cutting unit above waist height. - Check the cutting unit at regular short intervals during operation, or immediately if there is a noticeable change in cutting behavior.
- For best results, your battery should be charged in a location where the temperature is greater than 5^ C and less than 40^ C. Do not store it outside or in vehicles.
If you are approached, stop the motor and cutting unit. -
Warn the operator of the danger of blade thrust (only using with 3-teeth blade).
-
Blade thrust may occur when the spinning blade contacts an object that it does not immediately cut.
Blade thrust can be violent enough to cause the unit and/or operator to be propelled in any direction, and possibly lose control of the unit.
Blade thrust can occur without warning if the blade snags, stalls or binds. -
Blade thrust is more likely to occur in areas where is difficult to see the material being cut.
-
Do not attach any blade to a unit without proper installation of all required parts. Failure to use the proper parts can cause the blade to fly off and seriously injure the operator and/or bystanders. Discard blades that are bent, warped, cracked, broken, or damaged in any way. Use a sharp blade A dull blade is more likely to snag and thrust (only using with 3-teeth blade).
A coasting blade/line can cause injury while it continues to spin after the motor is stopped or trigger is released. Maintain proper control until the blade/line has completely stopped rotating.
Use only with EGO's battery packs and chargers listed below:
- Battery tools do not have to be plugged into an electrical outlet; therefore, they are always in operating condition. Be aware of possible hazards even when the tool is not operating. Take care when performing maintenance or service.
- Do not wash with a hose; avoid getting water in motor and electrical connections.
If situations occur that are not covered in this manual, use care and good judgment. Contact the EGO Customer Service Center for assistance.
SAVE THESE INSTRUCTIONS!
SPECIFICATIONS
| Cutting unit Trimmer head | 3-teeth metal blade | ||
| Voltage | 56V = 56V = 56V | ||
| No-load Speed | 4000-5800 /min | 4000-5800 /min | |
| Recommended Operating Temperature: | 0°C-40°C | ||
| Recommended Storage Temperature: | -20°C-70°C | ||
| Cutting Line Type 2.4mm / | |||
| Cutting blade / ABB1203 | |||
| Cutting Width 38cm | 30cm | ||
| Weight | 6.8kg | 6.46kg | |
| Measured sound power level LWA | 94.2dB(A) K=1.8dB(A) | 96.3dB(A) K=2.1dB(A) | |
| Sound pressure level at operator's ear LPA | 81.9dB(A) K=2.5dB(A) | 83.4dB(A) K=4.1dB(A) | |
| Guaranteed sound power level LWA (according to 2000/14/EC) | 96dB(A) 98dB(A) | ||
| Vibration ah | Left Handle | 1.9m/s2 K=1.5m/s2 | 1.9m/s2 K=1.5m/s2 |
| Right Handle | 1.5m/s2 K=1.5m/s2 | 1.3m/s2 K=1.5m/s2 | |
The declared vibration total value has been measured in accordance with a standard test method and may be used for comparing one tool with another;
The declared vibration total value may also be used in a preliminary assessment of exposure.
NOTICE: The vibration emission during actual use of the power tool can differ from the declared value in which the tool is used; In order to protect the operator, user should wear gloves and ear protectors in the actual conditions of use.
PACKING LIST
| PART NAME QUANTITY | |
| Brush Cutter 1 | |
| 3-teeth blade with Sheath 1 | |
| Guard Assembly 1 | |
| Nut 1 | |
| Outer Flange 1 | |
| Hex Wrench 1 | |
| Multi-Function Wrench 1 | |
| Hip-pad 1 | |
| Operator's manual 1 |
DESCRIPTION
KNOW YOUR BRUSH CUTTER (Fig. A)
- Trimmer Line
- Guard Assembly
- Shaft
- Trigger
- Lock-off Button
- Wing Bolt
-
Hook
-
Socket
- Guard Plate
- Bike Handle
- Sealing Screw
- Shaft-locking Hole
- Line-cutting Blade
- Guard Accessory
- 3-teeth Blade
- Blade Sheath
- Outer Flange
- Nut
- Multi-function Wrench
- Hex Wrench
21^ . Hip-pad (Sold separately)
WARNING: Never operate the tool without the guard firmly in place. The guard must always be on the tool to protect the user.
WARNING: When the tool is equipped with a trimmer head, the guard accessory with line-cutting blade should be mounted onto the guard. Failure to comply will result in overly long cutting line and overload the motor. Never use the trimmer head without guard accessory.
ASSEMBLY
WARNING: If any parts are damaged or missing, do not operate the brush cutter until the parts are replaced. Use of the brush cutter with damaged or missing parts could result in serious personal injury.
WARNING: Do not attempt to modify the brush cutter or create accessories not recommended for use with this product. Any such alteration or modification is misuse and could result in a hazardous condition leading to possibly serious personal injury.
WARNING: Always wear heavy gloves when installing or removing the guard and doing any maintenance on the 3-teeth blade/line-cutting blade. Be careful of the line-cutting blade on the guard accessory / 3-teeth blade for protecting your hands from being injured by both the blades.
WARNING: To prevent accidental starting that could cause serious personal injury, always remove the battery pack from the tool when assembling parts, making adjustments, cleaning, or when not in use.
EN
WARNING: Never operate the tool without the guard and bike handle firmly in place. Failure to comply could result in possible serious personal injury.
MOUNTING AND ADJUSTING THE BIKE HANDLE
The brush cutter is stored as shown in Fig. B. Firstly, loosen the wing bolt on the connecting joint and then lift the bike handle 180^ around the shaft (Fig. C), turn it 90^ anticlockwise to make it face the bump head (Fig. D). Lastly, move it back and forth to achieve a comfortable working position and tighten the bolt.
NOTICE: Operating the machine with the bike handle perpendicular to the shaft is only permitted.
MOUNTING THE GUARD
Loosen and remove the two screws from the guard (Fig. E), align the guard mounting holes with the assembly holes and then lock the guard onto the shaft base with the two screws, together with two spring washers (Fig. F).
WARNING: Make sure the guard is fixed according to Fig. F & G, any reverse fixing will cause great danger!
WARNING: When the brush cutter is equipped with a trimmer head, the guard accessory must be mounted onto the guard. Failure to comply could result in an overly long cutting line and motor overload.
REPLACE THE TRIMMER HEAD WITH THE 3-TEETH BLADE
Know the trimmer head as Fig. G shown. Then disassemble the trimmer head and mount the 3-teeth blade on the brush cutter.
- Press the release tabs on the spool retainer and remove the spool retainer by pulling it straight out (Fig. H1 & H2).
- Rotate the upper housing assembly to align the slot in the flange with the shaft-locking hole in the gear case and insert a stabilizer into the hole (Fig. H3).
- Rotate the socket wrench clockwise to remove the nut and upper housing assembly (Fig. H4).
- Remove the guard accessory by loosening the three screws with washer (Fig. H5).
- The blade is shipped with a sheath. Before mounting the blade onto the brush cutter, the sheath should be removed by undoing the clamp wire from the hook on the sheath (Fig. 11).
Fig. G & I1 parts description see below:
| G-1 | Inner Flange G-6 Cutting Line | ||
| G-2 | Flange Cover G-7 Spool | Retainer | |
| G-3 | Upper Housing ASSY | G-8 | Lower Housing ASSY |
| G-4 | Nut I-1 Clamp Wire | ||
| G-5 | Spring I-2 Hook | ||
NOTICE: To protect against injury, you have to wear gloves prior to any operation with the 3-teeth blade.
- Mount the inner flange and flange cover into its place (Fig. 12).
- Mount the blade onto the motor shaft, ensuring that the surface of the blade is flush with the surface of the inner flange bulge. Mount the outer flange and the nut (Fig. 13). Pre-tighten the nut in a COUNTERCLOCKWISE direction by hand.
- Position the gear case against a solid surface for support. With one hand hold the brush cutter shaft and the other hand grasp the multi-function wrench to tighten the nut following the directional arrow icon marked on the outer flange (Fig. 14).
REPLACE THE 3-TEETH BLADE WITH THE TRIMMER HEAD
Know the 3-teeth blade cutting unit as Fig. J1 shown. Then disassemble 3-teeth blade and mount the trimmer head on the brush cutter.
- Rotate the blade to align the slot in the flange with the shaft-locking hole in the gear case and insert a stabilizer into the hole.
- Position the gear case against a solid surface for support. With one hand hold the brush cutter shaft and the other hand grasp the multi-function wrench to loosen the nut clockwise.
- Take out the nut, outer flange, blade, inner flange cover and inner flange from the brush cutter (Fig. J2).
Fig. J1, J3 & J7 parts description see below:
| J-1 Shaft J-6 Nut | ||
| J-2 Inner Flange J-7 Slot in the Flange | ||
| J-3 Flange Cover J-8 Spring | ||
| J-4 3-teeth Blade J-9 Notch | ||
| J-5 Outer Flange J-10 Eyelet | ||
NOTICE: When the 3-teeth blade is unused, to prevent personal injury, mount the blade into its sheath.
- Assemble the guard accessory to the brush cutter by tighten three screws with washer.
- Mount the lower housing onto the gear case by tightening the nut and put the spring into its place (Fig. J3).
- Fold and wind trimmer line onto the spool as Fig. J4 shown. Then place the line ends through the two opposite notches in the spool (Fig. J5) and place the spool into its retainer with notches aligned with retainer eyelets (Fig. J7). Lastly, align the retainer slots with the tabs on the spool base and press the retainer evenly down, ensuring that it snaps into place (Fig. J6).
NOTICE: Failure to wind the line in the direction indicated it will cause the trimmer head to operate incorrectly.
OPERATION
WARNING: Do not allow familiarity with this product to make you careless. Remember that a careless fraction of a second is sufficient to inflict serious injury.
WARNING: Always wear eye protection, along with hearing protection. Failure to do so could result in objects being thrown into your eyes and other possible serious injuries.
WARNING: Do not use any attachments or accessories not recommended by the manufacturer of this product. The use of attachments or accessories not recommended can result in serious personal injury.
HOLDING THE BRUSH CUTTER
Before connect the backpack battery with the brush cutter, wear your backpack battery and mount the hip pad your backpack harness referring to BAX1500 and AHP1500 manual.
Mount the brush cutter with your hip-pad by connecting the hook to the mounting hole (Fig. K). There are 8 holes upon the shaft, choosing an optimum hole for comfortable operation.
Hold the line trimmer with both hands on the right side of your body. The trimmer head or blade should be parallel to the ground at a proper cutting distance without the operator bending over.
Releasing the brush cutter can be achieved in two ways. Release the chest and belt buckles (Fig.L1) or press the hook of the hip-pad and take it apart from the mounting hole on the shaft.
WARNING: When emergency occurs, releasing the chest and belt buckles is the quick release method to release the brush cutter.
WARNING: You should not use the single-shoulder strap and double-shoulder strap with backpack battery simultaneously.
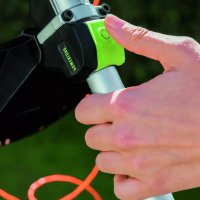
To Install Battery Pack (Fig. L2)
Align of plug with of brush cutter. Insert the plug into the machine until the green seal completely disappeared into the socket.
To Remove
Release the battery cord from the mounting groove and pull out the plug from the brush cutter.
STARTING/STOPPING THE BRUSH CUTTER
To Start
Push the lock-off button to position "ON" (Fig. M). Move the small trigger upwards and then press the switch trigger to start the brush cutter. Different pressure on the trigger results in variable rotating speed of the cutting unit.
Fig. L1 & M parts description see below:
| L-1 Chest Buckle M-1 Lock-off Button |
| L-2 Belt Buckle M-2 Small Trigger |
| L-3 Hook M-3 Switch Trigger |
To Stop
Release the switch trigger and push the lock-off button back to position "OFF".
WARNING: Always remove the battery pack from the line trimmer during work breaks and after finishing work.
EN
WARNING: Dress properly to reduce the risk of injury when operating the brush cutter. Do not wear loose clothing or jewelry. Wear eye and ear/hearing protection. Wear heavy duty, long trousers, boots and gloves. Do not wear short trousers, sandals or go barefoot. Before operating, look around you to ensure a safety working area without other people, animals or any loose objects. Make sure they are at least 15m away. And then check for eye protection, proper clothing and balanced footing. Before each use check for damaged/worn parts. Check the trimmer head, 3-teeth blade, guard, guard accessory and bike handle and replace any parts that are cracked, warped, bent, or damaged in any away. The line-cutting blade on the edge of the guard accessory can dull over time. It is recommended that you periodically sharpen it with a file or replace it with a new blade.
After each use, clean the brush cutter
Using with Trimmer Head
Adjusting cutting line length
The trimmer head allows the operator to release more cutting line without stopping the motor. As line becomes frayed or worn, additional line can be released by lightly tapping the bump knob on the ground while operating the trimmer.
NOTICE: Line release will become more difficult if the cutting line becomes too short.
WARNING: Do not remove or alter the line-cutting blade assembly. Excessive line length will cause the motor to overheat and may result in serious personal injury.
Line replacement
WARNING: Never use metal-reinforced line, wire, or rope, etc. These can break off and become dangerous projectiles.
Press the release tabs on the spool retainer and pull the spool retainer out (Fig. H1 & H2). Follow the step 6 of "REPLACE THE 3-TEETH BLADE WITH THE TRIMMER HEAD" to assemble a new trimmer line to the brush cutter.
Using with 3-Teeth Blade
WARNING: To cut wild growth and scrub, lower the rotating 3-teeth blade down onto the growth to achieve a chopping effect. Use the brush cutter like a scythe (sweep it to the right and left) at ground level. Do not use the cutting unit above waist height.
WARNING: The higher the cutting unit is off the ground, the greater the risk of injury from cuttings being thrown sideways.
WARNING: When cutting young stands or other woody materials up to 2cm in diameter, use the left side of the blade to avoid blade thrust situations. Do not attempt to cut woody material with a larger diameter, since the blade may catch or jerk the brush cutter forward. This may cause damage to the blade or the brush cutter or loss of control of the brush cutter, resulting personal injury.
WARNING: Improper use of a blade may cause it to crack, chip, or shatter. Thrown parts may seriously injure the operator or bystander. To reduce the risk of personal injury, it is essential to take the following precautions:
- Avoid contact with hard or solid foreign objects such as stones, rocks or pieces of metal.
- Never cut wood or shrubs with a stem diameter of more than 2cm .
Inspect the blade at a regular short interval for signs of damage. Do not continue working with a damaged blade. - Re-sharpen the blade regularly (when it has dulled noticeably) and have it balanced if necessary (performed by a qualified service technician).
Blade Thrust
Exercise extreme caution when using the 3-teeth blade with this unit. Blade thrust is the reaction that may occur when the spinning blade contacts anything it cannot cut. This contact may cause the blade to stop for an instant and suddenly "thrust" the unit away from the object that was hit. This reaction can be violent enough to cause the operator to lose control of the unit. Blade thrust can occur without warning if the blade snags, stalls, or binds. This is more likely to occur in areas where it is difficult to see the material being cut. For cutting ease and safety, approach the weeds being cut with the brush cutter from the right to the left. In the event an unexpected object or woody stock is encountered, this practice could minimize the blade thrust reaction.
MAINTENANCE
WARNING: Before inspecting, cleaning or servicing the unit, stop the motor, wait for all moving parts to stop, and remove the battery pack. Failure to follow these instructions can result in serious personal injury or property damage.
WARNING: When servicing, use only identical replacement parts. Use of any other parts may create a hazard or cause product damage. To ensure safety and reliability, all repairs should be performed by a qualified service technician.
GENERAL MAINTENANCE
Avoid using solvents when cleaning plastic parts. Most plastics are susceptible to damage from various types of commercial solvents and may be damaged by their use. Use clean clothes to remove dirt, dust, oil, grease, etc.
CLEAN THE MACHINE
After each use of 3-teeth blade / trimmer head, clean the debris, clogged soils or grass on the blade and guard with a soft brush.
NOTICE: When the line-cutting blade becomes dull, please sharpen it performed by a qualified service technician or replace with a new line-cutting blade as necessary.
After each use of brush cutter, clean the cutting unit using a damp cloth with a mild detergent.
- Do not use any strong detergents on the plastic housing or the handle. They can be damaged by certain aromatic oils, such as pine and lemon, and by solvents such as kerosene. Moisture can also cause a shock hazard. Wipe off any moisture with a soft dry cloth.
Use a small brush or a small vacuum cleaner to clean the air vents on the rear housing.
LUBRICATE THE GEAR CASE
For best operation and longer lifetime, lubricate the gear case with a special grease (4-5g each time) after every 50 hours operation.
The special grease should meet the following requirements.
- Belong to DIN51818: NLGI-1 cone penetration degree.
- Ester base grease.
- Excellent low-temperature startup, EP, mechanical shearing, abrasion resistance and oxidative stability properties.
- Operation temperature must contain -40 180^
Remove the battery plug and the sealing screw. Lubricating the gear case through the oil-hole.
WARNING: Do not lubricate while the brush cutter is still connected with battery or running.
EN
STORING THE MACHINE
-
Remove the battery pack from the tool.
Wear heavy gloves to clean the tool thoroughly. -
Mount the blade sheath onto the 3-teeth blade for safe saving (Fig. N).
Store the unit in a dry, well-ventilated area, locked-up or up high, out of the reach of children. Do not store the machine on or adjacent to fertilizers, gasoline, or other chemicals.
NOTICE: Do not operate your hedge trimmer with dull or damaged cutting blades. This may cause overload and will give unsatisfactory cutting results.
Protecting the environment
Do not dispose of electrical appliances as unsorted municipal waste, use separate collection facilities.
According to the European law 2012/19/EU, electrical and electronic equipment that is no longer usable, and according to the European law 2006/66/EC, defective or used battery packs/batteries, must be collected separately.
If electrical appliances are disposed of in landfills or dumps, hazardous substances can leak into the groundwater and get into the food chain, damaging your health and well-being.
EN TROUBLESHOOTING
| PROBLEM | CAUSE SOLUTION SOLUTION | |
| Fail to start. | ■ The battery pack is not attached to the brush cutter or no electrical contact between the brush cutter and battery. ■ The battery pack is depleted. ■ The lock-off button has not pushed to position “ON” before pressing the switch levels. | ■ Reinsert the battery plug into the hedge trimmer ■ Charge the battery pack with the specified charger. ■ Before using the trimmer, confirm the lock button is unlocked. |
| Stop working. | ■ The battery pack or brush cutter is too hot. ■ The brush cutter is overload. ■ The battery pack is disconnected from the tool. ■ The battery pack is deleted. | ■ Allow the battery pack or hedge trimmer to cool until the temperature to normal temperature. ■ The machine will recover when the load is removed. For continuous working, reduce the load of the machine. ■ Re-install the battery pack. ■ Charge the battery pack with the specified charger. |
| Excessive vibration or noise. | ■ Dry gearbox ■ The unbalance cutting line. ■ The 3-teeth blade is bent or damaged | ■ Remove sealing screw and add lubricating oil. ■ Lightly tap the bump knob on the ground while operating the trimmer. ■ Replace a new blade. |
| The cutting line can’t be released. | ■ The line in the trimmer head has been run out. ■ The cutting line has not been installed properly. | ■ Assemble a new cutting line into the brush cutter. ■ Remove the cutting line and re-assemble the cutting line. |
WARRANTY
EGO WARRANTY POLICY
Please visit the website egopowerplus.com for full terms and conditions of the EGO Warranty policy.
new cutting line into the
- cutting line and reti-. ecting line.
VEILIGHEIDS-WAARSCHUWINGSSYMBOL:De
WAARSCHUWING: Lees alle
WAARSCHUWING: Lees alle
ANDERE VEILIGHEIDSWAARSCHUWINGEN
HET APPARAAT OPBERGEN
STARTA/STOPPA RÖJSÄGEN
Starta
SIKKERHET I ARBEIDSOMRADET
BRUK OG VEDLIKEHOLD AV ELEKTROVERKTÖY
VEDLIKEHOLD OG LAGRING
GENERELT VEDLIKEHOLD
3NeKtpOnHCTpyMeHTbI rHepe npuyOT NCKpbI, KOTOpbl MOrTy BOCnJIaMeHHTb NBJIB ININ NCnapeHn.
He no3BoJnTe DeTm n NocToPOHHM HaxOHTbcra B5n3n pa6oTaHooero 3NeKtpOnHcTpymEnTa.
ÖTBLKEKAHOUne ΦaKTopbI MOrTy PnPBecTu K N oTepe KOHTPOJ.
JIHNAI B3OINACHOCTb
■Пинсплььзовани 3лкгронсгрм enta 6удte 6dnteblhbl, cneinte 3a cBOIMn DeiCTBnAMn CneDyIte 3dpabOMy CMbICny. He nOJIb3yIteCb 3лкгронсгрмToM, ecn Bbl yCTaIIH NII HaxOДTecb NOd BO3dEiCTBnEM HapKOTIKOB, aNKOrOJI NII MeNkAmeHTOB.Дажke KpATKOBpeMeHHaRe HEBHmATElbHOCTb npI paOte C 3лкгронсгрмToM MOXET pPbECTN K TЯЖeMbIM TpaBMam.
IcnoB3yIe cpeCTBa HINHbNdyaIbHO 3auNTbl. Bcerda ncoNob3yIte 3aunTHbIe cpeCTBa Ira rna3. NcnoJb3OBAHne 3aunTHbIX cpeCTB, TaKnx KaK peCnnpaTOp, HeckoJb3kA 3aunTHa o6yBb, Kacka I cpeCTBa 3aunTbI opraHOB Cnyxa B COOTBeTCTByUOuNX ycNoBnX yMeHbShaet PnCK NOnyuHeHr TpaBM.
He donyckaIte HnpeBnDeneHHbIX 3anyckOB. Npeed NOkHIOUeHNEM INCTpyMeHTa K ceTn NITAHN (nnn akKymyIaTOpY) npeed erO nepeHocKo y6eINTEcb, YTO BbIKNoUcATENB HaxODNTcB BBIKIOUeHOM NOLOXeHN. He depKeTIne naEuc Ha BbIKIOUaTeJI npn peHOCKe 3NEKTPOINHCTpyMeHTOB n HE BKIOUaTIe BNkY B pO3ETK, ECNI 3NEKTPOINHCTpyMEHT BKNIOUeH. 3TO MOKET npINBECTN K HecCACTHOMy Cnyau.
■Ipeed BkIIOueHHeM 3NeKTPoINHCTpymeHTa CHMMtTe C Hero peryIInpoBOOHyIe INHCTpymeHTbI N raeyHbI KIIouN. PeryIInpoBOOHbI INHCTpymeHT nIIN raeHbI KIIou, OCTabJIeHHbI Ha BpaJauIoEciS cActN 3JIeKTPoINHCTpymeHTa, MOxET CTaTb IpnUHOn TpaBMbl.
He TAHNTecb. Bcerda coxpaHnTe yctOuHBOe nOIOXeHne n paBHOBecne. 3TO N03BOJNT JyUWe KOHTPOJIUPoBaT b 3JIeKTPoIHCTpyMeHT B HENpeBnDEHHbIX CNTyaUNX.
OeBaItebHaJIeXaIIMo6pa3OM.He HaeBaIte CBo6OHyOJeKdyuYkpaSeHn. DePKeTe BOnocbl, OeKdyuNepTuKnNoJaBwe OT DnBxUxxCyacteN.CBo6OHaN aOeJda, YkpaSeHnNdINHHbIe BOOCblMOrT NOnaCTbB DnBxUxncsCryactn.
■PnHaJIuynyCTPOINCTB DnA OTBOa n C6opa nbIIn y6eHITecb, YTO OHN NOKNUOyeHbI N npABINbHO pa6oTaHT. IcNoJIb3OBAHne PbIeYJaBnBaHOxN x yCTPOINCTB CHNkaeT BpeI, PnUHNHEMbI nbIbIO.
He donyckaIte He6peXHocTn, KOtOpaM MoKet BO3HNKHyTB n3-3a qactoro nCNoJIb3OBAHn HNCTpyMeNTa n NobIeYb 3a co6oB camoyBepenHocTb n IrHopnpOBaHne npaBnI 6e3onacHocTn. HeocToPoxHoe DeIcTBne MOKet npuHHnTb cepbe3HyTO TpaBMy 3a DOJI N CEkyHdbI.
NCIOJIb3OBAHNE IOBcIyXINBAHNE 3JEKTPoIHCTPYMEHTA
He npKnaIbIaIte K 3neKtpOnHCTpyMeHType3MepHbIX ycIIIN. IcNoJIb3yIe TnoXOJaIIN DnBaIiX 3aDaU 3neKtpOnHCTpyMeHT. IpaBnIbHO Bbl6paHHbI 3neKtpOnHCTpyMeHT 6oJee aΦΦeKTINBeH N 6e3onaceH npHOMHaJIbHO Harpye.
He nCnoB3yIte 3JeKtpoHnCTpyMeHT,ecn erO BbIKIOuATeINb HEnCnpaBeH. 3JeKtpoHnCTpyMeHTbl C HEnCnpaBHbIM BbIKIOUaTeJIem ONaCHbI INoDnEkaT peMOHTy.
XpaHnte HEnCNoB3yeMbIe 3NeKtpOnHCTpyMeHTbIB MecTax, HeOCTynhBIX DnA DeTeN, H He DOBepaIte 3NeKtpOnHCTpyMeHT JINuAM, He 3HaKOMbIM C HIM N C 3TNMM INCHCTpyKcIyMNI. 3NeKtpOnHCTpyMeHTbIONaCHbIB pykAX HENoDROBHeNbIX NOJb3OBaTeJIeN.
BbINONHnIeTexHnueckoeO6cJyKnBaHne 3NeKtpOHnHCTpyMeHTOB n npHaIeXHoCTeN. PIOBepbTe BbIPaBHnBaHne n cIeJIeHne NOBnHXbIX DeTaneN, HAnuHne NOnOMOK n IpOChy ycNoBn, KOTOpBIE MOrY T NobnA rB pa6Oty 3NeKtpOHnHCTpyMeHt. Ecnn 3NeKtpOHnHCTpyMeHr NOBpeXdEn, nepei NCnOLb3OBAHNemero Heo6xOIMO OTpEMOnHTPOBaTb. HeoCTaTOUhBiy XoD 3a 3NeKtpOHnHCTpyMeHToR ABnEeTcR pInuHOn MHOrNX HeCuaEB.
XpaHnTepeKyuIe HNCTpyMeHTbIB YnCTOTE IN3aTOUeHHOM COCTOHN. IpaBnIbHO O6cLyJXnBaEmbIe IN XopoIO 3aTOUeHHbIE peKyuIe INCTpyMeHTbIMehbIe 3aKJIINHBaIOT IN LyuIe KOHTpOJIpyIOTcR.
IcnoJIb3yIte 3JKeTPOINHCTPymeHT,akceccyapbl, Hacadkn I T. II.B COOTBETCTBUN C 3TMM INCHtpyKUIMn, yuHTbIBaYUCIOBNI uCneUΦNky BblIOJIHReMoI pa6Otbl.IcnoJIb3OBAHHe 3JIeKTPOINHCTPymeHTa DIIAB BblONHEHNI HENpeDyCMOTpeHHbIX ONEpaUN MOKET PpNBecTN K ONaChbIM CITYaUINM.
Cneinte 3a TEM, yTo6bI pyKoTKn N NOBepXHOCTN 3axBaTa 6bln CyxIMN N YcHtBIMN Ha HNX He 6blIO Macna nn Cma3OyHoro MaTepnana.
CkOJIb3Kne pyKOaTkn n NOBepxHOCTn 3axBaTa He IO3BOJIAHOT 6e3ONaCHO INcNOJIb3OBaTB INHCTpyMeHT N KOHTpONIPoBAbTe ERO B HEnpeBnDEHHbIX CNTyauINX.
- Depxnte Ka6eHn noaIbwe ot pa6oey 30hbl HnCTpyMeHa. Bo BpeM nCNoB3OBAHn Ka6eNb MoKet IcHe3HyTb n3 NoJ 3peHn N CnyaAHO nonactb nOd IHCTpyMeHT.
3KCNJYATAUINOECNJXMBAHNE INHCTPYMEHTACNITAHMEMOT AKKYMJTOPA
3apKaTe aKKMyJITOpbI TObKO c NOMOuBIO 3apHOrO yCTpoNcTBa, yKa3aHHORo n3ROBnTeJeM. 3apHoe yCTpoNcTBo, ppeHa3HaueHHe OJn OHO Tnna aKKMyJITOpHBx 6atapei, MoKeT cTaB npuHHOI NOkapa npnNCIOJIb3OBAHm C dpYmTNINOM 6atapei.
IcnoNb3yIte 3JNEKTPoHnCTpyMeHT TOJIbKO CO CneuaJIbHO npedHa3NaeHHbIMn dIg Hero aKymyIaTOPAMn. IcnoJIb3ObaHne JIObOro dpyrOro BNuIa aKmyIaTOpHbIX 6atapeM MoKeT cTaB pnuHOn HeCuaCTbIX cnYaeB INI NOXapa.
Korda akkymyIaTOP He nCnOJIb3yeTcX, xpaHInTeero OTdJIbHOOT MeTAnNueeCKNX PpeDMeTOB KaHcEJIrpCKNX CKpenOK, MOHe, KlnOHe, rBO3Dei, BnHTOB uDp.- OHMOrY CoeINHtB KOHTaKTbl. KopotKoe 3AmbIkaHHe KOHTAKTOB aKKymyIaTOPHO 6atapEn MoKeT cTaTB pnpHHO OKOROB mNoKapa.
Pn He6IaropnIaTHbIX O6CTOaTeJIbCTBax N3 aKKymyIaTopa MoKeT noteu 3JeKtpoNT; N36eaiTe KOtAKTa C Hm. Pn cIyauHOM KOHTaTe npOMoITe BOIoE.Cnn XnKocTB nonana B rna3a, o6paTIeCb K bpaay. XnKocTB n3 aKKymyIaTOpHOi 6aTapeu MoKeT Bb3BaTb pa3dpaxKeHne n OXOrn.
He nCnoJIb3yIte akKymJrTOp nHcTpymeHT,ecn OHn NOBpeXdeHbI nn NOBBeprAnCb MoNΦnKaunm. IIOBeHne IOBpeXdeHHbIX nn MOINΦnUPOBaHHbIX aKKymJrTOpOB MoKET 6bITb HnpeDcKa3yeMbIM, YTO npIBeTeK BO3rOpaHnO, B3pbIBy n PnCKy NOnyuHnra TpaBM.
He noBBepraIte aKKyMylTOpHyo 6aTapeIO IHCTpymENT Bo3deNCTBnO ORH N BbICOKOI TemnepaTypbl. Bo3deNCTBne ORH INI TEMnepaTypbl BbIe 100^ MoKet PnIBecTn K B3pbBy.
CnedyTe BcEM HNCTpyKUHM NO 3apJKe H He 3apKaTe aKKMyIaTOp INHCTpyMeHT npi Temnepatype, BbIXOJaSe 3a IpeJeIb Iyka3aHHoro Dmana3oHa. Ecn 3apJaB bblONHeTcHepaBnH0 INB YcIOBnX HENODXOJaEe TEMnepaTpybl, 3TO MOKET npivBecn K NOBpeKdEHNO aKKMyIaTOpu BO3rOpAHIO.
PEMOHT
PemOH3JIeKTPoHnCtpyMeHTa DOJIxeh npOn3BODINbCR KBAHNΦuNpOBAHHbIM CneuaJIHCTOM C HcNOJb3OBaHnEM TOJIbKO IeHTNuHbIX 3aNaChbIX qactEn. 3To o6ecneuNT 6e3OnacHyIO pa60Tu 3JIeKTPoHnCtpyMeHTa.
HkoHa He BbINOJIHnTe 06cnyXnBaHne NOBpeKdEHHoro akkymyIaTopa. 06cnyXnBaHne aKKMyJrTOpOB DOJNXHO BbINOJHrTbcr TOJIbKO npON3BOJNTeIe MNN B aBTOpN3OBAHHOM cepBnCHOM ueHTpe.
PNEpyPExDEHNE. IpOHTaTe BCE npabnla 6e3oNaChocTN, INCTpyKuIN, INLIOCTpaUN n CneunkaCn, npnaIraeMbIe K ATOMy 3JIeKTPoHNCTpyMeHTy. HeBbINOJIHeHNe I3JIOKeHHbIX HNXe INHCTpyKUIM MOKeT pNBeCTN K NopaeHIO 3JIeKTPnueCKm TOKOM, NOkApY u (n) TRAKeJIbIM TpABMaM. CoXpAHTE Bce PpeDynpexDeHn I INHCTpyKUIM dI INCOJIb3OBAHnB 6dyuem.
CoxpaHnTe Bce npedynpeXeHnI nHcTpyKuIN dnnncn30BaHnB 6yduem.
RU
OBUYEHNE
BHMATEbHO npoHTaTe HNCTpyKuHIO.O3HaKOMbTEcb CO BCEM 3eMeHTaM ynpabHeHn HauHTecb npabINbHOMy NC0Nb3OBAHnO obOpyDobHn.
He pa3pewaIte noIb3ObaTbcra yCTpoiCTBOM JncaM, He npoHTaBIMn HactoIe INHCTpyKun, a TaKKe Detam. MecThbIe HopMbI MoryT OpaHnHbAtb BO3pact onepatopa.
IOMHHe, YTO ONEpAToP INN BnAeNeu HecyT OTBETCTBeHHOCTb 3a HecCaCTHbIe CnyuaN yUep6, HAHeCEHHbI DpyrIM NIOJAM INN INX IMMyEcCTBy.
IIOIOTOBKA
He nCnoB3yIe yCTPOICTBO,ecn pAOM HAXOJATcNIOIN (ocO6eHHo DeTn)nn KMBOTbIe.
Ppna pa6oTe c yctpoiCTBOM hadeBaIte 3aunTHbIe OUKN n npOHyIO 06yBB.
PacctoHHe MeXy yCTpoNCTBOM nIOCTOPOHMMIINaAMn DOxKHO COCTABJTB He MeHee 15 M.
Hnkorda He noJb3yItecb yCTpOYCTBOM,ecNn Bbl yctann,6oJbHbI nn HaxOaNTeCB B COCTOHN anKorolbHorO nn HApKOTUeCKOrO onbHeHn.
3KCNNYATAUHA
NcIOJIb3yIte INHCTpyMeHT TOIbKO pRn DHeBHom CBete NNOXPOWEM NCKYCCTBEHHOM OCBeUeHN.
He nCnoJIb3yIte HnCTpyMeHT,ecNI UNTKIOBpeXDeHbI INI He yCTaHOBNeHbI.
Ipeed 3anyckom Dbratela ybeintecb,TO pexyuine 3JIeMeHTbI HaxoJrTcH Na DOCTaTOHOM pacctOHHN OT pyKnHor.
BcerdaOTKJIUOaHTeYCTPOINCTBOOTNCTOUHnKaIITAHn(T.e.N3BNEkaTe aKKMyJITOP)BCJeDyOLuxClyHAX:
ecn INHCTpymEnT OCTaetc8e3 npncMToPa;
IpepeOuHcTKo3acopeHnra;
I nepei npoBepKo, ouHCTKO nn O6cnykBaHnem ycTpoiCTBa.
IOCNECTOJIKHOBENI CIOCTOPOHHIMIpeDMETOM;
B Cnyae Upe3MepHo Bn6paunu ycTpoiCTBa.
UTo6bI He IOnyCTnTb IOnyuEHNr TpaBM,pyKn HOrndoJXhbl HaxOHTBCr Ha 6e3oNacHom pacCToHmOTpeKxuX qacteY.
Cneinte 3a Tem, yTo6bI BEHTINJauIOHhIe OTBepCTnI He 6bln 3acopeHbl.
OBCJYKUBAHNE XPAHEHNE
Ipejkeyem BbIOJIHrTb 06CJyKINBaHne NIN OCHCTKy, BcERda OTKIIHOaIte yCTpoiCTBO OT IcTOHHKa PITaHnA (T. e.I3BJIeKaIte aKKymJIaTOP).
IcnoIb3yIeToIbko3aIacHbIeYactnIOIoHNHeIbHbIe npncoc6JIeHH,peKoMeHDoBaHbIe IpOu3BoDInTeJEM.
PeryIpyHO npOBepyTe yCTpoINCTBO N BbIIOHNHJTe erO 6cIyKBAHHe. PemOH YCTPOINCTBA DOJIKeH BbIIOHNHTb TOnBko KBaIIINpHIpOBaHHbI CneuaNtC.
EcnHnCTpyMeHT He nCIOJIb3yETcY, xpaHInTe erO B HeIOCTyINHom DITI DETeMecTe.
IOnOHnHtJIbHbIE PPeDyPPEJxEHnI NO TEXHnke 6E3OpACHOCTN
He donyckaIte pa6o8bI B onaChbIX ycNoBnx. He IcnoJIb3yIte yCTpoIcTBO Ha BlaXHbIX MOKpbIX CKIOHax.
3aunthbIe orpaXdHn DOJXhbl 6bItb yctahOBJIeHbI HAXOINTBcB R pa6oYem COCTOHN.
Bcerda depknte pykn n horn noaIbwe ot pexyux qacte.
YTo6bI CHN3NTb PNCK NOLyueHnTpaBM, HNKoRda He pa60taTe Ha cTpeMnKHe HnHa IIO6oB Ipyro HeycToHBOB NOBepXHOCTn. HNKoRda He IODHMaTe pexyun 3JeMeHT Bblwe ypOBHra TaHn.
Perynpho npOBepaTe pexyun 3neMeHT BO BpemnncnoB30BaHna, a TaKxpe cpa3y nocne 6hApyeHn cepbe3HbIX N3MeHeHn B pa6Ote yctpoNCTBa.
ДяdoctnxkeHnHaNnyuWnxpe3ynbTaTOB aKkymyIaTOp cJeDyET 3apXkaTb npi TemnepaType okpyxauoien cpebl ot 5 do 40^ .He xpaHnte erO BHE NOMEUHIN IVB TPAHCIOPTHom cpeCTBE.
Bcnyae npn6nHexeHnK npenrTCTBnM nnn NOctopOHnM nuaam OCTaHOBNTe DBnraTeIb n pexyui 3JemeHT.
PepdynpeDte onepatopa 06 onachoctn otdaun pekyuero 3JemeHTa (ToIbKO npn nCnoJIb3OBaHHn pexyuero 3JemeHTa c Tpemr 3y6cAmn).
OTdauBaO3HnKaet npKoHTaKe BpaUaIOeOcpeKyUeero 3neMeHToC oBekTOM, KOTOpbI OH He MoXeTcpa3y pa3pe3aTb.
OTDAaMoKET 6bIT DoCTaTOH CINbHO, YTO6bl OTOLKHyTB yCTPOIcTB O/IMN ONepaTOPA B JIObOM HApabJIeHN N IpiBecTN K Notepe KOHTpOJI HaJ yCTPOIcTBOM.
OTDAaMOKETBO3HnKHyTbBHe3aHNO,ecINpeKyuIIN 3JEMENT3aueHNIC,3ACTPNIIN3aKaINC.
OtdaHa Hn6oJee BepoTHa B TaKnx CInTyauJx, KOrDa 06pa6aTbIbAembMy MATEpHAn IIOXo BnHO.
He npnKpennIte HnKaKepexuune 3JeMeHbIK yctpoiCTBy 6e3 HaJnxAuey ctaHOBkBCex Heo6XoIMMbIX qacteH. HecobJeHnepeKomeHdaunnoYcTaHOBKe HaJnxAux YacteMOXe IpnBeCTN K OTNeTAHIO pExyUero 3JeMeHTaHaHeceHHIO cepbe3HBIX TpaBM onepaTOpy n/INn NOCTOPOHHM NtcaAM. 3aMeHnTe NOrHyTbie, IN3HOWeHHbI, TpeCHyBwne, CLOMaHHbI INn KaKNbO HnAue NobpeXDeHHbIpe xyuine 3JeMeHTbl.NcNoJIb3yIte ToIbKO ocTpblepexuyne 3JeMeHTbl.Tynoi pexyUn 3JeMeHT qaue 3acTpeBaETnpoBOuOpnyet ODaun (ToIbKO npn NcNoIb3OBAHmpexuyero 3JeMeHTaM).
Pexyun3nemHTnnnneCaNoHepuMoryT HaheCTn TpaBMBI BO BpEm BAeHnA daKe npn OCTaHOBKe DBnraTeJI nnOtnyckAHnn KypKa. CoxpanrTe NOhBn KOHTpoNb Hd ycTPOeCTBOM, noka peKyuun 3nemHTnnn neCk aONHocTbIO He octaHOBNTca.
IcnoIb3yIteToIbKOaKMyJITOpbln3apAnHbIe yctpoNCTBa EGO,yka3aHHbIe HNKe:
AKKUMYJIATOP3APIHOEYCTPOICTBO BAX1500CHX5500E
Pa6oTaIOuIe O T AKKyMylrTOPOB HNCTpyMeHbI He Tpe6yETcnoKlIOUaTb K pO3eTke 3NeKTPOcETn, NO3ToMy OH BCERda rOTOBbl K NCNOJb30BaHNo.
POMHNTe O BO3MOXHOCTN BO3HNKHOBEHIN ONaCHbIX CNTyaCn DaKe KOrDa yCTpoiCTBO He NCNoJIb3yETcR.
CoBIOJDAIte octopoxHocTh npn BbINONHeHHNTEXMHueCKOrO 6cnyKBAHNA INPpeMOHTA.
He moTe yctpoNCTBO n3 wnaHra. N36eAaTe nonadHnBODbIB dBHrAteIb n 3neKtpueckne coeHNHeHn.
Pn BO3HKnHOBeHHn CNTyaun, He ONncAHbIX B daHHOM pyKOBoOCTBe, CO6IIOaIte OCTOpOXHOCTb IpyKOBoCDByTEcB 3paBbIM CmblONM.
06paTnTeCb B cepBnChbI ueHtp EGO 3a nOMOu.
COXPAHNTE DAHHbIE HCHTPKcIIM!
TEXHNUECKNEXAPAKTEPNCNU
YACTN KYCTOPE3A (Puc. A)
- Pekyua necka
- LITOK BC6ope
- Ban
- Kypok
- IpeeknouateIb
- BapaKOBbI 6oNT
- KpOyok
-
Pa3beM
-
PpeoopaHnteHbHa nlaactnHa
- RykoTka BeJocnepHoro Tnpa
- YnIOHTHeJIbHbI BnHT
- OTrBepCTne 6JIoKInpOBKn BaJa
- JIeBnE IaJIeCKn
- 3aunTHbI 3JIeMeHrT
- Pexyuzni 3IeMeNT C TpeM 3y6zamn
- Koxyx pexyuero 3JemeHtA
- BheuHnФlaHeu
- Raika
- MhorofoyHKmnoHaJIbHbI raeHbI KlnOu
- ⅢeTnIpaHbI KlnOu
21*.Ha6epeHHbI uHTOK (npOaAetc oTdeIbHo)
A INPEDYNPEXKDEHNE. HNKOrda He NcNoJIb3yIte yCTPOINCTBO 6e3 HaDeXHO yCTaHOBInHORO UNTka. IuTOK BCERddoJKeH 6bITb YCTaHOBnEH Ha yCTPOINCTBO dIra 3aUHTb IOnb30BaTeJIa.
A INPEDYNPEXDEHNE. Korda Ha yctpoiCTBO yctaHOJIeHa pexyua rOIOBka, NOBepx uNTka HeoXODIMO yCTaHOIBtB 3aunTHbI 3JeMeHT C Je3BNEM dIra ope3KN Jecn. B npOTNBOM cIyae 3TO MOKeT npINBeCTN K Upe3MepHomY BbITrINBaHHIO pexyuJ e Necn H npeperpy3ke DbrarTeNa. HkOrDa He nCnONb3ynte pexyuU rOIOBky 6e3 aunTHoro 3JeMeHTa.
C5OPKA
A INPEDYNPEXDEHNE. Ecnn KaKne-Jn6o Yactn NOBpeKDeHb I NIN OTCyTCTBYOT, He NCNoNb3yIte KycTope3, NOKa OHn He 6ydyT yCTaHOBNeHb.IcNoNb3OBAHne KycTope3a C NOBpeKDeHHbIMN IIN OTCyTCTBYUOUMM UACTaMM MoXe TnpVBECTN K NOJyEHIO cepBe3HOJ TpaBMbl.
PPEyIeHHe. He nItaTeCb
n3MeHnTb KOHCTpyKUIO KycTope3a NnN CO3DaTb
He peKOMeHNDoBaHHBe IINr Hero IOnONHIneJIbHbIE
npncOco6JeHn. IOno6HoE n3MeHHe cHTaETc
HeHaJIeKaUIM NCNoJIb3OBaHHem I CNOco6CTByeT
BO3HKnHOBeHHIO OAnCHOiCtYaUN, KOTopA npuBeTeK
IOnyehHIO cepbe3HO TpaBMbl.
PNEpyPExEHE. Bcerda HaedeBaIte npOchBie nepaTKn npu yctaHOBe Nn N3BneUeHn UNTka, a TaKKe npBbONHeHH KAKx-1n60 pa6o Tno 06cnykBaHIO peKyuIero 3IeMeHTa C TpeM 3y6zAMN Ie3BnA DnA o6pe3Kn neCK. OcTepeaTecb Je3BnA DnA o6pe3Kn neCKn Ha uTke n pexyIeO 3IeMeHTa C TpeM 3y6zAMN, 6epeITe pyKn OT nope3OB.
A PEPDYNPPEXDEHNE. YTo6bI npeoTbpaNTb CnyaHoe BKNIOUeHHe yCTpOINCTBa N NOUYeHne cepBe3HO TpaMbI, IN3BLeKaIne AKKyMylrTOP nepeD BbINOJIHeHmE c6OpKn, peYnIpOBKn I ONUCTKn, a TaKKe KOrDa yCTPOINCTBO He NCIONb3yETcR.
A INPEDYNPEXKDEHNE. HIKoRda He nCnoNb3yIte yCTpoiCTBO 6e3 HaJeXHO yCTaHOBJIeHHORO uNTKa N pykoTKn BeNoCIneHOrO TnPa. B npOTNBOM cnyae 3TO MOKeT IINPBECTN K cepbe3HbIM TpaBMam.
YCTAHOBKA IN PERGYIINPOBKA PYKOKTKN BELOCHNEHOROTUNA
PacnoJoxnTe KycTope3, KaK noka3aHo Ha Pnc. B. OTKpyTnte 6apaUkoBbI 6oNT Ha CoeDInHeHnn, a 3aTeM NOBepHnTe pyKoTky BeLOcNHeHOrO Tnna Ha 180^ BOKpyr Bala (Pnc. C), NOBepHnTe ee Ha 90^ npotNB Yacoboi CTpeKNi TAKIM 6pa3OM, YTO6bl OHa 6blNa HAnpAbJeHa B CTOpOny rONOBKn kAtuShkn (Pnc. D). 3aTeM nepemeaJte ee Ha3ad N BpePe, YTO6bl HaHTn yDo6Hoe pa6ooye IIOJXeHne, N 3aTaNtE 6oNT.
PIMMEAHNE. Pn nCnoB3OBAHn yCTpoiCTBa pyKoTka BeNoCnneHOro Tnna DoJnxHa 6bItb paCnoLoXeHa ToIbKO nepNeHdNkUyIaRHO Bany.
YCTAHOBKA UNTKA
OTkpYtnte ydaJIte DaB BuHTa n3 uNTka (Pnc.E), COBMeCTNe KpeIeXhble OTBepCTnA C OTBepCTnAMn IINyCTaHOBKn, a 3aTeM 3aΦnkCpyuTe uNTOK Ha OCHOBAHn BAHa npN NOMOUn DByx BuHTOB n DByx npyKHHbIX uAn6 (Pnc.F).
A INPEyIpyEKeHNE. Y6eIITecb, YTO BHyTpeHHra NOBepxHOCTb ⅢNTka ObaaSeHa B CTOpOHy peXyuei roNoBKN (Pnc.FnG).
A INPEDYNPEXDEHNE. Korda Ha kyctope3 yctaHOJIeHa rOIOBka TpIMMepa, NOBepx UNTKa Heo6XODIMO yCTaHOBHTb 3aUHTbIy IeMeENT. B IPOTNIBHom Clyuae 3TO MOKeT pINBeCTN K Ype3MePHOM ByITraIBAHIO peKyuSe IneCKn I nepepy3ke DBrIaTeJIa.
3AMEHA PEXUeI FOIOBn HA PEXUuN 3JIEMENT C TPEM3y6LAMN
O3haKOMbTecb c KOHCTpyKUneI rOIOBKn TpMMepa Ha Pnc. G. 3aTeM cHMMnte rOIOBky TpMMepa n yctAHOBnTe Ha KycTope3 peKyuN 3JIeMeNT C TpeM 3y6aMn.
-
HaxMMte Ha 3aXIMbI Ha qKcatope KaTyUkN n NotAHTE ee, YTO6bI CHrTb (Pnc.H1nH2).
2.Повернite Верхюч actb kopnyca takIM o6pa3OM, YTO6bl COBMecTnTB OTBepCTne HaФпанцe C OTBepCTnEM 6LOKIPOBKN BaJaHa KOpNcpepeyKTopa, N BCTaBbTe KIIIOH CBOMeUeHHIe OTBepCTnB KaueCTBe φNKCaTopa (Pnc.H3). -
NOBEPHNTe TOPCEBOI KIOU NO YACOBO CTpeNke, YTO6bI CHaTb rAky N BepxHIOU qACTb KOpnyCa (Pnc.H4).
- TTo6bI CHrTb 3aunTHbI 3JIeMeHT,OTKpyTITe TpN BnHTa C wai6amn (Pnc.H5).
- Pexyuyn 3neMeHNT noCTabnEeTc C yexnOM. Ipey cTaHOBKOJ peKyuIero 3neMeHTa Ha Kcytope3 Heo6xOIMMO CHrTB C HReo YExON, CHRB nPoBOIOuHbI 3aXIM C KpOuKa Ha YexNe (Pnc.11).
Oncanhe yactey Ha Puc. G n11
YDEPKINBAHNE KYCTOPE3A
Ipeep noKluHem paHcBOrO aKKymyToppa Kkytope3y HaedeHbTe paHcEByi aKKymyTToP Ha c68n npKpEnTe KOB3Ke H6epeHHbI uTOK B COOTBeCTBm C NHTpyKlmaMn B pyKOBoDCTBE nO ekCnPyatauB BAX1500 n AHP1500.
PnKpEnTe Kcytope3 K HabeepHHOMy uNTKy.ДЯ 3TOI 3aueHnTE KPOHOK 3a MOHTaxHoe OTBepCTne (Pnc.K). PdeYCMOTpeHO BOCeMb OTBepCTn, YTO NO3BOJAre Tb6paTb Han6Oone yD06Hoe nOIOXeHne.
YdepxnBaTe yctpoCTBO DBym pykamC npaBoi CTopoHbI OT c6b.Pexyua rnoBka Hnpexuyn 3nEMeHT doJXhbl paonlaTbcNnapanleNbHO 3emHe TaKOM paCCToAHN, pni KOTOpOM OepaTOpY He HyXHO TAnHyTcN npeRn6aTbcN.
Ocb6oBntb8cOT Kcytope3a MoXHO DByMn CNooc6amn.
PacTeHnTe HarpDHyIO NPOsCHyIO npAekn (Pnc.L1)nn
HaXmTe Ha KpOuOK HabePeHHORO UNTKa n N3BLeKeTne
ero n3 MOHTaXHOrO OTBepCTnI.
A INPEDYNPEXKDEHNE. B CNYaee BO3HNKHOBEHnna ONaCHO CNyauu CaMbIM 6bICTpbIM CNoOCOBm CHrTHN KycTOpe3a YBJIaETcR paCCTeINBaHne HArpydHOI NIOCHOH npJKeK.
A PEPENPEXDEHNE. He nCnoJIb3yIe c paHcEbbIM AKKMyJITOPOM OINHApHbI IN DBOHOn HAnHe pEmHn ODNHOPEMeHHO.
YcTaHObKa aKKymyIaTopa (Pnc. L2)
Cobmctte 063Haehne Ha Bnke C 063Haehem Hkyctope3e. BCTaBte BNky TaKIM 6pa3OM, YTo6bl 3eJeHoe yNtOHeHne NOnHOCTbIO NcE3JIO Bpa3BeMe.
N3BJeHHe
Ocb6oDnTe Ka6eIb n3 MoHTaXHOro na3a n n3BNeKeNTe BnIKy n3 pa3bema KcyTope3a.
BKNIOUeyHNE IN BbIKIOUeyHNE KYCTOPE3A BKnIOUeyHne
IpebeDnte KhONky 6nOKnPOBKn B nONoKeHne «ON» (BKl) (Pnc. M). CdbNbTe MaJIeHbKni nepeKnHouaTeIb BBepx, a 3aTeM hAXMnte Kypok, YTObbl 3aNyCTNb kyctope3. Cuna haxatna Ha Kypok Bnraet Ha CKopoCtB BpaueHnpeKyuJero 3IemaHtA.
OncaHne HacTeHa Pnc.L1nM
NCN0JIb3OBAHNE KYCTOPE3A
A INPEDYNPEXDEHNE. OdeBaITeCb HaJIeKaUIM
O6pa3OM, YTO6bI CHN3NTb PNCK NOJyHeHNA TpaBM npi
NCIONB3OBAHIN Kcytope3a. He HadeBaIte CBO6oNDHyO
OExdy N yKpaWeHn. IcNoJIb3yIte CpeCDtBA 3aUNTBI
OPraHOB 3peHn N cnyxa. HadeBaIte PNOTHbIe DInHHbIE
6pIKN, PPOuHYO 06yBn N nepuATKn. He HadeBaIte
WOpTBI, CaHaIIIN N He paBoTaIte BocNKOM. IpePe
HAaIOM pa60bTI OCmOTnPte pa6OyU 3OHy N y6eDntEcB
OTCYCTBNI JIODei, XKBOTbIX N NOCTOPOHNX PpeDMeTOB.
Y6eDntECB, YTO OHN HaxOJrTcH Na pacCToHn H MeHee
15 M. 3aTeM HaneHbTe 3aUNTHbIE OChN, NOxOJaUyO
OJeKdy, PpIMITE yCTOUYBOE pa6Oye NoLoXeHne.
Ipepe KaKdbim NcNoIb3OBAHnEM npOBepaTe yCTpOCTBO HaHaJIyHe NOBpeXDeHHbIX IN3HOWeHHbIX YacteI. IpoBepBe TOnOBKy TprIMMepa, pexyUm 3JeMeENT C TpeMra 3y6zAMn, UHTOK, 3aunTHbI 3JeMeNT n pyKoRTky BeLOCIneDHorO Tnna. 3aMeHrTe BCE TpeChyBwne, DeOpMnpoBaHHbIe, 10rHyTbe INIIOBpeXDeHHbIe qactn. Je3BVE dIpa Obpe3Kn neckn Ha KpaO 3aUnTHoro 3JeMeHtAmoKeT BpeMra OT BpeMeHn 3aTyPIrTbcr. PeKomeHdyETca nepNoDnueckn 3aTaYNBaTb erO HAnIIbHKOM INI 3aMeHrTb HOBbIM.
OuetaTe KcyTope3 nocne KaKDoRo NCNoJIb3OBaHn.
NCIOJIb3OBAHNEPEKUeI TOLOBKN
PerynpobkA nnHbI pexyuee neckn
Pexyza ronobka no3BONrE onepaTopy BbITHyTb DOnoHnTeJIbHOe KOINueCTBO JeCKN, He BbIKIOUaY dBnIaTeJIb. EcnI neCa n3Hocinacb Bo BpeM NcNoIb3OBAHn, CnErKa npKmnte fNKcatop KaTyuKN K 3EmNe, YTO6bl BbITHyTb DOnoHnTeJIbHyIO JeCKy.
PIMMEAHNE. BbITaRnBaHne JeCKN CTAHOBNTC NO Mepe ee yKOpaHbHnA.
A PEPENPEXEHNHe DEMOHTpyTe Hn3MeHnTe y3eI ne3BnI nI6pe3Kn IeCKn.CnNkOM DnHHa Jncka MoKET CTb npuHnHnpepeBa DBnTaTeN n CepBe3hIX TpaBM.
3aMeHaJIeCKn
PPEyPExEHNKoHa He NcNoB3yTe yCIneHHyMO MetaIOM JecKy, IpOBoNOKy, BepeBky nT.D. Actn 3TNx MaTePnaOB MoryT OTdEnrTaCn ONaCHO pa3NeTaTbCn B CToPOhbl.
HaKMTHe Ha 3aXIMbI cNKcTOpa KaTyuKn N ChIMMtTe erO (Pnc. H1 n H2). Iy uCTaHOBKn HOBoN peKyuJe Ieckn BbINOHTe 8ar 6 B pa3deJe 3AMEHA PEXKYEro 3JIEMEHTA C TPEMr 3YbUAMN HA rOJOBKY TPUMMEPA.
IcnoIb3OBaHne pexyuzero 3nemEnTa c TpeM 3y6zamn
PPEyPExEHE Npe3Kn DnKoN nOpocn KycTapHnKa onyCTnte BpaauOuynCpeKyuN 3JeMeHT C TpeM 3y6aAMn Ha paCTnteNbHOCTb DnA DOCTXKeHn N3MeIbuaOoo 3ΦΦeKta. NcNoIb3yInTe KcyTOpe3 KaK KOCy (nepeMeaIte cnpBa HaneBO) Ha yPOBHe 3eMn. HNKOrDa He noDnMaIte peKyuN 3JeMeHT Bblwe yPOBn TaNN.
PPEyPPEKDEHNE Yem Bblpe pexyuyn 3JeMeHT HAD 3emne, TEm Bblpe pNCK NOnyueHnra TpaMbI OT OTo6paCbIbAembIX BCTOpOhbl Obpe3KOB.
PPEyPExEHEI nppe3Ke MoJIOoI pactteJIbHOCTN ININ DpyInx DpeBeChbIX MaTePnaIOB CO CTe6Ie DNAmETpOM He 60Jee 2 CM NcNoJIb3yIte JEBYIO CTOPOHy peKyuIero 3IeMeHTA INI PpeIoTbPaUeHn IuCKa OTdauH. He NblTaIeTCb Cpe3aTb DpeBeCHbIE MATEPNAbl6OJIbWeTo DNAmETpa, TAK KAK peKyuIN 3IeMeHT MOKET 3aCtPraTb INOTbPOcHTb KcyTOpe3 BnepeID. 3TO MOKET PnIBeCTN K NOBpeXJeHIO peKyuIero 3IeMeHTA ININ KCyTOpe3a, a TAKKE K NOTEpe KOHTpON HA KcyTOpe3OM INTPaBMam.
I PEPENPEXEHENE. HnpaBnBHOe
NcNoIb3OBAHnpeXyUeero 3JIeMeHTa MoKET npNBecTn K ero pactpeckBaHnIO,packaIbIBaHnIO nOBpeXdeHnIO. O6paCbIbAembIe qACTn MOYr HAHeCTn cepBe3HbIe TpaMbI onepatOpY nocToPOHHm IuCaM. YTO6bl CHN3NTb PNCK NOJyEHNr TpaBM, Heo6xOdmo npNHrTb CJeNyUOne MepbI ppeOCTOPOXHOCTN.
I36eraTe KOHTaKaTpeKyuero 3JeMeHToCTBepDbIMNIOCTOPOHHMn IpeDMeTaMn, TaKMn KaK KaMH NINΦparMeHTbI MetaJIa.
HkoIgHa He pexbTe pactnteJIbHOCTc DnAmETpOM cte6n6 bonee 2 cm.
Perjnapno npOBepnTe pekyuIm 3neMeHn HnpEIMET noBpeXJdHn. He npOdoJkaTe pa60Ty cNoBpeXJdHHbIM peKyUIM 3neMeHtOM.
PeyraH0 3atauBaIte pexyui nIeMeHT (Korda OH 3aMetHO 3atynIeTc) N BbINONHJeero 6baHaCnPOBky,ecNI Tpe6yeTc(C NOMOUIKBAINΦNUPOBAHNO CNEuaJIInCTa).
Onda pexkyuero 3nementa
Ipo8BnIe KpaHIOO OCToPoxHOCTb npu MCNoB3OBaHN pexyueo 3IeMeNTA C TpeM 3y6aAMN. OTdaupexuyero 3IeMeNTA -3TO peakun, KOtOpAR MOKET BO3HNKHTb PnKoHTAKTE BpaUaIOUeROcpeXuyero 3IeMeNTA C npeTCTBHeM, KOTOpOE OH He MOKET pa3pe3aTb. B pe3yIbTate 3TOrO KOHTAKTa pexuyuim 3IeMeNT H MaHOBHeHc OCTaHaBUNBaETcra N 3aTeM BHe3aHNO OTCKAnBaet OT ObBeKTa, C KOtOpBM CTOnKHynC. 3Ta peakun MOKET 6bITb DOCTaTOHc CNJbHou, YTObI npINBeCTN K IOTEpe KOHTPOJn HAD yCTpOInCTBOM. OTdaua MOKET BO3HNKHyTB BHe3aHNO, ECIN PExuyuIM 3IeMeNT 3aueHnnc, 3actprn nn 3axanc. OTdaua Han6oJeBepoTHA B TaKnx CnTyauRx, KOrDa o6pa6aTBaEMbIM MaTePnAII NIOXo BVnHO. DIn JERKO IN 6e3onacOH pe3Kn pa6oTae Kcytopezom cnpaba HaneBO.Bcnyae CTOnKHOBHeHc C NOCToPoHHm PpeDMToTakayTexHnKa IO3BOJNT MNHMn3InPOBaTb peakun OTdauH.
OBCJNYKMBAHNE
PPEyIeHNE PpexJe yEM BbIOJIHTB npOBepKy, OuchKy uNl OcbnyKBAHne yCTpoiCTBa, BblKIOUHTe DBIrataN, DoXnTecb, Noka BCE DnBkyuNecr DaTaN IIOHOCTbO OCTaHOBTcA, a 3aTeM n3BnEKeNTe AKKyMnTOp. Hec6bIOHe He daHHbIX INCHpykM MoKET npIBeCTN K cepbe3hIM TpaBMam NnM MaTePnaIbHOMy Uiepe6y.
PNEpyPExEHEI nppeMOHTe nCToNb3yTe TOlbKO IdeHTNCHbIe 3aNachbIe Yactn. NcNoB3OBaHne DpymX 3aNachbIX YacteM MoKET pINBeCTN K Bo3HNHOBEHIO ONaCHO CITyaUIM INI NOBpeXDeHIO yCTPOINCTBa. Yo6bl oBeCneHTb 6e3OAnCHOCTb I NaExKHOCTb yCTPOINCTBa, eO peMOHT DoJIKeH BbINOJHrTb KBaINΦuINpOBaHHbI CNEuaJIInCT.
OBUEE OBCJYKUBAHNE
He nCnoB3yIte pactbOpnteI nIraOuCTKn
IIaCTNKOBbIX qACTe.I BoNbUHNCtBO INaCTNKOBbIX qACTe
YCbCTBNTeJIbHbIK pa3JIuHbIM 6blTOBbIM pactbOpnteJIam
MOrYT 6blTb NOBpeXdeHb.IIra ONUCTKn OT rpa3N,blIN,
MacJa, Cma3Kn I T. II. IcNoJIb3yIte YNuCTyK TkaHb.
OuNCTKA YCTPOINCTBA
IocneKaKdOroNcNoB3OBaHnYdAJaIYeMycOp, HauinuSyIO NOBy INtpaby CpeKyUeero 3JeMeHtA, peKyUe RoNOBKn N UNTkApn NOMOUn MmRkO uETKn.
PIMMEAHNE.Ecnn ne3Bne dna o6pe3Kn neckn 3aTynnIOcb, 3aToCHTE erO y KBaJIINΦuIUPOBaHHOrO CNeuaJIInCTa IIN 3aMeHNTe Ha HOBOE Ne3Bne, ECNI Tpe6yETc.
- Pa6oua TeMnepaTypa DoIHHa HaxOuTbcB B npeJeTax OTo -40do 180°C.
I3BbIeKte pa3bem aKKyMylrTopa n yIIOHTHeIbHbI BnHT. CmXbTe peDyKTop uepe3 MacNo3aJIbHObe OTBePCTne.
A PEPDyPExEHE He BbIOJIHnIe CMa3Ky KycTope3a,ecNI OH pa6OtaET INN K HEmy NODKIOUeH aKKMyJITop.
XPAHEHNE YCTPOICTBA
13BnKeNTeakMyTATOPnycTPOcTBA.
HaedeHbTe npOHyIe nepyAtKN BblNOJHITe TuaTeJIbHyO uOCTKy yCTPOINCTBa.
-Дябezonaachoroхангинадeн te yexon ha pexyun 3nement Ctpemr 3y6amn(Pnc.N).
XpaHnTe yCTpoICTBO CxyOM,XopoOIOPOBETpINBaEMOM,3aKpbITOM ININ BbICOKOM MecTe,HeIOCTyNHom IINI DETeH.He XpaHnTe yCTpoIcTBO PraOM C yIO6peHnAIM,NeHNOM ININ DpyTMM XmUneCKMIM BeIeCTBAMN.
PIMMEAHNE. He nCnoJIb3yIe KcTOpe3 C TyIbIMn IIN NOBpeXdEHHbIMN peKyuIIMN HOxAMN. 3To MOKeT Bbl3BaTb NepERpy3ky i CTaTB npuHHOH HeyIOBNETBOpNTbHbIX
IocJIe KaJzDOrO nCIOJb3OBaHnKyCTope3a OuNuaTe pe3yJbTaTOB pe3KN. peKyuI 3JIeMeENT C NOMOUsBO BIAxHO TKAHN MRAKORo MOUoero cpeCDBa. 3aunTa OKpykaio
He nCnoJIb3yIte aKTHBhIe moIOUne cpeIcTba IaIryOChTKn INaCTNkoBOrO KOpnyCa NnpyKOaTKn. OHmMOrYt 6bITb NobpeXJeHbI ONpeJeHbIM apOMaTIuCeKNM MaClAm, TaKIMN KaK XBOHoe HJIMoHOHoe Macna, a TaKKe pAcTBOpTeJIaMn, HanpImep KePOCSINOM. KpOME TOrO, HAnuNe BnA rMOxKET PnIBeCTN K NopaxKeHN ONeKTPuCeCKM TOKOM. IpoTpTe BnAXHoe MeCTO MArKo CxOH TKAHbIO.
C NOMOJIbMO ManeHbKOJ UTeKn JIN He6oJIbIWOI NBInecOCA OuNCTITE BEHTINRAUHOHHbIE OTBepCTNA Ha 3aDHei CTopoHE KOpNyCa.
CMA3KA PEOYKTOPA
Дя obecneeyHn Hannyuwe npOn3BOnIteJbHocTn yBeJIyEHHa CpOKa CnyX6bl Cma3bIBaIe peDyKTop cNeuaJIbHOcMA3KO (4-5 r npN KaXdOM Cma3bIBaHn) uepe3 kaXdbie 50 YacOB NcNoJIb3OBAHn.
CneuHaBna Cm3Ka DoJXHa COOTBeTCTBOBaTb CNeDyUoM Tpe6oBaHnM.
- CoOTBeTCTBnE cTaHdApTy DIN51818: cTeeHb KOHyChOn neHeTpALN NLGI-1.
2.Cma3kaHa ochoBe 3npa. - OTINHbIe NOKa3aTeHn HN3KOTemNepaTpyHOro 3aTyCKa, IPOTNBO3aDnPHbIe CBOJCTBa, YcToHbBOcTb K MExAHueckOMy pa3pyUHeHIO, INCTpaHIO n OKcInHeHIO.
3aunTaOkpykaoueIcpebl

He Bb6paCbBaIte 3nEeTPOnpB6OpbI BMeCTc HeOTcOpTnPoBAHHbIMN rOpoDckIMN OTXoAMN;IOB3yITeCb CNEuAIBHbIMN NyHKTaMn c6opa BTOpcBpBja.
B COOTBETCTBnC eBponeckm 3aKoHOM 2012/19/EU 3neKtpnueckoe n 3JIeKTPoHHoe o6OpyOBAHHe, KOTOpoe He IIOJNeXHT DaIbHeiWee 3KcNlYatauIm, a TaKKe HEnpNiROHbIe N IcNoJIb3OBaHHbIe 6aTapeKn N aKKymJrTOpbl (CorNaCHO eBponeckomy 3aKohy 2006/66/EC) DOJKNbIb 6bITyTNIN3nPOBaHbI OTDeNbHO.
Pn yTnN3aun 3JneKtpnuecknx
yCTpOInCTBa CBAJIkax B NOd3eMHbIe BObl
MOrTy IPOcoHTbcr OAnchbIe BeUeCTBa,
KOTOpBle 3ATEm NOnaDyT B NIIuEByIO
Cenb IN PnBEdyT K ObSeMy yXuDWeHIO
3DopOBbI n 6JaIorOnluyn.
YCTPAHEHNE HENCINPABHOCTEIN
BEZPIECZENSTWO W MIEJSCU PRACY
POLITYKA GWARANCYJNA EGO
LUGEGE KASUTUSJUHENDIT
NONEPEDXEHHA.ⅡIra rapaHTyBaHH6e3IeKN TaHaJInHOCTi BCIpoBOTn3peMOHTyTa3amHINIOBHeH IPOBOHTN KBaJIphiKOBaHHTexHiHN CneiaJIcT.
CIMBOJI, 10 CTOCYIOTBcB E3NEKIN
MeTa CnMBoJIb,IOB'3aHnx i3 6e3neKOHO,-PnHBepHyTb BaIy yBaIy DO MOKJIINBHX He6e3NEK.CnMBOJIH 6e3NEKt Ta ixHe IIOJcHHe H3acLyROByOTb Ha BaIy IIbHy yBaIy Ta POzymHHa. CnMBOJI NIOpeJKeHb Cami IIO co6i He ycBaHTb 6yIb-IAKOI He6e3NEKn. IHCTpyKlII Ta IIOpeJKeHHaIKI BOHN HAdAOTb,He 3aMIHOITb HAJIeKHHx 3axoDIB IOdo 3aIO6iraHHa ABapim.
A NOPEPEXEHH. IepH HIX KOpNCTyBaTnC HMM IHCTpyMeHTOM, O6OB'3KOBO O3HaHOMTeC3 ycima IHCTpyKzimn 3 6e3neKn, HabeJeHmN B cIbomy NocioHky KOpNCTyBaCu, 30KpeMa 3 ycima CHMBOJAMN NOpeJXeH, TAKHMn Jk «HE6E3NEKA», «NONEPEXEHH» Ta «3ACTEPEXEHH». HeIOTpmaHH HaBeJeHx HHXue Bka3IBOK MOKe CnpuHHInuYpaKeHH eJIeKTPuHHM CTpyMOM, POKeKy Ta/abo cepno3Hi TpaBMn.
3HAUHRA CUMBOJY
CIMBOJNONEPEDXEHHJIOOJE3NEKN: Bka3yeHaHE6E3NEKY,NONEPEDXEHHABO 3ACTEPEXEHH. MoKe BNKOpNCOTOByBaTHcpa3OM 3 IHMMN CHMBOJAMn a6o NIKTORpamm.
BKA3IBKN 3 TEXHIKN B3NEKN
Ha cti CTopIHc 3o6paKeHo Ta OINcHcMbOJIH, NOB'3aHI 3 6e3neKOHO, kI MoKyb BiIO6paKaTNCb Ha cboMy Bnpo6i. NepH HIX HAMarATcN 3i6pArTHa ekCIIyAtyBaTH NOrO, O3HaHOMTeec 3 Ycima IHCTpyKqIIMHa MaHHI Ta dOTpHMyTEcBix.
IHII NONEPEDJXEHN YOIO B63NEKIN
YnkaTe He6e3neuHx cepoBn. He BnKOpNCTOByTe npnAaHbOJrnx a60 MOKpNx CXnIax.
3an06ixHNKm MaOTb 6yTu Ha Micu Ta B po6oHomy CTahi.
TpmaTe pyKa Ta HOrn noaI BiD Micra pi3aHna.
Ioo6 3MeHUnTHn PN3NK OTpMaHHa TpaBMn, HIKON He cnid npaIOBaTu Ha dpA6NHi a6o Ha 6yDb-akii Inwi He6e3neHni Onopi. HIKON He TpMaTe pixyyn npncptpi Bnue BnCOTn Norca.
Perynphno nepebiprte pixynn npncptpi uepe3 kopotki npomixkny cnd yac po60tn, a6o HeraHNO, kKIO NOMITHa 3mHa B cnocobi pi3aHH.
Дяdoягнн haikpauxpe3yltatibakymyIaTOp notpi6no 3apJxKatn npu TemnepaTyPiBd 5^ do 40^. He 36epiraTe noro 3a Mexamnpimiuehna a6o B aBTOMo6ini.
Ipeep Ha6JnxEHHa3yHnHiB MOTOp i pixyu npucptpi.
IonepeBte onepato npo He6e3neky BiKndaHHaJe3a (nme B pazi BNkopncTahHna 3 33y6aMn).
YnopJe3a MoKe MaTn MicE, KOJI N o6eptObe Je3o KOHTaKToYc 3 npEdMeTOM, kIN BIn He 3pIaE HeraiHo.
YnopJe3a MoKe 6yTu DoCTaTHbCnIbHIM i BiUToBxHyTu PpInaI/a6o KopNcTBya B 6yDb- kOMy HApMaKy, I, MOXKnBO, PpN3BeCTNo BTPaTN KOHTPOnIO HaI npInaDom.
Ynop ne3a MoXe cTaTnC8 6e3 nonepeJKeHH, RaIIO JIe3o HAIETnB Ha KOpHi, 3actonopuTbcra a60 3aIpyTaetbcra.
- Ynop ne3a qactiwe BiD6yBaHtbcra B o6nactax, De Baskko no6aHTn MaTepian, 10o 3piaac7bcra.
He npinkpinioye ne3o do npina dy 6e3 haneKhoro BCTaHOBnEHnBAcix Heo6xIDHnx qactnH. BnKOpNCtAHn HEBiIOBIDHNX DeTaeN MeO pns3BeCTn Do BNbOtY Ne3a Ta cepno3Horo NOnkOKeHH OepaTopa Ta/ a60 cToPOHHIX CNOCTepiraivB. BnKnDaIte ne3o, Rkso BOHO 3irHyNoC, DeΦopMyBaNoC, TpiCHyNo, 3JamAlNoC A6o NOro NOuKOJKeHo 6yDb-RAHM iHsIM YHOM. BnKOpNCTOByTe roCTpe ne3o. Tyne ne3o qactiwe 3auiHoeTbcra i BiKnJaAeTbcra (JIuWe B pa3i BnKOpNCtAHnNe3a 3 3 y64mN).
Jezo/nicka,po pyxactbca,MOKe cnpnuHHT nookdoxeHHKONPiPOOBXyE o6ePtaTnCn icna 3ynHKn MoTopa a6o 3BInbHeHH TpRepa. NiTpmyTe HaJeHHN KOHTpObl,DOKN Jezo/nicka nobHicTHo He npnnHHTb o6ePtaTnc.
BukopncToByte Nmse akymyTOpn Ta 3apdHi npctpoi EGO, nepenieHhi Hxue.
| AKUMYJIYTOPHA БATAPEЯ | ЗAPяДний ПИСТPIй |
| BAX1500 CHX5500E |
AkymyTophi iHcTpmyHTn He notpi6ho niklouatn do eNeKtpnuHoi po3etKn; OTke, BOH 3aBXnn Bpo6oyomy CTahi. BybTe B Kypci MoxJINBnx He6e3neK, HabItb KaIO iHcTpmyHT He npauOc. BybTe o6epexHi, BVKOHyOuT TexHicHe O6cnyroByBaHHa YI dOrJIaD.
He MmTe uHaHrom; yHkaTne notpanJHHB ODo B MOTOp Ta eNeKtpnHi 3'cDHaHH.
KuO BuHnKaHOb CHTyaui, KI He po3rJaAOtbc B ucbomy noci6Hnky, npoBnJeTe oBepeXHicTb i po3cydNnBicTb. 3BepHITbCdo cepBichoro ceHTpy dIra kniHcTIB EGO no donomory.
3BEPKITb IIO IHCTPYKLIIO!
CNEUINΦIKALJI
PIMITKA. RaKo He HamoTaN Jicky y Bka3aHOMy Hanpymky, roJbKa TpImepa npaIOBaTmE HnpaBnBHO.
EKCINYATAU
A NONEPEDXEHHA.3HaHHBnO6y He Mae po6ntu BAC He6aJIIM.Pam'raTte, 10 niBceKHyHn HeyBaXHoCTi DOCHT bIe cepno3HOITpaBMn.
A NONEPEIXEHH. 3aBxHn HocItb 3acO6n 3axNCTy opraHIB 30py Ta cIvy. Be3 OKyIaRiB Bu pN3NKyTe TpaBMAMU Oey BiD BKNHyTnx PpeMTeB Ta iHUNMI cepno3HMNI TpaBMAMN.
A NONEPEXEHH. He BnKOpNCTOByTe HiaKi npJIAdYu HacaIKN, He peKOMeHDoBaHi BnPo6HnKoM Uboro npNCTpOIO. BnKOpNCTaHH HepeKOMeHDoBaHO npJIAdYu HacaDOK MoKe np3BecTn Do cepNo3Hnx TpaBM.
YKTPMATN KUOPI3
Iepw hix nikluyatn HanliyHn akymyJrTop do Kuyop3a, HndrHtB HanliuHn akyMylrTop Ta npKpinitb niknaKy Ha cTeHNO do peMeHIB 3riDHO 3 iHCTpykqjMn 3 ekcnnyataui BAX1500 ta AHP1500.
PnKpiniTb KUoPi3 Do NiKaJAdKn, PnUeHnBwn raOk Do KpInuIbHoro OTbOpy (pnc. K). Ha Bany E 8 OTbOpib. BnBepiTb ONtImaJIbHni OTbip nJa 3pyHocTi BnKopNCTaHH.
TpmaTe NICKOBn TpMep O6oma pykamn cnpaBa BiD ce6e . FonOBka TpMepa a6o ne3o Ma6 6ytN npaJIeIbHOIO 3emJI Ha DoCTaTHi BiDCTaHI dIpyiHaHH, onepaTOp He NOBHeH HarnHaTnc.
3BinbHHTN KyUOpi3 MOKHa DbOMa CnOco6amN.
Po3'edhaTe harpydhy Ta noaChy 3acti6kn (pnc. L1) a6o HATNCHTb Ha rayok CTeHOBoi nikKaJKn i BnIMtB Noro 3 KpinHbHOrO OTbOpy Ha BaNy.
NONEPEKHEHNA. KOJIIN BUNHKaE Ha3BnuaHa cnTuayi,po3'EdHnHnHarpydHO Ta NoACHO npJxOK dae 3MOy WBNIKO 3HrTN Kyoip3.
PONEPENKHH. He cnid OndHocHO BnKOpNCTOBByBaTNI OINHApHNI i NOBiiHNI pNeOBoN peMiHb 3HaJIiHMM aKymyIaTOpOM.
YcTaHOBHeHHaKymIaTOpHoi6aTapei (pnc. L2)
3ictaTe no3HaKy ▲ Ha 1eKepi 3 no3HaKoIO ▲ Ha kyuOpisi. BctaTe wTenceB bInctpymEt TaKIM YHOM, 06 3eHen yuiNbHOBaNOBHCTO 3Hk y rHi3di.
BudaneHH
BiEaHnTe HypakymyIaTopa BiKpInnBHoro na3a Ta BHTHtB Wtencelb i3 KUOpisa.
3ANYCK/3YNIHENHH KUYIOPI3A
Noataok
HaTnCHiB KhONky 6IbOKyBaHHa, 106 yCTaHOBHTI B noNoKeHHA «ON» (pnc. M). NpeMictb MaHehbkn BaXilb yTropy, a notim HATnCHiB BaXilb nepeMnKaHa, 106 3anycttN KyuOpis. P3Hn TnCK Ha TpRep np3BOHTb Do 3mHHoi WbNDKoCTi o6ePtaHH pIXyOHO npCtpoIO.
Pnc.L1iM-Db.0nC DeTaeHnKHe:
CIMBOJN 3A 6E30NACHOCT
LcetaHa CnMBONITE 3a 6e3oNACHOCT e da npebNHTA BHNMaHHeTO KbM Bb3MOxHn ONaCHOCTn.CnMBONITE 3a 6e3oNACHOCT n OBeCHENrTa KbMTAX 3acJyKabT BaWTo NOBHeHO BHMaHHe NOCb3HaBaHe.CnMBONITE 3a 6e3oNACHOCT Camn No Ce6e CN He EINMMHpaT KaKBATO n Da e ONaCHOCT. HcTpyKmnte N ppeDyPpeXdEHnra T, KOtO PpeIOCTABRT He ca 3ameCTnteN 3a NODXODaHTe MEPKn 3a PpeDOrBpTaRBAhe Ha NHUdENT.
PPEyPExEHE:YBepTe ce,YeCTe npOeynIOcB3HaNN BCuKN HNCTpyKcN 3a 6e3oNaCHOCT B TOBa PkoBOcTBO Ha OnepatOpA,BKnOHTeHNO BCuKN N3BeCTraBaUc CmBOJN 3a 6e3oNaCHOCT,KATO "ONACHOCT,""PPEyPExEHENE,"N"BHMAHNE" npEn Da n3noJI3BaTe To3n INCTpymENT. Hecna3BaHTo Ha BCuKN INHCTpyKcN IN3bpoEH NOy MOKe Da IOBeDe Do eJeKtpueeCKn WOK, NoXap n/nn cepNo3HO HapaHBAHe.
3HAUHHE HA CUMBOJNTE
CIMBOJ CNHAN3NPAU 3A
BE3OJACHOCT: Ioka3Ba ONACHOCT,
IPEDYIPEXKDEHNE, INB BHUMAHNE. Morat da
6bDat N3NON3BAHIN BvB Bp3Ka C DpyrN CIMBOJ INN
NIKTOrpamn.
HCHTPYKUN 3A BE30NACHOCT
Ta3n CTpaHnca n306pa3raBa n ONNCBA CNMBOJNTe 3a 6e3oNaCHOCT, KOINTO MOKe Da Ce NOBRT NO TO3n IpOdyKT. PiooyTeTe, Ocb3HaTne H CNEBbAte BCNUK INCHpyKuIN No MaunHata npedn npednpmeHa Ha crNo6BaHe nn pa6ota.
BE30NACHOCT B PABOTHATA 3OHA
IopdbpkaTe pa6oTHata 30Ha YnCTa Ndo6pe oCBeteHa.Pa3XBpbPnHnNnTbMnPa6oTHn 30Hn npaxdat HnndeHTn.
He pa6oTe c eIeKtpouHCTpyMeHTN B EKcNIO3NBHa aTMocOepa, KaTo HApnpMep B npCbCTBnETo Ha 3anaIMn TeuHOCTn, ra3 nn npax. EKeKtpuecknrt INHCTpyMeHT Cb3daBa NCKpa, KOrTO MOKe da Bb3IIaMeHH npaxa NN N3napeHnraTa.
ДрьхTe Ha pa3ctoHne Deцata N ctpaHnHTe IInua,doKaTo pa6oTne C eNeKtpuYeCKN HcHcTpymEHT. Pa3ceBaHeTo MoKe da npuHHn 3aY6bHa KOHTpOJ.
JIIMUHA B3O3NACHOCT
BHMaBaIte, rJedaiTe KaKBO npaBIne n m3non3BaIte 3dpaB pa3ym, Korato pa6oTnTe c eJeKTPnueckn INCTpymEHT. He n3non3BaIte eJeKTPnueckn INCTpymEHT, KORAto CTe yMopeHn HNN KORATO CTe NOB BnHnHne Ha HApKOTnU, anKOxOJI NNI JekapCTBa. MOMENT HEBMHaHne NO BpeMe Ha pa6oTaTa C eJeKTPnueckn INCTpymEHT, MOKe Da DOBeDe Do cepNo3HO JNUHO HapaHbAHe.
H3noJI3BaIte IuHn npEpa3Hn cpeCTBa.BnHaH Hocete 3aHTa 3aOHTe. 3aHTHO o6OpyDbaHe KaTo npaxOBmack, He IIb3raUc 6e3oNaCHO OByBKN, TBbpda KACKa Nn 3aUHTa 3a CnyxA n3NoJ3BaHa npi NOxOJaUN yCIOBn Ue HAMAn PnCKA OT IuHn HapaHbAHNA.
IpeDToBpaTe He npEeHamepeHo nycKaHe. YBepeTe ce, Ye KIOuBT E B N3KIOUeHa PO3nUa, IpeDN da CbPKeTe KbM 3axpaHBAHe H/nn 6aTeepn, NOBdraKN nn HOceKn IHCTpyMeHTa. Hocekn INCHPTpymEtA, DOkATO pbcTb BN e Ha cNcBka HIN NOdaBaHETo Ha 3axpaHBAHe HA IHCTpyMeHTN, KOINTCa C BKIOUeH INPeKcbBaue IpeDIOCTabKa 3a NHUdENTN.
■ 3BaTe BceKn perynnpaun KJIOH nIrauehen KIOU, npedn da BkIOuHTe 3axpaHbaHeTo. Tauehen IIN dpyr KJIIOH OCTaBeH 3aKaueH KbM BbPTaNTe Ce Yactn Ha eNeKtPnueckn INHCTpyMeH, MoKe Da DOBede Do JNUHO HapaHBAHe.
He ce npotrae.3ana3e npabnHa cToKa n6aHc no BcKO BpeMe.ToBa no3BONRA no- do6bp KOHTpOIN Bbpxy eJektpnueckn INHCTpymENT B HnpeDnDEHN CNTyaun.
O6neTe ce noxOra. He HocTe OTnycHaTn dpexn nn 6kUyTa. PbXte Kocata, dpexnte npKaBnCte dauey ot DmKeun Ce yactn. OTnycHATn dpexn, 6kUyTa nn Dblra Koca, Morat da 6bDat XBaHATN B DmKeeuTE ce yactn.
Ako ca npedocTaBeHn yctpoNCTBa 3a CBapBaHe Ha npaxoyNoBteI nn CbOpBXeHn 3a Cb6npaHe, yBepTe Ce, Ye Te Ca CbBp3AHn Ca npabuHNO m3no3BaHn. Ynotpe6ata Ha yctpoNCTBa 3a npax MOKe Da HamaPi pNCKOBete Cbbp3AHn C npax.
He no3BOJRABaTe Ha pyTHHHOCCTTa npHDo6nTa ot YecTaTa yNtpe6a Ha HnCTpyMeHTa Da No3BOJn Da cTaHete He6pexHN Da nHrHopnPte pnpHcnnPte 3a 6e3oNaChOcT Ha HnCTpyMeHTa. He6peXHo DeIcTBne MOKe Da npuHnCepNo3HO HapaHraBe 3a qactn OT CEkyHdata.
YIOTPE6A IΓPUNXA 3A ENEKTPUUECKN AHCTPYMEHT
He npecnBaaTe eNektpnueckn HnctpyMeH.
H3noJ3BaaiTe npabunHnaeNektpnueckn
nHcTpymeHT 3a Baata pa6ota. PpaBnHnrt
eNektpnueckn nHcTpymeHT 5e Cbbpns pa6oTaT a
no-dOpe n no-6e3onacHO npi KanauNTa 3a KOITo e
npoeKtnpaH.
He n3non3BaTe eNeKtpnueckna HnCTpymEnT aKO kNIOyBT He ro BKNIOyBa Nn N3KnIOyBa.Bcekn eNEKtpnueckn INCTpymEnT, KOITo He MoKe da 6bJe KOHTPOIpaH OT KIOUa e OnaceH n Tp8Ba da 6bJe nonpaBEN.
-ДрьхTe CBO6OнHЯ eNEKtpueckn HNCTpyMeHT N3BbH DoCTbNa Do Deua N He No3BOJBAuTe Xopa, KOnTo He ca 3aNo3HaTu C eNEKtpueckn HNCTpyMeHT Nn Te3N HNCTpyKcN Da pa6oTAT c Hero. ENEKtpuecknTe HNCTpyMeHT Ca ONaChN B pbUeTe Ha Heo6yHeH nOTpe6nteJI.
I PdPbXka Ha eKtpnueckn HNCTpyMeHTn
aKcecoapn. Pobepete 3a pa3mecTbahe nn
6IOkpane Ha NOBxHn Yactn, CynBaHe Ha yactn,
IN BCKaKBN dpyrN ycNoBn, KOnTO MOrat da NOBnraT
Ha paOtaTa Ha eKtpnueckn INCTpyMeHT. Pnp
NOpeDa pemOHnpaTe INCTpyMeHTa npedn ynotpe6a.
MHO rHcndEHTn ca npuHHeN OT Noo NODbpxaHn
eKTPnueckn INCTpyMeHTn.
-ДрьхтpepeeHTe HNCTpyMeHTn OCTPN NCHTn. IpaBnHNO nOaPbKaHn pekeu NHCTpyMeHTn, C OCTPN pekeu p6oBe e no-MaKo BepoTHo Da ce 3akneTn INo-JIeCHO Ce KOHTPOJnpat.
■ N3noJ3BaIte eNEKtpnueckn HNCTpyMeHT, akcecoapnte, yactnte Ha nHCTpyMeHTa T.H B CbOTBETCTBne C Te3n HNCTpyKcnn, KaTO B3emete npedBnD ycNoBnTa Ha pa60ta N BnDa pa60ta, KOrTo 6bJe N3BbPwBaHa. Ynotpe6ata Ha eNEKtpnueckn HNCTpyMeHT 3a DeiHoCTn Pa3nHn OT PnpdHa3NaHeHnTe MoKe Da DoBeDe Do OnaChn CITyaun.
I DpBxTe pBkoXBaTKnTE n MecTa 3a 3axBauahe cyxH, uCTn H6e3 Macno n rpec. XJb3raBnTe pBkoXBaTKn I MeCTa 3a 3axBaUaHe He N03BOJRAbT 6e3oNaCHO 6opabeH e KOHTpOINpaH e HNCTpyMeHTA pni HeOueKaBaHa cITyaUaJI.
-ДрьхTe Ka6eNTe daneu ot pa6oTHata 30Ha Ha
HHCTpyMeHTa. ПО Врeme Ha pa6oTa Ka6eNTe MoXe
da ca CkPHTn OT NOrIeDa Bn I da 6bDat cPra3aHn
HHUdENTHO OT INHCTpyMeHTa.
YIOTPEBAI IPRIXA3A MHCTPYMEHT C BATEPNA
Ipe3apekdaTe cAmOc 3apAHO yCTPOIcTBO onpeJeHOr OT npOn3BODnteJI. 3apAnHO yCTpOInCTBO, KOeTo e NdoXoJaIO 3a eINH TnI akMyIaTOpHb6aTePN MoKe Da Cb3JaDe pNCK OT noXkap, KORAto Ce I3noJ3Ba C dpyrN akMyIaTOpHb 6aTePN.
■ H3non3BaIte eIeKtpOnHcTpymEnI cMo cbc CneuΦnUHO 6o3NaueHn akMynatOpHn 6aTePnN. Ynotpe6aTa Ha KaKBATO n da e Dpyra 6aTePnM oMe da cb3dApe pncO T hapaHbAHe nn noXap.
Korato akymylaTophnte 6aTeepn He ca b ynotp r n dpbXte Ha pa3ctoHne OT dpyr MeTaHn o6eKn, KaTo KlaMepn, MoHeTn, KIOUOBe, NPOHn, OTBepTKu Hn Dpyr MaJIKN MeTaHn PpeMeTn, KOtO MOrat Da HapBaRc CBbp3BaHe MExdy KIeMnte. CbP3BaHe Ha KbCo Ha KIeMNTe Ha akymylaTophata 6aTeepn MoKe Da npuHHn I3rapHHN uIN Noxap.
■IpyuCNOBnHa 3noyNoTpe6a, TeHocT MoKe Da ce OTeHNOT akyMnyaTopHaTa 6aTePn; npeoTbPaTeK KOtAKT. Ako HnUeHTHO B3NkHe KOtAKT, nIIaKHe Tc BOa. Ako TeHocT Bne3e B KOtAKT C OHTe, DOnbJIHnTeHNO NOTbcTe MeDnIHcKa NOMO. TeHocT OTdeNeHa OT akyMnyaTopHaTa 6aTePnMoKe Ca npei3BnKa Bb3nAJeHne IIn n3rapHn.
He n3noI3BaIte akymyIaTOpHa 6aTepeHn IIN HNCTpymeHT, KOITo ca NOBpeHn IIN MoIcHnIpaHn. NOBpeHnTE IIN MOIcHnIpaHnTE 6bAepn MoKeJa npOraBt HENPeDcKa3yeMo NOBeHne, KoEt Da IOBeDe Do NoKap, EKCIIIO3n IIN PnCK OT HapaHbAhe.
He n3naraTe 6aTePnraTa HnNnHCTpyMeHa Ha OByH HnI npekomepa TempepaTpa. N3naraHe Ha OByH NnI TempepaTpyn Ha1 100^ MoKe da npuHnEcknlo3n.
CneBaanTe BCnKN HNCTpyKcMn 3a 3apeXdaHe n He 3apeXdaTe 6atepnaTa nn HNCTpyMeHTa N3BbH TempepaTyPhnO 6xbat 3adAeH B INCTpyKcInTe. HenpabnHTo 3apeXdaHe nn 3apeXdaHe n3BbH onpeDeIeHn TEMpepaTpeH 0xbat MoKe da NobpeDn 6atepnaTn Da nobuyn pncKa ot noxap.
OBCJNYKBAHE
O6cIyXBaIe BaIaIe IeKTpIueCKn HNCTpyMeHTpe3 KBaIIHΦIuIpaH TexHKn, KaTO n3NoI3BaTe camo IeHTnHn pe3epBn Yactn. Toba ue OcnIpyn noIbIpKaHeTo Ha 6e3onacHOCTTa Ha eJeKtpIueCKn IHCTpyMeHT.
Hnkora He nonpaBnTe NOBpeHn akymyIaTOPn6aTePnn.PeMOHTbT Ha akymyIaTOPn 6aTePnn Tp6Ba Da 6bDe N3BbPWBah OT npOn3BoNTeN rNt OToPn3npan cepBn3.
A INPDEyINPEXKJEHNE: IpOoTeTe BCnUKN INpeDyInpexKdEHHa 3a 6e3OnacHocT, INcTpkyCmN, INIOCTpaunu n Cneunfkaunn INpeOCTaBeHN C TO3n EJIeKtpueckn INHCTpyMeHT. Hecna3BaHeTO Ha BCnIKN INHCTpyKUIM N36poEHn DOny MOKe Da IOBede Do TOKOB yIap, NOxap N/nn Cepno3HO HapaHbAHe. 3ana3eTE BCNUKN INpeDyInpexKdEHHa INHCTpyKUIM 3a 6bDeUa CNpaBka.
3ana3eTe BCNUKn ppeynpexKeHn HnHctpyKuN 3a6bdeesa cnpaBka.
O6yEHNE
IpoyeBHNMaTeJHNO HNCTpyKunTe.3aNo3HaNte ce cynpabHeHTo INpabInHaTa yNtpe6a Ha MaUnHata.
Hikora He no3BONBAIte Ha xopa nn Deca, KOTo He ca 3ano3HaTn C Te3n HNCTpyKcnn Da n3No13BaT ypea. MecTHnte pa3npoep6m MORa Da orpaHuaT Bb3pactTa Ha onepaTopa.
He 3a6paBaiTe, ye onepaTopbT uIN NOTpe6uTeIaT Hocn OTROBOPHOCT 3a 3IOIOyKn uIN PNCKOBe NO OTHOWeHne Ha dpyuX oopa uIN TExHOTo IMUeCTBO.
IIOIFTOTOBKA
Hikora He pa6oTeTe C MaunHaTa, DOKaTo B 6n3OCT mma xopa, oc6eHo Deca nn DomauHN JIO6mU.
Hocete 3aunita 3a ouHTe n noDcneHH o6yBkn no BcraKo BpeMe dokato pa6OTnte C MaunHaTa.
Pa3ToHHeTo MExkDy MaWuHaTaN OKoJIHnTe Xopa Tp6Ba Da 6bDe MNHMym 15M.
He n3no3BaTe HnKora MaunHaTa, KOraTO onepaTopbTe yMOpEn, 6oJen nn PoD BnnaHne Ha ankoXoI nn dpyuynyNoBauu cpeCTBa.
PABOTA
H3no13BaIteMaunHaTa eMHCTBeHO Ha DHeBHa CBETnHa HIN pRn Do6pa NkcyCTBeHa CBETnHa.
Hikora He pa6oTeTe C MaunHaTc NOBpeHn npa3nteN nE ekpann 6e3 noCTabeHn npa3nteN nE ekpann.
BknHoyeteMOTopa cmo, koraTo pLeTe n KpaKaTa ca daJeY OpeKeUHTe CpeCTBa.
BnHaIpa3eINHbAteMaIHHATAOT eNEKtpueckoto 3axpaHbHe (npMepHO MaxHete akMyNaTopHaTa 6aTepeJ.
KOraToOCTaBTeMaunHaTa6e3HaD3Op;
IpeINIOuHCTBaHeHa3aDpBcTBAHe;
npei npobepka, nouictbahe npapota no MaunHata.
CneyprHe Ha yKd npedMeT;
KORATO MaunHata 3aNoUHe Da Bn6pnpa HeECTECTBEHO.
B3emete npedn3Hm Mepkn npotnb KOHTy3n no KpaKaTa npbTeOT cpeCTBaTa 3a p3aHe.
Bunhar6bdeTe CnpyH,Ye BeHTnlaNoHHte OTbOpN ca 3ana3eHN YIcTN OT OINaIbI.
IIOIDPbJxKAnCbXPAHEHNE
Pa3eHHeMaHnHaTaOT eEKeTpueckOTo 3axpaHbAHe (npMepHO n3BaTe 6aTepyra), npEn Da n3Bbpnte pa6oTa no nDpBka nn NoCTBaHe.
H3noJ3BaIe eINHCTBHeNo npenOpbauHaN O Tnpo3BODInTeJepe3epBn Yactn N akcecoapn.
PpOBepBaTe NnDnBpKaTMe MaunHaTa peoBHO. PEmOHtnpaTe MaunHaTa eINHCTBeHO B OToPi3uPAH cepBu3.
Korato He e b ynoTpe6a,cbxpaHete MaunHaTa N3BbH IOCTbHa Ha neua.
Dpyn PEPdynpeKDEHNA B3ONACHOCT
1368BaTe onachn cpeH-He n3no3BaTe en. ypeHn BbB BnaXHN mOKpn MeCTa.
IpbXTe npedna3nteNTe NO MecTa Tb pa60THO CbCToHHe.
DpBxTe pBcTe IN KpaKaTa daneu OT 30HaTa Ha pR3aHe.
3a da haamalnte pncka ot HapaHbaHe, HNKORA He pa6oTe Ha CTb16a HnHa HnKaKBa Dpyra Hecnrypha ynpa. HNKORA He dpBkTe pexeun 6nok Ha nHBOTO Ha TaJIrTa.
PpOBepeBaTe peKeuHa qeCTn KpaTkn INTEpBaH No BpeMe Ha pa60Ta Hn He3a6abHo, aKO HMa 3a6eJekMa npomHa B NOBeHeHHeTo npn pR3aHe.
3a HAI-DO6Pn pe3yNTaTH, BawaTa 6atepna Tp86Ba da ce 3apeXda Ha MeCTa, KbTeTo Tempepatypata e noBncoKa ot 5^ nno-Hncka ot 40^. He cxbpaHraBte HA OTKPINTO INN B PpeBO3HN CpeCDtBA.
Ako 6bTe np6nHexe OT OBeK, cnpTe MOTopa npeXeun6nok.
IpeynpeTe onepatopa 3a onachocT OT TnackaHe Ha HOXa (H3no13BaIte camo C H0X c 3 3b6a).
TJaackaHe Ha HOxa MoKe Da ce NOnyuH, KOrato BbPTAaHT Ce HOx, BNe3e B KOHTaKT C PpeMTo, KOITo He MOKe Da OTpeKe He3a6abHo.
TnackaHTo Ha HOka MoKe Da 6bDe DoCTaTBHO CnH03a Da PmHHu YpeBb T N/NN OepaTOpB Ta 6bDaTINXBbPHeHn HcBcKa NocKa N BepoTHO Da Ce 3ary6N KOHTPOI BbPxYpeDa.
TnackaHTo Ha HOka MoKe Da ce Cnyu 6e3 npEynpeKdHe, aKO HOXbTe Ce 6JbcHe, 3aceHne nnCe 3akNeu.
TJaCKaHETo HA HOXA e NO BepoTHO da CE cnYHM B30Ha, KbTeO e TpydHO da BvDnTE przahm MaTePnAn.
He 3aKaayte HoX Ha ype, 6e3 npabnH OMTnpaHe Ha BCnuK Heo6xOIMM qactn. Hecna3BaHeto 3a yNtpe6a Ha npabunH qactn, MoKe da npuHH N3nTHe Ha HOxa n cepno3HO da HapaHn OepaTopa nnNk OKoJIHO cToaIte. N3XBpIeTe ot yNtpe6a HOKOBe, KOHTO ca ORbHaTn, DeOpopMnPaHH, HanykaHH, CUYNEH nnIOBpeHn NO dpyr Hauchn. N3NoJ3BaIte OCTbp HOX. EDNH Tbn HOX e No-CKNOHE KbM 3acraHe NN Tnackahe (N3NoJ3BaIte cAm HOX c 3 3b6a).
■ DnKeCne no HnepuH HOx/Kopda, MoKe da npuHH HapaHbAHe, Tb KaTo npoDbJXkBa Da ce BbPTN Cnei KaTO MOTOpBt e cnpH NIN CNyCbKbT e OcBO6OeH. YnpaXHBAIte npaBnEH KOHTpO, DOkato HOXbT/ KOpDATA HnBJIHO cPpe Da ce BbPTN.
H3noI3BaIte eINHCTBeHO aKymnATopHn 6aTePN EGO n 3apAHN yCtPOJcTBA n3bpoEHn No-dony:
CMA3BAHE HA KOPNYCA HA PEDYKTOPA
3a Hau-dobpa pa6ota n no-dbIbIg KINBOT cma3BaIte Kopnyca Ha peyKTopa cbc cneuaHa rpec (no 4-5 rpaMa BCEk nT) cJeB BCEk 50 yaca pa6ota.
CneuaHaHaTa Tpec Tp6Ba Da otroBapr Ha CneHnTe H3NCKBaHn.
1.ДаotroваряHa ctaHapTa DIN51818:NLGI-1 cteneh Ha npOHKBaHe Ha KOHyca.
2. Tpec Ha ectepha ochoba.
3. OTINHIO CTAPTIPaHE npn HnCKN Tempeatpy, EP, MEXAHUHO Cp83BaHe, yCTOuYBOcT Ha abpa3nI n CTABNJHOCT Ha OKCnDIPAhe.
4. Pa6oTHaTAtemnepaTpya Tp8Ba Da 6bJe-40\~180°C.
OTcTpaHete uencena Ha 6aTepeRnTa n yIbTHBaunBnHT. CmaKeTe Kopnyca Ha peDyKTopa Ipe3 OTbopa 3a Cma3Bahe.
I PEPDyPEXKDEHNE: He cMa3BaTe,doKaTo xpactope3bTe Bce Oue CBpb3aH C 6aTepeYra nn pa60Tu.
CbXPAHEHNE HA MAUNHATA
3BaTe aKymyNaTopHaTa 6aTepeN OTHcTpMeHtA.
Hocete pBkabu3a TeKka ynoTpe6a 3a da n3nctnte LARIOCTHOHCTpymeHTa.
MoHTnpaTKe Kanaka Ha HOXa KbM HOXa C 3 3b6a 3a 6e3oNaCHO cbxpanHeHne (fN).
Cbxpahete ypea B cyx MoCTO c do6pa BeHTnaua, 3aknoye Hnn CbxpahraBaH Ha BnCOKo N3BbH DoCTbHa Dae. He CbxpahraBaTe MaunHata B 6JIn3OCT nn Bbpxy Top, 6EH3HN INI dpyTN XmNkann.
BENEXKA: He pa6oTe c Baawata HoXnua 3a nIeT, KOraTo pexeUnte HoxOBe ca 3aTbNeHn IIn NIOBpeDeHn. Toba MoKe da npuHn npetOBapBaHe n Ue DoBeDe do He3aDOBOJNTeHN pe3yTTaTN npn pr3aHe.
Ona3BaHe Ha OKoJIHaTa CpeDa
He n3XbPnIe eJekTpuecko
obopydBaHe c 60Knyk OT
DOMaKNHCTBOTO, n3NoI3BaIte OTDeHN
CMETOCbBnPaUcCBopBXKeHn.
CbrrnacHO eBponeckna 3aKoH 2012/19/EC, eJektpnuecko n eJektponHO o6OpyDbaHe, KOeTO NOBEcHe He MoKe Da ce N3noN3Ba u CbrrnacHO eBponeckoto 3aKOHOdaTeNCTBO 2006/66/EO, dpekTHnTE nn N3noN3BaHnTe akyMylatopHn 6aTePn/ 6aTePn TpR6Ba Da ce Cb6npat OTdEInHO.
Ako ce n3xBpIaT eJekTpueckn ypeiB CMeTuHa a nn 6yHua, onaChn BeeuctBa MoarTa n3TeKaT B noDNoYBeHnte BoN I da nOpaHbT B xpaHHTenHaTa Bepira, kato yBpeIaT BaWTo 3dpaBe n 6laRoCbctoHne.
OTCTPAHRAHE HA HEU3PABHOCTN
| ПОНБЛЕМ | ПРИЧИHA RESEHINE | |
| Отka3 посторда. | ■ Акymлаторна 6атерия He e зakpenehа Кьм xpacstopeза ини hyma eilektrupechkin Контakt медух相对较еа иbaterpЯта. ■ Акymлаторна 6атерия e n3toшени. ■ Бутоыт 3a оtkлочаhe He e hahtschat Ha нозиця "ON" (ВКЛ) поду ratnckаhe Ha лостовete 3a повклочаhe. | ■ Изва对接и и поставете OTНОВ akymлаторна 6атерия кьм х相对较еа ■ Зараздente akymлаторна 6атерия c пооченото заю усточьо. ■ Празду n3рлочанe Ha hoxицата, notв相对较е, ye bутоыт 3a Зakлочанe e OTКлочen. |
| Спра да работи. | ■ Акymлаторна 6атерия иних相对较е; са Тьрде ropeши. ■ Xpactopeзыт e петоварен. ■ Акymлаторна 6атерия e prazdenihena инстру金融市场. ■ Акymлаторна 6атерия e n3toшени. | ■ Позв对接е Ha akymлаторна 6атерия иних相关信息 на ce oxлади, дokато temпepатура stане hopмална. ■ Машината ще сьзстанови, korato habоваранeto e OTстани. 3a несячы? paбota hamалеге habоваранeto Ha машинatura. ■ Могтураійе OTНОВ akymлаторна 6атерия. ■ Зараздente akymлаторна 6атерия c пооченото заю усточьо. |
| Празалени визрацinnii иниш汞 | ■ Суха predecessorну КУТЯ ■ Дебаланс Ha pexeша-ta korда. ■ Ножьт c 3 зьба e оьнат ини ров federen | ■ OTстрав对接е ултынвшия ВИNTи Добаветe смаочно масло. ■ Лес чьг对接е bутона 3a OTпuckа: Ha korда на земота, дokато paбOTITE c TrIMepera. ■ Празав对接е НВ НЖ. |
| Рexeшata korда н ложда визда. ocвобODена. | ■ Корда в Тримерна范围内а e сьрши. ■ Pexeшata korда He e inhstamiparana правлino. | ■ Могтураійе Нова рexeша korда в х相对较еа. ■ OTстрав对接е рexeшata korда и moHTpraiTe OTНОВ. |
TAPAHUN
TAPAHUNOHNAIOJNTNKA EGO
Mona nocete te ye6caT a egopowerplus.com 3a nbHnTe yCNoBna no rapaHcnoHHaTa noJNTka Ha EGO.
PROCTAJTE UPUTE U CJELOSTI!

PROCTAJTE KORISNICKI PRIRUCNIK
UPOZORENJE! Radi osiguranja sigurnosti i pouzdanosti sve popravke i zamjene treba obavljati kvalificirani servisni tehnicar.
SIGURNOSNI SIMBOLI
Syrha sigurnosnih symbola je skretanje pozornosti na moguce opasnosti. Sigurnosni symboli i njihova objasnjenja zahtijevaju vašu potpunu pozornost i razumijevaanse. Sami symboli upozorenja ne isključuju opasnost. Upute i upozorenja koja pruzaju nisu zamjena za propisne mjere za prevenciju nasreca.
UPOZORENJE! Priej koriistenja ovog alata povrinite se da sve upute u ovom korisnickom prirucniku,uklučujuci sve sigurnosne simbole kao sto su "OPASNOST", "UPOZORENJE" I "OPREZ" procitate s razumijevanjem. Zanemarivanje svih uputa navedenih u nastavku moze rezultirati strujnim udarom, požarom i/ili teškim tjelesnim ozljedama.
ZNAÇENJE SIMBOLA
SIGURNOSNI SIMBOL: ukazu je na OPASNOST, UPOZORENJE ILI OPREZ. Moze se koristiti u kombinaciji s drugim simbolima ili piktogramima.
SIGURNOSNE NAPOMENE
Na ovoj stranici slikovno su prikazani i objasnjeni sigurnosni symboli koji se mogu pojaviti na ovom proizvodu. Pije pokušaja sastavljanja i rukovanja s razumijevanjem procitajte sve upute na stroju i pridržavajte ih se.
| Simbol upozorenja | Oznacava potencijalnu opasnost od osobnih ozljeda. | |
| Pročitajte korisnički priručnik. | Radi smanjenja opasnosti od ozljeda, prije korištenja ovog proizvoda korisnik treba s razumijevanjem pročitati ovaj korisnički priručnik. | |
| Nosite zašitu za oči. | Kada rukujete ovim proizvodom, uvijek nosite zatvorene zašitne naoçale ili zašitne naoçale s bočnim štitimica i štitnik za cijelo lice. | |
| Nosite zašitu za sluh. | Radi zašite sluha uvijek nosite zvučne barijere (čepovi za uši ili štitnici za uši). | |
| Nosite zašitu za glavu. | Radi zašite glave nosite odobrenu sigurnosnu kacigu. | |
| Nosite zašitne rukavice. | Kada rukujete nožem ili štitnikom noža zašitite ruke rukavicama. Neklizajuće rukavice za teške radne uvjete poboljišavaju zahvat i štite ruke. | |
| Nosite sigurnosnu obuću. | Kada koristite ovu opremu nosite neklizajuću sigurnosnu obuću. | |
| Čuvajte se povratnog udara noža. | Upozorite rukovatelja na opasnost od povratnog udara noža. | |
| Udaljite i zadržite promatrače podalje | Odbačeni predmeti mogu oskočiti i rezultirati tjelesnim ozljedama ili materijalnom štomet. Pobrinite se da druge osobe i kućni ljubimci ostanu podalje od obrezivača grmlja kada je u uporabi. | |
| Promatrače držite na udaljenosti. | Pobrinite se da druge osobe i kućni ljubimci ostanu majmanje 15 m udaljeni od šišača trave s reznom niti kada je u uporabi. | |
| Ne koristite okrugle noževe. | Ne postavlajte okrugle rezne noževe. | |
| Ne izlagati kiši | Proizvod ne koristite na kiši ili ne ostavlajte ga na otvorenom kada pada kiša. | |
| CE | CE | Ovaj proizvod je u skladu s važćim smjernicama EZ-a. |
| WEEE | Elektrčni opad ne smije se odlagati s kućnim opadom. Odnesite do ovlaštenog centra za recikliranje. | |
| XX | Buka | Zajamčena razina zvučne snage: Emisija buke u okruženju u skladu je s Direktivom Europske unije. |
| V Volt Napon | ||
| - | Istosmjerna struja | Vrsta ili karakteristike struje |
| n0 | Brzina bez opterećenja | Broj okretaja u praznom hodu |
| min'1 U minuti Okretaji u minuti | ||
OPCA UPOZORENJA O SIGURNOSTI ELEKTRICNIH ALATA
A UPOZORENJE: Procitajte sva upozorenja, upute, ilustracije u vezi sigurnosti i tehnicke podatke isporučene s ovm elektricnim alatom. Zanemarivanje svih uputa navedenih u nastavku moze rezultirati strujnim udarom, požarom i/ili teškim ozljedama.
Sva upozorenja i upute spremite za buduce potrebe.
Pojam „elektrichi alat“ se u upozorenjima odnosi na sav alat s mreznim napajanjem (s priključnim kabelom) ili s baterijskim napajanjem (bez priključnog kabela).
SIGURNOST RADNOG PODRUCJA
Obecneythe nctoty nOCBeuHoctb pa6oeryo Mecta.3arpoMoxDeHHbIe nPiXO OCBeuHbIe MeCTa Cnykat npnuHOn HeCuaCThix CnyuaEB.
He nCnoJIb3yIte 3JKeKtpOnHCTpyMeHTbl BO B3pbIBOONaChbIX MeCTax, HApPIMep B6IINrROPouNX KINDKoCTeI, Ra3OB INII INII. 3JKeKtpOnHCTpyMeHTbl REHePnpUOT NCKpbl, KOToPbIE MOryT BOCnJaMeHTbl IIInN INcapaHnIa.
He no3BOJIte DeTAM N NOCTOPOHHIM HAXOINbCBA6NI3n pa6oTaIOUeO 3NEKTPoVHCTpyMeHTA.OTBNeKaIOUne PaAKTopBI MOry T PnVBecTN K Notepe KOHTPOJIa.
OSOBNA SIGURNOST
Budite oprezni i koncentrirajte se na posao koji obavljate i ponašajte se razumno pri korištenju elektrčnog alata. Nemojtve raditi s elektrčnim alatom ako ste umorni ili pod utjecajem droge, alkohola ili lijekova. Trenutak nepažnje pri radu s elektrčnim alatom moze dovesti do ozbilnej ozljede.
- Koristite osobnu zašitnu opremu. Nosite zašitu za oci. Osobna zašitna oprema kao što je maska protiv praseine, zašitne cipele s potplatama protiv kizanja, zašitna kaciga ili štinici za sluh, koja se koristi za odgovarajuca stanja, umanjit ce opasnost od ozljede.
Sprijecite nehoticno uključivanje alata. Prije nego alat povežete na izvor napajanja i/ili dio sa baterijom, podižete ili nosite alat provjerite nalazi li se prekidač u položaju "isključeno". Nosenje alata s prstom na sklopci ili priključivanje alata na napajanje s uključenom sklopkom pogoduje nezgodama.
- Skinite s alata sve ključeve za podesavanje ili pritezanje prije uključivanja njegov napajanja. Vilicasti ključ ili ključ za stezanje glave koji su ostali na rotirajucem dijelu elektrïcnog alata mogu izazvati ozljede.
Nemoje se pretjerano naginjati. U svakom trenutkuKORISTENJE I NJEGA BATERIJSKOG ALATA
stojte stabilno na nogama. Na taj nacin cete zdrzati bolju kontrolu nad alatom u nepredvidenim situacijama.
Obucite se prikladno. Ne nosite široku odjecu ili nakit. Kosu, odjecu i rukavice držite dalje odPokretnih dijelova. Pokretni dinjelovi mogu zahvatiti siroku odjecu, nakit ili dugu kosu.
Ako postoj euredaji za povezivanje s usisivačima i skupljacima prasine, provjerite jesu li dobro spojeni i koriste li se isprawno. Uporaba uredaja za prasinu smanjuje opasnost koja nastaje nakupljanjem prasine.
Zbog sigurnosti koju ste stekli zbog ucestale upotrebe uredaja nemojte biti opusteni i zanemariti sigurnosna načela rukovanja s alatom. Neoprezna radnja moze dovesti do teske ozljede u djelicu sekunde.
KORISTENJE I BRIGA O ELEKTRICNOM ALATU
Nemojte preopterecivati elektrici alat. Koristite alat koji odgovara poslu koji obavljate. S prikladnim elektrici im alatom cete posao obaviti bolje i sigurnije i predvidenom brzinom.
Nemojte koristiti alat akogasklopkom ne mozete uklujcitili isklujcitii.Elektrcniat alat koji se ne moze uklujcitili isklujcitisklopkom opasan je i treba ga popraviti.
Elektricni alat koji ne koristite spremite izvan dohvata djece i nemojte dozvoliti da njime rade osobe koje nisu upoznate s elektricnim alatom ili s ovm uputama za rad s elektricnim alatom. Elektricni alati su opasni u rukama neizvjezbanih osoba.
- Održavajte elektricni alat i pribor. Provjerite daPokretni dizelovi alata nisu necentrirani ili zaglavljeni,da nema polomljenih dizelova i drugih stanja mogu utjecati na rad elektricnog alata.Ako ima ostecenja, svakako ih prije koristenja otklonite.Mnoge nezgode su nastale upravo zbog slabog održavanja elektricnog alata.
- Rezne alate održavajte ostrima i cistima. Prvilno održavani rezni alati s ostrim reznim bridovima manje su skloni zaglavljivanju i njima se lakse upravlja.
Koristite elektricne alate, dodatke i nastavke u skladu s ovm uputama, uzimajuci u obzir radne uvjeti vrstu rada koji ce te obavljati. Upotreba elektricnog alata za radove za koje on nije previden moze dovesti do opasnih stanja.
Neka vam ruke i povrsine rukohvata budu suhe, ciste i bez ulja i masti. Skliske rucke i povrsine za hvatanje ne omogucuju sigurno rukovanje i upravljanje alatom u neocekivanim situacijama. - Sklonite kabele iz radnog prostora alata. Tijekom rada kabeli mogu biti skriveni od pogleda i moze ih se slucajno ostetiti alatom.
Punjenje obavljaje samo s punjacem kojeg je naveo proizvodač. Punjač koji je prikladan za jeder tip baterijskog modula, moze stvoriti rizik od požara ako se koristi's drugim baterijskim modulom.
Elektricni alat koristite samo tocno propisanim baterijskim modulima. Koristenje drugih kompleta baterija moze stvoriti rizik od ozljeda i pozara.
Kada baterija nije u uporabi, drzite je podalje od metalnih predmeta, kao sto su spajalice, kovanice, kljucevi, cavli, vijci ili bilo koji drugi metalni predmeti koji mogu uspostaviti vezu s priključkom. Kratko spajanje baterijskh kontakata moze prouzročiti opekline ili požar.
U slučaju pogresne uporabe, baterija moze izbaciti tekuciñu; izbjugavajte kontakt. Ako slučajno dode do doticaja, mjesta doticaja isperite vodom. Ako tekuciñna dode u doticaj s ocima, dodatno potražite pomoc liječnika. Tekuciña koju izbaci baterija moze prouzročiti nadrazaj koze ili opekline.
Nemojte rabiti ako je pakiranje osteceno ili otvoreno Ostecene ili izmijenjene baterije mogu se nepredvideno ponašati, sto moze dovesti do požara, eksplozije i posljedičnih ozljeda.
Baterijsk modul nemojte izlagati vatri i prekomjernim temperaturama. Izlaganje utjecaju vatre i temperature iznad 100^ moze dovesti do eksplozije.
Slijedite sve upute za punjenje i nemoje puniti baterijski modul ili alat izvan raspona temperature navenedenog u uputama. Nepravilno punjenje ili punjenje na temperaturi izvan zadanog raspona moze dovesti do ostecenja baterije i povecavanja opasnosti od nastanka pozara.
SERVISIRANJE
Servisiranje strojnog alata prepustite kvalificiranom osoblju za popravak koje koristi samo identiene zamjenske dijelove. Time ce se osigurat odrozavanje sigurnosti strojnog alata.
Nemojte popravljati ostecene baterijske module. Popravak baterijskog modula smije izvrsti samo proizvodač ili ovlasteni serviser.
UPOZORENJE: Procitajte sva upozorenja, upute, ilustracije u vezi sigurnosti i tehnicke podatke isporucene s ovm elektricnim alatom. Zanemarivanje svih uputa navedenih u nastavku moze rezultirati strujnim udarom, pozarom i/ili teskim ozljedama. Sva upozorenja i upute spremite za buduce potrebe.
Sva upozorenja i upute spremite za buduce potrebe.
OBUKA
- Pozorno procitajte uppute. Upoznajte se's upravljačkim elementima i propisnom uporabom stroja.
- Osobama koje se nisu upoznale s ovm uputama i djeci nemojte dozvoliti upotrebu alata. Lokalni propisi mogu ogranicavati starosnu dob rukovatelja.
Imajte na umu da je rukovatelj ili korisnik odgovoran za nesrece ili opasnosti za druge osobe ili njihovu imovinu.
PRIPREMA
OSTALA SIGURNOSNA UPOZORENJA
Izbjegavajte opasna okruzenja - ne upotrebljavajte uredaje na vlaznom ili mokrom nagibu.
SACUVAJTE OVE UPUTE!
TEHNICKI PODACI
| Rezni priključak Glava šiša | Metalni nož s 3 zuba | ||
| Napon | 56V = 56V = 56V = 56V = 56V = 56V = 56V = 56V = 56V = 56V = 56V = 56V = 56V = 56V = 56V = 56V = 56V = 56V = 56V = 56V = 56V = | ||
| Brzina bez opterećenja | 4000-5800 /min | 4000-5800 /min | |
| Preporučena radna temperatura: | 0 °C - 40 °C | ||
| Preporučena temperatura skladištenja: | -20 °C - 70 °C | ||
| Tip rezneŽinke 2,4mm / | |||
| Rezni nož / ABB1203 | |||
| Širina rezanja 38cm 30cm | |||
| Masa (bez kompleta baterija) | 6,8kg 6,46kg | ||
| Izmjerena razina zvučne snage LwA | 94,2dB(A) K=1,8dB(A) | 96,3dB(A) K=2,1dB(A) | |
| Razina zvučnog tlaka kod uha rukovateljla LPA | 81,9dB(A) K=2,5dB(A) | 83,4dB(A) K=4,1dB(A) | |
| Zajamčena razina zvučne snage LwA(u skladu s 2000/14/EZ) | 96dB(A) 98dB(A) | (A) | |
| Vibracija ah | Lijeva drška | 1,9m/s2K=1,5m/s2 | 1,9m/s2K=1,5m/s2 |
| Desna drška | 1,5m/s2K=1,5m/s2 | 1,3m/s2K=1,5m/s2 | |
Bjol bsagolgogbgs 8000000000000000000000000000000
A aagbocg: gogobomgs: b0300 dbsdsolss
60s agsdgo6moo gosb5b0b 6030
Babob us36foo u68a0mmbo5u.66
B0300 85b0no, gnosms 85usdmo
Qds 30ngsugmns. amnag
O3cmob os mcbob/udb0 qsd330
Lsagsgjgno. B0300 Usagdm 66dgmo
aagaaagaaagaaagaaagaaagaaagaaagaaagaaagaaagaaagaaagaaagaaagaaagaaagaaagaaagaaagaaagaaagaaagaaagaaagaaagaaagaaagaaagaaagaaagaaagaaagaaagaaagaaagaaagaaagaaagaaagaaagaaagaaagaaagaaagaaagaaagaaagaaagaaagaaagaaa
y03mo 8s0mg60ob 0o5 agsdmdj0
00b0562gmo/80300000 bfoomg0b
s6gmoas. agdmdgmo lssm00b ms330,
3-38ocmbosbo osbs, osds30 23560,
doo cdoos os 3cmbo3c0ob 0o3ob
usbgmo, g03cmo 6g0bdogmo 5f0mo,
mgoog 8896mmo, 8oy6mmo,
duo 8o3cmo 0gmds sb 0o6bos6gmo
bb3s336q. o4o3 3365b0 qosdsgbo
3oogluos5 dogosng dgo1 usfmo
cos5 agsdmoos gokmgbqgl qmms
85ds3cmdo. g93d6qogymos
doo asmgus 3hmonmgo jmodol
lsadsgboo s5 sbso 0s6b0 qosmd6yjds.
DyBgluUw3ggo.
d3eep 1000
g000000000000000000000000000000000000
Looa dnu logodu yocpoyo oohol
luo08oos3s30 sdmg3u amabdsngcui
lsagssmgsb gbsqomb bsnoob dyol
loogdoadomol asyghnogoo.6mojss
dyo 0300gds qyoggs, qdsgdo
dyol boagdoa aamg3gds agsdmoos
luo08oos3s30 dof56g6doo qsohydoo
bgushymmu lsmagmabolsu.
g6o360: gob 8a0a3g8s y36m
86000008, o8 dobo log6d9 m35b0
dsos5 osan3008s.
A yogohoog: oogobogos: 6n dmbbs
a03mmdoyol bsfoqno 050
3mblgdo. bsfoqno doyol qoofoaand
ssmofo333u doomol ososbmyos,6sds
agodmoa doosyfoo bogomnyo bosfo.
dol: 8oogovol 3oogovol
A aogmbocgbs: 65bmoqgl aodmoqgbo
a300no, b3s agosmol bs600sfo
6056o, m3o qs lb3. j6bo agusdms
8yogcuosdabsblsbogsoom
aamg6bcoo bggmo
Qssgoo 301ob Qosagogogog
8888 g oos3ggb Qs dmbgboo 301ob
Qs86o (b5b.H1 qs H2).doogoo
3-8ocoofoqolu yogno hao,3-8ogosboso
OOG" ms300 " obgndonu ag--6-g bsgbnybl,
6000 ssd5gjmo sbsoo lsoooo dy
8gJol bs3696g.
3-3
2006006006006006006006006006006006006006006006006006006006006006006006006006006006006006006006006006006 158
3-8
6
6
6
6
6
6
6
6
6
6
6
6
6
6
6
6
6
6
6
6
6
6
6
6
6
6
A aagbomgaa: aangmo 5foomol
aegn eanmoo o6oogdo 306scoo
aagol agaaagcogmo 5foomgdo
83960bg 85mmol 400830.
A yobogos: sbwsosdmyo
a6b60s b6b6b6b6b6b6b6b6b6b6b6b6b6b6b6b6b6b6b6b6b6b6b6b6b6b6b6b6b6b6b6b6b6b6b6b6b6b6b6b6b6b6b6b6b6b6b6b6b6b6b6
A ygfoobogos: gboomgds: o5b0sulmoads
aaggygsd agusdmo s886ms, 88gbol
5 qssag3mo1o. aodmoomomds
bsfogdaagcngs uonomgws
gssbosmu dmabdsgmo 5 85bg dgoamdo
sgosso. 3ofoosbol doqbol gobol
gduoogmoogmo gogomgmo dgoog
glsgmbgol maqbol doqgs:
aogmoogbunluymbdsasqysd 50300005365s,6m8mooos33g0s 5
mmmbol bsaggo.
655m0g 838mm bS 8y8do 6mdqol
Oo88ou oosdOmo 2 bd-bg dgoos.
a0s000000000000000000000000000000000000000000000000000000000000000
68yms6y6y6y6y6y6y6y6y6y6y6y6y6y6y6y6y6y6y6y6y6y6y6y6y6y6y6y6y6y6y6y6y6y6y6y6y6y6y6y6y6y6y6y6y6y6y6y6y6y6y6
dodgolodg
Qoog300 85630000000000000000000000000000000000000000000000000000000000000000000000000000000000000000000000000000
A 80000000000000000000000000000000000000000000000000000000000000000000000000000000000000000000000000000
8000000000000000000000000000000000000000000
aagmoogg aabsbgcgob gadmygbosb
bgmbbsymb 3cnsbdsbol bsfoomgdol
sfoobls. yggbms 3msdbgs
gocssg bos6gds dso8g asabblgdool
asdygbob agqaa. saamoygbon bygoss
oognoo osmbol, q360b, b000b, bodol
gs bbd mbscgogsg.
OSTALA SIGURNOSNA UPOZORENJA
SAÇUVAJTE OVO UPUTSTVO!
SPECIFIKACJE
| Jedinica za sečenje Glava trimera | 3-zubi metalni nož | ||
| Voltaža | 56V = 56V | --- | |
| Brzina bez opterećenja | 4000-5800/min | 4000-5800/min | |
| Preporučena radna temperatura: | 0°C-40°C | ||
| Preporučena temperatura skladišenja: | -20°C-70°C | ||
| Tip strune za sečenje 2,4mm | / | ||
| Nož za sečenje | / | ABB1203 | |
| Širina sečenja 38cm 30cm | |||
| Težina 6,8kg 6,46kg | |||
| Izmereni nivo jačine zvuka Lwa | 94,2dB(A)K=1,8dB(A) | 96,3dB(A)K=2,1dB(A) | |
| Nivo zvučnog pritiska kod uha rukovaoca Lpa | 81,9dB(A)K=2,5dB(A) | 83,4dB(A)K=4,1dB(A) | |
| Garantovan nivo jačine zvuka Lwa (prema 2000/14/EC) | 96dB(A) 98dB(A) | ||
| Vibracije ah | Leva drška | 1,9m/s2K=1,5m/s2 | 1,9m/s2K=1,5m/s2 |
| Desna drška | 1,5m/s2K=1,5m/s2 | 1,3m/s2K=1,5m/s2 | |
Deklarisana ukupna vrednost vibracije je izmerena u skladu sa standardnim metod testiranja i moze se koristiti za uporedivanje jegnog alata sa drugim;
Deklarisana ukupna vrednost vibracije moze se koristiti u preliminarnoj proceni izlaganja.
OSTALA SIGURNOSNA UPOZORENJA
Izbjegavaje opasna okruzenja. - Uredaje nemojte upotrebljavati na vlaznim ili mokrim nagibima.
- Održavajte štitnike na njihovom mestreu i uradnom stanju.
ninn n nn nnn nnn nnn nnn nnn
.
ninn
yynnnn nn nnnnnnnnnnnnnnnnnnnnnnnnnnnnnnnnnnnnnnnnnnnnnnnnnnnnnnnnnnnnnnnnnnnnnnnnnnnnnnnnnnnnnnnnnnnnnnnnnnnnnnnnnnnnnnnnn
.
n nn nnnn nnnn nnnn nnnn nnnn nnnn nnnn nnnn nnnn nnnn nnnn nnnn nnnn nnnn nnnn nnnn nnnn nnnn nnnn nnnn nnnn nnnn nnnn nnnn nnnn nnnn nnnn nnnn nnnn nnnn nnnn nnnn nnnn nnnn nn
n nn nnnnnnnnnnnnnnnnnnnnnnnnnnnnnnnnnnnnnnnnnnnnnnnnnnnnnnnnnnnnnnnnnnnnnnnnnnnnnnnnnnnnnnnnnnnnnnn
nno nnnn nn nnnnnnnnnnnnnnnnnnnnnnnnnnnnnnnnnnnnnnnnnnnnnnnnnnnnnnnnnnnnnnnnnnnnnnnnnnnnnnnnnnnnnnnnnnnnn
nniunnnnnnnnn
nnnnnnnnnnnnnnnnn
- 17pnnn nn nnnnnnnnnnnnnnnnnnnnnnnnnnnnnnnnnnnnnnnnnnnnnnnnnnnnnnnnnnnnnnnnnnnnnnnnnnnnnnnnnnnnnnnnnnnnnnnnnnnnnnnnn
wnnnn nn nnnnnnnnnnnnnnnnnnnnnnnnnnnnnnnnnnnnnnnnnnnnnnnnnnnnnnnnnnnnnnnnnnnnnnnnnnnnnnnnnnnnnnn
DUNNNNINNNNNNNNNNNNNNNNNNNNNNNNNNNNNNNNNNNNNNNNNNNNNNNNNNNNNNNNNNNNNNNNNNNNNNNNNNNNNNNNNNNNNNNNNNNNNNNNNNNNNNNNNNNNNNNNNNN
n nn n nn n nn nn nn nn nn nn nn nn nn nn nn nn nn nn nn nn nn nn nn nn nn nn nn nn nn nn nn nn nn nn nn nn nn nn nn nn nn nn nn nn nn nn nn nn nn nn nn nn nn nn nn nn nn nn nn nn nn nn nn nn nn nn nn nn nn nn nn nn nn nn nn nn nn nn nn nn nn nn nn nn nn nn nn nn nn nn nn nn nn nn nn nn nn nn nn nn nn nn nn nn
Xn Xnn nn nnnnnnnnnnnnnnnnnnnnnnnnnnnnnnnnnnnnnnnnnnnnnnnnnnnnnnnnnnnnnnnnnnnnnnnnnnnnnnnnnnnnnnnnnnnnnnnnnnnnnnnnnnnnnnnnnnnnnnnnnnnnnnnnnnnnnnnnnnnnnnnnnnnnnnn
ITNNTY
D197D7
·72
-
17
HE
n nnnn nn nnnn nn nnnn nn nnnnnnnnnnnnnnnnnnnnnnnnnnnnnnnnnnnnnnnnnnnnnnnnnnnnnnnnnnnnnnnnnnnnnnnnnnnnnnnnnnnnnnnnnnnnnnnnnnnnnnn
n7 7y nynnnn nn nnnn nn nnnnnnnnnnnnnnnnnnnnnnnnnnnnnnnnnnnnnnnnnnnnnnnnnnnnnnnnnnnnnnnnnnnnnnnnnnnnnnnnnnnnnnnnnnnnnnnnnnnnnnnnnnnnnnnnnnn
yon.1n nn ynn nn nn nn nn nn nn nn nn nn nn nn nn nn nn nn nn nn nn nn nn nn nn nn nn nn nn nn nn nn nn nn nn nn nn nn nn nn nn nn nn nn nn nn nn nn nn nn nn nn nn nn nn nn nn nn nn nn nn nn nn nn nn nn nn nn nn nn nn nn nn nn nn nn nn nn nn nn nn nn nn nn nn nn nn nn nn nn nn nn nn nn nn nn nn nn nn nn nn nn nn
yDNNNIOYINJn.0
nnonnn nn nnnn nn nn nn nn nn nn nn nn nn nn nn nn nn nn nn nn nn nn nn nn nn nn nn nn nn nn nn nn nn nn nn nn nn nn nn nn nn nn nn nn nn nn nn nn nn nn nn nn nn nn nn nn nn nn nn nn nn nn nn nn nn nn nn nn nn nn nn nn nn nn nn nn nn nn nn nn nn nn nn nn nn nn nn nn nn nn nn nn nn nn nn nn nn nn nn nn nn nn nn nn
nynnn nn nnnnnn nnnnnnnnnnnnnnnnnnnnnnnnnnnnnnnnnnnnnnnnnnnnnnnnnnnnnnnnnnnnnnnnnnnnnnnnnnnnnnnnnnnnnnnnnnnnnnnnnnnnnnnnnnnnnnnnnnnnnnnnnnnnnnnnnnn
X IN nipn 10.11n IN DITn
nynnnn nnnnn nn nnnn nn
nynnnn nn nnnn nn nn
x nynn nn nnnn no nynn 100C-n nnnn nn nnnn n.
nniyinnnnnnnnnnnnnnnnnnnnnnnnnnnnnnnnnnnnnnnnnnnnnnnnnnnnnnnnnnnnnnnnnnnnnnnnnnnnnnnnnnnnnnnnnnnnnnnnnnnnnnnnnnnnnnnnnnnnnnnnnnnnnnnnnnnnnnnnnnnnnnnnnnnnnnnnn nn nannn nn nannn nn nannn nn nannn nn nannn nn nannn nn nannn nn nannn nn nannn nn nannn nn nannn nn nannn nn nannn nn nannn nn nannn nn nannn nn nannn nn nannn nn nannn nn nannn nn nannn nn nannn nn nannn nn nannn nn nannn nn nennn nn nannn nn nannn nn nannn nn nannn nn nannn nn nannn nn nannn nn nannn nn nannn nn nannn nn nannn nn nannn nn nannn nn nannn nn nannn nn nannn nn nannn nn nannn nn nannn nn nannn nn nannn nn
#
nniyn noin nniy nnnn nn ninn nnnn nn nnnn
yuyannn ynnn nny nynn .D. DNOIN NNI 790 IN
·,
y n 7n nn nn nnn nnn nnn nn nn nn nn nn nn nn nn nn nn nn nn nn nn nn nn nn nn nn nn nn nn nn nn nn nn nn nn nn nn nn nn nn nn nn nn nn nn nn nn nn nn nn nn nn nn nn nn nn nn nn nn nn nn nn nn nn nn nn nn nn nn nn nn nn nn nn nn nn nn nn nn nn nn nn nn nn nn nn nn nn nn nn nn nn nn nn nn nn nn nn
ynnnnaaannnnnnnnnnnnnnnnnnnnnnnnnnnnnnnnnnnnnnnnnnnnnnnnnnnnnnnnnnnnnnnnnnnnnnnnnnnnnnnnnnnnnnnnnnnnnnnnnnnnnnnnnnnnnnnnnnnnnn
#
.
ninnnn nnnnnnnnnnnnnn
INNNN NNTN 100 IN
n nn n
□□□□
mnnn
non
.2020 TNN IN,
15 n 1
,D
nannn
,y
nNnNnNnNnNnNn
un nn n nn no nnnn nn
1NINININDINININNNNN
1
n nn nnnnnnnnnnnnnnnnnnnnnnnnnnnnnnnnnnnnnnnnnnnnnnnnnnnnnnnnnnnnnnnnnnnnnnnnnnnnnnnnnnnnnnnnnnnnnnnnnnnnnnnnnnnnnnnnnnnnn
nno nnnn nn nnnn nn nnnn nnnn
non by nnwnn|nyi nnoo no 7
nwn nn
ywnn nn nnnn nn nnnn nn nn nn nn nn nn nn nn nn nn nn nn nn nn nn nn nn nn nn nn nn nn nn nn nn nn nn nn nn nn nn nn nn nn nn nn nn nn nn nn nn nn nn nn nn nn nn nn nn nn nn nn nn nn nn nn nn nn nn nn nn nn nn nn nn nn nn nn nn nn nn nn nn nn nn nn nn nn nn nn nn nn nn nn nn nn nn nn nn nn nn nn nn nn nn nn nn nn nn
A
ynnnnn nn ynnnnnnnn
wnnnn nn
A
ynnnnnnnnnnnnnnnnnnnnnnnnnnnnnnnnnnnnnnnnnnnnnnnnnnnnnnnnnnnnnnnnnnnnnnnnnnnnnnnnnn
1
wnnnn n nn nn onnnnn
nXnnnNn
nnn nn nnnn nn nnnn nnnn
Innnaaonnnn nn nnnn nn, G-F
A
n nn nnnnnnnnnnnnnnnnnnnnnnnnnnnnnnnnnnnnnnnnnnnnnnnnnnnnnnnnnnnnnnnnnnnnnnnnnnnnnnnnnnnnnnnnnnnnnnnnnnnnnnnnnnnnnnnnn
yann
3 3
n7 .G nnnnnnnnnnnnnnnnnnnnnnnnnnnnnnnnnnnnnnnnnnnnnnnnnnnnnnnnnnnnnnnnnnnnnnnnnnnnnnnnnnnnnnnnnnnnnnnnnnnnnnnnnnnnnnnnnnnnnnnnnnnnnnnnnn nn
Hnnnnnnnnnnnn (H2-H1 nnnn) nnnnnnnn
y n nn nn nn nn nn nn nn nn nn nn nn nn nn nn nn nn nn nn nn nn nn nn nn nn nn nn nn nn nn nn nn nn nn nn nn nn nn nn nn nn nn nn nn nn nn nn nn nn nn nn nn nn nn nn nn nn nn nn nn nn nn nn nn nn nn nn nn nn nn nn nn nn nn nn nn nn nn nn nn nn nn nn nn nn nn nn nn nn nn nn nn nn nn nn nn nn nn nn nn nn
yIyun nn nn nn nn n 3 nn nn nn nn nn nn nn nn nn nn nn nn nn nn nn nn nn nn nn nn nn nn nn nn nn nn nn nn nn nn nn nn nn nn nn nn nn nn nn nn nn nn nn nn nn nn nn nn nn nn nn nn nn nn nn nn nn nn nn nn nn nn nn nn nn nn nn nn nn nn nn nn nn nn nn nn nn nn nn nn nn nn nn nn nn nn nn nn nn nn nn nn nn nn nn nn nn nn nn nn. (H4nnn)
nnuuynypannnnnn.4 .H5nnn) qwn ynn
xnnn n 5
y nn nn n nn nn nn nn nn nn nn nn nn nn nn nn nn nn nn nn nn nn nn nn nn nn nn nn nn nn nn nn nn nn nn nn nn nn nn nn nn nn nn nn nn nn nn nn nn nn nn nn nn nn nn nn nn nn nn nn nn nn nn nn nn nn nn nn nn nn nn nn nn nn nn nn nn nn nn nn nn nn nn nn nn nn nn nn nn
.11nnn) n 17n nn nn
7nn noon nn nnn nn nn nn .6 (12nnn)nn
yynn nn nnn nn nnn .7 0nn nn nn nn nn nn nn
yynnnn nn nnnn nn nn nn nn nn nn nn nn nn nn nn nn nn nn nn nn nn nn nn nn nn nn nn nn nn nn nn nn nn nn nn nn nn nn nn nn nn nn nn nn nn nn nn nn nn nn nn nn nn nn nn nn nn nn nn nn nn nn nn nn nn nn nn nn nn nn nn nn nn nn nn nn nn nn nn nn nn nn nn nn nn nn nn nn nn nn nn nn nn nn nn nn nn nn nn nn nn nn nn nn
n nn nn nn nn nn nn nn .8
n nn nnnn nn nn nn nnnn nn nn nn nn nn nn nn nn nn nn nn nn nn nn nn nn nn nn nn nn nn nn nn nn nn nn nn nn nn nn nn nn nn nn nn nn nn nn nn nn nn nn nn nn nn nn nn nn nn nn nn nn nn nn nn nn nn nn nn nn nn nn nn nn nn nn nn nn nn nn nn nn nn nn nn nn nn nn nn nn nn nn nn nn nn nn nn nn nn nn nn
yannnnnnnnn nn (14nn) nn
an 3 ynnn nn
3 3 3 3 3 3 3 3 3 3 3 3 3 3 3 3 3 3 3 3 3 3 3 3 3 3 3 3 3 3 3 3 3 3 3
ynnn nn n nn nn nn nn nn nn nn nn nn nn nn nn nn nn nn nn nn nn nn nn nn nn nn nn nn nn nn nn nn nn nn nn nn nn nn nn nn nn nn nn nn nn nn nn nn nn nn nn nn nn nn nn nn nn nn nn nn nn nn nn nn nn nn nn nn nn nn nn nn nn nn nn nn nn nn nn nn nn nn nn nn nn nn
n nn nnnnnnnnnn 2
nnn nn nnnnnnnnnnnnnnnnnnnnnnnnnnnnnnnnnnnnnnnnnnnnnnnnnnnnnnnnnnnnnnnnnnnnnnnnnnnnnnnnnnnnnnnnnnnnnnnnnnnnnnnnnnnnnnn
1
,n,,
n nn noon .J2nnn nn
J7-J3,1ninnnnnnnnnnnn
| J-1 | |
| J-2 | |
3 100000000000000000000000000000000000000000
n nn nnnnnnnnnnnnnnnnnnnnnnnnnnnnnnnnnnnnnnnnnnnnnnnnnnnnnnnnnnnnnnnnnnnnnnnnnnnnnnnnnnnnnnnnnnnnnnnnnnnnnnnnnnnnnnnnnnnnnnnnnnnnnnnnnnnnnnn
y7n nn nnn nnn nnn .J3 nn nn
yin jin 1010 100n nn n7 .6
mnnn J4 nnnn nn nn
nnnnnnnnnnnnnnnnnnnnnnnnnnnnnnnnnnnnnnnnnnnnnnnnnnnnnnnnnnnnnnnnnnnnnnnnnnnnnnnnnnnnnnnnnnnnnnnnnnnnnnnnnnnnnnnn
yDyDyDyTnNynnn nn nnnn nn nn nn nn nn nn nn nn nn nn nn nn nn nn nn nn nn nn nn nn nn nn nn nn nn nn nn nn nn nn nn nn nn nn nn nn nn nn nn nn nn nn nn nn nn nn nn nn nn nn nn nn nn nn nn nn nn nn nn nn nn nn nn nn nn nn nn nn nn nn nn nn nn nn nn nn nn nn nn nn nn nn nn nn nn nn nn nn nn nn nn nn nn nn nn nn nn nn nn nn
.(J6 ninn)
mnn,11n 1102 Oinn nn 1997 n Dn:nytn.
#
n nn nnnn nn nnnn nn nnnn nn nnnn nn nnnn nn nnnn nn nnnn nn nnnn nn nnnn nn nnnn nn nnnn nn nnnn nn nnnn nn nnnn nn nnnn nn nnnn nn nnnn nn nnnn nn nnnn nn nnnn nn nnnn nn nnnn nn nnnn nn nnnn nn nnnn nn nannn nn nnnn nn nnnn nn nnnn nn nnnn nn nnnn nn nnnn nn nnnn nn nnnn nn nnnn nn nnnn nn nnnn nn nnnn nn nnnn nn nnnn nn nnnn nn nnnn nn nnnn nn
.
n nn nnnnnnnnnnnnnnnnnnnnnnnnnnnnnnnnnnnnnnnnnnnnnnnnnnnnnnnnnnnnnnnnnnnnnnnnnnnnnnnnnnnnnnnnnnnnnnnnnnnnnnnnnnnnnnnnnnnnnnnnnnnnnnnnnnnnnnnnnnnnn
A
.
nannnnn nn
N 10000000000000000000000000000000000000000000000000000
- (Knnn) nn n nn n nn nn nn nn nn nn nn nn nn nn nn nn nn nn nn nn nn nn nn nn nn nn nn nn nn nn nn nn nn nn nn nn nn nn nn nn nn nn nn nn nn nn nn nn nn nn nn nn nn nn nn nn nn nn nn nn nn nn nn nn nn nn nn nn nn nn nn nn nn nn nn nn nn nn nn nn nn nn nn nn nn nn nn nn nn nn nn nn nn nn nn nn nn nn nn nn nn
ynnn nn n nn nn nn nn nn nn nn nn nn nn nn nn nn nn nn nn nn nn nn nn nn nn nn nn nn nn nn nn nn nn nn nn nn nn nn nn nn nn nn nn nn nn nn nn nn nn nn nn nn nn nn nn nn nn nn nn nn nn nn nn nn nn nn nn nn nn nn nn nn nn nn nn nn nn nn nn nn nn nn nn nn nn nn nn nn nn nn nn nn nn nn nn nn nn nn nn nn nn nn nn
y nnnn nn nnnnnnnnnnnnnnnnnnnnnnnnnnnnnnnnnnnnnnnnnnnnnnnnnnnnnnnnnnnnnnnnnnnnnnnnnnnnnnnnnnnnnnnnnnnnnnnnnnnnnnnnnnnnnnnnnnn
nnn nn nnnn nn nnnn nn nnnnnnnnnnnnnnnnnnnnnnnnnnnnnnnnnnnnnnnnnnnnnnnnnnnnnnnnnnnnnnnnnnnnnnnnnnnnnnnnnnnnnnnnn
nnn nn nnnn nn nnnn (L2nn) nn nn nn nn nn
y0i ▲ ty nyn y0i Xnny Tynnn nnyn nn nn nn nn nn nn nn nn nn nn nn nn nn nn nn nn nn nn nn nn nn nn nn nn nn nn nn nn nn nn nn nn nn nn nn nn nn nn nn nn nn nn nn nn nn nn nn nn nn nn nn nn nn nn nn nn nn nn nn nn nn nn nn nn nn nn nn nn nn nn nn nn nn nn nn nn nn nn nn nn nn nn nn nn nn nn
nni
n nn nnnnnnnnnnnnnnnnnnnnnnnnnnnnnnnnnnnnnnnnnnnnnnnnnnnnnnnnnnnnnnnnnnnnnnnnnnnnnnnnnnnnnnnnnnnnnnnnnnnnnnnnn
nannnnn nn nnnn
yohn nn
(Mnn) "y" nn n nn nn nn nn nn nn nn nn nn nn nn nn nn nn nn nn nn nn nn nn nn nn nn nn nn nn nn nn nn nn nn nn nn nn nn nn nn nn nn nn nn nn nn nn nn nn nn nn nn nn nn nn nn nn nn nn nn nn nn nn nn nn nn nn nn nn nn nn nn nn nn nn nn nn nn nn nn nn nn nn nn nn nn nn nn nn nn nn nn nn nn nn nn nn nn nn nn nn nn nn
2012/19/EU INNINNNNINNNNNNNNNNNNNNNNNNNNNNNNNNNNNNNNNNNNNNNNNNNNNNNNNNNNNNNNNNNNNNNNNNNNNNNNNNNNNNNNNNNNNNNNNNNNNNNNNNNNNNNNNNNNNNNNNNNNNNNNNNNNNNNNNNNNNNNNNNNNNNN
.191|19101901,1
nyn Dny nnn nn
DIOIN,
y
.
niy21901 7nXnIy2