
L 710 S - Lighting STEINEL - Free user manual and instructions
Find the device manual for free L 710 S STEINEL in PDF.
| Product type | LED wall light with infrared detection for indoor/outdoor wall mounting |
| Model | Steinel L 710 S |
| Dimensions (W × D × H) | 260 × 140 × 63 mm |
| Supply voltage | 220-240 V, 50/60 Hz |
| Power consumption (on) | 8.3 W |
| Power consumption standby (detector) | 0.47 W |
| Luminous flux | 729 lm |
| Luminous efficacy | 88 lm/W |
| Color temperature | 3000 K (warm white) |
| Color rendering index (Ra) | 82 |
| Detection technology | Passive infrared (PIR) |
| Detection angle | 360° |
| Maximum range (tangential) | 8 m |
| Adjustable time delay | 5 seconds to 15 minutes |
| Light threshold | 2 to 2000 lux (adjustable) |
| Protection rating | IP44 |
| Protection class | II |
| Ambient temperature | -20 °C to +40 °C |
| Average lifespan (L70B50) | > 60,000 h at 25 °C |
| Light source | Integrated non-replaceable LED |
| Special functions | Soft start, orientation light (10%), night economy mode, forced on |
| Material / Color | Not specified in manual (usually white or gray) |
| Package contents | Luminaire, wall bracket, 2 screws, 2 wall plugs, 3 spacers, snap-in covers |
| Maintenance | Clean with a damp cloth, no detergent. No special maintenance required. |
| Safety | Disconnect power before servicing. Electrical installation must comply with standards (NF C 15-100). |
| Manufacturer's warranty | 36 months from date of purchase |
Frequently Asked Questions - L 710 S STEINEL
User questions about L 710 S STEINEL
0 question about this device. Answer the ones you know or ask your own.
Ask a new question about this device
Download the instructions for your Lighting in PDF format for free! Find your manual L 710 S - STEINEL and take your electronic device back in hand. On this page are published all the documents necessary for the use of your device. L 710 S by STEINEL.
USER MANUAL L 710 S STEINEL
GB....14 Follow written instructions!
Please read carefully and keep in a safe place.
- Under copyright. Reproduction either in whole or in part only with our consent.
- Subject to change in the interest of technical progress.
Symbols

Hazard warning!

Reference to other information in the document.
2. General safety precautions

Disconnect the power supply before attempting any work on the unit.
- During installation, the electric power cable being connected must not be live. Therefore, switch off the power first and use a voltage tester to make sure the wiring is off-circuit.
- Installing these units involves work on the mains voltage supply; installation must therefore be carried out professionally in accordance with the applicable national wiring regulations and electrical operating conditions (e.g.: DE-VDE 0100, AT-ÖVE/ÖNORM E 8001-1, CH-SEV 1000)
- Only use genuine replacement parts.
- Repairs may only be made by specialist workshops.
3. L 710 S/L 710 N
Proper use L 710 S
- LED light with sensor for indoor and outdoor wall mounting.
The integrated infrared sensor detects the invisible heat radiated from moving objects (people, animals, etc.). The heat detected in this way is converted electronically into a signal that switches the light ON automatically. Heat is not detected through obstacles, such as walls or panes of glass, and will therefore not activate the light.
Important:
The most reliable way of detecting motion is to install the sensor-switched light with the sensor aimed across the direction in which a person would walk and by ensuring that no obstacles (such as
trees and walls, for example) obstruct the line of sensor vision. Reach is limited when walking directly towards the light.
Proper use for L 710 N
- LED light with Nightmatic function for indoor and outdoor wall mounting.
The integrated Nightmatic function measures ambient brightness and automatically switches the light ON at the selected level of darkness and OFF again in line with various setting options.
L 710 S package contents (Fig. 3.1)
Luminaire
Wall mount
- Two screws
- Two wall plugs
- Three spacers
- Shrouds
L 710 N package contents (Fig. 3.2)
- Light
Wall mount - Two screws
- Two wall plugs
L 710 S product dimensions (Fig. 3.3)
L 710 N product dimensions (Fig. 3.4)
L 710 S product components (Fig. 3.5)
A Sealing plug
B Wall mount
C Connecting terminal
D Luminaire enclosure
E Retaining strap
F Basic light level
G Twilight setting
H Time setting
Sensor unit
L 710 N product components (Fig. 3.6)
A Sealing plug
B Wall mount
C Connecting terminal
D Light enclosure
E Retaining strap
J Night economy mode
G Twilight setting
K ON/OFF in the morning
L 710 S detection zone (Fig. 3.7/ 3.8/3.9)
Luminous intensity distribution (Fig. 3.10)
4. Electrical connection
Wiring diagram (Fig.14.1)
The supply lead is a three-core cable: L = phase conductor (usually black, brown or grey)
N = neutral conductor (usually blue)
PE = protective-earth conductor (green/yellow)
If you are in any doubt, identify the conductors using a voltage tester; then disconnect from the power supply again. Connect phase (L) and neutral conductor (N) to the connecting terminal; optionally, protective-earth conductor (PE) can be connected to terminal (E).
Important:
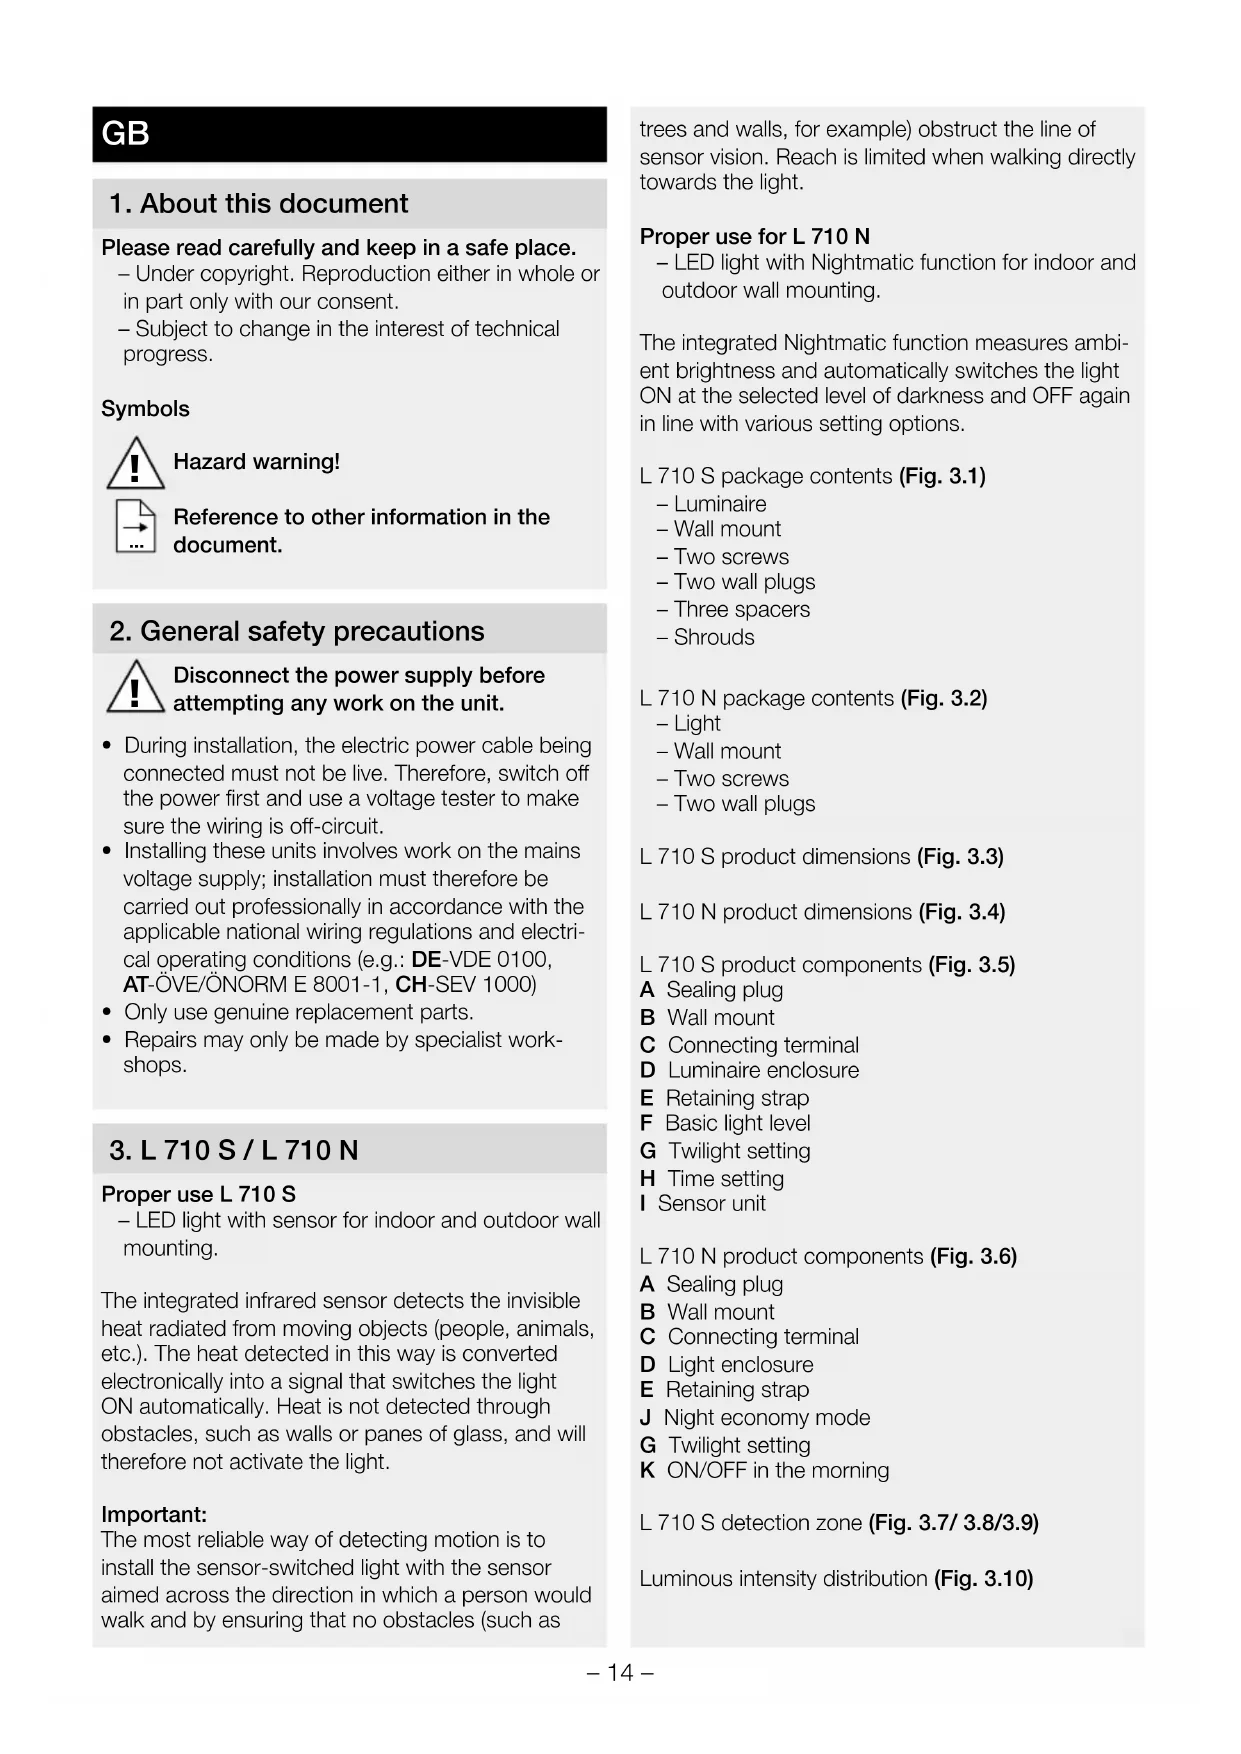
incorrectly wired connections will produce a short circuit later on in the product or fuse box. In this case, you must identify the individual conductors once again and reconnect them. A mains switch for switching the product ON and OFF may, of course, be installed in the mains supply lead. The light source of this luminaire cannot be replaced.
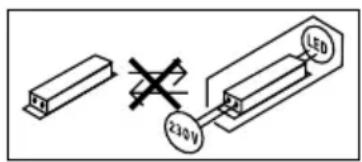
If the light source needs to be replaced (e.g. at the end of its service life), the complete luminaire must be replaced.
5. Mounting
- Check all components for damage.
- Do not use the product if it is damaged.
- When installing the LED luminaire, make sure the installation site is not subject to vibration.
- Select an appropriate mounting location, taking the reach and motion detection into consideration.
Mounting procedure
- Switch OFF power supply (Fig.4.1)
- Undo screws (Fig.5.1)
- Press catch and pull luminaire o the wall mount (Fig.5.2)
- Undo retaining strap and terminal and remove luminaire (Fig.15.3)
Mark drill holes (Fig.5.4) - Drill holes and insert wall plugs (Fig.05.5)
- Pierce sealing plug for power supply lead (Fig. 5.6)
-
Concealed mounting (Fig.15.7)
-
Surface mounting (Fig.15.8)
- Attach retaining strap and terminal to the wall mount (Fig.15.9)
- Connect conductors (Fig.15.10)
- Remove retaining strap on lamp side and store in wall mount (Fig.5.11)
- Install luminaire enclosure on wall mount (Fig.15.12)
- Tighten screws (Fig.5.13)
- Switch ON power supply (Fig.15.13)
- Make settings "6.([]Function"
6. Function
Factory settings L 710 S
Time setting: 5 seconds
Twilight setting: daytime operation
Basic light level: OFF
L 710 N factory settings
Twilight setting: daytime operation
Basic light level: OFF
ON/OFF in the morning: ON
Time setting L 710 S (Fig.6.1H)
The light's stay ON time can be set to any period from approx. 5 seconds to a maximum of 15 minutes. Any movement detected before this time elapses will restart the timer.
Twilight setting (Fig.6.1G)
The chosen response threshold can be infinitely varied from approx. 2 to 2000 lux.
-
Control dial set to = daylight mode (depending on ambient brightness)
-
Control dial set to = twilight mode (approx. 2 lux)
Basic light level (Fig.6.1F)
Standard programme - Soft light start / no basic light level
What is soft light start?
The sensor-switched light features a soft light start function. This means that when turned ON, the light is not switched directly to maximum output but constantly builds up brightness to 100% within a short period of time. Brightness is also gradually reduced when the light is switched OFF.
User-friendly economy programme
- Soft light start + basic light level until the middle of the night
- Basic light level ON from twilight setting selected until the middle of the night
How does the user-friendly economy programme work?
The sensor-switched light does not have an integrated clock. The middle of the night is only determined on the basis of the length of darkness phases. To work perfectly, therefore, it is important for the sensor-switched light to be permanently connected to the power supply during this period. During the first night (calibration phase), basic light level remains activated throughout the night. The values are saved even in the event of a mains power failure. We do not recommend interrupting the power supply in this the programme. The values are determined over several nights. The sensor-switched light should, in the event of any fault occurring, be monitored over several nights to ascertain whether the switch-off time moves towards midnight.

User-friendly programme
- Soft light start + basic light level
- Basic light level ON from twilight setting selected
What is basic light level?
Basic light level provides continuous night-time illumination at approx. 10% light output. The light only switches to maximum output (100%) for the time selected in response to movement in the detection zone. The light then returns to the basic light level (approx. 10% ).
NM Nightmatic programme
- Soft light start, no basic light level, no movement evaluation
- Switches ON at 100% if the light level falls below the level set
Night economy mode (Fig. 6.2. J)
The light can be switched OFF automatically at night to save even more electricity. The electronic system does not have a clock. All times are computed by the microprocessor on the basis of light levels at twilight. Seasonal changes in light levels are identified automatically and taken into account.
- Control dial set to OFF = light ON all night
- Control dial set to ECO = light OFF for 3.5 hours in the night
- Control dial set to ECO + = light OFF for 7 hours in the night
ON/OFF in the morning (Fig. 6.2. K)
The night economy mode always ends in the early hours of the morning between approx. 4 and 5 a.m. After then, the luminaire switches ON again automatically when it gets dark.
- Control dial set to ON = light switches ON automatically at dawn.
- Control dial set to OFF = light stays OFF in the morning.
Manual override L 710 S (Fig. 6.3)
1) Activate manual override: Switch OFF and ON twice. The light is set to manual override for 4 hours. Then it returns automatically to sensor mode.
2) Deactivate manual override: Switch OFF and ON once. Light goes out or switches to sensor operation.
Important:
Switching must take place within 0.2 to 1 second.
Adjusting the detection zone L 710 S (Fig.6.4/6.5/6.6/6.7)
The detection zone can be limited to suit requirements. The shrouds supplied with the unit can be used to mask out as many lens segments as you wish. This prevents the light from being activated unintentionally, e.g. by cars, passersby etc., and allows you to target danger spots. The shrouds can be cut along the grooved vertical divisions. Then you simply clip them onto the lens.
7. Maintenance
The product requires no maintenance.
The light can be cleaned with a damp cloth (without detergents) if dirty.
Important note: the control gear cannot be replaced.
8. Disposal
Electrical and electronic equipment, accessories and packaging must be recycled in an environmentally compatible manner.

Do not dispose of electrical and electronic equipment as domestic waste.
EU countries only:
Under the current European Directive on Waste Electrical and Electronic Equipment and its implementation in national law, electrical and electronic equipment no longer suitable for use must be collected separately and recycled in an environmentally compatible manner.
9. Manufacturer's Warranty
This STEINEL product has been manufactured with the utmost care, tested for proper operation and safety and then subjected to random sample inspection. Steinel guarantees that it is in perfect condition and proper working order. The warranty period is 36 months and starts on the date of sale to the consumer. We will remedy defects caused by material flaws or manufacturing faults. The warranty will be met by repair or replacement of defective parts at our own discretion. The warranty shall not cover damage to wear parts, damage or defects caused by improper treatment or maintenance.
Further consequential damage to other objects shall be excluded. Claims under the warranty will only be accepted if the unit is sent fully assembled and well-packed with a brief description of the fault, a receipt or invoice (date of purchase and dealer's stamp) to the appropriate Service Centre.
Service:
Our Customer Service Department will repair faults not covered by warranty or after the warranty period. Please send the product well-packed to your nearest service station.

10. Technical specifications
| Dimensions (W × D × H) L 710 N 260 × 140 × 77 mm L 710 S 260 × 140 × 63 mm | |
| Supply voltage 220 - 240 V, 50 / 60 Hz | |
| Power consumption (Pon) 8.3 W | |
| Sensor on standby (Psd) 0.47 W | |
| Luminous flux 729 lm | |
| Efficiency 88 lm/W | |
| Basic light level L 710 S: 10% | |
| Average rated life expectancy > 60,000 h (L70B50 at 25°C) | |
| Colour temperature 3,000 K (warm white) | |
| Colour rendering index R = 82 | |
| Sensor technology L 710 S: passive infrared | L 710 N: light sensor/photo-cell controller |
| Detection zone L 710 S: 360° | |
| Detection reach | L 710 S: max. 8 m tangentially |
| Time setting | L 710 S: 5 s - 15 min |
| Twilight setting | 2-2,000 lux |
| IP rating | IP44 |
| Protection class | II |
| Ambient temperature | -20 to +40°C |
| Lamp | LED |
| Colour consistency SDCM | Starting value: 3 |
| Luminous intensity distribution | |
| This product contains an energy efficiency class "E" light source. | |
11. Troubleshooting
| Malfunction Cause Remedy | ||
| Luminaire without power | ■ Fuse has tripped, not switched ON, break in wiring | ■ Activate, change fuse, turn ON mains switch, check wiring with voltage tester |
| ■ Short circuit in mains power supply lead | ■ Check connections | |
| ■ Any mains switch OFF | ■ Switch on mains switch | |
| Light does not switch ON | ■ Incorrect twilight setting selected | ■ Readjust |
| ■ Mains switch OFF | ■ Switch ON | |
| ■ Fuse has tripped | ■ Activate, change fuse, check connection if necessary | |
| Light does not switch OFF (L 710 N) | ■ Continuous movement in the detection zone | ■ Check zone |
| Luminaire does not switch OFF completely (L 710 N) | ■ Basic light level selected | ■ Turn programme selector dial to Off |
| Luminaire switching ON despite no movement being detected (L 710 N) | ■ Luminaire not mounted for detecting movement reliably | ■ Securely mount enclosure |
| ■ Movement occurred, but not identified by the observer (movement behind wall, movement of a small object in immediate light vicinity etc.) | ■ Check detection zone | |
| Light does not switch OFF completely (L 710 N) | ■ Wrong twilight setting selected | ■ Set control dial to Ⓒ |
FR
NM Programme Nightmatic
NM Programma Nightmatic
NM Programa Nightmatic
NM Programa Nightmatic
NM Nightmatic-program
NM Nightmatic-program
- Soft-lysstart, intet grundlys, ingen bevagelses-analyse
- Lyset taendes 100% , hvis lysstyrkeværden underskrides
Natsparetilstand (fig. 6.2 J)
NM Nightmatic-program
Permanent lys L 710 S (ill. 6.3)
1) Tenne permanent lys:
PwI ENTOs/EKTOs (6.2.K)
H oikovopikn I oupyia vuxTac TELWVEI NAVTA TIC npwTEc npwivec wpe c nepiou ueta4 kai 5 n wpa. Katoniv o laaTTnpac avabe i nai otav OKOTeiviaeI.
Off Standart program
- Yumusak isik baslatma / fon isigi yok
NM Nightmatic programi
NMNightmatic program
NM Program Nightmatic
NM Program Nightmatic
NM Program Nightmatic
NM Programul Nightmatic
- Aprindere treptata a luminii, fara luma de veghe, fara evaluarea miscarii
- Aprindere la putere maxima / 100% cänd se coboara sub valoarea luminozitäti setate
NM Program Nightmatic
NM Nightmatic programma
N = HnyeBOI npOBOu (Haue BCero CInnH)
PE = npoBOJ 3a3emnHeHn (3eHeBHy/KeNTbI)
B clyuae comHeHnIeHTnIcnpoBaTb npOBoDa C NOMOUsIO INdNkAToPA, 3aTeM CHOBa OTKJIOnHTb HapRjKeHne. PncoEINHTb pa3HbI (L) n HJleBOI npOBoD (N) K KJEMMe, npOBoD 3a3eMJIeHnRA (PE) MOxHO ONUHOHaJIbHO IOnKJIOnHTb K KJEMMe (E).
Baxho:
BcIeCTBHe HnPaBnBHO npncOeHHeHn npoBOOB IV3dEINN INB paCnppeJNTeBHOM RaUKe C npEdoxpaHntJIeMM MoKET npOn30HTN KOpOTKoe 3aMbKaHne. B TaKOM cLyuae peKOMeHdyetc eUe pa3 npOBepNTb npoBOda N 3aHOBO nOdknOHTb INX.
Camo co6oB pa3yMeTc8, B ceTeBOI npOBOD MOKET 6bITb BMOHTnPOBaH BbIKJIIOUaTeJIb DnRA BKJIIOUeHIN N BbIKJIIOUeHIN CTeBOrO TOKa. IVCTOHNK CBETA 3TOFO npOXKeTOpa He NOdJIeKNT 3aMeHe.
При Heo6xOДIMOCTN 3aMeHbI NCTOCHNka CBeTa (Ha- npimep,В KOHc e rO cPoKa CnyKbI),Heo6xOДIMO 3aMeHnTb BeCb nPoXKeKTOp.
5. MoHTaX
- Поберпь ВсЕ KOHCTpyKTHBьIe DeTaIIH Na празmet NOВрждEHЯ.
- PnIOBpeKdEHHx He BKJIIOuHaTb IpoIyKT.
- Pn MoTaxKe CBeToIONoIHO CBeTINbHnKa CneIITb 3a TEM, YTO6bl OH KpeNlncs Be3 Bn6paun.
- Bb6paTb noxoaduee MeTo dna MOHTaKa c yHeTOM paunyc DeIcTBn I peNcTpaunn DnIXKeHn.
Popraok MoTtKa
- OTKIIOHTb 3JIeKTpOnITaHHe (pnc. 4.1)
BbIKpyTNtB BnHTbl (pnc.5.1) - HaxkaTbФHKCaTOP IN CHaTb CBeTNbHnK C KpOHuTeuHa (pnc. 5.2)
- CHaTb JIeHTy 6e3OpaCHOCTn I OTCoeDINHHTb KJIeEMMy IN CHaTb CBETNJIbHNK (pnc. 5.3)
- Hametntb OTBepctnna Ia CBepneHn (pnc. 5.4)
-ПрocBepNTb OTBepCTnI N BCTaBNTb IIO6eJI (pnc.5.5) - PpOTKHyTb yNlOTHnTeJIb (Pnc. 5.6)
MoHTaX CkpbIToN npOBoKoN (pnc. 5.7) - MoHTaX OTKpbIToN IpoBOJKOI (pnc. 5.8)
3aKpeHnTbJeHTy6e3OnaCHOCTN KJIeMMy Ha KPOHwTeHHe (pnc. 5.9) - NoidKJIIOUHTb COeINHITeNBbI KabeJIb (pnc. 5.10)
- YdaIITb JIeHTy 6e3OpacHOCTn CO CTOpOBJIaMnbl N y6paTb B KpoHHTeH (pnc.5.11)
- YCTaHOBnTb KOpNyc CBETnJIbHnKa Ha KPOHJTeHn (pnc. 5.12)
- 3aKpyTnTB BnHTbI (pnc.5.13)
BkHIOuHTb 3JIeKTPoNITaHne (pnc.5.13) - Bыллнгь ренировки → "6. Эксплутаця"
6. 3Kcnpnyatauia
3aBoDcKne HacTpoKn L 710 S
PerynipOBKa BpeMeHn: 5ceKHyN
YctaHOBka cymepeuHoro nopora: DHeBHO peKIM
XeIaembl npor cpa6aTbIBaHnMoXHO yCTaHOBnTb PnABHOOT 2do 2000 Jk.
- PeryIaTOp, yCTaHOBJIeHHbI Ha =peXIM DHeBHO OCBeUeHnA (He3aBNCmO OT JpKoCTn)
- Peryntop, yctahOBHeHHbHa C = peKIMCymepeHoro OcBeUeHnA (OK. 2 Jk)
Ba3OBaЯркocTB(pnc.6.1.F)
Off CtaHapTha nporpaMa
-ПлавhoeВКЛЮЧЕнe CBeta / HeT 6a3OBoI npKocTN
TO TAKOE PJIABHOE BKJIOUHHe CBeta?
CecnOpHbI CBeTnIbHnK OChaueH cyHKUnei IJIaBHO BkJIIOHeHnCBeta.5JaIogApra daHHoI CyHKUIM MaKC. JRPKOCTc CBeTnIbHnKa yCTaHaBNIBaETc MeJLeHNO B TeUeHnE HEnpOdoJXHTeJIbHO BpeMeHn. TaKIM JKe O6pa3OM peryInpyETc MouHOCTb CBETA pR N BBIKIOUeHm CBeTnIbHnKa.

KomΦopTHa 3KOHOMnHa nporpaMa
-Плавhoe BKЛючене CBeta +6a3OBaЯяркocтбdocepeHbI HOU
- Ba3OBaЯяркocьвКЛIOuaETcЯ,нauHЯсуCTa-HOBJIeHHOrO 3HaueHЯсуМepeuHOrO nOpOradocepeINHbI HOU
Kak pa6oTaet KOMΦopTHaJ 3KOHOMnHaJ nporpaMa?
B ceHcOpHbI CBeTnJIbHbIK He BCTpoEhbI YaCbI, PONHOy ONpeJeJIeTcR ToJbKO IIO NpOdoJXKeITb-HoCTN TeMHbIX nepNoOB. IOnToMg DnI 6e3ynpeHcH OpaBoTb HEOxOIMo, YTObI Ha CeHCOPHbI CBeTnJIbHbIK B 3TO BPEM NOCTOHH NOdaBaJIocb HapPrjKeHne. Bo BPEM NepBOH HOU (pePNO I3MepeHn) 6a3OBaRA JPKOCTb NOLHOCTbIO AKTINBA. 3NaueHncoxpanHOTcR C 3aUHTOOT OT OKJIIOUeHn CTeBOrO NiTaHn. Mbl peKOMeHNyEM, He OTKJIIOuHaTb NiTaHn BO BPEM npOrpamMbI. 3NaueHn ONpeJeJIOTcR Ha NpOTraKeHn HECKOJIbKHX HOey. IOnTOMy 3a NpOKeKTOpOM B 0B3MOXHom Clycae OUn6Kn CNeDuET NaJIIODaTb B TeueHne HECKOJIbKHX HOey, IN3MeHReTcR IIN BPEM BBIKIOUeHn POdKJIIOUeHHORO NOTpe6NIteJI prn pIn6JIINKeHn K POnLyHOH.

KomΦopTha nporpaMa
He BbI6paCbIBaTb 3JIeKTpOpnp6OpblB 6bITOBbIE OTXoDbI!
TolbkoДлЯстан EC:
Corgnacno DeIcTByUoJe EbponeNCKO IupeKTHBe
No OTPa6oTaHHOMy 3JKeKTPuueckOMy N 3JKeKTPoH
HOMy 6OBpyOBOAHIO U ee peaIN3aUNB HaUN-
OHaJIbHbIX 3aKOHOJaTeJIbCTBax OTPa6oTaHHbIE
3JKeKTPoPn6Opbl DOJXHbI CObpaTbcr OTdJIbHO
HaIpaBJIaTbCra Ha 3KOLOrnHyU BTOpNHyU nepe
pa60TKy.
9. Гаразноюпг
Данhoeизделп роиьбовсba STEINEL 6ылсocobIM BHIMaHnEMИЗROTOВЕнИ NCbITaHoHa paBOTOCNOCBHOCTb 6e3OpaCHOCt b 3KcIpyataUcIIu COOTBETCTBENHO DeIcTBYQUUM INHCTpyKUm, a NOTOM NOBBePHyTO BbIbOpOHOMy KOHTPOJIKAueCTBa.ФИрma STEINEL rapaHTnpuyET BbICOKOE KaueCTBO И HalexhHyIO paObyИЗдELЯ. ГаанТинblcspOK 3KcIpyatauCoCtABnReT 36 MecaIeB co DnH npOdaJNИЗдELЯ.ФИрma OБя3yETcYCTpaHNTb HeIOCTaTKN, KOTOpbIE BO3HnKlN BCJeDCTBNe DepeKTA MaTePnAJa NII KOnHCTpyKUm. DeΦeKTbl YCTpaHryOTcnyTEM peMOHTaИЗдELЯ JIN60 3aMeHoi HeNCpabHBx DeTaleN NO yCMOTpeHIOФИрMbI. ГаANTинblcspOK 3KcIpyatauMn He paNPoCtpaHReTcHa NOBpeXdEHNr N DeΦeKTbl, BO3HnKUWe B pe3yIbTaTe N3HOCA DeTaleN, HeHaJNeJkaUeN 3KcIpyatauMn UxOda.ФИрma He Hecet OTBETCTBEHNOCTNa MATEPnaJIbHbI yUePb TpeTbIX JInu, HAnceEHbI B pIoUeCE 3KcIpyatauMn I3dELNA. ГаANTиnpedOctabJIeTcToJIbKO B TOM Clyuae, ecInи3dEJIne B CO6paHHOM n UynakOBaHHom BVIDE C KpaTKIM ONICAHNem HeNCpabHOCTN6blO OTnpaBNEHO BMeCTe C npINOJOKeHHbIM KACCOBBiM YeKOM NII KBITaHcne (C datoN npOdaXn INeHaTbIO TOpROBOrO ppeIprnTn) n O anpecy cepBnCHOH MaCTepCKoN.
CepBnCHoe o6cIyXnBaHne:
IIO nCTeueHn rapaHTnHO rCpOKa IIN npn HAnuHn HeNoJaOK, NCKJIouHaOUsx rapaHTnIO, HaJe cepBnCHoe npedprnTne npednaeT cBOYcLyr. B TAKnx CnyaX npocm OTnpaBnTb n3dJIne B yNaKOBaHHOM BVNe B 6JnxKaIShyO cepBnCHyO MaCTepCKyU.

10. TexHnueckne daHHbIe
PocjeIOBaTeJIHOCT 3a MOHTAX
-Да ceи3KЛIOUeIeKTpO3aXpaHbAHeTo (pnc.4.1)
BnHTOBeTe Da ce OTBnHTaT (pnc. 5.1)
3actonopraBaHTo Da Ce HATNCHe N JAMnata Da ce n3TeTNI OT CToiKaTa 3a CTeHa (Pnc.5.2)
-ObesonacnteHaTaJeHTaNKeMaTaJa ce ocB6oOyTnJaMnata Da ce CBaJn (pnc.5.3)
-Да ce МаркираТ MecтаТа 3a побиBaHe (pnc.5.4)
-Да ce npobnT dynknte n da ce noctabrt IIO6eJIITE (pnc.5.5)
- Na ce npo6nT ynlbTHnTeJnTe (pnc. 5.6)
CKpNT MOHTaX (puc. 5.7)
OTKpNT MOHTaX (pnc. 5.8) - ObesonacntenHaTa JIeHTa N KJIeMaTa Ja ce 3aKpeTn Ha CToiKaTa 3a CTeHa (pnc.5.9)
KabeniTe da ce cbbpxkAT (pnc. 5.10)
-Да ce OTCTpaHи NOcNrypRABaUaTа JeHTa OT CTpaHaTа Ha JAmnata N Da ce NoCTaBn B CToiKaTa 3a CTeHa (Pnc.5.11)
KopnycBt Ha JAmnata Da ce NoCTaBu Ha CToiKaTa 3a CTeHa (pnc.5.12)
BnHTOBete da ce 3aBnHTaT (pnc.5.13) - EneKtpo3axpaHbHaHeTo da ce BKJIIOuN (pnc. 5.13)
- Na ce HappaBraT HacToPiKn "6.Функця"
6.Функця
3aBODcN HacTpoKn L 710 S
HactpoIka Ha BpeMeTo: 5 cekyHn
Hactponka Ha CBETIOUyBCTBNTENHOCTTA:
Дневен ржим
Ba3OBO OCBeTJeHne: N3KJI
3aBODcN HAcTpoKu L 710 N
Hactpoika Ha CBETNoCyBCTBnTEHOCCTTa:
Дневен ржим
Ba3OBO OCBetIeHne: N3KJI
CytpnB KJI/M3KJI: BKJI
Hactpoika Ha BpeMeTo L 710 S (pnc. 6.1 H)
KeJHaHATA npOdbJxKHTeHOCHT Ha CBTeHe Ha JAmnata MoKe da ce peryInpa 6e3CTeHNO OT OKJIO5 cekyHdno MaKc.15 MmHyTn.BcraKO 3aceHDoBHXKeHne PpeDn N3TuHaHE Ha BpEmTo BpBuJaacOBHnKa B nbpBOHaayHaNo3nIa.
HactpoikKa Ha CBetJIOUyBCTBNTeJIHOCTTa (pnc. 6.1 G)
KeIaHnT npaHa 3aJeCTBaHe MoKe da 6bJe peRyInpan 6e3cteneHNo oT OKoJ0 2 do 2000 lykca.
-PeryanaTopBno3nua =HeBeHpeKIM (He3aBNCIMOOTOCBTeHOCTTa)
- Perynatop B no3nua = cna6a cBeTnHa (okono 2 lykca)
Ba3OBOOCBeTJeHne(pnc.6.1.F)
Off Pporpama CtaHapr
-ПлавноВКЛIOУBaHe/6e36a3OBOOCBeTJIeHnE
KaKBO npeDCTaBna PnlaBHOTo BKJIIOUbaHe?
Ceh3OpHaTajamna pa3nolara cФyHKUa 3a
PnabHOBKIOUcbHe (MeK CTapT).ToBa O3Haayaba,
Ye npB BKIOUbaHe CBETINHaTa He DOCTURA CBOA
MaKcIMMyM BeHara.3a KpaTko BpeMe OCBeTeHOCT-
Ta ce NOBVIIaBa Do 100% NoCTeHNo. CbUo TaKa CBETINHaT a 6abHo yraCBA npu N3KJIIOUbaHe.

Iporpama KomΦopT IKOHOMUHa
-Плавно ВКЛЮЧВаHe +бa3ОВО OСБЕТЛЕНе ДО ПОЛУHOU,
-БазовоTo ocBetneHne BKN npn DocturaHe Ha n36paHaTa CTenEH Ha ocBeteHoCTdoNoIyHOu
Kak pa60tn nporpama Komfopt IKOHOMMnHa?
BceH3OpHaTajamna He e INHTerpnpaH yacOBnK. IonyHOUc ce onpeJeI NocpeCTBOM IbJxHaTa Ha TbMHnTE qACTN OT DeHOHOuNETo. Io Ta3n npuHa e BaxHO CEH3OpHaTa JAMNa NOCTOARHO dae 3axpaHeHa C HApexKeHne.Ipe3 IIpbata HOU (KaIN6pnpaU pepNO) 6a3OBTO OCBETJeHne e NOCTOARHO AKTNBO.C ToiHOCTUte OCTaBAT B naMeTTa, DOpn npu CpNB B eEkeTpueckaTa Mpeka. IpeopbYBaMe Da He npeKbcBaTe 3axpaHBaHeto npn nporpama.CToiHOCTUte ce onpeDenrB IpoIbJIKeHne Ha HAKOIKO HOU. 3a TOBA, B clyau Ha npeKbcBaHe Ha HApexKeHneTO, Tpr6Ba Da Ce CLeDN PPODbJIkNTeHIO DaJIn N3KJIIOUBaHETo Ha CEH3OpHaTajamna Ce N3MeCTBa KbM IonyHOU.

Pporpama KomΦopt
-Плавно BKЛIOUBAHe +6a3OBO OCBETJIeHne
- Ba3OBO OCBetIeHne BKN npn IOCTnraHe Ha n36paHaTcTeNEH Ha OCBeteHOCT
KaKBO e 6a3OBO OCBETJIeHHe?
Базово OCВETлене Дава ВьзмхнocT 3a HOИ NOOCBETЯBaHe C OKOJO 10% OT OCBETnteHata MOU.ЕДВпprдвженив obxbaTа CBETnHaTa ce BKIOUBy (3a ИЗбразOTOBpeMe) Ha MaKcIMaJIHa MOuHocT (100%).Слд КОЕТЯМпАТОТНOBО ПрMuHaba Na 6a3OBO OCВETленe (OKOJO 10%).
NM Pporpama Nightmatic
-ПлавноВКЛЮчBAHe,6e36a3OBOOCBETJIeHNe, 6e33acNHaHe HaДВИЖЕHne
- 100-npoUeHTOBO BKNIOUcBaHe npi naIaHepoDCTOHOCTTa Ha OCBETeHOCT
IkoHOMnueH HOuEHN pexm (pnc. 6.2. J)
Jaamnata MoKe Da 6bJe N3KJIIOUeHa aBTOMaTNUHO npE3 HOuTa, 3a Da CNECTBa DOnbJNHTeJHo eJ. eHepn. EneKTPOHnKaTa He CbIbPka YacOBnK. BpemTo ce n3cncJaBa OT MKNpOpoecop, cNopei CTeneHHTa Ha OKoJHaTAt OCBeteHOCT. Ce3OHnTe IpomEnB CBETJINHHn NotOK Ce OTHrAT aBTOMaTNUHO.
- Perynatop Ha Off = lamnata e BknoyeHa Lya HOU.
-
Perynatop Ha ECO = lamnata e n3Kluoyeha 3,5 yaca npes HooTa.
-
Perynatop Ha ECO+ = lamnata e n3KIOyeHa 7 yaca npe3 HOuTa.
CytpnB KJI/N3KJI (pnc. 6.2. K)
IKOHOMUHNHTHOUeHpeKIMCBpWBaBnHaBIN BpaHHnteCyTpeuHnYacOBePn6n3nteJHoMekdy 4n5yaca.CneTTOBaPnMPaKJaMaNaTaOTHOBO Ce BKJIIOUBA.
- Perynatop Ha On = JAMnata ce BKNIOUba aBTOMaTNUHO B CyTpEuHInTe YacObe.
- Perynatop Ha Off = JAmnata octaba n3KlOyeha cyTpuH.
NocToHHa CBeTmHa L 710 S (pnc.6.3)
1) Bключbahe NOCTOЯнha CBETинha: wantrep 2xИЗКЛ n BKЛ.ЯмпаTOCTaBa C NOCTOЯнha CBETинha 3a 4 yaca.CleTToBa aBTOMaTNUHNo ПрЕМиHaBa OTHOB BCeH3OpeH peKIM.
2)ИЗКЛЮУВанеHa NOCTОЯНHa CBETЛИHA: shantep 1xN3KЛ n BKN.JaMaNaTa ce N3KJIIOUBA,CbOTBeTHO npeMHaBaBceH3OpEN pexIM.
Baxho:
BKNIOUBAHNA Ta Tp6Ba Da Ce N3BbPWBaT 3a 0,2do 1cekyHda.
PerynpaHe Ha 06Xbata L 710 S (pnc. 6.4/6.5/6.6/6.7)
CnopeHHeo6xOJIMOCCTTa,06xBaTbT MoKe Ja 6bJe OgraHnueH. PnIIOXeHNTE B KOMNJIeKTA 6JIeHn CJIyKAT 3a NOKPINAhe Ha IPOU3BOJEN 6pOi CeRMENTOn OT ObEKTINBa.Taka Ce IpeMaxBaT IORpeuHN BKNIOUcBAHnRA,HaNPIMePOT ABTOMO6nI, NeJExOJUN T.H.NII NcJIeBO Ce HApJIoDABaT N3TOUHNs HA ONaCHOCT. IOKPINAHTe 6JIeHN MoRat Da 6bDat OTdJIeHN IO NblJXHnHaTa Ha IpeJ-BapITeJHO OT6eJIAHNTe BEPTUKaJIHn KaHaJI. CJeI KoEtO ce NoCTABRT Bbpxy ObEKTINBa.
7.Подрьжka
PpOdykTbT He ce Huykdae ot npDpBxka.
Pn 3aMbpcaBaHe, IaMnata MoKe Ja 6bIe NouNCTeHa C BnaXHa KbPna (Be3 NoocntBaU npenapaT).

- Please read carefully and keep in a safe place.
- Symbols
- Hazard warning!
- Reference to other information in the document.
- General safety precautions
- Disconnect the power supply before attempting any work on the unit.
- L 710 S/L 710 N
- Proper use L 710 S
- Important:
- Proper use for L 710 N
- L 710 S package contents (Fig. 3.1)
- L 710 N package contents (Fig. 3.2)
- L 710 S product components (Fig. 3.5)
- L 710 N product components (Fig. 3.6)
- L 710 S detection zone (Fig. 3.7/ 3.8/3.9)
- Luminous intensity distribution (Fig. 3.10)
- Electrical connection
- Mounting
- Mounting procedure
- Function
- What is soft light start?
- How does the user-friendly economy programme work?
- User-friendly programme
- What is basic light level?
- NM Nightmatic programme
- Night economy mode (Fig. 6.2. J)
- ON/OFF in the morning (Fig. 6.2. K)
- Manual override L 710 S (Fig. 6.3)
- Adjusting the detection zone L 710 S (Fig.6.4/6.5/6.6/6.7)
- Maintenance
- Disposal
- EU countries only:
- Manufacturer's Warranty
- Service:
- Technical specifications
- Troubleshooting
- FR
- NM Programme Nightmatic
- NM Programma Nightmatic
- NM Programa Nightmatic
- NM Nightmatic-program
- Natsparetilstand (fig. 6.2 J)
- Permanent lys L 710 S (ill. 6.3)
- 1) Tenne permanent lys:
- PwI ENTOs/EKTOs (6.2.K)
- Off Standart program
- NM Nightmatic programi
- NMNightmatic program
- NM Program Nightmatic
- NM Programul Nightmatic
- NM Nightmatic programma
- Baxho:
- MoHTaX
- Popraok MoTtKa
- 3Kcnpnyatauia
- Ba3OBaЯркocTB(pnc.6.1.F)
- Off CtaHapTha nporpaMa
- TO TAKOE PJIABHOE BKJIOUHHe CBeta?
- KomΦopTHa 3KOHOMnHa nporpaMa
- Kak pa6oTaet KOMΦopTHaJ 3KOHOMnHaJ nporpaMa?
- KomΦopTha nporpaMa
- TolbkoДлЯстан EC:
- Гаразноюпг
- CepBnCHoe o6cIyXnBaHne:
- TexHnueckne daHHbIe
- PocjeIOBaTeJIHOCT 3a MOHTAX
- 6.Функця
- HactpoikKa Ha CBetJIOUyBCTBNTeJIHOCTTa (pnc. 6.1 G)
- Ba3OBOOCBeTJeHne(pnc.6.1.F)
- Off Pporpama CtaHapr
- KaKBO npeDCTaBna PnlaBHOTo BKJIIOUbaHe?
- Iporpama KomΦopT IKOHOMUHa
- Kak pa60tn nporpama Komfopt IKOHOMMnHa?
- Pporpama KomΦopt
- KaKBO e 6a3OBO OCBETJIeHHe?
- NM Pporpama Nightmatic
- IkoHOMnueH HOuEHN pexm (pnc. 6.2. J)
- CytpnB KJI/N3KJI (pnc. 6.2. K)
- NocToHHa CBeTmHa L 710 S (pnc.6.3)
- PerynpaHe Ha 06Xbata L 710 S (pnc. 6.4/6.5/6.6/6.7)
- 7.Подрьжka
Brand : STEINEL
Model : L 710 S
Category : Lighting