
Scanner termic HG Scan HG 2620 E - Thermal scanner STEINEL - Free user manual and instructions
Find the device manual for free Scanner termic HG Scan HG 2620 E STEINEL in PDF.
| Product Type | Thermal scanner (temperature recorder) for Steinel hot air gun |
| Brand | Steinel |
| Model | HG Scan HG 2620 E (also compatible with HG 2520 E) |
| Dimensions (with sleeve) | 99 x 95 x 153 mm |
| Weight (without sleeve) | 120 g (HG Scan PRO 2620 E) / 85 g (HG Scan PRO 2520 E) |
| Power supply | 15 V DC via connection to hot air gun |
| Temperature measurement range | 0 °C to 300 °C (32 °F to 572 °F) |
| Accuracy | ±2 °C or ±5 % of reading (at 25 °C and optimal distance) |
| Working distance | 10 cm (measurement spot approx. 2 cm) |
| IR spot size | 10:1 |
| Adjustable emissivity | 0.10 to 0.99 |
| Main functions | Non-contact infrared measurement, visual (LED ring) and audible alarm, 4 preset programs, memory function, LOC (lock) function |
| Display | Temperature in °C or °F, emissivity, operating symbols |
| Laser | Class 2, < 1 mW, 630-670 nm |
| Operating temperature | 0 °C to 50 °C (32 °F to 122 °F) |
| Operating humidity | 10 % to 90 % RH |
| Maintenance and cleaning | Clean the lens with a soft, lint-free cloth (no acidic/alcohol detergents); housing with water or mild detergent |
| Safety | Do not look into the laser beam; avoid moisture, dust, fumes; disconnect before assembly/disassembly |
| Warranty | 12 months of operation; repair or replacement of defective parts (excluding wear, misuse, drop) |
| Repair service | Contact Steinel after-sales service (number +33/3/20 30 34 00) after warranty |
| General information | Use with Steinel HG 2520 E or HG 2620 E guns; do not use with air-deflecting nozzles |
Frequently Asked Questions - Scanner termic HG Scan HG 2620 E STEINEL
User questions about Scanner termic HG Scan HG 2620 E STEINEL
0 question about this device. Answer the ones you know or ask your own.
Ask a new question about this device
Download the instructions for your Thermal scanner in PDF format for free! Find your manual Scanner termic HG Scan HG 2620 E - STEINEL and take your electronic device back in hand. On this page are published all the documents necessary for the use of your device. Scanner termic HG Scan HG 2620 E by STEINEL.
USER MANUAL Scanner termic HG Scan HG 2620 E STEINEL
IRL Socket Tool Company Ltd
Unit 714 Northwest Business Park
Kilshane Drive · Balkoolin Dublin 15
Tel: 00353 1 8809120 · Fax: 00353 1 8512061
info@sockettool.ie
F STEINEL FRANCE SAS
pronods@pronods.pt · www.pronods.ct
S KARL H STRÖM AB
Verkvasvågen 4 • S-55302 Jörköping
Tel: -46/36/31 42 40 · Fac +45/36/31 42 49 · www.ahs.se
DK Roliba A/S
Heidknervej 52 · DK-5250 Cdense SV
Tel: -45 6593 0357 · Fax: +45 6593 2757 · www.rcliba.dk
FI STC-Trading Ov
Konstantie 47 A · B-00390 Helsinki
Tel: +358 9 680 4180, Fax: +358 9 680 41877
msil@stolvading fi · www.stools.fi
N. Villan AS
Olat Heisetsveil 8 · N-0694 Colo
Tel: +4722725000 · post@lan.no
GR PANOS Lingonis + Sans O. E.
Aristofanous 8 Str. · GR-10554 Athens
Tel.: +90/210/9212021 · Fax: +90/210/9218690
lygonis@otenet.gr
Tel: +421/42/4 45 67 10 - Fax: +421/42/4 45 67 11
гресо@гресо.sk · www.grесо.sk
RO. Steinel Distribution SRL
Parc Industrial Matrom · RD - 500269 Brasov · Str. Carpatilor nr. 60
Tel: +400268 53 00 00 · Fax: +400268 53 11 11
www.steinelro
HR Daljinsko upravljanje d.o.o.
Bedlcha Smetane 10 - HR-10000 Zagreb
t/00385 1 388 66 77 · t/00385 1 388 02 47
dallinsko-upravlanje@net.hr · www.dallinsko-upravlanje.hr
LV Ambergs SIA
Brivbas galve 195-16 · LV-1039 Riga
Tel.: 00371 67550740 - Fax: 00371 67552850 - www.amcergs.M
B, 5/F, Wing Lok Street Trade Centre · 235 Wing Lok Street
Sheung Wan, Hong Kong
Tel.: +852 2543 3440 · Fax: +852 2854 1798
info@uslar.com.hk · www.fuslar.com.hk
STEINEL®
PROFESSIONAL

natural_image
Exterior view of a handheld electronic device labeled 'HD SCAN PRO' (no additional text or symbols visible)HG Scan PRO 2520 E

natural_image
Black MG SCAN PRO device with handle and control buttons (no visible text or symbols on body)HG Scan PRO 2620 E
Information
HG Scan PRO
text_image
Technical diagram showing five different types of hair blower tools with numbered labels indicating each component.⑤
text_image
Diagram illustrating a welding torch tool with cross and check symbols, showing tool positioning and assembly steps.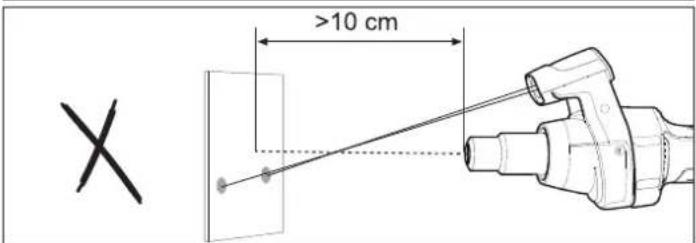
text_image
X >10 cm
text_image
10 cm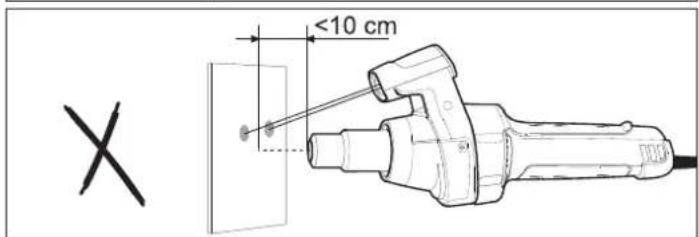
text_image
<10 cm X-4--5-

Bedienungsanleitung
Operating instructions
Designed for use with Steinel hot air tools, HG Scan PRO is a temperature scanner that uses infrared for measuring temperature on a contactless basis. During use, HG Scan PRO gives you an acoustic and visual warning if the temperature measured exceeds or falls below the temperature selected. It is powered from
the hot air tool. Please familiarise yourself with these operating instructions before using this product.
Prolonged reliable and trouble-free operation will only be ensured through correct handling.

Safety warnings
Tampering or technical modifications will result in the loss of warranty cover and exemption from liability.
Do not expose the device to any major mechanical strain or strong vibration.
The device must not be exposed to high levels of air humidity nor must it be allowed to get wet. Outdoors, the device must only be used in appropriate weather conditions or provided with appropriate protection.
Smoke, dust, steam and/or other vapours may adversely affect the HG Scan PRO's optical system and lead to incorrect results being displayed.
Switch the device OFF and prevent it from being switched ON unintentionally if it must be assumed that safe operation cannot be ensured. e.g. if
- the device shows visible damage
- the device does not work or
- the device has be exposed to adverse conditions for a prolonged period
- the product has been exposed to severe strain in transit.
- disconnect the HG 2520/2620 from the mains power supply before attaching / detaching.

Safety warnings
This device may be used by children aged 8 or above and by persons with reduced physical, sensory or mental capabilities or lack of experience and knowledge if they are supervised or have been given instructions on how to use the tool safely and understand the hazards involved. Do not allow children to play with the device. Children are not allowed to clean or carry out maintenance work on the device without supervision.
LASER RADIATION DO NOT LOOK INTO BEAM = 630 nm - 670 nm LASER CLASS 2 < 1 mW EN 60825-1:2008-05
How it works
HG Scan PRO measures an object's surface temperature. The heat radiated from the object is measured by the scanner's sensor and transmitted to the hot air tool. Emissivity is a value used to describe the relative ability of a material to emit thermal energy by radiation (characteristic "radiance").
The greater the emissivity, the more capable the material is of emitting thermal energy. Most organic materials and surfaces have a emissivity coefficient of approx. 0.90. Metallic surfaces or shiny materials have a lower emissivity coefficient. HG Scan PRO's emissivity can be selected so as to rule out imprecise measured values.
Controls (Fig. ①/ Fig. ③)
1 Lens
2 Laser
3 Holder
4 ON/OFF button
5 Operating symbol
6 Memory symbol
7 Symbol for memory programme / alarm tolerance level / audio signal
8 Temperature display °C, °F or emissivity E
9 LOC function symbol
10 Airflow symbol
11 Airflow adjustment
12 Display values

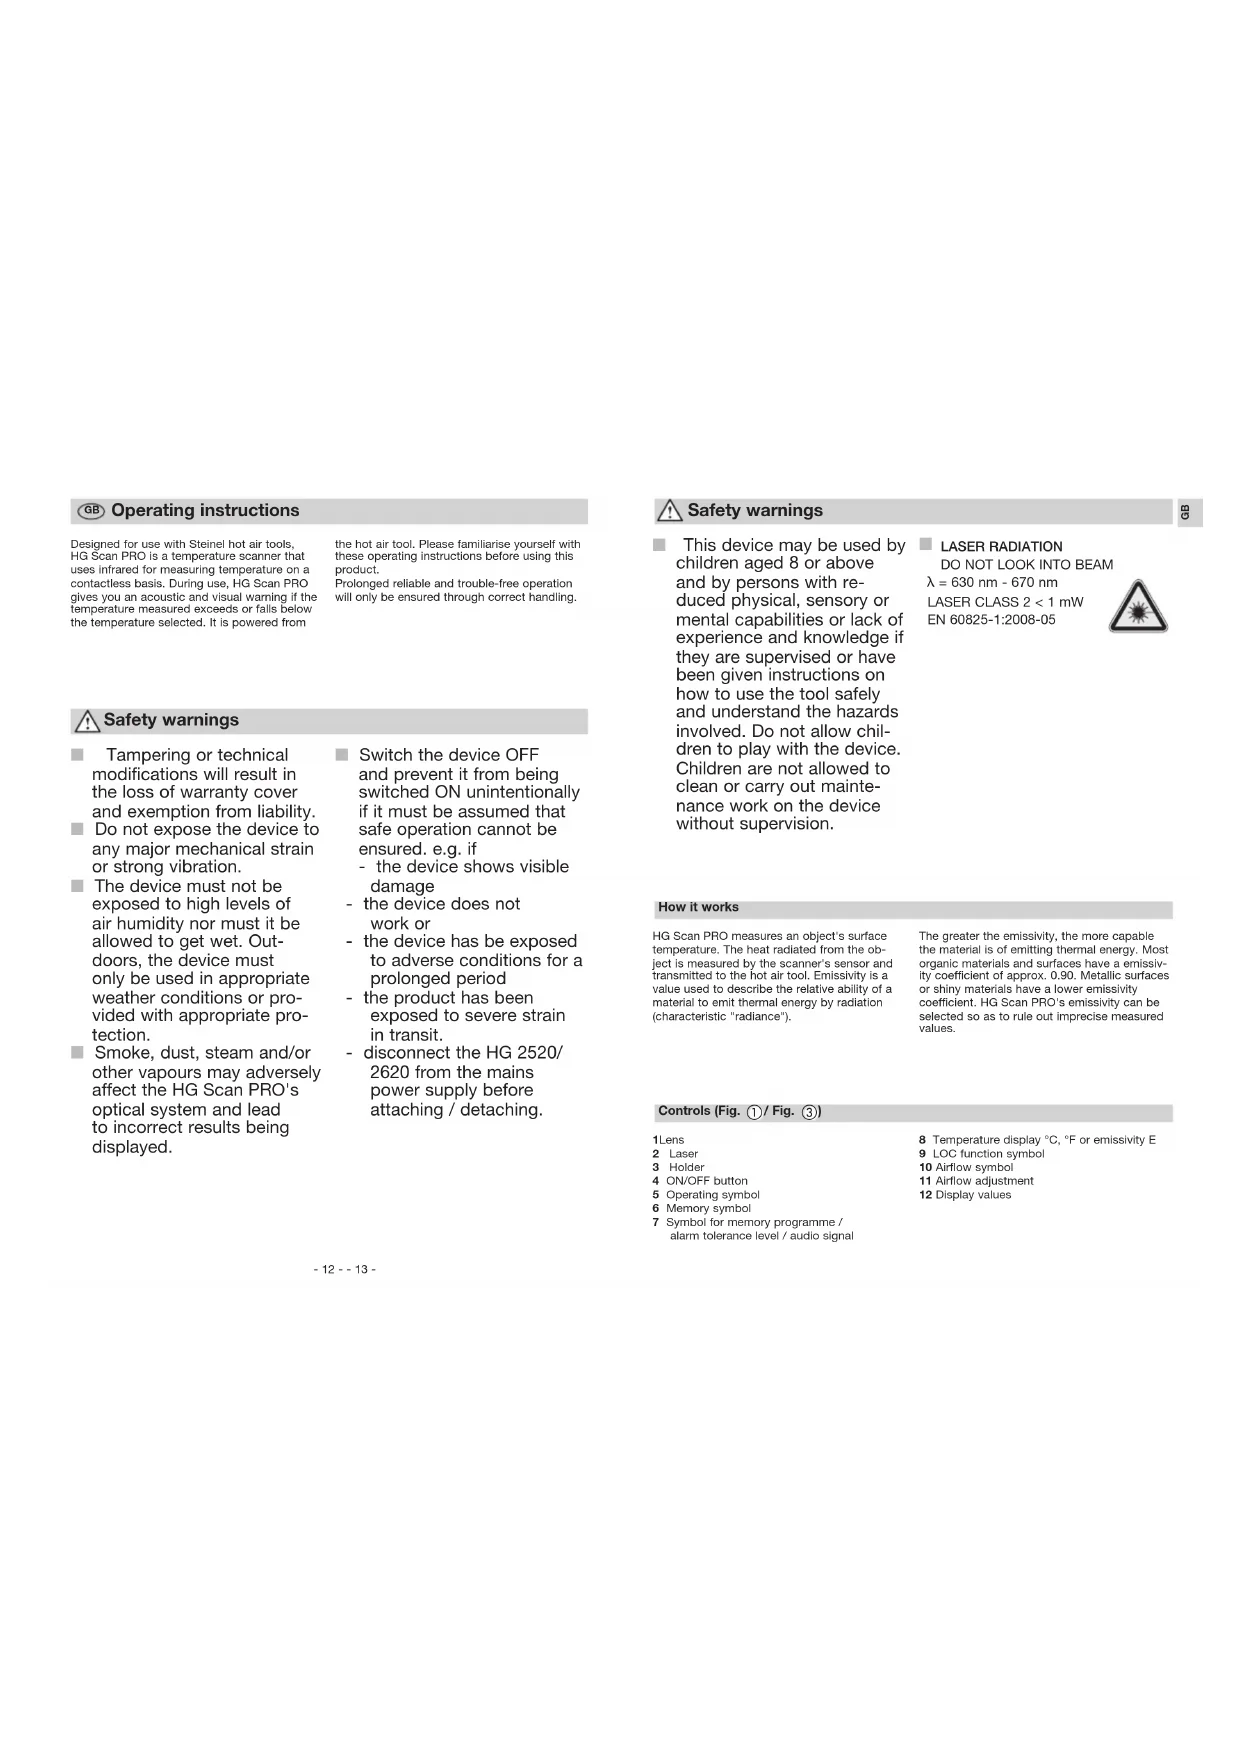
Attaching / detaching (Fig. ② / Fig. ④)
Attaching to / detaching from HG 2620 E (Fig. 2)
- Switch OFF HG 2620 E and disconnect from the power supply.
- Undo screws on side of guard sleeve and remove guard sleeve. Now remove cover cap.
- Fit guard sleeve into HG Scan PRO.
- Fit guard sleeve with HG Scan PRO onto the HG 2620 E and tighten screws at side.
- HG 2620 E ready for use with HG Scan PRO. Keep the cover cap in a safe place in case HG Scan PRO is removed again.
Operation
- Fit HG Scan PRO onto hot air tool ② and ④.
- The HG Scan PRO is switched ON by pressing the ON/OFF button (4). While the HG Scan PRO is activated, the display on the hot air tool shows the operating symbol (5). The HG Scan PRO can be used after switching ON at the controls of the hot air tool. The HG Scan PRO has a memory function. If it was active during the last time of use, it will be reactivated automatically the next time the HG 2620 is switched ON. Otherwise, it remains inactive until it is switched ON by pressing ON/OFF (4).
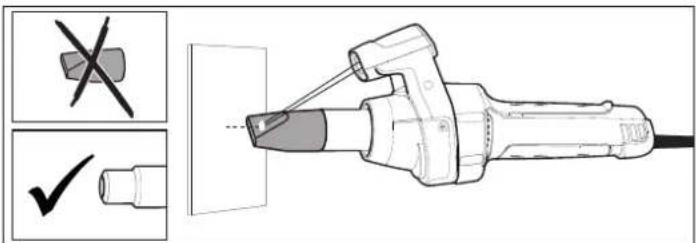
Measuring temperature (Fig. ⑤)
The ideal measurement area is 10 cm in front of the hot air tool's delivery outlet and measures approx. 2 cm (at the point where both laser beams intersect). Reducing / increasing the distance will cause results to vary.
To obtain accurate results, the object being measured must be larger than the measurement area. It is recommended for the object being measured to be at least twice the size of the measurement area.
■ HG Scan PRO is unable to take measurements through transparent surfaces, such as glass. Instead, HG Scan PRO measures the surface temperature of the glass.
Nozzles that deflect air and/or cut off sensing because of their length cannot be used with the HG Scan PRO.
Attaching to / detaching from HG 2520 E (Fig. 4)
- Switch OFF HG 2520 E and disconnect from the power supply.
- Undo screws on front of guard sleeve and remove guard sleeve. Now remove cover cap.
- Fit HG Scan PRO onto HG 2520 E
- Now fit guard sleeve back on and tighten front screws.
-
HG 2520 E ready for use with HG Scan PRO. Keep the cover cap in a safe place in case HG Scan PRO is removed again.
-
When switching ON for the first time, the device is active in the state it was in on leaving the factory: temperature setting = 150 °C / 300 °F, airflow setting 5, alarm tolerance level = 10 °C / 50 °F, emissivity = 0.90, audio signal ON.
-
The temperature and airflow rate are determined by material and intended method of working. Please always perform a test at a point that is hidden from view.
■ The measurement results obtained for reflective objects may be corrupted.
To obtain accurate results, HG Scan PRO must be allowed to reach ambient temperature. This also applies when moving from one place of use to another.
■ Prolonged use at high temperatures may cause the HG Scan PRO to heat up and deliver results that diverge from the actual surface temperature.
Settings
a) Settings
The following settings can be made: directly:
- Temperature
hrough the settings menu:
• Airflow: 150-600 l/min
• Alarm tolerance level: 10/20 °C, 50/70 °F
• Emissivity: 0.10-0.99 - Audio ON/OFF
The temperature setting is selected directly by using the joystick. Move the joystick to the right to increase the temperature setting or to the left to reduce it.
The airflow button takes you to HG Scan PRO's Settings menu where you can make further settings. Programmes can be selected at the programme button. For further details, please read the section on "Programme mode".
- Set the airflow by pressing the airflow button. The airflow symbol (10) on the display flashes while airflow is being set. Move the joystick to the right to increase the temperature setting or to the left to reduce it. If you do not wish to change the setting, please continue at 2.
- Emissivity is set by pressing the airflow button a second time. The display shows the letter "E" (8) while emissivity is being set. Move the joystick to the right to increase emissivity or to the left to reduce it. For further information on this, please read the section on Emissivity. If you do not wish to change the setting, please continue at 3.
-
Set the alarm tolerance level by pressing the airflow button a second time. The display shows the letter "L" (7) while the alarm tolerance level is being set. Move the joystick to the right to increase the alarm tolerance level or to the left to reduce it. For further information on this, please read the section on 'Alarm function'. If you do not wish to change the setting, please continue at 4.
-
Set the audio signal by pressing the airflow button a second time. The letter "A" (7) appears on the display while the audio signal is being set. Move the joystick to the right to switch the audio signal ON and to the left to switch it OFF. If you do not wish to change the setting, please continue at 5.
- Press the airflow button a second time to leave the Settings menu. HG Scan PRO starts to measure the temperature straight away.
b) Programme mode
Four programmes are factory-set for the most common types of work. After pressing the programme button, number 1 (7) is displayed for programme 1. Continuing to press the programme button displays numbers 2-4 (7) for programmes 2-4. Pressing the button again will return the tool to normal operation. No number (7) is displayed in normal mode.
c) Memory function
The values selected for the four programmes can be changed and memorised at any time. To do this, first press the programme button until the display shows the programme you wish to change. Select the chosen temperature setting, airflow and emissivity. The memory symbol on the display flashes to indicate that the programme selected has been changed. To memorise this setting in the programme selected, press and hold down the programme button. The memory symbol continues to flash for approx. 2 sec. The settings entered are saved once the memory symbol stays on all the time. The alarm tolerance level and audio signal can be changed in normal mode and applied to all programmes.
Preset programmes:
| Programme | 1 | 2 | 3 | 4 |
| Temperature setting (°C/°F) | 80 °C/180 °F | 120 °C/250 °F | 160 °C/320 °F | 250 °C/480 °F |
| Airflow setting | 4 | 5 | 6 | 5 |
| Emissivity | 0.95 | 0.85 | 0.90 | 0.94 |
d) LOC function
To avoid altering the chosen settings unintentionally, the HG Scan PRO comes with the Lockable Override Control Function (LOC).
To find out how to set the LOC function, please contact our Service Department on +44/1733/366-700.
Alarm function
HG Scan PRO comes with an alarm function that is activated when the temperature measured exceeds or falls below the temperature selected. The alarm is given in acoustic form by an audio signal and in visual form by a blue and red LED ring. The alarm is triggered when the temperature measured exceeds or falls below the temperature that is set.
A green LED ring shows that the temperature measured by HG Scan PRO is equivalent to the target value within the tolerance. The acoustic audio signal can be deactivated. To deactivate the audio signal, go to the section on 'Settings'.
| Alarm function table | ||
| Variations from the temperature setpoint in °C | ||
| Alarm tolerance levels 10°C 20°C | ||
| Red LED ring and audio signal >20°C >40°C | ||
| Red LED ring 10°C to 20°C 20°C to 40°C | ||
| Green LED ring -10°C to 10°C -20°C to 20°C | ||
| Blue LED ring -20°C to -10°C -40°C to -20°C | ||
| Blue LED ring and audio signal<-20°C<-40°C | ||
| Variations from the temperature setpoint in °F | ||
| Alarm tolerance levels 20°F | 40°F | |
| Red LED ring and audio signal | >40°F | >80°F |
| Red LED ring | 20 to 40°F | 40 to 80°F |
| Green LED ring | -20 to 20°F | -40 to 40°F |
| Blue LED ring | -40 to -20°F | -80 to -40°F |
| Blue LED ring and audio signal | >-40°F | >-80°F |
Emissivity
HG Scan PRO's emissivity can be selected to obtain accurate measurement readings for different materials and surfaces (see table).
The display shows the figures after the decimal point. (tenths and hundredths) e.g. 0.93 equates to 93.
| Surface | Emissivity |
| Car films 0.90-0.95 | |
| Wood | 0.80-0.90 |
| Rubber 0.86-0.95 | |
| Oil-based paints | 0.95 |
| Leather | 0.75-0.85 |
| Lacquers | 0.80-0.95 |
| Paper, card | 0.75-0.95 |
| Textiles | 0.90 |
| Plastic (PVC, PE, PP) | 0.85-0.95 |
The emissivities shown in the emissivity table are approximations. Surface quality, geometry or other parameters may influence the emissivity of the object being measured.
Please go to our website for a detailed overview: www.stinel-professional.de/emissionswerte (German) www.stinel-professional.de/emissivities (other languages)
| Technical specifications | HG Scan PRO 2620 E | HG Scan PRO2520 E |
| Operating voltage: | 15V DC | |
| Response time: | 500 ms | |
| Spectrum: | 8-14 μm | |
| Emissivity: | 0.10-0.99 | |
| Resolution: | 10°C / 10°F | |
| Working distance: | 10 cm | |
| IR measurement area: | 10:1 | |
| Operating temperature: | 0-50°C / 32-122°F | |
| Operating air humidity: | 10 % - 90 % RH | |
| Storage temperature: | -10-60°C / 14-140°F | |
| Storage air humidity: | < 80 % RH | |
| Temperature measurement range: | 0°C - 300°C (32°F - 572°F) | |
| Accuracy*: | ±2°C / ±3.6°F or ±5 % of the temperature measured | |
| Weight: | 120 g | 85 g |
| Dimensions: | 99 x 95 x 153 mm | 88 x 56.5 x 77 mm |
* Accuracy at an ambient temperature of approx. 25 °C and maintaining the optimum distance from the object being measured.
Care and maintenance
Cleaning the lens:
The lens may be cleaned with a damp, soft and non-linting cloth if it gets dirty (do not use cleaning agents). Alternatively, lens cleaning fluid may be used. Never use any acid-based or alcohol-based solvents or solvents of any other kind.
Cleaning the enclosure
The enclosure can be cleaned with water or mild detergent. Never use any abrasive products or solvents.
Disposal

Do not throw devices, rechargeable batteries / batteries into household waste, fire or water at the end of their useful life.
Rechargeable batteries/batteries should be collected, recycled or disposed of in an environmentally friendly manner.
CE Declaration of Conformity
This product complies with
- EMC Directive 2014/30/EC
- RoHS Directive 2011/65/EC
- WEEE Directive 2012/19/EC
Functional warranty
This STEINEL product has been manufactured with utmost care, tested for proper operation and safety and then subjected to random sample inspection. STEINEL guarantees that it is in perfect condition and proper working order. The warranty period is 12 months and starts on the date of sale to the consumer. We will remedy all defects caused by material flaws or manufacturing faults. The warranty will be met by repair or replacement of defective parts at our own discretion. This guarantee does not cover damage to wearing parts, damage or defects caused by improper treatment or maintenance nor does it cover breakage as a result of the product being dropped. Further consequential damage to other objects shall be excluded. Claims under warranty shall only be
accepted If the product is sent fully assembled and well packed complete with sales slip or invoice (date of purchase and dealer's stamp) to the appropriate Service Centre or handed in to the dealer within the first 6 months.
Repair service:
If defects occur outside the warranty period or are not covered by warranty, please ask your nearest service station for the possibility of repair.
FUNCTIONAL
12 month
WARRANTY
F Mode d'emploi
- directive RoHS 2011/65/CE
11 Luftmengdeinnstilling
12 Visningsverdier