EW1050HX - Water pump MAKITA - Free user manual and instructions
Find the device manual for free EW1050HX MAKITA in PDF.
| Product type | Self-priming centrifugal water pump |
| Brand | Makita |
| Model | EW1050HX |
| Weight | 5.8 kg |
| Dimensions (L x W x H) | 327 x 231 x 319 mm |
| Engine type | 4-stroke, unleaded gasoline (octane rating 87+) |
| Displacement | 24.5 cm³ |
| Max power | 0.71 kW at 7000 min⁻¹ |
| Fuel tank capacity | 0.5 L |
| Oil tank capacity | 0.08 L |
| Max flow rate | 110 L/min |
| Max total head | 35 m |
| Max suction height | 8 m |
| Connection diameter (suction/discharge) | 1 inch |
| Ignition type | Transistorized |
| Spark plug | NGK CMR6A (gap 0.7-0.8 mm) |
| Sound pressure level (LpA) | 88.4 dB(A) (K=3 dB) |
| Sound power level (LwA) | 109 dB(A) |
| Allowable water temperature | 5-40 °C |
| Intended use | Clear water pumping for garden and irrigation |
| Recommended engine oil | SAE 10W-30, API SF or higher (4-stroke automotive) |
| Oil change interval | First at 20 hours, then every 50 hours |
| Air filter maintenance | Cleaning every 10 hours |
| Fuel filter maintenance | Cleaning every 50 hours, replacement every 3 months |
Frequently Asked Questions - EW1050HX MAKITA
User questions about EW1050HX MAKITA
0 question about this device. Answer the ones you know or ask your own.
Ask a new question about this device
Download the instructions for your Water pump in PDF format for free! Find your manual EW1050HX - MAKITA and take your electronic device back in hand. On this page are published all the documents necessary for the use of your device. EW1050HX by MAKITA.
USER MANUAL EW1050HX MAKITA
GB Engine Pump Instruction Manual
Explanation of general view
| 1 Plug (priming) | 13 Muffler | 25 Plug (priming) |
| 2 Delivery | 14 Choke lever | 26 Delivery |
| 3 Suction | 15 Starter knob | 27 Suction |
| 4 Plug (drain) | 16 Recoil starter | 28 Strainer |
| 5 Pump case | 17 Oil gauge | 29 Hose (optional accessory) |
| 6 Handle | 18 Set base | 30 Oil gauge |
| 7 Spark plug cover | 19 Throttle lever | 31 Upper level |
| 8 Air cleaner | 20 Packing | 32 Lower level |
| 9 Tank cap | 21 Hose coupling | 33 Fuel tank cap |
| 10 Fuel tank | 22 Thumb nut | 34 Upper level |
| 11 Primer pump | 23 Hose band | 35 Fuel tank |
| 12 I-O (On/Off) switch | 24 Hose | 36 Fuel pipe |
Thank you very much for purchasing the MAKITA Engine Pump. We are pleased to recommend to you the MAKITA Engine pump which is the result of a long development program and many years of knowledge and experience.
Please read this booklet which refers in detail to the various points that will demonstrate its outstanding performance. This will assist you to obtain the best possible result from your MAKITA engine pump.
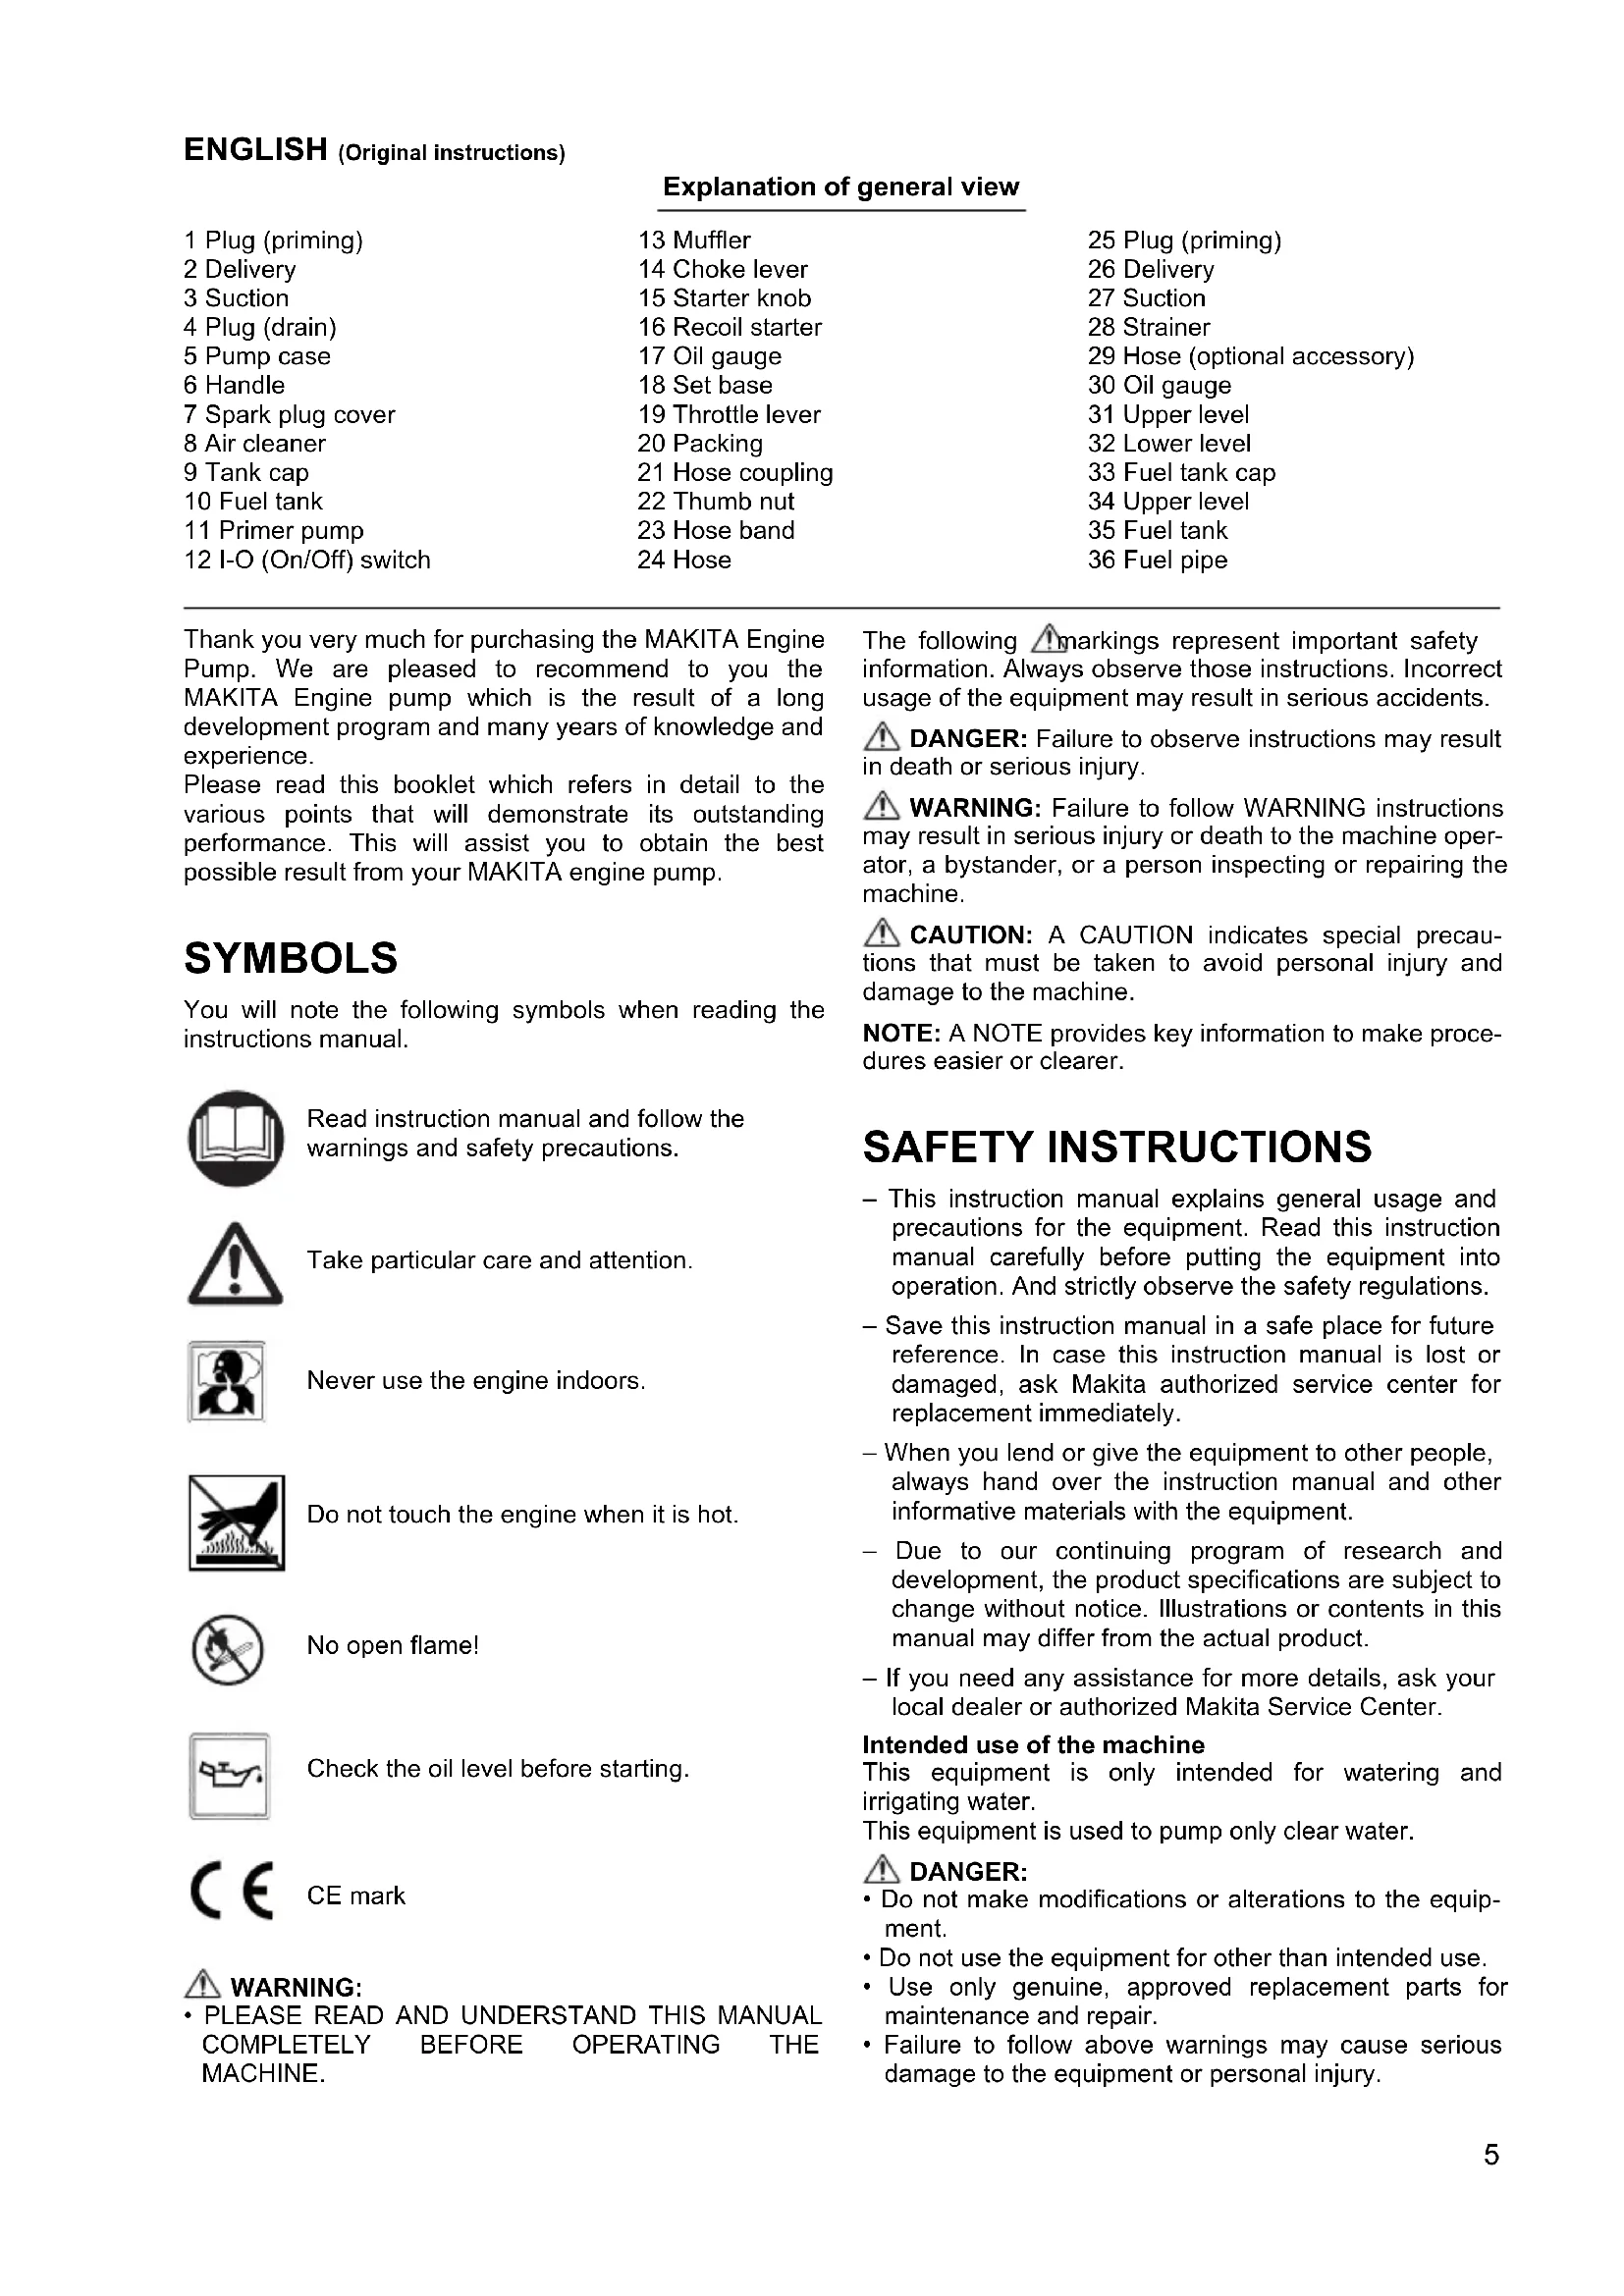
SYMBOLS
You will note the following symbols when reading the instructions manual.

Read instruction manual and follow the warnings and safety precautions.

Take particular care and attention.

Never use the engine indoors.

Do not touch the engine when it is hot.

No open flame!

Check the oil level before starting.

CE mark
WARNING:
- PLEASE READ AND UNDERSTAND THIS MANUAL COMPLETELY BEFORE OPERATING THE MACHINE.
The following markings represent important safety information. Always observe those instructions. Incorrect usage of the equipment may result in serious accidents.
DANGER: Failure to observe instructions may result in death or serious injury.
WARNING: Failure to follow WARNING instructions may result in serious injury or death to the machine operator, a bystander, or a person inspecting or repairing the machine.
CAUTION: A CAUTION indicates special precautions that must be taken to avoid personal injury and damage to the machine.
NOTE: A NOTE provides key information to make procedures easier or clearer.
SAFETY INSTRUCTIONS
- This instruction manual explains general usage and precautions for the equipment. Read this instruction manual carefully before putting the equipment into operation. And strictly observe the safety regulations.
- Save this instruction manual in a safe place for future reference. In case this instruction manual is lost or damaged, ask Makita authorized service center for replacement immediately.
- When you lend or give the equipment to other people, always hand over the instruction manual and other informative materials with the equipment.
- Due to our continuing program of research and development, the product specifications are subject to change without notice. Illustrations or contents in this manual may differ from the actual product.
- If you need any assistance for more details, ask your local dealer or authorized Makita Service Center.
Intended use of the machine
This equipment is only intended for watering and irrigating water.
This equipment is used to pump only clear water.
DANGER:
- Do not make modifications or alterations to the equipment.
- Do not use the equipment for other than intended use.
- Use only genuine, approved replacement parts for maintenance and repair.
- Failure to follow above warnings may cause serious damage to the equipment or personal injury.
EXHAUST PRECAUTIONS
- Never inhale exhausts gasses. They contain carbon monoxide, a colorless, odorless and extremely dangerous gas which can cause unconsciousness or death.
- Never operate the engine indoors or in a poorly ventilated area, such as tunnel, cave, etc.
Exercise extreme care when operating the engine near people or animals. - Keep the exhaust pipe free of foreign objects.
REFUELING PRECAUTIONS
- Be sure to stop the engine prior to refueling.
- Do not overfill the fuel tank.
- If fuel is spilt, wipe it away carefully and wait until the fuel has dried before starting the engine.
- After refueling, make sure that the fuel cap is secured to prevent spillage.
FIRE PREVENTION
- Do not operate the equipment while smoking or near an open flame.
- Do not use the equipment around dry bush, twigs, cloth rags, or other flammable materials.
- Keep the engine at least 1 meter away from buildings or other structures.
- Keep the engine away from flammables and other hazardous materials (trash, rags, lubricants, explosives).
- Never put the hot Pump onto dry grass or onto any combustible materials.
For European countries only
EC Declaration of Conformity
The EC declaration of conformity is included as Annex A to this instruction manual.
TECHNICAL DATA
| EW1050H EW1060H | |||
| Weight kg 5.8 7.3 | |||
| Dimension mm 327 x 231 x 319 356 x 234 x 336 | |||
| Type Self-priming CENTRIFUGAL PUMP | |||
| Diameters (suction-discharge) inch 1 | |||
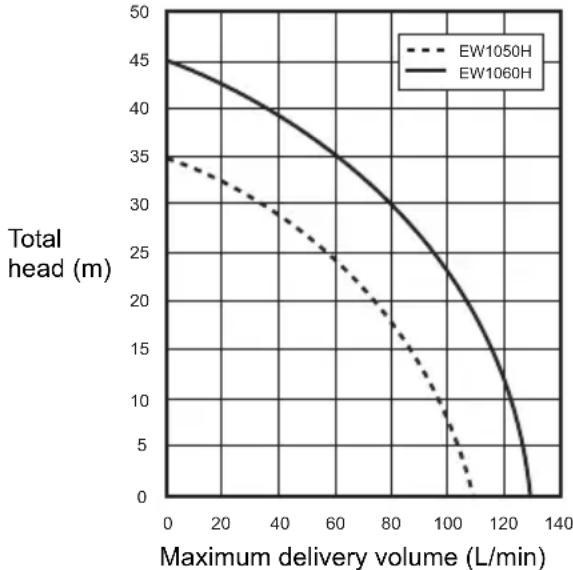
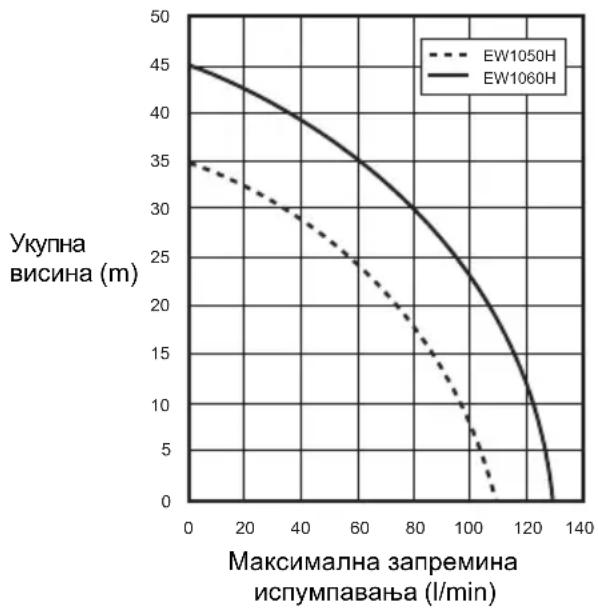
| Total head | m | 35 | 45 |
| Maximum delivery volume | L/min | 110 | 130 |
| Maximum suction lift | m | 8 | 8 |
| Volume (fuel tank) | L | 0.5 | 0.65 |
| Volume (oil tank) | L | 0.08 | 0.1 |
| Engine displacement | cm3 | 24.5 | 33.5 |
| Maximum engine performance | kW | 0.71 at 7,000 min-1 | 1.07 at 7,000 min-1 |
| Carburetor | type | Diaphragm | |
| Ignition system | type | Solid state ignition | |
| Spark plug type | NGK CMR6A | ||
| Electrode gap | mm | 0.7 - 0.8 | |
| Fuel | Automobile gasoline | ||
| Engine Oil | SAE 10W-30 oil of API Classification, Class SF or higher (4-stroke engine for automobile) | ||
| Applicable water temperature | °C | 5 - 40 | 5 - 40 |
| Sound pressure level | LpA eq | dB (A) | 88.4 |
| Uncertainty K | dB (A) | 3 | |
| Sound power level | LwA, d | dB (A) | 109 |
Note: Wear ear protection during operation.
DESIGNATION OF PARTS (Fig. 1 & 2)
ASSEMBLY (Fig. 3)
WARNING:
- Before doing any work on the equipment, always stop the engine.
- Start the engine only after having assembled the equipment completely.
HOSE INSTALLATION
- Install the hose joints on the pump.
CAUTION:
- When installing the joint to the pump, be sure the packing is in place.
- Connect the hoses on the joints with band.
Check the hose band is securely tightened. - Connect the strainer on the inlet hose end.
NOTE:
If air leaks, water could not be drawn up.

CAUTION:
- Do not remove strainer or pump damage may occur by foreign material.
Check the hose band is securely tightened.
- Before doing any work on the equipment, always stop the engine. And always carry on work on flat and stable surface.
- Check the equipment for loose screw or loose connection parts before starting engine.
- Avoid touching the engine and muffler with any part of your body or clothing during inspection or repair, while they are still hot.
- Take special care of ventilation. Beware of CO poisoning.
INSPECTION AND REFILL OF ENGINE OIL (Fig. 4)
Perform the following procedure, with the engine cooled down.
Assure that the engine is on horizontal position.
- Do not thread the oil gauge into oil filler to check oil level.
- Check if the oil level is between the lower or upper limit on the oil gauge.
- If the oil level is below the lower limit, add oil.
- You may need to refill oil approximately every 10 operating hours (every 10 refueling).
- If the oil changes in color or mixes with dirt, replace it with new one.
Recommended oil: SAE 10W-30 oil of API Classification, Class SF or higher (4-stroke engine for automobile)
Oil volume:
For model EW1050H: Approx. 0.08L
For model EW1060H: Approx. 0.1L
NOTE:
- If the engine is not positioned horizontal, an inaccurate indication of oil level may occur and oil may be over-filled. Filling oil above the upper limit may cause oil contamination or white smoke.
Refilling engine oil
- Keep the engine in horizontal position, and detach the oil gauge.
- Fill with oil to upper limit mark. Use oil bottle when filling.
- Securely tighten the oil gauge. Insufficient tightening may cause oil leakage.
After refilling oil
Wipe any spilled oil with a rag immediately.
Replacement of oil: Oil gauge
- Remove dust or dirt near the oil refill port.
- Keep the detached oil gauge free from sand or dust. Otherwise, any sand or dust adhering to the oil cap may result in problems with irregular oil circulation or wear on the engine parts.
FUEL
WARNING:
- Fuel is highly flammable and poisonous. Keep away from open flames (cigarette, stove, fireworks), electric spark (battery, short circuit, spark from shorted switch, welding spark etc.) when handling the fuel.
- Be sure to stop the engine before refueling. Do not refuel when the engine is still hot.
- Other than the occasion of refueling, even when decanting fuel to small container, always pay ample attention.
- After refueling, securely tighten the fuel tank cap, and wipe out spilled fuel completely.
Handling of fuel
It is necessary to handle fuel with utmost care. Fuel may contain substances similar to solvents. Refueling must be performed in a sufficiently ventilated room or in the open air. Never inhale fuel vapor, and keep fuel away from you. If you touch fuel repeatedly or for a long time, the skin becomes dry, which may cause skin disease or allergy. If fuel enters into the eye, clean the eye with fresh water. If your eye remains still irritated, consult your doctor.
Storage period of fuel
Fuel should be used within a period of 4 weeks, even if it is kept in a special container in a well-ventilated and shaded area.
Otherwise, fuel may deteriorate in one day.
Storage of machine and refill tank
- Keep the machine and tank at a cool place free from direct sunlight.
- Never keep the fuel in a car.
Type of fuel:
The engine is a four-stroke engine. Be sure to use an unleaded automobile gasoline 87 or higher octane (R + M) / 2 .It may contain no more than 10% alcohol E- 10).
- Never use a gasoline mixture which contains engine oil. Otherwise, it will cause excessive carbon accumulation or mechanical troubles.
Fuel tank capacity:
For model EW1050H: 0.5L
For model EW1060H: 0.65L
Refueling (Fig. 5)
- Keep the engine in horizontal position.
- Loosen the fuel tank cap a little to release the tank pressure.
- Detach the fuel tank cap, and refuel. DO NOT fill fuel up to the top of the tank.
-
After refueling, securely tighten the fuel tank cap.
-
Wipe the outside of the fuel tank cap to prevent debris from entering into the fuel tank.
- If there is any flaw or damage on the fuel tank cap, replace it.
- The fuel tank cap wears out in course of time. Replace it every two to three years.
- DO NOT put fuel in the oil fill port.
Priming water (Fig. 6)
CAUTION:
- Do not start the pump without water in the pump case. Otherwise mechanical seal could be damaged.
Remove priming plug and add clear water until pump case is filled up with water. After filling tighten the priming plug.
NOTE:
- If the water intake is not sufficient, self-priming capacity becomes lower.
- Be sure the pump is placed on the firm place and as near to available water source as possible.
- The higher the suction head is the more time will be required for priming with a less discharge.
CHECKING ENGINE:
- Carefully check fuel hoses and joints for looseness and fuel leakage. Leaked fuel creates a potentially dangerous situation.
- Check bolts and nuts for looseness. If any, retighten them. A loose bolt or nut may cause serious engine trouble.
- Check the engine oil and refill if necessary.
- Check the fuel level and refill if necessary. Take care not to overfill the tank.
- Keep cylinder fins and recoil starter free of dirt, grass and other debris.
- Wear snug fitting working clothes when operating the engine.
OPERATION
WARNING:
- Never touch a hot engine muffler especially when restarting the engine. The engine muffler becomes hot after running the engine.
- Do not put your hands or foreign objects in the release valves when the pump is in use.
WARNING:
Beware of water-hammering
- Do not allow the wheel of a vehicle to run over the delivery hose. Do not close the delivery valve abruptly, because a water-hammer will occur which may result in heavy damage to the pump.
Starting:
CAUTION:
-
Because the lubricating oil has not yet spread enough, do not rev up the engine just after engine starts. Unnecessary high-revolution shortens life of the equipment or cause damage.
-
Check that the pump case is filled with water.
- Check that the strainer is set under the water.
CAUTION:
- Employ some preventive method when the bottom of the water is covered with mud or sand.
- Check there is no obstacle on the mouth of delivery hose.
- Turn the engine I-O (ON/OFF) switch to the "I" (ON) position.
- Check that the throttle lever indicates "L". (Fig. 7)
-
Continue to push the primer pump until fuel comes into the primer pump. (In general, 7 to 10 pushes.)
-
Adjust the choke lever.
- If the engine is cold or the ambient temperature is low, close the choke lever fully. (Fig. 8)
- If the engine is warm or the ambient temperature is high, open the choke lever half-way, or keep it fully open.
- Pull the starter knob gently until a certain resistance is felt. Then, return the starter knob, and pull it strongly. Never pull the rope to the full extension.
- Adjust the choke lever.
- If the engine is cold or the ambient temperature is low, close the choke lever fully. (Fig. 8)
- If the engine is warm or the ambient temperature is high, open the choke lever half-way, or keep it fully open.
- Pull the starter knob gently until a certain resistance is felt. Then, return the starter knob, and pull it strongly. Never pull the rope to the full extension. Once the starter knob is pulled, never release your hand immediately. Hold the starter knob until it returns
Once the starter knob is pulled, never release your hand immediately. Hold the starter knob until it returns to its original point.
If it is difficult to start the engine, open the throttle by about 1/3. - Once engine starts, set choke lever to the OPEN position if you have closed the choke lever. (Fig. 9)
- Allow the engine to properly "warm up". Continue warm-up operation for 2 to 3 minutes at "L" position.
Running engine:
Turn the throttle lever to middle position, and check water come out from the delivery hose.
Finishing operation
Stopping engine
Turn the throttle lever to "L" position to set the engine at the lowest revolution.
Turn the engine I-O (ON/OFF) switch to the "O" (OFF) position.
Drain of water after use
Water inside the pump case freezes at below 0^ in winter and pump may possibly break. After use, drain water from the drain at bottom to store.
SERVICING INSTRUCTIONS
WARNING:
- Before doing any work on the equipment, always stop the engine. Do not perform any work when the engine is still hot.
CAUTION:
- Do not modify or adjust the carburetor. It is already factory adjusted for its best efficiency. In case adjustment is required, ask your local service center.
- Do not wash the engine with water during servicing.
ENGINE OIL CHANGE
WARNING:
- The engine and engine oil is still hot just after stopping engine. Allow sufficient time for the engine and engine oil to cool down. Otherwise a skin burn may result.
CAUTION:
- Before changing oil, check for a suitable way to dispose of old oil. Do not pour it down into sewage drains, onto garden soil or into open streams. Your local zoning or environmental regulations will give you more detailed instructions on proper disposal.
Deteriorated engine oil shortens the life of the engine. Be sure to check the oil and level regularly.
NOTE:
- If the oil filled above the limit, it may be contaminated or may catch fire with white smoke. Allow sufficient time after stopping engine for the engine oil to return to the oil tank to ensure accurate reading of the oil level.
Interval of replacement: After first 20 operating hours, followed by every 50 operating hours.
Recommended oil: SAE 10W-30 oil of API
Classification SF Class or higher (4-stroke engine oil for automobile)
Oil volume:
For model EW1050H: Approx. 0.08L
For model EW1060H: Approx. 0.1L
- Remove the oil gauge. (Fig. 10)
Be cautious to place the oil gauge in a place where it will not gather dirt, dust or other foreign matter. - Place a cloth or paper towel to the area around the oil filler hole.
- Remove the oil gauge, then tilt the engine and drain the oil into a pan or other receptacle.
- Put the equipment on a level surface. Pour the oil in from a squeeze bottle or other appropriate. Fill with the oil up to the point of overflowing the filler neck. (Fig. 4)
- After filling the engine with oil, reinsert the oil gauge. Ensure that the oil gauge is tight, as if it loosens later oil will leak out.
CHECKING THE SPARK PLUG (Fig. 11)
CAUTION:
- Never touch the spark plug connector while the engine is running (danger of high voltage electric shock).
Interval of Cleaning and Inspection: Daily (every 10 operating hours)
- Only use the supplied universal wrench to remove or to install the spark plug.
- The gap between the two electrodes of the spark plug should be 0.7 - 0.8mm
If the gap is too wide or too narrow, adjust it. If the spark plug is clogged or contaminated, clean it thoroughly or replace it.
CLEANING OF AIR CLEANER (Fig. 12)
WARNING:
- Shut off the engine. Keep away from open flames. Dirty air cleaner element causes starting difficulty, power loss, engine malfunctions, and shortens engine life extremely. Keep the air cleaner element clean.
Interval of Cleaning and Inspection: Daily (every 10 operating hours)
- Place the choke lever to the fully closed position so that dust and dirt are not allowed to enter the carburetor.
- Remove the fixing bolt of air cleaner cover.
- Pull out the lower edge of the cover to remove the air cleaner cover.
- Remove the element, and then clean it with a solution of warm water and a mild detergent, thoroughly drying it afterward.
- Install it in alignment with the lines as shown in illustration.
- Wipe off any oil adhering to the area around the air cleaner cover and breathe with a cloth.
- After cleaning, reassemble the cleaner cover (insert the tab at the top first, then insert the bottom tab) and tighten the fixing bolt.
CLEANING OF FUEL FILTER
WARNING:
- Shut off the engine. Keep away from open flames. Do not smoke.
Interval of Cleaning and Inspection: Monthly (every 50 operating hours)
The fuel filter is used to filter the fuel required by the carburetor. A periodical visual inspection of the fuel filter is to be conducted.
- Open the fuel tank cap, use a wire hook and pull out the suction head through the tank opening.
- Remove the hose clamp and pull out the fuel filter from fuel pipe.
- Wash the fuel filter with kerosene.
- After washing, reassemble it.
- If the filter is hard or clogged up, replace it with new one.
Replace the fuel filter at least quarterly to ensure an enough fuel supply to the carburetor. Otherwise an insufficient fuel supply may cause the engine start failure and limited maximum speed.
After checking, cleaning or replacing, fix the fuel filter onto the fuel pipe with the hose clamp.
Push the fuel filter in all the way to the bottom of the fuel tank. (Fig. 13)
REPLACEMENT OF FUEL PIPE (Fig. 14)
WARNING:
- Shut off the engine. Keep away from open flames.
Interval of Cleaning and Inspection: Daily (every 10 operating hours)
Replacement: Annually (every 200 operating hours)
Replace the fuel pipe every year, regardless of operating frequency. Fuel leakage may lead to fire.
If any leakage is detected during inspection, replace the fuel pipe immediately.
INSPECTION OF BOLTS, NUTS AND SCREWS
- Retighten loose bolts, nuts, etc.
- Check the fuel cap and oil cap for tightness. Check for fuel and oil leakage.
- Replace damaged parts with new ones for safety operation.
CLEANING OF PARTS
- Always keep the engine clean by wiping down with a cloth rag.
- Keep the cylinder fins free of dust or dirt. Dust or dirt adhering to the fins may cause piston seizure.
Periodic maintenance schedule table
| Item\Operating time | Before operation | Daily (10h) | 50h 200h | Before storage | ||
| Engine oil Inspect/REFILL | ○ | |||||
| Replace *1 | ○ | |||||
| Tightening parts (bolt, nut) | Inspect | ○ | ||||
| Fuel tank Clean/INSPECT | ○ | |||||
| Drain fuel | ○ | |||||
| Throttle lever Check function | ○ | |||||
| I-O(ON/OFF) switch Check function | ○ | |||||
| Air cleaner Clean | ○ | |||||
| Spark plug Inspect | ○ | |||||
| Clean/Adjust | ○ | |||||
| Cooling air passage and cylinder fins | Clean/INSPECT | ○ | ||||
| Fuel pipe Inspect | ○ | |||||
| Replace *2 | ◎ | |||||
| Fuel filter Clean/replace | ○ | |||||
| Valve clearance (intake valve and exhaust valve) | Inspect/adjust | ◎*2 | ||||
| Engine overhaul if necessary | ◎*2 | |||||
| Carburetor Drain fuel | ○ | |||||
| Pump set | Clean | ○ | ||||
| Strainer | Inspect/Clean | ○ |
1 Perform initial replacement after 20h operation.
Before changing oil, check for a suitable way to dispose of old oil. Do not pour it down into sewage drains, onto garden soil or onto open streams. Your local zoning or environmental regulations will give you more detailed instructions on proper disposal.
2 For the 200 operating hours inspection, request authorized service center.
STORAGE

WARNING:
- When draining the fuel, be sure to stop the engine and confirm that the engine cools down. Just after stopping the engine, it may still hot with possibility of burns, inflammability and fire.

CAUTION:
- When the equipment is kept out of operation for a long time, drain all fuel from the fuel tank, and keep it at a dry and clean place.
Before storage
- Completely remove any water from the drain port.
-
Pull gently the recoil starter handle on the engine until resistance is felt.
-
After removing fuel from the fuel tank, push the primer pump until fuel in the gas pipe runs out. Remove the fuel from the pump once more.
- Set the throttle lever in the "L" position.
- Wipe away any dirt or dust.
- Store the pump in a dry, warm location where there is no chance of freezing.
Transporting
When lifting and transporting the machine, hold the handle firmly with both hands.
TROUBLESHOOTING
Before making a request for repairs, check for trouble by yourself. If any abnormality is found, control your machine according to the description of this manual. Never tamper or dismount any part contrary to the description. For repairs, contact authorized service center.
| Trouble Cause Remedy | ||
| Engine does not start | Failure to operate primer pump. | Push 7 to 10 times. |
| Low pulling speed of starter rope. | Pull strongly. | |
| Lack of fuel. Feed fuel. | ||
| Clogged fuel filter. Clean it. | ||
| Disconnected fuel tube. Connect fuel tube properly. | ||
| Bent fuel tube. Straighten fuel tube. | ||
| Deteriorated fuel. | Deteriorated fuel makes starting more difficult. Replace with new fuel. (Recommended replace-ment: 1 month). | |
| Excessive suction of fuel. | Set throttle lever to medium or "H" position, and pull starter handle until engine starts. If engine still does not start, remove spark plug, dry the electrode, and reassemble them as they originally were. Then, start as specified. | |
| Detached plug cap. Attach securely. | ||
| Contaminated spark plug. Clean it. | ||
| Abnormal clearance of spark plug. | Adjust clearance. | |
| Other abnormality of spark plug. | Replace it. | |
| Abnormal carburetor. Make request for inspection and maintenance. | ||
| Starter rope cannot be pulled. | Make request for inspection and maintenance. | |
| Abnormal drive system. Make request for inspection and maintenance. | ||
| Engine stops soon Engine speed does not increase | Insufficient warm-up. Perform warm-up operation. | |
| Choke lever is set to "CLOSE" although engine is warmed up. | Set to "OPEN". | |
| Clogged fuel filter. Clean it. | ||
| Contaminated or clogged air cleaner. | Clean it. | |
| Abnormal carburetor. Make request for inspection and maintenance. | ||
| Abnormal drive system. Make request for inspection and maintenance. | ||
| Pump does not work. Sticking of impeller. | Ask your local Makita authorized service center to repair it. | |
| Pumping volume is small. | Air enters suction side. Check | piping at suction side. |
| Drop of engine output. | Ask your local Makita authorized service center to repair it. | |
| Breakage of mechanical seal. | Replace packing. | |
| High suction lift. Lower the suction lift. | ||
| Thin or long or kink of hose. Thicken or shorten or straighten. | ||
| Leak of water from water passage. | Stop leak. | |
| Clogging of foreign substance in impeller. | Ask your local Makita authorized service center to repair it. | |
| Wear of impeller. | Ask your local Makita authorized service center to repair it. | |
| Pump does not self-prime. | Suction of air at suction side. Check piping at suction side. | |
| Insufficient priming water inside pump case. | Prime fully. | |
| Imperfect tightening of drain cock. | Tighten the 2 plugs completely. | |
| Imperfect revolution of engine. | Ask your local Makita authorized service center to repair it. | |
| Entrance of air from mechanical seal. | Replace packing. | |
Descriptif
- No permitted that the vehicle passes on the road.
- No permit to pass through the vehicle's parking lot.
- No permit to pass through the vehicle's parking lot.
- No permit to pass through the vehicle's parking lot.
- No permit to pass through the vehicle's parking lot.
Arranque:
PRECAUCION:
Mny ayyicTe TOV KIVNTnpa OTV AVEi CEOTc.

Oxivuuvcfoyec!

EaeyTe Tn 0aOu Aoiou PIV EKivnoeT.

ΣημαCE
1 NPOEIAOIOIHsH:
He TopkaTecs dBnryHa, KOnn BIn rapaun.

He BnKOpNCTOByBaTn npicptpi n6n3y BiDKpNTOro BOHIO!

Ipeep3anyckom nepeBipTre pibH MaCTnJa.

MapkyBaHHCE
NONEPEKHEHRA!
- INEPU HIX KOPNUCTYBATNCR BINOPOBOM, NOBHICTIO IPOHTAITE TA 3PO3YMITE LIO IHCTPYKLIIO.
HabeHe HnKHe No3HaueHHcynpOBoJxIyOtB BaxJIbBi BiDOMocTi 0oTo TexHikn 6e3neKn. 3aBXdN DoTPmYTeCzHX Bka3iBok. HenpaBnIbHe BnKOpNCtAHn O6NaHaHH MoKe npN3BeCTn Do cepNo3Hnx HeuacHnx BnJaIKB.
HE6E3NEKA! HeDToPImaHHa Bka3iBOK MOKe cnpuHHn Cmeptb a6o BaXkI TpaBMn.
NONEPEDXEHH! HeDopmAHnBk3IBOK, NOB'3aHnx i3 NONEPEDXEHHAM, MoKe cnpuHHTn BaxKi TpaBMn a6o Cmeptb onepatoa 0bnadHaHH, Oc6n Jka npOBOnTb nepeBipky a6o peMOHT Bnpo6y, H3NaOOnTbCnPnD.
YBAGA! CnoBOM YBAGA! no3NaueHo cneuaJIbHI 3aCTepeXHi 3axOHi, kNkx cnId yKuBaTu DnIa nonepedJKeHH TpaBMyBaHH nIOdei I NOIKoDKeHH O6naHaHH.
PIMITKA. Y PIMITKAX HaBeJeHO OCHOBH BiOMocTi, np3HaueHi cnpocTnTu Nn NpOec.
IHCTPYKlI 3 TEXHIKN B3NEKN
- Y ciin hctpykuii Micntbcr noaehnna 3araJIbHOI eKcnnyatau ta 3axoig 6e3neKn iid yac KopncTyBaHHraObaHaHHam. PeTeNbHO O3HaHOMTeCe 3 ciio IHCTpykuicIO, nepw HIX NOHNATN KopncTyBaTcra cIM npncTroem. TaKoK cnId HeyxnbHo dOTpmyBaTnc npabNil Texhikn 6e3neKn.
36epiraTeIIO IHCTpyKciIO BHaDiHOMyMiCiI DnBVKOPNCtAHNBA Mai6byTHbOMy.YBnAnky BtpaTu N0sKOJKeHHI HCTpyKciI HeraiHo 3BepHiTbcr Do yNOBHOBaxeHOrO cepBichoro ceHTpy Makita Inra II 3amIn. - RaIIO Bn No3NuAeTe a6o nepeJaTe o6NaHaHHa HINMM IHOJAM, 3ABXKn nepeDaBaIe pa3OM i3 O6NaHaHHaHm IHCTpyKciIO Ta iHwi IHOpMauiHi MaTepiAn.
- 3BaXaOuH Na Te, IIO B Hac NoCTiH OIe InporpaMa DocnIxKeHb i PO3BNTKy, TexHiH XiapaKTePncTKn BInpo6y MoKe 6ytN 3MiHeHO 6e3 NObiOMLeHH. 3o6paXeHH a60 3MICT ciEi IHcTpkyiMoKytb BiDiPI3HrTtCBAI HAReBHOro BInpo6y.
- YKuo Bam noTpi6H ioknaadhii BiOMOci, 3BepTaItecno DOnOMory Do MicceBoro Dnepa afo yNoBHOaxeHOro cepBicHOro ceHTpy Makita.
BnKOpncTaHHo6NaHaHHa 3a npu3HaueHnA
Lc oBnHaHH npn3HaeHe nWe dIe IOnnBaHH Ta 3poWeHH.
Ioro MoXHa BnKOpNCToBbATn dny IOnaui IInuie YIncToi BOIN.

HEBE3NEKA!
KaTeOpuH0 3a6OpOHeo BHOCHTn 6yNb-aki MoNΦiKaui 603miHn B O6naHaHH.
- He KopinCTyItec8OobJaHaHHM dIa BnKoHaHHpO6iT, dIra kIX BOHO He npu3HaueHe.
-ДляТexнчногообсгу罗ваннЯТа peMOHTy BnKOpNCTOBuYTe LNsE CXBaJIeHi opnirHaJIbHi 3aIuaCTuHn.
- HeDToPmHaHH BnKNaIeHnx BnIe nonepdXeHb MoKe CnpuHHTn cepNo3He yKoJxHn o6naHaHH a6o TpaMbYBaHH JIOJe.
3ACTEPEXEHHJIODOBUXJIOHNXFA3IB
- Kateropnno 3a6bOpOHeo BAnxatn BuxlonHi ra3n. BoHm MicTAYdHn ra3, 6e3KolipHn ra3 6e3 3anaxy, knn, npote, e Ha3BnuaHNo He6e3neuHm i MOKe cnpuHHrtn Btpaty CbIDOMocTi a60 Cmeptb.
KateropnH0 3abOpOHeHO KOpNCyBaTncr DnBryHom y npMiuIeHHI a6o B HeIOCTaTHbO npOBiTPIOBAHOMy Micui, HapnKnad, TyHeni, neepi TOno. - BybTe oO6nBO o6epKHi, BnKOpNCTOByOuH DnBnHyN no6n3y nOeA 60 TBapnH.
CniikkyTe 3a Tm, uo6 y BuxlonHy Tpy6y He noTpannna cToPOHHi npEdMeTI.
3ACTEPEXEHHJI0IO 3APABJIHHJ
- Iepu Hix 3anpaBnTn naINBn 6ak, noTpi6HO BIMKHyTN DBNyH.
- He 3aɪnbaɪte nælbHe B 6aK Bɪuʒe MaKcɪmʌlɪbHOro pɪBŋ.
- Y pa3i po3nTTT naIbHoro peTeNbHO BnTpTiB NOro Ta doyeKaIteCra NobHoro BnCuXaHHra NobepxHi, nepu HIX 3anyckatN DBNrHy.
- Picn3anpaBkn ⅢijbHo 3akpyTITb KpnuKy 6aKy, 0o6 nonepeDHTN BNTiKaHH.
IIOXEKHA B63NEKA
He kypitb niz qac KopncTyBaHHo6nadHaHHm i He KopncTyItecBupobom no6n3y BiKpntoro nonym'a.
- He kopncTyTecra 6bnaHaHnHm npuy i3 cyxuMn KyuAMn, TpaBOU, rAnHyip'Am Ta iHsMMn IerKo3aMnCTUMMaTepiAanm.
BicTaHbMIXDnBryHomi6yDIBJMyafoiHWMn cnOpyamn NOBUNHa CTAHOBNTu 1 metp.
- TpmaIte DbIryH Ha BiIcTaHi BiD 3aIMnCTnx Ta iHux He6e3neuHnx MaTepiJIIB (CmITT, raHypOK, MaCTINbHnx MaTepiJIIB, Bb6yXOBx peOvIH).
Hikon He Knapitb rapny nomny Ha cyxy npaby a6o 6ydb-aki iHsi 3aMncti matepiann.
Tilbkn dIy kpaIH CbpOnn
Deklapaia npo BiNobiHictb CtanhapTaM EC
Deknapaia npo BiNobHicb cTahapam CC BkIIOueHa do doataKy A ciie iHctpyKu3 3 ekcnnyataui.
TEXHIUHIXAPAKTEPNUCTUKN
- Ipeed BCTaHOBJeHHaM MyTb BCTaHOBiTb npokJaKy Ha Micue.
-
3aΦikcyte WJnAHn Ha MyΦtax 3a DOnOMOrHO xMyTa.
Ipebeipte HadiHictb 3aTARHeHHXOMyTib. -
BctaHOBiB ciTuactn iInbTp Ha kiHeuB BnyckHoro IJNaHry.
PIMMITKA.
- Y BUNaIky BNTOKy NOBiTpЯ BOda MoKe HECMOKTyBaTnCra.
YBATA!
He 3HimaTe ciTuaCTn fIbTp, OCKINbKn CTOpOHNIpeDMeTN MoKytB NOUKOHTN NOMny. IpeBipTe HaidinHicTh 3aTARHeHHXOMyTIB.
IPEBIPKA IEPED POBOTOIO
1NONEPEKEHRA!
-Перед ВИКОHAннam 6удь-якnx po6it i3 DBИгуHOM HeODmIHHO 3упнIHt b Ioro. Po6oty cIiD 3aBЖДN BИKOHyBaTn Ha pIBHIN CTiIKI NOBepxHi.
- Nepu HIX 3anyckatn DBNrHy, nepeBipTe 06naHaHHa Ha HaeBHicTh nocna6neHnx TBnHTiB a6o 3'EdHaHb.
-Пидчac ornanyу peMOHTy He TopkaItecra rapaYOrO DBuRyHa Ta rnyuHnka HabiTb OJrrom.
-ДбайтпpoнанlexHyВentnlaцio.Пam'Ятытпpo He6e3neky OtpyehHЯчднIM ra30M.
NEPEBIPKA PIBHRA MACTNJIA TA 3APPABNEHHRA (maJ.4)
OnucaHI HIXKue II CNiD BIKOHyBaTu Ha XoIOHOMy DBrHyI.
-ДВИгУн Мае поpe6уВaTи B roриЗоHTaNbHOMy nopoJOxEHHI.
- IpeBipraHpiBHeb MaCTnHa, He BkpyyTe uyn y 3aINBHH OTBip DnMaTnHa.
- Pibehb MaTnna Mae 6yTu mix K no3HaaykammiHIMaJIbHO r imKcImaJIbHO r pIBr Ha uyni.
JaKIO pIBeHb MaCTnHa HIXKYe MiHimaJIbHOrO, MaCTnIO cnIDdoNTn.
- Mactnno noTpiio Ho DoIINBaTu OpiEHTOBHO uepe3 Koxhi 10 roDIn hpo6oTu (KoxHa 10 3anpaBka).
- JaKuO MaCTnIO 3MiHoe KOnIp a6o MiCTnTb DomiUKN 6pydy, NiRo cIiD 3aMInHTN.
PekomeHdoBaHe MaCTnNo SAE 10W-30 3a knacnphiikaieo API,Knac SF a6o BNuN (Dn4-takTHnx ABTOMo6iNbHx DnBryHb)
06'EM MaCTnla:
Дя moDiEi EW1050H: 6n3bko 0,08 n
Длma mojeni EW1060H: 6иьko 0,1 n
ПРИМITKA.
- RaIIO DnBHyH He CToITb rOpN3OHTaJIbHO, pIBeHb MaCTIna MoKe BiIO6pKaTNCr HeTOHc, 0o MoKe CTATn npuHIO NOrO nepeINBaHH. NepeINBaHH MaCTIna Bnue MaKcMaJIbHO rOBIO pIBHr MoKe npN3BeCTn Do 3a6pydHeHH MaCTIna aBO yTbOpEHnB 6Iloro dmy.
DOnnBaHHMaCTNJa DJIa DBuRyHa
- BctaHObitb DnBryH y rOpu3OHTaJIbHe nIoJKeHHra Ta BnIMtB uyn pIBH MaCTIna.
2.ДоиTe MaCTINo Do N03HaKN MaKcMaJIbHOro pIBH.NIa HAnBaHHB BnKOpNtOByIte MaCeIbHnHyK. - HadiH No 3akpytib uyn. HeoctaThe 3atraHeHH MoKe CnpuHHTn NiTiKaHH MaCTnla.
IicJIdoJINBaHHMaTnla
-Якшо мacrno npolnooc, HeraHOBntpitb no raHijpkOIO.
3aHa MaCTnla: yyn dJa MaCTnna
BntpiB nnn a6o 6pyd HABKONo 3aNNBHorO OTbopy dnia MaCTnna.
CTeTe 3a Tm, uo6 Ha 3HrTn uyn He noTpAnNB nicok a6o nn. Hauunahnna nicky a6o nny Ha kpiuky 6aky a6o yn dna MaCTnna MoKe npn3BecTN do HepiBHomipHO iNpKyIa MiCTnna a6o 3HOWeHHa Detalej DBNyHa.
NAJIbHE
NONEPEDJXEHHRA!
- PanaBHe - ue Hau3BnuaH0 3aMnCTa Ta OtpuHa peObHa. Pid Yac po6OTn 3 paIbHm TpMaTe NOro Ha BiDcTaHi BID BiDKPnTO ROrHIO (CirapeTn, nei, feepBepky), eNEKTPuHnx Ickop (6atapeN, KOPOTkoR 3aMnKaHH, Ickop BiD 3aMnKaHH B IpeMnKaHi, Ickpn 3BaPioBAHH ToIo).
- Penei Do3anpaBneHHn m nalbHoro o6o'B3KOBO 3ynnHt bDunHy. He 3anpaBnTe nalbHe, noKn DBNrHy rapAyn.
- DToPmMyTeCBAHrTKoBOOi ObepeKHoCTi He nIwe niD Yac 3anpaBnHHra, ane i B IHnx CnTyauqix, HabITb NiD Yac 3JIbaHHra naJbHoro B MeHuy EMHicTb.
- Picnla 3anpaBkn HaDiH No3akpytiB KpuuKy naIINBHorO 6aky Ta peTeNbHO BntPiBpo3nnte naIbHe.
IOBODKeHHaNbHm
I3 nabHnM cnid NOBODNTNc HAD3BnUaHNO oBepeKHo.
PanbHe MoKe MICTTN peOBOHN, NODi6Hi do
PO3HHNKIB. 3anpaBky cnid npOBoHTN y HAnEKNHM
YHOM npoBItpBOAHOMy npmimiueHHi a60 Ha BiDKpNTOMy
NoBITpi. KateropuHO 3abOpOHeNo BdHXATN Bnnapu
6eH3Hy; 3ABKnD TpMaJTe NOro Ha BiCTani. YactnH
a60 TpNBaHNI KOtAKT naIbHoro 3i WkipoO BnKnHae
cyXictb i MOKE BnKNKaTI WkIPHI 3axBOPBOAHnA 6o
anepriIO. Y pa3i NOTpanJaHHra naIbHoro B Oci npomnTe
ix YnCToIO BOHO. JkUO noPa3HeHHB Ooi He MnHae,
cnID 3BepHyTnCdo NiKapra.
Tepmin36epiraHnnaIbHorO
PnIbHe cIiD BnKOpNCtAtn npOraom 4 TnXHIB HABITb 3a yMOBn Ioro 36epirAHnB CneiaIaNbHOMy KOHTeHepi y Do6pe npoBItpOBaHOMy Ta 3axuueHOMy BiD Cbitna Micci.
B iHOMy pa3i naIbHe moKe 3incyBaTnca 3a OIN DeHb.
36epiraHHBnpo6y Ta 6aky 3 naJIbHm
36epiraTe Bpi6 i 6ak dny 3anpaBkn y npoxoJOnHomy Micci, 3axnueHomy BiD npramnx cohryHnx npomeHiB.
- KaTeropuHNo 3a6OpOHeNo 36epiratn NaIbHe B aBTOMo6iJI.
Tn nanbHoro:
ДВИRGYMOTONOMNQUOTIPBOXTAKTHN.ДЯHbOrciD BKNOPNCTOBYBATNIIWSEABTOMO6JIbHnB6eH3nH,IOHE MICTNTCBINHIO,3OKTAHOBNUM YNCJOM87a6oBNUIM (R + M) / 2) .BeH3nHMOKeMiCTNTHe6Ibue 10% cnnpTy (E-10).
- KaTeropuHNo 3a6OpOHeHO BnKOpNCToByBaTu 6eH3nHOby cymi, kka MICTNb MaCTnIO dIra DnBnHyHa. Lc MoKe CnpuHHTn HAdmipHe HAKoPnueHHcaXi abo MeXaHiHi N0wKOJxehHn.
Mictkictb naHNBHoro 6aky:
Длma moJIeI EW1050H: 0,5 n
Длma mojen EW1060H:0,65 n
3anpaBneHHa (MaI.5)
- BctaHObitb DnBryH B roPn3OHTaJIbHe nOIOKeHHA.
- 3Ierka BiikpyiTb KpNshky naiNBHoro 6aKy, oO6 cnycTHTN TnCK.
- 3HIMtB KpUk Ky nAnBHorO 6aKy Ta dOnnTe naIbHe. HE doJIbaIe NaIbHe Do Bepxy 6aKy.
4.Писяз苹равицilbHo3akpyTiTbKpUWky naINBHorO 6aky.
-Bntpitb kpiuky naHBO6aKy 33OBHI, 0o6 yHKHTnNotpannHaHH6pyDvB6ak.
- Kkuo Kpuuka nannBHO 6aky Mae nepeKT a60 nookdokeHH, ii cnid 3amHHTn.
- 13 yacom KpuuKa naiNBHOro 6aky 3HOwyeTbcra. iCJIi3amHHOBaTN KOxHi DBA-Tpn POKN.
HE HauBaIe naIbHe B 3aINBnO TBip dJa MaCTuJa.
3aHbHHBODn (MaI.6)

YBAGA!
- He 3anyckaite Bnpi6, kkuo B Kopnyci nomn Hemae BOIN. Lc MoKe cnpuHHTN noUKoJKeHHa MexahiHoro yuiNbHeHHra.
3HIMiTb 3aINBHy np6ky i HanOBHITb KOpNc NOMn YnCTOIO BOIO IO BepxY. Picnla zuoro 3akpyiTb 3aINBHy np6ky.
PIMITKA.
- 3a6ip B0n 6yde HeoctaTHim, 3daTHicTb CAMO3aONBHeHHI NOMN 3H3NTbcra.
- POMny cnid po3TaWOBByBaTN Ha TBepdiN NOBepxHi Ta JAKOMORA 6nKHe Do DkepeJa BODn.
- Ⅲo 6iNbwa BncoTa NiIyOMy BoNHa BCMOKTyBaHHi,TO 6iNbwe yacy 3HaIo6uTbcra IЯ 3aNoBHeHHa, NpaA B UcbOMy BnnaKy 3MeHunTbcra.
NEPEBIPKAДВИГУHA:
PeteNbHO ornHbTe naNBHI IaHaHr Ta 3'EdHaHH Ha npedMeT nocna6neHH Ta BntiKaHH NaIbHoro. Bntik nIaNbHorO CTBOpIO noteHuiHO He6e3neHy cTuyaio.
- Papebipte 3atjkky rBnHtib i ranok. y pa3i notpe6n 3atJrHtib ix. He3atJrHytn rBnHT a6o raJa moKyTb cnpuHHtu cepNo3Hi yUkOdkxeHHa DnryHa.
- Ipepeipte piBeb MacTnla Ta doJnTe Noro B pa3i noTp6n.
- IpepeipTe pibEnb nabHoro Ta doJnIte noRo B pa3i notpe6n. CTeXTe 3a Tm, uO6 He nepepeOBHTn 6ak.
- OxonodkyBaIbHi pe6pa cIIInHpa Ta shHypobn CTapTepeCNI TpMaTu B uNcTOTi (6e3 6pydy, TpaBn Ta IHwix qactOK).
- Pid yac po60tn 3 dBuryHom oJraIte uinbHo npuiyraUCHn po6OuOdIg.
EKCJIyATAIJA

TONEPEDJXEHH!
KateropuHHO3a6oPoHeHO TOpKaTnCraIyUHHaRapAuro DnryHa,OCObNBO nIac NOBtOPHOrO 3anycky DnryHa. IiD yac po6Ot DnryHa IyUHHK HarpBaetbcr.
-Пд ус Кориctуваньnomnoю He niicstabnIte pykn a6o IHwi npedmetni nid BunynckHI Knanahan.

NONEPEDXEHH!
Pam'raTae npo ripabnHnyap.
CTeTe 3a Tm, no6 no shaHry noaHi He i3nAbTOMo6i. He 3akPbAte p3ko klanah nOaHi, OckIbKn BHaCNIk OcBoro BNHKHe rpaBJIuHn yap, AKN MOKe cepNo3HO NOxKOJTN NOMny.
3anyck:

YBAGA!
He 36inbuyte o6eptn DnBryha Biipasy niicnycky, OckinbKn Ha ue MOMENT MactnIO ue HeoctaTHBO po3noiine. Po6ota Ha HADTO BnCOKNX o6eptax ckopooye TepMin EKcnnyatauii ObnaHaHHra Ta MoKe cnpuHHTN NOWKODKeHHa.
- IpepeBipTe, YI KOpNc nOMn 3aONbHeH N BoDoHO.
- Cituactn pInbtp nobHEn 6ytn nokpntn BOIOJ.
YBATA!
- KOnI dHo pe3epByapa 3 BOIO IO BkPnTe Mynom a6o nICKOM, BKNBaIte DoDAtKOBuX 3aXNCHx 3axOjIB.
- Пееверг, чи He 3a6nokobahOB BnynckHn OTBip shaHry noDAci.
- BctaHObitb nepemKau DnBryHa I-O (yBIMK./BIMK.) B noJoxeHHra "I" (yBIMK.).
- Baxinb peryntopanaodaianbhoro ma6ytnB noIoxeHHi L.(man.7)
- HatnckaTe naJIbHy nomny, nOKn B Hei Hne notpanntb naIbHe. (IpepeBaJxHo noTpio6Ho BiD 7 do 10 HaTnCSHeHb.)
- BidperyIIOIte BaKijb IpoceJIIOBaHHa.
-Як soo DBuRyuH xoJIoHn a6o Temnepatypa nobitpr Hn3bKa, Baxinb DpocenIOBaHHc nID NOBHCIO 3akpTN. (MaI.8)
-Як soo DBnryh TeIJIa abo TempepaTypa nobitpr BncoKa, BiKpnTe BaXilb DpocenIOBaHHHaNoJOBuHy a6o NobHicTHO.
8. 3nerka notarHITb pyky cTapTepa,doKn He BiDyyeTe onip. Picra yboro noBepHITb pyky cTapTepa Ha Micue i CunbHo notarHITb ii.
Hikon He Bntaryte UHyp Ha BCIO DOBXHNy.
IotrhyBwn 3a pyky cTapTepa, He BiDnyckaTe II BIDpa3y. TpMaIne pyKy, nOKn BOHa He nobepHeTbcra B NoaTKOBe NOnoKeHHJ.
JaKUO 3aNyCTnT NDBIgYH BINBJIeETbCBAKKO, BiDkPnTe Dpocenb Ha 1/3.
- Nicna 3anycky DBNyHa BCTaHOBiB Baxinb dpocenIOBaHH y noOKeHH BIDKPTO, kkuo Bin 6yB 3akpntn. (MaI.9)
10.ДВИгун сид Hanexно "поррит". Поррівань в пооженни "L" MaE TrpВaTn 2-3 xBUNHn.
Ppauoouch DBNrHy:
NobephiB BaxiNb peryIaTopa noaChi nIbHoro B cepeHne nooxKeHHn i nepeBiPe, nn 3i IwnHa rnoaHi BVXOuNTb BOda.
3abepuenno po6oTu
3ynnHka DnBnyHa
Bctahobitb baxilb peryIaTopa noaHnabHoro B noJIOXeHHa "L" 3MeHUnTn o6epTu DnBuHa.
BctaHObitb nepemKau DnBryHa I-O (yBIMK./BIMK.) y noJIOKeHHa "O" (BMMK.).
3JInTe Body nicna 3akInHHeHHa po6oTu
B3mky 3a temepatypn 0^ Boda B kopnyi nomnn 3amep3ac Ta moKe po3ipBatn Kopnyc nomn. Picna 3akHueHH np6OTn NOBHCIO 3NIITE BOy uepe3 3INBHNI OTBIP BHN3Y.
BKA3IBKNIooO OBCJyROBYAHHЯ
NONEPEDXEHHRA
- PpeD BUKOHaHHaM 6yDb-kaX po6i i3 DnHyHom HeoDMInHO 3yPiHITb Ioro. He BnKohyTe XoDHx po6i, NOKI DnHyH He OxonoHe.
YBAGA!
He BINO3MHHoIe I He peryHIOte KAP6Opatop. Noro 3aBOcBi Ka HanaSTyBaHHra 3a6e3neuHtB HauBnUe yeKTeBHicTb po60TN BnPo6y. JaKuo Bnpi6 BCE J Notpi6HO BiDpeYnHOBaTH, 3BepHiTc8 Do MlCeBoro UeHTpy O6CnyROByBaHHra.
- He MInTe DnBryH BDOIO nID Yac o6cnyroByaHHra.
3AMIHA MACTILA Y DBNYHI
1 NOPEDEXJEHHRA!
-ПисяЗунндВИгУСаСмДИгИIMacTиLOBHyOMy 3aIINsAOTbcra rapaHm.CniДDocTaTHbONoueKaTu, 6OBДИRGYNiMaCTnIO oxoJOnN.BInOMy pa3i e pN3NK onikB shkpN.
YBAGA!
- Ipeep 3amio Mactna niiroTytecra Do HaneXhoi ytniaqii CTaporo MaCTnla. He 3nBaTe noro B kaHaiiaqio, Ha 3emIoo afo y Biikpnti pich. MiceBi HopMaTnBHI nOIOKeHH npo 3axnc TdoBkiJIa MiCTb 6ilbwe DOKnaDHOIHOPMaui npo HaneKHy ytniaqio. BiippaCbObaHe MaTnO cKopooye Tepmin po6Ot n DBnryHa. PAm'raTae npo HeobxidHicTh peryJrpho nepeBiprtn cTaH i pBeH MaCTnla.
NPMMITKA.
- JI KIO DOJNTM MaCTINo Bnue MaKcImaNbHoro pIBH, ce MoKe npu3BecTn Do Noro 3a6pydHeHH a60 3ropaHH 3 6iIM dNMOM. Uo6 ToHb Bu3HaHTn pBeH MaCTIna, NoeKaIte NeBn Yac NiNnKn DnRyHa, Uo6 MaCTIno CTekNo B6ak.
Intepban 3amHn: Picna nepux 20 roDnH po6oTu, notim uepe3 kOxHi 50 roDnH po6oTu.
PekomeHdoBaHe MacTNo:MacTNo SAE 10W-30 3a KnaCnΦiKauiEo API,Knac SF a6o Bnui (nra 4-takTHnx ABTomO6ijbHx DnBHyH)
06'EM mactnla:
Длг модени EW1050H: 6иько 0,08 n
Длma moeni EW1060H: 6и3ько 0,1 n
- BnmiMbIy npn nna. (Ma. 10) IoknaIbIy npyn y mice, De Ha Hboro He notpanntb 6pyd, nn afo hwi ctopoHhi npdmTe.
- O6ropHitb HauBnO tBip dIra MaCTnla raHicpKOIO a6o nanepeOBm pyuHNKOM.
- BnHbBmIuyn, HaxNJITb DnByH i 3nnTe MaCTno B kactpynO a60 iHwY eMHicTb.
- BctaHObitb 6bnaHdHaHH Ha pIBHy nobepxHIO. HAIInIte MaCTnIO i3 rHyKoi nIIaIKn a6o IHWOIT 3pyHoi EMHOCTi. MactnIO cNlD HAINBaTn Do TOcIK INepetikaHH Ypee3 roPNOBHy 3aINBHOrO OTbOpY. (MaI.4)
- 3anOBHnBwI DnBryH MaCTNIOM, BcTaBTe uyn. HadiHIO 3akpyTiB uyn, ockiNbB iHwOmy pa3i MaCTnIO BNTiKaTMe.
IPEBIPKA CBIJK 3AIIJIOBAHHRA (MaI.11)
YBATAI
- KateropuHNo 3a6oPoHeHO TopKaTnCn ApOy CbiKn 3anaJIbBaHH, KOJI NDbIgHy npaIoo (He6e3neKa ypaXeHH eJekTpnuHm CTpyMOM BnCOKOi HanpyrN).
IntepBaI YuIeHnTa orJy: OoHn (KoXHi 10 roHN po6Oti)
-ДяЗИМАнгТа BCTaHOBNeHHCBIOK 3anaJIIOBaHHKOPINCTyITEcR JNlle yHIbepCaJIbHIM KIIIOYe,ЯКINBXODNTbdoKOMNNEKTe.
-BiDcTaHb MIX BOMa eJekTpOamn CBiK3anaJIIOBaHHI NOBUNHa CTAHOBUTN 0,7-0,8 MM.
KuO rB iDCTaHb 6IbSha a6o MeHwa, BiDperyIIOHTe II.
KuO cbIcKa 3anaJIIOBaHHra 3abNlacb a6o 3a6pydHeHa, petJIbHO ouNCTiTb a6o 3amHiTb II.
OuHueHHI NOBITPRAHO FOINbTPA (man. 12)
1 NONEPEDJXEHHRA!
BIMKHiTb DnHyh. TpMaTe 0bnHaHHa Ha BiIcTaHI BiD BiKpntoro BOrHIO.
3a6pydHEnn NOBITpHn FJIbTp CnpNHHre TpyHOu3 3anyckom, BtpaTy NOTyXHocTi, HecnpaBHOcti B po60ti DBNrhya i cyTBe BO CKOpOuye TepMih Ioro ekCNIyataaII. CTexTe 3a YnCTOTOIO NOBITpHoro FInbTa.
IntepBan YnueHn Ta orJy: LOnn (KoXn 10 roHn po6Otn)
1.ПовситуЗakриTe Baxinb ДрocenIOBaHHa,цo6 yHnKHyTuNotpapanJIHHa ПИу Ta 6pydY b Kap6IopatOp.
2. 3HimItb 3aTnCKHn 6oNT Ha KpUuCi nOBiTpHaHO φinbTpα.
3. Μοδ 3ΗΑΤΟ ΚριχΚΥ ΝουβτραγΟ φιλθυρα, NOTΑΓΗΙΤΑ 3a iI HνχΚΗκραι.
4. BnMItb pInbTp, npomHte y BoDi 3 DoaBaHHaM M'kaKOro MnOyoro 3acO6y, nicra Yoro peTeBHO BucuWtB.
5. BctaHOBITb Ioro, dOtpmMyIOHnCb KOHTpy, 3o6paKeHOrHa MaJIHOHky.
6. BntpiB raHuyipkoHO MaCTnIO, RaKe MOrJIo HauNHyTn HABKONo KpNIshK NoIITpyHoro fInbTp a Ta canyHa.
7. Nicna OunueHH BCTaHObit KpnWky fInbtpa Ha Micue (CnoataKy BCTaHObit BepxHi Kpa, notim HnXHi), nicra yoro 3akpyTtB 3atNcKHi 6oTT.
OuHJEHNAJIINBHOFOIJIbTPA
1 NOPEEDJXEHHRA!
BIMKHiTb DnHyh. TpMaIte 06naHaHHa Ha BiDcTaHi BiD BiKpntoro BOrHIO.He Kypitb.
Intepban YnueHHa Ta ory: Lomicra (KoXhi 50 roDIN po60t)
PnNBnΦinbTp BnKOpNCtOByETbcra nIaBtpyBaHnaNbHoro,Ke nOTpanJIe B KAp6Opatop.CiI nepioDnUHOOrJaATn PnNBnΦInbTp.
- Biikpnite KpiuKny naiNBHorO 6ky i uepe3 oTBip y 6aky BnMIb rOJIIBKy BCMOKTyBaHHra 3a DonomoroIO dpoTaNHO raka.
- 3HIMtB 3aTnCKaU ShaHra i BnIMtB naINBnHn φiJbTp i3 6eH3OpBOyD.
- Помптелалньнифлграсом.
- Nicna npommbaHHBcTaHObIb NOro Ha Micue.
- RaKUo fipIbTp 3aTBePdIB a60 3a5uBcA, 3aMiHITb NOrO HnHOBn.
3a6e3neuHTn NOauy DOCTaTHbOi KINbKOcTi naIbHOro B Kap6Opatop, NaIbHN HJIbTp CIId 3amIHOBaTu npHaumHi KOxHi TpN Micu. RaKIO cBoro He po6HTn, HeIOCTaTHra NOaay NaIbHO rO MoKe cPnUHHNTn Pno6nem 3 3anyckOM DBNyHa Ta oMEXHTn MAKCImaJIbHy WbUdkictb.
Iicna nepebipkn, ouuueHHa 6o 3amHn BCTaHOBITb naNBn fInbTp Ha 6eH3Opobid i3 3aTnckayem WnAHy.
PpoWToBxHItb naNBnI ΦInbTp Do caMOrO dHa naNBHoro 6aky. (MaN.13)
3AMIHA BEH3OPOBOy (man. 14)
PONEPEDEXEHHRA!
BIMKhitbDnHyh.TpMaTe 0bnHaHHHa BicTaHi BiBikpntoro BOrHIO.
IInTeBaI YnueHn Ta orJy: IooHn (KoXHi 10 roDnH po6Otn)
3amHa: lOpoky (KoXnI 200 roDnH po6ToN)
He3aJExKHO BiD qactOTn po6OTn 6eH3OpOBiD cIid 3amHrTn UOpOky. BntiKaHHra NalbHoro MoKe np3BecTe Ido BHNKHHeHHnoXekXi.
Kaio n iac orny BnBneHO Btikahna, 6eH30npoBi cIi HeraiHo 3amHHTN.
NEPEBIPKA BOJITIB, TAIOK I TBNHTIB
- DotrHtB Bci nocna6neHi 60ntu, raKu Ta rBuHTn.
- Ipepeipte repmetnucHictb Kpuiwok naiNBHOTo Ta MactnbHOro 6akib. OrJraHbTe nomny Ha npedmet BNTiKaHHa naIbHOrTa MaCTnla.
-3 MeTOIO 3a6e3neHHeHH 6e3neHnx yMOB po60TN 3aMIHTb NOUKoJKeHi YACTuHN.
YUHJYACTINH
- DnHyCNiD TpMaTn B YNCTOTI Ta BNtnpaT NOrO raHjpkamn.
- Ha oxoJoxyBaIbHnx pe6pax uINiHpa He noBnHHo 6ytu nnny cn 6pydy. HAnnnaHn nnny a6o 6pydy Ha pe6pa moKe npn3BeCTn do 3aKnHOBaHHn nopUHNr.
Ta6npu rpaiky nepioDnHoro texhiHoro 06cnyroByaHH
UCYHEHHH HECNPABHOCTE
Nepu Hix 3BepTaTcna Do cneuaicitB 3nTuHb peMOHTy, nepeBipTe npo6IeMy camocTiHo. Y BnuaKy BuHnKHeHHa He3BnuaHnx RaBnDu iTe 3riDHO i3 BkazIBkamu y ciu iHCTpyKcii. KaTEROpuHNo 3a6opOHeo po3bnpaTn qn 3HimaTn 6yNb-aki YacTHnH, kUcO ce He npeEbaHeo IHCTpyKciEIO. IJra npoBeDeHHra peMOHTy 3BepTaTecra BynoHBaXKeHH cepBichn UeHTp.
SRODKI OSTROZNOSCI ZWIAZANE Z UKLADEM WYDECHOWYM
FORHOLDSREGLER FOR ETTERFYLLING AV DRIVSTOFF
Enne hoiule assetamist
MEPbI INPEIOCTOPOXHOCTN OTHOCNTIELHOB BbIXJIOIOB
- Hn B KOem cnyae He BdbXaIte BbIXIOHbIe ra3bl. OHn coepkaT yrapHbI ra3, Ype3BbUaIHO onaChbI ra3 6e3 ZBeTa n 3anax, KOTOpbIMoKet BbI3BaTb noTePHO C03HaHnI INcMeptb.
HnKoIa He nCNoIb3yIe MOTOP B NOMEuEHN IIN B MeCTAX C nIOXoB BeHTUNLAuEne, HAnpUmEp, B TOHHeJx, NeUepax u T.I. - PpOraBnIaTe OcO6yH BHNMaTeIbHoCTb npn pa6oTe MOTopa B6JIn3N IIOJe NIN JKNBOTbIX.
- He donyckaia Te nonaadaHnB BbIXlonHyIO Tpy6y noCTopOHnX npEdMeTOB.
MEPbI INPEIOCTOPOXKHOCTN PPN 3APPABKE TOJIINBA
-Перед 3апраькоу TOПЛINBOM 6язATEьHO octaHOBUte MOTOp.
-He 3aJIbBaTe CnIuKOM MHO TOnJIbBA B TOJIINBHyI 6ak.
- Ecnn TOnJIINBO npOJIINOCb, TuaTeIbHO BbITnTe ero n noDoJNte, noka OHO He BbICOXHET, npEKe De Yem 3anyckaTb MOTop.
- Pocne 3anpaBkn 6b3aTeNbHO npOBepbTe, yTo6bl KpbIka TOnJIbHOrO 6aka 6bIa 3aKpbIta, DnI npedOTbpaueHn npOIbAHn.
ПОНTOЖAPHBIEMEРы
-He nCnoJb3yIte o6OpdyObaHne BO BpemK ypeHn nnB6JIn3N OTKpbIToro IJaMeHN.
-He nCnoJb3yIe o6OpyDObaHne pIOM c cyXIMN KycTAMn, BcTKamn, TpIKNkAmn I DpyrIMN orHeonacBbIMMaTePnaJAmn.
-ДеркиTe MoTOp,п крайнeМepe,B1 MeTppe ot 3daHnN npyInx cTpoEHN.
-ДерхиTe MToTOp BdaJIn OT OrHeOnaNchbIX npynX onaChbIX MaTePnaJIbO8 (Mycop, TprIKN, Cma3OuHbIe NIN B3pbIBOONaChbIe BeUcTBA).
- Hn B Koem Cnyae He CTaBbTe NOMny Ha MOKpyo TpaBy, a TaKke Ha NIO6bIe DpyrIe NERKO BO3ropaEmble MaTePnaJIbI.
TolbkoДЯЕВОПЕСКИX CTpaH
CeptnuKat COOTBcTbna EC
CepntnФнкAT COOTBETCTBNA EC BHeceH KAK PpInoxKeHne A KaHHoIN HNCTpyKuIN NO 3KcNlNyatauIN.
TEXHnueCKNE DAHHbIE
| EW1050H EW1060H | |||
| Вес ........................... ........................... ........................... ........................... ........................... ........................... ........................... ........................... ........................... ........................... ........................... ........................... ........................... ........................... ........................... ........................... ........................... ........................... ........................... ........................... ........................... ........................... ........................... ........................... ........................... ........................... ........................... ........................... ........................... ........................... ........................... ........................... ........................... ........................... | ...... ... ... ... ... ... ... ... ... ... ... ... ... ... ... ... ... ... ... ... ... ... ... ... ... ... ... ... ... ... ... ... ... ... ... ... ... ... ... ... ... ... ... ... ... ... ... ... ... ... ... ... ... ... ... ... ... ... ... ... ... ... ... ... ... ... ... ... ... ... ... ... ... ... ... ... ... ... ... ... ... ... ... ... ... ... ... ... ... ... ... ... ... ... ... ... ... ... ... ... ... . | 356 x 234 x 336 | |
| Тул | ...... ... ... ... ... ... ... ... ... ... ... ... ... ... ... ... ... ... ... ... ... ... ... ... ... ... ... ... ... ... ... ... ... ... ... ... ... ... ... ... ... ... ... ... ... ... ... ... ... ... ... ... ... ... ... ... ... ... ... ... ... ... ... ... ... ... ... ... ... ... ... ... ... ... ... ... ... ... ... ... ... ... ... ... ... ... ... ... ... ... ... ... ... ... ... ... ... ... . | Самоальwoчьй сеHTPOБЖьий HACOC | |
| Диametры (Васьванie-ВыIpск) | Дюим | 1 | |
| Высota поочи Воры | M | 35 | 45 |
| Мakсимальный объem поочи | Л/Min | 110 | 130 |
| Мakсимальна Высота Васьваня | M | 8 | 8 |
| Оььem (тοпливный бak) | Л | 0,5 | 0,65 |
| Оььem (масянныйSBak) | Л | 0,08 | 0,1 |
| Равочи объem цлиндров Двигателя | СM³ | 24,5 | 33,5 |
| Мakсимальая мошность мотopa | КВТ | 0,71噼и 7000 мIN-1 | 1,07噼и 7000 мIN-1 |
| Карбюрахор | Тул | Мембрана | |
| Систema зжиганя | Тул | Полуэрвовodниковoe зжиганie | |
| С党支部 зжиганя | Тул | NGK CMR6A | |
| Зазор мени щелкову радами | ММ | 0,7-0,8 | |
| Тошиво | АВТOMБИNB�й Бензин | ||
| МOTOPhoe масло | Масло SAE 10W-30 по клASSФИКAZANII API, Кlass SF по Вишe (4-TaKTНьй Двигателя ДьЯ АВТOMБИЯ) | ||
| Примен�ая Temпегатура Воры | °C | 5-40 | 5-40 |
| У探测ь в Зукового давлиения | LpA eq | dB(A) | 88,4 |
| Погашность K | dB(A) | 3 | |
| У探测ь мошности звуха | LwA, d | dB(A) | 109 |
PpmeHHe:BoBpeMa pa6oTbI nCNoJIb3yIte cpeIcTBa 3aunIbI dIraOpraHOB cnyxa.

PACNOLOXHEHNE YACTEN (Pnc. 1 n 2)
C6OPKA (Pnc. 3)
I PENEOCTEPEKHEHNE:
- PpeB BbINONHeHnEM NIO6bIX DeNCTBn C o6OpyOBOAHnEM 6o3aTeNbHO OCTaHOBNTe MOTOP.
3anyckaTe MOTOP TOnbKO nocJe TORO, KaK obopydOBaHne 6ydt NOJHOCTbIO c6paHo.
YCTAHOBKA LJIAHRA
- BctaBbTe MyoTbI WJNaHra B Hacoc.
I PENEYPENPEKDEHNE:
- PpN yCTaHOBKe MyfTbI B Hacoc y6eINTEcB, YTO yNtHnTeJIb HaxOuNTcHa MeCTe.
-
CoeHnTe WJHaHn Ha MyfTaX C o6oDm.
PpOBepbTe, YTO o6oD WJHaHra HAdExKHO npBInHcH. -
PooCoeHnHte pHbTp Ha KOHcE BCacbIbAIOJero WnHaRa.
ПРИМЕЧАНЕ:
B cnyuae yTeKN BO3dyxa B0a He CMOKET NOHNMaTbCra.
I PEDAUPPEKDEHNE:
He ydaIyTe fNbTp, HnAte MoKet npOn3oITn NobpeXdHne HAcOca NocToPOHHmN IpEdmTaMn. PpOBepbTe, YTO o6oD wHaHra HaJeXHO npBUNHcH.
ПРЕДэКСПЛУАTUAOHHьIE ПОВЕРКИ
I PENEOCTEPEXEHNIE:
- Ppeed BbINONHeHnEM IIO6bIX DeIcTBn C o6OpyOBOAHmE O63aTeNbHO OCTaHOBNTe MOTop. O63aTeNbHO BbINOnHnIte pa60Ty Ha POBHO u yCToHNBIOB NOBepXHOCTN.
-ПеледЗалусOMMOTopa npOBepbTe,HETJINHa 6obopydOBaHHNOTKpyeHHbIXBnHTOBNJINOTKpyeHHbIX COeENHNTbHbIX qAcTei. - 136eraaTe npikocHOBeHn K MOTOpY n rnyuNTeHIO NIObIMN YacTAMN TeNa NII ODeXDbI BO BpeMn PPOBepKn npMOHTA, NOKA OHN eUe ropyHe.
- YdienTe oc6oe BHIMaHne BeHTNJIaUN. OcteperaTecb OTPaBHeHryrJekncblim ra3OM CO.
ПОВЕРКИЗАПВАКAMOTOPHОМACЛА (Pnc.4)
BbInonHnTe cIeDyUOuI npOeDpy npn OxnaKdEHHOM MOtope.
- Y6eIntecb, yTO MOTOP HaxoIITcB B rOpN3OHTaIbHOM nOIOKeHn.
- He 3a npabnIte MaCnHbM MaHOMeTp B MacnHbMΦnIbTp dI npOBepKn ypOBHMaCna.
- Поберп, Нхдтся Лу уровь Маслma Мжду Нжним И Ворхим пpeДелом Ha MacЯнOM MaHOMeTpe.
- Ecnn ypoBHeb Macna HnXe HnXKHeRo npEeNa, do6aBBte Macna.
- Bam MoXeT notpe6oBAtbCz 3anpaBnTb MacNo np6n3nteHbHo uepe3 kaxdIe 10 acob pa6oTb (kaxdA 10 3anpaBka).
- Ecnn MacNo n3MeHnIO CBet NIN CMeWanocb C nbJIbI, 3aMeHInTe eRO HOBbIM.
PekomeHyemoe MacNo: MacNo SAE 10W-30 no KnaaccnphiKaunn API,Knacc SF nnn Bblwe (4-TaKTHbI INBnraTeIb dnn ABTomObn)
Obem macna:
Дпma moeEN EW1050H:Прби3.0,08 nДпma moeEN EW1060H:Прби3.0,1n
ПРИМЕЧАНЕ:
- Ecnn MOTop pacnoIoxKeH He rOpn3OHTaJIbHO, NOKa3aHne ypoBHa Macna MoKet 6bITb HeTOHbIM, IN BO3MOxHo nepeJINBaHne Macla. HanONHeHne MaCJOM Bblwe BepXHero npeJena MoKet npNBecTn K 3aqr3HeHIO Macna nn 6eIomy dblmy.
3anpaBka MOTOPHORo Macna
1.ПлJOXHTe MOTOPВ rOpN3OHTaJIbHoe nIOnJoxHeNe mOTCOeINHITe MaCJIrHbI MaHOMeTp.
2. 3aene Te Macno Do MeTKn BepxHero ypoBHa. Pn3a npabKe HcNoIb3yIte 6aHky C MaCNoM.
- HadejHo 3aKePnTe MaCJIbI MaHOMeTp. HeIOCTaTOHoe 3aBHHuBaHne MoKET npVBecTn K npOJIuBAHIO Macla.
Pocne 3anpaBm Macna
- HemeIeHNO BbITpNTe BCE npoNtOe MacNo BetoBIO.
3aMeHa MacJa:MacJHbMaHometp
- YdaInte nbInb n 3aIrp3HeHnO OKoIIO OTBepCTNn DnIg 3apBaKm MacJa.
- Depxnte OTcoeHHeHHb MaJHbMaHometp BdaIOnOT necka nn nbln. B npotnbHom cnyae necok nn nbIn, nonabwne B KpbIkwy Macno3aJIINBOUHOr rOpOBuHbI, MoryT npNBecTu K npoblemam C HnnpaBnHbONpkyLauNeMacna nn npNBecTu K n3Hocv yacteMOTopa.
TONJIINBO
I PENEOCTEPEXEHNIE:
- TOnJIbBO YBIAETC4 Ype3BbUaHNo ONaCHbIM IydoBntbIM. PnO6paueHn C TOJINBOM He npN6JIuKaIteCb K OTKpbITOMy PnAmEHn (CInapTeAM, neYam, fneepBepkam), 3NeKtpnueckm NCKpam (6atapeiKaM, cENN KOPOTKO 3aMbIkaHn, NCKpam OT 3aKOpOeHHoro NepeKNIQUaTeTn, CBapOHTbIM NCKpam nT.I.).
- Ipeed 3anpaBkoTOnJIINbOM O6ra3aTeIbHO OCTaHOBNTe MOTop. He 3anpaBIAte TOnJIINBO, Noka MOTop eue tropyH.
- O63aTeIbH NoPraBnIe TocTaTOHyo BHIMATEJIbHOCTb He ToJIbKO npN 3aIpaBKe TOJINBa, a TaKke DaXe Pn nepeJIbAHn TOnJIbBA B He6OJIbSyIO EMKOCtB.
- Pocne 3anpaBn HAdexKHO 3akpyTnte KpbIuKy TOnNHBHOrO 6aka N TuaTeNbHO BbITpnte BCE npoJNBueecr TOJINBO.
06paueHHe c TOnnBOM
Pn 6paueHn C TOJINBOM Heo6xoDIMO Co6IIOdaTb
4pe3BbUaHnyO octopoxHOCTb. ToJINBO MoKET
CoepKaTb cy6ctAHcHn, HANOMHaOuHne
pactBOPHTeN. 3anpABky Heo6xOJIMO npOBODTB
NOMeUHnC DOCTATOHOB BEHTINJUcHNe IIN HA
OTKpbITOM BO3dyXe. H N B KOem CNYaE He BDbixaHTe
NCnapEHn TOnJIbA, a TaKKe DEpXNTe TOnJIbBO Ha
pacCTOHN OT Ce6y. Pn peryJYPHOM INN DINTeJBHOM
KOHTAKTE C TOJINBOM KOKa BbICYNJBaETC, YTO MOKET
PnIBECTN K KOXhIM 3a6OBeBAHnM INN aIJIpeRNUeCKM
peakunm. Pn nonadHn TOnJIbA B rna3a npomOnTe
nx YnCTo BoDoE. Ecn pa3dpaxKeHne rna3 He nCye3HeT,
6bpATntecb K BpaCy.
BpemxpanenrTOJnBa
TOnnBO Heo6xOdmo NcNoJb3OBaTb B TeeHnn 4 HeJeB, DaXe ecN OHO XpaHNTcB CneUaJIbHO EmKocTN B 3aTeHeHHOM MecTe DocTaTOOH BeHTNJraIeuN.
Pn OTCyTCTBn TAKnx ycNoBn TOIINBO MOKeT CTaTb HENPIROHbIM KNCIOJIb3OBAHnIO 3a OOnH DeHb.
XpaHHe ycTpoCtBa n 3anpaBka TOnnBHOrO 6aka
-Держнту устюп CTBOи 6aKВ npoxlaHOM MeCTe, He NOДВергадуошся BO3deIcTBHIO npЯMbIX COJIHeYHBIX Iyuei.
- Hn B Koem cnyae He xpaHnte TOnIINBO B aBTOMo6nne.
TIN TONJNBA:
Motop ABnreTc qyTBipexTaKTHbIM. O6raTeIbHO
NCIOB3yIte HE3TNINPOBaHHbI aBTOMo6NJbHbI
6eH3N COKTAHOBBIM YCNOM He HNKe 87 ((R+M)/2). OH
MOKeT CoepKaTb He 6Oenne 10% cnnpTa (E-10).
- Hn B KOem cnyae He nCnoJb3yIte 6eH3nHObyo Cmecb, coepkauO MOTOPhoe macNo. B npOTNBHom cnyae 3TO pINBeTe K ype3MepHOMy HaKOpJIeHIO yrIepoJa nn MExaHNueckm HEnCnpaBHOCTram.
EMKoCTb TOnnBHoro 6aKa:
Длma moDEJI N EW1050H:0,5π
Длma moden EW1060H: 0,65 n
3anpaBka TOnJnBa (Pnc. 5)
- IonoXnTe MOTOP B rOpHOrTaJIbHOe NOIOKeHHe.
- Hemhoro OTBnHTnte KpbuKy TOnJINBHORO 6aka, yTo6bl BbIPOBHrTb DaBJeHne BHyTpN 6aka c aTMocdepHBIM.
- CHIMITE KpbIUKy TOnJIIBHoro 6aka n 3aIpaBbTe TOnIIBO. HE 3aONHnIe 6ak TOnJIIBOM NOIHOCtBuO Do KpaeB 6aka.
- После заразвкн Наджно 3akpyTNTe Кршky TOnnBHorO 6aka.
- BbItpTe BOKpyr KpbIuKn TOnJIuBHorO 6aka Dnna IpeDoTbpaueHn nnadaHn 3aRpa3HeHn B TOJIINBHyBn 6ak.
- B cnyuae Hannuyna kakx-Jn6o TpeunH nn nOBpeXdeHn B KpbIwKe TOJINBHorO 6aka 3aMeHnte ero.
- Kpbiuka TOnnBHO 6aka n3HaunBaetc C TeueHneM BpemeH. 3aMeHraTe ee KaJbIe DBA INI TPN rOda.
- HE donyckaTe nonaHaHn TaonnBa Ha 06IacTb MacNo3aINBHOr ropNOBuHbl.
3aHBOUHbAo (Pnc.6)
NPEUYPEXKDEHNE:
He 3anyckaIte Hacoc 6e3 BObI B KOkxyhe Hacoca. B npOTnBHom Cnyae BO3MOxHO NOBpeKDeHne MExaHueCKoro yNIOtHEHnI.
YdaIte 3aINBOHyO 3aRnyuKy u Do6aBbTe YnCTyO BOy, noka Koxkx HacocA He 6yDet 3anONHe BDOJ. Nocne 3anONHeHn 3aBnHTnte 3aINBOHyO 3aRnyKy.
PIMMEYAHNE:
B cnyuae HeioctaToHoro BOIO3a6opa cnooc6hoctb K camO3aJIbKe CTAHeT HIXKe.
- Y6eIntecb, yTO HAcOC HaxoINTcB B yCTOuHOB MceK KaM oXHO 6JIxke K DOCTyINHomY nCTOuHNY BObl.
- YEM BbIe HaxoNTcBcScBaHouaRrONoBka,TeM 60JIbIe BpemEn NoHaIObNTc DnA 3aINBKn C MeHbIM pacxODom.
IPOBEPKA MOTOPA:
BHHMaTeIbHO npOBepe, He OTBnHcEhJI nn IJNaHn noaHrTONINBa n MyoTbI, HET JN yTeHKn TOnJIbA. BbTEKuee TonINBO Bbl3bIBaet NOTeHuaJIbHO onaChyIO cTuayauio.
- PpOBepbTe, He OTBnHcHehJI JIN 6oJITbI IraKn. 3aBnHTnte nx B Cnyae Heo6xOdmocTn. Pa3BnHcEHbI 6oJIT nn raiKa MOryT Bbl3BaTb cepBe3HyIO npo6nEmy c MOTopom.
- PpOBePbTe MoTOpHoe MacNo n 3aIpaBbTe ero npn Heo6xOAnMoCTn.
- PpOBeBte ypoBeHb TOnJIbBa n 3aPabBte ero npn Heo6xOAnMoCTn. ByIbTe BHNMaTeIbHbl, YTo6bl He nepenONHHTb 6ak.
- He donyckaIte nonaHaHnN nbIn, TpaBbI n dpyrnx 3arpa3HeHn Ha pe6pa cUInHdpa N BO3BpaTHbI CTapTep.
- Ppna pa6oTe c MOTOPOM nCnOJIb3yIe nIOTHO 06JeraIOUyIO 3aUNTHyIO OdExdy.
3KcπIyATAUЯ
I PENEOCTEPEXEHNIE:
HnKorda He npKacaiTecb K ropayemy rnyuHTeJIOMOTopa 0c06eHHo pni nepe3anycke MOTopa. rnyuHTeJIb MOTopa cTaHOBNTcR ropaym Nocne 3anycka MOTopa.
He nomeuaIte pykn nIu npyrne noctopOHnne npedMeTbI B BblnyckHbIe KJIaIaNbI BO BpeMa NCIOJIb3OBAHnHaHCoCA.
I PENEOCTEPEXEHNIE:
Onachocb rnpabBnueckoro yapa
He no3B0JnTe KOJecy HNCTpyMeHTa BbIXoDntb 3a IJnAHr NOaun. He 3akpbBaIte HeOxKJaHHO KJnAnH NOaun, TAK KAK npou3oJET rIdpabTnueckn yIap, KOtOpB MoKeT npuBeCTn K CnIbHOMy NOBpeXJeHNIO Hacoca.
3anyck:
PENEYPEXKDEHNE:
Tak kac cma30Hoe Macno eue He pacnpoctpaHnIOcb BdoCTatoHHo Mepe,He yBENuBaHTe YNCNO 6obopoTOB MOTOPa Cpa3y nocne erO 3anycka. N3nnuHe BbICOKOE BpaueHne COKpaaet Cpok cnjX6bl 6obopyoBaHn nn npBODNT K NOBpeKDeHnIO.
1. Поверът, УTo кoxух Hacocа 3aONHeH BDoI.
2.Поверъ,чToФильтусановлен noД BODоI.
PDEyPExEHN:
- IcnojIb3yIte kakOJ-NI6o npoФJIaKTnueckn MeToD, KOrda HIXHЯ Yactb BOdbI NOKpbITa rpa3bIO INN NECKOM.
- IpoBepbTe, HeT JI npenrTcTBn Ha BbIXoHOM naTpy6ke WJNaHra noaun.
- NobeprHne nepeKIOUaTeIb I-O (BKJ./BbIKI.) MOTopa B noJoxHe "I" (BKJ.).
- Поберъг, уTo pyuKa akceлepaTopa yka3bIbaet Ha "L". (Pnc. 7)
- Пюдогжайе Нжимать На 3алноуньи Hacoc, noka в Hero He noctупт ТОЛНВ. (ОбьИHо OT 7do 10 habatni.)
- OTPerynpyTe pbUar Bo3dyuHoi 3acNoHKn.
B cnyae xonodHoro MOTopa HnH3KoI TEMnepatypbOkpykaOuue Cpebl 3aKpOte pbUar BO3duHOn 3aRnyuKn nonHOCTbIO. (Pnc.8)
B cnyae TENI OMOta pIN BbICOKO TeMnepaTpybl OKpykaUoSei Cpebl OTKpoNTe pbHar BO3dyuHoi 3aIpyuKN HAnOpIOBHy nIN DePKeHTe erO NOJHOCTbIO OTKpbITbIM. - AkkypaTHO TAHHTe pyKoTky CTapTepa, noka He 6yJeT OuyuataBcra ONpeJeHHeCnpoTnBHeHne. 3aTeM BepHtPe pyKoTky CTapTepa n CnIbHO NOTHtE ee. HIKOrDa He BbITraHBaIte Tpoc Ha BCHO JINHy.
Nocne TOrO, KaK pyKoRtKa cTApTepa 6yDet BbITaHTa, HNKOrda pe3KO He OTnyckaIte pyKy. Depxnte pyKoRtKy cTApTepa, Noka OHa He BepHETcK KNCXODHOI TOUKe.
Ecn 3anyctntb Dniratelb He ydaetc, OTkponte dpocceIbHyIO 3acNoHky npImepHo Ha 1/3.
- Iocne 3anycka MoTopa yctahOBuTe pbUar BO3dyuH0n 3acnoHKn B noJooXeHne OTKpblTO,ecnn BbI 3akpbBaJIIN pbUar BO3dyuH0n 3acnoHKn. (Pnc.9)
10.ДаиTe MOTOpy IOCTaTOUHO "nporpeTBcra". IpoIoJnxJaTe OepaunIO nporpeBaHnO r 2do3 MInHyT B NIOLOXeHHN "L".
Pa60a MoTopa:
IobepHnTe pbyar akcepeapotaB cpeJHee noIOXKeHne n npOBepbTe, yTO BOda BbIXOAnT N3 WlaHa rnoaH.
3aBepWeHne pa6oTbI
OctaHOBKa MOTopa
NobepHnTe pbyar akcepepatopa B noIooKeHne "L", yTO6bl yCTaHOBnTB MOTOP Ha cAmoe Hn3KOE BpaueHne. NObepHnTe nepeKJIIOuATEb I-O (BKJ./BblIK).) MOTOP BA NOIooKeHne "O" (BblIKI.).
Cnyck BoDbl nocne nCnoJb3OBaHnA
Boda BHytpn Koxyxa Hacocaa 3aMep3aet npn TemnepaType Hxke 0^ B 3mHee Bpem, yTO MoKET npNBecTn K BO3MOKHOMy NOBpeXeHIO Hacoca. Nocne nCNoJIb3OBAHn CNeIte BoNy I3 CnHBHO OTBepCTn B HxKHeu YAcTn DnY XpaHeHn.
NHCTPYKUNIPOTEXHNUECKOMYOBCLJUXINBAHNUO
I PENEOCTEPEXEHNIE:
- Ipeed BbINOJIHeHnEM NIO6bIX DeIcTBn C obOpyIOBaHNEm O6a3aTeNbHO OCTaHOBNTe MOTop. He BBINOJIHnTE HnKaKne pa60tbl, noka MOTop eIe rOpaqHn.
NPEUYPEXKDEHNE:
- He moiΦnIuPyTe n He hAcTpaBaIte Kap6IopatOp. Oh yKe hAcTpoe H a 3aBoJe-n3rOToBnte dIra HanNyUWe IΦΦeKtNBHOCTn. B Cnyuae Heo6XoDMOCn HAcTpoiKn ObpaNTeCb B MecTHbI UeHTp No Texo6cnyKuBaHIO.
He MoTe MOTop BOdo Bo BpeMa TexHnueckoro 06cnykBAHn.
3AMEHA MOTOPHOFO MACJIA
I PENEOCTEPEKHEHNE:
- Motop n MOTOPHOE macNo eue ropyue cpa3y nocne octaHOBKn MOTopa. DaIte MOTopy n MOTOPHOMy macNo DOCTaTOUHO BpemEH, yTo6bl OxlaadTbcra. B IPOTNB Hom Cnyae 3TO MOKET pINBEcTn K OKoRAM.
PPEyPExEHNIE:
- Ipeep 3aMeHoi Macna onpeJeIne Te NOxOJaun cnocob yTnJIn3aunn CTaporo Macna. He BblnBaIte ero B KaHaJIIN3aUNIO, B 3eMNI UIN B OTKpbITbIe BOIOeMbI. Baun MeCThBiE MyHNUINaJIbHbIe IN npipOooXpAHbIe opraHbI npeoCTabRT Bam 60onee noDpo6HbIe INcTpyKUnn O NOxOJaUNx cnocobax yTnJIn3aunn.
3arpy3HeHHoe MOTOPHoe MacNo cokpaaet cpoK cnky6bl MoTopa. 063aTeNbHo peryIpaHno npOBepraIte MacNo I erO yPOBeHb.
ПОНМЕЧАНЕ:
- EcIn MacNo 3aJInTO BbIe OrpaHnUHTeNbHO MeTKN, OHO MoKet 3aRp3HNTbcra NIN MoKet npNBecTn K BO3rOpaHnIO C 6JIbIM DbIMOM. IOnoXknte DOCTaTOHoe BpeM NOcIe OCTaHOBKn DBurTaTeN JnB O3BpaUeHn MToPbHO MaCJa B TOnJIuHBnBnBnBnBnBnBnBnBnBnBnBnBnBnBnBnBnBnBnBnBnBnBnBnBnBnBnBnBnBnBnBnBnBnBnBnBnBnBnBnBnBnBnBnBnBnBnBnBnBnBn
HHTepBaJ 3aMeHbI: NocJIe nepBbIX 20 yacOB pa6oTbl, 3aTeM uepe3 kaxdbie 50 yacOB pa6oTbl.
PekomeHnyemoe maclo: Macno SAE 10W-30 no KlaaccnphiKaunn API, Knaacc SF nnn Bblwe (4-taKTHbI nBnraTeIb dnn ABTomo6nna)
Obem Macna:
Длma moeJIи EW1050H:ПибИЗ.0,08I
- BbIKJIIOUHTe MOTOp. Bbl6epNTe MecTo BdaIIN OT OTKpbITOrTO PJIaMeHn.
3aarp3HeHHbI 3JeMeHT Bo3DyXooHCTnTeJI Bbl3bIbAe 3aTpUdHeHn Ipn 3aynCe, CHNXeHne MOuHocTN, HEnCnpabBHOctb MoTopa N 3HaunTeJbHo COKpauaet cPok cnYk6bl MoTopa. POndepXnBaTe YnCTOTy 3JeMeHTa Bo3DyXooHCTnTeJI.
PpomexytoK uNCTKN npOBepKn: EkeHHeBHO (kaKdbie 10 yacob pa6oTbI)
- Nomecnte pyuB BO3dyuHOn 3acNoHKn B NOJHOCTbIO 3akpyIToe NIOJOKeHne TAKIM O6pa3OM, YTO6bl NbJIb N rpr3b He MOrJI N ONaCTb B KAP6IopatOp.
- YdaHnTe 60NT KpbIuKn BO3dyXooHcTHeJIa.
- BbITAHNTe HxHn KpaKpbIuKn, YTO6bl ydaIHTb KpbIuKy BO3dyXooUcHTneJIa.
- YdaJInte 3JIemEHT, a 3aTeM OChNTe erO pactBopOM TENIOI BObI MRAKORO MOUcero CpeDCTBa, TuaTeJIbHO BbICyWIB ERO NOCNE 3TOrO.
- YCTaHOBnte eRO B COOTBeTCTBUN C JINHnMn, KAK NOKa3aHO Ha pncyHKe.
- Bbtpnte Tprnkoi Macno, nonaBuee B 06naCTb BOKpyr KpbIuKN BO3dyXooHcNTteJI N BCacbIBaHOSeI Tpy6bl.
- Nocne YnCTKn 3aHOBO co6epnte KpbIuKy BO3dyXooCHNTeTn (BCTaBBte Chauana yuKO CBepxy, a 3aTEM BCTaBBte HxKHee yuKO) n 3akpyTnTe fHKCnpyIOuN 6oJt.
CHCTKA TOJIINBHOFO NJIbTPA
PNEOCTEPEXEHNE:
- BbiknouhTe MOTop. Bbl6epnte MeCTO BdaJIH OT OTKpbI toro nnaMeHH. He Kypnte.
PpomexytoK uNCTkn n npOBepKn: ExeMeecuHo (kaKdble 50 yacob pa60tbl)
TOnnBbHbI pNt npONb3yeTcI dIaHbtpaunn TOnnBa, Heo6xOIMoro IpaKap6Opataopa. Heo6xOIMIO npOBODIb nepNOUeCKN Bu3yaJIbHbIOcmToTOnnBHO rPbPa.
- OtkpoIte KpbIuKy TOnnBHorO 6aKa, nCnoJb3yIte npoBOIoHbI KpHouK N BbITauNTe BCacbIBaHOUToIIOBky Upe3 OTBepCTne 6aKa.
- YdaInte 3axm IJHaHra N BbITAHNTe TOnJIINBHyBI mNtbpn3TOnJIINBOPPOBDA.
- IpnomOnTe TOnnBHybI ΦnJbTp KepocnHOM.
- Iocne npombibkn 3aHOBO co6epnTe erO.
- Ecn n pfnbtp 3atBepdennnn 3a6nncra, 3ameHnte ero Ha HOBBi.
3aMeHnTe TOnJIINBHyI ΦnIbTp, no KpaIHeMpe, exeKbapTaIbHO dIg ObecneYehn IocTaTOUHO nOdaHn TOJIINBa B Kap6Opatop. B npOTNBHom cnyae HeIOCTaTOUHa NODaYa TOnJIINBa MoKeT npNBecTN K c6oIO B 3anycke MOTopa I K OrpaHueHIO MAKcImaJIbHO CKOpOCTn.
Iocne npoBepKu, uCTKn nn 3aMeHbI 3akpeNITe TOnJIINBHyI Ntbp Ta HnTOnNBONpOBoE C NOMOIO 3axmMa IHaHra.
BdABnTe TOJINHBHbI ΦnIbTp NOJIHOCTbIO CHN3y TOJINHBHoro 6aka. (Pnc.13)
3AMEHA TOПЛВОПBOIDA (Puc. 14)
PPEOCTEPEXEHNE:
- BbiklouhTe MOTop. Bbl6epnte MeCTO BdaJI NOT OKpbI toro nJaMeHn.
PpomexyToK uNCTKN npOBepKn: EkeHHeBHO (kaKdbie 10 yacob pa6oTbl)
3aMeHa:ExkeoQHO(KaXdbie200yacOBpa60TbI)
3aMeHnTe TOnNtBONpOBoD exKeroJHO BHe 3aBNCmOCTN OT yAcToTbI pa6Otbl. YTeUka TOnNtBA MoKeT npNBecTn K BO3rOpAHIO.
EcnBBO BpemnpoBepKn 06HapyKeHa yTeKa, HEmeDneHHo 3aMeHnTe TOnJIbONpOBoD.
NONCK HENCnPABHOCTEIN
IpepeobpaueHem 3a peMOHTOM camocToTebHO npOBepbTe HeNCpabHocTH. Ecn no6HapyKeHa HHeOpMaJIbHoCTb, npOBepbTe BaWe ycTpoiCTBO B COOTBcTcBn C ONCAHN Mn B daHHo IHCTpyKcNn. HIKoTa He nepepeIbIbaIte n He MOHTpyIte Hkakne yactn HeCMOTpr Ha ONCaHne. IyBaINOnHeHnpeMOHTa o6paNTecb B yIOJNHOMOeHHbI cHTp no TexO6cIyKuBaHnIO.
OZNAKA DELOV (Sliki 1 in 2)
SESTAVA (Slika 3)
OPOZORILO:
- P r e d z a cetkom kakrsnega koli dela na opremi,vedno zaustavite motor.
- Motor zaženite samo, ko v celoti sestavite opremo.
PpOBepeTe DaII pEmeHOT Ha UpeBoTo e Do6po npuBpCTeH.
- Повзете ro Фиntерот Ha Кра差别 Ha ДобогOTO ueBO.
HANOMEHA:
Ako nponyuTa BO3nyx, Hema da MoXe da ja noBnekyBa BOndaT.
BHIMAHNE:
He BaTeTe ro fInTepeT 6nEjKn nymnata MoKe da ce OWTeTN OD CTpaHO TENO.
PpOBepeTe daHn peMeHoT Ha upeBTo e do6po npuCBpcTeH.
ПОВЕРКИ ПЕД PавOTA
PENEYNPEDYBAHbE:
- Cekoraw racete ro MOTOPOT nped da pa60ntte Ha onpemata. Cekoraw pa60TeHa pamHa n cta6nHa nobpwnHa.
- Поберета дани на onpeMaTa Иma Лабави урафobи Ипл лабави сюжки мERY.DeLOBITE nped da ro CTapTyBaTe MOTOPOT.
- I36erHybajTe da rI donnpate MOTOPIT N3dYBHNOT NOHeC co Koj 6nIO den OD BaWeTo TeNo nIn oBneKa 3a BpeMe Ha npOBepka nn nonpaBka DoNeKa ce yUWeKu.
- O6pHeTe Noc6Ho BHNMaHne Ha BeHTnJaCuJaTa. BuDeTe CBeCHN 3a onaChOCTa oD TpyeHe co CO (jarJIepoJeH MOHKcND).
Hnkoraa He BneyeTe ro jaxeTo do kpaJ.
Otkako Ke ro nobneye T konhe To 3a CTapTyBaHe, He Tprajte ja BeHaaw BaWata paka. IpxeTe ro konhe To 3a CTapTyBaHe Doke Ka He Ce BpaTn BO HerOBata opinHahHa noNoK6a.
Kora MOTOPOT TeuKO ce cTapTyBa, OTBopTe ja paKaTa Ha racot 3a 1/3.
- OTKAKO KE CTAPTyBa MOTOpOT, NOCTaBeTe ja paKaTaHa cayXoT Ha no3nJia OTBOPEHO dOKoNky npetxOAnoCte ja 3aTBOpHne. (Cn. 9)
10.OctaBeTe ro MOTOP TaCe 3arpee".IpoDoJIkeTe co 3arpeBaHe Ha MOTOP 2 Do 3 MNHyTN, CTaBEN Ha INo3nJia ,L".
Pa6oTeHe co MoTOpOTo:
CTabete ja paKaTa Ha racot Ha cpeHa no3nJa n npOBePeTe daHdoa BODa oUpeBOTO 3a nCnpopaKa.
3aBpuSyBaHbe co pa6oTa
Tachehe Ha MOTOPOT
CTabete ja paKaTa Ha racot Ha no3nJa ,L 3a da ro noctabITE MOTOPOT Ha HajHN3OK 6poj Ha BpTeKN.
CTaBeTe ro npeknHyBaOHT ha MoToPoT I-O (BKnyUeHO/ NCKJyUeHO) Ha no3nuija "NCKJyUeHO).
- HnKoraw He DonnpajTe ro KOHEKTopoHa CBeKnUkata DoNeKa pa60TN MOTOPOT (ONaCHOCT Od CTpyeH yap co BnCOK HanoH).
BpeMeHcKn nHTepBaI Ha YnCTeHe n npOBepKa: CekojdHeBHO (Ha ceko1 10 pa6OTH yacobn)
KopncTeTe ro camo npnloKeHNOt yHnBep3aJeH Knyu 3a BaedeHe mOHTnpaHBe Ha CBeKnUkata.
- 3a30pOT MeIy DBeTe eNeKTpOuHa CBeKnUkata Tpe6a da 6nDe 0,7-0,8 MM.
DOKONKY 3a3OpOT e MHORY uHPOK uNn MHORY TeceH, npncnoc6eTe ro. DOKONKY CBeKuKaTa e 3aTHaTa uNn KOHTAMHHupaHa, ueNoCHO uCNCTeTe ja uNn 3aMeHeTe ja.
YHCTEHE HA ΦNITEPOT 3A BO3DyX (Cn. 12)
NPEyNPEDYBAHbE:
- U3rachete ro MOTOP.Држete ro noHactpaHa oD OTBOpEN nIaMeH.
HeuCTnOT fHnTep 3a BO3dyx npEiN3BkyBa TeUko CTapTyBaHBe, r6beHe Ha MOkHOCTa, DepeKTN BO MOTOpOT n EKCTpeMHO ro cKaPaTyBa pa6oTHNOt BEK. FnTepOT 3a BO3dyx ODPKyBajTe ro UcT.
Bpemehckn HHTepBaHa YncTeHe n npOBepka: CekojdHeBHO (Ha ceko1 10 pa6OTH yacobn)
- Ctabete ja paaykata Ha cayxot Bo ceIIOCHO 3aTBopeHa No3njuja 3a Da cnpeHTe HABNeryBaHc Ha npaunHa n HeuNCTOTnja BO Kap6ypatopOT.
2.ИЗваде тг 3аВрткITEза ФнКспаьe Ha Ka napokT ha ФнлтepOT 3a BO3dYx. - Nobnehe To HaBOp DoHNoT pa6 Ha KanaKOT 3a da To n3BaInTe KaNaKOT Ha qntepoT 3a Bo3dyx.
4.ИЗвадеTe ro eIeMENTOT,notoa nCnHcTeteTo co pactBop Ha TOnIIa BOda n 6nar DeTePreHT n Ha Kpaj ueIOCHO nCyWeTe ro. - MoHTnpajTe ro Taka 6To Da 6nDe nopamHet co JINHHTE KAKO 6TO e npKkaKaHO Ha CInKaTa.
- N36pniwete ro co Kpna MacNoTo wTo ce 3aJenHNO OKOy KanakOT Ha cHNTepoT 3a BO3dyx N BEHTnIOT.
- Nocne YnCTeHbTe OCKlonete ro kanaKOT Ha qntepot 3a BO3dyx (BMETHeTe ro npBO ja3uHcTo Ha rOpHnOt DeJ, a notoa ja3uHcTe Ho DOJIHNOT DeJ) n npuCBpCTe je HABPTkata.
YHCTEHE HA ΦNJITEP 3A ΓΟΡΙΒΟ
NPEAYNPEDYBAIbe:
- I3rachete ro MOTOP.Држete ro noHaCTpaHa od OTBOpeH nJaMeH. He nywete.
BpemeHckn nHTepBaJ Ha YncTeHe n npOBepka: MeceHo (Ha ceKoN 50 pa6OTHn Yacobu)
ΦnITepoT 3a rOpINO ce KOpNCTn 3a ΦnITpnpaHbHe Ha rOpNBOTo nOtpe6Ho 3a Kap6ypatopOT. Tpe6a Da Ce BpuN nepNoDnUHa BN3yeJHa npOBepKa Ha ΦnITepoT 3a rOpINO.
- OTbopete ro kanakot Ha pe3epBoapot 3a ropnBO, a notoa co nomou Ha Kyka od Knuca noBneye Ta ra nabaTa 3a WMykahe Hn3 OTbopOT Ha pe3epBoapot.
2.ИЗваде Г стerte HaцpeBOTo И nobIeHTe roФиNTepoT 3a ropuBO OД цЕКаТа 3a ropuBO.
3.Измujte ro Фнтетор 3a roриBO co kepo3H. - NocJIe MHeIbeto, NOBTOpHO cKJoneTe ro.
- AkoФиNTepOT e UbpCT nIN 3aTHaT, 3ameHete ro co HOB.
MeHyBajTe ro fInTePoT 3a rOpINBO 3a da o6e36eInTe DOBOJHO cA6dyBaHe Ha Kap6ypaTopoT co rOpINBO. Bo CnpoTINBO, HeDOBOHOTO cA6dyBaHe co rOpINBO MoKe Da npEiN3BnKa TeuKOTn PnCTapTyBaHeTo Ha MOTOPOT n ORpaHnueHa MaKcImaHa 6p3nHa.
Iocne npOBepKaTa, YnCTeHbeto 3aMeHaTa, npuCBpCTeTe ro fntepo 3a rOpBO BO CpEBOTo 3a ropBO CO Ctera 3a CpEO.
PnTnCHeTe ro fntepo3a rOpNBO BHaTpe Do dHOTo Ha pe3epBoaop 3a rOpNBO. (Cn.13)
Ioc6hO o6paTne npKHy.

Hemojte Kopunctu MOTOp y 3aTBopeHom npocTopy.
MEPE INPEDOCTPOXHOCTN 3A AYCNYX
- Hemojte ydncatn n3dyBHe racobe. OH caipxye yIbEn-MOHOKCnD, BeOMa onacan rac 6e3 6oje mnpca kojn moKe da doBeJe Do r6ntka cBeCTn nn CMPTN.
HemojTe KOpNCTHTypehaj y 3aTBopeHOM IINILOWe npoBeTpEHom npocTopyNONyt TyHena,neHnHa NTd. - Noc6Ho Na3nte KaJa KOpNCTnTe MOTOp y 6JIN3Hn JbYdN INJN JKNBOTnHa.
- Na3nTe Da y n3dYBHOJ CEbN HeMa cTpaHx npEdmeta.
MEPE INPEIOCTPOXHOCTN3A CINNAHE TOPNBA
- 06abe3no 3ayctabnte MOTOP npe cnnaHa ronpBa.
- Hemojte npekomepho nyHHTn pe3epBOap 3a rOpuBO.
- Ako ce ropnbo npocne, naKbnuBo ra o6pnuHte n cauekajTe da ce ocyu npe Hero uTo NOKpeHete MOTOP.
- HakoH cunhaBa rOpBa Do6po npuBpcTne noknonaKakO 6nCTe CnpeuNII npocnnaBe.
3AHTNTA OJIOKAPA
- Hemojte Kopunctu ypehaj dok nyuTE uynu 6n3uHn OTBOpeHor nameHa.
- Hemojte Kopncttn ypehaj oko cybor rpmba ninn rpaHnua, kpn nn npyror 3anaJbHor MaTejujana.
-Држnte MOTOP Ha Hajmahe 1 MeTap oJ 3rpaJa Ипдугnx cTpykTypa.
-ДржITE MOTOP NOdaJIbe OI 3anaIbIbIX IpyrIX onaChNX MaTePnJaNA (CmeHa, KpNa, Ma3NuBa, ekCnIO3NuBA).
Hemojte ctabbaTn Bpyny nymny Ha cyBy TpaBy nn 6nno koj npyru 3anaabnu Maepujan.
Camo 3a ebponcke 3embe
E3 n3jaba o ycarnaaehoctn
E3 n3jaba o ycarnaaehoctn je HabeDeHa ydoataKy A OBOr ynyTCTBa 3a ynotpe6y.
TEXHnUKNIOdaun
| EW1050H EW10 | 60H | ||
| Текида 5,8 7,3 | |||
| Деменzeиode mm 327 x 231 x 319 356 x 234 x | 336 | ||
| Тун | Самонунеши СЕНТРИФУГАЛHA ПУМПА | ||
| Прechници (увлиаочь-иславпаваьe) | Инч | 1 | |
| Уктуна висиа | m | 35 | |
| Мakсимална з苹етima на с replenishment висина увлиеьa | I/min | 110 | |
| Мakсимална висина увлиеьa | m | 8 | |
| З苹етima (peзерваор гориba) | I | 0,5 | |
| З苹етima (peзерваор уьa) | I | 0,08 | |
| З苹етima моторa | cm³ | 24,5 | |
| Мakсимално поформанце мотора | kW | 0,71 по 7.000 min-1 | |
| Карбу ratop | Тур | Диюфразma | |
| Систems палева | Тур | Елькоюско палевe | |
| Сveица | Тур | NGK CMR6A | |
| Размak eльковая | mm | 0,7-0,8 | |
| Ториво | Аутомоблески бенин | ||
| МOTOPно улье | Улье SAE 10W-30 API кlasифikaциja, Класа SF пли вишa (чеборотakтуни ратомobлески мотор) | ||
| Применльва Temпегатура boide | °C | 5-40 | |
| Ниво звуногрипstska | LpA eq | dB (A) | 88,4 |
| К несигуrchости | dB (A) | 3 | |
| Ниво звуне сhanе | LwA.d | dB (A) | 109 |
Hanomeha: Tokom Kopniusheneha Hocnte 3awtuty 3a yu.
O3HAKEДЕЛОВА (cI.1n2)
CACTABJbAHbE (cI. 3)
yN03OPEHbE:
- Ппег коршениа урehajа увек заустов.TMOTOP.
- Покренте MOTOP TEK Када NOTnyHO caCTaBnteype Haj.
IOCTABJbAHe LPEBA
- Ioctabte cnojebe uebHa npymny.
ONPE3:
-ПиИнКOM NOCTaBlaBa Cnoja Ha nymny NOCTaBte DnXTyHr Ha MeCTO.
2. Повекитураь на сноюnomоу трак.
PpOBepeTe da JI ne TpaKa ueBn YBpCTo 3aTeHyTa.
3. IocTabInTe ueinbky Ha yna3Hom kpaJy upeBa.
HANTOMEHA:
- Ako Ba3dyx Cypn, B0da He MoKe da ce yByue.

ONPE3:
- Hemojte cknatn ueinbky jep moke doohn oOwTeheBa nymne cTpaHm npedmetom.
PpOBepTe da IJ je Tpaka cEBN YBPCTo 3aTeHyTa.
ПОBEPE ПЕ KОПИШЕHBА
YNO3OPEHbE:
-Пе коришениа урeshaja ybek 3ayctabnte motop.Cbe paOBe obabjajte Ha paBhoJ n cTa6nHoj nobpunHn.
-Ппе покета hypehajapnoBepnte da Jn Ha Heemy mma na6abnx 3aBpTbeBa nJn Na6abnx cnojeBa.
- HemojTe DoOpnbATn MOTop HHTN aycnyx TeONM nnn OdeHOM TOKOM ppeJIeDa nn nonpaBke (doK cy jow Bpyh).
- Noc6Hn na3nte Ha npoBeTpabaHe. ImajTe Ha yMy TpoBaHbe yIbeH-MOHOKCnIDOM.
PPERLEI CNHABE MOTOPHOYbA (cn. 4)
ObaBnte doJeHaBeEHN noCTynak kaJa je MoTOp oxnaheH.
- NocTabnte MOTOp y XOpn3OHTaJIHN NOJOKaj.
- Y6aunTe Mepaay yIba y OTBop 3a yIbe da 6nCTe npoBepniln HnBO yIba.
- PpOBepTe da nn je HnBO yIba n3MeHy doHe n rOpHe rpaHnue Ha MepaCy yIba.
- Ako je HnBO yIb a nCnoD doHe rpaHnce,doaJte yIbe.
- MoKda he 6nTn noTppe6Ho da doJaTe yJbe otnpnIke Ha cBAknx 10 paHnx caTn (cBAknx 10 docnnaHa roPbA).
-Ako ce npomeHn 6oja yba nnc ce oHO nomeHa ca npJbawtHOM,3aMeHHTe ra HOBM.
IpenopyeNo yBe: YBe SAE 10W-30 API KnaCnФиkaUne,Knaca SF nNn BnUa (yETBOPoTakTHn ayTomO6nckn MOTOP)
3anpeMHa yJba:
3a moen EW1050H:Oko 0,08I
3a Moen EW1060H: OKO 0,1
HANOMEHA:
Ako MOTOp He cToJN XOpu3OHTaJIHNO, MoXe DoHn Do HetaUHor OUYTabaHa HnBOa N npEnyHabAba. YKoIInKO ce yBe Cnna npeko rOpHe rpaHnue, MoXe DoHn Do KOHTAMHaCUnJe yBa nn noJaBe 6enor dima.
Cunhahe motophor yba
1.Држnte MToTp y xOpN3OHTaJIHOM nONoKajy u cKnHnTe mepauyJbA.
2. Cnajte ybe do rope rpaHne. 3a cnnahe Kopncntte pfnauy yba.
3.Добpo 3aterHnTe Мерач yba.YkOniko ra He 3aterHete DOBOJbHO,MOKe DoHn Do cypeBa yba.
HaKoH cInaHa yBa
- YkoNko ce yIbe npocne, oDmax ra oBpniHTe Kpnom.
3aMeHa yIba: Mepau yIba
- O6pnuHTe npaunHy nnn npBaBHTnHy oKO OTbopa 3a cunhaBe yJba.
- Na3nte Da Ha N3BaHeHm MepaY yBa He DoCnejy necak nn npaunHa. Y cynpothom necak n npaunHa Ha noKJIOUy 3a yBe MOry Da DOBey Do npo6nema ca HnppaBnHOM Cnpkylaucnjom yBa nn xa6baJa DeNoBa MOTopa.
TOPNBO
YNO3OPEHbE:
- FopnBO je BeOMa 3anaJbNBO n OTOPOBHO. PpunNKOM pyKOBaHa rOpNOM dPKIne ra NOdaJIbe OD OTBOpeHOr nIaMeHa (uIrapete, uNopet, BATpomet), eNEkTpUHnx BapHnua (6atepiJa, KpataK cnoj, BAPHnua oD KpaTko cNojeHOR npeknDaay, BapHnua oD 3aBapNBaHa nTd.).
- 06abe3Ho 3ayctabnte MOTOP npe CnnaBa rOpNBa. HemojTe CnataN rOpNBO DOK je MOTOP jow Bpyh.
- YBek 6yDnTe BeOMa naxJbN Bu N y npuJikama OCIM CnnaBa rOpNBa, qak N KaDa npeCnNaTe rOpNBO y Many Nocdy.
- HakoH cinnaba ropna, yBpctO 3aterHnTe noknonau pe3epBoapa 3a ropnoNIO notnyHO o6pnuHTe npocyTo ropnoBO.
PykoBaHe roPnBOM
TropBOM Mopate pyKOBaTN BeOma naXbNBO. TropBOM OMe Da caDpxn CyntaHue CInuHpe pa3peHnbauHMa. CnnaBe rOpBa ce Mopa obabbaTu y DOBObHO npoBETpeHOJ npocToPOnjn Hn Ha OTBoPeHOM npocTopy. HeMoJe yDncatn NcnapeHa rOpBa n DpKNTe rOpB0 DaJIbe oD ce6e.AKO 6yTe BnEe NyTa DoDnPbAaNr TropBIO nIIN ONo DyKe 6yDe y DoDnPy ca BaWOM KOKOM, OHa he Ce nCyUnTI, WTo MOKe DOBecTn Do OboBeHa kOKe nII anepnje. AKO Bam rOpBIO DoCne y OOn, IcnepnTE INx YnCTom BOdOM. AKO Bam OOn i daJIbe 6dy NaDpaXkeHe, Obpatnte ce nekapy.
Pok cknaDiuIteHa rOpBa
Tropno 6n Tpe6ano da ce nckopnc7u poky o4 HeeJe, qak u ako ce dpkn y noc6hoj nocdyn Ha do6po npoBeTePHOM mpaHOM MeCy.
Y cynpoTHOM ce moKe deCHTIa ce nokBapn 3a jean dAn.
Cknadnthehe ypehaja n pe3epBoapa 3a donybaBaBe
Дркnte ypehajи pe3epBoap Ha xlaHOM MeCTy Koje je 3aWtInHeO od DnpeKTHOr cyHua.
HemojTe dpkaTn ropuBO y ayTomo6nny.
Tn ropuBa:
Ypeaj nMa YeTBOPoTAkTHN MOTOp. O6aBe3HO KOpHCTnTe 6e3OIOBHN ayTOMOBuJICKN 6eH3uH ca 87 uNn BnIe OKTaHa ((R + M) / 2) . He cme da caDpKn BnIe od 10 % ankoXona (E-10).
HemojTe KOpNCTnTm MeuabHy 6eH3nHa Koja caApxM MOTOPHO yIbe. Y cynpOTHom MOKe DohN Do IpeKOMepHor HArOMnJIaBaHa yIbEHNKa mExAHUKNX npo6JIema.
KanaunTe pe3epBoapa 3a ropnBO:
3a moen EW1050H:0.5I
3a moJoEN EW1060H: 0,65I
Cnnahe ronpBa (cN.5)
1.Држnte MOTOp y XOpN3OHTaJIHOM nIOJokajy.
2. MaIIO oJIa6abNTe noklonau pe3epBoapa 3a roPnBO kaKo 6nCTe OTNyCTnIN npTnCaK y pe3epBoay.
3. CkHnTe noklonau pe3epBoapa 3a roPBO n cInajte roPBO. HEMOJTE cnatn roPBO do Bpxa pe3epBoapa.
4. HakoH cinnaba do6po 3aTeHnTe noklonau pe3epBoapa 3a roPBO.
- O6pnHnte cnoBHN Deo noklonua pe3epBoapa 3a roPBO kaKo 6nCTe cnpeuHn npOIpaHe oTnpa y pe3epBoap 3a roPBO.
- Ako je noknonaq pe3epBoapa 3a ropnBO oWtehen, 3ameHnte ra.
- POKNONaц pe3epBoapa 3a roPbBO ce BpeMeHOM xa6a. MehajTe ra Ha cBaKe 2-3 roDInHe.
HEMOJTE cunatn ropuBO y oTBOP 3a cunbae yba.
Nybebe BOOM (cI.6)
ONPE3:
Hemojte nokpeTaN ymny aKO y kyhunTy nymne Hema Bode. Y cynpoTHOM MOKe DoHN Do OwTeheBa MexaHnue 3aNTNBke.
CknHnTe qen 3a nyhebe n cinnajte Yncty Body DOK ce kyhniwTe npmne He HanyHn BODom. HakoH nyheba 3aTerHnTe qen 3a nyhebe.
HANOMEHA:
- Ako yBnauehe BoJe Hnje DOBOJbHO, KaNaHTet camonyhbeBa ce CmAbye.
- O6aBe3Ho cTaBnTe nymny Ha cTa6nHnMo mecTo n uTo je Moryhe 6JnxKe DOCTynHom N3BOpy BoJe.
- ITo je BnCnHa 3a yBnaeHe BeHa, To he 6ntn Notpe6Ho BnWe BpemeHa 3a NyBeHe y3 MaHe nCnymnabaHe.
IIPOBEPA MOTOPA:
- PAnKbNoI npOBepnte da IIN cy ueBa 3a ropBIO n cnojeBn IabABn IIN cype. LypeHe roPbBa CTbapa notEHnJaJHNO onachy cnTuayuJy.
- PpOBepnTe Da JIn cy 3aBPTbN mMatnue Na6abN. Ako jecy, 3aterHnTe nx. Na6ab 3aBPTaH nIn MaTnca MoKe Da y3pOKye o3bNb He npo6neme ca MToPOM.
- PpOBePte yIbe MoTopa n DoCnTe ra aKO je noTpe6Ho.
- Поверпге НИВО Рогиви ДOCПпге ra akо ја notpe6No. ПаЗИТе д He npENyHnTe pe3epBoap.
- Na3nte da Ha pe6pma cunHnpa n HAMOTajy CTapTepe He 6ye npaunHe, TpaBe n Dpyror OTnda.
- Ppunikom KopuheHa MoTopa Hocnte npunjehy paHny oJeHy.
PYKOBAHbE
YNO3OPEHbE:
- HemojTe DoIupnBaTn Bpyh aycnyx MOTopa, noroTOBO npuNKOM NOHOBHor NOKpeTaHa MOTopa. Aycnyx MOTopa ce 3arpeBa HAcOH paDa MOTopa.
- HemojTe cTaBbataN pyke HHTN cTpaHe npedMeTe y nCnyche BeHTnne KaJa Ce Nymna KopnCTn.
YNO3OPEHbE:
Pn3nte Ha BoDHe ydape
- HemojTe 03BOJNT Da ToaK Bo3nA nphe npeko UpeBa 3a NcynmnaBaHe. HemojTe Harno 3aTbapatu BeHTNJ 3a NcynmnaBaHe, jep he doHn Do yDapa BOe, ITO MOKe Da DOBeDe Do O36nBHor OwTeHeb a Nymne.
PokpeTaHe:
ONPE3:
-
PoiTo ce yIbe 3a noMa3nBaHBe jow Hnje npOuInpNo, HemoJTe TpynpaTn MOTOP TIK HAKOH NOKpeTaHa. Henotpe6Ho Bucok 6poj o6ptaja he ckpatTu paHn BEkypehaja nn DoBecTu do OwTeHeHa.
-
IpoBepTe Da JI je KyHnTte npmne nyHO Bode.
- IpoBepnTe da JI ne ueeJbKa noD BOOM.
ONPE3:
Ako je dHO BOe npeKpNBHeo 6IaTOM NIN neCKOM, yNtpe6nte Heky MeToy 3aU7nTe.
3. Поверпе за лима пеника на улайу црва за Иску мamba.
- 1000000000000000000000000000000000000000000000000000000000000000000000000000000000000
4.прбачиTe I-O npeКИДЧМOTа (yKbUHBAHe/ nCKbUHBAHe)Ha noLoXaj,I" (yKbUyeHo).
5. Поберпеси се на поуграьиL" (cN.7)
- Hactabnte da rypate npmny 3a nphebe doK ropbo He yhe y npmny 3a nphebe. (Y npnHunny, 7 do 10 rypaHa.)
- Nodecite ne nyry cayxa.
Ako je MOTOP xnaadan nJn je TeMnepatypa cpeHne npehncka, notnyHO 3aTbOpnte nonyry cayxa. (cn.8)
Ako je MOTop 3arpejan nn je TeMnepaTpa cpeHHe BnCOKa, OTBOPnte NOnyr Cayxa Do NOOBnHe nn je Dpxknte NOTnyHO OTBOpEny. - Hekho NObyuTe pyuCy CTapTepa DOK He ocTe 6naIOn OTnop. 3atm BpaTne pyuCy CTapTepa n jako je NObyuTe.
HemojTe nOtnyHO n3BJIaHTn KaHaN.
Kada noByte pyuCy cTApTepa, HEmoJTe OdMax nyTuTaPy Ky. DpxNte pyuCy cTApTepa DOK ce He Bpatn Ha npBo6nTHn NOJokaj.
Ako ce motop teuko nokpehe, otbOpTe rac 3a oko 1/3.
9. Kaça ce motop nokpeHe, noctaBnte nonIyry cayxa y noIoxkaj OPEN (otbopeHn noIoxkaj) ako cTe je 3aTbapAn. (cN. 9)
10. NcTne MoToP Da ce npaBnHNo 3arpeje. HacTaNte 3arpeBaHe Ha 2 Do 3 MNHyTa y noJoxajy,L".
PaMoTopa:
Okpene nonyry raca y cpeHn noIoojaj npOBepTe Da nn BODa n3Ja3n 3 upeBa 3a nCnyMnaBaHe.
3aBpuetak pada
3ayctabbahe MoTopa
OkpeneHte nonyry raca y noJoxkaj ,L" kako 6ncte nocTabNJM MOTOP Ha HajMaHb 6pOj o6ptaja.
Ipe6aunTe I-O npeknau MoTopa (yKbYnBaHe/ nCKbYnBaHe) Ha noLoXaj ,O" (NCKbYueHo).
IcTaKaHe HakoH ynotpe6e
Boda y kyhunty nymne ce 3amp3aba Ha TemnepatypmaHobj od 0^ 3mMn mOKe doHn do oUTeheha nymne. HakoH ynoTpe6, nctOHTe BDOy npEko nCnycTa Ha dHy padncknaadnTeha.