
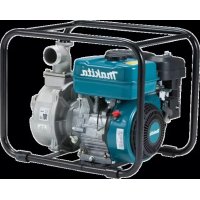
EW1060HX - Water pump MAKITA - Free user manual and instructions
Find the device manual for free EW1060HX MAKITA in PDF.

 FR
FR
 BG
BG
 CS
CS
 DA
DA
 DE
DE
 EL
EL
 EN
EN
 ES
ES
 ET
ET
 FI
FI
 HU
HU
 IT
IT
 LT
LT
 LV
LV
 MK
MK
 NL
NL
 NO
NO
 PL
PL
 PT
PT
 RO
RO
 RU
RU
 SK
SK
 SL
SL
 SQ
SQ
 SR
SR
 SV
SV
 TR
TR
 UK
UK
| Product type | Submersible water pump |
| Brand | Makita |
| Model | EW1060HX |
| Rated power | 1000 W |
| Max flow rate | 200 L/min |
| Max delivery head | 10 m |
| Max immersion depth | 7 m |
| Outlet diameter | G 1" (25.4 mm) |
| Max particle size | 5 mm |
| Max fluid temperature | 35 °C |
| Power supply | 230 V ~ 50 Hz |
| Protection class | IPX8 |
| Weight | 8.5 kg |
| Dimensions (L x W x H) | 22 x 22 x 45 cm |
| Cable length | 10 m |
| Body material | Stainless steel and reinforced plastic |
| Rotor type | Open rotor suitable for dirty water |
| Float switch | Included, adjustable |
| Sound level | 70 dB(A) |
| Maintenance | Regular cleaning of water inlets and blades |
| Spare parts | Available through Makita network |
| Warranty | 2 years |
Frequently Asked Questions - EW1060HX MAKITA
User questions about EW1060HX MAKITA
0 question about this device. Answer the ones you know or ask your own.
Ask a new question about this device
Download the instructions for your Water pump in PDF format for free! Find your manual EW1060HX - MAKITA and take your electronic device back in hand. On this page are published all the documents necessary for the use of your device. EW1060HX by MAKITA.
USER MANUAL EW1060HX MAKITA
2
3

4

5

6

7

8

9
10 11


12 13


14
ENGLISH (Original instructions)
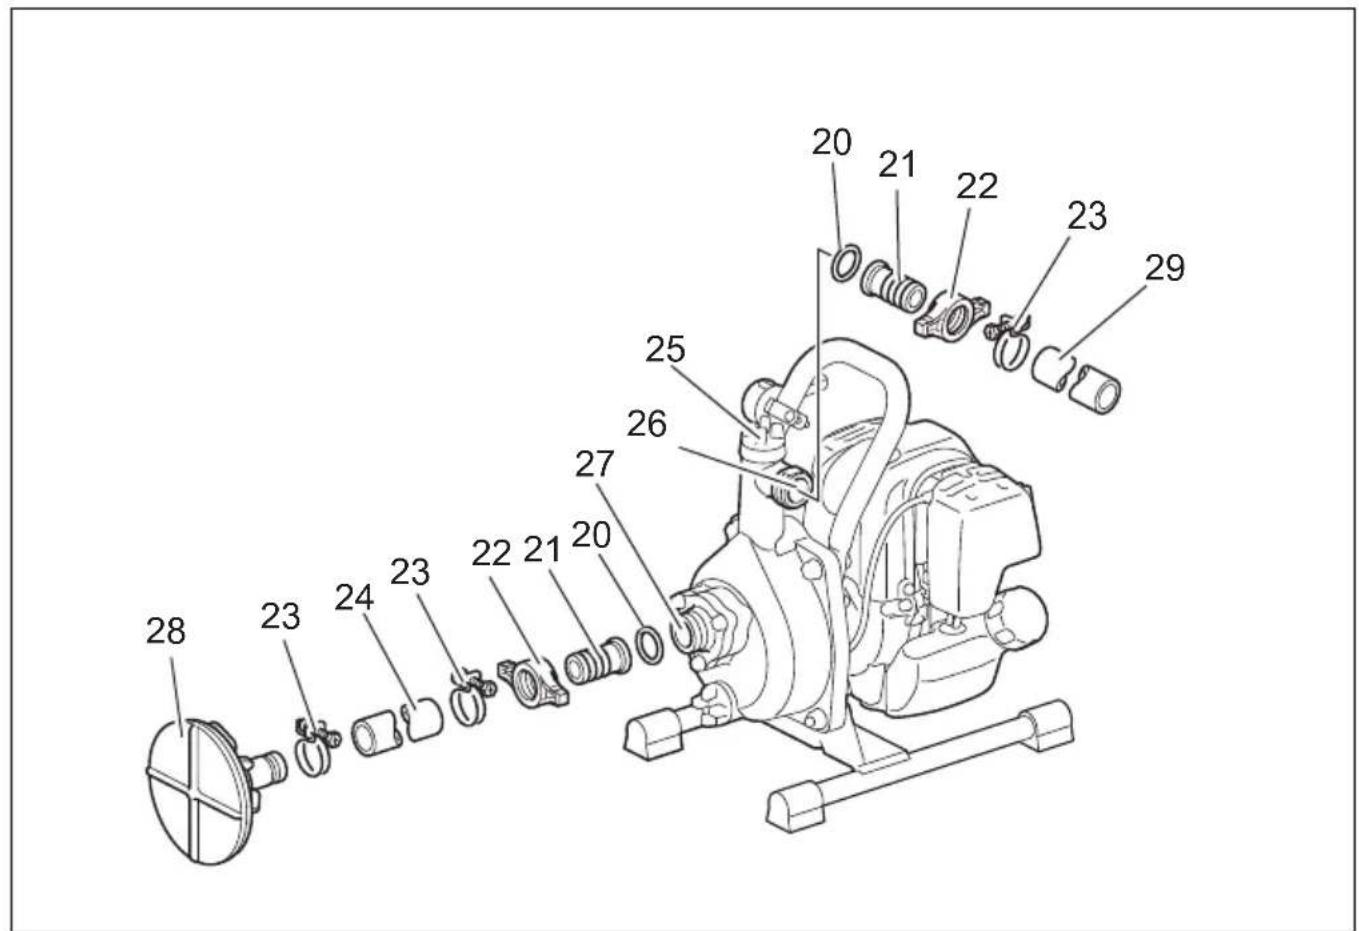
| Explanation of general view | ||
| 1 Plug (priming) | 13 Muffler | 25 Plug (priming) |
| 2 Delivery | 14 Choke lever | 26 Delivery |
| 3 Suction | 15 Starter knob | 27 Suction |
| 4 Plug (drain) | 16 Recoil starter | 28 Strainer |
| 5 Pump case | 17 Oil gauge | 29 Hose (optional accessory) |
| 6 Handle | 18 Set base | 30 Oil gauge |
| 7 Spark plug cover | 19 Throttle lever | 31 Upper level |
| 8 Air cleaner | 20 Packing | 32 Lower level |
| 9 Tank cap | 21 Hose coupling | 33 Fuel tank cap |
| 10 Fuel tank | 22 Thumb nut | 34 Upper level |
| 11 Primer pump | 23 Hose band | 35 Fuel tank |
| 12 I-O (On/Off) switch | 24 Hose | 36 Fuel pipe |
Thank you very much for purchasing the MAKITA Engine Pump. We are pleased to recommend to you the MAKITA Engine pump which is the result of a long development program and many years of knowledge and experience.
Please read this booklet which refers in detail to the various points that will demonstrate its outstanding performance. This will assist you to obtain the best possible result from your MAKITA engine pump.
SYMBOLS
You will note the following symbols when reading the instructions manual.

Read instruction manual and follow the warnings and safety precautions.

Take particular care and attention.

Never use the engine indoors.

Do not touch the engine when it is hot.

No open flame!

Check the oil level before starting.

CE mark
WARNING:
- PLEASE READ AND UNDERSTAND THIS MANUAL COMPLETELY BEFORE OPERATING THE MACHINE.
The following ⚠markings represent important safety information. Always observe those instructions. Incorrect usage of the equipment may result in serious accidents.
⚠️ DANGER: Failure to observe instructions may result in death or serious injury.
WARNING: Failure to follow WARNING instructions may result in serious injury or death to the machine operator, a bystander, or a person inspecting or repairing the machine.
⚠️ CAUTION: A CAUTION indicates special precautions that must be taken to avoid personal injury and damage to the machine.
NOTE: A NOTE provides key information to make procedures easier or clearer.
SAFETY INSTRUCTIONS
- This instruction manual explains general usage and precautions for the equipment. Read this instruction manual carefully before putting the equipment into operation. And strictly observe the safety regulations.
- Save this instruction manual in a safe place for future reference. In case this instruction manual is lost or damaged, ask Makita authorized service center for replacement immediately.
- When you lend or give the equipment to other people, always hand over the instruction manual and other informative materials with the equipment.
- Due to our continuing program of research and development, the product specifications are subject to change without notice. Illustrations or contents in this manual may differ from the actual product.
– If you need any assistance for more details, ask your local dealer or authorized Makita Service Center.
Intended use of the machine
This equipment is only intended for watering and irrigating water.
This equipment is used to pump only clear water.
DANGER:
- Do not make modifications or alterations to the equipment.
- Do not use the equipment for other than intended use.
- Use only genuine, approved replacement parts for maintenance and repair.
- Failure to follow above warnings may cause serious damage to the equipment or personal injury.
EXHAUST PRECAUTIONS
- Never inhale exhausts gasses. They contain carbon monoxide, a colorless, odorless and extremely dangerous gas which can cause unconsciousness or death.
- Never operate the engine indoors or in a poorly ventilated area, such as tunnel, cave, etc.
- Exercise extreme care when operating the engine near people or animals.
- Keep the exhaust pipe free of foreign objects.
REFUELING PRECAUTIONS
- Be sure to stop the engine prior to refueling.
- Do not overfill the fuel tank.
- If fuel is spilt, wipe it away carefully and wait until the fuel has dried before starting the engine.
- After refueling, make sure that the fuel cap is secured to prevent spillage.
FIRE PREVENTION
- Do not operate the equipment while smoking or near an open flame.
- Do not use the equipment around dry bush, twigs, cloth rags, or other flammable materials.
- Keep the engine at least 1 meter away from buildings or other structures.
- Keep the engine away from flammables and other hazardous materials (trash, rags, lubricants, explosives).
- Never put the hot Pump onto dry grass or onto any combustible materials.
For European countries only
EC Declaration of Conformity
The EC declaration of conformity is included as Annex A to this instruction manual.
TECHNICAL DATA
| EW1050H EW1060H | ||||
| Weight kg 5.8 7.3 | ||||
| Dimension mm 327 x 231 x 319 356 x 234 x 336 | ||||
| Type Self-priming CENTRIFUGAL PUMP | ||||
| Diameters (suction-discharge) inch 1 | ||||
| Total head | m | 35 | 45 | |
| Maximum delivery volume | L/min | 110 | 130 | |
| Maximum suction lift | m | 8 | 8 | |
| Volume (fuel tank) | L | 0.5 | 0.65 | |
| Volume (oil tank) | L | 0.08 | 0.1 | |
| Engine displacement | cm3 | 24.5 | 33.5 | |
| Maximum engine performance | kW | 0.71 at 7,000 min-1 | 1.07 at 7,000 min-1 | |
| Carburetor | type | Diaphragm | ||
| Ignition system | type | Solid state ignition | ||
| Spark plug type | NGK CMR6A | |||
| Electrode gap | mm | 0.7 – 0.8 | ||
| Fuel | Automobile gasoline | |||
| Engine Oil | SAE 10W-30 oil of API Classification, Class SF or higher (4-stroke engine for automobile) | |||
| Applicable water temperature | °C | 5 – 40 | 5 – 40 | |
| Sound pressure level | LpA eq | dB (A) | 88.4 | 88.4 |
| Uncertainty K | dB (A) | 3 | 3 | |
| Sound power level | LwA, d | dB (A) | 109 | 109 |
Note: Wear ear protection during operation.

DESIGNATION OF PARTS
(Fig. 1 & 2)
ASSEMBLY (Fig. 3)
WARNING:
- Before doing any work on the equipment, always stop the engine.
- Start the engine only after having assembled the equipment completely.
HOSE INSTALLATION
- Install the hose joints on the pump.
CAUTION:
- When installing the joint to the pump, be sure the packing is in place.
- Connect the hoses on the joints with band.
Check the hose band is securely tightened. - Connect the strainer on the inlet hose end.
NOTE:
- If air leaks, water could not be drawn up.
CAUTION:
- Do not remove strainer or pump damage may occur by foreign material.
Check the hose band is securely tightened.
- Before doing any work on the equipment, always stop the engine. And always carry on work on flat and stable surface.
- Check the equipment for loose screw or loose connection parts before starting engine.
- Avoid touching the engine and muffler with any part of your body or clothing during inspection or repair, while they are still hot.
• Take special care of ventilation. Beware of CO poisoning.
INSPECTION AND REFILL OF ENGINE OIL (Fig. 4)
Perform the following procedure, with the engine cooled down.
– Assure that the engine is on horizontal position.
- Do not thread the oil gauge into oil filler to check oil level.
- Check if the oil level is between the lower or upper limit on the oil gauge.
– If the oil level is below the lower limit, add oil.
- You may need to refill oil approximately every 10 operating hours (every 10 refueling).
- If the oil changes in color or mixes with dirt, replace it with new one.
Recommended oil: SAE 10W-30 oil of API Classification, Class SF or higher (4-stroke engine for automobile)
Oil volume:
For model EW1050H: Approx. 0.08L
For model EW1060H: Approx. 0.1L
NOTE:
- If the engine is not positioned horizontal, an inaccurate indication of oil level may occur and oil may be overfilled. Filling oil above the upper limit may cause oil contamination or white smoke.
Refilling engine oil
- Keep the engine in horizontal position, and detach the oil gauge.
- Fill with oil to upper limit mark. Use oil bottle when filling.
- Securely tighten the oil gauge. Insufficient tightening may cause oil leakage.
After refilling oil
– Wipe any spilled oil with a rag immediately.
Replacement of oil: Oil gauge
- Remove dust or dirt near the oil refill port.
- Keep the detached oil gauge free from sand or dust. Otherwise, any sand or dust adhering to the oil cap may result in problems with irregular oil circulation or wear on the engine parts.
FUEL
WARNING:
- Fuel is highly flammable and poisonous. Keep away from open flames (cigarette, stove, fireworks), electric spark (battery, short circuit, spark from shorted switch, welding spark etc.) when handling the fuel.
- Be sure to stop the engine before refueling. Do not refuel when the engine is still hot.
- Other than the occasion of refueling, even when decanting fuel to small container, always pay ample attention.
- After refueling, securely tighten the fuel tank cap, and wipe out spilled fuel completely.
Handling of fuel
It is necessary to handle fuel with utmost care. Fuel may contain substances similar to solvents. Refueling must be performed in a sufficiently ventilated room or in the open air. Never inhale fuel vapor, and keep fuel away from you. If you touch fuel repeatedly or for a long time, the skin becomes dry, which may cause skin disease or allergy. If fuel enters into the eye, clean the eye with fresh water. If your eye remains still irritated, consult your doctor.
Storage period of fuel
Fuel should be used within a period of 4 weeks, even if it is kept in a special container in a well-ventilated and shaded area.
Otherwise, fuel may deteriorate in one day.
Storage of machine and refill tank
- Keep the machine and tank at a cool place free from direct sunlight.
– Never keep the fuel in a car.
Type of fuel:
The engine is a four-stroke engine. Be sure to use an unleaded automobile gasoline 87 or higher octane ((R+M)/2). It may contain no more than 10% alcohol (E-10).
- Never use a gasoline mixture which contains engine oil. Otherwise, it will cause excessive carbon accumulation or mechanical troubles.
Fuel tank capacity:
For model EW1050H: 0.5L
For model EW1060H: 0.65L
Refueling (Fig. 5)
- Keep the engine in horizontal position.
- Loosen the fuel tank cap a little to release the tank pressure.
- Detach the fuel tank cap, and refuel. DO NOT fill fuel up to the top of the tank.
- After refueling, securely tighten the fuel tank cap.
- Wipe the outside of the fuel tank cap to prevent debris from entering into the fuel tank.
- If there is any flaw or damage on the fuel tank cap, replace it.
- The fuel tank cap wears out in course of time. Replace it every two to three years.
- DO NOT put fuel in the oil fill port.
Priming water (Fig. 6)

CAUTION:
- Do not start the pump without water in the pump case. Otherwise mechanical seal could be damaged.
Remove priming plug and add clear water until pump case is filled up with water. After filling tighten the priming plug.
NOTE:
- If the water intake is not sufficient, self-priming capacity becomes lower.
- Be sure the pump is placed on the firm place and as near to available water source as possible.
- The higher the suction head is the more time will be required for priming with a less discharge.
CHECKING ENGINE:
- Carefully check fuel hoses and joints for looseness and fuel leakage. Leaked fuel creates a potentially dangerous situation.
- Check bolts and nuts for looseness. If any, retighten them. A loose bolt or nut may cause serious engine trouble.
- Check the engine oil and refill if necessary.
- Check the fuel level and refill if necessary. Take care not to overfill the tank.
- Keep cylinder fins and recoil starter free of dirt, grass and other debris.
- Wear snug fitting working clothes when operating the engine.
OPERATION

WARNING:
- Never touch a hot engine muffler especially when restarting the engine. The engine muffler becomes hot after running the engine.
- Do not put your hands or foreign objects in the release valves when the pump is in use.

WARNING:
Beware of water-hammering
- Do not allow the wheel of a vehicle to run over the delivery hose. Do not close the delivery valve abruptly, because a water-hammer will occur which may result in heavy damage to the pump.
Starting:

CAUTION:
- Because the lubricating oil has not yet spread enough, do not rev up the engine just after engine starts. Unnecessary high-revolution shortens life of the equipment or cause damage.
-
Check that the pump case is filled with water.
-
Check that the strainer is set under the water.

CAUTION:
- Employ some preventive method when the bottom of the water is covered with mud or sand.
- Check there is no obstacle on the mouth of delivery hose.
- Turn the engine I-O (ON/OFF) switch to the "I" (ON) position.
- Check that the throttle lever indicates "L". (Fig. 7)
-
Continue to push the primer pump until fuel comes into the primer pump. (In general, 7 to 10 pushes.)
-
Adjust the choke lever.
- If the engine is cold or the ambient temperature is low, close the choke lever fully. (Fig. 8)
- If the engine is warm or the ambient temperature is high, open the choke lever half-way, or keep it fully open.
- Pull the starter knob gently until a certain resistance is felt. Then, return the starter knob, and pull it strongly. Never pull the rope to the full extension.
Once the starter knob is pulled, never release your hand immediately. Hold the starter knob until it returns to its original point. If it is difficult to start the engine, open the throttle by about 1/3. - Once engine starts, set choke lever to the OPEN position if you have closed the choke lever. (Fig. 9)
- Allow the engine to properly "warm up". Continue warm-up operation for 2 to 3 minutes at "L" position.
Running engine:
Turn the throttle lever to middle position, and check water come out from the delivery hose.
Finishing operation
Stopping engine
Turn the throttle lever to "L" position to set the engine at the lowest revolution.
Turn the engine I-O (ON/OFF) switch to the "O" (OFF) position.
Drain of water after use
Water inside the pump case freezes at below 0° C in winter and pump may possibly break. After use, drain water from the drain at bottom to store.
SERVICING INSTRUCTIONS

WARNING:
- Before doing any work on the equipment, always stop the engine. Do not perform any work when the engine is still hot.
- Do not modify or adjust the carburetor. It is already factory adjusted for its best efficiency. In case adjustment is required, ask your local service center.
- Do not wash the engine with water during servicing.

CAUTION:
ENGINE OIL CHANGE

WARNING:
- The engine and engine oil is still hot just after stopping engine. Allow sufficient time for the engine and engine oil to cool down. Otherwise a skin burn may result.

CAUTION:
- Before changing oil, check for a suitable way to dispose of old oil. Do not pour it down into sewage drains, onto garden soil or into open streams. Your local zoning or environmental regulations will give you more detailed instructions on proper disposal. Deteriorated engine oil shortens the life of the engine. Be sure to check the oil and level regularly.
NOTE:
- If the oil filled above the limit, it may be contaminated or may catch fire with white smoke. Allow sufficient time after stopping engine for the engine oil to return to the oil tank to ensure accurate reading of the oil level.
Interval of replacement: After first 20 operating hours, followed by every 50 operating hours.
Recommended oil: SAE 10W-30 oil of API Classification SF Class or higher (4-stroke engine oil for automobile)
Oil volume:
For model EW1050H: Approx. 0.08L
For model EW1060H: Approx. 0.1L
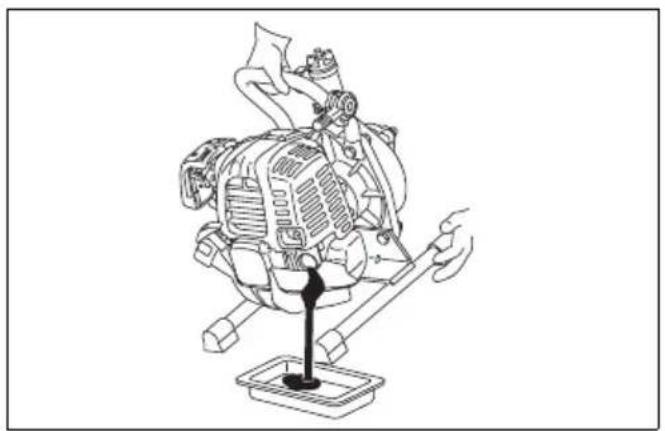
- Remove the oil gauge. (Fig. 10)
Be cautious to place the oil gauge in a place where it will not gather dirt, dust or other foreign matter. - Place a cloth or paper towel to the area around the oil filler hole.
- Remove the oil gauge, then tilt the engine and drain the oil into a pan or other receptacle.
- Put the equipment on a level surface. Pour the oil in from a squeeze bottle or other appropriate. Fill with the oil up to the point of overflowing the filler neck. (Fig. 4)
- After filling the engine with oil, reinsert the oil gauge. Ensure that the oil gauge is tight, as if it loosens later oil will leak out.
CHECKING THE SPARK PLUG (Fig. 11)
CAUTION:
- Never touch the spark plug connector while the engine is running (danger of high voltage electric shock).
Interval of Cleaning and Inspection: Daily (every 10 operating hours)
- Only use the supplied universal wrench to remove or to install the spark plug.
- The gap between the two electrodes of the spark plug should be 0.7 - 0.8 mm .
If the gap is too wide or too narrow, adjust it. If the spark plug is clogged or contaminated, clean it thoroughly or replace it.
CLEANING OF AIR CLEANER (Fig. 12)
WARNING:
- Shut off the engine. Keep away from open flames. Dirty air cleaner element causes starting difficulty, power loss, engine malfunctions, and shortens engine life extremely. Keep the air cleaner element clean.
Interval of Cleaning and Inspection: Daily (every 10 operating hours)
- Place the choke lever to the fully closed position so that dust and dirt are not allowed to enter the carburetor.
- Remove the fixing bolt of air cleaner cover.
- Pull out the lower edge of the cover to remove the air cleaner cover.
- Remove the element, and then clean it with a solution of warm water and a mild detergent, thoroughly drying it afterward.
- Install it in alignment with the lines as shown in illustration.
- Wipe off any oil adhering to the area around the air cleaner cover and breather with a cloth.
- After cleaning, reassemble the cleaner cover (insert the tab at the top first, then insert the bottom tab) and tighten the fixing bolt.
CLEANING OF FUEL FILTER
WARNING:
- Shut off the engine. Keep away from open flames. Do not smoke.
Interval of Cleaning and Inspection: Monthly (every 50 operating hours)
The fuel filter is used to filter the fuel required by the carburetor. A periodical visual inspection of the fuel filter is to be conducted.
- Open the fuel tank cap, use a wire hook and pull out the suction head through the tank opening.
- Remove the hose clamp and pull out the fuel filter from fuel pipe.
- Wash the fuel filter with kerosene.
- After washing, reassemble it.
- If the filter is hard or clogged up, replace it with new one.
Replace the fuel filter at least quarterly to ensure an enough fuel supply to the carburetor. Otherwise an insufficient fuel supply may cause the engine start failure and limited maximum speed.
After checking, cleaning or replacing, fix the fuel filter onto the fuel pipe with the hose clamp.
Push the fuel filter in all the way to the bottom of the fuel tank. (Fig. 13)
REPLACEMENT OF FUEL PIPE (Fig. 14)
WARNING:
- Shut off the engine. Keep away from open flames.
Interval of Cleaning and Inspection: Daily (every 10 operating hours)
Replacement: Annually (every 200 operating hours)
Replace the fuel pipe every year, regardless of operating frequency. Fuel leakage may lead to fire.
If any leakage is detected during inspection, replace the fuel pipe immediately.
INSPECTION OF BOLTS, NUTS AND SCREWS
– Retighten loose bolts, nuts, etc.
- Check the fuel cap and oil cap for tightness. Check for fuel and oil leakage.
- Replace damaged parts with new ones for safety operation.
CLEANING OF PARTS
- Always keep the engine clean by wiping down with a cloth rag.
- Keep the cylinder fins free of dust or dirt. Dust or dirt adhering to the fins may cause piston seizure.
Periodic maintenance schedule table
| Operating timeItem | Before operation | Daily (10h) | 50h 200h | Before storage | ||
| Engine oil Inspect/refill | ○ | |||||
| Replace *1 | ○ | |||||
| Tightening parts (bolt, nut) | Inspect | ○ | ||||
| Fuel tank Clean/inspect | ○ | |||||
| Drain fuel | ○ | |||||
| Throttle lever Check function | ○ | |||||
| I-O(ON/OFF) switch Check function | ○ | |||||
| Air cleaner Clean | ○ | |||||
| Spark plug Inspect | ○ | |||||
| Clean/Adjust | ○ | |||||
| Cooling air passage and cylinder fins | Clean/inspect | ○ | ||||
| Fuel pipe Inspect | ○ | |||||
| Replace *2 | ◎ | |||||
| Fuel filter Clean/replace | ○ | |||||
| Valve clearance (intake valve and exhaust valve) | Inspect/adjust | ◎*2 | ||||
| Engine overhaul if necessary | ◎*2 | |||||
| Carburetor Drain fuel | ○ | |||||
| Pump set | Clean | ○ | ||||
| Strainer | Inspect/Clean | ○ | ||||
*1 Perform initial replacement after 20h operation.
Before changing oil, check for a suitable way to dispose of old oil. Do not pour it down into sewage drains, onto garden soil or onto open streams. Your local zoning or environmental regulations will give you more detailed instructions on proper disposal.
*2 For the 200 operating hours inspection, request authorized service center.
STORAGE
WARNING:
- When draining the fuel, be sure to stop the engine and confirm that the engine cools down.
Just after stopping the engine, it may still hot with possibility of burns, inflammability and fire.
CAUTION:
- When the equipment is kept out of operation for a long time, drain all fuel from the fuel tank, and keep it at a dry and clean place.
Before storage
- Completely remove any water from the drain port.
-
Pull gently the recoil starter handle on the engine until resistance is felt.
-
After removing fuel from the fuel tank, push the primer pump until fuel in the gas pipe runs out. Remove the fuel from the pump once more.
- Set the throttle lever in the "L" position.
- Wipe away any dirt or dust.
- Store the pump in a dry, warm location where there is no chance of freezing.
Transporting
When lifting and transporting the machine, hold the handle firmly with both hands.
TROUBLESHOOTING
Before making a request for repairs, check for trouble by yourself. If any abnormality is found, control your machine according to the description of this manual. Never tamper or dismount any part contrary to the description. For repairs, contact authorized service center.
| Trouble Cause Remedy | ||
| Engine does not start | Failure to operate primer pump. | Push 7 to 10 times. |
| Low pulling speed of starter rope. | Pull strongly. | |
| Lack of fuel. Feed fuel. | ||
| Clogged fuel filter. Clean it. | ||
| Disconnected fuel tube. Connect fuel tube properly. | ||
| Bent fuel tube. Straighten fuel tube. | ||
| Deteriorated fuel. | Deteriorated fuel makes starting more difficult. Replace with new fuel. (Recommended replacement: 1 month). | |
| Excessive suction of fuel. | Set throttle lever to medium or “H” position, and pull starter handle until engine starts. If engine still does not start, remove spark plug, dry the electrode, and reassemble them as they originally were. Then, start as specified. | |
| Detached plug cap. Attach securely. | ||
| Contaminated spark plug. Clean it. | ||
| Abnormal clearance of spark plug. | Adjust clearance. | |
| Other abnormality of spark plug. | Replace it. | |
| Abnormal carburetor. Make request for inspection and maintenance. | ||
| Starter rope cannot be pulled. Make request for inspection and maintenance. | ||
| Abnormal drive system. Make request for inspection and maintenance. | ||
| Engine stops soon Engine speed does not increase | Insufficient warm-up. Perform warm-up operation. | |
| Choke lever is set to “CLOSE” although engine is warmed up. | Set to “OPEN”. | |
| Clogged fuel filter. Clean it. | ||
| Contaminated or clogged air cleaner. | Clean it. | |
| Abnormal carburetor. Make request for inspection and maintenance. | ||
| Abnormal drive system. Make request for inspection and maintenance. | ||
| Pump does not work. Sticking of impeller. | Ask your local Makita authorized service center to repair it. | |
| Pumping volume is small. | Air enters suction side. Check piping at suction side. | |
| Drop of engine output. | Ask your local Makita authorized service center to repair it. | |
| Breakage of mechanical seal. | Replace packing. | |
| High suction lift. Lower the suction lift. | ||
| Thin or long or kink of hose. Thicken or shorten or straighten. | ||
| Leak of water from water passage. | Stop leak. | |
| Clogging of foreign substance in impeller. | Ask your local Makita authorized service center to repair it. | |
| Wear of impeller. | Ask your local Makita authorized service center to repair it. | |
| Pump does not self-prime. | Suction of air at suction side. | Check piping at suction side. |
| Insufficient priming water inside pump case. | Prime fully. | |
| Imperfect tightening of drain cock. | Tighten the 2 plugs completely. | |
| Imperfect revolution of engine. | Ask your local Makita authorized service center to repair it. | |
| Entrance of air from mechanical seal. | Replace packing. | |
Descriptif
INSTRUÇÕES DE ASSISTÊNCIA
ADVERTÊNCIA:
PROTIPOŽIARNA OCHRANA
OZNAKA DELOV (Sliki 1 in 2)
SESTAVA (Slika 3)
OPOZORILO:
- Pred za četkom kakršnega koli dela na opremi, vedno zaustavite motor.
- Motor zaženite samo, ko v celoti sestavite opremo.


- SYMBOLS
- WARNING
- SAFETY INSTRUCTIONS
- INTENDED USE OF THE MACHINE
- DANGER
- EXHAUST PRECAUTIONS
- REFUELING PRECAUTIONS
- FIRE PREVENTION
- FOR EUROPEAN COUNTRIES ONLY
- EC DECLARATION OF CONFORMITY
- DESIGNATION OF PARTS
- (FIG. 1 & 2)
- ASSEMBLY (FIG. 3)
- HOSE INSTALLATION
- CAUTION
- NOTE
- INSPECTION AND REFILL OF ENGINE OIL (FIG. 4)
- OIL VOLUME
- REFILLING ENGINE OIL
- AFTER REFILLING OIL
- REPLACEMENT OF OIL: OIL GAUGE
- FUEL
- HANDLING OF FUEL
- STORAGE PERIOD OF FUEL
- STORAGE OF MACHINE AND REFILL TANK
- TYPE OF FUEL
- FUEL TANK CAPACITY
- REFUELING (FIG. 5)
- PRIMING WATER (FIG. 6)
- CHECKING ENGINE
- OPERATION
- BEWARE OF WATER-HAMMERING
- STARTING
- RUNNING ENGINE
- FINISHING OPERATION
- STOPPING ENGINE
- DRAIN OF WATER AFTER USE
- SERVICING INSTRUCTIONS
- ENGINE OIL CHANGE
- CHECKING THE SPARK PLUG (FIG. 11)
- CLEANING OF AIR CLEANER (FIG. 12)
- CLEANING OF FUEL FILTER
- REPLACEMENT OF FUEL PIPE (FIG. 14)
- INSPECTION OF BOLTS, NUTS AND SCREWS
- CLEANING OF PARTS
- STORAGE
- BEFORE STORAGE
- TRANSPORTING
- TROUBLESHOOTING
- INSTRUÇÕES DE ASSISTÊNCIA
- ADVERTÊNCIA
- PROTIPOŽIARNA OCHRANA
- OZNAKA DELOV (SLIKI 1 IN 2)
- SESTAVA (SLIKA 3)
- OPOZORILO
Brand : MAKITA
Model : EW1060HX
Category : Water pump