GD40ST - Snow blower GREENWORKS - Free user manual and instructions
Find the device manual for free GD40ST GREENWORKS in PDF.
| Technical Features | Electric snow blower, 40V power, 50 cm clearing width, 25 cm clearing depth |
|---|---|
| Usage | Ideal for clearing driveways, sidewalks, and small areas, easy to maneuver due to its light weight |
| Maintenance and Repair | Regularly check blades and belts, clean after each use, store in a dry place |
| Safety | Wear gloves and safety glasses, do not use in rain or extreme weather conditions |
| General Information | Compatible with other tools in the GREENWORKS 40V range, 2-year manufacturer warranty |
Frequently Asked Questions - GD40ST GREENWORKS
User questions about GD40ST GREENWORKS
0 question about this device. Answer the ones you know or ask your own.
Ask a new question about this device
Download the instructions for your Snow blower in PDF format for free! Find your manual GD40ST - GREENWORKS and take your electronic device back in hand. On this page are published all the documents necessary for the use of your device. GD40ST by GREENWORKS.
USER MANUAL GD40ST GREENWORKS
English (original instructions)
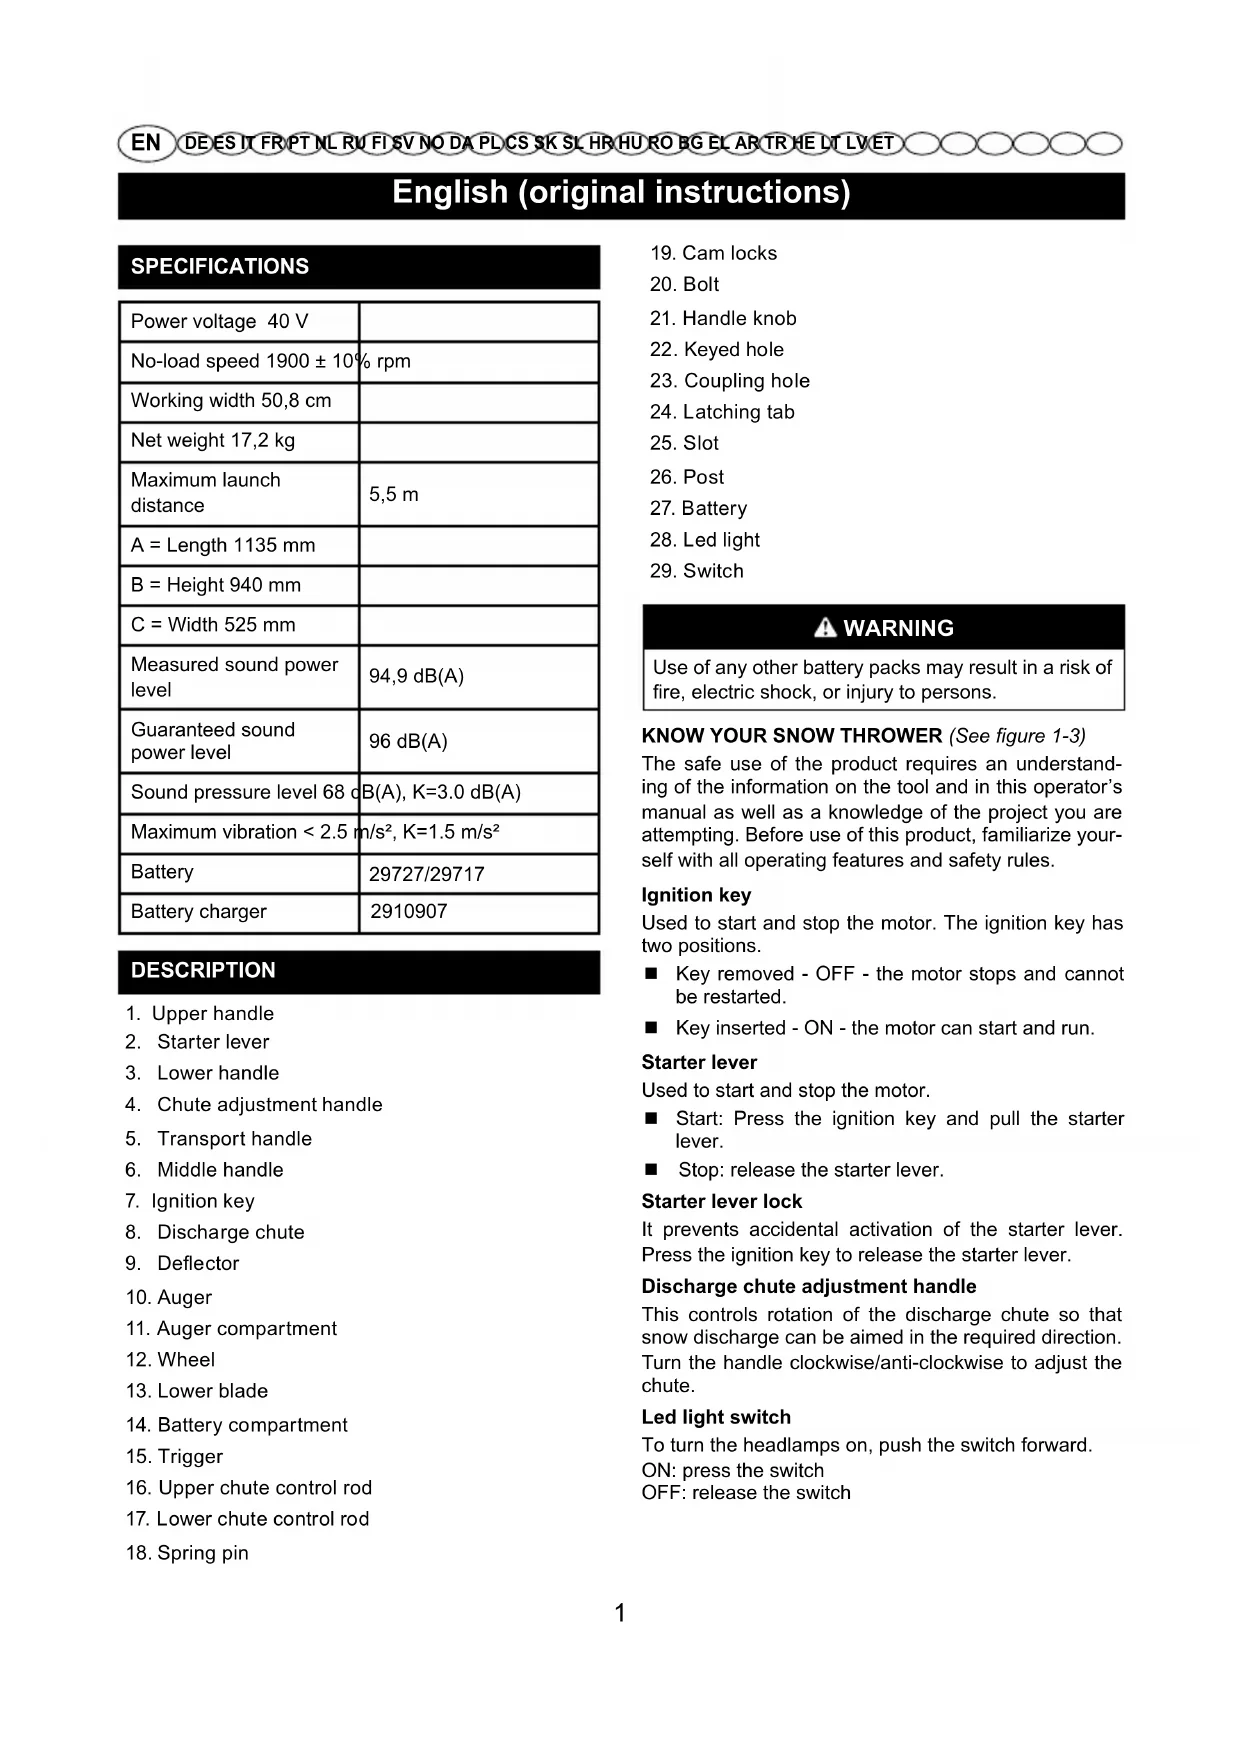
SPECIFICATIONS
| Power voltage 40 V | |
| No-load speed 1900 ± 10% rpm | |
| Working width 50,8 cm | |
| Net weight 17,2 kg | |
| Maximum launch distance | 5,5 m |
| A = Length 1135 mm | |
| B = Height 940 mm | |
| C = Width 525 mm | |
| Measured sound power level | 94,9 dB(A) |
| Guaranteed sound power level | 96 dB(A) |
| Sound pressure level 68 dB(A), K=3.0 dB(A) | |
| Maximum vibration < 2.5 m/s2, K=1.5 m/s2 | |
| Battery | 29727/29717 |
| Battery charger | 2910907 |
DESCRIPTION
- Upper handle
- Starter lever
- Lower handle
- Chute adjustment handle
- Transport handle
- Middle handle
- Ignition key
- Discharge chute
- Deflector
- Auger
- Auger compartment
- Wheel
- Lower blade
- Battery compartment
- Trigger
- Upper chute control rod
- Lower chute control rod
-
Spring pin
-
Cam locks
- Bolt
- Handle knob
- Keyed hole
- Coupling hole
- Latching tab
- Slot
- Post
- Battery
- Led light
- Switch
WARNING
Use of any other battery packs may result in a risk of fire, electric shock, or injury to persons.
KNOW YOUR SNOW THROWER (See figure 1-3)
The safe use of the product requires an understanding of the information on the tool and in this operator's manual as well as a knowledge of the project you are attempting. Before use of this product, familiarize yourself with all operating features and safety rules.
Ignition key
Used to start and stop the motor. The ignition key has two positions.
■ Key removed - OFF - the motor stops and cannot be restarted.
■ Key inserted - ON - the motor can start and run.
Starter lever
Used to start and stop the motor.
■ Start: Press the ignition key and pull the starter lever.
■ Stop: release the starter lever.
Starter lever lock
It prevents accidental activation of the starter lever. Press the ignition key to release the starter lever.
Discharge chute adjustment handle
This controls rotation of the discharge chute so that snow discharge can be aimed in the required direction. Turn the handle clockwise/anti-clockwise to adjust the chute.
Led light switch
To turn the headlamps on, push the switch forward.
ON: press the switch
OFF: release the switch
English (original instructions)
ASSEMBLY
UNPACKING
This product requires assembly.
■ Carefully remove the product and any accessories from the box. Make sure that all items listed in the packing list are included.
WARNING
Do not use this product if any parts on the Packing List are already assembled to your product when you unpack it. Parts on this list are not assembled to the product by the manufacturer and require customer installation. Use of a product that may have been improperly assembled could result in serious personal injury.
■ Inspect the product carefully to make sure no breakage or damage occurred during shipping.
■ Do not discard the packing material until you have carefully inspected and satisfactorily operated the product.
If any parts are damaged or missing, please call your Greenworks Tools service centre for assistance.
PACKING LIST
■ Snow thrower
■ Upper chute control rod
■ Lower chute control rod
■ Middle handle assembly
■ Chute deflector
■ Cam locks
Bolts
■ Handle knobs
■ Spring pin
■ Ignition key
■ Owner's Manual
WARNING
If any parts are damaged or missing do not operate this product until the parts are replaced. Use of this product with damaged or missing parts could result in serious personal injury.
WARNING
Do not attempt to modify this product or create accessories not recommended for use with this product. Any such alteration or modification is misuse and could result in a hazardous condition leading to possible serious personal injury.
WARNING
To prevent accidental starting that could cause serious personal injury, always remove the battery pack from the product when assembling parts.
HANDLE ASSEMBLY (See figure 4)
■ Remove the battery pack.
■ Align the holes on the middle handle and the lower handle. Insert the bolts, and use the handle knobs to tighten them.
■ Align the hole on the middle handle and the upper handle. Insert the cam locks and tighten them with the handle knobs provided. Once tightened, close the cam locks to secure them in place.
Note: If the upper handle is loose or separated from the middle handle, tighten the cam lock handle knobs by turning them clockwise. Do not overtighten the handle knobs.
DISCHARGE CHUTE ADJUSTMENT HANDLE ASSEMBLY (See figure 5-6)
■ Align the holes on the upper chute control rod with the holes on the lower chute control rod.
■ Insert the spring pin in the hole and fasten.
■ Insert the end of the chute control rod through the keyed hole in the bracket that is attached to the top of the middle handle.
■ Insert the end of the handle in the specific coupling hole on the chute, keeping it straight and with the grip upwards.
■ Check the discharge chute by turning it entirely in both directions. The chute must freely rotate.
DEFLECTOR ASSEMBLY (See figure 7)
■ Push the chute deflector until the latching tabs on both sides click into the slots and the posts on both sides click into the keyed holes.
English (original instructions)
OPERATION
WARNING
Do not allow familiarity with products to make you careless. Remember that a careless fraction of a second is sufficient to inflict serious injury.
WARNING
Always wear eye protection. Failure to do so could result in objects being thrown into your eyes resulting in possible serious injury.
PREPARATION (See figure 8)
■ Check the auger has not already taken in snow in the start position.
■ Insert the battery in the specific compartment.
Note: Before starting to clear the snow, silicone spray should be applied to the auger to avoid ice formation on the rotating units.
SAFETY CHECKS
After start-up and before using the machine, it is essential to run the following safety tests. Check the results of the safety checks correspond to those in the table.
WARNING
Always carry out the safety checks before use.
WARNING
If any of the results fails to match the indications provided in the following table, do not use the machine! Take it to a service centre to be checked and repaired if necessary.
General safety and auger functionality check.
| Object Result | |
| Press the ignition key. Press the starter lever. | The motor starts and the auger starts to rotate. |
| Test driving | No abnormal vibrations. No abnormal sound. |
| Release the starter lever. | The motor and auger stop immediately. |
START-UP / OPERATION (See figure 9)
WARNING
The auger starts to rotate when the snow thrower starts. Keep people a safe distance away and check the auger is not touching stones or objects that could be launched.
Departure
■ Tilt the snow thrower slightly back and lift the auger slightly from the ground.
■ Press and keep the starter lever release pressed.
■ To start, pull the starter lever.
WARNING
If the auger is blocked, do not attempt to operate the motor. The machine is equipped with an automatic "Motor save" protection when inserted, wait a few minutes before re-starting the machine.
Operation
Lower the auger towards the ground and start to remove snow.
WARNING
Always stop the motor before proceeding with release operations.
STOP (See figure 9)
To stop the machine, release the starter lever.
IMPORTANT: If you have to leave the machine, remove the battery.
■ Snow is removed more easily when it is still fresh. Pass back over the already cleared zones to remove snow residue.
■ If possible, clear the snow in the direction of the wind. Check the distance and the direction of the removed snow jet.
In strong winds, lower the deflector to direct the discharged snow towards the ground, reducing the likelihood of the wind transporting the snow to the wrong areas.
■ Once you have finished work, leave the machine running for a few minutes to prevent ice from forming in the discharge chute.
Dry and normal snow
Snow up to 20 cm can be quickly removed by proceeding to evenly clear it away. For deeper or built up snow, reduce the speed and let the machine work at its own rhythm.
English (original instructions)
Wet or compact snow
Slowly move forward. Avoid using the lower blade to remove compact snow and ice.
IMPORTANT: Heavy use of the machine with wet or compact snow can cause faults to the auger compartment.
AFTER OPERATION
■ Immediately remove the battery from its compartment.
■ Clean the remaining snow on the machine with a brush.
■ Move all the controls forward and back a few times.
■ Tighten any nuts and bolts that are loosened during operation.
- Check there are no loose or damaged components. If necessary, replace the damaged components.
WARNING
Do not cover the machine when the motor is still warm.
DEFLECTOR ADJUSTMENT (See figure 10)
■ To adjust the discharge chute, rotate the chute adjustment handle in the direction that you wish to direct the snow stream.
■ To adjust the chute deflector (and therefore the height of the snow stream), squeeze the trigger and raise or lower the chute deflector.
MAINTENANCE
WARNING
All service and all maintenance checks must be carried out on a stationary machine with the motor switched off. Before any maintenance operation, switch off the motor and remove the key from the compartment.
WARNING
Wear adequate clothing, gloves and goggles before carrying out any maintenance.
■ The use of non-genuine spare parts and accessories could adversely affect machine operation and safety. The manufacturer shall decline all liability in the event of injuries or damages caused by such parts.
■ Genuine spare parts are supplied by authorized assistance workshops and dealers.
IMPORTANT: All the maintenance and adjustment operations not described herein must be carried out by your dealer or Authorised Service Centre.
CLEANING
WARNING
Carry out cleaning operations with the machine switched off. Do not try to remove snow from the discharge without firstly:
- Releasing the auger control.
- Removing the ignition key.
- Removing the battery.
Always clean the machine after use.
To clean the machine adhere to the instructions provided below:
■ Stop the motor.
■ Remove the battery from its compartment.
■ Cool the snow thrower.
■ Clean the snow thrower internally and externally with an adequate brush and/or compressed air.
WARNING
Never wash the snow thrower with water, otherwise the electric device will be damaged causing the risk of electrocution.
STORAGE
If you intend to put your machine away for more than 30 days:
■ Clean the snow thrower thoroughly.
■ Check for any damage. If necessary, see to the necessary repairs.
■ If the paintwork is damaged, touch it up to prevent rust.
■ Protect any exposed metal surfaces from rust.
ASSISTANCE AND REPAIRS
This manual provides all the necessary information to run the machine and for correct basic maintenance operations which can be performed by the user. Any regulations and maintenance operations not described herein must be carried out by your Dealer or Authorized Service Centre, which have the necessary knowledge and equipment to ensure that the work is carried out correctly, maintaining the correct degree of safety and the original operating conditions of the machine. Any operations performed in unauthorized centres or by persons will totally invalidate the Warranty and all obligations and responsibilities of the Manufacturer.
- Only authorized service workshops can carry out guaranteed repairs and maintenance.
English (original instructions)
- The authorized service workshops only use genuine spare parts. Genuine spare parts and accessories have been designed specifically for machines.
- Non-genuine spare parts and accessories are not approved. Use of non-genuine spare parts and accessories cause the warranty to expire.
- It is advisable to send your machine once a year to an authorized service workshop for servicing, assistance and safety device inspection.
TROUBLESHOOTING
| PROBLEM PROBABLE CAUSE SOLUTION | ||
| No start | Battery is not inserted or is inserted incorrectly. | Check that the battery is correctly inserted. |
| Overload protection activated Wait a | few seconds for automatic reset. | |
| The auger is on and the motor cannot start. | Immediately release the start control and remove the obstacle. Try and switch on again. | |
| The motor barely rotates. | Auger or discharge chute obstructed, blocked by obstacles or damaged. | Clean the auger and chute. Remove any dirt or foreign bodies. Replace if damaged. |
| The capacitor is faulty. Call assistance or the dealer. | ||
| The motor stops suddenly | Electric part malfunction Call assistance or the dealer. | |
| Overload protection activated Wait 10 minutes and try again. | ||
| Excessive vibrations | Loose parts or auger or rotor damaged. | Tighten all the fastening devices. Replace the damaged parts in the authorised assistance centre. |
| Handle not correctly positioned. | Ensure the handle is fastened in its position. | |
| Loss or slowing of thrown snow | Blocked discharge chute. Clean the discharge chute. | |
| Auger blocked. | Remove any dirt or foreign bodies from the auger. | |
| The snow thrower leaves a light layer of snow on the ground. | Auger blade worn. | Contact the authorised assistance centre. |
m = 311
m = 311
m = 311
m = 311
m = 311
m = 311
m = 311
m = 311
m = 311
m = 311
m = 311
m = 311
m = 311
m = 311
m = 311
m = 311
ف
ف
ف
ف
ف
ف
ف
ف
12
12
12
12
12
12
12
12
a
a
a
a
a
a
a
a
-
-
-
-
-
-
-
-
m = 311
m = 311
m = 311
m = 311
m = 311
m = 311
m = 311
m = 311
,
,
,
,
,
,
,
,
b
b
b
b
b
b
b
b
□
□
□
□
□
□
□
□
4
4
4
4
4
4
4
4
-
-
-
-
-
-
-
-
m = 311
m = 311
m = 311
m = 311
m = 311
m = 311
m = 311
m = 311
1
1
1
1
1
1
1
1
b
b
b
b
b
b
b
b
-
-
-
-
-
-
-
-
-
-
.הכלההוּרָהוּרָהוּרָהוּרָהוּרָהוּרָהוּרָהוּרָהוּרָהוּרָהוּרָהוּרָהוּרָהוּרָהוּרָה
תְרָה בְּרָה
All new Greenworks Tools machinery is supplied with a 2 year parts and labour warranty from original date of purchase. A 30 day warranty is available for machines used professionally as Greenworks Tools are designed primarily to be used by DIY consumers.
This warranty is non-transferable.
LIMITATIONS
This warranty applies only to defective parts/components and does not cover repairs due to:
- Normal wear and tear.
- Routine tune up or adjustment.
- Damage caused by improper handling/abuse/misuse or neglect.
- Overheating due to lack of maintenance.
- Damage due to fittings/fasteners becoming loose/detached through lack of maintenance.
- Damage caused by cleaning with water.
- Machines serviced or repaired by non-authorised Greenworks Tools service centres.
- Machines incorrectly assembled or adjusted.
- Damage caused by improper use of the machine.
- Damage caused by improper winterisation (pressure washers)
-
Items considered as consumable parts are not normally covered by the warranty, including but not limited to:
-
Batteries
- Electric cables
- Blade and blade assemblies
- Belts
-
Filters
• Chucks and tool holders -
Certain products may contain components such as engines, transmissions from an alternative manufacturer, these items will be subject to the appropriate manufacturer's warranty policy except where Greenworks Tools Europe GmbH agrees to underwrite any claims outside the said manufacturer's warranty period.
-
Second hand goods are not covered under this warranty policy.
- The fitting of spares, replacements or extra components which are not supplied or approved by Greenworks Tools Europe GmbH.
Warranty
To claim a warranty on any product under this policy a proof of original purchase is required. Credit card statement do not qualify as sufficient proof of purchase. In the first instance of a warranty event occurring the consumer should return the product to the original place of purchase with their proof of purchase. The machine will be sent to our central service facility and an inspection made. If the machine be found to be at fault it will be repaired and sent back to the address of the consumer free of charge. Machines that retail for less than €100 euros including sales taxes will generally be replaced.
If the central service facility finds that machine is not found to be at fault
then the consumer will be advised they will need to pay for the cost of the repair.
This warranty policy is subject to change from time to time to accommodate the needs of new products. A copy of the latest warranty policy will be available at www.greenworkstools.eu.

Greenworks Tools garantibetingelser for gjør-det-sely-maskiner
GARANTIPERIODE
Greenworks Tools - 30
תְבָרִי
| :הכלההוּרָהוּרָהוּרָהוּרָהוּרָהוּרָהוּרָהוּרָהוּרָהוּרָהוּרָהוּרָהוּרָהוּרָהוּרָה |
.1. כְרָה אַרִי
.2. מַרְשָׁה
.3.הכלה
.4.הכלה
.5
.שְׁרָה
.6. מְקַרָה לִיְבָם
.7 Greenwork
.Tools
- Traffic
.9.הכלה
.10 (γιντα γιντα)
| ,הכלההוּרָהוּרָהוּרָהוּרָהוּרָהוּרָהוּרָהוּרָהוּרָהוּרָהוּרָהוּרָהוּרָהוּרָהוּרָה |
:ת אַלְרָה בְּבָרִי
תְּלָהִי
•
•
•
•
•
12
EN EC DECLARATION OF CONFORMITY
Manufacturer: Changzhou Globe Co., Ltd.
Address: No. 65 Xinggang Rd., Zhonglou Zone, Changzhou, Jiangsu, China
Name and address of the person authorised to compile the technical file:
Name: Peter Söderström
Adress: Greenworks Tools Europe AB, Propellergatan 1, 211 19 Malmö, Sweden
Herewith we declare that the product
Category Battery Snow Thrower
Model 2600007
Serial Number ...... See product rating label
Year of Construction ...... See product rating label
■ is in conformity with the relevant provisions of the Machinery Directive (2006/42/EC)
■ is in conformity with the provisions of the following other EC-Directives EMC Directive (2014/30/EU),
Noise Emission Directive (2000/14/EC amended by 2005/88/EC)
And furthermore, we declare that
■ The following (parts/clauses of) European harmonised standards have been used EN 60335-1; ISO/DIS 8437; EN 62233, EN ISO 3744;
EN 55014-1; EN 55014-2; ISO 11904
Measured sound power level 94.9 dB(A)
Guaranteed sound power level 96 dB(A)
Conformity assessment method to Annex VI / Directive 2000/14/EC
Place, date: Changzhou, 01/03/2017
Signature: Ted Qu Haichao
Quality Director
Ted Qu
DE
Adresse: No. 65 Xinggang Rd., Zhonglou Zone, Changzhou, Jiangsu, China
Indirizzo: No. 65 Xinggang Rd., Zhonglou Zone, Changzhou, Jiangsu, China
FR DÉCLARATION DE CONFORMITÉ EC
Fabricant : Changzhou Globe Co., Ltd.
Adresse : No. 65 Xinggang Rd., Zhonglou Zone, Changzhou, Jiangsu, China
Endereço: No. 65 Xinggang Rd., Zhonglou Zone, Changzhou, Jiangsu, China
Adres: No. 65 Xinggang Rd., Zhonglou Zone, Changzhou, Jiangsu, China
Osoite: No. 65 Xinggang Rd., Zhonglou Zone, Changzhou, Jiangsu, China
Adress: No. 65 Xinggang Rd., Zhonglou Zone, Changzhou, Jiangsu, China
Adress: Greenworks Tools Europe AB, Propellergatan 1, 211 19 Malmö, Sweden
Adresse: No. 65 Xinggang Rd., Zhonglou Zone, Changzhou, Jiangsu, China
Adresse: No. 65 Xinggang Rd., Zhonglou Zone, Changzhou, Jiangsu, China
Adres: No. 65 Xinggang Rd., Zhonglou Zone, Changzhou, Jiangsu, China
Adresa: No. 65 Xinggang Rd., Zhonglou Zone, Changzhou, Jiangsu, China
Adresa: No. 65 Xinggang Rd., Zhonglou Zone, Changzhou, Jiangsu, China
Naslov: No. 65 Xinggang Rd., Zhonglou Zone, Changzhou, Jiangsu, China
Adresa: No. 65 Xinggang Rd., Zhonglou Zone, Changzhou, Jiangsu, China
Ime i prezime, i adresa osobe ovlaštene da sastavi tehničku datoteku:
Ime i prezime: Peter Söderström
Adresa: Greenworks Tools Europe AB, Propellergatan 1, 211 19 Malmö, Sweden
Cím: No. 65 Xinggang Rd., Zhonglou Zone, Changzhou, Jiangsu, China
Adresa: No. 65 Xinggang Rd., Zhonglou Zone, Changzhou, Jiangsu, China
Adres: No. 65 Xinggang Rd., Zhonglou Zone, Changzhou, Jiangsu, China
No. 65 Xinggang Rd., Zhonglou Zone, Changzhou, Jiangsu, China :
Adresas: No. 65 Xinggang Rd., Zhonglou Zone, Changzhou, Jiangsu, China
Adrese: No. 65 Xinggang Rd., Zhonglou Zone, Changzhou, Jiangsu, China
Adrese: Greenworks Tools Europe AB, Propellergatan 1, 211 19 Malmö, Sweden
Aadress: No. 65 Xinggang Rd., Zhonglou Zone, Changzhou, Jiangsu, China