CHE 228 R - Drill Flex - Free user manual and instructions
Find the device manual for free CHE 228 R Flex in PDF.
| Technical Specifications | Hammer drill, 720 W power, no-load speed of 0-2800 rpm, maximum torque of 15 Nm. |
|---|---|
| Usage | Ideal for drilling wood, metal, and concrete, with hammer function for hard materials. |
| Maintenance and Repair | Regularly check the carbon brushes, clean the filters, and lubricate moving parts for optimal operation. |
| Safety | Use safety glasses, gloves, and ensure the tool is unplugged when changing accessories. |
| General Information | Weight of 2.2 kg, 2-year warranty, included accessories: chuck, auxiliary handle, depth stop. |
Frequently Asked Questions - CHE 228 R Flex
User questions about CHE 228 R Flex
0 question about this device. Answer the ones you know or ask your own.
Ask a new question about this device
Download the instructions for your Drill in PDF format for free! Find your manual CHE 228 R - Flex and take your electronic device back in hand. On this page are published all the documents necessary for the use of your device. CHE 228 R by Flex.
USER MANUAL CHE 228 R Flex
Klaus Peter Weinper
Head of Quality
Department (QD)
Symbols used in this manual 12
Symbols on the power tool. 12
Technical specifications 12
Overview 13
For your safety 14
Noise and vibration 15
Instructions for use 16
Maintenance and care 19
Disposal information 20
C-Declaration of Conformity 20
Exemption from liability 20
Symbols used in this manual

WARNING!
Denotes impending danger.
Non-observance of this warning may result in death or extremely severe injuries.

CAUTION!
Denotes a possibly dangerous situation.
Non-observance of this warning may result in slight injury or damage to property.

NOTE!
Denotes application tips and important information.
Symbols on the power tool

Before switching on the power tool, read the operating manual!
Wear goggles!

Wear ear protection!

Use light-weight breathing protection!

Disposal information for the old machine (see page Disposal information)!
Technical specifications
| Hammer drill and chisel hammer | CHE 2-28 R SDS-plus | |
| Rated power W 800 | ||
| No-load speed | min-1 | 0-1300 |
| No-load impact rate | min-1 | 0-4000 |
| Max. single impact energy (according to “EPTA-procedure 05/2009”) | J | 2.7 |
| Lubrication Grease | ||
| Tool holder SDS-plus | ||
| Max. drill diameter - Concrete | mm | 28 |
| - M a s o n r y (HM drill bit) | mm | 68 |
| - Wood | mm | 30 |
| - M e t a l | mm | 13 |
| Weight according to “EPTA Procedure 01/2003” | kg 2.65 | |
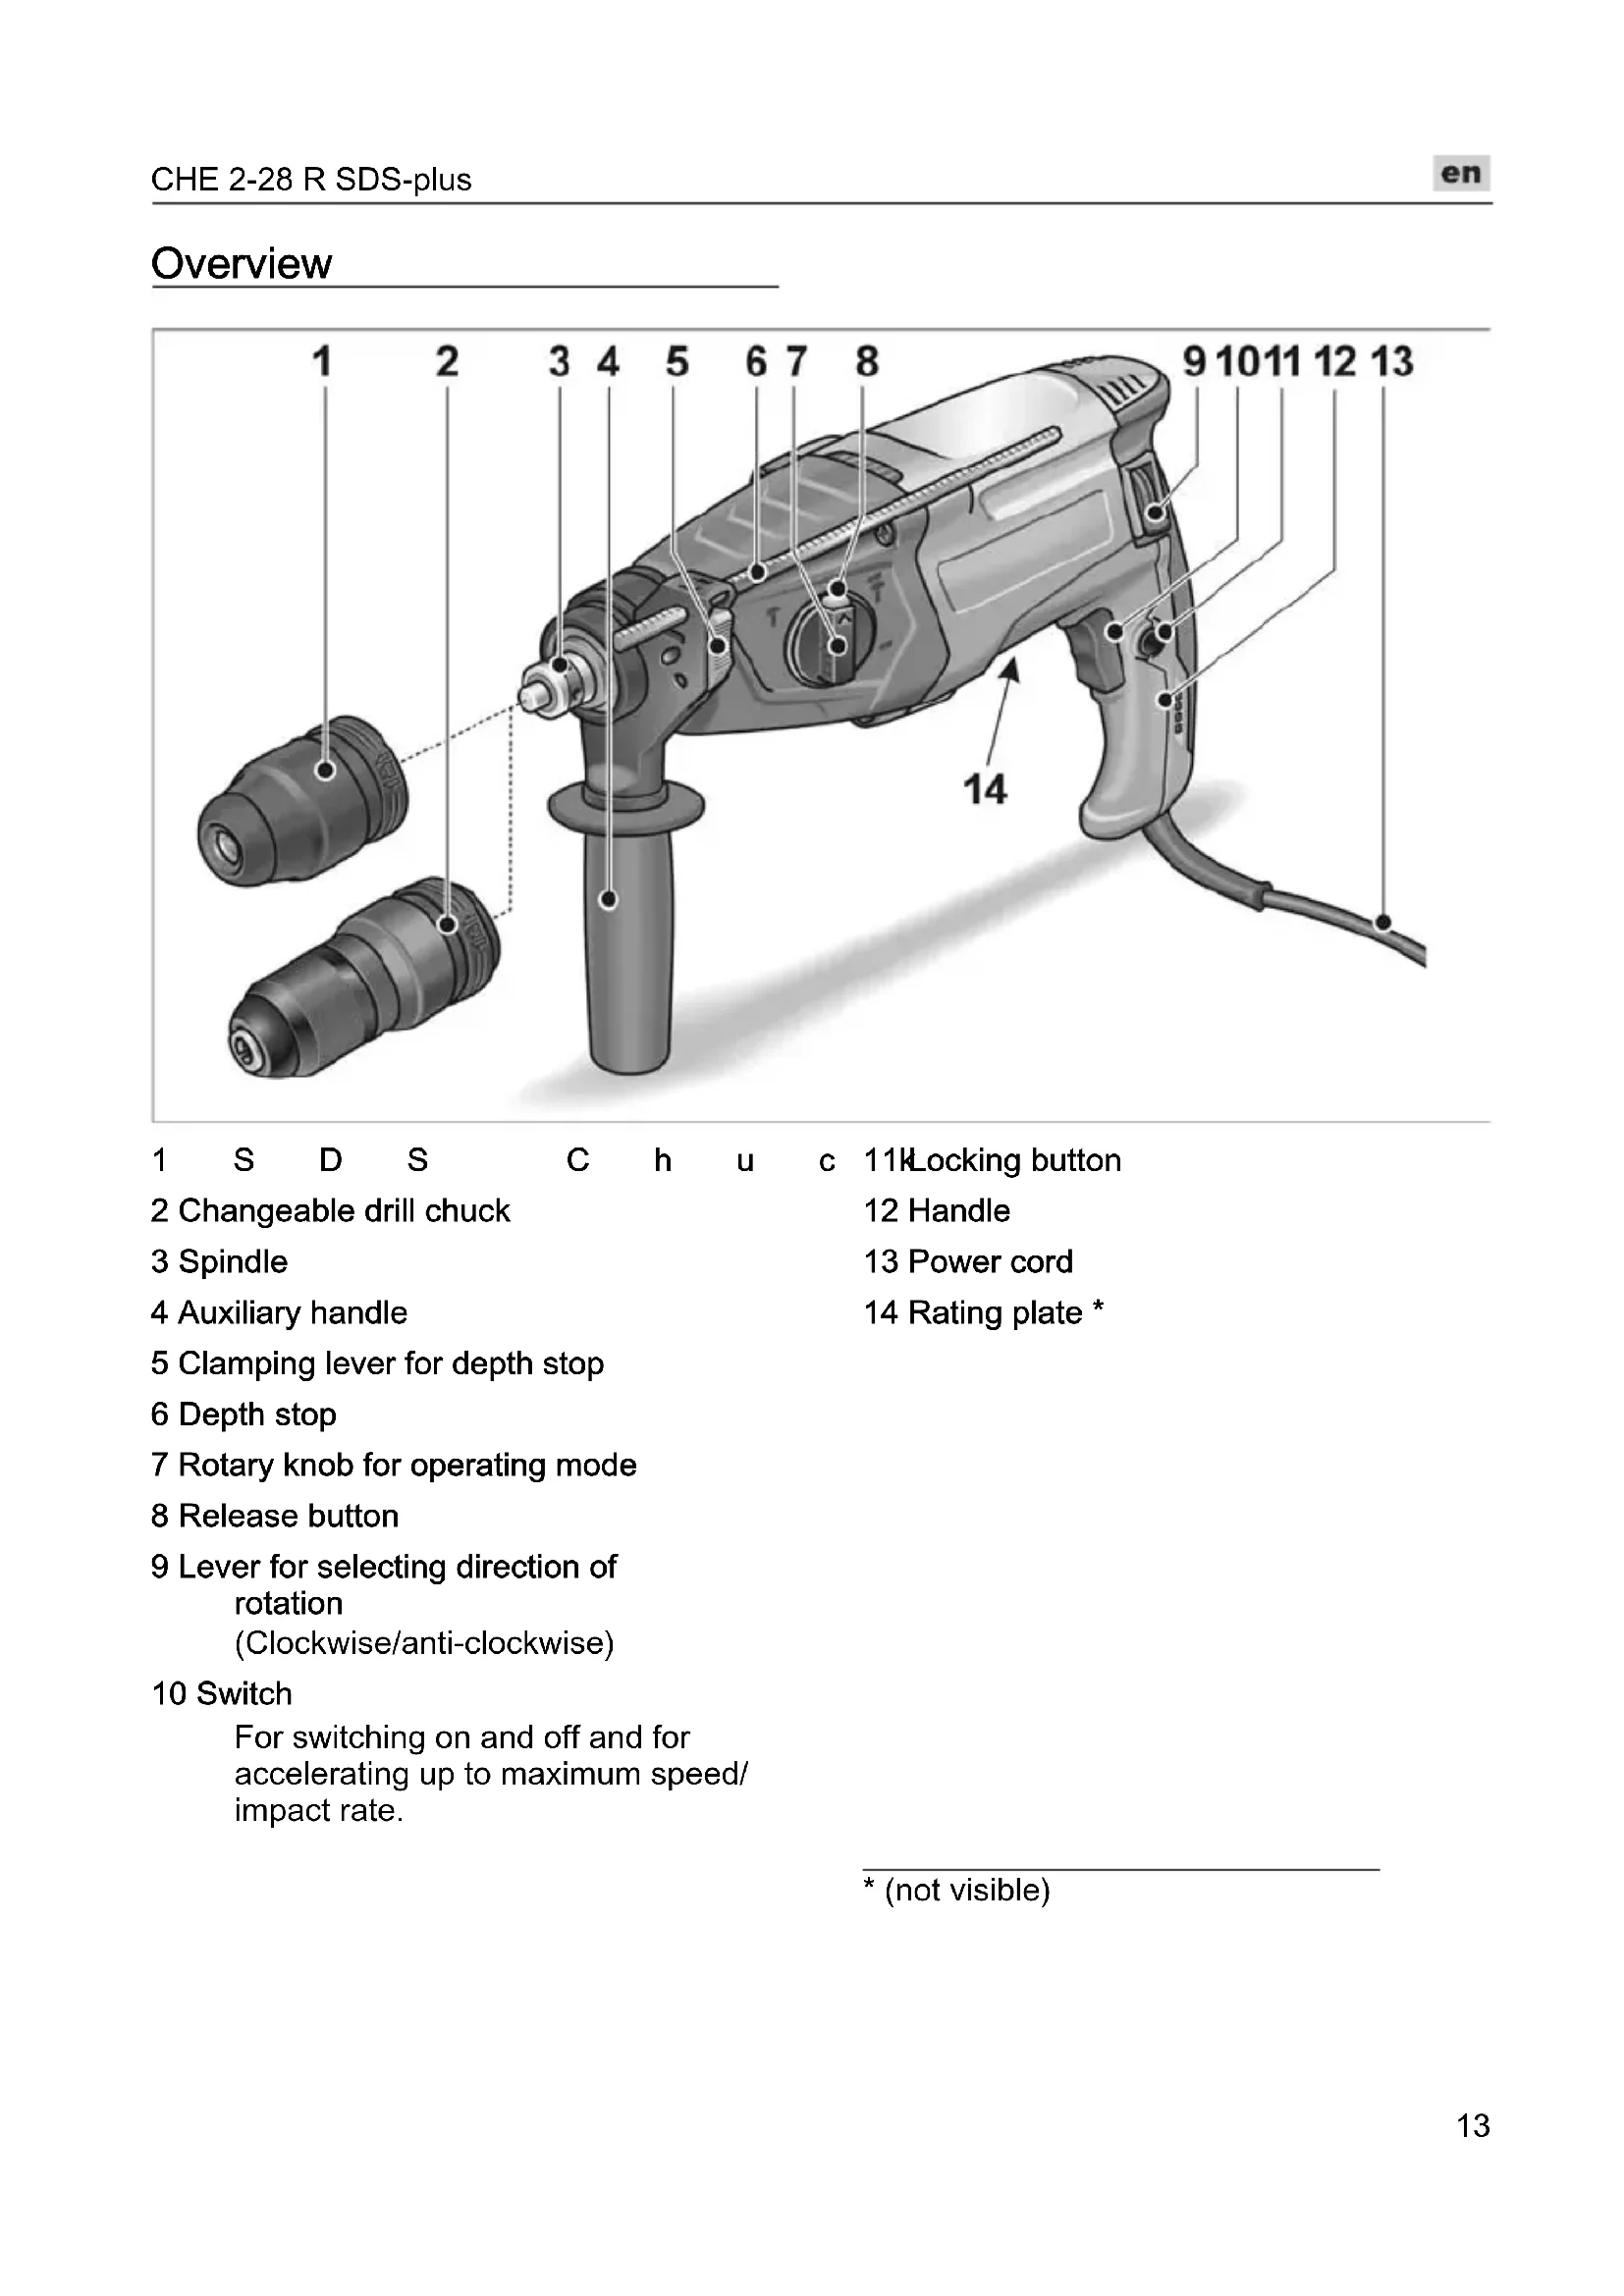
Overview
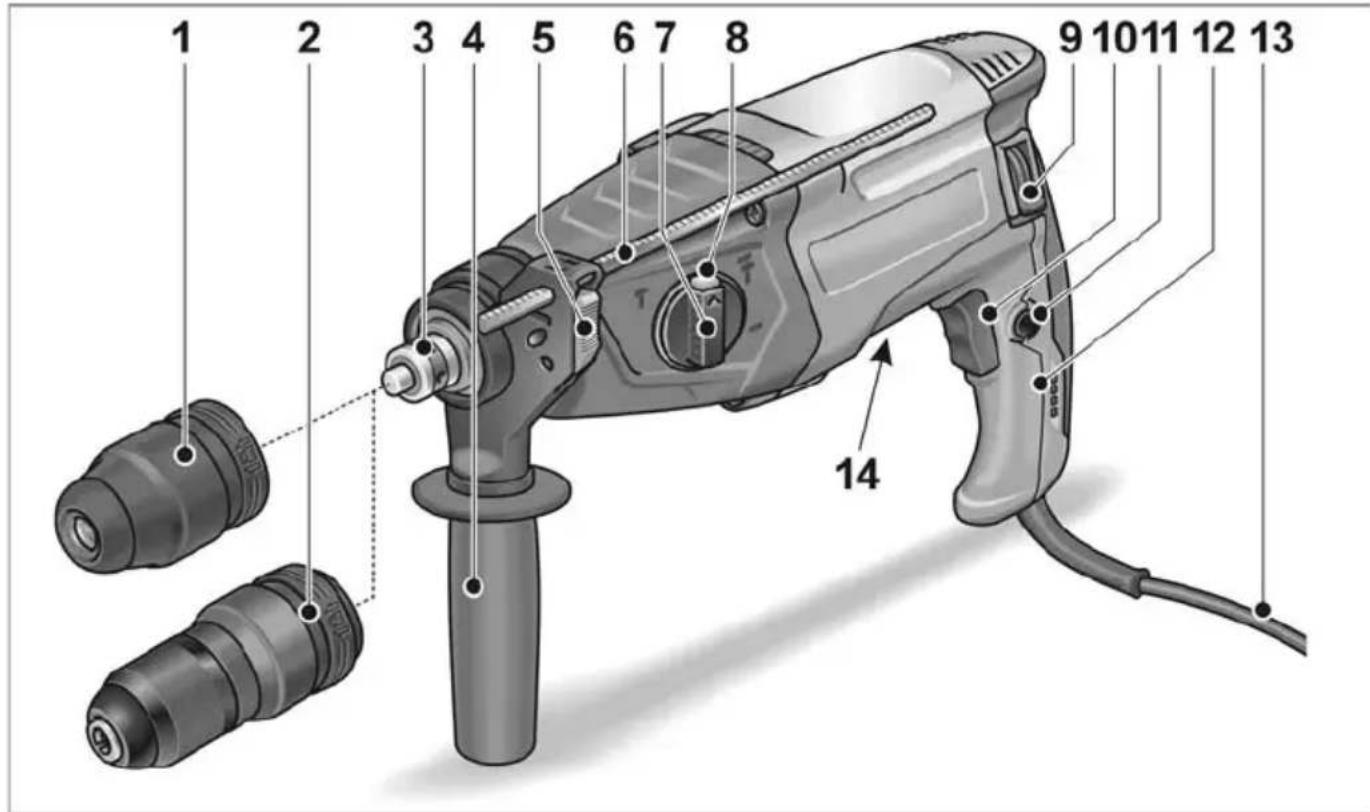
1 S D S C h u c 11Locking button
2 Changeable drill chuck
3 Spindle
4 Auxiliary handle
5 Clamping lever for depth stop
6 Depth stop
7 Rotary knob for operating mode
8 Release button
9 Lever for selecting direction of rotation (Clockwise/anti-clockwise)
10 Switch
For switching on and off and for accelerating up to maximum speed/ impact rate.
* (not visible)
For your safety

WARNING!
Read all safety instructions and other instructions. Failure to observe the safety instructions and other instructions may result in an electric shock, fire and/or serious injuries. Save all warnings and instructions for future reference.
Before using the power tool, please read and follow:
these operating instructions,
- the "General safety instructions" on the handling of power tools in the enclosed booklet (leaflet-no.: 315.915),
- the currently valid site rules and the regulations for the prevention of accidents.
This power tool is state of the art and has been constructed in accordance with the acknowledged safety regulations.
Nevertheless, when in use, the power tool may be a danger to life and limb of the user or a third party, or the power tool or other property may be damaged. The power tool may be operated only if it is
as intended,
in perfect working order.
Faults which impair safety must be repaired immediately.
Intended use
The hammer drill and chisel hammer CHE 2-28 R SDS-plus is designed
- for commercial use in industry and trade,
- for hammer drilling in masonry and concrete for wall plug and anchor attachments and through-holes,
- for light trimming work to remove plaster and tiles,
- to be used with suitable tools recommended by the manufacturer for this power tool.
Safety instructions for hammers
Wear ear protection. The effect of noise may result in loss of hearing.
Use auxiliary handles supplied with the power tool. The loss of control may result in injuries.
Hold power tool by insulated gripping surfaces only, when performing an operation where the cutting accessory may contact hidden wiring or its own cord. Cutting accessory contacting a "live" wire may make exposed metal parts of the power tool "live" and shock the operator.
Additional safety instructions
Use suitable detectors to detect concealed power supply cables or consult your local supply company. Contact with electric cables may result in a fire and/or electric shock. A damaged gas pipe may cause an explosion. Cutting into a water pipe will cause damage to property or may cause an electric shock.
- When working, hold the electric power tool firmly with both hands and ensure that you have a secure footing. The electric power tool is controlled more securely if held with both hands.
- Secure the workpiece. A workpiece is held more securely in a clamping device than by hand.
- Do not use the electric power tool if it has a damaged power cord. Do not touch the damaged power cord and pull out the mains plug if the power cord is damaged during work. Damaged power cords increase the risk of an electric shock.
Only use tools with SDS-plus tool holder. Pull on the insertion tool to check that it is locked properly.
- Immediately have a damaged dust cap replaced. The dust cap prevents the ingress of dust into the tool holder.
-
Dust released from materials, such as lead paints, some types of wood, minerals and metal, may be hazardous to the operator or people in the vicinity. Inhaling or touching these dusts may result in respiratory diseases and/or allergic reactions.
-
Ensure the work place is well ventilated!
- If possible, use external dust extraction.
-
It is recommended to wear a respirator mask belonging to filter class P2.
-
Do not work on materials which release hazardous substances (e.g. asbestos).
Identify the power tool with stickers only. Do not drill any holes into the housing.
The mains voltage and the voltage specifications on the rating plate must correspond.
Noise and vibration
The noise and vibration values have been determined in accordance with EN 60745.
The A evaluated noise level of the power tool is typically:
Sound pressure level: 91 dB(A);
Sound power level: 102 dB(A);
Uncertainty: K = 3 dB.
Total vibration value:
- when hammer drilling:
Emission value: a = 14.30 m/s^2
- Uncertainty: K = 1.5 m/s
- when chiselling:
Emission value: a = 14.50m / s^2
Uncertainty: K = 1.5 m/s
ATTENTION!
The indicated measurements refer to new power tools. Daily use causes the noise and vibration values to change.
i NOTE!
The vibration emission level given in this information sheet has been measured in accordance with a standardised test given in EN 60745 and may be used to compare one tool with another. It may be used for a preliminary assessment of exposure. The declared vibration emission level represents the main applications of the tool. However if the tool is used for different applications, with different accessories or poorly maintained, the vibration emission may differ. This may significantly increase the exposure level over the total working period. However if the tool is used for different applications, with different accessories or poorly maintained, the vibration emission may differ. This may significantly decrease the exposure level over the total working period. Identify additional safety measures to protect the operator from the effects of vibration such as: maintain the tool and the accessories, keep the hands warm, organisation of work patterns.
CAUTION!
Wear ear protection at a sound pressure above 85 dB(A).
Instructions for use
Before switching on the power tool
Unpack power tool and accessories and check that no parts are missing or damaged.
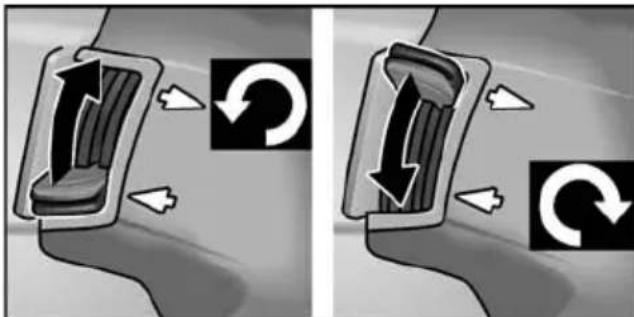
Adjusting the auxiliary handle

WARNING!
Before performing any work on the electric power tool, pull out the mains plug.

CAUTION!
Use electric power tool with attached auxiliary handle only.
The auxiliary handle can be swivelled into any position to ensure safe and fatigue-free working.
Loosen the clamping by turning the clamping screw anti-clockwise.
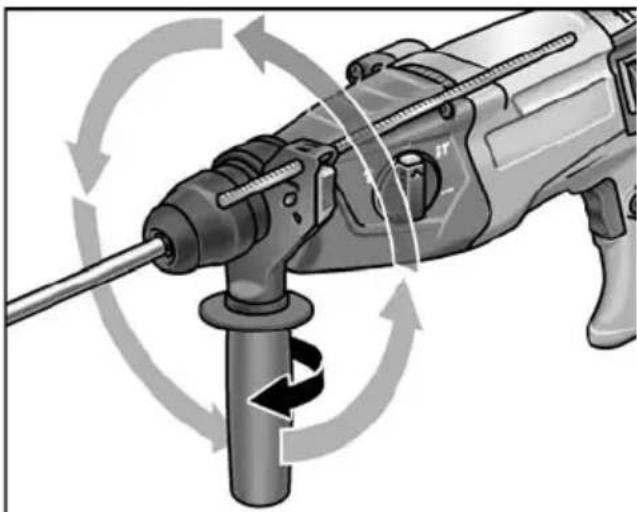
- Swivel the auxiliary handle into the required position.
By turning the clamping screw clockwise, fix the handle in the required position.
Attaching the depth stop

WARNING!
Before performing any work on the electric power tool, pull out the mains plug.
Press and hold clamping lever on the auxiliary handle in the upper area.
Push in depth stop.
Set depth stop to the required drilling depth.
Release clamping lever.
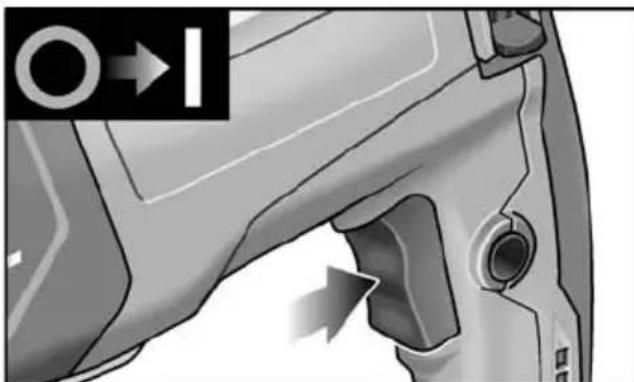
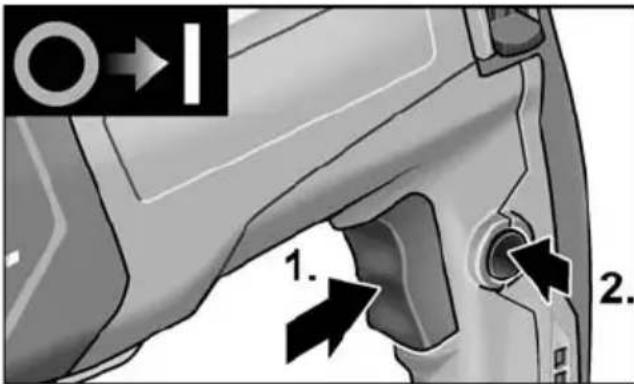
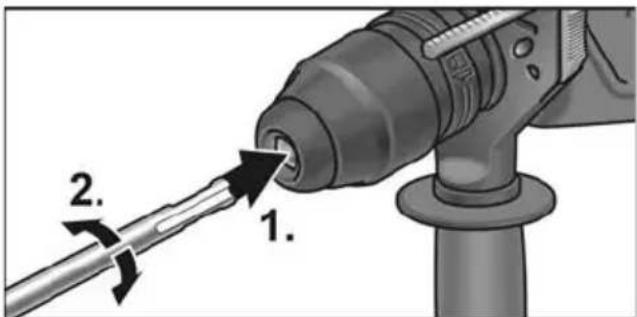
Inserting tools with SDS shank

WARNING!
Before performing any work on the electric power tool, pull out the mains plug.

CAUTION!
Used insertion tools may become hot. Wear protective gloves!

NOTE!
Tools used must have an SDS shank. If tools do not have an SDS shank (e.g. wood drill bit), a three-jaw chuck must be used.
Check dust cap.
Clean dirty cap.
- Have a defective dust cap replaced.
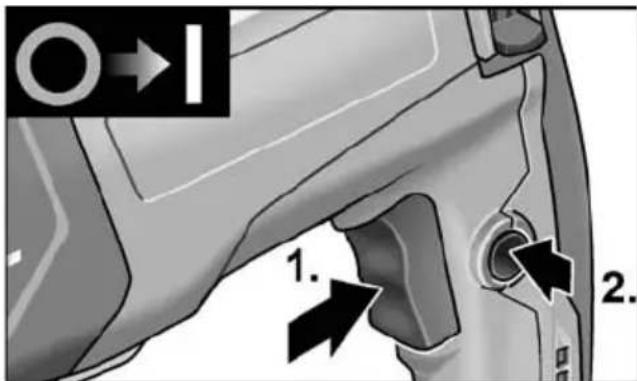
Insert insertion tool (1.) and turn (2.) it until it locks.
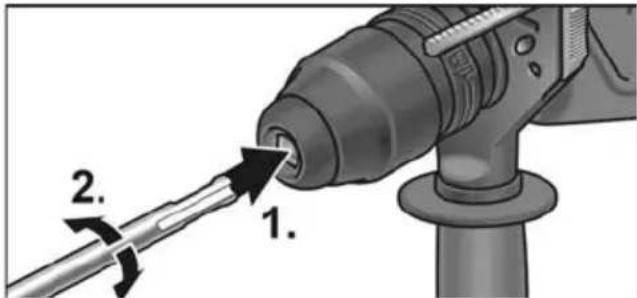
Check lock by pulling on the insertion tool.
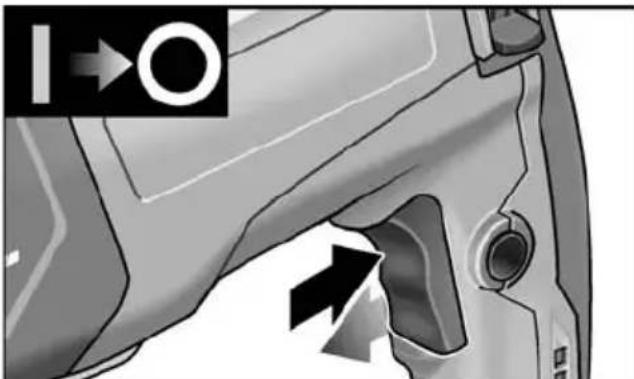
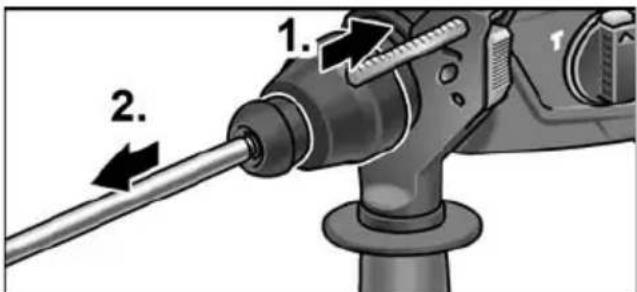
Removing the tools
WARNING!
Before performing any work on the electric power tool, pull out the mains plug.
CAUTION!
Used insertion tools may become hot. Wear protective gloves!

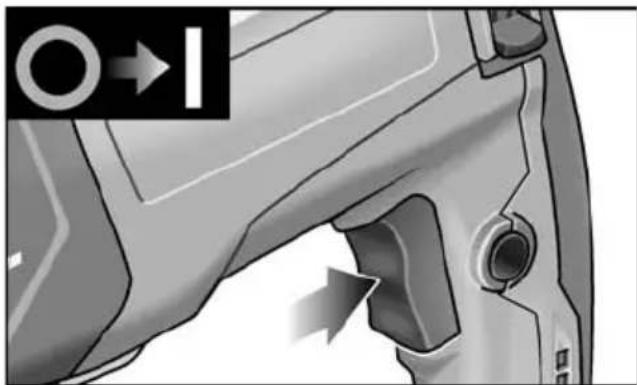
Pull locking sleeve backwards (1.).
Remove insertion tool (2.).
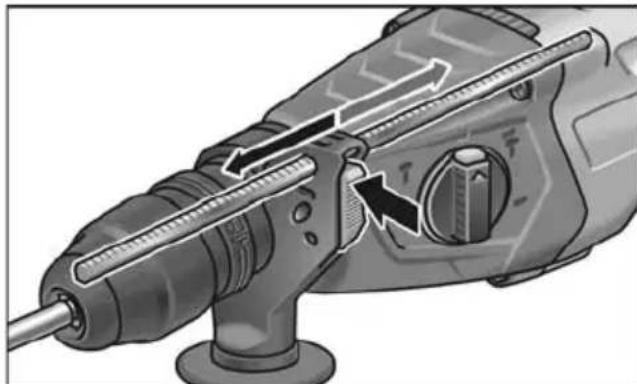
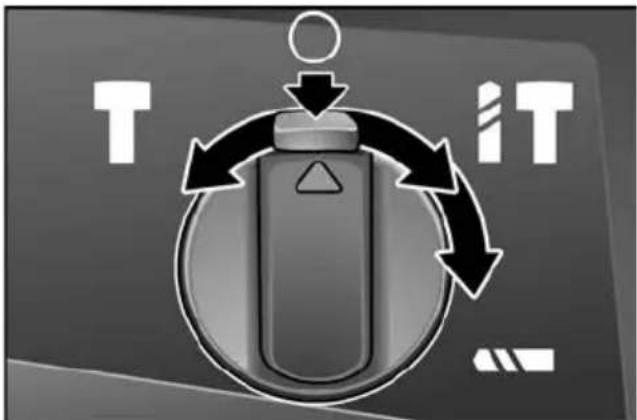
Setting operating mode
CAUTION!
Do not change operating mode until the electric power tool is at a standstill.
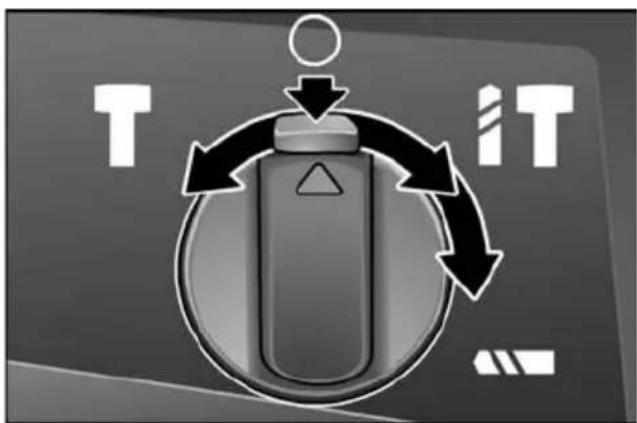
Press release button.
Setting rotary knob to the required operating mode:
Drilling
IT Hammer drilling
Setting the chisel position (see below)
T Chiselling
NOTE!
- The release button must visibly lock (jump out) in the (drilling), (hammer drilling) and (chiselling) positions.
- Do not switch on the electric power tool in the position (setting the chisel position).
Setting the chisel position
The chisel can be turned to a position which is ideal for the work to be performed.
Press release button and move rotary knob for operating mode to the symbol 1.
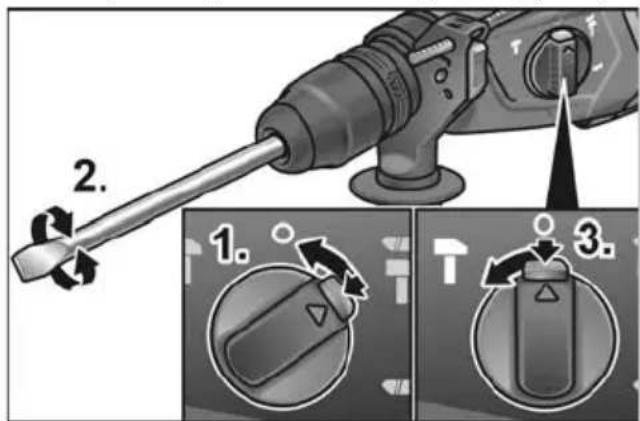
Turn chisel until the chisel is at the required angle (2.).
Press release button and move rotary knob for operating mode to the symbol T Ensure button is locked!
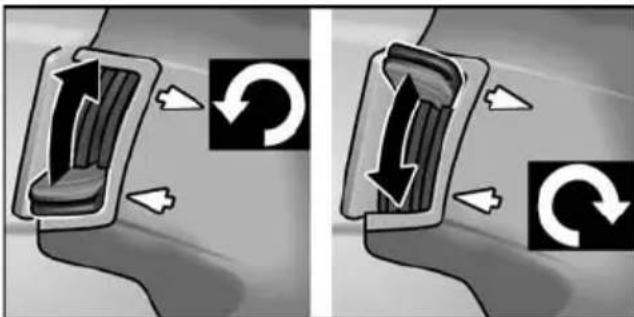
Setting direction of rotation

CAUTION!
Do not change operating mode until the electric power tool is at a standstill.
Set switch for selecting direction of rotation to the required position:
-Top: Anti-clockwise
- Bottom: Clockwise
Switching on the power tool Without locking the switch:
Press and hold down the switch.
The electric power tool switch enables the speed or impact rate to be increased slowly to the maximum value.
Switch off the machine:
Release the switch.
Locking the switch:

WARNING!
Following a power failure, the switched on electric power tool will start running again. Immediately switch off electric power tool!
Press and hold down switch (1.).
Press locking button to lock the switch (2.). Switch off the machine:
Press and release the switch.
Operating instructions
Drilling/hammer drilling
- Move rotary knob for operating mode to the symbol (drilling) or symbol (hammer drilling). Ensure button is locked!
- Insert drill bit.
- Swivel the auxiliary handle into the required position.
- Insert mains plug.
- Grip electric power tool with both hands and assume working position.
- Position drill bit and switch on electric power tool.
- Gently press electric power tool forwards.
- After drilling, switch off the power tool.
- Pull out the mains plug.
Chiselling
- Insert chisel.
- Move rotary knob for operating mode to the symbol.
- Turn chisel into the required position.
- Move rotary knob for operating mode to the Symbol. Ensure button is locked!
- Swivel the auxiliary handle into the required position.
- Insert mains plug.
- Grip electric power tool with both hands and assume working position.
- Switch on the power tool.
- When chiselling, gently press electric power tool forwards to prevent it from jumping.
- After working, switch off the power tool.
- Pull out the mains plug.
Other information
- The use of "sharp" insertion tools increases performance and the service life of the electric power tool.
- After work, clean the electric power tool and store in the carrying case in a dry location.
Maintenance and care

WARNING!
Before performing any work on the electric power tool, pull out the mains plug.
Cleaning
Regularly clean the power tool and ventilation slots. Frequency of cleaning is dependent on the material and duration of use.
Regularly blow out the housing interior and motor with dry compressed air.
Carbon brushes
The electric power tool features cut-off carbon brushes.
When the cut-off carbon brushes reach their wear limit, the electric power tool switches off automatically.

NOTE!
Use only original parts supplied by the manufacturer for replacement purposes. If non-original parts are used, the guarantee obligations of the manufacturer will be deemed null and void.
When the power tool is being used, the carbon brushes can be seen sparking through the rear air inlet apertures. If the carbon brushes are sparking excessively, switch off the electric power tool immediately. Take your electric power tool to a customer service centre authorised by the manufacturer.
Gears

NOTE!
Do not loosen the screws on the gear head during the warranty period. Non-compliance will deem the guarantee obligations of the manufacturer null and void.
The electric power tool has grease lubrication. Have the grease changed/ topped up by a customer service workshop authorised by the manufacturer.
Repairs
Repairs may be carried out by an authorised customer service centre only.
If the power cord of the electric power tool is damaged, it must be replaced with a specially prepared power cord (attachment type X). This power cord is available from FLEX customer service.
Spare parts and accessories
Other accessories, in particular insertion tools, can be found in the manufacturer's catalogues.
Exploded drawings and spare-part lists can be found on our homepage: www.flex-tools.com
Disposal information

WARNING!
Render redundant power tools unusable by removing the power cord.

EU countries only
Do not throw electric power tools into the household waste!
In accordance with the European Directive 2012/19/EU on Waste Electrical and Electronic Equipment and transposition into national law used electric power tools must be collected separately and recycled in an environmentally friendly manner.

NOTE!
Please ask your dealer about disposal options!
-Declaration of Conformity
We declare under our sole responsibility that the product described under "Technical specifications" conforms to the following standards or normative documents:
EN 60745 in accordance with the regulations of the directives 2014/30/EU, 2006/42/EC, 2011/65/EU.
Responsible for technical documents:
Exemption from liability
The manufacturer and his representative are not liable for any damage and lost profit due to interruption in business caused by the product or by an unusable product.
The manufacturer and his representative are not liable for any damage which was caused by improper use of the power tool or by use of the power tool with products from other manufacturers.
Table des matieres
Symbolesutilisés 21
Eckhard Ruhle, Manager Research Development (R)
Klaus Peter Weinper
Head of Quality
Department (QD)
27.02.2018
Klaus Peter Weinper
Head of Quality
Department (QD)
27.02.2018
Desmontar as ferramentas
AVISO!
EN 60745 de acordo com as determinacoes das directivas 2014/30/UE, 2006/42/CE, 2011/65/UE.
Responsavelela documentacao Tecnica: FLEX-Elektrowerkzeuge GmbH, R & D Bahnhofstrasse 15,D-71711 Steinheim/Murr


Eckhard Ruhle
Manager Research & Development (R & D)
Klaus Peter Weinper
Head of Quality
Department (QD)
27.02.2018
Manager Research & Development (R & D)

Klaus Peter Weinper
Head of Quality
Department (QD)
27.02.2018
Klaus Peter Weinper
Head of Quality
Department (QD)
27.02.2018
Manager Research & Development (R & D)
Klaus Peter Weinper
Head of Quality Department (QD)
27.02.2018
Klaus Peter Weinper
Head of Quality
Department (QD)
27.02.2018
Oxi yia xwpes ts Eupwtaikns Evwns.
Mny TETATe Ta nAekptiKa εpyaεia Ota oikia aToppipmuata!
Baoi TnC EupwtaiknC Odyiac 2012/19/EE
Tepi nEeKtpiKow Kai nEeKtpovikow Tnaiwv
OoKeuW Kai mXavmuTOW KAI Tnv εap
moyn Tnc oTo eViko diKaio, ta axpota
nEeKtpia epyaleia TTpeTIva ouAeyovtai
xwiota Kai va obnyouvtai oE pIAIKn TpoC
TO TEPiBaALov ETTavaGIOPTOIN.
i YIIOAEOEHI
Manager Research & Development (R & D)
Klaus Peter Weinper
Head of Quality
Department (QD)
27.02.2018
Klaus Peter Weinper
Head of Quality
Department (QD)
27.02.2018
Manager Research & Development (R & D)
Klaus Peter Weinper
Head of Quality Department (QD)
27.02.2018
Prohlasei o shode (c. 139
Manager Research & Development (R & D)
Klaus Peter Weinper
Head of Quality
Department (QD)
27.02.2018
Manager Research & Development (R & D)
Klaus Peter Weinper
Head of Quality
Department (QD)
27.02.2018
Manager Research & Development (R & D)
Klaus Peter Weinper
Head of Quality Department (QD)
27.02.2018
Klaus Peter Weinper
Head of Quality
Department (QD)
27.02.2018
NCKJIIOUeHHe OTBeTCTBeHHOCTn 185
IcnoJIb3yeMbIe CnMBOJIbI

IPEyIPEXJEHHE!
0603Haayet HenocpeCTBeHHO
YrpoXaOyU OAnChocTb. HeBbINOnHeHne 3TOrO yKa3aHnA MoKet NOBNeuB 3a COboI TAgKeJIbIe TELeChbIe NOBpeXdEHNr IINI DaKe CMePTb.

BHIMAHVE!
Obo3Haayet BO3MOXHOCTb BO3HnKHOBEHnO nachOn CNTyaun. HeBbINOJIHeHne 3TOrO yKa3aHn MOxET NOBJeY 3a CO6oI TeJIeCHbIe NOBpeJdeHn IIN MaTePnaJIbHbI yUep6.

PIMMEYAHVE!
O6o3HaayaeT COBtI NO NcNoJIb3OBaHnIO n BaxHyIO INΦopMaCyIO.
CnmboJIbHa npIbope

Ipeed BBODOM B 3Kcnpya-taunIO npOueCTb INHcTpkyuio NO 3KcnpyaTaun!
IcnoB3OBaTb 3auNTy dna rna3!

IcnoB3OBaTb 3aunTy dna opraHOB cnyxa!

IcnoJb3OBaTb Ierkyo Macky dna 3aunTbI OpraHOB dbixHnra!

Yka3aHne no yTuNn3aun cTaporo npnbopa (cM. cTp. Yka3aHna no yTuNn3aun)!
TexHnueckne daHHbIe
*Ha puncyHke He BnDHa
YcTaHOBka NHCTpyMeHTOB C XBOCTOBNKOM CnCTembl SDS
IPEyIPEXHEHNE!
IpeqIIO6bIMpa6OTAMnHaad3NEKTPoHHTpyMeHToM N3BNEKaTb UTeNcEINbHyIO BUNKy U3 PO3ETKN.
BHUMAHVE!
IcnoB3yeMbIe pa6Oue HNCTpyMeHTbI MoryT HarpeBaTbcr.
IcnoJb3OBaTb 3auHTbIe nepyATK!
i IPNMEUAHME!
IcnoJb3yeMbIe IHCTpyMeHTbl DOJIxHbl 6blTchAbXeHbIXBOCTOBKOM CnCTEmbl SDS.ДЯИHCTpyMeHTOB 6e3 XBOCTOBKa cnCTEmbl SDS (HaNP.,CBepNo no DepeBy) Heo6xoJIMO IcNOJb3OBaTb TpexKyJaU-KOBbl CBepNlBHyI NaTPOH.
IpoBepntb nbIe3aHTHbIKoJIpaOK. -OounCTnTb 3arpy3HeHHbIKoJIpaOK. -OpyuHTb 3aMeHy HeNCpPaBHOro nbIe3aHTHOKoJIpaKa.
BcTaBnTb pa6OuN uHCTpyMeHT (1.) nIOBepHyTb (2.)do ero fNKcaun.
IpoBepntbΦnKcauHIO,NOTaHyB 3a pa6oyn INCTpyMeHT.
I3BneHHe HNCTpyMeHTOB
PPEyIPEXHEHME!
Ipeep IIObIMn pa6otamn Had 3neKtpOnHCTpyMeHTOM N3BNEkAtb WTeNCEJIbHyU BUNKy U3 PO3ETKN.
BHIMAHVE!
Ucnonb3yemble paoboune HnHCTpyMeHTbI MoryT HarpeBaTbcra. Ucnonb3OBaTb 3aunTHbIe nepuATkn!
OTBeCTnΦHKnCnpyuOuMyΦTy Ha3aI (1.).
I3Bneueb pa6oynn HnCTpyMeHT (2.).
yctahOBka pexnma pa60tbi

BHIMAHVE!
Pexm pa60bIMoXHO nepeKnIOyATb TOJbKO Nocne OCTaHOBKN 3JIeKtpOHHCTpyMeHTa.
HaKaTaB Ha De6IokpyUOyIO KhoNky.
YCTaHOBntb C NOMOuIIO NOBOPOTHON KHONK XeJaembl peXIM pa60TbI:

CbepeHne

CbepeHne cydapom

YcTaHOBkaNoJoxeHn3y6nna (CM.Tam)

Dol6neHne

PIMMEYAHVE!
-B noIoxKeHx (epnHe),
IT (cBepenHe nC yDapom) nT
(Долблени) De6ЛOKиpyUOuЯ KHONka ДОЛЖна 3aMeTHO 6ЛOKирOBaTb (BbICKaKNBaTb).
-B noIoxeHnOCTaHOBka noIOxehn3y6nla) 3neKtpOnHcTpymeHT HeBKIOUoATb.
YCTaHOBka NIOJoxeHn 3y6nla
3y6nlo MoXHo NOBepHyb B ONTmAlbHoe DnBa BInONHReMbIX pa60 TNOJKeHne.
HaXaTb Ha De6IokpyuOyU KHONky uYCTaHOBnTB NOBOPOTHyU KHONKy dJa peKIma pa6oTb Ha cIMBOJ (1.).

I NobopaunBaTb 3y6nNo Do Tex nop, noka OHO He DOCTURHT XeJaemoro yrna (2.).
HaKaTb Ha De6JIOKpyUOyU KHOJky UycTaHOBnTB NOBOPOTHyU KHOJky DnpeXnMa pa6Otbl Ha CmBOJ T CneIITb 3aФNKcaUne!
YcTaHOBka HappaBJIeHnA BpaUeHnA

BHIMAHVE!
Pexm paobtbo MOxHO nepeKIOuatab TOnbKO nocne OCTaHOBKn 3JeKTpoNHCTpyMeHTa.
YcTaHOBnTb NepeKJIouaTeIb Bbl6opa HnPaBJeHn BpaUeHn B Heo6-XOdIMoe NOJIOKeHne:
-Cbepxy: npOTNB yacOBoCtpeJKN
- Chn3y: no yacobov cTpeJke
BkIIOUeHne 3JIeKTPoINHCTpymEHTa Be3ФИКcaци:
HaKaTb BbIKIouaTeIb n yIepKINBaTb. BbIKIOUaTeIb 3JIeKTPoIHCTpyMeHTa N03BOJAreT MeIeHHO NOBbIaTb YNCIO O6OpOTOB IIN yIapOB Do MaKcImaJIb-HORO 3HaueHn.
BbiknueHne npnbopa:
OTnyctnTb BbIKIOuTaTeNb.
CΦnKcaun:
IPEyIPEXHEHME!
Iocne nepeb0B nOaue 3NeKtpo3HepnB KJIIOUeHHbI 3NeKTPoHCTpymeHT CHOBa 3anyckaetc. HEmdIeHHO BbIKIOuHTb 3NeKTPoHCTpymeHT!
HaKaTb Ha BblKlHouaTeJb n ydepxnBaTb (1.).
HaKaTb Ha CToNOpHyo KHOnKy, YTO6bl 3aappetnpoBaTb BbIKNoHuateJIb (2.).
BbiknueHne np6opa:

HaKaTb Ha BbIKIIOuATEJb N OTNcyCTNTb.
Yka3aHnno pa6oTe
CbepeHne/CbepeHne c yapom
- YcTaHOBnTb NOBOPOTHyO KHONKy IJIpeKIMa pa6oTbI Ha CmBOJ (CbePJIeHne) IJIc CBePJIeHne c yIapOM). CJeINr3aФNKcaUnei!
- BCTaBtB cBepNo.
- YcTaHOBnTb DOnONHInTeNbHyO pyUky B XeJaEMoe NIOXKeHne.
- BCTaBnTb ITeNceJIbHyIO BNJKy B PO3ETKy.
- B3aTb 3JIeKTPoINHCTpyMeHT o6eIMn pyKaMn n 3aHrTb pa6Ooee noIooKeHne.
6.Ппставиь CBерлк NOВЕХОCTN BKЛЮЧИТь 3JIeКТрОHCTPyMeHT. - OctopoxHo npoBnRaTb 3JIeKtpOnHCTpyMeHT BnepeI.
8.ПосеЗаВершени CBерпеньВыКЛЮЧТь 3ЛЕКТРОИСТPyMeHT.
9.ИЗВЛЕЧБЛТЕСЕЛБНУОВИЛКУИЗ pO3eTк.
Don6neHne
- Bctabntb 3y6nlo.
- YcTaHOBnTb NOBOPOTHyO KHONKy IJIpeKIma pa60TbI Ha CmBOJ O
- Повернь 3убино В кенимoe nolokhenie.
- YcTaHOBnTb NOBOPOTHyO KHONKy IJpeKIma pa6oTbI Ha CmBOJ TCneITb 3aФNKcaUnei!
- YcTaHOBnTb DOnONHInTeJbHyO pyUky B XeJaEMoe NIOXKeHne.
-
BCTaBnTb ⅢTeNcEJIbHyIO BUNKy Bpo3eTKy.
-
B3aTb 3JIeKTPoHnHCTpyMeHT o6eIMn pyKaMn 3aHaTb pa6Ouee nOLOXKeHne.
- BkHouHTb 3JNeKTPoHCTpyMeHT.
- Пи долблениoctopoxkHo npoDbnRaTb 3JIeKTPoHnHCTpyMeHT Bnepei TaK, yTO6bl OH He OTCKaKNBaJ.
- После заBERшени pa6oТы ВьIKЛЮЧИТь пибор.
11.ИЗВЛЕЧБШТЕСЕЛБНУОВИЙКУ n3 pO3ETKn.
Почи указань.
-Примеени经《OCtpbIX》pa6ounx HnHCTpymENTOB NOBbIaet npOn3BO-DnteJIbHOcTB pa6Otbl n cPOK CnyK6bl 3JIeKTPoINHCTpyMeHTa.
- Pocne pa6oTbI NOuHCTnTb 3JIeKTpOHHCTpymeHT n, yIOxN B YcMoDaH Dn TpaHCnOpTnpOBKn, pa3MeCTnTb Ha XpaHeHnB CyXOM MeCTe.
TexobnykBaHne uyxod
IPEyIPEXHEHME!
Ipeed IIO6bIMn pa6OTAMn Hnd 3NeKtpoMHCTpyMeHTOM N3BNEKaTb BUNKy N3PO3eTKN.
UncTka
Perynno ouuatab npnbop n BeHTnnaHnhble npope3n.
IepnoDnHocTh 3aBncnt OT o6pa6aTbIBaemoro MaTePnaJa N npoDoJxNtJIbHOCTN IcNoJIb3OBAHn.
BHytpenHee npoctpaHCTBO Kopnyca nDbiratelcneDyET peryIrpHo npOdyBaTb cyxIM CxAtbIM BO3dYXOM.
YroJIbHbIe 电
3NeKtpOnHCTpyMeHT OChaueH yToJIbHbIMN OTKnUOHaHOUsM NJIeMeHTaMn.
IIO DoCTnXeHnO rpaHnCbI n3HOca yrOJIbHbIX OTKlIOUaIOuNX 3JemeHTOB 3JeKtpoMHCTpyMeHT aBTOMaTnueCKN OTKlIOuaeTcR.
i IPNMEUAHNE!
JIa 3aMeHbI CneJyET NcNoB3OBaTb TOJbKO OpNnHaJIbHbIe DeTaII NT3ROTOBUTeJI. Pp NcNoB3OBAHm ITeTaeJe IPOU3BOdCTBa dpyrnx qnpM aHHyInpuyOTcra rapaHTnHbIe O6raTeJIbCTBa N3ROTOBUTeJI.
Yepe3 3aHnHe BXoHbIe OTBepCTnJa DnBa BO3dyXa MoXHo Ha6JIIOdaTb NCKpeHne NODUcTKaMn BO BPeMn NCNoJb3OBAHn.
Pn CnIbHOM NCKpeHn NOJ 5eTKaMn 3JeKTPoPnp6Op cNeDyET HeMeIeHHO BbIKNoHTb. 3JeKTPoPnp6Op cNeDyET nepeDaTb B aBTOpN3OBAHHyIO I3ROTOBNTeJIem cepBnCHyO MaCTepCKyU.
PnBOD
i PPIMMEAHHE!
B TeueHne rapaHTnHoro cTpoka He BbIKpyuHBaTB BnHTbI N3 PnIBoHOJ ROnOBKn. PpN HeBbINONHeHN 3TORO YcNOBna rapaHTnHbIe O6ra3aTeJIbCTBa N3ROTOBNTeJI aHHyInpuyOTc.
3JIeKTPoHnHCTpyMeHT CMa3aH JxIpOBoi CMa3KoI. 3aMeHa/3aONHeHne JxIpOBoi CMa3Kn DOJXHa NOpUaTbCra ABTopn3OBaHHoN I3rTOBNTeJeM cepBnCHoMactepcKOI.
Pemohthbpepa60tbi
PemOHThbIe pa60TbI DOJXHbI npOBODtbcr NCKJIIOUHTeJIbHO B aBTOpN3OBAHHo N3ROTOBNTeJeM cepBnCHO MaCTepcKoI.
Ecn coeHnHTeHbI npOBo3neKtpOnHCTpyMeHa 6yDeT nobpeXKeH, OHdoJxeh 6bITb 3aMeHeH Ha cneuaNbHO NOrTOBJIeHHbI coeHNHTeHbI npOBoD (cnooc6 KpEnJeHn X). 3ToT npOBoMoxHo npNo6peCTn uepe3 cepBnCHyo Cnyk6y FLEX.
3anaChbIe yactn
I npHaJneJXHOCTN
Ipoyne npnHaJnxHocTn,OCo6eHno pa6Oue nHcTpymEnTb, Bbl cMOxKeTe HaHTN B kataJorax n3rTOBNTen.
ПОКOMNOHETHHoe H3O6paXeHne I CnNCKI 3aNaChbIX YacTeBbI HaNdTe HaHaWeM caIte B INThepHeTe: www.flex-tools.com
Yka3aHnno yTnIn3aun

IPEyIpyEKeHHeIe!
Otpa6oTaBwne cBoi cPoK np6OpbI BBBeCTn 3 yNtpe6NeHnry nyTeM OTpe3aHncaTeBOrO Ka6eJ.

ToIbKO dIa cTpaH EC.
He BbI6paBBAaTe 3JIeKTPoINHCTpyMeHTbIB MyCOp BMeCTe C bIToBbIMN OTXoJaMn!
Corlacho Ebponecko DnpekTnBe 2012/19/EC OTHocnteIbHO CTapbx
3JIeKTPnuCeCKNX NJIeKTPoHHbIX Pn6OpOB H ee peaII3aUIN B HaUIOHaJIbHOM 3aKOHOdaTeJIbCTBE, INcOJIb3OBAHHbIE
3JIeKTPoIHCTpyMeHTbl DOJXHbI CObnpaTbcra OTDeJIbHO OT IpOuHX OTxOIOB IN
NODBepRaTbcr 3KOLONueCKN YnCTOn
BTopNUHO nepepa6OTke.

PIMMEAHHE!
HOpMaIO BO3MOXHbIX MToaX yTNI3aUN MOKHO NOnyHTB B CnEuaNIN3uPOBaHHO TOpROBne!
COOTBETCTBNE HOPMaM (C
Mbl 3aBnem C NCKHouHTeJbHOI OTBeTCTBeHHoCTbIO, YTO N3DeJIne, ONuCaHHoe B pa3dJe «TexHnueckNe DaHHbIe», COOTBeTCTByET CJeDyUOUsIM HOpMaM IIN HOPMaTHNBbIM DOKymeHTaM: EN 60745 B COOTBeTCTBnC OnpedeJIeHnAMyN, PnIBeDEHHbIMN B DInpeKtNbax 2014/30/EC, 2006/42/EG, 2011/65/EC.
OTBeTCTBeHHa 3a TexHnueCKyU DOKyMeHTa
ZIIO KOMNaHnA:
FLEX-Elektrowerkzeuge GmbH, R & D
Bahnhofstrasse 15, D-71711 Steinheim/Murr

Eckhard Ruhle
Manager Research & Development (R & D)
Klaus Peter Weinper
Head of Quality Department (QD)
27.02.2018
IckJIIOUeHHe OTBETCTBEHHOCTN
I3ROTOBHTeJIb I erO npedCTaBHTeJIb He Hecyt OTBeTCTBeHHoCTn 3a yUepe6 UnyuHHyIO np6bIb B pe3yJIbTaTe IpepbBaHnA DeNoBOI DeTeJIbHOCTN, KOTOpblE Bbl3BaHbI N3deJInEM IIN HeBO3MOxHOCTbIO NCNOJIb3OBaHnIA3DeJInr. I3ROTOBHTeJIb I erO npedCTaBHTeJIb He Hecyt OTBeTCTBeHHoCTn 3a NOBpeKdEHnRA BO3HNKUHe B pe3yJIbTaTe NCNOJIb3OBaHnIA3DeJInr He No Ha3NaueHIO IIN npi erO NCNOJIb3OBaHnC N3deJInrMn DpyrNX I3ROTOBHTeJIeI.