
VLP 18.0 - Drill Flex - Free user manual and instructions
Find the device manual for free VLP 18.0 Flex in PDF.
| Product Type | Cordless lifting suction cup |
| Brand | Flex |
| Model | VLP 18.0 |
| Dimensions (L x W x H) | 305 x 190 x 147 mm |
| Weight (without battery) | 1.38 kg |
| Rated voltage | 18 V |
| Battery type | Li-Ion (compatible 2.5/5.0/8.0 Ah) |
| Maximum permissible load | 130 kg |
| Max. vacuum | 0.85 bar |
| Sound pressure level (LpA) | 59 dB(A) |
| Sound power level (LwA) | 70 dB(A) |
| Total vibration value | < 2.5 m/s² |
| Operating temperature | -10 °C to 40 °C |
| Storage temperature | -10 °C to 50 °C |
| Charging temperature | 4 °C to 40 °C |
| Display | Digital display with measurement units |
| Foam seal | Patented technology (black foam + red silicone seal) |
| Maintenance | Regular cleaning of the seal and air filter |
| Repairability | Spare parts available at www.flex-tools.com |
| Warranty | CE compliance (Directives 2014/30/EU, 2006/42/EC, 2011/65/EU) |
Frequently Asked Questions - VLP 18.0 Flex
User questions about VLP 18.0 Flex
0 question about this device. Answer the ones you know or ask your own.
Ask a new question about this device
Download the instructions for your Drill in PDF format for free! Find your manual VLP 18.0 - Flex and take your electronic device back in hand. On this page are published all the documents necessary for the use of your device. VLP 18.0 by Flex.
USER MANUAL VLP 18.0 Flex
Peter Lameli Technical Head
Klaus Peter Weinper
Head of Quality
Department (QD)
21.08.2023
Symbols used in this manual 15
Symbols on the device 15
Important safety information 15
Noise and vibration 18
Technical data 19
Overview 20
Instructions for use 21
Maintenance and care 24
Disposal information 25
Declaration of Conformity 26
UK Declaration of Conformity 26
Exemption from liability 26
Symbols used in this manual
WARNING!
Denotes impending danger. Non-observance of this warning may result in death or extremely severe injuries.
CAUTION!
Denotes a potentially hazardous situation.
Non-observance of this warning may result in injury or damage to property.
i NOTE
Denotes hints on use and important information.
Symbols on the device

Before switching on, read the operating manual.

Wear protective gloves!

Wear eye protective!
Disposal information for the old tool (see page 25).
Important safety information
WARNING!
Before using the power tool, read the following and act accordingly:
These operating instructions
The "General safety instructions" for handling power tools in the enclosed booklet (leaflet no.: 315915)
The currently valid site rules and regulations for the prevention of accidents
This power tool is state of the art and has been assembled in accordance with the acknowledged safety regulations. In spite of this, the power tool may pose a danger to life and limb of the user or a third party when in use, or the power tool or other items could become damaged. The power tool may be operated only
for its intended use,
in perfect working order.
Faults which compromise safety must be repaired immediately.
Intended use
The rechargeable vacuum lifter VLP 18 is designed for:
- commercial use in trade and industry
- lifting, moving and positioning items such as tiles, slabs, drywall panels, glass and furniture with a maximum weight of 130kg
- use with dry, rough and lightly porous material
The rechargeable vacuum lifter VLP 18 is not designed for:
- as a loose load handling attachment for cranes, hoists or other hand-guided manipulators,
- climbing or securing the human body in any way
- climbing or carrying the weight of a person
- lifting, moving or positioning items made of very porous, soft/flexible or crumbly material, e.g. simple cardboard boxes, polystyrene, dry-cast paving slabs, pressed sand or poor quality concrete.
WARNING!
Use of the tool for climbing or any other nonintended application can result in injuries or fatality.
Safety instructions

WARNING!
Read all safety notices and instructions. Failure to comply with the safety notices and instructions may result in electric shock, fire and/or serious injuries. Keep all safety notices and instructions in a safe place for future reference.
Safety instructions for vacuum lifter
- Do not deliberately try to rip the load off with extreme force. There is a risk of the load crushing feet and hands and damaging the object and tool.
- Do not lift objects weighing more than 130kg (287 lbs). There is a risk the weight can fall off.
- Risk of load crushing feet and hands and damaging the object and tool. Do not shake the tool while lifting, moving and placing objects. Do not swing or shake the load while lifting, moving and placing objects. Do not use the tool when the seal is worn out. Lift and carry the load with uniform speed without sudden sharp and strong movements.
- Do not use the tool while the battery is low. There is a risk of injury and damage to the materials being lifted.
If the sealing force begins to noticeably decrease while the battery is fully charged, check the rubber foam seal for wear and tear or damage. Do not attempt to lift anything with the tool until you have replaced the seal.
Use caution when lifting large thin flexible sheets, like drywall, cardboard, plastic, plywood, thin sheet metal etcThin sheets bend and flex and can unexpectedly change curvature above their limit and detach. - Do not attach the tool to surfaces with visible puddles of water. Internal components are not waterproof. If water is sucked into the air ducts it can cause permanent damage to the tool. The tool is not waterproof and therefore extreme caution should be taken when using it in the rain or wet conditions.
-
Never let the tool fall to the floor. If it falls down inadvertently, inspect the device and the sealing lips for damage.
-
Do not place heavy objects on top of the tool.
- Do not place the digital display indirect sunlight or near strong heat sources for prolonged periods. Extreme heat may damage the display and it may become unreadable. A damaged display does not necessarily impact the functionality of the tool.
To avoid overheating, do not cover the tool. - Ensure the switch is in the off-position before transporting the tool and when in storage. Be mindful that the tool is not switched on accidentally.
Use only original batteries with the voltage indicated on the type plate of your power tool. The use of other batteries, e.g. imitations, reconditioned batteries or other makes, increases the risk of injury and material damage by exploding batteries.
A
WARNING!
If the safety precautions are not heeded, the load could fall without warning. The power tool generates a strong vacuum.
Failure of this kind can occur very suddenly and without any tangible indication or prewarning if the seal is damaged or the maximum permissible weight is exceeded or another factor occurs resulting in spontaneous loss of the vacuum.
There will be no indication of the load detaching itself and there will be no means of stopping or catching it. This represents a high risk, particularly with heavy loads. All possible safety precautions should therefore be taken in full.
i
NOTE
Due to the high negative pressure generated by the power tool, it is strongly recommended not to attach the power tool to glass less than 6 mm thick. Glass thinner than 6 mm can break.
Use and safety of foam seals
The foam seal consists of two parts: the black foam and the red silicone seal. The Black rubber foam is mostly used to create initial vacuum. After it compresses, the red seal holds the longest and strongest seal. As long as the initial seal is created to get suction, the "strong" seal will also be created. The rubber foam seal uses patented technology and is one of the main components of the tool. It should be handled with caution as it directly impacts the overall performance and safety.
The seal can withstand an estimated 900 compression cycles, depending on force and duration of compression, without any damage.
- Avoid rubbing the seal over rough surfaces. Seal material is very prone to parallel wear (moving parallel to rough surface in ironing motion). Lift perpendicularly on very rough surfaces. Rubbing the seal over a smooth surface such as granite in the presence of thick abrasives (thick sand) will damage the seal and may cause unexpected detachment.
Surfaces with very sharp edges should not be lifted in parallel hold. Edges sharper than 45 degrees may damage the seal and lead to sudden vacuum loss and sudden detachment. The motor should always be on.
Always store the seal covered with a hard cover. The seal can be easily damaged by sharp corners and edges when in storage. The seal should not be stored with any sharp tools or in contact with any hard objects (e.g. inside a toolbox).
- Do not dip the seal in water. The rubber foam seal is slightly water absorbent. Unless it is fully dipped in water and soaking wet, slightly soaking the seal with water will not damage its performance. If it is soaked in water, it can be squeezed by hand like a sponge to dry without damage. It is advisable to use a dry seal to avoid water getting sucked into air ducts and inside the body.
CAUTION
Do not dip or use the seal in the presence of any oil-based products. Oil and oil products (machine oil + lubricants) will permanently damage the seal and cannot be removed. If the seal has absorbed any oil, it should be disposed of safely, the base should be cleaned, and the seal replaced.
CAUTION!
Do not use or store the seal in the presence of chemical solvents. Kerosene, acetone, turpentine, benzene, acids, etc. and even their fumes in closed spaces or thin layers on surfaces can melt the seal and damage its structure and cause failure.
Safety instructions for handling batteries
- Do not open the battery. Danger of short circuit.
- Protect the battery against heat, including prolonged sunlight, fire, water and moisture. Danger of explosion.
A damaged or incorrectly used battery may result in the emission of fumes. Ensure a supply of fresh air and consult a doctor if you feel unwell. The fumes may irritate the respiratory tracts.
Liquid may leak out of the battery if the battery is used incorrectly. Avoid contact with such liquid. In the event of accidental contact, rinse with water. If liquid gets into the eyes, seek medical attention as well. Liquid ejected from the battery may cause irritation or burns.
Use FLEX rechargeable batteries only in connection with FLEX tools and FLEX accessories. Only in this way is the rechargeable battery protected against dangerous overloads. - Recharge batteries using only chargers recommended by the manufacturer. A charger that is suitable for one type of battery may create a fire hazard if used with another battery.
- The battery could be damaged by pointed objects such as nails or screwdrivers or by force exerted on it externally. This may give rise to an internal short circuit, causing the battery to burn, smoke, explode or overheat.
Additional safety notices
Use only adhesive signs to label the power tool. Do not drill any holes into the housing.
The mains voltage must match the voltage specification on the factory plate.
Noise and vibration

NOTE
Values for the Arated noise level as well as the total values pertaining to vibration can be gleaned from the "Technical data" table. The noise and vibration values have been determined in accordance with EN 62841.

WARNING!
The specified measured values apply to new power tools. Daily use causes the noise and vibration values to change.

NOTE
The vibration emission level stated in these instructions has been measured in accordance with a standardised test given in EN 62841 and may be used to compare one tool with another. It can also be used for a preliminary assessment of exposure. The declared vibration emission level represents the main applications of the tool.
However, if the tool is used for different applications, with different accessories or poor maintenance, the vibration emission level may differ. This may significantly increase the exposure level over the total working period.
However if the tool is used for different applications, with different accessories or is poorly maintained, the vibration emission may differ. This may significantly decrease the exposure level over the total working period.
Identify additional safety measures to protect the operator from the effects of vibration such as: Maintain the power tool and accessories, keep hands warm, organise work patterns.

CAUTION!
Wear ear defenders at a sound pressure level above 85 dB(A).
Technical data
| Device VLP 18 | ||
| Type Rechargeable vacuum lifter | ||
| Nominal voltage V 18 | ||
| Tool dimensions (LxWxH) mm 305x190x147 | ||
| permissible load capacity kg max. 130 | ||
| Max. vacuum bar 0,85 | ||
| Battery | AP 18,0/2.5AP 18,0/5.0AP 18,0/8.0 | |
| Weight according to "EPTA procedure1/2003" (without battery) | kg 1.38 | |
| Weight of battery- 2.5 Ah | kg | 0.42 |
| - 5.0 Ah | 0.72 | |
| - 8.0 Ah | 1.10 | |
| Charger | CA 12/18, CA 18.0-LD,CA 10.8/18.0 | |
| Working temperature °C -10 - 40 | ||
| Storage temperature °C -10 - 50 | ||
| Charging temperature | °C | 4~40 |
| A-rated noise level in accordance with EN 62841 (see "Noise and vibration"): | ||
| Sound pressure level \( L_{pA} \) | dB(A) 59 | |
| Sound power level \( L_{WA} \) | dB(A) 70 | |
| Uncertainty K dB 3.0 | ||
| Total vibration value in accordance with EN 62841 (see "Noise and vibration"): | ||
| Emission value \( a_h \) | m/s2 | <2.5 |
| Uncertainty K | m/s2 | 1.5 |
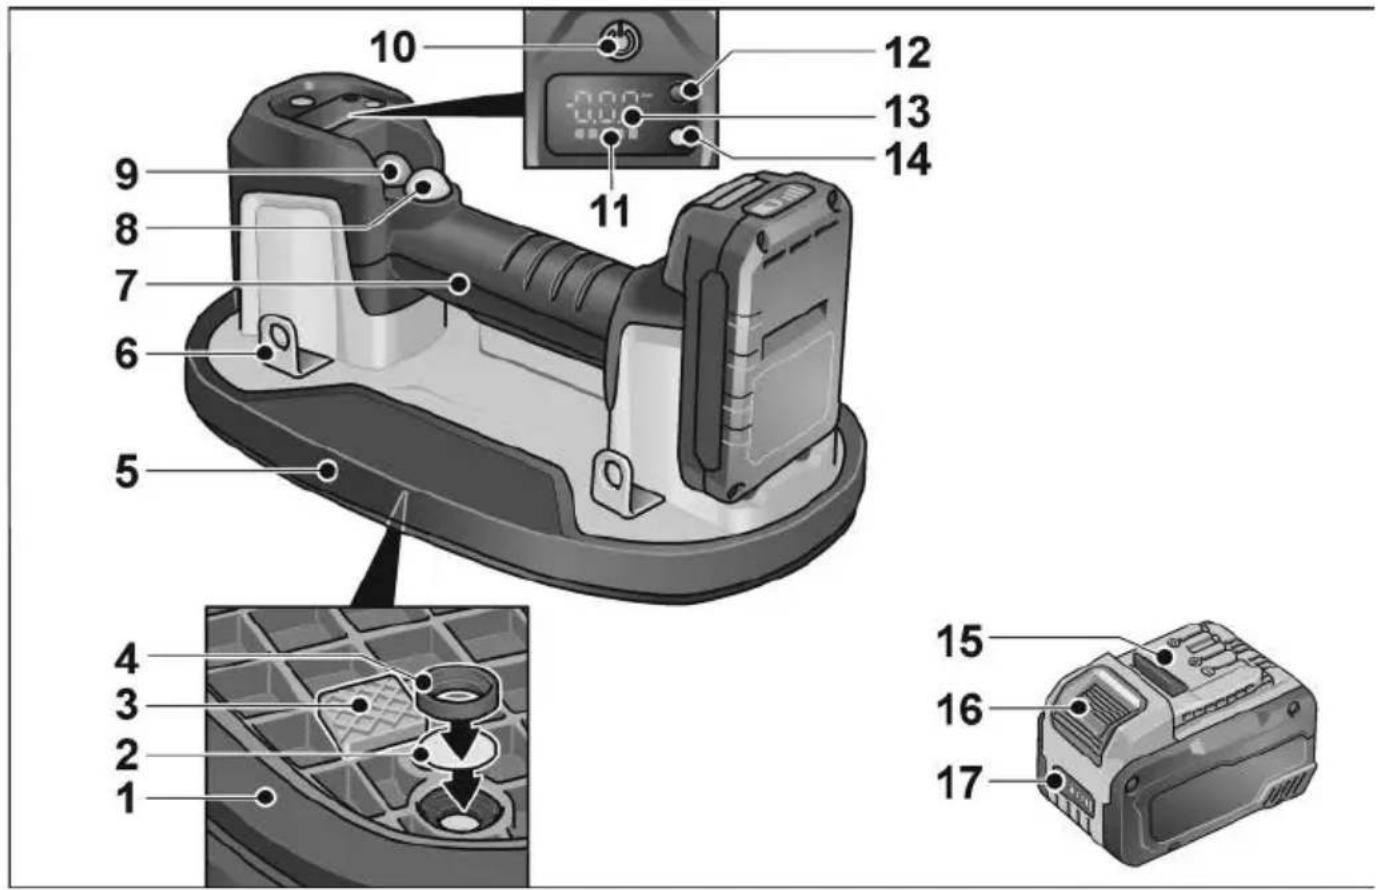
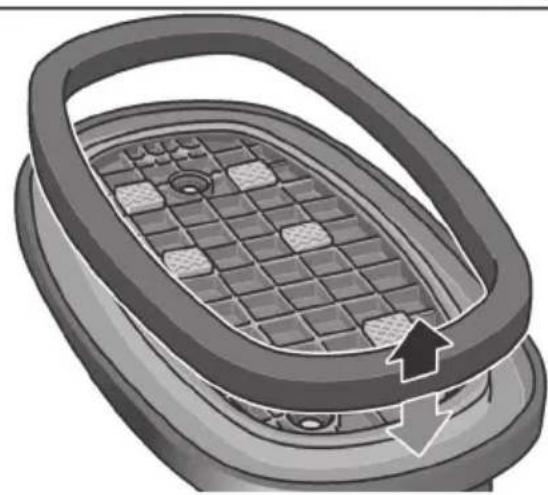
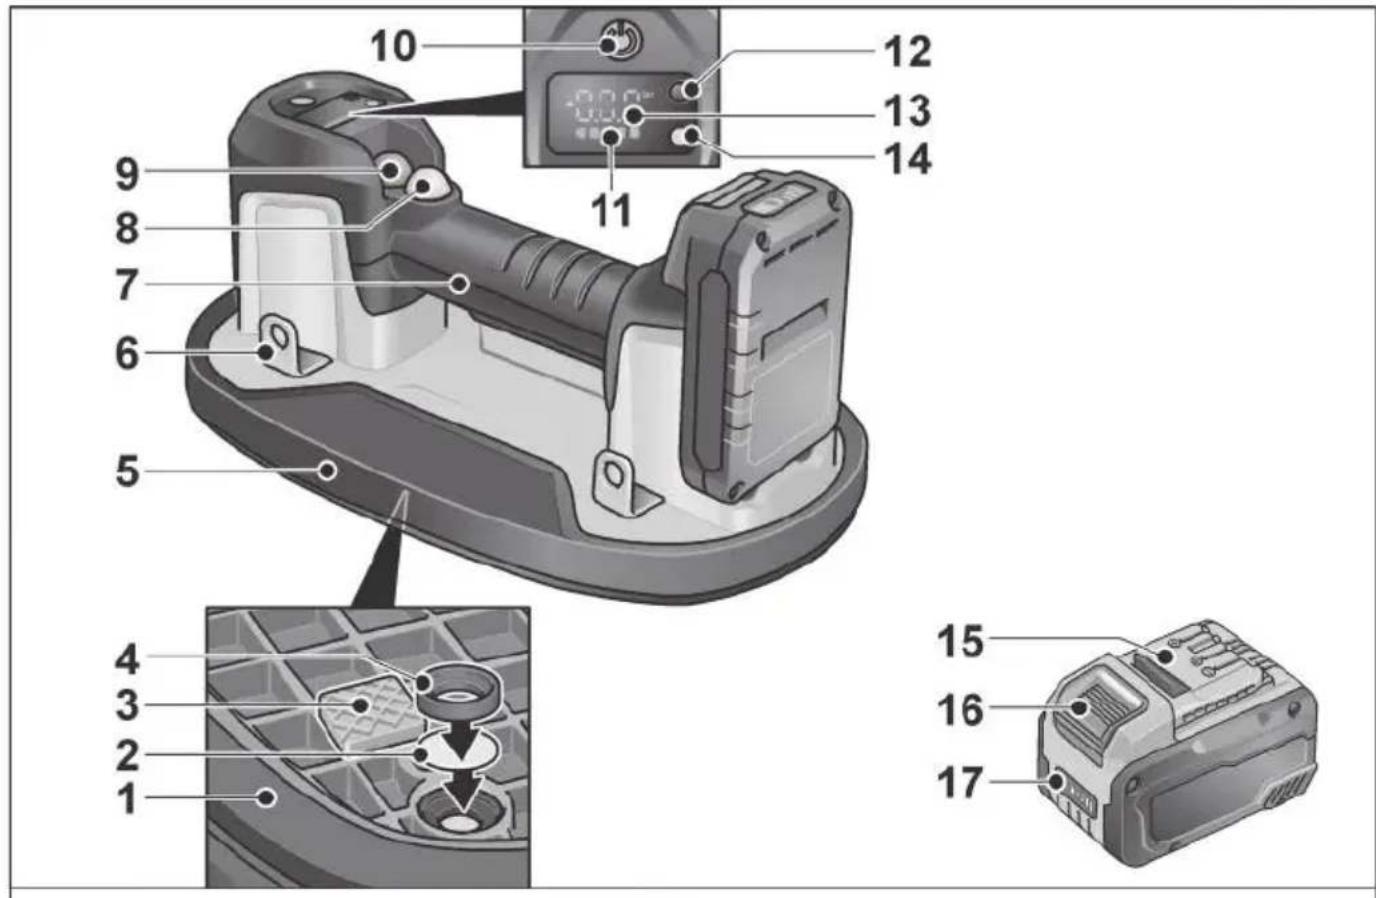
Overview

1 Foam seal
2 Air filter mat
3 Spacer
4 Air filter sealing ring
5 Base plate
6 Securing tabs
7 Handle
8 Pump start button (black)
9 Vacuum release button (red)
10 Button
For switching the power tool on and off.
11 Battery charge level indicator (device)
12 Selector button for unit of measure
13 Display with selected unit of measure
14 Operating status indicator
15 Li-ion battery (2.5 Ah/5.0 Ah/8.0 Ah)
16 Battery release button
17 Battery status indicator (battery)
Instructions for use

WARNING!
Before working on the tool, remove the battery.
Before initial operation
Unpack the device and accessories and check that no parts are missing or were damaged during transport.

NOTE
The batteries are not fully charged on delivery. Prior to initial operation, fully charge the batteries. Refer to the charger operating manual.
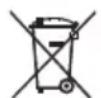
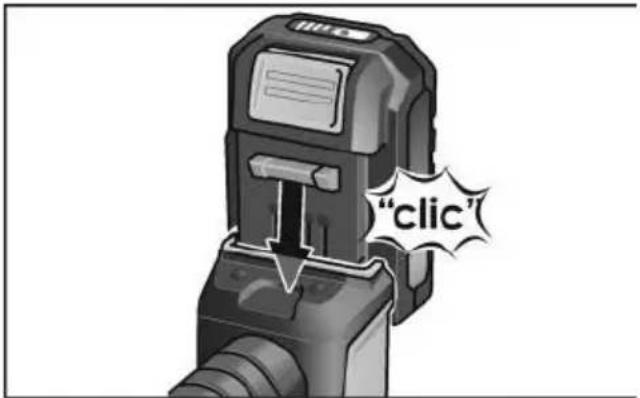
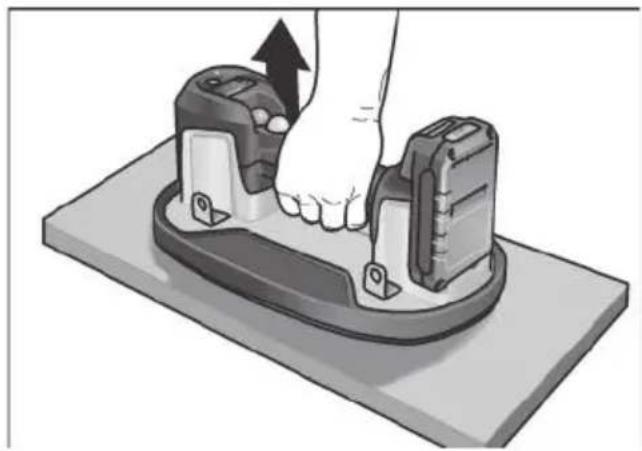
Inserting/changing the battery
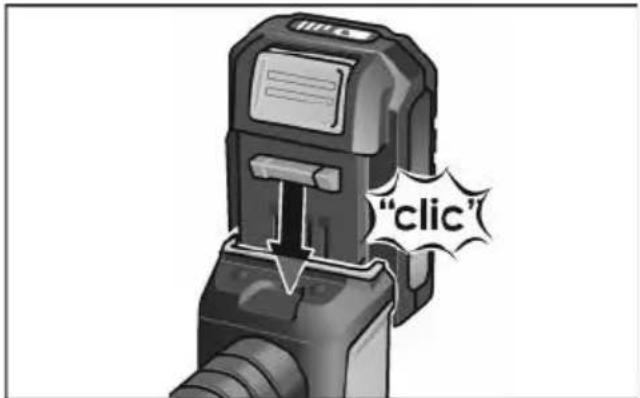
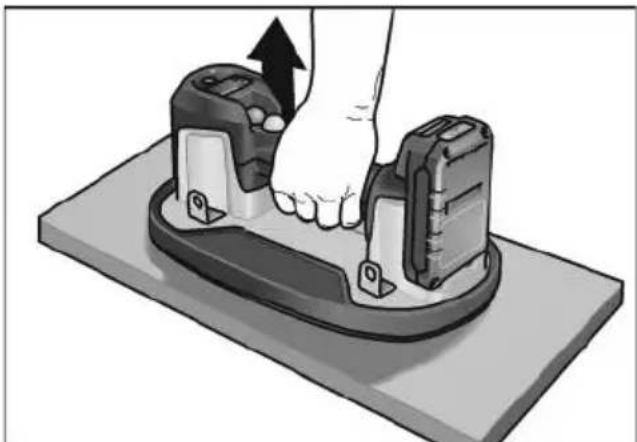
Push the charged battery into the device until it engages fully.
To remove, press the release button (1.) and pull out the battery (2.).

CAUTION!
When the device is not in use, protect the battery contacts. Loose metal parts may short-circuit the contacts; explosion and fire hazard!
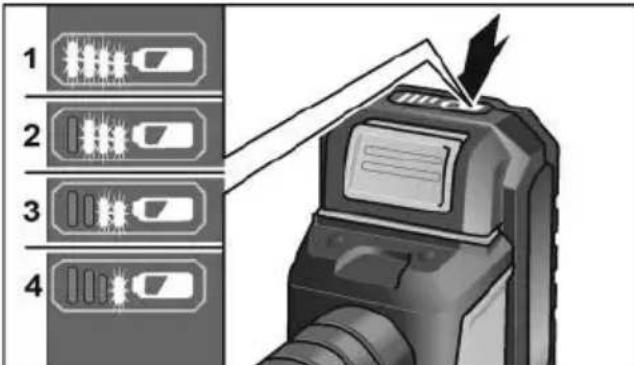
Battery charge level
Press the button to check the charge level via the battery charge indicator LEDs.

The indicator goes out after 5 seconds. If one of the LEDs flashes, the battery must be recharged. If none of the LEDs light up after the button is pressed, the battery is faulty and must be replaced.
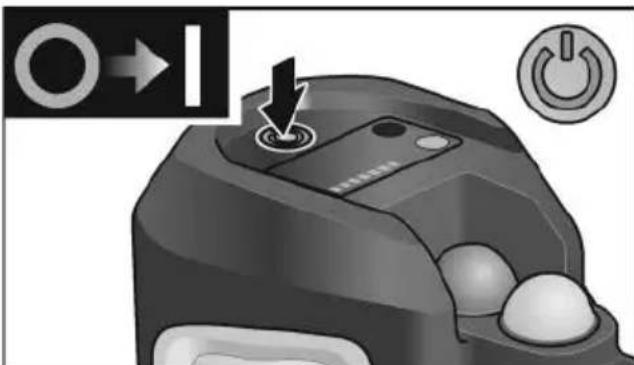
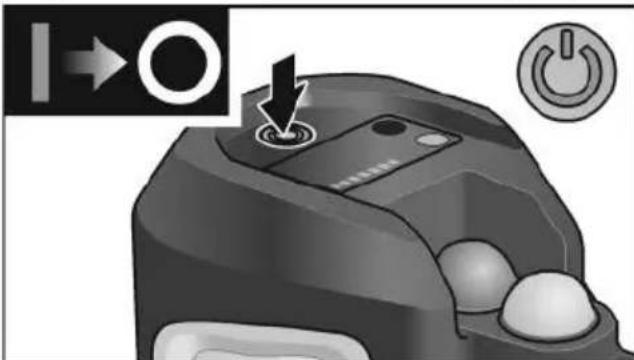
Switching on and off

Press button (10) to switch on.

Press button (10) again to switch off.
Working with the vacuum lifter
- Switch on the device.
The operating status indicator on the device lights up red and the digital display shows the available charge and the current pressure.
i NOTE As soon as the last bar of the battery charge indicator on the device flashes red, charge the battery of the device.
CAUTION!
If the device is used with a low battery charge, injuries can ensue and damage to the material being lifted can be caused. It is recommended to completely charge the battery before using the device.
Attaching the device to the object
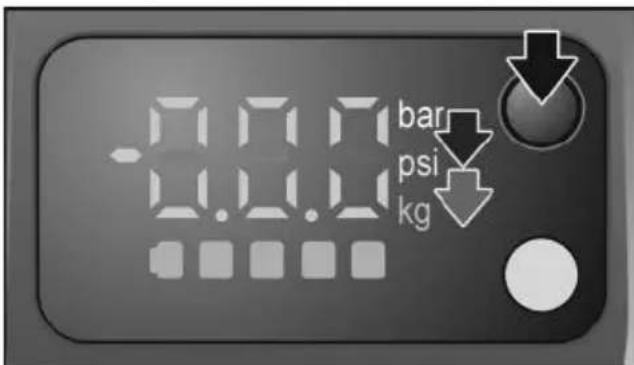
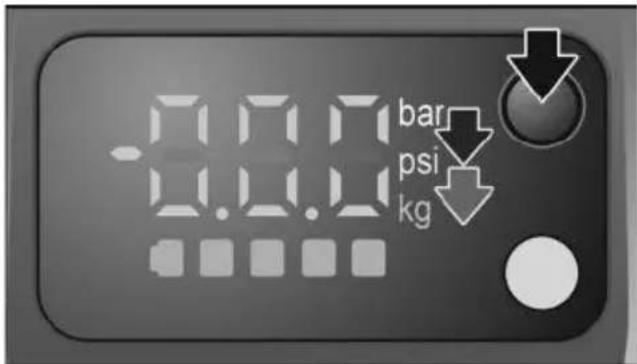
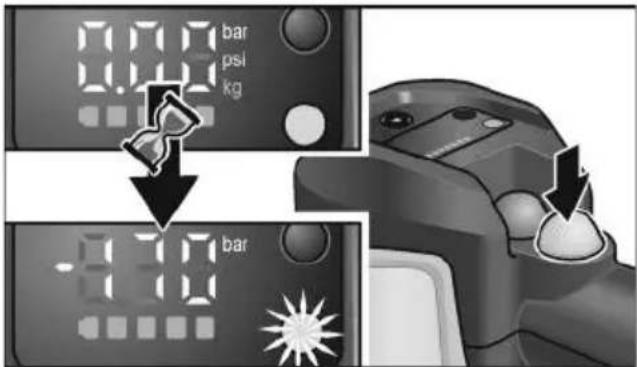
If required, press the selector button for the unit of measure to change from bar to psi for pressure and from kg to lbs for weight.
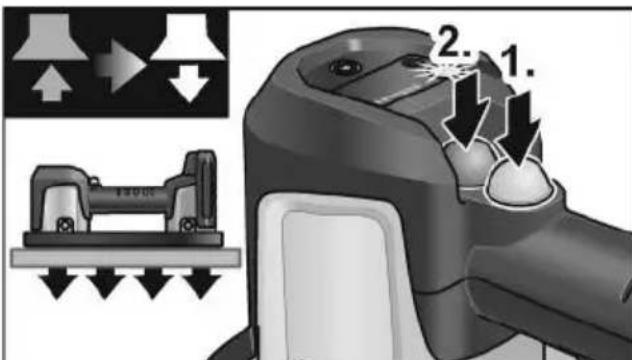
- Place the device firmly on the surface of the object to be lifted.

- Press the black pump start button. The operating status indicator flashes red. The pump starts and within a few seconds the tool adheres to the load. Once the vacuum reaches the maximum value, the operating status indicator turns green and the motor stops automatically.
Lift and move the object.
i NOTE
If objects with dusty, dirty or damp surfaces need to be lifted, first remove as much of the dust and dirt as possible. The tool switches the pump on and off automatically to maintain the necessary pressure for safe lifting.
i NOTE
For maximum safety, switch the display to weight units (kg/lbs) and compare the displayed values with the load to be lifted, see the "Maximum holding force" table. Do not lift loads that are heavier than the displayed value.
Ending lifting
After lifting and safely placing the object down:
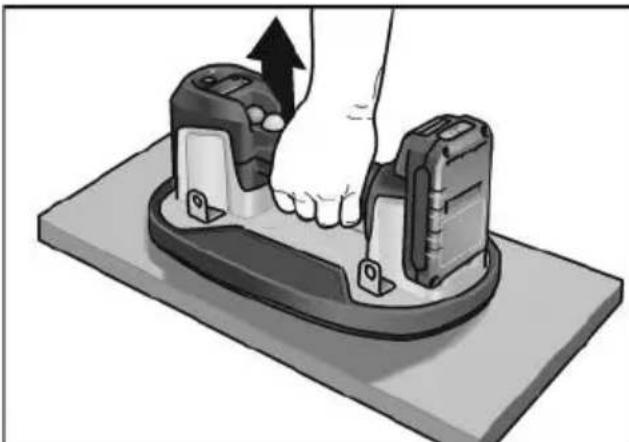
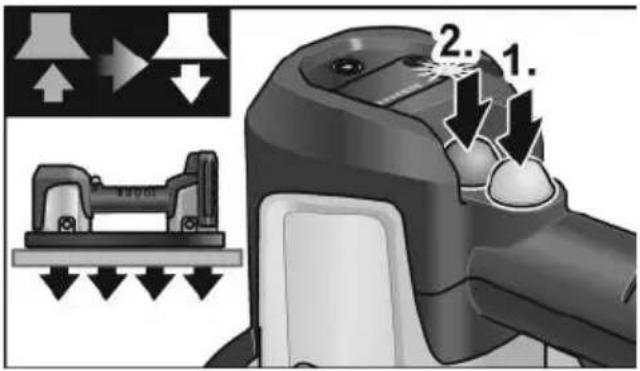
Press the black pump start button to stop the vacuum pump (1.).
- Then press the red vacuum release button to sever the bond and detach the tool from the object (2.).
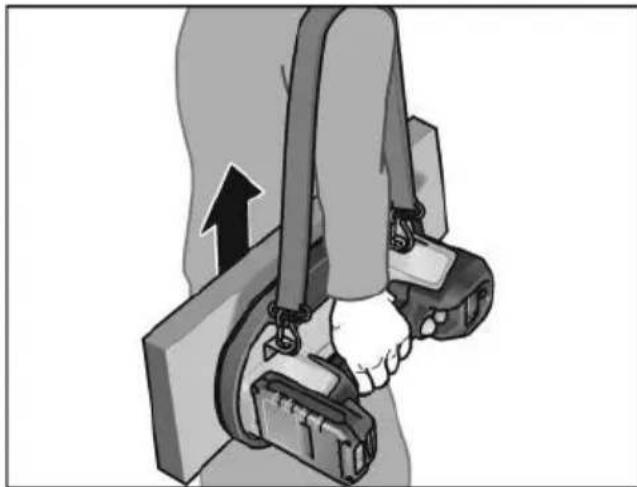
Securing the carrying strap
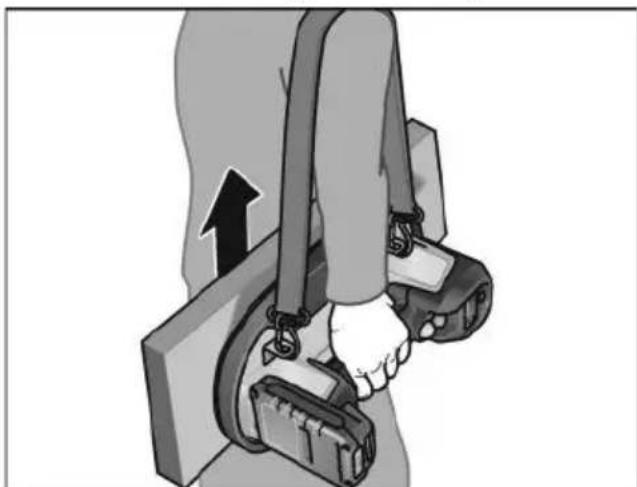
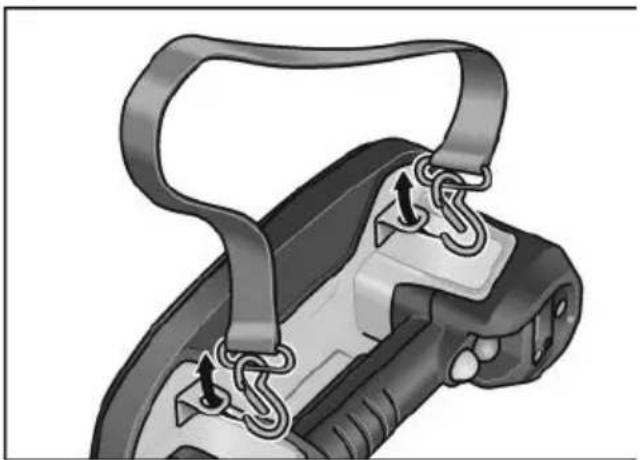
To transport objects with the tool easier and more safely, a carrying strap can be attached. The carrying strap is available as an accessory.
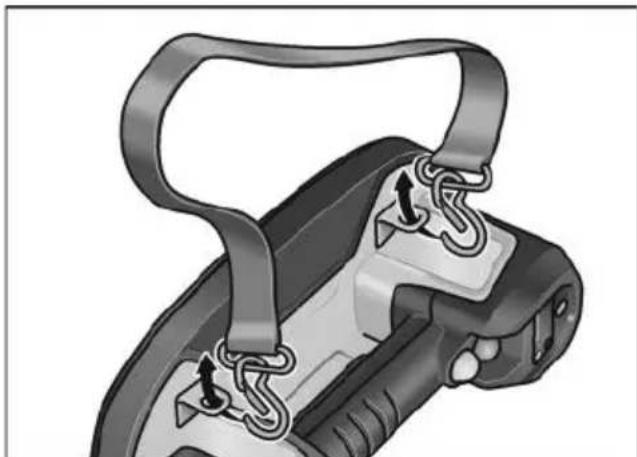
- Secure the carrying strap with the hook to two of the retaining tabs as required.
Operating instructions Lifting capacity

NOTE
A safety factor of 2 is taken into account in the officially permissible load capacity of 130kg The device must not be used to lift loads heavier than 130kg regardless of the maximum holding force of 170kg shown on the display.
Maximum holding forces (estimated), tested on various materials:
| Vertical holding force (kg) | Parallel holding force (kg) | |
| Glass 170 120 | ||
| Ceramic tile 170 | 120 | |
| Metal 110 | ||
| Plastic 100 | ||
| Wood 100 65 | ||
| Subconcrete 80 | ||
| Dry-cast paving slabs | 80 | |
| Gypsum card-board | 75 65 | |

NOTE
If the vacuum drops below -0.65 bar (-65kPa) ,the tool starts the pump automatically (if the pump is switched on) and achieves the pressure necessary for use in this way.
For very uneven objects, a flexible seal is available as an accessory.
Lifting techniques

NOTE
Think about what you want to lift and how you are going to lift it. Observe the weight of the object when doing this.
Consider whether the object can be lifted alone.
- Ensure that the working area is flat, dry and free of obstacles.
Check the route. Ensure that the path is clear. Remove trip hazards and obstacles.
Check for wet or smooth surfaces.
Use ergonomic equipment.
Use lifting aids such as fork-lift truck, sack truck, equipment trolley, pallet truck or lifting platform.
Make sure that you are suitably trained before using the equipment.
- Request assistance if necessary. Bulky or heavy loads should be lifted by two persons. Lift evenly and keep the load straight.
Lifting diagonally

NOTE
Use this essential lifting technique for small items by positioning yourself over the load and lifting with legs apart.
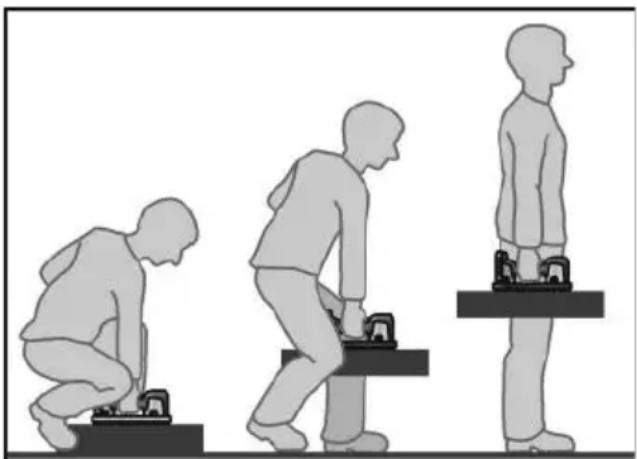
Get as close to the item as possible.
- Stand with legs apart, one foot in front of the item and one foot to the side of the item to maintain a good balance.
- Keep your back straight and press your buttocks out. Bend with your legs and hips down to the item.
Bring the item as close to yourself as possible.
- Place your hand (on the same side as the foot that you placed in front of the item) on the side of the item that is furthest away from you.
- Secure the load with your free hand while the load is lifted and the tool is held with one hand.
Before lifting, tense your core muscles, look ahead, keep your back stiff and straight.

NOTE
You should not hold your breath when lifting. Do not bend and turn at the waist. Always grip with the whole hand. Do not impair your vision while carrying. Do not yank the load or lift it quickly. Do not trap your fingers or toes.
- Lift the load slowly, following with head and shoulders.
- Keep the load close to your body.
Stretch your legs with back straight and exhale when lifting.
Turn your feet to prevent twisting.
Teaching-in mode / recalibration mode In the event of problems with the digital display, please carry out the following steps to reset the digital display.
- Place the tool on a non-porous surface, e.g. a polished tile.
- Switch on the device.
Press the selector button for the unit of measurement (12) and hold for 10 seconds.
As soon as the pump starts, release the selector button for the unit of measurement (12). The calibration routine takes 10-15 seconds. - When the pump switches off, the calibration routine is complete.
- Switch the tool off and on again.
The tool is now calibrated and the values on the digital display should be correct.

NOTE
The tool will show incorrect values on the digital display if it is not calibrated on a non-porous surface such as a tile or piece of glass. If this is the case, the calibration routine must be repeated on a non-porous material. Do NOT perform this routine on glass that is thinner than 6 mm as the glass can break.
Maintenance and care

WARNING!
Before working on the tool, remove the battery.
Cleaning

WARNING!
Do not use water or liquid detergents.
Clean the tool and foam seal at regular intervals. The frequency of cleaning is dependent on the material and duration of use.
- Check the foam seal for damage at regular intervals.
Clean the air filter at regular intervals using compressed air.
i NOTE
As soon as the filter is significantly worn or damaged, it must be renewed (customer appraisal).
This depends on the type of use:
- Lifting of clean material - longer service life of filter
- Lifting of dirty/dusty material - shorter service life of filter
i NOTE
Any changes to the tool, including technical modifications, are not permitted. They can cause injuries. Failure to comply will invalidate any claims under the manufacturer's warranty.
Repairs
Repairs may only be carried out by an authorised customer service centre.
Exchanging wear parts
Replacing foam seal
i NOTE
As soon as the foam seal is worn or damaged, it must be renewed.

Pull out foam seal.
- Carefully fit new foam seal. Ensure that the new foam seal is seated correctly and securely.
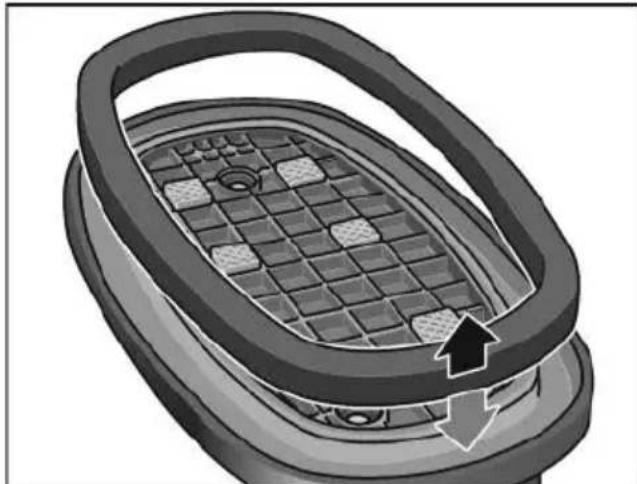
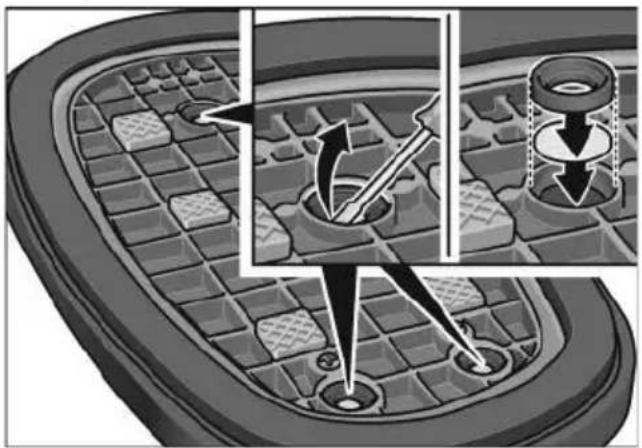
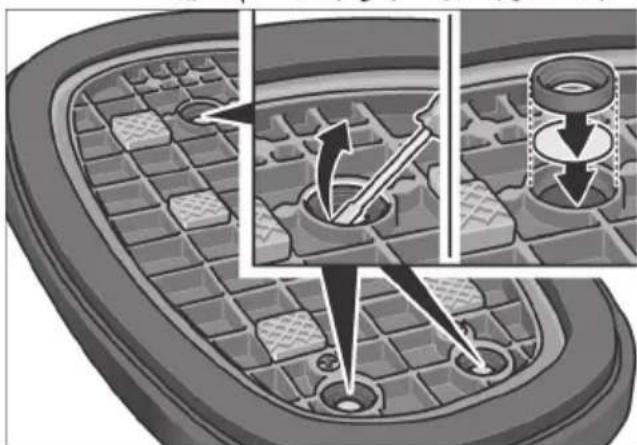
Replacing air filter
NOTE
A reduction in suction performance is a sign that the air filter needs to be cleaned and/or renewed. When replacing the filter, keep the air line clear of obstacles or foreign bodies.
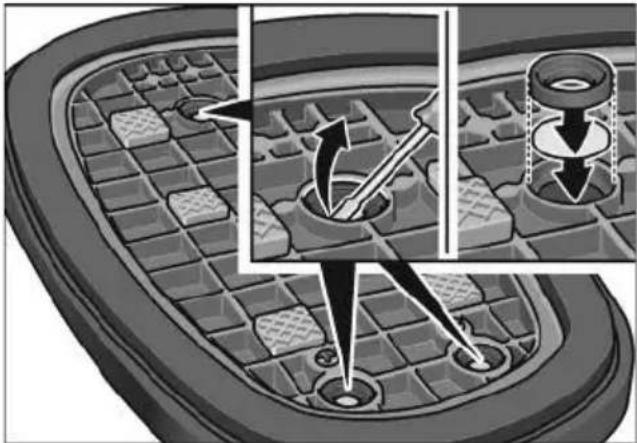
Turn the tool onto its head.
- With the pointed end of a screwdriver, remove the air filter sealing ring and take out the air filter mat.
Two procedures are now possible:
- Clean air filter with compressed air
- Insert new air filter mat.
Insert the air filter sealing ring again to secure the air filter.
Spare parts and accessories
Exploded drawings and spare-part lists can be found on our homepage:
www.flex-tools.com
Disposal information
WARNING!
End-of-life power tools must be rendered inoperable before disposal.
- For mains-operated power tools, remove the mains cable.
- For battery-operated power tools, remove the battery.
EU countries only
Do not dispose of electric power tools in the household waste!
In accordance with European directive
2012/19/EC on Waste Electrical and
Electronic Equipment and its incorporation into national law, end-of-life power tools must be collected separately and recycled in an environmentally-friendly manner.

Recycling raw materials instead of waste disposal.
The device, accessories and packaging should be recycled in an environmentally-friendly manner. Plastic parts are identified for recycling according to material type.

WARNING!
Do not throw batteries into the household waste, fire or water. Do not open end-of-life batteries.
EU countries only: In accordance with directive 2006/66/EC, defective or used batteries must be recycled.

NOTE
Please ask your dealer about disposal options.

Declaration of Conformity
We hereby declare that the product described under Technical data complies with the
following standards or normative documents:
EN 62841 according to the provisions of directives 2014/30/EU, 2006/42/EC, 2011/65/EU.
Responsible for technical documents:
Declaration of Conformity
We as the manufacturer: FLEX
Business address: Bahnhofstr. 15,
71711 Steinheim, Germany
declare under our sole responsibility, that the product(s) described under "Technical specifications" fulfills all the relevant provisions of The Supply of Machinery (Safety)
Regulations S.I. 2008/1597 and also fulfills all the relevant provisions of the following UK Regulations:
Electromagnetic Compatibility Regulations S.I. 2016/1091, The Restriction of the Use of Certain Hazardous Substances in Electrical and Electronic Equipment Regulations S.I. 2012/3032 and are manufactured in accordance with the following designated Standards: BS EN 62841-1+A11:2015, BS EN 55014-1:2021, BS EN 55014-2:2021 Place of declaration: Steinheim, Germany. Responsible person: Peter Lameli, Technical Director - FLEX-Elektrowerkzeuge GmbH
Contact details for Great Britain:
FLEX Power Tools Limited,
Unit 8 Anglo Office Park, Lincoln Road,
HP 12, 3RH Buckinghamshire,
United Kingdom.

Peter Lameli
Technical Head

Klaus Peter Weinper
Head of Quality
Department (QD)
21.08.2023
Exemption from liability
The manufacturer and its agent are not liable for any damage and lost profit due to interruption in business caused by the product or by an unusable product. The manufacturer and its agent are not liable for any damage which was caused by improper use of the power tool or by use of the power tool with products from other manufacturers.
Table des matieres
Symbolesutilisés 27
Peter Lameli Technical Head
Klaus Peter Weinper
Head of Quality
Department (QD)
21/08/2023
Peter Lameli Technical Head
Klaus Peter Weinper
Head of Quality
Department (QD)
21/08/2023
Elevatorion diagonal
NOTA
Peter Lameli Technical Head
Klaus Peter Weinper
Head of Quality
Department (QD)
21/08/2023
EN 62841 de acordo com as determinacoes das directivas 2014/30/UE, 2006/42/CE, 2011/65/UE.
Responsavelela documentacao Tecnica: FLEX-Elektrowerkzeuge GmbH, R & D Bahnhofstrasse 15, D71711 Steinheim/Murr

Peter Lameli Technical Head
Klaus Peter Weinper
Head of Quality
Department (QD)
21/08/2023

Peter Lameli Technical Head

Klaus Peter Weinper
Head of Quality
Department (QD)
21-08-2023
Peter Lameli Technical Head
Klaus Peter Weinper
Head of Quality
Department (QD)
21-08-2023
Peter Lameli Technical Head
Klaus Peter Weinper
Head of Quality
Department (QD)
21.08.2023
Peter Lameli Technical Head
Klaus Peter Weinper
Head of Quality
Department (QD)
2023-08-21
Peter Lameli Technical Head
Klaus Peter Weinper
Head of Quality
Department (QD)
21.08.2023
Peter Lameli Technical Head
Klaus Peter Weinper
Head of Quality
Department (QD)
21.08.2023
Peter Lameli Technical Head
Klaus Peter Weinper
Head of Quality
Department (QD)
21.08.2023
Peter Lameli Technical Head
Klaus Peter Weinper
Head of Quality
Department (QD)
21.08.2023
Peter Lameli Technical Head
Klaus Peter Weinper
Head of Quality
Department (QD)
21.08.2023
Peter Lameli Technical Head
Klaus Peter Weinper
Head of Quality
Department (QD)
21.08.2023
Hrup in tresljaji 226
Tehniceshpecifikacije 227
Pregled 228
Navodila za uporabo 229
Peter Lameli Technical Head
Klaus Peter Weinper
Head of Quality
Department (QD)
21.08.2023
EN 62841 conform preederilor Directivei 2014/30/UE, 2006/42/CE, 2011/65/UE.
Responsabili pentru documento tehnice
FLEX-Elektrowerkzeuge GmbH, R & D
Bahnhofstrasse 15, D-71711 Steinheim/Murr


Peter Lameli Technical Head
Klaus Peter Weinper
Head of Quality
Department (QD)
21.08.2023
ДоьнHTeHHуka3aHn83a 6e30NaCHOCT
3a obo3hauBaHe Ha ypeDa n3noJ3BaIte camo IenpaIc ce Ta6eJI. He npo6nBaIte OTBOpN B KOpnyca.
HOMHaJIHOTo HApExeHne I DaHHnte 3a HApExeHne Bbpxy TInOBaTa Ta6JIka Tp6Ba Da CbOTBeTCTBaT.
Шу м вибрацни

YKA3AHVE
CTOINOCHTe 3a A-npeterneHOTo HnBO Ha
WyMa, KaKTo N ObuNTe CTOINOCHTHa
Bn6paunTe MoKeTe Da HamePte B
TabInuata,TexHnueckn daHHN.
CTOINOCHTe 3a Wym N Bn6paun Ca
ONpeJeJIeHN B CbOTBeTCTBHe C
EN 62841.

NPEyIYPEXJEHNE!
TocoueHnTe CTOnHOCTu BaxKaT 3a HOBn ypei. Pn n3PON3BaHe B exEJHeBnTo CTOHOCHTte Ha Wym N BnBpaunn Ce npomehrT.

YKA3AHHE
ДадeHOTOBTOBAУNTBAnE HNBOHa Bn6paunI e n3MpeHoB CbOTBeTCTBne c onpeDeneHata B EN 62841 npoedypa no N3MepBaHe I MOKe Da ce N3NoJ3Ba 3a CpaBnBaHe Ha eNeKTPnuYeCKn INHCTpyMeHTn. To e NODxOJaIO u 3a npedBapntEnHa npueHka Ha Bn6paunIte. TocoueHOTo HNBO Ha Bn6paunI ppeDCTabR OCHOBHnTe npINIOXeHnHa eNeKTPnuYeCKn INHCTpyMeHT. Korato obaue eNeKTPnuYeCKnT INHCTpyMeHT ce N3NoJ3Ba 3a dpyrN ueJI, C HeNOxDxOJaU npInCTaBKn IIN HEnPaBnJHO OBCJyXBaHe, HNBOTo Ha Bn6paunI MoKe Da e pa3NJuHO. TOBa MOnke 3NaHTeJHo Da NOBUnBn6paunITe 3a YIOTO Bpeme Ha pa6Ota. 3a Toyna IpeuenKa Ha Bn6paunIte Tp6Ba Da ce B3eMe PpeDbNd I BpemeTo, Ppe3 Koeto UpeDbT e N3KlOyuEN IIN E BKlOyuEN, HO C Hero B DeiCTBnTEJIHOCT He Ce pa6OTn. TOBa MOnke 3NaHTeJHo Da HAmJIbNn Bn6paunIte 3a ZraIOTO Bpeme Ha pa6Ota. B3emete DOnbJnHTeJHm MePKs 3a 6e3onacHOCT 3a 3auNTa Ha NOn3BaTeJr OT Bb3deICTBnETo Ha Bn6paunIte, KATO HanpIMep: ObcnykBaHe Ha eJeKTPnuYeCKn INHCTpyMeHT N Ha npinCTaBKnTe, 3aTOnJLHe Ha pbute, opraHn3aucnHa npoceca Ha pa6Ota.

BHIMAHHE!
Hocete 3aunta 3a cnyxa npn HnBO Ha 3BykoBO Hnrahe Ha85 dB(A).
TexHnueckn DaHHN
| Урек VLP 18 | ||
| Тип | Актулаторен варуемен повдоган | |
| Номинално наразожения V 18 | ||
| Разmersу на урека (ДхшхВ) mm 305x190x147 | ||
| Дорунстima Товаронocимост кг макс. 130 | ||
| Мakсимално оtripиating no наразам bar 0,85 | ||
| Актулаторна сатерия | AP 18.0/2,5 AP 18.0/5,0 AP 18.0/8,0 | |
| Тergл съласно „EPTA-Procedure 1/2003" (6e3 akumylatop) | kg 1,38 | |
| Тergл akтулаторна сатерия - 2,5 Ah - 5,0 Ah - 8,0 Ah | kg | 0,42 0,72 1,10 |
| Зарадно устroduстvo | CA 12/18, CA 18.0-LD, CA 10.8/18.0 | |
| РавOTна Temпегатура °C -10 - 40 | ||
| Temпегатура на съхсане °C -10 - 50 | ||
| Temпегатура на заекдане °C 4~40 | ||
| А-превенью НИВО наш汞ma с褥ед EN 62841 (Вижт_e „ш汞 и Вибрацnia"): | ||
| Прог на налгане наш汞ma LpA | dB(A) | 59 |
| Прог на навOTO наш汞ma LWA | dB(A) | 70 |
| Кольбане K | db | 3,0 |
| Об既可以 стойост за вибрацни съласно EN 62841 (Вижт_e „ш汞 и Вибрацnia"): | ||
| Емисонна стойоста/h | m/s2 | <2,5 |
| Кольбане K | m/s2 | 1,5 |
C eDnH nOgIeA
1 YnIbTHHeHne OTe nHa
2 NpIIOKka 3a Bb3dUweH pIITbp
3 P a 3 Д e Л n T e
4 3aknouBaunpbcTeH Ha Bb3duyHnna
5 Onopha nlaactnHa
6 MoHTaXHn cKo6n
7PbKOXBaTaKa
8 BytoH 3a cTapTnpaHe Ha nomnata (YepeH)
9 ByToH 3a OcBo6oxKdAbaHe Ha BaKyyMa (YepeBHe)
10 BytoH 3a BKJIIOUBAHe n N3KJIIOUBAHe.
11 CbctoHne Ha akyMylatopa Hdkaun (YpeD)
12 ByToH 3a n36Op Ha MepHa eDnHnua
13 INdkaCn 36paHa MepHa eHnua
14 INdkaunna Ha pa6oTHOTOCbCTOHNHe
15 Li-Ion akyMynaTopHa 6aTepey (2,5 Ah/5,0 Ah/8,0 Ah)
16 ByToH 3a De6IoknpaHe Ha akymylaTophata 6aTepey
17 INdkaun 3a CbCToHneTo Ha akymyIaTopa (akymyIaTop)
YnTbaHe 3a ekcnnoataua

IPEyIPEXJEHME!
Ipeu BcKaBn DeHocTn no ypea n3BaXdaTe aKymyNaTopa.
Ppei nyskaHe B eKcnIooTaunia
Pa3oNaKobaiTe ypea n npHaJneXHocTnTe n npOBepTe 3a IIbJIHOta Ha DoCTaBkata N 3a eBEHTyaHn TpaHCnOpTHn UeTN.

YKA3AHHE
AkyMnyaTOPHnTe 6aTePNn He ca HnBnHO 3apeHn npn doCTabKa. Ipeu IIpbBaTa ynotpe6a 3apeTe HaNbHNO akymyNatOPHnTe 6aTePNn.Bx. PbKOBOdCTBOTO 3a EKcNIOaTuHa 3apAnHO TO YCTPOIcTBO.
Noctabraye/cmraHa ha akymylaTophata 6aTepey
IpnTnchTe 3apeHnAkyMynaTop do nblno qnkcapaHe Bypeda.

3a cBaIaIHe HaTnCHeTe 6yToHa 3a De6JIOKIpaHc (1.) n N3TerIeTe akymlyaTopHaTa 6aTePnra (2.).

BHIMAHVE!
Ipn Hen3no3BaHe oBe3oNaCeTe KOHTaKTITE Ha aKymyNaTopHaTa batepna. Xnaabyte MetaHn Yuactn Morat da 3aKbCrt KOHTaKTITE, IMa ONaCHOCT OT EKcNIO3n I NoXap!
CbctoHne Ha 3apeXdaHe Ha akymylaTopa
Upe3 HATnCKaHe Ha 6yToHa nO CBeTOIIOJNTe Ha INHdNkATopa 3a CbCToHNeTO Ha aKymyNaTOpHaTa 6aTepeRMAoKe Da ce npOBepn CbCToHNeTO Ha 3apeXdaHe.
HnkaTopbT yracBa cne5 cekyHn. Ako eINH OT CBETOIOIte Mira, akymyataopHaTa 6aTeprna Tp86Ba Da ce 3apei. Ako cJeI HATNCKaHETo Ha 6yToHa He CBeTHE CBETOIOI, akymyataopHaTa 6aTeprna e DepeKTHa n Tp86Ba Da ce CMeHN.
BkJIIOUyBaHe n N3KJIIOUyBaHe
3a BkIIOUbaHe HaTnCHTe 6yToH (10).

3a N3KJIIOUBAHe HaTNCHETe OTHOBO 6yToH (10).
Pa6ota c BaKyumnna IOBnraq
BkIIOUeTe ypeJa.
HndkaTopbT 3a pa60THOTOCbCTOHNHe Ha ypeDa CBETBa B YepBeHo, a cnpoBnT DnCnne Noka3Ba HAnuHn3aprHa akymylaTopa N TeKyUTo HJraHe.
YKA3AHHE
IOM nocneHOTO cTbIbue Ha uHdNkaTopa 3a 3apeXdaHe Ha akymyNatopa Ha ypeHa 3anoyHe da Mura B uepBeHo, 3apeTe akymyNatopa.
BHIMAHHE!
3no3BaHeTo Ha ypeDa, KOrato aKymyIaTOPbTe e N3TOUeH, MoKe da IOBeDe Do HapaHbAHnHa NIOBpeDa Ha NOBnraHnMaTePnA. IpenOpbYBa Ce IIhOto 3apExKaHe Ha aKymyIaTopa, IpeDuHa N3No3BaTe ypeDa.
3acMykBaHe Ha ypeDa KbM o6eKTa
IIO JEAHHe HATNCHE Te 6yToHa 3a N36Op Ha MepHa eINHua, 3a Da IpOMeHnte MepHata eINHua 3a HaJIraHe ot bar Ha psi I MePHaTa eINHua 3a TerNo OT kg Ha lbs.
NocTaBete ypeDa nIbTHO BbPxy NOBbPxHOCCTTHa NOBdIraHn OBeKT.
HaTnchete YepHna 6yToH 3a CTapTnpaHe Ha NOMnata. INDnKaTOpB T 3a pa6OTHOc BCTOJHne Mmra B UepBeHo. NOMnata ce 3aDeIcTBa N B pAMKInTe Ha HRAKO KcKHyN Ci Ce Cb3DaBa 3axBaUaHe KbM TOBapa. Korato OTpuCaTeJIHOTo HAnraHe DOCTINHE MaKcIMMaIIHaTa CToHOCr INDnKaTOpB T 3a pa6OTHO cBCTOJHne CTaba 3eJIeH N DnRaTeJIr T CNIPA aBTOMATnHOr.
IobnHHeTe npemecTe npeMeta.
i YKA3AHVE
Korato NOBdInrata MaTePnAnu CbC 3a npaaehn, Mpbchn nn BnaXn IOBbPxHOCTN, npeBapnteHNOOTcPaHeTe Bb3MOxHO Hau-MHOrO npax N MPbCOTNA. YpeTbTABTOMaTHHO BkIOUyBa N3KIOUyBa NOMnata, 3a da NoDlbpka HaIraHaTeO, Heo6xoIMo 3a 6e3OnacHO NobdnraHe.
i YKA3AHVE
3a MaKcMaJIHa 6e3ONaCHOCT BKNIOyTe DnCnIe C MepHIne eHNuN 3a TerNo (kg/lbs) n cpaBHeTe NOKa3AHTE CTOnHOCTn C Te3n Ha TObapa, KOITpRbBa Da bJe NOBdURHaT,BK. TaBnUcaTa "MaKcMaJIHn CNn Ha 3aJbPkaHe". He NobduraTe TOBAPn, PO-TeKKn OT NOKa3aHaTa CTOnHOCT.
Kpaɪ ha nɒBɪŋaHéTo
Cnei noBnirane He 6e3onacno nocTabrHe Ha npedMeta:
HaTnchete UepHna 6yToH 3a cTapTnpaHe, 3a da cnpeTe BaKyymHaTa nomna (1.).
CneTobHaTnCHTeYepeBHeN86yToH3aOCBO6OxJaBaHeHaBaKyUma,3aDa cnpTe npIneNBaHetoI da OCBO6OnTe npedMeTa (2.).
3aKpenBaHe Ha peMbka 3a HocHe
Mоже да се пикpenп peMbК 3a HocHe, 3a da ce ynechnи n obezonacn TpaHcnpoptupaHeto Ha npedMeTn c ypeDA. PembKbT 3a HocHe ce npednara kaTo npHaJnxHocT.
■ПикpenetepeMbka3aHocheC Kyknte KbMДBe npOu3BOJHn PnaHKn 3a 3akpenBaHe.
Yka3aHnna 3a pa6ota
KanauTeHa noBnraHe
i YKA3AHVE
OphiunaHNO pa3peWeHaTTOBapOHOCMocT OT 130 kg BKNIOUBA KOephiueHT Ha CnryphocT 2. Cypea He Tp8Ba da ce NOBdURAT Ha TOBAPN, NO-TeKu OT 130 kg, He3aBNCMO OT MAKcIMMaHATA cNHa HA 3aIbpxKaHe OT 170 kg, NOKa3aHa Ha dncnner. MaKcImaHn cNn Ha 3aIbpxKaHe (npnbN3ntenH), n3nNTAHN Bbpxu pa3nuchn MaTePnaH:
Toba 3aBnCH OT BnDa Ha yNtpe6a:
- NOBUNrAHe Ha YnCT MaTePnA1 - NoTOrJaMa N3DpbXKnVBOcHT Ha QnNTbpa
-Повдигане Ha 3aMbpeHn/npaunHaMATEpnaHn -No-MaJka H3dpbXJIINBOCTHaФИNTbpa

YKA3AHVE
BcKaKbMoHΦkaUHa ypeDa, BKnIOHTeNHO TexHueCKn, He ca pa3peWeH. Te Morat Da IOBeaTdo HapaHraBaHna. Pnp HeCnA3BaHe rapaHNoHHte 3aIbJxKeHna Ha npOn3BODHTeN OtnaTaT.
PemOHn
PemOHNTe Tp6Ba Da ce N3BbPWBaT
N3KIOUHTeHNO OT OTOpN3npaH OT
IPOIN3BOIDTeJI cepBn3 3a
KJNEHTcKO O6CnyXbaHe.
CmHa Ha n3HOCBaUnte ce yactn CmHa Ha yIbTHHeHneTo OT IyHa

YKA3AHVE
OM yIbTHHeHTo OT Ia Ce n3HOcN IIN NOBpeu, To TpaBa Da ce CMeHn.
I3BaTe ynTbTheHHeTo OT nHa.
BHHMaTeJHo HaTnChete HOBOTo yNtBTHHeHne OT nHa.YBepeTe ce,Ye HOBOTO yNtBTHHeHne OT nHa e npaBnHO n Cta6nIHO NOCTaBeHO.
CmHa Ha Bb3dUshnA qnTbp
i YKA3AHHE
HamaJIbHaHeTo Ha BCMyKaTeJIHaTa MOUHOCT NOKa3Ba, Ye Bb3dUwHnT fNITbP TpOBA Da ce NOuCTn H/nn CMeHn. Pn CMHa Ha fNITbPa ce yBepTe, Ye Bb3dYXOBoDbT e CBOOdeH OT IpeIaTCTBn HnN YyKdn TeNa.
Obphe Te ypea c rnaBata HaOny.
C nOMOHTa Ha BbpxHa OTBepTKaTa CBAJTe 3akHouBaUnI npbCTeH I NOIIOKKATA Ha Bb3dUuHnIΦnITbp.
Cera ca Bb3MOxHN DBe npoceDypn:
-ПоунстeteВь3ДушняФИТьр cбСгБСЕН Вь3ДуX,
IocTabete HOBaTa IOnIOXKa Ha Bb3dUshnHnФnTbp.
IocTaBeTe 3aKnIOUBaUHn npbCTeH Ha Bb3dUHHnΦnTbp, 3a Da rO 3aKpEnITE.
Pe3epBn YacTn n npHaJekHOCTn
Pa3shnPeHnTe YepTexn n CnncbCnTe Cpe3epBnN yactn ue OTkPneTe Ha hawata Naayalna cTpaHnua: www.flex-tools.com
Yka3aHnra 3a n3XbPJIrHe
IPEyIPEXJEHNE!
I3ne3nTe OT eKcnnoataunaeNEkTPOHnCTpyMeHTN npedn N3XBbPnHeda ce npabRT HeN3NoJ3BaEMN:
- eJNEKTPoHnHCTpyMeHTnte C Ka6eJ ype3 OTCTpaHraBaHe Ha eJNeKtpuYeCKnja Ka6eJ,
akymyataTOPHHe eJekTpOHCTpyMeHTn 4pe3 OTCTpaHBAHe Ha akymyataTOPHaTa batepna.

Camo 3a Dbpxabn - YneHKn Ha EC He n3xBpbIe Te eNeKtpueecknte ypeiB o6uia 6oknyk!
CnopeI eBponeckata dnpekTnBa 2012/19/EC 3a n3non3BaHnTe eJeKtpoypei Tpr6Ba da ce cb6napa pa3dEJIHO Ida 6bDaT npedAbaHN 3a peuKnipaHe c Mncbl 3a OKonHaTa CpeJa.

PeuKnnpaHe Ha cypOBHH BmecTo n3XBbPJIHe Ha OTNaDbU.
UpeBt, npnHaJneJXHocHTe n ONAKOBAtA Tp8Ba Da ce npedaT 3a ekOJOnuHo peunKInpaHe. 3a ueJIte Ha npaBnHOTo peunKInpaHe PnaCTMaCobITE qactn ca o6o3NaueHn.

NPEyynPEXKeEHNE!
AkymyNatOpHnTe batepnHa He ce 13XbBpIaT npu bntOBnTe OTnabuN Ha He ce XbBpIaT B ObH nnn Boda. N3ne3nTe OT ekCnnoataqna akymyNatOpHn batepnHa He ce OTbaprT.
Cama 3a dIbpxkABn OT EC: CbrnaCHO InpekTnBa 2006/66/EO depekTHnte nIu N3pa3xOJBAHn akymyNaTopn/baTepn Tp8Ba da ce peuknpaT.

YKA3AHHE
3a Bb3MOXHOCTNTE 3a N3XBbPJIHe Ce OCBeJOMeTe npn TbproBea!
Декларача 3a СьOTВЕТВЕ (€
ДeКларпаме сцянаси eнOLИЧА OTROBOPHOCT Ye ONICAHNYTВ «TEXHNUECKN DAHHN» ПОДУKT cБВПада сьС CNeДНITE HOPMN ИЛN HOPMaTNBHN DOKUMEHTN:
EN 62841 B CbOTBeTCTBnE c pa3nopei6nTe Ha dinpeKtNBn 2014/30/EC, 2006/42/EO, 2011/65/EC.
OTROBOPEH 3a TexHnueCKNte DOKyMeHTN: FLEX-Elektrowerkzeuge GmbH, R & D Bahnhofstrasse 15, D-71711 Steinheim/Murr

Peter Lameli Technical Head
Klaus Peter Weinper
Head of Quality
Department (QD)
21.08.2023
UyMbI IN Bn6paun 265
TexHnueckne xapaKTepeNCTnKn 266
Kpatkn o63op 267
HCTpykuaNo 3KcnpyaTaun 268
YxOi TexHnueckoe 6cnyKbHaHne .272
Yka3aHnno ytniHaun 273
COOTBETCTBNE HopMaM C. 274
NCKJIIOUeHHe OTBeTCTBeHHoCTn 274
IcnoJb3yeMbIe cIMBOJIbI

NPEyIYPEKDEHME!
Obo3haayaet HenocpeJCTBeHHc
yrpoKaIOUyIO ONaCHOCTb. Ipn
HecO6IIOJeHN yKa3aHnCyuEcTByeT ONaCHOCTb IOnyueHn CepbE3HbIX TpaBM INN CMEPTeNbHO NcXoJa.

BHIMAHHE!
O603Haayet BO3MOxHOCtB BO3HNKHOBeHn
ONaCHO CNTyaCNI. Pn Heco6JIIODeHn
Yka3AHN CyueCTByeT ONaCHOCTb
NONyHeH N TpaBM INM MaTePnaIbHOro
Usep6a.

ПРИМЕЧАНЕ
Obo3haaet COBtI NO IpMHeHIO I BaxHyIO HOpMaunio.
CnMBoJIHaIIOJbEMHnKe

Ipeed nCNoJb3ObaHnem npoTuTe HNCTpyKuIO NO 3KcPnyaTaun!

HaedeBaIte 3aunTHbIe nepuAtkn!

HaedeBaIte 3aunTHyO oSyBb!
Yka3aHne no yTuJIn3aCnn 6bBWeRo B NcNoJIb3OBaHn IOdIeMHNka (cm. cTp. 273)!
TexHnka 6e30napocTn

IPEyIpyEKeHHeIe!
IpeqncnOb3OBaHneM 3JIeKTPoHHCTpyMeHTa Heo6XoIMo IpoueCTb nepeuNCHeHHyIO dOKyMeHTaCNIU N DeiCTBOBaTb COIaCHO yKa3aHnA M, PnBEdHHbIM:
B npnnaeMoH nHctpyKuN NO 3KcnnyaTaun;
- «Ошших указаших поTekнIKE 6e3oNaChOCTn» npu ObaPaeHnC 3JIeKTPoMHCTpyMeHTaMn B npNJarAemOM CnpaBOyHOM pyKOBoJCTBe (ДOKуMeHT №: 315915);
- npabnnaX n NOJoxeHnX nO npedOTbpaueHNIO HecuaCThbx CnyaB, npmehmbix B MeCTe NcNOJIb3OBaHnY.
3TOT 3JNEKTPOHCTPymeHT N3ROTOBHeH B COOTBETCTBUN C COBPemHHbIM yPOBHEM pa3BNTN TEXHKN CORNACHO 6Ueepn3HaHHbIM npaBnIam TEXHKN 6e3ONaCHOCTN. Tem He MeHee, npu erO NCNoJIb3OBAHNI MOKeT BO3HNKHYTB ONaCHOCTb IIN JN3HN I 3DOpOBBy NOJIb3OBaTEJI INI TpeTbIX JINU, a TAKKE IOBpeXdEHe NIOBpOHOBAHNI INI INHOrO IMyueCTBa. 3JNEKTPOHCTPymeHT DOJXeH NCNoJIb3OBaTBCr TOJbKO
- H3HaueHIO
BTEXHNUECKNHCINPaBHOM COCTOHN.
HemeIeHHO yCTpaHnTe IIObIe HeNCpPABHOCTN, HApUaIOuNe 6e3oNaCHOCTb 3KcIIpyataun.
IcnoJb3ObaHne no Ha3HaueHnIO
AkkymyIaTopHbI BaKyyMhBn NOdbEMHNK (BaKyym-npucoc) VLP 18 npedHa3NaueH:
-ДЯ npopeccnoHaJIbHOrO
ИСПОЛБ3OBaHЯВпрмblIшлЕHHои
КOMМерчecкосфеpe;
- NOdbema, nepemeueHn yctaHOBKn TaKnx npedMeTOB, KaK Kepamuecka nnTka, KaMeHHbIe nnITbl, INncOKapToHHbIe NcHTbl, CTekna n npedMeTbI Me6eHN MaccOJdo 130 kr;
- INCNoJIb3OBAHnA C CyXIM, IePOXOBaTbIM N CInrKa IOpNCbIM MaTePnaJOM.
AkkymyIaTOPbI BaKyyMhBn NOIbEMHnK (BaKyym-npucoc) VLP 18 He npedHa3NaueH:
-ДЯИСПОЛБ3OBAHЯВКачEcTBe CBO6OДHOrO rpy303aXBaTHOrO yCTpoIcTBA Ha KpaHax, rpy3ONoDbEМнIKaX IJIIM MaHInyIaTOpax C pyuHbIM ynpaBLeHnEM,
-ДлЯлзаньилфКсALИЧЕЛОБЕСКOrTeJa KaKIM-JIN6O cNoOCOBom;
- Na3aHbI NII nepeHoca Beca dpyrOrO YeNoBeka;
- NOBEMA, NepemeueHnIyUcTaHOBKn PpeMeTOB n3 OueHb NOPuCToro, Mrkoro/tn6KOro IIN JOMKOro MaTePnaJa, HApnPmEp o6bIuHbIX KapToHHbIX Kopo6ok, CTIpOpopa, 6pyCuaTkn, PpeccOBaHHoro necka IIN 6eToHa Hn3KOro KaueCTBa.

IPEyIPEKDEHNE!
IcnoJIb3OBAHHe IOJbEMHnKa IJaIa3aHbI
IIIN HHO OTOINuHOrO OT IpEiNCaHHOrO
IpIMHeHnRA MoKET PnBecTu K TpaBMam
IIIN CMePTeNbHOMy ICXoDy.
Yka3aHnno TExHnke 6e3OnaCHOCTN

IPEyIPEKDEHNE!
IpoHTaTe BCE yka3aHnno TExHnke 6e3OnaCHOCTn HNCTpyKuH. NyUeHn npu Co6nOJeHnnu Ka3aHn no TexHnke 6e3OnaCHOCTn HNCTpyKuH MOryT npNBecTN K NopaxKeHnIO 3JneKtpueckm TOkOM, NOxApY I/IIIN TJaKeJIbIM TpaBMam CoXpaHnTe BCE yka3aHn no TexHnke 6e3OnaCHOCTn HNCTpyKuH dnn Bdyuux nNoB3OBaTeNei.
Yka3aHnI NO TexHnke 6e3OnaCHOCTN DnBakyyMHO NODbEMHnKa
Kateropnueckn 3anpeuaeTcnoHmMaTb rpy3 (OTpbIBaTb erO OT OCHOBaHn, Ha KOTOpOM OH yCTaHOBJIeH) C npIMHeHnEM cnIbl. py3 MoKeT npVBecTu K pa3daBnBaHnO pyK n HOr nJIn NOBpeJeHnIO noDNHMaemOro npEdMeTa n camoro IHCTpyMeHTa.
He nbitaTeCb NOHMaTb npedMeTbI maccn 60nee 130 kr. CyueCTByeT pnck naDeHnra rpy3a.
TO MOKET npINBecTn K pa3daBJIINBaHIO pYK HOR NNI NOBpeXJeHHIO NODHMaEMoro IpeDMeTa n CaMOro INHCTpyMeHTa. BHNMaHne! He Tprcnte INHCTpyMeHT npN IOdbEme, IpeMeueHn I onyckaHn IpeDMeTOB.
Co6IIOdaIte octOpoxHocTb, He
packaunBaIte n He TpncTe
NoHMmaembl rpy3 npn noDbEme,
nepeMeueHn n OnyckaHn. He
NCNOJIb3yIte nHCTpyMeHT, ecnn
ynlnotHeHn e3HOseHo. NoHMaTe n
pepeHocnte rpy3 c paBHomepHoi
CKOPOCTbI, 36eray BHe3aHbIX n pe3Knx
DBNXKeHn.
He nCnoJb3yIte HNCTpyMeHT npHn3KOM yPOBHe 3apra aKKymyTOpa. CyueCTByeT pNCK TpaBMnpoBaHnI n NOBpeXdEHHNoHNMaemOrrpy3a.
EcnHa6JIOaETc3aMeTHaI NOTepeYcNlra YpIOTHeHn, DaKe ecnAkkymyTOp NOnHOCTbIO 3apXKeH, PpOBepbTe NeHOpJIaCTOBoE yIpOTHeHne Ha n3Hoc IIN NOBpeKdEHN. HeNbITaNTecb NODHMaTb rpy3bl C NOMoUbTO 3TOrO INHCTpyMeHTa Do Tex nop, NOKa He 3aMeHIne yIpOTHeHne.
БудьTe ocToPoxKbI npn noDbEme 60JIbIINX, ToHKnx n rN6Knx naHeIeN, HApnIMep n3 rInCOKapTOHa, KapTOHa, nIaCTnKa, fAnepbl, TOHKOrO IInCTOBORo MetaIIa N T.Д. ToHKnE NaHEn CKIOHHbI K IpOrnBaHnA M N MOrY T HeOxNuDAHNO npOrHyTbcra 3a DOnyCTmMbI ppeJeBn KaK CJIeDcTBne, OTCoeDInHHTbcra OT INHCTpyMeHtA.
He yctaHaBnBaIte INHCTpyMeHT Ha YBHO BnaXhIx NOBepxHocTJX. BHyTpEHnHe KOMNoHEtbl NObIbEMHnKa He BOHOHePOnHuaembl. IOnaDaHne BObl B Bo3DyXoBObl MoKET npNBecTI K Heo6paTMOMy IOBpeKdEHNIO HCTpyMeHTa. IHCTpyMeHT He BOHOHePOnHuaem. Po3Tomy 6yDbTe PpeJeBHo OCTopoXhbl npN erO IcNoIb3OBAHmB DoXdJIbByU NOrOdy NIn BO BnaXhOH cpeDe.
He donyckaite naeHnHa nHcTpymeHTa Ha non.Pnp cnyuahom naeHn HNCTpymeHTa npOBepbTe nHcTpymeHT n yNtTHraUoIe KpOMKn Ha OTCyTCTBne NOBpeKdEHH.
He knaIte TjKJIbIe npEIMetbI Ha nHCTpyMeHT.
He noDBepraTe UcfoPoBoi DnCnnei DInIteHOMy BO3DeIcTBIO nPraMbIX COJIHeuHbIX JUyei HxpaHInTe INHCTpyMeHT BDAJN OT INTEHCNBbIX NCTOCHIKOB TeIIa. 3KCTpeMaJIbHbI HaPeB MoKeT NOBpeINtB DnCnIeN OrpaHnUHTb pa36OpUBOcTB INDnKaun Ha HeM.
IobpeKdHe nCnne He o6aTeNbHO BnIeT Ha cyHKUHOHaJIbHOCTb CaMOrO IHCTpymEHTa.
He hakpbBaIte HnCTpyMeHT BO n36exKaHne ero neperpeBa.
Ipeed TpaHcnpTnPOBKO u NOCTaHOBKO IHCTpymeHTa Ha xpaHeHne y6eINTecb B TOM, YTO BBIKIOUaTeJIb 3JeKTPoNITaHnRA BBIKIOUeH. Y6eINTecb B TOM, YTO IHCTpymeHT He MOKeT 6bITb BKIOUeH CnyauHNo.
IcnoJb3yTe TOnbKO opuHaJIbHbIe aKKMyJTopbIC HAnpJxKeHnEM, yKa3aHHbIM Ha 3aBOdCKoT a6JIuKe BaWeero 3JeKTPoHCTpyMeHTa. Ipn IcNoJb3OBAHm DpyrNX aKKMyJTopOB, HApPImep NOpDeJOK, BOCCTaHOBNeHHbIX aKKMyJTopOB INN N3DeJIn CTOPOHHX npOn3BOJNTeJen, cyUeCTByET pNCK IOnJuEHn TpaBM ININ MaTePnaJIbHOrO yUepeBa BCJeDCTBne B3pbIbA aKKMyJTopa.

NPEyINPEXKDEHME!
Ipn Heco6nOJeHm Mep npedocToPOxHOCTu BO3MOxHo HnpeBnDeEHoe NaedeHne rpy3a! 3NeKtpoHnCtpyMeHT Co3daET BbICOKoe pa3pexHeHne.
IOnobHbIcBOMoKETnpOu30TuBHe3aHHO 6e3KaKHX-Ni6o3aMeTHbIX / OuYUaembIX TaKTnIbHO npu3HaKOB uNII npEduynpeXdEHnB Cnuae NOBpExHn yNtOHEny (npucoc), PpeBbIWeHn DONyCTUMORO BeCa IOnHMAmero pPeDMeta HnN INHOr OaKTopa, Bbl3bBaIOUeRO CAMOpON3BOJbHbI c6poc BaKyyMa.
MOxHO He 3aMeNTb MOMENT OTPbIBa rpy3a;
Pn3TOM He bdyET BO3MOxHOCTH
OCTAHOBITb NIN NOIMATb erO.3TO
OBCToTeJIbCTBO ppeCTabNReT CO60i
BbICOKNI PnCK, OcOBeHNO B Cnyae
TJKeJIbIX ppeMetOB.1o3tOMy
Heo6xoIIMO B nIoHON Mepe Co6JIIOdaTb
BCE BO3MOxHbIE Mepbl ppeIOCTOPOXHOCTH.

IPVIMEYAHME
13-3a BBICOKO ra3pexehn, CO3daBaemoro 3JIeKTPoHCTpyMeHTOM, HAcTOrTebHO He peKOMeHdyETcra 3aKpePnTb 3JIeKTPoHCTpyMeHT Ha CTeKNe TOIuHoi MeHee 6 MM. CTeKNo TohBwe 6 MM MoKeT 6bITb NOBpeXdeHO.
IcnoJb3OBaHne n 6e3ONaChocTb neHONJIaCTOBbIX yNlOTHTeJIeN
IeHONlactOBoe yIpOTHeHne COCTOHT n3
DByx Yacte: YepHoro neHONlacta n
KpaCHoN CnIKKOHOBn PpOKnaKn. YepHbI
IeHONlact Cnyknt DnA Co3DaHnA
HaayalbHOrO pa3pexKeHn. Iocne CxKaTnA
IeHONlacta KpacHOe yIpOTHeHne
ObecneuBaet HAn6OJIee npOHyoe
PnpKATne npCocA. PokfOpMpyETcA
IepBOHaayalbHOe CXBaTbIBAHNe DnA
Co3DaHnBAkyMa, TAKKe 6yDet
ΦopMnPOBaTbcr «IpoUHOe» yIpOTHeHne.
IeHONlactOBoe yIpOTHeHne n3ROTOBJeHo
No 3aNaTeHTOBaHHoTExHOJOnm N
YBJIaETcR OdHM n3 OCHOHBix
KOMnoHEtOB PoDbEMMnka. C Hm CJIeDyET
ObpaAsTaBCr OCTOpOXHo, NoCKoMbky erO
CocToHne HaNPMyU BnIaReT Ha o6Uyo
3ΦΦeKTHBHOCTb n 6e3OJaACHOCTb
HCNOb3OBaHnY INHCTpyMeHTa.
■ПреднолараетсуToулnotениьыдерхиBaetnpimepHo900цИКIOВСКАТЯ,ВЗавиСнМОCTNOTeroУСИЛЯИпpoДОЛЖИTeJIbHOCTHI.
Kateropnueckn 3anpeuaeTcTepeTb yNIOHTHEHNE WepoxOBaTbIMN NOBepxHOCTaMn. MaTePnAJI yNIOtHeHnO uehb YyBCTBNTeJIeH K npaJIeJIbHOMU n3HOcy (CMeUaETCr npn CKOJIbXeHn NapaJIeJIbHO WepoxOBaToI NOBepxHOCTn). Pn OueHb WepoxOBaTbIX NOBepxHOCTaX IOdHmAJte INHCTpyMeHT BepTKaJIbHO BBep. Ecnn yNIOtHeHne 6yDet KOHTaKTIPOBaTb C rJaKDOn NOBepxHOCTbU (HaNPImep, C rpaHNTOM), NOKpbITOn TOJCTbIM CNoem a6pa3NuBA (KpyNHO3epHnctTOrNeCKa), To yNIOtHeHne 6yDet NOBpeJdeHo n rpy3 MoKET HeoKndaHNO OTOpBaTbcra.
■Поверхнoctи сочь octpbIMN KpOMkAmn HeIb3Я NOdHMaTb napaJIneIbHbIM XBaTOM.Края OCTpee 45^ MOryT NOBpeIITb yIIOThHeHne I npNBecTN K BHe3aIHHOMy c6pocy BaKyyMa I, KaK CJIeIcTBNe, OTPbIBY NOdHMaemoro rpy3a.MOTOp DOJIXeH 6bITb BCerda BKJIIOUeyH.
Bcerda xpaHnTe yIIOThHeNc B NOxOJaUeM KOHTeHpe.Bo BpeMa XpaHEny yIIOThHeNc JERKO NOBpeDITb OCTpbIMN yIaMm N KpaAMN.YIIOThHeNc He CJIeDyET XpaHnTb BMeCTe C OCTpbIMN IHCTpyMeHTaMn IIN B KOHTaKTe C TBepDbIMN pPeDMtAmN (HaNPmEp, B RAuKe dIra INCHTpymeHTOB).
He norpykaite ynpnoTHHe N B Ody.
IeHONnactOBoe ynpnoTHHe o6naaet
BbICOKoBnITbIBaHOUe CnOCOBnCTbIO.
Ioka ynpnoTHHe He norpykeHo B BODy
NoHOCTBIO Hc 3AmauINBaETcra,
KpaTKOBpemeHHoe CmauINBaHne BOOn He
BnIaTe Ha erOpabOt. Ecnn OHO 6yJeT
NoHOCTBIO npOnHTaHO BODOn, To erO
MOxHO BbIXaTb B pyKe, KaK rY6Ky, YTObbl BbcUHTb 6e3 NOBpeXJdeHNI.
PekomeHdyETcra IcNoJIb3OBAtB TOnbKO cyXoe ynpnoTHHe, YTObbl PpeDToBpaTNTb
NONaHaHne BObl B 03dYxOBObl N eE
3acacbIBAHne BHyTp b Kopnyca.

BHUMAHNE!
YIITOTHEHNE HENb3aNORpyKaTb B MacNo
HINNCIOJIb3OBA Tb PdOM C IPOyKTAMHa
MACJHO OCHOBE.MACNO N
HePTePOnyKDbl (MaunHoe MaCNO +
cma3ka) npBODrK Heo6paTMOMy
IOBpeXJeHIO yIITOTHEHNA, INX
HEBO3MOxHO ydaJIHTb. Ecnn yIITOTHEHne
BNHTAJO MACNo, eRc Heo6xoIMMo
6e30nacHO yTNn3uPoBa Tb, OUcCTNTb
OCHOBAHNE N 3aMeHtB YIITOTHEHNE.

BHVMAHHE!
YnnotHeHne Heb3n NorpyKaTb B XmMueckne pactBOpHTeNn Nn NCnOJb3OBaTb PdOM C HmN. Kepocn, aTeOH, CKnIaDap, 6eH30JI, KNCOTbl N T. D., B TOM YNCNE IN Napbl B NOMeUeHNn TOHKne, NOBepxHOCThBiE NOKpbITnM MOryT npNBecTN K NOBpeKdEHNu YNtNOTHeHn, erO CTpykTypbl N, B KOHeCHOM CcTe, K BbIXOy N3 CTPOr.
Yka3aHnI NO TEXHnKe
6e30nacnoCTn npn obaueHnnc aKKyMylrTopamN
He BckpbBaIte akKymJyTOp.CuIeCTByET ONaCHOCTb KOPOTKOTo 3AmbikaHn.
3aunuainTe aKKymJrTOp OT HarpBa, B YacTHOCTN OT npMbIX COJIHeHbIX Lyuei, a TAKKe OT ORHn, BObln BJaRn. CyueCTByeT pNCK B3pbIba.
■Пи NOBpeJdeHn HHe npaBnIbHOM o6paUeHn C aKKyMylrTopom BO3MOxHo o6pa3OBaHne napOB.ObecNeYbTe npntOK CBexKeRo BO3dYxa, a B clyuae yXydWeHn caMooyBCTBnO6paTntEc b K bpay. NapbIMOrTy pa3dpaxKaTb DbIXaTeJIbHbIe nyTu.
■Пи HENpaBnIbHOM npIMeHEni n3 aKKymyIaTOPOB MOxKET BbITeYb XNIDKOCTb. N36eraIte KOHTaKTA c Hei. Ppi CnyaH-HOM KOHTaKTe CMbITb XNIDKOCTb BOOJ. Ppi nonaHm XNIDKoCTn B rJa3a HemeJeHNO 6paTNTecb 3a NOMOuBo K BpaUy. BbITEkua aKKymyJIaTOpHaJ XNIDKOCTb MOxKET pINBeCTn K pa3dpaxKeHIO KOKN IIN K OXKOrAM.
IcnoIb3yIte aKkymyIaTOpbI FLEX TOnbKO C MaunHaMn I npHaIeXHoCTaMn FLEX. NIsb B 3TOM clyae oBeceNeuBaETcra 3aunTa aKKymyIaTOpa OT HeDOnycTUMoI neperpy3Kn.
3apjkaTe aKMyJrTOpbI TOJIbKO B peKOMeHdyEmbIX N3ROTOBHTeNem 3apJHbIX yCTpOiCTBax. 3apJHoe yCTPOiCTBO, npeHa3HaueHHOe dJa aKKMyJrTOPOB ONpeJeHHO rBnDa, MOKeT BOCPiMaHHTbcR, eCNI erO NCIOJIb3OBaTb DJIa 3apJDKn aKKMyJrTOPOB dpynx TINOB.
Bo3deIcTBne ocTpbix npeIMeTOB, HAnpIMep Nfblb IIN OTBepTKn, a TaKKe BHeUHeN CInbl MOxET NOBpeNTb aKKymyJrTOP. 3To MoXeT npNBecTN K BHyTpEHHeMy KOpOTKOMy 3aMbIKaHIO n BO3rOpaHIO, DbIMNeHIO, B3pbBy NJI INepeReBy aKKymyJrTopa.
Дононтеловьie yka3aHnЯ NO TexHnke 6e3ONaChOCTn
Длma МаркнрOBК MaunHKn CneJyET nOJIb30BaTbcr TOnIbKO HaKNeiKaMn. B KOpnyce MaunHKn HeJIb3r npOpeJIbBaTb HnKaKnx OTBepCTn.
HanpajkeHne B cetn 3JleKtpoNTaHnna 3HaueHne HapjKeHn Ha 3aBODcKO Ta6JIuUKe DOJXHbI COOTBETCTBOBaTb Dpyr dpyry.
Uymbln Bn6paunr

ПРИМЕЧАНЕ
3haueHnA-ckoppeKtnpoBaHHOrO ypOBHn 乌Ma, a TaKKe oBzero ypOBHn BvOpauN npuBoaTcB TaBnue «TexHueckne XapakTeepntkU».
3haeHn ypoBHa 7yMa n Bn6paCnn 6blnn onpeJeHeBc corlaCHO HopMaTINBHOJ DOkyMeHTaun EN 62841.

NPEyynPEXKeHNE!
PpNBedeHHbI N3MepeHHbI 3HaueHnA DeYCTBNTeHbI IJI HOBbIX PpN6OpOB. PpExeJHeBHOM NcNoJIb3OBAHn3HaueHn Wyma N Bn6paqnn N3MeHraOTc.

ПРИМЕЧАНЕ
PnBHeHbI B DaHHo HNCTpyKcHn
yPoBeH Bn6paCn 6bln OnpeJeH
CTaHdApTn3nPOBaHHbIM MeToDOM
m3MepeHn B COOTBeTCTBn C HopMaTHBHO
doKymeHTaCnei EN 62841, n MoKeT 6bltB
ncNoJb3OBaH dnn CpabHeHn
3JIeKTpOHnCTpyMeHTOB dpYc DpyROM.
Oh npirodoen TaKke IJn ppeBapntbHOn OueHK Bn6paunOHn Harpy3Kn.
PnBBeHbI yOBeHb Bn6paCnn BO3HnKaeT npN nCNoJb3OBaHn 3NeKtpOnHCTpyMeHTa N O OCHOBOMy Ha3NaueHIO. Ecnn Jx eJNeKtpOnHCTpyMeHT nCNoJb3yeTcR He No Ha3NaueHIO, B
KOMPNeTe C pyrUm paOumn HNCTpyMeHTaMn, INI INpH HeIOCTaTOUHOM Texo6cJyXuBaHN, TO yPOBeH Bn6paCm MOKeT OTJNUaTbcra. 3TO MOKeT
3HaHTeJIbHO NOBbICNTb Bn6paCNOHHyU HArpy3Ky Ha npOTJKeHN Bcei PpOJXHTeJIbHOCTn pa60Tbl.
ДляTochoroOnpeDeJIeHnBn6paCIOHNoHnHarpy3Kn Heo6xOdIMo TaKKe yuHTbIBaTbBpeM, B TeueHne KOTOPOro np6OpOCTaETcR BbIKIQUeHHbIM NJI Xe BKIQUeH, Ho Ha caMOM DeJe He nCNoJb3YeTCr.
3TO MOKET 3HaUHTeNbHO CHN3NTb Bn6paHOnHyU Harpy3ky Ha npOTxKeHN BcE npOJONKITbHOCtI pa60Tbl.
ПрIMITEДОПOLHINTEЛьнBLEМерbl NO 6e3ONaCHOCnДЯЗaUNTBI NOlb3OBaTeJIr OT BO3dEInCTBnBnB6paCnN, KaK HApPImeP: npOBeDEHnE Texo6cnyKuBaHnN 3JeKeTPOHnHCTpyMeHTa n pa6OuNX INHCTpyMeHTOB, CO3DaHnE BO3MOxHocTn CoDePkaTb pyKn B TeNJIe,oprAHn3aCnna Pa6OuNX pnoceccOB

BHIMAHHE!
Pn npOBHe 3ByKOBOrO daBnEHHa Bblwe 85 dE(A) HaedeBaTb 3auNThble HayuHnKn.
TexHnueckne xapaKTepeNCTnKN
Ecn nocJe HaxaTna KhoNKn Hn OOnn H3 CBeToNDIOOB He rOpNT, aKKymyIaTOP HeNCnPapBeH I NOJIeKHT 3aMeHe.
BkIIOUeHne N BbIKIOUeHne

ДяВКЛЮЧЕнHAЖМITEKHONKY(10).
IckJIIOUeHHe OTBETCTBEHHOCTN
I3ROTOBNTeNb I erO npedCTaBnteNb He Hecyt OTBETCTBeHHOCn 3a yuep6 NnotepraHHyU npnbbl, BO3HKNKUnne B pe3yJbTaTe npepbIBaHnI pOMbiUJIeHHoN DeTaeNbHOCTN, OBCIOBHeHHOrO u3deJIeM uIN HeBO3MOX-HocTbIO NCNOBJ3OBaHnI u3deJIIn.
I3ROTOBNTeNb I erO npedCTaBnteNb He Hecyt OTBETCTBeHHOCn 3a yuep6, BO3HKnUIM B pe3yJbTAte NcNoJIb3OBaHnI u3deJIIn He NO Ha3NaueHIO uIN npi erO NCNoJIb3OBaHnIC u3deJIInM INpyrNX u3ROTOBNTeNeI.
Sisukord
Peter Lameli Technical Head
Klaus Peter Weinper
Head of Quality
Department (QD)
21.08.2023
Peter Lameli Technical Head
Klaus Peter Weinper
Head of Quality
Department (QD)
21.08.2023
Peter Lameli Technical Head
Klaus Peter Weinper
Head of Quality
Department (QD)
Jaeio J5, aozimll aily 11 g21
aaiiiaaaiaaybLaeggao 5cIg
y
a a a b b c d e f g h i j k l m n o p q r s t
g:LLaogjgj11oLxg2s; 100L11s>8j,
1.
aaii iiaai oie aai aiiaai aiiaai
aloeiull llll 8.111 g jiljg jai jill
aagolll aag:aa ggs 13281 JgJ
LbIaJI/ajg31 LJIbJIyjgai bJc! 2006/66/EC
a ≤ g = 1,3 ,b = 2,4
1
jocglsl 105 jolnill cllsol jc pkswlq
jannnnn
L
xocdoa aagjg 21 1001 1
ai = 12,bj = 14
4.5xg=8x1s1j81
gaiw21 p<21 gbb
1
i
yj 15i j
a11.2.2001
aaiw1pksxgbs
1 1
Jxu 1yiew21 pLxg b 0a5b
= = 35
S OBC = S COD + S BOC - S BOC
1
i
1111111111111111 111111111111111
aaiy 11 plwgl gilgal no gals
lg - 12 = - 12 - b
10421()
(12)wLl 15-10 yll Loc
yell laloc gii,asall agsi sic
a1 = 12,b2 = 3
1c0g>g110a21gSj1g jgjgj
a a a a a a a
1

aaii iiaii lcc aannn yie jg 1
j 100000000000000000000000000000000000000000000000000000000000000
A
1

a1 = 2,a2 = - 4
a2 + a3 + a_4 = 10
b1 = 2,b2 = - 4
1

aillilil cllkill gll psswi
pIbili giaawy1 pLsoy1 gog jgfoa bii: a
plnwn 82og aLell aolglc sjjla
00g 15i yiaow21 pL>81 gbo a
lognllslgglpliclglgjjjiea
1.

aaii i 1
( j a或 ) ( j a或 ) ( j)
:plainw21 Egi glc aioi liang
jiall jolal a xoo -aaiill slll
jiall jai aioo-aij8aiaillvailslgai
1

11111111111111111111111111111 1
s
1

o o aol plw yio aow w 8g jai aia pssiwl .Lw osclgo gjag Jodl ggsigjll Jls

000000000000
p0g p0w31 pLo?o2og p0e,clw oocyo 0
1gj 4jglc
1 1
Jusg C1sLm gai jinil
JcKxj 100
a = 22,b = 21 b^ = 20
000000000000000000000000000
ggee no LgLg Lgog gno JaoJI gbl 15
AJIJIJIJIJIJIJIJIJIJIJIJIJIJIJIJIJIJIJIJIJIJIJIJIJIJIJIJIJIJIJIJIJIJIJIJIJIJIJIJIJIJIJIJIJIJIJIJIJIJIJIJIJIJIJIJIJIJIJIJIJIJIJIJIJIJIJIJIJIJIJIJIJIJIJIJIJIJIJIJIJIJIJIJIJIJIJIJIJIJIJIJIJIJIJIJIJIJIJIJIJ
Jg
a1 = 2,a2 = - 4, b1 = 2,b2 = - 4
aaiiiaaiiei 1
yglg 5glll loljll jll g
gJl caiog l ciJI liLi gI ciJI ciJI gI aeg
1 1
JL881 gJgAsn JnJ 8081 pJ 1aal
jil 1 jil 100
JodlaolwJlc
L
zai
i
1
- Jc uji Jlaoi jia jia 1plasuiol jao28. JlaeJia
IV. aall gllll all lall llll
auiiui iie aianai
10 1
130
S1 = 12 · S2 = 12 × ( a1 + a2)
1

a,b,g aaswio g aio chwol c12 algo gao pga c15 1
paa Laa wo cLw8g jll no s, gai alljia
laill lc balaal glalag axinll Jiaui yilaljgl31
aiol g, aLoai pJl
I
12g jaiuill Jgaiy aagaii 0al lglj
aajjai jao aagaii aai (Jb/naS)jjll
jai xia jgi. gaii gaii gaii jgai jbi
aogjai ai jao
eJ1c
:

asall jai,8 sgl asall Jie wjjgcl hao
(1)
Joc a aIwll aessl jx
jg jai jh s Lui ciu aui ciu oui u
aolc ojbi
()11
J 12
osdulwulalldg 13
14
/ACLw yol 5,0/ACLw yol 2,5) gJU Lgj ALa 15
(aclw j08,0
16
(aJbJI)aJbJIgimno jso 17
1
1galljili 2
JUUL 3
1gj1 jla jia 4
jLjj10aL5
6
7
(g)aai1j
()
10
Lg
100 1
ALoS1Joo
aI aLad aolio 10wog 10
a:Jll Jw Jgao jg
Icblld.
Jaeiluoyo aaii ita 8281
1
(A) 85 cagall bdo ginnno oolj all
yiiu 21g 1jgl y
| VLP 18 | \( {}^{j} \) | |
| \( {}^{j} \) | \( {}^{j} \) | |
| \( {}^{j} \) | \( {}^{j} \) | |
| 18 | \( {}^{j} \) | \( {}^{j} \) |
| \( {}^{j} \) | \( {}^{j} \) | |
| \( {}^{j} \) | \( {}^{j} \) | |
| 147x190x305 | \( ^{j} \) | \( {}^{j} \) |
| \( {}^{j} \) | \( {}^{j} \) | |
| \( {}^{j} \) | \( {}^{j} \) | |
| 130 | \( {}^{j} \) | \( {}^{j} \) |
| \( {}^{j} \) | \( {}^{j} \) | |
| 0,85 | \( {}^{j} \) | \( {}^{j} \) |
| AP 18.0/2,5AP 18.0/5,0AP 18.0/8,0 | \( {}^{j} \) | |
| 1,38 | \( {}^{j} \) | \( {}^{j} \) |
| 0,420,721,10 | \( {}^{j} \) | \( {}^{j} \) |
| CA 12/18, CA 18.0-LD, CA 10.8/18.0 | \( {}^{j} \) | |
| 40 - 10- | \( {}^{j} \) | \( {}^{j} \) |
| 50 - 10- | \( {}^{j} \) | \( {}^{j} \) |
| 40~4 | \( {}^{j} \) | \( {}^{j} \) |
| \( {}^{j} \) | \( {}^{j} \) | |
| \( {}^{j} \) | \( {}^{j} \) | |
| 59 | \( {}^{j} \) | \( {}^{j} \) |
| 70 | \( {}^{j} \) | \( {}^{j} \) |
| 3,0 K | \( {}^{j} \) | \( {}^{j} \) |
| \( {}^{j} \) | \( {}^{j} \) | |
| <2,5 | \( {}^{j} \) | \( {}^{j} \) |
| 1,5 | \( {}^{j} \) | \( {}^{j} \) |
a 102020202020202020202020202020202020202020202020202020202020202020202020202020202020202020202020202020
.01281 pue Jds aolaiolg
1wzj 1
yall aolssiwl g cjjll gls yg b zc jy
aibaii ciaiiig cijll uuiu aybiil ciaill i
gbl aill jxgl gld! g (paaill algo + ai Sll ci
plxyl gob valaoial allg lqllj; sccg pLx
oalall aibiqnol J5n ao valsiill
P ≤ x ≤ y 且 y = 12 x = 1
1
aalssiwlgl ailgla 11 jllg pIe gab zj y
y jnllg nnnnnng ng wngg 31. Lgio wall
gai jia aalzll sLo81 gag, l! Log oala
ggb bll gali jsc aeg aalaaa aall lalbll
Jbc igao jI gog ags c aillig pl
oJolaln 2010wog Jolai
J 1
J 1
J 1
J 1
J 1
J 1
J 1
J 1
J 1
J 1
J 1
J 1
J 1
J 1
J 1
J 1
J 1
J 1
J 1
J 1
J 1
J 1
J 1
J 1
J 1
J 1
aigssllbgsi jai 1381 1381 1381 1381 1381 1381 1381 1381 1381 1381 1381 1381 1381 1381 1381 1381 1381 1381 1381 1381 138
x1 = -b - ^2 - 4ac2a,x2 = -b + ^2 - 4ac2a


- Symbols used in this manual
- WARNING!
- CAUTION!
- i NOTE
- Symbols on the device
- Important safety information
- Intended use
- Safety instructions
- Safety instructions for vacuum lifter
- A
- i
- NOTE
- Use and safety of foam seals
- CAUTION
- Safety instructions for handling batteries
- Additional safety notices
- Noise and vibration
- Overview
- Instructions for use
- Before initial operation
- Inserting/changing the battery
- Battery charge level
- Switching on and off
- Working with the vacuum lifter
- Attaching the device to the object
- Ending lifting
- Securing the carrying strap
- Operating instructions Lifting capacity
- Lifting techniques
- Lifting diagonally
- Maintenance and care
- Cleaning
- Repairs
- Exchanging wear parts
- Replacing foam seal
- Replacing air filter
- Spare parts and accessories
- Disposal information
- EU countries only
- Declaration of Conformity
- Exemption from liability
- Table des matieres
- Elevatorion diagonal
- NOTA
- ДоьнHTeHHуka3aHn83a 6e30NaCHOCT
- Шу м вибрацни
- YKA3AHVE
- NPEyIYPEXJEHNE!
- YKA3AHHE
- BHIMAHHE!
- C eDnH nOgIeA
- YnTbaHe 3a ekcnnoataua
- IPEyIPEXJEHME!
- Ppei nyskaHe B eKcnIooTaunia
- Noctabraye/cmraHa ha akymylaTophata 6aTepey
- BHIMAHVE!
- CbctoHne Ha 3apeXdaHe Ha akymylaTopa
- BkJIIOUyBaHe n N3KJIIOUyBaHe
- Pa6ota c BaKyumnna IOBnraq
- 3acMykBaHe Ha ypeDa KbM o6eKTa
- i YKA3AHVE
- Kpaɪ ha nɒBɪŋaHéTo
- 3aKpenBaHe Ha peMbka 3a HocHe
- Yka3aHnna 3a pa6ota
- KanauTeHa noBnraHe
- PemOHn
- CmHa Ha n3HOCBaUnte ce yactn CmHa Ha yIbTHHeHneTo OT IyHa
- CmHa Ha Bb3dUshnA qnTbp
- i YKA3AHHE
- Pe3epBn YacTn n npHaJekHOCTn
- Yka3aHnra 3a n3XbPJIrHe
- IPEyIPEXJEHNE!
- NPEyynPEXKeEHNE!
- Декларача 3a СьOTВЕТВЕ (€
- IcnoJb3yeMbIe cIMBOJIbI
- NPEyIYPEKDEHME!
- ПРИМЕЧАНЕ
- CnMBoJIHaIIOJbEMHnKe
- TexHnka 6e30napocTn
- IPEyIpyEKeHHeIe!
- IcnoJb3ObaHne no Ha3HaueHnIO
- IPEyIPEKDEHNE!
- Yka3aHnno TExHnke 6e3OnaCHOCTN
- Yka3aHnI NO TexHnke 6e3OnaCHOCTN DnBakyyMHO NODbEMHnKa
- NPEyINPEXKDEHME!
- IPVIMEYAHME
- IcnoJb3OBaHne n 6e3ONaChocTb neHONJIaCTOBbIX yNlOTHTeJIeN
- BHUMAHNE!
- BHVMAHHE!
- Yka3aHnI NO TEXHnKe
- 6e30nacnoCTn npn obaueHnnc aKKyMylrTopamN
- Дононтеловьie yka3aHnЯ NO TexHnke 6e3ONaChOCTn
- Uymbln Bn6paunr
- NPEyynPEXKeHNE!
- BkIIOUeHne N BbIKIOUeHne
- IckJIIOUeHHe OTBETCTBEHHOCTN
- Sisukord
Brand : Flex
Model : VLP 18.0
Category : Drill