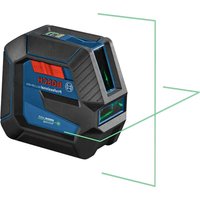
GLL 380 C Professional - Laser level BOSCH - Free user manual and instructions
Find the device manual for free GLL 380 C Professional BOSCH in PDF.
| Product Type | Laser Level |
| Brand | Bosch |
| Model | GLL 380 C Professional |
| Dimensions (L × W × H) | 162 × 84 × 148 mm |
| Weight (with battery) | 0.90 kg |
| Weight (with batteries) | 0.86 kg |
| Main power supply | 12 V lithium-ion battery (GBA 12V) or 4 LR6 (AA) batteries via adapter |
| Backup battery | CR2032 (3 V) for CAL guard memory |
| Standard range | 30 m |
| Range with receiver | 5 – 120 m |
| Leveling accuracy | ±0.2 mm/m |
| Self-leveling range | ±4° |
| Leveling time | < 4 s |
| Laser class / Type | 2 / < 10 mW, 630–650 nm (red) |
| Protection rating | IP54 (dust and water splashes) |
| Connectivity | Bluetooth® 4.0 Low Energy |
| Tripod mount | 1/4" and 5/8" |
| Operating temperature | -10 °C to +40 °C |
| Storage temperature | -20 °C to +70 °C |
| Main functions | Projection of horizontal and vertical lines, multiple operating modes, receiver mode, self-leveling, CAL guard, remote control via Bosch Levelling Remote app |
| Included accessories | Universal bracket, rotating plate, remote control, laser target, viewing glasses, protective pouch, tripod, telescopic rod, case, clamping |
| Maintenance and cleaning | Clean with a soft, damp cloth; do not immerse; store in the pouch or case |
| Repairability | Only entrust to a qualified repairer using original Bosch spare parts |
Frequently Asked Questions - GLL 380 C Professional BOSCH
User questions about GLL 380 C Professional BOSCH
0 question about this device. Answer the ones you know or ask your own.
Ask a new question about this device
Download the instructions for your Laser level in PDF format for free! Find your manual GLL 380 C Professional - BOSCH and take your electronic device back in hand. On this page are published all the documents necessary for the use of your device. GLL 380 C Professional by BOSCH.
USER MANUAL GLL 380 C Professional BOSCH
ka mfoag6g ng judgns
054673
ro Instruction: original
hgCmHnHaHn
mQDHAHHOYFCTTO30305TA
0
hr Originaline uprite za rad
et Aliguparane kasutusjuhend
IV instruktias originalvaloda.
Original instrukcja
ar LsR1L
fa 1

Deutsch .Seite 7
English Page 16
Francais.. Page 26
Espanol . Pagina 36
Portugues. Pagina 46
Italiano.. 56
Nederlands.. . 65
Dansk. Side 75
Svensk. Sidan 83
Norsk. Side 92
Suomi .Sivu 101
EAnyika. 2eAia110
Türkce Sayfa 119
Polski Strona 129
Cestina. Stranka 139
Slovencina Stranka 148
Magyar .Oldal 157
Pycckn. .. CtpaHua 167
YkpaHcbKa ..CtoPiHa 178
Kaak. 5et 188
Joooyoo 83.198
Romana . Pagena 210
Блгарск... ... .. .. .. .. .. .. .. .. .. .. .. .. .. .. .. .. .. .. .. .. .. .. .. .. .. .. .. .. .. .. .. .. .. .. ... ... ... ... ... ... ... ... ... ... ... ... ... ... ... ... ... ... ... ... ... ... ... ... ... ... ... ... ... ... ... ... ... ... ... ... ... ... ... ... ... ... ... ... ... ... ... ... ... ... ... ... ... ... ... ... ... ... ... ... ... ... ... ... ... ... ... ... ... ... ... ... ... ... ... ... ... ... ... ... ... ... ... . .... .... .... .... .... .... .... .... .... .... .... .... .... .... .... .... .... .... .... .... .... .... .... .... .... .... .... .... .... .... .... .... .... .... .... .... .... .... .... .... .... .... .... .... .... ......
MaKeDoHcN. CtpaHua 229
Srpski Strana 239
Slovenscina Stran 248
Hrvatski .Stranica 257
Eesti. Lehekulg 266
Laser Radiation. Do not
stare into beam.Class 2
Consumer Laser Product
EN50689:2021
IEC60825-1:2014.
<10mW,630-650nm
(17) (18) (19) (20)
GLL 3-80 CG
(17)

Laser Radiation. Do not
stare into beam.Class 2
Consumer Laser Product
EN50689:2021
IEC60825-1:2014
<10mW.500·540nm
GLL 3-80 C
Bosch Power Tools 1609 92A 8AR| (18.10.2022)
(25)
BM1
0601015A01

(24)
RM3
0601092800
(29)
LR6
0601069H00
(GLL 3-80 C)

(24)
(29)
LR7
0601069J00
(GLL 3-80 C)
GLL 3-80 CG)
ST150
0601096B00
(34)
L-BOXX 136
1600A012G0

(34)
1608M00C1Y
(27)
RC2
0601069C00
1608M0005B
(GLL 3-80 C)
1608M0005J
(GLL 3-80 CG)
AA1
1608M00C1B
(35)
1608M00C20

(24)
(28)

(31)
Deutsch
Sicherheitshinweise

www.bosch-pt.com/serviceaddresses
Transport
All instructions must be read and observed in order for the measuring tool to function safely. The safeguards integrated into the measuring tool may be compromised if the
measuring tool is not used in accordance with these instructions. Never make warning signs on the measuring tool unrecognisable. SAVE THESE INSTRUCTIONS FOR FUTURE REFERENCE AND INCLUDE THEM WITH THE MEASURING TOOL WHEN TRANSFERRING IT TO A THIRD PARTY.
Warning! If operating or adjustment devices other than those specified here are used or other proced
ures are carried out, this can lead to dangerous exposure to radiation.
The measuring tool is delivered with a laser warning sign (marked in the illustration of the measuring tool on the graphics page).
If the text of the laser warning label is not in your national language, stick the provided warning label in your national language over it before operating for the first time.

Do not direct the laser beam at persons or animals and do not stare into the direct or reflected laser beam yourself. You could blind somebody, cause accidents or damage your eyes.
If laser radiation hits your eye, you must close your eyes and immediately turn your head away from the beam.
Do not make any modifications to the laser equipment.
Do not use the laser goggles (accessory) as protective goggles. The laser goggles make the laser beam easier to see; they do not protect you against laser radiation.
Do not use the laser goggles (accessory) as sunglasses or while driving. The laser goggles do not provide full UV protection and impair your ability to see colours.
Have the measuring tool serviced only by a qualified specialist using only original replacement parts. This will ensure that the safety of the measuring tool is maintained.
Do not let children use the laser measuring tool unsupervised. They could unintentionally blind themselves or other persons.
Do not use the measuring tool in explosive atmospheres which contain flammable liquids, gases or dust. Sparks may be produced inside the measuring tool, which can ignite dust or fumes.
Do not open the battery. There is a risk of short-circuiting.
In case of damage and improper use of the battery, vapours may be emitted. The battery can set alight or explode. Ensure the area is well ventilated and seek medical attention should you experience any adverse effects. The vapours may irritate the respiratory system.
If used incorrectly or if the battery is damaged, flammable liquid may be ejected from the battery. Contact with this liquid should be avoided. If contact accidentally occurs, rinse off with water. If the liquid comes into contact with your eyes, seek additional medical attention. Liquid ejected from the battery may cause irritation or burns.
The battery can be damaged by pointed objects such as nails or screwdrivers or by force applied externally. An internal short circuit may occur, causing the battery to burn, smoke, explode or overheat.
When the battery is not in use, keep it away from paper clips, coins, keys, nails, screws or other small metal objects that could make a connection from one terminal to another. A short circuit between the battery terminals may cause burns or a fire.
Only use the battery with products from the manufacturer. This is the only way in which you can protect the battery against dangerous overload.
Only charge the batteries using chargers recommended by the manufacturer. A charger that is suitable for one type of battery may pose a fire risk when used with a different battery.

Protect the battery against heat, e.g. against continuous intense sunlight, fire, dirt, water and moisture. There is a risk of explosion and short-circuiting.


WARNING


Ensure that the coin cell is kept out of the reach of children. Coin cells are dangerous.
- Coin cells must never be swallowed or inserted into any other part of the body. If you suspect that someone has swallowed a coin cell or that a coin cell has entered the body in another way, seek medical attention immediately. Swallowing coin cells can result in severe internal burns and death within 2 hours.
Ensure that coin cell replacement is carried out properly. There is a risk of explosion.
Only use the coin cells listed in this operating manual. Do not use any other coin cells or other forms of electrical power supply.
Do not attempt to recharge the coin cell and do not short circuit the coin cell. The coin cell may leak, explode, catch fire and cause personal injury.
Remove and dispose of drained coin cell correctly. Drained coin cell may leak and damage the product or cause personal injury.
Do not overheat the coin cell or throw it into fire. The coin cell may leak, explode, catch fire and cause personal injury.
Do not damage the coin cell and take the coin cell apart. The coin cell may leak, explode, catch fire and cause personal injury.
Do not allow damaged coin cells to come into contact with water. Leaking lithium may mix with water to create hydrogen, which could cause a fire, an explosion, or personal injury.
Do not use the measuring tool if the coin cell holder (22) does not close. Remove the coin cell and have it repaired.
Remove the rechargeable battery/non-rechargeable batteries from the measuring tool before carrying out
18|English
work on the measuring tool (e.g. assembly, maintenance, etc.). The battery/batteries should also be removed for transport and storage. There is risk of injury from unintentionally pressing the on/off switch.
When operating the measuring tool, loud signal tones may sound under certain circumstances. For this reason, keep the measuring tool away from your ears and from other persons. The loud sound can damage hearing.
Keep the measuring tool and the magnetic accessories away from implants and other medical devices, e.g. pacemakers or insulin pumps. The magnets inside the measuring tool and accessories generate a field that can impair the function of implants and medical devices.
- Keep the measuring tool and the magnetic accessories away from magnetic data storage media and magnetically sensitive devices. The effect of the magnets inside the measuring tool and accessories can lead to irreversible data loss.
The measuring tool is equipped with a wireless interface. Local operating restrictions, e.g. in aeroplanes or hospitals, must be observed.
The Bluetooth® word mark and logos are registered trademarks owned by Bluetooth SIG, Inc. and any use of such marks by Robert Bosch Power Tools GmbH is under license.
Caution! When using the measuring tool with Bluetooth, a fault may occur in other devices and systems, aeroplanes and medical devices (e.g. pacemakers, hearing aids). Also, damage to people and animals in the immediate vicinity cannot be completely excluded. Do not use the measuring tool with Bluetooth in the vicinity of medical devices, petrol stations, chemical plants, areas with a potentially explosive atmosphere and in blasting areas. Do not use the measuring tool with Bluetooth on aeroplanes. Avoid using the product near your body for extended periods.
Product Description and Specifications
Please observe the illustrations at the beginning of this operating manual.
Intended Use
The measuring tool is intended for determining and checking horizontal and vertical lines.
The measuring tool is suitable for indoor and outdoor use.
This product is a consumer laser product in accordance with EN 50689.
Product Features
The numbering of the product features shown refers to the illustration of the measuring tool on the graphic page.
(1) Laser beam outlet aperture
(2) State of charge of rechargeable batteries/non-rechargeable batteries
(3) Display CAL guard
(4) Pendulum lock indicator
(5) Receiver mode button
(6) Receiver mode indicator
(7) Button for laser operating mode
(8)Bluetooth ^ 念 connection indicator
(9) Bluetooth® button
(10) Battery bay
(11) Battery adapter covera
(12) Batteriesa)
(13) Rechargeable battery/battery adapter release button
(14) Battery adapter cap
(15) Rechargeable batterya
(16) On/off switch
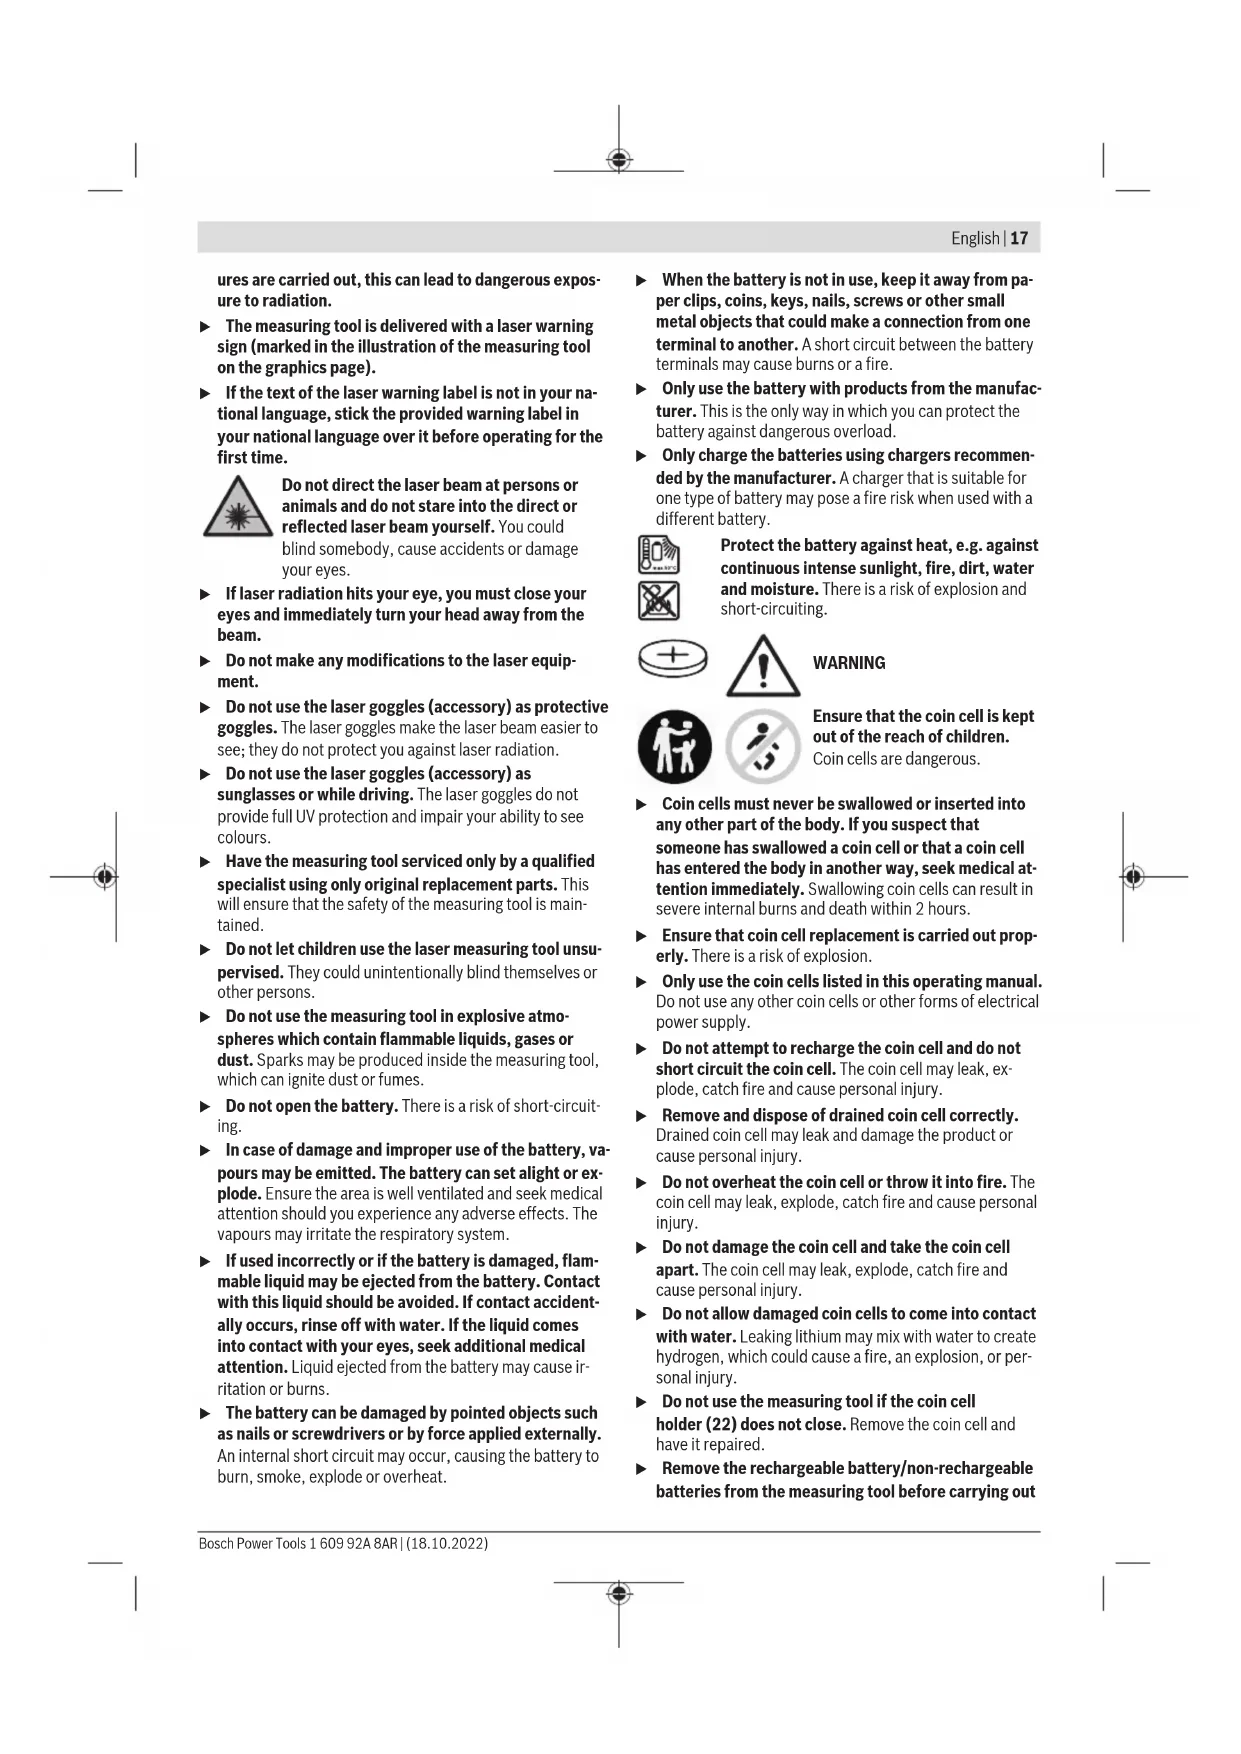
(17) Laser warning label
(18) Serial number
(19) 5 / 8^n tripodmount
(20) 1 / 4'' tripod mount
(21) Coin cell
(22) Coin cell holder
(23) Coin cell port
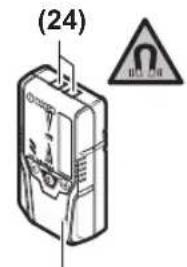
(24) Magneta
(25) Universal holder
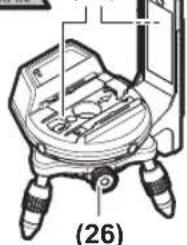
(26) Rotating platform
(27) Remote control
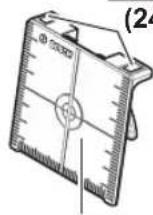
(28) Laser target plate
(29) Laser receivera)
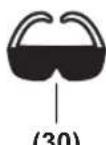
(30) Laser viewing glassesa)
(31) Protective bag
(32) Tripoda
(33) Telescopic rod
(34) Case
(35) Inlay
a) Accessories shown or described are not included with the product as standard. You can find the complete selection of accessories in our accessories range.
Technical Data
| Line laser GILL 3-80 C GILL 3-80 CG | ||
| Article number | 3601 K63 R.. | 3601 K63 T.. |
| Working rangea) | ||
| - Standard 30 m 30 m | ||
| - in receiver mode 25 m 25 m | ||
| - With laser receiver 5-120 m 5-120 m | ||
| Levelling accuracyb(CD) | ±0.2 mm/m ±0.2 mm/m | |
| Self-levelling range ±4° ±4° | ||
| Levelling time < 4 s < 4 s | ||
| Max. altitude 2000 m 2000 m | ||
| Relative air humidity max. | 90 % | 90 % |
| Pollution degree according to IEC 61010-1 | 2E) | 2F) |
| Laser class | 2 | 2 |
| Laser type | < 10 mW, 630-650 nm | < 10 mW, 500-540 nm |
| C6 | 10 | 10 |
| Divergence of laser line | 50 × 10 mrad (full angle) | 50 × 10 mrad (full angle) |
| Shortest pulse duration | 1/10000 s | 1/10000 s |
| Pulse frequency | ||
| - Operating without receiver mode | 23 kHz | 23 kHz |
| - Operating with receiver mode | 10 kHz | 10 kHz |
| Compatible laser receivers | LR 6, LR 7 | LR 7 |
| Tripod mount | 1/4", 5/8" | 1/4", 5/8" |
| Measuring tool power supply | ||
| - Rechargeable battery (Li-ion) | 12 V | 12 V |
| - Non-rechargeable batteries (al-kaline manganese) | 4 × 1.5 V LR6 (AA) (with battery adapter) | 4 × 1.5 V LR6 (AA) (with battery adapter) |
| - Buffer battery (coin cell) | CR2032 (3 V lithium battery) | CR2032 (3 V lithium battery) |
| Operating time with three laser planesf) | ||
| - With rechargeable battery | 8 h | 6 h |
| - With non-rechargeable batteries | 6 h | 4 h |
| Bluetooth® measuring tool | ||
| - Compatibility | Bluetooth® 4.0 (Low Energy)G) | Bluetooth® 4.0 (Low Energy)G) |
| - Max. signal range | 30 mH) | 30 mH) |
| - Operating frequency range | 2402-2480 MHz | 2402-2480 MHz |
| - Max. transmission power | < 1 mW | < 1 mW |
| Bluetooth® smartphone | ||
| - Compatibility | Bluetooth® 4.0 (Low Energy)G) | Bluetooth® 4.0 (Low Energy)G) |
| - Operating system | Android 6 (and above) | Android 6 (and above) |
| iOS 11 (and above) | iOS 11 (and above) | |
| Weight according to EPTA-Procedure 01:2014 | ||
| - With rechargeable battery | 0.90 kg | 0.90 kg |
| - With non-rechargeable batteries | 0.86 kg | 0.86 kg |
| Dimensions (length × width × height) | 162 × 84 × 148 mm | 162 × 84 × 148 mm |
| Protection ratingI) | IP54 (dust and splash-proof) | IP54 (dust and splash-proof) |
20|English
| Line laser GLL 3-80 C GLL 3-80 CG | ||
| Recommended ambient temperature during charging | 0°C to +35°C | 0°C to +35°C |
| Permitted ambient temperature during operation | -10°C to +40°C | -10°C to +40°C |
| Permitted ambient temperature during storage | -20°C to +70°C | -20°C to +70°C |
| Recommended rechargeable batteries GBA 12V... | (except for GBA 12V ≥ 4.0 Ah) | GBA 12V... |
| (except for GBA 12V ≥ 4.0 Ah) | ||
| Recommended chargers GAL 12... | GAX 18... | GAL 12... |
| GAX 18... | ||
A) The working range may be reduced by unfavourable environmental conditions (e.g. direct sunlight).
B) At 20-25°C
C) Applies to the four horizontal intersection points
D) The values stated presuppose normal to favourable environmental conditions (e.g. no vibration, no fog, no smoke, no direct sunlight). Extreme fluctuations in temperature can cause deviations in accuracy.
E) Only non-conductive deposits occur, whereby occasional temporary conductivity caused by condensation is expected.
F) Shorter operating times in Bluetooth® operation and/or in conjunction with RM 3
G) When using Bluetooth® Low Energy devices, it may not be possible to establish a connection depending on the model and operating system. Bluetooth® devices must support the SPP profile.
H) The signal range may vary greatly depending on external conditions, including the receiving device used. The Bluetooth® range may be significantly weaker inside closed rooms and through metallic barriers (e.g. walls, shelving units, cases, etc.).
1) The lithium-ion battery and the AA1 battery adapter are excluded from IP54. The serial number (18) on the type plate is used to clearly identify your measuring tool.
Assembly
Measuring Tool Power Supply
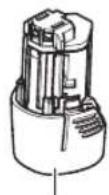
The measuring tool can be operated either with conventional non-rechargeable batteries or with a Bosch lithium-ion battery.
Operation with Rechargeable Battery
Use only the chargers listed in the technical data. Only these chargers are matched to the lithium-ion battery of your measuring tool.
Note: Lithium-ion rechargeable batteries are supplied partially charged according to international transport regulations. To ensure full rechargeable battery capacity, fully charge the rechargeable battery before using your tool for the first time.
To insert the charged battery (15), slide it into the battery bay (10) until you feel it engage.
To remove the battery (15), press the release buttons (13) and pull it out of the battery bay (10). Do not use force to do this.
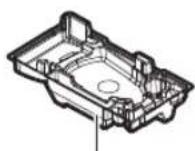
Operation with Non-Rechargeable Batteries
It is recommended that you use alkaline manganese batteries to operate the measuring tool.
The batteries are inserted into the battery adapter.
The battery adapter is intended only for use in designated Bosch measuring tools and must not be used with power tools.
To insert the batteries, slide the cover (11) of the battery adapter into the battery bay (10). Place the batteries into
the cover as per the illustration on the sealing cap (14).
Slide the sealing cap over the cover until you feel it click into place.

To remove the batteries (12), press the release buttons (13) of the sealing cap (14) and pull off the sealing cap. Make sure that the batteries do not fall out. To do this, hold the measuring tool with the battery bay (10) facing upward. Remove the batteries. To remove the cover (11) from inside the battery bay, reach into the cover and pull it out of the measuring
tool, applying light pressure to the side wall as you do so.
Always replace all the batteries at the same time. Only use batteries from the same manufacturer and which have the same capacity.
Take the batteries out of the measuring tool when you are not using it for a prolonged period of time. The batteries can corrode and self-discharge during prolonged storage in the measuring tool.
Battery Charge Indicator
The battery charge indicator (2) shows the state of charge of the battery/batteries:
| LED State of charge | |
| Green continuous light 100-75 % | |
| Yellow continuous light 75-35 % | |
| Red continuous light 35-10 % | |
| No light - Rechargeable battery de- fective -Batteries drained |
If the rechargeable battery or non-rechargeable batteries are running low, the laser lines will gradually become dimmer. Immediately replace a faulty rechargeable battery or any empty batteries.
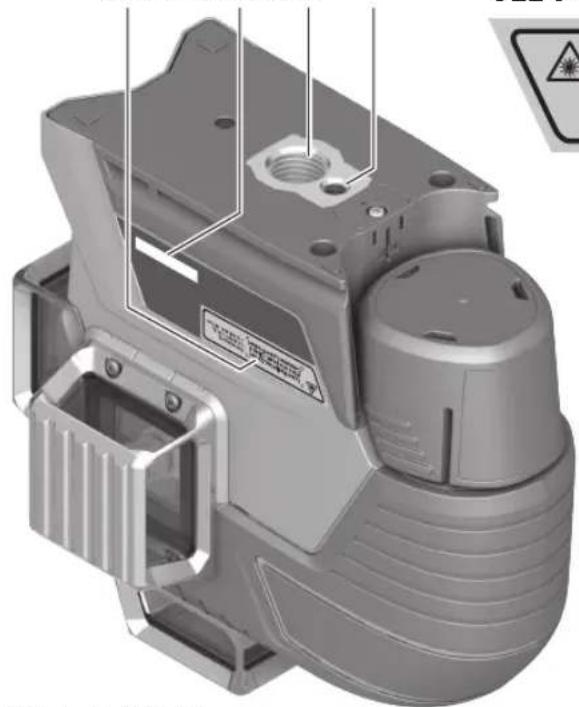
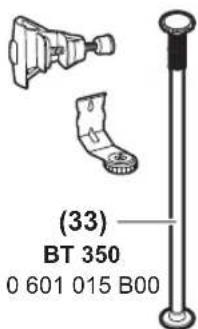
Changing the Coin Cell (see figure A)
The measuring tool is fitted with a coin cell (21) so that date and time can be saved for the CAL guard function without having a battery pack or batteries inserted.
In order to change the coin cell, remove the battery pack or the entire battery adapter.
Pull the coin cell holder (22) out of the coin cell port (23).
Remove the empty coin cell (21) and insert a new coin cell. Ensure that the polarity is correct according to the illustration on the coin cell holder (the positive terminal of the coin cell must be facing upwards).
With the coin cell fitted, slide the coin cell holder (22) into the port (23). Ensure that the coin cell holder is inserted correctly and fully, as otherwise protection from dust and splashes is no longer guaranteed.
When using for the first time, remove the protective film from the coin cell (21). To do this, follow the same steps as when changing the coin cell.
Operation
Starting Operation
Protect the measuring tool from moisture and direct sunlight.
Do not expose the measuring tool to any extreme temperatures or fluctuations in temperature. For example, do not leave it in a car for extended periods of time. If it has been subjected to significant fluctuations in temperature, first allow the measuring tool to adjust to the ambient temperature and then always carry out an accuracy check before continuing work (see "Accuracy Check of the Measuring Tool", page 23).
The precision of the measuring tool may be compromised if exposed to extreme temperatures or fluctuations in temperature.
Avoid substantial knocks to the measuring tool and avoid dropping it. Always carry out an accuracy check before continuing work if the measuring tool has been subjected to severe external influences (see "Accuracy Check of the Measuring Tool", page 23).
Switch the measuring tool off when transporting it.
The pendulum unit is locked when the tool is switched off, as it can otherwise be damaged by big movements.
Switching On/Off
To switch on the measuring tool, slide the on/off switch (16) to the "On" position (for working with the pendulum lock) or to the "On" position (for working with automatic levelling). As soon as it is switched on, the measuring tool emits laser lines from the outlet apertures (1).
Do not direct the laser beam at persons or animals and do not stare into the laser beam yourself (even from a distance).
To switch off the measuring tool, slide the on/off switch (16) to the Off position. The pendulum unit is locked when the tool is switched off.
- Never leave the measuring tool unattended when switched on, and ensure the measuring tool is switched off after use. Others may be blinded by the laser beam.
If the maximum permitted operating temperature of 40^ is exceeded, the tool shuts down to protect the laser diode. Once it has cooled down, the measuring tool is operational again and can be switched back on.
If the temperature of the measuring tool is approaching the maximum permissible operating temperature, the laser lines will gradually become dimmer.
The measuring tool is protected against electrostatic discharge (ESD). If the measuring tool becomes electrostatically charged (e.g. when it is touched in an environment with low humidity), it switches itself off automatically. In such cases, switch the on/off switch (16) off and on again.
Deactivating the Automatic Shut-Off Function
If no button on the measuring tool is pressed for approx.
120 min, the measuring tool will automatically switch itself off to preserve battery life.
To switch the measuring tool back on after it has been automatically switched off, you can either slide the on/off switch (16) to the "Off" position first and then switch the measuring tool back on, or press either the laser mode button (7) or the receiver mode button (5) once.
To deactivate the automatic shut-off function, hold down the laser mode button (7) for at least 3 s (with the measuring tool switched on). If the automatic shut-off function is deactivated, the laser beams will flash briefly as confirmation.
To activate the automatic shut-off function, switch the measuring tool off and on again.
Deactivating the Signal Tone Function
The signal tone function is always activated once the measuring tool is switched on.
To deactivate or activate the signal tone function, simultaneously press the laser mode button (7) and the receiver mode button (5) and hold them down for at least 3 s.
Three short signal tones will sound as confirmation both when the signal tone function is activated and deactivated.
Operating Modes
The measuring tool has several operating modes which you can switch between at any time. These are for:
- Generating a horizontal laser plane,
- Generating a vertical laser plane,
- Generating two vertical laser planes,
- Generating a horizontal laser plane and two vertical laser planes.
22 | English
After you switch it on, the measuring tool generates a horizontal laser plane. To change the operating mode, press the laser mode button (7).
All operating modes can be selected with both automatic levelling or the pendulum lock.
Receiver Mode
Receiver mode must be activated when working with the laser receiver (29), regardless of which operating mode is selected.
In receiver mode, the laser lines flash at a very high frequency, enabling them to be detected by the laser receiver (29).
To switch on receiver mode, press the receiver mode button (5). The receiver mode indicator (6) will light up green.
When receiver mode is switched on, the laser lines are less visible to the human eye. Therefore, switch receiver mode off by pressing the receiver mode button (5) again to work without a laser receiver. The receiver mode indicator (6) will go out.
Automatic Levelling
Working with Automatic Levelling
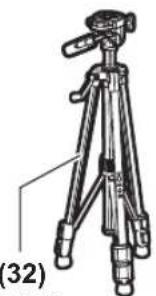
Position the measuring tool on a level, firm surface or attach it to the universal holder (25) or the tripod (32).
For work with automatic levelling, slide the on/off switch (16) to the "On" position.
The automatic levelling function automatically compensates irregularities within the self-levelling range of ± 4^ . The leveling is finished as soon as the laser lines stop moving.
If automatic levelling is not possible, e.g. because the surface on which the measuring tool stands deviates by more than 4^ from the horizontal plane, the laser lines will begin to flash quickly. If the signal tone function is activated, rapid signal tones will sound.
Place the measuring tool in a horizontal position and wait for self-levelling to take place. As soon as the measuring tool is within the self-levelling range of ± 4^ , the laser beams will light up continuously and the signal tones will cease.
In case of ground vibrations or position changes during operation, the measuring tool is automatically levelled again.
Upon re-levelling, check the position of the horizontal or vertical laser line with regard to the reference points to avoid errors by moving the measuring tool.
Working with the Pendulum Lock
For work with the pendulum lock, slide the on/off switch (16) to the "On" position. The pendulum lock indicator (4) lights up red and the laser lines continuously flash slowly.
For work with the pendulum lock, the automatic levelling is switched off. You can hold the measuring tool freely in your hand or place it on a sloping surface. This means that the laser lines are no longer levelled and no longer necessarily run perpendicular to one another.
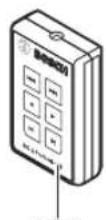
Remote control via the Bosch Levelling Remote App
The measuring tool is equipped with a Bluetooth® module which uses radio technology to enable remote control via a smartphone with a Bluetooth® interface.
The Bosch Levelling Remote App application (app) is required to use this function. You can download this in the app store for your terminal device (Apple App Store, Google Play Store).
Information about the system requirements for a Bluetooth connection can be found on the Bosch website at www.bosch-pt.com
When remote controlling via Bluetooth, poor reception conditions can cause time delays between the mobile terminal device and the measuring tool.
Switching on Bluetooth®
To switch on Bluetooth®, press the Bluetooth® button (9). Ensure that the Bluetooth® interface is activated on your mobile terminal device.
The connection between mobile end device and measuring tool is established after the Bosch application has started. If multiple active measuring tools are found, select the appropriate measuring tool. A connection will be established automatically if only one active measuring tool is found.
The connection is established as soon as the Bluetooth indicator (8) lights up.
The Bluetooth® connection may be interrupted if the distance between the measuring tool and the mobile terminal device is too great or is blocked, and if there are any sources of electromagnetic interference. Should this occur, the Bluetooth® indicator (8) will flash.
Switching off Bluetooth®
To switch off Bluetooth® for remote control, press the Bluetooth® button (9) or switch off the measuring tool.
Calibration warning CAL guard
The sensors for calibration warning CAL guard monitor the status of the measuring tool, even when it is switched off. If the measuring tool is not being supplied with power by a rechargeable battery or non-rechargeable batteries, an internal energy storage system provides continuous monitoring by the sensors for 72 hours.
The sensors are activated when the measuring tool is started up for the first time.
Calibration Warning Triggers
If one of the following events occurs, the calibration warning CAL guard is triggered and the indicator CAL guard (3) lights up red:
- The calibration interval (every 12 months) has expired.
- The measuring tool was stored outside of the storage temperature range.
The measuring tool was subjected to a strong shock (e.g. impact with the ground after being dropped).
You can refer to the Bosch Levelling Remote App to see which of the three events triggered the calibration warning.
Without the app, the cause cannot be identified, as the indicator CAL guard (3) lighting up indicates merely that the levelling accuracy needs to be checked.
Once the warning has been triggered, the indicator CAL guard (3) lights up until the levelling accuracy has been checked and the indicator switched off.
Procedure in the Event of a Calibration Warning Being Triggered
Check the levelling accuracy of the measuring tool (see "Accuracy Check of the Measuring Tool", page 23).
If the maximum deviation has not been exceeded in any of the tests, switch the indicator CAL guard (3) off. To do so, press and hold the receiver mode button (5) and the Bluetooth® button (9) at the same time for at least 3 s. The indicator CAL guard (3) will go out.
Should the measuring tool exceed the maximum deviation during one of the tests, please have it repaired by a Bosch after-sales service.
Accuracy Check of the Measuring Tool
Influences on Accuracy
The largest influence is exerted by the ambient temperature. In particular, temperature differences that occur from the ground upwards can refract the laser beam.
In order to minimise thermal influences resulting from heat rising from the floor, it is recommended that you use the measuring tool on a tripod. In addition, position the measuring tool in the centre of the work surface, wherever this is possible.
In addition to external influences, device-specific influences (e.g. falls or heavy impacts) can also lead to deviations. For this reason, check the levelling accuracy each time before beginning work.
First check the levelling accuracy of the horizontal laser line, then the levelling accuracy of the vertical laser lines.
Should the measuring tool exceed the maximum deviation during one of the tests, please have it repaired by a Bosch after-sales service.
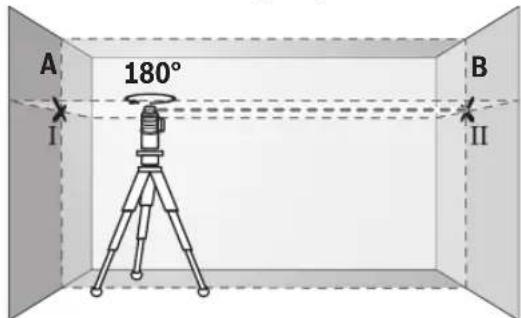
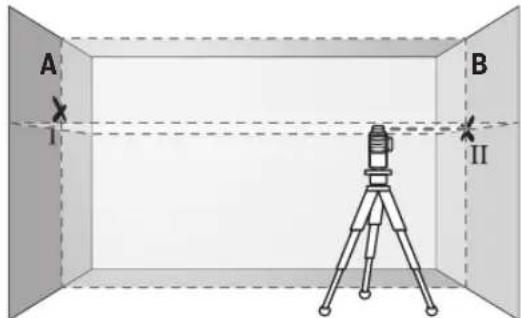
Checking the Horizontal Levelling Accuracy of the Transverse Axis
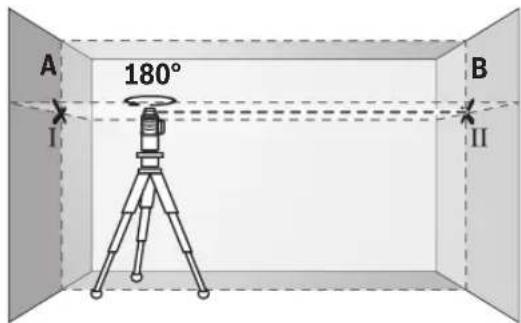
For this check, you will need a free measuring distance of 5 m on firm ground between two walls (designated A and B).
- Mount the measuring tool close to wall A on a tripod, or place it on a firm, flat surface. Switch on the measuring tool in the mode with automatic levelling. Select the operating mode for generating a horizontal laser plane and a vertical laser plane directly in front of the measuring tool.
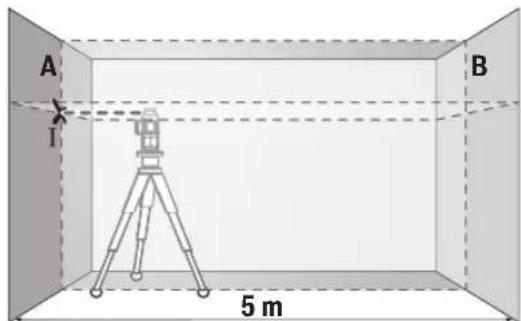
- Aim the laser at the closer wall A and allow the measuring tool to level in. Mark the middle of the point at which the laser lines cross on the wall (point I).
-
Turn the measuring tool 180^ , allow it to level in and mark the point where the laser lines cross on the opposite wall B (point II).
-
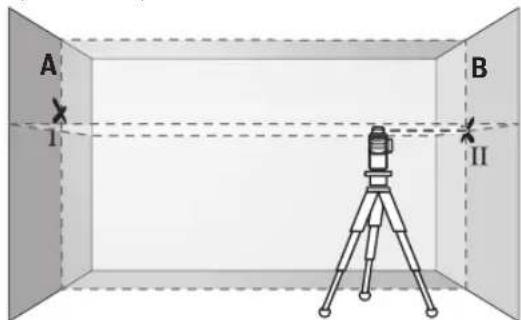
Position the measuring tool - without rotating it - close to wall B, switch it on and allow it to level in.
Align the height of the measuring tool (using the tripod or by placing objects underneath as required) so that the point where the laser lines cross exactly hits the previously marked point II on wall B.
24|English
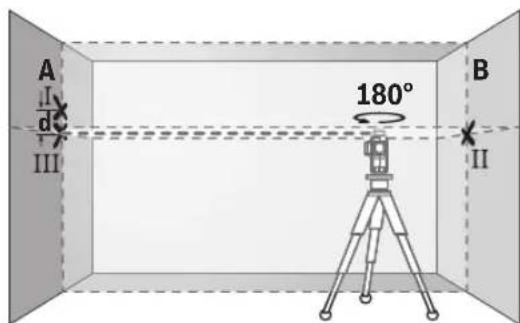
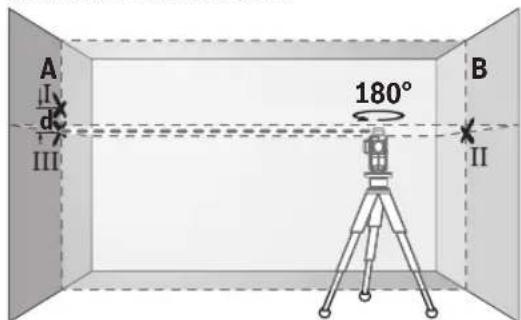
Turn the measuring tool 180^ without adjusting the height. Aim it at wall A such that the vertical laser line runs through the already marked point I. Allow the measuring tool to level in and mark the point where the laser lines cross on wall A (point III).
- The discrepancy d between the two marked points I and III on wall A reveals the actual height deviation of the measuring tool.
The maximum permitted deviation on the measuring distance of 2 × 5m = 10m is as follows:
10 m × ±0.2 mm/m = ±2 mm. The discrepancy d between points I and II must therefore amount to no more than 2 mm.
Checking the Levelling Accuracy of the Vertical Lines
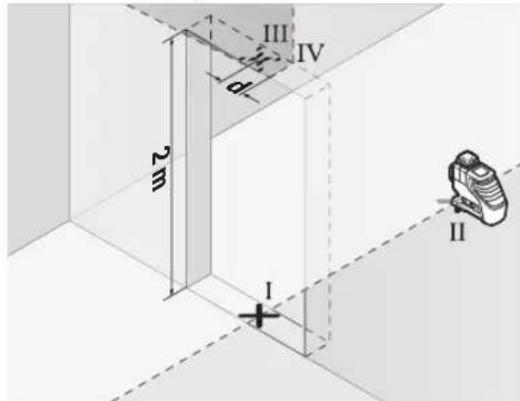
For this check, you will need a door opening (on solid ground) which has at least 2.5m of space either side of the door.
- Place the measuring tool 2.5m away from the door opening on a firm, flat surface (not on a tripod). Switch on the measuring tool in the mode with automatic levelling. Select the operating mode for generating a vertical laser plane directly in front of the measuring tool.
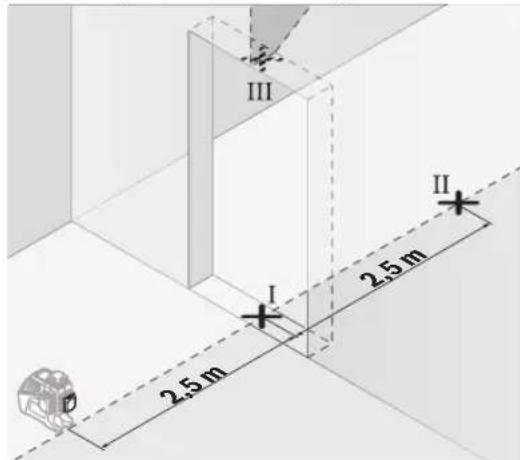
- Mark the centre of the vertical laser line on the floor of the door opening (point I), 5 m away on the other side of the door opening (point II) and on the upper edge of the door opening (point III).
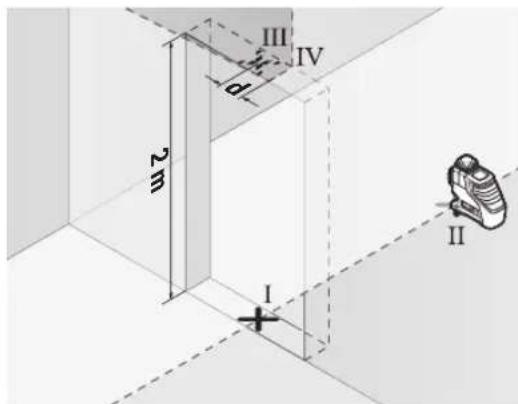
- Rotate the measuring tool 180^ and position it on the other side of the door opening, directly behind point II. Allow the measuring tool to level in and align the vertical laser line in such a way that its centre passes through points I and II exactly.
- Mark the centre of the laser line on the upper edge of the door opening as point IV.
- The discrepancy d between the two marked points III and IV reveals the actual vertical deviation of the measuring tool.
- Measure the height of the door opening.
Repeat the measuring process for the two vertical laser planes. To do this, select the operating mode for generating a vertical laser plane to one side of the measuring tool and rotate the measuring tool by 90^ before beginning the measuring process.
You can calculate the maximum permitted deviation as follows:
Doubled height of the door opening × 0.2mm / m
Example: At a door opening height of 2 m, the maximum deviation amounts to
2 × 2m × ± 0.2mm/m = ± 0.8mm . The points III and IV must therefore be no further than 0.8mm from each other.
Working Advice
Only the centre of the laser line must be used for marking. The width of the laser line changes depending on the distance.
Working with the Laser Target Plate
The laser target plate (28) improves visibility of the laser beam in unfavourable conditions and at greater distances.
The reflective surface of the laser target plate (28) improves visibility of the laser line. The transparent surface enables the laser line to be seen from behind the laser target plate.
Working with the Tripod (Accessory)
A tripod offers a stable, height-adjustable support surface for measuring. Place the measuring tool with the 1/4'' tripod mount (20) on the thread of the tripod (32) or a conventional camera tripod. Use the 5/8'' tripod mount (19) to secure the measuring tool on a conventional building tripod. Tighten the measuring tool using the locking screw of the tripod.
Roughly align the tripod before switching on the measuring tool.
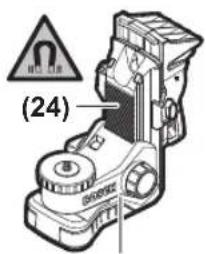
Securing with the universal holder (accessory) (see figure C)
You can secure the measuring tool, for example, on vertical surfaces or magnetisable materials using the universal holder (25). The universal holder is also suitable for use as a floor stand and facilitates the height adjustment of the measuring tool.
- Keep your fingers away from the rear side of the magnetic accessory while attaching the accessory to surfaces. The strong pulling force of the magnets may jam your fingers.
Roughly align the universal holder (25) before switching on the measuring tool.
Working with the laser receiver (accessory) (see figure C)
Use the laser receiver (29) to improve detection of the laser lines in adverse lighting conditions (bright environment, direct sunlight) and over greater distances. When working with the laser receiver, switch on receiver mode (see "Receiver Mode", page 22).
Laser Goggles (Accessory)
The laser goggles filter out ambient light. This makes the light of the laser appear brighter to the eye.
Do not use the laser goggles (accessory) as protective goggles. The laser goggles make the laser beam easier to see; they do not protect you against laser radiation.
Do not use the laser goggles (accessory) as sunglasses or while driving. The laser goggles do not provide full UV protection and impair your ability to see colours.
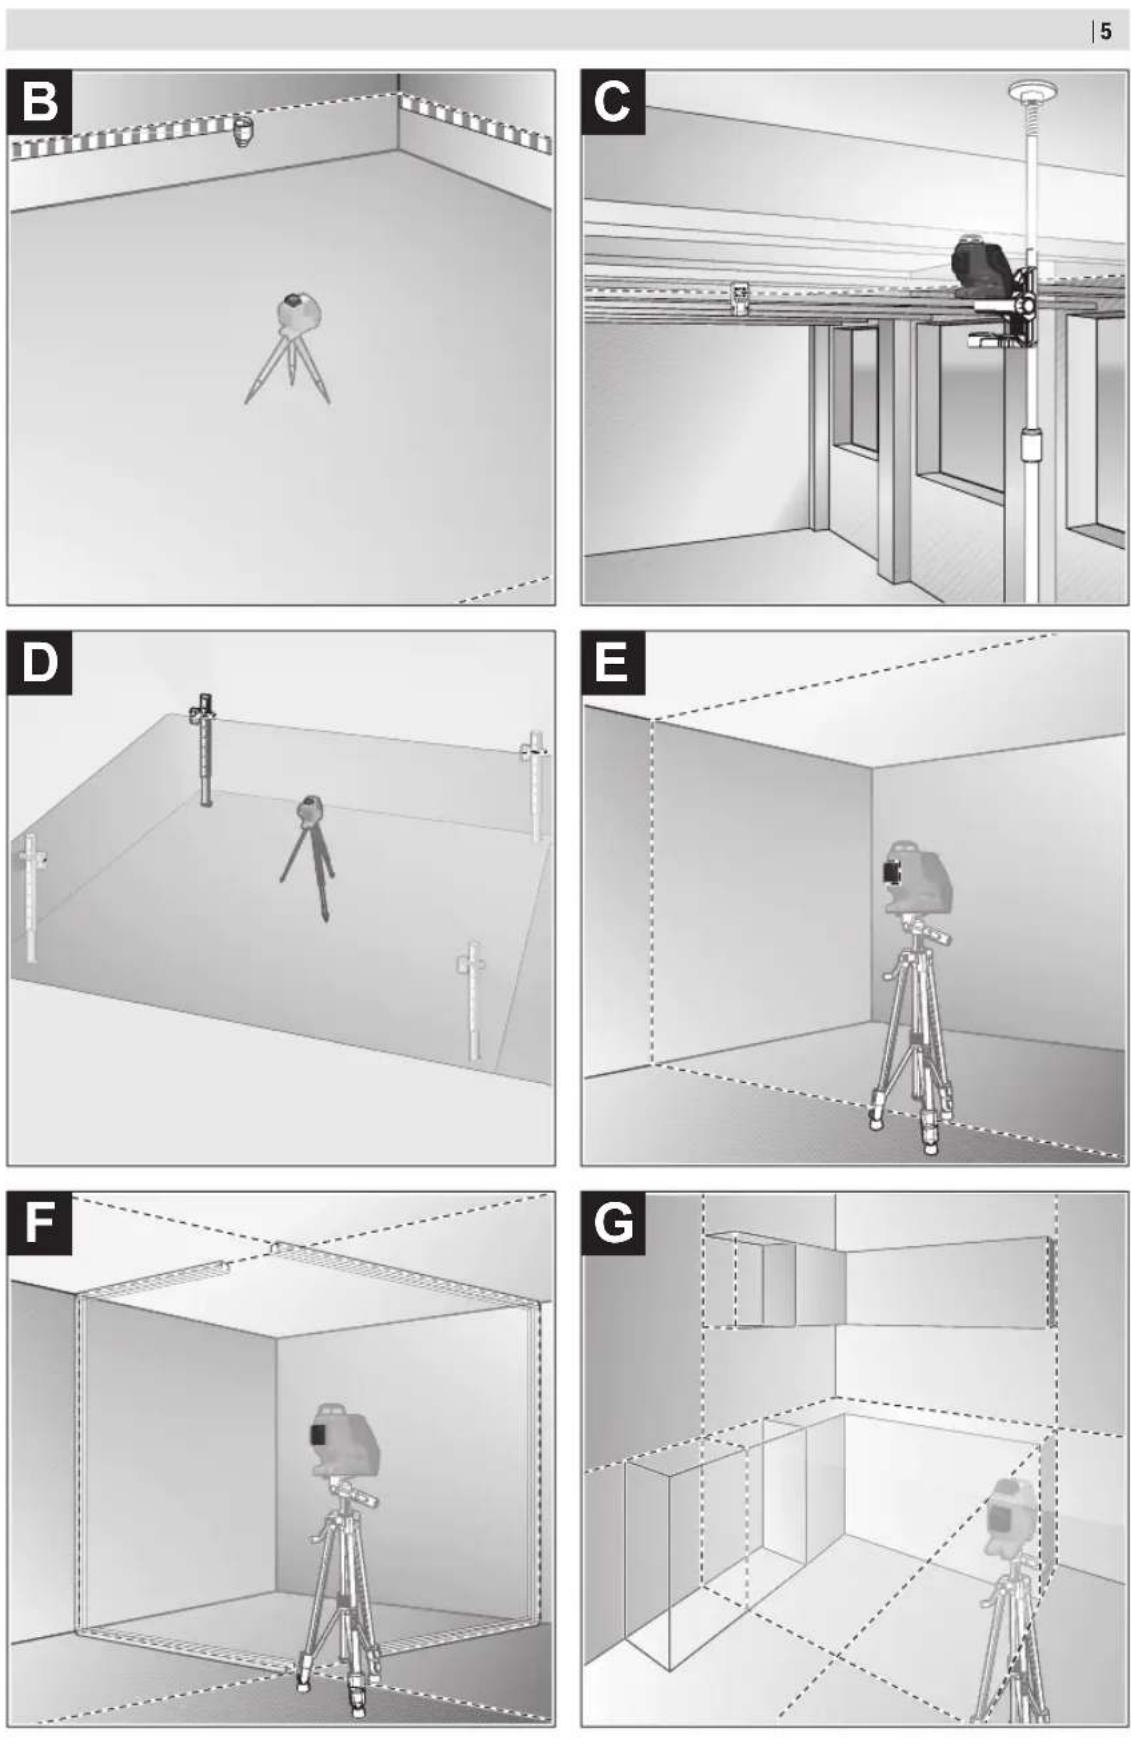
Example applications (see figures B-G)
Examples of possible applications for the measuring tool can be found on the graphics pages.
Maintenance and Service
Maintenance and Cleaning
Keep the measuring tool clean at all times.
Never immerse the measuring tool in water or other liquids. Wipe off any dirt using a damp, soft cloth. Do not use any detergents or solvents.
The areas around the outlet aperture of the laser in particular should be cleaned on a regular basis. Make sure to check for lint when doing this.
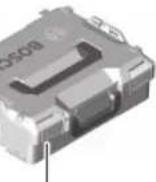
Only store and transport the measuring tool in the protective bag (31) or the case (34).
If the measuring tool needs to be repaired, send it off in the protective bag (31) or the case (34).
After-Sales Service and Application Service
Our after-sales service responds to your questions concerning maintenance and repair of your product as well as spare
parts. You can find explosion drawings and information on spare parts at: www.bosch-pt.com
The Bosch product use advice team will be happy to help you with any questions about our products and their accessories.
In all correspondence and spare parts orders, please always include the 10-digit article number given on the nameplate of the product.
Great Britain
Robert Bosch Ltd. (B.S.C.)
P.O.Box 98
Broadwater Park
North Orbital Road
Denham Uxbridge
UB95HJ
At www.bosch-pt.co.uk you can order spare parts or arrange the collection of a product in need of servicing or repair.
Tel. Service: (0344) 7360109
E-Mail: boschservicecentre@bosch.com
You can find further service addresses at:
www.bosch-pt.com/serviceaddresses
Transport
The recommended lithium-ion batteries are subject to legislation on the transport of dangerous goods. The user can transport the batteries by road without further requirements.
When shipping by third parties (e.g.: by air transport or forwarding agency), special requirements on packaging and labelling must be observed. For preparation of the item being shipped, consulting an expert for hazardous material is required.
Dispatch battery packs only when the housing is undamaged. Tape or mask off open contacts and pack up the battery in such a manner that it cannot move around in the packaging. Please also observe the possibility of more detailed national regulations.
Disposal

Measuring tools, rechargeable/non-re-chargeable batteries, accessories and packaging should be sorted for environmental-friendly recycling.

Do not dispose of the measuring tools or battery packs/batteries with household waste.
Only for EU countries:
According to the Directive 2012/19/EU on waste electrical and electronic equipment and its transposition into national law, measuring tools that are no longer usable, and, according to the Directive 2006/66/EC, defective or drained batteries must be collected separately and disposed of in an environmentally correct manner.
If disposed incorrectly, waste electrical and electronic equipment may have harmful effects on the environment and
26 | Français
human health, due to the potential presence of hazardous substances.
Only for United Kingdom:
According to The Waste Electrical and Electronic Equipment Regulations 2013 (SI 2013/3113) (as amended) and the Waste Batteries and Accumulators Regulations 2009 (SI 2009/890) (as amended), products that are no longer usable must be collected separately and disposed of in an environmentally friendly manner.
Battery packs/batteries:
Li-ion:
Please observe the notes in the section on transport (see "Transport", page 25).
Français
Robert Bosch (France) S.A.S.
www.bosch-pt.com/serviceaddresses
Transport
Controlo remotovia"Bosch Levelling Remote App"
www.bosch-pt.com/serviceaddresses
Vervoer
Kalibreringsadversel CAL guard
Sensorerne til kalibreringsadvarslen CAL guard overvager malevarktojets tilstand, ogsa nar det er slukket. Nar malevarktojet er uden energiforsyning fra akku ell batterier, sorger et internt energilager for 72 timers kontinuereglimg overvagning ved hjaelp af sensorerne.
Bosch Service Center
Telegrafvej 3
2750 Ballerup
Pá www.bosch-pt.dk kan der online bestilles reservedele el-ler oprettes en reparations ordre.
TIf. Service Center: 44898855
Fax:44898755
E-Mail: vaerktoej@dk.bosch.com
www.bosch-pt.com/serviceaddresses
Transport
Fast ljus gult 75-35%
Fast ljus rott 35-10%
Inget Ijus-Batteri defekt
-Batterier tomma
Fjarrstyrning via "Bosch Levelling Remote App"
Matinstrumentet ar utrustad med en Bluetooth®-modul som tillater tradlós fjarrstyrning via en smarttelefon med Bluetooth®-gransnitt.
For anecdena denna Funktion behovs appen "Bosch Levelling Remote App". Dessa kan du ladda ner fran en app store (Apple App Store, Google Play Store) beroende pa enhet. Information om systemkrav for en Bluetooth® anslutning hittar du pa Bosch webbsidor under www.bosch-pt.com. Vid fjarrstyrning med Bluetooth® kan fordrojninger uppst a mellan mobil enhet och matinstrument vid dalig mottagning.
Aktivera Bluetooth®
For att aktivera Bluetooth® for fjarrystyrningen, tryck pa Bluetooth®-knappen (9). Se till att Bluetooth®-gransnittet ar aktiverat pa din mobila enchet.
Bosch Service Center
Telegrafvej 3
92 | Norsk
2750 Ballerup
Danmark
Tel.: (08) 7501820 (inom Sverige)
Fax: (011) 187691
Du hittar fler kontaktuppgifter till service har:
www.bosch-pt.com/serviceaddresses
Transport
De rekommenderade lithiumjonbatterierna ar underkastade kraven for farligt gods. Anvandaren kan utan ytterligare forpliktelser transportea batterierna pa allman vag.
www.bosch-pt.com/serviceaddresses
Transport
www.bosch-pt.com/serviceaddresses
Kuljetus
Na diatnpieTe to epyaleio metponc navTa KaBap.
Mn ubioge to epyaleio meptnanc o evpo n oe aaaa uypa. Kaapicete tuxov punavon ^ eva uypo, paako navi. Mn xpn- oponnoe Kaveva uyko kaphapouu n diautn.
Na kaapizete taikia idaiitaepa tic enipaveiec kovta otny eEdo tnc aktivac alezep kal va npoeexete va un dnmuouyouvta xvoia.
Фдуетакетафетeto opyaо метрпсocmo pda otny taia npoataiac (31) n otny kaetiva (34).
E nepiinwn eniakeun csteilte to opyavo metponc meo atnva npootiaac (31) n anv kaoetiva (34).
Eumnpenno nAarov kauouaec apayoyic
H unnpoeia eunnpetnnc neaow anavta otic epwnoic oac oxetka me tnv eniakeun kai tn ouvtphon tou npoiovtoc oac kaohc kai yia ta avtiotoxa avtalaaktka. xedia ovapao loynoc kai nnpopopiec yia ta avtaalaktka 0a ppeire eni onk katw ao:
www.bosch-pt.com
H ouba napoxic oubouw tnc Bosch anavta euxapiatwcs epwnoeic aac yta npoiovta mac kai ta eapntmuata tou. Awote ae olec tic epwnoeic kai npayyalec avtaalakikow onomega note to 10nphiio kwdiok apiog oupovva pe nvi vakiba tunou tou npoiovtoc.
EAAaδa
Robert Bosch A.E.
Epexia37
19400Kopwni-Athiva
Tnλ:2105701258
Φaξ:2105701283
Email: pt@gr.bosch.com
www.bosch.com
www.bosch-pt.gr
Pepatepw dieuovocic oepuc ta bpte re onny nlektpovikn diuovan:
www.bosch-pt.com/serviceaddresses
Meraqop
Ouoviatwpeveucmuatapieovtwvaiolou unokevttai anai tnoecTuv enikivbuvawayaw. Omuatapiecmuopouvvaetapepeoov obikc anotov xphtnxwpic allouoc opouc.
'Otav, oμwoc, oI natapiec anoetAovtai ano tpiouc (n.x. ae- ponopikoc h μe eTapiia eTapopov) npenei va npouvtau
diapoepiciaitepeacanitnoeicyaToukeuaoiaKaItn
mavon. E6w npenei, kata tny npoeoiaia tou tepaio ano- oAoc va ztnnei onoohnote kai n ououh evoc eikouy iEikivuva aya.
AnoTeAeTic uatapiec moV oTav to TepiBnma eivai dIko. Kollate tic yuvcce napec me kollntk taivia kai va oukeuaZe Tnv unatapia kat tetoio tpno, wote autn va mnu kouvieta ma otu ouakeuaaia. Napakaloume va laubave emianc unoyn qac kaluyov nauotnpec eovikc diataxiic.
Anoupon

Ta opyava metpnonc, oI enavapopntoueve c natapiec/mnatapiec, ta eaptmata kai ooukeuaoc npenei va avakukawovtai me Tpno piko poc to nepiaaov.
Mn pivvete ta opyava metpnc kai tic pnataiec ota oikiaa anopipmuata!
Movi yia xopec mc EE:
Uppwa me TnV Eupwnaiok odnyia 2012/19/EE oxetikdae tic naiec nkeptikec kai nkeptovikce ouakevckai tn meta-opa tnc odnyiac autnc oe viko bikaio ta axpota opya va metponc kaluipwva me Tnv Eupwnaiok odnyia 2006/66/ EKoi xalaouevc h npounonnevec mnatapiec npenei va oulambdaoyovta Exwpiota, yia va avakukawoov me rpnophiiko npoc to nepiBaalov.
Se nepittwnon n evdeevnac anouponc o nektpkek kai nektpovikce ouokeuc, loyew evdoevcnapouiaecntivduuvw ouiw mopoov va exouenbetaic enttwaecto nepiAALov ka otny avthetaun yueia.
Enavaopptiopevecmuatapie/Mnatapiec:
Li-Ion:
PiooEe npapaakawTic unoedeieic otny evotnta Metapopd (BHeTe «MeTaOpopa, a 119).
Türkce
Güvenlik talimati

www.bosch-pt.com/serviceaddresses
Nakliye
Robert Bosch Sp. z o.o.
www.bosch-pt.com/serviceaddresses
Transport
Trvalesviti zlute 75-35%
Trvale sviti Červene 35-10%
Bosch Service Center PT
K Vapence 1621/16
692 01 Mikulov
Na www.bosch-pt.cz si si muzete objednat opravu Vaseho stroje nebo nahradni dily online.
www.bosch-pt.com/serviceaddresses
Preprava
Doporucene lithium-iontove akumulatory podlehaji pozadavkum zakona o nebezpechnych nkladech. Tyto akumulatory mohou byt bez dalsich podminek prepravovany uzivatelem po silnici.
www.bosch-pt.com/serviceaddresses
Transport
Odporucane litiovo-ionovekumulatory podliehaju poziadavkam na transport nebezpecnheho nakladu. Tieto akumulatory smie pouzivatei naradia prepravoat po cestach bez dalsich opatreni.
www.bosch-pt.com/serviceaddresses
Szallitas
He yctahabnbaTe H3MePHTeBbHbI
HhCTpyMeHT M MaHTHbIe PpHaJaLExKHOCTu B6NtH HmPiHaTbTO HpoUHX MeHcHCKx annapatoB, HAp., KApNHOCTMMyaTOpOB HHCyHNOBbIX HAcOCOB. MaHTbI H3-MepHTeBHO HcTpyMeHTa H pHaJaLExKHOCTu CO3dAOT NONE, KOTOPoe MOKeT OTPuaTeBHo BnAHTb Ha paBoTy HmPiHaTbTO MMeDnHcknx annapatoB.
DepxHTe H3MePHTenbHbI HNCTpyMeHT MaHHTHbIe npHaJnEKNHOCTb BdAHIOT MaHHTHBIX HOCTeEN DaHHbIX N OT pN6OpOB, YyBCTBHTenbHbIX K MaHHTHO My nonIO. Bo3JeCTBHe MaHHTOB H3MePHTenbHOro HHCTpyMeHTa HpHaJnEKNHOCTe MoKET pNBeCTN K Heo6paTmOIn oTepe DaHHbIX.
M3mepntelbHHHnCTpymeTobopydoBanpaDnHOHTepfecom. Co6IOdaTe MeCtHbe OprpanHeHHNo npHMehHHo, HAp., B CaONetax Hn60bnHax.
CNoBechTTOBAPHbI 3HaK Bluetooth H rpaΦnueckn 3HaK (NOrToTH) ABnHOCTaERHeCTpHPOBaHHbIM TOBAPHbIM 3HaKOM H CO6CTBeHHoctbO Bluetooth SIG, Inc.
KomnaHnra Robert Bosch Power Tools GmbH nCnoB3ayet 3TO CIOBeChbI TOBapHyI 3hAk/NoTnNo NHeuEHN.
OctopoxHo!Pn HcIIOb3OBaHn H3MepeTebHOro HhCTpymEnTa C Bluetooth®BO3MOXHbI NOMExdIyDpyrHx npH6OpOB HycTaHOBOK, CaMOnetOB H MeHNuHcknx annapatOB (HaNP., KApNHOCTMMyrTOPOB, CNYXBbIX annapaTOB).KpOme TOrO, HeNB3a NOnHOCTbIO HCKIIQUHTb HaHeceHne BpeDa HAXOJUHMCB HENOCpeCTBeHHo 6IN3OCTN IIOJIM H XHBOTbIM. He NtB3yTEcb H3MepeTebHbIM HcTpymEtomC Bluetooth®B6IN3H MeHNuHckNx annapaTOB, 3aPaBOHybIX cTAHCNI, XMMueCkNX yCTaHOBOK N TeppHTOpN, Ha KOToPbIX CyuEcTByET OAnCHOCTb B3pbIBa HMI MOrTy nPoBoHITbc B3pbIBHbIe pa6ToI. He NtB3yTEcb H3MepeTebHbIM HcTpymEtom C Bluetooth®CBamOnetax. CtapaiTeCb HE BKIOUATb Ero Ha PpODonKHTeNbHOe BpeMa B HenocpeCTBeHHo 6IN3OCTN OT TaNa.
Onncahne npoodykta n ycnyr
IpoKanyIcTa,co6JIIOJaIteHIIIOCTpaIIN B Hauane pyKOBOCDBaNo 3KcnIyatauIN.
PpimHeHnNoHa3NaeHHIO
HactoIuN N3MePnteNbHi np6Op npedHa3Hauen nNoCTpoEHn KOnTpOJI rOp30HTaNbHbIX BePTNaKbHbIX HnH.
H3mePteIbHbI HnCTpyMeHT pnproTeIpa6Otbl BHytpnOMeueHmHaOTKpbITOM BO3dyXe.
3To yctpoiCTBO npeCTabnAeT co6oN oTpe6ntbckoe na- 3epHoe yctpoiCTBO cornaCHO EN 50689.
H306paXeHHbIe coCTaBhbIe yactn
HymepaunipnepctabneHHbIX COCTABbIX qacte BbINONHeHa IIO N3OpaKeHHIO N3MePHTeBHO IHCTpyMeHTa HA CTpaHNe C HNIOCTpauNAM.
(1) OTeBepTne Ia BbXoJa naZepHoro lyuHa
(2) CoctoHne 3apda aKkyMnyIaTopa/6aTaapeek
(3)Индikatop CAL guard
(4) INHdkatopФнкcatopaMaTHnka
(5) KhoIIka peKIMa pa60TbI c npHemHHKOM
(6) INHdkatoppekHMa pa60tbc npHeMHKOM
(7) KhoIIka BbI6papeKIMpa6Obla3epa
(8)Индік atop coeindhenno nO Bluetooth®
(9) Khonka Bluetooth®
(10) AKKMyIaTOpHbI OTeK
(11)KoKyx nepexoDnka nla 6aTaapeek
(12) BaTapeiKn
(13) KhoNka pa36IokpObKn aKKyMnyTopa/nepexoHnKa dIaTeapeek
(14) Kpbilka nepexoDnHaJn 6aTapeeK
(15) AKKMyNITop
170|Pycckn
(16) BbiknnoaTeB
(17) PpeynpeiTeIbHa Ta6nHka Na3epHoro HnyeHHa
(18) CepiHbI HOMep
(19)「He3dO nOuI WtAtnB 5/8"
(20)「He3DIO NOI WATINB 1/4"
(21) KhoNoHbI 3JIeMeHTIITaHIN
(22) DepeKataB KHOHOnOHHo 3neMeHTa NITaHn
(23) OTCEK KHOHNOUHOrO 3JIeMeHTa NITaHHI
(24) MaHHTa
(25) YHnBepcAbnbHoe KpenneHne
(26)Поворотая паТформaa
(27) CnCTema DaIcTaHauOHHO ynpaBHeHHra
(28) Bn3nprna Mapka dIra IaIepHoro lyuca
(29) Na3ePbHbI npHeMHNk
(30) Oukn dnn pa6oTbI cna3epHbIM HhCTpyMeHTOM
(31) 3aunthbnyuexonal
(32)UHTaTHB
(33) Teneckonnueckn wecet
(34) y a^a)
(35) Bknaabiiw
a)H3o6paXeHHbIe HnO nOHcaHHbIe npHaJdNExKHOCT He Bxo- DHT B cTaNAPThBIO bEEM NOCTABKN. IOnHbI accOPTMHeIT npHaJdNEXKHOCTe CM.B HAeI npOrpamme npHaJdNExHOCTe.
Texnueckne daHbIe
3KcIyataaOn 6aTapeek
B H3mepHtBbHom HnCtpyMeHTpe peKoMeHdyETc HcNoIb30BaTb ⅡeIoOHO-MapraHcEBeBie 6aTaapeiKn.
BaTaapeKn BCTabJIOTcB NpeXeOdHnДЯ BaTaapeEK.
Ipexohn4 6aataeepnpeha3aeh ncknouTeNbHO IINPmHeHHB INpeyCMOTpeHHbIX H3Me-pHTebHbIX HcTpyMeHTax Bosch, he pa3peBaetca HcNoB3OBaT bero B3neKtponHcTpyMeHTax.
UTo6bI yctaHOBnTb 6batapeKN, CdBHbTe KOxuy (11) nepeXOHNka dJa 6batapeek B AKKyMnyTophbl OTcck (10).PiMeCTHte 6batapeKN B KOKyX B COOTBeTCTBN C PNCYHKOM HaKpbIiKe nepexoHNka (14).CdBHbTe KpbIiKHa KOxuy, UTo6bI OHa OTcETINBO BOWla B 3auePHeHne.

ДяТOrO,уTO6bIи3BNeUb6aTapeKn(12),HAJKMHTeHaKHONKnpa36NoKropOBKn(13)HaKpbIiKepePexoDnHka(14)NCHMHTeKpbIiKy.CneIITe3aTeM,YTO6bI6aTapeKnHeBbIaJI.NДЯ3rTOIepKHTeN3MpInTeBbHmHCTpyMeHTaKKymyIaTOpHbIMOTcEkom(10)BBepX.I3BNEKHTe6aTapeKn.YTO6bI3BNeUbHaxOJaIINcBAHyTpN Koxy(11),N3AKkyMy
IANTOPHOO OTCeKa BO3bMNTecb 3a KOxy H N3BNEKHTeero, CnEka HadaabNbaH a60KOByIO CTEHK, IN3N3MePntbHOro IHCTPYMEHTA.
MeHnTe cpa3y BCE 6aTapeKo OJHOBpeMeHHo. NcNoJIb3yI Te TOLbKO 6aTapeKo OJHOrO npOn3BOJntEn I OJINHaKOB0B EMKOCTH.
13BNEkaTe 6aTapeeKn H3 N3MepHTenbHoro HNCTpyMeHa,ecnn PpOONKTeNbHOe BpeMa He 6yDte pa60TaTb CHH.PnP DNTeBHOM XpaHeHN B N3MepTeNbHOM IHCTpyMeTe BO3MOKHa Koppo3n I CamOpa3PraKa 6aTapeek.
HdkaTop 3apXeHHocTH
HnHKaTOp 3apraJa 6atapeen (2) oTo6paKaet cTeneH 3apraJa aKKyMyJrTopa Hn 6atapeek:
Ecnn AKKyMnyTOp nHbatapeNn HauHnaiOT caHntbcra, npKoCTb na3epHBix NHHm MeDneHHO CHNkaeTc.
HemeHnHO 3aMeHHTe HncnPabHbI aKKymyTOp nnn pa3paKeHHbe 6aTapeN.
3aMeHa KhoNoHOro 3nemEnTa nHTAHnA (cm.pnc.A)
H3mePHTeBbHmHCTpyMeHT OCHaUeH KHONouHbIM 3JeMeH TOM NITAHnA (21), YTO NO3BOJREt COxpaHnTb DaTy H BPem nIg CAL guard daxe bez akymyIToPA nn6BaTapeek.
UTo6bl3aMeHHTb KHONoOHbI 3JeMeHNTnTaHnA, H3BLeKHTe aKKyMnyTOp HnN NepexoDnHK Dn4 SaTapeek cenNKOM.
OTOKMITE DEpKATeNB KHONoHbIX 3NeMeHToB NITAHN (22) BOTCEKE KHONoCHOrO 3NeMeHToA NITAHN (23).NABKeNTe pa3paKeHHbIKHONoCHbIK 3NeMeHn NITAHN (21) INCTaBBTe HOBb. CneHTe 3a npaBnBHOI NOJIphocTbO B COOTBetCTBnC PNCyHKOM Ha DEpKAteNE KHONoCHOrO 3NeMeHtA NITAHN (NOJIOKHeBbIKoNIOc KHONoCHOrO 3NeMeHtA NITAHN DOJXKe CMOTpeB BBepx).
BCTaBtE depKataeHb KHONOHOro 3nemeHTa NtAHn (22) CO BCTaBHeHHbIM KHOIOUHbIM 3nemeHTOM NTaHHB OTeCk (23).CteIte 3a Tem, YTO6bl depKaTeB KHONOHOrO 3nemeHTa NtAHN 6bl BCTaBHeN PpaBnHbHO INONHO, NOINOCbIO, NocKOBky HnAue He 6yJed rapaHTnpoBaHa 3aUHTa OT bbln H6pb3r BObl.
IpeHnauHmHCNOB3OBAHn CHMnTe 3aunTHyIO nHeKc KHOONOHOrO 3neMeHTA NITAHN (21).IgN 3TOr BOINJHnTe DeNCTBnB CooTBeTCTBNC INHCTpykUHMN NO 3ameHe KHOONOHOrO 3neMeHTA NITAHN.
Pa6ota c HcTpymeHToM
BkloueHne HnctpymeHa
3aunaaTe H3MeHrtenbHbHnHcTpymeHT OT Bnarn H npMbIX COHeuHbIX Lyuei.
He noDBepraTe H3MEpHTeBbI HnCTpyMeNT B03-DeHCTBHO 3KCTpeMaIbHbIX TEmnpaTYP N TEmnpaTYPbIX NepaIOB. HanpIMep, He octabIyte erO haIINTEbHO BPEM BAETOMoBIIne. Ipn 3HaHTeBbIX KOeBaHHX TempeATpybI Chauana daIte TemnpaType H3MEpHTeBHO INHCTpyMeHTA CTa6HIN3HPOBaTbC, INpeXJe cE M pOdoJIkAtb paOToTaB C nHCTpyMeTOM, BcERda npOBepRte erO ToHocTB (CM.,KOHtPbI TOHOCTN H3MEpHTeBHO INHCTpyMeHTA", CtpaHua 175). 3KCTpeMaIbHbIe TEMpeATpybI N TEmnpaTpHybe nepaIaBl MOrYT OpiCaTeBHO BnIaTb Ha ToHOCb H3MepeTIbHO INHCTpyMeHTa.
H36eRaTe CNbHBix TOnyKOB NpaEdHHN H3MePHTenbHO HOHCTpyMEnTa. Iocne CNbHBix BHeuHXN BO3deiCTBn HA H3MePHTenbHbI H3CTpyMEnT peKoMeHdyETcnpOBepNTb erO ToHOCb, npEjne Yem IpOdoJXaTb paOToTb C H3CTpyMEnTOM (CM. KoHTponb ToHOCTH H3MePHTenbHO HOHCTpyMEnTA, CtpaHnca 175).
Pn TpaHcnpTPOBKe BbIKIOUaTe N3MepNTeBbHbI HcTpymENT. Pn BbIKIOUeHN bIOKINpyeTc MaHTNHO KOBbIMexAHN3M, KOtOpB INHaue npn CINbHbIX DINHex HnX MoKeT 6bITb NOBpeXdE.
BkJIOueHHe/ BbIKJIOueHHe
YTO6bI BKNIOHTb N3MEpNTeNBHIN HNCTpyMeHNT,pepeBnHbTe BblKIOUaTeNb (16) B NOIOXeHne «On» (ДЯ pa-bOTb C bOKIOKPOBKO MaTHnKA) INN B NOIOXeHne «On» (ДЯ paBOTb C ABTOMATUeCKHM HINBENIOPOBAHmE).Cpa3yJxOncNE BKNIOUeHn N3MEpNTeNBHIN HNCTpyMeHNTNluyaETN 0TBEpcTn DnBbIXoDa Na3epHOro Nya (1) Na3epHbIeNHH.
He HanpaBnIte na3epHbI nyu Ha IIOe Hm JN BOTHbIX HcMOTPe cAMn B na3epHbI Nyu, B TOM YNCne n 6oNbIoro pacCTOHH.
YTO6bI BBIKIOHTb N3MpHTeBbHbI HNCTpyMeHT,nepeBHBbTe BIKIOaTeB (16) B NOJOKeHHe Off. Pn BBKIOUeHHMaTTHKOBBmexAH3M 60knpyETcR.
He octabnIte H3mepntebHbI HnCTpyMeT 6e3 npncMOTpa N BbIKIOaHT He3mepntebHbI HnCTpyMeT IocJIe HcONb3OBAHH. DpyrIe nua MoTy 6bITb OCenIIeHbI na3epHbIM NyOM.
PnnpBbIeHHN npedEnbHO dOnycHMo pa6oey Te mpepaTypbI B 40C npOxCODHT bIKIOueHne Ira3aunTbI na3epHOrO nOHa. Pocne OxJaXdEHH N3MePntEBHbI HnCTpyMeHT ONrTb rOToB K pa6ote N MoKet 6bTb ChOba BKIOUeH.
EcH TemnepaTypa H3MepntEnbHoro HNCTpyMeHa np6nnKaTaC K MaKCHMaJIbHO DOnyCTHMo paOoye TMnpaTpe, RpKocTb Na3epHbIX NHH MeDNeHHO CHXKaTeCra.
H3mepntbHbHnHCTpyMeHT 3aunueeOT Bo3neCTBna 3JIeKTPoCTaTHueCKOrO pa3pra (3CP).Ecn H3mepntbHbHnHCTpyMeHT NOBepraetcBO3neCTBnIO 3JIeKTPoCTaTHueCKOro pa3pra (HaNPmep, npn PnPKOCHOBENK Hemy BycNOBHX H3KO BlaxHOCTN), OH ABTOMaTHueCKN BblkIOUaETcB. B 3tOM cnyae nepeBeJeNTe BblkIOUaTeNB (16) B nONooJKeHHe BblKn., a 3aTEM B NOnOKeHHe BKn.
DeakTHBaunrABOMaTHueCKOroBbIKIOUeHn
EcN B TeueHHe np6n. 120 MHN. Ha n3MepeTebHom HnCTpyMeHTe He 6yET haKImaTbC HnKaKx KHOJOK, n3MePteBbHbMn HnCTpyMeHT C cIbO 3KOHOMnn aKKMyJrTopa nn 6atape abTomatnueeckn BblKnouaeTcR.
YtobcHOBa BkIOUHTb N3MePteIbHbI INHCTpyMeH Tocne ABTomathueCKOTo BbIKIOUeHHa,MOXHOJI6NopeBbHytb BbIKIOUaTeIb (16) Chayala B NoJooKeHHe «Off», a3aTEM CHOBA BkIOUHTb N3MePteIbHbI INHCTpyMeH, NIOo OIN pa3 HaxaTb KONky peKIMa paOToI na3epa (7) nIN KONky peKIMa npEmHKa (5).
YTo6bI DeakTHBnpoBaTb ABTomTuueckoe OTKIOUeHHe, npi BKIOUeHHOM H3MepntEnbHom HHTpyMeHTe DepXHTe KONKy peXmHa paOToI Na3epa (7) HaxKaToH He MeHee 3c. Ecn ABtomTuueckoe OTKIOUeHHe OTKIOUeHO, Na3epHbIe LyuN KOpOTKO MrrAOT DnI NOITBePxJDeHH.
UTo6bla kTbHbPOBaTb aBtOMaTHueCKoe BbKIOUOeHne, BblKIOUHTe H3MePHTeNbHbI INHCTpymEt N CHOba BKIOUHTe erO.
BbIKIOeHHe 3ByKOBOro CnHana
PnBKnIOueHn H3MePHTeINbHOrO INCTpyMeHTa 3ByKOBOI CnHaN BcERda BkIOueH.
IINOTKIOUOeHnN BKNIOUeHn3BYKOBOrO CnHaJa HAJMMTE ONDOBpeMeHHo KHOIKy peKIMa pa6ToI Na3epa (7) INKHOIKy peKIMa npHeMHNA (5) nYdEpxkBaTe Hx HaxKaTbIMH He MeHee 3c.
B KaueCTBe NODTBePckDHeHn PnB BKIOUeHn N BbIKIOUeHn pa3daETc3 KOpOTKHX 3ByKOBoBx CnHaHa.
Pexhmbi pa6oTbi
H3mePntBbHnHCTpyMeHT NMeET HecKoJIbKO peKHMOB pa60bl, KOtOpble MOxHO nepeKIOUaTb B IIO6OJ MOMENT:
-3nyeHne OndHnO rnp3oHTaBHO n3epHo nIPOCKocTN,
-иЗлунецпедд�ногВерткальногlaэрнолпоскости,
-и3nyeHHe DByX BepTnKaJIbHbIaIa3epHbIX nIOCKOCTe,
H3nyeHHe OHOH TOpH3OHTaNbHO H3aePHOH NIOCKOCTN INDBYX BepTKaJIbHbIX Na3epHbIX NIOCKOCTE.
Iocne BkHoueHHN3MepHTenBbHbINHCTpyMeHTN3Nyuaet OHy rOpH3OHTaBHyIO Na3epHyIO NIOCKoCTb. UTo6bl CMeHHTb peKHM,HaKMITE Ha KONky peKmMa pa60tbi Na3epa (7).
BcepeKmbi pa6oTbMoKHO BKNIOaTb cABTOMaTHueCKM HNBENHPOBaHHemN C 6IOKHPOBKO MaTHnKa.
PexnIpHemHnka
Дя pa60t c na3epHbIM npHEMHNKOM (29) -пн liO6bIXpeKIMax pa60tbi -peXIM npHEMHKAdoJIxeh 6blbBkIIOeH. BpeXIME npHEMHKAJna3epHbIE JHHM MIRAOIT C OueHb BblCOKOJ qactoToI, YTO NO3BOJrE TnapeHomy npHEMHKY (29) onpeDenTb nx.
UTo6bBKIOUHTbpeXHMnpHEMHNka,HAKMITEKHONKY(5).HINHKATOPpeXHMA npHEMHNka(6)CBETTC3eNEHBIMCBeTOM.
PnB KIOUeHOM peXHMpeHMHKa BNDIMOCtB na3ep HbIX NHHI DnI YeNOBuecCKOrO rna3a NOHNKeHa. I0TOMy dIpaob63 na3epHoro pneHmHKBaIKIOuayTe peXIM npHemHKa nyTEM NOBTOPHo HaxatNa HA KHONky peXHMa npHemHKa (5). INHnKaTOp peXHMa npHemHKa (6) racHeT.
ABTomathueckoe HmBEnIpObaHne
Pa60ta cABTOMaTHueCKHM HNBENHOBaHHem
YCTaHOBHTeH3MePHTbHbI HNCTpyMeHT Ha IPOUHOE TOpH3OHTaHbHO ECHOBAHHe HIN 3aKpENTEero HA yHNBePCaHbHOM DEPATeNE (25) HnHa WTAHBe (32).
IpaobTbcaBOMaTHueCKHM HBeINHPOBaHNEMpeBnHbTe BkIOUaTeJIb (16)B NOIOKeHHe « n>.
ФункцаabTomatueckoro HnBelenpoBaHЯKOMneHcnpyet HepOBHOCTN BpaMKaxДиana3OHa aBTOMaTHueckoro HnBelenpoBaHЯ±4°.HnBelenpoBaHЯЗaBepSeHo,KaK TOnbko Na-3ePbHle NHHIN nepectanI nepeMeMaTaBCra.
Ecnn ABToMaTHueCKoe HnBeHIpOBaHHe HeBO3MOxHO, HanpHmep,T.K.NOBepXHOCTb,HaKOTopoYcTaHOBHeN3MePHTeNBHy INCTpyMeHT,OTKNIOHReTcAOTropIN3OHTaIN60nee Yem Ha4",Na3epHbIe IHHHn HauHHaOT 6bICTPO MIRaTb. Ecnn 3ByKOBoB CNrHaN BkJIoueH, OH NpDAeTcC KOPOTKMHNTEPBANOM.
YCTaHOBInTe H3MePteIbHbI INHCTpyMeHT ROpN3OHTaIbHo IdoxJNTeCb OKOHuaHHaBtOMaTHueCKTO CaMOHNbINpOba
HnI. Iocne TOrO, KaK H3MePHTeNbHbI INHCTpyMeHT BOIDet B DnHaNa3OH ABTOMaTHueCKTO HNBEnHpOBaHH ± 4^ , Na3epHbIe LyuH NauHaHOT HeNpepbIBHO CBETNbCnBkyBOB CNrHaJ OTKnIOuaTcR.
PnCOTpRcEHnX INH N3MeHeHHX NOLOXeHHN BO BpeMpa6Obl H3MePntbHbI INHCTpyMeHNT ABTOMaTHueCKN CAMOHNBENHyPTc. Iocne NOBTOPHORo HNBENIpOBaHHN pOBepbTe NIOJoxHe Tropn3OHTaJIbHO INH BepTkaJIbHO J3epHOINHINNO OTHoWeHHIO K peNEpHBIM TOUkAM JnI npEOtBpAaEHHN OwHbOK BpeyIbTaC MeuEHHN N3MePHTbHOrO INHCTpyMeHtA.
Pa60Ta c 6nOKnPOBkoMaTHnKa
Ipaobtbc6nokpOBkoMaTHNka nepeBnHbTe BkiHouateNb(16)BnoOxHeHne(On)。HdkaTOp 6nKpOBKn MaTHNka(4)ropHT KpaChbIM Nna3epHbIe HnHn HnpepbIBHO MraIOT B MeDJIeHHOM TEMne.
Pn pa6ote C 6IoknoPBKO MaTHNka ABToMaTHueCKoe HBeBENPOBaHHe BbIKIOUeHO. N3MePHTeNBbHbINHCTpyMeNT MOKHO DEpKaTaHb CaBy B pyKe HIN NOCTaBtB Ha HA KIOHHe OCHOBaHHe. Pn 3TOM Na3epHbIE NHmH 60JIbWe He HNBENpyOTcH He o8a3aTeNbHO 6pa3yOt nepneHdkyJ np.
DuctanchoHoe ynpablenne npn nomou npinoxehna Bosch Levelling Remote App
N3mepntelbHbI HhCTpyMeHT OCHaUeH MOyUeM Bleetooth, KOtOpbI pIpi NOMOuPi PAJIOTEXHueCKHX cpeCTB o6ecNEuHBaET BO3MOXHOCTb IHCtAHcHNOHOrO ynpabneHnA uepe3 CMapTfOH C HHTepFeHCOM Bleetooth.
Дянспльбовая STОД Функштpe6уетс рпнлжени (App) «Bosch Levelling Remote App».ВЗвснмoc't OT OKOHEHOrO yctpoCTBa erO MOKHO ckaaTb B COOTBetCTByIounx Mara3HHax (Apple App Store, Google Play Store).
Hhopmaun O Heo6xOHNbIX CnCTeMHbIX Tpe6oBaHnx Dn coeHHeHHn Blueth haxOHTc H caTe Bosch no aDpecy www.bosch-pt.com.
PnDCTaHOnHOMynpaBneHHIOBluetooth®BO3MOKHa 3aepkKa NO BpeMeHH MExdy MObNbHbIM OKoHeuHbIM yCtpoiCBOM H3MepHTeHBbIM HHcTpyMeHToM BCNeIcTBHe nioxyCNOBCHB3H.
Bknquene Bluetooth
UTo6bl BKNIOuHTb Bluetooth®nIaNCTaHcHNOHORO ynpabNEHnHAKMTe KHOJky Bluetooth(9).YIOCTOBepBTECb,TO HInTepeCBluetoothBKNIOueHHa OKOHeHOMMOHbHOM yCTpOJCTBE.
Iocne 3anycka npniloxeHn Bosch yctaHaBnBaetc CBA3b MExdy MoBnBhIM OKOHeuHbIM YCTpoiCTBOM H3MepeNTbHbIM INCHTpymeHTOM. Pnp O6hApyKeHH HeCKONbKHX aKTHBbIX IN3MePHTeBbIX INCHTpymeHTOB Bb6peNToNDxoJrnn IN3MePHTeBbHINCHTpymeHT. Pnp O6hApyKeHH TOnbKO JInMb ODHO RkTHBHO IN3MePHTeBHO INCHTpymeHTa COeDInHeHHe yTaHaBnBaETc ABTomAtueckn.
CoeHHeHne yCTaHOBNeHO, KOrDa 3arOpaETc HnDnKaTOp Bluetooth®(8).
CoeHHeHnNo BTooth MoKTeN ppeBaTcBn3-3a 60nboro pacctoHaHHnn PpenATCTBm MeKdy H3MePH
TeIbHbIM HNCTpyMeHTOM Mo6NbHbIM OKOHeuHbIM yCTpoiCTBOM,a TaKke N3-3a 3JeKTPomarHHTHBIX NOMex.B TaKOM cnYue HnDkaTOp Bluetooth®(8) Muraet.
BbiknoueHne Bluetooth
IINBbIKHIOUeHHnBluToothDnIINCTaHUNHOHOROynpaBHeNHNHAHXMITEKNKNYBluTooth(9)ININBBIKHIOUHTNE3MePNTeNBHBnHCTpyMeHT.
Hndkatop npdeynpejckdenn o hapyueneHH KAN6pOBKN CAL guard
Datukn npedynpexdeHnO kAn6pOBKe CAL guard cneqIa 3a COCToHHem N3MepnteBHO IHCTpyMeHTa, daxe KOrda OH BbIKIOueH. EcnN N3MepnteBHyI INCTpyMeHT He NOnyuaet NTAHN OT AKKMyTApOp HnN 6aTaapeek, BByTpENHH NaKONtE hHeprHn ObecneuBaet 72 yaca HenpepbIBHOcLeXeHn Pn NOMOUn DaTuKOB.
DaTtHKn akTNBpyKTOc npn nepBOM BkHIOueHn H3MepHTeIbHOrO IHCTpyMeHTa.
ΦakTopbI cpa6aTbIBaHHn IpeDynpexKeHHn o KaHH6pOBke
PnHnactynneHHN OJHO r3 cIeMyoHx CObIyH CpaBtH BaeT npdynpexKeHHe O KaIIb6pOBKe CAL guard H INHnKaT0P CAL guard (3)3aRopaETcKpaChbIM UBeTOM: -HTepBaan KaIIb6pOBKn (KaJIbIe 12 MecuE) HCTek.
KoHTpOJIb ToUHOCTn H3MePHTeJIbHOrO HHCTpyMEnTa
ΦaKTopbI, BnHryoune Ha ToUHOctb
HanboBue BnHHe H aToHocb oka3bIaB eKpyKaIOua TemepaTpa. B OcoBeHNocTH TempeAtpHbIe nepenAbI, ImeOJIne MeTO NO Mpe ydaENHr OT NoBbl, MOrY TcTaB npuHOn OTKnloEHnna3epHoro lyua.
Mby pekomehdyem hncnolb30BaTb h3MepeNTbHbHbHcHTpyMeHT Ha 7aTATNB, YTO6bI CBECTN K MINHMMy BO3dEChTBe TENla, HxCOJaIero CHN3y. KpOME TORO, yCTaHaBNIBaTe H3-MepNTbHbH INCHPTyMEHT, NO B03MOXHOCTN, B cepEnHe pa6oey nobepxHOCTN.
Hapny C BHeuHHMn BO3eJCTBnMn, CneuHneckne nI INHCTpymEna BO3eJcTBn (HaNP., NaEHNn NIN CNbHbIe yIapbl) TaKke MOryT PnBODHTb K OTKIOHEHNM. PO3tOMy BCEJa nepei HaayIom paOToBt npOBepRte ToHocTb HHeJIPOBaHn.
PpOBepaIte Chayana ToHOCb HBeINpOBAHHropn-3OHTaBHOJlaePHoJIINHnA, a 3aTeM ToHOCb HBeINpOBAHH BepTKaBbIX laePhbIX INHn.
EcnB BO Bpemr OJHO H3 npOBepK N3MepntbHbI INCTPymENT PpeBbICNT MAKCmAlbHO DOYCTHMoe OTKIOHeHne,OTaTe erO B pemOH B cepBNCHyIO MaCTepCKyIO Bosch.
IpoBepKa TOUHOCTN ROpH3OHTaIbHOro HHBENPOBaHHBdoJI nonepeuHoH OCH
JIa KOHTpOHa Heo6xOaHm CBO6OaHbI OTe30K 5Ma npouHOM OCHOBaHH Mekdy CTeHaMn A N B.
-3akpeHnTe H3mepHTenbHbHnHCTpyMeT B6n3n CTehA Ha 7tATHe HnYcTAHOBITEeroHa npOuHoe, nIOCKoe OCHOBaHne. BKIOUHTe H3mepHTenbHbHnHCTpyMeT dIpa0tBcABTOMaTHueckMN HnBeINPOBaHNem. Bb6epTe peKIM pa0tB, npN KOTOPOM TOpN3OHTaHBaH N BePTKaIBHa Na3epHbE PNOCKOCTn H3nyaHOTc CnpeENn H3-MepHTenbHOrHCTpyMeHTa.

- HanpaBbTe Na3ep Ha 6nHIOCTeHy A n daIte H3mePInTehOMy IHCTpyMeHTy HNBENPOBaTbcr.OTMeTbe CepeHNHY TOKIN, B KOTOpOaNa3epHbIe NHHN nepeceKaIcra HA cTeHe (TOUka I).
-NoBepHnTe N3MepnteIbHbI INHCTpyMeHT Ha 180°,noDoxnTe, nOKa OH He npOn3BeTe CaMOHBENPObAHne, OITMeTbTe TOUY KepeKpeUBaHnHa Ia3epHbIX IHHn Ha npOTUBONOLOXHO CTHe B (TOKA II).
- YCTAHOBITE H3MepNTeBbHbI INCHPTyMeHT - He NOBOPaHBA erO - B6n3N CTehb B, BKIOHTe ero n daTe emByBpem HAIBENIPOBATBCA.
HaTpoTe H3MepeHbHbH NcTpymeH Tn BbCote (cn MoouBIO tATNBA HIN NOKNaDOK) TAK, YTO6bl TOUka nepeKpeuBaHna Ia3epbIX INHH ToHOba CpaHee OTMeueHHO TOkO II HA cTeHe B.
-ПовернгИЗМерпелбий ИСТРУМЕТ Ha 180°, He Измени ВсICOTы. HanpaBte ИСТРУМЕТ Ha CTeHу A TAK, UTOБы ВERTКальгай Лаэргай ЛINHApyoxOДиа Урета Уже OTMeueHHYIO TOUky I. ПОJOДNTe, NOKA ИСТРУМЕТ He 3aKOHHT CamOHnBEHnPOBaHne, И OTMeTbTe TOUky Nepeke\PuBaHgлЯэрьхлINHиHa CTeHа (TOUka III).
-PacctoHHe d MEXy DByMa 0603HaueHHbIM TOUkAMn I n III Ha cTeHe A OTPaKaet pakTHueeCKoe OTKIOHeHne N3MePnPteBHO HOHCTpyMeHTA NO BbICOTE.
Ha yuactke 2 × 5 M = 10 M MaKcHMaJIbHO DoIpyCTHMoe OT-KNOHEHHe COCTaBnREt:
10M×±0,2MM/M=±2MM.TaKHMo6pa3OM,pacCToHHe d MeKJyTOUkAMnI HII He DoJIKNHOpeBbIaTb MaKc.2 MM.
PpOBepKa TOUHOCTN HNBENHPoBaHnB BepTnKaIbHbIX
Длп поверкь Bam Tpe6yeTс рpoem DBepn, B 06e CTopoHbI OT KOTOPORO (Ha npouHOM nOу) ectb CBO6oHoe pOCTpaHCTBO dINHOH He MeHee 2,5 M.
- YcTaHOBnTe H3MePHTeBbHbI HNCTpyMeHT Ha pacCTOHH 2,5 MoT DBePHOro Ipoema Ha npOuHoe, POBHOe OCHOBaHne (He Ha WtATNB). BkIOUHTe H3MePHTeBbHbI HNCTpyMeHT IaIpa60bI cABTOMaTHueCKHM HNBEINPOBaHNEM. Bbl6epHTe peKHM pa60bI, pni KOTOpOM BepTKKaJIbHaIa3epHaaIIOCKOCTb H3IyuaETc Cpepei N3MePHTeBbHO HO HNCTpyMeHTa.

-OTMeTbeCepeHHyBepTHKaIbHOHnnnHa nOy B npoeMe DBepn (Toka I), Ha pacCToRHaB 5 M cDpyroCtopoHbI npoeMa DBepn (Toka II), a TaKKe no BepxHemy KpaIO npoeMa DBepn (Toka III).
-Повернite Изм epitelbHy INHCTpymert Ha 180°и noCTaBBte erO NOДугIO CTOPOHy DBepHOro npOeMa npRMO nO3aHn TOUKN II.ДaHTe I3MepITeBHomy npHbOpy caMoHNBeHnPoBaTcHn HAnpaBbTe erO BepTHKaJIbHbIe Na3epHbIe lyuN Tak,чTObIh XCEpeDINbI pPOxOdINn ToUHO uepe3 TOUKN I NII.
-ПометътсерснHyлзерноучаHaВерх hem Краe DBерно npoema KaK Touky IV.
-PacctoHHe d MeKdy DByM O6O3HaueHHbIMn TOyKaMn III IV OTo6paKaet paKTuYeCKoe OTKnOHeHne H3MePHTenb-Horo IHCTpyMeNTa OT BePTNkAIN.
HmepbTe BbcOTy PpoMa DBeRn.
IIOBTOPTNE npoecc n3MepeHHa DByx BeptnKaJIbHbIX na3epHbIX nIOCKOteN. Bbl6epHTe peKIM pa60tI, pni KOTOPOM BeptnKaJIbHa N3epHra NIOCKOCTb N3lyuayetc C60ky n3MePHTeBHOrO INCHTpymEHTA, INOBEPHTe N3MepeTEnbHbINHCTpymEHT NepeD hauJOM n3MepeHHa Ha 90°
MaKcHmAlbHO DOnyCTHMoe OTKIOHeHHe paccHTbIbAeTcNcEduOuMn 6pa30m:
DBoHnA BbCota DBePHO npoema × 0,2MM /M
PpHMEp: pN Bbcote DBebpHO pPoema B M MaKcHMaJIbHOE OKIOHEHNE MOXET COCTABIHTb
2× 2M× ± 0,2MM / M = ± 0,8MM .TouKINIIVdoJHKbHaXOHTBCaPnO6oHxN3MepeHHxHa paCCToHHMaKCHMyM0,8MMDPyROTDPyra.
Yka3aHnno npmHeHHIO
NcnoIb3yIte Bcerda TOnbko cepeHny na3epHOH Hnnn IIO MTMeTKn. HnpHa na3epHOH IHHn HmehReTc no Mepe ydaJIeHn.
Pa60TbC Bn3HpHoM MapKoN
Bn3npna Mapka (28) ynyuetaet BnIMoctb na3epHoro lya npn He6laoropnTbix ycIOBnx Ha 6oIbuxpacctoHnx.
OtpaKaIOUaI NOBEPXHOCTb Bn3HPOH MapKn (28) ynyuHa-ET BnIMOCt bIa3epHOJ NINHN, HApno3paHNOBepXHOCTN Ia3ePHyIO IINHIO TaKKe BnIDHO C TbJIbHO CTOpOHbI BN3HPOH MapKn.
Pa6oTa co 7aTHBOM (nPnHaIeJekHocTB)
山taHB oecneuBaet c6nBHyO, perynpemyIO No BcCote onopy nH3mepeHH. NocTaBte H3mepntbHbI HNCTpyMeHT rHe3dOM NOJ WtATHB 1/4" (20) Ha pe3b6y wTA-tNbA (32) INH O6bUHOro FOToWtATNbA. JINr yCTaHOBKn HA obBuHb CTPONTeHbH bITATNB NCNoB3yTe rHe3do NOJ WtATNB 5/8" (19). 3aFHKcPyTe H3mepntbHbI NHCTpyMeHT C NOMOsbIO KpeNeKHOBOHHTA tNbBA.
PpeBapntbHO BbipOBHnTE WtATNB, npexJe Yem BKIOuatb N3MePTeHbHn HNCTPYMENT.
ΦHKcaunc n NOMOuBHOYHNBepcAusbHOro KpePHeHHa (npHaadnHexHoctb) (cm.pnc.C)
C NOMOJIbU yHnBepCaJIbHO rKpeJIeHrA (25) MoXHO 3a-KpeNTb H3MePHTeJIbHbI HNCTpyMeHT, HApIMep, Ha BepTHKaJIbHbIX NOBepXHOCTx HIN HA NOBepXHOCTx H3 MaHTHbIX MaTepHaIOB. YHnBepCaJIbHOe KpeJIeHne MOXHO TaKKe IcIb3OBaTb B KaueCTBe NoCTaBKn. OHO oBJeYaeT BbipABHHBaHHe INHCTpyMeHTA IO BbcOTE.
PnФKcaun npHnAdneXHOCTK NOBepxHOCTM DEXPHTe NaIbCBy BDAHOT 3aDHeuactn MarHTHOH npHaDeNEXHOCTN. Bpeyntate CInbHoro MaHHTHOrO npTJKeHH MoKET npon30TH 3aUeMLeHne NaIbueB.
PpeBapntelbHo BblpoBnIte yHNBepcAIBHe KpeIeHne (25), npexKeYem BkIOaTb H3MePHTebHbH INCTpyMENT.
Pa6oTa cIa3epHbIM npHEMHNKOM (pPnHaJIeXHoCTb) (cm.pnc.c)
PnH6NaornpnTHOcBSeHnCTn(CNbHoeOCBeHHe,PnMbteCOnHeHbIeNyH)Ha6BoJbOMpacCToHHIN DnnyuWero HaxOxKeHnna3epHBIXnnHnNcNoB3yTe na3epHbNpneMHNK(29).PnPa60tAXcna3epHbIM npEmHKOM BKNIOaHTpepeKM npHEMHKKa(CM.,PeKMnpEMHNKa",CTpaHua173).
OuKnIpa60TbIcna3epHbIM HhCTpyMeHTOM (pHaadnHexHoctb)
Ia3epHbIe OUKn OTpMbTpoBbIAHOkpykaIOuC BcET. Io3ToMycBET na3epa KaKcTeCBAOoe npKm DnI 3pntelbHo- ro BocnpraTHA.
He hcnb3yte ouKn npa pa6oTb c na3epHbIM HnctpymehTom (npHaJnxKHOCTb) B KaueCTBe 3aunHbIX oukOB. OcKn dIpa6oTb c na3epHbIM HnctpymehTom oecneuBAOT nyuwee pacno3habAne na3epHoro Lyya, Ho He 3aunuAot OT na3epHoro H3nyeHna.
He hcnol3yIte ouKn Ipa6oTbI c na3epHbIM HnCTpyMeHTOM (PpHaadneXHOCTb) B KaueCTBe coHN- ceaunTHbIX OOKOB Hnn 3a pyem. OouKn Ipa6oTbI c Na3epom He oecneuBaHOT 3auNTy OT YΦ-H3nyeHnN MeaAOT PpaBnHOMY CBETOBOCpNAHTIO.
PpHmepbI BO3MOXhBIX BnO8 pa6oTbi (cm.pnc.B-G)
PpIMEmpeBbO3MOKHBxIpIMMeHHeHHN3MepnteBbHOrOHHTcPymEHaPnBeDeHbHaCTpaHuaxCpncyHKaMn.
TexobnyxHbAHne n cepBnC
Texo6cnyxmbHne n ounctka
CoepKHe H3MePHTeHbHbI HHCTpyMeHT NOCTOARHO BCHCTOTE.
HnKOrJa He nOpykaIte H3MePHTeJIbHbI INHCTpyMeHT B BOy HIN DpyTHe XIKKoCTN.
BbIpaIte 3aRpa3HeHn CyXo H MArKO TpAknKo. He nCnonb3yTe KaKe-Im6 OHeCTBa HnN pactBoHnTEHn.
Ouetaepepernpooc6eHNOOBepxHOCTyBbIXoHOrOTBepCTna3epaNCeIte npN 30TOM 3a OTCyTCTBHeM BOP-CHHOK.
XpaHNTe HnepeHOCTe H3MePHTeBbHINHCTpyMeHT TOnbKO B3aUNTHOH Cymke (31) HNNB OyTnape (34).
Ha pemOH TOpPabnIte N3MepnteHbHINHCTpyMeHT B 3a- uTHOM YexIe (31) INB yTnIpe (34).
CepBnKoHcyNbTHpOBAHHe NO BOpocam npMeHen
CepBnchbOtDenOTBeTHTHaBceBaunBONpocbI no peMoHTy nO6cnyKbBaHIO BaWero npOdykTa, a TaKxe No 3aNpaCTM. N3o6paXeHHcN pOcTpaHCTBeHHbIM pa3deneHHem DeNaTe HnHΦopMauNo 3aNpaCTM MoXHO NOCMOTpeTB TaKxe No aDpecy:
www.bosch-pt.com
KonneKTHCBOTpydHnKOB Bosch, npedocabnaHOuOH KOHCyNbTaaHnHa npedMeT nCnoB3ObAHnnpoDyKuHn, C
yBOBbCTBnEM OTBeHT Ha Bce Baun BONpocbI OTHOCHTeH HOro Hauen npOdyKun H ee npHaadJeXHOCTe.
IpoKanyIcTa,Bo BceX 3aPocax H 3aKa3ax 3aNpacteO 06raTeIbHo yKa3bBaIte 10-3HaHbI ToBapHbI HOpE IIO 3aBODcKoTabIIuKe H3dJIIN.
DnpernoHa:Pocnna,Benapycb,Kazaxctan,Ykpanha
FapaHTnHoe 6cbnyKbAHne H pEmoHT 3neKtpOnHCTpyMeH Ta, C cO6NIODeHem Tpe6OBaHn H Hopm N3rTOBNTeI npoH3BOyTcra Ha TeppHTOpHN BCex CTpaH ToIbKO BΦHpMeHHbIX INn ABTOP3OBaHHbIX cepBcHbIX eHTpax «Po6epT BoW). IPEyIPPEXJEHNE! NcNoIb3OBaHne KOHTpaKaTHOH npOdyKuIN OnaCHO B EKcnIyatauIN, MoKeT pInBeCTN K Uyepe6y dIra BaWoero 3dOpOBb. N3rTOBNeHne H pacnpocTaPahHeH e KOHTpaKaTHOH npOdyKuIN npeCneJeYetcno 3aKohyBaAMMHnCTpaTHBOM H yROLOBHOM NOPAKe.
Poccn
YyONHOMOeHHa H3ROBtEnem OprAHn3aun: 000 «Pobep BoW» BauTyINHcKe oocce, Bl.24
141400,r.XHMKN,MockOBcka8o7n.
Ten.: +7 800 100 8007
E-Mail: info.powertools@ru.bosch.com www.bosch-pt.ru
IOnonHnTeNbHbIe aDpeca cepBnchbIX ueHTPOB Bbl NaHdTeNo CbInke:
www.bosch-pt.com/serviceaddresses
TpaHcnpOpBbKa
Ha peKoMeHdyembIe IHTN-HOHHbIe AKKyMnTOpHbIe 6batape paCnPOCTpaHnOTc Tpe6OBaHN B OTHoWeHN TpaHCnopTnPOBKN OnacbIX rpy3OB. AKKyMnTOpHbIe 6batape MOrTy nepeBO3NTbcra CamHM NOnb3OBaTeEm ABTOMo6NbHbIM TpaHCnOPTOM 6e3 Heo6xOdmocnt Co6nOedHn DOnonHHTeJIbHbIX HOPM.
PnpebeO3Ke c npBneHem TpebX nIc (Hanp.: camoIetom HIN TpaHcnpTHbIM 3KcNeHTOpOM) Heo6xOJIMO co6NIOaTb OC6bIe Tpe6oBaHH K yNaKOBKe m MapKnPOBKe. B 3OM Cnyae PnPi NOrTOBKe rpy3a K OTpABKe Heo6xOJMo yuaCTHe 3Kcnepta no OAnchbIM rpy3am.
OtnpabnneAkkymnyTopHy6batapeoToIbnKc Henobpe KdeHHbIM Kopnycom.3aKnleTe OTKpbTbe KOHTaKtbi UynKaYte AkkymnyTopHy6batapeoToTak,UTObbl OHa He nepeMeUaNacB BHTpyuNakOBKn. Poxkanycta,co6nOdaTe TAKKe BO3MOXHbIe DOnONHITbHbIe HaunOHaNbHbIe NpeDncaHNH.
YTNIN3aun

H3MepHTenbHbHnHcTpymeHT,AKKMyIaTOp/ 6atapeKn, npHaJnEKeXHOCTn yNaKOBy HxK HO CdaBaTb Ha EKoONrueckn HcTcyUytINN3a- cHIO.
He bIb6paCbBaBnTe aKKMyJnTOpHbIe 6aTapeN/ 6aTapeKn B 6bIToBOm Mycop!
TolbkoДЯСТРАн-ЧЕНOB EC:
B cootbetCTBnC eBponeckO nIpeKTHBOI 2012/19/EU 06 Otpa6oTahbIX 3neKTPnueecknx H neKTPoHHbIX npHbopax N ee Ipeo6pa3oBaHnEM B hauNoHaJIbHOe 3aKooHDoTeJIbCTBO Bblweuine N3 yNTope6NeHn I3MePntEbnble INCTpyMeHtBI N B COOTBetCTBnC eBponeckO nIpeKTHBOI 2006/66/ EC deFeKTHbIe mN OTcLyKnBWe CBoI cPoK aKKyMylatOpHbIe 6Batapen/BatapeKn DoJKNbIc Co6npaTbc pa3dEnbHO n CdaBaTbc Ha 3KOLOrueckn uNCTyIO pekyepaunio.
PnHnpaBnblHoYttnn3aunn Otpa6oTaHHbE 3neKtpueckne H3neKtpoHHbIe Pnp6opbl Moryt OKa3aTb BpeDHO Bo3-DeiCTBHe Ha OKpykaUOyUcpeyN3doOpOBe Yenobeka N3-3a BO3MOXHO TpncyTCTBnB HHX ONaChbIX BeIecTB.
AkkymyIaTOPbHe 6aTapeN/6aTapeKn:
HHTNHOHOBBie:
IopKaanyiCtA,yuHTbIbAte yka3aHnB pa3dene "TpaHcnOpTnpOBk" (cm.,TpaHCnopTnpOBk",CTpaHnca 177).
YkpaIHcbka
Bka3iBkn 3Texhikn 6e3neKn

IpoHTaTe BcI BKa3iBKn IOTpMnyTeCe
IX,IO6 ppaIOBaTH 3 BMIpHOBaHbHM
IHCTpyMeHTOM 6e3NeuHO Ta HAdInHO.
BkOpHCTAHH BMIpHOBaHbHorO
IhCTpyMeHTa 6e3 DoTpMaHnR uX IHCTpyKuIMoKe npn3BecTHdo N0xKOJKeHH INTERPOBaHNx 3axHCNH MexAHImiM. HikOnn He DOBoJbTe NOpEJaYBaJIbHi Ta6nUKN Ha BmIPIOBaHbOMy IHCTpyMeHTi do HeBnIsHaHNocti. IO6PE 36EPIGAITe UIHCTPYKUII I IEPdABAIte IX PA3OM 3 IPEPAUEO BmIPIOBAJIbHO IHCTpyMEHTy.
06epexho-BHKOpncTaHHa3acobibO6cnyroByBaHHiaHactpoIOBAHn,UO BiDpi3HnOTbcBid3a3HaueHNXBiiinHCTpyKu,a6o BHKOpncTahHHdo3BOeHNX3ac06bY Heo3BOeHHcnoci6,MOKe np3BOHTDo He6e3neHOro BNnBy BnnpomHOBAHn.
BnMipOBaHbHn IHCTpMeHT NoCTaAcTbc3 nonepeJxByBaHbHO TO TabNcKoIO Na3epHOrO BnPOMiHOBAHH (BOHa N03NaYeHa Ha 3o6paKeHHI BnMIPOBaHbHO IHCTpMeHTa H CTOpIHci 3 MaHOHKOM).
Akuo TeKCT nonepdxyBaIbHOI Ta6nHKn Ia3epHOro BInpomHIOBAHHHaHncaHn He MoBOO Baoi KpaHH, nepe nepuHM 3anyCKOM Bekcnnyataio 3akneTe II HAKNeKOHO Ha MOi BaOH KoaiH, 0x BXoHNb y KomnNEKT NoCTaAHH.

He HanpaBnAte Na3epHn npomihb Ha IIOeA 60 TBapH, i cami He DnBtbcnHa npamn A60 BIDo6paXyBaHn Na3epHn npomihb.BIH MoKe 3acNilnTH inHxN IOe,
cnpnuHHTn Heaachi BinaaKn a6o noKoHTn oii.
Ypa3i notpannHna3epHoro npomeHa BOKO, HABMNche 3anIOUIb oui i BiDpa3y BiDBepHITbcBID npomeHa.
HiHOrO He mHaTe B nA3epHomy npHcTpoI.
He BHKOPNCOTBye OKyIaRn DnIPO60TH 3 na3epom (npna)Ak 3axnci OKyIaRn. OKyIaRn DnIPO60TH 3 na3epom 3abe3neuYtB Kpaue po3ni3HaBaHnH Na3epHOro npomeHIO, OJHaK He 3axuiaOtB BiJ Na3epHOro BnIPOMIHOBAHII.
He BHKOPNCTOByTe OKyIaIpynI pyo60TH 3 na3epom (npnaIaI) kK coHcEaxHChi OKyIaIpy Ta He BJaIaIe TIX, KOHN B3HAXOITec3a KepMOM. OKyIaIpy nI pyo60TH 3 na3epom HE 3abe3neuyIOb NOBHI 3axHCT BiD yΦ npomeHIB Ta noripWyIOb PO3NI3HaBaHNN KOJIbOpIB.
BidabaiTe BHMipIOBAIbHm IHcTpymEt Ha peMOHT NHE KBAANIPIKOBAHM qaxIBaAM Ta NHE 3 BHKOPHCTAHNMOpriHANbHx 3AnactHN.TiBKn 3a TAKNX yMOB BaW BHMIPIOBAIbHn npIaI iHaani 6yde 3aHHaTcA 6e3neuHIM.
HeO3BOJRATe DIITM BHKOPHCTOBYBaTH Na3epHNBMIPHOBAIbHN IHCTPmENT 6e3 HaIy. DITMOKByt HeHaBMnCHe 3acinNTn Ce6e YI HINX IIOJe.
He npaioTe 3 BnMipIOBaIbHIM IHCTpyMeHTOM y cepeoBnui, de icHye He6e3neKa Bn6yxy BHaCniOk npncTyHocti ropoux piinr, ra3iB a60 nny. Y BnMIPOBAIbHOMy pInlaDi MoKyTB yTbOpIOBaTHcI cKpn, BiJHKX MoKe 3aMAtnc IIN a60 napn.
He BIDKpBaIe akymyIaTOpHy 6aTapeIO. IChye He6e3neKa KopoTKoro 3aMnKaHHa
Pn nookxheni a6o He npabHbHn ekcnnyatau
akymyTopho6aTapei moke BxOHTn nap.
AkymYTopha 6aTapee moke 3aimatncb a60
Bb6yxathn. Bnycttb CbiKe nobitpr i - y pa3i ckapr
3BepHtbcn do nikapar. Nap moke noDpa3HIOBaTHn
DnxanbHi IJXn.
Pn Hn HnpaBbHomy BnKOpNCTaHHi 3 AkymyIaTOpHO 6atapei moKe noteKTn piHa. YHkaJIte KOHTAKTy 3 Heo. Pn BnnaKObOMy KOtAKTI pOmHIne BiNoBIDhe MicCe BODoIO. RaIo piHa notpanNa B ooi,doaTKOBO 3BepHITbcr do nikapA. AkymyIaTOpHa piHaMoKe cnpuHHrN noDpa3HeHHr WkIpn a60 oniK.
FocpHmnpEmdetamn,Hanp.,rbi3dkamna60 BHKpykamn,a6o npNKladaHHMa 3OBHIhboi Cnn MoKHa noKoHTn AkymyIaTOpHy 6aTapeo.MoKJIHe BHYtpiHc KOPOTKe 3AMKaHHa,3aOropHHa,yTBopeHHa Dmy,B6byx a6o neperpib akymyIaTOpHO6bataei.
He 36epiraite akymnytohpny 6atapeio, kkoBn came He KopncTyecb, nopad i3 KaHcneIpcbKHMn ckpinkamn, KIOUqAMn, Tbi3dKAMn, TbHTAMn Ta IHWMN HeBENKHM MeTaneBHM NpeMetAmn, kki MOxytb cnpuHHTH NpeMKNAHN KOHTAKTIB. KopOTke 3aMHKaHH MIX KOHTaTAMn akymytoTOPHOI 6atapeIMOKE cnpuHHTH OIKN abo noKexy.
BnKOpHcTObyIte akyMnyIaTOpy 6aTapeIO IInse y Bnpo6ax Bnpo6hNka. NInse 3a TaKHX yMOB akyMnyIaTOp 6Bye 3axnueHH BID He6e3neuHOro nepeBaHTaKeHHa.
3apaJkaTe akymyTOpHi 6aTaepi HnWe B 3apAHHx npHCTpoX, peKOMeHNDoBAHNX BnPo6HHKOM.
BnKOpNCaHn3apJxByBaIbHOro npCtpoIO nny
akymyTApOHH6batape, nnyAKNX BIn He nepedbaeHm,
MOKe pN3BODHTNo NOxeki.

3axuataeakymnytophy6atapeo Bid Tennla,30kpeMa,Hanp.,BIDcoHnHX npomehIB,BORHO,6pydy,BODTaBOrH. IChyec Hebe3neKa Bb6xyi KopoTKoro 3AMHKAHJ.


TONEPEDEXEHHA


TpMaTe MihiaHopi HeneHTN XHBNEHHa HeIOCTynHomy dna diteMicu. MiHaIaHopi eneMeHTN XHBneHHa He6e3neHi.
MihiaTuphi enemehn XNBHeHH He MOxHa KOBtAn a6o BBOHTN B iHni npnpOHI OTBOPn Tina. Y pa3i nio3pn Ha npokobTyBaHH MihiaTupHoro enemeta XNBHeHH a6o NOro BBeEHH Kpi3b iHNI npnpOHI OTBOPn HeraaHIO 3BepHITbc DO iKapra.
PpOKOByBaHHaMIHaTOpHoro eIeMeHTaXHBnEHMOKe npToTROM 2rOHN pN3BecTH Do BaKHXBHyTpIHix OnIKiB i Cmepti.
BukohyTe 3amiHy MiniaTOpHnx eneMeHTIB KHBnEHHaHEKHM qHHOM. IChyE He6e3neKa B6yxy.
BnKOpHCTOByTe IHe eIeMeHTN XHBneHH KHOKNBOrO TnHy, Bk3aHI Bui iHcTpyKu3 3 ekCnnyatau. He BnKOpHCTOByTe 6yDb-aki iHsi MINiAtIOHi eIeMeHTN XHBneHH a60 iHwi JxKepeNa CTpyMy.
HeHAMARATE3HOBY3APADHTMIHATOPHNI eHemT XHBNEHH I HA 3aKOpouyTe MIHATOPHNI eHemT XHBNEHH. MiHATOPHNI eHemT XHBNEHH M0Ke BTPaTHN TepMeTHuHCTb, Bn6yXHyTN, 3aHRTNCI TpaBMByATNIHOJe.
BnmaTe yTnni3yIe po3pJxHcMIiAtophi enemEnTH XNBHeHH 3rIHO 3 npHncAMn. Po3pJxKeHi MINiaTHPOHI eneMeHTXNBHeHH MOxyTB BtpaHTN repMeTHuHicTh i NOIKoHTN pOpyKT a60 TpaBMyBaTH IIOeI.
He neperpbaTe MHiAtOpHn enemEt XNbneHHi He KdAte NOr y BORoH. MiHiatOpHN eneMeHT XNBIeHHa MOKe BTPaTHn repMetHnHicTh, Bn6yXHyTN, 3aHIaTcA I TpaBMyBaTH nIOeH.
He nowkodkyte miniatopnne enemet knbeneHHI he po3bnpaTe noRo. MihiaTOpHN eneMeHT KNBHeHHMOKe BTPaTNTn repMetnHicTB, Bn6yXHyTN, 3aHrTnci TpaBMByATn IIOJe.
He do3BonaTe MihiaTlOphOMy enemeHTy XHbEnHn KOHTaKryBaTH 3 BOIOQ. BInbneHn nITI moKe yBiINr
Bpeakuio3 BOHnEM BOHN, BKNKlnKaOHy nPn Ucbomy NOkexy, B6yxa 0p TpaBMvBaHHNIOJe.
PnHHHtB BkOpHCTAHH BmipHOaBbHOro IHcTpMeHTA, KUO TpMaM uMHiaTOpHOro eMeHtA XuBHeHH (22) He 3aKpNaBcTa. BmMitb MIHiAtOpHn eneMeHT XuBHeHH i BiDaIte TpMaU y peMOHT.
Ipeep ycima maninyuianm3BHMipOBaBHN m IHCTpymENTOM (Hanp.,MOHTAXEM,TEXHINM 06CnyROyBaHHAMTOO),aTAKOXnPHNHO TpaHCnOpTyBaHHi 36epirAHHI BHMmaTe aKmyJrToPhy 6aTaPeIO 6o 6aTaPeIKH 3 BHMipOBaBHoI hCTpymeHa. PnHeHaBMCHOMY BKIOUeHHI BIMNKaua ICHye Hebe3neKa nopaHeHHA.
Pnpo60i3BmipOBaIbHmIHCTpymeHOM3a neBHnx yMOB MOKyTb NyHATn rOOnCH 3ByKoBi CnHAn.3ciipnHnTPMaHTe BmipOBaHn IHCTpymeHT Ha BiDctahi BiD Byxa i BiD iHux oci6. TuyHn 3BYK MoKe NooKOJTHn CnyX.
He BCTAHOBHIOte BMIPBOAbhnn IHCTpymeHT IMarHIThe npnndra no6n3y IMnHaTantib iIiXnx MeDHyAn apatIB, Hap., KApIOCTMMyTOpB i IHCynIHOBx NOM. MarHITb BMIPBOaHOrO IHCTpymeHTa I npnAaCTBOPIOb NOE, AKe MOKe HErATNBHO BnNBAtH NaFHKIOHaJIbHy 3aTHICTb IMnHaTaHtIB iIHxN MeDHyAn apatIB.
BmipobbHHn IHcTpyment imarHtne npnaad He nobHHI 3haxoHTncn o6n3y mharTHnx HocfB daHX i npnaIDIB, yTnNBHX Do mharTHoro non. DIm marHITIB BMIPBOBaHOrO IHCTpymeHTa I npnaMDMOKe cnPHuHHTH Heo6OpOTHy BtpaTy daHX.
BmipobbHH IHcTpMeH 0bnHaHH paioiHTepFeHcom.3BaKaIte Ha MiceBi 06MexHn, HAp., B nItakax a6o lkapHx.
CNoBecHn TOBapHn 3HaK Bluetooth® i rpaDiHi TOBapHi 3HaKn (NOrToTHn) e 3apeeCTpOBAHHMTOBAPHHM 3HaKaAMi IBaChicTIO Bluetooth SIG, Inc. KomnaHia Robert Bosch Power Tools GmbH BnKOpncTObYe ci CNoBecHi/raPdiHi TOBapHi 3HaKn 3a Niueh3icIc.
06epeXHO!PnBnBkOpNCTaHHi BmMipOABbHoro 1nCTpyMeHTy3BluTeothMOxNBI nepeKoDN DnI INHINnpAadIBiYcTaHOBOK,niTakIBiMeDnHcBKnx anapatIB (hanp.KapdIOCTMMyrTopiB,CnyXBnx anapatIB).KpIMTOH,HE MOxHA NOBHCIOBnTH MoXNBicTB3aBDAHHUoDNIIOJAMITbAPnHAM,IO 3hAXoAByCB6e3NocePeHNI6n3bKocTI.He KOPNCTyTEcBAmIPBOAbbHM IHCTpyMeHToM 3 BluetoothnoN3y BiMDnHcBKNx anapatIB, 6e3oKoONoK,XMiuHNx yctAHOBOK iTepHTopi,Ha JkNx icHy eHe6e3NeKa Bb6yixab6oMoKytb npOBOntncPiPbHIpoBt. He KopNCTyTEcBAmIPBOAbbHM IHCTpyMeHToM 3BluetoothBnTakax.HamaraTEcHe BMHKaTH IHCTpyMeH TaPBAnHvac6e3NocepeHbKO tina.
180|YkpaHcbka
Cymichi naeephi npnmaui LR 6, LR 7 LR 7
Hnizno niz wtaHB 1/4",5/8"1/4",5/8"
KbIeHHBmipioBaHbHoro IHCTpyMeHTa
-Akymyntopha6atapera(nii- 12B12B iOnHa)
-Батapestен (лухно-марганцебi) 4×1,5ВLR6(AA)(3 nepexiДннkom 4×1,5ВLR6(AA)(3 nepexiДннkom Дяьбатapestиok)
-Буфернабатaperи(MiniathopnHex CR2032(nii-iOHaakymyIaTOpHa CR2032(nii-iOHaakymyIaTOpHa 6atape3B) enemTeiBKNBHeHH
TpBaicTb ekcnnyatau3 3 na3epHHM nIooHnHaMa
-3akymyTopHO6atapeeIO8ro. 6roI.
-36atapeiKam 6ro. 4ro.
Bluetooth® BIMIPHOBAHORIO IHCPTPYMENTA
- Cymichictb Bluetooth® 4.0 (Low Energy)Bluetooth® 4.0 (Low Energy)
-Мakc.dalbHictb cnHany 30MH 30MH
-Po60n diana3oh qactot 2402-2480 M2 2402-2480M
-ПOTужнICTь петерài мкс. <1MBT <1MBT
Bluetooth®cmapTΦOHy
- CymichicTB Bluetooth® 4.0 (Low Energy) Bluetooth® 4.0 (Low Energy)
-Операцьни систema Android6(iBnue) Android6(iBnue)iOS11(iBnue)iOS11(iBnue)
Bara BjnoBjno do EPTA-Procedure 01:2014
-3akymyntopno6aatae0 0,90Kr 0,90Kr
-36atapeiKamn 0,86Kr 0,86K
PozMipn 162×84×148MM 162×84×148MM
DeakTHBaui cyHKui ABOTMAuHOROBHMKHeHH
JHKU npOTaROM pH6JI.120 XBnI. He HATNCKaTH Ha KODHy KHONKY HA BmIPIOBaNbHOMY IHCTPMEHT, IHCTPMEHT aTOMaTHuHO BmNkaTbCra, 3o5 3aoUaNTn AkyMnyTOp abo bataei.
Uo3HOBy yBIMKHYTN BHMIPBOaBbHn IHCTpyMeHT nicra ABTomATuHOrO BMKHeHH, MoXHa a60 NocyHyTH BUMKaq (16) CnoaTky B NoIOKeHHA Off, a NotIM 3HOBy yBIMKHYTN BHMIPBOaBbHn IHCTpyMeHT, a60 OHN pa3 HaTHCHyTH KhoNk pyekmny po60Tu na3epa (7) a60 KhoNk pyekmny npinMaya (5).
Uo6deakTHByaTH aBOMaTHNe BUMNKAHn, npu yBMKHeHOMY BMIPIOBaIbHOMy IHCTpyMeHTI TpMaTe KHOKNy peKmMy pOBoTH Na3epa (7) HATNCHyTOI pINHaMHI 3c. RaIO abOMaTHNe BUMNKAHn DeAKTHBOBaHe, na3epHi npOME Hi KOPOkO 6JIMaOTb Ha NiITBePdKeHH.
Uo6aKTHyBaTH cyHKuio aBtOMaTHHOrOBHMKHHeHH, BMMKHTbBMIPIOBaIbHNnPiunad i3HOByYbIMKHITb HrO.
De3aKTHBaui 3BykoBOrO CHHany
Pn yBIMKHeHHI BHMIPIOBaHbHO npnaDy 3ByKObN CnHaI 3aBXnAkTHBOBaHn.
IINBHMKHeHHa60YbIMKHeHH3ByKOBOrO CnHany ODHouacHO HATNCHTb KONky peXmMy po6oTn Na3epa (7)i KONky peXmMy npMmaa (5) i TpMaTe ix HAtnCHeHHMe MeHw HIX 3 C.
PnAkTNaBci i De3akTNaBci nyHaoTb TpN KOpOTki 3ByKOBi CnHaNNIy NiTBePdKeHH BnKoHaHOI onepaJI.
Pexmmpo60Tu
BmipioBaIbHn npHnaMaEKeIbKapeKHMIBpo60TH, kIMoXHa Bbyb-akn qac nepeMkATn:
-BNpomHOBaHHoDHiieI rOpH3OHTaBHOI NaepHOI NIOUHN,
-BINPOMIHOBaHHoOHiCBePTNkaIbHOI Na3epHOI NIOHN,
BnnpomHIOBAHHIBOXBepTnKaIbHnxIa3ePnHxIIOuIHN,
-BINPOMIHIOBAHHO OHIEI TROP30HTaJIbHOI Na3epHOI NIOUHHN TaDBOX BEPTKKAJIbHN XNa3epHNX NIOUHH.
Piicra yBIMKHeHH BmipIOBaIbHn npnaIaB HnPOMiHoe Ondry rohp3oHTaIbHy na3epHy nnouHy. 063miHnTpeXHM,HaNTCHITb Ha KONky peXMy po6Otn na3epa (7).
Yci peKIMPi60Tu MOKHa BMKAATn 3 aBTOMaTHHm HIBENOBAHNM a6o 3 bOKyBaHHMaTHNka.
Pexnmpnmaa
Дяpo6i3naepHm npnMaayem(29)-pi6ydb-akomy pexnmi po60t-NOBnHeh 6ytn yBIMKHeHH pexnmpnmaa.
Y pexnmi npinmaa na3ephi nii6nmaotb 3 nyke BnCOKOU qactOTOIO, IO DO3BONRE na3epHOMy npinmauebi (29) po3ni3HaTHix.
U6 yBIMKHyTN pEXHM npHmMaay,HaTCHITb KHONKY pEXHM npHmMaay (5).IINiKAtOp pEXHM npHmMaay (6) CBITbC3eJIeHM KOLbOpM.
Pn yBIMKHeHomy pexHmI npHmMaay BUNMlCt b naepHnx liH nnIOcbKOro OKa e 3HNKeHO. npo6it 6e naepHORO npHmaya BUMKHITb peKHM npHmaya, ue pa3 HaTHCHyBwHa KHONky peKHM npHmaya (5). HnKaTOp peKHM npHmaya (6) rache.
AbTomatnuhe HibenIOBaHHa
Po6ota y pexkmi abTomatuHoro HibenobhaHH
BCTaHOBIb BmIPIOBaIbHn IHcTpyMeHT Ha TBepy Trop3oHTaIbHy NOBepxHIO, 3akpiITb Noro Ha yHIBePCaIbHOMy KpINIIeHHI (25) a60 Ha WtATnBi (32).
ДяpoBOTN3aBOMaTHHIMHIBeJIbOBAHHmNepeCyHBTe BIMNKaU(16)B NOJIOXeHHA《T》
ABTomatnue HIBenIOBaHHa ABtomATnHBOBipHBIOE hepBHOCTy Mexax diaJana3OHy cMOHBeIIOBaHHA ± 4^ HibenIOBaHHa 3aBepHe, kTINbKn Ia3epHi nHII npnnHApOTcCBi pyx.
AaOBtOMaTHUHe HIBeIOBbAHHaHEMOXJIbHe, HApNKnIaI, AIOBepxHn, HaIKi BCTaHOBneHH BmIPIOBaIbHn IHcTpymEt, BiPizHIeTbcra Bid rOpH3oHTani 6InBe Hk Ha 4°, Na3epHi NiHII NouHAIOTb 6INMaTHy U WbHKOmy TeMNI.
KIO 3ByKOBn CnHaN YBIMKHeHH, BIN NyHaC 3 KOpOTKNMn INTePbanaMn.
BctaHOIBt BVMIPBOAbHn IHCTpyMeHT B Trop30HTaJIbHe NOJoxeHHI 3aueKaHte, NOKn HE 3akIHHTbcra ABOMaTHUHe CAMOHIBeIOBaHH. IicnaTTO K B VMIPBOAbHHn npHaJyBiNe B Diana3OH aBTOMaTHUHO HIEJIIOBAHH4" , na3epHi npOMEHI NOuHaIOBcR 6e3nepepBHO CBITNTcR i 3ByKOBn CINHAHBMNKAcTbCA.
PnCtpycax Ta 3mHax NOOKeHHN pOToTROM ekcnnyataaB HBMIPOBaBHn IHCTpymeHT 3HOBy aBTOMaTHUHO HIBENIOETbCra. NICrN IOBTOpHORo HIBENIOBAHHN,IO6 3Anobirn NOMIKAM BpeyIbTaTI 3CyBaHHB HBMIPOBaBHOro npnaLy, nepeBipTe NOOKeHHR TOpH3OHTaBHoi YN BePTNKaJIbHOI Na3epHoI liHII BiDHOCH6a3OBHX TOOK.
P60Ta3 6nOKyBaHHMaTHnKa
Дяpo60t36nOKyBaHHMaTTHKa nepecyHbTe BmHKaU(16)BnoJoxeHHA<On),IINKatop 6nOKyBaHH MaTHHka(4)CBITbCByepBOHMi na3epHi niiHIOCTIHHO 6JIIMaOTb y nobInbHOMy TEMni.
PiJac pO6i3 6KoYBaHHMaTHnKa ABToMaTHUHe HIBeIOBAAHBAHMKHe. BIMIpOBAIbHIn IHCTpyMeHT MOXHa TpMaTHn Bpyu afo NOCTaBHTn Ha NoxNHy NOBepXHO. Na3epHi NiHii 6Bbue He HIEBIOTOBcH i He oOB'3KOBO npoxOaTb nepneHnKnyIpaH OHa Do OdHoi.
Iicra cnpaobbyBaHH nonepeJxHnIHnIKatop CAL guard (3) CbITbca Do Tnx nip, KOHN He 6ynde nepeBipeHa ToHicTb HBeJIIOBAHH I NOTIM He 6ynde BHMKHeHH IHNkATop.
Iiy pazi cnpaocboByBaHHn nonepdxKeHH npo KanipbyBaHH
IpeBipTe ToHicTb HIBENIOBAHHB BIMIPIOBaIbHOrO IHCTpyMeHTa (INB. "IpeBipKa ToHocTi BIMIPIOBaIbHOrO IHCTpyMeHTa", CToPiHa 185).
Kkuo nuc ycx nepebipok MaKcHMaJIbHI BiXnHeHH He nepeBnuehi, BmKHTb iHnKaTOp CAL guard (3).ДЯцboro TpmaTe OndOuacHO HaTNCHEHMN KONKY peKmMy npMmaya (5) i KOnKy Bluteoth (9) npOTrOM He MeHwe HIX 3 c. IHnKaTOp CAL guard(3) rache.
Kyio nuc oHie3 nepeBipok BmipBoIbHn IHCTpyMeHT nepeBnITb MaKcHMaJIbHO DOYCTHMe BiXInenHH, Ioro TpeBa BiHeCTHa peMOHT Do MaIcTePHi Bosch.
Ipebeipka Touhocti BmipobanbHoro IHCTpymenta
ΦaKTOpH, ξO BnINBaIbTb Ha ToUHicTb
HaibbBnBnB CnpaBnRE Temnepatypa 3OBHIHBorO cepeoBnua.OcbnoTEMnepatpyH npenadn,io
CnOCTepiraIbCBaMipyBIDaJIeHHBaIpyHTyMOKyTB CnpHnHrTbBIXINHeHHNa3epHOro npMeHra.
1063BcTnD0MINIMyM TYNNOBBIINBNBIDTENNA,IO nHIMAcTBcBII niNtN,peKOMeHNyETbC BCTaHOBHTBMMIPoBAhBNIHCTpyMeHT HaIITAB. KpimTOR,3a MOKNIBCTIO BMIPoBAhBN IHCTpyMeHT Tpe6a BCTaHOBIOBATN B CEHTPi pOboOoi DInrKn.
Iopn i3 3OBHIMm yMOBAMn TAKo j Cneuifiu nI INCTpyMeHTy MOBN (HaNP.. cTpyCNbHi Ydapu) MoKyTB pN3BOiNTn Do BiXIneH. 3 liEi npuHH KxKHO pa3y nepeD NOaTkom Po6OTo NpeBipRte ToHicTb HBeINOBAHn.
Cnoatky nepebipte TouyHCTb HIBeIOBAAHH Trop30HTaIbHOI na3epHOI liHii, a NotIM -TouyHCTb HIBeIOBAAHH BePTKakbHnx na3epHxN liHii.
JaNIO nIac OndHie3 nepeBipOK BmIpOBaIbHN IHCTpyMeNT peBnuNTb MaKcMaJIbHO DonyCTnme BiXnHeHH, HOrO Tpe6a BiHeCTn Ha pEmOH Do MaIcTePH Bosch.
Ipebipka touhocti rupnontanbhorcAmohibenbohna y3dox nonepuhoi oci
IynepeBipKnNoTpi6HaBInbHaBmipObaHbAinraHKa DOBXNHOIO 5 M HA TbePDoMy rpyHTi mixDbOMa CTiHaMn A i B.
BCTaHOBITB BMIPOBaBHn npnaI KO nA Ha 10TaTb a6o BCTaHOBIT boro HA TBepy, pIBHy NOBepxHIO. YBIMKHTB BMIPOBaBHn IHCTpymENT dIra po60TH 3 aBTOMaTHUHM HIEJIbOBAHHM. Bn6epiTBpeKmPo60TH, B KOMY ROPN30HTaJIbHa Ta BEPTHKaJIbHa Na3ePha IIOUHN BINPOMIHIOITbCR nonepedy BMIPOBaBHORo IHCTpymEnta.
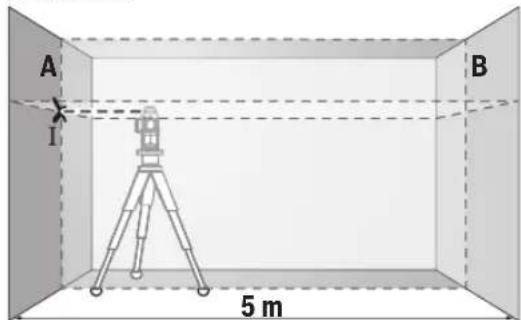
- Cnpmyte na3ep ha 6nKcy cHy A ta daite Homy HIBeIOBATnca. Po3Haute cepeHHy TOckN, B Aki naeephi NiHII nepexpeuIOTbcra Ha CTHI (TOka I).
-Поверпь ВИМЮВалбнй прлад ha 180°, даite Ну My HIBENOBATNCSI NO3HauTe TOUky, Bякіи NAeEHpi NiiHIN nepexpeuTyObca Ha npOTnEcxHi CTHI B (TOUka II).
- Po3aIyIe BIMIPIOBaNbHn npNAd, He NOBepTaOuH Noro, KOLO CTIN B, yBIMKHiTb Horo Ta daIte NOMy HIBeIOBATNCRA.
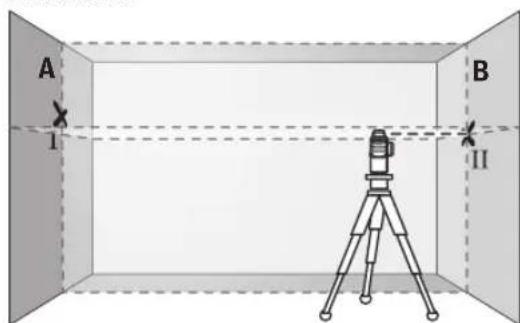
BnipBnHnTe BnMIPbOaBbHn IHCTpyMeH NO BnCOTI TaKHM (3a DOnOMoTOO WtTaNBA a60 NiIMOCTHBUN OHe6yNb NiD HbOrO), 106 ToKa, B KIn NpepeSyuTbcn Na3epHi nii, ToHO NoTpanNa Ha No3Haeny paHiwe Toky II Ha CTiH B.
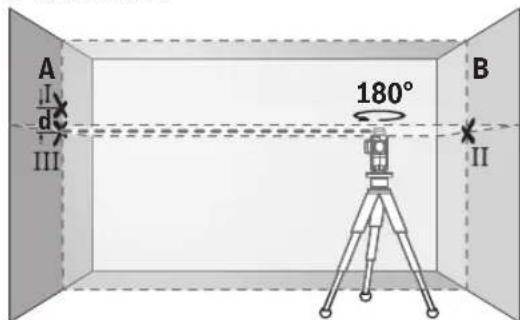
-Повернь Вииміювалыніnpилад Ha 180°, He 3miiHIOUH NOrO BnCOTN.CnpmyTe HOrO Ha CTiHy A TAKM YINOM, U6b BepTKaJIbHa Na3ePHa NIIH INPOxODIla uepe3 paHIe No3haueHy ToKy I.ДaHTe BmIPOBaIbHOMy npniady HIBeIIOBAtnc iNo3haute ToKy Ha CTiHi A,BЯкіп epexpeuTybc Na3ePHi NIIIT (ToKa III).
- P3Hnua d mix DBOMa no3haueHMn Ha CTiHi A TOUKAMN I III - ue qakTnue BixnneHHBmipHOBaIbHOrO IHCTPYMEHTA NO BNCOTI.
HaДиЯнCi 2×5M=10MaKcHMaJIbHo DOnyCTHMeBIXINHeHnCTAHOBNb:
10M×±0,2MM/M=±2MM.TaKHM YHOM,pI3HHUdMixTOUKAMIIIMoKe6yTHMaKCHym2MM.
Ipebpka Toocnti HBeIOBANH BepTKaIbHx IHH Ia nepebpKa Bam notpi6n DBePn npop3, BkOMy 3 0606KIB BID DBepeE mH.2,5M (Ha TbePdOmy rpyHTi).
BCTaHOIBt BmIPoBaIbHn IHCTpyMeHT Ha BiIcTaHI 2,5 M BiI dBePBOHO npopi3y Ha TBepHy, piBHy NOeBEXHO (He Ha IITAH).YBMKHTb BmIPoBaJIbHn IHCTpyMeHT IINPOBOTN 3 ABTOMATuHIM HIBeIHOBHHM. Bn6epiB peKHM po60TN, B kOMy BEpTHKaIbHa Ia3epHa IIIOUHnBAHnPOMIHOCbCRNONepeDy BmIPoBaIbHO IHCTpyMeHTA.
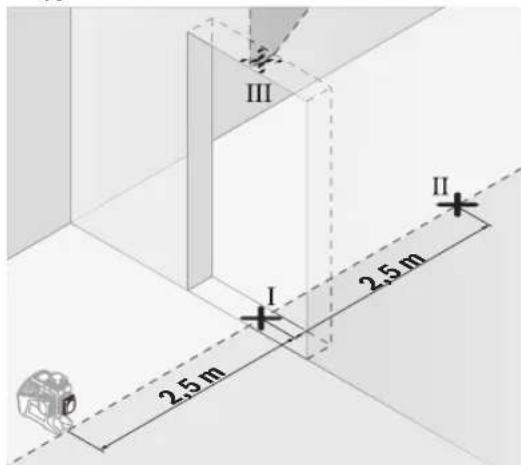
-ПоЗначе серени Бернкальhoи Лимпллу Идюгу Дер希огу npopisi (TOkaI), Ha BiDCTani 5 M 3 IИшOTOбOKу Дерhoeuro npopisi (TOka II), aТахож з Ворхього краю Дерhoeuro npopisi (TOka III).
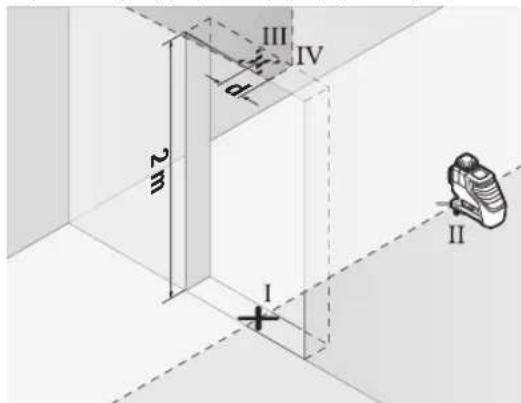
-NoBepHITB BmipIOBaIbHN npnIaHa 180°i noCTabe Horo3 iHoro 6Oky DBePHO npop3y npmo nO3a ToKoHO II. DaIte BmipIOBaIbHOMy npnaDy HBeNIOBaTcra I cnpMyTe BePTKanbHy na3epHy nHiIO TAKIM YINHom, IO6 II CEpeHnHa npoxOJNaToHo yepe3 ToKy I III.
-ПОЗHAчЕсеpeHNYIa3ePHOI liHIIHa BepXHBOMy KpaI DBepHOrO npop3y BЯKoCTI TOnK IV.
www.bosch-pt.com/serviceaddresses
TpaHcnopTyBaHHa
Ha pekomehoBaH iitieBO-ioHHaKymyIaTOPhi 6aTapei
po3noBCIOJkyTOBc BmOtn OIO TpaHCnOpTyBaHH
He6e3neuHX BaHTaxiB. AkymyIaTOPhi 6aTapei MoKyTB
pebe03ntnc KOpNCTyBaueM ABtOMobilbHM TpaHCnOpTOM
6e3 Notpe6n DToPMaHH DoaTKOBHX HOpM.
PnnepecnuiTpetimnooc6amn(hanp.:noBITpHMM TpaHCnopTmOa0TpaHCnopTHMekCneIHTOPOM)NOTpi6HOdoepKyBaTHCAOC6bHMBXBMORoYoynakOBKN Ta MapkyBaHH. yCbomy BnnaKy yPiROTOBcI NOBHN6bpTNyacThEKCNEPT3He6e3NeuHXBaHTaXIB.
BicnnaTe akymyntopny 6atapeo nne3 HenoKoJxHMM KOpNycOM. 3akNeTe BIKpNTI KOHTaKN Ta 3anakyTe akyMnyTOpHy 6atapeo TAK,IO6 BOHa He COBaIacBy yIaNkOuCi. IOTpMyIteCra, 6yNb IacKa, TakoX MOKnBHX DoaATKOBNX HaioHOJIbHIN npInncIB.
Ytunizaia

BmipioBaJIbHI IHCTpyMeHTN,akMyIaTOpN/ 6atapei, npnaIaI yIyakOBky Tpeba3aIaBatn Ha ekonorHIO NCHTy NOBTOPh nepepo6Ky.
He BnKdAaTe BmipkoBaNHI iHCTpyMeHTNI akyMnyTopHi 6atapei/6atapenKn B nobytoBe CMITTA!
Hnue nKpaH EC:
BiINOBiINOdoEbponeCbKOI INpeKTHBn 2012/19/EU
OIO BIXOIB ENEKTPOHORo Ta eNEKTPOHORo ObaHaHHa
TII NpeTBOpEHHA B HauioHbHe 3aKHOdaBCTBO
BIMIPOBaHbHI hCTpyMeHTN, Aki BiNbwe He npndaTHIO
BHKOPCTaHHa TAKoB BiINOBiHO do EbponeCbKOI
INpeKTHBn 2006/66/EC HecnpaBH aO bIDnpaCbOBaHi
akymyItophi 6atapei/6atapekn NOBHHI 3daBaTnca OKpmo i ytni3yBatncra ekonorigu HcHm cnocobom. Pnp HenpaBnbln ytni3aui BIDnpaBoBAhi eektpnuH ta eNEkTOPHNI pnilanMoKyb MaTH uKdINBn BNNB Ha HABKONlWHCEpeoBnue Ta 3doPOB'naDHN Hepe3 MOxNBy HAHBHICb Hebe3neuHx peOvBH.
AkymylaTophi 6aTapei/6aTapeKh:
Jiriiebo-oHHi:
Bydnaacka,3BaKaJteHaBkazIBKnBpo3nIni "TpaHCnpTyBaHH"(INB.,TpaHCnpTyBaHHCtoPiKa188).
Ka3ak
Eypa3nna 3KoHOMnKaIbIK OdaftbHa (KeJeH OdaftbHa) Mywe MemNeKeTtep ayMaftbHa KOnDaHbIaDbI
HdyinH yin kapaftpfaH naaanaHy KKaTapbHbKpaMbHa naaHaNy XeHHeiOCbl HcaybKcoBmeh bipre Kocmbuap a da bony MykH.
CaikeiipaykaHbIaknapaKocbIMuaa6ap.
EHdiprehMeMneKeTTypaIbaknapaTeHMHH
kopnycbHaJxHeKocbIMadaKepceTInreH
EHdpireH Mep3iHyckaybIK Myka6acbIHbH COFBb 6etIHe Xe HIM KOpnycbIHda KepcetinreH.
HmnpTepeKaTbIcTb6aHaNbIcaknapaTeHIM KaTAMacBnHaKepcetinreH.
Ehimi nai danany Mep3iMi
HMHHHKb3MeTetyMep3iM7KbIn.0HdipinreHmep3imHe6bacn(0HdpykyHi3aybITaKaTHwaCbIHdaJaa3bINFaH)ICTeNe5KbInCaKaTaHaHHaCOH,0HIMTeKcepyci3(cepBnCTIK TeKcepy)naDanaHyCbHBnMaIbI。
Kb3MeTKeHemeCe naDanaHyBbHbH KATENIkTepi Me HCTEH bIry ce6entepinH T3IMi
-ohimkopnycbHAnTikeneyTyrHbKca,naaHaHa6aHb3
JaybH-1aWbHKe3HDe CbPTa(daIada) naDanaH6baH3
Kopnyc iwihe cy Kipce KypbfnHb Kocybl 60nMaHb3
Uekri kyn genrinepi
-ENHIMKOPNycbHbIH3aKbIMdaNybl
Kb3met Kepcety Tpy MeH xiniri
Op naIaIaNyIaH coN eHIMdTa3aIay yCbIbIaNbI.
CaKray
KypfakKepe daTay Kepek
KorapbI TemnepaTypa Ke3iHEn KHe KHy CaynepePiHi, acepiHEn anblc caTay KepeK
- caTay Ke3iHne TemnepaTypaHbIH KeHeT ayblTKyblHaH KOpFay KepeK
-erep Kypan KymcaK cMke Hemece NactK KeCTe XekTki3iNce OHbl OcbI e3IH KOPFaBII Ka6bHda caKTay YcBhlNaBl
- cakay wapTAPbI typaIbIKocbIMwa aKnapaTanyuH MEMCT 15150-69 (WapT 1) KyaKaTbIH KapaHbI3
Tacbimanday
TacbImaIay KeiHne OHiMki KynatyrKaHeKe3 KeKnreH MExAHKnAblk bknan etyRe KaTah Tblm CaBHaDbl
-6ocaty/xykTey Ke3iHne NaekTI KbICaTBH MaunHaapn naDanahyFa pyKcat bepinmeNi.
-TacbImaJay wapTAPbI TanaITAPbIH MEMCT 15150-69 (5wapt)KxKaTbIH OKbIHb3.
Kayinci3ik HycKaynapbI

Oney Kypanbimen Kayincis Xe He cemdi
XyMbic ictey yin bapnbik
HcyaynbikTapbl OkblOpbHday Kepek.
Oney Kypanbih Ocb hyckaynapra cai
naananaanbay enwey KypalnbHdaBkiipictipinren Kayinci3ik wapanapbHa XaFBimcb3 acep etedi. Onwey KypalnbHdaBcckepTynepei Keipin6eTIN KbIMMaHb3. OCblHYCKAYIAPBbICAKTAN, ONWEY KYPALbIH BACKAIIAPFA BEPENDE OJAPBbKOCA YCbHbHb3.
A6ai 60nbHb3 -erep ocby xepde 6epiren naaanany HeMece ty3ety Kypanapbihan 6acka Kypanah nainanha CHeMece 6acka Jymbic aictepi opbHanca 6yn Kaynti caynere wanbHyra anbin Kenyi MymkiH.
Onwey KypanbI na3ep eckepy TaKtacbImen 6ipre Xetki3inei (rpaHka 6etihderi onwey KypanbHbH cyperinhe 6nirineHren).
Erepnaepeckpy TaKtacbHbIM Mtihi eniizhi3in tiinhe 60nMaCa, anfaw pet kondaHbicka enri3ec 6ypbOHbIHOpbHa eniizdiHtinihderi XancbipMaHbJXabicTbIpbHb3.

Ja3ep caynein aadamapra Hemece
Xahyapnapra 6abftTAMahb3 Xehe 03iH3
de tikene Hemece waftnbickan Ha3ep
cayncine Kapamahtb3. Byn aanamapdbH
Ke3ih Waftbnbpby MyMKH, catci OKfanaP
Akenyi Hemece Ke3re 3akBm Kentipty MymKH.
Erepnaepcayneci Ke3re Tycce Ke3depjixymbIn 6actbcayndeHapbI KapatyKepeK.
Na3ep KypbInfbicbHda eukKaHdAn e3repty opbIHMaHbI3.
- Na3ep Kepy Ke3inDipirih (KepeK-japaK) KopFaHbIe Ke3inDipiri petihe naaanaHa6bI3. Na3ep Kepy Ke3inDipiri na3ep cayneciin Jxakcbipak Kepy yuIN KOJaHaBnAbbl, aanJa n3ep cayneciHeN KopFamAaBl.
P3ep Kepy Ke3inipirih (Kepek-Kapak) KyyHHeKopraTbH Ke3inipik petiHne Hemece konKo3FaBcBHa naaDanaH6aHb3. P3ep KepyKe3inipiri ynbtpaKynriH cayeneped ToNbIKKOPFaHbCTb KaMTaMacb3 eTneDi KHe TycTi ce3yKa6inetIH a3aiTaBbl.
Onwey KypanbH TeK 6nikiMaHaHaXHe apHaynb6nweKtepeMeH XeHdti3. Con apKbInb Ewey KypaN Kayinciairin caKaTaNb3.
Bananapra na3ep enwey kypanbih 6akbinaycbi3 nainanahyra pykcat etnehi. Onap 6acka aadamapdbH Hemece e3iHn K3iH a6aibcdaan Hwafblbictby MyMKIH.
KahatbH cybIKbIKTap,ra3ap Hemece waH KnbIHAN KApblnc Kayi6ap optaenwey KypabHn naDanaHaB13.0wey KpaIbYkKBH WbIfapbln,waHbJkaHdbpbln,optTydbpybMYMKH.
AkkymyTopb1 aunha13. Kbicka TynbIKany Kayini 6ap.
AkkymyIITOP 3akbIMdaIaN HEmece Ipybc naiDanaHbIMMaFAH KAFdIa, OAn 6y bHybl MyMKIN. AkkymyIITOP XaHbIN HEmece Xapbln KaYbIMyMKIN. Ta3a aya iUke TaTbHbI3 KHe 7aFbIMap 6oNca, dApirepDiH KEMeri He JyRiHi3. By TbHbC any KOJIaPbIH TitIPKeHdpIyIMyMKIN.
AkkymyIaTOp dypbc naiDanaHbIMFaH HeMece 3aKbIMdaFAnf XaFdaJa, aKKMyIaTOpdAn cybIKtbIK aYbyI yMmKIn. OaH TImeH3. Ke3eicOcK tepire THReHc, con Xepdi Cymen WaibHb13. CybIKTBIK Ke3re THe, MeiHaHaBik KeMeK aIbHb13.
AkkymyIATOpdaBcI cybIKtbK TepiHITipKeHdipyI HMece KIyIdpYIMMKIH.
Were Hemece 6ypaybui cnaKtbi yuTbi 3aTap Hemece cbiptkbi cep apkblnbakyymynIATOP 3aBIMdaHybl MymKIN. By Kbcika tybnkTanyfa anbin Kenin, aKKyMnyIATOP kahybl, TyIH bIfapbybl, kApblNybl Hemece Kbl3bn Ketyi MyKIN.
PaiDanaHbIMaTbHAnKKyMnTOpDbTyicnenepei TybIKaybMyMKINKbCTbIPfBHTapdH, TbIHdApHa, KInTepDeH, WerenepeH, BHTTepDeH Xe He 6acka Ycak Temip 3aTAPdaH cKaTaHbI3.
AkkymyIaTOp TynicnepinH apacbHaDaKbIcKa TybIKaNy KyiIKTepe Hemece optKe Akenyi MyMkiH.
Byn akKymyIaTOPbI TeK KaHa oCbI eHdpYi eHIMepiHe naDanaHbHb3. Coapkblb aKKymyIaTOPbI KayintI, apbIK KytEynHe caKaTbcI3.
AkkymyIaTOPbIK 6aTapeHbI TEK eHdipywi KepcTeKEn 3apdTay KypbnfbcBImeH 3apAdTaHbI3. 3apdTay Kypblfcbi 6enrini 6ip akkymyIaTopnap typine apHaHa, OHb 6acka akkymyIaTopnpbl 3apdTay yuHn naDaanahy ept Kayin TdybipabI.

AkkymyIaTOpdbI,xbinydHa,coHdaI-aK, MbicanbI,y3diKcI3 KYNKapbIFbIHAn,OTTaH, KipdeH,cyaHxHe bINFaDAnH KopraHbI3. XApblbcXeHKeBlcKaTybIKanyKayni TybHdaIbI.


ECKEPTY


TyMEnI ΣNEMENT 6anaIapdbH KOnbHa TycnyiH KaMTaMaCbI3 etiH. TyMEnI ΣNEMENTeep Kayinti.
TyMeni 3nemENTepdi ew kafdaJa Kytura Hemece Dehere 6aca Konnapmen Kipriayre 6onmaIbI. TyMei 3nemEn TxytbInFaH Hemece Dehere 6acKa Konmeh Kipin Ketken KaFda,pepey apiirepre KOblfbi3. TyMei 3nemEnTih KytblNybi 2 carat iuiHne iTuien KaTb Kyore Xane Onilme eKeny MyMKIH.
TyHMeIeNEMeHTTI anMaCTbpy Ke3InHe epeKeTTIy DpybcOpbIHdAnFaHbHa Ke3 KeTki3iH3. KApblbc kayni 6ap.
TeKocbI naHanaHy 60bIHHa HcKaynbIKa KepcTInReH TyMEni 3neMeHTePdi naHanaHbHb13. BacaTyMeNi 3neMeHTePdi HEmce 6acka Kyat Ke3depin naDaanHbHb3.
Kiwi 6atapereanapbl3apraTayfa TbipbcnaHb3, onapbl KbiCKa TyblkTayfa apeket XacamaHb3. Kiwi 6atapere afbin Ketyi, xapblnybl, xahybl XaHe aadmnapbl xapaKaTaybl MymkiH.
3apnKanmaFah KIi6aTapeApnbTtictipette anbTactanKaDereXapaTbHb3.3apnKanmaFaH 6aTapeAp TaBb3 60mMknBanBn EHMdi 3aKbIMdayb HEmece aamapdaJkapaKaTTayblMYMKIH.
Kiwi 6atapehHbApTbIK Kbl3dbpMaHb3 Xehe anayfTaCTaHaB13. Kiwi 6atape afbn Ketyi, Japblybl, KaHyblXHe aamapdbl JkapakattaybMYKmH.
Kiwi 6atapehbl 3aKbIMdamaHb3 XHe Kiwi 6atapehbl aXbipatnaHb3. Kiwi 6atapear arbin keTyi, Xapblby, XaHybl XeHaamdapbl XapaKaTaybl Mymkih.
3aKbIMdAnFah Kii6 6ataperaHbCyfA Tnir36eH3. 1bIfaTbH NtTH cyTeK Xacan ept, Xapblbc Hemece aamapXkapakATAHybiHa anBn KeYi MymKiH.
ErepKiWi6atapera yctafblb22)ka6bnmaTbH 60nca,onwey KypanbH naDanaH6aHb3.KiWi 6ataperaHbAnbIn TactahB3 XHe OHJI KeHJeH3.
AkkymyITopbI HeMece 6aTapeHnapbIeNwey KypablmE6apblk XmbICTapbl (MbICanbl, opHaty, KbIMETKepcTe,T.6.) 6actay andbHa, coHdaN-ak, eNwey KypabIn TacbImdlay XHe caKtay Ke3iHde WbIFapbIb3.KockBII/EwipriWke Ke3eNcoK THO JapaKaTTaHy KayniHTyDbipAbI.
Oniwey Kypanbl Kymbic icterehde 6enrini Kaanapda KaTbI da6bn Idb6bcTapbl WbIfaBb. Co yin Hnewey Kypanbl H KyaktaH hemec 6acka aamdpdAn KaWbIK YCTahB3.KaTbI db6bc ecty KaBinetIH 3aKbIMdaybl MYMKH.

Onwey Kypabih XHe MaHHTIK KepeK
KapaKTapdbi HMMNaHTaTAPdbi XHe
KapdnoCTHMnTOp HEmece HNCynH
Copfbcbl CnKtbl BacaDa MeuHnHaBbI
Kypblfblapdbi XaHbHa KoMaHb3.
Onwey Kypabbl MeH KepeK-KapaKTapdbI
MaHHTepi HmNnTaTAPdbIH XHe
MeuHaBk KpybIbIaPbIH XMbicBaHa acep eTeiH epic TybIpaBl.
Θnwey KypalbMeH MaHHTTI akccceCyapdbMaHHTIK depeK TacBfblTAP MeH MaHHTKe ce3IMtan KypblfnbpdaH anwak yctahbI3. Θnwey KypalbMeH akccceCyap MaHHTepiHH acepi DepeKtepdi KaTbIMcbI3 KOblNybiHa eKenyi MymkiH.
Oniwey Kypanbl paNo yHusbfbimEn Xa6dbiktanfah.Keprinikti naindaanany weKteynepiH,Mbicanbl, ywaKTapHa Hemece emXaHanaLapda eckepiiz3.
Bluetooth® c03 genrici, cohdai-ak cypet 6nirinepi (norotntep) Bluetooth SIG, Inc komnanncbihin tipkenre h cayda 6nirinepi xhe xke mehwi r 6bn t6bnad. Ocbc c03/cypet 6nricinH Robert Bosch Power Tools GmbH TapanbHaH ap kondaBnybl nuehen 6oynbHa Jy3ere acadbl.
A6a60nbHb3!Ouwey Kypanbln Bluteoth 6eH naDanahyda 6acKa Kypanlap Men XabkTap, ywaK xHe MeNHNHaBik Kypanlap (Mbicnbl, kApnoCTMMyIaTOp, ccty Kypanlapbi) Xymbcihda Keeprinep NaDa 6onyb MyMKIn. Cohdai-akXaKBH TypFaH aamap Men XaYaNapra 3HH tybipy Kayin HtonbIKXoIO MyMKIn emec. Ouwey Kypanbln Bluetooth 6eH MeNHNHaBik Kypanlap, XaHap Ma8 6ekETepi, XmNnBikXa6bIKTap, Xapblny Kayni 6ap XHe XapblNaBH aMaKTap XaHBnHa naidanahb13. Ouwey Kypanbln Bluetooth 6eH ywakTAPda Naidanah6aHb13. DeHeree XaKbH aMaKaTa y3Ak yakbln naDanaHbHb13.
Ohim XkHe KyaT CnNaTTaMaCbI
NananaHyckaynbfbHbH anfb6nirinH cpeTepine
TaFaihany6oBihuaKoJdany
Onwey kpaanblkndeneHxHe TIK cb3bKapnbl enIwey xHE TeKcepyre apHaHaF.
Onweky KpaIb iKIMeH cbIpKb aMakTapda naDanaHyra apHaIFaH.
BnyenHM EN 50689 cTaNdaptb60nIHwTaTytbHybIbIK na3epNIK Kpyblfbl 60bn Ta6bnabbl.
BeHHHeHReH KypamDbI 6nweKTeP
KopceTinreH KypamdaCTap Hmipi cypeTep 6ap 6teri eWey KypaBbHbH CnTaTtMaCbHa KaTbICtbl.
(1) Na3ep cayneciH, uBbFbc CaHbIaNby
(2) AkkymynTopnap/6ataperaepnap 3aapdbhBn DeHre
(3)Индikatop CAL guard
(4)MaTHnKti 6yFaTTay HnDnKaTOpbl
(5)Ka6bInJaftbIwpeKIMinHITyMeci
(6)Ka6bIJaftIwpeKIMHINHHNkAtopbl
(7) NaépЖуMbIC peKIMHe apHaIFaH TyIme
(8)Bluetooth®apKbIbIbAaNHaHbICnHdNkaTObpI
(9)Bluetooth®Tymecci
(10) Akkymyntop 6eNiimi
(11) BaTapeaandaTepeHHKa6bHa
(12)Батapestяnap
(13) AkkymyraTop/6aTapea aadantepinH bocaty Tmecia
(14) BaTapea aanTepeiHJxanKbIbWb)
(15) AkkymyIaTOp
(16) AkkbipaTkbi
(17) Na3ep eckepTy TaKtacbi
(18) CepnIbIK HOpMip
(19)UtaTnB6ekitkiu,5/8HouM
(20) ⅢtaTnB6ekitkiu,1/4HIOHM
(21) Tymeni 3eMeENT
(22) Tymeni 3neMeHT yCTaFbllbl
(23) TγιMηπε ηημεΜΗ Ḁγας
(24)MaHHTa
(25) 0M6e6an yctafbui
(26) AaHaMa nIaTΦopMa
(27) KaibikTah 6ackapy KpaIb(a)
(28) Na3ep Hb1caHb1K TaTcTa(b)
(29) Na3ep Ka6bIaFbIaBbI
(30) Naep Kepy Keaindipir
(31)KopFaHbIiKaTtAa
(32) LITaTINB
(33) TeneckonTbIK KapHaK
(34) 甲aδaadn
(35) KocbIMwa
a) BeHeneHre Hemece CnnaTaNrHan KepeK-XapakTap cTaNdaptbI XeKtIKsIM XNbHTbIFbIMeKAMbTbIMaNbl. TonBkKepeK-XapakTapdb63diKepeK-XapakTap 8aDapnamcBihAN tabCbIs.
TexHnKanbIK mAnimetTep
Thuey KpaIbI cTaNapITbI 6aTapeRnapMeH He Bosch HINTH-NOHBk AKKyMnTOpMeH XyMbIC iTeNJI.
AkkymyIHTOpmEn naIaIaNHy
TekTexHkAnbIK MOniMeTepDe Ka3bInFaH 3apdTay KpaanapbH naDanaHbHbI3. Tek KaHa OcbI 3apdTay KpaanapbCi3iH eNlwey KpaanbHb3dbH iwiHne NHTINHOHBik AKKMyIaTOPMeH caiKec.
Eckenthe: NHTHNOHB6aTapeepanp xabikapabIK TaBImaay epekeepine caikec iuihapa zapdtafAH Kynde JeTKi3iJeI.AKKyMnyTopbIH TObIK KyaTbIH naDanahy yin OHby anfau pet naDanahydah 6pybIH TOnbIK 3apTaHb3.
3apraTanFaH akKymyIaTopbI (15) opHaty yuH OHbI aKKymyIaTOp bemimwecine (10) ceinin tipenreHwe KblkbltbHbI3.
Akkymyntopdb15)wbfarpy wih 6ocaty nepheepin (13) bacn akkymnytropdbakkymnyrto6enimuecihen (10) WbIfapbHbI3. OcbkeDe Kyy canMaHbI3.
BatapeanapMeHnaiDanaHy
Oniwey kypanbI yuH ankann H maprae6ataperecbn naDanaHy ycBhlnaBl.
BaTapeJnap BaTapea aanTepine caIbHaNbI.
Batape aanepi teknticti Bosch tekcepy KaemepacbHn naDanahyra aphanfah 60bnin 3neKtp KypanapbImeH naDanahyra 60mai.
BatapeanapbIcanyuHbatapeaandepinHka6bH (11) aKMynTOp 6nIMueCHe (10)XbNkbltBuH3.
BatapeaapabjkabyKaKaNafbHdaFb1(14)cypETe KepcetinreHdienKanKa canaHb3.Kaby KaNaFBH Kan yctiHe CEzInTePiTE TipeReHwe XblkbTbHb3.

(10)KOFapbIfa KapaTbIn YcTaHbIa.
BatapeanapbIaIbIN KoiBHbI3.IuHIne KaTaN KaTb1 (11) aKKyMnIaTOp 6enimWeciHe nabin
KoIyH KanTbJ KaH KaBbPraFa a3 6acbin yCTan, eNwey KypaBbHaH WbIfapbHb3.
Bapnbk 6atapeenapdbi6ipde anMaTbipbHb3. Tek 6ip endpywiinxKHe Kyatb6ipde 6atapeenapdbn naDanaHbHb3.
Enwey KypanbH y3ak yakbit naDanaH6acaHb3, 6atapenHb enwey KypanbHah WbIFapbin aBih13.
Y3aYakblCaTafahJkaFdaJa,0nWeyKypanbHdaBb6atapennapbToTbacybJxHeonapdbHzapnBe3diriHehaycbIyblMmKiH.
3apdanykyinHnndkaTopbI
3apd DeHreHHHnKaTopbI (2) AkkymyTApnpabH Hemece 6atapennapdbH 3apd DeHreHH Kepcetei:
Xapbik nOdb3apd neirei
KacbIyTcIy3dikci3kapbIK 100-75%
Capbytyciy3iikc3kapbK75-35%
Y3diKci3 Japbik Kbi3bln 35-10%
KapbIK KOK-AKKyMnyTOp 6y3blfHa
-Батaperялардьн.зарды TaycbiIfah
Erep6atapereanap Hemece aKcymynTOp 3apRbIa3aBblkTe cnaep Cb3bIKTapbIHbH XapbIKTbIFbI aKbipH TEmHeDi.
By3bIraH aKKMyTApDb HeMece 6oc 6aTapeRnapBkyneik pette anMaCTbIpbHbI3.
Tymeni 3nementti anmactbipy (A cypetin kapaib3)
OJnwe KypanbI TYmEnIeNemENTHEN (21)Ka6dbkTaNFAH, Ocbnaa CAlg guard cyHKuINcBiHa apHaJIFaH KYH MeH yaKbITbAkkMyIITOpBHeMece BaTapeIaPapBcIamM JaKa caKTayfBa 0bnbl.
Tymeni anementi anmactbipy yuin akkymyarTopdbi Hemece toblk 6atapera aanTepiH sbifapbin anbHb3.
TMyMeI 3neMeH TcTaBbH (22) TYMeI 3neMeH HayacbHaH (23) TaTbIn aNbHbH3.3apabTaycbnFaH TYMeI 3neMeHTI (21) WbIfapBn, KaHaCbH cNbHbH3.
TMyemIeMeHytCTaftbHbHdaFbCypTe KepcTeINReHdEn, nonIOCTepDIn DYpbic 60NYbH KaMTamac3 EtIH3 (TMyemI eMeHTIH NIOC NOIOci KOfApBkapan Tpyblnic).
Tymeni 3nement yctfaibih (22) canbHfAH tymeni 3nementnebipre hayara (23) kipriizhi3. Tymeni 3nement yctfaibihhDpybcxHE ToIbIFIMeH kipriizireHHe Ke3 XeTKi3iH3, eHTnece Wau MeH WauBpaHdbCydah KopraHbc KaMTaMacbl3 etinmeNi.
Anfaw pet KOndaHbicka eHri3y yuH Tymeni 3nEMeHTIH (21) KopFaBbIy yndipih anbIn TaCTaHbI. On yuH Tymeni 3nEMeHTTI anMaTbpy KeiHderiepeApeKeTeiH3.
Paiandaanhy
Палданугehdipy
Onwey KypanbH cb3daH XaHe TIKenei KyH cayneepineh caKtaHbI3.
Onwey KypalbHa aibkwa TemnepaTypa Hemece TemnepaTypa 3repictepinH acepiTHr13yre 60MaNbIb. OHbl, Mbicab, ABTOMObnIb iWInDe y3ak yaBtKa KaIbIpMaHbI3. TemnepaTypa 3repictepi WfBln 60FaH KaFdaJa, anDbIme H JWey KypalbHbIH TypaKbI TemnepaTypacbIH caTahb3 XHe KYMbICTbl KaIFactbIPMac 6pybIH apdaiBM dAnik TEkcepiciH etKl3H3 (KapaHbI3,Onwey KypalbHbIH dAnirih TekcepY, Bet 195).
Aipbikka TemnepaTypa Hemece TemnpaTypa e3repictepi opbH anFaH kafda, OIwey KypaBbHdAndi TEmHeDeyi MymKIn.
Onwey KypanbH KaTbI cofbinydAn Hemece Tcydene CaKaTaHb3. CbytKbI KywTI acepIepEn KeiH onwey KypaBbHbIKyMbICbH KANFaCTbpydAn 6bpH apDaBHIM
dππικ TeKcepyH opbHday Kepek (kapaHb3, ΘIwey KypaIbHbH dππirH TeKcepy", Bet 195).
Oneyky KypanbH TacbMaIaydAn anbH OHb KocbHb3. Ewyde ter6eny 6eniri 6yFaTana, eHtnce on KaTbI apeKeTepne 3aKbIMdaNybl MyMKH.
Kocy/ewipy
Onuey Kypabih Kocy yuih axbipatkbltb1 (16) On" KyiHe (MaTHNKTI 6yfaTAY TetirimeH xMybc icTeY uH) Hemece "n" KyiHe (HNBENHPney abOMaTKacbIme HxMbic icTeY uH) XblXbITbHb3. Onuey KpyabI KocbIFAHHaH KeiH 6ipDeH bIfbc caBInaynapan (1) Na3ep Cb3bIKTapbiH xi6pepi.
Panaep caynein aadamapra hemece xanyapnapra 6aftTamaHb3 Xehe tinti anbictan GoncbHxapbk cayneine e3iH3 kapaMaHb3.
Ouwe Kypabih eipy yin Kockbw/ewipriwi (16) Off KyiHe Xblkblb3. Wipy KezHnTepe6ny 6norbl 6yFaTanaa.
Kocny3apaykypabih6akbinycbi3 KaIbipMaHb3XeHneOnweyKypabHnnaDAnHyd coHewiphi3. NaepcayneCimHe aamdpBnKe3IH 1aFbIbCTbpyMmKiH.
40°C wamacbHdafbpykcatetireh MaKc. Kymbic TEMnepaTpacbHaH acbipFaH KaFdaJa Na3ep DIObl KopraHbc yuii H eedi. CybifaHaH coH eIwey Kypanbi KaTAt Kocblnyb MyMKIH.
Erep onwey KypalbHbH TemnepaTpaCbe HKofapFbI pyKcataetinreH KyMbIC TemnepaTpaCbHa XKaBHaDaca,na3epcb3bIKTapbHbH KApblkTbFbAkbipbH TeMeHdenei.
Onwey KpaIbI aIpbIka 3neKtpCTaTHKaIbIK pa3pIaTah (ESD) KopraIFaH. Erep onwey KpaIbI 3neKtpCTaTHKaIbIK typde 3apRdTanca (MbICaIbI, aya bINFaIbIBbIFbI ToMeH optamen HkAHCy apKbInbI), on ABTomATbI tyPe eWIn KaIadbl. Byn KaIdna da axkbipaTKbiHTbl (16) eWipin, KaTAt KOcbIHbI3.
Ka6bIaFbIpeKHMJI KOCy yuH Ka6bIaFbIpeKHMINIH (5) nepHeCIn 6acbH3. Ka6bIay peKHMi (6) HdNkATOpbl Xacbl TCTe XaHaBbl.
Aam Kei yin Ka6blndaB1w peKHM Kocynb 60nFaHna3ep Cb3bkTapBhlh KepHici TMeHdetineI. Na3ep Ka6blndaB1wbc13 Kymbic tterHeDe Ka6blndaB1w peKHMdi (5) TYmeecin Kaeta Bacbn OwiPiH. Ka6blndaB1w peKmHIN (6) Kepcetkiu oWedi.
HbEnHpney ABTomKacbi
Hbennpey abomataKacbImn Kymbic icTey
OJy KpyaBnKeJeH,6epiK 6eTKe KObIn,Am6e6an YCTaFbIka (25) HEmecE WtATNBke (32) 6ekitih3.
HnBenipney abTomatNkacbIme Hymbc icTey yuH Kockbl/ eWipriwi (16)"n" KyIHe XblJbItbHb3.
HNBENPney ABTomAtnKacbI ±4wAmacbIHdArfE3diHHe HNBENPney aHaMaFbIHDa Teric emc JepNepDi ABToMaTTbI Tpye TericTeiDi. Na3ep cbIsBkTapbO daH apb Ko3FaIMaca, HNBENPney aAKTaNAbI.
ABTOMATbHNBENPneyMymKIN60nMaCA,MbICaNb,Enuey KypaNtpyFaH6eKoJNeHeHcB3bIKTaH4°-faBfbcca,naep Cb3bIKTapbI KblJaAM KblIBbIbIKTaH 6actaJIb.1bl6bICTbK CNrHaN Kocynb60ncA,ONKblJaAM bipraKeH 6epinei.
Onwey KpaanbH KeIeHeHIne H KObn, 3diriHEn HNBennpny aKaTaNFaHa KaTih3. Onwey KpaBb ± 4^ e3diHEn HNBenpny aMaFbHJa TpyCa, na3ep Cb3kTapbl Y3dkci3 KaHbN, Db6bcTbK cnHan ein Kanadbl.
PainanahyKeiHdeKaBbIynap60ncaHeMeceKyE3repce eIwey KypabblABTOMaTTbpeTte 83IN HNBEnIpnei KaHa HNBEnPiReH COH eIwey KypabblHbIKbIbIK KanbyHAn KaTeNepin anDbHanyWsiH KeIeHc HMeCE TIK naep Cb3bFbHbIH KyHHerizHyKTenepreCaNbCTbipbIn TeKcepH3.
MaTHMKTI6yFaTTay TetirimeHxymbcictey
MaTHNKTi 6yFATTay TeteirimeH Kymblc ictey yuHIN
aKbipATkBtBt (16) "on" KyiHe XkbIKNBtBhl3.
MaTHNKTi 6yFATTay HnDnKaTOpbl (4) Kbl3bl TycneH KaHbIn
TypaJIbXe He naep cb3bIKTapbl 6Ory XblnbIKTaJbI.
MaTHNKTi 6yFATTay TeteirimeH Kymblc ictereh Ke3de,
HNBeInpNeY abTomAtnKacbl eWipineDi. OJwey KypalbH
epKin Konda YCTayFa Hemece eHic 6etke KOIOFA 60NaIbI.
Ja3ep cb3bIKTapbl 6yDaH 6blaN HNBennpEnBeNi JxHe
6ip-6ipine TiriH eOnnei.
"Bosch Levelling Remote App" apkblnb Kaawbiktan 6ackapy
Onwey KpaIbI Bluetooth MODynimeH Ka6bIaTnFaH, on
paIIO apKbIbI cMaprfoHHaH Bluetooth HHTepFeci
apKbIbI Ka6bIKa7bIKa7bIK a6ckapya MyMKiHik 6epei.
Byn fyuHKuHbI naJdAnaHy yuiH (App) Bosch Levelling
Remote App" Sa4napaMaCbi Kepek 6oJaI. Obl coHfbl
KpbIbIFa 6aHaNaHcTb TnCTi App-Store-dan (Apple App
Store, Google Play Store) kkyTe n anyFa 6oJaI.
Bluetooth 6aHaNaHcBi yuiH tana erinTeH KyneiK
anFbIaPAPTApTypaJIbWww.bosch-pt.com Bosch HHTepHET
Topa6bIHda TabacB3.
Bluetooth apKbIbI Ka6bIKa7bIKa7bIK a6ckapyaMo6nJIcoHfbl
KpbIbIFbMeH enwey KpaIbI apacbIHda XamaH Ka6bINday
wapTApBbI naJa 6oJaBI.
Bluetooth® kocy
Bluetooth®KaawbIaTah 6ackapyra Kocv ywiH Bluetooth® TYmewirih (9) 6acblb3. MoBnBdbI KypalbHb3da Bluetooth®YawbIFbIHbH 6enceHdi 6onybH KaMTamacbi3 etiH3.
Bosch 6a4apnamalapbH 6actaydah coh moNBbl KypamHe enuwe KypaIb apacbHa da baNaHbc XacaIaNbl. Bipheue bencendi enuwe Kypanbl Tabbnca KepeKti enuwe Kypanbl TaHaab3.Erep 6ncendi enuwe Kypanbl Tabbnca BaNaHbc ABOMATbI peTte XacaIaNbl.
BluTeoth@ KepcTeKici (8) XaHaHaDa 6aNaHbc 6ap 6oIaNbl.
BluTeoth@ BaNaHbcIb enuwe Kypanbl MeH MoNbDi COHf bY KypbNfbl apacbHaIbfl y3ak KaWbIKbHK Hemece KepePri XeH 3JeKTPMaHHTIK aKaynb Ke3epi ce6eBiHen Y3iny MyMKH. Byn KaJaDaIa Bluteoth@ KepcTeKici (8) XbInbNbIKTaIbI.
Bluetooth® eupiy
Bluetooth® KaalbKaTah 6ackapy yiwih eWipy ywih Bluetooth TMyMeWirH (9) 6acbHb3 Hemece enWey KypanbH eWipipiH3.
Kanibpny eckepyi CAL guard
CAL guard kaH6pney eckepTy i enwey KypaIbHbH KyHH 6akblnab on eWik bOnca da. Erep enwey Kypanbl aKKymnyTop hemec 6atapen apkblb 3heprna
Kabikayibc60nca, iki3Heprna cKaTbbl72 cafat iHne cehcopnap bPkbnbl y3dkci3 6kblaybl KaTAMacbi3 etedi. Cencopnap enwey KpaBihAnlFaKhI icKe KocblyBIme Bencenipinedi.
Kann6pney eckeptyiin icke kocbinyi
Erep TEmeHeri OKHa naa 6oJa, KaHbpey eckepTyi CAL guard icke Kocblbn CAL guard (3) KepeTki CkIbTI CyteKaHaDbI:
-KaHn6pney apanbIbI (ep 12 aI) eTI.
- Θπuey Kypaβl bcaTay TemnepaTypaβla aMafbHaH TbIC caKtaBbIn Typ.
-0nuey KypaIbI KaTbI KaFbIHaH (MbIcAlbI, Kynan eJeHRe KaFbIHaJa).
"Bosch Levelling Remote App" 6aFapnAmacbHda yuOkFaHbKaiCbCbKaHbpey eceptyih icke KockaHbHKepye 6oana.6FaPnAmacb3 ceben aKbHdAmMaHdbi, CAL guard (3) KepcTeKiUHHkaHybTk HBeHInpney dndiriH TeKcepy KepektirH bindipei.
Eckety icke KocbifraHHaH COH CAL guard (3) Kpcetkii HnBeneipney dJIiri TeKcepinin Kpcetkiwi eWipinreHwe KaHaDbI.
Kannbpny eckeptyi icke kocbinfahnh coh xacanaBH opeketep
Onwey KpaIbHbIH HHBenIpney dAnirin TeKcepiH3 (kapaHb3,Onwey KpaIbHbIH dAnirin TeKcepy",Ser 195). Erep MaKcHMaIbbl bIfbcyaH ew6ip TeKcepiTe acbIpbMaca.CAL guard HnNikKatOpBH(3)ewipjH. On yuH KabIaFbIw peXm TymeciH(5)KaHe Bluetooth tyMeciH(9)6ip yaBbTTa keMinHe 3 ckyHd bacIn TypbHb3.CAL guard HnNikatOpBI(3)eweJI.
Erep enwey KpaIb TeKcepy KezHne MaKcMaIbI ayltkydAn acbIpcA, OHb Bosch cepBnCTIK optaIbIFHJa XeHndTeH3.
Onwey KypanbHbH, dAnirin Tekcepy
Danik acepnepi
Kopway TemnepatypacbE hkytiacep etedi. EeHdhen Jorapfa 60fAHTemnpatypa e3repictepi na3ep caynein ayltKybi MymkiH.
KepenKeepinre Hkyiynyad TemnepaTypanbKcepnpdi 6abihua a3ayTu yinH, enwey Kypalh WtATNBte naDanahyra Keiec bepineDi. OarH Koca eWey Kypalh MymkiHirInHe JyMbic aHaMaFbHbHOpTacbiHa KoBiHbI3. Cbiptkbl acepnpdenTbcacnTbIK cepnepde (MlcAnbl KaftlbIc HeMece KaTbCokkbnap) ayBtKynapfa anbl Kenyi MyMKIN. CoYwHAp KMybictaH anDbH HBeNinpny dndiriH TekepiH3.
AnbimEn KAnDHeHnape Cb3BfHbHnHBennpNey dndiriH, COcbIH TIK naep Cb3bIKTapbHnHBennpNey dndiriH TeKcepiH3.
Erep enwey KpaIbI TeKcepy KezHne MaKcMaIbI ayltkydAn acbIpcA OHb Bosch cepBnCTIK opTaIbIFbIHJa XeHndTeH3.
KoIeHocbTH KOnDeH HNBnnpney dndirH TeKcepy
Tekcepy yuih beipk 6eTte A xhe B eki KaabfpacbHbH apacbHa 5 M wamacbHdafbepkin enwey KaWbIKTBfB kepek bona.
-Onuey KypanbIH A Ka6bipFacbHbH KacbIHda WtATNBke Hemece KaTbI Teric Ta6aHaOpHaTbHb3. Onuey Kypanbl HnBeHnPney ABOTOMaTKacbIMeKocbHb3. KeJeHeH Na3ep Jx3bIKbFlbMeH TIK Na3ep Jx3bIKTbIFbEOnuey Kypanbl AnDbHnaXacanaTbH XyMbIC TypiH TaHaHb3.
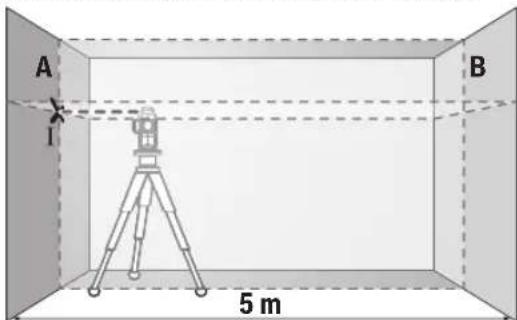
-Ja3epdi JkaKbIH A Ka6blPacbiHa 6aBfTTan, OJlwey KypalbH HNBENHPnEHI. Ja3ep cb3blkTapbl Ka6blPraaKbIiYuKbIi HkyTeciHHoptacbiH bEnrineHi (I hkyTeci).
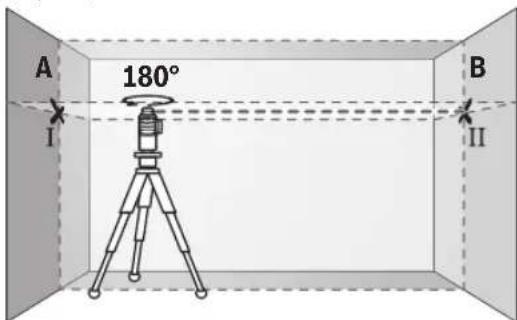
-0nuey kypanbH 1806ypan, onbl HNBennpen naep cbIbIKapbHbH apfbB Kab6bpFacbiHdaFbI aKbIu-MykbIHyKTecih Benrinei3 (II hykTeci).
-0nuey KypalbH 6ypamaB KabpbFacbHbH KacbHda KOybIN, KocbHb3 da HNBenIpneH3.

-0nuey KpyanbHbH 6nKtirin (WtatnbTep Hemece 6ap 6oIca tipeyiik Kemerimeh) na3ep cb3biktapbHbH aIKblu YKbIHIyKTEci B Ka6bIpacbiHa aIbIMeH 6enrineHRe HkyTere II cAneKec 6oNaTbHdai 6aftiHa3.

-0nuey Kypan1h 1806ypan6nikiriin 3eptneh3. OHb A Ka6bpFacbHaTik na3ep cb3bHb6enrinehre H KyTEciHeTeTih etin 6aftTaHb3.0nwey KypanBn HBeInpEn,na3ep cb3bKTapbHbH aKiW-NkBiH HkyTEciA Ka6bpFacbHaDa (III HkyTEci) 6enrineh3.
A ka6bipfacbiHdafti MeH III eki 6enrineHReH HkyTeHH aibipMaBblBfI enlwey KypalbHbH dAn 6nIKTKTeH aybiTkybiH KepceTei.
2× 5M = 10M enuwey KaBbIKtbIbIHda pyKcat etinreH MaKcImaNblaybiTky:
10M×±0,2MM/M=±2MM.ImeHIIHYKTepeapacbHaFbdaBpMaBbIbFbeEHKe6i2MM6onybKepek.
Tik cbIbIKTapbIH HBNBnIPney dAnDiIRiTEKcepiH3
Tekcepy yuH (kattb taabaHa) ecikTH ap XaFbIHah KEMiHe 2,5M kai60nataH eci Teciri KepeK.
- ΘιηNEY KYPANbIH ecic Tecirihen 2,5 M KaIbIKTBkTA 6eKEM Teric Ta6aHnA opHaNactbIpbH3 (UtaTINBTE emc). ΘιηNEY KYPANbIH HnBeNIPney ABTomAtNKacbIMEH KocbHb3. TIK Na3ep JxazblbFbI eNey KYPANbI aNbIHda XacaIaNbIH XyMbIC TyPiTH TaHdHb3.
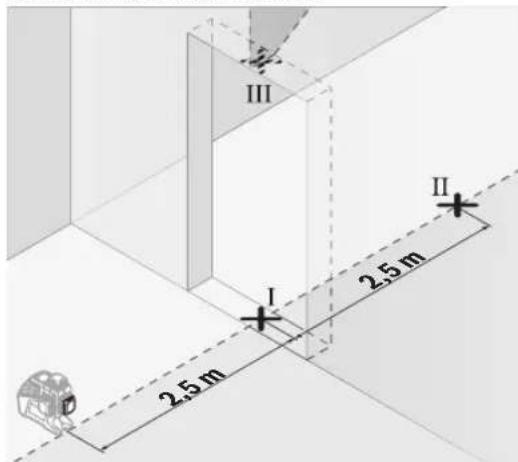
-Tik na3ep cb3bfbHbH opTaIbfbH ecik teciriH, edeHHde (I hkyTeci), 5 M kawblkTbKta ecik teciriH, baca KaftiHa (II hkyTeci) Xane ecik teciriH, xorapfbi Wetihne (III hkyTeci) benrineH3.

-0nwey KypalbH 1806ypan,ecik TeciriH 6aca KaBHaT iKeIeN HkyTeCinH apTBHa opHaTbHb3. 0nwey KypalbH HNBEnPnE,TKna3ep Cb3bFbH optaBbHaKbI MeH II HkyTepeiHe eTeH eTin 6aftTaHb3.
-Ja3epcb3bfbHbHOpTaBbFbHecicTeCirIHKofapFbI WetInHe IV HkyTeci peTHe 6enrineH3.
A ka6bipfacbiHdafbl III me IV eki 6enrinehre HYKTeHi d aIbIPMaBbIbFbEeWey KypaIbIHbH dən 6nIKTIKeH aytkyih KepeTei.
-Ecik tecirihin 6nikiriin enwehiz.
Ekihi TIK na3ep cb3bKtBfbl ywH enIwey adicih KaTanaHb3. On ywiH TIK na3ep Kaa3bKtBfbl enIwey Kypanbl KaHbHa JkacanaTbH KyMbIC TypiH TaHaB3 da enIwey KypanbH enIwey adiciHH anDbHa 90° bpaHb3.
MaKcHmAnIbI pyKcatetinTih ayBtKy TEmeHderiJe encentenei:
ecik TeciriHIN KOC 6nIKTirI × 0,2 MM/M
Mbican:ecik TeciriHIN 2 M6nKiTirHneri MaKcImaIdbayItky
2×2M×±0,2MM/M=±0,8MM.COHdbiktah III MeH IV HYKTEnpiH apanbIfbEh Ke6i 0,8 MM 60nybKepek.
PaiDanany HycKaynapbI
OpaHbIM TEK napecbi3bifbIHbIN opTaIbIFbH naDanaHbIHbI. Naep cbI3bIFbIHbH eHI KaUbIKTBKeH e3repeji.
Ja3ep HbicaHdbik TaKtacbiH naidanaHy
Na3ep HbicaHdbik TaKTacbl (28) KOJaCbI3 KafJaIa JxHe y3aK KaBbIKtbIKTapda Na3ep cbI3bIFbIH KePiHcIH KaKcapTaBl.
Ja3ep HbicaHdbIK TaKTabcbHbIH KaTapaTbIH Ja3bIKTbIbI (28) Ja3ep Cb3bIbHbIH KepiHyIH JkaKapTbIN, MeNIp Ja3bIKTbIFbl apKbIbI Ja3ep Cb3bIfbl Ja3ep HbicaHbIK TaKTabcbHbIH apTbHaH da KepiHei.
LITaTHBnEHKyMbIcICTey(KepeK-kaPak)
WtATNB TpyakTbKHe 6nKiTir peTtenetH enuwe Ta6aHbI
Bona. 0nUwe KypanbH 1/4"-wTaNTB nTPOHBmEh (20)
WtATNBHe Hemece (32) cTaNapTTb foTOuTaTNBiHe
OpHaTBHb3.CaHdApTTbKypblNbC wTaNTBInDe 6eKITy uH H 5/8"-WtATNB NAtPOBH (19) naDanaHbHb3. 0nUwe
KypanbH WtATNBteri Kynblntay bpaHacMbEm 6ekITiH3.
0nUwe KypanbH KocyaH anDbH WtATNBt SaftTahb3.
Om6ean yctaftbwnen 6ekiri3 (kepek-xapaK) (C cypetih kapaHb13)
Am6ean yctaftbTbH (25) KemerMe H enwey kpaIbH, Mbicab, tic aMaKTapra HeMece MarHTTI MaTepnaIapFa 6ekityre 6oana.3 Am6ean yctaftbH eEnHik WtATNB petInde de naDanaHbNadJxHe enwey kpaIbH, 6nIKTK 6oBuHua TypaNaHyB OHtaNaHbPaIb.
MarHnTik KepeK-XapakTbI yctIHri 6etTepre 6ektke Ke3de CaycafbHb3dbKepe-KapaKTBH apTKbl XaftbHaH anwak YCTahbI3. MarHnTirKaTTb TaTpTy KUWIni CandapbHaCaycafbHb3 Kbcbbln KaNbyMymkIH.
OJnwey KypaJIbIH KocyaH aIbIH aM6e6an yCTaFblITbl (25) Depeki 6aFbITTbH3.
Ja3epKa6bIaIarBfIbIbImEHxMblcicTey (KepeK-kaPak) (C cypetin KapaHb13)
KoNaCbI3 KApBkTbIK KaFdaNbHJa (KapBk KopWay, TKeNei Kyn Caynepe) XHe 3aKaBbIKTbIKTapDa naep CcyncinH dypbic Ta6bnybl Wih (29)naep KaBnaybIbH NaJdanaHbHb3. Naep KaBnafBbIMeH Kymbc icTeReHne KaBnaypeXmIH KocBbI3 (KapaHb3 ,KaBnadfbipexKmM, Bet 194).
Ja3ep KOpy Ke3inipiri (Kepek-kaPak)
Ja3epKepyKe3iJdpiriKopwayKaPbIKTbfHcy3rineNi。Ocbnai na3epXapbIbKe3yiwHkApKbHpa6oanaB.
- Na3ep Kepy Ke3inDipirih (KepeK-JkapK) KopraHbIa Ke3inDipiri petiHe naHaanhaBbI. Na3ep Kepy Ke3inDipiri na3ep cayncin XakcbpaK Kepy yuHn KondaHbna, ana da na3ep cayncineH KopramaHbI.
P3ep Kepy Ke3inipirih (KepeK-kaapK) KyHHek KopraTbH Ke3inipik petiHe Hemece XoN Ko3FaNbIcBnHa nndanah6aHb3. P3ep Kepy
Ke3indipiri ynbtpaynrH caynepeHTobnk KOPFaHbIcTb KaMTaMaCb1 eTnei XHe TVcti ce3y Ka6ineH a3aiTabl.
XHnHeyKaKet6oFAnKaFdAaJa,EnIeYKpyanbH KOpFaHbI KaTada(31) HeMeecwa6aDahda(34) Xi6epin3.
TytbHybIfa Kb3Met Kepcety XaHe naJaAnaHy Kehectepi
Kb3MET Kepcety optaIbIbIeHIMdi KeHDey XHe He ofaH texHHkaIbIK b3MET Kepcety, coHaai-ak Kocanbl 6enweKTeP typaIb cypaTapfKa Kayan bepei. Kypamdac 6enweKTeP boBHua Keckin MeH Kocanbl 6enweKTeP typaIb MmIeTTep TEmeHderi MeKeHkai BoBHua konjetimdi: www.bosch-pt.com
Bosch Kbl3MeTtIK Kehec 6epy To6bl 6i3in EhIMdep Xane OnapbH KepeK-JkapAkapbI TypaIb CypaKTapbIb3Fa Kayan 6epei.
CypakapkoKAneKocankb6enweKeptreTancbipbc6epy KeiHneMiHnTeTI TypE eHIMHHfmpMaIbK TaKaTaaCbHdAfb1 10 TaHbAbl EHM HemPiH 6epiH3.
Hdipywi taanTapbMeH HopmnapbHbH caKaTalybmeH 3neKtp KpaBbH XeHDey XaHe Keinii Kbi3Met Kepcety 6apbik MemkeTep ayMaftbHaTek "Pobert Boi" 4nPMabIK HeMece aBtOpH3aunHaFah Kbi3Met Kepcety optaikTabpHda opbHdanaDb. ECKETY 3aHcb3KoJlmeh AekiHRe HcIMepdi naIaNanay KayinTi, DeHCaybIfbHb3Fa 3nH KeNTipyi Mymki. OHIMepdi 3aHcb3Kacay XaHe Tapaty AkimWlrik XaHe KbImbICTbIK Taptin 60bHua 3aHMen KydanaHaBbl.
Ka3aKCTah
TybHybnapraKeHec6epyKaHe WafbImapdbi Ka6bnay opTaIbIfbl:
"Po6ept Bou" (Robert Bosch) XUJC
AJImaTbIK.
Ka3aKCTan Pecny6nKacb050012
MypaTb6aeB K., 180 y
"TepeMec" 60,7 ka6aT
Ten.: +7 (727) 331 31 00
a c: + 7 (727)2330787
E-Mail: ptka@bosch.com
CepBntik Kbi3MeT KepeCy optaIbIKTapbl MeH Ka6blIay nyHKTePiH MeKeH-JkaIbI TypaIbI TOnblK JHe e3eKTI aknapaTbI Ci3: www.bosch-professional.kz pecMn caTTaH ana anacbi3
Kb3met Kepcety optanbikTapbHbH 6acka da Mekehkaa npabH MbHa KepeH KapaHb3:
www.bosch-pt.com/serviceaddresses
TacbImaay
YcbHbIFaH HINTH-HOHBK AKKMyJATOpNap Kayinti TayapnapFa KObIaNbIH TaanTapfa 6aFbHaBbl.
PnndanahyblakkymnyTopnapblKeweDeKocbIMwa Kxkattapcb3TacbMaanda ana.
YuiHui TynfanaP (Mbicnbl, 8ye Keiiri Hemece Xiebepy) opamara KHe Mapknapra KoBbnaTbH apHaBt TaanTapdb caKtay KepeK. Xiebepyre daBihday KezInde KayinTi KyKTePdi TacbImaay MAmhBmEn xa6apnacy Kepe.
AkkymyIaTOpIbI Kopnycbl 3akIMdaIHa 60nca fHa
Ki6epiH3. AusbIK tyicnepepi JekimdeH3 KHe
aKKMyIaTOpIbI opamada Ko3FaMaIbHdI opaHbI. KaKeT
60nca, KocbIMw yITbIepekepepeDcKaTaHbI.
Kedere kapaTy

Oniwey KpaanbH, AKKMnTOpbH/
6atapennapbH, OHbIH Ka6DbIKTapbMeH
opamacBnKoipwafH opTaHb KOPFaTbH pette
Kaaderjxapaty OphBaHt TaNCbpy KaKeT.
Onwey KypanapbH kHe aKkymyTOpnpabI/ 6aTapeApBdy yKoKbcHbTaTcMaHb3!
TekKaHaEOeNepiyyin:
Ecki 3neKtpnik kHe 3neKtpoHbIkypbIfblap TypaB1 2012/19/EU eyponaBik DNpeKTNBacbi KHe OHbIH yTTbIK 3aHaMaJa KOlaHbIybi 6obIHwa naDaIaNHyfa 6ydaH 6blaJxapamCbI3 eNwey KpaIaDpBih Xe 2006/66/EC eyponaBik DNpeKTNBacbi 6obIHwa 3akIMdAnFaH HeMece ecipreh akymyTOpnapdb/6atapeHnapdb 6neK xHan, Kopwafah opta yuH kayinciX konMeH kaTa eHdeye Xiebpy KaKeT.
KaTe KOnMeH KdEre JXapTaBnFaehckIeKtpnIK XHe 3NeKTPOHbIK KpybINbInap Kayinti 3aTAPdbN 6ony MymKInHirige 6aHaNaHbICTbI KOpuaHafopTaF aHe aam DeHCayNbIFbHa 3HHDbI cep TNI3yIMyMmKIn.
AkkymyTOpnap/6aTapeennap:
JIHTHn-HOBbI:
TacbMaIay 6enimHderi, 6etHderi HcKaynapdbOpbHaB3 (KapaHb3,TacbMaIay",Bet 198) ceHcopnbIK nepHEMeH paTaHb3.
Jshonymn
yusmbnou 6n3nu anonnog

jusmabmgnbsusman
nsuymgnsbunsaamdyasman
y6myymgnn a66nn 66
86mmos gn3ssy3ms
n66mngs. amggaan anonnagn
y30mdsusbman n6uyn26n
aamysgndusu n333u wad3o 456n88n
psnsbsu, mamnnnsuy ygnmnnns uubman
nuayagobn. salsumgl u gaaanm uubman
nuayagobnau aonbnmngn uog30gon.
gabsgn gl naugdydgon o aaggaon nun6n
ssma n5uyn4gbsns6 gnss.
gmbnog - aonan 56 naygonnolus 3nnmgyngnou agmygonu gagdgoa 8amg6gbs, mdoongn 8ub3gds 1sbmdg36gmndn anomoymo5, 2gdmoa7aamg3nmu ubngsmm aabn3ds.
Lsma n 5u@y@6o amou m8gmy gamubogol agusbdoaonbomgdo
030000(000000)u8m0n 06b@y60u 8aMUsbyg68o 0yU660665 839w8).
my m8ymya aabmb3gnb 8gabmognognou
Oduo o030n sm snob od36n 32y6nlu
658,3m39mo gJUwOgynsAn R330n
66 83305 wosfgoon Loo6gmadom
OOn30n on36u 6m36y m 658.

mdoan mgo hbu 0
oosn68g6b6b03
oosn68g6b6b03
oogom 3nossn6sngm
oogom lb03u. 056 0ndog
ooosn6ymg uocnsn6gn, gdmog3omlu
ogmo 0dab33s 6 0ssnn5mbu
03gm.
mabgmalubn3nu mssmaon mbsgnausu 1sma nns mssnnu osbyf3o oos m3nu a330nn amdmsmonn ubn3nu amdagogdo b6n5 3aumlgs.
36 36
sddmny6mon lssomgdo m8bmyo n 05uagag6oan uaydsoop (jubuyn) o330 1sosamngnuusbmo. y8yymno 05uagag6oan agdsmou luosamgdo 8y63ymyog36 w89mymo ubogob uyqongum 05dognu, a8mudm ng36 w89mymo 05mbn36du36.
s yamny6m bsomgjon m8ymy n5uynogn no uysdmo (sugus) 80u 83aumgndu ubno 5 usglns. 886ms6 ydsmdou uasymgdo sm 8663cmyag5 uyyn-gadmbosagus 883o oayngdu upmo gndol sda
LsBman n5uLyg60nlu 330ngds
6gsosmnynnnabmmnp 33mnnnogdymo
3gumlsmalun3nu abmmn mngnbsmy
usosmngm 65ymgndu asmyg6gon.
a33m y8my63ymdoan LsBman gmy
yubmmbdul.
s oomn 60ds 03gdu nssgmm6
oogmnnn noan noagaaon. 0330dd
yyamgmon nn gndmoos 008ns6m6
abggwmds 6 gysbs6m6 ou ubgsaegn6gdu.
LsBmno n6u@y@5n 3gndgdo aegmdan
sn agdgaon, sngdo bnabggdo5, angdo5
oo @3gmo5 abmmlu. LsMa n6u@y@5u
ogdmns fmdo Su 63gmy3mgdo,
moadmss6 gndmgdo ssaggl @3gmo5
mngm.
sgbbsaaydysmaa.ahgmda3m gngnoln
33ydyomnouosbs6gnuosssuymno 33my6gnuagab33an, gndmgoaamnymu mngnn. 33ydyomnouogadmgdo56 33gndguofo6000, ma oogonoo 6ns6gds os anodmoqgddu, my 66
6nngg 839mnnn nnm3g5gdu.mnoedmas agusdmoa
8anogns6mn uugbndn uu gds.
36uymgmo gammygbognu 2dab033an, 56 mny 37ydmomno w8n8bgymns, 37ydmomno5 agndmgds yawamngbu 37ydmognu nunobj. 3a unambguo5 36bfo 37ydmognu o5 36cuo 37ydmognu. ny 37ydmognu o5 36cuo, hsaamdsboon 37ymmn. ny unobj ngsmn an amgbos, 37ymmn. ny unobj ngsmn an uadgynn 37ymmn. ny unobj ngsmn an uadgynn 37ymmn. ny unobj ngsmn an uadgynn 37ymmn. ny unobj ngsmn an uadgynn 37ymmn. ny unobj ngsmn an uadgynn 37ymmn. ny unobj ngsmn an uadgynnn 37ymmn. ny unobj ngsmn an uadgynnn 37ymmn. ny unobj ngsmn an uadgynnn 37ymmn. ny unobj ngsmn an uadgynnn 37ymmn. ny unobj ngsmn an uadgynnn 37ymmn. ny unobj ngsmn an uadgynnm
33dygmnoa gndmgdaos 8086gub 830860
mngdgoan, aagannnnae, yngu6gon 5
bmsb6ugon 56 8886 896ydoan dgaan.
gndggds ambgoglu daaamg agn3s,
mndgagagudmmgsdamaomlu
33dygmnoa 808630, dmmn, s2gondgs 80
gogobys.
mogus 3ydymsmo n ma aodmy6ds,
a05bga nao dawomnu uosagndu8s,
aogogua86,aaugogda86,
muaabgndus6,basb6gonus86sb3s
mamnuusagndus6,maegolus8 dydmon
gmn m6gdou gmdglus6 03s3dngds.
m3mg2gmds 3ydymsomnu 36gjol
mmol yoadmo asmaomcuo osd3mnss 6
bsdsmo.
aamay6gm abmmn 3ydyommnn
dymgmal 3mmyydgnon. gnu nlu
abmmn 88s, mmdmoan 2gdndmoan
oan30an 3ydyommnn lubao30nm
30m030n03ol85.
gsybom 33ydygmngn abmmg
aamomol dnm ngmogdoym
osydyn amymnmo. osudbo
amymnmo, magmny agusdsanlns gmon
03u sygymsmhalngobglsdmm
sdoqnnub5bdno noln, mgoug
ssmdoy6bs ubo 33ydygmmsmos5.

oogosb0nn 3ydyomm
osbsyngol6, asgmoanm
gyoana 56gbuynn anu yjol6,
bsdnoa6, fynla6, yymol85,
6glou6. sngomlu agonjdo u
amg ng gmonl mol3.


oogmabngdo


yuyuoyo 0000000000000000000000000000000000000000000000000000000000000000000000000000
a08364.
sngndmgsnla3nna6b0u yms335 8b3b6b6n3b6m0doa9356. gnu3no nagd6nlu gosysma33nu 8b3s 86mo b6mnnn aoy35nu 23o1du aob33do, 8yymgmo3 doadmogn 2nau. nuyn mgo6ooussyms33u agdmo sdaomnlu ngammyo nn oos osd3mmu uon3cmo 2 1ssnol 8600m0do.
guynno yagbab gumzmausu 6y600, mdu u bsasagm snu 83mmn. nugdou sgondou
aamoy600abmmnoguol3yynogm0g600,
m00000000000000000000000000000000000000000000000000000000000000000000000000000000000
sugmoan gnuynggogbuabmns 630 s an aamgbn5mm anun ammg 60mgds. conuysmd gagagbodds agudmms 636m5 3gndgyymms, sgonjgl, sanngu 60sosao6gol 8o5o anoyg5ml.
3333333333333333333333333333333333333333333333
s gssbsygmnn conuynn geagbgon oos 6n Aysannn GcBmnn. cunymdn ngd6gdds agudmmns 0o3mam 3gnadcycmmo, 000doglu, sumoglu oos aonogdu 8n6n ansygmb.
sossssssnnnnsygn gaggoggdoos sssssmmn. gusyndgsagaggagdaagusdmms 3gndgymmo, sggnglu, sggnglu 60sssssgduo5noaogy5mu.
s608300088856ymo cnuyymn 3m6ofoyysmon6. yysmon6 3m6ofoyolou mnnnydou yogm63o aqusdmoos 6a6ofoyocno oocdoon yodocn, sdoon 8000300b6dsno, 8000doos 56000856do 808056do.
amny6m bsmdn 6b6y6g,my cnuyno dshngu (22) ynn n bgyds. sannm gnny no d6y6g qs
usma n 6uugognu 6gnbodagmo uaydsml
guyngn 5 (as.. dnun amsgsgl, gdfny
amabysngn 0s.),aegm3d dnun
mnmngn 0s agsbalsu aadmg
sygmmo 0s dgs. admno
yongmo ngmo aomdgogmo aagcogdou R6gos
msgndognu Lssnnmgds.
LsBmno 6666666666666666666666666666666666666666666666666666666666666666666666666666666666666666666666666666
s# 00005m u##m n 6u#y#o6
os 0a#o#ymo s#ugusng
o33o56o6o0o5 oos ub3
usgongm om omyom
ommoos yom umo yom
s6 6uymo6n yom. aogno
usm no 6uoymo g on os yugusmo
d6o6 d6o6y mcu, maogus
aydoos oossmcmu o33ms66jou
os 6uogoo6m amyomomogdu
yoads.
Lusman n 5uuyag6o asa6no ymo
suguyngn ag6sbgdo a6no ymo
doomogonag6o asa6no ymo 30maboad
d6monag amyombmogonag6d amlu.
Lusman no 5uuyag6o do asa6no ydo
suguyngn bgdymjogds agusdmms
asamoa3nmu am5uoydgnuayd3ss oos833.
LsBmna 6uGyDg6o sOyHmnnos
nspono6ogogolom.0sno30n oAmy6bou
aIusbdo 6oAmmno3o 8ooyoo3jbo,0s..
03oana263jdo 5 bss3ooymgmo.
luOy3ngn 6336fM 6ds5n Bluteoth @
amno3ymo 6o36n (mmamn3o) 9o4mms86lu
oAonlOAmgo ym 6336fM 6ds5u
Bluetooth SIG,Inc-ub 6336fM.3m35bs
Robert Bosch Power Tools GmbH ny6d6u
luOy3ngn 6336fM 6ds5u/mamOn3u
mog68ooo
gnoobnog! 1s8m0n 6u6y6g6nBuIeBleoth- no s3myg6gndusu yondngos bs3g0bnu yamjbsb3a mymommoqab oos 3nsdgojgon3nlu, 03oand653gdoab0n0u uudaggnm 4yymonmmgndun3nu (ds..3yamom luynmnn, bnuu 3ssn). aynpu aadus, sm agndmoo buynmna gaaamnybmy ndsl ydymmnp unsbmm3gl yymn0 sssdsgndun3nu 00gbm3gndun3nu 8nsbnu any6gs. sn ssamny6mn lusmdn n5u6y6g6n Bluetooth -nn usdgaon5m amymonmmdojnu, 3usdaanm nnayygdnu, janyn no 556g6gndnu g 9ynmngnu unsbmm3gl, maagdg8g 5ugmou saegdgonu udanaemds 5u mygds gdsan uysdgm. sm ssamny6mn lusmdn n5u6y6g6n Bluetooth -nn ngan5s3gdo. ggygogn sh faanom nu bs6gmdm0 gn mn mnygg 85nun sbmm3gl.
36moydOnu os amalusbyngonu
aagaaon gduayosoou bgaedg36wmo
osusyoban amy36oognoomuyuOdo
008n86ymgdonuagdoaogymggs
Jusbman bnguysy y 66306mns
3mmnmb6mygno 6306mymo 68dou
unnyu n uusug66 68uueummoomoo.
Jusbman bnguysy y 66306mns 68moedn 68
mos unmgcn 68moqolungn.
Jusbman m58mym dmymooss
ambsaogmalongn EN 50689 agluudusso.
a0mbsbynn 3ma3m6g6gdo
mamgogobomn m3m6b6gdo osmbmnn
myuusogodu 339m8g bsmdg60moos
bomluysymu abgg00n.
(1) m8gmyo ubn0n ydmbuugmnn bgymo
(2)dyymo mno/aaognol ybno gom
(3) 05000000CAL guard
(4)dojdmun ngduomnu 600300mnn
(5) aaggonan ygsmnab ggnadob mgs30
(6) aaggonan agasmonn ngoadn o6o3o
(7) C086b0nluuogdmoxnoaouo
(8) Ws33d0ngdou Bluetooth® 6500330
(9) mngmgo3n Bluetooth®
(10) 33y3gms6mnb 86ymogmgo
(11) 000g00n g00sdy86nDyog
(12) 00000000
(13) 33ydymsmou/0s8mouu 8008y35b0 86dmm33nMgmo3a
(14) 0000000000000000000000000000000000000000
(15) 3700000000a
(16)amn03m
(17) 586gmyo ydoomobogdoy 3886mboaogmo gnno
(18) 60
(19) 5/8"
(20) 1/4"
(21)
(22) cooLgmo doogmgo
(23) onuynn doyognnu yogymogngos
(24) 8a6n
(25) 603gusmogn uosgogna
(26) 3000000000000000000000000000000000000000000000000
(27) 0ofofofofofofofofofofofofofofofofofofofofofofofofofofofofofofofofofofofofofofofofofofofofofofofofofo
(28) mssymyma bogoua a866g 6086ymo
(29) wssggygmn andgogna
(30) 586ymybmoaoymouo5uoydum
(31) 0000000000000000a)
(32) 080g03a
(33) 00guym3y6n0858
(34)
(35) ^a)
a) 88mbbym 56 gnnn n juguygogon an agunu 8ngogdnu 86s6gym 3m3mgjdn. 8uguygouan dgonn sumogbo nn. 8gna 8uguysgoan 36mggsan.
Gg63gna 0m64gajn
| bssgmaa bssgmaa bssgmaa | GLL 3-80 C GLL 3-80 CG | |
| bssgmaa bssgmaa bssgmaa | 3 601 K63 R.. 3 601 K63 T.. | |
| bssgmaa bssgmaa bssgmaaA) | ||
| - bssgmaa bssgmaa | 30 θ 30 θ | |
| - bssgmaa bssgmaa bssgmaa bssgmaa | 25 θ 25 θ | |
| - bssgmaa bssgmaa bssgmaa | 5-120 θ 5-120 θ | |
| bssgmaa bssgmaa bssgmaa B(C)D) | ± 0,2 θ/θ | ± 0,2 θ/θ |
| bssgmaa bssgmaa bssgmaa bssgmaa bssgmaa | ±4° ±4° | |
| bssgmaa bssgmaa bssgmaa cmm | < 4 θ < 4 θ | |
| bssgmaa bssgmaa bssgmaa bssgmaa bssgmaa | 2000 θ 2000 θ | |
| bssgmaa bssgmaa bssgmaa bssgmaa bssgmaa | 90 % 90 % | |
| bssgmaa bssgmaa bssgmaa bssgmaa bssgmaa bssgmaa | 2E) | 2E) |
| IEC 61010-1-nu dsgsdaa | 2 | 2 |
| bssgmaa bssgmaa bssgmaa | < 10 θ3θ, 630-650 θ | < 10 θ3θ, 500-540 θ |
| C6 | 10 10 | |
| bssgmaa bssgmaa bssgmaa bssgmaa bssgmaa | 50 × 10 θ60 (bssgmaa bssgmaa) | 50 × 10 θ60 (bssgmaa bssgmaa) |
Bosch Power Tools 1609 92A 8AR| (18.10.2022)
2021
| bssmssn | GLL 3-80 C | GLL 3-80 CG |
| 1/10000 | 1/10000 | |
| 23.3838 | 23.3838 | |
| 10.3838 | 10.3838 | |
| LR 6, LR 7 LR 7 | ||
| 1/4", 5/8" | 1/4", 5/8" | |
| 12.3 | 12.3 | |
| 4×1,53 LR6 (AA) (2020000000000000000000000000000000000000000000000000000000000000000000000000000000000000000000000000000 | 4×1,53 LR6 (AA) (20200000000000000000000000000000000000000000000000000000000000000000000000000000000000 | |
| CR2032 (20200000000000000000000000000000000000000000000000000000000000000000000000000000000000000000000000 | CR2032 (20200000000000000000000000000000000000000000000000000000000000000000000000000000000000000000 | |
| 8U | 6U | |
| 6U | 4U | |
| Bluetooth® usmào n5u | Bluetooth® 4.0 (Low Energy) | Bluetooth® 4.0 (Low Energy) |
| Bluetooth® 4.0 (Low Energy) | Bluetooth® 4.0 (Low Energy) | |
| Bluetooth® 4.0 (Low Energy) | Bluetooth® 4.0 (Low Energy) | |
| Bluetooth® 4.0 (Low Energy) | Bluetooth® 4.0 (Low Energy) | |
| Bluetooth® 4.0 (Low Energy) | Bluetooth® 4.0 (Low Energy) | |
| s#y#m##s usbm#n o#u#y#d#y#n 3330s usbm#n n#u#y#d#y#n 425 usbm#n #u#y#d#y#n 461 usbm#n u#y#d#y#n 481 usbm#n ##y#d#y#n 501 usbm#n ##y#d#y#n 511 usbm#n ##y#d#y#n 521 usbm#n ##y#d#y#n 531 usbm#n ##y#d#y#n 541 usbm#n ##y#d#y#n 551 usbm#n ##y#d#y#n 561 usbm#n ##y#d#y#n 571 usbm#n ##y#d#y#n 581 usbm#n ##y#d#y#n 591 usbm#n ##y#d#y#n 601 usbm#n ##y#d#y#n 611 usbm#n ##y#d#y#n 621 usbm#n ##y#d#y#n 631 usbm#n ##y#d#y#n 641 usbm#n ##y#d#y#n 651 usbm#n ##y#d#y#n 661 usbm#n ##y#d#y#n 671 usbm#n ##y#d#y#n 681 usbm#n ##y#d#y#n 691 usbm#n ##y#d#y#n 701 usbm#n ##y#d#y#n 711 usbm#n ##y#d#y#n 721 usbm#n ##y#d#y#n 731 usbm#n ##y#d#y#n 741 usbm#n ##y#d#y#n 751 usbm#n ##y#d#y#n 761 usbm#n ##y#d#y#n 771 usbm#n ##y#d#y#n 781 usbm#n ##y#d#y#n 791 usbm#n ##y#d#y#n 801 usbm#n ##y#d#y#n 811 usbm#n ##y#d#y#n 821 usbm#n ##y#d#y#n 831 usbm#n ##y#d#y#n 841 usbm#n ##y#d#y#n 851 usbm#n ##y#d#y#n 861 usbm#n ##y#d#y#n 871 usbm#n ##y#d#y#n 881 usbm#n ##y#d#y#n 891 usbm#n ##y#d#y#n 901 usbm#n ##y#d#y#n 911 usbm#n ##y#d#y#n 921 usbm#n ##y#d#y#n 931 usbm#n ##y#d#y#n 941 usbm#n ##y#d#y#n 951 usbm#n ##y#d#y#n 961 usbm#n ##y#d#y#n 971 usbm#n ##y#d#y#n 981 usbm#n ##y#d#y#n 991 usbm#n ##y#d#y#n 100-75% usbm#n |
LED aBol aogmoadgmo
| Boonjmo yoy3000 | 35-10% |
Oy aydyommo 5b do yngo oxxogdo,
mdymymo bsgdal un3dsd6gm-6cmns
3mgdymmol.
yymgdmgymdmygmgydsmon 3ydymsmngs
aagaaag aamggaagaaag 6 mnn-mnou wogamnol
aagaaagaaag 860000000000000000000000000000000000000000000000000000000000000000000000000000000000000000000000000000
-3sUymoos 3sOmo6m330u 058gmo3smo (ym3gmo12o39).
-58man n5uuygogn 68n 68bgoos ygdgogm g3gmy 30mmgdo.
-000003d0500u08m0n 05u0y0g060u dmo mgyo3u (a..g06oNusu noo0s6 a2xabnUsb).
Bosch Levelling Remote App"
6b6m, uan an 6n6 mdo
600030 600030 abgab gaoomboaog
600030. 600030 aagab
600030. 600030 aagab
CAL guard (3) 63g6o, ma uan
600030. 600030 aagm
aannnngnnnnaaamhagnu aagaaagaaonanmnnn nnnn nnnnnnnnnnnnnnnnnnnnnnnnnnnnnnnnnnnnnnnnnnnnnnnnnnnnnnnnnnnnnnnnnnnnnnnnnnnnnnnnnnnnnnnnnnnnnnnnnnnnnnnnnnnnnnnnnnnnnnnnnnnnnn nn nannn nannn nannn nannn nannn nannn nannn nannn nannn nannn nannn nannn nannn nannn nannn nannn nannn nannn nannn nannn nannn nannn nannn nannn nannn nannn nannn nannn nannn nannn nannn nannn nannn nannn nn ann
3aamnem3nulgubgo aommbngonu aamgbnusumdagogogndn 56anqg3mss
dAmgo 1s8mna 6uGyognlu 60gmaogdo
un8yog (ab. U8mna bumusyymlu un8yognu
dAmgo,33.206).
my ygmoaagmogonu gmo u 66 aamn
adunadymnoo oosdgon oomdo nol
oogodoo, gdmnoo on 6003oMn CAL
guard (3). adouanmnu gnmoynmwo gossn
andogon an dsmnlu ngndnu gnmsu (5)
mssu Bluetooth(9) 80fnnmna 3 7
obgnomn CAL guard (3) hgd.
my gmon-gmon agomgogonu comluusman bngusbym
gocoofojmofoa jundasmyoosobgoosobmol,ou
j60s hdoosaglu o603no amalusbymgonu 356mon
dogosogos Bosch.
U8mnbomubymyunbgyuGou agmddgds
unugjg jg oJgog gom
y3gms89 gong 203mg5b sbog6u gomgdml
g23gmo7ymo. 3gmdmo, m8gmo lu bnglu 8oosmbn
glusdmgoqmo 3g3gmo ymo 3mgo6nu 3d m
ns3ncs6 8gaon.
B3g5 gnnR03m 1s8mdn o5uGmyd6o 6aDmyg6mo
Oo38g, moos Iooomb 8gdymjagocds anny36mo
o6ooyd6og, mdoomab d33cog6 dmcon.
dsus, oossy6gn 1s8mdn o5uGmyd6o
dngonwgs3nsuaydsm gwsnnn yasn.
www.bosch-pt.com/serviceaddresses
Gul3mGnogds
6g30d260606060606060606060606060606060606060606060606060606060606060606060606060606060606060606060606060606
GonnoBss
B 108an 6b6g6g6g,
3ydyomfo6g6ofo6g,
3ygluyogonooagymg0n y60
60000000000000000000000000000000000000000000000000000000000
60 600000000000000000000000000000000000000000000000000
33yomn0m6n/0s0snj0n:
mmnnnau-nm6nsn:
oogooan oonnoogoo, mmoogmo amyo6ogmo
fo5u3mogognu 6ymgogosn (ob.
"66663mngds", 33.209).
Româna
Instruţiuni de siguranta

Service sculelectric
Strada Horia Macelariu Nr. 30-34, sector 1 013937 Bucuresti
www.bosch-pt.com/serviceaddresses
Transport
Accumulatori li tiu-ion recomandi respecta cerintelegislatiei privind transportul marfurilor periculoase.
Accumulatori pot fi transporte rutier fara restricti de catre utilizator.
H3mePbTeHNnT ypeD moKeJa 6bJe 3axpaHBa HnC o6NKHOBeHN 6aTePN, HnC cIHTneBO-IOHHa akymyNaTopHa 6aTePN Ha Bo.
Pa6ota c akymynaTopha 6aTepeira
N3non3BaIte cmo nocoyHHe Bpa3eJaTexnueckn daHH 3apAHH yctpoCTBa.CaMoTe3n 3apAHH yctpoICTBa ca npametprn, npxOAnu 3a H3non3BaHata BB Baun N3mePbaTeJen ypeJnTneBO-ohHa 6aTepna.
Yka3aHHe: NHTeBO-HOHHTe akyMynaTopHbAtePnCe DOCTABRT qACTNUHO 3apeHn NopdN MeKdyHapOHNTE npEDNHCANHra 3a TpaHCNOPT. 3a da ce rapaHTnpaNbHata MoUHOCrHa akymyNaTopHATA 6aTePn, 3apeTe RaHbHOr npEIN PbBbTa yNoTpe6a.
3a nocTabaHHe Ha 3apeHeHaTa akymyataopHa 6aTepeHn (15) BkapaTe B rHe3dTo (10),doKATO yCeTne OTeTnBO npsepaKaBaHe.
3a n3BaXdAe Ha aKymnatopHata 6aTepeRi (15) HATINCHETeOCBO6OxDaBauNTe 6yToHn (13) nIaDbpnaTte aKymnatop
HaTa 6aTePnO rTHe3DTo (10).Ipn ToBa He npHnaarTe cnla.
Pa6Ota c 6oBKnHOBeHn 6aTePmN
3a 3axpaHbAe Ha n3MepBaTeHHy ypeI ce npenopbUba H3- non3BaHeto Ha aKanHO-MaHraHOBn 6atepn. 6atePntte Ce noCTABRT B aAnTrop 3a 6atepn.
AanTopbT 3a 6atePnH e npedHa3haeH cmo 3a non3BaHe B npedBnDEHte 3a TOBa H3MepBATEH ypeHn Ha Bosch nnon3BaHTo My ceneKtpoHCTpyMeHTn He ce donycka.
3a noCTaBHe Ha 6aTePnnte BkapaTe kyTnTa (11) Ha aAnTopa 3a 6aTePnH B rHe3dOTo 3a 6aTePn (10).NoctabeTe 6aTePnnte Taka, KaTO e nOKa3aHo Ha 3IObpaKeHneTo Ha 3aTBapAunKa KanK (14) B KyTnTa. NoCTaBeTe 3aTBapAunKa KanK HA KyTnTa, DOKATO yCeTnTE OTeTINBO ppeuPaKaBaHe.

3a N3BaXdaHe Ha 6aTePnHTe (12) HATHCHeTe De6IOKpaIInte 6yTOHN (13) HA KaIapa (14) Iro N3dbpnaIte. Ipi TOBA BHHMaBaIte 6aTePnIte Ja He N3IIaHnat. 3aTOBA dpbXte H3MepeBaTeINH INCTpymEnT C rHe3DTo 3a AkymyIaTOP Ha 6aTePnHa (10) Harope. N3BaJeTe 6aTePnIte. 3a Da N3BaInTe pa3IOJIOKeHATA BbTpE BIOKa
(11)OTaKymyIaTOpHaTa KYTHn, 3aXBaHETe OT
BbtpeHnHaCTpaHa HnH3dbpHaHTeOTnH3MePbATEJHHypeCJIeKHaTHCK KbM CTpaHHuHaTcTeHa.
3aMeHHTe BnHaTn BCnKn 6aTePH n eHOBpEmHo. H3IOI- 3BaHTe BnHaTn 6aTePH n OT eHH N CbI IIPOH3BOJNTeJI N c EJ HAKB KanaIHTc.
Ako npoDbIxHnTeHbpeMe HMa da H3noN3BaTe HcTpymEnTa, H3BaXJaTe 6aTePnTe OT Hero. PIn npO- IbJHKTeJIHO CbXpaHraBaHe B Hee 6aTePnTe B H3MepBaTeJIHHn HnCTpyMeH TOrat Da KopoOpnat N da Ce camoppa3peTt.
HnKatop 3a cteneHTa Ha 3apeHeocT Ha akymnatophata 6atepna
HnKAtOpBt 3a CTeIeHTa Ha 3apeHeOCT Ha akyMyIaTopHaTa 6aTepn(2) IOKa3Ba KOJIko e 3apeHe akyMyIaTopHaTa 6aTepn, pecII. 6aTepnIte:
| СbvToNDоД Стени на за佩даховсT |
| Helenpbckbchata зелега СbvT-100-75% |
| Лина |
| Helenpbckbchata Кьлга СbvT- 75-35% |
| Линa |
| Helenpbckbchato СbvTeца чeр35-10% |
| Вehа СbvТлпа |
| НЯма СbvТлпа - Akумлалогната бateрпяe Deф ekтнa -Бateрпite ca ИЗтошени |
Cn30aabaHToHaakymyIaTOphHata6aTePnpeCnHa6aTePnHTeRkoCTTHaNa3epHnTeHHnnPiabHOHaMaJIraBa.CmHnTe He3a6aBHO NobpeHnAkyMylaTOpHa 6aTePnpeCn.H3xa6eHNb6aTePn.
CMAHa Ha 6yToHHa76ATEpHn(BK.ΦnR.A)
H3mePBateHNHTypee cHa6deHc6yToHHa 6atePn1(21), 3aJaMOrT aTaTAt NacBt 3aΦyHKInrTaI CAL guard Ja ce CbXpaHBAH H6e3 H3IOJI3BaHa akymlaTopHa 6atePn, peCn.6e3 IOCTaBeHN 6atePn.
3a da 3aemeHHe 6yToHHaTa 6aTePn, n3BaTe eKMyJAtopHata 6aTePn, pecn. aJaTepa 3a 6aTePn.
H3bpaaiTe cKo6ata, bPkaa 6yToHHata 6aTepeHr(22)OT
rHe3dOto Ha 6yToHHata 6aTepeHr(23). H3BaIe Te p3HaT a
6yToHHa 6aTepeHr(21) HIOCTabeTe HOBA. BHIMaBaiTe 3a
IpaBnHATA NOIApHOCT CbflACHO H3o6paKeHNeto Bpxy
CKo6ata, dPkaa 6yToHHata 6aTepeHra (NOIOKHTeIHHT NO-
JIOc Ha 6yToHHata 6aTepeHra Tp6Ba da e o6bpHar Harope).
BkapaIte cToiKaTa Ha 6yToHHa 6aTepeH(22) C NOCTBeHa B Heia 6yToHHa 6aTepeH BHe3IOHO (23). BHMaBaIte cToI KaHa 6yToHHa 6aTepeH da Ce Bkapa IpaBnHO HnHbI- HO, Tb Kato B IpoTHBeH ClyaH 3aIIHTaO t IpaX n Ppck BoDa Beue He MoKe da Ce rapaHTnpa.
PnIbpoHauJHO NyckaHe B EcknoataaOn OTCpaHete 3aIIHTHOΦIoHO Ha 6yToHHata 6aTepeHn(21).3aJeTtA DeNCTBAHte KaKTo IINp CmHa Ha 6yToHHata 6aTepeHn.
Pa6ota
IyckaneBekcnnoataa
PpeJa3BaIte H3MepBaTeHnHn np6Op OOBnAaKHaBAHe HdpeKTHO NOnaDaHe Ha CbHuEeBn IbYn.
He n3naIaIte H3MepBaTeHnHa ypeHa ekCTpeHHN TemnepaTyPh Hn pe3Kn TemnepaTyPh npomEH.
Hanp. He ro octabnIte npOdbJHKHTeHIO BpeMe B aBTOMo-6HJI. PInr foIemH TemIepaTpHN KOIEbHaHH OCTABnIte H3MepBaTeJHHy ypeJ Da c aIaIHTnpA H ppeN IpoDbJkaBaHe Ha paBoTATA BnHaH N3BbPbIIBaIte IpoBepKa Ha ToUHOCTTA (Bk. ,PiobepKa 3a ToUHOCT Ha H3MepBaTeJHHy ypeJ", CtpaHnla226).
IpnE kctpemHn TeMnepaTyprn HIN ROJIeMH TeMnepaTyprn pa3JHKN TOOHCTTa Ha N3MePbaTeJHHyypeJ MoKe Ja Ce BLOHn.
H36BraTe CnHH yDAPN Hn H3nyCkaHe Ha H3MePbaTeHHype. CJeUyapHN Bb3deIeCTBnB Bbpxy H3MePBaTeHHypeTp8bA da H3BbPWBate IPOBepKa Ha TOHOCTTa My, IpeIN Da IPOJbJKHTe Da rO H3IOJ3BaTe (BK. "IPOBepKa 3a ToHocCT Ha H3MePBATeHHype", CtpaHnHa226).
Korato npenacte ypea, npedbapntno ro n3knouBaTe. PnH3KNIOUHaHE MoyIbT 3a KOle6aTeHN DBNJKeHHce 3actOnOpBa, Tb KaTO pNCHIN B6paunMOKe da 6bJe IOBpeH.
BKNIOyBaHe H3KIOyBaHe
3a BknoBaHe Ha N3MepBaTeJIHHy ypeI pemeCteTe nycBOBn IpeKbcBaH(16)doIO3HnT" "On"(3a paOba C maXaIHO apETnpaHe) HmIo IO3HnTaT" "On"(3a paOba c ABTomATNuHn HnBeJInpaHe). BeHara CneB BKIOuBaHe H3-MepBaTeJIHHYpeI N3JIbUBA Ja3ePHN JInHHN IIpe3 HxOJaIHTe OTBOpH(1).
He hacoubaTe na3epHnI Nb4 KbM Xopa Hnn KKNBOTHN; He rnaTe Cpeu y na3epHnI Nb4, Cbso n OT rONMO pa3ctOHHe.
3a N3KIOUbaHe Ha N3MePbATEJIHHN HNCTpyMeHT IpemeCteTe NyCKOBH NpeKbcBau (16) B NO3HnH Off. PpH N3KIOUBAHe MOyIbT 3a KOJIe6aTeJIHHTe DBNKKeHH Ce 6JOKnpa.
He octabHte ypeDa BKNIOueH 6e3 HAp3Op; cneI KaTo npKIOHTe paOta, ro N3KIOUBAHTe. pyTH IINa MoT ra Da 6bDat 3acJIeEHn OT Ja3epHH Jbq.
PnI PEmHaBaHe Ha MaKChMaJHO DoNtHMaTa TempepaTy paOT 40CypeBc H3KIOUba 3a IpeIIa3BaHe Ha Ia3epHHaIOA.CIeOxIAkDaHe H3MePBateJIHHrYpeE oTHOBOTOB3a pa6oTa H MoKe Da 6bDe BKIOueH.
Korato Temnepatypata Ha H3mepBaTeHHype Ce do6nnkdo MAKcHMAJHO donyctHMATA pa60THa TEMnepatypa,ApKOCTTA Ha JHHHHTe HAmaJIIBA IIaBHO.
H3MePBATeIHHrT HnCTpyMeHt e 3aunTeH CpeUy EKCTpEmHOeKeTPOCTaTHNO pa3peKdAHe (ESD). Ako H3MePBATeIHHrT
yepeeneKTPOCTaTHO3apehen(Hanp.npDOKOCBaHE B CpeaC HnCKA BnaXHOCT HaBb3dyxa),TOI aBTOMaTHUHO CE nKIOuBa.NKIOUeTe NOTHOBO BKIOUeTe B TO3N CNYaay nyCKOBn PpeKcbau (16).
DeakTHBHPaHe Ha aBTOMaTHHOTo H3KIO4BaHe
AkoB npOdbJxKeHHe naPn6bn3ntenHO 120 min He 6bde HATNCHT BYTOH HA N3MEpBaTeHNHn HNCTpyMeHT, n3MEpBaTeHNHn HNCTpyMeHT Ce n3KNIOyBA ABOTMaTHyHO 3a 3ana3Ba-He Ha akymyTaTopa, pecn. 6aTePHte.
3a da BkIIOHTe NOBTOPO H3MEpBaTeHnHrypeclnABTOMatNUHO N3KIOUBAHe,MOKeTe Da N36yTate NcKOBnI ppeKbCBauch 16MbPBO Ha PO3HNu "Off"N CNE TOBA OTHOBA da BkIOHTe H3MEpBaTeHnHrypeD INH da HA TnCHETe EINH mTbyToaHa pexHM Ha paBota c na3ep (7) nH bTyToHa 3a peXHM Ha npHEMaHe (5).
3a da deakTNBnpe ABTOMaTHHOTo N3KIOUBAHe,HaTNCHe 3aIpbXTe NOHE 3cekyHn6byToHa 3a peKm Ha pa60Ta (7) (PnBkNHOe H3MEpBaTeH epei). PnDaeAKTNBnPaHe Ha aBTOMaTHOto N3KIOUBAHe Ia3epHHTe IINHH nPIMrBAT KpaTko 3a NOTbPckDeHne.
3a da aKTHBnpaTe aBTOMaTHHOTo N3KJIIOUBAHe, N3KJIIOUeTeN OTHOBO BKNIOUeTe N3MepBaTeHNHrypeI.
DeakTHBnpaHe Ha 3BykoBaTa CnHaHn3aun
CnEiBKNIOUBaHe Ha N3MePbATEHnIypeD 3ByKOBaTa CnHaN3aunBnHaH eAKTNBnpaHa.
3aH3KIIIOUBAHe HINB KBIIOUBAHe HA 3BYKOBA Ta CnHAn3auHnHaTNCHETe EINHOBPemEHNO6yTOHnTE 3apeXHM Ha pa6Ota(7) H3a peXHM Ha nPheMaHe (5) Hn 3aDpBkTe Ha-MAIko3cekyHn.
KaKTo npn aKTHBnPaHe, Taka H npn N3KNIOUbaHe Ha 3ByKOBA-Ta CnHaIIN3aIIN3a NotBbPjXDeHne Ce N3NbUbaT Pn KpaTKn 3ByKOBNCHHaJa.
Pa6oTHnpeXHMn
Ia3epHnHTypepa3noNara c HAKoNko pa6OTHn paBHHn, MEXKny KOnTO MoKeTe Da npeBKnIOuBaTe NO BCKO BPeMe:
- rēheπρahe Na eŋHa xopɪn³ɔHTaɪnHa IaʒeρHa paBHHa,
- rHeHepaHa He ha eHa BepKanHa JiaepeHa paBHHa,
-rghehpnaHe Ha DBe BepTKaJIHn Na3epHn paBHHN,
-rrnepnpaHae enHaXOpn3oHTaHa HnHaDBeBeptnKaHnna3epHN paBHnH.
CnEi BkIOUOBAHe N3MepBaTeHNNHTypeI reHepnpa EaHaXoPn30HTaHa Ia3ePha paBHHa. 3a da CmEHITe pexIma Ha pa6ota, HATNCHE6byToHa (7).
BcHKnpeKMMN MoT a6bDaT H3NoJ3BaHN KaKTo C aTO-MaTHNO HINBeHnPaHe, Taka N C MaxAnHO apETHaPe.
PexnncpneHmnnk
3a pa6oTa c nasepHHN npHemHnK (29) He3aBHCNOOTn36-paHHpeKHM Tp6Ba da 6bDe BKNIOueH npEeKMbT 3a pa6oTa c npHemHnK.
BpeKHM ha pa6oTa c npHemHK na3epHnTe HHHMnTc MHOrO BnCOKa YecToTA n Taka CTaBAT No-JeCHO OTKpmbaEM 3a Na3epHHN npHemHHK (29).
3a BkIIOUBaHe Ha pexHMHa pa6Ota C npHemHK HaTHcHTe 6byToHa peXHM Ha npHemHK (5). INHnKaTOpbT 3a peXHM Ha npHemHK (6)CBETBA B 3eNEHO.
3aOboeIKOToPnBkIIOueHpeKIM3a pa6oTaC npHEMHNK BNDMOCTTHaJa3ePHNTE HNHnE HaMaNEHa.3aTOBa npnpa6oTa 6e3na3epennpHMHK nKIOUeTe peKIMMa 3a npHMHK qe3 NOBTOHO HAHTCKaHe Ha 6yTOHa 3apeKIM Ha pEmHHK (5).HdkaTObT3apeKIM Ha npHEMHK (6) yraCba.
ABTomathuHO HnBeHnpaHe
Pa60Ta CbC ChTeMaTa 3a aBtOMaTHUHO HHBENHpaHe
IocTaBete n3MepBaTeHnHa ypeHa xOpH3OHTaHa 3dpaBa OCHOBa,3axBaHeTe Ro Ha cToiKa (25) HnHa cTaTHB (32). 3a da pa6oTnte C ABtOMaTHNo HnBeHnPaHene, noCTabeTe NcKOBnI pekcbay (16) B No3nua "n".
CnCTemata 3a ABTomATuHNO HNBennpaHE KOMneHCnpa OTKIOHeHNAOT XOpN3OHTaIATA B pAMKIne HA dHaNa3oHa 3a ABtomATuHNO HNBennpaHE OT ±4°. HNBennpaHToE npNKlOHN, KOrAto Na3epHnTe NHHN IpectaHaT da Ce npMeCTBaT.
Ako ABOMaTHUHOTO HINBENIPAHE He Bb3MOXHO, HApN. KOrato NOBbpxHOCTTa, HA KOrTo N3MepBaTeHNHType e NoCTaBeH, Ce OKIOHOBA OT XOpH3OHTanata C NOBEe ot 4°, Na3epHnTe NHHN 3AnOuBAT Da MNrAT 6bp30. PnB KIIIOueHa 3ByKOBA CNHnHn3aunCe UyBa 6bp30 NOBtapAA ce CnHnA.
IocTaBeTe H3MepBaTeHnHa ypeD xOpH3OHTaJIHO n3UkaKaIte aBTOMaTHuHOTo My HNBeJIHpAHe. Korato H3MepBaTeHNHtYpeD 6bDe NoCTaBeH b paMKHe Ha dnaNa3OH Ha cAmOHBeJIHpAe O T ±4°, Na3epHNe IbHu 3aNoOuBaT Da CBETAT HenpeKbCHaTO N3BYKOBnT CnHaN CE h3KnIOyBa.
Pnpa3bpcbaHHHINI INPOMHa HA NIOKHeHTo NO BpeMe Ha pa6Ota H3MEpBaTeHNHTypeD CE HNBEnHpA OTHOBaTOMaTHNo. CneN IOBtOpHOTo HNBEnHpA He PPOBePeTe N03uNTHe Ha XOpN3OHTaHnTa, pecn. BePTKaJHa Ja3epHn JHHN CnpMo pepepeHTH ToUKN, 3aJa H36eHHe TpeShK OT H3MecTBaHe Ha H3MEpBaTeHNH ypeD.
Демостс с maxанно apetupahe
3a da pa6oTnTe c maxaHno apetnpahe, noctabeTe nycKOBn npekbcbay (16) B no3nui "On". HndkaunTa 3a maxanHo apetnpahe (4) CBETBa B uepeBHe N na3epHne LHHN M rat NOCTOARHNO 6abHO.
Pn npabota c MaxaHHTO apetnpaHe ABTomauHOTo HBeI npaHe e N3KnHoyeHO. MoKTe Da IbpxNte N3MepBATEHnHa yed CBO60dHO BpbKa Hn da ro NoCTaBHTe Bbpy HaKIOHeHa IOBbpxHOCT. Na3epHNTe HnHH Beue He ca HNBenpaHn He e 3aDbNkHTeHNO da IpemHHaBt OTBeCHO EaHa Dpyra.
Диctанционуypаьненuepe3"Bosch Levelling Remote App"
N3mepBaTeHnHrIypeEcMoynBluetooth,KOITNO03BO-BA6e3KNUHOTOnDCTaHNoHOynpABHeHcNOMOHTaHa CmapTfOHcNHTepFeCBluetooth。
3a n3no13BaHe Ha Ta3nΦyHKuE H yKHO pIpNoXHHeTo
"Bosch Levelling Remote App".B 3aBnMocT OT BnDa Ha yCTpOHTBTO MOKTe Da rCBAJIte OT eINH OT MaRa3HNITE 3a npINOKeHHA (Apple App Store, Google Play Store).
HnΦopMaun3a Heo6xOHNMTe CNTcEMH N3NCKBaHn 3a OcbIeCTBraBaHTo Ha Bluetooth® Bpb3ka MoKeTe Da HamePnTe Ha INTEpHET CTpaHnCATA Ha BoW Ha aDpec www.bosch-pt.com.
PnDCTAHUHHTO ynpaBHeHne C Bluetooth® BCNECTBnE HaILOHNYCIOBnA 3a PnHemaHe HcNHaHa e Bb3MOXHO Bb3- HNKBAHeTO Ha 3AkbcHEHn BbB B3aHMoEiCTBnETo Ha CMapTfOH nH3MepBaTeHen ype.
BkIIOUbaHe Ha Bluetooth®
3a da BkIOUHTe INTEPfeIca Bluteoth 3a dIcTaHIOHO ynpabneHHe, HATNCHETe 6yToHa Bluteoth (9). YBepTe Ce, ue INTEpfeIcbT Bluteoth Ha BaWeTo MObInHO yCTpoiCTBO eAKTNBupaH.
CneI CTAPTnpaHe Ha npInoKeHHeTo Ha BoW ce H3rpAkaBb3kata MeKdy yCTpoiCTBOTo H3MepBaTeHHypei.Ako 6bDat OKPHTN HAKONKO AKTHNBH N3MepBaTeHHypei, Tp8Ba da H36pePeTe ypeDa, c KOtTO XeNaete Da KOMyHNKnPaTe. Ako 6bDe OTKPTcMoEeHH N3MepBaTeHn ypei, ABTomaTHUHO Ce H3rpaKaDa Bp3Ka C Hero.
Bp3kata e n3rpaedeHa, Korato HnDnKaTopbT Bluetooth@ (8) 3anoueH da CBETN.
Bp3kata Bluteoth MoKe da 6Be npeKcbHata npaDn TBpIe rOJAMo pa3cTOnHne MeXdy N3MePbATEHNH yPeN MOBHNOTO yCTPOHCTBO, KaKTo N BCNECTBHe Ha eNeKTPOMaRHTHN CMUeHHN. B TaKbB CnyaA HNDNKATOpBT Bluteoth (8) Mna.
N3KIIIOUBAHe Ha Bluetooth®
3a da n3KIOUHTe Bluetooth 3a DCCTAHNOHHTO ynpabHe Hne, HATNCHTe Bluetooth 6yTOHa (9) Hn H3KIOUHTe H3- MEPBATEHN Hyei.
PpeynpeinteneHnndkaTop 3a KaHH6pnpaHE CAL guard
Cen3OpTe Ha npdynpdntenHn HnHaTOp 3a KaH6pPaHe CAL guard CneJr CTbCTOHHeTO Ha n3MePbTeHNn HnCTpyMeH, CbIo N KOrATo ToE n3KlNoeH. Ako n3MePbTeHNn HnCTpyMeH e 6e3 3axpaHbHe o akymyIaTOPHaTa 6a- Tepna Hn6 BtpeSeH n3ToHnK Ha eHepnO cNrypBa pa6oTaHa CeH3OpTe 3a 72 Yaca.
Cen30pTe CE BkIOUoBAt PnI NbPBOHaaHHTO NcKaHe B EKcIIoatauHa H3MepBaTeHNH INCTpyMeH.
3aJeCTBaHe Ha npEynpeIeHnHn HnHKaTOp 3a KaH6pnpaHe
Ako HacbHn HnKoe OT cIeHNHe CbHnTn, npEynpeHntENHnTnHnKaTOp 3a KaHn6pnpaHe CAL guard ce aKTHBnpa nHnHKaTOpBT CAL guard (3) CBETBa BuepeBHeo:
-ИЗТЕКБЕ ИНТЕРВАЛТЗАΚΑΝΙΒΡΗΝΕ (на ВсЕКН 12 Me-ceua).
-Измервateлгатуpeдсхрановпрн TempeТунЗБьН TempeРУнИТЕрВа3схранБа.
-ИзмерВATEнТуpeEбипОДNOЖЕнHaСИНо CBtpeCehne(HAnp.NaDAHHeNoJaCnEDИЗNYCKAHE)
B"Bosch Levelling Remote App"MOKeTe Da BnITe Koe OT Tpnte CbHtna e aKTHBnpaI npdeynpeintenHn HndkaTOp 3a KaN6bpapane. Be3 npInIOxEHnTo Ta3n npuHa He Mo
Jae da 6bpea3no3HaTa, CBETBaHETo Ha HnHnKaTopa CAL guard (3) yka3Ba caMo, ye e Heo6xoIma npOBepKa Ha Ka- n6bpupaHTo.
Cnei 3aeneCTBaHe Ha npEynpeHnteHaTc nCTema HnHnKaTOpbT CAL guard (3) CBeTH,IOkato He 6bJe npOBepHa TOnHocTTa Ha HnBEnIpaHe nCneT ToBA HnHnKaTOpbT He 6bJe N3KloueH..
IeINCTBn np3aedcTBaHe Ha npdpynpeDHTenHata cnCTema 3a KaHH6pnpaHe
PpOBepe ToHOCCTHa HnBENIPAe Ha n3MepBaTeJIHHN HnCTpyMeHT (BX. PpOBepKa 3a ToHOCCT Ha n3MepBaTeJIHHypeD, CtpaHnca 226).
Ako MaKcMaHIO DonyctMIMO OTKHOHe He 6bIe HaXBbpHeo npn HHTO eHaOT npOBepKeTHe, N3KnIOueTe HINHKaTopa CAL guard (3).3a cENTa HATNCHeTe eHNOBpeMeHHO 6yTOH PeXMM C pNpEMNHK (5) n 6byToH Bluetooth (9) 3a MHNMyM 3 s. INHkKaTopbT CAL guard (3) yracBa.
Ako npn HkOa OT npOBepKIne N3MEpBaTeHNHrT ypeI hAnxBbpN MaKcHMaJIHO DONyCTHMOTo OTKnIOHeHne, TOI TpRbBa Da 6bJe peMOHTnpaH B OTOpH3a eNEKTPOINHCTpyMeHTn Ha Bosch.
PpOBepKa 3a TouHocT Ha H3MePbTeHNnYpe
ΦaKTOpN, BnHReuHa ToHocTtA
Hai-tonma BnnaHHe Bbpxy TouhoCTa HMa OKoHaTApempatya.CneuaHNO TemepatypHaTa pa3nka ot noHaRoPe MoKe da npednBnKa OTKnOHeHH Ha na3epHnIb.
3a MHHMHN3HpaHe Ha TepMnHn BnHnOHT HnraCa CEOT NOda TOPIHn, Ce npeopbUba H3noI3BaHETo HA n3MePBATeHNy ypeBbpy CTaTIN. OcbEN TOBa npn Bb3MOXHOCT BNHa NoCTABnTE H3MePBAeTNHn ypeB CpeDAtHa pa60tHaTnIOu.
HapecBbHnHTe pKaTOpn, npuHa 3a OTKnOHeHHa Morat da6bDat cbso n paKToPn, Cbbp3aHn Cypeda (HapnpaHne HIN CNHN Bn6paun/yapn).3aTOBa BNHar npedn3anObaHe Ha paBo Ta npOBepBaIte ToHocTtHa HNBenpae. BnHar npBo npOBepBaIte ToHocTtHa HNBenPahe Ha XOpN30HTaHATA Na3epHa IHHNn N CTe TOBA ToHocTtHa HNBenPahe Ha BeptNKaHATA Na3epHa IHHN.
Ako npn HraKoN OT npOBepKHe N3MEpBaTeHnHType nHaXBbPn MaKcHmAlHO DOnyCTHMOTO OTKnIOHeHne,TOI TpR6Bada 6bde peMOHTnpaH B OToPn3paH cepBn3a eNEKTponHCTpyMeHTn Ha Bosch.
PpOBepKa Ha XOpH3oHTaHaTToUHocT Ha HnBEnIpaHe no HanpaBHeHne Ha HanpeHaTAtoc
3a npOBepkata TpRA6Ba da HMaTe CBO6OHa 30Ha 3a H3MepeBaHe c TBbpda OCHOBA cBbIXnHa 5 m MeKdy DBe CTeHn A nB.
-MoHTnpaIte N3MepBaTeHnHny ypeD 6nH3O do cTeHata A ha CTaTHB Hnro IOCTaBeTe Bbpxy TBbpda paBHnOBbpxHOCT. BkIOUeTe N3MepBaTeHnHny ypeD B pexKm C aBTOMaTHuHO HnBeHnPahe. N3BepeTe peXm, pni KOTo ce reHepnPat EHa XOpN3OHaTAlHa Na3epHa paBHnHa, KaKTo n EdHa BePtnKaHa Na3epHa paBHnHa foPHTaHNo Ppei N3-MepBaTeHNHny ypeD.
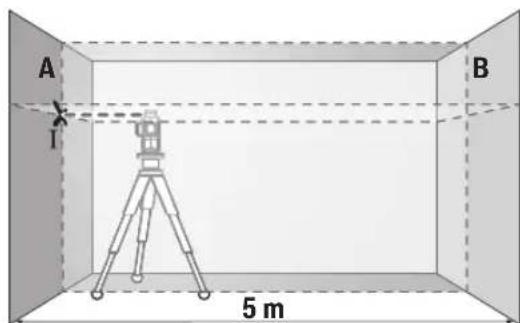
-HacoueTe Na3epa KbM 6nN3kata CteHa A nTo H3uKaaiTe Da ce HNBenipa. MapKnpaIte cpeJata Ha npceeuHata TOka Ha DBeTe Na3epHn NHHN (TOka1).
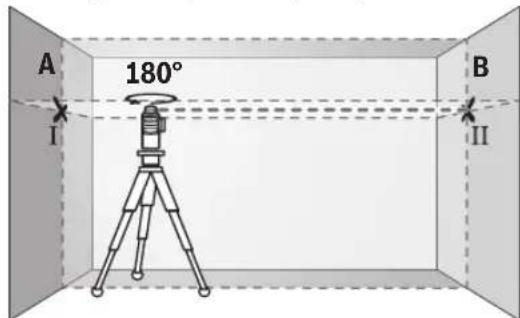
-3aBbPteTe H3MepBaTeHnH ypeHa 180°,H3uKaAteTo Da ce HNBeHnpa aBTOMaTHUHO H MapKpauTe npeceHaTa TOka Ha DBeTe Na3epHN JINHH Bbpxy CTehaT B (TOUY Ka II).
-IOCTaBete H3MepBaTeJIHHypeI -6e3 da ro BbptHte 6n3o do cTeHaTBA, BKIOUcTe ro n o OCTaBeTe da ce HnBENIPA.
H3MeCTe H3MepBaTeHHy ypeI NO BnCOUHa (ype3 cTA THBa HIN pNr Heo6xOdHMocT C NoJNaIaHE), Taka ye npeCeHuHATA TOUka HA Na3ePHHTeMbU Da NOnaDa TOUHO Bbp-xy MapKnpaHATA npEi ToBA TOU Ka II Ha CTehA B.
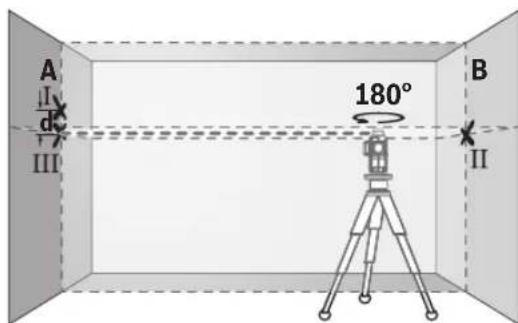
-3aBbptTe N3MepBaTeHnHa ypeHa 180°,6e3Ja npomeHnTe BnCOuHnHa.HacOeTe Ro KbM CTehAraTaka,Ye BEpTHKaJIHaTa Na3epHa HnHn Da npemHHaba npe3 MapKnpaHaTa npEn ToBa TOka I.N3uKaaiTe N3MepBaTeHNrYpeDa ce HnBeHnPa Ha MapKnpaTe npeceHuTa TOnkaHa Na3epHnTe NbHn Ha CTehA (TOka III).
- Pa3nikata d MeKJy DBeTe MapKnpaHn TOckn I n III Ha CTeHATA A daBa DeIcTBNTHOTO OTKIOHeHne NO BICouHnHa H3MepBaTeHNHrypei.
Ha pa3ctoHHe oT 2x5m=10 m MaKcHMaHNo DoNyCTHMO-TOOTKNOHeHne e:
10m×±0,2mm/m=±2mm.CnEoBATEHOppa3Nkata d Mekdy TouKHTI IN II Tp8Ba Da e Hau-MHO 2 mm.
IpoBepKaHaToHocTtHa HnBeHnpaHe Ha BepTHKaNHTe NHHN
3a npOBepkata ce HxjdaTe oT OTbOp Ha BpTa, npH KOrTO (Bbpxy TBbpda OCHOBA) HMa Hai MaIKo No 2,5 m Cbo6oHa nloou OT DBeTe CTpaHn.
- IocTaBeTe N3MepBaTeHnHa ypeHa pa3ctOraHne 2,5 m OTbopa Ha BpataHa TBbpda, paBaHa OCHOBa (He Ha ctaTINB). BKIOUcTe N3MepBaTeHnHa ypeD b pexHM c aBTOMaTHUHO HNBEInpahe. N36pePe pexHM Ha pa60Ta, npi KOnTo Ce rHepeIPA eHa BePtnKaIHa na3ePha paBHnHa φpoHTaHNo Ppe N3MepBaTeHnHa ypeD.
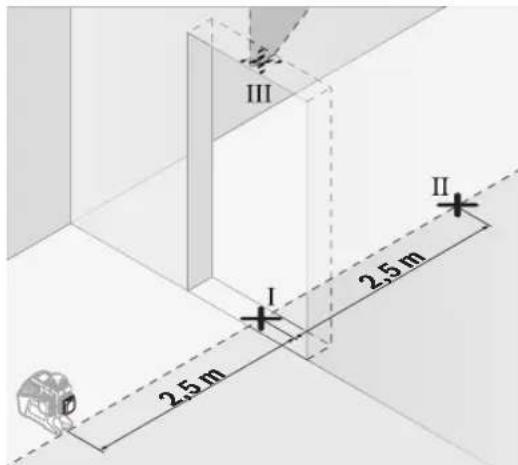
-Mapkpapte cpeata Ha BepTKaJIHATA Na3epHa MMnHa HnoHa OTbopa Ha Bpata (Touka I), Ha pa3ctoHHe 5 mOTdpyrata CtpaHa HA OTbopa Ha Bpata (Touka II), KaKTo HHa rOpHnPa b6 Ha OTbopa Ha Bpata (Touka III).
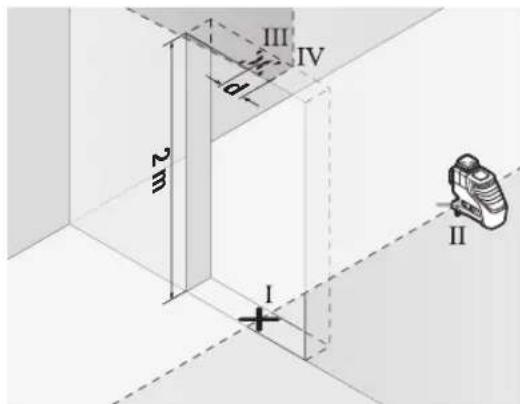
-3aBbpteteH3MepBaTeHHypeHa 180°nro nocTaBeTe OTDPyraCTpaHa HaOTBopa 3a Bpata HENOCpeCTBeHO 3aTouka II. N3aKaAte H3MepBaTeHHrTyePeIaCe HINBEInpa I HAcOeTe BePTNkAlHATA Na3epHa IINHn TaKa, Ye CpeDAta I Da MInHAb Pne3 TouKHe I II.
-Or6eIeKTe cpeTa Ha IaIaePHaTlaHHHa rOpHnPa b6 Ha OTbopa 3a BpTa KaTO ToKa IV.
-Pa3nKkata d Mekdy DBeTe MapKnpaHn TOnKn III IV daBa DeIcTBHTeHOTo OTKnIOHeHne NO BnCOuHa Ha H3MepBaTeHHy ypei.
-ИзмеретевисочинотаHaOTBopaHaВpaTata.
IbTOpe Ipoueypata 3a n3MepBaHe 3a BTOpTa BePTKaalHa na3epHa paBHHa. 3a ceTt a36pePe pexm Ha pa60ta, npi KoTo CE reHepnpa Ea HBeptnKaHa na3epHa paBHHa CTpaHnUHO HA n3MepBaTeHnYpeD, KATO nped 3anOuBaHe Ha n3MepBaHeto 3abptete YpeDa Ha 90^
MaKcHMaJIHO DOyCyCTMOTO OTKnOHeHHe MOKeTe Da H3uCnTe NO CNeDHH HaHH:
ДБа ПБТИ ВИСОУнота Ha BpaTata × 0,2mm/m Ппмер: Ппь ВИСОУнITA Ha BpaTata ot 2 m MaKcIMaHOTO
OTKLOHEHHe MOKe Da 6bDe
2× 2m× ± 0,2mm / m = ± 0,8mm .CnEIOBATEHNOTOUKHe III IVMOKe da ca ha pa3cTOrHne eHaOT dpyra HAMHO 0,8 mm.
Yka3aHn 3a pa60Ta
MapKnpaTe BnHaH ToUHO cpeDaTa Ha na3epHaTa HnHHa. IInpouHaTa Ha na3epHaTa IHHa Ce IpomHe r pa3CToHNHeTo.
Pa6ota cIa3epHaTMepeHnHa IIOUka
Ja3epHaTa MeHtEnHa NnOua (28) NOIO6pBa BnHMoCTTa Ha JIa3epHNbU npH He6NaIopNpIaTHn pa6oTHn ycNoBn H No-ROeMH pa3cTOnHn.
Otpa3raBaaTaNobbpxHOCTHaIa3epHataMePHTenHa nloua(28)NODo6pRaBaBnIMMOCTTaHaIa3epHataINHHa, a npesIpo3paHATAIOBbpxHOCTNa3epHataINHHaMOKe da ce BnIDnOTobpaTHata CtpaHaHaIa3epHataMePHTenHa nlocha.
Pa6oTa cbc cTaNb (npHnAdnEeXhoCT)
H3non3BaHTo Ha cTaTHB OcNpyRbA Cta6nHno,perynpyeMo No BnCOUHHa MOHTnpaHe Ha H3MepBaTeHNHa ypeD. NocTabeTe H3MepBaTeHNHa ypeD c 1/4" nocTabKaTa 3a cTaTHB
(20) BbpynpncBcHnHHTeHN H BuHT Ha CTAHb32 HnHa 6oNkHOBeH TpHNOHKn 3a fOToanapaT. 3a MoHTnpaHTo K bM CTaNapTeH CPTPONTeH TpHNOHKn NnONlBaIte 5/8" NOCTaBkata 3a CTAHb (19). 3aterHete NmMepBaTeHNy ypeC BnHTa HA CTAHbA.
Ipei Da BkHouHTe H3MePbATEHnYpei, HAcOyTe CTAHBa rpy6o.
MoHTnpaHecyHbepcAnHata cTOnKa (npHHaJIeXHoCT) (BHXTeΦnR.C)
C NOMOHTa Ha yHnBepcaHnHa cToKa (25) MoKTe Da 3axBaUaTe H3MEpBaTeHNHa YpeD HAnP. KbM BEPTNkANH NOBbPxHOCTn, Tpb6H Nn HAmHaTHe3HpAaCe MaTePnAIn. YHnBepCaHnHa cToKa e NoxOJa CbIo Taka n 3a NoCTabReHa NoJa NObKeKAba HAcTpoBaNHeTo NO BnCOuHa Ha N3-MepBaTeHNHa YpeD.
Pa3eTnPbCTHTne cHOT3aHaTcTaHa HA MarHHTHaTn pHnHaDnEHXoCT nPn 3aKpenBaHe Ha NocnEHaT KaM NOBbpXHOCTupe3 CnHATA npITernaCa cHa MaHnHTte PbCTHTe Bn Morat da ce 3axBaHaT.
H3paBHeTe yHnBepCaHaTa cToKa (25) rpy6o, npedn da BkIIOHTe H3MePBAteHNHypeD.
Pa6oTa c na3epeH npHemHHK (npHHaDnHexHOCT) (BHXTeΦHr.C)
3a no-do6po ha6nloDaBaHe Ha na3epHnnaBpy np He6NaIorponPnTHn CBtINHHY yCIOBn (CBETna CpeDa, HENOCpeCTBeHN CbHueBn IyH) nHa rOeMH pa3cTOnHHCe npenoppUBAH3no3BaHe Ha na3epHnnaPnpemHnK (29).Pnp pa6oTu cna3epeh npneMHNK BkIIOuBaTe peXmHa npneMHNK (BX. "PexmC pnpemHnK", CtpaHua 225).
OuHnla 3a H6bIIOdaBaHe Ha na3epHHaB (npHnHaNEXKHOCT)
OuHnata 3a Ha6nDaBaHe Ha Na3epHHnIbUc HnITpnpaT OKoHnHa TCBtINHa. TaKa Na3epHHnIbUc CTaB No-NECHO pa3nHm.
He n3non3BaIte na3epHnte ouHna (npnHaadnHexhoCT) KATO 3aunTHN OUHNA. Na3epHnte ouHna cnyKAT 3a noD6po pa3no3HabaHe Ha na3epHnIb4; Te He npedna3Bat OT na3epHO Ib4eHne.
He h3noI3BaIte na3epHnte ouHna (npHaIeXhoCT) KATO CbHueBn ouHna Hn npuOoHpaHe. Na3epHnte ouHna He npednarat nbHa UV 3aunHa n HamanraBt Bb3npHemaHTo Ha CBETOBete.
Pa6oTH HnppHmepn (BHXTeΦnR.B-G)
PpHmepn 3a npHNOKeHHeTo Ha n3MepBaTeHHypeD MoKeTe Da BnHTe Ha CTpaHncaTa C cnHyprte.
PoiDlbpxKaHe n cepBn3
Iopdbpxkane n nouchTbaHe
IopbpaKeIteH3MepBaTeHNHypeBnHaNnUcT. He noToPBAe H3MepBaTeHNHypeBbBBoaHnDpyrnteHuOCTH.
N36bpcBaiTe 3aMbpcBaHnTa C MeKa,NeKo HAbJaXHeHa Kbpna.He h3noJ3BaIe NouchTbaun npenapAn nn pa3T BOpHTenn.
IouncBaItepeoBHO CneuaHIO NOBbpxHOCTHeHa3XO-daHa na3epnHa bHy BNHMabaHTe Da He OCTaBaT BNaCnHKn.
CknadnpaTe nTpaHcnpTnpaTe N3MepeBATEHNy ypeD cMo B 3auNTNn Dxko6 (31) pecn. kyfapa (34).
HπpaaηTe nppeMOHTn3MepBaTeHHypeB3aunTHN 6 (31) pecn. Bkyfapa (34).
KnneTcKa cnx6a H KOhcyntaun OTHoCHO ynoTe6ata
CepBn3bT ue OTROBOpH a BbnpocHTe Bn OTHOCHOpeMOHTn HnoDpBkKa hA 3akynenHr O T BAC npOyKT, KaKTo n OTHo pe3epBHN qactN. POKOMIOHEHTH N eptExn HnΦopMa-ua 3a pe3epBnHTe qactN ueOTKPneTe H a:
www.bosch-pt.com
EkntnoKocyntaOTHOCHOyntpe6ataHaBoschue Bn nomorhe C yIOBOCTBNE npn Bbnpocn 3a HauHne npDkykTN nTexHNTe akcecoapn.
Mon, npn Bbpocn npnp npbpyBahe Ha pe3epBn qactn BHHaH noocayte 10-undpehen kataoKeH Homep, n3nncaH Ha Tabekkata Ha ypepa.
BbIraPn
Robert Bosch SRL
Service sculelectric
Strada Horia Macelariu Nr. 30-34, sector 1
013937 Bucuresti, Romania
Te.n.:+359(0)70013667(BbIrapckn)
ΦaKc: +40 212 331 313
Email: BoschServiceCenterBG@ro.bosch.com
www.bosch-pt.com/bg/bg/
DpyrH cepBn3H apecn ige oTKpHeTe Ha:
www.bosch-pt.com/serviceaddresses
TpaHcnpOpTuPAne
PnpOpbHnHTeNtHeB-NOHHnAkyMnATOpHn 6aTepeHH nTpa6Ba da n3bHbRaBat n3NCBaHHa 3a TpaHCnOpTpHahe Ha onaCHn TOBapn. AkymyNatOPHte 6aTePHn MoRat da 6bDat TpaHCnOpTpHaHn OT Notpe6HtEHa ny6bHnH MeCTa 6e3 DoNbHnTeHN pa3peuHTeHN.
PnTpaHcnpOpTnpaHeOTpTeHCTpaHH(HaNP.nPbB3dywEn TpaHCnoptnnNnON3BaHeHaKypnepcKyCny)nMa CneuAHNnN3NCBAHnKbM ONaKOBaHEoO603NaVaBaHEoM. 3a ceta npnoTOBkTaHa NaKeTHpaHeTo ce KOHCytpanTe CekCnept BcbOTBeHTa o6naCT.
H3npaaiTe akyMnatopn6atepn cmo aKo KOpnycbTHe He nOBpehen. H3OlnpaIte OTKPN KOHTAKTHN KLEMN CnePNIeHTN I ONAKOBaTe akyMnatopHNTe 6atepn Taka,ue da He MoRat Da ce N3MeCTBaT B onakOBkata CN. MonA, cna3BaTe CbIo N DoBnHTeHN HaOnoHaHn npedncaHH.
Бракуван

C orneon3BaHe Ha oKoHnHa Tcpea H3MepBaTeHNHa yPe,OBKnHOBeHte NnAkyMnaTOpHNbATEpHn,OnbLNHTeHNHe PnPnHaJNEXHocTHn OAnokBKeTpe TaBa Da ce npedabat 3aON030TBOPBAHe Ha CbDbpKaUHte Ce B T8X
cypOBHHN.
He 3XbBpNte H3mepBaTeHNTE ypeNi akyMynatopHnTe 6aTePN/6aTePnTe np6ntoBnTeOTnabu!
Cama 3a cTpaHH ot EC:
Cbflnacno eBponecka DnpeKTHBa 2012/19/EC 3a ctapnte enektpnueckn H enektpoHHn ypeHn HeHnOTo TpaHCnpTnPahe B haunohanHOTOp npabo HmepBaTeHNHe ypeHn, KOHTo He morat da ce non3Bat nobueye, a cbflnacno eBponecka DnpeKTHBa 2006/66/EO nobpeDeHN nn HxabEHN obHKOBEHn nnakymylatopHN bateHN, Tpr6Ba da ce cb6hpat n npedabat 3a onol3OTBOPBAHe Ha cbdbpxaunte Ce TBx cyPOBHN.
PnHnepaBnHO n3XbBpIaHcTapIte eneKtpueckn H eNekToHHypei NopadN Bb3MOxHOTo HAnuYe HaOnaCHn BeUeCTBa MoTaJa OKaKaT BpeHN BInHn BbpxO KOnHaTa CpeDa H OBeWkoTo 3dpaBe.
AkymyaTopn6aTeepn/6aTeepn:
JIHTHEBO-NOHHN:
MOnr, cna3BaIe yka3aHnraB pa3dena TpaHcnpTnpaHe
(BXK. TpaHcnpoTnpaHe, CtpaHmua 229).
MaKeDoHcKn
Be36eHocnHaNoMeHH

Ctye yntCTBa Tpe6a Da ce npouHTaaT n da ce BHHMABA Ha HNB, 3a Da MoKe 6e36eHNO 6e3 onachocT Da pa6oTne co MePHNOType.Дokonky MePHNOType He ce
KOpHCTN corIaCHO npHIOXeHHTe HnCTpyKunH, MoKe da ce HApUH ΦyHKunjata Ha BrpaJeHTe 3aWtHTH MExAH3MH BO MePHNO TyePe. He rOwTeTyBaJte HaneHNuHTe 3a npdeynpeyBaBe. IOBPO UYBAJT E OBE YIATCTBA N PPEADETE rN 3AEHO CO MEPHNO TyePe.
BHHMaHHe -DOKKky KOpHCTNe Dpyr Hyei 3a NOdecyBaBe HpaKyBaBe OCBeH OBDe HaBeJeHHTe HIN NONHAKNIOCTANKn, OBA MOKe Da DOBeDe Do ONACHA N3NOKeHOCT Ha 3pauehe.
MepHnOTypeCeHCnpaUyBaCo03HaKa3a npEynpeyBaBe 3aIacepot(O3NaeHOHa npKkA3OT Ha MEPHnOTypeHa rpaΦnKkATAcPana).
Dokonky TeKcTHa 03HaKaTa 3a npEynpeyBaHe 3a nacepot He e Ha BaHOT ja3NK, Bp3 Hero 3anenete ja
HaenHncaTa Ha BauHOT ja3NK nped npBaTa ynotpe6a.
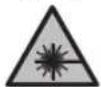
He ro hacouybaje Iacepcknot 3pak KOH
Hnca Hn JnKHBOTn HEmoJte H Bne camnte Da rIeDATE BO DnpeKTTHNOT Hn
pePfKeTPhaayKnOT nacepckn 3pak. Taka
MOKe Da rH 3acNeHrTe NnCATA, Da
IpeN3BnKate HeCpeKn Hn Da rN OWTETNE
OHTTE.
Dokonky nacepckhot 3paK doCnee do ouHTe, BeHaaw Tpe6a da rH 3aTBOPHTe H da ja TprHete rnaBata od nacepckhot 3paK.
He npabete npomeHH ha nacepcknotypei.
He Hn KopncTe Nacepcknte 3aHTTHN OUYna (DOnONHtENHa ONpema) Kako 3aHTTHN OUYna. Nacepcknte 3aHTTHN OUYna cnjkaT aNoob6po pacno3HaBaHe Ha NacepcknO tpaK; cenak, Tne He WHTAT OD NacepCKOTo 3paueHe.
He Hn Kopnctete Nacepcknte 3aunTHN OuHa (DOnonHnTeNa onpeMa) KaKo OuaHa 3a coHcE Hn NaK Bo CoO6paKaJot. Nacepcknte OuaHa He DaBaat UenocHa UV-3aHTNa Ito HamanyBaat npen03HabAbeTo Ha 6oN.
MepHnot ypeI cmEE da ce nonpaba caMo oI cTpaHa Ha KBaIIHfKByAH CTpyeH NepcoHa I CaMo CO opHrHHnPe3epBHN DeOBn. CaMo HA ToJ HauH Ke 6nTe CnryphN BO 6e36ednocta Ha MEPHnot ypeI.
He n octabajte deuata da ro Kopnctat nacepckhot Mepeh ypei 6e3 hao3op. Be3 hao3op, Tne moke da ce 3acnenat ce6ecnn npyn npua.
He pa6oTe co MepHnOT ypeB OOKOnnHa Kaede NoctOn onaChOCT od EKcNIO3nJa, Kaede HMa 3anaIbH NteHoCTn, rac Hn npaWnHa. MepHnOT ypeD co3daBa Nckpn, KON MOKe Ja ja 3anaNat npaTb Hn napeata.
He ja orbopajte 6atepnjata. Nocton onaCHOCT OJ Kpatok cnoj.
PnH OHTeYBaBe H HENpONHcHa yNtpe6a Ha 6BatePiata MoKe Da H3ne3e napea. BatePiata MoKe Da ce 3anannn da ekcnnoHpa. BheceTe CBex BO3dyx H DOKONky HMa NOBpeHn OHnecTe rHa nekap. Papeata MoKe da rHn Hndpa3Hn dHnHnnte NaTHuTa.
PnN nOrpeHNO KOpHe He Hn npOn OHTeHa 6aTepnJa MoKe Da HcTeue 3aAnHbA TeHocT od 6aTepnJa. N36ErHyBaJte KOtAKr CO Hea. DOKONky CnyauJHO JoJeTe BO KOtAKr CO TeuHocTa, NcnaKHe Co BOb. DOKONy TeUHOCTa DoJe BO KOtAKr CO OUnTE, NoBapajte NekapcKa NOMoi. NcTeueHata TeUHocT OD 6aTepnJa MoKe Da npEn3BnKa KOKHN npNTaunnnn Hn H3ropeHn.
Batepnjata Moke da ce owtetn od octpnte npedmetn KaKo Ha np. KInHcN HIN OdbpyBaH Nn Co HADBopeuho BnJaHne. MoKe da doJde Do BHaTpeWeH KpaToK cnoj n 6atepnjta MoKe da ce 3aapan, da NyuTH uad, da ekcnlonpa Hn da ce nperepee.
Heynotpebehata 6aTeepna dpxKe ja noadaneky od Kaunapnck cnojybankn, knyebn, kene3n napn,
KNHHN, 3aBPTK HIN DpyH MaH MeTaNHN PpeMETH, WTO MOKe Da NpeH3BnKaat NpeMoCtYBaBe Ha KOHTAKNTHe. KpaToK cNoJ MEr KOhtAKe THe Ha BatePnJaTa MOKe Da NpeH3BnKa HrOpeHnU HIN NoXap.
Kopctete ja 6aTepnjata camo BO npOn3BODn od npOn3BODntenot. Camo Ha ToJ hauHH 6aTepnjata Ke ce 3aHTTN oD onaCHO ppeontOBapyBahe.
Баерпгп Рнгсоинчиоce npenopaанн mcknyuBO O npon3bOHTENOT. ДOKONky nOnHaOT 3a KoJ ce HameHETn Ondpehen BnD Ha 6aTeHH, ce KOpHCTn COpyn 6aTeHH, noCTOn onaCHOCT ONDKAP.

3aHTTe ja 6atepjuata od TonnHa, Ha np. od DonroTpajHO H3NOXyBaBe Ha COHcEBN 3paU, ORAH, HEHCTOHN, BOA H Bnara. Hnaky, NoctOn onacHocT od ekCnNo3Ja n KpaTOK cnoj.
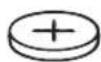

IPEyIPEyBAHbE


Bndete cnrypnn, deka decaTa
He doaata Bo donnp co
Kouectata 6atepna.
Konuectte 6atepn ce onacn.
HnKoraw nporotnybajte r konuectte 6aetepnn He CTabajte r n dpyr n OTbopn oTenoto. Dokonky noctOn comHeBaBe deKa konuectata 6aetepna e nporontana Hn E BmEtHata BO dpY den O TENOT, BeDnaw no6apajte MeuHncka nomow. PporotnyBaBeTo Ha Konuecta 6aetepna moKe BO pOK o2 Yaca da doBede do cepno3HN BHATpeHHN H3ROpeHHN Hn CmPT.
Pn3aMeHa hKa konuecTata 6atepnja, npOBepe daHne npabINHO 3aMeHeTa. HAnky, nocToH onacHOCT OdEKCnIO3nJa.
KopHCTeTn cAmo Konuectte 6aTeepn HabeJeH BO OBA yNaTcBO 3a KopHCTeHe. He KopHCTe np KOnueCTn 6aTeepn nI np dyBaBe co ctpya.
He ce 6bNyBaJTe NOBtOpHdJa ja NOnHHTe KOnueCTaTa 6aTePnJa H He ja npemocTyBaJte. KonueCTata 6aTePnJa MOKe Da IpoTeUe, da ekCnIOnpa, da ce 3aIaN Ha a NobpeDn Niua.
PpnoHcno OCTpaHete rH nΦpneTe rH hcnpa3HeTne konuectn 6aepnn. Hcpna3HeTne konuectn 6aepnn MOKe Da npoteuat n Co Toa da ro oWtEtat npon3Bodot nn Da NOBpeDat Nua.
He ja nperepebaje konuectata 6atepnja n He ja pnpajte BO oran. Konuectata 6atepnja moxe da npoteue, da ekcnnohpia, da ce 3anaHn da nobpeiu nua.
He ja owTeTyBajte KonuecTa 6atePnJa H He ja packKnonybajte. KonuecTata 6atePnJa MoKe Ja npoteYe, Da ekCnNoDnPa, da ce 3aannn n da nobpeHnna.
KoNueCTa 6atepHja He ja IOBeyBaJte BO KOHTaKt co B0da. NHTyMOT uTO HCTeKYBa MOKe CO B0da Da Co3daJe BOOpOu n Toa Da IOBeDe Do NoXkap, EKCnIO3Nu Ja HIN Do NOBpeDu Ha Nmua.
He ro KopncTeBeKe MEPnHOTypeA,ako dpkaOT 3a konjccta 6atepna (22) He moKe da ce 3aTbOpn. 3BaTe ja konjcctata 6atepna n nonpaBete ro.
PpeKaKBa 6nno HHTepBHeuJa Ha MepHnOtype(Ha np.MONTaxa,0dpxyBaBe nTH.) KaKo H npn HerOB TpaHCnopt N ODPxyBaBe H3BaTe Ro AkymyIaTOPOh.6atePHnte Oe MepHnOtype.PnHEBHMATEHO npTnCKaBe Ha PneKNHyBaOT 3a BkNpyBaBe/ NCKLuyBaBe NoCTOn OnaCHOCT ONOBPeHN.
3a BpeMe Ha pa6oTaHa MePNOTypeCe cnywaat rnaCHn CnTHaHn TOHOBn BO OPeDeHN OKOJIHOCTN. 3aToa DpKTe Ro MEPHNOYpeN IOJaNEky OyWHTe OHN.DpyrH Nua.ΓIacHNOrTOH MOKe da rO oITeTn cnyxOT.
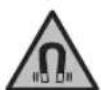
He n npnecybajTe MEPnnot ypeH marnheTHata onpema BO 6nn3nHa Ha HmnpaHTn Hn DpyrMeuunHckn ypeH,Ha np. nejcmejkepn Hn HhcynnHcKa npmna.
Ipeky MaHHeTHe Na MePHNt UpeH N OnPemata Ce Ipon3BcDyBa None, KOeHTO MOKe da ja HApUHN PhHKUJaTa Ha HmPnAHTHe nn MeHnHnHCKHe YpeH.
Држete rH Мернотypeн H MarHeThaTа onpeMa NOdaNeKy OJ MaHReTHN HocauH Na NOaTOu N ypeDn YyBCTBtENH Ha MarHT. IopaIN BInJaHNeTo Ha MaHETIte OD MepHOT ypeN H ONPeMATA MoKe Ja Dojne DO HEnOBpAtnH 3ary6H Ha NOaTOuTe.
MepHnotypee onpemeh co 6e3Knue HHTeppejc. Tpe6a da ce BnmaBa Ha NOKaJIHNTe OepaTHBn orpaHHyBaHa,HaNP.BO aBHOH Hn 6oHNHn.
Ozhakata co 36obuBluetooth KAKO u CnKNITE (Noroata) ce perncptpahn MapKn H CONCTBEHOCT Ha Bluetooth SIG, Inc. Cekoe KopncTebe Ha OBaa OzHaKa co 36obu/cnKn Ce BpuH co nueHau npEky Robert Bosch Power Tools GmbH.
BHHMaHHe!PnKOpHCTeBeToHaMepHHToypeIco BluetoothMOKeJaHacTaHATPneuKNHaDpyrHTe ypeHNCHCTeMH,ABHOHNMeHNHCNAnapatn(Ha np. nejCmeJkep, anapaTuHb3a CnyuBa).NcTo taKa He moKe zenocHO ca Hcknyu MoXHoCTa 3a NOBpeHaNyre HxNBOTHBO HenocpeHa OKoHHa. He ro KopHCTeMeHnoTyoedCoBluetoothBO 6m3nHa Ha MeMNCHKn ypeH,6EH3NcKn NymH, XemNcKn ypeH,OBnactn Co onaChocT od EKCnNo3Ja H BO 6m3nHa HA MHHCKN NOnHbA.He ro KopHCTe MePHOTyepCoBluetoothBO aBOHOHN.36erHyBajTe DOnroTpajHa ynotpe6a Bo dnpEKTHa 6m3nHa Ha TeNoto.
Onnc Ha npoN3B0DoT n nepΦopMaHcHTe
BHHMabajTe Ha cNIKHTe BO npeHnOT dEn Ha yNaTcTBOTo 3a KOpNCteHe.
YnOte6a co cooDbetHa HameHa
MepHHoT ypeI e HameHcT 3a OpeyBaHe n npOBepKa Ha XOpH3OHTaHn H BepTKaHn LInHH.
MepHnOT ypeI e nOroEN 3a KOpIcTeIe BO BHaTpeIeH N HADBopeIeH npocToP.
Oboj npoHbOe notpoWyBaU-nacepckn ypeD cnopeEN 50689.
Hnyctpaunja ha KOMnOHeHTN
HymepnpaBeTo Ha cInKHe Co KOMNoHeHTn Ce OndecyBaHa npka30 Ha MepHNOtypeHa rpaHnKaTcA tpaHnCa.
(1) N3ne3eH OTBOP 3a nacepcknOt 3paK
(2) Coctoj6a Ha HAnOnHeTOcT Ha aKyMyNaTopoT/ baTepeHnTe
(3)ПикадCAL guard
(4)Пикадocиларогаблokада
(5) KonquepejHKHnHa npneMHNK
(6)Ппказржимна ппсemнik
(7) Konue 3a nacepcknot BnD ha pa60Ta
(8)Пиказа Врса npeky Bluetooth®
(9) Konque Bluetooth
(10) Iperpa da 3a 6aTepejna
(11)OBBnBaHaBaTePnCKnOaJaTnTePa
(12) BaTepePnna
(13) Konue 3a oTKnyuBaHe Ha akyMnaTopcKaTa 6atePnja/6atePncKnOT aanTep
(14) Kanaye 3a aTbopahe Ha baTepecknoa danTpe
(15) BaTeepnja
(16) IpeKnHyBaay3a BknyyBaHbE/HckNyyBaHbE
(17) Hattnic 3a npdeynpeyBahe Ha nacepot
(18) Cepnskn 6poj
(19)PnpaHnCTaTHBOT5/8"
(20)PnHpaHa cTaNbT 1/4"
(21) Konuecta 6atepnja
(22)Држачакончесибатерп.
(23) OTBOP 3a KONueCTn 6aTepeHH
(24) MarHert
(25) yHHBep3aJIeH npKaq
(26) PotnpaKa nAaTΦopMa
(27)ДалачинскynypaByBaun
(28) Nacepcka ueHa Ta6bnaa
(29) Nacepckn nphemnkr
(30) Nacepckn 3aWHTTHO uHna
(31) 3aWNTTHa YaHTa
(32)CTaTHB
(33) Teneckoncka npaKa a
(34) KyΦepa
232|MaKeJoHcKn
(35) Bnouka
a) OnHaaHata onpema npkaKaHa Ha cNkHe He e den od CTanapdHHOT o6e Ha hCnpaka. Lcnochata onpema moKe da ja HajTe Bo Hauata PporpaMa 3a onpema.
Texnukn noaToun
| Плинский пасер GLL 3-80 C GLL 3-80 CG | |||
| Бpoj на дол | 3 601 K63 R.. | 3 601 K63 T.. | |
| РавOTно поleA) | |||
| - Стандарно 30 m 30 m | |||
| - Ворожим на п��емпк 25 m 25 m | |||
| - Сласерскп п��емпк 5-120 m 5-120 m | |||
| Точность на НовлирабeB(CD) | ±0,2 mm/m | ±0,2 mm/m | |
| Поле на самониvelларыe ±4° ±4° | |||
| В徕е на Новлирабe < 4 s < 4 s | |||
| Мас. орета вьна висна пекуpeфераNTната Висна | 2000 m | 2000 m | |
| Мас. релатвьна влажноct наВоздунот | 90% | 90% | |
| Стосян на ИзвалканocSt соредIEC 61010-1 | 2E) | 2E) | |
| Клеса на пасер | 2 | 2 | |
| Тип на пасер | < 10 mW, 630-650 nm | < 10 mW, 500-540 nm | |
| С6 | 10 | 10 | |
| Остanyвашие на пасерскata плиниja | 50 × 10 mrad (цelenocen aron) | 50 × 10 mrad (цelenocen aron) | |
| Нajкрату к в徕етрабе на Импунсot | 1/10000 s | 1/10000 s | |
| Фразковшия на пунс | |||
| - Рабotingе бez ржим на п��емпк | 23 kHz | 23 kHz | |
| - Рабotingе ворожим на п��емпк | 10 kHz | 10 kHz | |
| Коматрил徳л пасерскп п��емпк | LR 6, LR 7 | LR 7 | |
| Прифат за.stашиBOT | 1/4", 5/8" | 1/4", 5/8" | |
| Сныдунове со[eнергий на мернот урeded | |||
| - Актулatorsсь baterи (л'tиums-johски) | 12 V | 12 V | |
| - Бaterи (алкални-mанганскп) | 4 × 1,5 V LR6 (AA) (co baterискпадалпетр) | 4 × 1,5 V LR6 (AA) (co baterискпадалпетр) | |
| - Бaterида зеервно hayanoювашие (кочецда baterиа) | CR2032 (л'tиumscka baterиа 3 V) | CR2032 (л'tиumscka baterиа 3 V) | |
| В徕етрабе на ржим со 3 пасерскп рамнениF) | |||
| - Со akтулatorsсь baterиа | 8 h | 6 h | |
| - Со baterи | 6 h | 4 h | |
| Bluetooth® мерен урeded | |||
| - Kompatибилост | Bluetooth® 4.0 (Low Energy) | Bluetooth® 4.0 (Low Energy)G | |
| - Мас. oncesг на сигалот | 30 mH | 30 mH | |
| - Oncesг на оретахьна Фразковциja | 2402-2480 MHz | 2402-2480 MHz | |
| - Лучна наInsprakаые мас. | < 1 mW | < 1 mW | |
| Bluetooth® пamетен тelenфон | |||
| - Kompatибилost | Bluetooth® 4.0 (Low Energy)G | Bluetooth® 4.0 (Low Energy)G | |
Jnnnckn nacep GLL 3-80 C GLL 3-80 CG
| -Операцhev симстem Android 6 (и поюв) | iOS 11 (и поюв) | Android 6 (и поюв)iOS 11 (и поюв) |
| Текина сорласно EPTA-Procedure 01:2014 | ||
| -Со akумалаторда bateрINA 0,90 kg 0,90 kg | ||
| -Со bateрINA 0,86 kg 0,86 kg | ||
| Димензи(дожина ×ширина × висна) | 162×84×148 mm | 162×84×148 mm |
| Вид на заштITAII | IP54 (эаштITA od прав и псканые BOДA) | IP54 (эаштITA od прав и псканые BOДA) |
| Преторачан окулaite temпература停下来停下来 | 0°C ... +35°C | +35°C |
| Дозволега окулaite temпература停下来停下来 | -10°C ... +40°C | -10°C ... +40°C |
| Дозволега окулaite temпература停下来停下来 | -20°C ... +70°C | -20°C ... +70°C |
| Преторачаны akумалаторда bateрINA | GBA 12V... | GBA 12V... |
| (ocbeh GBA 12V ≥ 4,0 Ah) | (ocbeh GBA 12V ≥ 4,0 Ah) | |
| Преторачны пльчны GAL 12... | GAX 18... | GAL 12... |
| GAX 18... | ||
A) Pa6oHTHOI ONE MOKeJaCe HamaHINopaHIN HENOBONHH yCNOBn HA OKOINHATA (Ha np. INpeKTHa H3NOXeHcTt Ha cOnHeBn 3paH).
B) kaj 20-25°C
C) BaKn 3a YeHtpnTe XOpH3OHTaIH NToUKN HbKpCTyBaHe.
D) DaeHHTe BpeHIOCTn PpeBHyBaAT HOPMaIIHN Do NOBOIHN YcIOBN HA OKOINHATA (Ha np. Hema Bn6paun, Hema Ma nla, Hema qad, Hema n3noKeHOCT Ha COueBn 3paun). IIO EKCTPemH NEMepaupm Moke da doJe do OTCTanyBaBe BO TOHOCta.
E) HactanyBaat camo HecnpoBOdINbH NeHCTOTnH, Ho NobpeMeHO ce OeyKaBa npBpeMeHa CnpoBOdINBOcT npedIN3BnKaHa o KOHNHe3aJHa.
F) nokpatkn onepaTHBnH npn peKHM Ha Bluetooth® n/nn BO Bpcka co RM 3
G) Kaj Bluetooth®-ypeNTe CO HnCKa eHepRJa, BO 3ABNCHOT OJ MOeIOT N ONEPATNBHNO T CHTeM HE E BO3MOXHO BOCIOCTAByBaHe Ha BPCKATA. Bluetooth®-ypeNTe MOPa da npdpjxbyaat SPP npoqHn.
H) Oncerot MOKe MHORYa BaBnPa BO 3aBnCHoCT OHaDBopeuHHTe YcNoB, BkNpyHTeHNO H npHEMnKOT ITO CE yNtOpeSyBa. Bo 3aTbOpENHe IpocToPmN c MoTaJIHb BapHep (Ha np. sIIOBn, perAHI, Kyepn nTH.) oncEROT Ha Bluetooth MOke 3aHHTeHNO da c HAJIHb.
I)JIHTHMJ-JOHCKATA6ATEPnHa 6ATEPHCKHOaANTep AA1 ce NcknyeHn OIP54. CepNCKOT 6poj (18) Ha cneuHnKauHOna TnOuKa cnYkHa ja JachA HeNTnHnKauaHa BaWnOt MepeH ypei.
MOHTaKa
Cha6dyBaHbe co eheprnaHa MepeHOType
MepHHOT ypeJ moKe da ce KOpHCTn Hnn co 6oBuHn 6aTePn Hnn CO nHTynm-jOHN 6aTePn oD Bosch.
Pa6ota co 6atepuja
KopncTe Tc mo NnHaHTe KOHTo ce HabeHb BO TexNknte NoaOn. Cmo OBne ypeH 3a nonHebe ce norOHN 3a nInm-jOHckata 6atepnja To ce KopnTn 3a BaHnot MepeH ypeI.
Hanomeha:JINm-jOHCKnTe 6aTePNCe HcnpaYbaat DenymHO HANONHTN NopAHMeHyHApOHNTE npONCN3a TpaHCnOPT.3a Da ce 3arapaHTnpa CENoCHATA jaHHa Ha 6aTePnjata, npE npBata ynotpe6a enoCHO HAnONHeTe ja.
3aBMETHyBaBe Ha HANONHeta 6atepna (15) BMETHe ja BO OTBOPOT 3a 6atepn (10), ce IOneka He cnIywnete da ce BKNIOH.
3a BaIeHe Ha 6aTeepnJaTa (15) npHTncHe Ta KOnuHbTa 3a OTKlyuBaHe (13) n H3BneJe Ta oD OTBopOT (10). PpntoA He ynotpe6ybaJte cna.
Pa60a co 6aTepeHH
3a pa6oTa co MePHNOT ypeD ce npenopauyBa KOpHCTeHe Ha aKanHO-MaHraHcKn 6aTePN.
BaTePnnte ce cTabaat Bo 6aTePncKnOT aAnTep.
Batepcknoaandep e Hamehencknyuho 3a npedbndenhte MEPn ypeHn Ha Bosch n He cMee da ce Kopncn co enektpnna anatn.
3aBMETHyBaHe Ha 6atePnnte CTabeJe aOBBbKaTa (11) Ha 6atePnCKnOT aAnTep BO OTBOPOT 3a 6atePn (10). CTabeTe rN 6atePnnte CnpoeCnKata HA KanaeTo 3a 3aTbopaHe (14) BO OBBbKaTa. CTabeTe Ro KanaeTo 3a 3aTbopaHe nO bNBbKaTa,doKeKa He ce cnyuHHe Ta ce BKNoH.

3a BaBe He Ha 6atepHHe (12) npHTnCHeTe Ha KOHNbAra 3a OTKnyBaHe (13) Ha KanaeTo 3a 3aTbOpaHe (14) nOBNeueTe ro. PnToa BHIMAbajte Da He nCnaHnat 6atepHHe. Dpxkete Ro MEPHnOt ypeD co OTbOpOT 3a 6atePn (10) Hacouen Harope. N3BaTe r6atepHHe. 3a da ja H3BaJIne 6BbKata (11) Od BHaTpeHHocTa OD OTbOpOT 3a 6atePn,
fataTe ja Hn3BneYe ta co necho npHTNcKaHe Ha CTpaHnHHot SHD OJ MepHHOTypeI.
Cekoraw 3amehybajte rncnte 6atepnn OednaW. Kopnctete camo 6atepnn o eden npon3BOaHTEN co nct KaanuTet.
Ako He ro KopnCTHe MEPnHOTypei nooIro BpeMe, n3BaTeTe 6aTePnIte. Ppi nooIro cKnapHaBe BO MEPnHOTypei, 6aTePnIte Moke da KopoDnpaat Ha ce Hcnpa3HaT.
Pnka3 Ha coctoj6ata Ha hanoHHeTOcT
PnPKa3OT Ha COctoJbata Ha HANONHETOCT (2) HA EKpaHOT ja NOKAKyBa COctOJbata Ha HANONHETOCT Ha AKyMyaTOpOT ODH. 6aTePNITE:
LED-cBETMKN Cocto6a Ha HANOTHeTOCT
TpaJHo3eNeHcBETNo100-75%
TpaJno Jxnto CBeTNO 75-35%
TpaJHoUpBeHo CBeTno 35-10%
HemacBETNO-DeΦeKTHa6aTePnja
-ПраЗнбастп.
AkoakymyntaToPOT OH.6aTeHNTE ocna6ybaaT, CBeTnOCTa HaIacepCKNTE HNN NONEKa Ce HAManyBa.
BeHa3aMeHeTe ro HeHcnpaBHHOT akymyIaTOp Hnnpa3Hnte 6atePHN.
3aMeHa Ka konueceta 6atepejna (BnDn Cnka A)
MepHnotypee onpemeh co konyecta batepnja (21), 3a da moKe da ce 3auybaat datymot n BpeMeTo 3a cyHKnjuata CAL guard npn n6e3BMeTHATA akymnatopcKa batepnja nn6batepn.
3a da ja 3aMeHnte konuectata 6atepna, n3BaTe ja 6atepnjata nn enocno 6atepcknot aanTep.
N3Bneute rnpaoyot 3a konyectata 6atepnja (22) od OTbopot 3a konyecta 6atepnja (23). N3BaTe ja npa3HaT a konycta 6atepnja (21) nBMteHote HOBA. BHIMAbaje Ha npaBNHOT non cornacHO pniKa3OT haDPkaOT 3a konycta 6atepnja (no3HTNBHOT non HA konyectata 6atepnja mopa da nokaxyba harope).
BmetheToDpkaoy3a konuecta 6atepnja (22)co BMehata konuecta 6atepnja BO OTBOPOT (23).BHnmaBJte Ha Toa, npkaayot 3a konuecta 6atepnja da e npabnHO n ceNoCHO BMETHAT, 6nejKn BO cnpntBO Hema da MoKe da ce 0e36eHN 3auNTA oN npab NcnpckaHa Boda.
Pn npBata ynoTpe6a otctpaHete ja 3aunTHata foJnJa Ha konueCTa 6atepnja (21).3a Taa ue, noCTanete Ha nCT haHH KAKO KORA ja MeHyBaTe KOUeCTATA 6atepnja.
Ynotpe6a
CtabaBeBoynotpe6a
3aHTTeTo MepHnOTypeoBnara HnpeKTHO HNOxyBaBe Ha COHcEBN 3paun.
He ro n3noxyBaJTe MEPnHOT ypeHa ekctpemn HTEMnepaTyPhnn TMnepaTyPhn OCunnau. Ha np. He ro octabajTe doIro BpeMe BO aBTOMo6nOt. Pn ROlemn TEMnpaTyPhn OCunnau, OCTaBeTe ro MEPnHOT ypeI npBO Da ce AKINMaTH3npa HAnpaBeTe npOBepka
3a ToHocTa Cekorai npedJa npodJnKeTe co pa6oTa (BNDi, KOHTpona Ha ToHocTa Ha MepHHOTypeD", CtpaHnua 236).
PnekctpeMHNTemepaTyPi NTemepaTyHn OCunnau, npeun3HOCTaHa MePHOTypeMozKe da ce Hapuyi.
N36erhybaje yapn n ppeBpyBaHa Ma MepHnotype. Iocnnn HndBopeuHN BnnaJHa Ha MepHnotype, nped Da ro ynoTpe6nte 3a paobota, cekoraun3Bpwete KOHTpona Ha ToHocta (BnD „KoHTpona HaToHOcta Ha MepHnotype, CtpaHnua 236).
Mcknyute ro mepHnoType3aBpeMeHa
TpaHcnpotr. Pn INcknyuBaheTo, ce 6noKnpa OCnInpauKaTa eDHHua, Koja 6n ce oWTeHa npn HHTeH3BHN DNBKeHa.
BknyyBaBe/ncknyyBaBe
3a BknyBaHe Ha MePHNtype npHTNCHeTe ro npeKHyBaOT 3a BknyBaHe/HckNyBaBe (16) BO no3nJa,On" (3a paboTehe co ocunlataTopha 6nokada)
HIN BO N3Hnja, n" (3a pa6oTehe Co aBTOMaTHKa 3a HnBENpaHe). BeHaH No BkNpyBaHeto, MepHnot ypeI nyTa Nacepckn IHHN OJ H3Ne3Hnte OTBOpN (1).
He ro hacouybajte 3pakot CBETNHa KOH Nua Hnn XNBOTn H He norenybajte DnpeKTHO BO Hero,dypn HNO rONema Ondaneuehoct.
3a ncknyyBaBe Ha MePHNOT ypeI npHTnCHTe ro npeKHyBaOT 3a BknyyBaBe/ncKyUyBaHe (16) BO no3nJa Off. Pn HcknyyBaBe, ocunnpaKaTa eHNHa ce 6nKnpa.
He ro octabaje BknyeHnO Mepeh ypeI 6e3 Hau3Op ncknyte ro no ynotpe6aTa. Dpyrnte Nua MoKe da ce 3aclenat OJ nacepcknOT 3paK.
PnHaMmHyBaBe Ha HajBnCokata Do3B0JeHa pa6OHa TeMnepaTypo od 40°C ce ncknyuBa 3apdn 3aHTHa Ha nacepckata DnoDa. OTKako Ke ce onan, MepHnOT ypee e NOBtOPHO NOrToBeH 3a pa6OHa Moke OndHOBO Da ce Bknyu.
Dokonky temepaypata ha MEPHOT ypeo npn6nyBa do HajBcOKaTa DO3BOJeha ONEpAINBHa TEMpeAtya, CBETIOCTa Ha IacepCKITE NHHN NOEka Ce HAMAYBa.
MepHnotypeed3aHTnTeHOnekCTpemHOeNEKTPoCTaTcKO npa3Hebe(ESD).AkoMepHnotypeedceHaonHn eNEKTPoCTaTCKn(Ha np.co DonnpaBeBo CpeDnHa Co HNcKO HnBO HaBnAAkHoCT),TojABTOMaTcKNceNcknyuBa.BO OBOJ cnyaj,NCkyuete ro n NOBtOpHO Bknyuete ro npeKnHyBaOT 3a BknyuBaHe/NckNyUBaHe (16).
DeakTNBnpaBe Ha aBTOMaTHKATA 3a NCKIyUyBaBe
Iokony 120 min He ce npntnche HneHNO konue Ha MepnnoT ype, ToJ ce ncknyBa ABTomatcKn 3apadn 3aHTHa akyMnatopcknte batepn Ond. batepnte.
3a NOBTOHO Da rO BKnyHTe MePHNOT ypeI NO ABTOMATCKOTO NCKNYBaHe,MOKe IIN IIN PBO Da rO CTABHTe INPEKHyBAOT 3a BKNYBaHe/NCKNYBaHe (16) BO N03nJa,Off' NnotoA NOBTOHO Da rO BKNYHTe MePHNOT ypeI,IIIN eHnau Da pInTHCHe Ha KONUETO 3a peXHM Ha
pa6ota HaIacepoT (7) HIN HA KOnUeTo PExHM Ha npHemHHK (5).
3a da ja deaktnbnpate abTomatnka 3a ncknyybahe, dpjke ro npntncato kouyeto 3a pekm ha pa6ota (7) (npn BknyeH mepeh yepi) Hajmky 3s. Dokonky abtomatnkata 3a ncknyybahe e deaktnbnpaHa, nacepcknte 3paun KpaTko Tpenkaat 3a notbpda.
3a da ro aKTHBnPaTe aBTOMaTCKOTo NCKnyyBaHe, NCKnyeTe ro MepHnotypeN NOBTOHO BKnyteTe ro.
DeaKTbBpaBe Ha CnHAnHHOT ToH
IIO BKnyBaHBe Ha MEPHNOT ypeD, CnHAnHNO TOn e ceKoraiaAkTNBnpaH.
3a DeakTNBnPaHBe Ond. AkTNbPaHBe Ha CnHAnHNot ToH npNTCHETe NCTOBpeMeHO HA KOnyTe 3a peKHM Ha pa6oTa Hnacepot (7) n KOnyTe 3a peKHM Ha pInemHK (5) n DpKeTe Hn pNtCHaTH HajMaNKy 3s.
PnAaTbHpaBeTo nPnDeaKTHBpaBeTo ce cnyaaat TpN KpaTK CnHaHn TOHOBn 3a NtBpda.
HaunnHa pa6ota
MepHHOT ypeH NMa NOBeKe HauHH Ha pa6To, KOJ MOKe Da Tn PpOMeHHTe BO 6NIO Koe BpeMe:
-Emntnpa eHNO xOpn3oHTaIHO nacepcko HNBO,
-Emntnpa eHNO BepTKaJIHO nacepcko HnBO,
-EMNTupaDBeBepTKaHnNacepckn HbOa,
-EMNTpa eHNO xOpH3oHTaHNo IacepckO HnBO KaKo N DBe BepTKKaJIHH NacepCKH HnBOa.
По BKIуBaHeto,Мернотypee EMHTnpaXOpH3OHTaHIO nacepcko HnBO.3a da ro CmEHnte HaunHot ha pa6ota, npTnCHeteHa konTuTo 3a peKIm Ha pa6ota Ha Iacepot (7).
CHTe HauHHHa paBota MokeJa ce N36epaT co ABTOMaHka 3a HnBeHnpaBe KaKo n Co OcunatopHa blokada.
PexHM Ha npHmHHK
3a pa6oTeHe co nacepckn npneMHNK (29) mopa - He3aBncho OO n3bpaHnOT hauHH ha pa6ota - da bInde AKTNBnpaH peKHMOT Ha npneMHNK.
PnakTNBupan peKHM Ha npneMHNK, nacepCKHte HnHH TpeKaaT co MHORY BnCOKA ppeKBeHJna N TaKa MoKe da ce Hajde nacepckHOT npneMHNK (29).
3aBknyBaBe Ha pexHMOT Ha npHemHK nPHTNCHEtHa KONUeTo Ha NaacepckNt PnHemHK (5).PiPKa3OT 3a pexHM Ha pHemHKOT (6)CBET3eJENO.
3a yOBeKOTO OKO BVIIINBOCTa Ha IacepCKNTe IHHH e HamaIeHa DOKONky E BKNyueh peXHMOT Ha npHEMHK. 3a pa6oTeHe 63 nacepCKn pneMHNK, NCKnyeTe ro pEXMMOT Ha npHEMHK CO OJHOBO pNITNCKaHb Ha KONyeto PeXHM Ha npHEMHKOT (5). PnHKa30T (6) ce racn.
ABTomathka 3a HnBEnIpaIbe
Pa6otebe co aBTOMaTHKa 3a HNBenHpaBe
IocTaBete ro MePHNOT ypeHa xOpH3OHTaIIHa, ZbPcTa IoNDIora, npuBpCTeTe Ro Ha yHnBep3aIIHHOT dPkaU (25) INI HA CTATNBOT (32).
3a pa6oTeHbe co aBOMaTHKa 3a HnBeHnPaHbe, npHTNCHeTe ro pKeHHyBaUOT 3a BkNyuYBaHbe/ncKnyUyBaHbe (16) BO no3uJa , "
ABTomaHKata 3a HbBEnHpaBe aBTOMaTCKn Hn H3paMHyBa HepaMHHHte BO NOIeTO Ha cMOHbElnpaHe Od ±4°. HbBEnHpaHeto e 3aBPWeHO TOM IacepckTe NHHn He ce DnKAT NOBeKe.
Iokonky He e Bo3MOxHO aBtOMaTcKO HHeBnHpaHe,Ha np. 6ndejkn NpOrata Ha MePHNOT ypeD oTcAnyBa NOBeKe O4o OD XOpH3OHTaNaTa, nacePCKNTE IINHH 3aOnHyBaat Da Tpenkaat Co 6p30 TemNo. Iokonky CnHaNHNot Toe AKTNbnpaH, ce cnyu CaHaNHeH ToC 3a6p3aH TaKT.
Iocabete ro MEPHNOr ypeD xOpN3oHTaHNo nOuekajTe r cAmOHBENHPaHeTo. IITOM Ke CE hajDe MEPHNOr ypeD BO pAMKn Ha NoneTo HA cAmOHBENHPaHe oD ±4' NacepcknTe 3paun CBet HEnpeKHaTO H CnHaNHNOr TOH Ke CE NCKJyUH.
PnB6paunnnnpomeHa nnookbata3a BpeMe Ha pa6oTata, MepHnot ypeN NOBtOHO ce HNBenipa ABTomatcKn. IIO NOBtOHPo HNBenIPAhe, npOBepe ja no3uJaT a HA xOpH3OHTaHATA OIN. BePTKanHATA nacepcka nnHja BO ODHoc HA pepepeHTHe TOUKN 3a da CE h36erHat rpeKKn co NomecTyBaBe Ha MepHnot ypeI.
Pa6oTa co ocunnaTOpHa 6noka
3a pa6oTeHe co ocunlatohpa 6nokada, npHTNCheTe ro npeKHyBaOT 3a BknyuBaHe/ucKnUyBaHe (16) BO no3HnJa,On". PnPKa3O tcunlatohpa 6nokada (4) CBETN UpBeHO HncepCKnTE LHHH HePpeKHaTO TpenKaAT BO 6aBeH TaKT.
Pn pa6oTa co ocunatopHa 6Ioka aBTOMaTHKaTa 3a HbEnpahe e NCKnyeHa. MepHnoT ypeMoKe da ro dpKHe cNoBdo HO paka nn Da ro nocTabte Ha HabaneHa IIOIora. Nacepcknte nnHn NOBeKe He ce HbEnpaat H He Mopa da Ce BepTKaJIHO EDHa KOH dpyra.
Далецнско упавуbaие пеку „Bosch Levelling Remote App"
MepHnOt ype e onpemeh co Bluetooth®-MOyn, KOjIto co nOMoW Ha 6e3KnHa TexHOJra Do3BOyBa DaJeHHCKO ynpaByBaBe Co nOMoW Ha NaMeTeH TenefoH co Bluetooth®- HHTeppejc.
3a KopncTeHe Ha Obaa fynHKnJa Notpe6Ha e annKaunjata (App), Bosch Levelling Remote App". Hea moKeTe da ja npesemte od cooBETHNOt App-Store BO 3aBnCHOCTO KpaJHnOT ypeD (Apple App Store, Google Play Store).
Hhopmaa3a nptpe6hnte cHCTeMCKn npedycnoBn 3a Bluetooth BPcKa Ke hajdete Ha HHTepHET cpaHata Ha Bosch Ha www.bosch-pt.com.
Pn daeneHcKO ynpaByBaHe co nomow Ha Bluetooth MoKe Da HacTaHaT BpeMeHcKn OndoxyBaHa nOmeIy MObHHOT mepHnOt ypeD nopAHI NOH ycNoB 3a npHem.
BknyeTe ro Bluetooth
3a BknyBaHe Ha Bluetooth® 3a daneuHcO ynpaByBaHe, npntCHeTe ro Bluetooth®-KoNueTo (9).PpOBepTe daHn Bluetooth®-INTEpdejcoT e aKTbBpuH na Baunot MoBnneH ypeI.
IIO cTAPHa Bosch-anIIkaunaja ce BocnoctaByBa Bpcka nOmeIy MoBnHNOHT MePHNOT ypeI. JOKONky ce npOHajEnH NOBeKe AKTNBH MepHnypeI, 36epete ro COoDBeTHNOt MepeH ypeI. JOKONky e npOHajEncMoEeH akTBHeH MepeH ypeI, ce BOCNoCTaByBa ABTomatcKa Bpcka. IOBp3yBaBeTo ce BocnoctaByBa, Kora Bluetooth®-npKkaot (8)CBETN.
Bluetooth®-noBp3yBaHetoMoKeJaCe npeKnHe npaNr oIeMTo pactoJaan HnPipeKn NmEry MepHnOT H MoBnHHoT ypeD, KaOu NnpaDn EneKTpomarHeTcKN H3BOpn Ha npeKn.Bo OBOj cnuyaj TpenKa Bluetooth®-npka30T (8).
NcknyuBaBe ha Bluetooth®
3a Bluetooth® 3a daneyHckTo ynpaByBaHe, npHTncHeTe Ha Bluetooth®-KonTuEto (9) HnN NCKnyuTe rO MEPHNOTypeI.
PpeynpeyBaBe 3a KaH6pnpaBe CAL guard
Cen30pHTe Ha npdynpdyBaBeTo 3a KaHbnppaBe CAL guard ja HAdTneDyBaAT CoCToJbTa Ha MEPnOT ypeI Kora e NCKnyeH. Ako MEPnOT ypeI 6e3 HAnOjYBaBe CO CTpyja OJ AkymnATOpOT nII bATEpHtE, BHaTePshOTO CKlaDnPaHe Ha eHepnJa 3a 72 Yaca CE norpKByBa 3a NoctoJaHO HaTneDyBaBe co Ceh3OpHTe.
Ceh3OpHTe ce akTINBnPaat Co npBTo cTapTyBaHe Ha MePHNtypeI.
AkhBaTOp Ha npEynpEyBaHbeto 3a KaH6pHaBHe
Ako ce nojaBn eEn OJ cnEeHnTe HactaHn, ce AKTNbpa npedynpdyBaHeTo 3a KaNbepnpaBe CAL guard n npka3OT CAL guard (3) CBeTHyBa UpBeHo:
- INTEpBaIOn Ha KaIIbpaUJa (Ha cekO1 12 Meecu) e HCTeueH.
-MepHnOypeJe cKnJaHpaH HAdBOp oJ rpaHnIte Ha TemnepaTpya 3a cKnJaHpaHbe.
-MepnHOType6HnH3noXeHHaTOnEMBbpaunn(Ha np.yapHa nooT no na).
Bo „Bosch Levelling Remote App" MoKTe Da BUnITE KOI OJ TpHTe HAcTaHrTo AKTHBnPaJ npeDynpEyBaHBeTo 3a KaINbPepaHBe. Be3 aAnNkaujata He MoKe Da ce npenO3Ha npuHHATA, a CBeTHyBaHbETo Ha npHKa3OT CAL guard (3) COONHTyBa CaMo DeKa Mopa Da ce npoBepn ToHOCTa Ha HNBEnHPaHbETo.
IIOAKTINBnHPaHbTeHO HnpEynpeyBaHBeTo pNkA3OT CAL guard (3)CBETNDOeKaHe Ce NPOBepnTOHOCTa Ha HNBENIPAHbTeNOToaCe NCKLuyBa.
IocanyBaBe npn akTbHpaHo npdeynpeyBaBe 3a KaH6pnpaBe
IpoBepete ja TouHocTa Ha HNBEnpHaBeTo Ha MEPHNOT ypei (BnDn ,KoHTpona Ha TouHocTa Ha MEPHNOT ypei, CtpaHnua 236).
Ako MaKcMaHnHO OToCTanyBaHe He Ce HaDMnHe Kaj HHTy
eHa npOBepKa, ToraU NckIyueTe rnpKa3OT CAL guard
(3). 3a Taa Uen, HcTObpeMeHo DpKeTe rnpTHcHaTH
KoNueTo 3a peKHMOT Ha pInEmHHK (5) H KonueTo
Bluetooth93a HajmAnky 3s. PpKa3OT CAL guard (3) ce
racn.
Dokonky npn Hekoja od npoBepKeIte MEPHOTypeI ro HADMNHE MaKCHMaJIHOTo OTCTanyBaHe, ToraI Tpe6a Da ce nonpaBN Od CTpHa Ha cepBbCHATA cnKy6a Ha Bosch.
KoHTpOHa HToUHocTa Ha MepHnOtypeI
BnjuHnjaHaTouHocTa
Hajrolmo BnnaJaHne Bpss OkonHaTa TempepaTpa.
Oc06eHTo TempeTaPyHnTe pa3nKn KO n Ce dBNkA T O nOoT Harope MoKe Da ro npEacOaT NacepcknT 3paK.
Ce npenopayBa MEPHnot ypeJa ra 0 KopnCTne Ha cTaTINB 3a da rMHHmN3npaTe TepMHKNTe BnJaHJa oD TOnnHata wTo ce KpeBa Ond NoDT. DOKONy e BO3MOXHO, NOCTABYBaTe ro MEPHnot ypeB Go CpeHnHa tA pa6oTHATA NOBpUnHa.
Ocben HndBopeuHHTe BnJahJa,do OCTanyBahe MoKe Ja doBeDat NbnJahjnta CneuNfHuH3 aYpeDOT (kako Ha np. naobn nn jakn yapn). 3aToa, nped cekoj noeTOK Ha pa6oTa npOBepete ja ToUHOcTa HA HNBENHPaHeTo.
Hajnpbo npobepete ja Touhocta Ha HnBeneipaheTo Ha XOpH3OHTaJIHaTlaacepcka NHHja, a NotoTaTOHOCtA Ha HnBeneipaheTo Ha BepTKaHHTe NacepckN LHHN.
Dokonky npn Hekoja od npoBepKeIte MEPHOTypeI ro HADMNHE MAKCImaJIHOTO OTCTanyBaIbe, ToraI Tpe6aJa ce nonpaBN oD CTpHaHa cepBcHATA cnKbHa Bosch.
IpoBepKa Ha XOpH3OHTaHaTa TOnHocT npn HNBenpaBe Ha nonpeHaTa ocka
3a npOBepkata notpe6bNA Bcno6oHa MepaHnHja Od 5 m Ha CBpCTa NODORA NOMery Dba SnaA nB.
-MoHTnpajTe ro MEPHnOT ypeD BO 6IIN3Ha Ha SIOJ A Ha eDeH CTaTHB NII NOCTaBeTe Ro HA UBCPCTa,paMHa NOIOrA. Bknyete ro MEPHnOT ypeD Bo pexHM CO abTOMaTHKa 3a HNBENHPaHe. N3bepeTe ro pexHMOT Ha pa6Ota, Kaide ce EMINTpA xOpN3OHTaHO NacepCKo HNO, KAKO I BEPTKANHO NacepCKo HNO FOPOHTaHO nped MEPHnOT ypeD.

-HacouheToIacepot Bo 6n3Ha Ha SIOA H octaBeTe ro MeHnoT ypeJa ce HnBEnipa.ObeneKeTe ja CpeHNHata Ha ToKaTa, Kaede Iacepcknte nnHnN CE BkpcTyBaat Ha SHOT (TOKAI).
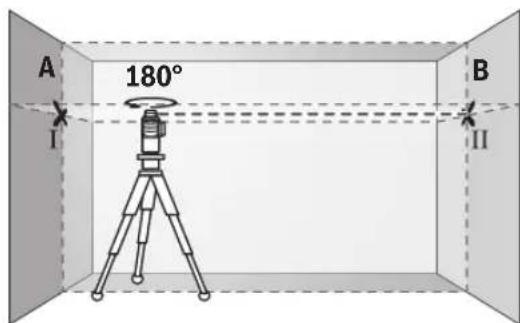
-Cbptete ro MePHHOType1 3a 180°,octabete ro da ce HnBennpa nO3aueTe ja TOyKaTa Ha BkpcTyBaBe Ha Nacepcknte nnHHn Ha cnpoTHBnOt sD B (TOyKa II).
-Noctabete ro MEPHNOtypeI-6e3 da ro BpTHe-BO 6n3Ha Ha SIOB, BKnyte Ro n octabete ro da ce HbEnipa.

IocTabete ro MepHnot ypei no BnCnHa (co nomow ha CTaTHBOT INI eBHTyaJHO CO NOIOrata), Taka ITO TOKATA HA BKPCTyBaHe HaIacePCKITE NHHN TOHKe ja IOROHN PteXoHD O3haueHATA ToKa II Ha SNOT B.
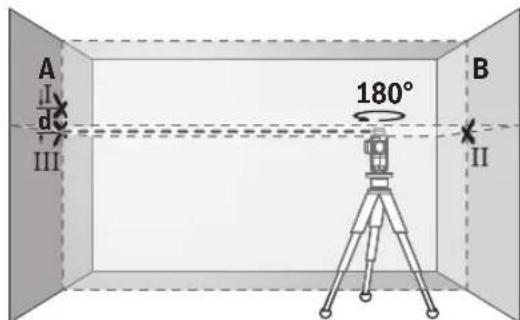
-CbpTeToMepHnOtyped3a180°,6e3da ja npomehnte BHCnHATA.HacoueteToHaSHoTAtA,TakaIto BEptNKaJIHATAJacepckaINHHjaIpoaraHn3BeKe O3haueHATA TOkaI.OCTabeteToMepHnOtypeda ce HNBenHpNAO3haueTe jaTOkataHaBkpcTyBahe Ha IacepCKteINHHNHa SNOtA(TOkaII).
Pa3nKaTa dHaDbete O3HaueHn TouKn I n III Ha sNDOT A ro DaBa paKTHKOTO oTcAnyBaIbe oD BnCHHaTa Ha MEPHNOTypeI.
HaMepHaIHHJaOJ 2× 5m = 10m MaKcHMaHOTo
D03BOHeHOOTcTanyBaHe H3HecyBa: 10m× ± 0,2mm / m = ± 2mm .Pa3Nkata d MeY ToKHTe I
II CMeE Da H3HecyBa HajMHory 2 mm.
PpOBepKa Ha ToHocTa Ha HnBennpaBeTo Ha BepTHKaHnHTe HHHH
3a KOHTpONa notpe6eH Bn eOTBop Od BpaTAt, KaIe (Ha CBpCTa NoIOra) Ha cekoja cTpaHa Od BpaTaTt HMa MecTo OJ HajMaNKy 2,5 m.
-Notabete ro MEPHnot ypeHa 2,5 m pactojaHne oO tBbOpot Ha BpataTa ha uBpcTa, pAmHa noDnOra (He Ha cTaN). Bknyte ro MEPHnot ypeD BO peKIM co ABTomaTHka 3a HnBeInHpAhe. N36peTe ro pexHMOT Ha pa6ota, kaDe ce emHTnpa BeptHKaIHO Nacepcko HNBO fpoHTAnHO Iped MEPHnot ypeD.

O3haute ja cpeHHaTa Ha BepTKaHnHa Taacepcka HnHa Ha nooT od OTBOPoT Ha BpaTata (touka I), Ha 5 m pactoJAHne OD npyraT a CpaHa Ha OTBOPOT OD BpaTata (touka II), KaKo Hn Ha rOpHnOt paHa BA pata Od OTBOPOT (touka III).
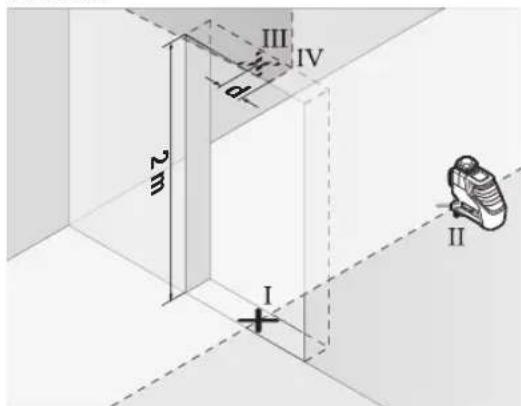
-CBpTeTo MepHnOTo ypeI 3a 180° nNoctabeTo Ho Na pyrata ctpaHa Ha OTBOPoT Ha BpaTaT a NipeKTHO 3aToukata II. Octabete To MEPHnOTo ypeI da Ce HnBeInnpa HacOueTe ja BEptnKaHnA tA lacepcka IHHJa Taka ITO HeJINHATA CpeINHKe NOMNHyBa TOHOr Hn3 ToQHTe I NII.
-06enexKeTe ja cpeHnHa Ta HaIacepckTaIHHJa Ha TropHnO tpa H a OTBOPOT HA BpaTata KAKO TOka IV.
PaJIHKATA dHa DBete O3haeHn TOKn III IV ro daBa KaTHKOTO OTCTaYBaHe Ha MepHnot ypeOd BEPTNKAJHHTe JINHH.
-Измерета ja висн ha Na OTbopoT OД ВраТа.
IbTOpeTe ro MEPHnOT npoec 3a BTOPOTo BEpTKaHNO NacepCKO HNBO. PnHToa H36peTe peKMM Ha pa60Ta, KaDe ce EMHTnpa eHNO BEpTKaHNO NacepCKO HNBO CTpaHNUHO NOKpaj MEPHnOT ypei n pei NoeTOKOT Ha MepeBe CBPTete Ro MEPHnOT ypei 3a 90^
MaKcHmAJHOTo Do3BOJeHOOTCTanyBaHe rO npeCMetyBaTe Ha CnEHNOT HauHH:
Dbojha BnCnHa Ha OTBOPOT Ha Bpata × 0,2mm / m PnpMep: PnBnCnHa Ha OTBOPOT Ha Bpatao 2 m
MAKCHMaHOTOOTCTaNYBaBe CMee Da N3HecyBa
2× 2m× ± 0,2mm / m = ± 0,8mm .TocknTe III IV cMeat da nekat HajMHory O,8 mm eHa oD npyra.
Cobetn npa6oTeheTo
3a obenexybahe, cekoraw koprctete ja camo cpednHa ta Ha nacepckata HnHja. HnpHata Ha nacepckata HnHja ce MeHyBa co odanaeYBaBeTo.
Pa6oTebe co cenHa Ta6na 3a Iacepot
LcnHata Tabla 3a nacepot (28) ja nooobpyBa BnInBocTa Ha IacepcknoT 3paK npn HenoBOnHyCNoBn rOenMn pactoJahna.
PepkeTnpaKaTnOBpHnHaHaeHnTaTa6NaHa nacepot (28) ja noobopyBa BnINBOcTa Ha nacepckata HnHja, Hn3 TpaHCnapeHTHaTnOBpHnHa nacepckata nnHjae BnHnBa H oD 3aHaTa CtpaHa Ha eHnHa Ta6Na Ha nacepot.
Pa6oTehe co cTaTHB (onpema)
CtAHBOT OBO3MOKByBa Cta6HnHa MepHa NODIora WTO MOKe Da ce NOdecyBa No BnCnHa. NocTaBeTe Ro MEPHNOT ypeD co 1/4"-npHafot Ha CTAHBOT (20) Ha HABoJOT HA CTaTHBOT
(32) nIN oBHyEn foTo cTaTNb. 3a npnUbpCTyBaHe Ha
ObHyEn rpaJExeHcTaNb, KopncTe 5/8"-npHpAt 3a cTaTNb
(19). 3aUbpCTeTo MepHnot ypeD co 3aBPtKa 3a
fHKnPaBe Ha cTaNBoT.
Ipy6o ceHTnpajTe ro ctaHBOT, nped da ro BKnyuHMepeHHOT ypeD.
Pnucpctete co yHbep3aneH dpka (onpema) (Bnu cnka C)
Co nomou Ha yHnBep3aHnHOT dpKau (25) MoKe da ro npuBpCTHe MEPnHOT ypeHa np. Ha BepTnKaHn NOBpHHn HnMaHHTnHpaHn MaTePnJaH. YHnBep3aHnHOT dpKau HnCTo Taka NOrOeH KAKo NOpEn CTaTHN I Go ONeCHyBa NoDecyBaBeTo NBOHCnHa Ha MEPnHOT ypeHa.
DpKTe r npCTHe nOdaNeky od 3aHnOT den Ha marHeTHata onPema Kora ja npKauyBate Ha
NoBpHnHHe. IopaJakata cHa Ha BneueHe Ha MaHHeTHe, BaWHTe npCTm MoKe Da ce 3aRnBaT.
Ipy6o ceHTnpajte ro yHnBep3aHnO rDpKaU (25), nped aI RO BknyuHTe MEPHnOTypeI.
Pa6oTeHe co Iacepckn npHemHnK (onpeMa) (BnDn CInKa C)
PnHEnoBONnCBETNOChynycNoBN(OCBeTneHaOKoJIHa, DnpeKTHnCOHueBn3paun)Ha roJemmpactoJaHnja 3a
noo6po HaafoaHe Ha nacepckte IHHN KOpHCTeTe ro nacepcknO TnpemHNK (29).PnpaOteHe co Iacepckn npemHNK Bknyute Ro pekmOT Ha npemHNK (BnDn PekmHa npemHNK, CtpaHua 235).
Nacepcn 3aunTHH ouHa (onpeMa)
Nacepckte 3aHTTHO Ounna ja qHnTPnpaaT OKoHATA CBETNIHa. Ha ToJ HauHH CBETNO HA nacepot N3rIeJa NOCBETNo 3a OKOTO.
He Hn Kopnctete nacepckhte 3aHTTHO uHna (doonHHTeHa onpema) kako 3aHTTHN OHNla.
Iacepcknte 3aunTHN Ounna Cnykat 3a noOp6po paon3HaBaHbHe Ha IacepcknOt 3paK; cenak, Tne He UTAT oI Nacepckoto 3pauehe.
He rKopHCTeIacepcknte3aHTTHOcHna (DononHnTeHa onpeMa) kako Ounla 3a COHue Hn nak Bo coo6paKaJot. Iacepcknte Ounna He daBaat cenocha UV-3aHTTa n ro HamanyBaat npen03HaBaHeto Ha 60n.
PpHmepn 3a pa60ta (Bnu n CnKn B-G)
PpMepn 3a MoXHocHTne Ha npmeha Ha MePHNOtypek Ke HajTe Ha rpaNcKte CTpaHn.
OdpKyBaHe n cepBnC
OdpxbyBaBe n uHCTeHe
Iocjoaho OdpjxBajTe ja HcTotaHa MePHHOTypei. He ro notonybajTe MePHHOTypei BO BODa Nn DpyrTeuHOCTN.
H36pnueTe rHeuCTOTnTE CO BnaKHa MeKa Kpna. He KopncTete CpeCTBa 3a YnCTeHe HnN pactBopn.
PeIOBHO YIcTeTg NOBpHINHTe OKOYI H3ne3HNOt OTBOP Ha Iacepot IN pntoA BHIMAbajte HA BlaKHeuata.
MepHHOTypeCmee da ccecknnapa n TpaHcnpTnpa cmo BO 3aHTTHa YHaTa (31) OIN. KyΦep (34).
Bo cnyaj ha nonpaBka, hcnpaTe ro MEPHnotypeD Bo 3aHTnTHata YaHTA (31)OHN. KypePOT (34).
www.bosch-pt.com/serviceaddresses
TpaHcnpr
IpenopaahnTe IInTHym-JohcN6bATEPN NOJExkAT Ha 6apabataHa3akoHOT3aONACHMATEPnJaHN. BatePHTe MoKe Da CE TpaHCnOpTnpaAT CaMO OD CTpHa HA KOpNCHKOT,6e3NOTpe6aODONOHNTENH KBaHnΦnKaun.
Pn npneHoc ha nCTHe oCtpaHa Ha TpeTnIuca (Ha np. Bo3dyWeH TpaHcNoPT nn IwNeDuNJa) HeoNxoHO e Da ce BHIMABA Ha CneUJAHnTE HanOMeHN Ha aM6aJaxata n O3HaKIne.Bo TakOB cnyuj, pnp noDrotOBkata Ha npatkata Mopa da Ce NOBnKa ekCnept 3a OnaChn CyntaHn.
TpaHcnpTpajTe r6BaTePnHTe cAmo DOKONky KyKnWTeTo e HeoWTeTeHO.3aIenete rN OTBOpHnTE KOHTACh nCnakyBaJTe ja 6BaTePnJaTa Ha ToJ HauHH WTO Hema Da ce dBHXn BO aMbaJXkata. Be MoJIme BHNMaBaJte Ha eBEHTyAnHnTe DOONHnTeHH HAIOHOHn IpOINCH.
OtctpaHyBaIbe

MepHnte ypei, akymynaTopne/6aTeepHnte, onpemata n am6anaknte Tpe6a da ce OTCpaHaT Ha ekONOKN npfapTnB HauHH.
He n pnpajte Mepnite ypeu n 6aTeepnnte Bo DOMaHHTA kaHTa 3a r6pe!
Cama 3a 3emjnte oEY:
CnopeE EBpONcATA INpeKTHBa 2012/19/EU 3a cTapn
eneKTPuHn H eNEKTPoHcN ypeDu H NHBaTa yNtpeBa BO
HaauHOHaHTo 3aKaHOHaBCTBO, MePHTE ypeDu WTO ce BOH
yNtpeBa H DeEeKTHHe Tnn NckOpHcTeHNte 6aTePNH
cnopeI dIpeKTHBaTa 2006/66/EC Mopa OndeHNo da ce
coBepat n da ce peuKnIPAaT 3a NOBtOPHa yNtpeBa.
Dokonky ce oTcPahyBaat HeNPaBNHO, eNEKTPuHnata n
eNEKTPoHcKATA ONPema MoKeJa HMaat wTeTHn BInjaHnja
Bp3 XINBOTHATA CpeDnHa H 3dpabJeTo Ha Lyfeto NOPaDN
MOXHOTIO PIPCYCTBO HA ONaCHM MaTePNH.
AkymynaTopcKn 6aTeepn/6aTeepn:
JTHym-jOHcKn:
Be monime BHHMabajte Ha HanomeHHe Bo DeIOT TpaHCnopt (BnDn, TpaHCnopt", CtpaHua 239).
Srpski
Bluetooth® 4.0 (Low Energy)
Bluetooth® 4.0 (Low Energy)
- Maks. domet signala
30m H
30mH)
-Opseg radne frekvencije
2402-2480MHz
2402-2480 MHz
Maksimalna snaga slanja
<1mW
<1mW
Bluetooth® pametni telephone
- Kompatibilnost
Bluetooth® 4.0 (Low Energy) G)
Bluetooth® 4.0 (Low Energy)
-Operativni system
Android 6 (i visi)
Android 6 (i viši)
iOS 11 (i viši)
iOS 11 (i visi)
Tezina u skladu sa EPTA-Procedure 01:2014
- Sa akumulatorom
0,90kg
0.90kg
- Sa baterijama
0.86 kg
0.86 kg
Dimenzijee (duzina × sirina × visina)
162× 84× 148mm
162× 84× 148mm
Vrsta zašite
www.bosch-pt.com/serviceaddresses
Transport
Preporučeni litijum-jonski akumulatori podležu zahevima propisa o opasnim materijama. Korisnik moze bez dodatnih uslova transportevi akumulatore na drumu.
Kod slanja preko trecih lica (na primer vizdušnih transportom ili špedicijom) mora se obrati za na posebne zahteve u pogledu pakovanja i označavanja. Tada se kod pripreme paketa za slanje mora pozvati strucnjak za opasne materije.
Akumulatorske baterije saljite samo ak o kuci ste nije osteceno. Odlepite otvorene kontakte i upakujte akumulatorsku bateriju tako, da se nePokrece u paketu. Molimo da obratite paznju na eventualne dalje nationalne propise.
Uklanjanje dubreta

Merne alate, akumulatore/baterije, pribor i pakovanja treba predati na reciklazu koja je u skladu sa zašitomŽivotne sredine.

Merne alate i akumulatorske baterije/baterijene mojte bacati u kuci otpad!
Samo za EU-zemlje:
Prema evropskoj direktivi 2012/19/EU o starim elektricnim i elektronskim uredajima i njenoj primeni u nacionalnom pravu, merni alati koji se vishe ne mogu koristiti, a prema evropskoj direktivi 2006/66/EC akumulatori/baterije koje su u kvaru ili astrosene moraju se odvojeno sakupljati i uklučiti u reciklazu koja ispunjava ekoloske uslove.
www.bosch-pt.com/serviceaddresses
Transport
www.bosch-pt.com/serviceaddresses
Transport
Preporucene litij-ionske aku-baterije podljezu zakun o transportu opasnih tvari. Korisnik bez ikakvih preduvjeta moze transportirati aku-baterije cestovnim transportom.
www.bosch-pt.com/serviceaddresses
Transport
Darbs ar stativu (papildiederums)
Stativs ir ierie ar regulejamu augstumu, kas paredzeta merinstrumenta stabilai nostiprinasaanai. Izmantojot merinstrumenta 1 / 4'' vitni (20) nostiprintet to uz stativa (32) vitnes vai ari uz parasta fotostativa, ko var iegadaties tirdzniecibas vietas. Lai merinstrumentu nostiprinatu uz tirdzniecibas vietas piejama celtniecibas stativa, izmantojet 5 / 8'' stipino so vitni (19). Stingri pieskrvejiet merinstrumentu ar stativa stipinajuma skruvi.
Pirms merinstrumenta ieslegsanas aptuveni izlidzinet stativu.
Lazera skatbrilles (papildiederums)
Lāzera skatbrillem piemit ipašila aizturet apkartējo gaismu,
tapèc lāzera stars acim liekas spilgtäks.
Nelietojiet lazera skatbrilles (piederums) ka aizsargbrilles. Lazera skatbrilles ir paredzetas lazera stara redzamibas uzlabosanai, tacu tas nespj pasargat acis no lazera starojuma.
Nelietojiet lazera skatbrilles ka saules brilles vai kablres, vadot satiksmes lidzekli. Lazera skatbrilles nenodrosina pilnvertigu aizsardzibu no ultravioleta starojuma un pasliktina krasu izskirsanas speju.
Darba operaciju piemeri (atteli B-G)
www.bosch-pt.com/serviceaddresses
Transportesana
Iteicamajiem litja jonu akumulatoriem ir piemerojami Bistamo kravu aprites likuma noteikumi. Lietotajs var transportet akumulatorus ielu transporte plusma bez papildun nosacjumiem.
Parsutot tos ar treso personu starpniecibu (piemeram, ar gaisa transporta vai citu transporte agenturu starpniecibu), jiaevero ipasi sutijuma iesainosanas un markesanas noteikumi. Tapec sutijumu sagatavoanas laika japieaicina bistamo kravu parvadasanas specialists.
Parsutiet akumulatoru tikai tad, ja ta korpussn nav bojats. Aizlimejiet valejos akumulatora kontaktus un iesainojiet akumulatoru ta, lai tas iesainojuma neparvietotos. Ludzam ieverot ari ar akumulatoru parsutisanu saistitos nacionalos noteikumus, ja tadi pastav.
www.bosch-pt.com/serviceaddresses
Transportavimas
Rekomenduojamu liocionjunakumulatoriugabenimui taikomos pavojingkuroviniu gabenima reglamentuojanciu jstatymu nuostatos. Naudotojui akumulatorius gabenti kelais leidzama be jokiuyapirojmu.
Jei siuncient pasitelkiami tretieji asmenys (pvz., oro transports, ekspedijavimo jmoné), butina atsižvelgtj pakuoteir zenlinimui taikomus ypatingus reikalavimus. Butina, kad
294 | Lietuvijk.
rengiant siunta dalyvauty pavojingyu kroviniu gabenimo specialistas.
gJ gJ j J J J J J J J J J J J J J J J J J J J J J J J J J J J J J J J J J J J J J J J J J J J J J J J J J J J J J J J
J 100000000000000000000000000000000000000000000000000000000000000000000
g kssllg yolwll lla a ydsall slll 1
15s g g. aal ll gall jil 10
gljai g ayalal al uyljyll ojl al y
aagog o jaiil gl ao dia sll agjg pssll
abraag dgiwl
y sll pals! Ic bga
aasall gaoiill gagll llao
no lgc g wllg yolwllg ydaalg
paae e aeae aaee aee
aalagaae aae aee aee aee aee aee
alii aaiy oia
g jn jnnn nn nnnn nn nnnn nn nnnn nn nnnn nn nnnn nn nnnn nn nnnn nn nnnn nn nnnn nn nnnn nn nnnn nn nnnn nn nnnn nn nnnn nn nnnn nn nnnn nn nnnn nn nnnn nn nnnn nn nnnn nn nnnn nn nnnn nn nnnn nn nnnn nn nnnn nn
4j山 aai jai 8
()
a#U|g≤J
a 111 111 111 111 111 111 111 111 111 111 111 111 111 111 111 1

gglawlglgldwyy
a:JUJI Uc Jj
eaw jce wJg glll Jj山
4.jUJjLgUcU 4(1)JUJI
pssuwwjulllagjollaq.dlaos jubis
Lai 2 Lai Jkawjjwew wJauw
Jluw
日 L _ 山 山 ( 出 ; 山 ) 山 山
aJLJI LJI JJJU 0jIbIs gJ maw aolil aJau jll uogj oJlbi gag J. aggJoll oJdJI IJI LJI LJS, aJusniu Jgq aWJ Jn .JglJU JuaJI JLc
aaii 1000000000000000000000000000000000000000000000000000000000000000000
wJlOeJg0s
JbJ Joo gUoi
a 1
jil jui jiu
auiJgSJI
Robert Bosch Power Tools GmbH aS wj
(a) aIg aI J I J I J oIa (32)
[山 g S u u u u u] (33)
(a)duo (34)
[a]iou 35
aJg aJb2 (21)
a a Jol (22)
aajjulai (23)
a u b li a (24)
(a) (25)
ijgjiiai_j (26)
(aaggall gll sllc) yjglk jlg (27)
Lai j 1 aolSgIgII .aaggl g Ig
aJUU Lgawj aagj (28)
(a) jU U Joo (29)
aaiiI uui
| GLL 3-80 CGLL 3-80 CG | Jahal Jahal Jahal Jahal Jahal Jahal Jahal Jahal Jahal Jahal Jahal Jahal Jahal Jahal Jahal Jahal Jahal Jahal Jahal Jahal Jahal Jahal Jahal Jahal Jahal Jahal | ||
| 3601 K63 R.. 3601 K63 T.. | ### | ||
| (###) | |||
| 30 j### 30 | -### | ||
| 25 p 25 | -### | ||
| 120-5 p 120-5 | -### | ||
| j###/### 0,2± | j###/### 0,2± | (D/C) | |
| ±4° ±4° | ### | ||
| ### 4> | ### 4> | ### | |
| ### 2000 | ### 2000 | ### | |
| % 90 | % 90 | ### | |
| 2E) | 2E) | ### | |
| 2 | 2 | ### | |
| ### 540-500.### 10> | ### 650-630.### 10> | ### | |
| 10 | 10 | C6 | |
| (a) ### 10×50 | (a) ### 10×50 | ### | |
| 1/10000 | 1/10000 | ### | |
| ### | |||
| ### 23 | ### 23 | ### | |
| ### 10 | ### 10 | ### | |
| LR 7 | LR 7 g LR 6 | ### | |
| ### 5/8,### 1/4 | ### 5/8,### 1/4 | ### | |
| ### | |||
| ### 12 | ### 12 | ### | |
| LR6 (AA) | LR6 (AA) | ### | |
| ### 1,5×4 | ### 1,5×4 | ### | |
| ### 2032 | ### 3 p 10 p 10 p 10 p 10 p 10 p 10 p 10 p 10 p 10 p 10 p 10 p 10 p 10 p 10 p 10 p 10 p 10 p 10 p 10 p 10 p 10 p 10 p 10 p 10 p 10 p 11 p 11 p 11 p 11 p 11 p 11 p 11 p 11 p 11 p 11 p 11 p 11 p 11 p 11 p 11 p 11 p 11 p 11 p 11 p 11 p 11 p 11 p 11 p 11 p 11 p 12 p 12 p 12 p 12 p 12 p 12 p 12 p 12 p 12 p 12 p 12 p 12 p 12 p 12 p 12 p 12 p 12 p 12 p 12 p 12 p 12 p 12 p 12 p 12 p 12 p 11 p 11 p 11 p 11 p 11 p 11 p 11 p 11 p 11 p 11 p 11 p 11 p 11 p 11 p 11 p 11 p 11 p 11 p 11 p 11 p 11 p 11 p 11 p 11 p 10 p 10 p 10 p 10 p 10 p 10 p 10 p 10 p 10 p 10 p 10 p 10 p 10 p 10 p 10 p 10 p 10 p 10 p 10 p 10 p 10 p 10 p 10 p 10 p 12 p 12 p 12 p 12 p 12 p 12 p 12 p 12 p 12 p 12 p 12 p 12 p 12 p 12 p 12 p 12 p 12 p 12 p 12 p 12 p 12 p 12 p 12 p 12 p 10 p 10 p 10 p 10 p 10 p 10 p 10 p 10 p 10 p 10 p 10 p 10 p 10 p 10 p 10 p 10 p 10 p 10 p 10 p 10 p 10 p 10 p 10 p 10 p 1 | ||
| ### | |||
| ### 6 | ### 8 | ### | |
| ### 4 | ### 6 | ### | |
| Bluetooth® | |||
298|
| GLL 3-80 CGLL 3-80 CG | الجعault | |
| Bluetooth® 4.0 (Low Energy)G | Bluetooth® 4.0 (Low Energy)G | -الجعault |
| H μö 30 | H μö 30 | -الجعault |
| jürgen 2480-2402 | jürgen 2480-2402 | -الجعault |
| b1g l.l.l.l> | b1g l.l.l.l> | -الجعault |
| Bluetooth® رززالداللانيال | ||
| Bluetooth® 4.0 (Low Energy)G | Bluetooth® 4.0 (Low Energy)G | -الجعault |
| (الجعault)6 رززالداللانيال | (الجعault)6 رززالداللانيال | -الجعault |
| )الجعault(g) iOS 11 | )الجعault(g) iOS 11 | -الجعault |
| EPTA-Procedure 01:2014 مصحيى | ||
| p≤0,90 | p≤0,90 | معربيالسلام |
| p≤0,86 | p≤0,86 | معربيالسلام |
| p≥148×84×162 | p≥148×84×162 | السلام |
| (العربية × الحرفية × الحرفية) | ||
| (الإستعمال وشرmination)(الإستعمال) IP54 | (الإستعمال وشرmination)(الإستعمال) IP54 | "الإستعمال"السلام |
| \( p^{\circ}35+ \ldots p^{\circ}0 \) | \( p^{\circ}35+ \ldots p^{\circ}0 \) | السلام |
| \( p^{\circ}40+ \ldots p^{\circ}10- \) | \( p^{\circ}40+ \ldots p^{\circ}10- \) | السلام |
| \( p^{\circ}70+ \ldots p^{\circ}20- \) | \( p^{\circ}70+ \ldots p^{\circ}20- \) | السلام |
| GBA 12V...(aclw 4,0 ≤ GBA 12V |sc lo) | GBA 12V...(aclw 4,0 ≤ GBA 12V |sc lo) | السلام |
| GAL 12...(GAX 18...) | GAL 12...(GAX 18...) | السلام |
.(a)aaii:
25-20 8jdauiic (B
aagglgblalllbla C
gds jgljdl lss (a) aaiia g gl aabab abaaal 1g jgssall ggsall gaaal baa (D
jai k 8.6s sll a jll l
Jauy i jy 8.6s 8.6s 8.6s 8.6s 8.6s 8.6s 8.6s 8.6s 8.6s 8.6s 8.6s 8.6s 8.6s 8.6s 8.6s 8.6s 8.6s 8.6s 8.6s 8.6s 8.6S 8.6S 8.6S 8.6S 8.6S 8.6S 8.6S 8.6S 8.6S 8.6S 8.6S 8.6S 8.6S 8.6S 8.6S 8.6S 8.6S 8.6S 8.6S 8.6S 8.6
oJgai Jg.1Lgbgaw 1aI aI yagaaia Iw wai Ibi) IaI ciiu Iq qal (301 aai, "wai Ioo
JooaIuSag,labxI sG aJU Wdag Jlaq] .0yduu
g
eai a 10000000000000000000000000000000000000000000000000000000000000000000000000000000
eaw u jbi a gg 2g uul
Jusuui liao jua uai osc lab Jyj
uuu lao Si .Off gll (16)lablg 2aill oag
.qlasaii jwai i o 6abig a
jllg l jlgl 14
jla jla jgl sic labl p
paag aag 40 la gaaal ll
aall wll osc wai .liill jll
sic agw olc n kog yll
o jla no wall ooc jla d wol
o wol qagaaall gwlll
bay jll bgs
kuiuigk lqilss uao wll
kuiuigk lqilss uao wll (ESD) dyll
woill qub cll lllwle) wll
oall qy (agbl alnsio abaa ay
aliably all o ma pa. kloggi
alably all o ma pa. kloggi
UJUJI UJUJIUU
00do1dawjg2g gno wal.
4acg pssuW
(11)UJUJUJIULUJUJUJIULUJUJIULUJUJIULUJUJIULUJUJIULUJUJIULUJUJIULUJUJIULUJUJIULUJUJIULUJUJIULUJUJIULUJUJIULUJUJIULUJUJIULUJUJIULUJUJIULUJUJIULUJUJIULUJUJIULUJUJI
12 111111111111111111111111111111111111111111111111111111111111111111
4ocic wuljll
j k jy jll. a y b o jai Jlssw i jai jai jai jai jai jai jai jai jai jai jai jai jai jai jai jai jai jai jai jai jai jai jai jai jai jai jai jai jai jai jai jai jai jai jai jai jai jai jai jai jai jai jai jai jai jai jai jai jai jai jali jali jali jali jali jali jali jali jali jali jali jali jali jali
jUJLg
(2)(20 1
LED
jai jiuwog%75-100
jol jaiu 9%35-75
jao jaiu w jg% 10-35
g 8-001
J 1
6w jaii yjll gaiyaiyaiyaiyaiyaiyaiyaiyaiyaiyaiyaiyaiyaiyaiyaiyaiyaiyaiyaiyaiyaiyaiyaiyaiyaiyaiyaiyaiyaiyaiyaiyaiyaiyaiyaiyaiyaiyaiyaiyaiyaiyaiyaiyaiyaiyaiyaiyaiyaiyai
Aagg (21) aaj yab oogj wll s
CAL guard aaggl acwll g jil njs
y. Uy bgs Jo yk jg L
Jl 0g l koll aayal ayall mui
Jl .JolkU ayall
B aq (22) aayal ayall Jola yaw
B aayal ayall aq (23) ayall ayall
Jl .Oy dy aayal ayall ay (21) ael
Aa lyb uall oal ocl yc y
ac u) ayall ayall Jola yc goll (Jk)
Jl .(Lcl yll ayall ayall ayall uyall y
Jl .yaill q (22) ayall ayall Jola y
Q y (23) ayall ayall uyall k
g jlg Jolsg yk ayall ayall Jola
Jl .Jl jg ayl jn ayall un
gwiil dJl
gull aJg
IcLgugagug aagai jIe wuall o
(32) 1gJU JUJU (25) JUJI
j j g wll 1d w
"On 11 (16)
guiXlgo gaiuui guiil qoi
J4±Jdaijglguillgblj
aegj jagwul alac guiu logjg
.4JJI JJJI Ibgaa
1e aisoo uuugogg auuul cils 13
wJll oxc g9g g jj jj jll
12 104
UgSi lo sic. gJw ELaIy Jogll JJIbgb
EaUw aWg oJw! Jauai dAoo aygall oJw
.
1
gjjawj jwJ
aill a gull laoa wai o sglg
aagjgJjLwJyCoggiuWg°4±
Jusuululgoljgljlll
.(j)oJLslogjIwJollBscIgWb
auii ysgao jg l gjll jll bgs
iagwul 0le 1aegyblal
.omega osc aolj qww 1b
gdiJiaJI JooJI
Jj jgjj Joo
JOng11(16)
jUU bgs jaoogg jguLL (4) Ug sll
auiuugjaiuw
aJ (jgSi JgSill 10011111111111111111
g waiol oxc elmo oikay. aag gio ayguill
oLg Lc gJ Usu JusggiUsu
gj jjjulgbgsalgiulbpoj alilo
Jusll qssy Lc gjg jy ooleio
abwlgjg jgsaill
"Bosch Levelling Remote App"
Bluethoht 1g jd
gjll llll jlll
aLwJaii jaiuJy Bluetooth auiu
gubill 1
"Bosch Levelling Remote App" (gubill)
joo jll ljj gjjll 1jji elss
gApple App Store) wlll l
.(Google Play Store
aojulpulululjuwaaallllogalall
WjB Bosch go Bluetooth
www.bosch-pt.com
jSBluetooth abwgl syjc sill sic
y
Jg JgLwsljSg g,glg j
(29) j山山 aai
(5)jllIcIbOaI,(Joooll aab Jfo
.1uU (6) u
sic oJjU jUU bgs aqg aJSo!
jUJUaunuugdJusll.Juaunll aJb Jssu
Iaal qjb u c laiuall aayb aayp
(5)(204
(6) Jauwall aJb uJy Gabiy
a0s jso 5u wuloll ooc uoljglp
glaI LwjglajBosch aJb
UulucuLd
wullloocdds150
aJU 0jgo Jolgc
J 1
a 2g1 jll l b a g wll a s lai s aai
do sdo jso yol wolall oocdolj oc
UgluU mjglai alla Bosch asju LssJ Uauac uol
J 1 1 1 1 1 1 1 1 1 1 1 1 1 1 1 1 1 1 1 1 1 1 1 1 1 1 1 1 1 1 1 1 1 1 1 1 1
agwog aul aulj Lg g algll j 00 uu wll aay jy wll ooc uu wuy uu wuy uuu wuy uuu wuy uuu wuy uuu wuy uuu wuy uuu wuy uuu wuy uuu wuy uuu wuy uuu wuy uuu wuy uuu wuy uuu wuy uuu wuy uuu wuy uuu wuy uuu wuy uuu wuy uuu wuy uuu wuy uuu wuy uuu wuy uuu wuy uuu wuy uuu wuy uUU WU
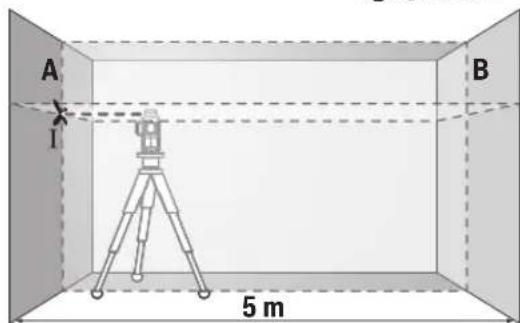
aai jaa q. gai b aai wai Jl Ijui Igba qiaai abai (1 abai)
Bluetooth®
Jbouj, jc Jyblu Bluetooth (J) JIJI BLoogl JSLu .Bluetooth (9) JJ Lc JJIU JLgAa aBooth
jgl jy jll sli! yiy g qai li sic ydall ygeiell alg .waiell oscg jaliil waiell oxcjiai iayi aaii lalqaoi ydiag yiqoic yle giall ygi. ayuill
Bluetooth® jwgo. lo sic pa sa Juskla ngS (8)
aJluuIbLbeothgabai jSj Jglg wai Iocn jgagll g aalgol SJIuublioggrkI uugwul Jgall Bteothgupo ooo
Bluetooth
blal 100
CAL guard 1JLJI J
cal guard 111111111111111111111111111111111111111111111111111111
-10a A 1
jlll jd 1b! cIg
[cal] puiu wul uai 10 gog a calg uall CAL guard oJau (3) guard
-1.aaai (jw 12 J5
-0jlaa jgjj
.
-()
(1)
Bosch Levelling Remote App" 120
.8aI aai I aai I aai I aai I aai I aai I aai I aai I aai I aai I aai I aai I aai I aai I aai I aai I aai I aai I aai I aai I aai I aai I aai I aai I aai I aai I aai I aai I aai I aai I aai I aai I aai I aai I cal guard (3)
1gijx|b
CAL guard (3) jaiy jaiy jaiy g bai s
Gao Aguuaabiaa aiai aiaia iiaia iiaia iiaia iiaia iiaia iiaia iiaia iiaia iiaia iiaia iiaia iiaia iiaia iiaia iiaia iiaia iiaia iiaia iiaia iiaia iiaia iiaia iiaia iiaia iiaia iiaia iiaia iiaia iiaia iiaia iiaia iiaia iiaia i
jll jll lll
(a,j)wulfoLgwlbuα(204.301 aoull,“wulfoLoo
JGgUGLuI JIJI 15JUL CAL guard (3) UaI Iabu
jjg(5)Jaaaall gggjLbc bdo1 3 3 aagll uai j Bluethoth9
.CAL guard (3) UJU Jabi. J2
302
jgSj wJwug.02= p/00,2x 10 Jd jg| jabaiJJ d gJal
15golJI bJI yguWJI 89
2.5 1 Jy y aai jiai w,aaai pui SJ .uill uilg no uil uLc (aui aoij Ulc)
Jolal yu) aagugag uiaa JyU 1
g wul ooc jwuy p. (jglal y
Ie gj jai ayguill aai yduil adb
ooc plai sogac jj lsgua a kuiy i
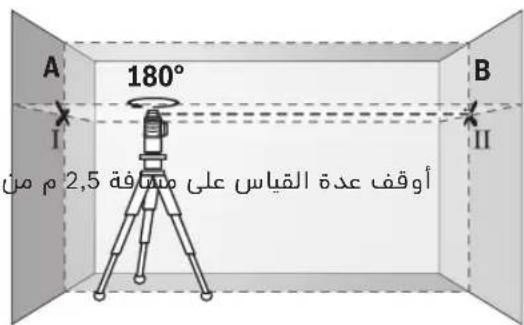
-aaig
abai jai g g wai ygwi B JaaJI JdJU Lc JJU (11 abai)
-ogai Iacg,aa
buiy gai Lcug,glu wu p9gBblU.
-oojJlL-JqJl
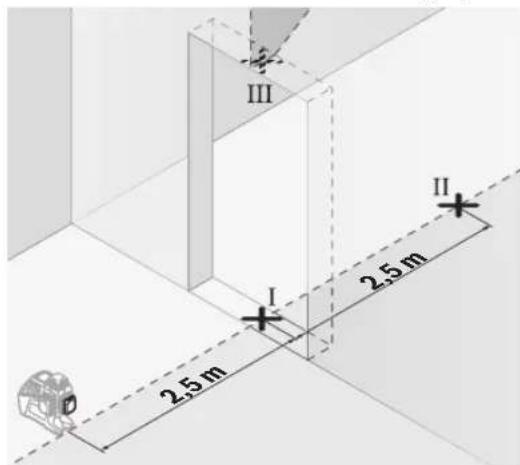
15 5 1g (I abai) aiai aai Ic lag (II abai) uai aiai jai. (III abai) uai aiai aggl

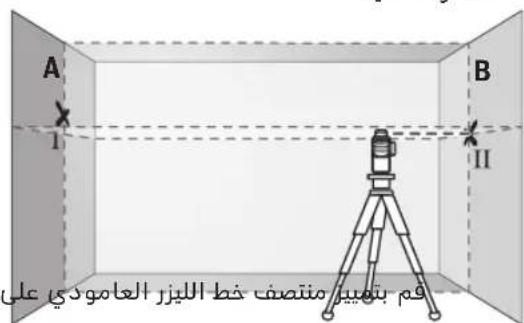
-()
sic lai lo g jg jg jilgal yjll iab abai abai (ogal jll lgl aai pig qw il abai ag B
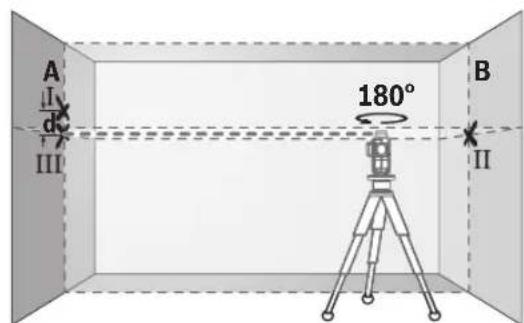
g.11 abaiI Ia 1u y uui aia jao jai
ba aag g li 1gwiBauy po aui o
i iibai Jn daaio juy y sgoJI jll
.aa 11 g
-111111111111111111111111111111111111
IV abaii ui yuiia
jullb juy A Jdall lc qingg j
lcs. ljuai g w jll aboill u c s golal
gblai abai juiy pag qwail yogai .(ll aboi) A Jdall lc jull b
-1cJnJalI I|gI
-ayglal aai ljc jlll baa cuao jauai p 0aagai IeaijI Ugl AJdA
-ⅣgⅢiabaiI j d qalI 1 wlaJI Uglai Ie y 10 = p5x2 wlaI aIwau L:agaaal
.1u| aai gla j uia
303
(gll)jj山aagjUJb
gai jui 1j g jui j
oaiu juii aag ojuaig. aLaa oJbIs
aui 2 i1 1, uao Jksw juiu Eaw uanaux
juu eau
aJlI I JJJU 0JbIs gJ maw aolll lalj jll ujjg jLbi pga J .Jgall oJdll JqI Ls,aaawaill gge aow J .JgJl Jau Jlc
(B-GJgJJIbJI)Joo
Lc wai ooc laaaw alal c j aubabail pgujll
aJg aJal
aillg ailll
wJl oJgIjLc Jla
Joo 10g Joll JwJol oXuJgWJ
- aBg aBaaabwglawgwl aWol aSgo gI cBbJ slgo p SAAU W JJJ 29a aig sic gBwll aolo bbl .uui uuiuuiu
Robert Bosch Morocco SARL
Jgssao jolal gJw,53 LlJI JI 20300
+212529314327:
sav.outillage@ma.bosch.com: JJI JJI
:aaJdJIuglic JsJdJI
www.bosch-pt.com/serviceaddresses
Jai
UjwLgogolpogulUgolpo gaa
gassjjglgawalwlaol alac jjgl gwaoudu kwwy sll wu wgi jai .jill uwllo lxc jlg wll oxc qiy gao
j0s0o0s0s0go jg sglwgj 1jg aia oio slgi Gdi a dgs
aui 5jL
Lol
<awjjjjl.
Bosch Levelling Remote App, jS 1u CcI Gai I J pAs S uu 1s Solj ng y. Cw o w p aJ CAL Jwai n Wn Wg Jw Jn Jw w Jw Jw Jw (3) guard
(3) CAL guard jwailoi jdu wu jui jwaioi g ujiis jj ci silo o wgj dai .gawolag
g 11111111111111111111111111111111111111111111111111111111111
jI jS jS jS oJl jI jI sI b a JI JdJI 1g jI g (c)al) Ia JI JI JI JI JI JI JI JI JI JI JI JI JI JI JI JI JI JI JI JI JI JI JI JI JI JI JI JI JI JI JI JI JI JI JI JI JI JI JI JI JI JI JI JI JI JI JI JI JI JI J
jJlJjI jiiS
Jucs josjissuolgc
gss.51sbslo slosj juiu 1j jgl gnsilgco xb a sla slos daii .sis
jI jU Loo uu uu uuuu uuuu uuuu uuuu uuuu uuuu uuuu uuuu uuuu uuuu uuuu uuuu uuuu uuuu uuuu uuuu uuuu uuuu uuuu uuuu uuuu uuuu uuuu uuuu uuuu uuuu uuuu uuuu uuuu uuuu uuuu uuuu uuuu uuuuu uuuu uuuu uuuu uuuu uuuu uuuu uuuu uuuu uuuu uuuu uuuu uuuu uuuu uuuu uuuu uuuu uuuu uuuu uuuu uuuu uuuu uuuu uuuu uu
0kws bgsj 1 jg jy jl jis JcL sJgi Jo (sW slqilS l, nslal silo) Eg jI jglgao a .sigw Ibs jg. SIs Uis I jji Cds Jg gai jbl bs jbi dJgaw SIs Uis Igac JJb Jj jI y jI yjoljI jI jI jI jI jI jI jI jI jI jI jI jI jI jI jI jI jI jI jI jI jI jI jI jI jI jI jI jI jI jI
jIbgbla sswjI jJ JUg S
g sily jg lJ
(16) wogla/ jw gJg JgJg JgJg C 0
JgJgJg. Sily "On" Cuaaggo J
logb g g u wj Jg Jg Jg (4) lg sU
Lo Saiaa duiu cmu L g sao U y
JJgue Sio logil jy Jg Jy Jg U L p
Jd ioljl jy jy Jy Jy Jy U g U .Sg W
Uo uoi gl (uod2, uo) uo uo uo uo uo uo uo uo uo uo uo uo uo uo uo uo uo uo uo uo uo uo uo uo uo uo uo uo uo uo uo uo uo uo uo uo uo uo uo uo uo uo uo uo uo uo uo uo uo uo uO
Uu ouag Gg a Ds
Cwlo ggs Jy W gS gJy Jy
"Bosch Levelling Remote App,"
BluethoB
Bluetooth
App) Solj y jui sloc j1 o laiwi 1j
Jn "Bosch Levelling Remote App,
Solju jlu jgs o w S u jilg
(SjLj (Apple App Store, Google Play Store)
.
Oj lbljI slpwww bW g o cblb! Bosch Jui Iaui jll Bluteoth
.Ss www.bosch-pt.com
Bluetooth dWg Ucblbl Jlaui Og
9 50 oJl jI jI joi Jy CwI koo
Bluetooth 日 日 日
jI jI C uu uu uuuu uuuu uuuu uuuu uuuu uuuu uuuu uuuu uuuu uuuu uuuu uuuu uuuu uuuu uuuu uuuu uuuu uuuu uuuu uuuu uuuu uuuu uuuu uuuu uuuu uuuu uuuu uuuu uuuu uuuu uuuu uuuu uuuu uuu uuuu uuuu uuuu uuuu uuuu uuuu uuuu uuuu uuuu uuuu uuuu uuuu uuuu uuuu uuuu uuuu uuuu uuuu uuuu uuuu uuuu uuuu uuuu uuuu uuuu uuuu uuuu uuuu uuuu uuuu uuuu uuuu uuuu uu
Jai Jai Jai Jai Jai Jai Jai Jai Jai Jai Jai Jai Jai Jai Jai Jai Jai Jai Jai Jai Jai Jai Jai Jai Jai Jai Jai Jai Jai Jai Jai Jai Jai Jai Jai Jai Jai Jai Jai Jai Jai Jai Jai Jai Jai Jai Jai Jai Jai Jai Jai
Bluetooth® nS S wgoa oJ jUuS uBluetooth uS S wgoa cJ JjUuS uJw g (9) Bluetooth aS sJg S uS S wgoa I J S uS oJsi
CAL guard pui j
jIg CAL guard pIi jS iJ S Ws dIg iS o Jii s Jsi
312|w

laa LsU 10gJolaw g Ugaw agj sIy JglgJwuy 10gJow
#
wJUJJWgBcK-UNUgUgUgUgUgUgUgUgUgUgUgUgUgUgUgUgUgUgUgUgUgUgUgUgUgUgUgUgUgUgUgUgUgUgUgUgUgUgUgUgUgUgUgUgUgUgUgUgUgUgU
:dua dJ J J J J J J J J W J W www.bosch-pt.com/serviceaddresses
olwos Jaa
JoljUgaw,0wduogj gjg jgl sUjL 1sgljOyJSL. SuiuSuiuSuiuSuiuSuiu Jusn uJusn jI oJaiu uJgdu Iu juiu .si
Copyright © 2012-2020 STMicroelectronics
All rights reserved.
Redistribution and use in source and binary forms, with or without modification, are permitted provided that the following conditions are met:
- Redistributions of source code must retain the above copyright notice, this list of conditions and the following disclaimer.
- Redistributions in binary form must reproduce the above copyright notice, this list of conditions and the following disclaimer in the documentation and/or other materials provided with the distribution.
Neither the name of STMicroelectronics nor the names of its contributors may be used to endorse or promote products derived from this software without specific prior written permission.
THIS SOFTWARE IS PROVIDED BY THE COPYRIGHT HOLDERS AND COLNTRIBUTORS "AS IS" AND ANY EXPRESS OR IMPLIED WARRANTY, INCLUDING, BUT NOT LIMITED TO, THE IMPLIED WARRANTYES OF MERCHANTABILITY AND FITNESS FOR A PARTICULAR PURPOSE ARE DISCLAIMED. IN NO EVENT SHALL THE COPYRIGHT OWNER OR COLNTRIBUTORS BE LIABLE FOR ANY DIRECT, INDIRECT, INCIDENTAL, SPECIAL, EXEMPLARY, OR CONSEQUENTIAL DAMAGES (INCLUDING, BUT NOT LIMITED TO, PROCUREMENT OF SUBSTITUTE GOODS OR SERVICES; LOSS OF USE, DATA, OR PROFITS; OR BUSINESS INTER-RUPTION) HOWEVER CAUSED AND ON ANY THEORY OF LIABILITY, WHETHER IN CONTRACT, STRICT LIABILITY, OR TORT (INCLUDING NEGLIGENCE OR OTHERWISE) ASING IN ANY WAY OUT OF THE USE OF THIS SOFTWARE, EVEN IF ADVISED OF THE POSSIBILITY OF SUCH DAMAGE.
#
1
| de | Hiermit erklart Robert Bosch Power Tools GmbH, dass der Funkanlage typ GLL 3-80 C/GLL 3-80 CG der Richtlinie 2014/53/EU entspricht. Der vollständige Text der EU-Konformitätserklärung ist unter der folgenden Internetadressee verfügbar: |
| en | Hereby, Robert Bosch Power Tools GmbH declares that the radio equipment type GLL 3-80 C/GLL 3-80 CG is in compliance with Directive 2014/53/EU. The full text of the EU declaration of conformity is available at the following internet address: |
| fr | Le sousigné, Robert Bosch Power Tools GmbH, déclare que l'équipment radioélectrique du type GLL 3-80 C/GLL 3-80 CG est conforme à la directive 2014/53/UE. Le texte complet de la déclaration UE de conformité est disponible à l'adresse internet suivante: |
| es | Por la presente, Robert Bosch Power Tools GmbH declares que el tipo de equipo radioélectrico GLL 3-80 C/GLL 3-80 CG es conforme con la Direiva 2014/53/UE. El textscomplet de la déclaration ue de conformidad está disponible en la dirección Internet suivente: |
| pt | A abaixa assinada Robert Bosch Power Tools GmbH declares que o presente tipo de equipamento de rádio GLL 3-80 C/GLL 3-80 CG está em conformidade com a Direiva 2014/53/UE. O texto integral da déclaration de conformidade está disponível no segunte endereço de Internet: |
| it | Il fabricante, Robert Bosch Power Tools GmbH, dichiara che il tipo di apparecchiatura radio GLL 3-80 C/GLL 3-80 CG é conforme alla direittiva 2014/53/UE. Il testo completeness della dichiarazione di conformità ue è disponibile al segmente indirizzo Internet: |
| nl | Hierbij verkaar ik, Robert Bosch Power Tools GmbH, dat het type radioapparatuur GLL 3-80 C/GLL 3-80 CG conform is met Richtlijn 2014/53/EU. De volledige tekst van de EU-conformiteitsverklaring kan worden geraadpleegd op het volgende internetadres: |
| da | Hermed erklasser Robert Bosch Power Tools GmbH, at radioudystyrstypen GLL 3-80 C/GLL 3-80 CG er i overensstemmelse med direktiv 2014/53/EU. EU-overensstemmelseserkräingens fulde tekst kan findes på følgende internetadresse: |
| sv | Härmed fösakrar Robert Bosch Power Tools GmbH attenna typ av radioutrustning GLL 3-80 C/GLL 3-80 CG overensstämmer med direktiv 2014/53/EU. Den fullständiga texten till EU-fösakran om overensstämmlse finns på foljande webbadress: |
| no | Robert Bosch Power Tools GmbH erklasser herved at radioustyrstypen GLL 3-80 C/GLL 3-80 CG er i overensstemmelse med direktivet 2014/53/EU. Den fullstandige teksten i EU-samsvarserkläeringen er tilgiengelig på følgende nettadresse: |
| fi | Robert Bosch Power Tools GmbH vakuuttaa,etta radiolaitetyppi GLL 3-80 C/GLL 3-80 CG on direktiavin 2014/53/EU mukainen. EU-vaatimustemmukaisuusvakuutuksen täysmittainen teksti on saatavilla seuraavassa internetosoitteessa: |
| el | Me tvn napouca o/n Robert Bosch Power Tools GmbH, δηλωνει οτιοράσεξαπιμός GLL 3-80 C/GLL 3-80 CG πλροι tvn obnyia 2014/53/EE. To πλήρες κειμένο της δηλωνός συμύρφωσε EE διαίθεται στην ακόλουθη στοσελίδα στο διαβίκτο: |
| tr | Robert Bosch Power Tools GmbH, GLL 3-80 C/GLL 3-80 CG radyo ekipmani tipinidirektif 2014/53/EU ile uyumlu oldugunu banyan eder. AB uygunluk banyanin tam metnine asagidaki internet adresinden ulasabilirsiniz: |
| pl | Robert Bosch Power Tools GmbH ninejsym oswiadzca, ze typ urzadzenia radiowego GLL 3-80 C/GLL 3-80 CG jest zgodny z dyrektywja 2014/53/UE. Pelny tekst deklaraci zgodnosci ue jest dostepny pod nastepujacym adresem internetowym: |
| cs | Tínto Robert Bosch Power Tools GmbH prohlaseje, ze typ rádioveho zaflizeni GLL 3-80 C/GLL 3-80 CG je v souladuseme směrnici 2014/53/EU. Üplné zněni EU prohlaseni o shodé je k dispozici na tefo internetové adrese: |
| sk | Robert Bosch Power Tools GmbH týmto vyhlasuje, ze rádiove zariadenie typu GLL 3-80 C/GLL 3-80 CG je v sulade so smernicou 2014/53/EU. Üplné EU vyhlasenie o zhode je k dispozicii na tejto internetovej adrese: |
| hu | Robert Bosch Power Tools GmbH igazolja, hogy a GLL 3-80 C/GLL 3-80 CG típusu rádioberendezés megfelela 2014/53/Irányelnek. Az EU-megfelelo ségi nyilatkozat teljes szövege elérhetó a kõvetkežo internetes cîmen: |
| ru | Сим Robert Bosch Power Tools GmbH záraßnej, чу радиоборudованип Ттуна GLL 3-80 C/GLL 3-80 CG cootbetCTbyeДирektivze 2014/53/EU. С пелнымTekстом декларцио COOTBETCTBи EU можно ознakомпься по сеюшему Итерnet-a-dpresу: |
| uk | Сим Robert Bosch Power Tools GmbH záraßnej, чу радиobладаннь Ттуна GLL 3-80 C/GLL 3-80 CG Biindobidae Дирektivze 2014/53/EU. 3 navnomTekstomanдекларци вдповдости EU можна ознakомпься за takочи Interpnet-a-dpresoco: |
| II | |
| kk | Осыmens Robert Bosch Power Tools GmbH Kompanhiers GmbH 3-80 C/GLL 3-80 CG Tjurin deri radio jazbiktardbi 2014/53/EU Д配电иьсын сальыгш мafлUMды. EO саджостik мafлUMдамасы Тeme徴и INTEPnet Mekeнжайда калжетимdi: |
| ro | Prin prezenta, Robert Bosch Power Tools GmbH declară că tipul de echipamente radio GLL 3-80 C/GLL 3-80 CG este în conformitate cu Direcva 2014/53/UE. Textul integral al declarației UE de conformitate este disponibil la următoarea adresă internet: |
| bg | С насточто Robert Bosch Power Tools GmbH Д配电иьа 2014/53/EC. РадocTHЯТTekCT ha EC Д配电иьота за сбответбе Mayo da se habero Na садпюй INTEPnet adpec: |
| mk | С ова, Robert Bosch Power Tools GmbH почртура, чу този ти п радиосьорьени GLL 3-80 C/GLL 3-80 CG e bo coласноct со Д配电иьота 2014/53/EU. ZeioschnotTekCT ha Изавата за coobpaцноct ha EU maye da ro npochitate Ha садпава INTEPnet CTpansuca: |
| sr | Ovim Robert Bosch Power Tools GmbH izjavljupe da je radio-oprema tipa GLL 3-80 C/GLL 3-80 CG u skladu sa direktivom 2014/53/EU. Kompletan tekst EC izjave o usaglaşeniosti je dostupan na sledecoj veb-adresi: |
| sl | Robert Bosch Power Tools GmbH potrjuje, da je tip radijske opreme GLL 3-80 C/GLL 3-80 CG sk laden z Direktivo 2014/53/EU. Celotno besedilo izjave EU o skladnosti je na voljo na naslednjem spltenem naslovu: |
| hr | Robert Bosch Power Tools GmbH ovime izjavljupe da je radijska opreme tipa GLL 3-80 C/GLL 3-80 CG u skladu s Direktivom 2014/53/EU. Cjeloviti tekst EU izjave o sukladnosti dostupan je na sljedecoj internetskoj adresi: |
| et | Käesolevaga deklareerib Robert Bosch Power Tools GmbH, et käesolev raadioseadme tüpp GLL 3-80 C/GLL 3-80 CG sk laden z Direktivo 2014/53/EL nouetele. ELi vastavusdeklaratsioni täielik tekst on kattesaadamav jargmisel internetaadressil: |
| lv | Ar so Robert Bosch Power Tools GmbH deklare, ka radioiekârta GLL 3-80 C/GLL 3-80 CG atbilst Direktivai 2014/53/ES. Pilns ES atbilstibas deklaracijas teksts ir pieejams šādā interneta vietne: |
| lt | Aš, Robert Bosch Power Tools GmbH, patvirtinu, kad radipo jrenginiç tipas GLL 3-80 C/GLL 3-80 CG atitinka Direktvyá 2014/53/ES. Visas ES atitikties deklaracijos tekstas prieinamas šiuo interneto adresu: |
| → http://eu-doc.bosch.com/ | |
Declaration of Conformity
Hereby, Robert Bosch Limited as authorised representative acting on behalf of Robert Bosch Power Tools GmbH declares that the radio equipment type GLL 3-80 C/GLL 3-80 CG is in compliance with the Radio Equipment Regulations 2017. The full text of the declaration of conformity is available at the following internet address:
-
https://gb-doc.bosch.com