
WRT1200AC - Router LINKSYS - Free user manual and instructions
Find the device manual for free WRT1200AC LINKSYS in PDF.
| Product type | Dual-band wireless Gigabit router |
| Brand | Linksys |
| Model | WRT1200AC |
| Dimensions (without antennas) | 246 x 194 x 52 mm |
| Weight | 833 g |
| Power supply | Power adapter 12V, 2.5A |
| Switch speed | 10/100/1000 Mbit/s (Gigabit Ethernet) |
| Frequency bands | 2.4 GHz and 5 GHz |
| Antennas | 2 adjustable external antennas (RP-SMA) |
| Ports | 1x USB 3.0, 1x USB 2.0/eSATA, 1x Internet (Gigabit), 4x Ethernet (Gigabit) |
| Buttons | Reset, Wi-Fi Protected Setup, power on/off |
| Indicators | Power, Internet, 2.4 GHz, 5 GHz, eSATA, USB1, USB2, Ethernet 1-4, WPS |
| Wireless security | WEP, WPA, WPA2, RADIUS (encryption up to 128-bit) |
| Supported file systems | FAT, NTFS, HFS+ |
| Compatible browsers | Internet Explorer 8+, Firefox 4+, Google Chrome 10+, Safari 4+ |
| Operating temperature | 0 to 40 °C |
| Storage temperature | -20 to 60 °C |
| Operating humidity | 10 to 80% RH non-condensing |
| Storage humidity | 5 to 90% RH non-condensing |
| Certifications | FCC, IC, CE, Wi-Fi a/b/g/n/ac, Windows 7/8, DLNA |
| Software features | Parental controls, guest access, media prioritization, media server, shared USB storage, FTP, VPN, firewall |
| Wall mounting | Possible (template provided, screws not included) |
| Care and cleaning | Unplug before cleaning. Use a dry, soft cloth for surfaces. Do not block ventilation openings. |
Frequently Asked Questions - WRT1200AC LINKSYS
User questions about WRT1200AC LINKSYS
0 question about this device. Answer the ones you know or ask your own.
Ask a new question about this device
Download the instructions for your Router in PDF format for free! Find your manual WRT1200AC - LINKSYS and take your electronic device back in hand. On this page are published all the documents necessary for the use of your device. WRT1200AC by LINKSYS.
USER MANUAL WRT1200AC LINKSYS
5 Where to Find More Help
5 How to Install Your Router
HOW TO USE LINKSYS SMART WI-FI
6 How to Connect to Linksys Smart Wi-Fi
6 How to Change Router Settings
TROUBLESHOOTING
10 Your router was not successfully set up
11 Your Internet cable is not plugged in message
11 Cannot access your router message
SPECIFICATIONS
13 Linksys WRT1200AC
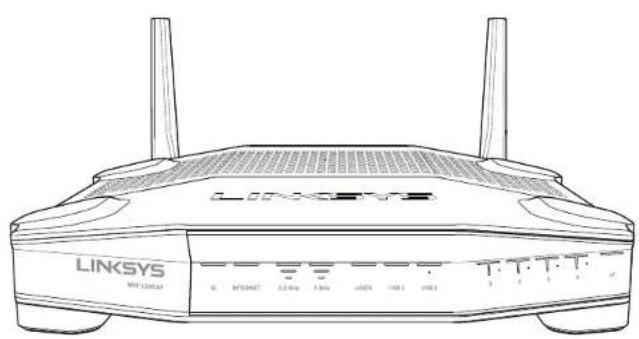
Product Overview
WRT1200AC
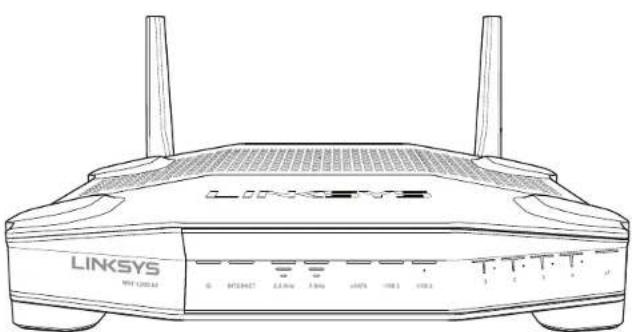
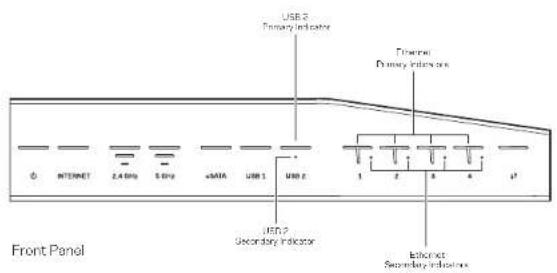
Front View
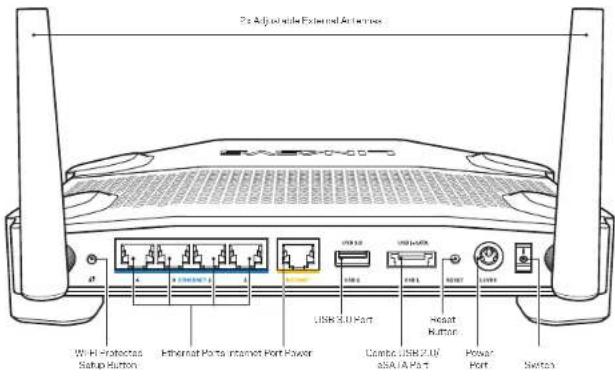
FRONT PANEL INDICATORS
(1)
(White) The power LED is solid white while the router is powered on. It will blink when the router goes through its self-diagnostic mode during every boot-up.
Internet
(White/Amber) The Internet LED is solid white when connected to the Internet. It blinks white while the router works to establish a connection. A solid amber LED indicates the connection is down due to configuration issues. Amber blinking indicates that the connection is down due to hardware issues.
2.4 GHz
(White) The Wireless LED is solid white when one or more clients are connected to the 2.4 GHz network. If the LED is blinking white, the router is sending or receiving data over the 2.4 GHz network.
5GHz
(White) The Wireless LED is solid white when one or more clients are connected to the 5GHz network. If the LED is blinking white, the router is sending or receiving data over the 5 GHz network.
eSATA
(White) When off, the USB/eSATA port is off or a USB device is connected. The LED is solid white when an eSATA device is connected. A blinking white LED indicates activity through the eSATA port.
USB1
(White) When off, the USB /eSATA port is off or an eSATA device is connected. The LED is solid white when a USB device is connected. A blinking white LED indicates activity on the port.
USB2 Primary
(White) When off, the USB 3.0 port is off. The LED is solid white when a USB device is connected. A blinking white indicates activity on the port.
USB2 Secondary
(White) When off, a USB 1.0 or USB 2.0 device is connected. A solid white LED indicates a USB 3.0 device is connected.
ETHERNET1thru4(Primary)
(White) These numbered LEDs correspond with the numbered ports on the router's back panel. If the white LED is solid, the router is connected to a device through that port. A flashing white LED indicates network activity over that port.
Product Overview
ETHERNET1 thru 4 (Secondary)
(White) If the white LED is off, the router is successfully connected to a device through that port at 10/100 Mbps. A solid white LED indicates that the router is successfully connected to a device at 1000 Mbps.
#
(White/Amber) The LED blinks slowly for up to two minutes during Wi-Fi Protected Setup. It will be solid white for five seconds to indicate a successful connection. The LED blinks amber if the Wi-Fi Protected Setup process fails. Make sure the client device supports Wi-Fi Protected Setup. Wait until the LED is off, and then try again. The router supports one session at a time.
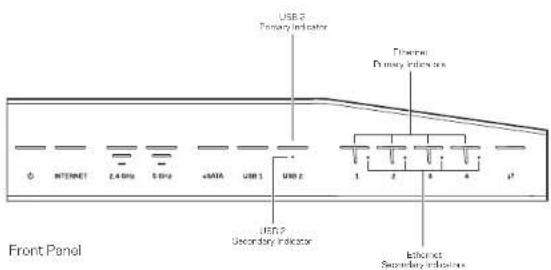
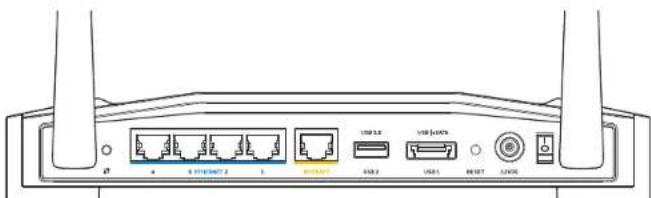
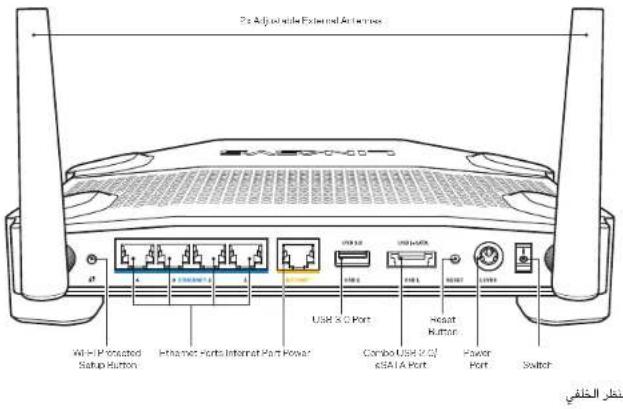
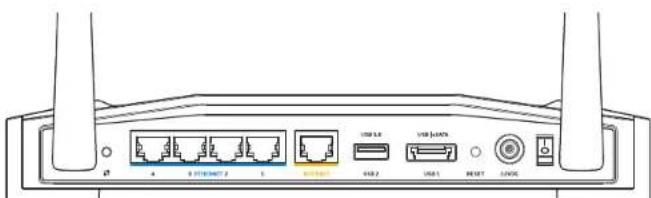
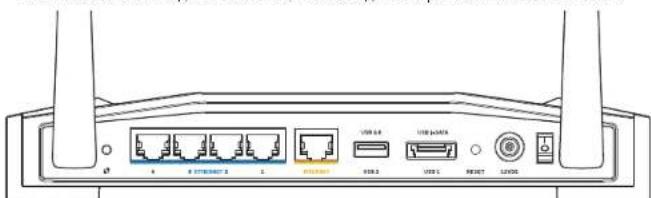
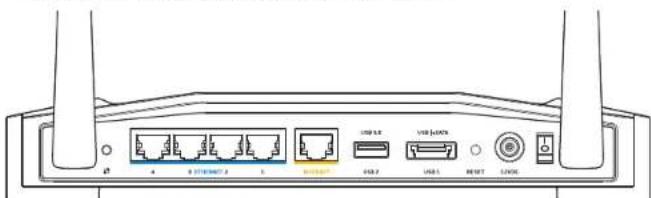
Back View
Adjustable External Antennas
This router ships with two adjustable external antennas that should be connected to the router before powering it on. To connect the antennas, twist the antenna connector clockwise onto the antenna port on the router.
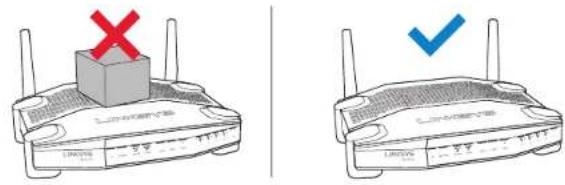
Note:
For best performance, position the side antennas vertically as shown in the picture.
Wi-Fi Protected Setup button
Press to easily configure wireless security on Wi-Fi Protected Setup-enabled network devices.
Ethernet Ports
Connect Ethernet cables to these blue gigabit (10/ 100/ 1000) ports, and to wired devices on your network.
Note:
For best performance, use CAT5e or higher rated cables on the Ethernet ports.
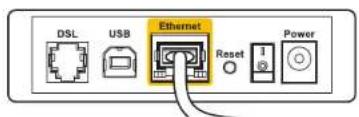
Internet Port
Connect an Ethernet cable to this yellow gigabit (10/100/1000) port, and to a broadband Internet cableDSL or fiber modem.
Note:
For best performance, use CAT5a or higher rated cables on the Ethernet ports.
USB 3.0 Port
Connect and share a USB or eSATA drive on your network or on the Internet.
USB 2.0/eSATA Combo Port
Connect and share a USB or eSATA drive on your network or on the Internet. You can also connect a USB printer and share it across your network.
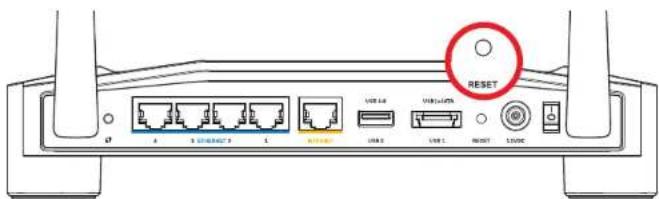
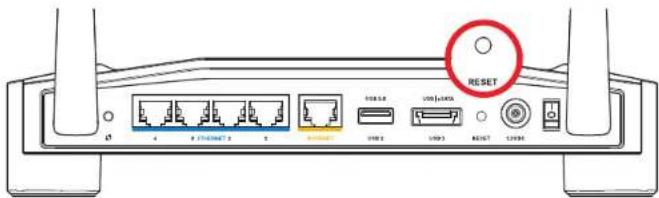
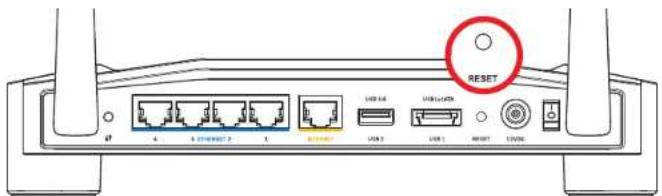
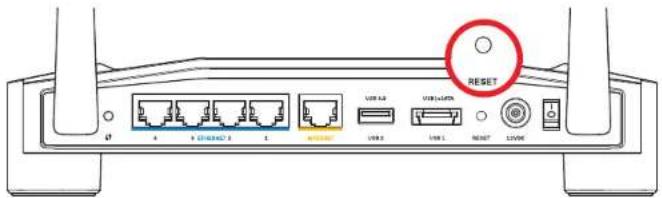
Reset Button
Press and hold for 10 seconds (until the power LED starts flashing) to reset the router to factory settings. You can also restore the factory settings using Linksys Smart Wi-Fi on the Internet or mobile app.
Power Port
Connect the included AC power adapter.
Power Button
Press to turn on the router.
Product Overview
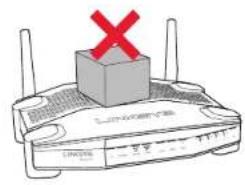
Avoid Overheating

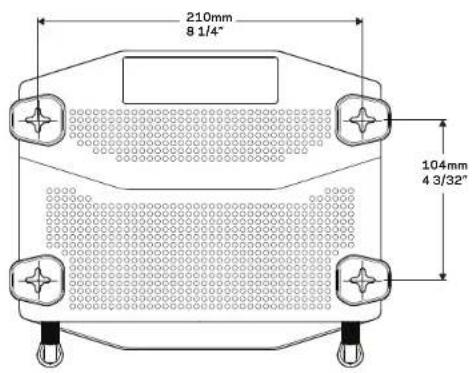
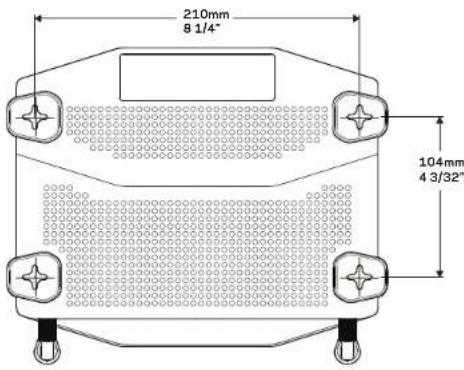
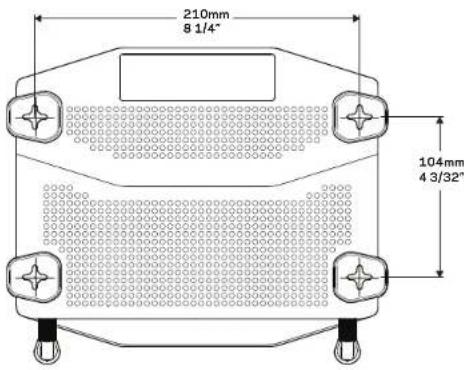
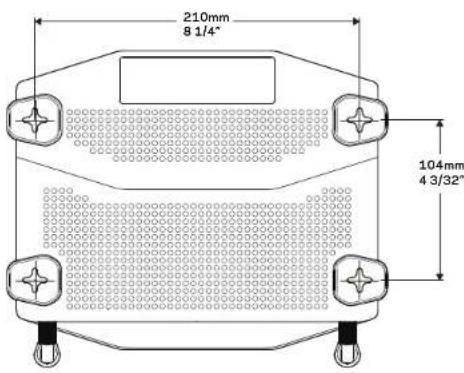
Wall-Mounting Placement
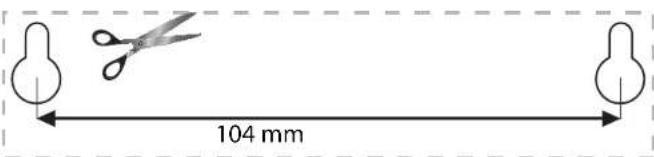
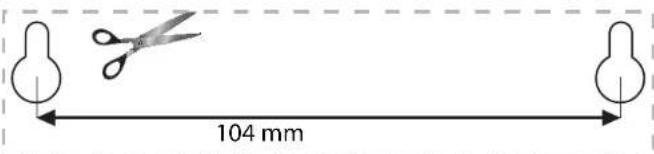
The router has wall-mount slots on the bottom of each foot for flexibility in mounting the router on the wall. The distance between the slots on the short side is 104 mm. The distance between the slots on the longer side is 210 mm. Two screws are needed to mount the router.
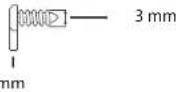
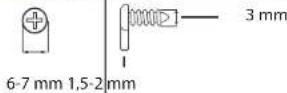
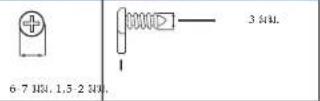
Suggested Mounting Hardware
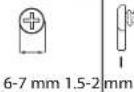
Note:
Linksys is not responsible for damages incurred by unsecured wall-mounting hardware.
Mounting Instructions
- Determine where you want to mount the router and which side you should use to mount it. Make sure that the wall you use is smooth, flat, dry, and sturdy. Make sure the location is within reach of an electrical outlet.
- Before drilling holes, choose the template (short side or long side) that fits your installation. Drill the holes using the correct template.
- Insert a screw into each hole and leave 4 mm of its head exposed.
- Position the router so the wall-mount slots line up with the two screws.
- Place the wall-mount slots over the screws and slide the router down until the screws fit snugly into the wall-mount slots.
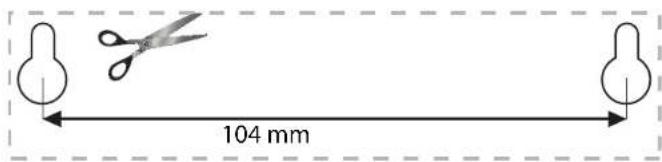
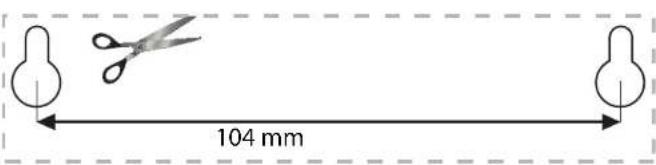
Wall-Mounting Template (Short Side)
Print this page at 100% size.
Cut along the dotted line, and place on the wall to ensure precise spacing of holes.
Product Overview
Wall-Mounting Template (Long Side)
Print this page at 100% size.
Cut along the dotted line, and place on the wall to ensure precise spacing of holes.

Setting Up Your Router
WHERE TO FIND MORE HELP
- Linksys.com/support/WRT1200AC (documentation, downloads, FAQs, technical support, live chat, forums)
- Linksys Smart Wi-Fi help (connect to Linksys Smart Wi-Fi, then click Help at the top of the screen)
HOW TO INSTALL YOUR ROUTER
To Install Your Router:
- If replacing an existing router, disconnect it.
- Connect the antennas and power on your new router.
- Power cycle your modem
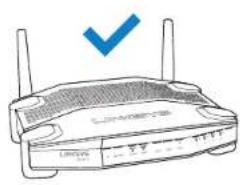
- Connect the Internet cable from your modem to the yellow Internet port on your router. Wait until the power light on the front of the router is solid.
- Connect to the secure wireless network name shown in the Quick Start Guide that came with your router. (You can change the network name and password later.) If you need help connecting to the network, refer to your device documentation. Note: You will not have Internet access until router setup is complete.
- Open a web browser and follow the instructions to complete setup. If instructions do not appear in the web browser, enter linksyssmartwifi.com in the address bar.
- At the end of setup, follow the on-screen instructions to set up your Linksys Smart Wi-Fi account. Use Linksys Smart Wi-Fi to configure your router from any computer with an Internet connection.
Manage Your Router's Settings:
- Change your router's name and password
- Set up guest access
- Configure parental controls
- Connect devices to your network
Test your Internet connection speed
Note:
As part of Linksys Smart Wi-Fi account setup, you will be sent a verification e-mail.
Make sure that you open the e-mail and click the provided link.
How to Use Linksys Smart Wi-Fi
HOW TO CONNECT TO LINKSYS SMART WI-FI
To Open Linksys Smart Wi-Fi:
- Visit linksyssmartwifi.com or myrouter.local (if not online) with a web browser.
- Enter the email address and password you set up earlier, and click Log in.
HOW TO CHANGE ROUTER SETTINGS
Note:
For additional help on any menu, click Help at the top of the screen.
- Log into your Linksys Smart Wi-Fi account by visiting linksyssmartwifi.com or myrouter.local (if not online) with a web browser.
- In the menu on the left, click an option.
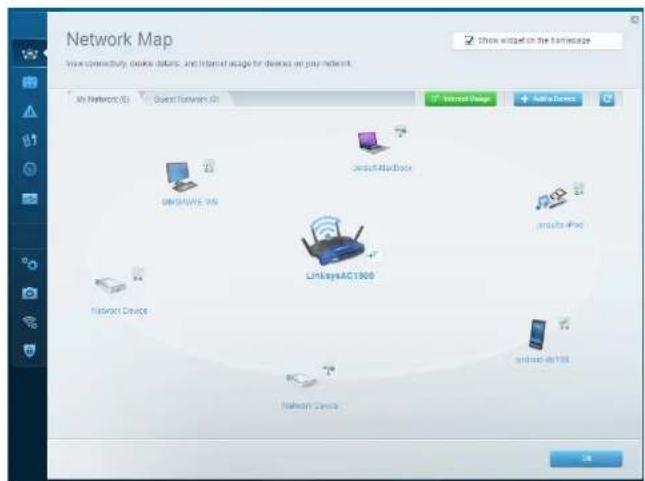
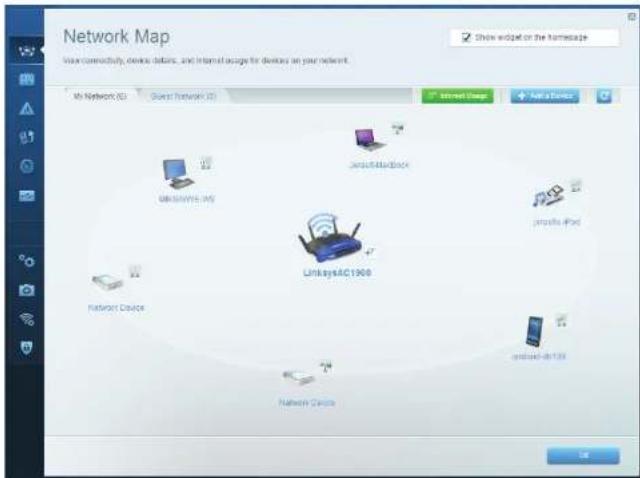
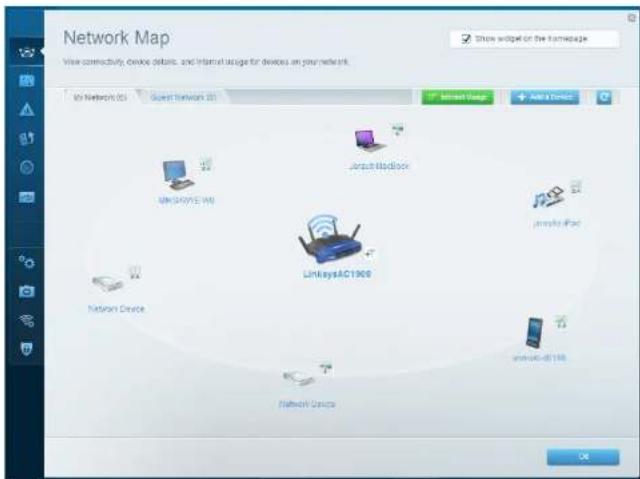
NetworkMap—Lets you display and manage all network devices connected to your router. You can view devices on your main network and your guest network, disconnect devices, or display information about each device.

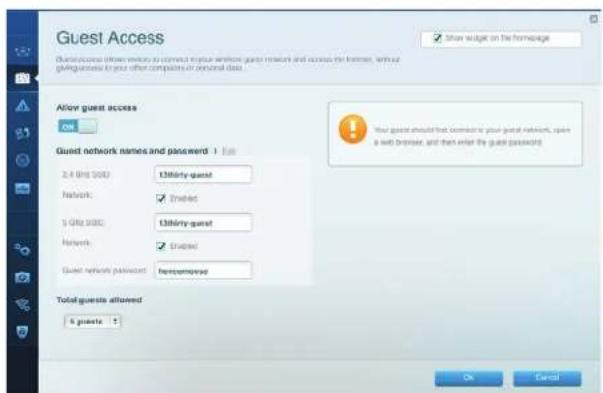
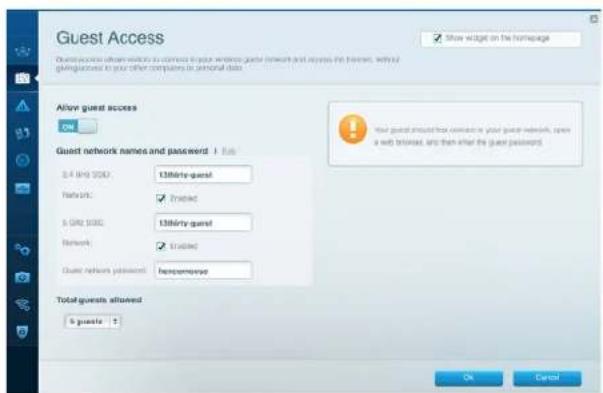
GuestAccess - Lets you configure and monitor a network that guests can use without accessing all of your network resources.
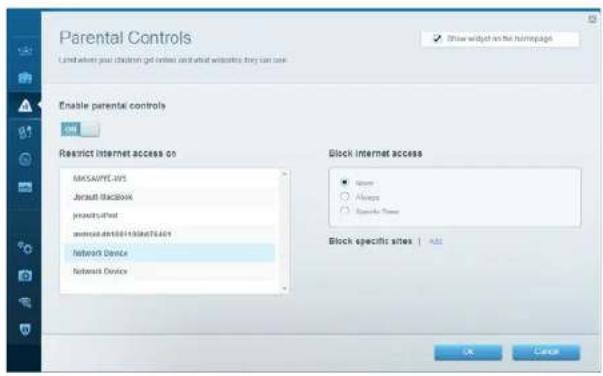
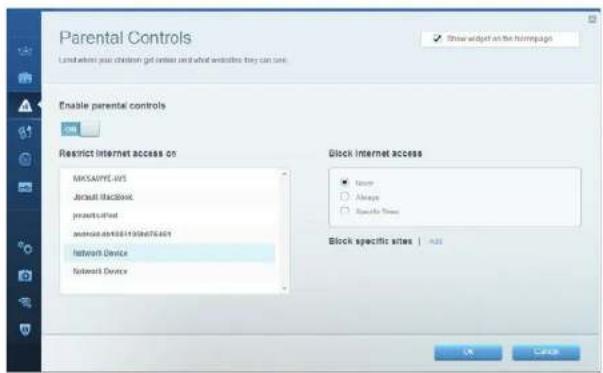
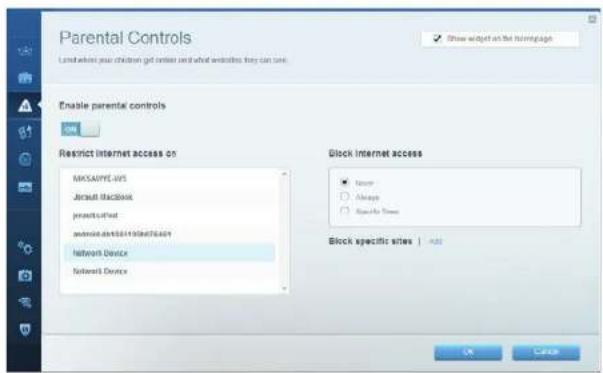
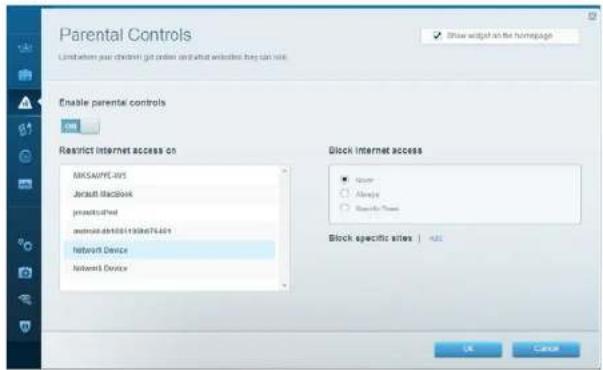
ParentalControls—Lets you block web sites and set Internet access times.
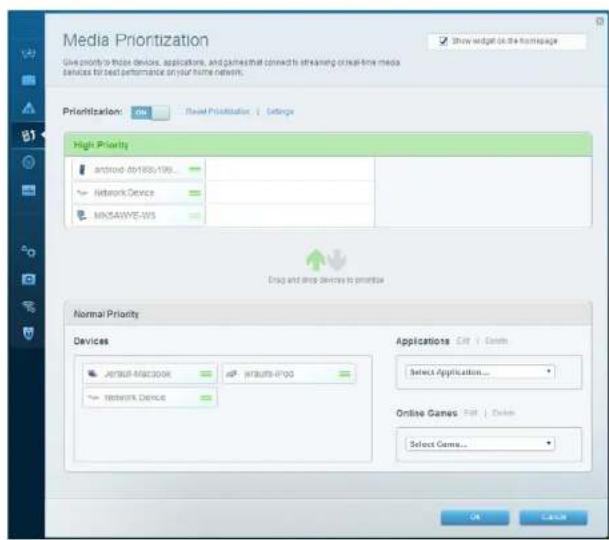
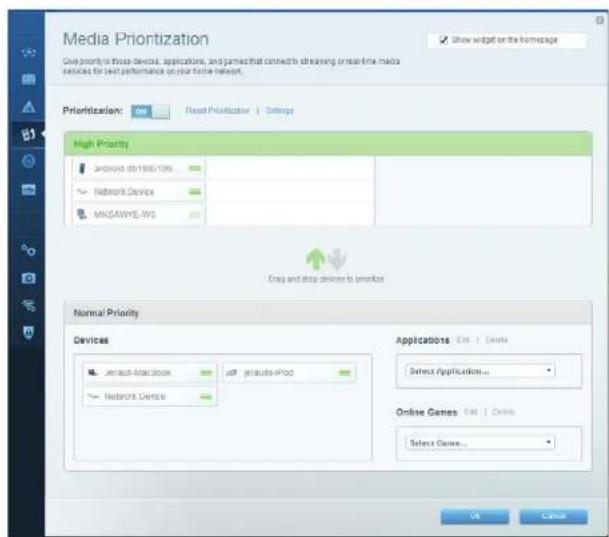
Media Prioritization - Lets you set which devices and applications have top priority for your network traffic.
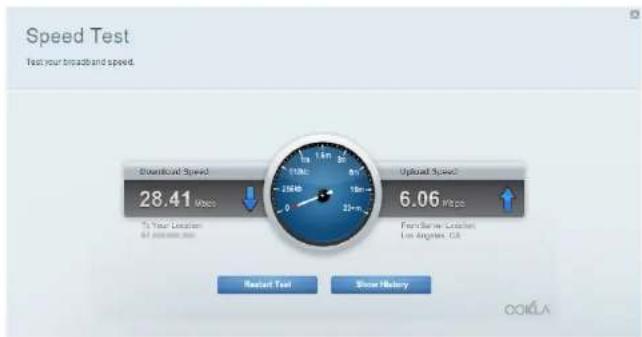
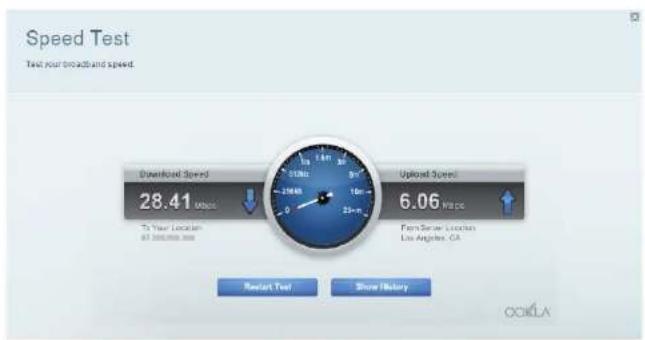
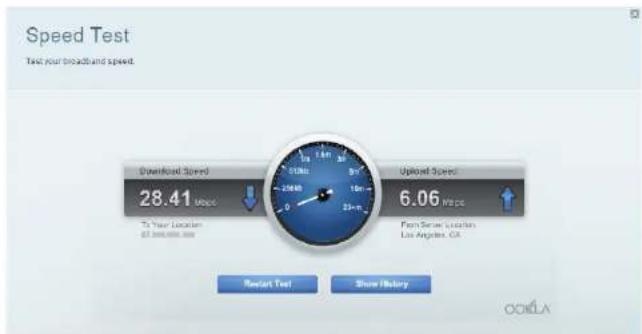
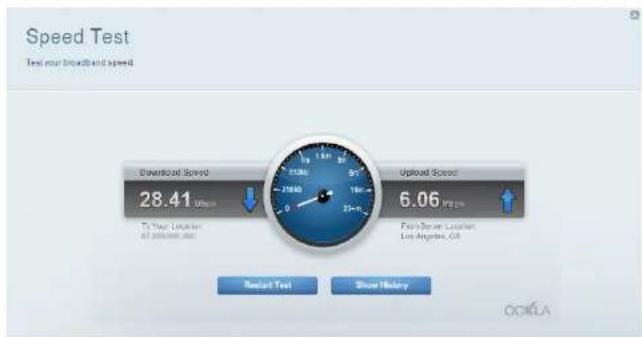
Speed Test - Lets you test your network's Internet connection speed.
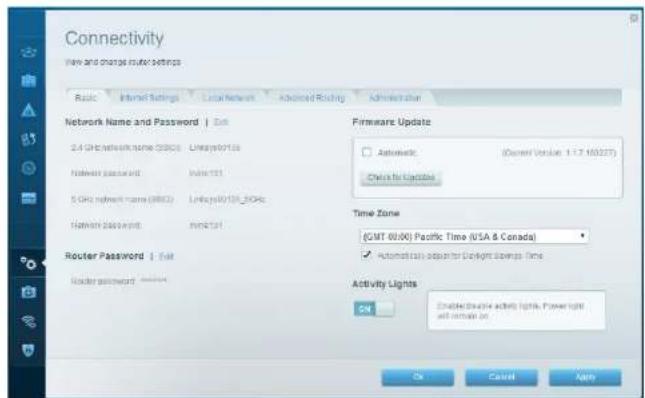
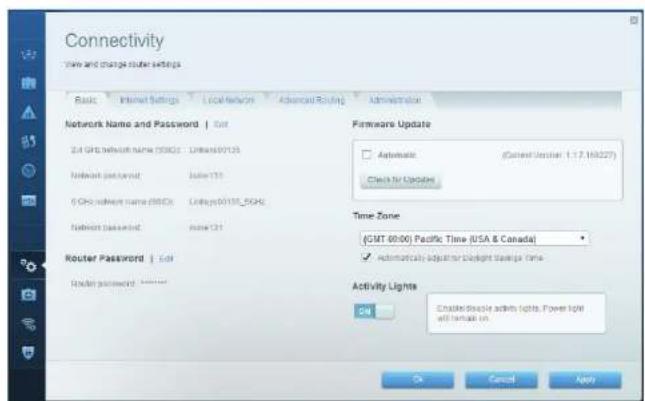
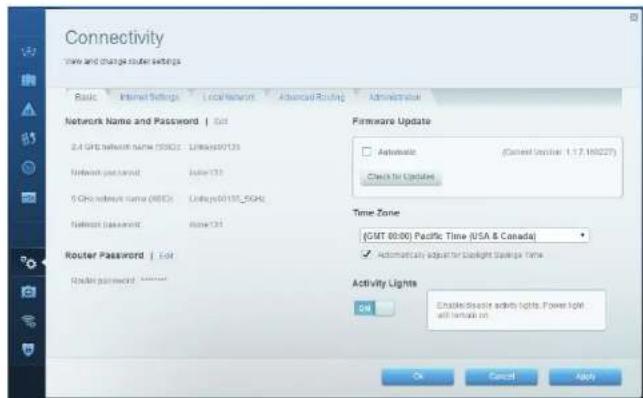
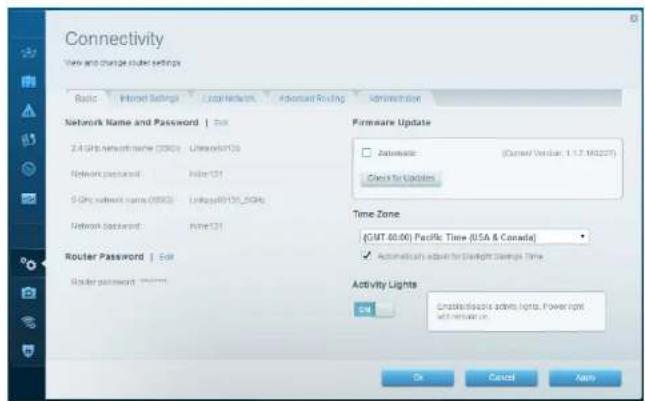
Connectivity - Lets you configure basic and advanced network settings.
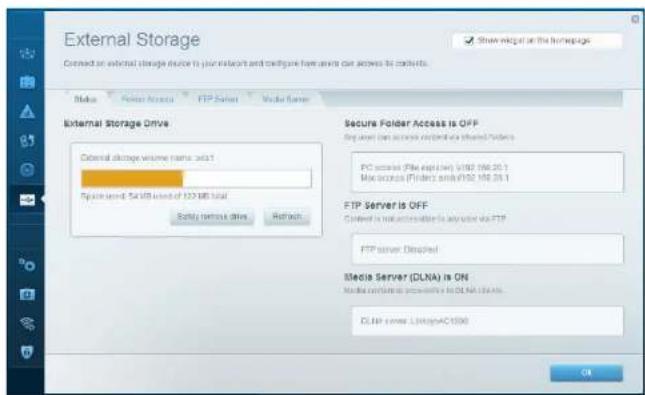
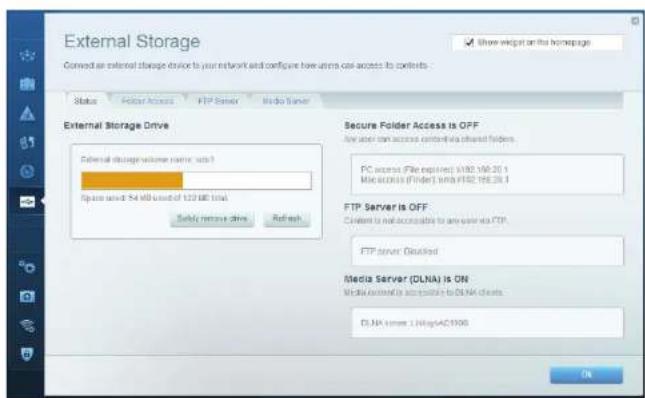
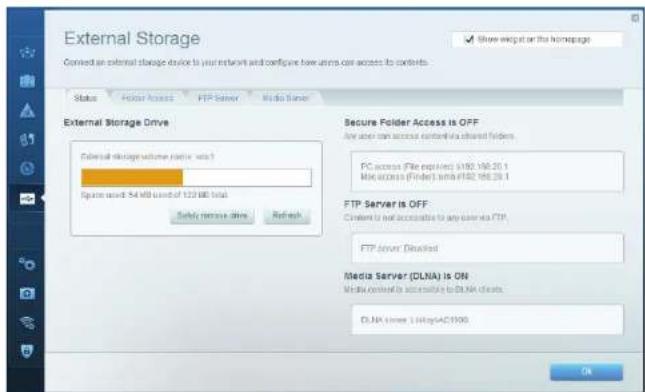
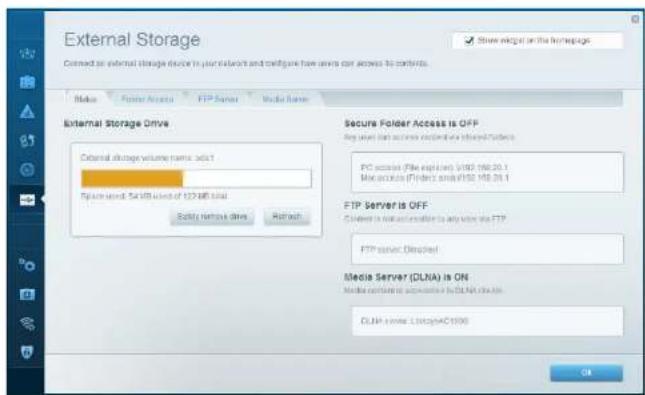
External Storage - lets you access an attached USB drive or eSATA drive (neither drive is included) and set up file sharing, a media server, and FTP access.

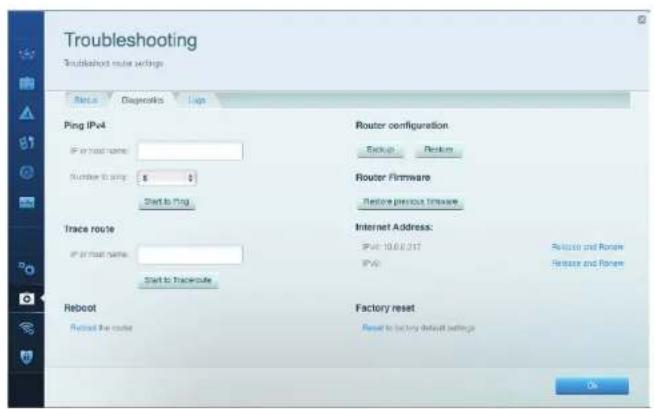
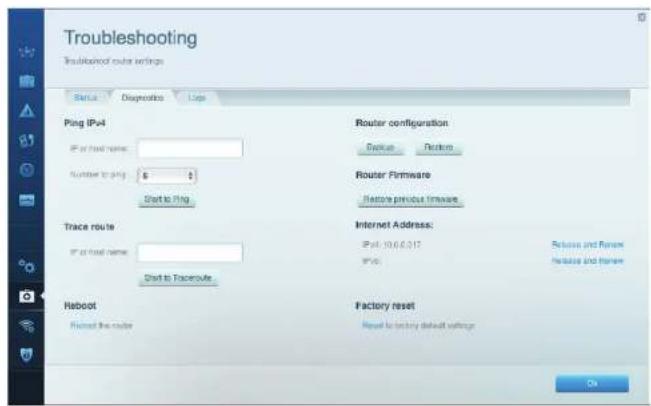
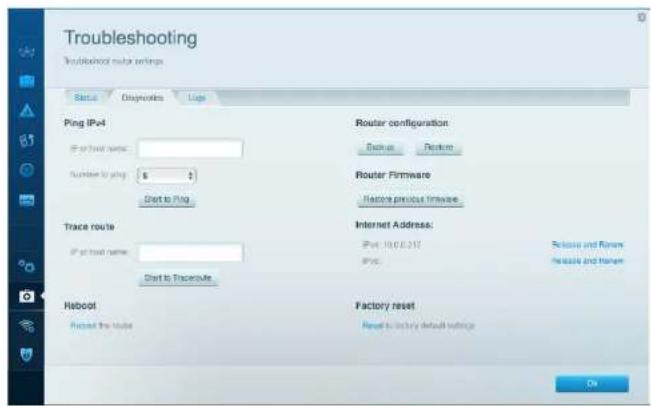
Troubleshooting - Lets you diagnose problems with your router and check the status of the network.
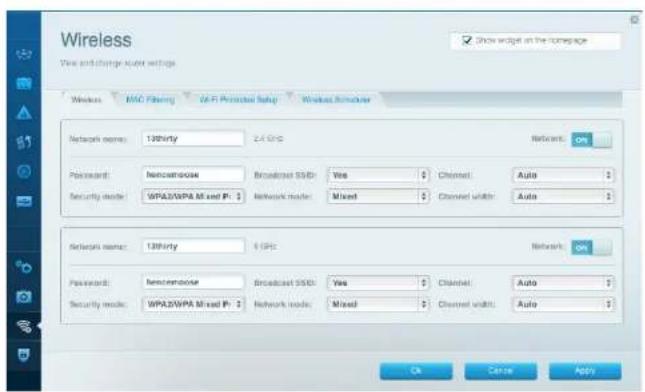
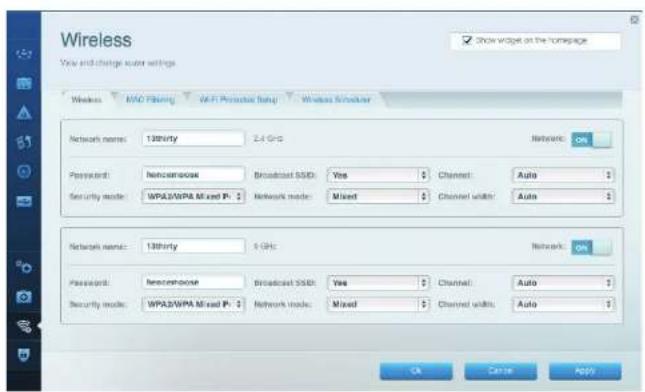
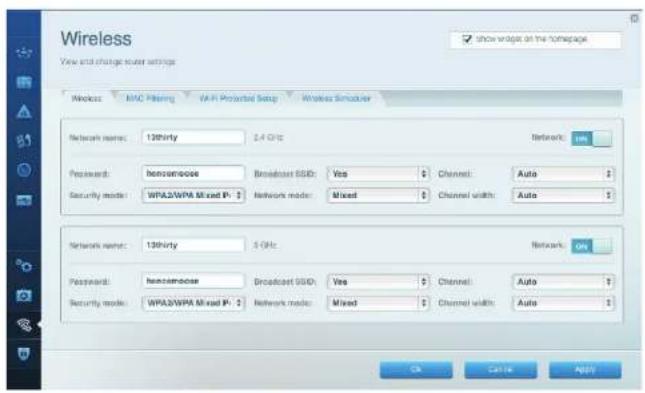
Wireless - Lets you configure your router's wireless network. You can change the security mode, password, MAC filtering, and connect devices using Wi-Fi Protected Setup".
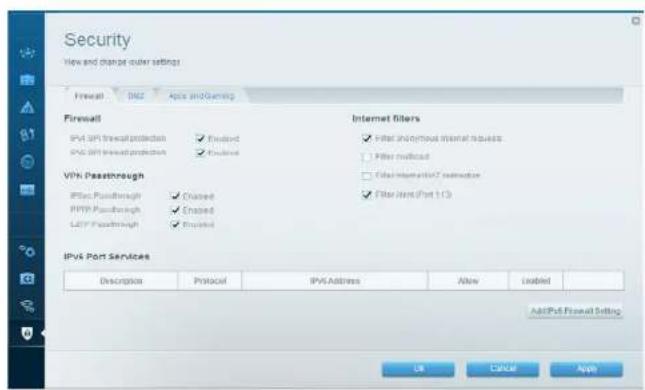
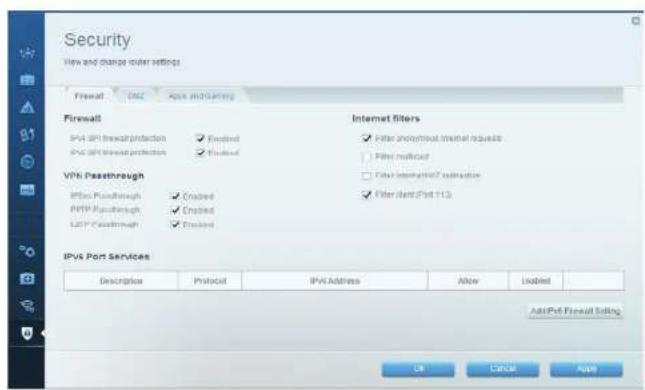
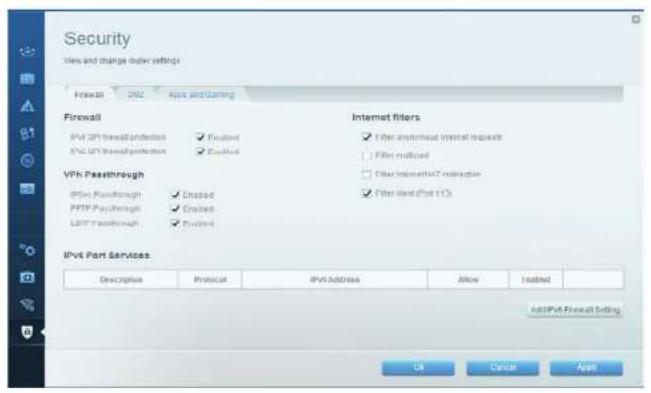
Security - Lets you configure your router's wireless security. You can set up the firewall, VPN settings, and make custom settings for applications and games.
Troubleshooting
This chapter can help you solve common setup issues and connect to the Internet. You can find more help from our award-winning customer support at linksys.com/support.
YOUR ROUTER WAS NOT SUCCESSFULLY SETUP
If Linksys Smart Wi-Fi Did Not Complete The Setup:
- Using a paperclip or pin, press and hold the Reset button until the power LED on the front of the router starts flashing (about 10 seconds). Install the router again.
Your Router's Appearance May Vary
- If that doesn't work, temporarily disable your computer's firewall (see the security software's instructions for help). Install the router again.
- If you still haven't set up the router, find another computer, and use that computer to install the router again.
Troubleshooting
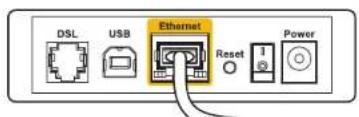
YOUR INTERNET CABLE IS NOT PLugged INMESSAGE
If you get a "Your Internet cable is not plugged in" message when trying to set up your router:
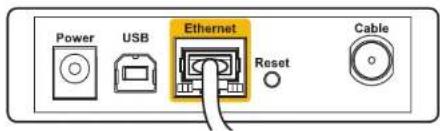
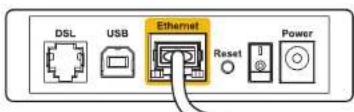
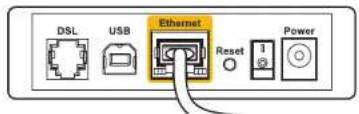
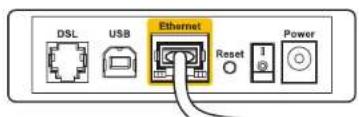
1. Make sure that an Ethernet or Internet cable (or a cable like the one supplied with your router) is securely connected to the yellow INTERNET port on the back of the router and to the appropriate port on your modem. This port on the modem is usually labeled Ethernet, but may be named Internet or WAN.
Back View of Router
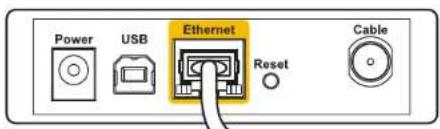
Back View of Cable Modem
Back View of DSL Modem
- Make sure that your modem is connected to power and is turned on. If it has a power switch, make sure that it is set to the ON or I position.
- If your Internet service is cable, verify that the cable modem's CABLE port is connected to the coaxial cable provided by your ISP.
- Or, if your Internet service is DSL, make sure that the DSL phone line is connected to the modem's DSL port.
- If your computer was previously connected to your modem with a USB cable, disconnect the USB cable.
Install the router again.
CANNOT ACCESS YOUR ROUTERMESSAGE
To access your router, you must be connected to your own network. If you currently have wireless Internet access, the problem may be that you have accidentally connected to a different wireless network.
To Fix the Problem on Windows Computers:
- On your Windows desktop, right-click the wireless icon in the system tray. Icon could be different depending on your version of Windows.

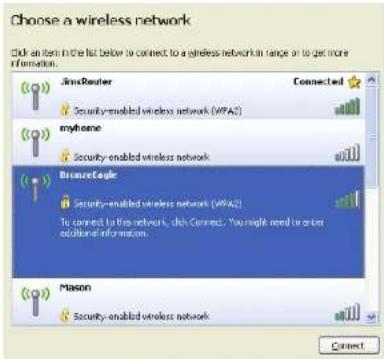
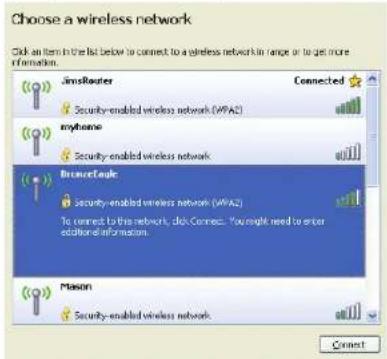
- Click View Available Wireless Networks. A list of available networks appears.
| Disable Status Repair |
| View Available Wireless Networks |
| Change Windows Firewall settings |
| Open Network Connections |
Troubleshooting
- Click your own network name. Click Connect. In the example below, the computer was connected to another wireless network named JimsRouter. The name of the Linksys E-Series network, BronzeEagle in this example, is shown selected.

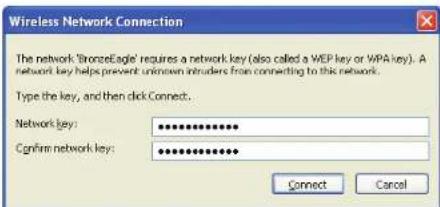
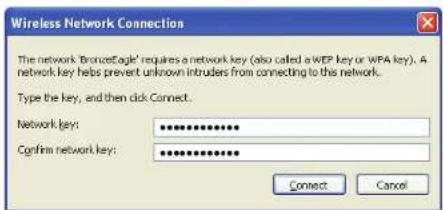
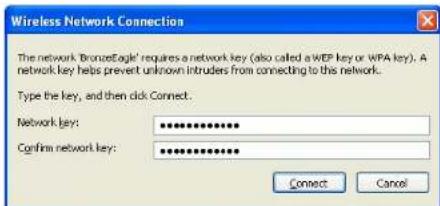
- If you are prompted to enter a network key, type your password into the Network key and Confirm network key fields. Click Connect.

You should now be able to access the router.
To Fix the Problem on Mac Computers:
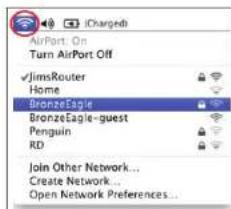
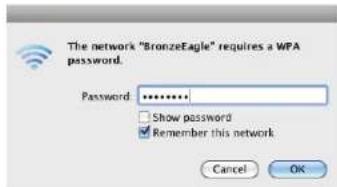
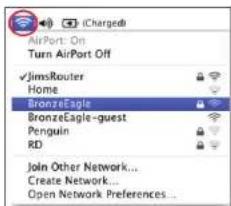
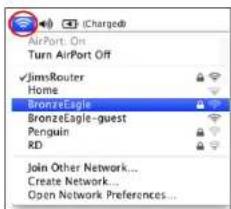
- In the menu bar across the top of the screen, click the AirPort icon. A list of wireless networks appears. Linksys Smart Wi-Fi has automatically assigned your network a name.
- In the example below, the computer was connected to another wireless network named JimsRouter. The name of the Linksys E-Series network, BronzeEagle in this example, is shown selected.
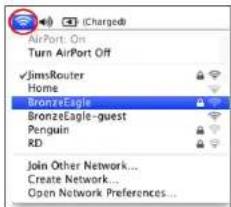
- Click the wireless network name of your Linksys E-Series router (BronzeEagle in the example).
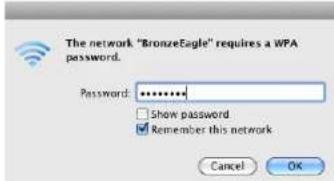
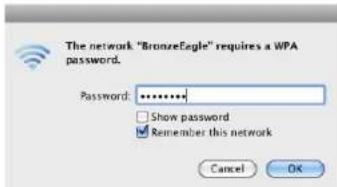
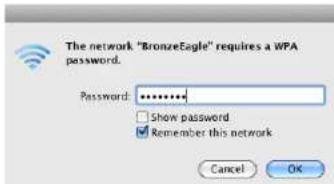
- Type your wireless network password into the Password field. Click OK.
Where to find more help
- Linksys.com/support/WRT1200AC (documentation, downloads, FAQs, technical support, live chat, forums)
- Linksys Smart Wi-Fi (linksyssmartwifi.com; click Help at the top of the screen)
Note:
Licenses and notices for third party software used in this product may be viewed on http://supportlinksys.com/en-us/license. Please contact http://supportlinksys.com/en-us/gplcodecenter for questions or GPL source code requests.
Specifications
LINKSYS WRT1200AC
Model Name: Linksys Dual-Band Gigabit Wi-Fi Router
Description Dual-Band AC Router with Gigabit and 2xUSB
Model Number WRT1200AC
Switch Port Speed 10/100/1000 Mbps (Gigabit Ethernet)
Radio Frequency 2.4 GHz and 5 GHz
of Antennas 2 external adjustable antennas
Ports Power, 1 x USB 3.0, 1 x combo USB 2.0/eSATA, Internet, Ethernet (1-4), RP-SMA (2)
Buttons Reset.Wi-Fi Protected Setup, Power
Front Panel Indicators Power, INTERNET, 2.4 GHz, 5GHz, USB1, USB2, Ethernet (1-4), Wi-Fi Protected Setup
UPnP Supported
Security Features WEP, WPA, WPA2, RADIUS
Security Key Bits Up to 128-bit encryption
Storage File System Support FAT, NTFS, and HFS+
Browser Support Internet Explorer 8 or higher, Firefox 4 or higher, Google Chrome 10 or higher, and Safari 4 or higher
Environmental
Dimensions 9.68^ 7.64^ 2.05^ without antennas (246 x 194 x 52 mm)
Unit Weight 29oz.(833g)
Power 12V,2.5A
Certifications FCC, IC, CE, Wi-Fi a/b/g/n/ac, Windows 7, Windows 8, DLNA
Operating Temp. 32 to 104^ (0 to 40^ )
Storage Temp. -4 to 140°F (-20 to 60°C)
Operating Humidity 10 to 80% relative humidity, non-condensing
Storage Humidity 5 to 90% non-condensing
Note:
For regulatory, warranty, and safety information, see the CD that came with your router or go to Linksys.com/support.
Specifications are subject to change without notice.
Maximum performance derived from IEEE Standard 802.11 specifications. Actual performance can vary, including lower wireless network capacity, data throughput rate, range and coverage. Performance depends on many factors, conditions and variables, including distance from the access point, volume of network traffic, building materials and construction, operating system used, mix of wireless products used, interference and other adverse conditions.
Visit linksys.com/support for award-winning technical support
BELKIN, LINKSYS and many product names and logos are trademarks of the Belkin group of companies.
Third-party trademarks mentioned are the property of their respective owners. © 2015 Belkin International,
inc. and/or its affliates. All rights reserved.
LNKFG00192 Rev.A00

aissssall jol
WRT 1200AC
Wi-Fi
yLaae aay gao jilai
LINKSYS
PERFORMANCE PERFECTED
1200AC WRT 1
gull je tale o jbi
44 gill jge 1x
5
5
LINKSYS SMART WI-FL
LinksysSmartWi-FiJy6
6
Lgshuoluyu
10
Juaa 11
11
1200AC WRT Linksys 13
iiialle lde oole srbbi
1200AC WRT
aayaiy ayiy i yj
g 1
aill 3, k j
三
J 1
y
2.4
()
24
24
5
1 1
5
5yall
eSATA
USB 100000000000000000000000000000000000000000000
aai 1
esata
1 USB
esATA 1234567890101123456789010112345678901011234567890101123456789010112345678901011234567890101123456789010112345678
1
USB2
3.0 USB 1
1J 1
USB2
2.0 USB 1.0 USB
3.0USB
(a)4110
AaBaaBaaBaaBaaBaaBaaBaaBaaBaaBaaBaaBaaBaaBaaBaaBaaBaaBaaBaaBaaBaaBaaBaaBaaBaaBaaBaaBaaBaaBaaBaaBaaBaaBaaBaaBaaBaaBaaBaaBaaBaaBaaBaaBaaBaaBaaBaaBaaBaaBaaBaaa
1
注
aillle dole sbi
()411y
eyay 15 y 3y 8y 8y 8y 8y 8y 8y 8y 8y 8y
1000 100/10
iill
69
wi-Fi Protected Setup 1
Wi-Fi Protected 1
WFiProtected Setup 1
100 100
aaiiie
y
gall jy gyl yj y 1eal y
26 = 30
y
Wi-Fi Protected Setup
Wi-Fi Protected Setup
(1000/100/10)
BAC = 90^
yj 1000000000000000000000000000000000000000000
DSL/1000/100/10
1
1 = 2
jll jlll jll l jll jll jll jll jll jll

- = + .
aaii jia jia jia jia jia jia
(1) Linksys.com/support/WRT1200AC
(1)Help 品 LinksysSmartWi-FiJL JL LinksysSmartWi-Fi
444gill jiee
gai jie cuu
1
2
3
14 2
5
j1:abla jall gll j 1 k a l l j cai l (1 2011)
42g j4j 14jLSSaCpJ 103
6
yssmartwifc.com
paaal y aalll Linksys Smart Wi-Fi 1000 ples ay 1000 ples ay 1000 ples ay 1000 ples ay
LalnKsS Mrt Wi-Fi
yj
4 1
allJn
y
a jyj
:
y
1.3g 1.3g 1.3g 1.3g 1.3g
LINKSYS SMART WI-FI
:LinksysSmartWi-Fi
myruterlocal, linksyssmartwifi.com 1
(1)
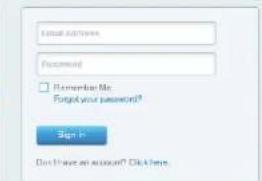
aagill jglcuij 1

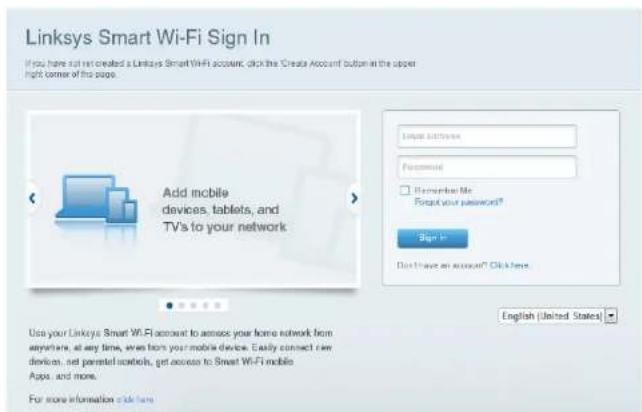
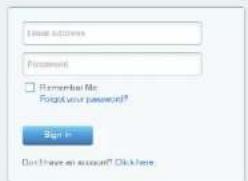
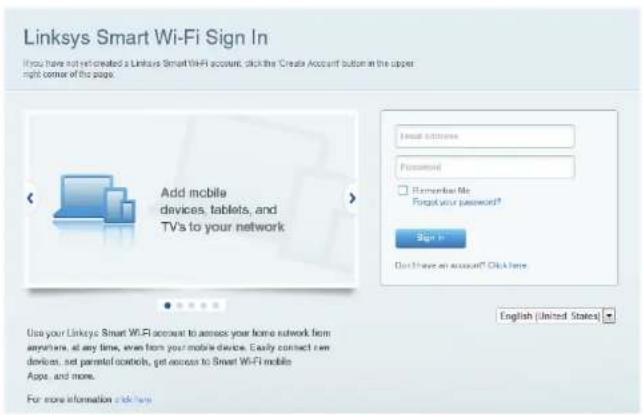
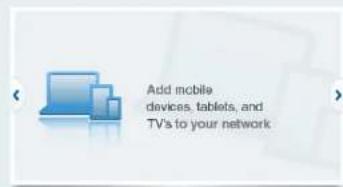
If you have not yet created a Linkable Smart Web account, click the Create Account button in the upper right corner of this page.


Use your Linksys Smart Wi-Fi router to access your home network from anywhere, at any time, even from your mobile device. Easily connect new devices, net parental accounts, get access to Smart Wi-Fi mobile Apps and more.
For more information ask us:

y 1 (s) Network Map
j 1

Gueess
1
Parental Controls
二

y 1 y
125
Speed Test
LaS)Jusll eSATA JUSB jLgjI JgjI JgjI JgjI JgjI JgjI JgjI JgjI JgjI JgjI JgjI JgjI JgjI
Aa aaa aae aee aee - (Jau) Connectivity
Jnagjg jgnl gnnn nnnn nn nnnn - (nss) nss) Troubleshooting
JWi-Fi Protected Setup 1
yVPN 1 yI 1 1 1 1 1 1 1 1 1 1 1 1 1 1 1 1 1 1 1 1 1 1 1 1 1
l_a : x_1l_b = y_1l_a
peaas jaeauli jyj jyall kky, yjdy jyaiy jyaiy jyaiy jyaiy jyaiy jyaiy jyaiy jyaiy jyaiy jyaiy jyaiy jyaiy jyaiy jyaiy jyaiy jyaiy jyaiy jyaiy jyaiy jyaiy jyaiy jyaiy jyaiy jyaiy jyaiy jyai
a
LinksysSmartWi-Fi
y 10
y jiei jiei jiee
y 1
华
juiuui juiuui juiuui juiuui juiuui juiuui juiuui juiuui juiuui
y
l_a : l_b = l_c
"Jaeiae yde ayalal luyl kll
dAe dae (aee aee eee) "Your Internet cable is not plugged in"
e 1
gill jilil kill
y
DSL
19 (L)ON e aae ae aee 8t ttae ae aee aee aee aee aee
CABLE 10000000000000000000000000000000000000000000000
DSL jaiy kaii DSL ayai yaii kaii kaii dsl aai ai iai kaii 4
USBB 150 USB 150
4gall jgsd1 jgsgljzai all
y 1
View Available Wireless Networks 2
| Disable |
| Status |
| Repair |
| View Available Wireless Networks |
| Change Windows Firewall settings |
| Open Network Connections |
451 452 453 454 455 456 457 458 459 460 461 462 463 464 465 466 467 468 469 470 471 472 473 474 475 476 477 478 479 480 481 482 483 484 485 486 487 488 489 490 491 492 493 494 495 496 497 498 499 500 501 502 503 504 505 506 507 508 509 510 511 512 513 514 515 516 517 518 519 520 521 522 523 524 525 526 527 528 529 530
Confirm, (k) Network key 1 k 2 k 3 k 4 k 5 k 6 k7 k8 k9 k10 k11 k12 k13 k14 k15 k16 k17 k18 k19 k20 k21 k22 k23 k24 k25 k26 k27 k28 k29 k30 k31 k32 k33 k34 k35 k36 k37 k38 k39 k40 k41 k42 k43 k44 k45 k46 k47 k48 k49 k50 k51 k52 k53 k54 k55 k56) network key
aill jaoi Jaooi jai
Mac jatn paa 1j aee
Aeae aee eae aeae aee aee aee aee aee aee aee aee aee aee aee aee aee aee aee aee aee aee aee aee aee aee aee aee aee aee aee aee aee aee aee aee aee aee aee aee aee aee aee aee aee aee aee aee aee aee aee aee aee aee aeee
Linksys JimsRouter 2018-2019
(1) Linksys E-Series (BronzeEagle 4000000000000000000000000000000000000000000000000000000000
(OK j, j, (j)k) Password
ailll jy jilj gail j
s#i1200AC
(a) (a) (a) (a) (a) (a) (a) (a) (a) (a) (a) (a) (a) (a) (a) (a) (a) (a) (a) (a) (a) (a) (a) (a) (a) (a) (a) (a) (a) (a) (a) (a) (a) (a) (a
LINKSYS WRT1200AC
Linksys 10000000000000000000000000000000000000000000
USB×2,GigabitgAC
WRT1200AC
1000/100/10
53j524
/2.0USB 1.3.0 USB 1.
(2)R-SMA (4-1)
Bul.Wi-Fi Protected Setup.
USB1.5.2.4.INTERNET
Wi-Fi Protected Setup.4-1) USB2
UPN
RADIUS.WEP, WPA, WPA2
128 1
+FAT,NTFS,HFS
4 18 Internet Explorer
4 Safari, 10 Google Chrome
2.05×7.64×9.68
52×194×246)
(833g)29 1
2.5 12
,7 FCC, IC, CE, Wi-Fi a/b/g/n/ac, Windows
DLNA,8 Windows
(4010)10432
(6020-)140
80 10
0%9015 电
= v_0t^2 + 14t^3
Jnne Jnne Jnne Jnne Jnne Jnne Jnne Jnne Jnne Jnne Jnne Jnne Jnne Jnne Jnne Jnne Jnne Jnne Jnne Jnne Jnne Jnne Jnne Jnne Jnne
gai 103gai 5u 3u Ws Linksys.com/support.
U
L 100
30 2018-06-04 19:57:53
0000000000000000000000000000000000000000000
30303030303030303030303030303030303030
1
j j j j j j j j j j j j j j j j j j j j j j j j j j j j j j j j j j j j j j j j j j j j j j j j j j j j j j j j j j j j j j
and had asked him to sign a letter with Belkin all over the world . Belkin was also given the first body mass index test by Linksys , BelkinBelkin has always been good at both TV and TV , Belkin International , Inc . and Belkin 2015 ( 2015 ) filed as " sexual abuse / sexual
Rev.AOC CC192-NKFG

GUIA DEL USUARIO
WRT1200AC
BANDA DUAL GIGABIT ROUTER Wi-Fi
LINKSYS
PERFORMANCE PERFECTED
Contendo
DESCRIPCION GENERAL DEL PRODUCTO
1 WRT1200AC
CONFIGURANDO EL ROUTER
If you have not yet created a Linkbase Sement Wiki account, click the Create Account Subtitle in the upper right corner of this page.
Linksys Smart Wi-Fi Sign In
Use your likely Smart Wi-Fi accounts to access your home network from anywhere, at any time, even from your mobile device. Easily connect raw devices, not parented outlets, get access to Smart Wi-Fi mobile Apps, and more.
For more information:

English (United States)
PbKOBOCTBO3A NOTPENEIA
WRT1200AC
DBYJEHTOB
ΓIΓAEBNTOB
Wi-Fi PYTEP
LINKSYS
PERFORMANCE PERFECTED
CbDpXaHne
OBU INPERIENDAHPODyKTA
1 WRT1200AC
HACTPOBBAHE HA PYTEPA
5KbdeHaHamePte OoJe noMoou
5 KaKa Da HnctaInpaTe pyTepa
KAKДАИЗПОЛ3BATELINKSYSSMARTWI-FI
6 KaKa da ce cbbpkTe KbM Linksys Smart Wi-Fi
6 KaKa Da npomehrte Hactpouknte HapyTepa
OTCTPAHBAHE HA HEN3PABHOCTN
10 Baunr pyTep He hAcTpoeh yCneuho
11 Cbo6eHneYour Internet cable is not plugged in (Baunrnt HnTepnet KaBcI He E BkIOueH)
11 CbOeHHe Cnnot access your router message (HMa doTbn do pyTepa)
CNEUΦNKALUN
13 Linksys WRT1200AC
06u npereHa npoDyKTa

WRT1200AC
HnneOpnp

INIKATOPN HA INPEHNI PAHEI
[Ba] CBoToTHNtHAtopTbHbTaXpaHbHaTeCBtBHePnpeKlChato B6nO,doKaTOHa pytepeCaNoBaTa3pxaPbHaHe.Mira,doKaTOpyteTpneMnaba npesPekHM Ha cmoDAHtoCTTKa PnBcKO npBeBOHaHaHO 3apExKaHa.
NHtepHET
(BaKexnBapH) CBeToHnDnKATOpb3a HHTepHcBTeHnpeKbchato B 8AIO, KORATO mmaBpKa c HHTepH. Mra B 6BNO,doHato pyteTpB cO nHTBa Da yCTAHOB pBbKa. IocToHnHaTc KexnBapHeBa cEBtHa Ha CBToTHmNAtOPa NOKa3Ba, Ye Bp3KaTa e PpeKbChATA nopA npo5nEMn, cbpa3aHc KOhFpypaJrta. Mraata cKaXnBapHe aCBtHaNnKo3Ba3, Ye Bp3KaTa e PpeKbChATA npoA npxApydpH npo6nEMn.
2,4 GHz
(B)CBOTOHKATOpBT3a6e3KHHaBPb3A CBeTNHnpehckato8Bn,Korato eHNNIOBEU KIIMEHTCa Cbbp3AHK MVMpekataCyeCTota2,4GHZ.AKO CBETOHNKATOpBTMraC6RaCBETINHApyTeptnnpaaNNnnyyabaDHHnpe3 MPekataCyeCTota2,4GHZ.
5GHz
[Ba]CBETOHJNATOpBt 3a Be3KnHbA Bp3Ha CBeHHePekChato a BkIO, KOrato eHIN NIN NOBE He KInHeNTCa CbP3AH KEM MPekata c YecToTA 5GHz. Ako CBETOHJNATOpBT MIRc C6BaLcBETnHA PyTeBt HnPaua NnNoLyhaba daHH npe3 MPekata c YecToTA 5GHz.
eSATA
[Ba] Korato He cBeTn, USB/eSATANopTe b3KIOHOHIIe cBp3AHOUSBycptocCTBO.
[Bc] Korato HcNkATOpBT cBeTHHeNpeKbCHATO B6KNO, Korato e CbP3AOeSATA yctpoIcTBO.
MinaaratB 600 cBeToHNkAIOTOPOK3ABA DEHOCT pRe eSATANopta.
USB1
[8] Korato He CBeTn, USB/EsATA Noptb E nKHeH n cebpaHo ESATA yctpoiCTBO.CoToHNkAtoPbT CBeTn HENpeKbCtAo B6ko, KOrato e Cbps3Ho USB yctpoTBO.MrAaunB T 6No CBeToHNkAtoTOp NcKaBa DeHocN pOtna.
OchObEH USB2
(Ba) Korato He cebti, USB 3.0 npbtE tsKIOHcH. CbetoHHNkATOpBt cBeTI HnpeKbcHATO B6IIO, KOrato e cbpbaHO USB yctpoiTBO. MInAunrB B6IO CBTOHNHkATOP nok438 DeHOCHT npoe3 npota.
DonbHnTeHeh USB2
(Ba) Korato He CbETn, Toba 03HauBa, Ye cBb3paHO USB 1.0 mH NUSB 2.0 yctpoIcTBo. CBeteuT nCtoTOnHHa BnA CBETnHA CBETOnHnKAtop nKa3Ba, Ye cBb3paHO USB 3.0 yctpoIcTBo.
ETHERNET1do4(OcHOBEN)
(Ba)Te3N HOMEPINAHCBOTOHDAKATOPC B0TBTCTBAH HOMEPINAHTE NOPBcEHA 3dHNHnAeHbpyTa. Ako6BnRTCBOTOHDAKATOPCBETCNOCTOHHA CBETNHa, pyteptBe CbO3aHbKYCTPOXCTOBpe3o3ToNpOT. MfauataBaNAcBcETNIHAA CBOTOHDAKATOPNOK33sVPEKCbAHTVBHCTP3e3NOPT.
06u npereHa npOdyKTa
ByToH Wi-Fi Protected Setup
HaHcHETe,3a Da KOHcHpynpate HeCHO 6e3KHHaTc HpyhOCT Ha MPekOBn yCtpoIcTa cakTNbpuH Wi-Fi Protected Setup.
Ethernet noptoe
Cabejne Ethernet KaBEn KbM TeN CNH rna6ntoBn (10/100/1000) npToBe nKbM KaBEnHTe yCTpoiCTBa B MPekata.
3a6e9e8ka:
3a da cn cncyprnbe Bbsmokno Haa-dobpn xapaKreptmCTKN, nnoI3BaTe KaBe 1M CAT5e nn no-Bnck KAc 3a Ethernet ncptoBe.
HHTepHET nopt
CabeXe TheMert KabEn KbToa NkBn rna6toa(10/100/1000) npnt KbM KaBeH/DSL nnnnne Hmoem 3a WnpokolteTOBa mHepeT Bp3ka.
3a6e9kka:
3a da cn ocnyprhe Bb3mokho Hae-dobopx xapaKTe pctnH, n3no3BaTe Ka6e-
USB 3.0 nopT
CsbpkeTe HnnoBaaTe CbMecTHo cdpytn Xopa USB nneSATA mck Bmpekata cn nnnno nntepHt.
USB2.0/eSATAKOM6HnHpaHnoPT
CbpxkTe HnnoaBtBe CbMecTo C dpyH Xopa USB Hnn eSATA nck B mpejata cn Hn no nHTepHc. MokeTe cbto Taka da CbpxkTe npInTep c USB n3oDn da ro cnoJeNo no MpejHata.
ByToH 3a Hynipane
HaHCHETn 3aepbKTe 8 npObIkeHHe Ha 10 cekyHn (doKaTO cEBOTnHnKAtOpBt H aapbaHaeHTo 3aoNHe DA mR) 3a Da HynPATE pyTeo do fApvHHTe My HactpOx. MoKeTe Da bctAnote fAp6puHHTa HactpOxu Hpea Linksys Smart WiFi no HmTEpHnet n ppe3 MoNHO npnOKeHne
NopT 3a 3axpaHbAhe
CbpxkTe BkIOeHnB KOMNtEa TpOMeHnIBOTOKB 3axpaHbaA aadTep.
ByToH Ha 3aXpaHbAHeTo
HaTnchete ro, 3a da BkIOuHte pyTepe.
06u npereIeHa npOdyKTa
Avoid Overheating

Noctabare npnte HMOHTAX
OTdoHATA CTpHa HA BcKHOpaHe Ha pyTePA NMA CLOT 3a CTENH MOHTAK, KOIO DAba BbMooHOCCTo RbKBAOCT NOI MOHTnPAHTo HA pyTePA HCTeHATA. Pa3ctOHNETO MEky cNoTOBcata HCTePA H 104 mm, a no DInrata-210 mm. 3a MoTHNAPAHTo HApyTePA Ca HeoXdoMMn DBA BnHTA.
PpenopbuntenHH

KOMHOHeHTn 3a MOHTaX
6-7 mm 1,5-2 mm
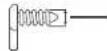
3mm
3a6eJekka:
Linksys HcHoc OTROBOPHOCT 3a 1eT, INpHHeHOnOT HeIO6pe 3akpenenKOMNOHEHTN 3a CTHeH MOHTAK.
HCTpyKm3aMOHTaK
- OnpeJeTe MRCTO, Ha KOTo NCKATE Da MOHTIpate pyTepa, nCTpaHATA, KOTo Da HNO3BATE 3A MOHTaKa. YSepeTe Ce, He CTeHATA, KOTo Ie HNO3BATE, e IraJaKa, paBaHa, cyxA 3dPaBa. PcBepete DaJIIMRCTO E B6IIN3OCT Do eNEKTPnEeCKN KOHTAKT.
2.PnDn da npo6ne TcBOPATE,na6peTe 8aBNOHA (KCAaHn DJIra CTPAHA),KOHTe eNOxOAn3aBaINM MOHTAK. PpO6Nte OTbOPTE NOCPEDTBM NOxOAnPnIA W-5hON. - NocCTABETBnHT BBB BcEKN OTBOP, KATO OCTaBNTe da ce noka 4 mm ot rnaBata My.
4.ПОЗИСИНПАЙТЕpyeTpeTаKa,ЧЕСЛOTOBETa CTeHENMOHTaKДaCaNODpaBHeHcPRAIMO DAba BHTA. - Noctabe cIOTOBETe 3a CTHeH MOHTAX HAD BINTOBETe INIb3HETe pyTepaHaDcIy, DCKATO BINTOBETe Bn3AT NtBTHO B CLOTOBETe 3a CTHeH MOHTAX.
Ua6noh 3a cTeHeH MOHTaK (kbca CTpaHa)
OTNeuataTe Taa CToPAHILB MaAa6100%
OtpexeTeNo nyHKtupanataIINHn H NOCTaBe Tbpy CTehata,3a Da Cn OcNpynte IpeuSHo N03UHOHpaHe O TBOpTe HcBcBTBHTne pa3CTOHNH.
06u npereIeHa npOdyKTa
OTneyataTeTa3nCTpaHMaB MaAa6100%
OtpexeTe No nyHKTHpHaTAta LINHn H noCTaBe Tbpyx CteHaTa, 3a da cn OCHyPte npeunHNO3uONHpaHe Ha OTBOPHTe Ha cbOTBETHMe pa3ctoHn.

HactpoBbHe Ha pyTepa
KbDE DA HAMEPTE OIEI NOMOUI
Linksys.com/support/WRT1200AC{okymentau, MaTePmaa 3a 3ternne, 3B. TexHueckna Pndpbskka, TaB PeaHIO BpeMe, fOpywn
- Pnmoa a3 Linksys Smart Wi-Fi (caBpkeTe ce c Linksys Smart Wi-Fi, cneKoetop KlnkHe Te Bbpxy Help (Pomou) B ropHata hct haekpaHa
KAK DA INHCTAINPATE PYTEPA
3a da HcTaInpaTe pyTepa:
1.AKcnyk3a3amHaHa cbueCTByBaU pyTe,p Heo6xOmo da rno hckIOHTe.
2.Cbpye aHTHnTe nnoaTa3xpaHaBaHe HaHOBn pyTeP.
3.ИЗКИЧАнИВКИЧАнЕHAMODEMa
4.CaPbKgTeAHTePHTKa6BaHaMaOEMAKbMxNtTHnHTePHTnptHnPAyTepaHaNaHAKIte,OKaTOCBETOnHnKATOpBtHa3xpaHbHcOTnpeHATAcPbHaHaPyTePa 3AnOvHe Da CBeTIcNoCToHnBA CEBTnHA
5.Cbpxkete KbM 3aunHeTa 63xHnHa MpeXa, HTo Ie nocOeHO B PkOBoCTBO To 3a 6bp30 cTAPnpuhe, KOeTO CT NOLyHn 3aeJHo CpyTepa.(MoKTe Da CMeHte MpeXoBto HmE nIapOnata No-KbCHO.) Ako CE HyKaBaTe OT NMOU npC bcpBaHTo KbM MpeXaT, HAnpabeTe CnpBaKa B DckyMeHTaUnrTa HA yCTPOHCTBOTo. 3abeJeKka: Hma da JMaTE Doctbn Do INHePHT Do KOHAteHIO HO TcTAInpape Ha pyTepa.
6. OToBopTe ye6 bpay3bp n cneBaIte HNcTpyKunIte 3a 3abpaBaHe Ha HAcTppoKaTa. Ako HcTpyKunIte He ce noka3BaT y6bPcy3pa, BbePeTe linkSyssmartwif.com aippechata JnHa.
7.B kpar Ha hactpOHaTc nEaBnTe yKa3aHmTa Ha ekpaHa, 3a da Hactpone npodnla ca 3a Linksys Smart Wi-Fi. ManlOkNtOgKoNtObTpC HntepHer ptp3ka.
YnpaBHeHnHa HAcTpoKIne Ha pyTepa:
-ПомянаHa IMTeипapолаТаHa pyTepa
Cb3daabaHHeJaoCTbN3aFOCTN
KoHpypupaHa npDnteckn KOHTpon
Cbbp3BaHe Ha yCTpoNCTBa KbMa BaWtA MpeKa
Tectbahe Ha CKOPOCTTa Ha HHTepHET Bb3KaTa
3a6eJekka:
Kato qactOT hactoBaHTo HnpoDn 3a Linksys Smart Wi-Fi,ue Bn bde nnpaTbHeMn 3a NotBxpkDHe. OTBopTe MmEJa NklnHHe TbPxpy npdoctabHaTa BY Bp3Ka.
Kak da n3noJ3BaTe Linksys Smart Wi-Fi
KAKDACECBpXETE KbM LINKSYS SMART WI-FI
3a da oTbOpnte Linksys Smart Wi-Fi:
- Pocetere linksysmartwifi.com mymyrouter.local (aKo He cTe OHnaiH) qpees y6 6pay
- BbBaeTe HactpoeHnTe npa Toba HmEn I apoc n npoA, cIeK KOeTo KInkHeTe Bbpy Bxoq.
If you have not yet created a Linkbase Sement Wiki account, click the Create Account Subtitle in the upper right corner of this page.

Linksys Smart Wi-Fi Sign In
Use your likely Smart Wi-Fi accounts to access your home network from anywhere, at any time, even from your mobile device. Easily connect raw devices, not parented outlets, get access to Smart Wi-Fi mobile Apps, and more.
For more information: 46

English (United States)
KAKDACEIPIPOMEHRTHACTPOIKITEHApyTEPA
3a6e9kka:
3a donbHnHHeHnMoO 3a BcKoCt MeHOTa KnnKbaTe Bbpx NmouBropHa Ta HAcT HaekpaHa.
- Bneste B npoPnna C n B Linksys Smart Wi-Fi, kato nocetire linksyssmartwi.com myrouter.local [kno He cte cnai]upes ye6 bpay3p.
2.BMHOIOOTDIAHBOKIMKHOETBbpyHXKORONHA
Network Map (Kapta ha MPekkata) — Bn Daa Bb3MOXHOCT Da BnuHTE u npablaBATE BCmHK MPekOBYcTPOCTBA, CBp3aHb KbMpyTea. Mokete da BnuHTE yctPOCTBA tBa TANbHATA cN MpeKA Hn B TaS 3a 30ctu, da PneKSCBATE Bp3kATC a yctPOCTBA nIi Da BnuHTE INHOPMAUa 3a BCHOOT yctPOCTBA tBA.
Guest Access (DocTo 3a roct) Bn Daba BbMooHcT da KOnFHyypate N HbIIOBaTe Mpeka, KOTo CE NOJ3BA CT RoCTNe, Be3 Te Da HmAT DOCTbn DO BCNUKN BAUIN MpeKOBN pecyprn.
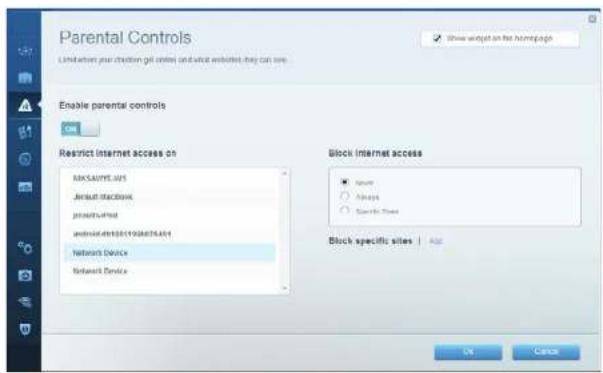
Parental Controls (Podteckn KOthpon) — Bn daBaBb3MOKHCT Da 5kncipate dcctbna do ye6 caiToe n da3daabeTae CooBe 3a doctbn do HntHePHT.
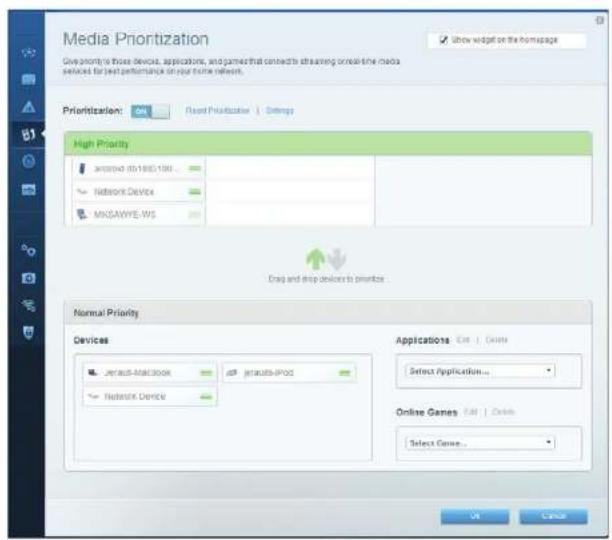
Media Prioritization (PnpOpTn3nPaH Ma Me) Bn Daa Bb3mKHOCT Da 3a4aTe Ye cTPOiCTBa H pIIOKeHc Hai BvCOK PnpOpTET B MpeKOBTRpaIK.
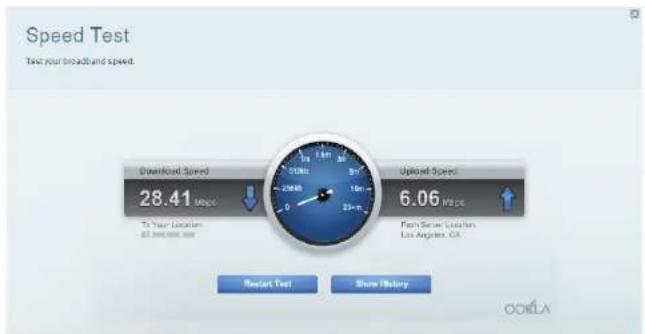
Speed Test (Tect ha ckopocctra) — Bn DABBb3MOXHOCT Da TECTBaTe CKOPOCTTa Ha HHTEPHET Bp3kata HA MPekata.

External Storage (3ana3bahe Bbb BbHoo yctpoiCTBO) -Bn Daba B3MOXHOCT da NOIy-NTe DOCTBn Do Cbpa3aO USB nn eSATA yctpoCTBO (He ca BNIOUENB KOMINTEKA) IN da HACTPone CNOEJIHREHO Ha faNIOBE, MyTNIVWEN Cbpbp n FTP DOCTBn.
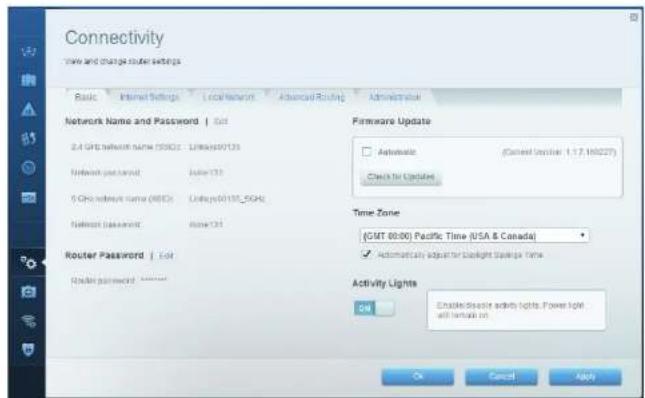
Connectivity (Cbbp3aHocT) — Bn Daa Bb3MOXHOCT Da KOHmrypnpate OCHOBHNT pa3wippeHNT MpeKOBn HacTpoKH.

Troubleshooting (OTcTpaHraBeHa HnE3npaHbOCTn) Bn DaBa Bb3MOKHOCT Da npaBHe nIaHocNTka Ha npo6JeMn C pyTepa N da npoBepBaTe cbToaHHeNo Ta MPoxkata.

Wireless (Be3KmHa MpeKa) —Bn DaBa BbMoXHOCT Da KOHpypPate
6e3KnHATA MpekHa Pyepa. MoKeTe Da CmHHTe peKHMHa 3aUHTa, npoLATA,
fTpapHe no MAC aDpc, KaTo n da cBpb3Be yCtpoHCTBa c nomuTa Ha Wi-Fi Protected Setup"

Security (3aun) — Bn Daa Bb3mXHooCT Da KoHpyrpupe 6e3KHHata Cnypoc H na Pytepa. Moke Ta hactpothe aauHTa cTeHa, hactpoKnte 3a VPN, KaTO n da Happanite nepcoHAAIIMPAHnA HactpoKn 3a npInnoKeHnHnHn
OTcpaHbAHe Ha Hen3npaBHOCTN
Ta3nTnBnMoKHe Da Bn NMOHRe 3a OTcPbAHaTe Hb O6u np6oBm npH aCtponKa n3a CbPbBaHe KbM INHeTpRe. Oue nmoK MeOp He Maepre De HAe mOn tDe 3a oCnLkBaHe Ka MInHTn, OTNlWabH cHarpaH, Ha aDpc linksys.com/support.
BAWIMRT PyTEP HE E HACTPOEH YCNEUHO
Ako Linksys Smart Wi-Fi He enpuknouh nactpoKaTa:
CnMOUHTa HKAJIAMEP NIKAPHua HATHCHETE NaapbKte 6ytoHa 3a HyIIPAHe, DOKAO CTBcOENHkAICOPbT Ha NPedHATA CTPaHa Ha pyTepe 3aOpue He da MIRa (oko10 10 cekyH)NCTaIPaPe Te pyTe aTOHO
BbHUNHNTNHaBaunpyTepeMoKeJaepa3nueH
AkoTcBaHeNOMoHRe,INKJIIOHTeBpeMeHHO3aUNTHATACTeHaKOMIIOTpba(NotbpcTe NOMOu BnHCTpyKUnTE Ha 3aUNTHARCOyep).HCTaJIpaTepyTePaOTHOBO.
AkoBce0uueHeCTeHactponnpyepa,INCTanypaTe rOTHoHaDpyrKOMNIOHp.
OTcpaHbAHe Ha Hen3npaBHOCTN
CbOUsEHHYOUR INTERNET CABLE IS NOT PLUGGED IN (BAHINHT HTEPHET KABENHE E BKNIOUYEH)
Ako noyue Tc b6eHHe Your Internet cable is not plugged in (BaWnT INTEpHET KaBJI He e BKNOeH), KORATO ce cHNTBATE da HAcTPOTe pyTepa:
1.YBepetece,ue EthernetKaebbTNNKabebt3aHHTepetn(NNKabenno6oehHa npoeocctaeHHa3eHOcPtepe cEBp3aHCTaBIOKNKbIKTHINr INTERNETnpOT 0AHaTaCPTaHa HpyTePAHKMcBTBTHNPOPT HAMOEa. To3nnpot HA MOEmaOBHBOEOHcHADNIEMethnerHOHOMAeNAeHNAPHNAIENrWAN
Mrrnndtaaadha pyTepa

H3nEoT3aHaKa6BHeHMOeM
H3nEo3aHaDSLmoEM
2.yepeTeCe,ye moEmbT Bn e Cb50aH KbM 3axpaHbaHe N BklnOeH.AHO HA KIOH3a 3axpaHbaHTo, yepTeCe, ye bnoNoXcHHe ON [Bkn]nnI.
3.AKnAnonanateKa6eHnHTepHOT,nppepeTaCABLE npTbHa Ka6aHHNMOJEM cBp3AH KbM KoAKCNHnHA Ka6eI npOCTaBeH OT DOCTaHKA HA HTepHOT.
4.Axo nnoBate HnTepHcya ype3 DSL, ybepece, ue DSL TeleohHaTa liHna Cbps3Ha Kbl DSL npTa HA Moema.
5.AKO KOMNIOBpBT BNI PPeIN E 6n CbP3AH KBM MOeM c USB Ka6eI,OTKaHETe USB Ka6eJIa.
HCTaIpaIte pyTepeOTHBO.
CbOBUHNE CANNOT ACCESS YOUR ROUTER (HrMA DOCTbI DO PYTEPA)
3aJaIMATNOOHTIOPOPTA,TPOBAaD6BnDECABP3AHKMO6CTBEHATA CN MPAKAAKOBAHMTAMATE6E3KHJHOCTBOIHOHTEPHTNP0B5M8MOK6V8, 电cyaHHO CTECECBp3AICDpyTA6E3KHUAPKEA.
3a da oTcpaHnte npo6nema ha kOMnOToBp c Windows:
1.Ha p60THHnIOT Ha Wndows KIKKHeTe C deCHN 6yTOH Bbpyx IKoHaTa 3a 6e3HNHa Bp3Ka BcCTeMHATA O6nact. IOKHATA MOKE DA p5AHH H BA3BcMOCT OT BEPCnTA Ha Wndows.

- KInnHete Bpxy View Available Wireless Networks (IperneHa HAnuHte 6e3nnmpexn).PnBBA Ce CnncbKa Ha HAnuHnte 6e3KnuH Mpexn.
| Disable Status Repair |
| View Available Wireless Networks |
| Change Windows Firewall settings |
| Open Network Connections |
OTcpaHbAHe Ha Hen3npaBHOCTN
3.KIINKHTe Bpxy MmTo Ha Baata Mpeka. HATNCHe Connect (Cbp3aHa).B DaENHn To-dny NmMEp KOMNtBpBe C bp3aH c pyra 663xHnA mpeKa C mMeTo JnsRuter.MmTe Ha Mpekata Ha Linksys E-Series network, BronzeEagle B tosni npmep, e nokao Hato n3oepao.
4.Ako 6bdeTOMOJIENH Da BBeDeTe MPexos KIOH, HAMUeTe Napolata CN a NOIetaTA Network key (Mpexos KIOH) and Confirm network key (TOBbPjDaBAHb HA MPexosBnKIOH). HATcHete Connect (Cbpb3BaHe).
CeraTpaBbA da MoKeTe da NoLyuHte DoCtbn Do pyTepa.
3a da oTcpaHHe npo6nema Ha KOMnIOTpbc Mac:
1.BJIHTaCmEHOTOBGPHTAACTHaekpHAAKINKHETEbpyNCHATAirPort. IIOBBAe CcNtCBKa HAnHnHHeBezHHMpeKn. Linksys Smart Wi-Fi 3adan aTOMMATUHOIMe HA BAuWtE BezHHKaMpeKx.
2. B daenno Dory npmeK komnptbte c bpaHc pyra 63kua H mpeKa C MeTo JimsRouter.ImeTo Ha mpekata Ha LInsys E-Series network, BronzeEagle B ToOn npmeK, e nokasaHO kato h5baHo.
- KlnkheTe BpyxH mEmTo Ha 6eaKunHata MpaXa Ha Baun pyTe Linkays E-Series (BronzeEagle a nonpeAe).
- BbBeTePe naponata Ha 6e3xuHata MpeXa B noneto Password (Iapona).KnKhete Bboxy OK.
Kbde da hamepe Te oomeomou
Linksys.com/support/WRT1200AC{dokeymaia,maeipmna3ahterlahe,43B, ToxHnckoKa noDpIbKka, Ta HpaBnOHe BpeM, oopymm}
- Linksys Smart Wi-Fi (linksyssmartwifi.com; KNIKKHTe Bbpxy Help (IOMou) a rophata hact Ha ekpana)
3a6e9exkkaa:
JIiueh3nTe NbeIeKknte OTHocO cOyepa OTpeH CTpaHH, H3oIaBcH CTo3H npdyckT,MOKeTe Da SuDte Ha apec http://supportlinksys.com/en-us/license. 3a BbnpcknN 3a 3a KcHAn 3a GPL oTbpOen KoD, MoJ, CbPkTe ce c http:// supportlinksys.com/en-us/gplicodecenter.
Cneunkaui
LINKSYS WRT1200AC
MHaMoDaa DByaHToB rnaabntoB Wi-Fi pytp Linksys
Onncnne DByIeHIOB AC pyTeP crrnaBIOB nopt n2 USB nppta
Home ha modal WRT1200AC
CkopoctHaKoMyTnpyEmn npT 10/100/1000 Mbp (Gigabit Ethernet)
PdnoeToa 2,4GHz5GHz
BpoaHTEN 2 BbHm nperynpaenn aHTEN
TopToBe 3axpaHbHe,1USB3.0,1KoMbHnHpaH USB2.0/eS
ATA, nHTepHet, Ethernet (1-4), R-SMA (2)
BytoH HynpaHe, Wi-Fi Protected Setup, saxpaHaHe
HdNkatopHa npadnnaen 3axpaabahe,INTERNET,2.4GHz,5GHz,USB1
USB2, Ethernet (1-4), Wi-Fi Protected Setup
UPnP no4bpxace
Функшии за saциТа
BHTOBeHa3aunTHnKIOU
PpBkaHa paIIOBaTa
CNCTeMa 3a CbXPaHEHHe
PnDpBkKaHa6pa3bpn Hnnno-BnCoka Bepcn,
WEP, WPA, WPA2, RADIUS
128-6ntoBO uHΦpOBAHe
FATNNTFSHFS+
Internet Explorer 8 no-no-BuCoka BepcN, Firefox 4
Google Chrome 10 no-no-vaoka bpcn Safari 4
HNo-BnCOKa BepCnA
aHHH 3a OKoHaTa cpeDa
Pa3mepn
9.68"x7.64"x2.05"6e3 aHTehn
(246x194x52mm)
TeroHa yctpojCTBTO
29yHm(833g)
3axpahBaHe
12V,2.5A
CeptnphiLipaphe
FCC, IC, CE, Wi-Fi a/b/g/n/ac, Windows 7,
Windows 8, DLNA
Pa6oTHaTemnepaTpa
0T32do104°F(0T0do40°C)
Tempepatypa 3a cbxpaHene
ot-4do140°F (ot-20o60°C)
PabothaBnaXHOCT
OT 10do80%OTHOCHTeHaBnAaXHooCT,63KoHdeH
BraHHoCT3aCbXpaHeHne
ot 5do 90%6e3 KOHdEHNpaHe
3a6eennka:
3aHOPMauoTHOCHO HOpMaTHnHbTa ype6a, rapahuRTa N 6e30NaCHocTta
BxKTe KOMnKaTnCKa,doCTaBcC BaaWpyTe,pW OTnDte Ha aDpec Linksys.
com/support.
CneuoukaunTe noDnEkat Ha npomHa 6e npedn3BecTne.
*MaKcMnHnTpeBa0THNnPKa3AeTI CaIbJIeEHNOT CnEiDfKaunHTe HCTaHap802.11 HA IEEE.DaeCTBnENTnHnPApeTaONPKa3AeTI MoKxJa ca paaNNH, BkIOCHNTIHO No-NHcIK KANATET 3a paBToa a6oKuHa MPkeKa, npOryckateHa cncoc6hct 3a daHH, dVnaJaoCh nOKpKnHe.EeKtBnHocCTTA 3aBCNcOT MHOrO fakTopr, yCIOBn HnPomeHnVB, BkIOCHNTIHO pAcSTOR-HETO TO TQKATA HdCctbI, O6MeBT Ha MPKOBnTPaFKn, CIPoTBeHnATE MaTePpNIM N KOHCTpyKUHTA, INIOIAIBAHATA ONEpaUHOHcXCTeMA, INIOIAIBAHN KOMIIEKT PPOyTK Ta 663XHH ENccTbI, CMUeHnRTA HdpYr HeBlaonpPnTHH YCCBN.
Iocetete linksys.com/support 3aBpb3ka C Hauata TeXHHeCKa noDipbKKA, yDCCTOBBAHc Hapdni
BELKIN,LINKSYSMHMOHMeHaHa npdyHn moTOrTuH Ca Tbprockn MapHe Ha rpynata dpykectBa Belkin
YnmeHATe TbprcKn Mapn Ha TpeN CcoBCTBeHOCT HcOHTe Vm npTeKaTe. 2015
Belkin International, Inc. 2000 Nieuhne Heknute fumvans. Bocun npaba sanaseH
LNKPG00192epnA00

GUIDE D'UTILISATION
WRT1200AC
ROUTEUR GIGABIT
SANS FIL DOUBLE
BANDE
LINKSYS PERFORMANCE PERFECTED
Table des matieres
VUE D'ENSEMBLE DU PRODUIT
1 WRT1200AC
CONFIGURATION DE VOTRE ROUTEUR
Bouton Wi-Fi Protected Setup
PRIPOJENI K LINKSYS SMART WI-FI
Otevfenl Linksys Smart Wi-Fi
BRUG AF LINKSYS SMART WI-FI
Knappen Wi-Fi Protected Setup
Tryk for nem konfigurering af tradjes sikkerhed pa Wi-Fi Protected Setup-kompatiblenetvearksenheder.
Ethernet-porte
Tryk for at taender routeren.
Produktoverblick
Avoid Overheating


Vaugmontering
MEDDELESEN "CANNOT ACCESS YOUR ROUTER" (INGEN ADGANG TIL ROUTEREN)
Knapper Nulstil, Wi-Fi Protected Setup, strarn
Lamper pã frontpanel Strøm,INTERNET,2,4 GHz,5 GHz,USB1, USB2,Ethernet(1-4),Wi-Fi Protected Setup
UPnP Understet
Sikkerhedsfunktioner WEP, WPA, WPA2, RADIUS
Tasten Reset, Wi-Fi Protected Setup, Ein/Aus
[9,68x7,64x2,05Zoll]
Gewicht
833 g (29 oz.)
Netzstrom
12V,2.5A
Zertifizierungen
FCC, IC, CE, Wi-Fi a/b/g/h/ac, Windows 7,
Windows 8, DLNA
Betriebstempoatur
0-40°C
Lagertemperatur
-20 bis 60°C
Uv6eote to npaexyoevrpofo8oepkEP.
Koupiévepyooinon/anévepyooinon
Nathate to yia va everyponnoe to router.
Etiokonnon npoiovtoc
Avoid Overheating
ToTeTmOn e ToIyo
rourer xei unoboxc yio tonoBtmon oToiOx Oa KAtu wepoc kde noiaoc npooepouw ueAria otny tonoBtmon tou router otov toyo. H aototaon ovapeoa otrc utoboxc otnv kovtn naeupd eivai 104 mm. H aototaon ovapeoa otrc utoboxc otny meyauen pneupd eivai 210 mm.Aanatovta 6oo bioe yio tvn tonoBtmon Tou router os toyo.
Pnoteivopveu uko tooBtnc ae toyo
Enelwao:
H Linksys dev iiva unovv yia nuee no Bo npoknboov anu ktoobetnnc o Toiyo to orio dev ivai ophiac.
Odyies tootheon
- Kaopioe to onie 0to onoia Ode tvo tonodnne to router kauic kai niv npua nry otoia 8x npunonoe te ytn totoetn onov toyo.Bepauwe Tnc o toioc no Ta xohonouniote elvao AIOOC,ntedoc,oteyovk aotatobpoc,Bepauwe Tnc nheanelov KOTa as piapeuato.
- Ipv tpuetae toyio, kniETo oyeiaypaia (ovirn nua np aikua naua) ou iivai kataan yia Tnv EynataoaoH oac. Tpuetae to tyio xnpouonoiuWvTAC OwOTo oyeiiaypaia.
- TOnoBtHnTe pia bia oe kOe oTnKai aonote EKeTeEeu4 mm nnc keoAhnC nTc.
- TomoBtnto to router me npno wote o unodoxc tonotnnc o Toixo va eivai uoypumquevee me tio do 0
- TOnoBETnTe TUC UTOBOXeT OTOBETnOg OE ToxO ENoV W TOIc BiEs KAI PAtaKInote To Router npo Ta KATW MEXP OI BIDc va OTAEOponoINou OTC UTOBOXe TOCOETnOg OE ToxO.
If you have not yet created a Linkbase SerialtyHsAcoount, click the Create Account button in the upper right corner of the page.
Linksys Smart Wi-Fi Sign In
Use your Link to Smart Wi-Fi accounted to access your home network from anywhere, at any time, even when your mobile device is offline. Easily contact raw devices, net parented outlets, get access to Smart Wi-Fi mobile Apps, and more.
For more information:
English (United States)
IIOE NA AAAAAEETIEPYOMISEIETOY ROUTER
Enneiwon:
Tn npoobtn BonBEOA o otOIOODHOTNE Pevou, Kovte kK OTNv EINIOy BonBEOA (Help) OTO
emawpeoc nC OBOVNC
- Linksys Smart Wi-Fi saalovnac ond disbovnur
Linksysmartwifi.com myrouter.local (av dev exer adekon 0r daiktu) e ev npo ypaqnaepynnc - 2a evou nou piokei aopate, kovie kai oe mnt enayn

XOpTNC dKtou - EITPTEI TIV eFADVON KAI T DIAxEPIaON DAW VU WO uOKEeuv TOU dIKTOU Oueuov ouvdegevec oTo router. MtOpeite va npoBaAte tic oukeuec otto Kopo kIO tku Ka Odo kIOKeHTW, va anouvduaeote oukeuec rva eFAPAViAE TE Npapopieq yia kabe Oaukeju.

PpObaeIIOKETN- EITPNTEI TIN BIOOPbOaON KAI TNY TAPAKAOoON evoc bIKIOU TOI pOIOv va xpoiaotokov oI eKOKETec, wipic va exov npObaon oe dIoou tou nopouc to dKIOU OAC.
Fovkoceayoc-EntepetovotaoKaeqpoTOnoBeovto webkntpOuonTow xpvwnpbaanotiaAiktu.
TaVouynon pOwOe oepa npoTeaOnTnac -EITIPENr Tov opoO TOU OauKeuW KAI TOW eapuyow Nou exouypeNpTopeaOnTnA y TaN kwon Tou dKtuOoc.
Eeayoc tauyntac - Etnpenei tov eeyto nct axutnac ouv6oou ooc 0to siuktu.
Eeepn anoekuean - Etnptne Tny npdaon oe evav uovdcpevo bko USB n eSATA (ev npexyov) kai ngpnc knvK xphoc apxkaw, diakouotn aolauokw knpdeaon. FTP.
UvOeouoTnA - EInrpeTei Tn 6iaoppwn Baoikov puoioeov kai puoioeov ia npoxnpuevoC.
AvmuTion npoBnauv - Emptene Tsiaywn Tov npoBnauw Tou router kai Tou kEyxo Tc, kaotaoang Tou ikou.
Aooppat oovean - EntpTeTn Tsiouopfoon Tou aoopatou dktou tou router. Mtopctre va aaiEeTn Tneouayia oaoaieoc, Tou kwbo npooaoc, foipapopa diuovovew MAC KA v ouovdoteo ouokoeke e xprjan Tou Wi-Fi Protected Setup
AoAeia - EtipnTei Tn diapoiopwn Tn aoopoptn acoAeiaoc Tou router. MTopette va diaiopopoeae to teixoc npnootaoic, tci puoiiec VPN, aa xai va denoupye e Eatoaikuevecpuoiieic yea oepoyec kai novivio.
Avtietwn npoBnmuaw
Auta to kaspiaia oia aac, bongneia va uaoe ouynn npaaiaata kara tny ekytaaataaon ka va uocoeote ot siakutuo Mtopeite va aotepnoatepn Boneia ato n 3paeueu en unotpi- en maov mac ont duovwn linksys.com/support.
TO ROUTER EN EKATAZAHOHKE ENITYXΩ.
Av to Linksys Smart Wi-Fi 6v oλκηρωε ην εγκατασαη:
Me Evay ouvEtnpa nia kopita, nariote npataeiva to koumi Reset mepniv eveKtkiu AuyixoL Ptdofoaioi oto npootvi mepoc tou router va apyoei v aooboohive (peitou 10 deutcpokta).Evkatoaotne Fovra to router.

Hepavion tou router oac mnpoi va diaeppei
Av npoBnnae 2ev 08ei, anepepyonone npooipvda to teixoc npnoataic tou uioyotni oac (Bb. onyies loayuukau aoeaeiaeg yai biheoi). Ekyataortne Eaav to router.
Av kai mai dev katipoei va yekataipotk to rour, 8piste vav daa otoayoi kai xpnipomate kivovio va yekataipotk eao to router.
Avtietwn npoBnmuatwv
MHNYMA TO KAAΩΔIO ΔIAIAKTYOY ΕEN EINAI ΣYNΔEEMENO (YOUR INTERNET CABLE IS NOT PLUGGED IN)
Av eufavotet evuynua To kakwioo diauktouov evivauovdepevo (Your Internet cable is not plugged in)Ev npaaatte va eykataaetae to router aoc:
1.Beaiwgeite nuc exte ouvdeea kaev kawio Ethernet n Internet n eva kawio ootc ekvevoouvoeoetorouterao) atnyktpavbiprINTERNETto piaowepoc tou router k any katoanl npouovteac.Autn thupo aotovreuovwnwcoWOWEETA Ethernet,0000 eovdctgataovovadctaKATN WAN.
FlowDyntou router

Piow oynou kawdiakou povre
nlow ou DSL oov
2.BaWcTe 60 To pOvTe OAC eivai ouovbcepevo oTo peua KAt evpyoioevo Av Exei diaKoTn evpyoainong/omewpyoainong,BeaWcTe on BiPaketai otN bKn ON I.
3. Av unnpoia Intarnet eivai Kaalbski,betauwoite on to opaoovko klaosio nou npexan oto rspocac, evai ouvdskevo on thopca CABLE tou oovteoc
4.H,ev oU nppeocic biaodukou oac eva DSL,bepaowte cTn Tnaepwn ypaun DSL eiva ouvbepeuyn tnpo aDSL rou povtpuoc.
5. Av o u t a o y iat nac oac hata v nponyouevw ouwdeep evoc oto movteu oac peow kaawsiou USB, anouvdeote to kawsiO USB.
EyKoToaToTe Sovu to rOuter.
MHNYMA «ΔEN EINAI ΔYNATH H IPOΣBAH ΣTO ROUTER ΣAΩ {CANNOT ACCESS YOUR ROUTERMESSAGE}
TVA vA OAKOTPE PPOBQAnO TAO rOUE A, pPTEIO UTOAoyIAC oA vEiAVU VDSEBEOVOC 0Ao DkoAoc Btvo. Av ExTe POC TO TAPOV aoupam PPOaON OTo dAIOKtuO, To pOBIANu EVEyoEvuc vEAiv OTo ECTe UDOBEti KATADoc EvvaDioepotoko auoipato kIoTuO.
Koumu Enavapopac, Wi-Fi Protected Setup, Evpyooinon/ Anevpyooinon
Ev5816cmuipovnuiaio Tpoaoboo,INTERNET,2.4GHz,5GHz,USB1, USB2,Ethernet(1-4),Wi-FiProtected Setup
UPnP Ynootnpioevec
Aetoupyic aocaaiae WEP, WPA, WPA2, RADIUS
Bit kai6io oaoaiaoc Kpumotypapnonewk ka 128 bit
Ynoohtn nootpatoc apceiw aothekuon FAT,NTFSxHsF+
Ynoaipcpeva npoypaepata Internet Explorer 8 rveoepo, Firefox 4 rveoepo,
peynonc Google Chrome 10 rweoepoK Safari 4 rweoepo
Xapaktnpiotka nepiBaalovtoc aeitoupyiac
246x194x52mmxwpi tckepa 0 (9,68"x7,64"x2,05")
Bapoc,muovda 833yp
Iocu 12V,2
FCC, IC, CE, Wi-Fi a/b/g/n/ac, Windows 7, Windows 8, DLNA
0 40C
Ypaia 10% 80%, 60% ypaia, wipc npkwn
Ypaia aonthetaue 5% eoc 90% wpiou
Inneiow:
Ia nlaopopiec, oxetika me touk kavovipouoc, trny eyyonn ka tny aophialeia, 8o CD
nou ovoeue to ruter oac netaeite oTo Linksys.com/support.
Opiobaiypapecmuopovvaalakovwipicpozibomoino.
H meytoan odoon npoknta an tnc npoiaypafc tou npotou IEEE 802.11.
H npayotikn ano0oyn evexetai va biapeei (xamnoepn xwptntotaaopupatou
diuov, biepiaiutik kavovtta deooyevov, eupoc, ebeiaia k.a.). H aioo0n eapatai
an oiaoc npayovic, auoykek caetaaianc, ouni nepiaipaevtoi n aoitotaan
anto to aneio ppoabane, o oyokoc tnc ivnanc ou diukvto, ta uikka kataaakeuck cai
n iia a kataaeknu, tonaoiouoioye voieotyko ootma, ouvuaouoc tw
xnpouoioioeuvw auuppatw vnpovtw, onapebuoc kai aaac ovtoec ouvnykec.
Entokxieite to linksys.com/support yia paebauevn texviun unotnpaen
Oe anowupie BELKIN,LINKSYS kai mdo ovopata npovay kai Mayrana onotao epropia oipora tou opau
Bepov Belkin. Tugv npuaa prnna ovoepovnt, anekie thknpin vny aivay kovtck
2015 Belkin International, Inc. 40/40 40/40 40/40 40/40 40/40 40/40 40/40 40/40 40/40 40/40 40/40 40/40 40/40 40/40 40/40 40/40 40/40 40
LNKPG00192AeB.ACO

GUIA DEL USUARIO
WRT1200AC
GIGABIT DE DOBLE
BANDA
ROUTER Wi-Fi
LINKSYS
PERFORMANCE PERFECTED
Contedio
DESCRIPICION DEL PRODUCTO
1 WRT1200AC
INSTALLACION DEL ROUTER
KUIDAS KASUTADA LINKSYS SMART WI-FIT
ETHERNET1 kuni 4 (Secondary)
Wi-Fi Protected Setupi nupp
Vajutage ornait, et konfigureerida Wi-Fi Protected Setupiga valmidusega vorguseadmete turvalisus.
Ethernet porid
Uhendage Ethernet: kaablid nende siniste gigabitide (10/100/1000) portidea ja teie fiksvorgu seadmete kulge.
Markus
KUIDAS UHENDADA LINKSYS SMART WI-FI
Linksys Smart Wi-Fi avamiseks:
- Sisestage veebbrauserisse linksyssmartwifi.com voi myrouter.local (kui teil eile internetu hendust).
- Sisiestage e-postiaadress ja salasona, mille eelnevalt seadistasite ring klopsake npppu Logisisse.
KUIDAS MUUTA RUTERI SEADISTUSI
Märkus:
Installige router uest.
JUURDEPAAS TEIE RUTERI TEATELE PUUTUB
FCC, IC, CE, Wi-Fi a/b/g/h/ac, Windows 7,
Windows 8, DLNA
32kuni 104°F (0kuni 40°C)
-4 kuni 140°F (-20 kuni 60°C)
Wi-Fi Protected Setup -painike
Painikkeet Nollauspainike, Wi-Fi Protected Setup, virtapainike
Etupaneelin markkivalot Virta, INTERNET, 2,4 GHz, 5 GHz, USB1, USB2, Ethernet (1-4), Wi-Fi Protected Setup
UPnP Tuettu
LNKPG CO192 Rev. AOC

GUIDE DE
L'UTILISATEUR
WRT1200AC
DOUBLE BANDE
GIGABIT
ROUTEUR Wi-Fi
LINKSYS
PERFORMANCE PERFECTED
Table des matieres
PRÉSENTATION DU PRODUIT
1 WRT1200AC
PARAMETRER VOTRE ROUTEUR
COMMENT UTILISER LE SMART WI-FI LINKSYS
Bouton Wi-Fi Protected Setup
COMMENT SE CONNECTER AU SMART WI-FI LINKSYS
Pour lancer Linksys Smart Wi-Fi:
If you have not yet created a Linkbase Sement Wiki account, click the Create Account Subtitle in the upper right corner of this page.

Linksys Smart Wi-Fi Sign In
Use your likely Smart Wi-Fi accounts to access your home network from anywhere, at any time, even from your mobile device. Easily connect raw devices, not parented outlets, get access to Smart Wi-Fi mobile Apps, and more.
For more information:

English (United States)
COMMENT MODIFIER LES PARAMÉTRES DU ROUTEUR
Remarque:
AZ UTVALASZTO TELEPITESE
If you have not yet created a Linkbase Sement Wiki account, click the Create Account Subtitle in the upper right corner of this page.

Linksys Smart Wi-Fi Sign In
Use your likely Smart Wi-Fi accounts to access your home network from anywhere, at any time, even from your mobile device. Easily connect raw devices, not parented outlets, get access to Smart Wi-Fi mobile Apps, and more.
For more information:

English (United States)
AZ UTVÁLASZTÓ BEÁLLITÁSAINAK MEGVÁLTÓZTATÁS
Megegyzés:
LNKPG CO192 Rev. AOC

PANDUAN PENGUNA
WRT1200AC
GIGABIT DUAL-BAND
ROUTERWi-Fi
LINKSYS
PERFORMANCE PERFECTED
Daftar Isi
RINGKASAN PRODUK
1 WRT1200AC
PENGATURAN ROUTER ANDA
5 Bantuan Lebih Lanjut
5 Cara Memasang RouterAnda
CARA MENGGUNAKAN WI-FI PINTAR LINKSYS
6 Cara Menyambungkan ke Wi-Fi Pintar Linksys
6 Cara Mengubah Pengaturan Router
PEMECAHAN MASALAH
Tombol Wi-Fi Protected Setup
Tombol Atur Ulang, Wi-Fi Protected Setup, Daya
Indicator Panel Depan Daya,INTERNET,2,4GHz,5GHz,USB1,USB2
Ethernet (1-4), Wi-Fi Protected Setup
UPnP
Didukung
Fitur Keananan WEP, WPA, WPA2, RADIUS
Bit Kunci Keamanan Hingga enkripsi 128-bit
Dukungan Sistem FAT,NTFS,dan HFS+
File Penyimpanan
COME CONNETTERSIA LINKSYS SMART WI-FI
Per apire Linksys Smart Wi-Fi:
MESSAGE "IMPOSSIBLE ACCEDERE AL ROUTER"
Supporto file system
FAT,NTFS,and HFS+
di archivazione
Supporto browser Internet Explorer 8 superiore, Firefox 4 o superiore, Google Chrome 10 o superfiore e Safari 4 o superfiore
Specifiche ambientali
Dimensioni (246 x 194 x 52 mm)
Peso unita
KAIP NAUDOTI,LINKSYS SMART WI-Fl
6 Kaip prijungti prie,Linksys Smart Wi-Fi
6 Kaip keisti marsrutizatoriaus nustatymus
TRIKCIU SALINIMAS
10 Marśrutizatorius nustatyas nasekmingai
11 PraneSimas api neprijungta interneto kabeli
11 Nepavyko pasiekti marsrutizatoriaus pranešimo
TECHNINIAI DUOMENYS
- Linksys WRT1200AC
Gaminio apžvalga
KAIP RIPJUNGTI PRIE LINKSYS SMART WI-Fl
"Linksys Smart Wi-Fi" atverimas:
- Ziniatinklic narsykleje jveskite adresq linksyssmartwifi.com arba myrouter.local (jei nesa te prisijungg).
- Iveskite anksiau nustatyq el, pasto adresq ir slaptaizodjir spustelokite Prisijungti.

KAIP KEISTIMARSRUTIZATORIAUS NUSTATYMUS
Pastaba.
Noredami gauti papildomos pagalbos del bet kurio menui, ekrano virsupe spustelke te „Pagalba".
- Ziniatinklio narsykloje jveskite adresq linksyssmartwifi.com arba myrouter.local (joe nesate prisijunge) ir prisijunkite prie „Linksys Smart Wi-Fi" paskyros.
- Menu kaireje spustolekite parinktj.

Tinklosemelapis- leidzia perziureti in valdyt visus prie marstrutizatoriai prjungtus tinkdo prietaisus. Galite perzurieti pagrindiname i svecio tinkluose esanius prietaisus, juos atunjngi arba perziureti informacij apie kiekviena prietaisa.
KÄ PIESLEGTIES "LINKSYS SMART WI-FI"
Lai atvertu "Linksys Smart Wi-Fi":
- Timekä pärlikap ameklejet vietni linksyssmartwif.com vai myruter.local (ja neesat tieessaaist).
- levadiet e-pasta adresi un iepriek izvaidoto paroli un ieejiet sistema, noklikskinot tausti nu "Log in" (lenakt).

KÁ MAINIT MARSRUTÉTJA IESTATJUMUS
Piezime:
VERBINDING MAKEN MET LINKSYS SMART WI-FI
Linksys Smart Wi-Fi openen:
Licencies are granted by the GPL and the GPL code center.
Specifications
LINKSYS WRT1200AC
Modelnaam Linksys Dual-Band Gigabit Wi-Fi-router
Wi-Fi Protected Setup-knapp
SLIK KOBLER DU TIL LINKSYS SMART WI-FI
Apne Linksys Smart Wi-Fi
Knapper Reset (Tilbakestill), Wi-Fi Protected Setup, Strem
Indikatorer pà frontpanel Strom, INTERNET, 2,4 GHz, 5 GHz, USB1, USB2, Ethernet (1-4), Wi-Fi Protected Setup
UPnP Statte
COMO USAR O LINKSYS SMART WI-FI
Botoes Reset, Wi-Fi Protected Setup, Power
Indicadores do Painel Frontal Power,INTERNET,2.4 GHz,5GHz,USB1,USB2, Ethernet(1-4),Wi-Fi Protected Setup
UPnP Suportado
Recursos de segurarca WEP, WPA, WPA2, RADIUS
KORZYSTANIE Z INTERFEJSU LINKSYS SMART WI-FI
COMO UTILIZAR O LINKSYS SMART WI-FI
COMO LIGAR AO LINKSYS SMART WI-FI
Abrir o Linksys Smart Wi-Fi:
MODUL DE CONECTARE LA LINKSYS SMART WI-FI
Pentru adeschide Linksys Smart Wi-Fi:
KAKIOJIb3OBATbCRA LINKSYS SMART WI-FI
6 KaK noDkNoHcy K Linksys Smart Wi-Fi
6 KaK nMaMeHHTb HAcTpOoHm MapuPyTuHaTopa
ПОИСК И YYSTРАЕНUE HENICPABHOCTEI
10 Bāw mappytnaTOp He 6uyn yCneuho yCTaHoBHe
11 Co6ueHHe «VHTepHET-Ka6eIb He noDKIOUeyE
11 Co06uHHe «MapuPyTu3aTOp He doCTyHn»
Khonka Wi-Fi Protected Setup
Haxmte KhoNky, yO6bI JERKO HAcTPOINb BcsoaHocBb BcnpoBOHO CBA3Ha yCPOIcTe b cFyHKuEe Wi-FT Protected Setup.
IopTb Ethernet
IIOKIOHHTe KABEMhETN CUNHM TINABNTM NpTAM (10/100/1000)N yctpoCTaAM npoBOHO CBAA BaaBcTH.
PpmeaHne.
Iyue npno3oDteBnOCTn, nEhmet noptOB,ncnoBsyTe Ka6eB CATE nn yue.
NoptHTepNet
PnKIOHTe Ka6eB Ethernet K KeTOMy rRabTHOMy npTy (10/100/1000) INpOKoONOCHM npTAM CBAH NHTAPHeT/DSL mnnnncckCMMy moemy.
PpMmeyaHne.
Iyue npnoBdoTeHoCTn, dA Ethernet noptOB,ncnoBsyteKaebbCAT5E nn lyue.
Nopt USB 3.0
IIOKIOHHTe, oBcneuHOBOKbTyDocTyn DnYcTPOHCTBa USB Hm eSATA B 6ecnpoBDHO CTeN Nm CTeN HTEpHET.
KoM6HnPoBaHHbI npT USB 2.0/eSATA
PIOIOHOH,OeBcNEHABOTHPaHbOCTyINJYCTPOINCTBAUSNnE SATA B 6ecnpoBOHOCHETCNHINHTEPHTB.1B TAKHE MOKETPOKIOHOHTNB USBPnHPHTB D0E CNOHb3OBOAHB CEN.
Khoika c6poca (Reset)
Tb6bBocCTaHOBHT3ABoDCNHEHACTpOHN, HAXMATEydpKBAeTHKONKY BTeHHeHNE10CEyHn (noKaCtOBcHnHnKATOPHEHnHETMRAtB).BbTaKKe MoxTeBOCCTaHOBHT3ABoDCNHEHACTpOHN, HcNoIbSyI RlksysSmartWiFBeTINrHerPHTNmBMOuHbHompUloKeHH.
NopTnHTaHn
IopKIOHTe aadTep nTTAHnNE peMeHHoro TOKa, KOTOpBb BXoNT B KOMNJIeKT.
Khonka nHTAHN
HaKMTe KhoNky, yTo6bI BKnIOHTb MaPspTytnaTApOp.
063op npoodykta
Avoid Overheating

PekomEnyEmble KpenExHbI npncoc6nne H

6-7 MM 1,5-2 MM
3MM
Приимеauthнe:
LinksysHE Hecet OTBCTBENHCTN 3aIOBpeKdEHN, HAneCHeHbE yCTPOCTBY BO BpEMr 3akpenlneHn Ha CTHe.
HCTpykunnoyctaHOBKe
- Otpednte, rde n cakoh tctopohb bbl xOHTe aakpenHtmbauppytnatop. Y6dntecb, qTOCTeHaIqKa, poBHn, cyxN hTepda. Y6dntecb, qTO3eKTPnckeaP08TeKA HaxoNTB 3OHe DOcTyNa.
- PpckJe Cm PocBepnTb OTBepCTNe, NO6BepNTe Tpaapet (JINI 11PPOKoN yakoCOTPOH), KOTpBn COOTBETCTByeT opHHAnly. PocBepNTe OTBepCTnNo Tpaapety.
3.BKaJdoeOtBepCTneBCaTBeTcUpyn TaKIMoobpaom,OTOBb rOIOBAuPyPnBaHcyTINAAHAD NOBepXHOCTbO CTHeHHa 4 MM.
4.PacnoIoxnTe MapuPytn3atop TaKIM 06pa3OM,HTo6bl BbEMKn HxOaHINcB HApOTNB DByX UpyPONB.
5.COBMECTHTEOTBepCTNRCUpynAMMIMeJIeHNOCDBNbTeMapuPyTn3atopBHNs, 4TO6UpyNBBOWNIBOTBepCTN.
HacteHHbI Tpaapet (y3KaA CTopoHa)
Pacnayatae 3ty ctpanu y pasmepe 100%.
OtpexbTe no nyHKmHoi nnHHn paCNOJoknte HaCTHe TaK, UTObI oecneuHTb TOHoe paccToHHe MeKdy OTBepCTaMn.

063op npoDyKTa
HacteHHbI Tpaapet (Wnpokar CTopoHa)
PacneuataaTe 3ty cTpaHnUy B paMaPe 100%.
Otpekbte no nyHKtnpHoi nHHn npacnoKHTe Ha cTeHe TaK, 106bl oecneHt ToHOe paccTcHHe MeXdy OTBepCTaHm.

HactpoikapoyTepa
DIOIOLHINTEIbHbIE CBEDEHnA
Linksys.com/support/WRT1200AC(okymeta,3aoy3k,yacto3daabaBbE BOPOCb,TEXHuecknnoepKKaOHnaHnT,foymbl)
- POMOuS no Linksys Smart Wi-Fi help (Bouynte B Linksys Smart Wi-Fi, a 3atem HAKMNTE KhoNky 'POMOuSb' (Help) B BepxHae HacTn EKpaHa)
KAK HACTPOINTb MAPUpyTN3ATOP
4T06bHaHCTpOHTbMapuPyTHaTOp:
1.ПиЗЗмЕну УKE cyUeCTbYIOcero MAPuPyTn3aTopa NocIeHIN Heo6xOmo OTKIOHHTb.
2.ПОДКИОЧЕТАНTEHHHиNTAHHEKBAUOMYHOBOMypoTyepy
3. OTKIIOHTE IN CHOBA BKKIOHTe poTyTe
4. PIOKIOHHTE INTepHET-KAbeI MoJema KKeJIaTy NpO Ty INTEpHET Ha MapuPyTaTaTope. IOKINTEcB, nKa HNViKATOp TnTAHn PepeCTaHET MIRAtb.
5. POKHIOHTecb K 3auuHHe6cnpoBHOH cTe H3aBHHe KOtopoYk3aHO B KpAeKOM pyKOBOJCTBE, IpEOCTABHHeHOM B KOMTJIKe Tc MapuTyIaTOpOM. (No3ke Bu CMOKE Te CMEHITb H3aBHHe cTe N Iapoi.) EcnB Bam NotpeSyETc NOMOUB B NOKIOHnK cTeH, oBaPteTCb K DcKymeHTaUN No yctpoCTBy. PImeueAHHe.DoCTyB V INTEpHT He bdyet oBeCneUbaTcdo 3aBepHHe HaCTPOH K MauuPyTHaTOpA.
6. OTKPcHte Be6-bpa7epn CnLdyeTHe HCTpyKuMn Dn3aBepueHryctahosKn.Ecm HNCTpyKuMn He NoAHToc B Be6-bpa7epe,BeEdtre B aippeChy cTpOky «linksyssmartwifl.com
7. 0aBepueHnY cTahOBKn C0a3aIe CBOO yTuTHy aIinb IJnLkSyS Smart Wi-Fi, cIeJaY HtCtpKuHM Ha KcpAHe.IcNcbl3yIte LkSyIs Smart Wi-Fi, cyo6h Ahtpmb BAI: MapUpTyTApOp C IIO50o KOMbIbTepe, IMoeioero Bxok D INHTepHe.
UnpaBHeHne HacptpoKaMn MapwpTy3aTopa:
- N3MeHHTb MMn NapoMb MapyTu3aTopa
- YcTaHOBnTB RoCTeBOI DOCTyn
HactpoKa poDnteBckOro KHTpOra
NoKIOHHeH yCTpOHTK COT
PpOBePkCaKOpocNHTepHET-CoeDHeHn
PnmeaHne:
Ha 37ane cozadnhyeHOn hAnnci LncSy SmaT Wi-Fi BAm 6ydt BNCnHO 3NeKTPoHNO HINbMo C nOaTBeRJeHNHeB. Bam Heo6xOymo OTKpBt 3NeKTPoHNO HINbMo HInpeN To ykaahAoB H EBM CcUkKe
Kak noIb3ObaTbcra Linksys Smart Wi-Fi
KAK NOДКЛIOYHTbC K LINKSYS SMART WI-FI
4To6blOTKpbTb Linksys Smart Wi-Fi:
- OtkpoTe Ccblky linksyssmartwif.com myruter.local (ecn HETIOKNOHENK INTEPHRy) B BaAMe Be6-6pay3pe.
- Baeinte aepc 3aektpnoHn noTH npao, KOTOpB bY yCTaHOBN npA perntpaun, Hakmtte kONky 已 BoTn (Log in).
If you have not yet created a Linkable Serialty-Info account, click the Create Account Subtitle in the upper right corner of this page.
Linksys Smart Wi-Fi Sign In
Using your Linky Smart WF-Mobile to access your home network from anywhere, at any time, even from your mobile device. Easily connect raw devices, net parenteral outlets, get access to Smart WF-mobile Apps, and more.
For more information:
English (United States)
KAK N3MEHHTb HACTPOINI MAPUPTN3ATOPA
PpMmueaHHe:
YTObIIOyUHTBDOJIOHMTeBIHyHOIOMOuBIOJIIOHOBbMpaSaTeAM,HAHXMTeKHOHky 「MOuB(Help)BepxHeNactInKpHa.
- B0yIaTe a cboo yehyto 3aHb Linksys Smart Wi-Fi, npoiiao ccblke linkssmartwifi.com mymyrouter.local (ecm HET noKIOHENH K INTEPHTY),pees 6payaeep.
2.Bb6epnToOnuHO MeHO CNEBA.
CnncokcyctpoCTB no3BOJAE TPOCMATPBbTB Bce CETBEIy cTPOICTBA, NOKIOUHHe K MapOyHTaTOpOy, aTAKKE ynpABJIbT bTHMIY cTPOCTBAM. BMOKeTe PcMOTPAIBa YcTPOCTBa BA BoJe OCHOBHO CTEN RTOCTBOE CETN, OTKHOATbYcTPOCTBa NIO TOOpaBAtb HNOOPMAIOIO KAKDMN HIX.
TocTeBOMOCTynI03BOJETHACPABATbNOCYUeCTBJIbKoHTPOJbHcCtBIO,KOToPOCMOTyRITIOJB3OBaBCrTOCTnBeOCTyNAKOBCEMBaUMCetEBMdecypCA.
PoDHTbcknKoHTpOJI -no3BolmET 6koKIpOBaTb DocTyN K Be6-caiTam MyCTaHaBnBaTb BpeMaDocTyNa HntepHET.

Ha3aHcHHe npOpntetob nHocHTeien -noB0n8ET OpeDeIb, KAKHe yCTpoCTBa nPiNoJKeHH NOB3yOToC eTeBbM TpeKOM Ha npOpNTeTHbIX ycNBoiX.
PpOeBaKcKOpocTn-n038oJIaRt npOeBaRbckopocTe VHTepHc-oeAHHHe.
NoKIOHENI -Nc8oJRE KOHpynpOaBb OCHOHBn IIOHOHTeHbHe HAcTPOKNCETN.
USB-namTb-n30nREHcIOB3oBATb USB HAKONMTeB [HE BxOHT B KOMTIKNT]yCTAHABMBAb bouu doctynk faaam, meDnacepBep, a taKke doctynk FTP.
NcN yctpanHe HecnpaaHocTe -nOMaET dnaHOCHTPOBaTb HcnpaHocTm MappyTn3atopn nPpOBepBt coCTOHe CTe.

BecnpoBna CaaBn -no380nHt HAcTpoNb p6OyTo MaOpUytNaTaT Oc BcePpOBOHOH cTeBb. Bbl MoeKe T MeHb HAcTpoNb BeoanacOHT, npoB, MAC FmItp, a taKHe NokIOHATyCPOTHa C nOmoIu Wi- Fi Protected Setup.

BeonacbtoNOMORATHACPTObTbnapaemTbBcEONACCHOTcBecpnooDHOPOKIOKIOUeHNMAOpWpyTHaTOpA.MOKHO HAcTPOBb6paHdMay3p,napaemTpVPN,a TAKOE BbPbTbNOI30aTeALKINBcHApTOPOBnIINpNpOKBHHnMP
YctpaHHe HencpapBHOCTe
3TOTpaJIAI NOMOXETBAMPAUHTPACNPoCTPAHNNHO np6bMnYcTAHOBKIN NOJIOJIIOHNEHNI HTHEPHTy.3a 60aeNOp6HOH NPOOPMAHNI ObaPaJIaTeCb B HAUY yOdoTeOHHyN KAPAD CNY6y NOJDOEKKIN linkkeys.com/support.
BAU MAPUPYTN3ATOP HE bbl YCNEUHOYCTAHOBIEH
EcnyctahOBka Linksys Smart Wi-Fi he 6bna ycnneHoi:
NcnoIa3yckp8nky n6yabky, hakmte ny dpejknaTe HONHy c6poca (Reset), noKa CBeTOB INHINATOp HE HAHTET (PnIMePHe 10 cekyHdy).YCTAHOBTE MaupyT TAta3op 3aHOBO.
BHeHmBnBaBweroMapuPyTnAtoPaMoKcTOTNtTaBCa
Ecln 30 He nOMIO, BpeMeHHO OTKKUHTe MeKcTeBcO 3kpaH KOMMbIepea (m. HCTpykunno no 6esocnachctnIO).YCTahOBATE MapUPyTH3atop 3aHOBO.
EbnBnBce eue He ydaonoc Hactpntb MapuPytn3atop, nncnbaeyte pyroH KMOHOTep, Tc6bHnactponbMapuPytn3atop cero Nmouho.
YctpaHHe HeucnpaBHOCTe
COOBUEHNE «HHTEPHT-KABELB HE NOKLIIOYEN
Ecn npn HacpokKe MappyntaTopa oTo6paKaetc coo6eHHe NHTepHt-KabeIb He noKIOUH:
1.Y6eNTcB,TO KaBb Ethernet nINHTepHET-KaBb (nN KaeKaBb,NDUyIN B KOMIIEKTE C BAUM MAPUPVTaTOpO MHaDEKHO NOkJIOHEN K KJEITOMy NpOTY INTERNET HaADHeNA HApEnM MapUPVTaTOpA IN COOTBeCTByIOuEMy NpOTy MoTaMa. Ka npAnIO,STOT NoPHT HAoDMg MaKIpObaH ETheRt, HOH TAKOE MOKQT HaBaTbCBAr Internet HIN WAN.

3aHnnahebMapuppytnaataopa

3aHnnaHn bKaebbHOro Moema
3aHnraHaHbMoAemaDSL
2.Y6eDITcB,yTO MoDEM NOKIOHOUH K CETN BIKIOHEn.EcIN OH OCHAUEHBKIOOHTAE TENTAHN, y6eDITcB,yTO NOCLDNYCTAHOBENBNOOKHO BKN.(ON)NNI
3.Ecnn Hb NnlyoTcb KaebuHMM oocTyNOB INHTOPHT, y6eNTOCb, hTO KAcKaCHaHb Hkabel, npoeocTabLeHHb npobvdepcm, noKnIOueK KABELbHOMy nOpy MOdema.
4. INmecnBnnoB3yeteBnHTEpHer-coeHHHeHemDSL,yBeDInTeCb,HToTeJePohHaJIHHNHOIOKIOHOHeKaDSL-npOyMoema
5. EcmBaKOMbIOpE6blpaHcnoKnOChENKMOeMycNoMoUbIOKaebIa USB, oTcoeAnHtKe KaebIb USB.
YcTaHOBnTe MapuPyTu3aTOp 3aHOBO.
COO6UEHNE -MAPUPYTN3ATOPHEIOCTUYEN
Tc6b noyHtB doCTyn K MapuPyTu3aTopy, Heo6xOmo 06ecneHTb noKIOUeHHe K BAuei co5ctBeHHoC CETn. EcmB HactoLuee BpemB bI NmEeTE BScIpOBDoH OocTyN Cetn INTEPHT, TO, BO3MOHO, BblnoKIOHINbc K YyKoi BScIpOBDoH CETn.
YcTpaHHeHHeNoJaOK Ha KOMMbIOpEx pax c OC Windows:
1.Ha paochem ctoe Windows npabow KHOHKO Mblu HAAKMTe Ha KOHky 6ecnpoB
IkoHMOyTOTJnAHTBCB3ABHCIMOCTNOTBepCINWindows.

- Haxmte Pocmotp doctynbix 6ecnpoBodhix cetBn. NOrBntc cnncok do-ctynhIX cetBn.
| Disable Status Repair |
| View Available Wireless Networks |
| Change Windows Firewall settings |
| Open Network Connections |
YctpaHHe HeucnpaBHOCTe
- HauMMte HA haBaHBeaBn BaaIe cTa. HauMMte TIOKIOUHTbCR. B npHMpe bHaay KCMbIeOp 6bl IIOuOIOH C yUckoi 6oecnpOIOHO Cetn noI nMHeOM JimsRouter. B daHOM npHMpe BaIbOaHO HaBaHBe cTei LinkSy S-Series BronzeEagle.

- Ecn npnepnaeraeTcBBAEeN KIOH CTeN, BBeDnTE Baa napBoB nOaN «KIOH CTeN» (Network key) and «NoTbePntb KIOH CTeN» (Confirm network key). Haxmte «NoT-KIOHCTBcR»
DocTy K MapuPyTu3atOpy DoJxHc6bTb oecneueH.
YcTpaHHeH HeNoIaDOK Ha KOMNbIOTepax C OC Mac:
1.BMHeB BEPXHJYACTN HHPaHA HAKMMTE HA KOKHY AirPort. POBHTCR CnICOH 6ecnpoBoHbix cTei. Linksys Smart Wi-Fi aTOMATHECNI HA3HNIO MRAWBI CETN.
2.B pIMepe Bnay KAMBIOTep Bua NIOHIOHOH K-Hyokai 6ecnpoao hcn CTH NOd HmEH JimsRouter. B daHOM npIMepe BbopaHo HaabaHne CETn Linksys E-Series BronzeEagle.
- Haxmte Ha hasbaHne bceipnoDn cTe Baewero MapuTytsaTopa Linksys E-Series (BronzeEagle B npmepe).
4.BBeInTeBaHnapoBb6ecnpoBdoHOcETN BnoIe "PapOB".HaKmTe OK
Kyaobpatntbcra3doonHHTbHOHnHOpMaune
- Linksys.com/support/WRT1200AC({okyemntaun,arpzkyk,hacto zadaabaembeBorponbci,tekhnckae nondepkkaohnaivat,foptyb}
- Linksys Smart Wi-Fi (linksyssmartwifi.com; haxmnte Help ("Pomou") Ha bepxy ctpaHnps)
Ppmeaane.
LIueHAnIckyMaTeTaaNo IpOgPamMHOmy o6ecNcHHeHIO O TptbIX CToPOH Moryt 6bTB HainBeHH 3decb: http://supportlinksys.com/en-us/licenses。PoXaMyCt aObaPteHcB http://supportlinksys.com/en-us/gplcdeccenter cBonipocamn nian zanopocam no GPL NcxOHNMy KoIy.
TexHnueckne xapaKTepeNCTIKN
LINKSYS WRT1200AC
HaabaHae moDenn DByxDnaaonHHB Iura6HTHb Wi-Fi Poyet Linksys
Oncahme Dayxmana30Hn MapyTn3atop,p6oatauuiOT ctn npememnoTO kcaCnAeTHbMn IopamnN2XUSB
Horme moen WRT1200AC
CckopocbKOMMyTnpyEmbx 10/100/1000 M6nt/c (rrra6nThBm Ethernet) nptoB
PaHnOaacto 2.4Tm5T
KoI-BO aHTEH 2 HactpaBaaMble BHeHnne aHTEHbI
IopTbPiTaHme,1xUSB3.0,1xKoM6HHPOBaHHB USB 2.0/eSATA,Internet,Ethernet(1-4),R-SMA(2)
KhoHn C6poc (Reset), Beoonacnoe noKnoyehne (Wi-Fi Protected Setup), Ntahne (Power)
VIIHikatopny nepedne naheyn Power,INTERNET,2.4 GHz,5GHz,USB1,USB2, Ethernet(1-4),Wi-Fi Protected Setup
UPnP 0dpeKvBaetc
FyHKHm6e3oNaChOCTN WEP, WPA, WPA2, RADIUS
PaaepnctbKIOa 1286Ht(uipobAHne) 6e3oanachocn
IOnDnepKdAChCTeMH FAT,NTFSHFS+ XpaHHeHb
Pnoepkka 6payepoea Internet Explorer B mnn Bwae, Firefox 4 mnn Bwae, Google Chrome 10 mnn Bwae n Safari 4 mnn Bwae
H3nueckx XapakTepcntK
Paamepb 9.68"x7,64"x2.05"6e3 aHTehbb (246x194x52MM)
Becn3denn 29yHKu833rp
ПИТАНЕ 12В,2.5A
Ceptnikauin FCC,IC,CE,Wi-Fi a/b/g/n/ac,Windows7, Windows8,DLNA
Pa6oHaIaTmN, OTo 0do 40°C
Temn.xpaehn O-20do60°C
BnKHOCTb np3KcNpyataaou 10do80%oTHOCHTbHOH BnAHHOCTn,6es KOHDeHCAU
BnKocTb npxpaehnn 05do90%6e3 KOHcHcaHH
Приимеauthин:
OKyMeHTALUIO, RapaHTIO A HHPOMAUIO NO TEXHINK 6E03NACCHOTCNVOTPTNE HADCKE, NCTABAREMOM B KOMNTKETE C MapUPyTHaTOpAM, WIM FOCETTO HAJI CAIT Linksys.com/support.
TexHHuecknExapakTePncTmNMOyTbHmMeHeHb83yBeDMnHnA
MaKIMaJIbHpaON3BODIteJIbHcCTpaccHTAHB CootBTCTBN CO cnaHnKAAKINMA CTA-AdPA TEE IEEB 802.11.FakTHNCKHeXapAHTepNCTKIK, BIOJHOBAKCHT, npOyckHyCnoc6HCT, dAnasao HnOKpHTNk
6ecrpoBOHOH CETN, MoryT OTNHATCSOT YK3A3HHbX.PoPBOBOHBcT B3ACVOT MHORIX FAKTOPOB, yCNOBHN NpeMeHHbX BAEHH, B TOM CHNE
paccToTHHnOT ToHKnOCTyH, O5bEMe CTeBEO TpApH, MaTePnAIOH IN KCHPTpyKUN D3HHN, nIOLOBEmOnOpEAHONOHCHNTsM, CoETAHNA
6ecrpoBOHbX yCTpoCTB, NOxH xDpynx He6laornpnTHbX yCIOBHN
NocTeTIe linksys.com/supportIINa noluyehnna nepeepboTcXHHnecko noDapKnn
BELKIN, LINKYS, A TAKO HABAHARH N A ROTOHN MHOHIX NPOJYKTOX B EYTOCTOS TOPAHHIM SHHKAMAO TYTHN KOMAHAI BUKLIN, TOKAHIPSHA CTAPOHHX KOMAHTAH, YUMSAHAKUHA ROC P ASHOMI PYKOROAGTRE, CEBRTOC CSCTEHHMOCTHO COCTETCTRYKUHIX B. 2015 INTRINTERNS, Inc. v. yuTHN aDCFHIVPORAHHE CTQKYPH KOMAHAI, BC se paba 3auuueHN. LINGK CO192 Rev. AUO

NAVOD NAPOUZIVANIE
WRT1200AC
DVOJPASMOVY
GIGABITOVY
BEZDROTOVY SMEROVAC
LINKSYS
PERFORMANCE PERFECTED
Obsah
OPIS VYROBKA
1 WRT1200AC
NASTAVENIE SMEROVAC
5 Ziskanie pomoci
5 Instalacia smerova
POUZIVANIE SLUZBY LINKSYS SMART WI-FI
6 Pripojenie k sluzbe Linksys Smart Wi-Fi
6 Zmena nastaveni smerovača
RIESENIE PROBLEM
Reset, WPS (Wi-Fi Protected Setup), napajanie
USB2,Ethernet (1-4),Wi-Fi Protected Setup
UPnP
Podporovane
Zabepečenie WEP, WPA, WPA2, RADIUS
Bity klfca zabepezenia
Sifrovanie do 128-bit.
Podpora su'borovych
FAT,NTFS a HFS+
systémovukladania
Podporovane
prehladaeVySs aleboVySs
FCC, IC, CE, Wi-Fi a/b/g/h/ac, Windows 7,
Windows 8, DLNA
Prevadzková teplota
32a104°F(0a240°C)
Skladovacia teplota
-4a140°F(-20a60°C)
Prevadzkovavlhkost
relatifvnavlhkost 10a8 80% ,nekondenzujica
Skladovacchia vhlkost
KAKO UPORABLJATI LINKSYS SMART WI-FI
Gumb Wi-Fi Protected Setup
Pritisnite za enostavno konfiguracijo brezziene varnosti na omreznih napravah z omogoceno funkcijo Wi-Fi Protected Setup.
Ethernetnavrata
Povezite ethernetne kable na ta modra gigabitna (10/100/ 1000)vrata in na oziicene naprave v vašem omrežju.
Opomba:
Za najboljse delovanje v ethemetna vrata priključite kable razreda CAT5e ali vijja:
Interneta vrata
Povezite ethernetni kabel na ta rumena gigabitna (10/ 100/ 1000) vrata in na sirokopasovni internetni kabel/DSL ali optici modem.
Opomba:
POVEZOVANJE Z LINKSYS SMART WI-FI
Kako odpreti Linksys Smart Wi-Fi:
- ObiSite linksysmartwifi.com ali myrouter.local (e nimate vzpostavljene povezave)s splteim brskalnikom.
- Vnesite e-postninaslov in geslo, ki ste ju nthavil prej, in kliknite Log-in(Prijava)

SPREMINJANJE NASTAVITEVBRSKALNIKA
Opomba:
ANVANDALINKSYSSMARTWI-FI
Knapp for Wi-Fi Protected Setup
vaggmonteringsutrusting.
Monteringsanvisinngar
Knappar Aterstallinging, Wi-Fi Protected Setup, strom
Frampanelsdikatorer Strm,INTERNET,2,4GHz,5GHz,USB1,USB2
Ethernet (1-4), Wi-Fi Protected Setup
UPnP Stdd
(1) 1.2.3.4.5.6.7.8.9.10.11.12.13.14.15.16.17.18.19.20.21.22.23.24.25.26.27.28.29.30.31.32.33.34.35.36.37.38.39.40.41.42.43.44.45.46.47.48.49.50.51.52.53.54.55.56.57.58.59.60.61.62.63.64.65.66.67.68.69.70.71.72.73.74.75.76.77.78.79.80.81.82.83.84.85.86.87.88.89.90.91.92.93.94.95.96.97.98.99.100
2.4GHz
(2017)LED photovoltaic and photovoltaic energy conversion 2.4 GHz commercial LED photovoltaic and photovoltaic energy conversion 2.4 GHz
5GHz
(2017) 10 LED photovoltaics and their application in renewable energy systems 5 GHz network LED photovoltaics and their application in renewable energy systems 5 GHz
eSATA
(1) nuiu uauaiaus 1SUSB/eSATA daagnueaeieeinei USB eH LED eaae aee
USB1
(1) 用uusrmaus USB ESATA daangnueeepnne nesAATy LED aeehnaa raatn oonaaagaa h USB uWLED anw
USB2
(2017) 34658900000000000000000000000000000000000000000000000000000000000000000000
USB2
(4) 1000000000000000 USB 1.0 2.0 3.0 4.0 5.0 LED (D) 1000000000000000 USB 3.0
sotua 14 (wn)
(42)12LED 100000000000000000000000000000000000000000000000000000000000000000000000
n
14 (2009)
LED 1000 Mbps (4Gbps)

(1)LED 200000000000000000000000000000000000000000000000000000000000000000000000000000000000000000000000000

中
T
cneae 2e eeeenee eeeennn ennnn nnnnnae
1
y
Wi-Fi Protected Setup
Wi-Fi
nooohoe
aennnnnne nannnnnne Gigabit (10/100/1000) (10/ 100/ 1000)
10
eae eae eae eae eae eae eae eae eae eae eae eae eae eae eae
nooohnne
100000000000000000000000000000000000000000000000000000000000
WuWEI:
eae eae eae eae eae eae eae eae eae eae eae eae eae eae
USB3.0
wouuusususususususususususususususususususususususususususususususususususususususususususususususususususususus
Combo USB 2.0/eSATA
Aeueaeusssssssssssssssssssssssssssssssssssssssssssssssssssssssssssssssssssssssssss
USB
Reset
medicalData 10 mT (unlnd LED) (onset) (duration) (duration) (duration) (duration) (duration) (duration) (duration) (duration) (duration) (duration) (duration) (duration) (duration) (duration) (duration) (duration) (duration) (duration) (duration) (duration) (duration)
meneeaaeaeacAC
and
mnnnne nnnnne

Avoid Overheating
a
1
snoe: Linksysluuunannnnaaennnnnnaanennnnnneaaenrnnnnaa
mnnnne
- 1
- i
- mnnnnsngnne nnnnns
- 电电电电电电电电电电电电电电电电电电电电电电电电电电电电电电电电电电电电电电电电电电电电电电电电电电电电电电电电电电电电电电电电电电电电电电电电电电电电电电电电电电电电电电电
- mnnnne nnnnne nnnnne nnnnne nnnnne nnnnne nnnnne nnnnne nnnnne nnnnne nnnnne nnnnne nnnnne nnnnne nnnnne nnnnne nnnnne nnnnne nnnnne nnnnne nnnnne nnnnne nnnnne nnnnne nnnnne nnnnne
uuiuunnnnneennnnnne (nna u)
100%
eannnnnne nnnnnnnnnnnnnnnnnnnnnnnnnnnnnnnnnnnnnnnnnnnnnnnnnnnnnnnnnnnnnnnnnnnnnnnnnnnnnnnnnnnnnnnnnnnnnnnnn
nannnnnnnnnnnnn
nannnnnnnnnnnnnnnnnnnnnnnnnnnnnnnnnnnnnnnnnnnnnnnnnnnnnnnnnnnnnnnnnnnnnnnnnnnnnnnnnnnnnnnnnnnnnnnnnnnnnnnnnnnnnnnnnnnnnnnnnnnnnnnnnnnnnnnnnnnnnnnnnnnnnnn nn nannnne nannnne nannnne nannnne nannnne nannnne nannnne nannnne nannnne nannnne nannnne nannnne nannnne nannnne nannnne nannnne nannnne nannnne nannnne nannnne nannnne nannnne nannnne nannnne nannnne nannnnee nannnne nannnne nannnne nannnne nannnne nannnne nannnne nannnne nannnne nannnne nannnne nannnne nannnne nannnne nannnne nannnne nannnne nannnne nannnne nannnne nannnne nannnne nannnne nannnne nannnae
iannnnnneennnnnneennnnnneennn (rann)
mnnnnaeennnnaeennn
wwnnnne nnnnne nnnnne nnnnne nnnnne nnnnne nnnnne

77777776767676767676
1
Linksys.com/support/WRT1200AC (anans and 1nane a e nnnnne nne nne nne nne nne nne nne nne nne nne nne nne nne nne nne nne nne nne nne nne nne nne nne nne nne nne nne nne nne nne nne nne nne nne nne nne nne nne nne nne nne nne nne nne nne nne nne nne nne nne
Linksys Smart Wi-Fi Linksys Smart Wi-Fi
国
mnnnne nnnnne
- 1
- laananeaannnne aen anne
4.000000000000000000000000000000000000000000000000000000000 - hneiieeienen eanennn ennnnene nane nee nne nne nne nne nne nne nne nne nne nne nne nne nne nne nne nne nne nne nne nne nne nne nne nne nne nne nne nne nne nne nne nne nne nne nne nne nne nne nne nne nne nne nne nne nne nne nne nne nne nne nae
- 63a hnnnne nnnnne nnnnne nnnnne nnnnne nnnnne nnnnne nnnnne nnnnne nnnnne nnnnne nnnnne nnnnne nnnnne nnnnne nnnnne nnnnne nnnnne nnnnne nnnnne nnnnne nnnnne nnnnne nnnnne nnnnne nnnnne
- hnnnne nnnnne nnnnne nnnnne nnnnne nnne nnnnne nnne nnnnne nnne nnnnne nnne nnnnne nnne nnnnne nnne nnnnne nnne nnnnne nnne nnnnne nnne nnnnne nnne nnnnne nnne nnnnne nnne nnnnne nnne nnnnne nnne nnnnne nnne nnnnne nnne nnnnne nnne nnnnee
1
Guest
P
137
PaeRnneernee eeeennnnnnaanl Linksys Smart Wi-Fi eneannnnnnaaene
链接 Linksys Smart Wi-Fi
LINKSYS SMART WI-FI
Linksys Smart Wi-Fi:
sfa. Wi-Fi Protected Setup,
nnaaannnnnnnnnnnnnnnnnnnnnnnnnnnnnnnnnnnnnnnnnnnnnnnnnnnnnnnnnnnnnnnnnnnnnnnnnnnnnnnnnnnnnnnnnnnnnnnnnnnnnnnnnnnnnnnnnn
Power, 2.4 GHz, 5 GHz, USB1, USB2
12345(1-4), Wi-Fi Protected Setup
UPnP
1
aannnnnnae
WEP, WPA, WPA2, RADIUS
inns
128
Storage File System Support
FAT,NTFSHFS+
(m)
s
Internet Explorer 8, Firefox 4
Google Chrome 10 wongjin uas Safari
yiej
aannnnnne
9.68" x 7.64" x 2.05"
(246×194×52
mnnnne
12V,2.5A
0
FCC, IC, CE, Wi-Fi a/b/g/n/ac, Windows 7
Windows 8, DLNA
eannnnnne nnnnnnne
32in104°F(Oin40°C)
nannnnnnnnnnnnnnnnnnnnnnnnnnnnnnnnnnnnnnnnnnnnnnnnnnnnnnnnnnnnnnnnnnnnnnnnnnnnnnnnnnnnnnnnnnnnnnnnnnnnnnnnnnnn
-40140°F(-2060°C)
mnnnneaae
1080%
590%1dlnmnnnnd
W
n 1
Linksys.com/support
aennnnnne aannnnnne ane annnnnne nnnnne
IIEE Standard 802.1 deswemmmnnsmnnnnaeennnnnne nnnnne mnnnnnnnnnnnnnnnnnnnnnnnnnnnnnnnnnnnnnnnnnnnnnnnnnnnnnnnnnnnnnnnnnnnnnnnnnnnnnnnnnnnnnnnnnnnnnnnnnnnnnnnnnnnnnnnnn nnne
b/1nksys.com/supportanmnnnnaaannnnnnnnnnnnnnnnnnnnnnnnnnnnnnnnnnnnnnnnnnnnnnnnnnnnnnnnnnnnnnnnnnnnnnnnnnnnnnnnnnnnnnnnnnnnnnnnnnnnnnnnnnnnnnnnnnnn
BELKIN, LINKSYS & DELUXUALITY AND BUSINESS: THE NEW MODEL OF INVESTING BELKIN. 1985. p. 247. ISBN 0-8367-1000-1.
INKDGmertTep

KULLANICI KILAVUZU
WRT1200AC
CIFT BANT GIGABIT
Wi-Fi ROUTER
LINKSYS
PERFORMANCE PERFECTED
icindekiler
URUNENGENELBAKIS
1 WRT1200AC
ROUTERINZIN KURULUMU
On Panel Gostergeleri Power (Guc), INTERNET (INTERNET), 2.4 GHz, 5GHz, USB1, USB2, Ethernet (1-4), Wi-Fi Protected Setup
UPnP
Destekleniyor
Güvenlik Özelikleri
WEP, WPA, WPA2, RADIUS
BKNOPNUCTAHH LINKSYS SMART WI-FI
6ПлкнчehнdoLinksysSmartWi-Fi
6 3miHa npaMaTePiB MaPUpyTuHaTaTopa
UCYHEHHH HENOIAOK
10 MapuytnaTOp He 6yIyo ycnIuHOHaJaTuBoHa
11 NobidomeneHHaMepeKebnKa6eIbHe nIeHaHO
11HEMOXJIINBNOCTyndoNIOIADOMNEHMapuPpyTn3atopa
MOnTaXnHm WAsbNoH (Dobwa CToPoHa)
PozpykyuTe UO CTOpINy B MacuTa6i 100%
BiDpiKTe B3OoBn NyHKnHpHoi nIiTn npNknaDItb Do CTIN, uO6 3a6eaneHTn TOHy BiDCTAHbMIK OTBopAM.

HanaaTyBaHHaBaworMappyTu3aTopa
JXKEPEIAIODATKOBOIIHΦOPMALI
Linksys.com/support/WRT1200AC(okymentai,3aatakeHH,akTyalhiTtAHH,TexHnHaPiTpMkA,OHnH-qt,fOpym)
Довдka Linksys Smart Wi-Fi (3a8aTae Ha croptiKy Linksys Smart Wi-Fi iHaTCHiB nocuHnH Dovdka y bexHi Nacthi Ekapha)
IOPRAIOK IHCTAJLICII MAPUPIYTN3ATOPA
IooHCTaJIIOBAtnMapuPyTu3atOp:
- ypa3i 3aMHHe HnBHoro Mappytnsatoa BiD'HaHte Ioro.
- NIKIOHTb aHTeHm Ta KINBHeHHr DO HOBOrO MapuTy3aToPA
3.BIMKHTbIyBMKHITbXHNBHeHHcBOrMoDenemy - PnncHaIe IInapHcKabeB nB Bauoro moBmy Do KOBtOrO IInepHcNpOpy Ha BApOy MauPuyTnatoi 3AeKaHe, dOKn IHaKATOP KINBEHHa HnepeDNI NaHJI MaUPuyTnatoi He 3acBITAtcB NoCtIHO.
5.3dHaeTecb 6eepnoHOeepoHOepeXeHO,Ha3Ba KaOlaa3aHaueHa BInctpyK
ii udo wuaikoro cnapTy,
otpmaHHi Bam pa0am 3MapuytnaTcPOM.Bm mokeTe 3MHHTn Ha3by MepeXi Ta
napoB n1huiE.
Kaio Bam notpi6Ha donoMora CTocOBHO 3eHaHHa 3peXeKO,neperrahe Tocky-
MeNTAUIO Bauro npncptko.
PnIMtKa: Bu He 3MoKeTe oTpMaTHn DOCTyn DopeXei IHTepET,DOHN He 3abeepWnte
HaaHTybaHH MaupuytnaToppa. - Bixpinyte 6b-6pay3epi DOpTMyHtErcb HcTpyuui dna 2aBepueHHHaIauyTaBAHH.
Kkuio hctpykui He aBnIObTa cHa cToPiH u6-6pay3epa, BBeITb lnsysmmartwi. com B pdoA apecn. - Iicra 3akHHeH npOeDpyn BCTaHOBHeH HanaTuTe 6bIKOBn 3arNc y cntemI LinkSys Smart Wi-Fi, d0tpmVouocb IBctpykui HA eKpHi. BinkopcTcEyTE LinkSys Smart Wi-Fi, 1o6 hanaTuBatn Mappytnsatop 3 dy-b-koTO KOMITOTepa 3 iKnIOHeHHMdoIHTepHy.
KepybaHHHaIaHTyBaHrMaBaworoMappytn3aTopa:
- 3MiHa HaaBn MaPwpyTu3aTopa Ta npoJia
HanaWtyBaHHaOCTynIraTcTei
HaanaybaHHbAikckoKHTPO
PiEHaHHHpiuCTpoIB Do CBOeMe
Bunpo6yBaHHaBnKoCTi3EHaHnH3IHTepHETOM
Pnmitka:
IiD qac halaaybAHnOB6NIKOBORaIanyC Lykssy Smrt Wi-Fi Bam 6yde HADICIAHO EeKPOHHa3HITNIO pIOTBepdKeHH. BiKpRte eEeKPOHHoBIIDCMLEHHI KAIJIHTs IOcIIAHJHH, UO MCITITbBa BHCMy
BukopncTaHnla Linksys Smart Wi-Fi
ПДКЛIOUHEHHДО LINKSYS SMART WI-FI
IooB Biikpnu Linksys Smart Wi-Fi:
- Bidaiae linksyssmartwifc.com abo myrouter.local (Kuo Bu He onnaiH) 3a donomoroh ne6-6payepa.
- BkaHITb bHaehi Baw paHue aepcy eektoHHo noHT Ta npO, HATCHtB HA KhoNky BBNTV.
If you have not yet created a Linkable SerialtyH-4 account, click the Create Account button in the upper right corner of this page.
Linksys Smart Wi-Fi Sign In


English (United States)
Use your Linky Smart Wi-Fi contacto to access your home network from anywhere, at any time, even from your mobile device. Easily connect raw devices, net parental accounts, get access to Smart Wi-Fi mobile Apps and more.
For some information:
3MIHA NAPAMETPIB MAPUPTYTN3ATOPA
Tpumitka:
IaOTPMHNNHOaTKBOcIHfOpMa33bYb-RAIOyHKITMyMeHIOKJIaHHTbIOHNJAHNDoBIDKaBvBepxHnYactHHIeKpHa.
- Baii ito Da Buuro o6nikoora 3a ncy y chteml Linksys Smart Wi-Fi, biai dianu linksyssmartwifi.com a6o myrouter.local {kucu Bn He onhui-} sa domor moro be6-bpaayepa.
- y mio, 10 poc3aioo hao 3na, Bn6pip, notpi6nn nyHt
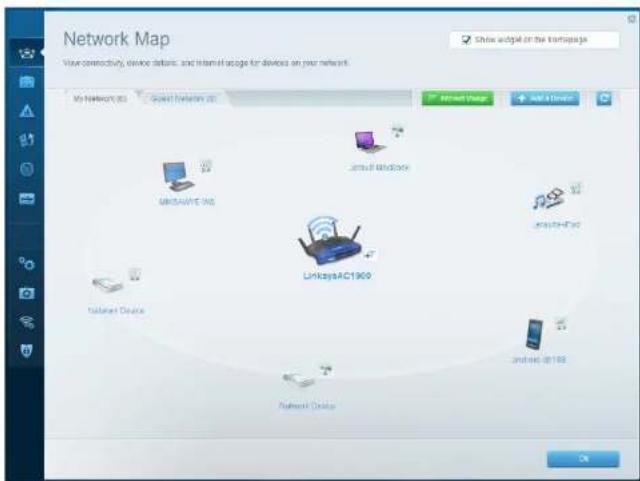
NyHKT Mana mepexi DOBIOIIEpeERJIAATINIeDHHI Do MapuPyTu3atopa
PnCTPOI TAEKPYBAtNIHMMoKHaNEPERJIAATINPcPTPOI ToBoHoi MepeXi Ta
MEpEXI, DRA RoCTeB, BIDeHyBAtN Ix aO tpyMaTIN HOpMaTIO npo KOnHNI
PnCTPOI.

YHKTN DcTyn pRoeTb BAKOPKOBETOByB TaBCTAHOBENH NAPAMETIP Ta BCTeKxvBAHH POToT MEPEXi BIKJ MOKyt b PauoBAtn HUI KOpNCTyaH3 06MBeHHmDcTyN dopeycpB Bauoi BnaOH MePEXi.
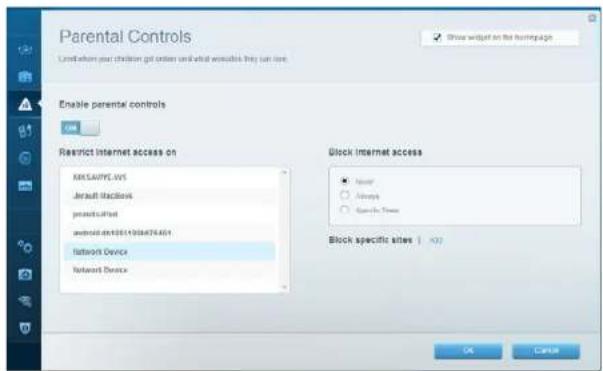
IyHKt BaTbKbcBkn KOHTpObnJae MOKImBicb 6IOkyBatn neHl Be6-caTn Ta oMeKxyBatn qac Doctyny do ITePehety.
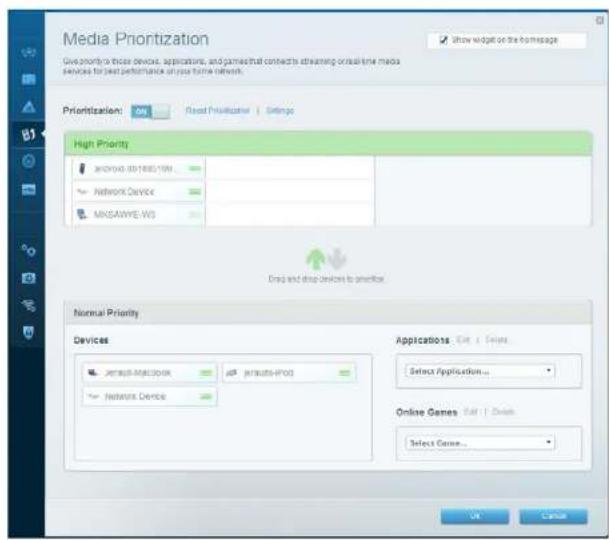
IyHKT BCTaHOBnHH NpiOpHTeY dI npNCTpoIB Do3BOJIe BCTaHOHTN, RIKI pNCTpOII IdoATK MAnbTpiOpHTeY BaWOMy MepeKHOmy TpaIky.

Tect wBnKocti 030BnRE nepebpntu WbNkictb 3eHaHHa 3 Mepekeio HtePHT.
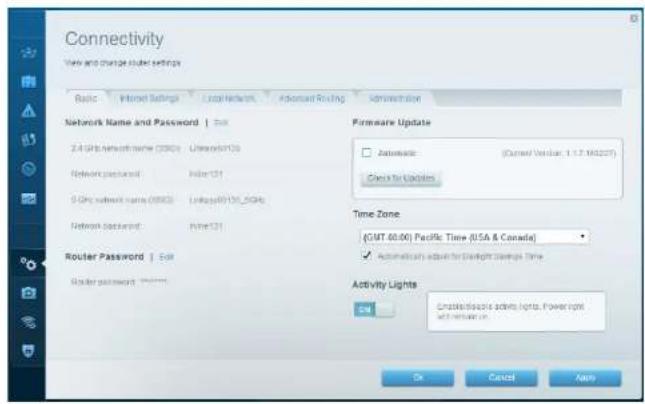
IyHKT MoKnBocTi MepeKeBoI B3aemOdi Oo3BOJc HanaTuBaTn OCHoHi i poaUpeHi HanaTuBaHHeMepeXi.

NyHKT3oBHIHnHaKONyBaYIO3BOJIeOETPMaHTOnDCTyNdoPmEHNHOUSB-Hocia 6c eSATA-Hocir (He BxOaIbB KOMnENT) HanaTuBn3aRaIbHn DOCTyn Do pAnis, Media-ceepaepai do FTP.

IyHXTyCHeHHH Henonadok MICTb 3ac06n diarHocn npo6neM 3 MapuTyTHaTOpOM Ta nepeBipKcCTAHy MepeXi,

IyHKt Be3pOToBe 3eHaHn HcB0JrE HaauTobByaTH Be3pOToBMypeKy
Mapuyn3atop. TyMOnKa 3mHOBaTH Dekm BcNkN npAons, BCTaHObBaTN
fip, tr MAC-aepoc ta nCdyBuTa npctpo Ta donomario fykuii Wi-Fi
Protected Setup".
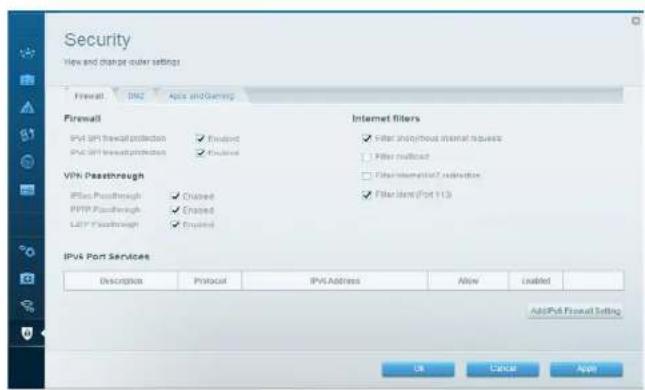
IyHKTBeNeKeAaMoeKbHbCTb3aDaBttnPbeBb3axccty6e3doTOBO38a3ky MapuTyTHsTATOp. TyT MoMeHaHaTaTOByTaN npameTpN 6paDmayepa, VPN, aTAKoX HnAaYBaYbN npametApN dnpnHn npopam Ta Iop.
YcyHHeHH HeNoJaDOK
Lue poaui jionoovke BAVBnpiuHNTA aabHnpo6nn HnnaaHTybaHHI nkiKIOCHH HnIOIePHETy. BMOKCTE 3AHNI BINUE JONOMNBI HAIHOI ydeTcOHOHARPOC DcykNtipTNMKN KInTeTB hlnkys.com/support.
MAPUPYTN3ATOPHEBYI0YCNIUHOHAIAWTOBAHO
KuO Linksys Smart Wi-Fi He 3abepwn HanautyBaHHA:
3a donomorokckipknnnaepny 60a liinbukhnatncihit lytpmnyte KhoNkypeepaahtaxkenn, noKc bsiIIOJHnIHnKATOP KHeJIeHnHaPeHnHaNeI mappyTtataOpHe noHueMrrn (npK6MaH0 10 cekyHd). HctanaKe MappuyTtataOp 3HOy.
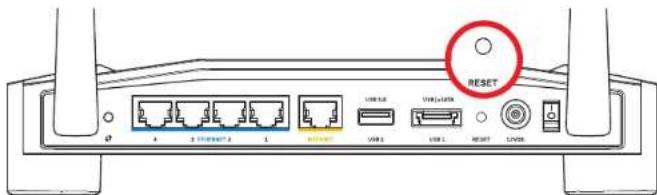
30BHHH BnRJaMapuPyTaAtopa MoKe BiipiHaTnca
Jauoue He denovoro, Tmaocao BiaKIOHHTb 6paIaMep KovTotepe (duh. hctpykio nporpam 3aeeaeneeHHB 6aeHKe). IcTAJIOny TaMapuYtaatop aHOy.
- RaHbBn HbHa7yBaHm MappyTN3atop, 3aHdIbIHmKoMnIOTeP I BHKOpCTaTEeHcKOMNIOTeP, IO6HCTaKOBaTHmMappyTN3atop 3HOY.
YcyHeHHH HeNoJaDOK
IOBIOMJIENHRA-MEPEXEBNIKAEBJIHEII'DHAHO
KuO BAt OPMALN NOBIOOMENHRA MepeBExn KaBHe NIDeHaHO] npn cnp6i Halauiybatn Mapuytnatop:
1. IpekoahTecb, 00 Ka6eB MepeXi Ethernet qH INTEPHT (a0o Ka6eB, 00 noCTa HACTb3 aMapuPyTuataPOM) HADINHO pncDHaHO JIO KOBTOI INTEPHT-NOTy a TnHBOI CTOPHO MauPyTuTaOpTa Ta DO BInOBIuHO NPTy HA BaWOMy MOeMI. Loe NPT HA MoDEMI 38uayHo No3aHuEHN EHTernet, aeMOKe MaTuNo3HaHcy INTEPHT abOWAN
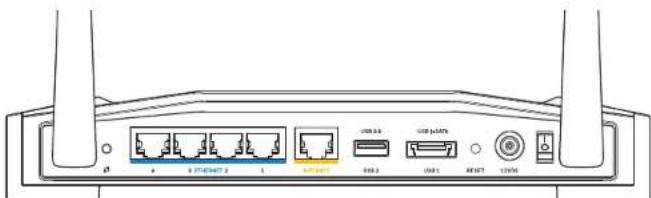
BnIaMapuPyTu3aTOpa3a3a
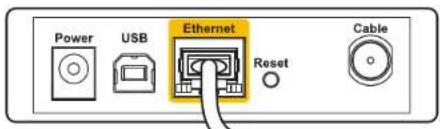
Bunna Kaebbno Moema 3aay
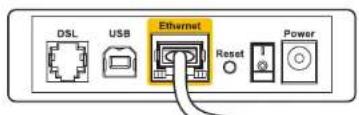
BnraMDmoeMaDSL3aay
2.IpekoHaiTeec,IO MODEM NiKIOUeHnIO KINBEHnI BIKIOUeHnI.KeIOBnM EHHMHKHJIMBIHnH,peekohaiTeec,IOHOBOCTAHOBHeO BNOIOKHeHnONa501
3.RaOyBacKa6eBnHINTEpHET,nepeKoHaTecR,IOIooKa6eBnHOrO npTyMoEma KABEInpiKIOKHeHNI KoAICAlbHn Ka6eBn,HaADHHnpOBaiDepOM.
4.A6o kuo y Bac DSL-IntepHET,nepeKohaiTecn,io TelefoHa nHia DSL nkioueHa do npry moema DSL.
5.RKIO Bau KOMIOTep 6y bpaHIIe nIKUQEHn DO MODEM ySa DOnomorO Ka6EIO USB,BIDcHAIte Ka6eNB USB.
HCTaHIOHTeMapuPyTn3atOp 3HOBy.
HEMOXJINBNIIOCTYI NOIIOBIOMJIENb MAPUPYTN3ATOPA
06OTPMATNDOCTYNO MAPUPUYTHATOPBAIOBNHHI67IINKNOCHEIHO BAOI MEPEKJIyO y Bac BKE e 63epoBONDcTynIOHTEPHYTOI pOeMaMOE 67InTomOIOBNIABIKOO NIKKIOHNICMdo IIOUOI 63epoBOI MEPEKI.
BpiueHHnietnpo6nHnHaKOMn'IOTePax 3 OC Windows:
- Hpaobcmy ctoniOCWindows HATNCHTbnpabIO HOHIO MIMK HA 3haOK 6e3-
- HpaobidHOmepeixoBolactiNtporpAMHa naehiAbaDbH.
Leh haoKO mox6ybtpiHm yzalhoXohti BID epcfWindows.

- HATNCHTb Npeperna DoctynnHex 6e3apotOBnx MepeK. 3'BBNTbcra nepenik doctynnHex 6e3npobiaHnx MepeK.
| Disable Status Repair |
| View Available Wireless Networks |
| Change Windows Firewall settings |
| Open Network Connections |
YcyHeHHHeNoJaDOK
- HATNCHIBHABAY CBOE MEPEKIXHATNCITINIADKNIOHTN.CY HABENOMHYNKHEPNKIAKOVIOTEPBNO 3 EHNHO 3 INOO BNEPPODHOO MEPEKEIO, KOTPA HANBAeTcBcJ "JimsRouter).HABAA MEPEKIXCepE E Bid《Linksys》,BrONzeEagle》BbOMy pIKNAdi devchtpcytcbg kOBpHa

- Iliou Béyè an apponoHBOBaBcTn KICh MepExi, BBeDIt CBg napBoB aNoJb KICh MepExi iPiTiBtBpeHbEHN KaOaMePexi. HATiCNiTi PiKiKnOHTnC.
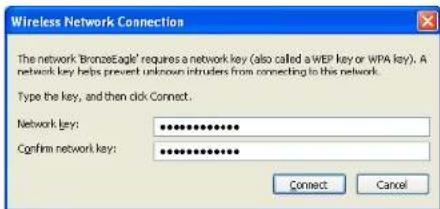
Tenep BmMaTe OtpMaTn DoCTyn Do MapuPyTHaTope.
BpiuHnH niE np6mHa KOMn'otepax Mac:
13CTPIIIMeHO,IOPOXODHTb Kp3b Bepx EkpAHy,HATNCHtB Ha 3HAOK AirPort. 3'8nBtBa cRa dEoepnDvIXMepex.ФHyKuIg«LinksysSmartWi-Fi"ABOMaTTHNO DAnlaHaBMy BauiMpeMeXI
2. Y HABEDEHOMY HNJIe NpIKnADi KOMN'IeTp Ebyo 3'EnHaHO 3 IHNIOE63npBpDIIHO
MepeKIO, KOTa HApBaVbIeTcBcJ "JimsRouter". HApBa MoeKei cepi F Bii d"Linksys", BrONzeEagle" bCyMOy pNkAIA DEMOHTCpyTeBcK AOBpaH.
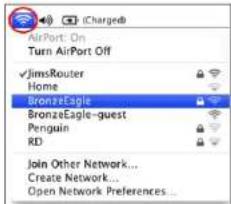
- Hatichvichi Habye beshapotov Bopeke Bauoro Mapuytsahtopa cepii E bID Linksys* BronzeEagle BbOmy npriKdAld.
4.BeBnbpAbao76e3pOBoMepexi y none nponb. HattchH Do6pe
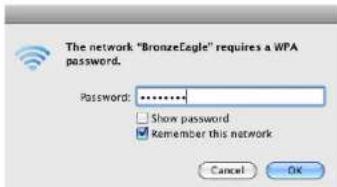
Jxepena doaTkoBoi infOpmaui
Linksys.com/support/WRT1200AC{Dokymentaia,3abaTatakeHHA,kTya,bHIniTaHa,TEXHI-HI pTmPnKa,OHLaH-CH,FOpyM}
- Linksys Smart Wi-Fi (linksyssmartwifi.com; http://www.niosilanha.de/obiduka.yearpx-huiyquh xinshi kepaara)
PpmmHka:
JIueh3T Ta NOBOMLEHNA QIO CTOPOHNBOI PnporpAMHO 3a6e3neHHN, KOte 3actCCOBycB B DAHOY BNOB01, MOHNA PepeyHHTA 3a NocnAHM http://support.linksys.com/en-us/ licenses.PepenDITb,6by-NAchA,3a aPecceohttp://support.linksys.com/en-us/gplcodecenter D AOSY HENH3a7nTb A60 3anNTB 10do nporpAMHO Kdy yHIEpcalHo cycnlnsHoi liEHI.
TexHiChi xapaKTepeNCTnKi
LINKSYS WRT1200AC
HaabaMoIeI DboKaHbHm MapuTyNaatop Wi-Fi 3 rira6iTHM noptom Linksys
Onnc DboKaHaHbHm MapwpyTn3atop AC siriabHm npotom 12xUSB
Horme moedj WRT1200AC
Bnckctb taHuiHoro npTy 10/100/1000 M6r/c (IraibHm Ethernet)
Paoocactn 2,4Tgui5Tg
KinbKiictb aHTeH 2 perybnbOaHi 30BHI Hi aHTeHH
TopnKMBeHnH,1xUSB3.0,1xKombioBaHH USB
2.0/eSATA, IHTepHET, Ethemet (1-4), RP-SMA (2)
KhoNn NpeoaaaHatakeHH,3axuHcHahauyBaHHWiFiXKBHeHH
IHdkaTopnpeepHbOi naheKInBHeHH,HTepHET,2.4Tt,5Tt,USB1,USB2, Ethernet(1-4),3axuueheHaauTuBaHHWi-Fi
UPnP Ⅱdtpmka
Фиунглбзпкг
PnpctpoB,hepeuKoTaiHINXHeepnBHXyMOB.
BidaiaTe linksys.com/support.06oTpMaTH BuHaHHy TeXHHy NIATPMNHy
BELIXN, 一 _ 1 JNKSYS = Ta garato Huxu Huxu Huxu noTnOHTaNOoOyjEiE TopoBmM MappHm Rpynn KOMsHII BELKIN. Buaeaeai toporal mapx Tepst CtoHnBnAChIOXHXI BnOIOHn BnAChIKH. 2015 Belin International, Inc. Ta/661 Naphepecko KOMHAI. Ycipraea saikho.
LNKFG00192RvA0C
HUONG DAN SUDUNG
WRT1200AC
BO DINH TUYEN
GIGABIT
Wi-Fi BÁNG TÁN KÉP
LINKSYS
PERFORMANCE PERFECTED
Muc luc
TONG QUAN SAN PHAM
1 WRT1200AC
Nut Wi-Fi Protected Setup
An de de dang dai cau hinh bao mat khong day trn cac thiet bi mang ho tro Wi-Fi Protected Setup.
Cong Ethernet
Két não cap Ethernet bói cac cóng gigabit (10/ 100/ 1000) mau xanh da tròi nay va vói cácthiét bi néi day trong mang.
Lu:
De dat hièu suàt tôn nhát, hyd dung cap CAT5e hóac chat luyong cao hon trén cóng Ethernet.
Cong Internet
Két不好意思 cap Ethernet vovi cóng gigabit (10/ 100/ 1000) mau vang nay va vovi modem cap Internet bang róng/DSL hoac modem cap quang.
Luuy:
Be dat hiou suat tot nhát, hyd dung cap CAT5e hoac chat lrgn cao hon trén cong Ethernet.
Cóng USB 3.0
Két nôi va chia sé ò dia USB hoac eSATA trén mang cua ban hoac trén Internet.
Cong USB 2.0/eSATA Két hop
Két não va chía se o dia USB hoac eSATA tren mang cua ban hoac tren Internet. Ban cung co the két não may in qua cóng USB va chía se tren toan mang cua ban.
Nut Datalal
An va glu trong 10 giay (cho den khi den LED nguan bat dau nhap nhay) dé dai la bi dinh tuyen vai cai dg. Ban cung co the khoi phuc cai bat dg suc sr dung Linksys Smart Wi-Fi tran Internet nao ung dung di dong.
Cong Nguon
Két nô bo chuyén doi dien AC kēm theo.
Nut Nguon
Nhan de bat bo dinh tuyen.
Tongquan Sanpham
Avoid Overheating
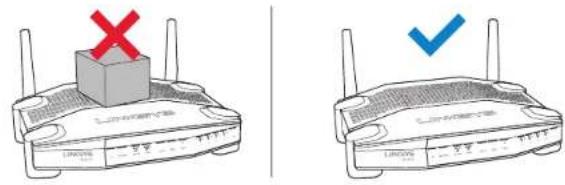
Bó tri Gàn Túròng
Bodinhuyoche gan troong duroi day cuo moi chan,cho phep linh hoat trong viec gan bdo huiyuyn trn turog.Khoang cach glura cac khe cam tren canh ngan la 104 mm. Khoang cach glura cac khe cam tren canh dal la 210mm.Can co hal din vit de gan bo dinh tuyen.
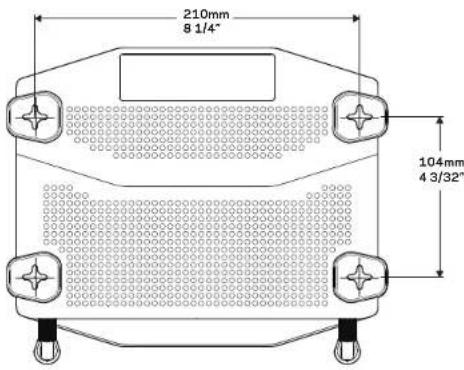
Phan cng gan duoc de nghi
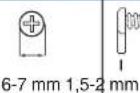
Lu:
Linksys khong chiu trach nhiem doi voi cac hur hai xay ra do phan cung gan turong khong chac chan.
Huong dan Lap dai
- Xac dinr nori ban muon gan bo dinh tuyen va canh ban muon dung de gan. Bao dam rang be ma trong cua ban tron nhān, phang, khô va chac chan. Bao dam vi tri gan trong tam ā cam dien.
- Truroc khi khoan Ió, hy chon mau (canh ngán hoc canh dai) phu hop voi cach lap dát cua ban. Khoan Ió theo mu dung.
- Gán dinh vit vao miǒ tō va chuá 4 mm o miǒ dαu.
- Dat bo dinh tuyén de cac khe cam treo tuong thang hang voi hai dinh vit.
- Dāl khe cām treo trong trin dinh vit va trut bot do dinh tuyen xuong cho den khi dinh vit vua khit vao khe cām treo trong.
Māu Gán Turong (Canh Ngān)
In trang nao kich 100%.
Cát doc theo duong cham cham va dat lén tu ng dé dam bao khoang cach chinh xac gira caci.

Tóngquan Sanpham
MaGanTuong(CanhDai)
In trang nay voi kich co 100%.
Cát doc theo duong cham cham va dat len tuong de dam bao khoang cach chinh xac giura cac lô.

Thiet lap Bô dinh tuyén
TIM TRO GIUP THEM O DAU
- Linksys.com/support/WRT1200AC (tai liu, não dung tai xuong, cau hoi thuong GAP, htro kyy thua tro chuyen truc tiep, dien dan)
- Tro giup Linksys Smart Wi-Fi (két nãovoie Linksys Smart Wi-Fi, sau do bem Help (Troy giup) or phia trén cung qua man先进技术
CACH CAI DAT BO DINH TUYEN
De Cal dát Bó dinh tuyén:
- Néu thay the bó dinh tuyen cū, hyāng két néi bó cū.
- Gán céc áng-ten va bát nguón bó dinh túyén mòi cua ban.
- Khoi dong lai modem cua ban
- Ket nol cap Internet tur modem vao cong Internet mau vang tren bo dinh tuyen. Doi den khl den bao nguon o mat turoc bo dinh tuyen on dinh.
- Ket noi voi teng khong day bao mat hi en trong Hrong dan Sur dung Nanh kem theo bo djinh tuyen. (Ban co the doi ten mang va ma t hau sau.) Nue ban cangt gk tni vao mang, hay tham khao tai iieu cua thi et bi. Luru y: Ban se khong the truy nhap Internet cho den khi hoan taq qua trinh tiel lap do jinh tuyen.
- Mó trinh duyét web va thuc hiên theo huóng dān dé hoan tát qua trinh thiet lap. Nou huóng dān khong xuàt hiên trinh duyét web, hay nhap lnksysmartwifi.com vao thanh dia chi.
- Cuiqua trinh thiel lap, huy truc hiem theo hurong dan tran man hinh de thiet lap taia khoan Linksys Smart Wi-Fi. Sut dung Linksys Smart Wi-Fi d dat cau hin bo dinh tuyen tbat ky may tinh nao coket nol Internet.
Quan ly Cai dāt Bô dinh tuyén:
- Thay dai tén vā māt khāu cua bó dinh tuyén
- Thiét lap truy nhap khach
- Dát cau hinh kiem soat cua cha me
Két não cac thiet bi voi mang cua ban - Klem tra toc do két nol Internet
Luru:
Nhr mot phan cua qua trinh thieI lap taikhoan Linksys Smart Wi-Fi, ban se nhanc duoc mot e-mail xac minh. Hay chac chan rang ban se mo e-mail nay va bam vao lien két duoc cung cap.
Cach Sudung Linksys Smart Wi-Fi
CACH KET NOI VOI LINKSYS SMART WI-FI
Dé Mo Linksys Smart Wi-Fi:
- Truy cap linksyssmartwifi.com hoac myrouter.local (néu khong truc tuyén) bang trinh duyet web.
- Nhap dia chi email vát mát kháu ban dà thiet lap truc do va bám Log in (Dang nháp).

CACH THAY DOI CAI DAT BO BINH TUYEN
Luuy:
Dé duroc tro giup them vé bát ky menu náo, hay bám Help (Tro giup) ò phia trén cung man hinh.
- Dāng nhāp tāi khoan Linksys Smart Wi-Fi cua ban bang cach truy cap linksyssmartwifi.com hoac myrouter.local (néu khong truc tuyén) bang trinh duyet web.
- Trong menu ben trai, hy bam vao môt tuy chon.
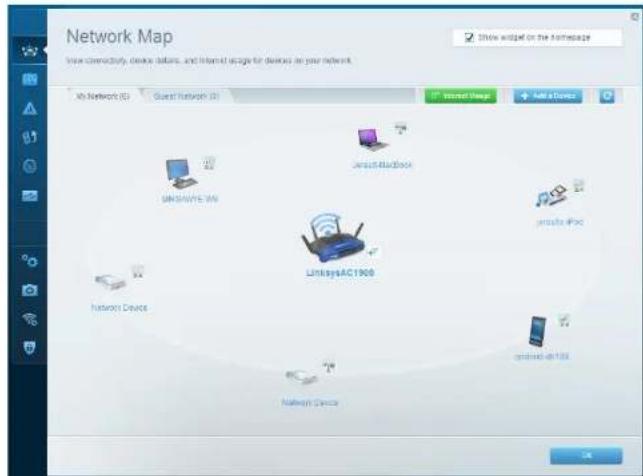
Network Map (Sor dā Mang) — Cho hép ban hiên thi va quan ly tát cac thiet bi mang duoc két nol voi bó dinh tvuy. Ban co thex eem cac thiet bi trén mang chinh va mang khach, ngét két nol cac thiet bi hao hiend thi thong tin vā mi nié thiet bi.

Guest Access (Truy nhap Khach) — Cho phep ban dát calu hinh vā glam sát mot mang dé cac thiet bi khach co the sur dung mā khong truy nhap tát cac tai nguyen mang cua ban.
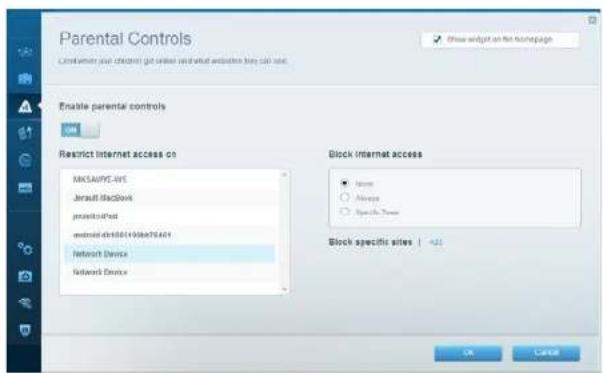
Parental Controls (Kidm soat cua cha me) — Cho phep ban chan cac trang web va quy dinh thoi bian truy nhap Internet.
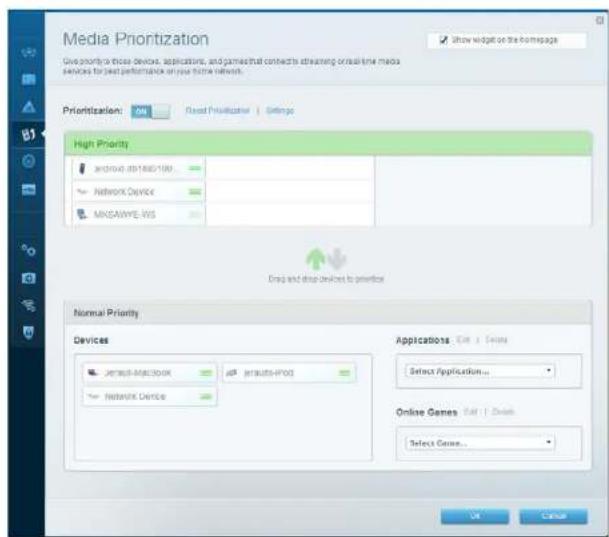
Media Prioritization (Uu tiem Phuong tiem) — Cho phep ban quy dinh nhung thiet bi vú ng dung nao duoc uru tiem hang dαo cho luru luong mang.
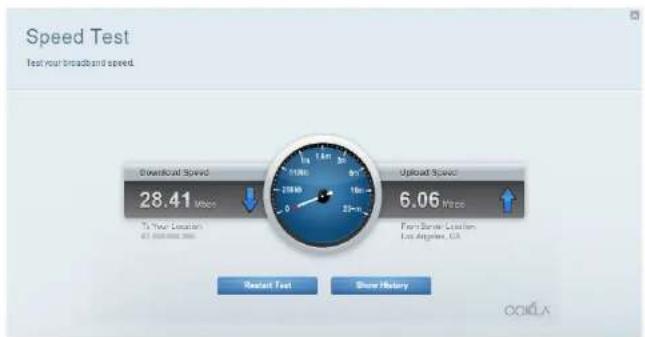
Speed Test (Kiern Ira Toc do) — Cho phep ban kiem tra toc do ket nol Internet cua mang.

External Storage (Liu tru Ngoal) — Cho phep ban truy nhap òia USB hoac òia eSATA duçc gán vao thiet bi (ca hai òia dué khong di kem) va thiet lap chia sé tep, may chu phuwr ng tiè vay truy nhap FTP.

Connectivity (Két não) — Cho phép ban dát cau hinh cac cai dát mang co bān va náng cao.
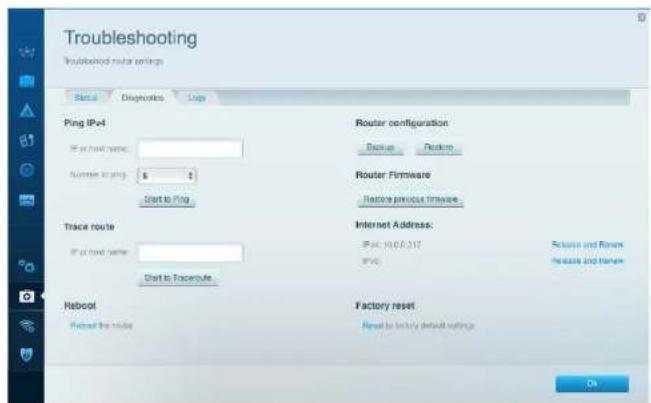
Troubleshooting (Xir ly sur co) — Cho phep ban chan doan cac ván de voi bo dinh tuyen va klem tra trang thai mang.

Wireless (Khong day) — Cho phep ban dai cuu hinh mang khong day cua bā dinh tuyen. Ban co the they do ché do bó mát, mat kháu, loc MAC va két não cac thiet bi bang cach sù dung Wi-Fi Protected Setup™.

Security (Bao mat) — Cho phép ban dat cau hinh bao mat khong day cua bó dinh tuyen. Ban co thei cai dat tvrng lira, cai dat VPN va tao cai dat tuy chin chocac ung dung va tro choi.
Xuyyco
Churong hay co the glup ban glai quyét cac su cai dai thurong gap va kénti Internet. Ban co tih them tro gup tu bo phan htro khach hang da giannnhiu gai thurong cua chung tói tai linksys.com/support.
BO DINH TUYEN CUA BAN CHUA DUOC THIET LAP THANH CONG
Neu Linksys Smart Wi-Fi Khong Hoan tāt Qua trinh Thiêt lap:
Hay sur dung kep giay hac gham de an va giur nut Dat lai cho den khi den LED nguon o mat trucc cua bo dinh tuyen bat dau nhap nay (khoang 10 giay). Cai dat lai bo dinh tuyen.
Ma san pham WRT200AC
Tóc do Cong Thiét bi chuyén mach 10/100/1000 Mbps (Gigabit Ethernet)
Nut Datalal, WI-Fl Protected Setup, Nguon
Den bao Mat truc Ngou,INTERNET,2.4 GHz,5GHz,USB1,USB2
Ethernet (1-4), Wi-Fi Protected Setup
UPnP Duroc h tro
Tinh ng Bao mat WEP, WPA, WPA2, RADIUS
Bit mā khoa bāo māt
Ma hao tói da 128-bit
Ho tro Hé thong Tep Luru tru
FAT,NTFSVAHFS+
HótroTrinhduyé
Internet Explorer 8 tro' len, Firefox 4 tro' len, Google
Chrome 10 tro lén va Safari 4 tro lén
Moltruong
Kich thuc
(246 x 194 x 52 mm)
Trong luong Thiel bi
Nguon
Chung nhan
Nhiét do Hoat dong
Nhiét do Bao quan
Bo am Hoat dong
Dām Bao quan
9,68" x 7,64" x 2,05" khong co ang-ten
29oz.(833g)
12V,2.5A
FCC, IC, CE, WI-Fl a/b/g/n/ac, Windows 7,
Windows 8, DLNA
32 dén 104°F (0 dén 40°C)
-4 den 140°F (-20 den 60°C)
10 dén 80% do am luong doi, khong ngung tu
Khong ngung tu 5 den 90%
Lu:
Bé biét thong tin quy dinh, bao hanh va an toan, hay xem CD di kém voi bó dinh tuyén, hoac truy cap Linksys.com/support.
Cac thong so ky thai co the thay dai ma khong can thong bao.
Hieu suat tio da lay tuc cac thong so ky thai cua Tieu chanl IEEE 802.11. Hieu suat thuc te co the thay doi, trog do cong suat cua mang khong dai, topo do truyen du lieu, pham vai vu ng chu song co the thap hon. Hieu suat phu tuoc vao nhieu yeu to, dieu klen va bien so nhr: khoang cach toi diem truy cap, Iru luong mang, vat lieu va cau truc xay dung, h diau hanh sur dung, ket hop cac san pham khong dai, nhieu va cac dieu kien baifloi khac.
Truy cap linksys.com/support dénhān hó tro kī yuà tādā giànghiái thruong
BELKIN, LINKSYS vamiuu taan phma va logo la thurong hui cua tao doan cac cong by Belkin. Cac thrung hui cua ben the ba ducce di tai sian chu su hou tureng um. © 2015 Belkin International, Inc. vahicac cac cong by cn cia Belkin. Bao Iru moi quyen.
LNKPG-00132 Rev. A00