
MT16H21FWS5EM581CR - Earphones 3M - Free user manual and instructions
Find the device manual for free MT16H21FWS5EM581CR 3M in PDF.

| Product type | Bluetooth noise-cancelling headset with sound modulation function |
| Brand | 3M |
| Model | MT16H21FWS5EM581CR |
| Power supply | 2 AAA batteries (rechargeable NiMH or alkaline) |
| Battery life in Surround + active Bluetooth mode | More than 12 hours |
| Battery life in Surround mode only | More than 80 hours |
| Bluetooth technology | Bluetooth V2.1 |
| Supported Bluetooth profiles | A2DP, HSP, HFP, AVRCP |
| Main functions | Ambient sound modulation, telephone call management, auxiliary audio input (3.5 mm and J22 jacks), volume adjustment, equalizer, balance, sound dose limiter |
| Sound attenuation | Certified according to EN 352-1, EN 352-4, EN 352-6, EN 352-8; SNR values available in the manual |
| Operating temperature | -20°C to +55°C |
| Storage temperature | -55°C to +55°C |
| Maintenance | Clean regularly with soap and lukewarm water; do not immerse. Replace sealing rings every 6 months or if damaged. |
| Cleaning | Clean the earcups, headband, and sealing rings with a damp cloth (mild soap and lukewarm water). |
| Spare parts / accessories | Hygiene kit (sealing rings and foam pads), audio cables (J22, 3.5 mm), boom microphone, headband padding |
| Certification | PPE Directive 89/686/EEC, EMC Directive 2004/108/EC |
| Weight | Not specified in the manual |
| Warranty | Not specified |
Frequently Asked Questions - MT16H21FWS5EM581CR 3M
User questions about MT16H21FWS5EM581CR 3M
0 question about this device. Answer the ones you know or ask your own.
Ask a new question about this device
Download the instructions for your Earphones in PDF format for free! Find your manual MT16H21FWS5EM581CR - 3M and take your electronic device back in hand. On this page are published all the documents necessary for the use of your device. MT16H21FWS5EM581CR by 3M.
USER MANUAL MT16H21FWS5EM581CR 3M
WS SportTac, WS5, WS Workstyle
A
A:18

A:19
A:20
B
C
C:1
C:2 C:3 C:4
C:5
C:6
C:7
C:8
D
Attenuation values, SNR
MT16H21FWS5*-*
| Frequency (Hz)2) 63 125 250 500 1000 2000 4000 8000 | ||||||||||
| Mean attenuation (dB)3) 15.1 11.1 18.2 27.0 23.8 33.4 37.7 38.9 | ||||||||||
| Std deviation (dB)4) 3.8 2.6 2.3 2.2 2.1 3.6 2.2 3.3 | ||||||||||
| Assumed Protection Value (dB)5) 11.8 8.5 15.8 24.8 21.7 29.8 35.5 35.5 |
1) Weight 352g
[ \text{NRR} = 20\text{SNR} = 26\text{db}\text{H} = 29\text{db}\text{M} = 23\text{db}\text{L} = 19\text{db} ]
E
Input signal / usage time
G
| Criterion Levels | |
| MT16H21FWS5*-**** | H= 103 dB(A) |
| M= 96 dB(A) | |
| L= 93 dB(A) | |
F
Max AUX input signal level = 1,5V_rms
AUX input signal level: 20mV_rms = 82dB
H
1
J
WS SportTac, WS5, WS Workstyle
EN 2-8
BG 9-16
CS 17-23
DA 24-30
DE 31-38
EL 39-46
ES 47-54
ET 55-61
FI 62-68
FR 69-76
HR 77-83
HU 84-90
IS 91-97
IT 98-104
LT 105-111
LV 112-119
NL 120-126
NO 127-134
PL 135-141
PT 142-148
RO 149-156
RU 157-163
SK 164-170
SL 171-177
SV 178-184
TR 185-191
EN
(1) What is What?
(2) Fitting and Adjustment
(3) Usage/Functions
3:1 Inserting the batteries
3:2 Charging your headset
3:3 Switching the headset on and off
3:4 BluetoothTM pairing
3:5 Managing phone calls
3:6 Adjusting surround-sound volume
3:7 Adjusting call volume
3:8 Adjusting streamed-music volume
3:9 Changing settings in the configure menu
3:10 Connecting external equipment by cord
(4) Other Functions
(5) Important User Information
(6) Technical Data
6:1 Attenuation values
6:2 Input signal level/usage time for audio input J22 (A:12)
6:3 Sound exposure when using audio input J22 (A:12)
6:4 Sound exposure when using the 3.5mm audio input (A:11)
6:5 Criterion levels
6:6 Battery type
6:7 Battery life
6:8 BluetoothTM
(7) Storage
(8) Maintenance/Cleaning
9:1 Cleaning
9:2 Removing/Replacing the outer shell
9:3 Removing/Replacing the ear cushions
(9) Spare parts/Accessories
WS SportTac, WS5, WS Workstyle
This product has been tested and approved against the personal protection equipment (PPE) directive 89/686/EEC, and is also in compliance with the electromagnetic compatibility (EMC) directive 2004/108/EC for CE marking. NOTE: Read these instructions carefully before use and save for future reference.
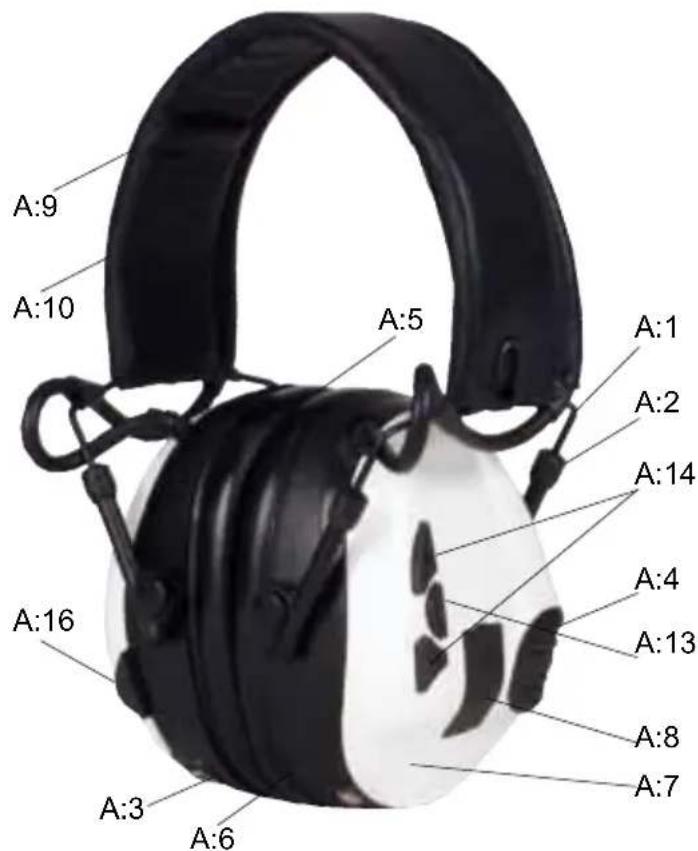
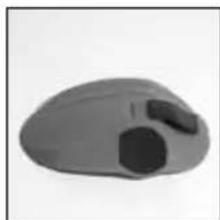
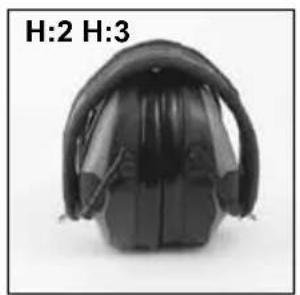
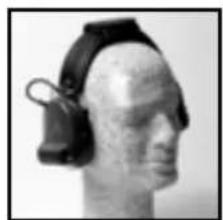
1. WHAT IS WHAT
(A:1). Headband wire (stainless steel)
(A:2) Two-point fastener (headband wire)
(A:3) Ear cushion (PVC foil and Polyester foam)
(A:4) Microphone for surround sound
(A:5) Attenuation cushion (Polyester foam)
(A:6) Inner shell
(A:7) Outer shell
(A:8) Clamp
(A:9) Headband (sheet metal)
A:10). Headband padding (Thermoplastic Elastomer or Leather)
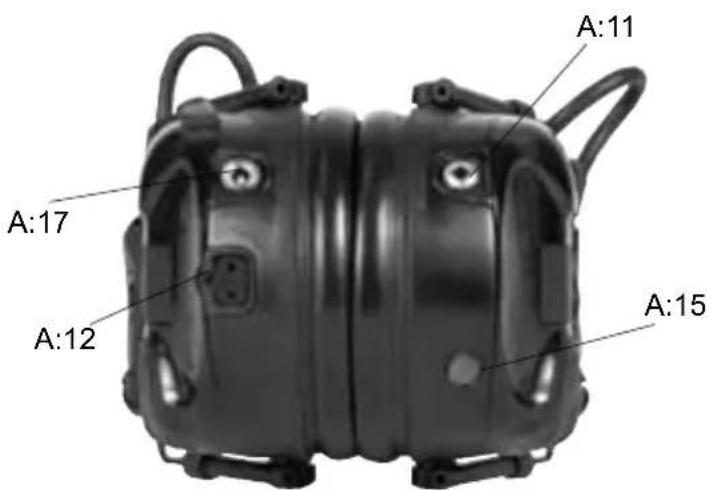
(A:11) AUX audio input, 3.5mm stereo
(A:12) Audio input, J22
(A:13) On/Off/Mode
(A:14) VOL+, VOL -
(A:15) Speech microphone
(A:16) Bluetooth button
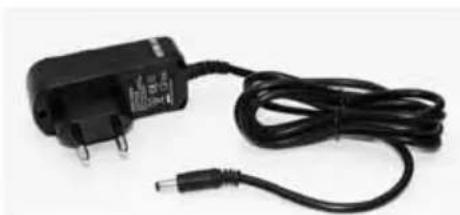
(A:17) Charger jack
(A:18) Charger
(A:19) Rechargeable AAA NiMH batteries
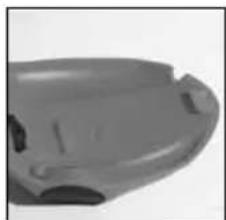
2. FITTING AND ADJUSTMENT
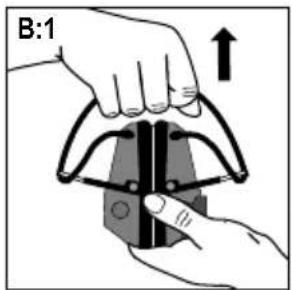
(B:1) Open the headband.
(B:2) Slide out the shells. Tilt the upper part of the shell outwards to ensure the wires are positioned away from the headband.
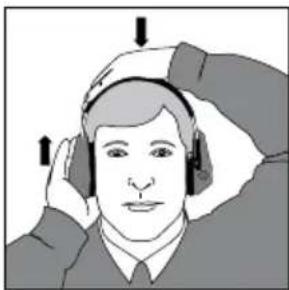
(B:3) Adjust the height of the shells by sliding them up or down whilst holding the headband in place.
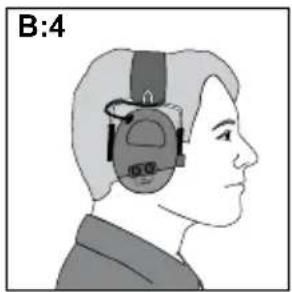
(B:4) The headband should be positioned across the top of the head.
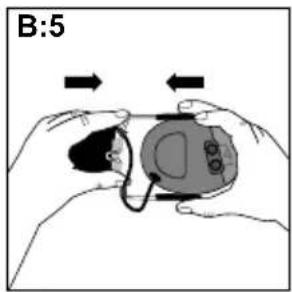
(B:5) Before folding the hearing protector, press the shells together. Leave about 4mm of the headband wire visible.
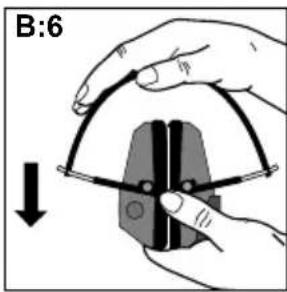
(B:6) Fold the headband as shown. Ensure that the ear cushions are not creased and that they lie flat against each other. Note: Be sure to remove the cord from the audio input (A:11) before folding the headband.
3. USAGE/FUNCTIONS
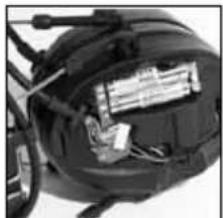
3:1 Inserting the batteries
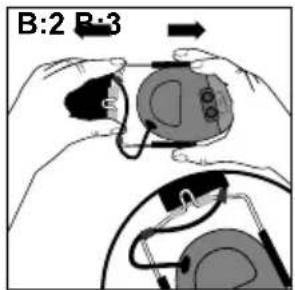
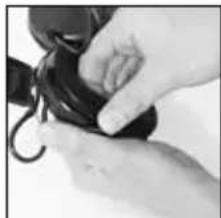
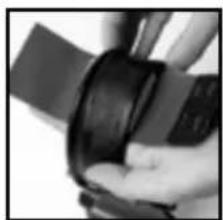
Remove the left outer shell.
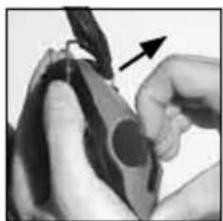
(C:1) Insert a blunt tool or finger under the edge of the clamp and pull outwards 3-4 mm.
(C:2) Press/slide the clamp down. Remove the shell.
Insert the rechargeable AAA NiMH batteries included with the product. Ensure that the poles are correctly aligned.
The headset can also operate on alkaline batteries.
Warning! Do NOT charge alkaline batteries as this may damage the headset.
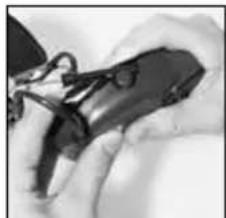
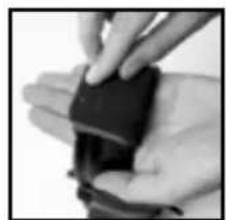
Replace the outer shell:
(C:3) Ensure that the clamp is fully pressed down.
Position the shell from the top down, ensuring that the hook on the top of the shell (C:4) fits in the hole on the inner shell (C:5).
(C:6) Press/slide the clamp up once the shell is in place.
3:2 Charging your headset
Connect the charger to the charger jack on the headset (A:17).
Charge the headset for 8 hours to achieve the maximum battery capacity.
EN
Warning: Use only original charger. Use of another charger can damage the headset.
Warning: Do NOT charge alkaline batteries as this may damage the headset.
Max charging temperature: +40^
3:3 Switching the headset on and off
Press and hold the On/Off/Mode button (A:13) for two seconds to switch the headset on or off.
3:4 Bluetooth pairing
The headset can be paired with and connected to Bluetooth units that support A2DP, HFP and HSP profiles.
NOTE that you can only stream stereo sound/music from a unit (mobile phone, computer, etc.) that supports the A2DP Bluetooth profile.
- Ensure that the headset is charged and switched off.
- Press and hold the On/Off/Mode button (A:13) for five seconds.
This puts the headset into pairing mode, which is confirmed by repeated voice message: "Bluetooth pairing mode".
- Activate your telephone's Bluetooth function and search for new units. After a few seconds "Peltor WS5" will appear on the screen.
- Select "Peltor WS5".
If the phone asks you for a password, enter: 0000 - Pairing is confirmed when you hear the voice message: "pairing complete".
Once the Bluetooth pairing function is activated it will automatically establish connection with the headset next time it is used with a confirmation void message "connecting Bluetooth", and then: "connected" when the units are connected. You can pair and store up to 4 units. The headset will automatically try to connect to the most recently connected unit first.
3:5 Managing phone calls
To manage phone calls, the headset must be paired with and connected to a mobile phone with Bluetooth capability, see Bluetooth pairing.
Answering calls
Incoming phone calls are indicated with a ring tone in the headset. Answer by pressing briefly on the Bluetooth button (A:16).
Rejecting a call
Reject a call by pressing and holding the Bluetooth button (A:16).
Voice dial
Press briefly on the Bluetooth button (A:16).
Redial
Press and hold the Bluetooth button for 2 seconds (A:16).
3:6 Adjusting surround-sound volume
Increase volume. Press the (upper) + button (A:14).
Decrease volume. Press the (lower) - button (A:14).
3:7 Adjusting call volume
You can adjust volume during a call by pressing the (+) or (-) buttons. Press the On/Off/Mode button (A:13) and then (+) or (-) to adjust the surround-sound volume during a call.
3:8 Adjusting streamed-music volume
You can adjust volume while streaming music by pressing the (+) or (-) buttons. Press briefly on the On/Off/Mode button (A:13) and then (+) or (-) to adjust the surround-sound volume during music streaming.
3:9 Changing settings in the Configure menu
The headset has a Configure menu where you can adjust settings.
To access the menu, press and hold the (-) and (+) buttons for 2 seconds (with the headset switched on).
Access to the Configure menu is confirmed by a voice saying: "menu".
To change the settings, use the (-) and (+) buttons. To move on through the
Configure menu, press briefly on the On/Off/Mode button (A:13).
See quick guide for information on how the menu is set up and where the functions are located.
Bass Boost
Bass Boost gives a fuller bass sound to streamed stereo music.
Music Limiter Mode
There are two settings for limiting the sound level when streaming music/audio with Bluetooth
ON
The limiter will reduce the volume level to 82 dB(A) Leq over 8 hours
- OFF limits the total sound exposure over 8 hours to 82 dB(A) Leq If the volume is set above 82 dB (A) it will be reduced to a very low volume, once the daily dose is reached.
This is confirmed by a voice saying: "daily dose reached".
The dosimeter will reset every 24 hours.
Warning: Daily dose coul be exceeded if batteries are removed and replaced, or if factory default is activated.
Balance
Changes the left-right balance of the surround sound.
Equalizer
Changes the frequency character of the surround sound.
Low
Normal
High
Extra High
External Input (only applies to audio input J22-A:12)
OFF - use this mode when the J22 audio input is not in use
- ON - use this mode if a cord is plugged into the J22 audio input
- Microphone - use this mode if a boom microphone is plugged into the J22 audio input
Side tone volume (applies only to Hands Free Bluetooth sound)
OFF
LOW
NORMAL
HIGH
Side tone noise reduction
ON
OFF
Reset to Factory Default
Resetssallfunctionstothefactory settings.
3:10 Connecting external equipment via a cord
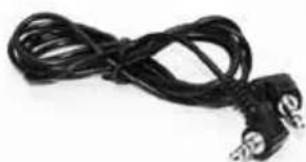
External equipment can be connected via the J22 audio input (A:12) or the 3.5mm jack (A:11). For information on various cords, see Spare Parts/ Accessories (I).
EN
4. OTHER FUNCTIONS
- The last settings are stored when the headset is switched off.
Automatic power-off after two hours of no active functions. Automatic power-off is indicated by a voice message: "automatic power off". - Low battery level is indicated by a voice message: "low battery".
5. IMPORTANT USER INFORMATION
The hearing protector must be worn, adjusted, cleaned and maintained in accordance with this manual.
- The hearing protector features active volume. Check that this feature works before using the unit. If distortion or flaws are discovered, consult the manufacturer's instructions for maintenance and battery replacement.
Always wear the hearing protector at all times during exposure to hazardous noise - Certain chemical substances may damage this product. Contact the manufacturer for more information.
- The hearing protector is fitted with an electric audio input. Check that this feature works before using the unit. If distortion or flaws are discovered, consult the manufacturer's instructions.
- If sound distortion increases or the volume becomes too weak, it is time to charge or replace the batteries. Never replace or insert batteries with the unit switched on. Ensure that the batteries are correctly aligned before using the product.
- Store product without the batteries.
Under extremely cold conditions, warm the hearing protector before using. - The wearer should ensure that the ear-muffs are regularly inspected for serviceability.
- The fitting of hygiene covers to the cushions may affect the acoustic performance of the ear-muffs
Note: If these recommendations are not followed, attenuation may be adversely affected leading to hearing impairment.
WARNING!
The sound from the active-volume circuit on the hearing protector may exceed the external sound level.
IMPORTANT! For the best protection, brush aside hair around the ears so the ear cushions fit snugly against the head. Spectacle frames should be as thin as possible and fit close to the head to minimise acoustic leakage.
Operating temperature: -20 °C to +55 °
6. TECHNICAL DATA
6:1 Attenuation values, SNR (D)
The attenuation values and noise levels for the headset are tested and approved according to EN 352-4: 2001, EN 352-6: 2002, EN 352-8 2002 and applicable parts of EN 352-1 2002. Certificate issued by FIOH (registration no. 0403).
Explanation of the attenuation data tables:
- Weight
- Frequency (Hz)
- Average attenuation (dB)
- Standard deviation (dB)
- Expected attenuation (dB)
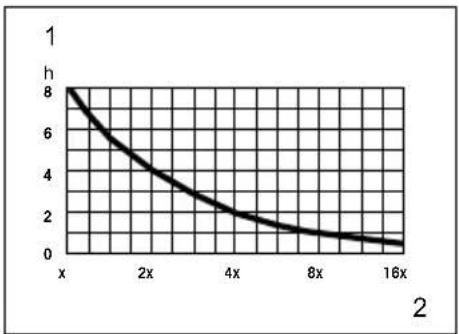
6:2 Input signal level/usage time for audio input J22 (E)
Maximum permitted audio signal in relation to usage time.
To prevent harmful effects on hearing, the input signal should not exceed the specified values (average speech sound level). The long-term average value of the earphone volume is measured at a level corresponding to no more than 82 dB(A) sound level.
- Hours/day
- Average level/electric signal X = 20mV
6:3 Sound exposure when using audio input J22 (F)
6:4 Sound exposure when using the 3.5mm audio input
The earphone level for music is measured at no more than 82 dB(A) equivalent sound level. Max input level 1,5 Vrms.
6:5 Criterion levels (G)
A criterion level is the amount of noise (measured as A-weighted sound pressure) outside the hearing protector that gives 85 dB(A) inside. The noise level depends on the type of noise. H is high-frequency dominated noise, M is noise that is not dominated by any given frequency, and L is low-frequency dominated noise.
6:6 Battery type
All types of AAA 1.2-1.5V batteries can be used (NiMH, NiCd, Alkaline, Lithium, Manganese, etc), but only NiMH and NiCd batteries can be recharged.
6:7 Battery life
The expected battery life may vary depending on the brand of batteries and the temperature in which the product is used. Low battery level is indicated by a voice saying: "low battery". The headset functions will not work optimally if the battery is low.
2*AAA NiMH
| Mode Life time | |
| Surround + Bluetooth (active) >12h | |
| Surround only + Bluetooth Off >80h | |
2\*AAA Alkaline
| Mode Life time | |
| Surround + Bluetooth (active) >12h | |
| Surround only + Bluetooth Off >80h | |
6:8 Bluetooth
2.1
A2DP 1.2
HSP 1.2
HFP 1.5
AVRCP 1.0
The headset is designed for Bluetooth standard V.2.1 (headset and handsfree profiles + A2DP) and is certified according to: EN 300 328 (radio test), EN 301 489-1/-17 (EMC test), EN 60 950 (electric safety, low voltage directive), FCC part 15.247 (US radio test) and I.C. (Canadian radio test).
7. STORAGE
Do not store the hearing protector at temperatures exceeding +55^ , for example on a dashboard or windowsill. Do not store the hearing protector at temperatures below -55^ .
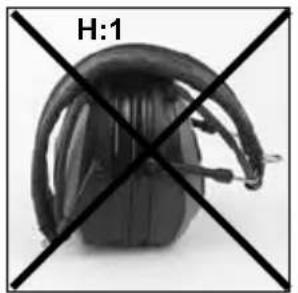
NOTE: Ensure the cord is removed from the audio input before folding the headband.
(H:1) WRONG. All headband wires must be tucked-in fully before the headband is folded.
(H:2) RIGHT. The ear cushions should lie flat against each other.
(H:3) WHEN DAMP. Turn the shells outwards. Remove the ear cushions so that the attenuation cushions can dry. Reinstall them. See Maintenance/ Cleaning section for further details.
Remove the batteries when storing the hearing protector for a long time. Check the functioning of the unit after replacing the batteries.
EN
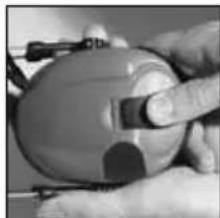
8. MAINTENANCE/CLEANING
This product is covered by the WEEE directive 2002/96/EC and is recyclable. Disposethe product in accordance with national regulation. Use local recycling system for electronic products.
8:1 CLEANING
Clean/disinfect the shells, headband and ear cushions regularly with soap and warm water. Note: Do not immerse in water!
8:2 REMOVING/REPLACING OUTER SHELLS
See 3:1
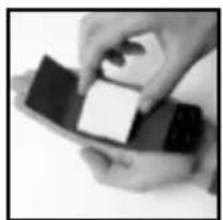
8:3 REMOVING/REPLACING EAR CUSHIONS
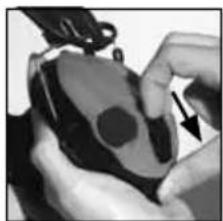
(C:7) Slide your fingers under the edge of the ear cushion and pull straight out.
(C:8) Insert a new ear cushion by pressing until it snaps into place.
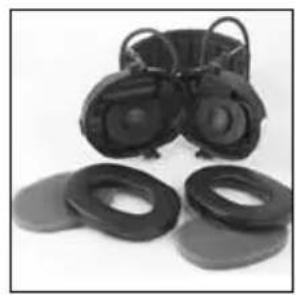
9. SPARE PARTS/ACCESSORIES
HY68 SV Hygiene kit
Easy to replace hygiene kit consisting of two attenuation cushions and snap-in ear cushions. Replace at least twice a year to ensure constant attenuation, hygiene and comfort, or if any of the parts of the hygiene kit are defective. The headset and particularly the ear cushions can deteriorate over time and should be inspected regularly to ensure that there are no cracks and sound leakage. If an ear cushion is damaged, it must be replaced. See Maintenance/Cleaning section.
Cords for audio inputs (receiving only)
FL6H J22 to 3.5mm mono contact
FL6M J22 to 2.5 mm mono contact
FL6N J22 to 3.5 mm stereo contact
FL6CE 3.5 mm to 3.5 mm stereo
Audio cord for two-way communication (Type ICOM)
TAMT06 Cord with push-to-talk button (PTT) and microphone, J22 contact
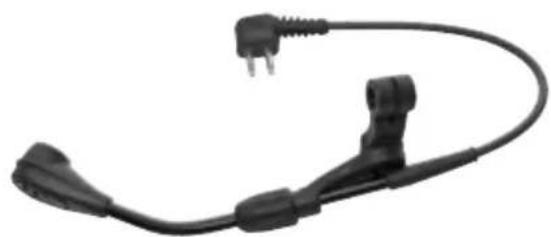
Other spare parts/accessories
MT53/1** Boom microphone (I:1) for communication in extremely noisy environments
HY400 Headband padding. For an optimal fit on a smaller head, use HY400 headband padding. The padding is easy to attach to the standard padding.
See the installation instructions (J).
The Bluetooth® word mark and logos are registered trademarks owned by Bluetooth SIG, Inc. and any use of such marks by 3M is under license. Other trademarks and trade names are those of their respective owners.
'3M does not accept liability of any kind, be it direct or consequential (including, but not limited to, loss of profits, business and/or goodwill) arising from reliance upon any information herein provided by 3M. The user is responsible for determining the suitability of the products for their intended use. Nothing in this statement will be deemed to exclude or restrict 3M's liability for death or personal injury arising from its negligence.'
BG
(1)KoeKaKBoe?
(2) MoHTaX n HaCTpoIBaHc
(3) YnoTpe6a/Функци
3:1 NocTabrHe Ha 6atePnte
3:2 3apekdahe Ha cnyuJaIKeTe
3:3 BknoBaHe n 13KIOUbaHe Ha cnUyAnKnTe
3:4 Cbbp3BaHe c BluetoothTM
3:5 YnpabneHne Ha TeJepeoHH oBaXdAHn
3:6 HactpoBbAHe Ha cnlaTa Ha cbpayHd 3Byka
3:7 HactpoiBaHe Ha cunata Ha 3Byka npn obaxdahe
3:8 HactpoBaHe Ha Cnata Ha 3Byka npi CnyuHahe Ha My3nKa
3:9ПоменянеHaHacTpOиКTeBMeHIOTo3aKOHФурupaHe
3:10 Cbbp3BaHe Ha BbHnHO6OpyDbaHe c Ka6eI
(4)ДугнФунки.
(5) Baxha nHΦopMaζηa 3a notpe6nteJIa
(6)TexHnueckn DaHHN
6:1 CToHocTn Ha 3aIywaBaHe
6:2 HnBO Ha BxoJaI CnHnI/BpeMe Ha ynoBxOJ22 (A:12)
6:3 Bb3dienCTBHe Ha 3Byka npn ynoTpe6a Ha ayDnO BXoJ J22 (A:12)
6:4 Bb3dienctBne Ha 3Byka npn ynoTpe6a Ha aydo Bxod 3,5 mm (A:11)
6:5 HnBa Ha KpnTepn
6:6 Bua 6aTeepu
6:7 PepnoHa ekcnloaataaHa 6aTepeHnTe
6:8 BluetoothTM
(7) CbXpaHeHne
(8) NopdApbKka/NouchTbaHe
8:1ПоунctbaHe
8:2 OToCTpaHЯBaHe/NoDmHa Ha BbHnHa HayuHnK
8:3 OTeTpaHbAHe/NoDMHa Ha noDIOXKKeTe 3a ywn
(9) Pe3epBn qactn/Akcecoapn
BG
WS SportTac, WS5, WS Workstyle
To3n npOdyKT e TectBaH n Odo6peH cBflaCHO dIpeKTHBa 89/686/EIO 3a IINHHTe pPeDna3HN CpeCDTa (JIIPC) n CbIoo TaKa CbOTBeTCTBa Ha dIpeKTHBa 2004/108/EC 3a eJNEKTPoMaHHTHa CbBMecTUMOcT 3a MapKnIpOBka CE.
3A6EJIEXKKA: IpoyeTe Te3n INHCTpykunn BHNMaTeNHO npedyn ynoTpe6a n 3ana3eTe 3a 6bdeega cnpaBka.
1. KOE KAKBO E
(A:1). Cbpb3Baua TeI (HepbXkaMa CTomHa)
(A:2) DbyTooukOba 3aKoNuaKHa (Ha cBbP3BaauTa TeI)
(A:3) PoiIIOxKn 3a yuN (PVC oIIO n noJIneCTepHa IyHa)
(A:4) MinkpoΦoH 3a cIbpaYH 3ByK
(A:5) Полloxka 3a 3aŋnyuwaBaHe (noJIneCTepHa nHa)
(A:6) BbTpueH HayuHHK
(A:7) BbHnE HnyuHnK
(A:8) Cko6a
(A:9) Cbpb3BaUaJIeHTa (JIncTOB MeTaJI)
(A:10).ПоДлоЖкаHa CBbp3BaцаТа ЛeHTa (TePMonlaCTnueH eJnactOmepeи КOKа)
(A:11) AUX aydno BxoD, 3.5 mm ctepeo
(A:12) Ayno BxoJ, J22
(A:13) BKN./N3Kn./PekmM
(A:14) NobuwaBaHe/NoHnKabaHe Ha CunTa Ha 3Byka
(A:15) Minkpoohon 3a roBop
(A:16) BytoH 3a Bluetooth
(A:17)Ka3a3apAHOyCTpOCTBO
(A:18) 3apAINDHOyCTpOoiCTBO
(A:19) Празаши се батерни AAA NiMH
(A:20) Ctepeo ka6en 3,5 mm. FL6CE
2. MOHTAXИ HACTPOIBAHE
(B:1) OTBopTe Cbbp3Baata NaHTa.
(B:2)ПьзHEte HayuHnUte HABbH. HAKIOHETe rOpHata qacT HaHayuHnKa HABbH, 3a da ce yBepnte, Ye Ka6eJIInTe ca pa3nOJoxEH n3BBH Cbbp3BaUaTa JIeHTa.
(B:3) HAcTpoIe BnCOunHaTa Ha HayuHnUte KaTo rN pB3HeTe HArope nHaNoIy, KaTO 3aIbpxKaTe Cbbp3BaUaTa IeHTA B HEnoDbXKHO NIOJKeHne.
(B:4) Cbbp3Baauata na hnta ce paanona Bbpx nphata qact OT rnaBata.
(B:5)ПпeДи Да прьнete снховяnpeДиа3nte,I npTnchTeHayuHnUte eINH KbMpyr.Octabete Okono 4 mm OT CBbp3Baauata TeBnDnma.
(B:6) NperbHeTe Cbbp3BaauTa JeHTa KaKTo e nokaHo. YBepTe ce, Ye NOIOXKKte 3a yuH He ca HabpbUkaHN ue Ca HAcOueHN npabUNHO eHa KbM dpyra. 3a6eNkKa: He 3a6paBnTe da oTcpanHe Ta6ena ot aydno BxoJa (A:11), npen Da nperebHeTe Cbbp3BaauTa JeHTa.
3. YNOTPEBA/ФУHKUIN
3:1 NocTaBHe Ha 6aTePnIte
OTCTpaHETeJIeBnBbHWeHayUHmK.
(C:1) NocTabeTe TbN INHCTpyMeHT ININ npbCT NOI p6a Ha Cko6ata N 6yTHete HABh3-4 mm.
(C:2)HaTnchTe/IIb3HeTe cKo6aTa HaOny.OTcPaHete HayuNka. IocTabete npe3apexJaunTe ce 6aTeepnn AAA NiMH, BKJIOueHn B npOdykTa. YBepTe ce, ye nonHOCnTe ca NoCTaBeHN npabUNHO.
CnywaJknte MoKe da pa6oTn c aKaNHb6aTePN.
IpeynpeKdene! HE 3apeKdaTe aIkaJIHn 6aTePmN, TbN KaTO TOBa MoKe Da noBpeu CnyuAknTe.
OctpaHeTe BbHnHaHayhNk.
(C:3) YbepeTe ce, ye cko6aTa e n34JIO HATNCHATA HaIOny.
IocTabete HayuHnka ot dony Harope, kato ce yBepnte, ye KyKnUkata B rophata qact Ha HayuHnka (C:4) nacBa B OTbopa Ha BBtpeuHnra HayuHnK (C:5).
(C:6) HatncheTe/IIb3Hete cko6ata Harope, cIeK KaTO HayuHNkBt e 3actonopeh.
3:2 3apekdahe Ha cnyuanknTe
Cbpxte 3apnHOTO yctpoNCTBO KbM Jka Ka 3a 3apnHOTo Ha CbpxBaTa Ta nHTa (A:17).
3aepkdaTe cnyaalknTe 8 yaca, 3a da nocTURHeTe MaKcImaJIeH KaIauNTet Ha 6aTepeuNTe.
PpeynpeKdHeN: 3nON3BaIe cAmO opuHnHaHNo 3apAHDTo yCTpoiCTBO.
YnOtnpe6aTa Ha npyro 3aprAno yctpOnCTBO MoKe da nobpeDu cnyuJaKInTe.
IpeynpeKdene: HE 3apeKdaTe aIkaHn 6aTePN, TbN KaTO TOBa MoKe Da nobpeu cnUshaJIKe.
3:3 BkIIOUBaHe nN3KIIIOUBaHe Ha cnyuAnKnTe
HaTnchete 3aApbXTe 6byToHa On/Off/Mode (BKn./N3Kn./Pekm) (A:13) 3a DBe cKeYHn, 3a Da BKnIOHTe NIn N3KnIOHTe CnywaJKNITE.
3:4 Cbpb3BaHe c Bluetooth
Cnywaankte moke da ce cBp3BaT KbM Bluetooth yctpoiCTBa, KOIto noDbpxaT A2DP, HFP n HSP npoqnn.
OBbPHETEBHIMAHHE,yeMOKTe Da cnywate Ctepeo 3Byk/My3nKa eINcTBeHOOTycTPOIcTBO (MO6nJIeH TeIeΦoH, KOMNIOTpBnДp.), KoETO noDbPka A2DP Bluetooth npoФnJ.
- YbepeTe ce, ye cnywaanknte ca 3apeDeHn n N3KnIyHeHn.
- HaTnchete n 3aIpbkTe 6yToHa On/Off/Mode (BKn./N3Kl./Pexm) (A:13) 3aNETcekyHn.
Toba nocTabra cnyuwaanKeTe B pexm Cbbp3BaHe, Koeto ce notBbpxdaBa
pe3 noBtaprao Ce rnaCobO cb6eHne: Bluetooth pairing mode" (PekmHa cBbp3BaHe c Bluetooth).
- AktnbupaTe cyHKuTlTa Bluetooth Ha TepeHa cn n TbpceTe HOBu yctpoNCTBa.CneHЯKoIko cekyHn „Peltor WS5" ue ce noaBn Ha ekpaHa.
- 136epete „Peltor WS5".
Ako TelepeohbT Bn noncka npona, BbBeTe: 0000 - Cbbp3BaHeto ce nOTBbPkaaba koraTo yyeTe rnaCoboto cbo6ueHne, pairing complete" (Cbbp3BaHeto 3aBbpueHo).
CneI KaTO CBp3Baaataf yHKnIg Bluetooth ce aKTHBnIpa, Ta aBTOMaTHNO ige yCTaHO BVpb3ka CbC cnyuAknite cneBaunr nT, KOrato 6bJe H3NoJ3BaHa, c NOTBbpxdAbaUcOboSeHne ,connecting Bluetooth" (CBbp3BaHe c Bluetooth), n CneI ToBa: "connected" (CBbp3aHo/), KOrato yCTpoiCTBaTaCe CBpXaT. MoKeTe Da CBp3BaTe n 3ana3BaTe nHΦopMaunr 3a Do 4 yCTpoiCTBa.CnyuAknite aBtOMaTHUo ue OnITaT da Ce CBbpKaT IIpBO KbM Na-NCJIeDHO CBbp3aHOTO yCTpoiCTBO.
3:5 YnpaBneHHe Ha TeJepeOHn ObaKaDaHn
3a ynpabIeHne Ha TelefoHHn 6oaxdHn, CnyuJAKTe Tp8Ba da ce CBpb3aHn C MoBnIeH TelefoH Upe3 fynKunra Ta Bluetooth, BnKTe cBbP3BaHe c Bluetooth.
PnemaneHa o6aKaHnA
BxOJaIuTe TelefoHHn 06aJdHnA Ce yka3BaT CbC CnHaN 3a 3BbHeHe B cnUaKnTe. PnpMeTe Upe3 6bp3o HaTnCKaHe Ha 6yToHa Bluetooth (A:16).
OTXBbPnHe Ha o6aKaHa
OTXBpneTe 6aKaDaHe KaTo HaTnChHe T3aDbpxKIne 6yToHa Bluetooth (A:16).
BG
Гласовибранe
Бьрзо haTиСнeTe 6уТоHa BluTeoth (A:16).
NobtopHoHa6pahe
HaTnchete n 3aDpBxTe 6yToHa Bluetooth 3a 2 cekyniA (A:16).
3:6 HactpoBaeHa cnilaTa Ha cbpayHd 3Byka
YBeHnueTe cnlaTa Ha 3Byka. HATnCHeTe 6yToHa + (ropHn) (A:14).
NoHHKeTe CnNaTa Ha 3ByKa. HATnCHeTe 6yToHa-(DOnHnA) (A:14).
3:7 HactpoBaHe Ha cnata Ha 3Byka npn o6aKaHa
MoKeTe Da HAcToBate CnNata Ha 3ByKa No BpeMe Ha 06aKdAne KaTO HaTnCKaTe 6yToHIne (-) n (+). HAtncHeTe 6yToHa On/Off/Mode (BKn./M3Kn./
Pekm) (A:13), a nocne (+) nnn (-), 3a da hactponte cnnta Ha cbpaynd 3Byka no BpeMe Ha o6aKaHa.
3:8 HacpoBaHe Ha cnIata Ha 3ByKa npn CnyuHa He My3Nka
MoKeTe Da HacToBate Cnata Ha 3Byka DoKaTo Cnywate My3nka KaTO HATnCKaTe 6yToHHe (+) n (-). HATncHete 6bp3o 6yToHa On/Off/Mode (BKn./
N3Kn./Pexm) (A:13), a nocne (+) nni (-), 3a da HacptponTe cnlaTa Ha cbpayHd 3Byka dOKaTO cnywaTe My3nka.
3:9Помяна На HabtpoикпБ МEHIOTo Confuge (KoHФИгурпанe)
CnywaJNKeIe IMaT MeHIO 3a KOHpynpaHe, KbTeO MoKte Da peryInpaTe HacptpoJNKeIe. 3a da DOCTnHHeTe Do MeHIOTo, HATNCHEte N 3aApbXkTe 6yTOHnTe (-) n (+) 3a 2 cekyn (DOKaTO CnywaJNKeIe Ca BKnIOueHn).
Дocтьтdo MeHTo Configure (KoHФИгурраHe) ce NOTbpxJaBa OТ rIacOBO cbo6ueHne: menu" (MeH). 3a da npOMeHnte HAcTpoiKITE, n3noJ3BaIte 6yToHnTe (-) n (+). 3a da npemHete HanpeB B MeHTo Configure (KoHФИгурраHe), hATncHete 6bp30 6yToHa On/Off/Mode (BKn./ N3Kn./Pexm) (A:13).
BnKTe KpaTkoTo pkoBOCTBO 3a HOpMaun OTHOCHO HAcTpoBaHTo Ha MeHIO To pa3noJKeHneTo Ha yHKUNTe.
YcHbAHe Ha 6acnte
Функлuarta Bass Boost Дава NO-пьен 6acob 3Byk Ha Cnyшанata cTrepeo My3nka.
Pekim 3a orpaHnuaBaHe Ha My3uKaTa
CbIeCTByBaT DBe HAcTpOKn 3a OrpaHnUbaHe Ha HNBTo Ha 3ByKa npu Cnyuane Ha My3nKa/ayDnO c Bluetooth.
ON (Bkn.)
OrpaHnHTeIaTcpe NOHxH HbTO Ha CnIaTa Ha 3Byka Do 82 dB(A) L 3a 8 yaca.
OFF orpaHnUaBa 06IooTb3JeCTBHe Ha 3Byka 3a 8 yaca Do 82 dB(A) I
Ako cnlaTa Ha 3Byka e HacTpoHa Ha82 dB(A), Ta ue ce noHxN do MHOro HnCKO HnBO npn DOCTnraHe Ha DHeBHata rpaHua.
ToBa ce notBbpxdaba O TnacOBO cbo6eHHe: daily dose reached" (doCTnrahe Ha dHeBHata rpaHua).
I3MePBeTHeHnIypeI ce pecTnpa Hb BceKn 24 yaca.
PpeynpeKdHeHne: HnEBHaTa rpaHua MoKe da 6bJe HaBnWeHa, aKO
6aTePnnte ce OTCTpaHrT n POdMeHrT, nIaKO ce aKTbBnPaT fapuHnte HacTroKn.
BanaHc
PpomeHa 6aHcJaIbO-IAcHO Ha cbpayH3Byka.
Ekbaan3ep
PpomeHЯ ueCTOTHTHe nokaTeHn Ha cbpayHn 3Byka.
- Low (Hücko)
Normal (HopmaHno)
High (Bucko)
- Extra High (Ekctpa Bucoko)
BbHueh BXoD (npnlarae ce eHNCTBeHO 3a ayINO BXoJ22-A:12)
OFF (N3Kn.) - n3noJ3BaIte To3n peXIM, KOraTO ayDIO BxoDbT J22 He ce N3NoJ3Ba.
ON (BKn.) - n3noI3BaIe To3n peXIM, aKO Ka6eI e BKnIOueH b ayDINO BXOda J22.
- Microphone (MnKpOΦoH) - n3noJ3BaIe To3n peXIM, aKO MnKpOΦoH Ha cToiKa e Cbbp3aH KbM ayDIO BxOJa J22.
Cnla Ha cTpaHnUHn 3Byk (npunara ce camo 3a Hands Free Bluetooth 3Byk)
OFF (N3KJ.)
LOW (Hncko)
NORMAL (HopmaJIHo)
HIGH (Bucoko)
Bpbuahe Ha cpaepnHHTe hactpoKn
Bpbuahe Ha BCNUKf yHKUN KbM fapuHnTe HAcToKn.
3:10 Cbbp3BaHe Ha BbHnHo o6OpyDbaHe ue3 Ka6eI
BbHnHO o6OpyDbaHe moKe da ce cBbpxe ype3 aydno BxOJ J22 (A:12) nnn kak 3,5 mm (A:11). 3a nHΦopMaqur OTHocHo pa3JIuHn Ka6eN, BnKTe Pe3epBn uactn/Akcecoapn (I).
4.ДРУГИФУHKUIN
- IocneHnTe HacToPouKn Ce cbxpaHbBat, KOrato CnyuAInKte Ce n3KnUoyat.
- ABTomaTHNO n3KNIOUBAHe CneI Dba Yaca, aKO He CE n3N0NJ3BaT HNKAKBn cyHKUN. ABTomaTHNO TO n3KNIOUBAHe CE yka3Ba OT INaCOBO Cbo6ueHHe: "automatic power off" (ABTomaTHNO n3KNIOUBAHe).
- Hnckoto HnBO Ha 6aTepuNTe ce yka3Ba OT rIacOBO cbo6ueHne: low battery" (Hncko HnBO Ha 6aTepuNTe).
5. BAXKA INHΦOPMALIJI 3A NOTPEBNTJI
CnyxOBnI npEa3nten Tp6Ba da ce Hocn, HacTpoBb, NOcCTBa n NoDbpxKa cbrnaCHO TOBa pKoBOcTBO.
CnyxOBnT npEtna3nteBKnHcBaakTNbHa cNlaHa 3Byka.PnpoBepeTe daH Ta3n FyHKuPa6To, npEtn Da n3noJ3BaTe yCTpoIcTBOTO.
Ako 6bdaT OTkpntn n3kprnbBaan nnn depektn, HappaBeTe cnpabKa C HCTpyKuNTHe Ha npOn3BOaNTeJra 3a noDpBjKka N CMHa Ha 6aTeepnnte.
BnHaHn Hocete cnyxOBnI npEJa3nteI NO BcRAKO BpeMe DOKaTO Ce n3JIaTe Ha onaceH wym.
HraKoXmMueeckn BeuecTba MoKe da NoBpeJr T03n npOyKT. CbpxKeTe ce c PpOn3BODntela 3a NObeue HOpopMaun.
CnyxOBnT npEpa3nteI e cna6deH c enektpueckn ayDIO BXoJ. PpOBepeTe daH Ta3n fynKunra pa6OTn, npEdu n3no3BaTe yCTpoiCTBOTo.Ako 6bDaT OTKPHTuN3KPNBBAHn IIN DepeKTn, HApPaBeTe cnpaBka C nHCTpyKUnTe Ha npOn3BOUInTeJ.
Ako n3KpNBraBaHTo Ha 3Byka ce yBeJIuNn IIN CnIaTa Ha 3Byka ce NOnHJN npekOMepHo, e BpeMe da CmeHnte 6atePnTe. HIKora He CmehnTe n He NoCTabRte 6ateHH, DOKATO YcTPOJCTBOTO e BKJIIOHeHO. YBepTe ce, He 6atePnTe ca npabNJHO NOCTABEHn Ppei Da n3NoJ3BaTe npOdykTa.
CbxpahraBaiTe npOyKta 6e3 6aTepuNTe.
- Ppi ekctpemHcTydeHn ycNoBnA, 3aToTneTe cIyXOBn npeDn3nteI npedyn ynoTpe6a.
- PON3BaTeJrT Tp6Ba Da ce yBepn, Ye HayuHnUnte Ce nHcneKtnpaT peoBHO 3a roDHOCT.
- NocTabraHTo Ha XnIeHnHn NOKpTnHa NoIIOKkTe MoKe Da NOBnRe Ha akCyTuHata cyHKUHOHaJIHOCT Ha HayuHnCtne.
3a6eJek: Ako Te3n npenopbKn He 6bDaT cna3BaHn, Ha 3arIyuaBaHeTo MOKe Da ce OKaKe OTpuCaTeJIHO Bb3DeiCTBne, KOeTO MoKe Da DOBeDe Do yBpeKdane Ha cnlyxa.
PNEyPEXKDEHNE!
3BykBT OT BepuraTa Ha akTnBHaTa Cnla Ha 3Byka Bbpxy CnyxOBn IpeDna3nteI
BG
MOKe Da HaBnWn BbHNoTO HbO Ha 3Byka.
BAKHO! 3a Hai-do6pa 3aunta, OtdpbHneTe Ha3aJ Kocata OKONo yuNTe, Taka Ye noIIOKKnte 3a yuN da nacHat ToUHO OKO No rnaBata. PAmKnte 3a OUnla Tp8Ba Da 6bDat Bb3MOxHO Hau-TbHKn N da nacBat NtBTHO KbM rnaBata, 3a da ce cBeDe DO MNHMym akyCTNUHOTo N3nyckaHe.
6. TEXHnueCKn DAHHN
6:1 CToHocTH Ha 3aRnyuBaHa, CNrHaJI KbM Wym (D)
Стойносту Са загушаве И Нивата Н ям 3a слушалкпс с Тecтваши Oдбрени Сыласно EN 352-4:2001, EN 352-6:2002, EN 352-8:2002 И пинокимпес уости Ha EN 352-1:2002. Сергфikот Идадан ot FIOH (perictpauzoHEN Homep 0403).
06aHHeHa Ta6JnCInTe c daHH 3a 3arNywaBaHe:
- Terno
- YecToTa (Hz)
3.CpeNo 3aRnyuwaBaHe (dB)
4.CtahdapTHOOTKJIOHeHne(dB)
5.OuakBaHo 3aTnywaBaHe (dB)
6:2 HnBO Ha BXoJaC nHnBpeMe Ha ynoTpe6a Ha ayNo BxoJ22 (E)
MaKcImaHNO DoIpyCTM aydno CnHaN BbB Bpb3Ka C BpeMeTo Ha yNoTpe6a. 3a da ce IpeDOrBpaTAT BpeHN eΦeKtn 3a CnyxA, BXoJauNt CnHaN He 6nBa da NaDbNiShaBa ONpeJeHEnTe CTOnHOCTn (CpeHNO ROBOPHO 3ByKOBO HnBO). DblrOtpaHnata CpeHnCT OToHOCHT Ha CnPaTa HA 3ByKa Ha CnyuAaKnite e N3MepeHa npn HnBO, CbOTBeTCTBaUO Ha 3ByKOBO HnBO OT He NObue O 82 dB(A).
- YacobE/DHn
- CpeHNO HnBO/eNeKtpnueeckn cnHaJ X = 20 mV
6:3 Bb3dienctBnE Ha 3Byka npn ynoTpe6a Ha aydo BXoJ22 (F)
6:4 Bb3dienCTBnE Ha 3Byka npn yNoTppe6a Ha ayDnO BXoD 3,5 mm
HnBoto Ha cnyuwaankte 3a My3nka e n3MepeHo npn 3ByKOBO HnBO OT He noBee ot 82 dB(A).MakcImanHO BxoJaio HnBO 1,5 Vrms.
6:5 HnBa Ha Kpntepnn (G)
HnBO Ha Kpntepnn e KOJIueCTBOTO Wm (N3MepeHo KaTo A-nerTeHo 3ByKOBO HaJraHe) N3BbH CnyXOBn IpeDna3nten, Koeto Daba 85 dB(A) OTBbTpe. HnBO To Ha Wyma 3aBnCn OT BnDa Wym. He BnCOKoEcTOHO DOMHHpaH Wym, Me Wym, KOIto He e DomHHpaH OT KaKaBaTO n Da 6nNo ONpeDeJeHa YecToTa, a L n HnCKOeCTOTHO DOMHHpaH Wym.
6:6 Bnδ baTepeHn
Mоже Да ce ИЗпОЛЗВаT BCИЧКИ ВИДОБе 6aTeри AAA 1,2-1,5 V (NiMH, NiCd, ankaHn, ЛNTeВи, МагнeЗeВи и др.), Н сamo 6aTeри NiMH и NiCd може Да ce пpeЗapeЖдТ.
6:7 NepnoHa ekcnloataunHa 6aTepeHnTe
OuKaBaHnT nepno Ha ekCnIooataaHa ha 6aTePnraMoKe da Bapnpa B 3aBNCmOCT OT Mapkata 6aTePnn N TempepaTypa, B KOrTO npOdyKtBT Ce n3NoJ3Ba. HnCKOTo HnBO Ha 6aTePnnte ce yka3Ba OT rJaCOBO cBo6ueHne. "low battery" (HnCKO HnBO Ha 6aTePnnte). PhyHKUInTe Ha cnUwAnKnTe Hma da pa60TAT ONTMaJIHo, aKO HnBOTo Ha 6aTePnnte e HnCKO.
2× AAA NiMH
WS SportTac, WS5, WS Workstyle
WS SportTac, WS5, WS Workstyle
WS SportTac, WS5, WS Workstyle
WS SportTac, WS5, WS Workstyle
AutoTo TPOoiov exEe AeyxTei Kai EykiTei Wc EeONIAOa otoukns TPOOtaia (MAI) ouqwva e Tnv Odbnyia 89/686/EOK, Kai eivai, tian, ooumuoppwon e Tnv nAektpopayvntikn ouatotnta (EMC) TNS Odbnyiac 2004/108/EC yia onpavon CE.
ZHMEIOsH: AiaBaeT PooekTIka autc s Tc obnyies piv aTO tn xpnon kai qualaTe Tc yia uelovtikxpnon.
1. E3APTHMATA
3:5 4aepipn nAeawikw knoewv
Tn diaeipion nAeewvKAnoeW, To eT Kepaiou TpTei va ouvduoetie
Eva KInTo nAeewvo Toun diaaTeI IKavOTnTa Bluetooth, EITE Iapanavw
Suvduoos eBluetooth.
Aiavtnoknaeewv
Eioepxóvecs knoeic avayyéovtai με kouoovioσa σto eKεpαliou.
ATIaVTnOTe TIEcovTaG sUvToMa To KoumPi Bluetooth (A:16).
Antoppipn khaon
Atoppipte (apvnthe va atavtnoet) ia knan nieovtac kai kpatwtaq
Tatnnevo to koupti Bluetooth (A:16).
EL
Eπλογπ φωνης
WS SportTac, WS5, WS Workstyle
"automatic power off".
WS SportTac, WS5, WS Workstyle
WS SportTac, WS5, WS Workstyle
WS SportTac, WS5, WS Workstyle
Bass Boost (Renforcement des basses)
9. PIEÇES DE RECHANGES/ACCESSORIES
WS SportTac, WS5, WS Workstyle
Ovaj proizvod ispitan je i odobren kao osobna zašitna oprema (PPE) u skladu s direktivom 89/686/EEC, usaglašen je sa zahtjevima za elektromagnetsku kompatibilnost (EMC) direktive 2004/108/EC te ispunjava zahtjeve za postavljanje CE oznake na proizvod.
NAPOMENA: Pažljivo pročitajte ove upute prije prve upotrebe i spremite ih za buduce korištenje.
1. UGRADBENI DIJELOVI
(A:1) Žičani obruč za glavu (nehrdajuci Čelik)
(A:2) Spona za pričvṛśćivanje u dvije točke (na Žičanom obruču za glavu)
(A:3) Jastučić za uši (PVC folija i poliesterska pjena)
(A:4) Mikrofon za okolni zvuk
(A:5) Prigušni jastučić (poliesterska pjena)
(A:6) Unutarnja školjka
(A:7) Vanjska skoljka
(A:8) Spona
(A:9) Obruc za glavu (limena oplata)
A:10) Postava obruča za glavu (termoplastici elastomer ili koža)
(A:11) AUX audio ulaz, 3,5 mm stereo
(A:12) Audio ulaz, J22
(A:13) Uklj./isklj./načini rada
(A:14) Glasnoća (VOL)+, VOL-
(A:15) Mikrofon za govor
(A:16) Gumb za Bluetooth
(A:17) Prikljucak za punjac
(A:18) Punjač
(A:19) Punjive AAA NiMH baterije
(A:20) Stereo kabel 3,5 mm. FL6CE
2. UGRADNJA I PODESAVANJE
WS SportTac, WS5, WS Workstyle
WS SportTac, WS5, WS Workstyle
Bessi vara hefur verio profo og vottuo i samrami vi PPE-tilskipun 89/686/
Bass Boost (Bassastyrking)
8:2 AD FJARL/EGJA EDA SKIPTA UM YTRI HLIFAR
Sja 3:1
8:3 AD FJARL/EGJA EDA SKIPTA UM PETTIHRINGI
WS SportTac, WS5, WS Workstyle
"WS SportTac", WS5, "WS Workstyle"
WS SportTac, WS5, WS Workstyle
Sis izstradajums ir pbaraudits un apstiprins saskaar Direktivu 89/686/ EEK par individuallajiem aizsardzibas lidzekliem (IAL), un attiecibuz CE markejumu tas atbilst Direktivai 2004/108/EC par elektromagnetisko saderibu (EMS).
PIEZIME. Pirms lietosanas rupigi izlasiet sos noradijumus un glabajiet tos turpmakai uzzinai.
1. SASTAVDALU SKAIDROJUMS
(A:1) Galvas siksnijas stieple (nerusjojsais terauds)
(A:2) Divu punktu stiprinājums (galvas siksninas stieplei)
(A:3) Austiŋ spilventini (PVC pleve un poliestera puts)
(A:4) Apkartējās skānas mikrofons
(A:5) Vajināsanas spilventini (oliesterautas)
(A:6) leksejais apvalks
(A:7) Ārejais apvalks
(A.8) Skava
(A:9) Galvas siksniina (metala sloksne)
A:10) Galvas siksninas polsterejums (termoplastisks elastomers vai ada)
(A:11) AUX audio izvade, 3,5 mm stereo
(A:12) Audio ieeja J22
(A:13) leslegt/izslegt/rezims
(A:14) Skalums+, skalums -
(A:15) Runāsanas mikrofons
(A:16) Bluetooth poga
(A:17) Lādēsanas ligzda
(A:18) Ladetajs
(A:19) Uzladajamas AAA NiMH baterijas
(A:20) Stereo vads, 3,5 mm FL6CE
2. UZSTÄDISHANA UN REGULEŠANA
(B:1) Atlociet galvas siksninu.
(B:2) Izbīdiet apvalkus. Izgrieziet apvalka augsejo daju uz āru, lái stieplies būtu novietotas tālak no galvas siksninas.
(B:3) Bidot apvalkus augsup un lejup, regulējiet to augstumu, vienlaikus cieši turot galvas siksniju.
(B:4) Galvas siksninai jabut novietotai pari galvas augspusei.
(B:5) Lai salocitu dzirdes aizsargierici, vispirms saspiediet kopā apvalkus. Atstajiet redzamus aptuveni 4 mm no galvas siksninas stiepes.
(B:6) Salokiet galvas siksniu, kā noradits. Raugieties, lai austinu spilventini nebūtu sakrunkoti un lidzeni pieguletu cits citam. Piezime. Pirms galvas siksnijas salocīsanas no audio ieejas (A:11) jāiznem vads.
3. LIETOSANA/FUNKCIJAS
Equalizer (stabilizers)
Mainaapkarteyas skanas frekvencu vibraciju raksturu.
Low (zems)
Normal (parasts)
High (augsts)
Extra High (loti augsts)
External Input (areja ieeja) (attiecas tikai uz audio ieeju J22 (A:12))
OFF (izsl.) - so rezimu lietojiet tad, ja netiek izmantota J22 audio ieeja
- ON (iesl.) - šo režimu lietojiet tad, ja J22 audio ieejai ir pievienots vads
- Microphone (mikrofons) - šo režūmu lietojiet tad, ja J22 audio ieejai ir pievienots mikrofons ar kātu
Side tone volume (sānu tona skalums) (attiecas tikai uz brivroku Bluetooth skanu)
OFF (izsl.)
LOW (zems)
NORMAL (parasts)
HIGH (augsts)
Reset to Factory Default (rupnicas noklusejuma iestatijumu atiestatisana)
Atiestata visas fungcjjas uz noklusejuma vertibam.
WS SportTac, WS5, WS Workstyle
Reset to Factory Default
WS SportTac, WS5, WS Workstyle
Dette Produktet er testet og godkjent i henhold til direktivet om personlig verneutstyr (PPE-direktivet) 89/686/EØF, og det er øgså i samsvar med direktivet om elektromagnetisk kompatibilitet (EMC-direktivet) 2004/108/EC for CE-merking.
Voice dial (talectyring)
6:5 Kriterienivae (G)
8. VEDLIKEHOLD/RENGJØRING
WS SportTac, WS5, WS Workstyle
WS SportTac, WS5, WS Workstyle
WS SportTac, WS5, WS Workstyle
(8)O6cnyKuBaHne/ouncTka
8:1 OuInCTka
8:2 YdaJIeHHe/3aMeHa HApyKbIx YaWeK
8:3 YdaJIeHHe/3aMeHa 3ByKoN3OJInpyUOuIX BaJIiKOB
(9) 3anachbte yactn/akceccyapbl
RU
WS SportTac, WS5, WS Workstyle
HactoJee H3dJIeNpeIpoWNo IcBbTaHnI yIOBNEbOPraTe Tpe6OBAHNm
DInpeKTHBbI O cpeCTbax INHINBnDyaNbHO 3aunTbI (PPE) 89/686/EEC n
DInpeKTHBbI 06 3JIeKTPomarHnTHOH COBMecTmOCtN (EMC) 2004/108/EC
Ebponeckoro co103a no 6e3onacchoTn npOyKuNN.
IPIMEUAHNA: BHImateJIbHo O3HaKOMbTeCb C daHHbIM NHCtpyKUmaMn
COxpaHnte IN B KaueCTBe CnpaBOuHO IHOpMaCuN
1. 4TO ECTb 4TO
(A:1) Ka6eJIb roJIoBHOH CTaJKN (HePkaBeIOuaI cTaJIb)
(A:2)Дыхноинhoe крплесн(e (ka6eJIb roJIOBHOI CTaKKN)
(A:3) 3BykOn3oJnpUoiuB aIiK (nneHka n3 PBX u noJIn3ΦnpHbI npOioH)
(A:4) MinkpofohДЯ objemHoro 3Byka
(A:5) Nódyuèyka 3BykònódαBnēHn (NójInəΦnpHbI nopoJIoH)
(A:6) BnytpenHyaoka
(A:7) HapuyxHna yauka
(A:8)ΦHKcaTop
(A:9) TOnOBHnA CTJKKa (TOHKOJIInCTOBO MTeaJIIN)
(A:10) Ha6nboHbI MaTePmAn rOIOBHO CTJKKN (3JaactoTePmonJaCT nKoKa)
(A:11) 3BykoBoB BxoAUX, CTepeo 3,5 MM
(A:12) 3BykoBoB BxOJ, J22
(A:13) Khoinka On/Off/Mode
(A:14) Khoonu VOL+, VOL -
(A:15) PeueBoM MmKpOboN
(A:16) Khoinka Bluetooth
(A:17)Pa3bEmIJIa3apJIKn
(A:18) 3apndnoe ycTpoiCTBO
(A:19) AkkymyTophie 6aTapeA AAA NiMH
(A:20) Ctepeokaebb 3,5 MM. FL6CE
2. CBOPKA IN HACTPOIKA
(B:1) OtkpoIte roIobHyIO CTaKKy.
(B:2) Pa3dBnHbTe YaIKN. HAKIOHIne BepXHIOU qactb YaIKN HApyKy TaKM 06pa3OM, yTO6bl Ka6JIIN OKa3aIINCBHE ppeJIOB rONOBHO CTAAKKN.
(B:3) Otperynpyte BlicOTy caWEK cDHNyB INx BBepx INN BHN3, pRn 3TOM ydepXNBARIIOBHyO CTaKKy Ha OJHOM yPOBHe.
(B:4) TOnOBHaa CTaKKa DOJIaHa 6bItb paCNoIOKeHa B CaMOBepxHeu qACTN TOnOBbl.
(B:5) IpepeTcKak cIoxNtB npOTnBOUyMhBie HayuHnKn npNXmTe yAuKn dpyr K dpuy. OCTaBBte OKOJ 4 MM Ka6eJra rOIOBHO CTAAKKn B npedeJIa BNDIMOCTH.
(B:6) CorHnte roNoBHyO CTaKky, KaK noka3aHO Ha pncyHke. Y6eIITecb B TOM, qTO 3ByKoN3OJnpyUoJne BaJIKN He CmJINcB I paCNOJoxKeHb POBHO npaJIpeJIbHO Dpyr Dpyry. PpImeHaHne: Ipeed cKJaIdbIbAHmE CTaKKn y6eIITecb, qTO n3 aydnOBxOda (A:11) n3BnueH en Hhyp.
3. INCNoJIb3OBAHNE/ФУHKUIN
3:1 YctaHObKa aKKMyIITOpOB
CHIMITE neByIO HApyXHyIO yaIky.
(C:1) Поденье край снкатopa ТупьIM пpeДмETOM ИИп пальем И OTТЯНITE снкcatop Ha 3-4 MM.
(C:2) HaxmTe Ha qKcTOp n CdBnHbTe ero Bn3. ChmTe yaKy.
YcTaHOBnTe aKkymyIaTOpbl AAA NiMH, npnilarauoIueeK n3dennio.
Y6eIntecb, yTO yCTaHabnBaete 6atapeB CootBetCTBm C yKa3aHHoI NOJIrpHOCTbIO.
HayuHnMoryT Takke pa6oTaB OT uenOHyix 6aataeek.
BHHMaHHe! HE 3APJXAHTE ⅢeNoUHbIe 6aTapeuKn, TaK KaK 3TO MoKeT npNBecTN K NOBpeXdEHNO yCTpoiCTBa.
3aMeHa HapxHNo YaXKn
(C:3) Y6eIntecb, yTO φnKcaTop nnotHO 3aKpeJIenH.
IpeBepHnTe YauKy TaK, YTObBi KpOuOK B BepxHei YaUKN(C:4) BOWeJI B Na3 BHyTpHenYaUKN(C:5).
(C:6) Haxmte Ha φnKcaTop n CdBnHbTe ero BBepx, KaT OJIbKO YauKa pa3MeCTNTcB HnWe.
3:2 3apДka HayшнкOB
Поdkлочte 3apядhoe yctpoiCTBO K cneциальHOMy pa3bemy Hayшнков (A:17).
Длг понов зардкakумлета noTpe6byetc8 yacob.
PpeynpekdeHne: Nolb3yTeCb TOnbKO 3apnHbIM yCTpoiCTBOM, npnaeraembIM B KOMnIeKeT. IcnoJIb3ObaHne dpYrOHO 3apnHO rTOpOHCTBa MOKET npNBeCTN K NOBpeKdeHIO HayuHKnOB.
Ppeynpexdene: HE 3APXKAITE ueonhbe 6aapeKn, TAK KaK 3To MOKeT npBecTN K NOBpeKdeHIO yCTpoiCTBa.
3:3 BkIIOUeHne N BBKIOUeHne HayuHnKOB
YTo6bI BKNIOHTb NIN BBIKIOHTb HayUHNK, HAnKMnTe N ydePKBaTKe KHOkKy On/Off/Mode (A:13) B TeueHne DByx cekyHd.
3:4 Bluetooth™-coeINHeHne
HayuHnKMOyT HaxoDntb NnoKNoHaTbc K yctpoiCTBaM c Bluetooth, noDepeKnaUoIm npoHnA2DP,HFP n HSP.
PIMMEUHNE Bb MoKeTe npocnyuBaTb My3bky n Dpyrne ayDnO3aNCH TOJIbKO C yCTpOoiCTB (MO6nIbHbIX TeNeΦoHOB, KOMNbHTepOB N T.n.), NOIDepKNaIoux npoΦnbl Bluetooth A2DP.
- Y6eNTecb, yTO HayuHnK3apXeHbl N BbIKIOueHbl.
- HaxmTe u ydepXnBaIe KhoIky On/Off/Mode (A:13) B TeueHne nTn CeKyHd.
HayuHnKnepeenDyT B pexkM Bluetooth-coeHHeHn, noCne yero BblcBHTe roLocOBoe coo6ueHne: "Bluetooth pairing mode" (pexkmBluetooth-coeHHeHn).
BkHIOHTe yHKUHO Bluetooth TeJeOHa n 3anyCTte NOCK HObIX yCTpOInCTB. Upe3 HeckoJIbKO cekyHn Ha 3KpaHe noaBUTcra yCTpoINCTBO Peltor WS5".
- BbI6epuTe "Peltor WS5".
EcnTeleoH 3anpocnt npoB, BBeDnTe: 0000
Korda coeHHeHne yCTaHOBNTcB, Bbl yCbIuHTe rOncOBoe coo6ueHne: "pairing complete" (coeHHeHne yCTaHOBJeHo).
Iocne nepBoa aKTHBaauu CoeHHe HBeoth, OHO 6yTe aBTOMaTueckn OcyueCTBnTbc npn NocNeDuOx BKnUoyEnHX HaHNIOB B peXnMe Bluetooth, noTBepeJdA JeCTBne rOLOCBbIM COo6ueHem "connecting Bluetooth" (noKnUoyHne Bluetooth) n 一 connected" (noKnUoyHo), KOrda yCTpoiCTBA noKnIooatcR dpyr K dpyry. TaKm o6pa30M MoXHO yCTaHOBtB CB3b N XpaHnTB B naMaTn noKnIOueHn K 4 yCTpoiCTbAM. HayuHNKn 6yDyT B nepByo OuepeDb aBTOMaTueeCKn noKnIOUaTbc R NOcJeHEmy N3 IcNoJIb3OBAHHbIX BamN yCTpoiCTB.
3:5 YnpaBJIeHne TeJIefoHHbIMN 3BOHKAMN
Дяупавлени TeleфоньIM 3BOHkAMN CNeIyET yCTaHOBtB C MO6NJbHbIM TelefoHOM COeINHeHne Bluetooth. CM. pa3dEN "Bluetooth-coeINHeHne".
OTBet Ha Bb130Bbl
PnBxOJaem BbIOBe B HayuHnKax pa3dAcTc nHaJI TeNefoHHoro 3BOHka.
YTo6bI OTBETnTb Ha BbI3OB, HaxMnte Ha KhoNky Bluetooth (A:16).
C6poc Bbl30Ba
YTo6bI c6pocntb BxOJaUu N Bb3OB, HaxMnTe KhoNky Bluetooth (A:16) u ydepXnBaIte ee.
RU
TolocobonHa6op
Haxmnte Ha Khonky Bluetooth (A:16).
IobTopbHnHa6Op Homepa
Hakmnte Ha KhoNky Bluetooth (A:16) n ydepxnBaTte ee B TeueHne 2 cekyHd.
3:6 Hactpoika rpoMkoTOn 06bemHoro 3Byka
YBeIuHHe rPOMKocTn. HaxMnte Ha KOnkUy YBeIuHHeHr rPOMKocTn + (A:14).
YMeHbWeHne rpoMkoCTn. HaxMtTe Ha KhoNkY yMeHbWeHnra pOmKoCTn-(A:14).
3:7 Hactponka rpoMkOCTn TenefoHHoro pa3roBopa
Bo Bpemr TepeonHoro pa3roBopa moxho perylnpoBaT rpmKocT npn nmoOn KhoNok (+) n(-). HaxMnte KhoNky On/Off/Mode (A:13), 3aTeM haxImaIte (+) nIn (-) dIra HactpoKn rpmKocTn obEmHoro 3Byka BO Bpemr TepeonHoro pa3roBopa.
3:8 Hactpoika rpoMkOCTn npnpocnyuBaHH My3bIKN
Pn npocnyuBAHm My3bIK MoXHO perynpoBaT rPOMKoCTb npn NOMOu KhoNOK (+) n (-) . HaxMnte KhoNky On/Off/Mode (A:13), 3aTeM haxMaTe (+) nI (-) dJIa HAcTpOoi TpOMKOCTn obemHOrO 3Byka BO BpeM npocnyuBAHnMy3bIK.
3:9 N3meHeHne npaMeTpOB B MeHIO KOHpyaun
Y HayuHnKOB NMeETcMa MeHIO KOHpyaun, NapaMeTpbl KOTOPORo MOxHO MeHrTb. Iy BxOda B MeHIO HaxMnte u ydePknBaIte KhoNk (-) n (+) TeueHne 2 cekyHd (pni BkJIoueHHbIX HayuHnKaX).
При BXODE B MeHIO KOHФИграци, Вbl yCbIbIWIte roLOcoBOe COO6JIeHne: "menu"(MeHIO).ДЯ n3MeHeHn napaMeTpoB BOCNoJIb3yITEcB KHOJkAMN (-) n (+).ДЯ nepeDvIXeHnno MeHIO KOHФИграци HaxKmMaTe KhoNky On/ Off/Mode (A:13).
HOpMaunO ctpkType MeHIO n pacnoIoxeHNn FyHKn IocTynHa B KpaTkom pyKOBOCTBe NOJb3OBaTeJI.
Bass Boost
Функь Bass Boost nomoraet ycnntb Hn3Kne YacToTb npn npocnyuBaHm My3bIK nCTepeo.
Pekm orpaHueHn npocnyuBaHn
Moxho orpaHnHTb rpoMKocTb 3Byka npn NOMOuN DByx npaMeTpOB npnnpocnyuBaHm My3bIKn nDpynx aydnofoaioB
nocpeiCTBOM Bluetooth-coeHNHeHn
ON
Ppeen rpoMKoCTn 3Byka orpaHnHTcnaKa3aTeIeM 82 d5 (A) Leq nocne 8 yacob BOCpOn3BeDeHn
OFF 06uee orpaHnueHne Bocnpoun3BeJeHna 3Byka 8 yacamc MaKcmaJIbHoI rPOMKOctbO 82 d6(A) Leq
Ecnn yctahOBHeHHa rpoMKocTb 3Byka npebblaet 82 d5 (A), oHa 6ydet yMeHbSeHa IIO nCTeueHNn DHeBHO HOpMbI IpocnyuBaHn B rPOMKOM peXIMe.
Pn 3OM Bbl yCbIuNTe TOnOCBOE COO6ueHHe: HHeBHa HopMa npBeBbIeHa"
CuetnK npe3anyckaetcKaKdbie 24 yaca.
PpeynpeKdHHe: HBeBHn HOpMa MoKeT 6bItb PpeBbIeHa TaKxep npu ydaJIeHNn nn 3aMeHe 6aTaPei nn npn akTNBaun 3aBOcKnx ycTaHOBOK.
Baihnc
I3MeHeHne 6aHaHcO obbemHO 3ByaHnHayuHKnOB.
Kbana3ep
I3MeHeHne XapaKTeepnCTnKu YactOTbI ObemHO 3Byka.
Hn3ka
CTaHdapTha
- BbICOKa
Cbepxbicoka
BHeuHm BxOa (npumehmo TOJbko K 3ByKObOMy BXOy J22-A:12)
OFF -akTNBnpyTe 3TOt peKIM, KOrda 3BykoBoB BXoD J22 He nCnoJb3yETcR
ON-akTNBpyIe 3TOTpeKIM,ecnKab6eJIb NOdkIOUeH K 3ByKOBOMy BXOyJ22
- Microphone (MnKpOPOH) - AKTNBpyTe 3TOT peXIM, ecIN MnkpoOH
ПОДКЛЮЧЕН K 3BYKOBOMY BXOу J22
PomkoCTb(OTHOCITcTOJbKO K 3Byky MmKpOoHa raphHTpybl Bluetooth)
OFF (BblkI)
LOW (HIN3KA)
NORMAL (CTAHДAPTHA)
- HIGH (BbICOKA)
BocctaHOBHeHne 3aBOdcknx yCTaHOBOK
BocTaHOBJIeHHe 3aBOdCKnX ycTaHOBOK BcEx cyHKI.
3:10 PpOBoDnHoe nOdkJIIOUeHne BHeuHNx yCtpoNCTB
BHeuHne yctpoNCTBa MoKHO NOkIIOHTb npn nOMOUs 3ByKOBOrO BxoJa J22
(A:12) nπn pa3bema 3,5 MM (A:11). NpObo6NaHnHΦopMaunr o pa3JIuHbIX BnIax ka6eJenecTB b pa3dene "3aIaNchIbe qactn/aKceccCyapbl" (I).
4.ДPyгпЕФУHKUIN
- Ppi BbIKNoeHn HayuHnKOB CoXpaHreTcNocJeHnHaCtpoKa.
- ABTomatnueeCKoe OTKIIuOHe yCTPOIcTBA: aKTNBpPyETcA, ecN B TeUHe NByx YacOB He IcNoJIb3OBAJNaCb HN OJaHcyHKU. PIna ABtOMaTnueckOM OTKIIuOHeHH Bbl YcJIbIiHTe TOnOCOBoe COo6UeHne: automatic power off" (ABTomatnueeCKoe OTKIIuOHeHne).
- Ppi pa3pRdke akKymJrTopa Bbl yCbIuTE rOncoboe coo6ueHne: "low battery" (akKymJrTOp pa3pJKeH).
5.BAXHHA INHOPMAUJN IIOJIb3OBATEJI
3KcπnyatauH,HaCTpoNky,YnCTky nTexHnueCKoe 06CnyKnBaHne yctpoiCTBa CNeIyET BbINOJHrTb B COOTBeTCTBUN C DaHHbIM PYKOBOIDCTBOM.
- YcTpoICTBO OCHaSeHOb cyHKcIe aKTHBHO rPoMkoCTn. Ipeed nCNoJIb3OBAHHem ycTpoICTBa y6eIITecb, yTO 3Ta cyKKcIra pa6oTaet. PpN o6HapyKeHm NOMex INI KAKIX-JIbO DeΦeKToB pOKOHcyJIbTIPyIITecb C npINarAeMbIM INHCTpyKcIaMn NO O6CNIyKbAHIO yCTpoICTBa n 3aMeHe 6atapei.
BcerdaHaedeBaTe npoTnBOyMhIe HayHNIKn npn HaxOKeHN B 30He onaCHO OyMa
HeKOTOpBle XIMnueckne BeuieCTBa MoryT NOBpeNTb N3dEJIe.ДлЯ ПОЛуЧЕНДОПOLHNTeJIbHOI INHΦOPMaUNC CBXHTeCb C pON3BOJNTeJIeM. - PpOITNBOUHMBHe HayuHnKIOcHaeHbI 3NeKTPnueckm 3ByKOBBIM BXoDM. IpeepiNCIOJIb3OBaHHem yCTPOINCTBa y6eINTEcb, YTO 3TaФyKKUpa6OtaET. Ppi O6HApUkeHn NOMex INI KAKNX-NI6O DeΦeKTOB IpOKOHcyIbTupyInTeCb C pPUNaRaEMbIM INHCTpyKlurnMn.
- Ppi yBeJIuHEnn yPoBnI NOMEX IIN 3HaHTeNbHOM CHIXKeHN rPOMKoCTN CneJeYET 3aMeHHTb 6aTapeN. IpeEz 3aMeHO N yCTaHOBKO BaTapeN 6b3aTeNBHO BbIKIOUHTe yCTPOJcTBO. Bo BpEMyCTaHOBKn 6aTapeN CneJeNTe 3a INIIOJIpaHOCtBu.
Ecni BbHe co6npaTeCb NcNoJb3OBAb yCTpoiCTBO B TeueHne DoJIroTo IepnoJa BpeMeHn, n3BNeKeNte 6aTapeu. - Ppeed 3Kcnnyataune npn OueHb Hn3KoTemnpaType Okpykaioe Cpebl HayuHnKnCneDyET npeBapntelHo BbldepKaTb B TenlOM MecTe.
- PerylarypHo npoBepaIte yctpoNCTBO Ha npiroDHOcTb K 3KcPlyaTaCuN.
Ha akycTnueckne xapaKTePncTnKn HayuHnKOB MOrTy BInrTaB rHnEHNueckne Yexbl, HadeBaemble Ha 3Bykon3OJnpyUoune BaNkN.
RU
PnmeHne: Pn Heco6IIOeHnn DaHHbIX NHCtpyKcui, WymOn3OJIaCnma MoKeT 6bITb HApUWeHa, YTO MoKeT pInBecTn K HapUWeHIO cIyxa.
BHIMAHHE!
3Byk B pexKIMe aKTHBHOI rPOMKOCTN MOXET IpeBOCXOJNTb yPOBeHb rPOMKOCTN BHeuHero 3Byka.
BAKHO! Iyuee 3auntb y6epnte BOncb 3a yu, YTO6bl 3BykOu3OInpyUoUne BaNKn PnOTHO npnneran K rONOb. DyKKn OOKOB dONKbI 6bTb KaK MoXHO Tohwe N nNoTHo npnneraTb K rONOb.
6. TEXHNUECKNE XAPAKTEPNCNTIKN
6:1 NapaMeTpbl 3BykonorIooHn, C/II (D)
Iapametpb3bkyonorloeHn ypoBeHyMa HayshNKOB 6bln npoteCTnpoBaHbN COOTBETCTByOT HOpMa CTaHdApTa EN 352-4: 2001, EN 352-6: 2002, EN 352-8 2002 n COOTBETCTByUOxu x uacteN EN 352-1 2002. CeptnPhiu npoBaHo FmHckm INcHTyTOM Tpyda (FIOH) (pernctpaunOHbH homep 0403).
06bIacHeHne TabnucI napaMeTpoB norloeHn:
- Bec
- Yactota (T)
3.CpeHHee 3bYkONorIooJeHne (B)
4.CtahapthoeOTKNOHHe(B5) - Pauchethoe 3BykonornoiueHne (B)
6:2 YpOBeHb CnHaJa Ha BXOe/BpeMЯ nCNoIb3OBAHnA 3ByKOBOrO BXOda J22 (A:12)
MaKcImaJIbHo pa3peWeHHbI yPOBeH BxOJHO rCnHaNA B 3aBNCIMOCtN OT cPoka nCNoJIb3OBaHHa. Bo n36exaHne 3ΦΦeKTOB, npINBOJaUHX K IOTepe Cnyxa, BxODaHn CNrHAn He DoJIKeH PpeBOcXoDHTyKa3aHHbIX PpeJeIOB (cpeHn yPOBeH rPOMKOCTn Peu). CpeHn NOKa3aTeJIb yPOBn rPOMKOCTn TeNeΦoHOrO pa3RObopa B TeueHne DInTEbHO rEPnoDA BpemeH BBICHTbIbAeTcR nCXoJa n3 yPOBn rPOMKOCTn, He ppeBOcXoDJIeero 82 d(B(A)
- Yacob B Deyb
- CpeHn ypoBeHb/əJIeKtpueckn cnHaX = 20 MB
6:3 Bo3dienCTBne 3Byka npn nCnoJIb3OBAHnn 3BykoBOrO BXoJa J22 (F)
6:4 Bo3eIcTBnE 3ByKa npn nCnoJIb3OBAHnN 3ByKOBOrO BXoJa 3,5 MM
YpOBeHb 3Byka B HayuHnKax npn npocnyuBaHH My3bIKn npn 3KBuBaJIeHTHom ypOBHe rpoMkoCTn, He npebocxOJaIeM 82 d5(A). MaKcImaJIbHbIy pOBeHb BXoJa 1,5 B 3ΦΦ.
6:5 NoporobbIe ypoBn (G)
IporobBny ypoBeHb -3To ypoBeHb wyma (no shkaJe A 3BykoBOro daBneHn)
chapyKn HayuHnKOB, npn KOTOpom ypoBeHb BHyTpN Hnx coCTabnAeT 85 d6(A).
YpOBeHb BHeuHrero wyma 3abncnt ot ero Tnna: H - c npeoblaadHnem
BbICOKx qactOT, M - c paBHbIM pa3NoXeHnem no rpynnam qactOTn L - c
npeoblaadHnem Hn3kNx qactOT.
6:6 TnT akKymyIaTOPhIx 6aTapei
MOxHNOJIb3OBA Tb BCE Tnbl aKkymyIaTOPhIx 6aTapeAAA 1,2-1,5 B (HKeJIb-MeTaJI-NrDpNDbHe (NiMH), HKeJIb-KaDMneBbIe (NiCd), IeNoUHbIe, NITNeBbIe, MapraHcEBeIe n.T.I., Ondako ToJbKO 6aTapeu Tnna NiMH n NiCd MOxHO 3apJXaTb.
6:7 Cpok cnjxkbblakkymnylantopa
Cpok cnyk6bl aKKymyIaTopa MoKET BapbIpOBAbC8B 3aBNCIMOCTH OT MapKn 6aTapeH N TempepaTypb IcNoIb3OBaHn yCTpoNCTBa. Pnp pa3prdke aKKymyIaTopa Bbl YcblIwnte rOLOCOBoe COo6JeHne: "low battery" (aKKymyIaTop pa3prJKeH). Pnp Hn3Kom 3apJe aKKymyIaTopa FyHKUH HayuHkoB MOrTy pa60TaTb HEnpaBnIbHo.
2*AAA NiMH
WS SportTac, WS5, WS Workstyle
Tento produkt bol testovany a schvaleny podla smernice o osobnych ochrannych prostriedkoch (OOP) 89/686/EHS a zarovoš dosahuje sulad so smernicou o elektromagnetickej kompatibilite (EMC) 2004/108/EC nevyhnutnou na označenie symbolom CE. POZNÁMKA: Pred zahájením používania si pozorne prešudujte tietoPokyny a odložte si ich pre budúcnost'.
1. POPIS SUCASTI
WS SportTac, WS5, WS Workstyle
WS SportTac, WS5, WS Workstyle
6:5 Kriterienivae (G)
WS SportTac, WS5, WS Workstyle
Pty Limited950 Pacific Highway,
Pymble,N.S.W.2073
+61 1800 024 464
Austria
3M Belarus Representation Office
Mogilevskaya str 18, office 4220007
Minsk
+375 172 22 97 90
Belgium
3M Belgium N.V./S.A.
Hermeslaan 71831 Diegem
+32 2 722 53 10
Bulgaria
33M Bulgaria Representation Office
1715 Sofia, Mladost 4Business Park, sgrada 4
+35929601911
Croatia
3M Croatia Representation Office
Predstavništvo, Žitjak bbHRA 10000
Zagreb
+38512499750
Czech Republic
3M Cesko, spol. s r. o.BB Centrum,
3M Egypt Trading Ltd.
Sofitel Tower, 19th Floor
Corniche el-Nil St.Maadi, Cairo
+202 525 9007
Estonia
3M Eesti filial
Mustamäe tee 410621 Tallinn
+3726115900
Finland
Suomen 3M Oy PL 90,
Lars Sonckin kaari 602601
Espoo
+358952521
France
3M France
Bd de I'Oise 95006 Cergy Pontoise
Cedex
+33130316596
Germany
3M Deutschland GmbH
PLC3M Centre, Cain Road Bracknell,
RG12 8HT
+448706080060
Greece
3M Hellas Limited
Knpiiac 20151 25 Mapouoi,
Aθήνa-Mapouα
+30 210 68 85 300
Hungary
3M Hungária
Kft.Vaci ut 140H-1138 Budapest
+3612707777
Ireland
3M Ireland3M House,
Adelphi Centre,
Upper Georges StreetDun Loaghaire,
Co. Dublin
+3531800320500
Italy
3M Italia S.p.A.
Via San Bovio 3,
Loc. San Felice20090 Segrate (MI)
+39 2 70351
Kazakhstan
3M Kazakhstan Representation Office
GlenfieldAuckland, NZ
+64800364357
Norway
3M Norge A/S,
Avd. Verneprodukter, Postboks 100,
Hvamveien 6,
2026 Skjetten +47 63 84 75 00
Poland
3M Poland Sp.
z o.o.Aleja Katowicka 117,
Bucharest Business Park,
Krylatsky Hills Business Park,
Krylatskaya st., 17, bldg. 3121614,
Moscow
+74957847474
Serbia
3M Representation Office
Beograd Milutina Milankovica 2311070
Novi Beograd
+381 11 3018459
Slovakia
3M Slovakia Representation Office
3rd floor, Kyiv, 03680,
+380444905777

- WS SportTac, WS5, WS Workstyle
- EN
- WHAT IS WHAT
- FITTING AND ADJUSTMENT
- USAGE/FUNCTIONS
- 3:1 Inserting the batteries
- Replace the outer shell:
- 3:2 Charging your headset
- 3:3 Switching the headset on and off
- 3:4 Bluetooth pairing
- 3:5 Managing phone calls
- 3:6 Adjusting surround-sound volume
- 3:7 Adjusting call volume
- 3:8 Adjusting streamed-music volume
- 3:9 Changing settings in the Configure menu
- Bass Boost
- Music Limiter Mode
- ON
- Balance
- Equalizer
- Side tone noise reduction
- Reset to Factory Default
- 3:10 Connecting external equipment via a cord
- OTHER FUNCTIONS
- IMPORTANT USER INFORMATION
- WARNING!
- TECHNICAL DATA
- 6:1 Attenuation values, SNR (D)
- Explanation of the attenuation data tables:
- 6:2 Input signal level/usage time for audio input J22 (E)
- 6:3 Sound exposure when using audio input J22 (F)
- 6:4 Sound exposure when using the 3.5mm audio input
- 6:5 Criterion levels (G)
- 6:6 Battery type
- 6:7 Battery life
- 2*AAA NiMH
- 2\*AAA Alkaline
- 6:8 Bluetooth
- STORAGE
- MAINTENANCE/CLEANING
- 8:1 CLEANING
- 8:2 REMOVING/REPLACING OUTER SHELLS
- 8:3 REMOVING/REPLACING EAR CUSHIONS
- SPARE PARTS/ACCESSORIES
- HY68 SV Hygiene kit
- Cords for audio inputs (receiving only)
- Audio cord for two-way communication (Type ICOM)
- Other spare parts/accessories
- BG
- KOE KAKBO E
- MOHTAXИ HACTPOIBAHE
- YNOTPEBA/ФУHKUIN
- 3:1 NocTaBHe Ha 6aTePnIte
- OctpaHeTe BbHnHaHayhNk.
- 3:2 3apekdahe Ha cnyuanknTe
- 3:3 BkIIOUBaHe nN3KIIIOUBaHe Ha cnyuAnKnTe
- 3:4 Cbpb3BaHe c Bluetooth
- 3:5 YnpaBneHHe Ha TeJepeOHn ObaKaDaHn
- 3:6 HactpoBaeHa cnilaTa Ha cbpayHd 3Byka
- 3:7 HactpoBaHe Ha cnata Ha 3Byka npn o6aKaHa
- 3:8 HacpoBaHe Ha cnIata Ha 3ByKa npn CnyuHa He My3Nka
- 3:9Помяна На HabtpoикпБ МEHIOTo Confuge (KoHФИгурпанe)
- YcHbAHe Ha 6acnte
- Pekim 3a orpaHnuaBaHe Ha My3uKaTa
- BanaHc
- Ekbaan3ep
- Bpbuahe Ha cpaepnHHTe hactpoKn
- 3:10 Cbbp3BaHe Ha BbHnHo o6OpyDbaHe ue3 Ka6eI
- 4.ДРУГИФУHKUIN
- BAXKA INHΦOPMALIJI 3A NOTPEBNTJI
- PNEyPEXKDEHNE!
- TEXHnueCKn DAHHN
- 6:1 CToHocTH Ha 3aRnyuBaHa, CNrHaJI KbM Wym (D)
- 06aHHeHa Ta6JnCInTe c daHH 3a 3arNywaBaHe:
- 6:2 HnBO Ha BXoJaC nHnBpeMe Ha ynoTpe6a Ha ayNo BxoJ22 (E)
- 6:3 Bb3dienctBnE Ha 3Byka npn ynoTpe6a Ha aydo BXoJ22 (F)
- 6:4 Bb3dienCTBnE Ha 3Byka npn yNoTppe6a Ha ayDnO BXoD 3,5 mm
- 6:5 HnBa Ha Kpntepnn (G)
- 6:6 Bnδ baTepeHn
- 6:7 NepnoHa ekcnloataunHa 6aTepeHnTe
- E3APTHMATA
- 3:5 4aepipn nAeawikw knoewv
- EL
- Bass Boost (Renforcement des basses)
- PIEÇES DE RECHANGES/ACCESSORIES
- UGRADBENI DIJELOVI
- UGRADNJA I PODESAVANJE
- Bass Boost (Bassastyrking)
- 8:2 AD FJARL/EGJA EDA SKIPTA UM YTRI HLIFAR
- 8:3 AD FJARL/EGJA EDA SKIPTA UM PETTIHRINGI
- "WS SportTac", WS5, "WS Workstyle"
- SASTAVDALU SKAIDROJUMS
- UZSTÄDISHANA UN REGULEŠANA
- LIETOSANA/FUNKCIJAS
- Equalizer (stabilizers)
- 6:5 Kriterienivae (G)
- VEDLIKEHOLD/RENGJØRING
- RU
- 4TO ECTb 4TO
- CBOPKA IN HACTPOIKA
- INCNoJIb3OBAHNE/ФУHKUIN
- 3:1 YctaHObKa aKKMyIITOpOB
- 3aMeHa HapxHNo YaXKn
- 3:2 3apДka HayшнкOB
- 3:3 BkIIOUeHne N BBKIOUeHne HayuHnKOB
- 3:4 Bluetooth™-coeINHeHne
- 3:5 YnpaBJIeHne TeJIefoHHbIMN 3BOHKAMN
- 3:6 Hactpoika rpoMkoTOn 06bemHoro 3Byka
- 3:7 Hactponka rpoMkOCTn TenefoHHoro pa3roBopa
- 3:8 Hactpoika rpoMkOCTn npnpocnyuBaHH My3bIKN
- 3:9 N3meHeHne npaMeTpOB B MeHIO KOHpyaun
- Pekm orpaHueHn npocnyuBaHn
- Baihnc
- Kbana3ep
- 3:10 PpOBoDnHoe nOdkJIIOUeHne BHeuHNx yCtpoNCTB
- 4.ДPyгпЕФУHKUIN
- 5.BAXHHA INHOPMAUJN IIOJIb3OBATEJI
- BHIMAHHE!
- TEXHNUECKNE XAPAKTEPNCNTIKN
- 6:1 NapaMeTpbl 3BykonorIooHn, C/II (D)
- 06bIacHeHne TabnucI napaMeTpoB norloeHn:
- 6:2 YpOBeHb CnHaJa Ha BXOe/BpeMЯ nCNoIb3OBAHnA 3ByKOBOrO BXOda J22 (A:12)
- 6:3 Bo3dienCTBne 3Byka npn nCnoJIb3OBAHnn 3BykoBOrO BXoJa J22 (F)
- 6:4 Bo3eIcTBnE 3ByKa npn nCnoJIb3OBAHnN 3ByKOBOrO BXoJa 3,5 MM
- 6:5 NoporobbIe ypoBn (G)
- 6:6 TnT akKymyIaTOPhIx 6aTapei
- 6:7 Cpok cnjxkbblakkymnylantopa
- POPIS SUCASTI
- Austria
- Belgium
- Bulgaria
- Croatia
- Czech Republic
- Estonia
- Finland
- France
- Germany
- Greece
- Hungary
- Ireland
- Italy
- Kazakhstan
- Norway
- Poland
- Serbia
- Slovakia
Brand : 3M
Model : MT16H21FWS5EM581CR
Category : Earphones