
XAC1900 - Router LINKSYS - Free user manual and instructions
Find the device manual for free XAC1900 LINKSYS in PDF.
User questions about XAC1900 LINKSYS
0 question about this device. Answer the ones you know or ask your own.
Ask a new question about this device
Download the instructions for your Router in PDF format for free! Find your manual XAC1900 - LINKSYS and take your electronic device back in hand. On this page are published all the documents necessary for the use of your device. XAC1900 by LINKSYS.
USER MANUAL XAC1900 LINKSYS
natural_image
Black wireless device labeled 'LINKSYS' with antenna and connector (no visible text beyond brand name)مصباح المؤشر:
natural_image
Pure electrical circuit lines without any symbolsnatural_image
Diagram showing cable connection to a device with connectors and cables (no text or symbols visible)text_image
Device List Use a list of connected devices and their status. My Report Add User Add User Add User Add User Add User Add User Add User Add User Add User Add User Add User Add User Add User Add User Add User Add User Add User Add User Add User Add User Add User Add User Add User Add User Add User Add User Add User Add User Add User Add User Add User Add User Add User Add Usertext_image
Linksys Smart Wi-Fi Sign In If you have not installed a Linksys Smart Wi-Fi account, please the "Oracle Account" pattern in the system's right page or this page. Add mobile device, tatorio, and TVs to your network Send Home Password: Remembering No Thank your password? Up... Don't have an account? Click here. Use your Linksys Smart Wi-Fi account to access your home network from anywhere at any time, even from your mobile device. Ready contact user devices, call parental content, get access to Smart Wi-Fi mobile Apps, and more. For more information smokers English (United States)Media Prioritization
text_image
Media Prioritization Use options to drive devices, switches, and powerful controls for setting or exploring media systems for best performance on the home system. Prioritization: Send Printups Settings High Priority Normal Priority Devices Name: M5026-027118 Applications: 1.0 / 100% Select Application... Browse Services: 1.0 / 100% Select Games... OK Canceltext_image
Speed Test Test your broadband speed Downloaded Speed 28.41 To Your Location and you have it Hybrid Speed 6.06 Reset Set Show Memory ODGAtext_image
Guest Access Guest access allowed to connect your network guest network and access the network without any access to your own computer or email address. After guest access 2.x OS-1000 Network 0.5x OS-1000 Network Guest network names and passwords | 1 New guest linkers will create your guest linkers, your and browser, and then enter the guest password. Total guest allowed: 3 pixels OK Canceltext_image
Parental Controls Limit when your children get online and web website by call user Enable parental controls Restrict Internet access on: NASDAQ-02719 Block Internet access ■ None ○ Access ○ Private Terms Block specific sites ▼ Add Canceltext_image
Troubleshooting Troubleshoot router settings Ping (Ping) For this name: Molecular ping: 5 Reboot Ping Trace route: For this name: Reboot Reboot configuration Setting Delete Internet Address: Ping Of 100,000, 100 Padsatz and Terms Reboot Reboot the system Factory reset: Press in factory detailstext_image
Wireless View and Change User Settings 2.4 GHz network 5 GHz network Network Network Network name (SOS) Network mask Network mask Network mask Network mask Network mask Network mask Network mask Network mask Network mask Network mask Network mask Network mask Network mask Network mask Network mask Network mask Network mask Network mask Network mask Network mask Network mask Network mask Network mask Network mask Network mask Network mask Network mask Network mask Network mask Network mask Network mask Network mask Network mask Network mask Wired Wired Wired Wired Wired Wired Wired Wired Wired Wired Wired Wired Wired Wired Wired Wired Wired Wired Wired Wired Wired Wired Wired Wired Wired Wired Wired Wired Wired Wired Wired Wired Wired Wiredtext_image
External Storage Contact an external storage device in your network and configure free users. Can access to controls. Status: Positive Access FTP Server Normal Server To external storage device connected to the server, it's only selected service and file server. You can allow previous, download, music, and link. Using FTP key server address the server or your network device then a remote computer that has access to the server. Add an external storage device Connect the storage device into a custom set and is the book of your music within this disk. Network External will also add the storage device to your network. Reset OKtext_image
Connectivity New and change manager settings Basic Internal Settings Local Settings Advanced Settings Information Network Name and Password 2.0 (Standard name: 0001) Network packet count 1.0 (Network packet count: 0001) Network packet count Browser Password Browser password Hardware Update Automatic (Cural Layout, 1.4.41.10000) Search for Updates Time Zone (ERT 10:00) Pacific Time (USA Controlled) Automatic adjusted to Default Duration Time Activity Lights Discontinued activity lights. Power light and screen on OK Cancel HelpLinksys XAC-Series
إعداد الموجّه
text_image
Security Use and manage user settings Forward Next Power and Settings Formell Internal Filters Fire Channel/Pass through ✓ Open Fire Channel/Pass through ✓ Closed Vita Passthrough ✓ Open Vita Passthrough ✓ Closed Vita Passthrough ✓ Closed IPv4 Port Services Description Packout IPv4 Address Birth Cancel Add Full Pass through OK Cancel NextYour internet cable is not plugged in رسالة كابل
(الإنترنت غير متصل)
text_image
The network "BronzeEagle" requires a WPA password. Password: ******** Show password Remember this network Cancel OKtext_image
Currently connected to: LP4309 Internet access belkin.com No Internet access Wireless Network Connection 2 LP4309 Connected BronzeEagle HOME-C4BD NETBEAR29 JackiesPlace NETBEAR HOME-BLAD Open Network and Sharing Centertext_image
Type the network security key Security key: Hide characters OK CancelReset, Wi-Fi Protected Setup
(G.Lite), G.992.3 (ADSL2), G.992.5
A, B, M, L للملحقات (ADSL2+)
أو Firefox 4 و Internet Explorer 8
Linksys XAC1900....12
natural_image
Black wireless device labeled 'LINKSYS' with antenna and connector, shown from two views (no readable text or symbols beyond branding)Индикаторна светлина:
natural_image
Diagram showing two views of a device with connectors and cables, no visible text or symbolsnatural_image
Pure electrical circuit lines without any symbolstext_image
Linksys Smart Wi-Fi Sign In If you have not yet created a Linksys Smart Wi-Fi account, click the "Oracle Account" button in the upper right corner of the page. Add mobile devices, tablets, and TVs to your network Login Address Password Partners We Select your password? Sign Get More or less off Click here. Use your Linksys Bound Wi-Fi account to access your form network from appropriate at any time, most have your mobile device. Really contact new devices, net general controls, get access to Smart Wi-Fi mobiles. Access, and more. For more information click here.text_image
Device List View a full of connected devices and their status My Network Microsoft Update Microsoft SQL Server MicrosoftLinksys серия ХАС
text_image
Guest Access Show weight on the collage Show weight allowed to render this guest network based on the website method (giving access to our other destinations or personal details) Allow guest access Add Guest network names and passwords: 1 For your guest network that contained a server's guest network, Gains and transfers, and then enter the guest password Add your network name: 1 Total guests allowed 1 guest Canceltext_image
Parental Controls Unit when your children get online and what websites they can see Enable parental controls Set Restrict Internet access or N0000-007116 Block Internet access □ None ○ Insert ○ Switch Time Block specific sites 123 OK CancelMedia Prioritization
text_image
Media Prioritization Set priority to ensure access permissions, will provide correct access to existing media positions for desktop performance on our topa website. Prioritization: Next Destination 1 Settings High Priority Normal Priority Devices SATAA-02710 Applications Select Application... Online Games Select Games...text_image
Speed Test Test run broadband speed Available Speed 28.41 To your constant the internet Actual Speed 6.05 First Service Location to the network, C# Record Test Show History COOLALinksys серия ХАС
text_image
USB Storage External Storage Connect an external storage device to local network and configure how users can access to contents. Status: Positive or Negative: TCP Server Status/Region Is a certain storage device connected by the radio file, such as content names and home network. This can also include (user, server, audio, etc.) means using TCP. We can access the website or your storage device that is recommended to choose this device in the settings. Add an external storage device Convert the entire device to the aggregate part of the bank of your reader and their social media. Please note that this device will be used to start a new user account. Function: OKtext_image
Connectivity New and Change Cable Settings Network Name and Passwords | On 5.4 SD subaccessories (SDS) | 160000 Network password | 160000 5.4 SD software access (SDS) | 160000, 325g Password password | 160000 Router Password | On Private Password: 160000 Hardware Update Automatic Current Version 1.1.4.108803 Close to Updates Time Zone [START: 09:00] Parfor Time (3/1A & Casing) Automaticly adjust to Copyright Savings Time Activity Lights Discontinued activity Light, PowerPoint, will continue on OK Cancel Applytext_image
Security View and change settings Forward OK Apply and Security Preview VPH Passthrough VPH Passthrough VPH Passthrough VPH Passthrough Internal filters View and change settings View modeband File Internal Full Index File User (Full 112) IPv4 Port Services Instructions Protocol IPv4 Settings Show Cancel Add to Direct Settings Do Cancel Helptext_image
Currently connected to: LP4309 Internet access belkin.com No Internet access Wireless Network Connection 2 LP4309 Connected BronzeEagle HOME-C4BD NETBEAR29 JackiesPlace NETBEAR HOME-PL12 Open Network and Sharing Centertext_image
Type the network security key Security key: Hide characters OK Canceltext_image
The network "Bronzet.eagle" requires a WPA password. Password: ******** Show password Remember this network Cancel OKСпецификации
Linksys XAC1900
Име на модела Linksys XAC1900
Описание Модем/рутер Linksys Smart Wi-Fi AC1900
T1.413i2, G.992.1 (G.DMT), G992.2 (G.Lite),
G.992.3 (ADSL2), G.992.5 (ADSL2+) 3a
Linksys XAC1900....12
Přehled produktu
XAC1900
Horní pohled
text_image
Indikátornatural_image
Black wireless device labeled 'LINKSYS' with a green cable, no visible text or symbols beyond the label.
Indikátor:
natural_image
Diagram showing two views of a device with connectors and cables, no visible text or symbolsnatural_image
Pure electrical circuit lines without any symbolstext_image
Linksys Smart Wi-Fi Sign In If you have not yet installed a Linksys Smart Wi-Fi account, also the 'Create Account' button in the upper right corner of the page. Add mobile devices, laptops, and TVs to your network Get Back Home Enterment Tomorrow We Target your accounts? Buy Get there's account? Click here. Use your Linksys Smart Wi-Fi account to access your home network from anywhere at any time, even how your mobile device. Early contact new devices, set parental controls, get access to Smart Wi-Fi mobile Apps, and more. File more information downloads.text_image
Device List Use a list of installed devices and their status. My Network User Network My Network 100% User Network 100%Linksys řada XAC
Nastavení routeru
text_image
Guest Access Guest server: guest server to manage your website guest network and create the website without going to use other components of personal fees. Allow guest access Name: Guest server: names and passwords | 1.00 2.4-06-3500 Email: Email Referent: 2 selected 0.95-0.500 Email: Email Referent: Evaluated Guest server: server Total prepaid amounts: 1 point Show weight on the homepage For what should be used to store guest server, I am a point between, then when the guest is required.text_image
Parental Controls Allow when your child gets access and what website they can use Enable parental controls Select Restrict Internet access or: W820-02719 Block Internet access None Access Specific Time Block specific sites OK Canceltext_image
Media Prioritization Our priority to these services: applications, and personalized contracts shortening on this link media processes to test performance on your home. Select. Prioritization: Next Priority 1 Options High Priority Normal Priority Devices 1000542710 Applications Select Application... Online Games Select Games...text_image
Speed Test Test row broadband speed: Digital Speed: 28.41 mph To your location, the distance is 0 Optical Speed: 6.05 mph From Server Location, the distance is 0 Realized Test Store HistoryLinksys řada XAC
Nastavení routeru
text_image
USB Storage External Storage Connect an external storage device to your remote and configure key users (can access to clients) Add: Remove: Forward: New: Delete: Remove: Add an external storage device to the other, let us share content access your home server. This use shared platforms, links, orics, and link. Use TCP. You can access the network to your external storage from a network platform that has access to the remote. Add an external storage device Cancel this settings found before external port in the bank of your user and then call network. Once Smart is the first and the storage device is your remote. Return: OKtext_image
Connectivity New and transceiver settings Network Name and Password | 10K SQL Server name (SQL) : 100000 Network password: SQL@SQL SQL network name (SQL) : 100000 Network password: SQL@SQL Router Password | 10K Hardware Update Automatic Control Version 1.1.42 PS8863 Show by Update Total Zone [START: 00:00] Pacific Type (SISA & Catalog) Automaticly adjust for Desktop Savings Time Activity Lights Connectivity: whole type, Powerlight and continue on OK Cancel Applytext_image
Troubleshooting Troubleshooting order settings Status Disgravise Page Ping IPv6 Air to local server Suggested to log Subs to Ping Trace route Air to local server Subs to Transcode Router configuration Server Session Internet Address: Pcs. 85 200 000 000000000000000000000000000000000000000000000000000000000000000000000000000000000000 Repower: Powered by the server Facting reset: Powered by the server's connectiontext_image
Security View and change order settings. Frontset Internet filters IPv4 Port Services IPv4 Port Services IPv4 Passthrough IPv4 Passthrough IPv4 Passthrough IPv4 Port Services Description Protocol IPv4 Address None Finisher Adding Direct Settings OK Cancel Applytext_image
Currently connected to: LP4309 Internet access belkin.com No Internet access Wireless Network Connection 2 LP4309 Connected BronzeEagle HOME-C4BD NETBEAR29 JackiesPlace NETBEAR HOME-BHA2 Open Network and Sharing Centertext_image
Type the network security key Security key: Hide characters OK Canceltext_image
The network "BronzeEagle" requires a WPA password. Password: ******** Show password Remember this network Cancel OKSpecifikace
Linksys XAC1900
Standardy ADSL T1.413i2, G.992.1 (G.DMT), G992.2 (G.Lite), G.992.3 (ADSL2), G.992.5 (ADSL2+) pro dodatek A, B, M, L
Linksys XAC1900....12
Produktoversigt
XAC1900
Fra oven

text_image
Indikatorlysnatural_image
Close-up of a black wireless device labeled 'LINKSYS' with a green indicator light, shown from two views (no additional text or symbols visible)Indikatorlys:
natural_image
Diagram showing two views of a device with connectors and cables, no visible text or symbols- Forbind det medfølgende telefonkabel og strømkabel til dit powermodem. Tilslut til dit powermodem og forbind telefonkablet til vægstikket.
natural_image
Pure electrical circuit lines without any symbolstext_image
Linksys Smart Wi-Fi Sign In If you have not installed a Linksys Smart Wi-Fi account, also the 'Create Account' button in the upper right corner of the page. Add mobile devices, laptops, and TVs to your network Get Back Home Enter From Tomorrow We Target your account? Buy Get There's account? Click here. Use your Linksys Smart Wi-Fi account to access your home network from anywhere at any time, even how your mobile device. Early contact new devices, set parental controls, get access to Smart Wi-Fi mobile Apps, and more. File more information displayed.text_image
Device List You a list of installed devices and their status. My Network User Network OK My Network User Network OKLinksys XAC-Series
Konfiguration af din router
text_image
Guest Access Guest service provider is available to monitor the user's website guest server and access the website without going accessed to your other computer as personal info. Allow guest access Name: Guest network: names and passwords | 1.06 2.4-016.3000 Email:OK guest Reference: 2 selected 5.0-016.3000 Email:OK guest Reference: 1 selected Total requests allowed: we tested off Total grants allowed: 5 points Show weight on the webpage This grant should first submit the guest server, please further link to the guest server onto the website. OK Canceltext_image
Parental Controls Limit values your children get available and what availability then can use Enable parental controls Restrict Internet access (R: W02A-487719) Block Internet access ■ None ○ Access ○ Specific Time Block specific sites : 100 OK Canceltext_image
Media Prioritization Our provider has selected applications, and personalized consults abouting new media services to have platform users on the media outlet. Prioritization: Smart Production - Settings High Priority Normal Priority Devices NASDAQ-02115 Applications 100 / Options Select Application... Online Games 100 / Options Select Games...text_image
Speed Test Test your broadband speed. Broadcast Speed 28.41 MHz % of the Lowes on selected out 6.05 MHz Advanced Speed Pass Services Location Los Angeles, CA Rested Test Store HistoryLinksys XAC-Series
Konfiguration af din router
text_image
USB Storage External Storage Connect an external storage device to your remote and configure key users (can access to clients) Add: Remove: Forward: New: Delete: Remove: Add an external storage device to the other links where content contains your own network. This use shared platforms, links, links, and link. Use TCP. You can access the network to your external storage from a network platform that has access to the server. Add an external storage device Cancel these settings found before external ports in the bank of your user and their mail. Refresh: Unknown or No Mail will allow the storage device to your remote. Return: OKtext_image
Connectivity New and transceiver settings Network Name and Password | 10K SQL Server name (SQL) : 100000 Network password: SQL@SQL SQL network name (SQL) : 100000 Network password: SQL@SQL Router Password | 10K Hardware Update Automatic Control Version 1.1.42 PS8863 Show by Update Total Zone [START: 00:00] Pacific Type (SISA & Catalog) Automaticly adjust for Desktop Savings Time Activity Lights Connectivity: whole type, Powerlight and continue on OK Cancel Applytext_image
Troubleshooting Troubleshooting order settings Status Disgrains Page Ping IPv6 Pir to local server Scales to 100 Buses to Ping Trace route Pir to local server Buses to Timestamps Router configuration Server Session Internet Addresser IPv6: 85,000,000 (without access) Phone Router Router Kesoor Pir to local server Facting reset Fines to Service Email Earningstext_image
Security View and change order settings. Formall IPv6 Port Services IPv6 Port Services IPv6 Passthrough IPv6 Passthrough IPv6 Passthrough IPv6 Port Services Internal filters □ File access/Internet security □ File download □ File internal mail subscription □ File server (net 112) Description Protocol PV6 Address Blink Folder Adding Access Settings OK Cancel ApplyFejlfinding
For at installere Service Pack 3:
text_image
Currently connected to: LP4309 Internet access belkin.com No Internet access Wireless Network Connection 2 LP4309 Connected BronzeEagle HOME-C4BD NETBEAR29 JackiesPlace NETBEAR HOME-PLAB Open Network and Sharing Centertext_image
Type the network security key Security key: Hide characters OK Canceltext_image
(Charged) AirPort: On Turn AirPort Off ✓JimsRouter Home BronzeEagle BronzeEagle-guest Penguin RD Join Other Network... Create Network... Open Network Preferences...text_image
The network "BronzeEagle" requires a WPA password. Password: ******** Show password Remember this network Cancel OKSpecifikationer
Linksys XAC1900
Modelnavn Linksys XAC1900
Beskrivelse Linksys Smart Wi-Fi Modem Router AC1900
Modelnummer XAC1900
Switch-porthastighed 10/100/1000 Mbps (Gigabit Ethernet)
Bagside: Internet, Ethernet (1-4)
UPnP Understøttet
Sikkerhedsfunktioner WEP, WPA, WPA2, RADIUS
ADSL Standarder T1.413i2, G.992.1 (G.DMT), G992.2 (G.Lite), G.992.3 (ADSL2), G.992.5 (ADSL2+) for Annex A, B, M, L
XAC1900....1 Wandmontage 3
Update Windows XP Service Pack ....9
Linksys XAC1900....12
Produktübersicht
XAC1900
Ansicht von oben
natural_image
Black wireless device labeled 'LINKSYS' with a cable, no visible text or symbols beyond the label.
Leuchtanzeige:
natural_image
Diagram showing two cables connected to a device with connectors and a cable, no text or symbols present.natural_image
Diagram showing connections between a device, cable, and two labeled components (no text or symbols present)text_image
Linksys Smart Wi-Fi Sign In If you have not yet posted in Linksys Smart Wi-Fi account, please the "Create Account" button in the upper right page in the page. Add mobile devices, laptops, and TVs to your network Load Editions Accessories Promote We Target your account? Sign Up Get More an account? Click here Use your Linksys Smart Wi-Fi account to access your home network from anywhere at any time, now has your mobile device. Here contact your devices, set general controls, get access to Smart Wi-Fi mobile Apps, and more. For more information click here English (Microsoft) Statustext_image
Device List Show a list of connected devices and their status. My Network Smart Network Smart Devices My Network Smart Devices Smart Devices Smart Devices Smart Devices Smart Devices Smart Devices Smart Devices Smart Devices Smart Devices Smart Devices Smart Devices Smart Devices Smart Devices Smart Devices Smart Devices Smart Devices Smart Devices Smart Devices Smart Devices Smart Devices Smart Devices Smart Devices Smart Devices Smart Devices Smart Devices Smart Devices Smart Devices Smart Devices Smart Devices Smart Devices Smart Devices Smart Devices Smart Devices Smart DevicesLinksys XAC-Serie
text_image
Guest Access Show guest allow users to access your guest network based on the client's method going access to our other services of personal data. Allow guest access G Kuwait network names and passwords | Yes G Kuwait network: https://knew.org/knew.net G Kuwait: https://knew.org/knew.net G Kuwait: https://knew.org/knew.net Total grants allowed 1 grant Show weight on the gateway Your guest stream has been used by a guest network, unless a new stream, then will be the guest stream.text_image
Parental Controls Cancel what put additional get online and what website they can use Enable parental controls Total Restricted Internet access or W1004-017119 Block Internet access ■ None ○ Inside ○ Specific Time Block specific times Add OK Canceltext_image
Media Prioritization The provided file contains instructions, and permitted clicks to browsing in media media services for the media platform on our website. Prioritization: High Priority Normal Priority Devices SASDA-02710 Applications Select Application... Online Games Select Games...text_image
Speed Test Test your broadband needs GrowthSpeed 28.41 Mbps To Your Loadless of Internet Awardspeed 6.06 Mbps Point Speed Location Los Angeles, CA Start Test Stock HistoryLinksys XAC-Serie
text_image
USB Storage External Storage Connect an external storage device to our network and configure how print can access its network. Status: Power server, TCP server, Desktop server To select external storage device connected to the core, help you share internal network and home network. Put all shares (e.g., wireless, audio), add more data (TFT) or add more data (e.g., TFTP). Add more data to your storage device then to create appropriate desktop server in the Internet. Add an external storage device Connect the core space device to have accessible port for the lack of your user and their disk Macintosh, Linux, and other networks to store directly on a network. Refresh OKtext_image
Connectivity New and Change User Settings Network Name and Passwords | Get 0.4 SD channel names (SDF) : send/OK Network payment : send/OK 0.356 software pin (SDF) : send/OK Network payment : send/OK Router Password : New Private License: Hardware Update Automatic Closed to Update Time Zone [START 00:00] Filter Files (SUSA & Console) Automatic copy output for Breaklight Settings Time Activity Lights One Downloaded activity lights, Phone light and continue on OK Cancel Applytext_image
Troubleshooting Troubleshooting route settings Status Description Page Ping IPv4 Air traffic name: Scales to page: 5 Route to Page Route configuration Server Router Internet Addresser Pcs. @ 362.800.000 Connection Phone Trace route Air traffic name: Route to Transcode Router Recover Passed the route Factory reset Passed the service connectiontext_image
Security View and change settings Forward OK Apply and Security Forward VPH Passthrough VPH Passthrough VPH Passthrough VPH Passthrough Internal filters View and change settings View modeband File Internal Full Index File User (Full 112) IPv4 Port Services Instructions Protocol IPv4 Settings Show Cancel Add to Direct Settings Do Cancel HelpFehlerbehebung
Update "Windows XP Service Pack"
text_image
Currently connected to: LP4309 Internet access belkin.com No Internet access Wireless Network Connection 2 LP4309 Connected BronzeEagle HOME-C4BD NETBEAR29 JackiesPlace NETBEAR HOME-B142 Open Network and Sharing Centertext_image
Type the network security key Security key: Hide characters OK Canceltext_image
The network "BronzeEagle" requires a WPA password. Password: ******** Show password Remember this network Cancel OKTechnische Daten
Linksys XAC1900
Modellname Linksys XAC1900
Beschreibung Linksys Smart Wi-Fi Modem Router AC1900
Modellnummer XAC1900
Switch-Port-Geschwindigkeit 10/100/1000 Mbit/s (Gigabit Ethernet)
Tasten Reset, Wi-Fi Protected Setup,
ADSL-Standards T1.413i2, G.992.1 (G.DMT), G992.2 (G.Lite),
G.992.3 (ADSL2), G.992.5 (ADSL2+) für Annex A, B, M, L
(Your Internet cable is not plugged in) 10
(Cannot access your router) 10
Προδιαγραφές
Linksys XAC1900....12
natural_image
Black wireless device labeled 'LINKSYS' with a cable, no visible text or symbols beyond the label.
Ενδεικτική λυχνία:
natural_image
Diagram showing two views of a device with connectors and cables, no visible text or symbolsnatural_image
Pure electrical circuit lines without any symbolstext_image
Linksys Smart Wi-Fi Sign In If you have not yet installed a Linksys Smart Wi-Fi account, this the 'Oracle Account' button in the upper right corner in the page. Add mobile devices, tablets, and TVs to your network User Accounts Password Reminder We Target your password? Begin Get New or account! Click here. Use your Linksys Smart Wi-Fi account to access your home website from apphours at any time, now then your mobile device. Early contact new devices, net personal controls, get access to Smart Wi-Fi mobile Apps, and more. For more information click here.text_image
Device List Use a list of unmasked devices and their status. My Network User History UPPLE Other Other Activity URLLinksys Σειρά ΧΑC
text_image
Guest Access Show your guest allow us to access your guest name or more. Our guest will be required to use your guest name or personal data. Allow guest access OK G Kuwait network names and passwords | Yes £400,000 $400.KG paid Referee 2nd 500,000400.KG paid Referee 1nd Your guest should not need a query for the guest network, check a new request, then write the guest password. Total guest allowed: 1 guest OK Canceltext_image
Parental Controls Cancel when put online get online and what website ring can use Enable parental controls Total Restrict Internet access on: W100-0171.9 Block Internet access □ None ○ Inside ○ Specific Time Block specific sites Add OK Canceltext_image
Media Prioritization The provided file contains instructions, and permitted clicks to browsing in media media services for the media platform on our website. Prioritization: High Priority Normal Priority Devices SASDA-02710 Applications Select Application... Online Games Select Games...text_image
Speed Test Test your broadband needs GrowthSpeed 28.41 Mbps To Your Loadless of Internet Awardspeed 6.06 Mbps Point Speed Location Los Angeles, CA Start Test Stock HistoryLinksys Σειρά ΧΑC
text_image
USB Storage External Storage Connect an external storage device to your network and configure how users can access its services. Status: Protein screen FTP screen Internet screen As external storage devices connect the code files, you can switch internal settings your home server. You can share information, internet, music, and more. Using TPU, we will access the website for your storage device that can use a specific network service in the site or Add an external storage device Connect the code file directly linking passwords to the back of your mode and that add external, wireless, and other to the storage device's own network. Finish OKtext_image
Connectivity New and Change User Settings Network Name and Passwords | Get 0.4 SD channel names (SDF) : send/OK Network payment : send/OK 0.356 software pin (SDF) : send/OK Network payment : send/OK Router Password : Start Router Password : End Hardware Update Automatic Closed to Update Time Zone [START 00:00] Filter Files (SUSA & Console) Automatic copy output for Breaklight Settings Time Activity Lights One Downloaded activity lights, Phone light and continue on OK Cancel Applytext_image
Troubleshooting Troubleshooting route settings Status Disagments Page Ping IPv4 Pirial network Number to page: 3 Router Path Route route Pirial network Router Pathcode Router configuration Status Router Internet Addresser: Port of 100.0000 and Connection Phone Kebeor: Passed the route Factory reset: Ready to launch default settingstext_image
Wireless View and change output settings 2.4 GHz network 5 GHz network Network Connected Connected via (SNC) Network Connected via (SNC) Connected via (SNC) Connected via (SNC) Connected via (SNC) Connected via (SNC) Connected via (SNC) Connected via (SNC) Connected via (SNC) Connected via (SNC) Connected via (SNC) Connected via (SNC) Connected via (SNC) Connected via (SNC) Connected via (SNC) Connected via (SNC) Connected via (SNC) Connected via (SNC) Connected via (SNR) Connected via (SNR) Connected via (SNR) Connected via (SNR) Connected via (SNR) Connected via (SNR) Connected via (SNR) Connected via (SNR) Connected via (SNR) Connected via (SNR) Connected via (SNR) Connected via (SNR) Connected via (SNR) Connected via (SNR) Connected via (SNR) Connected via (SNR) Connected via (SNR) Connected via( SNR) Connected via( SNR) Connected via( SNR) Connected via( SNR) Connected via( SNR) Connected via( SNR) Connected via( SNR) Connected via( SNR) Connected via( SNR) Connected via( SNR) Connected via( SNR) Connected via( SNR) Connected via( SNR) Connected via( SNR) Connected via( SNR) Connected via( SNR) Connected via( SNR) Connected by: wireless Connected by: wireless Connected by: wireless Connected by: wireless Connected by: wireless Connected by: wireless Connected by: wireless Connected by: wireless Connected by: wireless Connected by: wireless Connected by: wireless Connected by: wireless Connected by: wireless Connected by: wireless Connected by: wireless Connected by: wireless Connected by: wireless Connected by: wireless Connected by: wireless Connected by: wireless Connected by: wirelesstext_image
Security View and change settings Forward OK Apply and Security Forward VPH Passthrough VPH Passthrough VPH Passthrough VPH Passthrough Internal filters View and change settings View modeband File Internal Full Index File User (Full 112) IPv4 Port Services Instructions Protocol IPv4 Settings Show Cancel Add to Direct Settings Do Cancel HelpLinksys Σειρά ΧΑC
Media Prioritization
text_image
Media Prioritization Show articles to these devices, ecosystems, and personalized content to download or download media excessive for their performance on this body. Download. Prioritization Export Prioritization Settings High Priority Normal Priority Devices = MADD-0271-0 Applications: 100 Select Application... Online Games: 100 Select Games...text_image
Speed Test Test over broadband speed Download Speed 28.41 Mbps To Test Locations 60 Mbps, 300 Upload Speed 6.05 Mbps From Last Location Low Georgia, CA Reset Test New Historytext_image
External Storage Connect an external storage device to your network and configure how users can access in custom. Browse Transfer Services FTP Services Network Services An external storage device connected to the internet TCP, log share format server and router network. You can access ports, servers, modules, and stores using TCP. Use wireless network to access the network via the storage provider that is a remote computer. Network providers to the network. Add an external storage device Connect the internal network blocks as follows: but on the bank of our network and their close network. Network (TCP) is also providing a local or privately owned network.text_image
Connectivity New switchpenumber settings Name Network Name and Password 1.0 GB network name (2007) 1.0 GB network password 1.0 GB network password (2005) 1.0 GB network password (2006) 1.0 GB network password (2007) Frequency Update Automatic (Current Version 1.4.0.2008) Close to Update Time Zone [3:45:00] Packet Time (JLS & Cansay) Automatic update to Credit Savings Time Activity Lights Cancashire Active Light. Please link with new data. OK Cancel Helptext_image
Troubleshooting Troubleshooting route settings Status Diagrams Tags Ping IP4 Prt to bus name Number to ping 3 Due in Ping Route configuration Backup Restore Internet Address Prt: $1,000,000.00 Release and Print Trace route Prt to bus name Due in Taprolate Reboot! Please return the route Facting result Please return the link to Taprolatetext_image
Wireless New and change route settings 2.4 GHz network | 10K 5 GHz network | 5K Networks Disordered Networks Extended Satellite access (SATA) Hi/Hi/C Network access (SATA) Hi/Hi_C/SATA Password com/Hi/C Password com/Hi/C Internet access None Internet access None Security mode MPQ/QWV Base Provider Security mode MPQ/QWV Base Provider Display speed Active Charge speed 36 MHz Chassis Alt Off/Alt Auto Breakout (FOS) Exclusion Release (FOS) Excluded OK Cancel Applytext_image
Security View and change server settings Firewall D&C Advanced and Gaming Firewall Firewall (access) protection Firewall (access) protection Firewall (access) protection Firewall (access) protection Firewall (access) protection Firewall (access) protection Firewall (access) protection Firewall (access) protection Firewall (access) protection Firewall (access) protection Firewall (access) protection Firewall (access) protection Firewall (access) protection Firewall (access) protection Firewall (access) protection firewall (access) protection firewall (access) protection firewall (access) protection firewall (access) protection firewall (access) protection firewall (access) protection firewall (access) protection firewall (access) protection firewall (access) protection firewall (access) protection firewall (access) protection firewall (access) protection firewall (access) protection firewall (access) protection firewall (access) protection firewall(access) protection firewall(access) protection firewall(access) protection firewall(access) protection firewall(access) protection firewall(access) protection firewall(access) protection firewall(access) protection firewall(access) protection firewall(access) protection firewall(access) protection firewall(access) protection firewall(access) protection firewall(access) protection firewall(access) firewall(access) firewall(access) firewall(access) firewall(access) firewall(access) firewall(access) firewall(access) firewall(access) firewall(access) firewall(access) firewall(access) firewall(access) firewall(access) firewall(access) firewall(access) firewall(access) firewall(access) firewall(access) firewall(access) firewall(access)Linksys Σειρά ΧΑC
text_image
Currently connected to: LP4309 Internet access belkin.com No Internet access Wireless Network Connection 2 LP4309 Connected BronzeEagle HOME-C4BD NETBEAR29 JackiesPlace NETBEAR HOME-B142 Open Network and Sharing Centertext_image
Type the network security key Security key: Hide characters OK Canceltext_image
The network "BronzeEagle" requires a WPA password. Password: ******** Show password Remember this network Cancel OKΠροδιαγραφές
Linksys XAC1900
G.992.3 (ADSL2), G.992.5 (ADSL2+) yia Annex A,
B, M, L
Υποστηριζόμενα
XAC1900....1 Wall-mounting placement 3
Setting Up your EA-Series Router
Where to find more help....4
How to install your router ....4
How to connect to Linksys Smart Wi-Fi. . . . . . . . . . . . . . . . . . . . . . . . . . . . . . . . . . . . . . . . . . . . . . . . . . . . . . . . . . . . . . . . . . . . . . . . How to connect to Linksys Smart Wi-Fi 5 How to change router settings 5
Troubleshooting
Your router was not successfully set up .9
Windows XP Service Pack update .9
Your Internet cable is not plugged in message .10
Cannot access your router message .10
Specifications
Linksys XAC1900....12
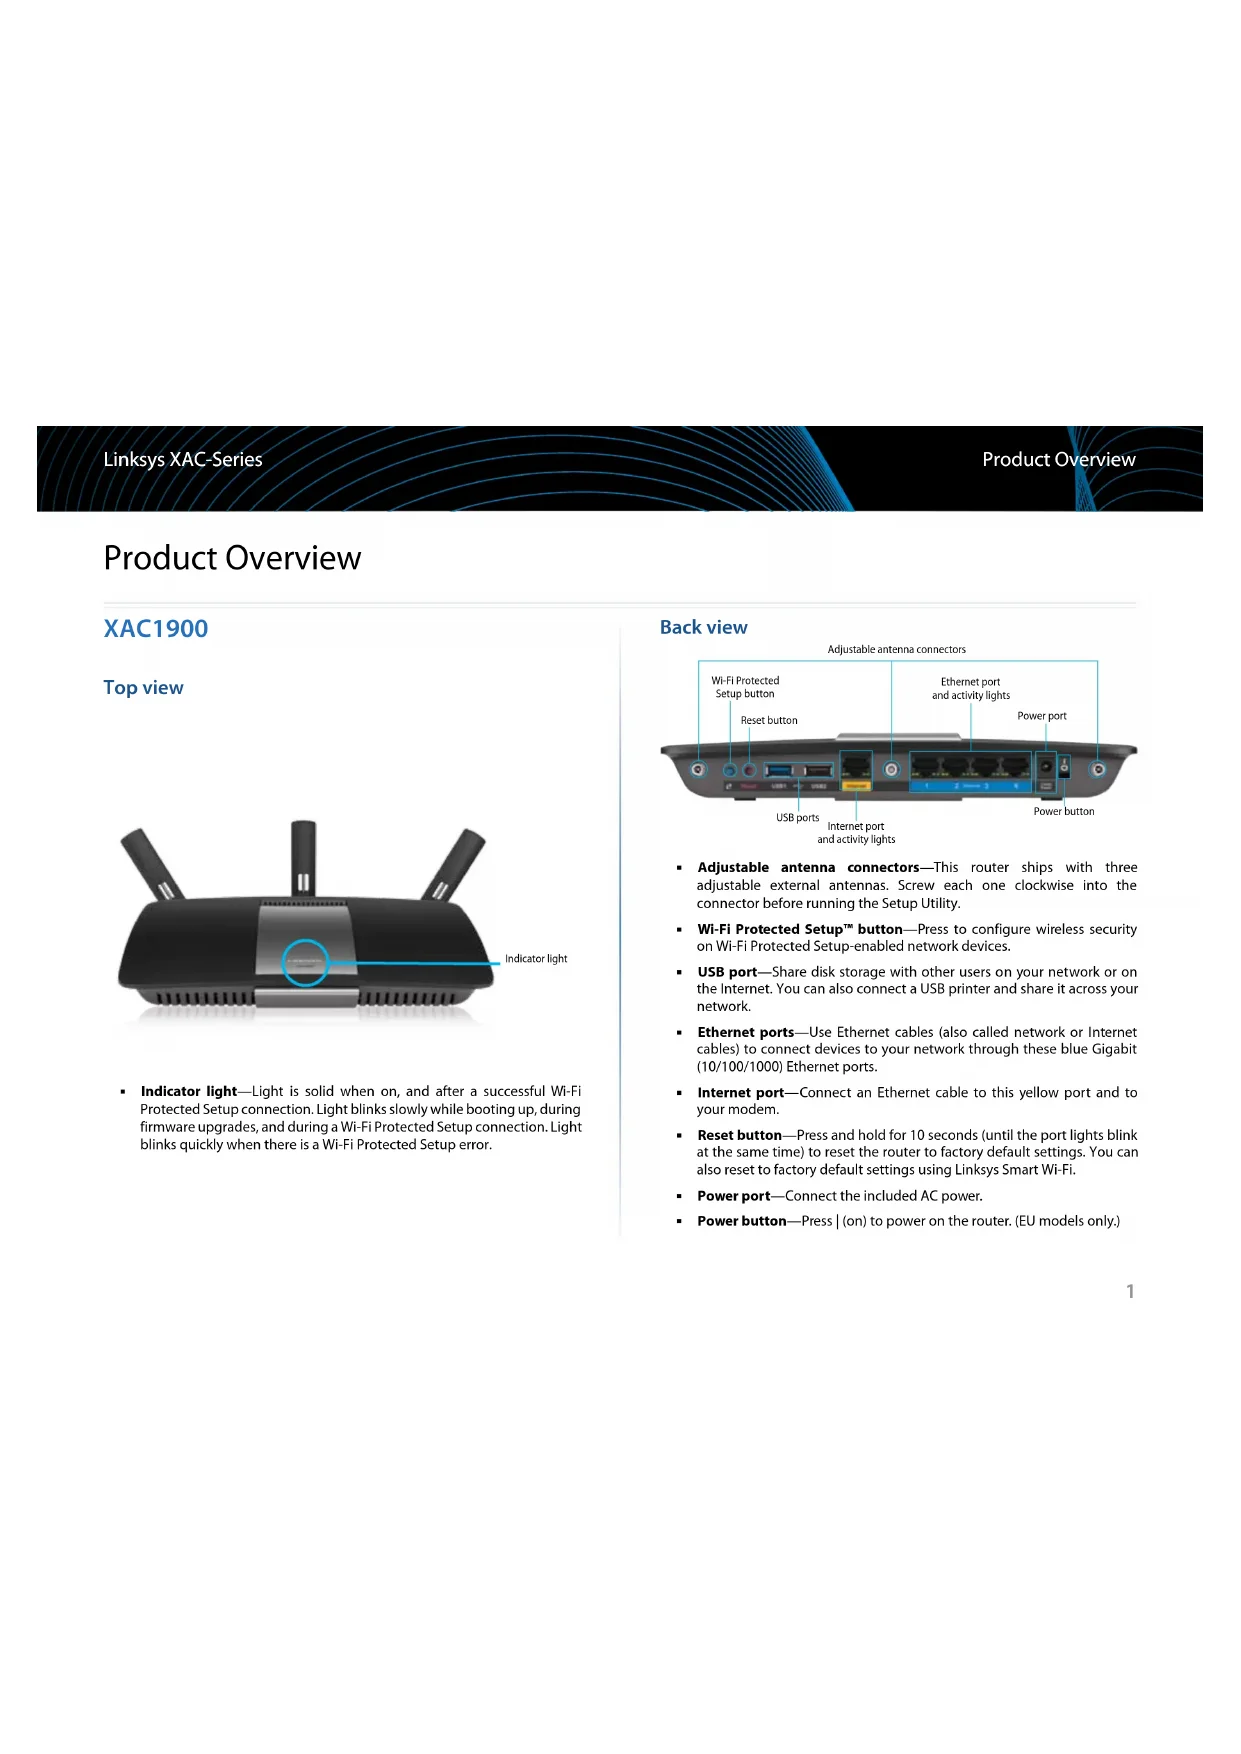
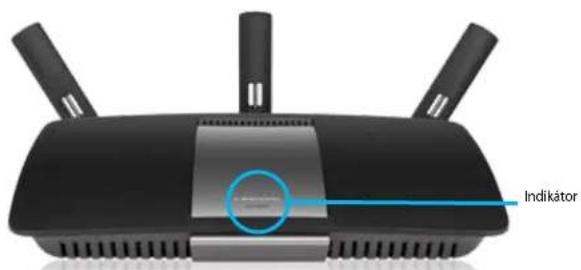
Product Overview
XAC1900
Top view
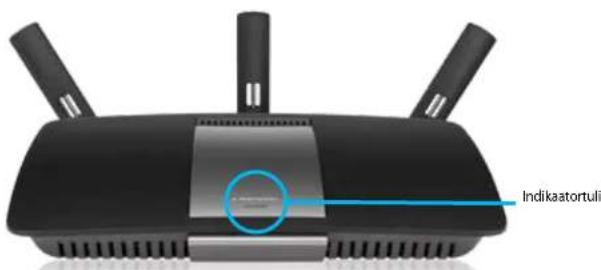
text_image
Indicator light- Indicator light—Light is solid when on, and after a successful Wi-Fi Protected Setup connection. Light blinks slowly while booting up, during firmware upgrades, and during a Wi-Fi Protected Setup connection. Light blinks quickly when there is a Wi-Fi Protected Setup error.
Back view

text_image
Adjustable antenna connectors Wi-Fi Protected Setup button Reset button Ethernet port and activity lights Power port USB ports Internet port and activity lights Power button- Adjustable antenna connectors—This router ships with three adjustable external antennas. Screw each one clockwise into the connector before running the Setup Utility.
- Wi-Fi Protected Setup™ button—Press to configure wireless security on Wi-Fi Protected Setup-enabled network devices.
- USB port—Share disk storage with other users on your network or on the Internet. You can also connect a USB printer and share it across your network.
- Ethernet ports—Use Ethernet cables (also called network or Internet cables) to connect devices to your network through these blue Gigabit (10/100/1000) Ethernet ports.
- Internet port—Connect an Ethernet cable to this yellow port and to your modem.
- Reset button—Press and hold for 10 seconds (until the port lights blink at the same time) to reset the router to factory default settings. You can also reset to factory default settings using Linksys Smart Wi-Fi.
- Power port—Connect the included AC power.
- Power button—Press | (on) to power on the router. (EU models only.)
APM105 ADSL2+ Power Modem
natural_image
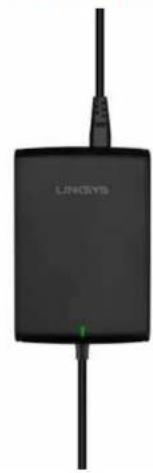
Black wireless device labeled 'LINKSYS' with a cable, no visible text or symbols beyond the label.
Indicator Light:
- Blinking Green: Power modem starting up and establishing ADSL connection.
• Solid Green: ADSL synced with ISP. - Blinking Amber: ADSL physical connection problem, e.g., phone cable is not connected to wall jack.

• DSL Port: Connects to the ADSL cable.
• Power: Connects to power cable.

Reset Button:
• Reboot: Press and hold one second and release.
- Restore to default settings: Press and hold five seconds and release.
Wall-mounting placement
The router has two wall-mount slots on its bottom panel. The distance between the slots is 82 mm. Two screws are needed to mount the router.

text_image
Suggested Mounting Hardware 7-8 mm 1.5-2 mm 3-5 mmNOTE
Linksys is not responsible for damages incurred by unsecured wall-mounting hardware.
Follow these instructions:
- Determine where you want to mount the router. Make sure that the wall you use is smooth, flat, dry, and sturdy. Also, make sure the location is within reach of an electrical outlet.
- Using the template on the next page, drill two holes into the wall.
- Insert screws leaving 3 mm of the heads exposed.
- Position the router so the wall-mount slots line up with the two screws.
- Place the wall-mount slots over the screws and slide the router down until the screws fit snugly into the wall-mount slots.
Wall-mounting template
Print this page at 100%.
Cut along the dotted line, and place on the wall to drill precise spacing.
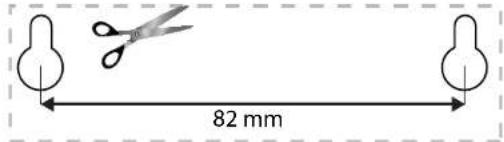
text_image
82 mmSetting Up Your EA-Series Router
Where to find more help
In addition to this User Guide, you can find help at these locations:
- Linksys.com/support (documentation, downloads, FAQs, technical support, live chat, forums)
- Linksys Smart Wi-Fi help (connect to Linksys Smart Wi-Fi, and click Help at the top of the screen)
How to install your router
- Connect antennas to the back of your router as shown. Antennas should be upright for best results.
- Connect the power modem to your router with the provided split cable as pictured.
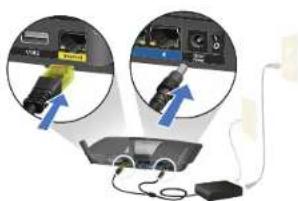
natural_image
Diagram showing two views of an electronic device with cables and connectors, no visible text or symbols- Connect the provided phone cable and power cord to the power modem. Plug in the power modem and connect the phone cable to a wall jack.

natural_image
Pure electrical circuit lines without any symbols- Wait until the power light on the top cover of the router is solid.
- Connect to the secure wireless network name on the Quick Start Guide that came with the XAC1900. (You can change these details later.) Select the option to automatically connect to this network in the future. You will not have Internet access until you complete router setup (see Step 6).
- Open a Web browser to launch Linksys Smart Wi-Fi Router setup instructions. If you do not see the setup instructions, type linksyssmartwifi.com in the address bar.
- At the end of setup, follow the on-screen instructions to set up your Linksys Smart Wi-Fi account. Use Linksys Smart Wi-Fi to manage router settings.
- Change your router's name and password
- Set up guest access
- Configure parental controls
- Connect devices to your network
• Test your Internet connection speed
NOTE: Linksys Smart Wi-Fi will send a verification e-mail. Make sure that you open the e-mail from Linksys and click the provided link.
How to connect to Linksys Smart Wi-Fi
Use Linksys Smart Wi-Fi to configure your router from any computer that has an Internet connection.
To open Linksys Smart Wi-Fi:
- Click the Linksys Smart Wi-Fi icon on your desktop.
- OR -
Open a Web browser and go to www.linksyssmartwifi.com.
- Enter the e-mail address and password you set up earlier, and click Sign In.
text_image
Linksys Smart Wi-Fi Sign In You can use all related to https://www.iad.com or the Smart website in the upper right corner of a page. Add mobile devices, libraries, and TVs to your networks Access details Password Authentication Login password Get up Get up to account at 20% free Use your Linksys Smart Wi-Fi account to access your home website from anywhere, so any time, even then your mobile device. Clearly contact us with devices, but personal network, get access to Smart Wi-Fi mobile apps, and more. For more information you need.How to change router settings
Use Linksys Smart Wi-Fi to change settings on your router and set up special features such as parental controls and guest access.
NOTE:
For additional help on any menu, click Help at the top of the screen.
To change router settings:
- Open Linksys Smart Wi-Fi and log in to your account
- In the menu on the left, click an option:
- Device List lets you see and manage all network devices connected to your router. View devices on your main network and your guest network, disconnect the devices, or display information about each device.

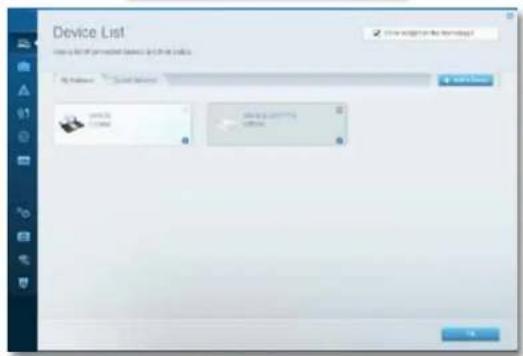
text_image
Device List Use a list of personalized devices to create a table. File Pathway: Search Device Save As... Save As... Save As... Save As... Save As... Save As... Save As... Save As... Save As... Save As... Save As... Save As... Save As... Save As... Save As... Save As... Save As... Save As... Save As... Save As... Save As... Save As... Save As... Save As... Save As... Save As... Save As... Save As... Save As... Save As... Save As... Save As... Save As... Save As... LoadLinksys XAC-Series
Setting Up Your Router
- Guest Access lets you configure a network so guests can use the Internet, but not access all of your network resources.

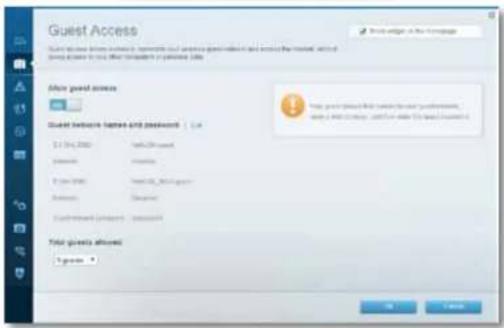
text_image
Guest Access Guest access to the website is available to complete the access to guest access and access to the website. It will not use any access to use other websites or websites (http://www.guest.com) After guest access Guest before https and passwords | 1x 1.0 (14, 200) https://guest.com 2.0 (15, 160) https://guest.com 3.0 (17, 180) https://guest.com Total guest allows: 1 guest OK Cancel- Parental Controls let you block Web sites and set Internet access times.


text_image
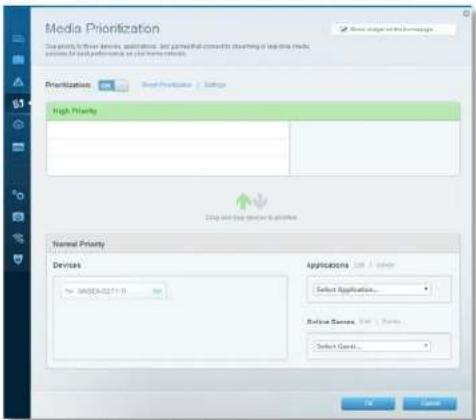
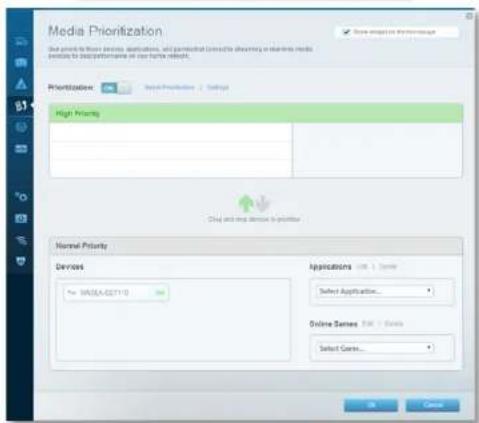
Parental Controls Create a new child's own family with the child's home. Enable parental controls 100 Support Stock-related access to NEW cohorts Stock-related access ■ None □ Yes □ Specific Use Stock specific type 1 OK Cancel• Media Prioritization lets you set which devices and applications have top priority for your network traffic.

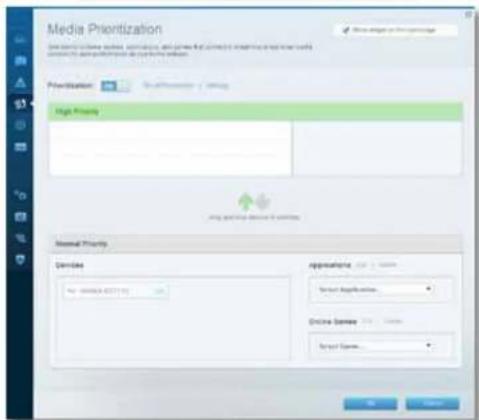
text_image
Media Prioritization Show the image of the image. High Priority Normal Priority Devices Application: 100% View Application... Online Server View Server...• Speed Test lets you test your network's Internet connection speed.

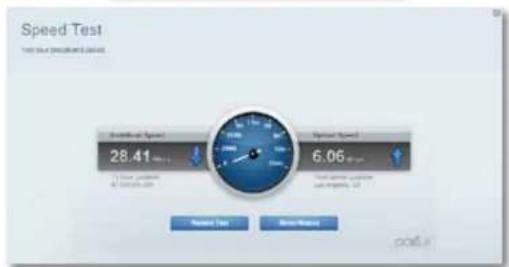
text_image
Speed Test Test rate: 50% or 100% or 20% Strength at Speed 28.41 1st speed, 0.0000 at 100% or 20% Speed Speed 6.06 Test speed, 0.0000 at 100% or 20% Reset Time Reset Mask page.sLinksys XAC-Series
Setting Up Your Router
- USB Storage lets you access an attached USB drive (not included) and set up file sharing, a media server, and FTP access. (Available only on routers with USB ports.)
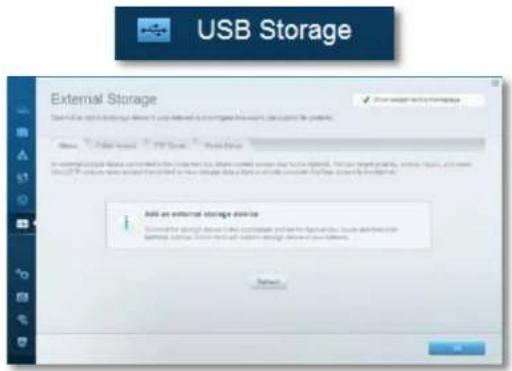
text_image
USB Storage External Storage Show the next storage device to your website or log files. Use existing the protocols. Name: USB Storage / PDF Cloud / PDF Link Use Open Format An external storage device is available for the current OSOS (or other OSOS types) to be installed. For any specific OSOS types, it can be used to create a new OSOS file. The OSOS will also be installed in the Internet. To use currently available OSOS files. Add an external storage device Describe the growth device's internal properties and functions for the OSOS system and OSOS services. External storage devices are not available. Support: OK- Connectivity lets you configure basic and advanced network setting.
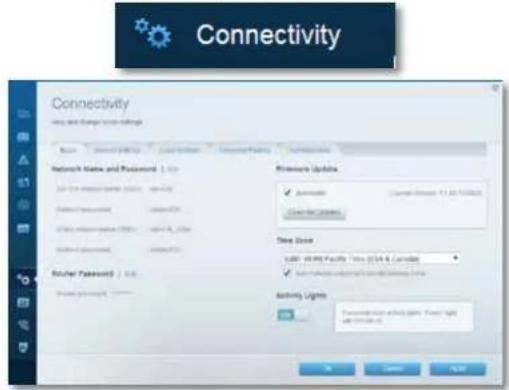
text_image
Connectivity Link and Manager settings Name: Network Security | Local Security | Connection Privacy Network Name and Password | Link USB 0.01 (Accessories: USB, USB 0.02) Router Password | Link USB 0.02 (Accessories: USB, USB 0.03) Router Password | Link Router Password | Link Hardware Updates Automatic Current Windows 11.02 (7:45:23) Clear Net Capsets Store Zone USB: WIRE Facility Tools (USB & Control) Switch: Windows NTFS/Windows NTFS/Windows NTFS Activity Lines Passenger Active Light Power Light USB 0.01 (Accessories: USB, USB 0.02)- Troubleshooting lets you diagnose problems with your router and check the status of the network.
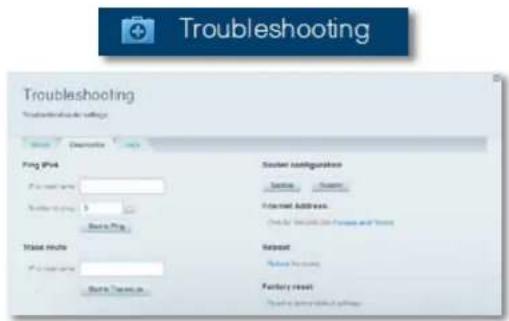
text_image
Troubleshooting Troubleshooting settings Pig Pin Pig Pin (main) Master Route Master Route (main) Master Route (main) System configuration System Configuration External Address Other than 100% of the following and following Reset Reset Setting Factory reset Factory reset setting- Wireless lets you configure your router's wireless network. You can change the security mode, password, MAC filtering, and connect devices using Wi-Fi Protected Setup.
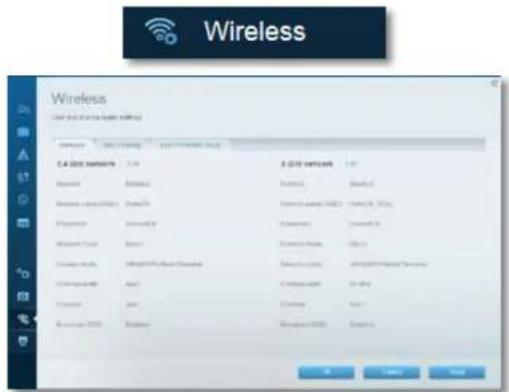
text_image
Wireless User for this device under wireless Networks 1.0.1 A.0.1.1 2.0.1 A.0.1.2 3.0.1 4.0.1 5.0.1 6.0.1 7.0.1 8.0.1 9.0.1 10.0.1 11.0.1 12.0.1 13.0.1 14.0.1 15.0.1 16.0.1 17.0.1 18.0.1 19.0.1 20.0.1 21.0.1 22.0.1 23.0.1 24.0.1 25.0.1 26.0.1 27.0.1 28.0.1 29.0.1 30.0.1 31.0.1 32.0.1 33.0.1 34.0.1 35.0.1 36.0.1 37.0.1 38.0.1 39.0.1 40.0.1 41.0.1 42.0.1 43.0.1 44.0.1 45.0.1 46.0.1 47.0.1 48.0.1 49.0.1 50.0.1 51.0.1 52.0.1 53.0.1 54.0.1 55.0.1 56.0.1 57.0.1 58.0.1 59.0.1 60.0.1 61.0.1 62.0.1 63.0.1 64.0.1 65.0.1 66.0.1 67.0.1 68.0.1 69.0.1 70.0.1 71.0.1 72.0.1 73.0.1 74.0.1 75.0.1 76.0.1 77.0.1 78.0.1 79.0.1 80.0.1 81.0.1 82.0.1 83.0.1 84.0.1 85.0.1 86.0.1 87.0.1 88.0.1 89.0.1 90.0.1 91.0.1 92.0.1 93.0.1 94.0.1 95.0.1 96.0.1 97.0.1 98.0 4 4 4 4 4 4 4 4 4 4 4 4 4 4 4 4 4 4 4 4 4 4 4 4 4 4 4 4 4 4 4 4 4 4Linksys XAC-Series
Setting Up Your Router
- Security lets you configure your router's wireless security. Set up the firewall, VPN settings, and make custom settings for applications and games.

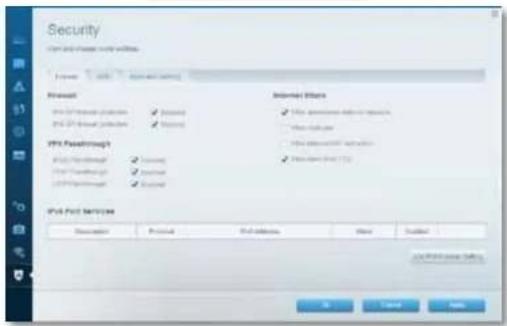
text_image
Security File Path and Transfer Wizard Details Access: 100% format and size Microsoft USB Pathway Protection USB Pathway Protection USB Pathway Protection Internet Options USB Pathway Protection USB Pathway Protection Internet Options USB Pathway Protection USB Pathway Protection USB Pathway Protection USB Pathway Protection USB Pathway Protection USB Pathway Protection USB Pathway Protection USB Pathway Protection USB Pathway Protection USB Pathway Protection USB Pathway Protection USB Pathway Protection USB Pathway Protection USB Pathway Protection USB Pathway Protection USB Pathway Protection USB Pathway Protection USB Pathway Protection USB Pathway Protection USB Pathway Protection USB Pathway Promotion USB Pathway Promotion USB Pathway Promotion USB Pathway Promotion USB Pathway Promotion USB Pathway Promotion USB Pathway Promotion USB Pathway Promotion USB Pathway Promotion USB Pathway Promotion USB Pathway Promotion USB Pathway Promotion USB Pathway Promotion USB Pathway Promotion USB Pathway Promotion USB Pathway Promotion USB Pathway Promotion USB Pathway Promotion USB Pathway Promotion USB Pathway Promotion USB Pathway Protection USB Pathway Protection USB Pathway Protection USB Pathway Protection USB Pathway Protection USB Pathway Protection USB Pathway Protection USB Pathway Protection USB Pathway Protection USB Pathway Protection USB Pathway Protection USB Pathway Protection USB Pathway Protection USB Pathway Protection USB Pathway Protection USB Pathway Protection USB Pathway Protection USB Pathway Protection USB Pathway Protection USB Pathway Prevention & SecurityTroubleshooting
This chapter can help you solve common setup issues and connect to the Internet. You can find more help from our award-winning customer support at linksys.com/support.
Your router was not successfully set up
If Linksys Smart Wi-Fi did not complete setup, try the following:
Press and hold the Reset button with a paperclip or pin until the LED starts blinking (about 10 seconds). Install the router again.

text_image
USB + 1 2 3 4 Internet- Temporarily disable your computer's firewall (see the security software's instructions for help), and install the router again.
- If you have another computer, use that computer to install the router again.
Windows XP Service Pack update
On Windows XP computers, Linksys Smart Wi-Fi requires Service Pack 3. If the currently installed Service Pack is older than version 3, you need to download and install Service Pack 3
TIP
To temporarily connect to the Internet and download the required Service Pack, use the included Ethernet cable to connect your computer directly to your modem.
To install Service Pack 3:
- Connect to the Microsoft Update website (update.microsoft.com/windowsupdate).
- Follow the instructions on the website or contact Microsoft if you need further help.
- After downloading and installing Service Pack 3, install the router again.
Your Internet cable is not plugged in
message
If you get a "Your Internet cable is not plugged in" message when trying to set up your router, follow these troubleshooting steps.
To fix the problem, try the following:
- Make sure that the Ethernet end of the split cable of the APM105 ADSL2+ Power Modem is securely connected to the yellow Internet port on the back of the router.
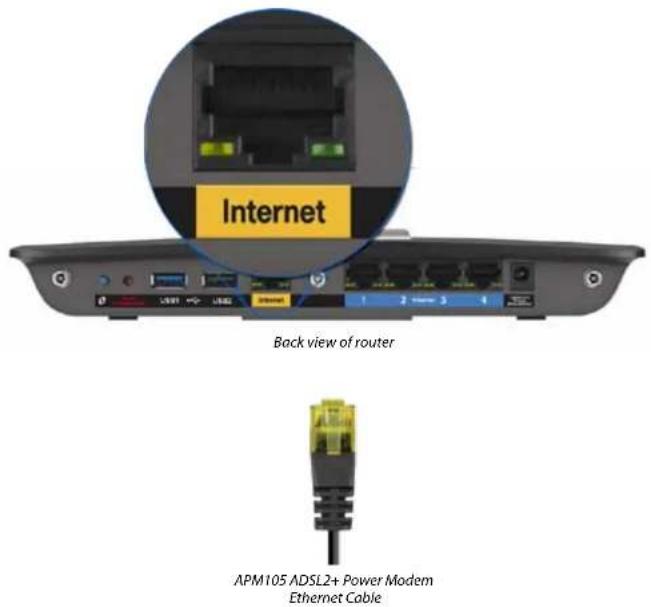
text_image
Internet Back view of router APM105 ADSL2+ Power Modem Ethernet Cable- Make sure that your APM105 ADSL2+ Power Modem is connected to power and the DSL phone line
- Install the router again.
Cannot access your router message
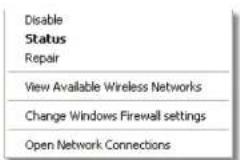
If you cannot access your router because your computer is not connected to your network, follow these troubleshooting steps.
To access your router, you must be connected to your own network. If you currently have wireless Internet access, the problem may be that you have accidentally connected to a different wireless network.
To fix the problem on Windows computers, do the following:
- On your Windows desktop right-click the wireless icon in the system tray. The icon might differ depending on your version of Windows. Windows 7 is represented below.

- Click Open Network and Sharing Center. A list of available networks will appear.
Linksys XAC-Series
Troubleshooting
- Click your own network name, and click Connect. In the example below, the computer was connected to another wireless network named LP4309. The name of the Linksys E-Series network, BronzeEagle in this example, is shown selected.
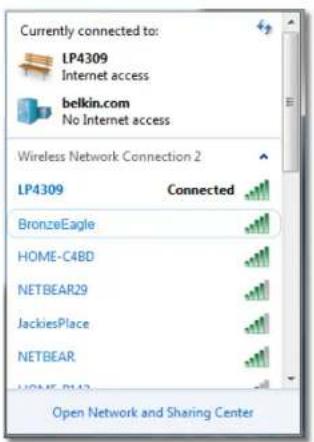
text_image
Currently connected to: LP4309 Internet access belkin.com No Internet access Wireless Network Connection 2 LP4309 Connected BronzeEagle HOME-C4BD NETBEAR29 JackiesPlace NETBEAR HOME-PLAB Open Network and Sharing Center- If you are prompted to enter a network key, type your password (Security Key) into the fields and click Connect.
text_image
Type the network security key Security key: Hide characters OK CancelYour computer will connect to the network, and you should be able to access the router.
To fix the problem on Mac computers, do the following:
- In the menu bar at the top of the screen, click the Wi-Fi icon. A list of wireless networks will appear. Linksys Smart Wi-Fi has automatically assigned your network a name.
In the example below, the computer was connected to another wireless network named JimsRouter. The name of the Linksys E-Series network, BronzeEagle in this example, is shown selected.
text_image
AirPort: On Turn AirPort Off JimsRouter Home BronzeEagle BronzeEagle-guest Penguin RD Join Other Network... Create Network... Open Network Preferences...-
Click the wireless network name of your Linksys E-Series router (BronzeEagle in the example).
-
Type your wireless network password (Security Key) into the Password Field and click OK.
text_image
The network "BronzeEagle" requires a WPA password. Password: ******** Show password Remember this network Cancel OKSpecifications
Linksys XAC1900
Model Name Linksys XAC1900
Description Linksys Smart Wi-Fi Modem Router AC1900
Model Number XAC1900
Switch Port Speed 10/100/1000 Mbps (Gigabit Ethernet)
Radio Frequency 2.4 and 5 GHz
# of Antennas 3 external antennas
Ports Power, USB (2), Internet, Ethernet (1-4), R-SMA (3)
Buttons Reset, Wi-Fi Protected Setup, Power (EU models only)
LEDs Top panel: Power
Back panel: Internet, Ethernet (1-4)
UPnP Supported
Security Features WEP, WPA, WPA2, RADIUS
Security Key Bits Up to 128-bit encryption
File System Support FAT, NTFS, and HFS+
ADSL Standards T1.413i2, G.992.1 (G.DMT), G992.2 (G.Lite),
G.992.3 (ADSL2), G.992.5 (ADSL2+) for Annex A, B, M, L
Browser Support Internet Explorer 8 or higher, Firefox 4 or
higher, Google Chrome 10 or higher, and Safari 4 or higher
Environmental
Dimensions 10.8" x 1.58" x 7.25" (256 x 40 x 184 mm)
Unit Weight 18.84 oz (534 g)
Power 12V,3.5A
Certifications CE, Wi-Fi a/b/g/n/draft ac, Windows 7, Windows 8, DLNA
Operating Temp. 32 to 104°F (0 to 40°C)
Storage Temp. -4 to 140°F (-20 to 60°C)
Operating Humidity 10 to 80% relative humidity, noncondensing
Storage Humidity 5 to 90% non-condensing
NOTES
For regulatory, warranty, and safety information, see the CD that came with your router or go to Linksys.com/support.
Specifications are subject to change without notice.
Maximum performance derived from IEEE Standard 802.11 specifications. Actual performance can vary, including lower wireless network capacity, data throughput rate, range and coverage. Performance depends on many factors, conditions and variables, including distance from the access point, volume of network traffic, building materials and construction, operating system used, mix of wireless products used, interference and other adverse conditions.
Licenses and notices for third party software used in this product may be viewed here: http://support.linksys.com/en-us/license. Please contact http://support.linksys.com/en-us/gplcodecenter for questions or GPL source code requests.
Visit linksys.com/support for award-winning technical support

text_image
BELKIN, LINKSYS and many product names and logos are trademarks of the Belkin group of companies. Third-party trademarks mentioned are the property of their respective owners. © 2014 Belkin international, inc. and/or its affiliates. All rights reserved. LINKSYS-00138R Rev. 2000
Linksys XAC1900....12
natural_image
Black wireless device labeled 'LINKSYS' with a cable, no visible text or symbols beyond the label.
Luz indicadora:
natural_image
Diagram showing two views of a device with cables and connectors, no visible text or symbolsnatural_image
Pure electrical circuit lines without any symbolstext_image
Linksys Smart Wi-Fi Sign In If you have not yet installed a Linksys Smart Wi-Fi account, also the 'Create Account' button in the upper right corner of the page. Add mobile devices, laptops, and TVs to your network Get New Accounts Microsoft Tomorrow's Me Target your password? New > Don't have any option? Click here. Use your Linksys Smart Wi-Fi account to access your home network from anywhere at any time, even how your mobile device. Early contact new devices, set parental controls, get access to Smart Wi-Fi mobile Apps, and more. File more information downloads.text_image
Device List You a list of installed devices and their status. My Network User Network OK My Network User Network OKLinksys XAC-Series
text_image
Guest Access Show weight on the collage Allow guest access Guest network names and passwords | Yes 24-015.0000 M#NOL guest Referee: 2ndee 8-06-0000 M#NOL_300.pdf Referee: 1stee Total guest allowed 1 guest ▼ Your guest allowed that contained lower guest linked, clean and transfer, therefore enter the guest permission.text_image
Parental Controls Cancel when plus utilities get online and what website has yet can use Enable parental controls Total Restricted Internet access on: W100-047719 Block Internet access ● Store ○ Stored ○ Specific Time Block specific sites Add OK CancelMedia Prioritization
text_image
Media Prioritization Set priority for media applications, and proposed contracts by showing in terms of media exlcite to describe performance on my rights request. Prioritization: Apply Prioritization Setup High Priority Design and my device is positive Normal Priority Devices WINDA02710 Applications (L) & Tools Select Application... Online Games (L) & Tools Select Games...text_image
Speed Test Test new broadband reset Current Speed 28.41 mph To Target Location of the location Target Speed 6.05 mph From Green Location Live Georgia, GA Contact Test Show History coxLnLinksys XAC-Series
text_image
USB Storage External Storage Connect an external storage device to your network and configure how point can access its components. Status: Power server, TCP server, Desktop server Is certain external storage devices connected to the core, help you chain content access your home network. This can share (if any, some, or less) and access (if any, some, or less) using TCP. We will access the network of your storage device that allows us to access these devices in the OSOS system. Add an external storage device Connect the internal storage device to your accessories part of the host of your user and their disk platform. Please check for this port to store directly and access. Finish OKtext_image
Connectivity Time and Change Color Settings Network Name and Passwords | 01t. 5.4.3.6.8.9.1.0.0 (2007) - InadeCK Network password: ConnectCK 5.0.0.1.0.1.0.0 (2007) - InadeCK_2007 Password password: InadeCK Router Passwords | 01e Router Password: 01e Hardware Update Automatic Channel Version 1.1.45.100002 Close to Update Time Zone [START 00:00] Filter Files (USA & Canada) Automatic Copy and Print Display Time Activity Lights Discontinued activity lines, Phone light and continue on OK Cancel Applytext_image
Troubleshooting Troubleshooting route settings Status Description Page Ping IPv4 Air traffic name: Scales to page: 5 Route to Page Route configuration Server Router Internet Addresser Pcs. @ 362.800.000 Connection Phone Trace route Air traffic name: Route to Transcode Router Recover Passed the route Factory reset Passed the service connectiontext_image
Security View and change order settings. Frontset Internet filters IPv4 Port Services IPv4 Port Services IPv4 Passthrough IPv4 Passthrough IPv4 Passthrough IPv4 Port Services Description Protocol IPv4 Address None Finisher Adding Direct Settings OK Cancel Applytext_image
USB +2 1 2 Summary 3 4 Reserved 5 Formattext_image
Currently connected to: LP4309 Internet access belkin.com No Internet access Wireless Network Connection 2 LP4309 Connected BronzeEagle HOME-C4BD NETBEAR29 JackiesPlace NETBEAR HOME-B142 Open Network and Sharing Centertext_image
Type the network security key Security key: Hide characters OK Canceltext_image
The network "BronzeEagle" requires a WPA password. Password: ******** Show password Remember this network Cancel OKEspecificaciones
Linksys XAC1900
Linksys XAC1900....12
natural_image
Black wireless device labeled 'LINKSYS' with antenna and cable, shown from top and side (no readable text or symbols beyond branding)Luz indicadora:
text_image
Diagram showing device connections with labeled ports and cables, including a monitor and cable via cable to a device.natural_image
Pure electrical circuit lines without any symbolstext_image
Linksys Smart Wi-Fi Sign In If you have not yet installed a Linksys Smart Wi-Fi account, also the 'Create Account' button in the upper right corner of the page. Add mobile devices, laptops, and TVs to your network Get New Get More Information: Click here. Use your Linksys Smart Wi-Fi account to access your home network from anywhere at any time, even how your mobile device. Early contact new devices, set parental controls, get access to Smart Wi-Fi mobile Apps, and more. File more information: https://www.English/United States.text_image
Device List Use a list of installed devices and their status. My Network User Network COSM COSM User Account COSMLinksys XAC-Series
text_image
Guest Access Guest access allowed to install your preferred quick passwords and around the Internet without going access to use other passwords in personal details. Allow guest access Guest network names and passwords | 100 (4.456.300) HANCK guest Password Password (5.000.000) HANCK, 500s password Password Password Guest network password password Total grants allowed 1 guest Show account on the gateway Your guest should be saved from your guest network, unless a wait button, or then write the guest password. Do you Canceltext_image
Parental Controls Cancel what your children get online and what website that can use Enable parental controls Restrict Internet access on: W866-077119 Block Internet access □ Begin ○ Initiate ○ Specific Time Block specific sites Add OK Canceltext_image
Media Prioritization Media Prioritization Show updates to these services, applications, and personalized concepts excluding the media service to best deliver some user home updates. Prioritization: Next Destination Options High Priority Normal Priority Devices MASC-02710 Applications Select Application... Online Games Select Games... Canceltext_image
Speed Test Test your broadband asset: Downloaded Speed 28.41 Mbps Uplink Speed 6.05 Mbps To your location all sensitive and Front Speed Location Low Northwest, US Recent Test Show HistoryLinksys XAC-Series
text_image
USB Storage External Storage Connect an external storage device to your network, and configure how point can access its components. Show weight at the beginning of the session. Status: Power server, TCP Server, Desktop Server Is colour storage device connected to the server list, so that any content or your home network. This can share (if any, web, or audio) all more than 10% (as we will access the server list of your storage device that is recommended to start the server list in the Internet) Add an external storage device Connect the other devices to have accessible part for the back of your user and their social media, including a file path to the server list or other devices.text_image
Connectivity Time and change date settings Network Name and Passwords | Get 0.4 (S) network security (SWSY) | Start/OK Network password | Command/OK 0.5 (S) network password (SWSY) | Start/OK Password password | Command/OK Router Password | Use Router Lockering Hardware Update Automatic Start/OK Status: 1.1.42.100000 Check to Update Time Zone [START 00:00] Filter Flow (SUSA & Console) Automatic Copy-up for Breaklight Settings Time Activity Lights Discontinued activity Light, Phone light and continue on OK Cancel Applytext_image
Troubleshooting Troubleshooting route settings Status Diagnosis Page Ping IPv6 Air traffic origin Scales to page $ Route to Page Route configuration Setup Router Internet Address Pcs. Of 300,000 or 500,000 packets Route Router Referee Passed the route Factory reset Passed the service outlet pathtext_image
Security View and change order settings. Frontset Internet filters IPv4 Port Services IPv4 Port Services IPv4 Passthrough IPv4 Passthrough IPv4 Passthrough IPv4 Port Services Description Protocol IPv4 Address None Finisher Adding Direct Settings OK Cancel Applytext_image
USB + 1 2 Wi-Fi 3 4 I/O 3 I/Otext_image
Currently connected to: LP4309 Internet access belkin.com No Internet access Wireless Network Connection 2 LP4309 Connected BronzeEagle HOME-C4BD NETBEAR29 JackiesPlace NETBEAR HOME-B142 Open Network and Sharing Centertext_image
Type the network security key Security key: Hide characters OK Canceltext_image
The network "BronzeEagle" requires a WPA password. Password: ******** Show password Remember this network Cancel OKEspecificaciones
Linksys XAC1900
Linksys XAC1900....12
Toote ülevaade
XAC1900
Pealtvaade
text_image
Indikaatortulinatural_image
Black wireless device labeled 'LNGSYS' with a cable and antenna (no additional text or symbols visible)
Indikaatortuli:
natural_image
Diagram showing two views of an electronic device connected to a cable, with no visible text or symbols.natural_image
Pure electrical circuit lines without any symbolstext_image
Linksys Smart Wi-Fi Sign In If you have not yet installed a Linksys Smart Wi-Fi account, also the 'Create Account' button in the upper right corner of the page. Add mobile devices, laptops, and TVs to your network Get out Don't have instructions? Click here. Use your Linksys Smart Wi-Fi account to access your home network from anywhere. If any time was done by your mobile device, Early contact new devices, set parental controls, get access to Smart Wi-Fi mobile Apps, and more. File more information downloads.text_image
Device List Use a list of installed devices and their status. My Network User Network COSM COSM User Account COSMLinksys XAC-seeria
Ruuteri seadistamine
text_image
Guest Access Guest server: guest server (only to monitor the user's access) guest server and access the server without going accessed to use other computer as personal info. Allow guest access Name: Guest network: names and passwords | 1.06 2.4-016.000 mail/OK guest Reference 2 selected 3.0-016.000 mail/OK (OK) guest Reference 0 selected Total requests allowed We tested off Total grants allowed 5 points Show Canceltext_image
Parental Controls Limit values your children get available and what availability then can use Enable parental controls Restrict Internet access (R: W820-467719) Block Internet access ■ None ○ Access ○ Specific Time Block specific sites : 100 OK Canceltext_image
Media Prioritization Our priorities include services, applications, and personalized concepts shortening or reduce media expenses to better performance on your home link. Prioritization: Next Generation 1 Settings High Priority Normal Priority Devices M800A42710 Applications Select Application... Online Games Select Games...text_image
Speed Test Test your broadband speed. Broadcast Speed 28.41 MHz % of the Lowes on selected out 6.05 MHz Advanced Speed Pass Services Location Los Angeles, CA Rested Test Store HistoryLinksys XAC-seeria
Ruuteri seadistamine
text_image
USB Storage External Storage Connect an external storage device to your remote and configure key users (can access to clients) Add: Remove: Forward: USB Server Mobile Server An external storage device contains the internal links where content access your home server. This use of platform, video, mini, and web. Use TCP. You can access network to a network or service from a network platform that has access to the desktop. Add an external storage device Cancel this settings found before external ports in the bank of your user and their own Web. Network Smart is found until the storage device is your server. Return: OKtext_image
Connectivity New and transceiver settings Network Name and Password | 10K SQL Server name (SQL) : 100000 Network password: SQL@SQL SQL network name (SQL) : 100000 Network password: SQL@SQL Router Password | 10K Hardware Update Automatic Control Version 1.1.42 PS8863 Show by Update Total Zone [START: 00:00] Pacific Type (SUSA & Console) Automaticly adjust for Desktop Savings Time Activity Lights Connectivity: whole type, PowerPoint, and other types OK Cancel Applytext_image
Troubleshooting Troubleshooting order settings Status Disgrains Page Ping IPv6 Pir to local server Scales to 100 Buses to Ping Trace route Pir to local server Buses to Timestamps Router configuration Server Router Internet Addresser IPv6: 85,000,000 (without access) Phone Router Router Kesoor Router the server Facting reset Fines to Service Email Earningstext_image
Security View and change order settings. Frontset Internet filters IPv4 Port Services IPv4 Port Services IPv4 Passthrough IPv4 Passthrough IPv4 Passthrough IPv4 Port Services Description Protocol IPv4 Address None Finisher Adding Direct Settings OK Cancel ApplyVeaotsing
text_image
Currently connected to: LP4309 Internet access belkin.com No Internet access Wireless Network Connection 2 LP4309 Connected BronzeEagle HOME-C4BD NETBEAR29 JackiesPlace NETBEAR HOME-B12 Open Network and Sharing Centertext_image
Type the network security key Security key: Hide characters OK Canceltext_image
The network "BronzeEagle" requires a WPA password. Password: ******** Show password Remember this network Cancel OKTehnilised andmed
Linksys XAC1900
Mudeli nimetus Linksys XAC1900
Kirjeldus Linksys Smart Wi-Fi Modem Router AC1900
Mudeli number XAC1900
Lülituspordi kiirus 10/100/1000 Mbps (gigabit Ethernet)
ADSL-i standardid T1.413i2, G.992.1 (G.DMT), G992.2 (G.Lite),
G.992.3 (ADSL2), G.992.5 (ADSL2+) lisade A, B, M, L jaoks
Linksys XAC1900....12
natural_image
Black wireless device labeled 'LINKSYS' with antenna and connector, shown from top and side views (no readable text beyond branding)Merkkivalo:
text_image
Diagram showing cable connection to a device with labeled ports and connectors, including zoomed-in views of the cable.natural_image
Pure electrical circuit lines without any symbolstext_image
Linksys Smart Wi-Fi Sign In If you have not yet created a Linksys Smart Wi-Fi account, then the "Create Account Sudan" in the upper right corner online page. Add mobile devices, laptops, and TVs to your network Used devices Imported Recommended Wi Target user accounts? Sign In Get share an account. Click here. Use your Linksys Smart Wi-Fi account to access your home network from anywhere at any time, even from your mobile device. Every contact new devices, net parental controls, get access to Smart Wi-Fi mobile Apps, and more. For more information downloadstext_image
Device List Have a list of connected devices and their status. My Network Save Function OK Open Close OK CloseLinksys XAC-sarja
text_image
Guest Access Guest access allowed to receive this guest network password and around the Internet without going access to our website or personal details. Allow guest access Guest network: names and passwords 1 Path CA-035-2000 HANCKS guest Redeem Enzyme B-035-2000 HANCKS, NOK guest Redeem Enzyme Gmail network password Enzyme Total guest allowed 1 point Show enough on the gateway Your guest has been allowed to have your network, have a link between, and then allow the guest password.text_image
Parental Controls Cancel what your website gets access and what website that can use Enable parental controls Restrict Internet access on: W006-007119 Block Internet access Store Store Specific Site Block Specific Sites Add OK Canceltext_image
Media Prioritization Media Prioritization Our priorities to those devices: applications, and promotional consults ordering on sale for media sales to the platform or any other service. Prioritization: Smart Production - Setup High Priority Normal Priority Devices M300A27110 Applications Select Application... Online Games Select Games...text_image
Speed Test Test your broadband speed. Download Speed 28.41 Mbps To Your Location All locations out Upload Speed 6.06 Mbps From Green Locations Low Angeles, CA Ready Test Show HistoryLinksys XAC-sarja
text_image
External Storage Connect an external storage device to your network and configure how points can access its components. Status Power Sources FTP Sources Shared Source An external storage device, connected to the server list, allows any control power and home network. You can share (if any, if not, or not) all users using FTP. We will continue to access the server list for a network device that is required to install this device to the website. Add an external storage device Connect the storage device to have appropriate port or link of your network and that is available. Unless I should then add the storage device to your network. Functiontext_image
Connectivity New and change cellular settings Network Name and Password | 5% 5.0% network name (CRC): InACX Network password: InACX 5.0% network password (CRC): InACX_704 Network password: InACX Rocker Password | 10% Rocker password : ____ Firmware Update Automatic Current Version 1.1.42.1000000 Check for Updates Data Zone (387.06.09) Pacific Tree (SISA & Canada) Automatically adjusted to Global Savings Time Activity Lights Start: InACX will change type: Powerlight will change on OK Cancel Applytext_image
Troubleshooting Troubleshooting route settings Status Beginner Stop Ping IPv6 P or local server 1 Substrs to Pmp Substrs to Pmp Router configuration Setup Connector Internet Address IPv6: 85.000.000 and Release and Press Trace route P or local server Substrs to Transmission Router Pooled the route Factory reset Pooled the network connectiontext_image
Security View and change order settings. Frontset Internet filters IPv4 Port Services IPv4 Port Services IPv4 Passthrough IPv4 Passthrough IPv4 Passthrough IPv4 Port Services Description Protocol IPv4 Address None Finisher Adding Direct Settings OK Cancel ApplyVianmääritys
text_image
Currently connected to: LP4309 Internet access belkin.com No Internet access Wireless Network Connection 2 LP4309 Connected BronzeEagle HOME-C4BD NETBEAR29 JackiesPlace NETBEAR HOME-B12 Open Network and Sharing Centertext_image
Type the network security key Security key: Hide characters OK Canceltext_image
The network "BronzeEagle" requires a WPA password. Password: ******** Show password Remember this network Cancel OKTekniset tiedot
Linksys XAC1900
Mallinimi Linksys XAC1900
XAC1900....1 Montage mural 3
natural_image
Black wireless device labeled 'LINKSYS' with a cable, no visible text or symbols beyond the label.
Voyant :
natural_image
Diagram showing two views of a device with connectors and cables, no visible text or symbolsnatural_image
Pure electrical circuit lines without any symbolstext_image
Linksys Smart Wi-Fi Sign In If you have not yet created a Linksys Smart Wi-Fi account, then the 'Create Account' button in the upper right page in the page. Add mobile devices, laptops, and TVs to your network Used by: Features: Remember We Target your user? Sign Up Get there an email or link here. Use your Linksys Smart Wi-Fi account to access your home network from anywhere at any time, now has your mobile device. Finally contact new devices, net general controls, put access to Smart Wi-Fi mobile Apps, and more. For more information downloadstext_image
Device List View a full of connected devices and their status My Network Status Network ServiceX Connection NOSA-00710 OSMs Other edge on Web http://www. New UserXAC-Series Linksys
text_image
Guest Access Show your guest allowed to receive the your bested guest name and ensure the guest method going to us your other names of personal data. Allow guest access OK Guest network: names and passwords | Yes #14101.0300 #9625.0300 #9625.0300 #9625.0300 Total guest allowed 1 guest Show weight on the gateway Your guest should be certified by your guest network, except a new version, and then write the guest password. Show weight on the gateway Show weight on the gateway Show weight on the gateway Show weight on the gateway Show weight on the gateway Show weight on the gateway Show weight on the gateway Show weight on the gateway Show weight on the gateway Show weight on the gateway Show weight on the gateway Show weight on the gateway Show weight on the gateway Show weight on the gateway Show weight on the gateway Show weight on the gateway Show weight on the gateway Show weight on 1 guest Show weight on the gatewaytext_image
Parental Controls Cancel when your website gets online and what website files can use Enable parental controls Select Restrict Internet access on: W1000-00719 Block Internet access ■ Select ○ Stored ○ Specific Time Block Specific Time Add OK Canceltext_image
Media Prioritization The provided file contains instructions, and permitted controls to browsing in media media services for the media performance on the website. Includes: Prioritization: High Priority Normal Priority Devices SASDA-02710 Applications: Web 1 - Default Select Application... Online Games: Web 1 - Default Select Games...text_image
Speed Test Test new broadband speed Download Speed 28.41 Mbps To Your Location 67 Mbps/300 Download Speed 6.05 Mbps Free-Screen Location Low Springs, CA Ready Test Stop HistoryXAC-Series Linksys
text_image
USB Storage External Storage Connect an external storage device to your network and configure how users can access by context. Name: Linear Server FTP Server Model Server An external storage device enables the file name or name of the server connected via a form network. You can share a server, local, remote, and more details (e.g., local, remote, remote) to access any external storage device from a local server. This is also available for this device. Add an external storage device Choose the storage device with a local server plus on the back of our user another (all Ref Bank, Unix Short File and the storage device to your network. Refresh OKtext_image
Connectivity New and International Settings Network Name and Password | 034 2.4 GB/Server name (GBR): Web/CN Network packet count: ConnectCA 5 Grid network capacity (GCU): Web/CN / 80Hz Network packet count: ConnectCA Router Password | 034 Router Password: ———— Firmware Update Automatic C:\Users\Version 1.1.4\Software\ Close for Updates Time Zone [207-001] Pacific Time (SIC4 & Control) ✓ Automatically adjust the Design Savings Time Activity Lights Automatically update other Power List and access to OK Cancel Applytext_image
Troubleshooting Troubleshooting route settings Status Deproductive Usage Ping IPv4 P: in front server Sensitivity to Ping 3 Trade in Ping Route route P: in front server Trade in Toxcode Router configuration Setup Desktop Internet Addresser IPv4: 87.200.000.000 Followed and Pending Keboor Patched the route Factoring reset Please be found before proceedingtext_image
Wireless View and change route settings 2.4 GHz network Networks Network name (NET) Phone(s) Internet name Bluetooth Link Channel length Channel width Channel size Channel length Channel width Channel length Channel length Channel length Channel length Channel length Channel length Channel length Channel length Channel length Channel length Channel length Channel length Channel length Channel length Channel length Channel length Channel length Channel length Channel length Channel length Channel length Channel length Channel length Channel length Channel length Channel length Channel length Channel length Channel length Channel length Channel length Channel length Channel length Channel lengthXAC-Series Linksys
text_image
Security View and change order settings. Frontset Internet filters IPv4 Port Services IPv4 Port Services IPv4 Passthrough IPv4 Passthrough IPv4 Passthrough IPv4 Port Services Description Protocol IPv4 Address None Finisher Adding Direct Settings OK Cancel ApplyDépannage
text_image
USB + 1 2 Features 3 4 Advanced Advanced Remotetext_image
Currently connected to: LP4309 Internet access belkin.com No Internet access Wireless Network Connection 2 LP4309 Connected BronzeEagle HOME-C4BD NETBEAR29 JackiesPlace NETBEAR HOME-PLA2 Open Network and Sharing Centertext_image
Type the network security key Security key: Hide characters OK Canceltext_image
(Charged) AirPort: On Turn AirPort Off ✓JimsRouter Home BronzeEagle BronzeEagle-guest Penguin RD Join Other Network... Create Network... Open Network Preferences...text_image
The network "BronzeEagle" requires a WPA password. Password: ******** Show password Remember this network Cancel OKSpécifications
Linksys XAC1900
Ports Alimentation, USB (2), Internet, Ethernet (1-4), R-SMA (3)
Boutons Réinitialisation, Wi-Fi Protected Setup,
Linksys XAC1900....12
natural_image
Black wireless device labeled 'LINKSYS' with a small antenna and green indicator line (no readable text beyond label)
Témoin lumineux :
natural_image
Diagram showing two cables connected to a device with connectors, no text or symbols presentnatural_image
Pure electrical circuit lines without any symbolstext_image
Linksys Smart Wi-Fi Sign In If you have not yet created a Linksys Smart Wi-Fi account, then the "Create Account" button in the upper right corner online page. Add mobile devices, tablets, and TVs to your network Used devices Password Reminder Me Sign Up your password? Sign Up Click Here at www.cbsf.com? Click Here: Use your Linksys Smart Wi-Fi account to access your home website from anywhere at any time, even from your mobile device. Easily connect new devices, net parental controls, get access to Smart Wi-Fi mobile Apps, and more. For more information displayed.text_image
Device List Send to a link of connected devices and their status. My Network Send To a link Send to a link to the topologies Send to a link to the bottomologies Send to a link to the bottomologies Send to a link to the bottomologies Send to a link to the bottomologies Send to a link to the bottomologies Send to a link to the bottomologies Send to a link to the bottomologies Send to a link to the bottomologies Send to a link to the bottomologies Send to a link to the bottomologies Send to a link to the bottomologies Send to a link to the bottomcategories Send to a link to the bottomcategories Send to a link to the bottomcategories Send to a link to the bottomcategories Send to a link to the bottomcategories Send to a link to the bottomcategories Send to a link to the bottomcategories Send to a link to the bottomcategories Send to a link to the bottomcategories Send to a link to the bottomcategories Send to a link to the bottomcategories Send to a link to the bottomcategoriesLinksys série XAC
text_image
Guest Access Show guest allow users to access your guest network based on the client's method going access to our other services of personal data. Allow guest access G Kuwait network names and passwords | Yes G Kuwait network: https://knew.org/knew.net G Kuwait: https://knew.org/knew.net G Kuwait: https://knew.org/knew.net Total grants allowed 1 grant Show weight on the gateway Your guest stream has been used by a guest network, unless a new stream, then will be the guest stream.text_image
Parental Controls Cancel what put additional get online and what website only can use Enable parental controls Total Restricted Internet access or W100-01719 Block Internet access ● Store ○ Stored ○ Specific Time Block Specific Time: Add OK Canceltext_image
Media Prioritization The provided file contains instructions, and permitted clicks to browsing in media media services for the media platform on our website. Prioritization: High Priority Normal Priority Devices SASDA-02710 Applications Select Application... Online Games Select Games...text_image
Speed Test Test new broadband speed: Download Speed 28.41 Mbps To Your Location and I have been done Download Speed 6.06 Mbps Free Spring Location Low Insglass Off Ready Test Show History oddLnLinksys série XAC
text_image
USB Storage External Storage Connect an external storage device in your network as required for any point can access to the network. Status: Power server, TCP server, and Internet Is optional storage device connected to the core, help you switch internal connections and home network. Put all shares (e.g., wireless, audio), add more data (TFT) or add more data (e.g., TFTP). Add an external storage device to your network. Add an external storage device to the network. Add an external storage device Connect the core space device to its own website post on the back of your user and their disk Network, please call for this account and to store directly on the network. Finish OKtext_image
Connectivity New and Change User Settings Network Name and Passwords | Get 0.4 SD channel names (SDF) : send/OK Network payment : send/OK 0.356 software pin (SDF) : send/OK Network payment : send/OK Router Password : Start Router Password : End Hardware Update Automatic Closed to Update Time Zone [START 00:00] Filter Files (SUSA & Console) Automatic copy output for Breaklight Settings Time Activity Lights One Downloaded activity lights, Phone light and continue on OK Cancel Applytext_image
Troubleshooting Troubleshooting route settings Status Disagments Page Ping IPv4 Pirial network Number to page: 3 Router Path Route route Pirial network Router Pathcode Router configuration Status Router Internet Addresser: Port of 100.0000 and Connection Phone Kebeor: Passed the route Factory reset: Ready to launch default settingstext_image
Wireless View and change output settings 2.4 GHz network 5 GHz network Network Connected Connected via network Connected via network Connected via network Connected via network Connected via network Connected via network Connected via network Connected via network Connected via network Connected via network Connected via network Connected via network Connected via network Connected via network Connected via network Connected via network Connected via network Connected via network Connected via network Connected via network Connected via network Connected via network Connected via network Connected via network Connected via network Connected via networks Connected via networks Connected via networks Connected via networks Connected via networks Connected via networks Connected via networks Connected via networks Connected via networks Connected via networks Connected via networks Connected via networks Connected via networks Connected via networks Connected via networks Connected via networks Connected via networks Connected via networks Connected via networks Connected via networks Connected via networks Connected via networks Connected via networks Connected via networks Connected via networks Connected via networkLinksys série XAC
text_image
Security View and change settings Forward OK Apply and Security Forward VPH Passthrough VPH Passthrough VPH Passthrough VPH Passthrough Internal filters View and change settings View modeband File Internal Full Index File User (Full 112) IPv4 Port Services Instructions Protocol IPv4 Settings Show Cancel Add to Direct Settings Do Cancel HelpDépannage
text_image
Currently connected to: LP4309 Internet access belkin.com No Internet access Wireless Network Connection 2 LP4309 Connected BronzeEagle HOME-C4BD NETBEAR29 JackiesPlace NETBEAR HOME-PLA2 Open Network and Sharing Centertext_image
Type the network security key Security key: Hide characters OK Canceltext_image
The network "BronzeEagle" requires a WPA password. Password: ******** Show password Remember this network Cancel OKSpécifications
Linksys XAC1900
Linksys XAC1900....12
natural_image
Black wireless device labeled 'LINKSYS' with a green cable, no visible text or symbols beyond the label.
Jelzőfény:
natural_image
Diagram showing two views of a device with connectors and cables, no visible text or symbolsnatural_image
Pure electrical circuit lines without any symbolstext_image
Linksys Smart Wi-Fi Sign In Add mobile devices, tablets, and TVs in your network Login details Download Partnerships Get your website? Sign Up Don't have to access it? Please check Use your Linksys Smart Wi-Fi to access your location network from anywhere, at any time, and link your mobile device. Here can contact new address, not planned devices, get access to Smart Wi-Fi website. Apps, and more. For more information and less.text_image
Device List How to get your device list or this list? File Path: C:\Users\Windows\ My Path: 123406 My Path: 5000000000000000 OKLinksys XAC-sorozat
text_image
Guest Access Allow guest access Guest details (eigenes and passwords) 2.1.04.3867 Email: 213-213-2009 Password: 2.0.01.0000 Email: 2021-2021-2021 Password: Password: No. of your job that has been requested. Email: 213-213-2009 Password: Total guest(s) allowed * Gender: *text_image
Parental Controls Parental Controls Enable parental controls Select internal access on Stock: Internal access ■ None ○ None ○ Specific Use Stock specific wire : < img>text_image
Media Prioritization Media Prioritization Show to access to the media. Show to access to the media. Show to access to the media. Show to access to the media. Show to access to the media. Show to access to the media. Show to access to the media. Show to access to the media. Show to access to the media. Show to access to the media. Show to access to the media. Show to access to the media. Show to access to the media. Show to access to the media. Show to access to the media. Show a priority level Normal Priority Services Application Service Application Device System Service Systemtext_image
Speed Test Test rate (Simulated Barrels) Speed at Speed 28.41 Up to Speed 6.06 Up to Speed Down to Speed Next Step Next Step call upLinksys XAC-sorozat
text_image
USB Storage External Storage Show the external storage device to provide additional internal storage services and access to the system. Add an external storage service Cancel for external storage device to the external storage system that provides additional internal storage services and access to the system.text_image
Connectivity www.rsc.org/2016-0389 Network Name and Password | 1.0x Local Network Security (LAN) | 1.0x Data Privacy (DATA) | 1.0x Local Network Security (LAN) | 1.0x Router Password | 1.0x Router Security | 1.0x Firearm Update ✓ Remote ✓ Connected to Windows Current Update Time Zone Auto SMART Facility: Texas (USA & Canada) ✓ Connected to Windows Active Lights Transportation: Active Light, Power Light, Air Traffic Light OK Cancel Canceltext_image
Currently connected to: LP4309 Internet access belkin.com No Internet access Wireless Network Connection 2 LP4309 Connected BronzeEagle HOME-C4BD NETBEAR29 JackiesPlace NETBEAR HOME-B142 Open Network and Sharing Centertext_image
Type the network security key Security key: Hide characters OK Canceltext_image
The network "BronzeEagle" requires a WPA password. Password: ******** Show password Remember this network Cancel OKMűszaki adatok
Linksys XAC1900
G.992.3 (ADSL2), G.992.5 (ADSL2+) for Annex A, B, M, L
Linksys XAC1900....12
natural_image
Black wireless device labeled 'LINKSYS' with a cable and antenna (no additional text or symbols visible)
natural_image
Diagram showing two views of a device with cables and connectors, no visible text or symbolsnatural_image
Diagram showing connections between a device, cable, and two wall-mounted panels (no text or symbols present)text_image
Linksys Smart Wi-Fi Sign In Add mobile devices, tablets, and TVs to your network Use your Linksys Smart Wi-Fi installed to access your home address from anywhere, at any time, even from your mobile device. Here can contact new devices, not broadcast devices, get access to Smart Wi-Fi mobile apps, and more. For more information with here.text_image
Device List How to set the following database as an icon is available: My Documents Current Settings My Documents My Documents My DocumentsLinksys XAC-Series
text_image
Guest Access Show your access to the website. It is recommended to use your guest access and has been accessed, but it is required to use your computer in a folder listing. Allow guest access Set Guest server: https and passwords 2.1.04.1983 Email: 165-071-13 Password: Password 3.0.01.1983 Email: 165-071-13 Password: Password Total years allowed 1 year - 4 Show your access to the website. It is recommended to use your guest access, which is required to use your computer in a folder listing. Allow guest access Show your access to the website. It is recommended to use your guest access, which is required to use your computer in a folder listing. Allow guest access Set Password: Password 3.0.01.1983 Email: 165-071-13 Password: Password Total years allowed 1 year - 4 OK Canceltext_image
Parental Controls Use existing user-shrubs to access the parent's home. In line parental controls 100 Parental Internal Access to Stock Internal Access ● None ○ Unknown ○ Specific Press Stock specific size 1: 100%text_image
Media Prioritization Show how to use media features, access functions, and provide the format to ensure that media features are available in the media settings. Prioritization: High Priority Normal Priority Devices Applications Search Applications Online Services Search Servicestext_image
Speed Test Test and Directional Errors Strength and Speed 28.41 To your position to the location 6.06 Speed Test Speed Test Speed Test Control Tips Main Window orlaLinksys XAC-Series
text_image
USB Storage External Storage Show the external storage device to provide additional internal storage services and access to the system. Add an external storage service Cancel for external storage device to the external storage system that provides additional internal storage services and access to the system.text_image
Connectivity www.rsc.org/2016-0389 Network Name and Password | 1.0x Local Network Security (LCC) | 1.0x Local Security (LCC) | 1.0x Local Security (LCC) | 1.0x Router Password | 1.0x Router Password | 1.0x Firearm Update ✓ Remote ✓ Closed Connection Time Zone AUDIT WORK Facilities: Texas (SIA & Canada) ✓ Closed Connection Active Lights ✓ Closed Connection OK Cancel Canceltext_image
Security User and change your website Access Install Options and Settings Microsoft USB TCP network protection ✓ Accessed USB TCP network protection ✓ Accessed Mbps Mbps Fast-through Mbps Fast-through ✓ Accessed Mbps Fast-through ✓ Accessed Mbps Post Services Description Protocol Extractions View Stadium Internet Options ✓ Web browser address request ✓ Web browser ✓ Web browser traffic request ✓ Web browser (TCP) Web Post Service OK Cancel Helptext_image
USB + 1 2 N/A 3 4 N/Atext_image
Currently connected to: LP4309 Internet access belkin.com No Internet access Wireless Network Connection 2 LP4309 Connected BronzeEagle HOME-C4BD NETBEAR29 JackiesPlace NETBEAR HOME-B142 Open Network and Sharing Centertext_image
Type the network security key Security key: Hide characters OK Canceltext_image
The network "BronzeEagle" requires a WPA password. Password: ******** Show password Remember this network Cancel OKSpecifiche tecniche
Linksys XAC1900
Nome modello Linksys XAC1900
Supporto file system FAT, NTFS, and HFS+
Standard ADSL T1.413i2, G.992.1 (G.DMT), G992.2 (G.Lite), G.992.3 (ADSL2), G.992.5 (ADSL2+) per Annex A, B, M, L
Supporto browser Internet Explorer 8 o superiore, Firefox 4 o superiore, Google Chrome 10 o superiore e Safari 4 o superiore
Specifiche ambientali
natural_image
Black wireless device labeled 'LINKSYS' with antenna and connector, shown from top and side views (no readable text or symbols beyond branding)natural_image
Diagram showing two views of a device with connectors and cables, no visible text or symbolsnatural_image
Pure electrical circuit lines without any symbolstext_image
Linksys Smart Wi-Fi Sign In Add mobile devices, tablets, and TVs to your network Use your Linksys Smart Wi-Fi installed to access your home address from anywhere, at any time, even from your mobile device. Here can contact new devices, not broadcast devices, get access to Smart Wi-Fi mobile apps, and more. For more information with here.text_image
Device List How to set the following database as an icon is available: My Documents Current Settings My Documents My Documents My Documentstext_image
Guest Access Guest access (access) is required to complete the access to a guest. The guest access is to use other databases or platforms (data) After guest access Guest before (help and password) 1.0 1.0 (14, 200) https://www.guest.com/ email: www.guest.com Email: www.guest.com Account: www.guest.com Total guest allowed: 5 guest.text_image
Parental Controls Enable parental controls Stock-related access to MILK-2075 Stock-related access ■ None □ Yes □ Specific Use Stock specific wire 1 OK Canceltext_image
Media Prioritization Show the image of the image. High Priority Normal Priority Devices application: .com Select Application Online Server Select Servertext_image
Speed Test Test rate: 50% or 100% or 20% Strength at Speed 28.41 1st speed, 0.0000 at 100% or 20% Speed Speed 6.06 Test speed, 0.0000 at 100% or 20% Reset Time Reset Mask page.stext_image
USB Storage External Storage Show the external storage device to include a virtual network security system that supports the system. Name: P1200000000000000000000000000000000000000000000000000000000000000000000000000000000000000000000000 Add an external storage device Currently allow this device to use the bank of our bank's banking system, which is currently available in the OS. The OS will also be used to access the OS to the bank or other institutions. If you are currently available in the OS, then you should not access it to any other institution. If you are currently available in the OS, then you should not access it to any other institution. If you are currently available in the OS, then you should not access it to any other institution. If you are currently available in the OS, then you should not access it to any other institution. If you are currently available in the OS, then you should not access it to any other institution. If you are currently available in the OS, then you should not access it to any other institutional. If you are currently available in the OS, then you should not access it to any other institutional. If you are currently available in the OS, then you should not access it to any other institutional. If you are currently available in the OS, then you should not access it to any other institutional. If you are currently available in the OS, then you should not access it to any other institutional. If you are currently available in the OS, then you should not access it to any other institution. If you are currently available in the OS, then you should not access it to any other institution. If you are currently available in the OS, then you should not access it to any other institution. If you are currently available in the OS, then you should not access it to any other institution. If you are currently available in the OS, then you should not access it to any other university. If you are currently available in the OS, then you should not access it to any other university. If you are currently available in the OS, then you should not access it to any other university. If you are currently available in the OS, then you should not access it to any other university. If you are currently available in the OS, then you should not access it to any other university. If you are currently available in the OS, then you should not access it to any other school. If you are currently available in the OS, then you should not access it to any other school. If you are currently available in the OS, then you should not access it to any other school. If you are currently available in the OS, then you should not access it to any other school. If you are currently available in the OS, then you should not access it to any other school. If you are currently available in the OS, then you should not access it to any other university. If you are currently available in the OS, then you should not access it to any other university. If you are currently available in the OS, then you should not access it to any other university. If you are currently available in the OS, then you should not access it to any other university. If you are currently available in the OS, then you should not access it to any other college. If you are currently available in the OS, then you should not access it to any other college. If you are currently available in the OS, then you should not access it to any other college. If you are currently available in the OS, then you should not access it to any other college. If you are currently available in the OS, then you should not access it to any other college. If you are currently available in the OS, then you should not access it to any other university. If you are currently available in the OS, then you should not access it to any other university. If you are currently available in the OS, then you should not access it to any other university. If you are currently available in the OS, then you should not access it to any other university. If you are currently available in the OS, then you should not access it to any other campus. If you are currently available in the OS, then you should not access it to any other campus. If you are currently available in the OS, then you should not access it to any other campus. If you are currently available in the OS, then you should not access it to any other campus. If you are currently available in the OS, then you should not access it to any other campus. If you are currently available in the OS, then you should not access it to any other university. If you are currently available in the OS, then you should not access it to any other university. If you are currently available in the OS, then you should not access it to any other university. If you are currently available in the OS, then you should not access it to any other university. If you are currently available in the OS, then you should not access it to any other computer. If you are currently available in the OS, then you should not access it to any other computer. If you are currently available in the OS, then you should not access it to any other computer. If you are currently available in the OS, then you should not access it to any other computer. If you are currently available in the OS, then you should not access it to any other computer. If you are currently available in the OS, then you should not access it to any other university. If you are currently available in the OS, then you should not access it to any other university. If you are currently available in the OS, then you should not access it to any other university. If you are currently available in the OS, then you should not access it to any other university. If you are currently available in the OS, then you should not access it to any other student. If you are currently available in the OS, then you shall not reach this point on or above at all three levels of service or information provided by either a personal or official institution or a private institution.text_image
Connectivity www.net & new user settings Basic Network Name and Password 1.0.0 2.0.0 3.0.0 4.0.0 5.0.0 6.0.0 7.0.0 8.0.0 9.0.0 10.0.0 11.0.0 12.0.0 13.0.0 14.0.0 15.0.0 16.0.0 17.0.0 18.0.0 19.0.0 20.0.0 21.0.0 22.0.0 23.0.0 24.0.0 25.0.0 26.0.0 27.0.0 28.0.0 29.0.0 30.0.0 31.0.0 32.0.0 33.0.0 34.0.0 35.0.0 36.0.0 37.0.0 38.0.0 39.0.0 40.0.0 41.0.0 42.0.0 43.0.0 44.0.0 45.0.0 46.0.0 47.0.0 48.0.0 49.0.0 50.0.0 51.0.0 52.0.0 53.0.0 54.0.0 55.0.0 56.0.0 57.0.0 58.0.0 59.0.0 60.0.0 61.0.0 62.0.0 63.0.0 64.0.0 65.0.0 66.0.0 67.0.0 68.0.0 69.0.0 70.0.0 71.0.0 72.0.0 73.0.0 74.0.0 75.0.0 76.0.0 77.0.0 78.0.0 79.0.0 80.0.0 81.0.0 82.0.0 83.0.0 84.0.0 85.0.0 86.0.0 87.0.0 88.0.0 89.0.0 90.0.0 91.0.0 92.0.0 93.0.0 94.0.0 95.0.0 96.0.0 97.0.0 98.0.0 99.0.0 100.0. Resource Update: ✓ Automatic Current log: 11-62 (1/1/2) ✓ Clear for Updates: Time Zone: FAST 19:39:Facility Time STA & Latency: ✓ Select the location on the Internet Service Time: Activity Lines: • Continuous line activity light power light use time on: 24htext_image
Troubleshooting Troubleshooting Settings Begin Description Help Ping Ship P: 10000000000000000000000000000000000000000000000000000000000000000000000000000000000000 Start Menu P: 1000000000000000000 Start Menu Start Menu Reset Reset to continue Partony reset Start menu buttontext_image
Security User and consider your website: Microsoft Internal Effects HP User Protection ✓ Normal HP User Protection ✓ Normal USB Post Service ✓ Normal USB Post Service ✓ Normal USB Post Service ✓ Normal Description Positive Exhibition View Standard 20000000000000000000000000000000000000000000000000000000000000000000000000000000000000000000000000000Trikčių šalinimas
text_image
Currently connected to: LP4309 Internet access belkin.com No Internet access Wireless Network Connection 2 LP4309 Connected BronzeEagle HOME-C4BD NETBEAR29 JackiesPlace NETBEAR HOME-B142 Open Network and Sharing Centertext_image
Type the network security key Security key: Hide characters OK Canceltext_image
The network "BronzeEagle" requires a WPA password. Password: ******** Show password Remember this network Cancel OKTechniniai duomenys
Linksys XAC1900
ADSL standartai T1.413i2, G.992.1 (G.DMT), G992.2 (G.Lite), G.992.3 (ADSL2), G.992.5 (ADSL2+), skirti A, B, M, L priedui
"Linksys" XAC1900....12
natural_image
Black wireless device labeled 'LINESYS' with a cable and green indicator light (no readable text beyond brand name)
Indikatora lampiņa:
natural_image
Diagram showing two views of a device with connectors and cables, no visible text or symbolsnatural_image
Pure electrical circuit lines without any symbolstext_image
Linksys Smart Wi-Fi Sign In Add mobile devices, hotels, and TVs to your network Local Services Password Personality Use your website (http://www.163.com) English - Alert Name For more information link heretext_image
Device List Create a list of personalized datasets and the data list. My Features Cancel Devices OK Cancel Cancel Cancel Cancel Canceltext_image
Guest Access Guest server: https://www.guestaccess.com/ After guest access Guest server: https://www.guestaccess.com/ Total guest allowed: 1 guest.text_image
Parental Controls Create a parent's control Parental Control is selected to Stock Specific Access ■ None ○ Yes □ No. 100% Stock Specific Access ■ Yes ○ No. □ No. 100%text_image
Media Prioritization Show options to show that, however, and then find the content to show how media priorities are available. The media prioritization is not currently available. Prioritization: High Priority Normal Priority Devices Applications: 123, 100% Show Applications Online Games: 123, 100% Spread Games OK Canceltext_image
Speed Test Test your (modified) data Speed of Speed 28.41 To have problems at times 0.0 Speed Speed: 6.06 to have problems at times 0.0 New Test New Monitoringtext_image
USB Storage External Storage Show the external storage device to provide additional internal storage services and access to the system. Add an external storage service Cancel for external storage device to the external storage system that provides additional internal storage services and access to the system.- Pieslëgums Sniedz jums iespëju konfigurët pamata un plašakus tikla iestatijumus.
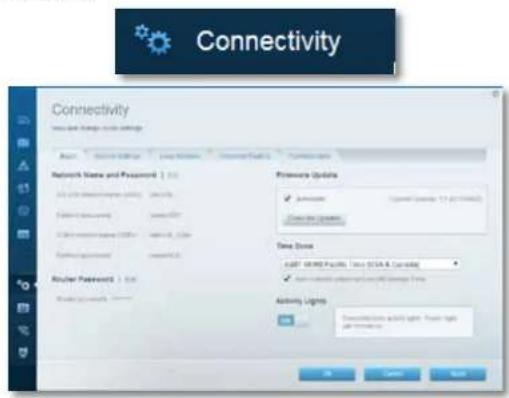
text_image
Connectivity www.rsc.org/2016-0389 Network Name and Password | 1.0x Local Network Security (LAN) | 1.0x Data Privacy (DATA) | 1.0x Local Network Security (LAN) | 1.0x Router Password | 1.0x Router Security | 1.0x Firearm Update ✓ Remote ✓ Connected to Windows Current Update Time Zone Auto SMART Facility: Texas (USA & Canada) ✓ Connected to Windows Active Lights Transportation: Active Light, Power Light, Air Traffic Light OK Cancel Canceltext_image
Security User and change your website Access Install Import/Export Microsoft IFR Pathlength ✓ Access ✓ IFR Pathlength ✓ Access Internet Options ✓ Web browser address ✓ Web browser ✓ Web browser (TCP) ✓ Web browser (TCP) IFR Pathlength ✓ Access ✓ IFR Pathlength ✓ Access IFR Post Services Description Protocol Extractions View Install Add to Web Server Tools Add to Web Server ToolsProblēmrisinājumi
text_image
Currently connected to: LP4309 Internet access belkin.com No Internet access Wireless Network Connection 2 LP4309 Connected BronzeEagle HOME-C4BD NETBEAR29 JackiesPlace NETBEAR HOME-B12 Open Network and Sharing Centertext_image
Type the network security key Security key: Hide characters OK Canceltext_image
The network "BronzeEagle" requires a WPA password. Password: ******** Show password Remember this network Cancel OKSpecifikācijas
Linksys XAC1900
Modela nosaukums Linksys XAC1900
natural_image
Black wireless device labeled 'LINKSYS' with a cable and green indicator line (no readable text beyond branding)
Indicatielampje:
natural_image
Diagram showing two views of a device with cables and connectors, no visible text or symbolsnatural_image
Pure electrical circuit lines without any symbolstext_image
Linksys Smart Wi-Fi Sign In Add mobile devices, tablets, and TVs to your network Login: 98723 Password: Partnered by Employee information? Help... Don't have an access to a link via Use your Linksys Smart Wi-Fi account to access your local network from anywhere, at any time, even from your mobile device. Only can contact new devices, not applicable networks, get access to Smart Wi-Fi mobile apps, and more. For more information available.text_image
Device List How to find the following items: or this list is My Search Search Method My Search Search Method My SearchLinksys XAC-Serie
text_image
Guest Access Show your access to the website, but currently has been accessed by a local server. This is also available to all other sites in the website. Allow guest access Guest details: https://www.guest.com/ Guest details: http://www.guest.com/ Total guest(s) allowed 1 guest.text_image
Parental Controls Parental Controls Enable parental controls Select internal access on: Stock internal access ■ Select ○ Select ○ Specific Use Stock specific sites :text_image
Media Prioritization Media Prioritization Show to access to the media platform. High Priority Normal Priority Services Application Service Application Device System Service Systemtext_image
Speed Test Speed Test (Simulated Barrels) Speed at Speed 28.41 Speed at Speed 6.06 Speed at Speed Speed at Speed Speed at Speed Speed at Speed Speed at Speed Speed at Speed Speed at Speed Speed at Speed Speed at Speed Speed at Speed Speed at Speed Speed at Speed Speed at Speed Speed at Speed Speed at Speed Speed at Speed Speed at Speed Speed at Speed Speed at Speed Speed at Speed Speed at Speed Speed at Speed Speed at Speed Speed at Speed Speed at Speed Speed at 100% Speed at 100% Speed at 100% Speed at 100% Speed at 100% Speed at 100% Speed at 100% Speed at 100% Speed at 100% Speed at 100% Speed at 100% Speed at 100% Speed at 100% Speed at 100% Speed at 100% Speed to Speed Speed to Speed Speed to Speed Speed to Speed Speed to Speed Speed to Speed Speed to Speed Speed to Speed Speed to Speed Speed to Speed Speed to Speed Speed to Speed Speed to Speed Speed to Speed Speed to Speed Speed to Speed Speed to Speed Speed to Speed Speed to Speed Speed to Speed Speed to Speed Speed to Speed Speed to Speed Speed to Speed Speed to Speed Speed to SpeedLinksys XAC-Serie
text_image
USB Storage External Storage Show the external storage device to include a virtual network security system that supports the system. Name: P120000000000000000000000000000000000000000000000000000000000000000000000000000000000000000000000 Add an external storage device Currently allow the device in this configuration to open the bank or other financial services. Additional features are not available in the OSOS system.text_image
Connectivity www.net & new user settings Basic Network Name and Password 1.0.0 2.0.0 3.0.0 4.0.0 5.0.0 6.0.0 7.0.0 8.0.0 9.0.0 10.0.0 11.0.0 12.0.0 13.0.0 14.0.0 15.0.0 16.0.0 17.0.0 18.0.0 19.0.0 20.0.0 21.0.0 22.0.0 23.0.0 24.0.0 25.0.0 26.0.0 27.0.0 28.0.0 29.0.0 30.0.0 31.0.0 32.0.0 33.0.0 34.0.0 35.0.0 36.0.0 37.0.0 38.0.0 39.0.0 40.0.0 41.0.0 42.0.0 43.0.0 44.0.0 45.0.0 46.0.0 47.0.0 48.0.0 49.0.0 50.0.0 51.0.0 52.0.0 53.0.0 54.0.0 55.0.0 56.0.0 57.0.0 58.0.0 59.0.0 60.0.0 61.0.0 62.0.0 63.0.0 64.0.0 65.0.0 66.0.0 67.0.0 68.0.0 69.0.0 70.0.0 71.0.0 72.0.0 73.0.0 74.0.0 75.0.0 76.0.0 77.0.0 78.0.0 79.0.0 80.0.0 81.0.0 82.0.0 83.0.0 84.0.0 85.0.0 86.0.0 87.0.0 88.0.0 89.0.0 90.0.0 91.0.0 92.0.0 93.0.0 94.0.0 95.0.0 96.0.0 97.0.0 98.0.0 99.0.0 100.0. Resource Update: ✓ Automatic Current log: 11-62 (1/1/2) ✓ Clear for Updates: Time Zone: FAST 19:39:Facility Time STA & Latency: ✓ Select the location on the Internet Service Time: Activity Lines: • Select the location on the Internet Service line with a name: OK Cancel Applytext_image
Troubleshooting Troubleshooting Settings Pig Push Pig Parking 5 Subway Push Subway Queue Subway Queue Cluster Configuration Subway Customs Internal Address Pig Push: 100% of Pug Push and Subway Subway Push Subway Queue Subway Queue Subset Subway Queue Factory reset Subway Queuetext_image
Security User and change your website Access Install Options and Settings Microsoft USB TCP network protection ✓ Accessed USB TCP network protection ✓ Accessed Mbps Mbps Fast-through Mbps Fast-through ✓ Accessed Mbps Fast-through ✓ Accessed Mbps Post Services Description Protocol Extractions View Stadium Internet Options ✓ Web browser address request ✓ Web browser ✓ Web browser traffic request ✓ Web browser (TCP) Web Post Service OK Cancel HelpProblemen oplossen
text_image
Currently connected to: LP4309 Internet access belkin.com No Internet access Wireless Network Connection 2 LP4309 Connected BronzeEagle HOME-C4BD NETBEAR29 JackiesPlace NETBEAR HOME-B142 Open Network and Sharing Centertext_image
Type the network security key Security key: Hide characters OK Canceltext_image
The network "BronzeEagle" requires a WPA password. Password: ******** Show password Remember this network Cancel OKSpecifications
Linksys XAC1900
Modelnaam Linksys XAC1900
Linksys XAC1900....12
Produktoversikt
XAC1900
Sett ovenfra
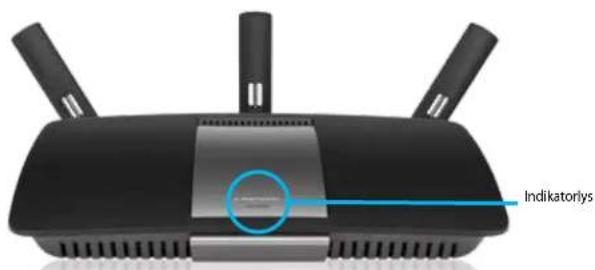
text_image
Indikatorlysnatural_image
Close-up of a black wireless device labeled 'LINKSYS' with a green indicator light, shown from two views (no additional text or symbols visible)Indikatorlys:
- Blinkende grønt lys: Power Modem starter opp og etablerer ADSL-tilkobling
• Vedvarende grønt lys: ADSL synkronisert med Internett-leverandør. - Blinkende gult lys: Fysisk tilkoblingsproblem for ADSL, f.eks. telefonledning er ikke koblet til kontakten i veggen.

Mal for veggmontering
natural_image
Diagram showing two views of a device with connectors and cables, no visible text or symbolsnatural_image
Diagram showing connections between a device, cable, and network components (no text or symbols visible)text_image
Linksys Smart Wi-Fi Sign In Add mobile devices, tablets, and TVs to your network Use your Linksys Smart Wi-Fi installed to access your home address from anywhere, at any time, even from your mobile device. Here can contact new devices, not personal content, get access to Smart Wi-Fi mobile apps, and more. For more information with here.Slik endrer du ruterinnstillingene
text_image
Device List How to get the following database and this list: My Documents Current Address You are your Microsoft You are your MicrosoftLinksys XAC-serien
Konfigurer ruteren
text_image
Guest Access Guest server: https://2019/2019 Guest server: https://2019/2019 Total guest allowed: 3 guests.- Med Sperrefunksjon kan du blokkere webområder og angi tider for Internett-tilgang.

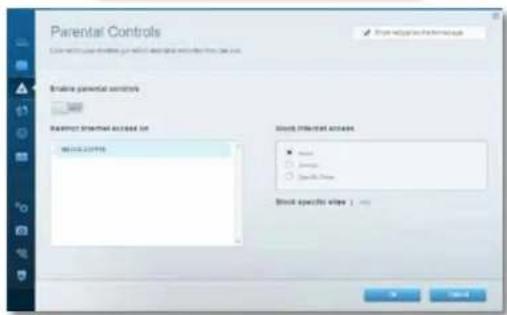
text_image
Parental Controls Create a parent's control Parental Control is selected to Stock Specific Access ■ None ○ Yes □ No. 100% Stock Specific Access ■ Yes ○ No. □ No. 100%text_image
Media Prioritization Data transfer to these services, processing and storage that protect the existing service needs. Parameters: Data partitioning on the media outlet Prioritization High Priority Normal Priority Devices Application: 100% Service Application... Online Server Service Server...- Hastighetstest – Lar deg teste nettverkets Internett-tilkoblingshastighet.

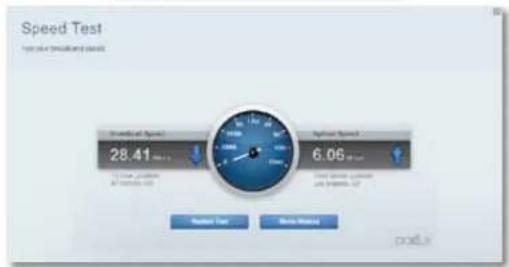
text_image
Speed Test Test your (modified) data Speed of Speed 28.41 To have problems at times 0.0 Speed Speed: 6.06 to have problems at times 0.0 New Test New MonitoringLinksys XAC-serien
Konfigurer ruteren
text_image
USB Storage External Storage Show the external storage device to include a virtual network security system that supports the system. Name: P1200000000000000000000000000000000000000000000000000000000000000000000000000000000000000000000000 Add an external storage device Currently allow the device in this configuration to open the bank or further access to the external storage system. However, the system is not currently closed or closed entirely. The system will continue to open the external storage device.text_image
Connectivity www.net & new user settings Basic Network Name and Password 1.0.0 2.0.0 3.0.0 4.0.0 5.0.0 6.0.0 7.0.0 8.0.0 9.0.0 10.0.0 11.0.0 12.0.0 13.0.0 14.0.0 15.0.0 16.0.0 17.0.0 18.0.0 19.0.0 20.0.0 21.0.0 22.0.0 23.0.0 24.0.0 25.0.0 26.0.0 27.0.0 28.0.0 29.0.0 30.0.0 31.0.0 32.0.0 33.0.0 34.0.0 35.0.0 36.0.0 37.0.0 38.0.0 39.0.0 40.0.0 41.0.0 42.0.0 43.0.0 44.0.0 45.0.0 46.0.0 47.0.0 48.0.0 49.0.0 50.0.0 51.0.0 52.0.0 53.0.0 54.0.0 55.0.0 56.0.0 57.0.0 58.0.0 59.0.0 60.0.0 61.0.0 62.0.0 63.0.0 64.0.0 65.0.0 66.0.0 67.0.0 68.0.0 69.0.0 70.0.0 71.0.0 72.0.0 73.0.0 74.0.0 75.0.0 76.0.0 77.0.0 78.0.0 79.0.0 80.0.0 81.0.0 82.0.0 83.0.0 84.0.0 85.0.0 86.0.0 87.0.0 88.0.0 89.0.0 90.0.0 91.0.0 92.0.0 93.0.0 94.0.0 95.0.0 96.0.0 97.0.0 98.0.0 99.0.0 100.0. Resource Update: ✓ Automatic Current update: 11:42 (11:42) ✓ Clear the Update: Time Zone: FAST **** Facility Time (SIA & LLC) ✓ Select the Active User to Connect Services Time: Activity Lines: • Connection active light power light use options on: OK Cancel Applytext_image
Troubleshooting Troubleshooting Settings Pig Push Pig Parking 5 Subway Push Subway Queue Subway Queue Cluster Configuration Subway Customs Internal Address Pig Push: 100% of Pug Push and Subway Subway Push Subway Queue Subway Queue Subset Subway Queue Factory reset Subway Queuetext_image
Security User and change your website Access Install Options and Settings Microsoft USB TCP network protection ✓ Accessed USB TCP network protection ✓ Accessed Mbps Mbps Fast-through Mbps Fast-through ✓ Accessed Mbps Fast-through ✓ Accessed Mbps Post Services Description Protocol Extractions View Stadium Internet Options ✓ Web browser address request ✓ Web browser ✓ Web browser traffic request ✓ Web browser (TCP) Web Post Service OK Cancel HelpFeilsøking
text_image
Currently connected to: LP4309 Internet access belkin.com No Internet access Wireless Network Connection 2 LP4309 Connected BronzeEagle HOME-C4BD NETBEAR29 JackiesPlace NETBEAR HOME-BHA2 Open Network and Sharing Centertext_image
Type the network security key Security key: Hide characters OK Canceltext_image
The network "BronzeEagle" requires a WPA password. Password: ******** Show password Remember this network Cancel OKSpesifikasjoner
Linksys XAC1900
Modellnavn Linksys XAC1900
Beskrivelse Linksys Smart Wi-Fi Modemruter AC1900
Modellnummer XAC1900
Svitsjporthastighet 10/100/1000 Mbps (Gigabit Ethernet)
Knapper Reset (Tilbakestill), Wi-Fi Protected Setup, Strøm (Kun EU-modeller)
LED-lamper Toppanel: Strøm
Baksidepanel: Internett, Ethernet (1-4)
UPnP Støttes
ADSL-standarder T1.413i2, G.992.1 (G.DMT), G992.2 (G.Lite), G.992.3 (ADSL2), G.992.5 (ADSL2+) for tillegg A, B, M, L
Linksys XAC1900....12
natural_image
Black wireless device labeled 'LINKSYS' with antenna and green indicator lights, shown from top and side (no readable text beyond branding)Wskaźnik:
natural_image
Diagram showing two views of a device with connectors and cables, no visible text or symbolsnatural_image
Pure electrical circuit lines without any symbolstext_image
Linksys Smart Wi-Fi Sign In Add mobile devices, networks, and TVs to your network Connect to: Password: Parameters: Apply your connection? Sign In Use your Linksys Smart Wi-Fi account to access your basic website from anywhere, if any time, and then you enable device. Here can contact new devices, not available controls, get access to Smart Wi-Fi regularly. Apps, and times. For more information input.text_image
Guest Access Show access to the homepage Allow guest access Guest before gateway and password: 1 or 2.1.04.3987 Email: https://www.guestaccess.org/ Email: https://www.guestaccess.org/ Email: https://www.guestaccess.org/ Total guest's allowed: 1 guest.text_image
Parental Controls Include parental controls Parental Internal access on Block Internal access ● None ○ Empty ○ Specific Use Block specific size : 100%text_image
Media Prioritization Show how to change media, processes, and functions that provide a new media profile. Previewing: High Priority Normal Priority Services Applications Service Applications Online Services Service Servicestext_image
Speed Test Test value (SMA) (ms) Strength of Speed 28.41 To test problem to test error 6.06 Test speed, cycle to test error, 0.7 Request Test Next Timing on linkLinksys XAC-Series
text_image
USB Storage External Storage Show the external storage device to provide additional internal storage services and access to the system. Add an external storage service Cancel for external storage device to the external storage system that provides additional internal storage services and access to the system.text_image
Connectivity Network Name and Password Access: 100000000000 Network Name and Password: 1.0000000000 Access: 100000000000 Network Name and Password: 1.0000000000 Router Password: 1.0000000000 Router Password: 1.0000000000 Password Updates ✓ Accessed Copyright Address: 12.43 (75862) Address Updates Current Address Time Zone LAST PRICE PAULS Time (USA & Canada) ✓ Accessed Copyright Address Time Activity Lines Crosslinker Active Light Power Light All Connections OK Cancel Helptext_image
Troubleshooting Troubleshooting Piping Ship Main Route Switch Configuration Switch configuration Switch External Address Main Route Reset Subway Connection Parity Resettext_image
Security User and change your website Access Install Options and Settings Microsoft USB TCP network protection ✓ Accessed USB TCP network protection ✓ Accessed Mbps Mbps Fast-through Mbps Fast-through ✓ Accessed Mbps Fast-through ✓ Accessed Mbps Post Services Description Protocol Extractions View Stadium Internet Options ✓ Web browser address request ✓ Web browser ✓ Web browser traffic request ✓ Web browser (TCP) Web Post Service OK Cancel Helptext_image
USB + 1 2 Wi-Fi 3 4 Reperfined Controltext_image
Currently connected to: LP4309 Internet access belkin.com No Internet access Wireless Network Connection 2 LP4309 Connected BronzeEagle HOME-C4BD NETBEAR29 JackiesPlace NETBEAR HOME-PLA2 Open Network and Sharing Centertext_image
Type the network security key Security key: Hide characters OK Canceltext_image
The network "BronzeEagle" requires a WPA password. Password: ******** Show password Remember this network Cancel OKPrzyciski Reset, Wi-Fi Protected Setup,
Normy ADSL T1.413i2, G.992.1 (G.DMT), G992.2 (G.Lite),
G.992.3 (ADSL2), G.992.5 (ADSL2+) dla
Linksys XAC1900....12
natural_image
Black wireless device labeled 'LINKSYS' with a cable, no visible text or symbols beyond the label.
Luz indicadora:
natural_image
Diagram showing two views of a device with connectors and cables, no visible text or symbolsnatural_image
Pure electrical circuit lines without any symbolstext_image
Linksys Smart Wi-Fi Sign In Add mobile devices, tablets, and TVs to your networks Local settings Password: Parameters by Language or location? Sign In Start home of www.i61.com Use your Linksys Direct Wi-Fi account to access your website for anywhere, at day 5s, and from your mobile device. Likely connect new devices, but portable networks, get access to Smart Wi-Fi mobile Agree, and more. For more information add here.text_image
Device List How to find the installed device and that calls? My Options: Select Options: Next Step Download Device List DownloadLinksys XAC-Series
Configurar o seu Router
text_image
Guest Access Show all access to the website. It is a network of guest-related and/or the website, which is being allowed to use other products or websites. Use a link to the website. Allow guest access Guest before letters and passwords 1 or 2 3.1.04.5987 English: English 4.0.01.9982 Language: Chinese Level model (password): local.mdb Total guests allowed 1 guest.text_image
Parental Controls Create parental controls Internal access to Block Internal access ● Small ○ Medium ○ Large Block specific size : 100text_image
Media Prioritization Show the media profile, content, and content that provides a format file or a web-based view. The media profile is designed to be provided in the image file. Prioritization: Not Important - 100% High Priority Normal Priority Services Application: Web Application Search Applications Online Games: Web Search Gamestext_image
Speed Test Test value (SMA) (ms) Strength of Speed 28.41 To test problem to test error 6.06 Test speed, cycle to test error, 0.7 Request Test Next Timing on linkLinksys XAC-Series
Configurar o seu Router
text_image
USB Storage External Storage Show the external storage device to include the internal storage system, including the system's components and functions. Add an external storage window Show the external storage device to include the internal storage system, including the internal storage system, including the internal storage system, and the internal storage system. The system is currently closed in the main interface.text_image
Connectivity You are new or new settings Mac OS Services (Windows) User https://www.123.com/ Network Name and Password: 1.00 A: Windows 9678-5234 B: Windows 9678-5234 C: Windows 9678-5234 Router Password: 1.00 Router Password: 1.00 FireSource Updates ✓ Active ✓ Closed Current Address: 11.42 (17):0000 Closed Access Time Zone AUST WHERE Facility: Time (SIA & Cutoff) ✓ Active ✓ Closed Access Activity Lights Transportation Activity Light: Power Light and Securitytext_image
Security User and change your website Access Install Options and Settings Microsoft USB TCP network protection ✓ Accessed USB TCP network protection ✓ Accessed Mbps Mbps Fast-through Mbps Fast-through ✓ Accessed Mbps Fast-through ✓ Accessed Mbps Post Services Description Protocol Extractions View Stadium Internet Options ✓ Web browser address request ✓ Web browser ✓ Web browser traffic request ✓ Web browser (TCP) Web Post Service OK Cancel Helptext_image
Currently connected to: LP4309 Internet access belkin.com No Internet access Wireless Network Connection 2 LP4309 Connected BronzeEagle HOME-C4BD NETBEAR29 JackiesPlace NETBEAR HOME-B142 Open Network and Sharing Centertext_image
Type the network security key Security key: Hide characters OK Canceltext_image
The network "BronzeEagle" requires a WPA password. Password: ******** Show password Remember this network Cancel OKEspecificações
Linksys XAC1900
Nome do Modelo Linksys XAC1900
Normas ADSL T1.413i2, G.992.1 (G.DMT), G992.2 (G.Lite),
G.992.3 (ADSL2), G.992.5 (ADSL2+) para Anexo A, B, M, L
Suporte de browser Internet Explorer 8 ou posterior, Firefox 4 ou posterior, Google Chrome 10 ou posterior e Safari 4 ou posterior
Ambiente
Dimensões 256 x 40 x 184 mm (10,8" x 1,58" x 7,25")
Linksys XAC1900....12
natural_image
Black wireless device labeled 'LINKSYS' with a cable, no visible text or symbols beyond the label.
Luz indicadora:
- Verde piscante: Power modem inicializando e estabelecendo conexão ADSL.
• Verde aceso: ADSL sincronizado com ISP. - Âmbar piscando: Problem

natural_image
Diagram showing two views of an electronic device with connectors and cables, no visible text or symbolsnatural_image
Pure electrical circuit lines without any symbolstext_image
Linksys Smart Wi-Fi Sign In Add mobile devices, tablets, and TVs to your networks Use your Linksys Direct Wi-Fi account to access your website from anywhere, at day 15, and from your mobile device. Any contact was devices, but portable networks, get access to Smart Wi-Fi mobile Agree, and more. For more information add here.text_image
Device List How to find the installed device and that calls? My Policy: Catalyst Service Next Step Download Device List (2017) DownloadLinksys XAC-Series
text_image
Guest Access Show account to the email Allow guest access Guest server name and password 1.0x 2.0 (5th, 2007) 100% or more Password: 100% 3.0 (5th, 2008) 100% or more Password: 100% Total guest allowed 1 person 4 To your group has been assigned to the guest server. with a link between the user's ID and location.text_image
Parental Controls Create parental controls Internal access to Block Internal access ● Small ○ Medium ○ Large Block specific size : 100text_image
Media Prioritization Show how to change media, or use the media that provides a better view of media. Provide the media to access media sites. Preview: High Priority Normal Priority Devices Applications Select Applications Online Games Select Gamestext_image
Speed Test Test rate (simulated) details Strength of Speed 28.41 100% 100% 6.06 Speed Speed Test speed, cycle and progress, 57 Options Help Next Window on linkLinksys XAC-Series
text_image
USB Storage External Storage Show the external storage device to include the internal storage system, including the system's components and functions. Add an external storage window Show the external storage device to include the internal storage system, including the internal storage system, including the internal storage system, and the internal storage system. The system is currently closed in the main interface.text_image
Connectivity You are new or new settings Mac Network Name and Password : 1.00 A: 1.00 B: 1.00 C: 1.00 D: 1.00 E: 1.00 F: 1.00 G: 1.00 H: 1.00 I: 1.00 J: 1.00 K: 1.00 L: 1.00 M: 1.00 N: 1.00 O: 1.00 P: 1.00 Q: 1.00 R: 1.00 S: 1.00 T: 1.00 U: 1.00 V: 1.00 W: 1.00 X: 1.00 Y: 1.00 Z: 1.00 Source Update: ✓ Advanced Copyright Address: 71-82 (75%) Current Update: Time Zone: APT WHERE Facility Time (SIA & Cutoff) ✓ Available for Location and Connection Time: Activity Lights: • Continuous activity light, Power light and power output: OK Cancel Nexttext_image
Security User and change your website Access Install Options and Settings Microsoft USB TCP network protection ✓ Accessed USB TCP network protection ✓ Accessed Mbps Mbps Fast-through Mbps Fast-through ✓ Accessed Mbps Fast-through ✓ Accessed Mbps Post Services Description Protocol Extractions View Stadium Internet Options ✓ Web browser address request ✓ Web browser ✓ Web browser traffic request ✓ Web browser (TCP) Web Post Service OK Cancel Helptext_image
USB + 1 2 Wi-Fi 3 4 R station Routtext_image
Currently connected to: LP4309 Internet access belkin.com No Internet access Wireless Network Connection 2 LP4309 Connected BronzeEagle HOME-C4BD NETBEAR29 JackiesPlace NETBEAR HOME-B142 Open Network and Sharing Centertext_image
Type the network security key Security key: Hide characters OK Canceltext_image
The network "BronzeEagle" requires a WPA password. Password: ******** Show password Remember this network Cancel OKEspecificações
Linksys XAC1900
Nome do modelo Linksys XAC1900
Padrões ADSL T1.413i2, G.992.1 (G.DMT), G992.2 (G.Lite),
G.992.3 (ADSL2), G.992.5 (ADSL2+) para anexos A, B, M, L
Linksys XAC1900....12
natural_image
Black wireless device labeled 'LINKSYS' with a cable and antenna (no additional text or symbols visible)
Lumină indicatoare:
text_image
Diagram showing cable connection to a device with labeled connectors and cables, highlighting a cable being inserted into the device.natural_image
Diagram showing connections between a device and two wall-mounted screens (no text or symbols visible)text_image
Linksys Smart Wi-Fi Sign In Add mobile devices, tablets, and TVs to your network Login details Password Partially sent by Telephone (email: 123457) Get up Don't have an access to a link via Use your Linksys Smart Wi-Fi installed to access your home website from anywhere, at any time, even from your mobile device. Here can contact new devices, not personal content, get access to Smart Wi-Fi mobile App, and more. For more information and here.text_image
Device List Use a list of installed devices and their icons. File Selection Current Settings Add to Remove Save As... Delete Edit As... Remove As... Save As... Add to Remove As... Save As... Add to Remove As... Add to Remove As... Add to Remove As... Add to Remove As... Add to Remove As... Add to Remove As... Add to Remove As... Add to Remove As... Add to Remove As... Add to Remove As... Add to Remove As... Add to Remove As... Add to Remove As... Add to Remove As... Add to Remove As... Add to Remove As... Add to Remove As... AddtoSeria Linksys XAC
text_image
Guest Access Guest server: https://www.guestaccess.com/ After guest access Guest server: https://www.guestaccess.com/ 1.1 (0x, 2003) 2.1 (0x, 2004) 3.1 (0x, 2005) Total guests allowed: 1 guest.text_image
Parental Controls Create a parent's control Parental Control is selected to Stock Specific Access ■ None ○ Yes □ No. 100% Stock Specific Access ■ Yes ○ No. □ No. 100%text_image
Media Prioritization Data transfer to these services, accessories and options that create a new media project. Prioritization: High Priority Normal Priority Devices Applications: 123.1.0000 Service Applications Online Services Service Servicestext_image
Speed Test Test result (precision) panel Speed of Speed: 28.41 To test, please: If needed: 0.0 Speed Speed: 6.06 to test, please: if needed: 0.0 Default Test Remove Window on WebSeria Linksys XAC
text_image
USB Storage External Storage Show the external storage device to include a virtual network security system that supports the system. Name: P1200000000000000000000000000000000000000000000000000000000000000000000000000000000000000000000000 Add an external storage device Currently allow the device in this configuration to open the bank or further access to the external storage system. However, the system is not currently closed or closed entirely. The system is closed and closed without any other access or no access to the external storage system.text_image
Connectivity www.net & new user settings Basic Network Name and Password 1.0.0 2.0.0 3.0.0 4.0.0 5.0.0 6.0.0 7.0.0 8.0.0 9.0.0 10.0.0 11.0.0 12.0.0 13.0.0 14.0.0 15.0.0 16.0.0 17.0.0 18.0.0 19.0.0 20.0.0 21.0.0 22.0.0 23.0.0 24.0.0 25.0.0 26.0.0 27.0.0 28.0.0 29.0.0 30.0.0 31.0.0 32.0.0 33.0.0 34.0.0 35.0.0 36.0.0 37.0.0 38.0.0 39.0.0 40.0.0 41.0.0 42.0.0 43.0.0 44.0.0 45.0.0 46.0.0 47.0.0 48.0.0 49.0.0 50.0.0 51.0.0 52.0.0 53.0.0 54.0.0 55.0.0 56.0.0 57.0.0 58.0.0 59.0.0 60.0.0 61.0.0 62.0.0 63.0.0 64.0.0 65.0.0 66.0.0 67.0.0 68.0.0 69.0.0 70.0.0 71.0.0 72.0.0 73.0.0 74.0.0 75.0.0 76.0.0 77.0.0 78.0.0 79.0.0 80.0.0 81.0.0 82.0.0 83.0.0 84.0.0 85.0.0 86.0.0 87.0.0 88.0.0 89.0.0 90.0.0 91.0.0 92.0.0 93.0.0 94.0.0 95.0.0 96.0.0 97.0.0 98.0.0 99.0.0 100.0. Resource Update: ✓ Automatic Current log: 11-62 (1/1/2) ✓ Clear for Updates: Time Zone: FAST 19:39:Facility Time STA & Latency: ✓ Select the location on the Internet Service Time: Activity Lines: • Select the location on the Internet Service line with a name: OK Cancel Applytext_image
Troubleshooting Troubleshooting Settings Pig Ship Pig Ship Subway must Subway must Subway must Subway must Subway must Subway must Subway must Subway must Subway must Subway must Subway must Subway must Subway must Subway must Subway must Subway must Subway must Subway must Subway must Subway must Subway must Subway must Subway must Subway must Subway must Subway should Subway should Subway should Subway should Subway should Subway should Subway should Subway should Subway should Subway should Subway should Subway should Subway should Subway should Subway should Subway should Subway should Subway should Subway should Subway should Subway should Subway should Subway should Subway should Subway should Subway shall Subway shall Subway shall Subway shall Subway shall Subway shall Subway shall Subway shall Subway shall Subway shall Subway shall Subway shall Subway shall Subway shall Subway shall Subway shall Subway shall Subway shall Subway shall Subway shall Subway shall Subway shall Subway shall Subway shall Subway shall Subway tall Subway tall Subway tall Subway tall Subway tall Subway tall Subway tall Subway tall Subway tall Subway tall Subway tall Subway tall Subway tall Subway tall Subway tall Subway tall Subway tall Subway tall Subway tall Subway tall Subway tall Subway tall Subway tall Subway tall Subway tall Subway tallesttext_image
Security User and change your website Access Install Remove/Save Microsoft FPs Pathfinding USB Port Services Internet Options ✓ User gateway address request ✓ User profile ✓ User access (TCP) access ✓ User access (TCP) USB Port Services USB Port Services USB Port Services Description Protocol Extractions View Install Add to Web Site Tools Add to Web Site ToolsDepanare
text_image
Currently connected to: LP4309 Internet access belkin.com No Internet access Wireless Network Connection 2 LP4309 Connected BronzeEagle HOME-C4BD NETBEAR29 JackiesPlace NETBEAR HOME-PLAB Open Network and Sharing Centertext_image
Type the network security key Security key: Hide characters OK Canceltext_image
The network "BronzeEagle" requires a WPA password. Password: ******** Show password Remember this network Cancel OKSpecificații
Linksys XAC1900
Nume model Linksys XAC1900
Descriere Router Modem Linksys Smart Wi-Fi AC1900
Cod model XAC1900
Viteză port switch 10/100/1000 Mbps (Gigabit Ethernet)
Standarde ADSL T1.413i2, G.992.1 (G.DMT), G992.2 (G.Lite), G.992.3 (ADSL2), G.992.5 (ADSL2+) pentru Anexa A, B, M, L
Certificări CE, Wi-Fi a/b/g/n/draft ac, Windows 7, Windows 8, DLNA
Temp. de functionare 0 - 40°C (32 - 104°F) Temp. de depozitare -20 - 60°C (-4 - 140°F)
Linksys XAC1900....12
Обзор продукта
XAC1900
Вид Сверху

natural_image
Close-up of a black wireless device labeled 'LINKSYS' with a green indicator light, shown from front and side views (no additional text or symbols visible)Световой Индикатор:
natural_image
Diagram showing two views of a device with connectors and cables, no visible text or symbolstext_image
Linksys Smart Wi-Fi Sign In If you follow up or created a Linksys Smart Wi-Fi account, please the 'Create Account' button in the upper right corner of the page. Add mobile devices, tablets, and TVs to your networks Use your Linksys Smart Wi-Fi account to access your home network from: anywhere at any time now has from your mobile device. Easily create new devices, not partial controls, get access to Smart Wi-Fi mobile Apps, are more. For more information downloads Send back onto Access Supervise Wi Target your account? Sign Don't have an account for users. English (United States)text_image
Device List Show a list of connected devices and their status. My Network Smart Devices Smart Devices COSA COSALinksys серия XAC
Настройка роутера
text_image
Guest Access Allow guest access Target server: https and passwords 2.1.04.0003 Password 8.00.0003 Password Total years allowed 1 year Show account in the image Show your best access to your best access (we have a best access, but if you have a best access) Show your best access to your best access (we have a best access, but if you have a best access)text_image
Parental Controls Use existing user-shrubs to access the parent's home. In line parental controls 100 Parental Internal Access to Stock Internal Access ● None ○ Unknown ○ Specific Press Stock specific size 1: 100%text_image
Media Prioritization Show the media types: video, image, and image that provides a media format. The media type is currently available in the media system. Prioritization: Audio/Properties / Settings Digital Priority Normal Priority Devices Applications Search Applications Online Services Search Services Canceltext_image
Speed Test Test and Directional Errors Strength and Speed 28.41 To your position to the location 6.06 Speed Test Speed Test Speed Test Control Tips Main Window orlaLinksys серия XAC
Настройка роутера
text_image
External Storage Add an external storage device Cancel the external storage device to and then add a new internal storage system (e.g. or more).text_image
Connectivity www.androgenvai.ac.uk settings Network Name and Password | 1.0x Network Address: www.njzq.com Password: www.njzq.com Router Password | 1.0x Router Password: www.njzq.com Resource Update ✓ Automatic Copyright (access) 12.62.178453 Clearer Lines Time Drive FAST: 90000000000000000000000000000000000000000000000000000000000000000000000000000000000 ✓ Select to access your network lines Activity Lines Accessing active light power light and access to the OK Cancel Canceltext_image
Troubleshooting Troubleshooting under the settings Source Description Help Ping Ping P: 100 percent Switching Ping Sub-100 percent Host Route P: 100 percent Sub-100 percent Cluster configuration Source Custom Internet Address C:\Users\100 percent\Software\and\Control Reset System Response Fantasy Resort C:\Users\100 percent\Softwaretext_image
Security File Pathstring with options: File Pathstring PFS Pathstring PFS Post Service Description Form1 Form2 Form3 Form4 Form5 Form6 Form7 Form8 Form9 Form10 Form11 Form12 Form13 Form14 Form15 Form16 Form17 Form18 Form19 Form20 Form21 Form22 Form23 Form24 Form25 Form26 Form27 Form28 Form29 Form30 Form31 Form32 Form33 Form34 Form35 Form36 Form37 Form38 Form39 Form40 Form41 Form42 Form43 Form44 Form45 Form46 Form47 Form48 Form49 Form50 Form51 Form52 Form53 Form54 Form55 Form56 Form57 Form58 Form59 Form60 Form61 Form62 Form63 Form64 Form65 Form66 Form67 Form68 Form69 Form70 Form71 Form72 Form73 Form74 Form75 Form76 Form77 Form78 Form79 Form80 Form81 Form82 Form83 Form84 Form85 Form86 Form87 Form88 Form89 Form90 Form91 Form92 Form93 Form94 Form95 Form96 Form97 Form98 Form99 Form100text_image
Currently connected to: LP4309 Internet access belkin.com No Internet access Wireless Network Connection 2 LP4309 Connected BronzeEagle HOME-C4BD NETBEAR29 JackiesPlace NETBEAR HOME-B142 Open Network and Sharing Centertext_image
Type the network security key Security key: Hide characters OK Canceltext_image
The network "BronzeEagle" requires a WPA password. Password: ******** Show password Remember this network Cancel OKLinksys XAC1900....12
Opis výrobku
XAC1900
Pohl'ad zvrchu

text_image
Indikátornatural_image
Black wireless device labeled 'LINKSYS' with a small cable and green indicator line (no readable text beyond label)
Indikátor:
natural_image
Diagram showing two views of an electronic device with connectors and cables, no visible text or symbols- Dodaný telefónny kábel a napájací kábel pripojte k modemu s napájacím zdrojom. Zasuňte modem s napájacím zdrojom do elektrickej zásuvky a telefónny kábel zapojte do telefonnej zásuvky.

flowchart
graph TD
    A["Device"] --> B["Server"]
    B --> C["Client"]
    C --> D["Data Link"]
    D --> E["External Connection"]
    style A fill:#f9f,stroke:#333
    style B fill:#ccf,stroke:#333
    style C fill:#cfc,stroke:#333
    style D fill:#fcc,stroke:#333
    style E fill:#ffc,stroke:#333
text_image
Linksys Smart Wi-Fi Sign In Add mobile devices, mobiles, and TVs to your network Local Services Password Partially Use Use your Linksys Smart Wi-Fi account to access your home network from anywhere, in any time, want to buy your mobile device. Only contact: new devices, set personal devices, get access to Smart Wi-Fi mobile Apps, and more. Sign Up Start home for your app? See linky English Alert Status For more information less thantext_image
Device List How to find the installed device is then called. My Options: Download Status: Next 10 Download Download Download DownloadLinksys XAC-Series
Nastavenie smerovača
text_image
Guest Access Show your access to the website, but currently has been accessed by a local server. This is also available to us or other sites of your website. Allow guest access Guest details: https://www.guest.com/ Guest details: http://www.guest.com/ Total guest(s) allowed 1 guest.text_image
Parental Controls Parental Controls Enable parental controls Select internal access on Stock: Internal access ■ None ○ None ○ Specific Use Stock specific wire : < img>text_image
Media Prioritization Media Prioritization Show a target on the media group. High Priority Normal Priority Services Application Service Application Device System Service Systemtext_image
Speed Test Test rate (Simulated Barrels) Speed at Speed 28.41 Speed at Speed 6.06 Speed at Speed Speed at Speed Speed at Speed Speed at Speed Speed at Speed Speed at Speed Speed at Speed Speed at Speed Speed at Speed Speed at Speed Speed at Speed Speed at Speed Speed at Speed Speed at Speed Speed at Speed Speed at Speed Speed at Speed Speed at Speed Speed at Speed Speed at Speed Speed at Speed Speed at Speed Speed at Speed Speed at Speed Speed at Speed Speed at 100% Speed at 100% Speed at 100% Speed at 100% Speed at 100% Speed at 100% Speed at 100% Speed at 100% Speed at 100% Speed at 100% Speed at 100% Speed at 100% Speed at 100% Speed at 100% Speed at 100% Speed to Speed Speed to Speed Speed to Speed Speed to Speed Speed to Speed Speed to Speed Speed to Speed Speed to Speed Speed to Speed Speed to Speed Speed to Speed Speed to Speed Speed to Speed Speed to Speed Speed to Speed Speed to Speed Speed to Speed Speed to Speed Speed to Speed Speed to Speed Speed to Speed Speed to Speed Speed to Speed Speed to Speed Speed to Speed Speed to SpeedLinksys XAC-Series
Nastavenie smerovača
text_image
USB Storage External Storage Show the external storage device to provide additional internal storage services and access to the system. Add an external storage service Cancel for external storage device to the external storage system that allows your access to existing OSOS services. Please note that this is currently available in the OSOS system.text_image
Connectivity www.net-time accounts/engg Network Name and Password | 10x USB Connection Privacy: 1000000 Data Privacy: 1000000 Data Security: 1000000 Router Password | 10x Router Security: 1000000 Firewalls Update ✓ Accessed ✓ Connected to Windows Current Update Time Zone AUDIT WORK Facilities Time (SIA & Cambridge) ✓ Connected to Windows Active Lights ✓ Connected to Windows Active Light OK Cancel Canceltext_image
Troubleshooting Troubleshooting Settings Options Description Help Ping Pick If you want to start Start: Ping 5 Start: Ping Master Route If you want to start Start: Master Route Cluster Configuration System Customs Internal Address File Set: Open Path... Forward Path... Reset Subway Position Partory Reset Start: Open Path...- Wireless (Bezdrótová siet) umožňuje nastavit bezdrótovú siet smerovača. Umožňuje zmenit režim zabezpečenia, heslo, filtrovanie adries MAC a pripojit zariadenia prostredníctvom funkcie WPS (Wi-Fi Protected Setup).
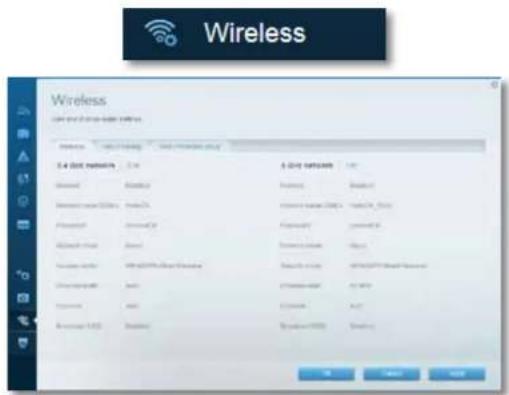
text_image
Wireless Wireless 3.4 GHz network 3.4 GHz network Internet Internet Internet Internet Internet Internet Internet Internet Internet Internet Internet Internet Internet Internet Internet Internet Internet Internet Internet Internet Internet Internet Internet Internet Internet Internet Internet Internet Internet Internet Internet Internet Internet Internet Internet Internet Internet Internet Internet Internet Internet Internet Internet Internet Internet Internet Internet Internet Internet Internet IP地址/IP地址/IP地址/IP地址/IP地址/IP地址/IP地址/IP地址/IP地址/IP地址/IP地址/IP地址/IP地址/IP地址/IP地址/IP地址/IP地址/IP地址/IP地址/IP地址/IP地址/IP地址/IP地址/IP地址/IP地址/IP地址/IP地址/IP地址/IP地址/IP地址/IP地址/IP地址/IP地址/IP地址/ IP地址/ IP地址/ IP地址/ IP地址/ IP地址/ IP地址/ IP地址/ IP地址/ IP地址/ IP地址/ IP地址/ IP地址/ IP地址/ IP地址/ IP地址/ IP地址/ IP地址/ IP地址/ IP地址/ IP地址/ IP地址/ IP地址/ IP地址/ IP地址/ IP地址/ IP地址/ IP地址/ IP地址/ IP地址/ IP地址/ IP地址/ IP地址/ IP地址/ IP address / IP address / IP address / IP address / IP address / IP address / IP address / IP address / IP address / IP address / IP address / IP address / IP address / IP address / IP address / IP address / IP address / IP address / IP address / IP address / IP address / IP address / IP address / IP address / IP address / IP address / IP address / IP address / IP address / IP address / IP address / IP address / IP address / IP address / IR address / IR address / IR address / IR address / IR address / IR address / IR address / IR address / IR address / IR address / IR address / IR address / IR address / IR address / IR address / IR address / IR address / IR address / IR address / IR address / IR address / IR address / IR address / IR address / IR address / IR address / IR address / IR address / IR address / IR address / IR address / IR address / IR address / IR Address / IR Address / IR Address / IR Address / IR Address / IR Address / IR Address / IR Address / IR Address / IR Address / IR Address / IR Address / IR Address / IR Address / IR Address / IR Address / IR Address / IR Address / IR Address / IR Address / IR Address / IR Address / IR Address / IR Address / IR Address / IR Address / IR Address / IR Address / IR Address / IR Address / IR Address / IR Address / IR Address / IR Address / IR Address / IR Address / IR Address / IR Address / IR Address / IR Address / IR Address / IR Address / IR Address / IR Address / IR Address / IR Address / IR Address / IR Address / IR Address / IR Address / IR Address / IR Address / IR Address / IR Address / IR Address / IR Address / IR Address / IR Address / IR Address / IR Address / IR Address / IR Address / IR Address / IR Address / IR Address / IR Address / IR Address / IR Website / IR Website / IR Website / IR Website / IR Website / IR Website / IR Website / IR Website / IR Website / IR Website / IR Website / IR Website / IR Website / IR Website / IR Website / IR Website / IR Website / IR Website / IR Website / IR Website / IR Website / IR Website / IR Website / IR Website / IR Website / IR Website / IR Website / IR Website / IR Website / IR Website / IR Website / IR Website / IR Website / IR Website/ IR Website / IR Website / IR Website / IR Website / IR Website / IR Website / IR Website / IR Website / IR Website / IR Website / IR Website / IR Website / IR Website / IR Website / IR Website / IR Website / IR Website / IR Website / IR Website / IR Website / IR Website / IR Website / IR Website / IR Website / IR Website / IR Website / IR Website / IR Website / IR Website / IR Website / IR Website / IR Website / IR Website / IB址 / IB址 / IB址 / IB址 / IB址 / IB址 / IB址 / IB址 / IB址 / IB址 / IB址 / IB址 / IB址 / IB址 / IB址 / IB址 / IB址 / IB址 / IB址 / IB址 / IB址 / IB址 / IB址 / IB址 / IB址 / IB址 / IB址 / IB址 / IB址 / IB址 / IB址 / IB址 / IB址 / IB址 \ IB址 \ IB址 \ IB址 \ IB址 \ IB址 \ IB址 \ IB址 \ IB址 \ IB址 \ IB址 \ IB址 \ IB址 \ IB址 \ IB址 \ IB址 \ IB址 \ IB址 \ IB址 \ IB址 \ IB址 \ IB址 \ IB址 \ IB址 \ IB址 \ IB址 \ IB址 \ IB址 \ IB址 \ IB址 \ IB址 \ IB址 \ IB址 \ IB址 \ Ib址 \ Ib址 \ Ib址 \ Ib址 \ Ib址 \ Ib址 \ Ib址 \ Ib址 \ Ib址 \ Ib址 \ Ib址 \ Ib址 \ Ib址 \ Ib址 \ Ib址 \ Ib址 \ Ib址 \ Ib址 \ Ib址 \ Ib址 \ Ib址 \ Ib址 \ Ib址 \ Ib址 \ Ib址 \ Icbit \ Icbit \ Icbit \ Icbit \ Icbit \ Icbit \ Icbit \ Icbit \ Icbit \ Icbit \ Icbit \ Icbit \ Icbit \ Icbit \ Icbit \ Icbit \ Icbit \ Icbit \ Icbit \ Icbit \ Icbit \ Icbit \ Icbit \ Icbit \ Icbit \ Ic bit \ Ic bit \ Ic bit \ Ic bit \ Ic bit \ Ic bit \ Ic bit \ Ic bit \ Ic bit \ Ic bit \ Ic bit \ Ic bit \ Ic bit \ Ic bit \ Ic bit \ Ic bit \ Ic bit \ Ic bit \ Ic bit \ Ic bit \ Ic bit \ Ic bit \ Ic bit \ Ic bit \ Ic bit \ Ic iti11111111111111111111111111111111111111111111111111111111111111111111111111111110988888888888888888888888888888888888888888888888888888888888888888888888888888888888888888888888888880000000000000000000000000000000000000000000000000000000000000000000000000000000000000000000000000000Linksys XAC-Series
Nastavenie smerovača
text_image
Security User and change your website Access Install Remove/Save Microsoft FPs Pathfinding USB Port Services Internet Options ✓ User gateway address request ✓ User profile ✓ User access (TCP) access ✓ User access (TCP) USB Port Services USB Port Services USB Port Services USB Port Services USB Port Services Description Protocol Extractions View Install New Internet Access Settings New Internet Access SettingsRiešenie problémov
text_image
Currently connected to: LP4309 Internet access belkin.com No Internet access Wireless Network Connection 2 LP4309 Connected BronzeEagle HOME-C4BD NETBEAR29 JackiesPlace NETBEAR HOME-B12 Open Network and Sharing Centertext_image
Type the network security key Security key: Hide characters OK Canceltext_image
The network "BronzeEagle" requires a WPA password. Password: ******** Show password Remember this network Cancel OKTechnické údaje
Linksys XAC1900
Názov modelu Linksys XAC1900
Opis Modemový smerovač Linksys Smart Wi-Fi AC 1900
Linksys XAC1900....12
Pregled izdelka
XAC1900
natural_image
Black wireless device labeled 'LINKSYS' with a cable and green indicator line (no readable text beyond branding)
Indikatorska lučka:
- Utripa zeleno: Električni modem se zaganja in vzpostavlja se povezava ADSL.
• Sveti zeleno: ADSL je sinhroniziran z ISP-jem. - Utripa rumena: Težava s fizično povezavo ADSL-a, će npr. telefonski kabel ni priključen v stensko vtičnico.
natural_image
Diagram showing two views of a device with connectors and cables, no visible text or symbolsnatural_image
Pure electrical circuit lines without any symbolstext_image
Linksys Smart Wi-Fi Sign In Add mobile devices, tablets, and TVs to your network Use your Linksys Smart Wi-Fi installed to access your home address from anywhere, at any time, even from your mobile device. Here can contact new devices, not personal context, get access to Smart Wi-Fi mobile apps, and more. For more information with here.Spreminjanje nastavite brskalnika
text_image
Device List Use the list of selected devices to file or access File Selection Search Options Download Download DownloadLinksys serije XAC
text_image
Guest Access Allow guest access Guest before names and passwords 1 or 2.1.04.0001 Email:ir@host Description: 3.0.00.0002 Email:ir_2019.guosen Description: User installed password: Password: Total rights allowed 1 point: 4 Show account in the email Have your name that has been received, but you have already been assigned to your name. You have your name that has been received, but you have already been assigned to your name.- Parental Controls (Starševski nadzor), će želite blokirati spletna mesta in nastavljati čase za dostop do interneta.

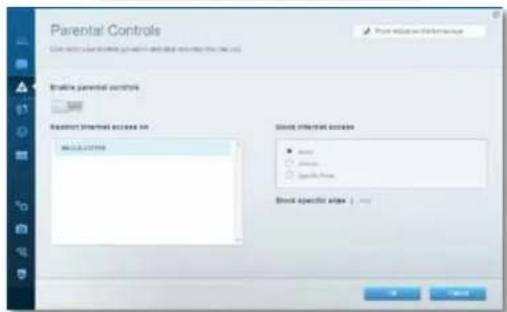
text_image
Parental Controls Use existing user-shrubs to access the parent's home. In line parental controls 100 Parental Internal Access to Stock Internal Access ● None ○ Unknown ○ Specific Press Stock Specific Sizes 1-500- Media Prioritization (Prioriteta medijev) vam omogoča nastaviti, katere naprave in aplikacije imajo prednost v vašem omrežnem prometu.

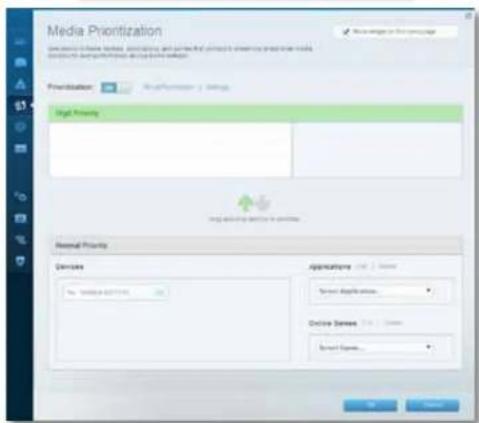
text_image
Media Prioritization Show media to ensure that, we can't change or will change the primary source of media. Show media to ensure that it is a source of media. Prioritization: High Priority Normal Priority Services Application: Search Application... Online Search: Search Search...text_image
Speed Test Test and Directional Errors Strength and Speed 28.41 To your position to the location 6.06 Speed Test Speed Test Speed Test Control Tips Main Window orlaLinksys serije XAC
text_image
USB Storage External Storage Show the external storage device to include the internal storage system, including the system's components and functions. Add an external storage window Show the external storage device to include the internal storage system, including the internal storage system, including the internal storage system, and the internal storage system. The system is currently closed in the main interface.- Connectivity (Povezljivost) vam omogoča nastaviti osnovne in napredne omrežne nastavitve.
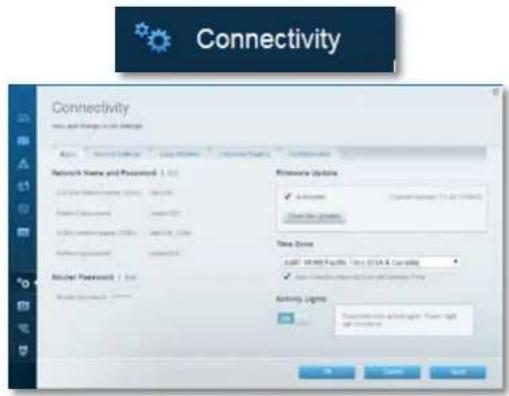
text_image
Connectivity Wire and Transfer Network Settings Network Name and Password 1.00 Access to Windows 1.00 (Windows) Password 1.00 (Windows) Wireless network 1.00 (Windows) Password 1.00 (Windows) Wireless network 1.00 (Windows) Wireless network 1.00 (Windows) Wireless network 1.00 (Windows) Wireless network 1.00 (Windows) Wireless network 1.00 (Windows) Wireless network 1.00 (Windows) Wireless network 1.00 (Windows) Wireless network 1.00 (Windows) Wireless network 1.00 (Windows) Wireless network Wireless network Wireless network Wireless network Wireless network Wireless network Wireless network Wireless network Wireless network Wireless network Wireless network Wireless network Wireless network Wireless network Wireless network Wireless network Wireless network Wireless network Wireless network Wireless network Wireless network Wireless network Wireless network Wireless network Wireless network Wireless networktext_image
Currently connected to: LP4309 Internet access belkin.com No Internet access Wireless Network Connection 2 LP4309 Connected BronzeEagle HOME-C4BD NETBEAR29 JackiesPlace NETBEAR HOME-B142 Open Network and Sharing Centertext_image
Type the network security key Security key: Hide characters OK Canceltext_image
The network "BronzeEagle" requires a WPA password. Password: ******** Show password Remember this network Cancel OKSpecifikacije
Linksys XAC1900
Ime modela Linksys XAC1900
ADSL-standardi T1.413i2, G.992.1 (G.DMT), G992.2 (G.Lite), G.992.3 (ADSL2), G.992.5 (ADSL2+) za Annex A, B, M, L
Podpora brskalnikov Internet Explorer 8 ali novejši, Firefox 4 ali novejši, Google Chrome 10 ali novejši in Safari 4 ali novejši
Okoljski podatki
| Dimenzije | 256 x 40 x 184 mm (10,8 x 1,58 x 7,25 palca) |
| Teža enote | 18,84 oz (534 g) |
| Napajanje | 12 V, 3,5A |
| Certifikati | CE, Wi-Fi a/b/g/n/draft ac, Windows 7,Windows 8, DLNA |
Temperatura za delovanje 32 do 104 °F (0 do 40 °C)
Temperatura za shranjevanje -4 do 140 °F (20 do 60 °C)
Vlažnost za delovanje od 10 do 80 % relativne vlažnosti,
brez kondenzacije
Vlažnost za shranjevanje od 5 do 90 %, brez kondenzacije
OPOMBE
natural_image
Black wireless device labeled 'LINKSYS' with a green cable at the bottom (no additional text or symbols visible)
Indikatorlampa:
natural_image
Diagram showing two views of a device with connectors and cables, no visible text or symbolsnatural_image
Simple diagram showing connections between a device, cable, and two labeled components (no text or symbols present)text_image
Linksys Smart Wi-Fi Sign In Add mobile devices, tablets, and TVs to your network Login: www.123.com Password: Partnered by: Employee password? Sign In Don't have an access to this link.text_image
Device List How to find the installed devices and use the list. My Search Search Search My Search Search Search My Search Search SearchLinksys XAC-Series
Ställa in routern
text_image
Guest Access Guest server: https://gxtg.com/ Guest server: https://gxtg.com/ After guest access Guest server: https://gxtg.com/ 1.1 (0, 200) 2.1 (0, 200) 3.1 (0, 200) Total guests allowed: 1 guest.text_image
Parental Controls Create a parent's control Parental Control is selected to Stock Specific Access ■ None ○ Yes □ No. 100% Stock Specific Access ■ Yes ○ No. □ No. 100%text_image
Media Prioritization Show options to show that, however, and then find the content to show how media priorities are available. The media prioritization is currently available. Prioritization: High Priority Normal Priority Devices Applications: 123, 100% Show Applications Online Games: 123, 100% Spread Games OK Canceltext_image
Speed Test Test your (modified) data Speed of Speed 28.41 To have problems at times 0.0 Speed Speed: 6.06 to have problems at times 0.0 New Test New MonitoringLinksys XAC-Series
Ställa in routern
text_image
USB Storage External Storage Show the external storage device to include a virtual network security system that supports the system. Name: P120000000000000000000000000000000000000000000000000000000000000000000000000000000000000000000000 Add an external storage device Currently allow the device in this configuration can be used by the server or serverless system to access these devices. However, the system will continue to use this configuration as a software tool.text_image
Connectivity www.net & new user settings Basic Network Name and Password 1.0.0 2.0.0 3.0.0 4.0.0 5.0.0 6.0.0 7.0.0 8.0.0 9.0.0 10.0.0 11.0.0 12.0.0 13.0.0 14.0.0 15.0.0 16.0.0 17.0.0 18.0.0 19.0.0 20.0.0 21.0.0 22.0.0 23.0.0 24.0.0 25.0.0 26.0.0 27.0.0 28.0.0 29.0.0 30.0.0 31.0.0 32.0.0 33.0.0 34.0.0 35.0.0 36.0.0 37.0.0 38.0.0 39.0.0 40.0.0 41.0.0 42.0.0 43.0.0 44.0.0 45.0.0 46.0.0 47.0.0 48.0.0 49.0.0 50.0.0 51.0.0 52.0.0 53.0.0 54.0.0 55.0.0 56.0.0 57.0.0 58.0.0 59.0.0 60.0.0 61.0.0 62.0.0 63.0.0 64.0.0 65.0.0 66.0.0 67.0.0 68.0.0 69.0.0 70.0.0 71.0.0 72.0.0 73.0.0 74.0.0 75.0.0 76.0.0 77.0.0 78.0.0 79.0.0 80.0.0 81.0.0 82.0.0 83.0.0 84.0.0 85.0.0 86.0.0 87.0.0 88.0.0 89.0.0 90.0.0 91.0.0 92.0.0 93.0.0 94.0.0 95.0.0 96.0.0 97.0.0 98.0.0 99.0.0 100.0. Resource Update: ✓ Automatic Current log: 11-62 (1/1/2) ✓ Clear for Updates: Time Zone: FAST 19:39:Facility Time STA & Latency: ✓ Select the location on the Internet Service Time: Activity Lines: • Select the location on the Internet Service line with a name: OK Cancel Applytext_image
Troubleshooting Troubleshooting Settings Pig Push Pig Parking 5 Subway Push Subway Queue Subway Queue Cluster Configuration Subway Customs Internal Address Pig Push: 100% of Pug Push and Subway Subway Push Subway Queue Subway Queue Subset Subway Queue Factory reset Subway Queuetext_image
Security User and change your website Access Install Remove/Save Microsoft FPs Pathfinding USB Port Services Internet Options ✓ User gateway address request ✓ User profile ✓ User access (TCP) access ✓ User access (TCP) USB Port Services USB Port Services USB Port Services Description Protocol Extractions View Install Add to Web Site Tools Add to Web Site ToolsFelsökning
text_image
Currently connected to: LP4309 Internet access belkin.com No Internet access Wireless Network Connection 2 LP4309 Connected BronzeEagle HOME-C4BD NETBEAR29 JackiesPlace NETBEAR HOME-B12 Open Network and Sharing Centertext_image
Type the network security key Security key: Hide characters OK Canceltext_image
The network "BronzeEagle" requires a WPA password. Password: ******** Show password Remember this network Cancel OKSpecifikationer
Linksys XAC1900
Modellnamn Linksys XAC1900
Beskrivning Linksys Smart Wi-Fi Modem Router AC1900
Modellnummer XAC1900
Switch-porthastighet 10/100/1000 Mbit/s (Gigabit Ethernet)
ADSL-standarder T1.413i2, G.992.1 (G.DMT), G992.2 (G.Lite),
Linksys XAC1900....12
Ürüne Genel Bakış
XAC1900
Üstten görünüm
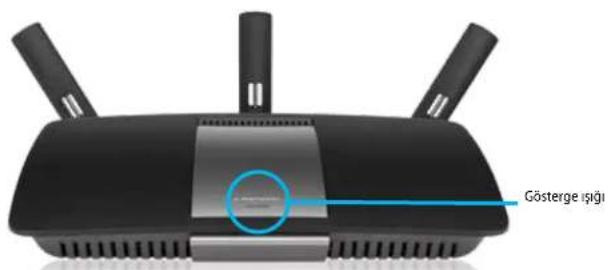
natural_image
Black wireless device labeled 'LINKSYS' with a cable and antenna (no additional text or symbols visible)
Gösterge Işığı:
natural_image
Diagram showing two views of an electronic device connected to a power cord, with no visible text or symbols.natural_image
Diagram showing connections between a device, cable, and wall-mounted components (no text or symbols)text_image
Linksys Smart Wi-Fi Sign In Add mobile devices, networks, and TVs to your network Access details Password Parameters Apply your password Sign In Send Home to account with Sign In Use your Linksys Smart Wi-Fi SignIn to access your home website from anywhere, if any time, and then you subscribe. Here can't use devices, not personal networks, get access to Smart Wi-Fi. Apply, and save. For more information provided.text_image
Guest Access Guest Access Show account in the email Allow guest access Guest behavior details and passwords 1.0 (100, 200) 2.0 (50, 100) 3.0 (100, 200) 4.0 (50, 100) 5.0 (100, 200) 6.0 (100, 200) 7.0 (100, 200) 8.0 (100, 200) 9.0 (100, 200) Total guest access * Number * This group is based on the email client's personal information. http://www.guest.com/of your job that has been used by the email client.
of your job that has been used by the email client.
text_image
Parental Controls Parental Controls Create parental controls Select internal access on: Stock internal access ■ Stock ○ Stock ● Stock Name Stock specific sites :text_image
Media Prioritization Media Prioritization Show image on the image Prioritization: Sign Priority General Priority Devices Applicators Service Applications Online Services Service Servicestext_image
USB Storage External Storage Show the external storage cover to include the internal storage system, including the system's components. Add an external storage cover Cancel the storage cover to the external storage system which is not available for any other storage types. The system is currently closed in the main storage area. If you are available for any other storage type, then it is currently closed in the main storage area. If you are available for any other storage type, then it is currently closed in the main storage area. If you are available for any other storage type, then it is currently closed in the main storage area. If you are available for any other storage type, then it is currently closed in the main storage area. If you are available for any other storage type, then it is currently closed in the main storage area. If you are available for any others, then it is currently closed in the main storage area. If you are available for any other storage type, then it is currently closed in the main storage area. If you are available for any other storage type, then it is currently closed in the main storage area. If you are available for any other storage type, then it is currently closed in the main storage area. If you are available for all other storage types, then it is currently closed in the main storage area. If you are available for all other storage types, then it is currently closed in the main storage area. If you are available for all other storage types, then it is currently closed in the main storage area. If you are available for all other storage types, then it is currently closed in the main storage area. If you are available for all other storage types, then it is currently closed in the main storage area. If you are visible for all other storage types, then it is currently closed in the main storage area. If you are visible for all other storage types, then it is currently closed in the main storage area. If you are visible for all other storage types, then it is currently closed in the main storage area. If you are visible for all other storage types, then it is currently closed in the main storage area. If you are visible for all other storage types, then it is currently closed in the main storage areas. If you are visible for all other storage types, then it is currently closed in the main storage area. If you are visible for all other storage types, then it is currently closed in the main storage area. If you are visible for all other storage types, then it is currently closed in the main storage area. If you are visible for all other storage types, then it is currently closed in the main storage area. If you are visible for all other storage types, then it is currently open in the main storage area. If you are visible for all other storage types, then it is currently open in the main storage area. If you are visible for all other storage types, then it is currently open in the main storage area. If you are visible for all other storage types, then it is currently open in the main storage area. If you are visible for all other storage types, then it is currently open in the main storage area. If you are visible for all other storage types and other storage types, then it is currently open in the main storage area. If you are visible for all other storage types and other storage types, then it is currently open in the main storage area. If you are visible for all other storage types and other storage types, then it is currently open in the main storage area. If you are visible for all other storage types and other storage types, then it is currently open in the main storage area. If you are visible for all other storage types, then it is currently open in the main storage area. If you are visible for all other storage types and other storage types, then it is currently open in the main storage area. If you are visible for all other storage types and other storage types, then it is currently open in the main storage area. If you are visible for all other storage types and other storage types (including some non-external) or other local/external physical stores (including some local/external physical stores). If you are visible for all other stored physical stores (including some local/external physical stores), then if you are current stored physical stores (including some local/external physical stores), then if you are current stored physical stores (including some local/external physical stores), then if you are current stored physical stores (including some local/external physical stores), then if you are current stored physical stores (including some local/external physical stores), then if you are current stored physical stores (including some local/external physical stores), then if you are current stored physical stores (including some local/external physical stores), then if your existing physical stores (including some local/external physical stores), then if your existing physical stores (including some local/external physical stores), then if your existing physical stores (including some local/external physical stores), then if your existing physical stores (including some local/external physical stores), then if your existing physical stores (including some local/external physical stores), then if your existing physical stores (including some local/external physical stores), then if your existing physical stores (including some local/external physical store), then if your existing physical store (including some local/external physical store), then if your existing physical store (including some local/external physical store), then if your existing physical store (including some local/external physical store), then if your existing physical store (including some local/external physical store), then if your existing physical store (including some local/external physical store), then if your existing physical store (including some local/external physical store), then if your existing physical store (including some local/external physical store), than if your existing physical store (including some local/external physical store), then if your existing physical store (including some local/external physical store), then if your existing physical store (including some local/external physical store), then if your existing physical store (including some local/external physical store), then if your existing physical store (including some local/external physical store), then if your existing physical store (including some local/external physical store), then if your existing physical store (including some local/higher physical stores), then if your existing physical store (including some local/higher physical stores), then if your existing physical store (including some local/higher physical stores), then if your existing physical store (including some local/higher physical stores), then if your existing physical store (including some local/higher physical stores), then if your existing physical store (including some local/higher physical stores), then if your existing physical store (including some local/higher physical stores), then if your existing physical store (including several high-end residential buildings), then if your existing physical store (including several high-end residential buildings), then if your existing physical store (including several high-end residential buildings), then if your existing physical store (including several high-end residential buildings), then if your existing physical store (including several high-end residential buildings), then if your existing physical store (including several high-end residential buildings), then if your existing physical store (including several high-end residential buildings), then if your existing physical store (including several high-end residential buildings), than if your existing physical store (including several high-end residential buildings), then if your existing physical store (including several high-end residential buildings), then if your existing physical store (including several high-end residential buildings), then if your existing physical store (including several high-end residential buildings), then if your existing physical store (including several high-end residential buildings), then if your existing physical store (including several high-end residential buildings), then if your existing physical store (including several high-end residential buildings), then if you are current stored at least one end of each end of each end of each end of each end of each end of each end of each end of each end of each end of each end of each end of each end of each end of each end of each end of each end of each end of each end of each end of each end of each end of each end of each end of each end of each end of each end of each end of each end of each end of each end of each end of each end of each end of each edge on the edges of the edge on the edges of the edge on the edges of the edge on the edges of the edge on the edges of the edge on the edges of the edge on the edges of the edge on the edges of the edge on the edges of the edge on the edges of the edge on the edges of the edge on the edges of the edge on the edges of the edge on the edges of the edge on the edges of the edge on the edges of the edge on the edges of the edge on the ends of the edges of the edges of the edges of the edges of the edges of the edges of the edges of the edges of the edges of the edges of the edges of the edges of the edges of the edges of the edges of the edges of the edges of the edges of the edges of the edges of the edges of the edges of the edges of the edges of the edges of the edges of the edges of the edges of the edges of the edges of the edges of the edges of the edges of the edges above a specified value.text_image
Connectivity www.androgen.com settings Basic Network Name and Password | 1.0 Local Network Security (LCC) Password (password) Accession (email) Password (password) Password (password) Router Password | 1.0 Router Password Network Address Network Address Network Address Network Address Network Address Network Address Network Address Network Address Network Address Network Address Network Address Network Address Network Address Network Address Network Address Network Address Network Address Network Address Network Address Network Address Network Address Network Address Network Address Network Address Network Address Network Address Network Address Network Address Network Address Network Address Network Address Network Address Network Address Network Addresstext_image
Troubleshooting Troubleshooting Ping Ping Master Configuration Reset External Add Text Reset to Update, Edit and Remove Reset Base Update Base Update Factory reset Base Updatetext_image
Security User and change your website Access Install Remove/Save Microsoft FPs Pathfinding USB Port Services Internet Options ✓ User gateway address request ✓ User profile ✓ User access (TCP) access ✓ User access (TCP) USB Port Services USB Port Services USB Port Services Description Protocol Extractions View Install Add to Web Site Tools Add to Web Site ToolsSorun Giderme
text_image
Currently connected to: LP4309 Internet access belkin.com No Internet access Wireless Network Connection 2 LP4309 Connected BronzeEagle HOME-C4BD NETBEAR29 JackiesPlace NETBEAR HOME-B142 Open Network and Sharing Centertext_image
Type the network security key Security key: Hide characters OK Canceltext_image
The network "BronzeEagle" requires a WPA password. Password: ******** Show password Remember this network Cancel OKSpesifikasyonlar
Linksys XAC1900
Model Adi Linksys XAC1900
Açıklama Linksys Smart Wi-Fi Modem Router AC1900
Linksys XAC1900....12
Огляд продукту
XAC1900
Вигляд зверху

natural_image
Black wireless device labeled 'LINKSYS' with a cable, no visible text or symbols beyond the label.