
GROUP - Video Conferencing System LOGITECH - Free user manual and instructions
Find the device manual for free GROUP LOGITECH in PDF.


| Product type | Video conferencing system |
| Brand | Logitech |
| Model | GROUP |
| Dimensions (L x W x H) | Approx. 23.5 x 15.2 x 5.0 cm |
| Weight | Approximately 850 g |
| Power supply | USB via hub or power adapter (5 V, 500 mA) |
| Maximum video resolution | 1920 x 1080 pixels (Full HD) |
| Field of view | 90° (diagonal) |
| Built-in microphone | Yes, omnidirectional, range up to 3 m |
| Built-in speaker | Yes, for audio playback |
| Connectivity | USB 2.0/3.0 compatible |
| Software compatibility | Zoom, Microsoft Teams, Google Meet, etc. |
| Main functions | HD video calls, audio capture, autofocus, digital zoom |
| Care and cleaning | Wipe with a soft dry or slightly damp cloth. Do not use solvents. |
| Safety | Use on a stable surface, avoid shocks and liquids. |
| Spare parts and repairability | USB cable, power adapter available as options. |
| Operating temperature | 0 °C to 40 °C |
| Warranty | 2 years (depending on country) |
Frequently Asked Questions - GROUP LOGITECH
User questions about GROUP LOGITECH
0 question about this device. Answer the ones you know or ask your own.
Ask a new question about this device
Download the instructions for your Video Conferencing System in PDF format for free! Find your manual GROUP - LOGITECH and take your electronic device back in hand. On this page are published all the documents necessary for the use of your device. GROUP by LOGITECH.
USER MANUAL GROUP LOGITECH
- 10X lossless zoom
- Camera LED
- Kensington security slot
HUB
- Hub LED
- Power
- USB
- Camera
- Speakerphone
SPEAKERPHONE
- Kensington security slot
ACCESSORIES
- Camera mount
- Hub velcro mount
- Cables clip
- Cables
- Power adapter
- Expansion Microphones
CAMERA ACCESSORIES

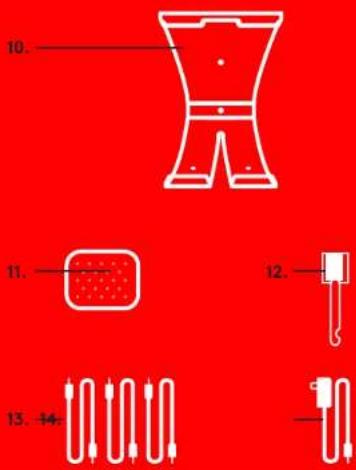
HUB
EXPANSION MICROPHONES (OPTIONAL) SPEAKERPHONE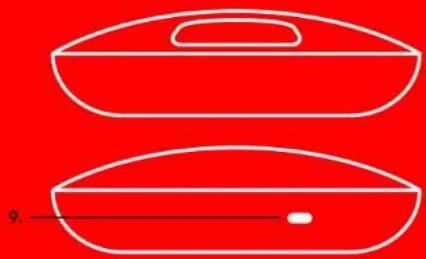

CONNECTION AND SETUP
Setup and connection to a computer
- Set the camera on the table, or using the included camera mount on the table or a wall.
- The hub can be placed on a table or mounted underneath using the included hook and loop pads.


CONNECTION AND SETUP
Setup and connection to a computer
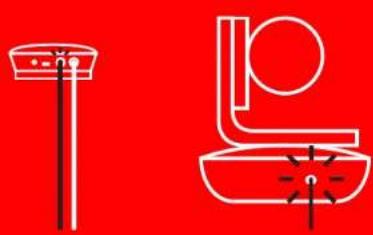
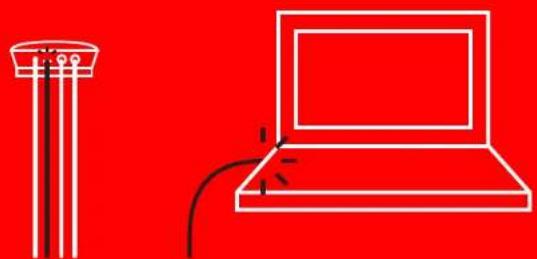
- Connect the cable between the speakerphone and hub. Simply match the colored ends of the cables to the corresponding color marks on the speakerphone and hub.
Connect the cable between the camera and hub. Simply match the colored ends of the cables to the corresponding color marks on the camera and hub.
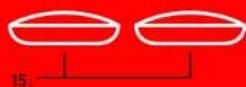
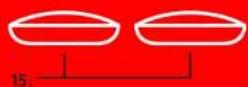
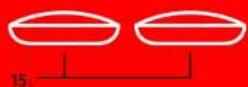
If you're using the optional Expansion Microphones, connect them to the appropriate jacks on the bottom of the speakerphone. Please use only these microphones with GROUP; use of other microphone can damage GROUP and the microphones and may void the warranty.


CONNECTION AND SETUP
Setup and connection to a computer
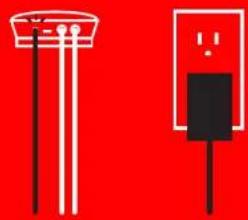
Press the cables into the slots on the bottom of the speakerphone.
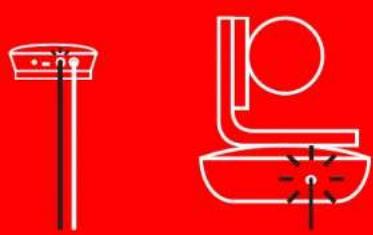
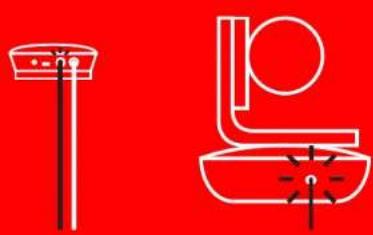
Connect the power cable to the hub and plug in the power adapter. The display on the speakerphone will turn on and show the Logitech logo when powered.
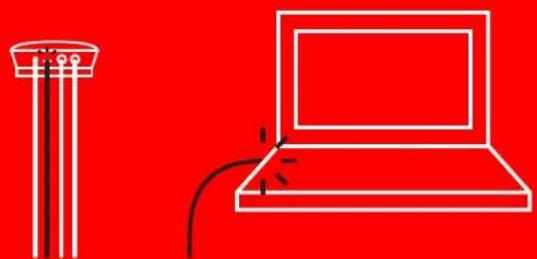
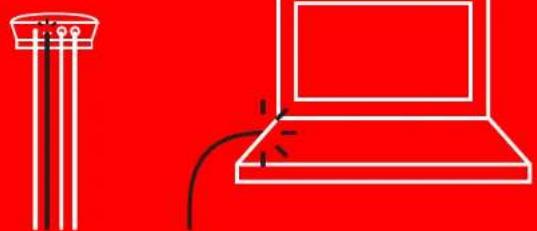
- Connect the hub to a USB port on your computer. The speakerphone display will also prompt you to make this connection. The camera and the Activity light will flash to show that connection is taking place, and when completed, the camera head will rotate and the speakerphone will play a sound. If these activities do not take place, try again and then consult Troubleshooting or contact technical support


CONNECTION AND SETUP
Setup and connection to a computer
5. Attaching cable lock
- Attach Cable Lock to cable end that connects to the camera. • Plug Cable Lock into the slot of the housing of the camera
- Rotate the Cable Lock clockwise to lock the cable
A. B.
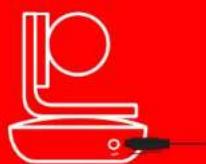
C.
- Optional: connect computer to external display such as a television, monitor or projector.
Note regarding longer cables: GROUP includes 5m/16' cables to connect the speakerphone and camera to the hub. Extending this length while maintaining picture quality requires amplified cables. Please see the Complimentary Solutions page at www.logitech.com/LCP-compsolutions for options.


CONNECTING TO BLUETOOTH® DEVICE
To connect GROUP to your mobile device:
- If your device is NFC enabled, touch the mobile device to the NFC icon on the speakerphone, which should enable Bluetooth acceptance on the mobile device OR
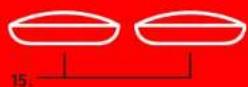
- Hold down the Bluetooth button until the Activity light on the speakerphone starts blinking blue rapidly. Follow the instructions on your mobile device to pair with Bluetooth.
Note: When GROUP is paired and connected, the Bluetooth icon on the speakerphone will appear bright. When paired but not connected, it will be greyed out.
GROUP cannot pair to Bluetooth while streaming to USB. If an attempt is made to pair to a mobile device while in a USB call, an error beep will sound. Please wait until the USB call is complete before pairing your mobile device.
USING LOGITECH GROUP
Video and audio
- Ensure GROUP is selected as the microphone, speaker and camera in your video application.
- Simply start a call in your video application to use GROUP for HD video and high quality audio. The Activity light will be blue when video is streaming.
Audio only with Bluetooth
- Ensure GROUP is paired and connected to your mobile device as outlined in Connection and Setup. Place a call on your mobile device and enjoy the improved audio experience via the GROUP speakerphone.
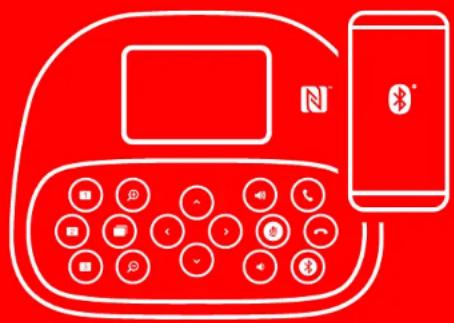


REMOTE and EXPANSION MICROPHONES
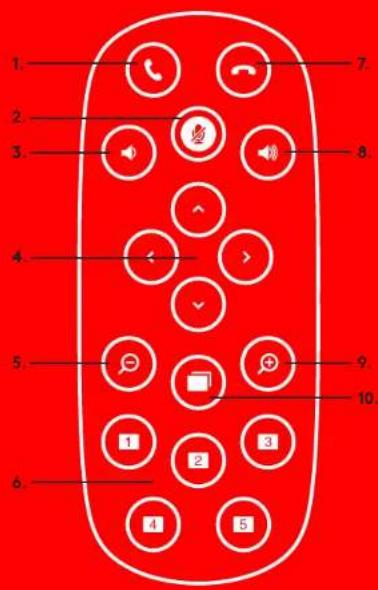
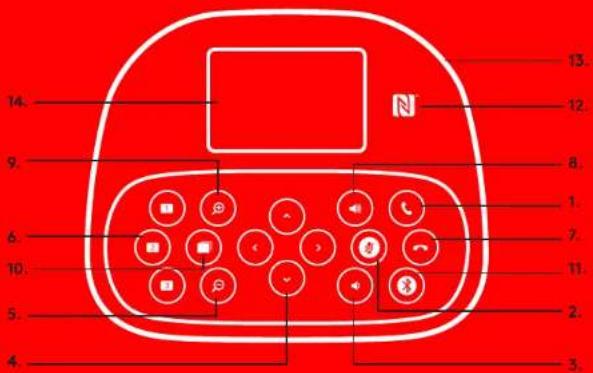
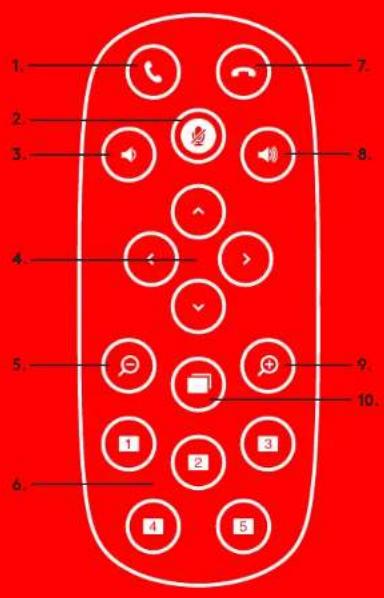
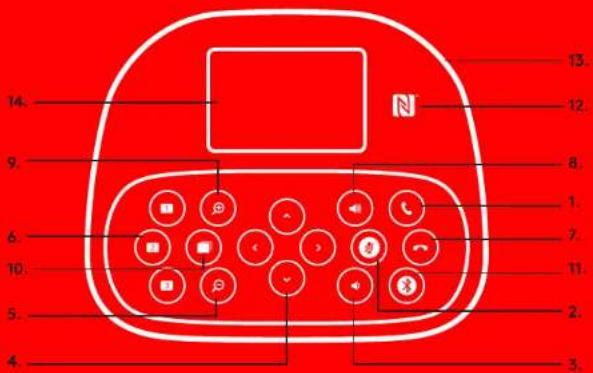
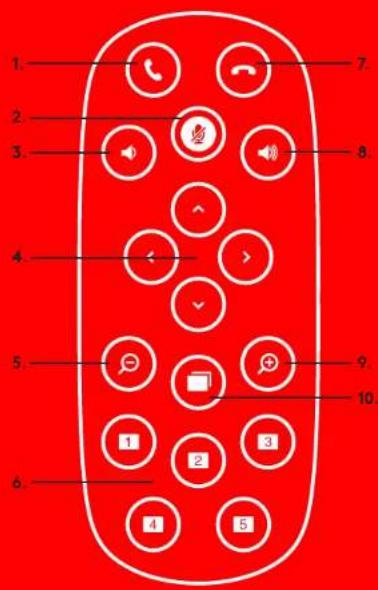
- Call answer
- Microphone mute
- Volume down
- Camera pan/tilt
- Camera zoom out
- Camera presets
- Call end
- Volume up
- Camera zoom in
- Near/For camera control
- Remote battery door. The GROUP remote control runs on a LI-ion CR2032 battery. Battery life will vary based on usage.

- Answers incoming calls in supported applications
- Note: Call Answer and End buttons may not work in some applications so simply use your video application to answer and end calls. To enable answer and end buttons for Skype or Cisco Jabber, please download the respective plug-ins available from www.logitech.com/support/group
- Mutes the microphones
- Decreases the speaker volume.
- Pans and tilts the camera. Press once for incremental or press and hold for continuous pan or tilt. Caution. Do not manually rotate the camera as doing so may cause damage.
- Zooms the camera out.
- Camera Presets: GROUP has 5 camera presets (1 through 3 are on both the remote and the speakerphone and 4 & 5 are on the remote) that allow you to position the camera at a preset location with a push of a button. To set the camera preset, move the camera to the desired location and then press and hold the Camera Preset button until the associated icon shows on the display and a beep plays to confirm the setting.
- Ends the current call in supported applications
- Increases the speaker volume

- Zooms the camera in up to 10x.
- Near/Far camera control: In supported applications this button allows you to control the pan, tilt and zoom of a remote GROUP, ConferenceCam CC3000e or a ConferenceCam BCC950. Some applications support this feature natively, others can be enabled by using an application that can be downloaded from www.logitech.com/support/group. Please visit the download page listed for more information.
- Bluetooth pairing button. Please see Connection and Setup section for more information.
- NFC antenna location. Place your NFC enabled mobile device here to initiate Bluetooth pairing.
- Speakerphone Activity light indications:
• Blue - GROUP is in active call. - Blinking blue — incoming call - Blinking blue light in call — Call has been put on hold (via hold function in application) • Rapid blinking blue – in Bluetooth pairing mode • Speakerphone blue activity light may not function in some applications. • Red - Audio is muted
- Display will show call activity as well as volume and connectivity status.
- Kensington Security Slot for securing the speakerphone and camera.
VISIT PRODUCT CENTRAL
Discover your product's full potential
Get valuable information and usage tips by browsing easy-to-use FAQs. Find answers to product questions and get help setting up your product. See if there's software available for download that can enhance your product experience. To enjoy all the benefits of your Logitech product, visit www.logitech.com/support/group and take advantage of Logitech's wide range of useful support services:
- Product information
- Tutorials
- Troubleshooting
- Diagnostics
- Firmware upgrades
- Support community
- Software downloads
- In-box documentation
- Warranty Information
- Spare parts
Troubleshooting tips
Please visit www.logitech.com/support/group for troubleshooting tips, information on software tools and for a diagnostic tool to help troubleshoot issues you may have with GROUP.
CAMERA
- 10x lossless zoom
- Camera LED
- Kensington Security Slot
HUB


CONNECTING TO A BLUETOOTH® DEVICE


CONNECTION AND SETUP

CONNECTION AND SETUP

CONNECTION AND SETUP
CONNECTING TO A BLUETOOTH® DEVICE


EXTENSION MICROPHONES AND REMOTE MICROPHONES


CONNECTING TO A BLUETOOTH® DEVICE


REMOTE CONTROL AND EXPANSION MICROPHONES






CONNECT TO THE BLUETOOTH® DEVICE


REMOTE CONTROL and EXPANSION MICROPHONES
SPEAKER
- Hub LED
- Aar/vuit
- USB
- Camera
- Speakerphone
SPEAKERPHONE
- Kensington security slot
ACCESSORIES

CONNECT AND INSTALL


CONNECT AND INSTALL
CONNECT AND INSTALL
CONNECTING TO A BLUETOOTH® DEVICE


EXTERNAL MICROPHONES AND EXPANSION MICROPHONES
GO TO PRODUCT CENTRAL
(1) January 1, 2014
CONNECTION AND CONFIGURATION


CONNECTION AND CONFIGURATION

CONNECTION AND CONFIGURATION

CONNECTING TO A BLUETOOTH® DEVICE
Connect GROUP to your mobile device:



REMOTE AND EXPANSION MICROPHONES

CONNECTION AND CONFIGURATION
CONNECTION AND CONFIGURATION

CONNECTION AND CONFIGURATION
CONNECTING TO A BLUETOOTH® DEVICE



REMOTE AND EXPANSION MICROPHONES
CONNECTION AND SETUP
CONNECTION AND SETUP
CONNECTION AND SETUP
Setup and connection to a computer

CONNECTION AND SETUP
CONNECTING THE BLUETOOTH® DEVICE



REMOTE CONTROL AND EXTENSION MICROPHONES
- Answer a call
- Microphone on/off
- Volume down
- Camera pan/tilt
- Camera zoom out
- Camera presets
- End a call
- App volume
- Camera zoom in
- Camera controls near/far in front
- Battery compartment on remote control. The GROUP remote control uses one Li-ion CR2032 battery. Battery life depends on usage.
VISIT THE PRODUCT CENTER

CONNECTING AND SETUP

CONNECTING AND SETUP
CONNECTING TO A BLUETOOTH® DEVICE


CONNECTING AND SETUP


CONNECTING AND SETUP


CONNECTING AND SETUP
A. The following table is in English:
B.
C.


CONNECTION AND SETUP

CONNECTION AND SETUP
Connector for reporters


(2) projection
CONNECTION AND SETUP


CONNECTION AND CONFIGURATION

CONNECTION AND CONFIGURATION
CONNECTING TO A BLUETOOTH® DEVICE


REMOTE CONTROL AND EXTENSION MICROPHONES
GO TO THE PRODUCT CENTRAL PAGE


CONNECTING TO A BLUETOOTH®-CAPABLE DEVICE


ADAPTER

CONNECTION AND SETUP

CONNECTION AND SETUP
CONNECTING TO A BLUETOOTH® DEVICE


REMOTE CONTROL and EXTENSION MICROPHONES

CONNECTION AND SETUP


CONNECTION AND SETUP
Setup and connection to the computer
Snap the cables into the holes on the bottom of the speakerphone.

CONNECTION AND SETUP
Setup and connection to the computer
CONNECTING TO A BLUETOOTH® DEVICE
Connecting the GROUP camera to your mobile device:


REMOTE CONTROL and EXTENSION MICROPHONES
- Answer call
- Mute microphone
- Decrease volume
- Pan/tilt camera
- Detach camera
- Camera presets
- End call
- Increase volume
- Zoom in camera
- Camera control near/far
- Remote control battery cover. The GROUP camera remote control is powered by a CR2032 Li-ion battery. Battery life varies depending on usage.


CONNECTION AND SETUP

CONNECTION AND SETUP
CREATING A CONNECTION WITH A BLUETOOTH® DEVICE


REMOTE CONTROL and WIDE-RANGE MICROPHONES

CONNECTION AND SETUP
Setup and connection to a computer
CONNECTION AND SETUP
Setup and connection to a computer
- Connect the microphone and speaker to the hub with a cable. Both cable ends and the connection points on the microphone, speaker, and hub are color-coded – you just need to match the colors.

CONNECTION AND SETUP
Setup and connection to a computer

(1) January 2014
CONNECTION WITH A "BLUETOOTH"® DEVICE


REMOTE and ADDITIONAL MICROPHONES

CONNECTION AND SETUP

CONNECTION AND SETUP
CONNECTING TO A BLUETOOTH® DEVICE


REMOTE AND EXTENSION MICROPHONES


(1) January 1, 2017
Cable connection




(1) January 1, 2019

CONNECTING TO A BLUETOOTH DEVICE


REMOTE AND EXTENSION MICROPHONES

CONNECTION AND SETUP
Setup and connection to a computer
- Place the camera on a table or use the included camera mount to attach it to a table or wall.
- The hub can be placed on a table or mounted under a table using the included Velcro pads.


CONNECTION AND SETUP
Setting up and connecting to a computer
- Connect the cable between the speaker and the hub. Simply connect the colored cable ends to the corresponding color-coded terminals on the speaker and the hub.
Connect the cable between the camera and the hub. Simply connect the colored cable ends to the corresponding color-coded terminals on the camera and the hub.
If you are using additional microphones for expansion, connect them to the appropriate jacks on the underside of the speaker. Use only the microphones that came with the GROUP; using other microphones may damage the GROUP and the microphones and may void the warranty.


CONNECTION AND SETUP
Setting up and connecting to a computer
Press the cables into the channels on the underside of the speaker.

CONNECTION AND SETUP
Setting up and connecting to a computer
5. Attaching the cable clip
- Attach the clip to the end of the cable that connects to the camera.
- Insert the cable clip into the slot on the camera housing. • Turn the cable clip to the right to secure the cable.
A.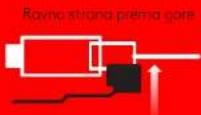
B.
C.
CONNECTING TO A BLUETOOTH® DEVICE
Connecting the GROUP to a mobile device:
- If the device supports NFC, touch the NFC icon on the speaker with your mobile device to accept the Bluetooth connection on the mobile device OR
- Press and hold the Bluetooth button until the blue activity light on the speaker starts blinking rapidly. Follow the mobile device's instructions for Bluetooth pairing.


REMOTE CONTROL and EXTENSION MICROPHONES
- Answering a call
- Muting the microphone
- Muting the sound
- Continuous camera pan/tilt
- Reducing the camera image
- Preset camera positions
- Ending a call
- Increasing the volume
- Camera image enlargement
- Close/distant camera control
- Remote control battery cover. The GROUP remote control works with a Li-Ion CR2032 battery. Battery life depends on frequency of use.


CONNECTION AND SETUP


CONNECTION AND SETUP

CONNECTION AND SETUP

CONNECTING WITH A BLUETOOTH® DEVICE


REMOTE and EXTENSION MICROPHONES
- Answering a call
- Muting the microphone
- Muting the sound
- Horizontal/vertical camera movement
- Zooming out the camera
- Camera initial settings
- Call end
- Volume up
- Camera zoom in
- Camera near/far control
- Battery compartment cover for remote. The GROUP remote control is powered by a CR2032 Li-ion battery. Battery life depends on usage.

SPEAKER
- Answers incoming calls in supported applications.
- Note: The call answer and end buttons may not work in some applications, in which case simply use the video application to answer and end calls. To enable the call answer and end buttons for Skype and Cisco Jabber, download the additional components available at www.logitech.com/support/group.
- Temporarily mutes the microphones.
- Decreases the volume on the speaker
- Moves the camera vertically and horizontally. Press once for gradual movement or press and hold for continuous horizontal and vertical movement. Caution: Do not rotate the camera by hand, as this may cause damage.
- Decreases camera zoom
- Camera presets: GROUP has 5 camera presets (1 to 3 are on both the remote and the speaker, and 4 and 5 are on the remote) that allow you to position the camera to a preset position with the press of a button. To set a camera preset, move the camera to the desired position and then press and hold the preset button until the corresponding icon appears on the screen and an audio signal confirms the setting.
- Ends the current call in supported applications.
- Increases the speaker volume.
- Zooms in up to 10x with the camera.
- Camera near/far control: This button allows you to control pan, tilt, and zoom of a remote GROUP, ConferenceCam CC3000e, or ConferenceCam BCC950 in supported applications. Some applications natively support this function, while others can enable it using an app that can be downloaded from www.logitech.com/support/group. For more information, visit the download page.
- Bluetooth pairing button. For more information, see the Connecting and setting up section.
- NFC antenna location. Place your NFC-enabled mobile device here to initiate Bluetooth pairing.
- Speaker activity light indicators
- Blue - GROUP is in an active call. • Blinking blue — incoming call
- During a call, blinking blue lights — call is on hold (via the hold function in the application)
- Fast blinking blue — in Bluetooth pairing mode.
- In some applications, the blue speaker activity light may not work. • Red — audio is muted.
- The screen will show call activity, as well as volume and connection status.
- Kensington security slot for securing the screen and camera.
PRODUCT CENTER
Discover the full potential of your product. Find valuable information and tips for use by browsing the easy-to-use FAQ section. Find answers to product questions and get help setting up your product. Check for available software downloads that can enhance your product experience. To enjoy all the benefits of Logitech products, visit www.logitech.com/support/group and take advantage of a wide range of helpful support services from Logitech:
- Product information
- Instructions
- Troubleshooting guide
- Diagnostics
Firmware updates
- Support community
- Software downloads
- Packaged documentation
- Warranty information
- Spare parts
ADDITIONAL MICROPHONE (OPTIONAL)
CONNECTION AND SETUP

CONNECTION AND SETUP

CONNECTING TO THE BLUETOOTH® DEVICE
Connecting the GROUP device to a mobile device:


REMOTE, ADDITIONAL MICROPHONES

CONNECTING AND CONFIGURING
CONNECTING AND CONFIGURING


CONNECTING AND CONFIGURING

CONNECTING AND CONFIGURING

CONNECTING TO THE BLUETOOTH® DEVICE


REMOTE AND EXTENSION MICROPHONES

CONNECTION AND SETUP

CONNECTION AND SETUP
CONNECTING TO THE BLUETOOTH® DEVICE


REMOTE CONTROL AND EXTRA MICROPHONES







תְרָה בַרִי לְרָה


一、召开情况
תְקַרָה בְּרָה
בַרְשָׁה בִרְשָׁה
תְקַרָה בְּרָה
בַרְשָׁה בְּרִיֹתָה
16/05 16:05 16:05 16:05 16:05 16:05 16:05 16:05 16:05 16:05 16:05 16:05 16:05 16:05 16:05 16:05 16:05 16:05 27 www.logitech.com/ www.logitech.com/ LCP-compsolutions for options

- 2015
BLUETOOTH®
GROU
NFC-הַרְשָׁהִיֹתְרָהִיֹתְרָהִיֹתְרָהִיֹתְרָהִיֹתְרָהִיֹתְרָהִיֹתְרָהִיֹתְרָהִיֹתְרָהִיֹתְרָהִם
in 10:00:00:00 Bluetooth
jogon jogon


11 Bluetooth-7
© 2005: Logitech, Logitech, Logitech level other Logitech marks are owned by Logitech and may not be registered. The information shown above is registered trademarks owned by Bluetooth IPCS, Inc. and any use of all such media by Logitech is under license. "The TV Music is a trademark for registered trademarks of NPC Forum, Inc. All other trademarks are the property of their respective owners. It should consider research advice by any other method that may appear in this material information contained herein as a subject to change without notice.
621-000725.002


- HUB
- SPEAKERPHONE
- ACCESSORIES
- CAMERA ACCESSORIES
- CONNECTION AND SETUP
- SETUP AND CONNECTION TO A COMPUTER
- ATTACHING CABLE LOCK
- CONNECTING TO BLUETOOTH® DEVICE
- USING LOGITECH GROUP
- VIDEO AND AUDIO
- AUDIO ONLY WITH BLUETOOTH
- REMOTE AND EXPANSION MICROPHONES
- VISIT PRODUCT CENTRAL
- TROUBLESHOOTING TIPS
- CAMERA
- CONNECTING TO A BLUETOOTH® DEVICE
- EXTENSION MICROPHONES AND REMOTE MICROPHONES
- REMOTE CONTROL AND EXPANSION MICROPHONES
- CONNECT TO THE BLUETOOTH® DEVICE
- SPEAKER
- CONNECT AND INSTALL
- EXTERNAL MICROPHONES AND EXPANSION MICROPHONES
- GO TO PRODUCT CENTRAL
- CONNECTION AND CONFIGURATION
- CONNECTING THE BLUETOOTH® DEVICE
- REMOTE CONTROL AND EXTENSION MICROPHONES
- VISIT THE PRODUCT CENTER
- CONNECTING AND SETUP
- GO TO THE PRODUCT CENTRAL PAGE
- CONNECTING TO A BLUETOOTH®-CAPABLE DEVICE
- ADAPTER
- SETUP AND CONNECTION TO THE COMPUTER
- CREATING A CONNECTION WITH A BLUETOOTH® DEVICE
- REMOTE CONTROL AND WIDE-RANGE MICROPHONES
- CONNECTION WITH A "BLUETOOTH"® DEVICE
- REMOTE AND ADDITIONAL MICROPHONES
- REMOTE AND EXTENSION MICROPHONES
- CONNECTING TO A BLUETOOTH DEVICE
- SETTING UP AND CONNECTING TO A COMPUTER
- ATTACHING THE CABLE CLIP
- CONNECTING WITH A BLUETOOTH® DEVICE
- PRODUCT CENTER
- CONNECTING TO THE BLUETOOTH® DEVICE
- REMOTE, ADDITIONAL MICROPHONES
- CONNECTING AND CONFIGURING
- REMOTE CONTROL AND EXTRA MICROPHONES
- תְקַרָה בְּרָה
- BLUETOOTH®
Brand : LOGITECH
Model : GROUP
Category : Video Conferencing System