
PTZ Pro 2 - Video Conferencing System LOGITECH - Free user manual and instructions
Find the device manual for free PTZ Pro 2 LOGITECH in PDF.

| Product Type | Video conferencing system |
| Brand | Logitech |
| Model | PTZ Pro 2 |
| Optical zoom | 10x lossless |
| Motion functions | Pan, tilt, zoom (PTZ) |
| Camera presets | 3 programmable positions |
| Control | Infrared remote control with CR2032 battery |
| Connection | USB 2.0 (cable included) |
| Power | External power adapter (included) |
| LED indicator | Indicates connection and video streaming |
| Security slot | Kensington® lock |
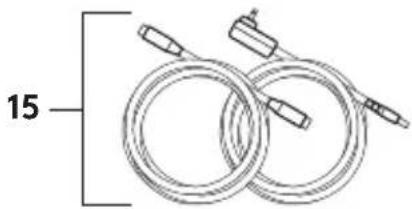
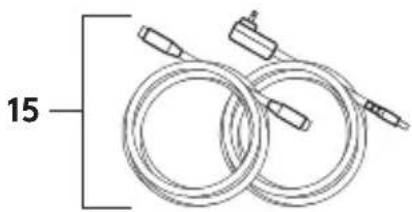
| Included accessories | Camera mount, mounting clip, remote control, cables |
| Software compatibility | Video conferencing applications, Logitech Camera Settings software |
| Technical support | www.logitech.com/support/ptz2 |
| Warranty | Manufacturer warranty (see provided documentation) |
| Maintenance | Clean the lens with a soft, dry cloth; do not use abrasive products |
| Safety | Do not manually rotate the camera; use the Kensington lock to prevent theft |
| Repairability | Spare parts available on request; contact technical support |
Frequently Asked Questions - PTZ Pro 2 LOGITECH
User questions about PTZ Pro 2 LOGITECH
0 question about this device. Answer the ones you know or ask your own.
Ask a new question about this device
Download the instructions for your Video Conferencing System in PDF format for free! Find your manual PTZ Pro 2 - LOGITECH and take your electronic device back in hand. On this page are published all the documents necessary for the use of your device. PTZ Pro 2 by LOGITECH.
USER MANUAL PTZ Pro 2 LOGITECH
natural_image
Black and white photo of a desktop computer with a curved screen and remote control (no visible text or symbols)logitech®
3 ENGLISH
8 DEUTSCH
13 FRANÇAIS
18 ITALIANO
23 ESPAÑOL
28 PORTUGUÊS
33 NEDERLANDS
38 SVENSKA
43 DANSK
48 NORSK
53 SUOMI
58 ΕΛΛΗΝΙΚΑ
63 ПО-РУССКИ
68 PO POLSKU
73 MAGYAR
78 ČESKÁ VERZE
83 SLOVENČINA
88 УКРАЇНСЬКА
93 EESTI
98 LATVISKI
103 LIETUVIŲ
108 БЪЛГАРСКИ
113 HRVATSKI
118 SRPSKI
123 SLOVENŠČINA
128 ROMÂNĂ
133 TÜRKÇE
لعربيya 138
143
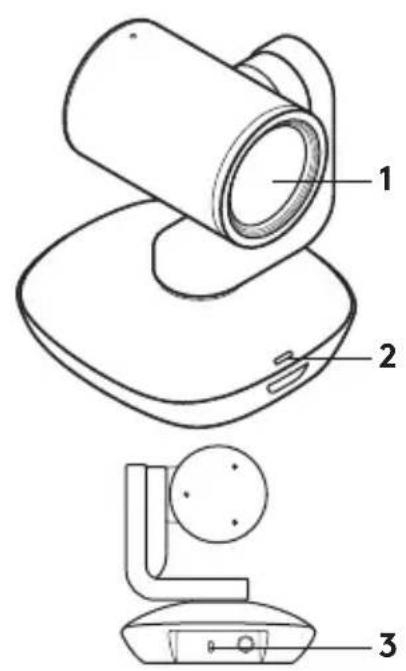
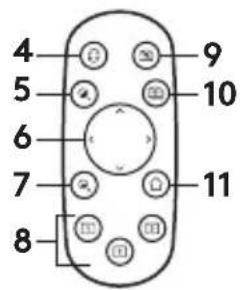
KNOW YOUR PRODUCT


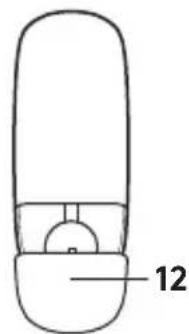
Camera
- 10X lossless zoom
- Camera LED
- Kensington® Security Slot
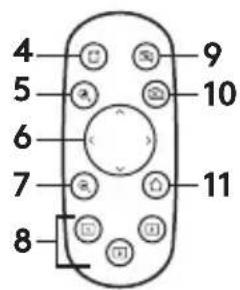
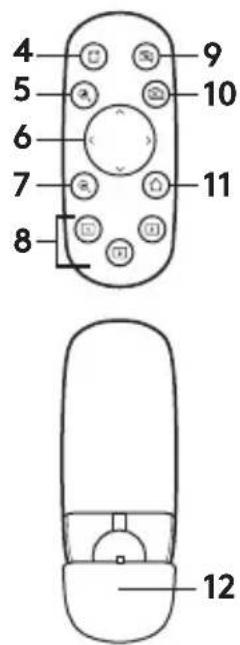
Remote
- Mirror
- Zoom in
- Pan and tilt
- Zoom out
-
Camera presets 1, 2, and 3
-
Video mute
- Far end control
- Home
- Remote battery door
Accessories
- Camera mount
- Cable lock
- Cables
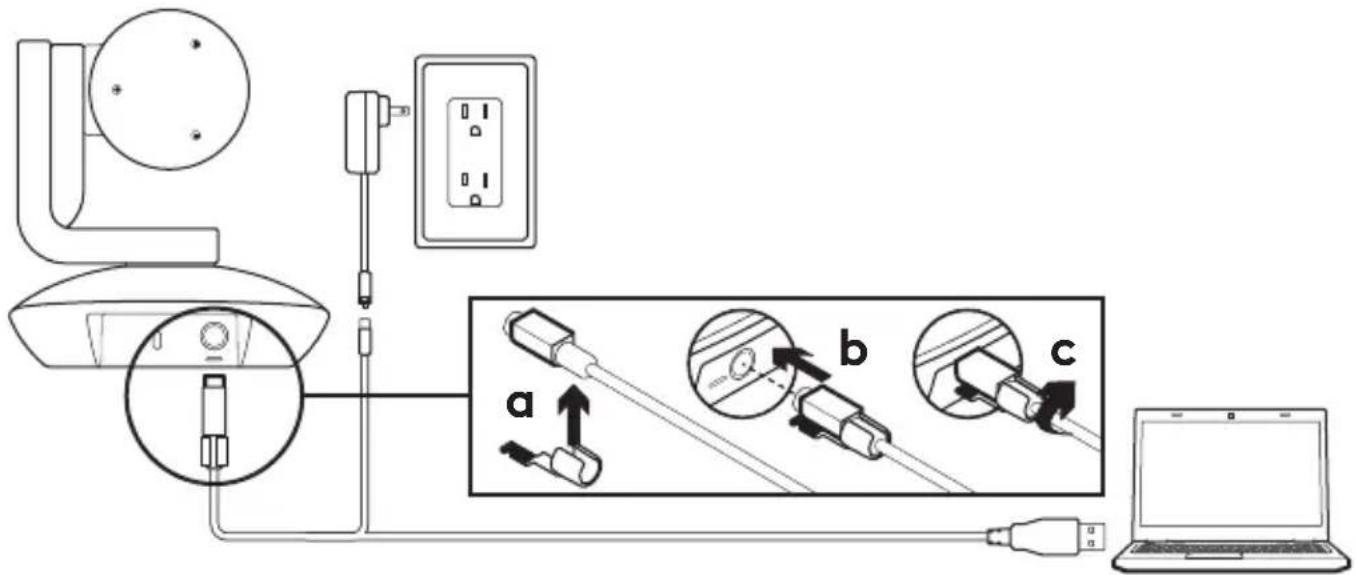
SET UP YOUR PRODUCT

- Set up camera by placing on table or by using camera mount on table or wall.
- Attach cable lock before plugging the cable into the camera port.
- Connect to external power.
-
Connect the USB cable to your computer.
-
The camera LED will flash when the camera is connecting. Once complete, the camera head will rotate.
- If the camera cannot connect, try again. If issues persist, consult www.logitech.com/support/ptz2 or call technical support.
- Start your video call from your application. The camera LED will illuminate when streaming.
VISIT PRODUCT CENTRAL
Discover your product's full potential. Get valuable information and usage tips by browsing easy-to-use FAQs. Find answers to product questions and get help setting up your product. See if there's software available for download that can enhance your product experience.
To enjoy all the benefits of your Logitech product, visit www.logitech.com/support/ptz2 and take advantage of Logitech's wide range of useful support services.
- Troubleshooting
- Diagnostics
- Firmware upgrades
- Support community
- Software downloads
- In-box documentation
- Warranty information
- Spare parts (if available)
USE YOUR PRODUCT
Video
- Starting the video: Video will start once a video call/capture session is opened and the camera is selected. The camera LED will illuminate when the video is streaming.
- Pan and tilt the camera using the remote control. Press once for incremental movement or press and hold for continuous pan or tilt. Caution: Do not manually rotate webcam head. Doing so may damage unit.
- Zoom the camera up to 10X by pressing the zoom button.
- Home: Press the Home button to return to the default, out-of-box home position.
- Camera presets: You can set up to 3 preset positions. First, position the camera using the pan and tilt controls, and then press and hold one of the preset buttons for 3 seconds to save that position. You may return to your defined position at any time by pressing the preset button once.
Use Preset 1 as your own defined "home" position. When the camera is reconnected to the PC, it will return to the position set in Preset 1. If no position is set for Preset 1, the camera will return to the default home position.
All three presets are by default set to the out-of-box home.
- Far end control: This function allows you to control the pan, tilt, and zoom of any remote Logitech ConferenceCam or select Logitech Webcams. Some applications support this feature natively, while others can be enabled by using an application downloaded from www.logitech.com/support/ptz2. Please visit the download page listed for more information.
- Camera settings application: You can use this program to control the pan, tilt, zoom, focus, and image quality (like brightness and contrast) of the camera from your computer. This application can be downloaded from www.logitech.com/support/ptz2.
Mounting your camera Changing the remote control battery

The PTZ Pro 2 remote control runs on a Li-ion CR2032 battery. Battery life will vary based on usage.
TROUBLESHOOTING TIPS
Please visit www.logitech.com/support/ptz2 for troubleshooting tips, information on software tools, and for a diagnostic tool to help troubleshoot issues you may have with your PTZ Pro 2.
PRODUKT AUF EINEN BLICK


Kamera
- 10-fach verlustfreier Zoom
- Kamera-LED
- Kensington® Security Slot
Fernbedienung


Caméra
INSTALLATION DU PRODUIT


Webcam
- Zoom 10X lossless
- LED della webcam
- Kensington® Security Slot
Telecomando


Cámara


Câmara


Camera
GA NAAR PRODUCT CENTRAAL
TIPS VOOR PROBLEEMOPLOSSING

natural_image
Simple line drawing of a computer mouse with a labeled part (no text or symbols on the diagram itself)

natural_image
Line drawing of two coiled cable assemblies with connectors (no text or symbols)Kamera
INSTALLERA PRODUKTEN


Kamera
KONFIGURATION AF DIT PRODUKT

TIP TIL PROBLEML∅SNING
BLI KJENT MED PRODUKTET


Kamera
- 10 x zoom uten tap
- Kamera-indikatorlampe
- Kensington® -sikkerhetsspor
Fjernkontroll
KONFIGURERE PRODUKTET

- Sett opp kameraet ved å plassere det på bordet, eller bruk kamerastativet for å montere det på bordet eller veggen.
- Fest kabellås før du kopler kabelen til kamerainngangen.
- Kople til ekstern strøm.
-
Koble USB-kabelen til datamaskinen.
-
Kamera-indikatorlampen vil blinke när kameraet kobler til. Så snart dette er fullført, vil kamerahodet rotere.
- Hvis kameraet ikke kobler til, prøv igjen. Hvis problemene vedvarer, gå til www.logitech.com/support/ptz2 eller ring teknisk brukerstøtte.
- Start videoanropet fra programmet. Kamera-indikatorlampen lyser opp när du strømmer.
BES∅K PRODUKTSENTRALEN


Kamera


Κάμερα


Камера


Kamera


Kamera


natural_image
Simple line drawing of a computer mouse with a labeled part (no text or symbols on the diagram itself)
natural_image
Line drawing of two coiled cable assemblies with connectors (no text or symbols)Kamera


Kamera


Камера

natural_image
Simple line drawing of a computer mouse with a labeled part (no text or symbols on the diagram itself)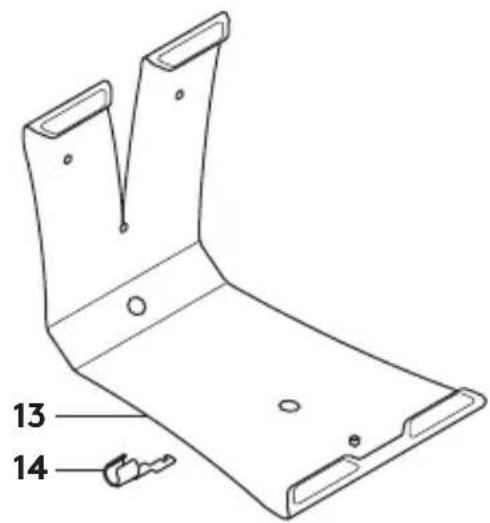

natural_image
Line drawing of two coiled cable assemblies with connectors (no text or symbols)Kaamera
- 10kordne kadudeta suumimine
- Kaamera-LED
- Kensington®-i turvapesa
Kaugjuhtimispult


Kamera
PADOMI PROBLÉMU NOVĚRŠANAI.
SUSIPAŽINKITE SU SAVO PRODUKTU


Vaizdo kamera
NUSTATYKITE SAVO PRODUKTA


Камера

Kamera
- Zumiranje bez gubitaka 10x
- LED indikator kamere
- Kensington® sigurnosni utor
Daljinski upravljač
- Zrcalo
- Povećavanje
- Pomicanje i nagib
- Smanjivanje
-
Gotove postavke kamere 1, 2 i 3
-
Utišavanje video
- Upravljanje daljim krajem
- Početna stranica
- Poklopac baterije daljinskog upravljača
Dodatna oprema


Kamera
- 10X zumiranje bez gubitaka
- LED svetlo za kameru
- Kensington® sigurnosni priključak
Daljinski upravljač
- Ogledalo
- Uvećaj
- Horizontalno i vertikalno pomeranje
- Umanji
-
Unapred podešene postavke kamere 1, 2 i 3
-
Isključen video
- Kontrolisanje daljeg kraja
- Matična stranica
- Poklopac odeljka za bateriju za daljinski
Dodatna oprema
- Postolje kamere
- Fiksator kabla
- Kablovi
PODEŠAVANJE PROIZVODA

- Postavite kameru na sto ili pomoću postolja kamere na sto ili zid.
- Postavite fiksator kabla pre nego što povežete kabl na priključak za kameru.
- Priključite na spoljno napajanje.
-
Povežite USB kabl na računar.
-
LED lampa kamere trepće dok se kamera povezuje. Po završetku, glava kamere će se rotirati.
- Ako kamera ne može da se poveže, pokušajte ponovo. Ako problemi nastave da se javljaju, pogledajte www.logitech.com/support/ptz2 ili pozovite tehničku podršku.
- Započnite video poziv iz aplikacije. LED lampa kamere zasvetleće kada započne trimovanje.
POSETITE CENTRALU ZA PROIZVOD
Otkrijte pun potencijal svog proizvoda. Pronađite vredne informacije i savete a korišćenje pregledanjem odeljka sa najčešćim pitanjima koji je jednostavan za upotrebu. Pronađite odgovore na pitanja o proizvodu i pronađite pomoć pri podešavanju proizvoda. Proverite da li postoji softver dostupan za preuzimanje koji može da poboljša vaše iskustvo u korišćenju proizvoda.
Da biste uživali u svim pogodnostima
Logitech proizvoda, posetite lokaciju
www.logitech.com/support/ptz2
i iskoristite širok asortiman korisnih servisa za podršku kompanije Logitech.
- Rešavanje problema
- Dijagnostika
- Nadogradnja firmvera
- Zajednica za podršku
- Preuzimanje softvera
- Primljena dokumentacija
- Informacije o garanciji
- Rezervni delovi (ako su dostupni)
KORIŠĆENJE PROIZVODA
Video zapis
- Započinjanje video zapisa: Video će započeti kada se pokrene video poziv/ snimanje i kada izaberete kameru. LED lampa kamere zasvetleće kada započne strimovanje video zapisa.
- Vertikalno i horizontalno pomerajte kameru pomoću daljinskog upravljača. Pritisnite jednom da biste povećali za jedan stepen ili pritisnite i zadržite za neprekidno horizontalno i vertikalno pomeranje. Oprez: Nemojte ručno da rotirate glavu veb kamere. Na taj način možete da oštetite jedinicu.
- Zumirajte kameru do 10X pomoću dugmeta za zumiranje.
- Početak: Pritisnite dugme za početak da biste se vratili na podrazumevani, fabrički položaj.
- Početne postavke kamere: Možete da podesite do 3 početne postavke položaja. Prvo pozicionirajte kameru pomoću komandi za horizontalno i vertikalno pomeranje, a zatim pritisnite jedno od dugmadi za početne postavke i zadržite ga 3 sekunde da biste sačuvali taj položaj. U svakom trenutku možete da se vratite na definisani položaj tako što ćete jedanput pritisnuti dugme za početnu postavku.
Koristite početnu postavku 1 kao lični početni položaj. Kada ponovo povežete kameru sa računarom, ona će se vratiti u položaj koji je podešen za početnu postavku 1. Ako za početnu postavku 1 nije definisan položaj, kamera će se vratiti u podrazumevani početni položaj. Sve tri početne postavke podrazumevano su podešene na fabrički početni položaj.
- Kontrolisanje daljeg kraja:
Ova funkcija vam omogućava da upravljate horizontalnim/vertikalnim pomeranjem i zumom bilo koje Logitech ConferenceCam ili odabranih Logitech veb kamera. Neke aplikacije matično podržavaju ovu funkciju, dok je druge moguće omogućiti pomoću aplikacije preuzete sa www.logitech.com/support/ptz2.


Kamera


Camera


Kamera
natural_image
Simple line drawing of a cylindrical object with a labeled dimension (12), no text or symbols present.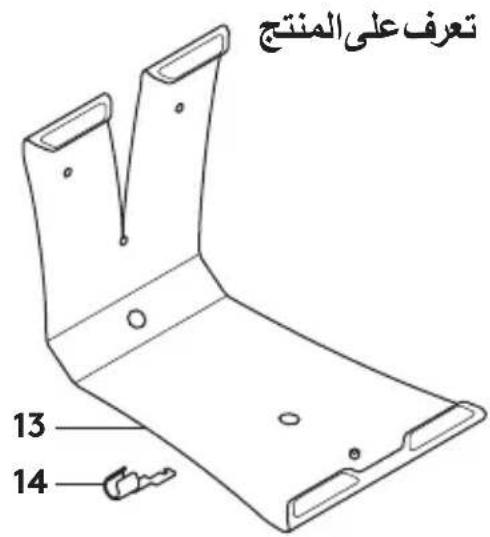
natural_image
Line drawing of a coiled electrical cable with two connectors and a plug, labeled with number 15 (no text or symbols on the diagram itself)الملحقات
3ita Household in the United States


natural_image
Simple line drawing of a cylindrical object with a labeled dimension (12), no text or symbols present.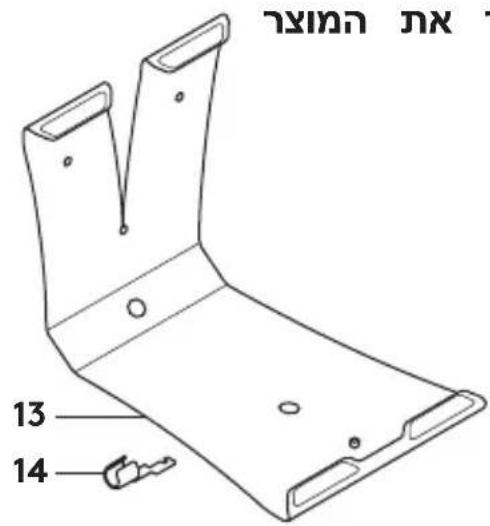
natural_image
Line drawing of a coiled electrical cable with two connectors and a plug, labeled with number 15 (no text or symbols on the diagram itself)תְרָה
הכלה.13
.14
.15720
הכלה.10
תְּל.11
© 2017 Logitech. Logitech, Logi and other Logitech marks are owned by Logitech and may be registered. All other trademarks are the property of their respective owners. Logitech assumes no responsibility for any errors that may appear in this manual. Information contained herein is subject to change without notice.
WEB-621-001008.002


- Camera
- Remote
- Accessories
- SET UP YOUR PRODUCT
- VISIT PRODUCT CENTRAL
- USE YOUR PRODUCT
- Video
- Mounting your camera Changing the remote control battery
- TROUBLESHOOTING TIPS
- Kamera
- Fernbedienung
- Caméra
- INSTALLATION DU PRODUIT
- Webcam
- Telecomando
- Cámara
- Câmara
- GA NAAR PRODUCT CENTRAAL
- TIPS VOOR PROBLEEMOPLOSSING
- INSTALLERA PRODUKTEN
- KONFIGURATION AF DIT PRODUKT
- TIP TIL PROBLEML∅SNING
- Fjernkontroll
- KONFIGURERE PRODUKTET
- BES∅K PRODUKTSENTRALEN
- Κάμερα
- Камера
- Kaamera
- Kaugjuhtimispult
- PADOMI PROBLÉMU NOVĚRŠANAI.
- SUSIPAŽINKITE SU SAVO PRODUKTU
- Vaizdo kamera
- NUSTATYKITE SAVO PRODUKTA
- Daljinski upravljač
- Dodatna oprema
- PODEŠAVANJE PROIZVODA
- POSETITE CENTRALU ZA PROIZVOD
- KORIŠĆENJE PROIZVODA
- Video zapis
- - Kontrolisanje daljeg kraja:
Brand : LOGITECH
Model : PTZ Pro 2
Category : Video Conferencing System