WD5600 - Wet and dry vacuum cleaner KARCHER - Free user manual and instructions
Find the device manual for free WD5600 KARCHER in PDF.
User questions about WD5600 KARCHER
0 question about this device. Answer the ones you know or ask your own.
Ask a new question about this device
Download the instructions for your Wet and dry vacuum cleaner in PDF format for free! Find your manual WD5600 - KARCHER and take your electronic device back in hand. On this page are published all the documents necessary for the use of your device. WD5600 by KARCHER.
USER MANUAL WD5600 KARCHER
| 16 17 | 18 | 19 | 20 | 21 | 22 | 23 | 24 | 25 | |
| WD 5.2xx M | ● | ● | ● | ● | ○ | ● | ○ | ○ | ○ |
| WD 5.2xx MP | ● | ● | ● | ● | ○ | ● | ● | ○ | ○ |
| WD 5.3xx | ● | ● | ● | ○ | ● | ● | ○ | ○ | ○ |
| WD 5.3xx M | ● | ● | ● | ○ | ● | ● | ○ | ○ | ● |
| WD 5.4xx | ● | ● | ● | ○ | ● | ● | ○ | ○ | ○ |
| WD 5.5xx M | ● | ● | ● | ○ | ● | ● | ○ | ○ | ○ |
| WD 5.6xx MP | ● | ● | ● | ○ | ● | ● | ● | ● | ● |

Inhaltsverzeichnis
Safety instructions EN .6
Description of the Appliance EN . . .6
Operation EN 9
Maintenance and care . . . EN .10
Troubleshooting EN 11
Technical specifications . EN . 11
General notes
Dear Customer,

Please read and comply with these original instructions prior
to the initial operation of your appliance and store them for later use or subsequent owners.
Proper use
The appliance is intended for use as a Multi-Purpose Vac corresponding to the descriptions given in these operating instructions and the safety notes.
This appliance has been designed for use in private households and is not intended for commercial use.
- Protect the unit from rain. Do not store outside.
- This device may not be used to suck in ash and soot.
Use the Multi-Purpose Vac only with:
Original filter bag.
- Original spare parts, accessories and special accessories.
The manufacturer is not responsible for any damages that may occur on account of improper use or wrong operations.
Environmental protection

The packaging material can be recycled. Please do not place the package to the ordinary refuse for disposal, but go for the proper recycling.

Old appliances contain valuable materials that can be recycled. Please arrange for the proper recycling of old
appliances. Please dispose your old appliances using appropriate collection systems.
Disposing the filters and filter bags
Filters and filter bags are made from environment-friendly materials.
They can therefore be disposed off through the normal household garbage provided you have not sucked in substances that are not permitted to be thrown into household garbage.
Notes about the ingredients (REACH)
You will find current information about the ingredients at:
www.kaercher.com/REACH
(See address on the reverse)
Customer Service
Our KÄRCHER branch will be pleased to help you further in the case of questions or faults.
(See address on the reverse)
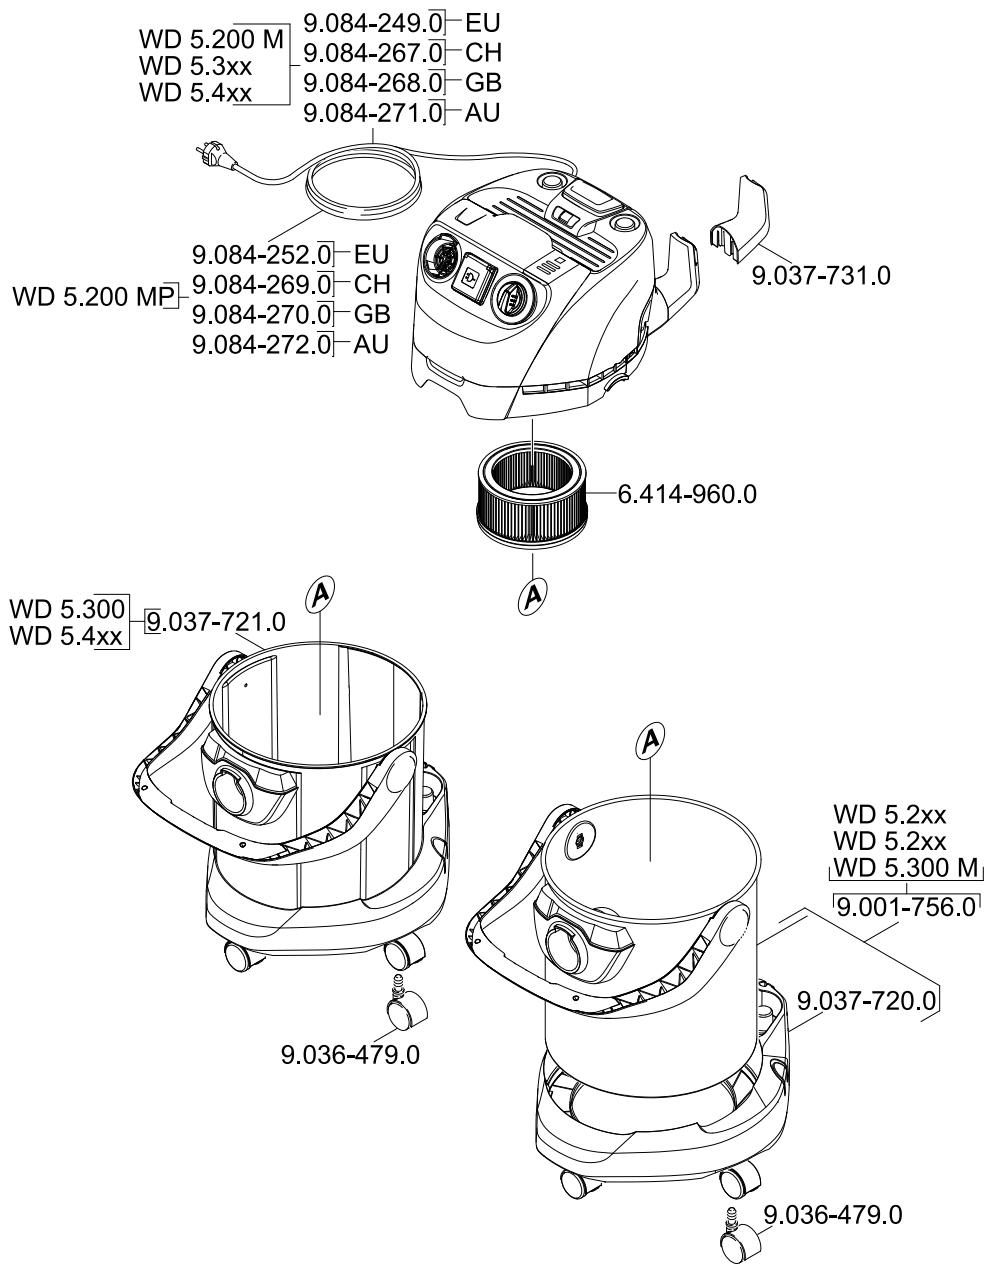
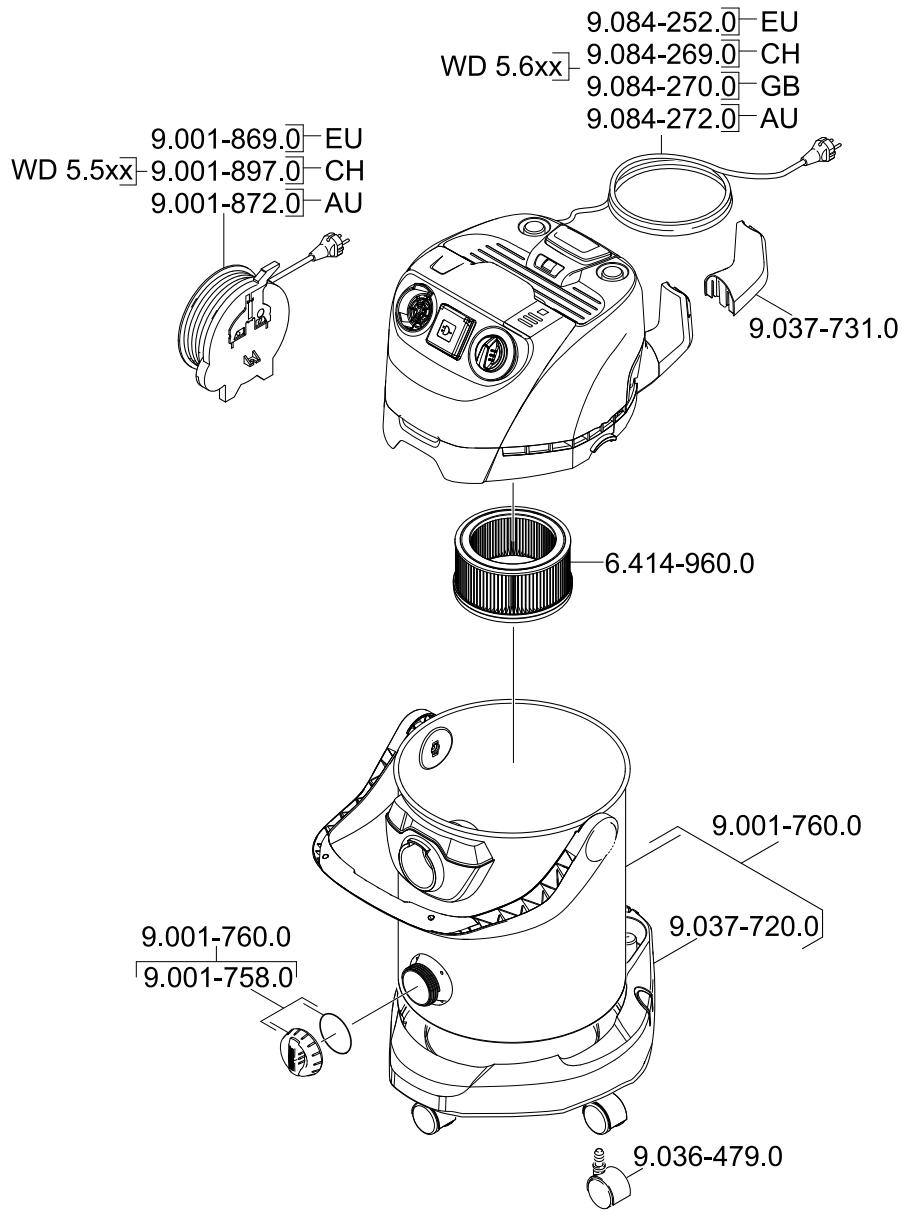
Ordering spare parts and special attachments
At the end of the operating instructions you will find a selected list of spare parts that are often required.
You can procure the spare parts and the attachments from your dealer or your KÄRCHER branch office.
(See address on the reverse)
Warranty
The terms of the guarantee applicable in each country have been published by our respective national distributors. We will repair possible faults on your unit free of charge within the warranty period, insofar as the faults are caused by material defects or defective workmanship. Guarantee claims should be addressed to your dealer or the nearest authorized customer service centre, and supported by documentary evidence of purchase.
Safety instructions
- This appliance is not intended for use by persons with limited physical, sensory or mental capacities or lack of experience and/or skills, unless such persons are accompanied and supervised by a person in charge of their safety or if they received precise instructions on the use of this appliance.
- Children must only use this appliance if they are older than 8 and if they are supervised by a person responsible for their safety or if they are instructed on the use of the appliance by such person.
- Keep packaging film away from children - risk of suffocation!
- Switch the appliance off after every use and prior to every cleaning/maintenance procedure.
- Risk of fire. Do not vacuum up any burning or glowing objects.
The appliance may not be used in areas where a risk of explosion is present.
Electrical connection
The appliance may only be connected to alternating current. The voltage must correspond with the type plate on the appliance.
Risk of electric shock
Never touch the mains plug and the socket with wet hands.
Do not pull the plug from the socket by pulling on the connecting cable.
Check the power cord with mains plug for damage before every use. If the power cord is damaged, please arrange immediately for the exchange by an authorized customer service or a skilled electrician.
To avoid accidents due to electrical faults we recommend the use of sockets with a line-side current-limiting circuit breaker (max. 30 mA nominal tripping current).
Danger
Certain materials may produce explosive vapours or mixtures when agitated by the suction air!
Never vacuum up the following materials:
- Explosive or combustible gases, liquids and dust particles (reactive dust particles)
- Reactive metal dust particles (such as aluminium, magnesium, zinc) in combination with highly alkaline or acidic detergents
Undiluted, strong acids and alkalies
Organic solvents (such as petrol, paint thinners, acetone, heating oil).
In addition, these substances may cause the appliance materials to corrode.
Description of the Appliance
Illustrations on fold-out pages!

These operating instructions describe the basic models of the Multi-Purpose Vacs shown on the front cover.
Depending on the model, there are differences in equipment and supplied accessories.
When unpacking the product, make sure that no accessories are missing and that none of the package contents have been damaged. If you detect any transport damages please contact your dealer.
- included in the scope of delivery
possible accessories
Suction hose connection
To connect the suction hose during vacuuming.
(see description / illustration)
2 Machine socket
Note: Observe the maximum connected power (see Chapter "Specifications").
To connect an electric tool.
(see description / illustration
3 Blowing connection
Connect the suction hose to the blower connection, this will activate the blower function.
(see description / illustration
4 Recessed grip
After unlocking it, grab the appliance head by the handle recess and remove it.
5 Carry handle
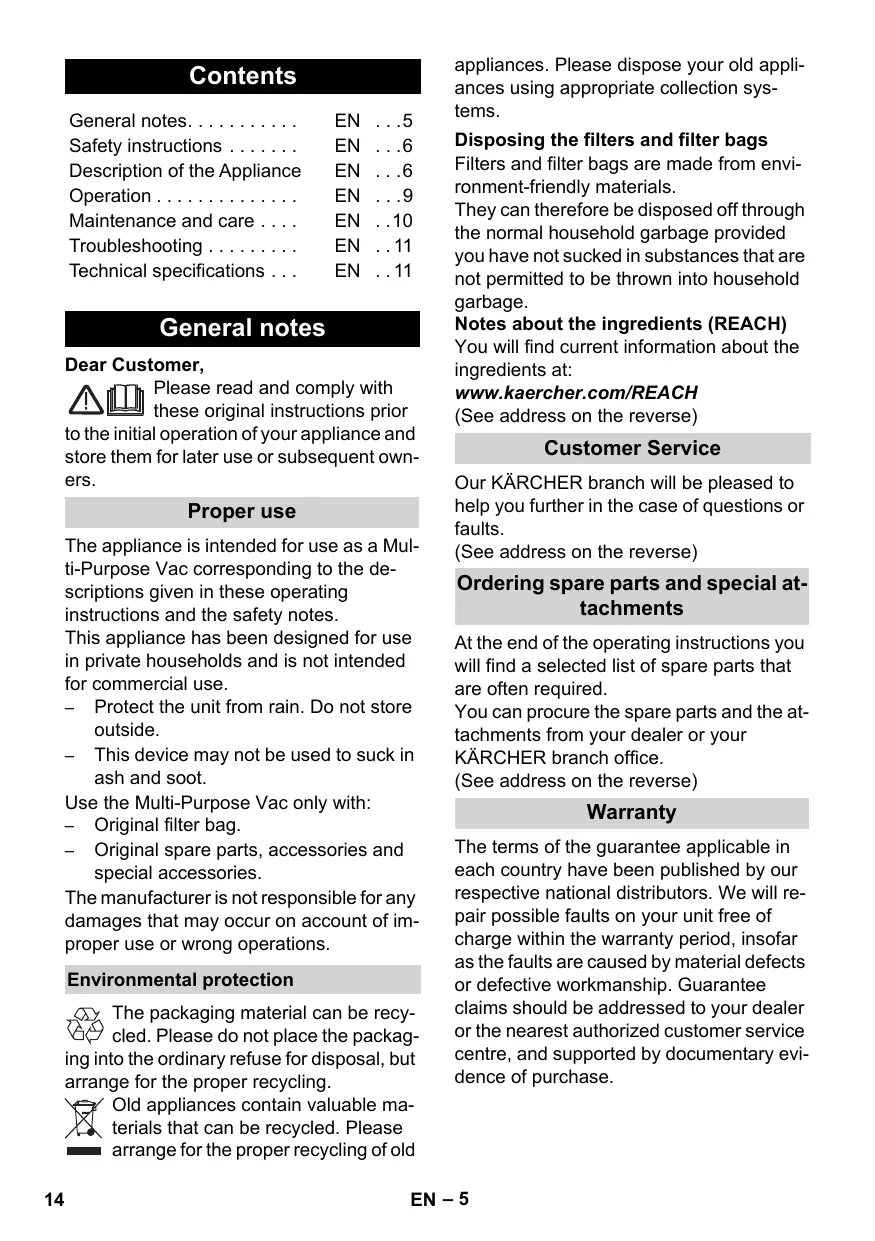
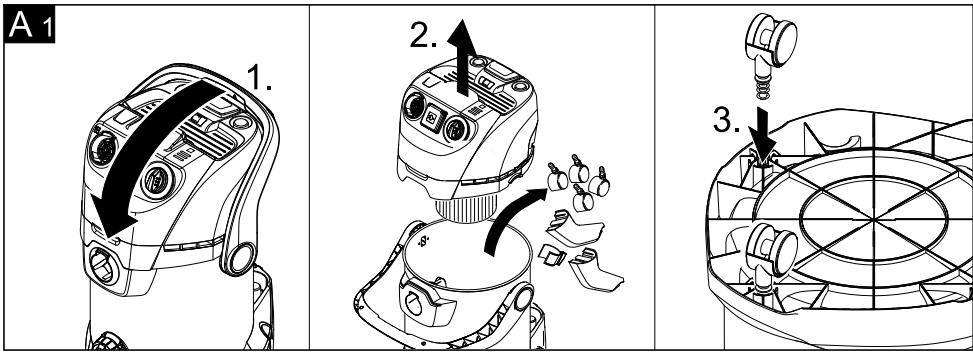
The carrying handle is also used to lock the appliance head and the container. To unlock, push the bow all the way forward until you clear the lock. (see description / illustration A1)
Grab the appliance head by the handle recess and remove it.
In the carrying position, the bow is pointing up, during work with the appliance, swivel the bow toward the back until the operating controls on the appliance are accessible.
6 Accessory compartment, appliance head
This accessory compartment allows the storage of suction nozzles on the appliance.
Note: This accessory compartment is required to use the efficient filter cleaning function.
(see description / illustration
7 Switch for Efficient Filter Cleaning
To clean the built-in cartridge filter.
Note: Do not activate the switch with a wet cartridge filter.
(see description / illustration 1)
8 Filter cleaning display
If the filter cleaning indicator is red, activate the switch for efficient filter cleaning.
(see description / illustration)
9 Key for mains cable retraction
Press the key for the mains cable retraction. The cable will pull itself automatically into the appliance.
10 Accessory compartment, hook
This accessory compartment allows the storage of the suction hose, the mains cable and the suction nozzles.
(see description / illustration
11 Rotary switch (ON/OFF)
(without built-in socket)
Position I: Suction or blowing
Position 0: Appliance is switched off
(see description / illustration
11 Rotary switch (ON/OFF)
(with built-in socket)
Position MAX: Suction or blowing.
Position + MAX: Vacuuming with connected electric tool
Performance regulation: Reduce the suction if necessary during vacuuming, blowing or when working with an electric tool.
Position 0: The appliance is switched off. Electric tool is supplied with voltage.
(see description / illustration
12 Parking position
To rest the floor nozzle during work interruptions.
(see description / illustration
13 Accessory storage container
This accessory compartment allows the storage of the suction pipes or other accessories.
(see description / illustration
14 Steering roller
The steering rollers are located in the compartment when the appliance is delivered. These must be attached prior to starting up the appliance.
(see description / illustration 21)
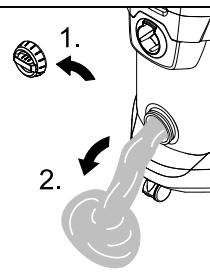
15 Drain screw
The drain screw is used to quickly and comfortably empty wastewater in the container. Tilt the container forward for easier emptying.
(see description / illustration cn)
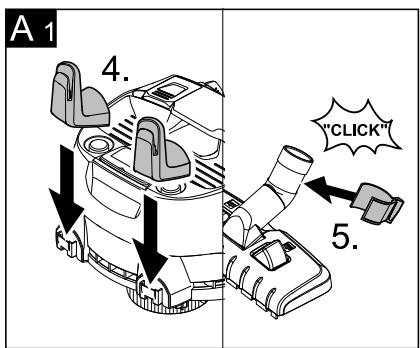
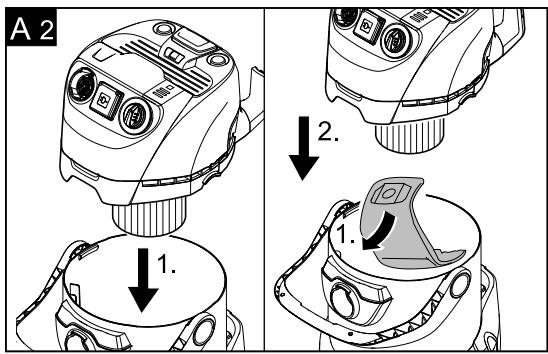
16 Filter bag
Note: Do not use a filter bag for wet vacu-uming!
Recommendations for appliances without efficient filter cleaning:
To vacuum fine dust, use the filter bag. (see description / illustration A2)
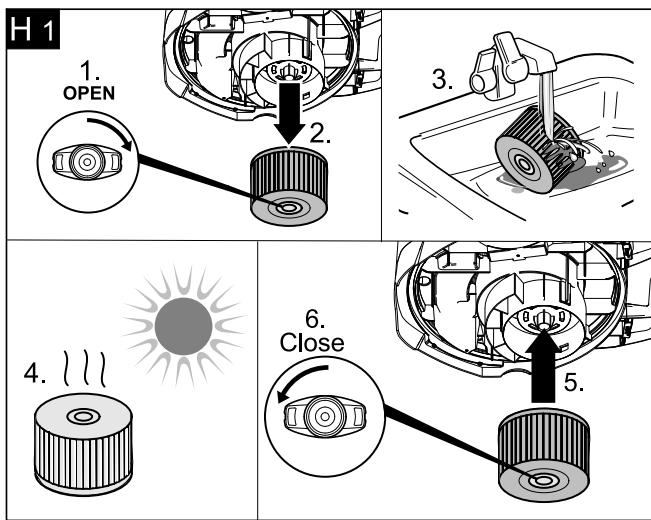
17 Cartridge filter (already installed in the appliance)
The cartridge filter must always be installed - with wet and dry vacuuming.
Note: Let the wet cartridge filter dry prior to using it for dry vacuuming.
(see description / illustration H)
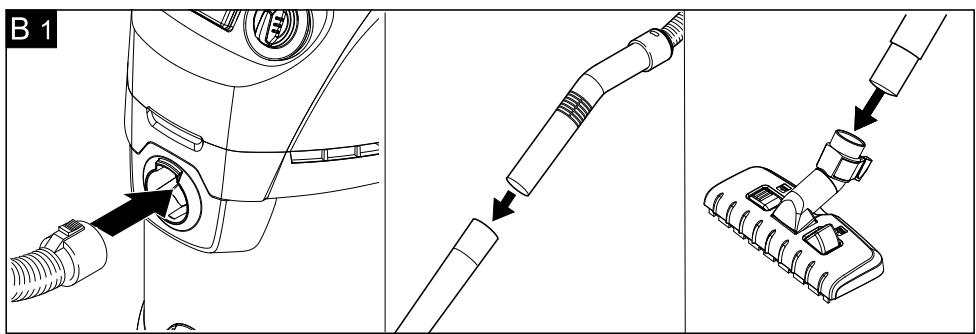
18 Suction hose with handle
Slide the suction hose into the connection, it will lock into place.
(see description / illustration
Note: In order to disconnect it, push down with your thumb and pull the suction hose out.
19 Suction tubes 2 × 0.5 ~m
Connect both suction pipes and connect them to the suction hose.
(see description / illustration E)
Floor nozzle
(with inserts)
Use the appropriate insert for vacuuming on hard surfaces and carpets.
Hard surfaces, wet vacuuming: Use the insert with 2 rubber lips.
Hard surfaces, dry vacuuming: Use the insert with 2 bristles.
Carpets, wet and dry vacuuming: Work without an insert.
Floor nozzle
(with switching lever)
For vacuuming dust from hard surfaces and carpets:
Lever on symbol for carpets
Lever on symbol for hard surfaces
22 Crevice nozzle
For edges, joints, heaters and hard to reach locations.
Adapter
To connect the suction hose with an electric tool.
(see description / illustration )
Adapt the adapter to the connection diameter of the electric tool using a knife if necessary.
24 Flexible tool hose
For more flexibility when working with electric tools.
Note: Can also be used with an adapter.
(see description / illustration )
Coarse dirt set
Extensive vacuum set for coarse dirt of all kinds.
Operation
Always work with an inserted cartridge filter - during wet as well as dry vacuum cleaning!
Before Startup
Illustration A1
Mount loose parts delivered with appliance prior to start-up.
Illustration A2
Recommendations for appliances without efficient filter cleaning: To vacuum fine dust, use the filter bag.
Start up
Illustration B1
Connect accessories.
Illustration B2
Plug in the main plug.
Illustration B3
Turn on the machine.
Dry vacuum cleaning
Work only with a dry cartridge filter!
Caution: Always use a pre-separator while vacuuming ashes and soot (order no. 2.863-139).
Recommendations for appliances without efficient filter cleaning: To vacuum fine dust, use the filter bag.
(see description / illustration 23)
The filling level of the filter bag depends on the dirt that is sucked in.
Clogged filter bags can burst - therefore make sure to replace the filter bag in a timely manner!
The filter bag needs to be replaced more frequently while sucking in fine dust, sand, etc.
For appliances with efficient filter cleaning: When vacuuming without a filter bag, the filter cleaning indicator lights up red if the cartridge filter needs to be cleaned.
Use efficient filter cleaning.
(see description / illustration 1)
Wet vacuum cleaning
Attach the accessories to vacuum moisture or wetness to the suction pipes or directly to the handle.
Caution:
Do not use a filter bag!
Immediately switch the appliance off if foam forms or liquids escape!
Note: If the container is full a float closes the suction opening and the appliance works at a higher speed. Switch off the appliance immediately and empty the container.
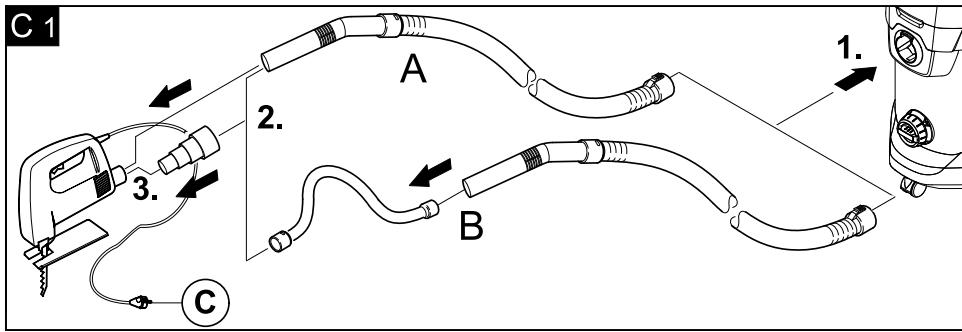
Working with electrical power tools
Adapt the adapter to the connection diameter of the electric tool using a knife if necessary.
Illustration C1
A) Plug the enclosed adapter onto the handle of the suction hose and connect the electric tool with the connection.
or
B) Use the flexible tool hose to gain more flexibility in your work. Connect this hose to the suction hose and to the adapter and then to the connection of the electric tool.
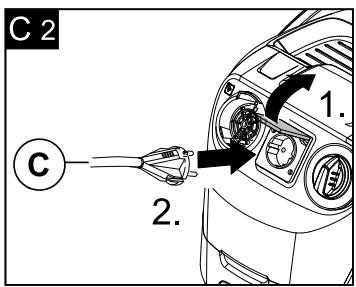
Illustration C2
For appliances with built-in socket:
Connect the mains plug of the electric power tool to the vacuum cleaner.
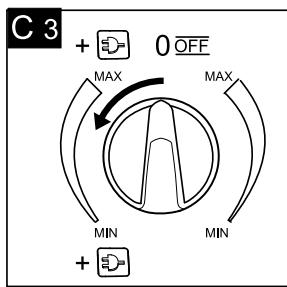
Illustration C-8
Switch the appliance on (move the rotary switch to the left to position +MAX) and start working.
Note: The suction turbine starts with a delay of 0.5 seconds after the electric tool has been switched on. After the electric tool has been switched off, the suction turbine will continue to run for approx. 5 seconds to suck in the remaining dirt from the suction hose.
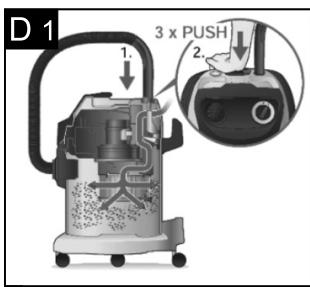
Efficient filter cleaning
If the filter cleaning indicator is red, initiate the filter cleaning.
Illustration D1
Insert the suction hose with the handle into the accessory compartment on the appliance head. Press the efficient filter cleaning key 3 × times with the appliance switched on; wait 4 seconds between the individual presses.
Note: If the filter cleaning display is illuminated permanently or after the filter cleaning switch has been activated several times, check the reservoir for its fill volume. Otherwise, the dirt might escape when the container is opened.
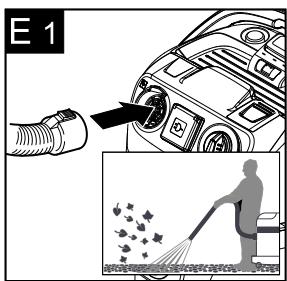
Blowing function
Cleaning hard to reach locations or, where vacuuming is not possible, like leaves from a gravel bed.
Illustration E1
Connect the suction hose to the blower connection, this will activate the blower function.
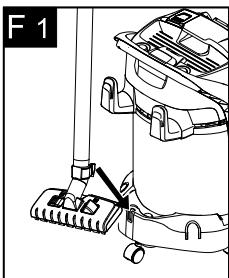
Interrupting operation
Turn off the appliance.
Illustration F1
Hook the floor nozzle into the parking position.
Finish operation
Turn off the appliance and disconnect the mains plug.
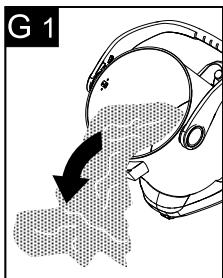
Empty the container
Illustration G1
Remove the appliance head and empty the reservoir filled with wet or dry dirt.
For appliances with drain screw:
Empty the dry dirt over the container. Use the drain screw to empty liquids.
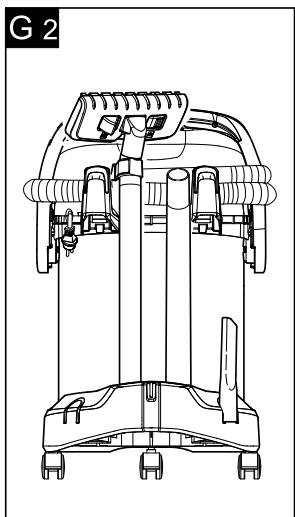
Storing the appliance
Illustration G2
Stow away the mains cable and accessory at the machine. Store the appliance in a dry room.
Maintenance and care
Danger
Turn off the appliance and remove the mains plug prior to any care and maintenance work.
Repair works may only be performed by the authorized customer service.
Caution
Do not use abrasives, glass or universal cleaners! Never immerse the appliance in water.
Clean the appliance and accessory parts made of plastic with a commercial plastic cleaner.
If required, rinse the container and accessories with water properly and dry them before reuse.
Illustration H1
Only clean the cartridge filter under running water; do not wipe or brush. Let it dry completely prior to installation.
Troubleshooting
Mains cable retraction does not function
The mains cable is probably dirty, clean the mains cable.
Decreasing cleaning power
If the cleaning power of the appliance deteriorates please check the following:
Accessories, suction hose or suction tubes are clogged, please remove the obstruction using a stick.
Cartridge filter is dirty:
For appliances without efficient filter
cleaning: Knock the dirt off the cartridge filter, clean it under running water if necessary.
(see description / illustration
For appliances with efficient filter cleaning: Use the filter cleaning.
(see description / illustration)
Clean the cartridge filter under running water if necessary.
(see description / illustration)
Replace damaged cartridge filter.
Filter bag is full, install new filter bag. (see description / illustration A4)
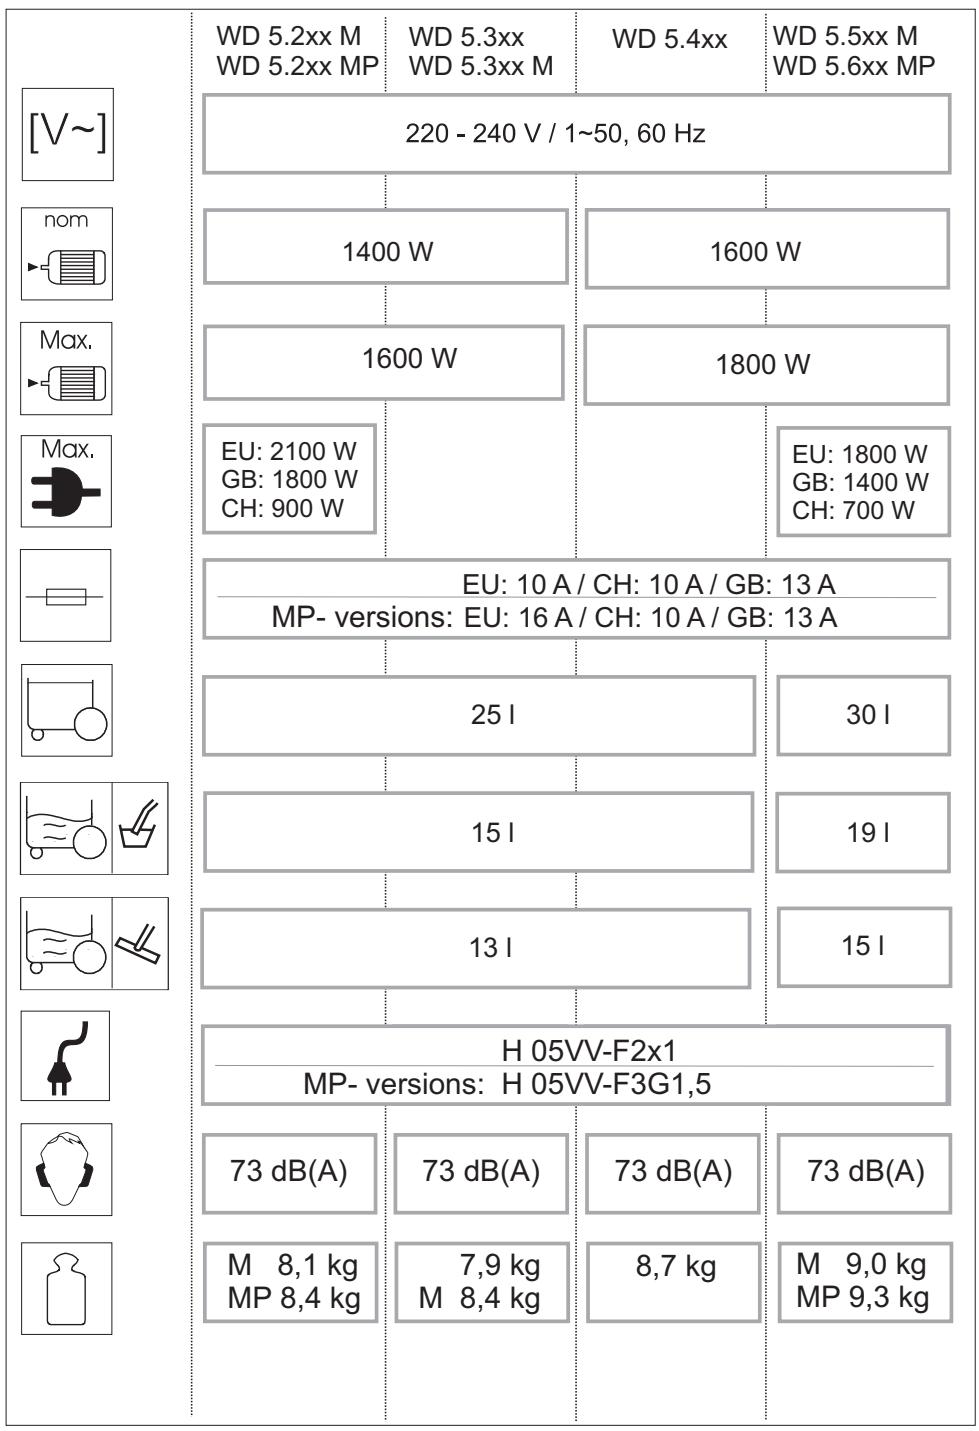
Technical specifications
The specifications are listed on the flaps. In the following, you will find the explanation of the symbols used.

Voltage

Output P_nom

Output P_max

Max. connection output of appliance socket

Mains fuse (slow-blow)

Container capacity

Water intake with handle

Water intake with floor nozzle

Power cord

Sound pressure level (EN 60704-2-1)

Weight (without accessories)
Subject to technical modifications!
Table des matieres
Consignes generales . FR .5
www.kaercher.com/REACH
(Adresse au dos)
Service après-vente
www.kaercher.com/REACH
www.kaercher.com/REACH
www.kaercher.com/REACH
www.kaercher.com/REACH
www.kaercher.com/REACH
(Se adressen på bagsiden)
Kundeservice
Brug已经超过 filter pose!
www.kaercher.com/REACH
(Se adresses pâ baksiden)
Kundetjeneste
Våre KÄRCHER-avdelinger hjelper deg gjerne ved feil eller om du har spørsmål. (Se adressé på baksiden)
www.kaercher.com/REACH
(Se baksidan for adress)
Kundservice
www.kaercher.com/REACH
www.kaercher.com/REACH
www.kaercher.com/REACH
(Adres icin Bkz. Arkasayfa)
Müsteri hizmeti
Calismayi yarida kesme
Cihazi kapatin.
→ Sekil F1
www.kaercher.com/REACH
(Adpec yka3aHa ha o6oPoTe)
CepBnchna cnyx6a
B cnyuae Bo3nKHOBeHna BOpocOB nIIN IIOJOMOK HaI qJIinaI qIpMbI KARCHER NOMOKeT Bam pa3peUHTb IX.
(Adpec yka3an Ha o6oPoTe)
3aKa3 3aNaacHbIX YacTei N Cneu-aJIbHbIX npHaAdJeKHOcTei
Bb6op HanboJee qacto Heo6xOaMbIX 3a- pacteBbl HauTe B KOHcE INHCTpyKcIN no 3KcNpyaTaun.
3anaChIbe yactn n npHaJnxKoCTn BbIMoKeTe nOyUHTb y BaWero dInepa nnBΦnnaIe ΦnpMbI KARCHER.
(Adpec yka3an Ha o6oPoTe)
TapaHTnA
B kaJdoi cTpaHe DeiCtByIOT COOTBeTCTBENHO rapaHTnHbIe ycNoBnIA, n3DaHHbIE yNOJIHOMOueHHoOpraHn3aUnei C6bItaHaWei npOdyKcNn B daHHoI CTpaHe.Bo3-MoXHbIe HeINcnpaBHOCTn np6opa B TeueHne rapaHTnHOrO cPoka Mbl yCTpAHaREMecPnlaTHO, ecnn npuHna 3akNIOuaETcB NdeFekTx MaTePnAIOB nIn OOn6kax npn I3rTOBnEHN.B Cnyuae Bo3NHKnOBehnnpTeH3N B TeueHne rapaHTnHOrO cPoka npoc6Ba o6paTaTbcA, Imeep Ce6yeO NOKyPke, B TopROby OprAHn3aUIO, npoDaBsyBam pnp6op nIn B 6bnKaMHyU yNOIHOMOueHHU cNyXbY cepBnCHOrO 6cLyKnBaHN.
Yka3aHnI NO TeXhNke 6e30na-CHOCTN
-Данhoe ycmpooucmo He npedha3na-yeHO dnoUCIOb3O8aHua JIOdbMu C OApauHueHHbIMu FU3UeCKUMU, CEHCOPHBIMU Unu YMcmbeHHbIMU cNooc6-Hocmmu Unu omycmmeuem Onbima U/Uno omycmmeuem 3HaHu, 3a UckIIOueHuem Cnyaee, KOda OHu HaxodmraNOD haD3Opom OmeemcmBeHNHO23a Be3OanachcMb luua Unu NOnyauom om Hezo yka3aHua No npUmHeHuO ycmpooucma.
-Доуckaemсяnpumehene ycmpoUcmea demam,docmuaum8-lemheo e03pacma,haxodayumcno npucmOpom luca,omemcmeHNO2O 3u ux6e3onacHocmb,uuNoIyueuUM uHcmpykquuO npumehenu ycmpoUcmea om makoo luca.
- Ynakoobouhyo nIeHky depXume no-daIbwe om demeu, cyuecmeyem ona-Chocmb ydyuhenura!
- Ppu6op cneyem omkIouamb nocle kaxdozo npumehenu u neped npoeedeHuem oucMcu/mexHueckoo o6-cnyxueaHua.
- Onachocmb noxapa. He donyckamb ecacbibaHua oopux unu mneohux npedMemoe.
- 3Kcnnyamau npubopa 60 63pbbeoo-nachbix 3OhaX 3anpeuzaemc.
Iodknoyehue Kcemu numaHua
Ppubop cneodyem eknouamb moIbko 8 cemb nepemehnozo moka. HanpJxHeue doJXHO coombeemcmeoabmyka3aHnM 8 3aeodcko ma6luuKe npubopa.
Onachocmb npaxeHua mokom
He npukacambcK cemeoou uKe u po- 3emke MOKpbIMu pykamu.
He ebimackuabmbcemeyu umencelbHyou eunky npmem noqmraueaunr 3a cemeo uhyp.
Ipeed hauanom paobmI c npubopom npoeepmb cemeoohyp u umencbHyu buky ha noepexkdehui. IopexkdHbIc meoou hyp dojken 6bImb he3amadJumeBHO 3aMeHen ynoHMOeHHO cnyXboe cepueuchzo o6cnjkuhaH/ cneuaJucmOM-3JeKmpukom.
Bo u36bexaHue Heccacmhbix cnyae, c8a-3aHHbIX C 3JIeKmpuuecmeoM, Mbl peKomeHdyem UcnoIb30eAHue po3emok cnpedeknueHHbIM ycmpoucmeo3auumblom moka noepexkdeHua (MaKC. HOMUNaJIbHaJcuna moka cpaabambeaHua: 30 mA).
Onachocmb
HekomopbIe eueecmba npu cmeuenu co
ecacbIeaeMbIM 603dyxom Mozym o6pa3o8bl
bam 63pbIeOONachbIe npbl unu cmecU!
HuKoegaHa He ecacbIeambcne dyouue ee
ueecmea:
B3pbIeYamble UNU aOpUoye aa3bl, XuO-Kocmu un b (peakmuHa nJIb)
Peakmuha Memannuuecka nbInb (HaPumep, anomuhu, MaHu, uHK) coeduneHuC CunhBIMU ueNoHybIMU u KUCnOMhbIMU MOUUMcpecm6amU
- Hepa36a8nHbIe cUJIbHbIe KUCNOMbl u uJenoyu
- Opaanuueckue pacmoeopumenu (ha-npumep, 6eH3uH, pacmoeopumelb, aemoh, ma3ym).
Kpome mozo 3mu 6euece mea Moaym pa3b- edamb uCnoIb3oBaHHbIe 8 npu6ope Ma- mepuaJIb.
Onncanne np6opa
N3o6paXeHnMa. Ha pa3-Bopotax!

B daHHoH uHCTpyKuIN no 3KcNlyaTaUuONiCaHbI 6a3ObIe MoJeI NblIEcOCOB DnBlaJXHO/CyXO y6OpKn, PpeDCTaBLeHHbIe Ha o6JIoxKe.
OcnaueHne n KOJIuYeCTBO DOnOJIHnTeIbHbIX npHaJdJIeXHoCTeN, BXOJaIux B O6bEm IOCTaBKn, 3aBNCIT OT MoJeIN yCTpOInCTBa.
Pn paacnakokBke npnbopa npoBepeTbe erO KOMnJIeKTHOCb, a TaKKe erO ueNoCTHOcTb. Pn o6HapUKeHN IOBpeXJeHNI, pOnyueHHbIX BO BpeM TpaHCnOpTnpOBKn, CJIeDyET YBeDoMnTb TOPROByO oprHn3aCnIO, PnpDaBswyo npnbop.
COepeKHTcB OObbeMe IOCTaBKN
○ BO3MOXHoe IOIIOJIHITeJIbHoe O6Opy-DOBaHne
1 ΘЛeMeHT NOДКЛЮЧЕНЯ BCaСыВа- IOцero WlaHra
→ПяpoДоСоЕДИнEHЯВCaSbIBAIOUeO ⅢlaHra BO Bpempa60TbI.
(CM. onucaHue /puCyHOK E)
2 Po3etka annapata
Yka3aHne: YCHtBtBaTb MaKcMmaIbHyO npICoeDInHeHHyO MOUHOCTb (CM. 2na8 "TexHuYeCKue daHHbIe").
(CM. OnucHue / pucyHOK D1)
8 INdikkaTop oucntkn qnbltpa
EcnHnDnKaTOp OunchKn QnlbTpra roPNT KpaChbIM UBeTOM, CneJeYET HaxaTb KHOKnY DnI npOBeHeNr 3ΦΦeKTuBHOJ OunchTk nIbTpA.
(CM. OnucHue / pucyHOK)
9 Khonka cMaTbIbAHnca cTeBOro shHypa
→ HαKaTb KONky CMaTbIbAHnI CeTeBOrO shHypa. Lhyp aBTOMaTHueCKn CMaTbI-BAeTCB yCTpOJICTBO.
10 MecTo xpaHEnnI npHaIaIeXHoCTeN Ha KpUoyKe
→ 3TO MeCTO DIIЯ XpaHEnI pyINaJIeX-HOCTeI PpeINa3HaueHO DJIЯ XpaHEnI BCaCSbIBaIOUeI OJInAHa, CeTeBOrO Ka-6EJIa I BCaCSbIBaIOUx CONeI. (CM. ONUCaHue / pucyHOK)
11 NOBOPOTbI nepeKIOUaTeJIb (BKN./BbIKJ.)
(6e3 BCTpoEHNo pO3eTKn)
PpncoeDnHtbpnuHaJTeJxHoCTN
PucyHok B2
BctabbTe 7teNceIbHyIO BnIKy B 3neK-tpop03eTKy.
PucyHOK B3
Bbiklouhnte npibop.
Cyxayuuctka
Pa6omamb moIbko npu cyxom na-mpoHnom fUJbmpe!
→ BHMaHHe:ПиВсаСьВаHипeпla И сжИ NGIOJIb3OBaTb TOnIbKO npeДвapnteIbHbI OTeKaTeIb (№ 3akaz2.863-139).
Pekomehdaun yctpoCTB 6e3 fYHKUN 3ΦΦeKTHBHO ONUCTKN
BkIIOUHTb npI6Op (NOBOPOTbI Bbl- KIIIOUaTeJIb BnEBO BNOJKeHne +MAKC.) nHaaytbp6Ory.
Yka3aHue: Ka monbko 3neKmpouHcmpyMeHm 6kIIOyaemcra, 8caCbIaOuua myp6Ha 3anyckaemcra c 0,5cekyHbIM 3amdeJeHuEe. Ppu bI-KIIOyeHn 3neKmpouHcmpyMeHmaecBaIooja myp6Ha npodOnJaempaBommb no uHepuuu eue npumepHo 5 ckyHd, ymo6bl ecocamb ocmanku Mycopa u3 wJnaHa.
OuNTka TpydNOIOCTyINbIX MeCT INIMeCT, IDe BCaCbIBaHHe He BO3MOxHO, HApIMep, YdaJIeHne JInCTbeB IN3 rpaBnI.
PucyHok E1
PnncoeHHntb BcacbIbaUoHn UHaH K NOdkJIOUeHNO IaN IOdau NBO3dyxa. Tem camblm akTINBpyeTc yHKzna npOyBkn.
PpepebBpa6oTe
→ BbIKIIOUHTe npu6Op.
PucyHok F1
YctaHOBt b HacaKy IJIy nOJa B napKOBOUHoe NOJIOXeHne.
OkoHuaHne pa6oTbI
→ BbIKIouHTb npIbOp n BBItaIITb ceTeByIO BNPKY.
Onopoxhntb pe3epByap
PucyHok G1
ChTb roIobky yctpoiCTBa, onopokHnTb pe3epByap c BnaJHoN iJIn cyXoI rpa3bIO.
ByctpoiCTbax c npo6kO cnNBHoro OTBepcTn: ydaIITb cyxuI rpa3b n3 pe3epByapa. IyraJIeHnJxNdko
CTe INCNOJIb3OBAtB Ipo6ky CInBHOOTBepCTnI.
XpaHHe yCTpOncTbA
PncyHok G2
CNoXnTb Ka6eJb NHTaHnO T3NeKtpocTeN I npHaIaNpExKHOCTn Ha yCTpoiCTBe. XpaHnTb yCTpoiCTBO B cyxnx NOMeueHnX.
YxOД n TexHnueckoe o6cny-XnBaHne
Onachocmb
Ipu npoeedeenu IIO6bix pa6om no yxody u mexHueckomy ocbnykuhaHIO annapam cneyem ebIKJIOUumb, a cemeoou HHyp - ebIHymb u3 po3emku.
Pemohmhbie paobmbi u paobmbic 3neKmpuueckmu y3namu Moaym npou38o-dumbcra molbko ynoHMOeHHoClyk60c cepucchozo ocbnykueaHua.
△ BHUMaHue
He ucnonb3oabmb yucmuaux nacm, mouux cpecm dner cmekna u ynueepcannbHbIX MOUox cpecm! 3anpeuaemcnoapykamb npubop eody.
→ Pπbopи npnHaIeJxHocTиИNcKycCTBeHHbIX MaTePnaIOB CJIeJeYET YN-CTITb CTaHapTHbIMM MOUcIMN CpeICTBaMIДЯ INCKYCCTBeHHbIX MaTePnaIOB.
→ Pπn Heo6xOДmOCTn 6aK n DeTaIIN npOnIoNCKaTb BOIOI N BbCyUHTb IJI NOcNeDyUoIeRo IcNoIb3OBAHnI.
PucyHok H1
B cnyae Heo6xOaHMoCTn npoBOuNTb OuchTy natoHOro fNJIbTpa NOd CTpye BObl. He BbITnpaTb N He uCtNTb C npIMHeHem UcETKn. PpeJ yCTaHOBKO pONHOCTbIO BVICUHTb.
Cetebo shhpy He cMaTbIBaetcra
BepoTHO, cTeBOH shHyp 3aarp3HeH. OunchTb ceTeBOH hyp.
Падаюцая моцноctь BCacsbIbA-HЯ
Ecnn MoUHocTb BCacbIbAHnna annpaTa CHNkaeTc, NOKaJyIcTa, nPoBepntb CJeDyuOuNe NyHKtbl.
Iotppe6JIeHHe BOdbI pyKoAraTkoI

Iotppe6JIeHne BObI HacaIkoI JIa Iona

CeteboI shhpy

YPOBHeB 3ByKOBOrO DaBNeHnA (EN 60704-2-1)

Bec 6e3 (pnpHaJleJxHocTei)
N3zomoeumelb ocmaeJem 3a cobou npa8o eHeceHua mexHuueckux u3MeHeHu!
Tartalomjugyzek
www.kaercher.com/REACH
www.kaercher.com/REACH
(Adresy pobocek najdete na zadni strane)
www.kaercher.com/REACH
www.kaercher.com/REACH
(Adres znajduje sie na odwrocie)
Serwis firmy
Mult stimate client,

www.kaercher.com/REACH
www.kaercher.com/REACH
(Adresu cete naci na poledini)
Servisna služba
U slučaju pitanja ili smetnji rado ce Vam po-moçi naša podružnica KÁRCHER.
(Adresu cete naci na poledini)
Naručivanje pričuvnih dizelova i po-sebnog pribora
Pregled najcese potrebnih priucvnih dijelova naci cete na kraju ovih radnih uputa. Priucvne dijelove i pribor mozete nabaviti kod Vaseg prodavaca ilu U Va soj KAR-CHER podruznici.
(Adresu cete naci na poledini)
Jamstvo
www.kaercher.com/REACH
(Adresu cete naci na poledini)
Servisna služba
www.kaercher.com/REACH
(AdpeTe ige HamePte Ha 3aHaTa cTpaHnua)
Cnyk6a 3a pa6oTa c KIneHTn
PnBbnpocn n nobpei Baunr Tnncptn6bytor Na KARCHER ige Bn nomorhe c ydoBOJCTBne.
(AdpeTe ige HamePte Ha 3aHaTa cTpaHnua)
IopbUkaHape3epBHNuactnncne- zuaJIHNI npHaJnLeXHOCTN
CnncbKaHaHai-yeCTO Heo6xOaMmTE pe3epBHNuactnIe HamePnte B KpaHa ynbTbaHETO 3a ekcnnoataun.
Pe3epBn Yactn npinaDJIeXHOCTn ce noJyUHTe OT BaIINr TBpROBeu IIN BvB fuiHanaHa KARCHER.
(AdpeTe ige HamePte Ha 3aHaTa cTpaHnua)
TapaHcIa
BbB BcKa ca CtpaHa ca BaJIiDn H3JaDeHHe YcJIOBnA 3a rapaHnOy CTpaHa Ha HauWe OTOpu3IpaHO dpyKecTBo 3a pa3- npocCTpAHen He NaPOnyKTnTe HN. EBeHTyAJIH NOBpeDN B ypeDa B pAMKnTe Ha Cpoka Ha rapaHnIra Tce OCTpaHnBaT 6e3- PnAtoHO, AOK npuHnTa 3a Tx e B MaTePnAa Hnnpn PpOn3BOdCTBO.To. B cLyuaH Na N3No3BaHe Ha npABOTo Ha rapaHnca ce OcbPsauTe, MoJ, KbM BaWnY TbProBeu Hn Hn-6JIn3KnO OTOpu3IpaH cepBN3, KATO pPeIcTabNTe bOpUdbaHeto n DokymeHTa 3a NOKynKa.
Yka3aHnna 3a 6e3oNaCHOCT
To3u ypeH He e npedHa3NaueH 3a mo-6a,da 6bde u3no138aH om luua c oapaueHu fU3uuecku, cEH3OpHu U yMcmEHe Cuocobocmu U lunca Ha onum U/Unu Lunca Ha no3HaHura,OCbeH aKO me ca nod Had3opa Ha omoeBapra-03ma mXhama be3oNaChocm luue unu ca nonyuUOn He2o UNcmpyK-uu, kak da u3no138am ypeDa.
- Ioc3oolenoe deua da u3non3a m ypeda, ako ca had 8 ooduunu u ako ca nod had3opa ha nuue, koemo ce apuxu 3a mnxhama be3onacncm unu ca noIyunu om Heo uHcmpkyuu 3a u3- non3eaHemo Ha ypeda.
-Дрьжme onakobchHomo foJuo daJe om deua, cIuecmeyea onachocm om 3adywaeane!
- Ypeobm da ce u3knIOyea cneo ecko u3noI3BaHe uu npdu ecaKO noUcmeane/ noOdpbXka.
- Onachocm om noxap. He 3acmykea-me aopu uu meeuu npedmemu.
3a6paheHa e pa6omama ebe 3pu8oo-nachu nomueheny.
EneKmpuuecko 3axpaHaHe
Cepb3eaime ypeda camo KbM npomeHnue mok. HanpexeHuemo mpr6ea da cbom- eemcmea Ha umupaHomo ebpy ma6en- kama Ha ypeda HanpexeHue.
Onachocm om mokoe ydap
Hukoa He dokocbaume KOhmaKaMa u uenCeJa c eJaxHu pIe.
Ueencenume da He ce u3eaXdAm nocpeoCmBOM u3obpnahe Ha npucbeDuHumeNHa Ka6eI om konhmacma.
Ipedu ecaKo cebp3eAnne Ha KaBena c KOHmakma Ha eJeKmpo3axpaHaehemo, npoeepraume KaBena 3a nopedu.
He3a6a6Ho npedaume no6pehedume c8bp3ea4u Ka6eIu 3a noMmaHa ha ompu3upaan cepu3/eJeKpmomexHuk.
3a da u36e2heme a8apuu c moka, Bu npenopbyeame da u3noI3eame KOHmakmu, npedu Koumo e MoHmupan npedna3umei (MaKcUmJHo 30 mA HomunaHa cuna Ha moka 3a 3adeUcm8aHe).
Onachocm
Ppu 3aeuxpHne c 6b3dyxa 3a 8cMkyBahe onpedenenu eeueecmba Moam da o6pa3yeam ekcnnoBu npu unu cmecu! Hukoea He u3cMkyBaume cnehume eeuecmba:
- Ekπλο3uεHu unu aopumu 2a3o8e, meuHocmu u npaxooe (peakmueHu npaxooe)
Peakmuhme Memannu npaxoeu (Ha np. anymuHui, MaaHe3u, uHK) 8b6 epb3ka cbc cunho akmuHu u Kucelen noucm6au npenapamu - Hepa3peedeHu cunHu KucenuHu u ocho
- opaanhnu pa3meopumenu (Hap. 6eH3un, pa3peudemu 3a 6ou, auem, hao).
Ocehen moa me3u eeeecmea Mozam da nopeyam MamepuaIume, u3noJ3BaH npu u3pa6omkama Ha ypea.
OnncaHne Ha ypeDa
BuxTe cxemnte Ha ctpaHn-Te Ha OTbaprHe!

ToBa YnTBaHe 3a yNoTpe6a onncBa OCHOBHInTe MoJeIN Ha NocOueHInTe Ha npEHaTa oBIOKKa npaxOCMyKaUKN 3a MOKpo/ cyXo NOuNCTBaHe.
CnpoeM MoeIa Ima pa3nKn B o6OppyDbaHeTo N DoCTaBeHInTe npHaJIeXKHOCTN.
Ppi pa3oNaKOBaHe npOBePeTe daJIb B ONAKOKBaTa JINCBAT pRnHaJNeXHOCTN OT OKOMJIeKTOBKaTa NIM NMa NOBpeDeHn eJeMeHTn. Ppi noBpeDi pRn TpaHCnpOta yBeDoMeTe TbproBeca,OT KOrTo Cte 3aKyI nn ypeDa.
BKNIOUeH BO6ema Ha DoCTaBAka
Bb3MOXHa npuHaJIeXHOCT
1 Bpb3ka 3a BCMykaTeHnMa Mapkyu
3a Cbpb3BaHe Ha MapkyuHa 3a 3acMyKbaHe npn n3cMycKaHe.
(6xK onucahuemo / quaypama 1)
2 KoHTaKT Ha ypeda
Yka3aHne: Cna3BaIte MaKcImaJIHaTApnCbEduHInTeJHa MOUHOCT (8ux aJa6a"TexHuYeCKu daHHU").
3a cBbP3BaHe Ha eJIeKTpNueeCKn INHCTpyMeHT.
(uxk onucahuemo / quaypama 23)
Bp3ka 3a n3dyXbaHe
IocTabete cmykateJIHHa Mapkyu B OTOBopa 3a N3dYXbaHe, Taka yHKunraHa Hn3dYXbaHe e aKTINbupaHa.
7 ByToH EΦeKTHBHO NOuHCTBaHe Ha ΦnIITbpa
3a nouchtbahe Ha Brpaednna qniltbpeH natoPH.
Yka3aHHe:He 3aJeIcTbaiTe 6yToHa npM MOKbpΦnITbpeH nATPOH.
(6ux onucahuemo / quaypama 1)
8 INdikaunia 3a nouchTbaHe Ha fHNTbpa
Ako INHДИКaUЯТа 3a NOuHcTbAHe Ha ΦЛТьpa NOKa3Ba YeRBeHo, 3aJeI-CTBaIte 6yToHa 3a eΦeKtNbHOb NOuHcTBAHe He ΦЛТьpa.
(6xK onucahuemo / quaypama 10)
9 BytOH 3a npn6bpaHe Ha mpekoBnra Ka6eI
→HaTnCHeTe 6yToHa 3a npuBupane Ha mpeXOBnI Ka6eI. Ka6eIbT ce npuBpa aBTOMaTHUHO b ypeIa.
Kyka B MЯCTOTO 3a CbXpaHHe HApnHaIJIeKHOCTN
ToBa MЯcTo 3a CbXpaHene Ha npiHaJdJIeKHOCTnTe N03BOJЯBa CbXpaHEnHeTO Ha CMyKaTeJIHnI MaPkyU,
MpeKOBn3axpaHbau KaBeJ N BCMyKaTeHNHTe IIO3N. (6ux onucanuemo / quaypama )
11 BbptaIcpeKbcBauch (BKJ/IN3-KJI) (6e3 BrpaJeH KOHTaKT)
Положене I:ИЗсмУКВанe ИЛи ИЗДух-BAнe. Положене 0:Урелт e ИЗКПючeN. (eux onucahuemo / quaypama
11 BbptaIc npekcbay (BKJ/IN3-KJI) (C BrpaJeH KOHTaKT)
Положене MAX:Измукван Ии ИЗдунхван.
→ПлJOЖЕне +MAX:ИЗСМУКBAнe c BKNHOUeH eJIeKTpUeCKn INHCTpyMENT
→ PeryunipaHe ha MoUHocCTTa:HaMaIeTe npn Huxda MoUHocCTTa npn n3cMyKbAHe, n3dYXbaHe nII npn pa60Ta c eJeKtpuYeCKn INCHTpymeHT.
Положене 0:Уретыт eиЗклочen.Е lektprucecknayt Инструмент e 3axpa-heн c Hanpexkene.(ux onucanuemo /quaypama E8 C3)
12 NpO3nIg3a napKnpaHe
3a cbaIaHe Ha noIOBaTa IIO3a npn ppeKbCBAHe Ha pa60ta. (ux Onucahuemo / fuaypama
13 MЯсто 3a cБханене Ha npHaД-пекноpe3epBoap
ToBa MЯcTO 3a CbXpaHEnHe Na npiHaNdIeXHoCTn N03BOLyBa CbXpaHEnHe Ha BCMyKaTeJIHn Tp6b NIIpyrN pniHaNdIeXHoCTn. (euk onucaHuemo / fuaypama
14 Bodeesa pojka
→Пи Достаькata BОдeшite KOлела ca nocstabehnВ pe3epBoapa,MOHTnpaTe rI npeДЯ puchete уpeДа EКспloa-taця. (eux onucahuemo / quaypama)
15 3nyckaTeJHa npo6ka
I3nyckaTeIHaTa npo6ka cnyxu 3a 6b30 u yO6Ho n3npa3BaHe Ha MpbC Hata BoJa B pe3epBoapa. 3a no-do6po n3npa3BaHe o6bPHeTe pe3epBoapa Ha- nped. (Euk onucanHemo / fuaypama
16 ΦитьрнТа Торбунчka
Yka3aHHe: 3a MOKpo I3CMyKBaHe He 6nBa da ce noCTabr qnnTbPna TopuKa!
→Прелорьк做一个уpeибe3epeKTHB-HO NOUHCTBaHe HaФИТьpa: 3aЗamkyBaHeHaФИнпрахноCTaBe-TeФИТьрHaTATOp6nUka. (euk onucahuemo /quaypama
17ФИЛТьрен NaTpoN (Bee e nocTaBeHa B ypeda)
ΦπΠtbpHnT NaTPOH TpIbBA Da 6bDe NOCTaBeH BnHaRn, KaKTO npi MOKpo TaKa nPn CyXO n3CMyKBaHe. Yka3aHne: OCTaBete MOKpIaΦnITb- peH NaTPOH Da n3CbXHe npeDn Da npoDblJxITE Da rO n3PON3BaTe 3a CyXO n3CMyKBaHe. (Euk OnucanHuemo / fuaypama)
13 BcmykaTeJIeH MapKyuC pBkoXBaTka
→ПиТИСНЕТВСМУКАТELHЯМAPКУ,TOI CEФИКСИРa.(euk onucaHuemo/duaypama B)Yka3aHne:3a CBaJIHe HATINCHTeФИKCaTOpa C napeu И n3TeRJIte TBCMUY-KaTeJHnI MAPKyU.
19 BcmyKaTeJIHn Tpb6n 2x0,5M
ПостаBetete ДБerte BCMykaTeJIHn Tpb6и eHa BДpyra И ГСВьржete CBMykaTeJIHnЯ МарКуч. (Bux onucahuemo / quaypama B)
Tbpyn NOBbpxHOCTN, MOKpo N3-CmyKBaHe: 13noJI3BaIte c 2 rymeHn paackn.
Tbpyn NOBbpxHOCTn, cyxo n3-cmykBaHe: N3noJI3BaIte c 2 ueTkn.
IpoOBe C KJIIMM, MOKpo N cyxo n3-cmyKbaHe: Pa6oTeTe 6e3 BnOxka.
21 Побова дюза
(c JIOCT 3a npEeBKnHouBaHe)
→ 3a n3cMyKBaHe Ha TBbPdN IOBbPxHOCTn I NOIOBE C KINIMM:
JIocT Ha CnMBOJa 3a IIOOBc KIJIIMN
IocT Ha CnmbOla 3a TBbpN IOBbpxHOCTN
22 IIO3a 3a NOUInCTBaHe Ha OpyrN
Pa6oTa c eIeKTpUeCKn HhCTpy-MeHTN
→Пин hyжда пигодente aandaTopa c HoxKbM dIaMaTebpa Ha CBbp3BaHe HaeJIeKtpnueckn IHCTpyMeHT.
→ Φύγρα ①
A) NocTabeTe BKNIOUeHnB OKOMNJIeKTOBkata aDantep KbM pkoXBaTKaTaHaBCMyKaTeJINHm Mapkyu CbPjKeTe eJeKtpnuCeKnHhCTpyMeHT.
→nnn
B) 3a noBce Ye bBkABocT npi pa60Ta n3noJI3BaIte Te bBkABnA MapKyU 3a INCTpyMeHT. CbPKeTe ro cbc cmyKaTeJHnA MapKyu n eBEHT. c aAnTpE n KbM n3BOda Ha eJeKTPnueckn INHCTpyMeHT.
→ Φύγρα C2
Pn ypeNi C BrpaIeH KOHTaKT: LIeCeJa Ha eJneKtpuYeCKn INHCTpyMeHT Da ce IbXHe B npaxOcMykaUkata.
→ Φύγρα
BkIIOUeTe ypeDa (BbPTrAunr InpKbCBAu HnRABO Ha nOIOKeHne + MAX) n 3aONoHHe pa6Ota.
3a6eIekka: Lc om ce ekIIOU eIekmpuueckqum uHcmpymem, cMykamennama mypbuHa nomea n c 0,5cekyHou 3akbcHeue. Lc om ce u3KIOUeIekmpuueckqum uHcmpymem, cMykameHama mypbuHa paBomu oue npub. 5 cekyHou, 3a da ce 3acMyeocmambhama Mpbcomu8 c Mykamennua Mapky.
EeKTHBNO NOUcTBaHe Ha qnIITb- pa
PnuepeBaHnDnKaun3aNoocTbaHe HaΦnTbpaN3pOJ3BaIte NoocTbaHeTo HaΦnTbpa.
→ Φύγρα D1
IocTabeTe CmyKaTeJHnHa Mapky C pB- KoxBaTka KbM INaBaTa Ha ypeDa B McTOTO 3a CbXpaHeHne Ha npHaIaJIeKHOCTn. HATncHete 3x6byToHa 3a eΦeKTbHNo IOuNCTBaHe Ha φnITbpa, npToBa n3UaKaaiTe 4 cekyHm Mekdy OTdeJHInTe 3aDeiCTBaHnI.
Yka3aHHe: PnnpocToHHa YepBeHa HNDnKaun 3aNoCnCTBaHe HaΦnTbpa Nn CneD MHOrOkparHo 3aDeeNCTBaHe Ha6yToHa 3aNoCnCTBaHe HaΦnTbpa npOBepTe OSe BeDhBx OBeMa Ha 3aNbNaBe Ha pe3epBoapA. B npOTuBEN Cnyau npi OTBapAne Ha pe3epBoapa MoKe Da N3JIe3e MpbCOTnJ.
Pa60Ta KaTo dyxJaIka
IOncTbAHe Ha TpydHDoocTbHn MeCTa n TaM, KbTeTo He e Bb3MOxHO 13CMyKBaHe, Happ. Wyma OT aneTa c 6anactpa.
→ Φύγρα ①
IocTabeTe cMykaTeHnHa Mapkyu B OTBopa 3a n3dyXbaHe, Taka fyuHKunraTa Ha n3dyXbaHe e aKtubnpaHa.
PpeKbcBaHe Ha pa6oTa
Pomou npn HEn3npaBHOCTN
PnibpaHTo Ha MpeXOBnKa6eI He yHKuOHnpa
BepoTHoMpexKOBnT Ka6eJe3aMbpcen,POuNCTeMeMpexKOBnKa6eJ.
HeIOCTaTbUeH eΦeKT OT n3cMyKBa-HETo
Ako MoUHocTtHa BCMyKBaHe Ha ypea ce NOHNJN,MOJa Da Ce npOBepr TcJeHNTe TOuKN.
→ПинадлесхочтnteOTOKOMПЕКТВ-kaTа,CMyKaTeJIHnIaTMapKyuИNBCMMy-kaTeJIHnTe TpbOu ca 3anyuSeHIMOLIM,OTCTpaHeteC npbUka TOBa,KoETO n3anyuBa.
→ Φитьрнят патоне 3ambpceh: Пи у畴и 6e3 eфektubno nouchТыну ha Фитba:ИЗтуалу Te ФилТьрня патон,пи Нжда ro NOUCHTETe NOД TEчаanza BODa.
(eux onucahuemo / quypama H)
Ppnu ypeNi c eefekTNBHO nouNCTBaHHe Ha qnIbpa: PnpJIOKeTe nouNCTBaHc H aqntbpa.
www.kaercher.com/REACH
(Aadressvtagakuljelt)
Klienditeenindus
www.kaercher.com/REACH
(Adresi skatit aizmugure)
Klientu apkalpošanascenters
www.kaercher.com/REACH
(Adresa rasite kotoje puseje)
Klientu aptarnavimo tarryba
Iškilus klausimams arba prietaisui sugedes, Jums padés mûsç KÄRCHER filialo darbuotojai.
(Adresa rasite kitoje puseje)
3o6paXeHHaNb.Ha p03BOpOTax!
U y cIbOmy nociBnky 3 ekCnlyatauii onncahi 6a3oBi moJeI niNtococIB dna BOIororo/cyxoro npnbipanHra, kI npedctableni Ha o6knaDnHci.
OchauHn Tai KjIbKicTb DoaTkoBOr npuaJdny, 10 BxOuNTb B O6cI r noCTaHaHH, 3aJeKHTb BiD MoeJI npictpo.
Ppi po3nakyBaHHi nepeBipTe BMICTynakOBKn Ha HaaBHicTb DoaTKOBORO6bnHaHHN YnOwKOJKeHb.YBnApKnyoWkoJKeHb PnTpAHCnOpTyBaHHINobIDOMTe npo ce CBOeMy npoDaBuIO.
BXOJaTb DO KOMnJIeKTy NocTaHaHHa
MOXJIINBEO6JaHaHHA
1 Micce ni'd'εndhaHnHa nHaHy
→Для niДКнluчЕнг BCMOKТУВаЛьНOrO shaHry niД уac po6otn.
(du8. onuc / ManIOHOK E)
2 17e9cbha po3eTka npncTropo
Примитka:Враховываи мakсимальнуnpиевдануnotукhibitb(due.ana8y«TexhiDiahi)
→Дяпдкнючehня eNeKtpoiHCTpyMeHTy. (du. onuc /MaJIHOHK 02)
3 Micce niД'epsilonHaHnЯ po3aBy
→ PπeДHaTn BCMOKTyBaJIbHn IJIaHr Do nIiKJIuOHeHH dIЯ nOJaYi NOBiTpra. Tm CAMIM aKTbByEcBcA yHKci npOdyBaHHJ.
(duu. onuc/MaiohoK
4 3aIIN6JIeHnHaJ pyOc
→ 3нятNi roJIOBky npIcTpOu nICnЯ рo36лOKyBaHnY B 3aIIn6JIeHHi dIЯ ручok.
5 Puyka
PyuKa OJHouaCHO cIyKInTb IJIpa036IoKYBaHnRA TIOOBKn IpiCtpoHO pe3ePByapa. IJIpa PO36IoKYBaHnI IOBHiCTO BIDKNHyTu pyuKy BpePeI. (du8. OnUC /MaJIHOHOK AIT)
B3aTnca 3a roNoBky npncTopo i BnTaRHyTu ii 3aargn6neHHa.
Y noJoxeHHI dJIa TpaHcnpTyBaHHpyuKa DnBntbcra Bropy, npIN BnKOpNCtAHHi npICTpOIO NOBepHyTu pyuKy Ha3aI, 0o6 OTPMaTIN DoCTyNdo eJeMeHTiB KepyBaHHa PnCtPoEM.
Bka3iBka: He NaTnCKyBaTN KONky y HaABHicTb BONORO NaTPOHHoro fijIbTpY.
(duu. Onuc / ManIOHOK D)
8 IIndkaTop ouuueHHaipbtpa
YkIoo iHdIkaTOp OuIeHnHaJIbTpY roPHTb YepBOHm CBIITlOM, cIiHaTNCHTN KHOKNy IJNA pOBeDeHnEeKETNBHO OOnuHnHaJIbTpY.
(du8. ONUC/MaHIOHOK
9 Khonka 3MOTyBaHHa MepeXHoro shHypa
→HaTnCHyTu KHOJky 3MOtyBaHHa MepeXHoro shHypa. Ka6eIb aBTOMaTHUHO 3aMOTyEcTbc y npunctpii.
10 MicnceДлЯДоДаTKOBORO
обладнання натуку
LcIe micue IJRA 36epirAHnH IOaTkoBOrO ObIaHaHHn Ipn3NaYeHe IJRA 36epirAHnBCMOKtYBaIbHoro UJnaHra, MepeXHOrO Ka6JIHO Ta HacaDOK. (duE. ONUC / MaJIIOHOK)
11 ПоворOTни перимkaч (BKЛ./ BИКЛ.) (6e3 Вуюваною розтк)
→ПоицяI:BCMOKТУВаHHa6oHarHITAHнЯ NOBITpI.ПОJOxEHnO:ПпСТрИВIMКHeHn.(du. onuc/MaIIHOHOK
11 ПоворOTни перемпа (ВКЛ./ВИКЛ.) (3i ВБуДоваHOIO рОЗТKOIO)
→Положенна MAKC.:BCMOKtyBaHHa 60HarhitahnnoBITpI.
→Пложення+MAKC.: BCMOKTyBaHn3piI'EdHaHm eNeKtpoiHCTpyMeHTOM
→ PerynTOp nOtJxHocTi: 3a Heo6XiIHOCTi, npu BCMOKTyBaHHi a6o npu pOboTI 3 eJeKtpnUHMn IHCTpyMeHTAmN 3Hn3NTn nOtJxHicTh yCMOKTyBaHHa.
NpOJKeHn8o:PnpCTpi BBIMKHeHn. Ha eIeKtpoiHCTpyMeHT nOdaetbCn Hanpyra. (ou. onuc / MaJIIOHOK 30
12 NapkyBaJIbHc NOJIOXeHHa
→ДяВIMKHeHHH HacaIKn IЯ NiIIOrNiI Yac NpeepBn Bpo6Oti.(due. onuc/MaIHOHOK)
13 Micce IJRAIOaTkoBoro 6bnaHaHHHa cMHOcti
LcIeMICueIJIa36epirAHHHIOaTkoBOrO 0bIaHaHHn IpN3NaUHeIJIa 36epirAHHHBCMOKtYBaJIbHnX Tpy6oKa Ta IHwOToIOaTkoBOrO ObIaHaHH. (ouE. ONUC/MaJIHOHOK
14 CnpaMOByBaJIbHn BaJeCb
→Пелег поаTkOM ekCnIpyaTuci i CJIД BCTaHOBtN HAnpabTnOChi POJIKN,Які Рпи NOCTaHHi PO3MiUyOTbCBy pe3epByapi. (du8. onuc /MaIIHOK)
15 Pi3b6oBa npo6ka 3JnBHorO oTbOpy
→Пюбka 3ЛиВHOrO OТВОРСуЖИТБДЯ
швИдКOrO i 3рУнOrO CnОрoxKHeOBaHHЯ
бpyДHoI BODN 3 EMHOCTi.ДЯ КрацоR
CnОрoxKHeOBaHHЯ HAXINITN EMHiCTb
упepeД.
(du8. ONUC / MaJIJOHOK)
16 ΦiNbtpyBaNbHbMiWiOk
PpIMItka:ДЯЧИSEHNY BOJOrOMy pexkI Me cIiD 3aCTOCOBaTNI MiIKN IJIY 36Opny nIy.
→ PekomehdaiaI Jn npictpoivb6e3 fynkuii efeKTHBHO OunueHHa Pinbtpy: IJIy BCMOKTyBaHnJ dpi6HOrO nIpy cIId 3actOCOBvBATNI MiWOk dJIy 36Opny nIpy. (du8. ONUC /MaJIIOHOK)
17 NaTpoHnI ΦiNbTp (Bxke BCTaHOBLeHn B npNCptpi)
Φиьтуваьни naюн мас 6утп BCTaHOВлeня к пи робoti y BOLOROMY, tak i B cyxOMy peЖIMi. Прмітka: Перед подаьшим BЖИBAHNЯ MДЯ УПИSEння B cyxOMy peЖIMi Naюнни Фильtp слдnpocCyштNi.
(du. ONUC / MaJIHOHOK H)
18 BcMoKtYBaJIbHn ⅢJHaHr3pyuKoH
→ BtncHTn BCMOKtyBaHbHn ⅢnaHrB 3'eDHaHHNo fikcaii.
(duu. onuc / ManIOHOK E)
Pnmitka:ДяВИТЯнгшlaHrycniD HATNCHyTN ПальцмиHa cTOnOp i BHTIHyTN BCMOKtyBaJIbHnшlaHr.
19 BcMoKtTuOci Tpy6Kn 2x0,5M
→ 3'εДиТиОБиДВi BCMOKТУВаЛьНI TpyБКиТа пДКЛЮЧИТи Ixdo BCMOKТУВаЛьНOrO ShnaHry.
(duu. onuc / ManIOHOK E)
20 HacákaДпя NiДногn (3i BCTaBkAmn)
→ДячишеняТьердixiКИIMMOBIX NOKpTTIB 3aCTOCOBYHTbCByIbIDIOBIdHi BCTaBKn.
Tbepi nobepxhi, BOIore npn6panHra: BnKOpncToBvBatu BCTaBky 3 2 rymOBmN r6kamn.
Tbepi nobepxhi, cyxe npnbupanHn: BnkopncToByBaTu BCTaBky 3 2 1tKamn.
KnlIMMOBE NOKPNTTBAORe TaCyXe np6npanHn: PpaUOBaTu 6e3 3aCTOCyBaHHB BCTaBOK.
MepexHnI uHyp He 3MOtyeTbca
IMoBipHO, MepeXHnI ShHyp 3a6pydHeHn. OunchTIn MepeXHn IShHyp.
3HIXeHHa CUNBcMOKtYBaHHa
Y BnPaIky 3HnKeHHc CINN BCMOKTyBaHHa nepeBipTe HactynHe.
Ⅲnahr BCMOKTyBaHHa 60 Tpy6ka BCMOKTyBaHHa 3abuINcR. BndaJIITb 3a6pydHeHHa 3a DOnOMOrOIO cTepeHHa.
→ΠaTPOHnHmΦiNbTp3a6pydHeHnB nPncTPOx 6e3ФyHKcii eΦeKTHBHorO OuHcEHHraΦiNbTppy:BnTPycNTn Bmict NaTPOHnHOΦiNbTpuy y pa3i notpe6n npOMHTnΦiNbTp npOTouHO BOIOU.
(duu. onuc / ManIOHOK
B npnctpoax 3 yHKciio epeKTHBHO OuHcHHe pInbTpib:
OuHCTHTn pInbTp.
(du. ONUC/MaHIOHOK
3a Heo6xidHocti, OunchTn naTpOHHn fiNbTp Ta npomTu nD cTpymem BODn.
(duu. onuc / MaJIHOK H)
3amihntnooikokxeHn natpoHHn 1btp.
MiwoK DnA 360py nIy 3aONBHeH, BCTABNTN HOBI MiWOK.
(ou. ONUC/MaJIHOHOK
TexHiChi xapaKTepeNCTnKn
TexhiHx xapaKtepcntkN Bka3aHi Ha cToPiHKax, 10 po3kpBaHObCra. Dani npONoHyEeTbcr po3'AcHeHHBnKOpNCtAHnx CmBOJIb.

Hanyra

IotyXHICTb POMIHahBa

POTyXHICTb PMAKCHMaJIbHa

MaKcImaJIbHa HApya B po3eTci npicrpoI

3anobixHHK (iHepuiHn)

MictkictbpeepByapy

BxINTOK BOIDpyKoTkoHO

Bxitok BOIN HacaKoIO nIpiIiIOnI

MepexeBn ka6ebIb

Pibehb 3BykoBOro TnCKy (EN 60704-2-1)

Bara (6e3 oBlaHaHnHa)
Moxjuei 3miHu y KOHcmpykuii npucmpoio!
a
Lg. g. agall aal yaiy
JLd aovssowll jgwrj
[\log {}{b}N = \frac{{\log }{a}N}{{\log }_{a}b}]
aawyj
00
J 1
jIgJ1
aJySJI aJzSJI JrZio
(1sllgogll) auij
JzJzaw
s9d jaaal olal w
.aaJy aagolal
JU
gall bao sguo
(1-2-EN 60704)
()


Iabgazo aqic JyJus Jz/Jgaz
yI aagbprjll jil 1aabuyy pa y, aJl lsc gI aK> pai y:luiaI IaII cJg Iolai aaezuy p9.olwajll aabuyy aui
Jllae oosie oselwll
aJg aJbJrJrJrJrJrJrJrJr
0: 0d all o3s w s d o jgJU a
Jzll Jn no aJgJlJgJgJgJgJgJgJgJg
jglj
G2
a>laIg clrjU 120yI alo g jzj p9 .a|gJ sloJ jgeJI bex JgeJI
aIJg aJll
y_b =
JyS// JyL// 2wog jgj// glc y
aie// Jlacl, pia// Jg oo J
.ia/1g
p/aio/9 o>yo/y/ c>gbgaoo
aoi jal yjglz// ailgkl
laie// cyae//
:
abio g/ jg/ abw/s o1/ a/ p2iuiy 1 cll jgljz y.012xuy/ 12eio .llbdo cll jglz// y.l/ 1clalll jgljz lcbu, p 1
Jd
JcJg JlWJUJg Jsc JgJgJgJgJgJgJgJg
oljgljlll jglj
()gogll
JaaJI 21g
A 1/01/1/2
oal aibllo icuy baiill Jz0 Jz
aJyS/10s/1 Jzss 0.5
5//g> odJae baw//j2
/1gslalbawpge
bawllpgbj 9 aai/
jull Jlal lbi
glll lalwfo ool al
Jlalll aabaaol oos
D1oo
g jaaagjallbajllpgsj
jbcbsol jgljlll sJyIaIaIall a
Jz
4 1jgl alg w jll jgeJl
J
jgo oclol Jrnnl all : abglo
jJ jgJgJgJgJgJgJgJgJgJgJgJg
gI bawll aajl aoJU UclaxJU
.0wJyJgS Jd
:
jld juspsuiy
JUw 2g Jc g oG cS aI
jgfofofofofofofofofofofofofofofofofofofofofofofofofofofofofofofofofofofofofofofofofofofo
aolgc ggej jj11 cXio/ aI> abglo
jgl//acw yjjbaw/axi
j/11 j/20
. 192/1 Lc
aIyIgJyIyIy
jai g a>laic jai qai
wlo o1sawu ayol yol alog
C10jg
.
sJd jlll lal
aogg aagg gaaaagb
.
gl
p2xwlJasll aigjoll no jiall (
alogg. jol all oJyogj
oojialnlae laagbaaillgob
olly aolil alglalogg
aJL
C2oo
g:Jallssaaalldo jgeUaasill
aaiKJy aJyRj<Jl oJy Jw
p|
1
Jzill 1
A1oo
aSsall 1j>ll
jIgJgooaQ
A2oo
aolz ojgajll ojg>U aill a
aJlJIJIJIJIJIJIJIJIJIJIJIJIJIJIJIJIJIJIJIJIJIJIJIJIJIJIJIJIJIJIJIJIJIJIJIJIJIJIJIJIJIJIJIJIJIJIJIJIJIJIJIJIJIJIJIJIJIJIJIJIJIJIJIJIJIJIJIJIJIJIJIJIJIJIJIJIJIJIJIJIJIJIJIJIJIJIJIJIJIJIJIJIJIJIJIJIJIJIJIJIJ
J 1
J
B1oo
LdJU
B2o
eJ 1
B3 oJ
jgl J
#
1
yolwgljllb:
:J 100
(2.863139
aolj ojg joll ojgJU aill a
pJlJIJIJIJIJIJIJIJIJIJIJIJIJIJIJIJIJIJIJIJIJIJIJIJIJIJIJIJIJIJIJIJIJIJIJIJIJIJIJIJIJIJIJIJIJIJIJIJIJIJIJIJIJIJIJIJIJIJIJIJIJIJIJIJIJIJIJIJIJIJIJIJIJIJIJIJIJIJIJIJIJIJIJIJIJIJIJIJIJIJIJIJIJIJIJIJIJIJIJIJIJ
J 1
(a)
aJgjlll jL aJb
Lgbaew
.00000000000000000000000000000
I 1
a: a
.aaS
Jaaal Iaewllgbrjle baiol
aillso
(3)
bcbeol,awll aloe:plal:labglo
p8bj> wlg pglg y gbl ablwl
1
| ρ 0.5 × 2 ∅pψψψψψψψψψψψψψψψψψψψψψψψψψψψψψψψψψψψψψψψψψψψψψψψψψψψψψψψψψψψψψψψψψψψψψψψψψψψψψψψψψψψψψψψψψψψψψψψψψψψψpsi | 19 |
gglg laoaill Jw
.
(3) 1 ,0 0 / 2 ,0 0
jiall 1000000000000000000000000000000000000000
a 1
Jalal Jlal
()

Jlll Jj Jc Jbj
JdsLklogg|llllw
j_L > 0

JJJ JIgUgUgUgUgUgUgUgUgUgUgUgUgUgUgUgUgUgUgUgUgUgUgUgUgUgUgUgUgUgUgUgUgUgUgUgUgUgUgUgUgUgUgUgUgUgUgUgUgUgUg
.
()
jgljll
!aagall aaal jblgall
Jgall Jz
yolal ylll lgl
a.b.j.luol u aJluS ausd
.
aill aill lalglg g
gall go laalw pll lall
Jg
pOo ooll pOgall Ugoo 29
y
jioy jiei joojia dic egjial jla
JJI
LaaLwPpIylllalgizzalljbnao
aolao
baillgbsa
1
alaoa plaii sic baiwul gboj Jogui
.bai
(b)

.
()

aill alog 1baal gboj
a aabg baae Jaojll
()

aJxwglgxxjll

aaiia jgll Joljlo
Jg.og.1.1g jg Jg
16 × 5 =
pIiuiu 2ai iuius oJgog/ li
a/1s//o//g b2 2lao /jmu/
30 1/2/1)J/1/01/01
/11
#
101
glg/10 25
.
lalbdoa/ul/olwylbduy
g/2y1/g/2y1/2a;u/2u/2a//u/2u
(a|c(a/1 a/1) a/1
Joo) Jcill Jla//jla//Jla-
1iC (j/9,0guiicla/9,0guiogaiy
a gl/ a bui//jIu9 go 1
a1a2 = 1
oJyallg agelljolio//g jla>1/
jio)aia//aia//la//
y/9/9/9/9
( x,y) = l_00 + 1,00
laiaai
Jlll lalll 1gss sse alg
aaii aiaai iis
Jc Jb d Jbc JcJc
JlJzJzJzJzJz
g>g jj0i j0i
aIgaiIgaiIgai
a aaaa a a a a a a a a a a a
cLac aoo jgjg jg jll
.
aJ
0o pioiWU aoo jIJI/1i
g/ a// 1/211/ y2920 1/2
g/vj/g/yyoog/aL2//g/a
p9g g2u p/1g 4jra//g/9 ou//
a 10/10y/10g22
Lc aio igla2gipioIwugpoi
jgl0/1012w0/4a5g>glg>
yjgljy1p/2xuwJlksUcgauno
1/1/21g/.aiol//w g9[gil5]
gla2 gilpgiolwugpbiol 10
J 1 J 1 J 1 J 1 J 1 J 1 J 1 J 1 J 1 J 1 J 1 J 1 J 1 J 1 J 1 J 1 J 1 J 1 J 1 J 1 J 1 J 1 J 1 J 1 J 1 J 1 J 1 J 1 J 1 J 1 J 1 J 1 J 1 J 1 J
aui a la
oLg yIyIyIyIyIyIyIyIyIyIy

5.965-919.0 21.11.2012